Install a Single Node Deployment
This section presents instructions on deploying Autonomous Identity in a single-target machine with Internet connectivity.
Autonomous Identity 2022.11.0 introduces a new installation script, deployer pro (Deployer for Production), letting customers manage their third-party software dependencies in their particular Autonomous Identity environments.
| The procedures presented in this section are generalized examples to help you get acquainted with Autonomous Identity. Consult with your ForgeRock Professional Services or technical partner for specific assistance to install Autonomous Identity within your particular environment. |
About the new deployer pro script
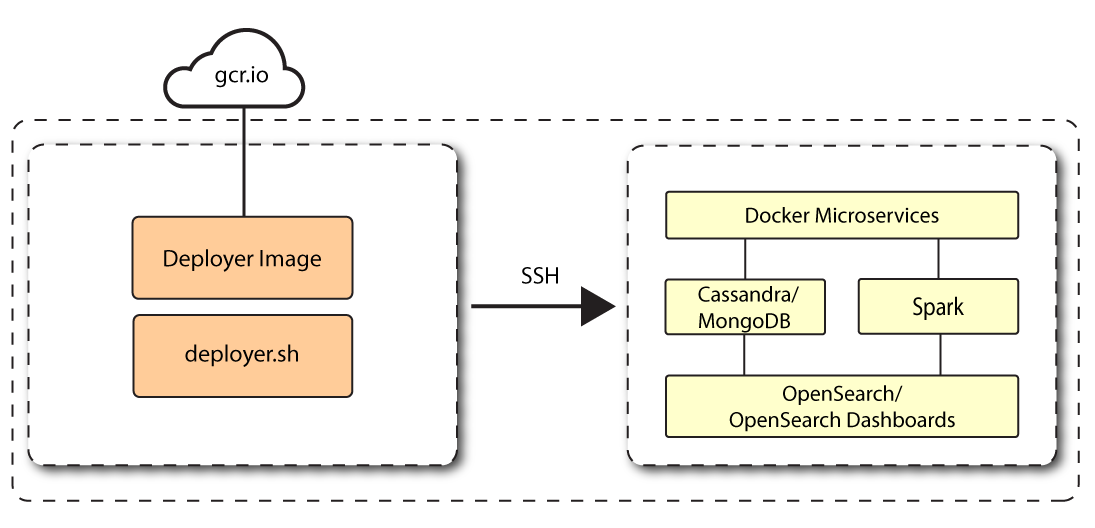
ForgeRock has updated the installation script for new Autonomous Identity 2022.11.0 deployments. The new Deployer Pro script downloads and installs Autonomous Identity within your environment. However, customers must now install the third-party software dependencies required for Autonomous Identity prior to running Deployer Pro for new deployments. The deployer lets the customer install and configure those dependencies best suited for their network environment as well as their scale, performance, high availability (HA), and disaster recovery (DR) requirements.
You also have the flexibility to apply security patches and other updates to the third-party software when they become available. In the past, ForgeRock had to test and release a new deployer everytime a third-party patch or update was required.
The following chart shows what components the deployer pro installs when run. For specific questions, contact ForgeRock.
| Host | Prerequisite | Installed/configured by Deployer Pro |
|---|---|---|
Docker nodes |
Docker v20.10.17 |
|
Spark Master/Livy node |
|
|
Spark worker nodes |
Spark Worker v3.3.1 (spark-3.3.1-bin-hadoop2.7) |
None |
Cassandra nodes |
Cassandra 4.0.6 |
Seed the schema using connection details provided in the |
MongoDB nodes |
MongoDB 4.4.15 |
Seed the schema using connection details provided in the |
OpenSearch nodes |
|
Seed the indices using connection details provided in the |
Prerequisites
For new and clean deployments, the following are prerequisites:
-
Operating System. The target machine requires Red Hat Linux 8/CentOS Stream 8. The deployer machine can use any operating system as long as Docker is installed. For this chapter, we use CentOS Stream 8 as its base operating system.
If you are upgrading Autonomous Identity on a RHEL 7/CentOS 7, the upgrade to 2022.11 uses RHEL 7/CentOS 7 only. For new and clean installations, Autonomous Identity requires RHEL 8 or CentOS Stream 8 only. -
Memory Requirements. Make sure you have enough free disk space on the deployer machine before running the
deployer.shcommands. We recommend at least 500GB. -
Default Shell. The default shell for the
autoiduser must be bash. -
Deployment Requirements. Autonomous Identity provides a Docker image that creates a
deployer.shscript. The script downloads additional images necessary for the installation. To download the deployment images, you must first obtain a registry key to log into the ForgeRock Google Cloud Registry. The registry key is only available to ForgeRock Autonomous Identity customers. For specific instructions on obtaining the registry key, refer to How To Configure Service Credentials (Push Auth, Docker) in Backstage. -
Database Requirements. Decide which database you are using: Apache Cassandra or MongoDB.
-
IPv4 Forwarding. Many high security environments run their CentOS-based systems with IPv4 forwarding disabled. However, Docker Swarm does not work with a disabled IPv4 forward setting. In such environments, make sure to enable IPv4 forwarding in the file
/etc/sysctl.conf:net.ipv4.ip_forward=1
Install third-party components
First, set up your GCP virtual machine and install the third-party package dependencies required for the Autonomous Identity deployment:
-
Create a GCP Red Hat Enterprise Linux (RHEL) 8 or CentOS Stream 8 virtual machine: n2-standard-4 (4 vCPU and 16GB memory). Refer to https://www.centos.org/centos-stream/.
-
Create an
autoiduser with the proper privileges to run the installation. For example:sudo adduser autoid sudo passwd autoid echo "autoid ALL=(ALL) NOPASSWD:ALL" | sudo tee /etc/sudoers.d/autoid sudo usermod -aG wheel autoid su - autoid
-
Install the following packages needed in the Autonomous Identity deployment:
-
Java 11. For example,
sudo dnf install java-11-openjdk-devel. -
wget. For example,
sudo dnf install wget. -
unzip. For example,
sudo dnf install unzip. -
elinks. For example,
sudo yum install -y elinks.
-
-
Install Python 3.8.13.
-
Refer to https://docs.python.org/release/3.8.13/.
-
Make sure no other Python versions are installed on the machine. Remove those versions. For example:
sudo rm -rf /usr/bin/python3
sudo rm -rf /usr/bin/python3.6
sudo rm -rf /usr/bin/python3m
sudo rm -rf /usr/bin/pip3
sudo rm -rf /usr/bin/easy_install-3
sudo rm -rf /usr/bin/easy_install-3.6
-
Create symlinks for python3:
sudo ln -s /usr/bin/python 3.8 /usr/bin/python3
sudo ln -s /usr/bin/eash_install-3.8 /usr/bin/easy_install-3
sudo ln -s /usr/bin/pip3.8 /usr/bin/pip3
-
-
Install Cassandra 4.0.6. Refer to https://cassandra.apache.org/doc/latest/cassandra/getting_started/index.html. (For MongoDB installations, follow the instructions in [download-mongodb].)
-
Log in to the Cassandra shell. For example:
cassandra/bin/cqlsh <$ipaddress> -u cassandra -p cassandra
-
Create the Cassandra roles for Autonomous Identity. Refer to https://cassandra.apache.org/doc/latest/cassandra/cql/security.html. For example:
cassandra/bin/cqlsh <$ipaddress> -u cassandra -p cassandra -e "CREATE ROLE zoran_dba WITH PASSWORD = 'password' AND SUPERUSER = true AND LOGIN = true;" cassandra/bin/cqlsh <$ipaddress> -u cassandra -p cassandra -e "CREATE ROLE zoranuser WITH PASSWORD = ''password' AND LOGIN = true;" cassandra/bin/cqlsh <$ipaddress> -u zoran_dba -p 'password -e "ALTER ROLE cassandra WITH PASSWORD='randompassword123' AND SUPERUSER=false AND LOGIN = false;" cassandra/bin/cqlsh <$ipaddress> -u zoran_dba -p 'password -e "ALTER KEYSPACE "system_auth" WITH REPLICATION = {'class' :'NetworkTopologyStrategy','datacenter1' : 1};" -
Configure security for Cassandra. Refer to https://cassandra.apache.org/doc/latest/cassandra/operating/security.html.
-
-
Install MongoDB 4.4. Follow the instructions in https://www.mongodb.com/docs/v4.4/tutorial/install-mongodb-on-red-hat/.
-
Create a MongoDB user with username
mongoadminwith admin privileges. Follow the instructions in https://www.mongodb.com/docs/v4.4/core/security-users/.For example:
db.createUser({ user: "mongoadmin",pwd: "~@C~O>@%^()-_+=|<Y*$$rH&&/m#g{?-o!z/1}2??3=!*&", roles: [ { role: "userAdminAnyDatabase", db: "admin" }, "readWriteAnyDatabase" ]}) -
Set up SSL, refer to https://www.mongodb.com/docs/v4.4/tutorial/configure-ssl/#procedures—using-net.ssl-settings. For example, the MongoDB configuration file (
/etc/mongod.conf) would include a section similar to the following:net: tls: mode: requireTLS certificateKeyFile: /etc/ssl/mongodb.pem CAFile: /etc/ssl/rootCA.pem- IMPORTANT
-
Make sure that the CN entry in the
mongodb.pemcertificate is the IP address/hostname of themongodbinstance. You need to add this same CN value to thehostsfile during the Autonomous Identity deployment.
-
Restart the daemon and MongoDB.
sudo systemctl daemon-reload
sudo systemctl restart mongod
-
-
Install Apache Spark 3.3.1. Refer to https://spark.apache.org/downloads.html.
-
Configure the
SPARK_HOMEin yourbashrcfile. For example:SPARK_HOME=/opt/spark/spark-3.3.1-bin-hadoop3 export PATH=$PATH:$SPARK_HOME/bin:$SPARK_HOME/sbin
-
Configure authentication on Spark, refer to https://spark.apache.org/docs/latest/security.html#authentication. For example:
spark.authenticate          true
spark.authenticate.secret   <your-secret>
-
Enable and start the Spark main and secondary servers:
sudo chown -R $USER:USER $SPARK_HOME
-
Spark 3.3.1 no longer uses log4j1 and has upgraded to log4j2. Copy or move the log4j template file to the
log4j2.propertiesfile. For example:mv /opt/spark/spark-3.3.1-bin-hadoop3/conf/log4j.properties.template /opt/spark/spark-3.3.1-bin-hadoop3/conf/log4j2.properties
You will install Apache Livy in a later step. Refer to Install Apache Livy.
-
-
Install OpenSearch 1.3.6 and OpenSearch Dashboards 1.3.6. Refer to https://opensearch.org/versions/opensearch-1-3-6.html.
-
Configure OpenSearch Dashboards using the
/opensearch-dashboards/config/opensearch_dashboards.ymlfile. Refer to https://opensearch.org/docs/1.3/dashboards/install/index/. -
Configure TLS/SSL security:
-
Follow the instructions in https://opensearch.org/docs/latest/security-plugin/configuration/tls/.
-
Follow the instructions in https://opensearch.org/docs/2.0/security-plugin/configuration/generate-certificates/.
- IMPORTANT
-
Make sure that the CN entry in the
esnode.pemcertificate is the IP address/hostname of the OpenSearch instance. You need to add this same CN value to thehostsfile during the Autonomous Identity deployment.
-
-
-
Set up Docker using the procedures in https://docs.docker.com/engine/install/centos/.
-
For post-installation Docker steps, follow the instructions in https://docs.docker.com/engine/install/linux-postinstall/.
Do not use /opt/autoidas Docker root as the directory is overwritten during the Autonomous Identity installation and will result in a recursive error.
-
Set Up SSH on the Deployer
This section shows how to set up SSH keys for the autoid user to the target machine. This is a critical step and
necessary for a successful deployment.
-
On the deployer machine, change to the SSH directory.
cd ~/.ssh
-
Run
ssh-keygento generate a 2048-bit RSA keypair for theautoiduser, and then click Enter. Use the default settings, and do not enter a passphrase for your private key.ssh-keygen -t rsa -C "autoid"
The public and private rsa key pair is stored in
home-directory/.ssh/id_rsaandhome-directory/.ssh/id_rsa.pub. -
Copy the SSH key to the
autoid-configdirectory.cp id_rsa ~/autoid-config
-
Change the privileges and owner to the file.
chmod 400 ~/autoid-config/id_rsa
-
Copy your public SSH key,
id_rsa.pub, to the target machine’s~/.ssh/authorized_keysfolder. If your target system does not have an~/.ssh/authorized_keys, create it usingsudo mkdir -p ~/.ssh, thensudo touch ~/.ssh/authorized_keys.This example uses
ssh-copy-idto copy the public key to the target machine, which may or may not be available on your operating system. You can also manually copy-n-paste the public key to your~/.ssh/authorized_keyson the target machine.ssh-copy-id -i id_rsa.pub autoid@<Target IP Address>
The ssh-copy-idcommand requires that you have public key authentication enabled on the target server. You can enable it by editing the/etc/ssh/sshd_configfile on the target machine. For example: sudo vi /etc/ssh/sshd_config, set PubkeyAuthentication yes, and save the file. Next, restart sshd: sudo systemctl restart sshd. -
On the deployer machine, test your SSH connection to the target machine. This is a critical step. Make sure the connection works before proceeding with the installation.
ssh -i ~/.ssh/id_rsa autoid@<Target IP Address>

Last login: Tue Dec 14 14:06:06 2020
-
While SSH’ing into the target node, set the privileges on your
~/.sshand~/.ssh/authorized_keys.chmod 700 ~/.ssh && chmod 600 ~/.ssh/authorized_keys
-
If you successfully accessed the remote server and changed the privileges on the
~/.ssh, enterexitto end your SSH session.
Install Autonomous Identity
Make sure you have the following prerequisites:
-
IP address of machines running OpenSearch, MongoDB, or Cassandra.
-
The Autonomous Identity user should have permission to write to
/opt/autoidon all machines -
To download the deployment images for the install, you still need your registry key to log into the ForgeRock Google Cloud Registry to download the artifacts.
-
Make sure you have the proper OpenSearch certificates with the exact names for both pem and JKS files copied to
~/autoid-config/certs/elastic:-
esnode.pem
-
esnode-key.pem
-
root-ca.pem
-
elastic-client-keystore.jks
-
elastic-server-truststore.jks
-
-
Make sure you have the proper MongoDB certificates with exact names for both pem and JKS files copied to
~/autoid-config/certs/mongo:-
mongo-client-keystore.jks
-
mongo-server-truststore.jks
-
mongodb.pem
-
rootCA.pem
-
-
Make sure you have the proper Cassandra certificates with exact names for both pem and JKS files copied to ~/autoid-config/certs/cassandra:
-
Zoran-cassandra-client-cer.pem
-
Zoran-cassandra-client-keystore.jks
-
Zoran-cassandra-server-cer.pem
-
zoran-cassandra-server-keystore.jks
-
Zoran-cassandra-client-key.pem
-
Zoran-cassandra-client-truststore.jks
-
Zoran-cassandra-server-key.pem
-
Zoran-cassandra-server-truststore.jks
-
-
Create the
autoid-configdirectory.mkdir autoid-config
-
Change to the directory.
cd autoid-config
-
Log in to the ForgeRock Google Cloud Registry using the registry key. The registry key is only available to ForgeRock Autonomous Identity customers. For specific instructions on obtaining the registry key, refer to How To Configure Service Credentials (Push Auth, Docker) in Backstage.
docker login -u _json_key -p "$(cat autoid_registry_key.json)" https://gcr.io/forgerock-autoid
The following output is displayed:
Login Succeeded
-
Run the create-template command to generate the
deployer.shscript wrapper and configuration files. Note that the command sets the configuration directory on the target node to/config. The--userparameter eliminates the need to usesudowhile editing the hosts file and other configuration files.docker run --user=$(id -u) -v ~/autoid-config:/config -it gcr.io/forgerock-autoid/deployer-pro:2022.11.0 create-template
-
Create a certificate directory for elastic.
mkdir -p autoid-config/certs/elastic
-
Copy the OpenSearch certificates and JKS files to
autoid-config/certs/elastic. -
Create a certificate directory for MongoDB.
mkdir -p autoid-config/certs/mongo
-
Copy the MongoDB certificates and JKS files to
autoid-config/certs/mongo. -
Create a certificate directory for Cassandra.
mkdir -p autoid-config/certs/cassandra
-
Copy the Cassandra certificates and JKS files to
autoid-config/certs/cassandra. -
Update the
hostsfile with the IP addresses of the machines. Thehostsfile must include the IP addresses for Docker nodes, Spark main/livy, and the MongoDB master. While the deployer pro does not install or configure the MongoDB main server, the entry is required to run the MongoDB CLI to seed the Autonomous Identity schema.[docker-managers] [docker-workers] [docker:children] docker-managers docker-workers [spark-master-livy] [cassandra-seeds] #For replica sets, add the IPs of all Cassandra nodes [mongo_master] # Add the MongoDB main node in the cluster deployment # For example: 10.142.15.248 mongodb_master=True [odfe-master-node] # Add only the main node in the cluster deployment [kibana-node] # Please add only the master node in cluster deployment
-
Update the
vars.ymlfile:-
Set
db_driver_typetomongoorcassandra. -
Set
elastic_host,elastic_port, andelastic_userproperties. -
Set
kibana_host. -
Set the Apache livy install directory.
-
Ensure the
elastic_user,elastic_port, andmongo_partare correctly configured. -
Update the
vault.ymlpasswords for elastic and mongo to refect your installation. -
Set the Cassandra-related parameters in the
vars.ymlfile. Default values are:cassandra: enable_ssl: "true" contact_points: 10.142.15.248 # comma separated values in case of replication set port: 9042 username: zoran_dba cassandra_keystore_password: "Acc#1234" cassandra_truststore_password: "Acc#1234" ssl_client_key_file: "zoran-cassandra-client-key.pem" ssl_client_cert_file: "zoran-cassandra-client-cer.pem" ssl_ca_file: "zoran-cassandra-server-cer.pem" server_truststore_jks: "zoran-cassandra-server-truststore.jks" client_truststore_jks: "zoran-cassandra-client-truststore.jks" client_keystore_jks: "zoran-cassandra-client-keystore.jks"
-
-
Download images:
./deployer.sh download-images
-
Install Apache Livy.
-
The official release of Apache Livy does not support Apache Spark 3.3.1. Use the zip file located at
autoid-config/apache-livy/apache-livy-0.8.0-incubating-SNAPSHOT-bin.zipto install Apache Livy on the Spark-Livy machine. -
For Livy configuration, refer to https://livy.apache.org/get-started/.
-
-
On the Spark-Livy machine, run the following commands to install the python package dependencies:
-
Change to the
/opt/autoiddirectory:cd /opt/autoid
-
Create a
requirements.txtfile with the following content:six==1.11 certifi==2019.11.28 python-dateutil==2.8.1 jsonschema==3.2.0 cassandra-driver numpy==1.19.5 pyarrow==0.16.0 wrapt==1.11.0 PyYAML==5.4 requests pymongo pandas==1.0.5 tabulate openpyxl
-
Install the requirements file:
pip3 install -r requirements.txt
-
-
Make sure that the
/opt/autoiddirectory exists and that it is both readable and writable. -
Run the deployer script:
./deployer.sh run
-
On the Spark-Livy machine, run the following commands to install the Python egg file:
-
Install the egg file:
sudo /usr/local/bin/pip3.8 install setuptools==46.00
cd /opt/autoid/eggs
sudo /usr/local/bin/easy_install-3.8 autoid_analytics-2021.3-py3.6.egg
-
Source the
.bashrcfile:source ~/.bashrc
-
Restart Spark and Livy.
./spark/sbin/stop-all.sh
./livy/bin/livy-server stop

./spark/sbin/start-all.sh
./livy/bin/livy-server start
-
Resolve Hostname
After installing Autonomous Identity, set up the hostname resolution for your deployment.
-
Configure your DNS servers to access Autonomous Identity dashboard on the target node. The following domain names must resolve to the IP address of the target node:
<target-environment>-ui.<domain-name>. -
If DNS cannot resolve target node hostname, edit it locally on the machine that you want to access Autonomous Identity using a browser. Open a text editor and add an entry in the
/etc/hosts(Linux/Unix) file orC:\Windows\System32\drivers\etc\hosts(Windows) for the self-service and UI services for each managed target node.<Target IP Address> <target-environment>-ui.<domain-name>
For example:
34.70.190.144 autoid-ui.forgerock.com
-
If you set up a custom domain name and target environment, add the entries in
/etc/hosts. For example:34.70.190.144 myid-ui.abc.com
For more information on customizing your domain name, see Customize Domains.
Access the Dashboard
-
Open a browser. If you set up your own url, use it for your login.
-
Log in as a test user.
test user: bob.rodgers@forgerock.com
password: <password>
Check Apache Cassandra
-
Make sure Cassandra is running in cluster mode. For example
/opt/autoid/apache-cassandra-3.11.2/bin/nodetool status
Check MongoDB
-
Make sure MongoDB is running. For example:
mongo --tls \
--host <Host IP> \
--tlsCAFile /opt/autoid/mongo/certs/rootCA.pem  \
--tlsAllowInvalidCertificates  \
--tlsCertificateKeyFile /opt/autoid/mongo/certs/mongodb.pem
Check Apache Spark
-
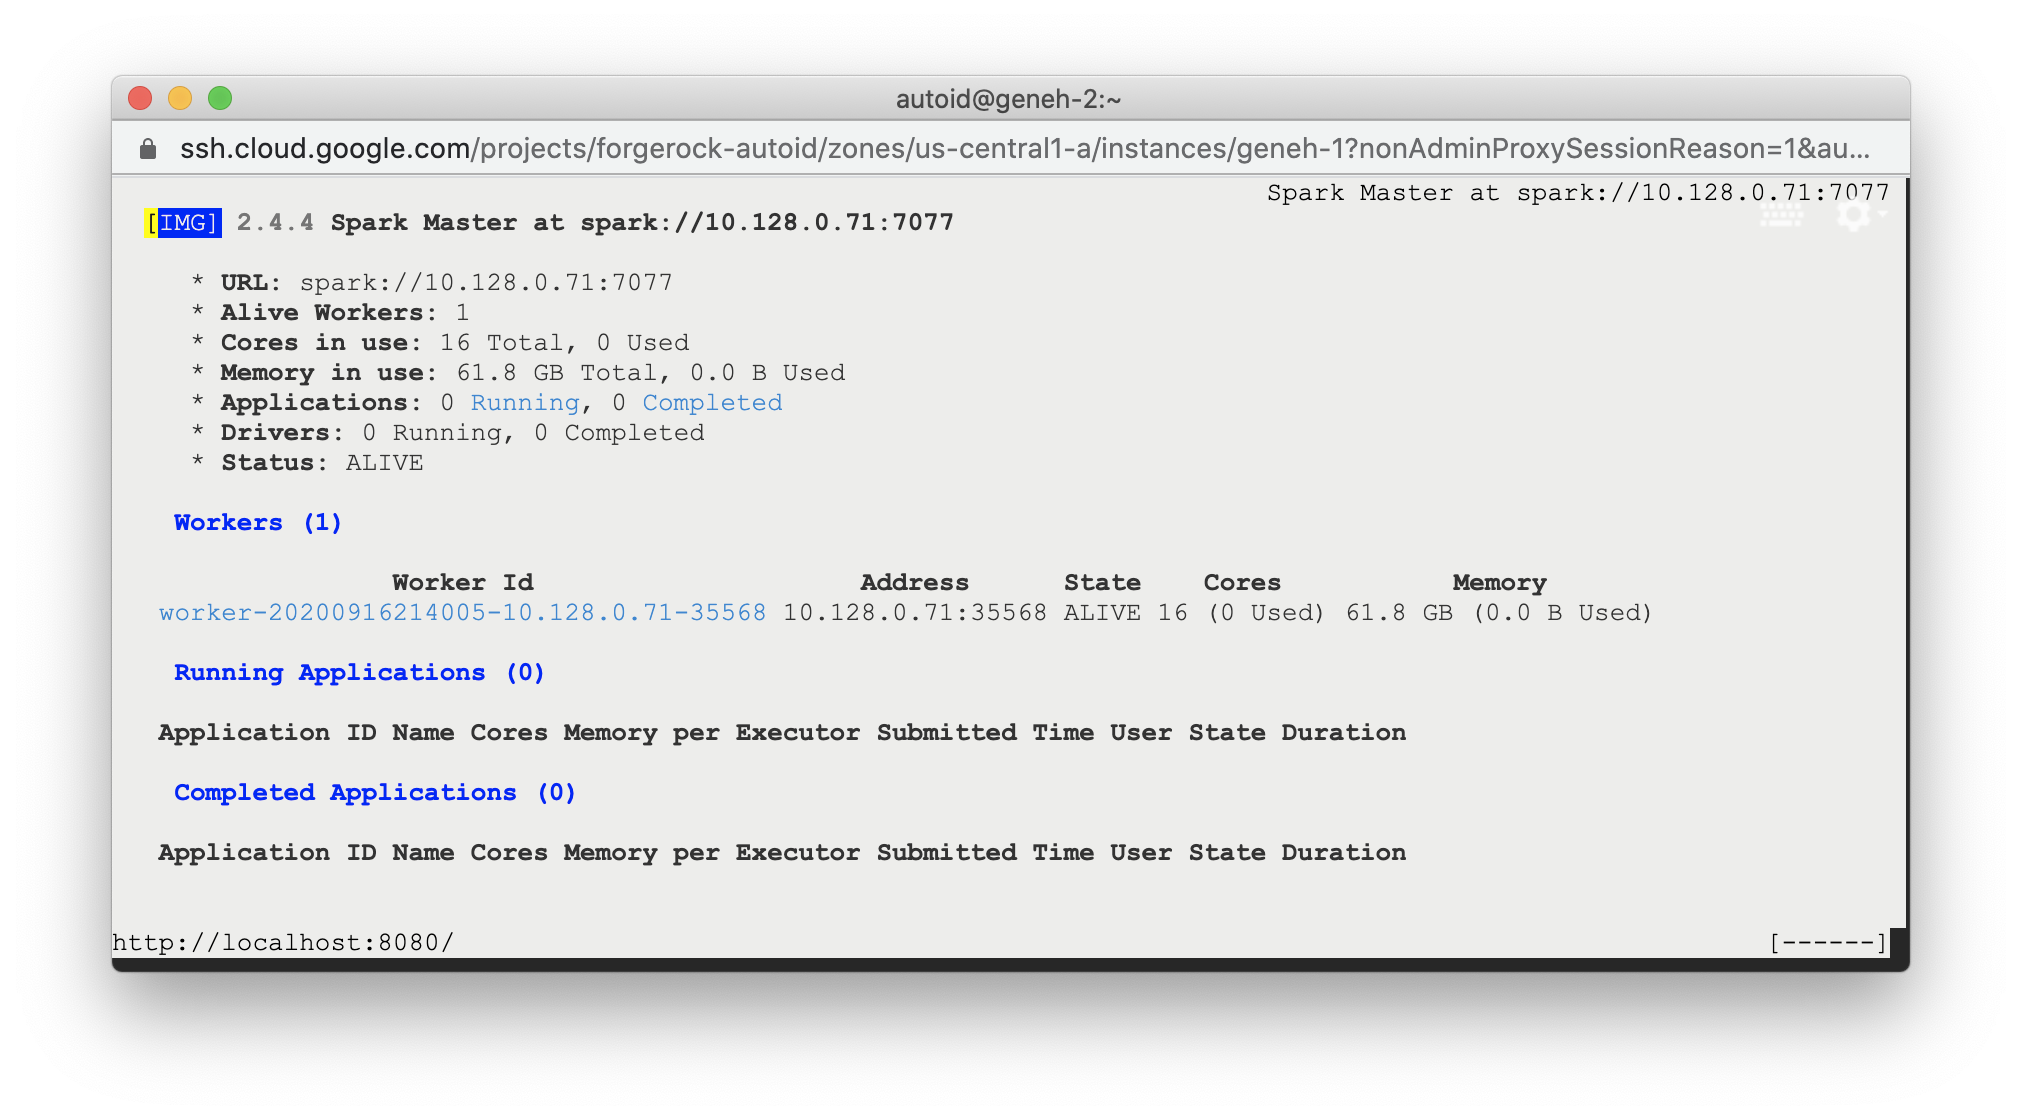
SSH to the target node and open Spark dashboard using the bundled text-mode web browser
elinks http://localhost:8080
Spark Master status should display as ALIVE and worker(s) with State ALIVE.
Click to See an Example of the Spark Dashboard
Start the Analytics
If the previous installation steps all succeeded, you must now prepare your data’s entity definitions, data sources, and attribute mappings prior to running your analytics jobs. These step are required and are critical for a successful analytics process.
For more information, see Set Entity Definitions.