Custom attributes
These sample deployments demonstrate using DS as a shared identity store for AM and IDM. The DS setup profile that configures DS as a shared identity store defines all the platform attributes required by AM and IDM.
Many deployments use additional custom attributes in identity profiles. The following examples show how to add a custom attribute, and how to configure AM and IDM to use it.
|
This example adds a custom attribute that the platform can retrieve with a user profile. This custom attribute is not searchable, and therefore not indexed. |
Before you start, create a demo account for test purposes in your sample deployment:
-
Browse to the platform end user UI page of the sample deployment, and click Create an account.
-
Create a user with user identifier
demo, and whatever other attributes you like. -
Find this user’s entry in the DS shared identity repository:
/path/to/opendj/bin/ldapsearch \ --hostname identities.example.com \ --port 1636 \ --useSsl \ --usePkcs12TrustStore /path/to/opendj/config/keystore \ --trustStorePassword:file /path/to/opendj/config/keystore.pin \ --bindDn uid=admin \ --bindPassword str0ngAdm1nPa55word \ --baseDn ou=identities \ "(uid=demo)"bashNotice that the user’s entry is named for its
fr-idm-uuidattribute.
Define the attribute in DS
You define the attribute in DS as an attribute type in the LDAP schema. In LDAP, an entry’s object classes define which attributes it can have. You therefore also define an object class that lets the entry have the custom attribute.
The example custom attribute is a multi-valued directory string attribute named customAttribute.
The auxiliary object class that lets the entry have the attribute is named customAttributeOC:
-
In DS, add LDAP schema for the new attribute and object class alongside other LDAP schema definitions:
/path/to/opendj/bin/ldapmodify \ --hostname identities.example.com \ --port 1636 \ --useSsl \ --usePkcs12TrustStore /path/to/opendj/config/keystore \ --trustStorePassword:file /path/to/opendj/config/keystore.pin \ --bindDn uid=admin \ --bindPassword str0ngAdm1nPa55word << EOF dn: cn=schema changetype: modify add: attributeTypes attributeTypes: ( customAttribute-oid NAME 'customAttribute' EQUALITY caseIgnoreMatch ORDERING caseIgnoreOrderingMatch SUBSTR caseIgnoreSubstringsMatch SYNTAX 1.3.6.1.4.1.1466.115.121.1.15 USAGE userApplications ) - add: objectClasses objectClasses: ( customAttributeOC-oid NAME 'customAttributeOC' SUP top AUXILIARY MAY customAttribute ) EOFbashBy default, DS writes these definitions to the file
/path/to/opendj/db/schema/99-user.ldif. -
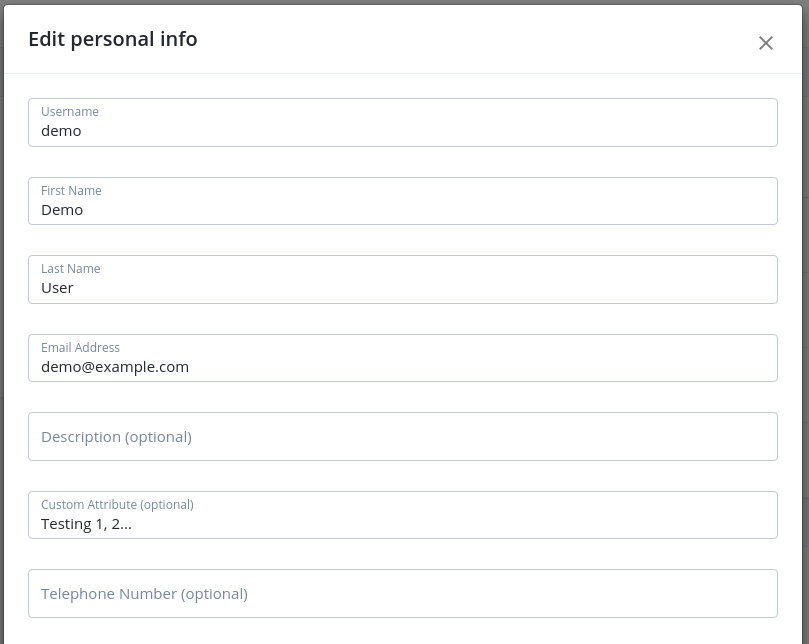
Test that you can add a custom attribute to the
demouser entry.Use the
fr-idm-uuidthat you got when searching foruid=demoinou=identities:/path/to/opendj/bin/ldapmodify \ --hostname identities.example.com \ --port 1636 \ --useSsl \ --usePkcs12TrustStore /path/to/opendj/config/keystore \ --trustStorePassword:file /path/to/opendj/config/keystore.pin \ --bindDn uid=admin \ --bindPassword str0ngAdm1nPa55word << EOF dn: fr-idm-uuid=<fr-idm-uuid-for-demo-user>,ou=people,ou=identities changetype: modify add: objectClass objectClass: customAttributeOC - add: customAttribute customAttribute: Testing 1, 2... EOFbash -
Read the
demouser entry to check your work:/path/to/opendj/bin/ldapsearch \ --hostname identities.example.com \ --port 1636 \ --useSsl \ --usePkcs12TrustStore /path/to/opendj/config/keystore \ --trustStorePassword:file /path/to/opendj/config/keystore.pin \ --bindDn uid=admin \ --bindPassword str0ngAdm1nPa55word \ --baseDn ou=identities \ "(uid=demo)" \ customAttribute dn: fr-idm-uuid=<fr-idm-uuid-for-demo-user>,ou=people,ou=identities customAttribute: Testing 1, 2...bashNotice that the value of
customAttributeis set toTesting 1, 2....
LDAP schema features are much richer than this simple example can demonstrate. For details about LDAP schema in DS, see LDAP schema.
Update AM to use the attribute
Update the AM configuration to make AM aware of the new object class and attribute:
-
Sign in to the platform admin UI as
amAdmin.The password used in the documentation to set up the platform is
Passw0rd. -
Under Native Consoles, select Access Management to open the AM admin console.
-
In the
alpharealm, under Identity Stores > OpenDJ > User Configuration, update these settings:- LDAP User Object Class
-
Add
customAttributeOC. - LDAP User Attributes
-
Add
customAttribute.
-
Save your work.
For additional details, see Adding user profile attributes.
Update IDM to use the attribute
Update the IDM configuration to make IDM aware of the attribute:
-
In the
conf/managed.jsonfile, underuser>schema>order, add the custom attribute to the list:"customAttribute",json -
In the
conf/managed.jsonfile, underuser>schema>properties, define a property corresponding to the custom attribute:"customAttribute" : { "title" : "Custom Attribute", "type" : "string", "viewable" : true, "searchable" : false, "userEditable" : true },jsonNotice that this property is not searchable; meaning, it does not need to be indexed.
-
In the
conf/repo.ds.jsonfile, underresourceMapping>explicitMapping>managed/user>objectClasses, add the object class:"customAttributeOC",json -
In the
conf/repo.ds.jsonfile, underresourceMapping>explicitMapping>managed/user>properties, add a mapping for the attribute:"customAttribute" : { "type" : "simple", "ldapAttribute" : "customAttribute" },json -
Restart IDM to take the changes to the
conf/repo.ds.jsonfile into account.
For additional details, see Create and modify object types, and Explicit mappings (DS).