Guide showing you how to install ForgeRock® Access Management. ForgeRock Access Management provides authentication, authorization, entitlement, and federation software.
This guide shows you how to install ForgeRock Access Management for access and federation management.
This guide covers the install, upgrade, and uninstall procedures that you theoretically perform only once per version. This guide aims to provide you with at least some idea of what happens behind the scenes when you perform the steps.
This guide is written for anyone installing Access Management to manage and federate access to web applications and web-based resources.
Almost anyone can learn something from this guide, though a background in access management and maintaining web application software can help. You do need some background in managing services on your operating systems and in your application servers. You can nevertheless get started with this guide, and then learn more as you go along.
Unless you are planning a throwaway evaluation or test installation, read the Release Notes before you get started.
ForgeRock Identity Platform™ serves as the basis for our simple and comprehensive Identity and Access Management solution. We help our customers deepen their relationships with their customers, and improve the productivity and connectivity of their employees and partners. For more information about ForgeRock and about the platform, see https://www.forgerock.com.
This chapter covers prerequisites for installing AM software, including how to prepare your environment, how to set up your application server to run AM, how to prepare directory servers to store configuration data, and how to prepare an identity repository to handle AM identities.
This section covers setting up the environment in which to run AM.
The topics covered in this section are:
| • Preparing a Fully Qualified Domain Name |
| • Preparing a Java Environment |
| • Setting Maximum File Descriptors and Processes Per User |
For more information about supported operating systems and Java requirements, see "Operating System Requirements" and "Java Requirements" in the Release Notes.
AM requires that you provide a fully qualified domain name (FQDN)
when you configure it. Before you set up AM, be sure that your system
has an FQDN, such as openam.example.com. For evaluation
purposes, you can give your system an alias using the
/etc/hosts file on UNIX systems or
%SystemRoot%\system32\drivers\etc\hosts on Windows. For
production deployments, make sure the FQDN is properly assigned using DNS.
Do not use the hostname localhost for AM, not even
for testing purposes. AM relies on browser cookies, which are returned
based on the domain name.
You can set the cookie domain name value to an empty string for host-only
cookies or to any non-top level domain.
For example, if you install AM and use openam.example.com
as the host, you can set the cookie domain name as example.com.
Important
Do not configure a top-level domain as your cookie domain as browsers will reject them.
Top-level domains are browser-specific. Some browsers, like Firefox, also consider special domains like Amazon's web service (for example, ap-southeast-2.compute.amazonaws.com) to be a top-level domain.
Check the effective top-level domain list at https://publicsuffix.org/list/effective_tld_names.dat to ensure that you do not set your cookie to a domain in the list.
AM software depends on a Java runtime environment. Check the output of the java -version command to make sure your version is supported according to "Java Requirements" in the Release Notes.
The suggestions in this section pertain to AM deployments with the following characteristics:
The deployment has a dedicated DS server for the Core Token Service. The host running this directory server is a high-end server with a large amount of memory and multiple CPUs.
The AM server is configured to use CTS-based sessions.
Important
It is important to keep your Java software up-to-date with the latest
supported version. Make sure that your JAVA_HOME
environment variable always points to the latest supported Java version.
When using an Oracle Java environment set at least the following options:
-serverUse
-serverrather than-client.-Xmx1g(minimum)AM requires at least a 1 GB heap. If you are including the embedded DS, AM requires at least a 2 GB heap, as 50% of that space is allocated to DS. Higher volume and higher performance deployments require additional heap space.
-XX:MetaspaceSize=256mSet the metaspace memory size to 256 MB.
-XX:MaxMetaspaceSize=256mSet the maximum metaspace memory size to 256 MB.
For additional JVM tuning and security recommendations, see "Tuning Java Virtual Machine Settings".
When using an IBM Java environment, set at least the following options:
-DamCryptoDescriptor.provider=IBMJCE,-DamKeyGenDescriptor.provider=IBMJCEUse the IBM Java Cryptography Extensions.
-Xmx1g(minimum)AM requires at least a 1 GB heap. If you are including the embedded DS, AM requires at least a 2 GB heap, as 50% of that space is allocated to DS. Higher volume and higher performance deployments require additional heap space.
When using an OpenJDK Java environment set at least the following options.
-Xmx1024m(minimum)AM requires at least a 1 GB heap. If you are including the embedded DS, AM requires at least a 2 GB heap, as 50% of that space is allocated to DS. Higher volume and higher performance deployments require additional heap space. Recommended:
-Xmx2048m.-XX:MetaspaceSize=256mSet the initial metadata space size to 256 MB.
To configure AM to make HTTP requests through a proxy server, set at least the following options:
-Dhttps.proxyHostIP address or hostname of the proxy server. For example,
proxy.example.com.-Dhttps.proxyPortPort number of the proxy server. For example,
8443.-Dhttps.nonProxyHostsList of IP addresses or hostnames that should be reached directly, bypassing the proxy configuration. For example,
internal.example.com.
Note
ForgeRock's ClientHandler code, such as the Google reCAPTCHA user
self-service feature or the social authentication providers, require setting
the advanced server property
org.forgerock.openam.httpclienthandler.system.proxy.enabled
to true to enable proxy support.
This section gives some initial guidance on configuring the JVM for running AM. These settings provide a strong foundation to the JVM before a more detailed garbage collection tuning exercise, or as best practice configuration for production:
| JVM Parameters | Suggested Value | Description |
|---|---|---|
| At least 1 GB (2 GB with embedded DS), in production environments at least 2 GB to 3 GB. This setting depends on the available physical memory, and on whether a 32- or 64-bit JVM is used. | - |
| - | Ensures the server JVM is used |
| Set both to 256 MB | Controls the size of the metaspace in the JVM |
| 60000 | Controls the read timeout in the Java HTTP client implementation This applies only to the Sun/Oracle HotSpot JVM. |
| High setting: 30000 (30 seconds) | Controls the connect timeout in the Java HTTP client implementation When you have hundreds of incoming requests per second, reduce this value to avoid a huge connection queue. This applies only to the Sun/Oracle HotSpot JVM. |
| JVM Parameters | Suggested Value | Description | |||
|---|---|---|---|---|---|
|
| Controls the protocols used for outbound HTTPS connections from AM. Specify one or more of the following values, separated by commas:
This setting applies only to Sun/Oracle Java environments. | |||
|
- | Controls the protocol AM uses to connect to various external resources. Specify one or more of the following values, separated by commas:
|
Note
For -Dhttps.protocols, specify the protocol version(s)
Java clients can use to connect to AM.
For -Dorg.forgerock.openam.ldap.secure.protocol.version,
see "Securing Communications" for a list of external
resources to which communication is affected.
Specify a single protocol if AM will only use that protocol when
connecting to affected external resources. For example, a value of
TLSv1.2 configures AM to only use the TLSv1.2 protocol
to connect.
Specify a comma-separated list with multiple protocols if AM will use
the most secure protocol supported by the external resources. For example, a
value of TLSv1,TLSv1.1,TLSv1.2 configures AM to attempt
to use the TLSv1.2 protocol to connect to external configuration and user
data stores. If a TLSv1.2 connection is not supported, AM attempts to use
TLSv1.1 to connect. If TLSv1.1 is not supported, AM uses TLSv1.
| JVM Parameters | Suggested Value | Description |
|---|---|---|
| - | Verbose garbage collection reporting |
|
| Location of the verbose garbage collection log file |
| - | Prints a heap histogram when a SIGTERM signal is received by the JVM |
| - | Prints detailed information about garbage collection |
| - | Prints detailed garbage collection timings |
| - | Out of Memory errors generate a heap dump automatically |
|
| Location of the heap dump |
| - | Use the concurrent mark sweep garbage collector |
| - | Allow class unloading during CMS sweeps |
AM is not file-descriptor intensive. However, each DS instance in your environment should have access to, at least, 65,536 file descriptors to handle multiple client connections.
Ensure that every DS instance is allocated enough file descriptors. For example, use the ulimit -n command to check the limits for a particular user:
$ su - opendj
$ ulimit -n
65536
The embedded DS runs inside the AM process space. When AM is configured with the embedded DS instance, you must ensure that the user running the AM processes has, at least, 65,536 file descriptors.
It may also be neccessary to increase the number of processes available to the user running the AM processes.
For example, use the ulimit -u command to check the process limits for a user:
$ su - openam
$ ulimit -u
2048
Important
Before increasing the file descriptors for the DS instance, ensure that the total amount of file descriptors configured for the operating system is higher than 65,536.
Otherwise, if the DS instance uses all of the file descriptors, the operating system will run out of file descriptors. This may prevent other services from working, including those required for logging in the system.
Refer to your operating system's documentation for instructions on how to display and increase the file descriptors or process limits for the operating system and for a given user.
For more information about setting up your environment for DS, see Choosing an Operating System in the Directory Services 6 Release Notes.
To use the SecurID authentication module,
you must first build an AM war file
that includes the supporting library, for example
authapi-2005-08-12.jar, which you must obtain from
RSA. The authapi-2005-08-12.jar file also requires a
dependency file, crypto.jar, which you can also obtain from RSA.
Unpack the AM
.warfile. For example:$ mkdir /tmp/openam $ cd /tmp/openam/ $ jar -xf ~/Downloads/openam/AM-6.0.0.7.war
Obtain the
authapi.jar(for example,authapi-2005-08-12.jar) and its dependency file,crypto.jarfrom RSA. Then, copyauthapi-2005-08-12.jarinto theWEB-INF/libdirectory. For example:$ cp /path/to/authapi-2005-08-12.jar WEB-INF/lib/
Pack up the AM
.warfile. For example:$ jar -cf ../openam.war *
Deploy the new
.warfile. For more information, see "Deploying".In this example, the
.warfile to deploy is/tmp/openam.war.
This section covers setting up a web application container in which to run AM.
The topics covered in this section are:
Note
If a Java Security Manager is enabled for your web application container, add permissions before installing AM.
For a list of supported web application containers, see "Web Application Container Requirements" in the Release Notes.
AM examples often use Apache Tomcat (Tomcat) as the deployment container.
Tomcat is installed on openam.example.com,
and listens on the default ports
without a Java Security Manager enabled.
JVM start up
AM core services require a minimum JVM heap size of 1 GB, and a metadata space size of up to 256 MB. If you are including the embedded DS, AM requires at least a 2 GB heap, as 50% of that space is allocated to DS. See "Preparing a Java Environment" for details.
Set the CATALINA_OPTS environment variable in
Tomcat's start-up script or service with the appropriated tuning for your
environment. For example:
CATALINA_OPTS="-server -Xmx2g -XX:MetaspaceSize=256m -XX:MaxMetaspaceSize=256m"
Some versions of Internet Explorer and Microsoft Edge support the
Expires header attribute instead of the Max-Age
header attribute, which may cause SAML 2.0 and agent logout sequences
to fail.
If you have set the org.apache.catalina.STRICT_SERVLET_COMPLIANCE
Tomcat property to true, add the
org.apache.tomcat.util.http.ServerCookie.ALWAYS_ADD_EXPIRE
property to Tomcat's start-up sequence to add the Expires
attribute to the headers:
CATALINA_OPTS="-server -Xmx2g -XX:MetaspaceSize=256m -XX:MaxMetaspaceSize=256m \
                -Dorg.apache.tomcat.util.http.ServerCookie.ALWAYS_ADD_EXPIRES=true"
Slashes in Resource Names
Some AM resources have names that can contain slash characters (/), for example, in policy names, application names, and SAML v2.0 entities. These slash characters can cause unexpected behavior when running AM on Tomcat.
One possible workaround is to configure Tomcat to allow encoded slash characters
by adding the org.apache.tomcat.util.buf.UDecoder.ALLOW_ENCODED_SLASH=true
property to the CATALINA_OPTS variable; however, this is not recommended for production
deployments (see the warning below). For example:
CATALINA_OPTS= "-server -Xmx2g -XX:MetaspaceSize=256m -XX:MaxMetaspaceSize=256m \
                -Dorg.apache.tomcat.util.buf.UDecoder.ALLOW_ENCODED_SLASH=true"
Warning
It is strongly recommended that you do not enable
org.apache.tomcat.util.buf.UDecoder.ALLOW_ENCODED_SLASH
when running AM in production as it introduces a security risk.
For more information, see How do I safely enable the org.apache.tomcat.util.buf.UDecoder.ALLOW_ENCODED_SLASH setting in AM/OpenAM (All Versions)? in the ForgeRock Knowledge Base.
Cookie Domains
You can set the cookie domain name value to an empty string for host-only
cookies or to any non-top level domain.
For example, if you install AM and use openam.example.com
as the host, you can set the cookie domain name as example.com.
For information about configuring the cookie domain during installation, see
"To Custom Configure an Instance".
Encoding and Security
ForgeRock recommends that you edit the Tomcat <Connector> configuration
to set URIEncoding="UTF-8".
UTF-8 URI encoding ensures that URL-encoded characters
in the paths of URIs are correctly decoded by the container.
This is particularly useful if your applications use the AM REST APIs
and some identifiers, such as user names, contain special characters.
You should also ensure the sslProtocol property is set to
TLS, which disables the potentially vulnerable SSL v3.0
protocol.
<Connector> configuration elements are found in the configuration file,
/path/to/tomcat/conf/server.xml.
The following excerpt shows an example <Connector>
with the URIEncoding and sslProtocol
attributes set appropriately:
<Connector port="8443" protocol="HTTP/1.1" SSLEnabled="true"
 maxThreads="150" scheme="https" secure="true"
 clientAuth="false" sslProtocol="TLS" URIEncoding="UTF-8" />
Embedded DS
When you set up AM with the embedded DS, make sure
that Tomcat's autoDeploy attribute is set to false.
If autoDeploy is set to true,
the host dynamically deploys and updates any web application, for example, when
a new .war file is dropped into the appBase.
You can deploy AM on JBoss EAP and WildFly. The procedures listed here provide steps for configuring JBoss EAP and WildFly for AM.
After configuring JBoss or WildFly, you then prepare AM for deployment by
making a few changes to the contents of the AM .war
archive.
Stop JBoss or WildFly.
The default JVM settings do not allocate sufficient memory to AM. This step shows one method that you can use to modify the JVM settings. For other methods, see either the JBoss Application Server Official Documentation Page or the JVM Settings page in the WildFly documentation
Open the
standalone.conffile in the/path/to/jboss/bindirectory for JBoss or WildFly in standalone mode.Check the JVM settings associated with
JAVA_OPTS.Change the JVM heap size to
-Xmx1g. The default JVM heap size for some versions of JBoss might already exceed the recommended value. If you are using the embedded version of DS, the minimum heap size may be higher. For details on the JVM options to use, see "Preparing a Java Environment".Change the metaspace size to
-XX:MaxMetaspaceSize=256mif the default size does not exceed this amount.Set the following JVM
JAVA_OPTSsetting in the same file:-Dorg.apache.tomcat.util.http.ServerCookie.ALWAYS_ADD_EXPIRES=true
Verify that the headers include the
Expiresattribute rather than onlyMax-Age, as some versions of Internet Explorer and Microsoft Edge do not supportMax-Age.
Now deploy the
openam.warfile into the appropriate deployment directory. The directory varies depending on whether you are running in standalone or domain mode.
To prepare AM to run with JBoss or WildFly, you should make a change to
the AM war file. JBoss and WildFly deploy
applications from different temporary directories every time you restart the
container, which would require reconfiguring AM. To avoid problems,
change the AM war file as follows:
If you have not already done so, create a temporary directory and expand the
AM-6.0.0.7.warfile. For example:$ cd /tmp $ mkdir /tmp/openam ; cd /tmp/openam $ jar xvf ~/Downloads/AM-6.0.0.7.war
Locate the
bootstrap.propertiesfile in theWEB-INF/classesdirectory of the expandedwararchive. Update the# configuration.dir=line in this file to specify a path with read and write permissions, and then save the change.# This property should also be used when the system user that # is running the web/application server process does not have # a home directory. i.e. System.getProperty("user.home") returns # null. configuration.dir=/my/readwrite/config/dirIf you are deploying AM on JBoss EAP, remove the
jboss-all.xmlfile from theWEB-INFdirectory of the expandedwararchive.Be sure not to remove this file if you are deploying AM on WildFly.
Rebuild the
openam.warfile.$ jar cvf ../openam.war *
If you plan to deploy multiple cookie domains with WildFly, you must configure the
com.sun.identity.authentication.setCookieToAllDomainsproperty after you have installed the AM server. See "Handling Multiple Cookie Domains When Using Wildfly" for more information.
To deploy AM in Oracle WebLogic, perform the following steps:
Update the JVM options as described in "Preparing a Java Environment".
Customize the
AM-6.0.0.7.warfile as described in "To Prepare for Oracle WebLogic".
To prepare AM to run in Oracle WebLogic, you must change
the AM war file. Be sure to
make these changes whenever you deploy a new war
file, or as part of an AM upgrade.
Prepare for deployment in Oracle WebLogic as follows:
Create a temporary directory and expand the
AM-6.0.0.7.warfile. For example:$ cd /tmp $ mkdir /tmp/openam ; cd /tmp/openam $ jar xvf ~/Downloads/AM-6.0.0.7.war
Ensure the installer is able to locate configuration files by specifying a folder which the user running Oracle WebLogic can read and write:
Locate the
bootstrap.propertiesfile in theWEB-INF/classesdirectory of the expandedwarfile.Update the
# configuration.dir=line in thebootstrap.propertiesfile to specify a path with read and write permissions. For example:# This property should also be used when the system user that # is running the web/application server process does not have # a home directory. i.e. System.getProperty("user.home") returns # null. configuration.dir=/my/readwrite/config/dirIf installing on Windows, the specified path should have slashes / and not backslashes \.
Ensure the correct packages are available to Oracle WebLogic during installation:
Locate the
weblogic.xmlfile in theWEB-INFdirectory of the expandedwarfile.Replace the
<!-- Bouncy Castle -->section in theweblogic.xmlfile to ensure the correct loading order of packages, as follows:<!-- Bouncy Castle --> <package-name>org.bouncycastle.*</package-name> <package-name>org.bouncycastle.util.*</package-name> <package-name>org.bouncycastle.util.io.pem.*</package-name> <package-name>org.bouncycastle.openssl.jcajce.*</package-name> <package-name>org.bouncycastle.openssl.*</package-name> <package-name>org.bouncycastle.asn1.*</package-name> <package-name>com.fasterxml.jackson.*</package-name>Important
Note the addition of the required
com.fasterxml.jackson.*package.
Rebuild the
AM-6.0.0.7.warfile:$ jar cvf ../Edited-AM-6.0.0.7.war *
Ensure Oracle WebLogic passes responsibility for account management over to AM, as follows:
Ensure Oracle WebLogic is not running.
Navigate to the Oracle WebLogic
config.xmlconfiguration file for the domain in which AM runs.For example,
$HOME/Oracle/Middleware/Oracle_Home/user_projects/domains/base_domain/config/config.xml.In the
<security-configuration>section, add the following line before the closing</security-configuration>tag:<enforce-valid-basic-auth-credentials>false</enforce-valid-basic-auth-credentials>
For example:
    <enforce-valid-basic-auth-credentials>false</enforce-valid-basic-auth-credentials>
</security-configuration>
Configure the Oracle WebLogic domain to use the canonical path of resource files by performing the following steps:
In the Oracle WebLogic console, in the Domain Structure panel, click the name of the domain. For example,
base_domain.On the Configuration tab, click the Web Applications tab, and then enable the Archived Real Path Enabled property.
Save your changes, and restart Oracle WebLogic for them to take effect.
You can now deploy your
Edited-AM-6.0.0.7.warin Oracle WebLogic.
To deploy AM in IBM WebSphere, perform the following steps:
Update the JVM options as described in "Preparing a Java Environment".
Customize the
AM-6.0.0.7.warfile as described in "To Prepare for Oracle WebLogic".After deploying AM, configure WebLogic as described in "To Prepare WebSphere".
To prepare AM to run in WebSphere, change
the AM war file to ensure that the AM
upgrade process is able to find the AM configuration files. Be sure to
make this change whenever you deploy a new war
file as part of an AM upgrade.
Change the AM war file as follows:
Note
If installing on Windows, the specified paths should have slashes / and not backslashes \.
Create a temporary directory and expand the
AM-6.0.0.7.warfile. For example:$ cd /tmp $ mkdir /tmp/openam ; cd /tmp/openam $ jar xvf ~/Downloads/AM-6.0.0.7.war
Locate the
bootstrap.propertiesfile in theWEB-INF/classesdirectory of the expandedwarfile.Update the
# configuration.dir=line in thebootstrap.propertiesfile to specify a path with read and write permissions. For example:# This property should also be used when the system user that # is running the web/application server process does not have # a home directory. i.e. System.getProperty("user.home") returns # null. configuration.dir=/my/readwrite/config/dir(Optional) If you are using an IBM JDK, replace the default
WEB-INF/template
      /keystore/keystore.jceks
keystore file with one generated using the IBM JDK, by performing the following steps:Generate a new, empty
keystore.jcekskeystore file in IBM JDK format:$ keytool -genkey -storetype jceks -keystore keystore.jceks -storepass changeit -keypass changeit
Copy the new
keystore.jcekskeystore file into the expanded .war file, overwriting the existingWEB-INF/template/keystore/keystore.jcekskeystore file:$ cp keystore.jceks /tmp/openam/WEB-INF/template/keystore/keystore.jceks
Rebuild the
AM-6.0.0.7.warfile:$ jar cvf ../AM-6.0.0.7.war *
In addition to preparing the AM .war file, perform the following steps to configure WebSphere for AM after you deploy AM into WebSphere:
Load classes from AM bundled libraries before loading classes from libraries delivered with WebSphere:
In the WebSphere administration console, navigate to Application > Application Type > WebSphere enterprise applications > AM Name > Class loading and update detection.
Set Class loader order > Classes loaded with local class loader first (parent last).
Ensure that the value of the WAR class loader policy property is set to the default value:
Class loader for each WAR file in application.Save your work.
(Optional) If your environment uses SOAP of Java agents earlier than version 5, perform the following steps to add SOAP-related properties to the JVM:
In the WebSphere administration console, select Servers.
Expand Server Type, and select WebSphere application servers.
Select your WebSphere server name.
Expand Java and Process Management, and select Process Definition.
Under the Additional Properties section, select Java Virtual Machine.
Locate the Generic JVM argument box and add the following properties:
-Djavax.xml.soap.MessageFactory=com.sun.xml.internal.messaging.saaj.soap.ver1_1.SOAPMessageFactory1_1Impl
-Djavax.xml.soap.SOAPFactory=com.sun.xml.internal.messaging.saaj.soap.ver1_1.SOAPFactory1_1Impl
-Djavax.xml.soap.SOAPConnectionFactory=com.sun.xml.internal.messaging.saaj.client.p2p.HttpSOAPConnectionFactory
-Djavax.xml.soap.MetaFactory=com.sun.xml.internal.messaging.saaj.soap.SAAJMetaFactoryImpl
-Dcom.ibm.websphere.webservices.DisableIBMJAXWSEngine=true
Save your work.
Cross-origin resource sharing (CORS) allows requests to be made across domains from user agents. AM supports CORS, but CORS is not enabled by default.
To enable CORS support, edit the deployment descriptor file before deploying AM. CORS support is implemented as a servlet filter, and so you add the filter's configuration to the deployment descriptor file.
If you have not yet deployed AM:
Unpack the AM
.warfile. For example:$ mkdir /tmp/openam $ cd /tmp/openam/ $ jar -xf ~/Downloads/openam/AM-6.0.0.7.war
Open the deployment descriptor file
WEB-INF/web.xmlin a text editor.
If you have already deployed AM:
Open the deployment descriptor file
web.xmlin a text editor. The location of the file depends on your web application container, for example in Tomcat it might be located at:/path/to/tomcat/webapps/openam/WEB-INF/web.xml.
In the deployment descriptor file, add a
<filter-mapping>element containing the name and a URL pattern for the filter. The URL pattern specifies the endpoints to which AM applies the CORS filter.To enable CORS support for all endpoints, use the following example:
<filter-mapping>
    <filter-name>CORSFilter</filter-name>
    <url-pattern>/*</url-pattern><!-- CORS support for all endpoints -->
</filter-mapping>
To enable CORS support for individual endpoints instead of all endpoints, add multiple
<filter-mapping>elements, one for each endpoint:<filter-mapping> <filter-name>CORSFilter</filter-name> <url-pattern>/uma/*</url-pattern> </filter-mapping> <filter-mapping> <filter-name>CORSFilter</filter-name> <url-pattern>/json/*</url-pattern> </filter-mapping> <filter-mapping> <filter-name>CORSFilter</filter-name> <url-pattern>/oauth2/*</url-pattern> </filter-mapping>In the deployment descriptor file, add a
<filter>element to configure the filter.The available parameters for the
<filter>element are as follows:<filter-name>Specifies the name for the filter. Must match the name specified in the
<filter-mapping>elements.<filter-class>Specifies the Java class the implements the CORS filter. Should be set to the default
org.forgerock.openam.cors.CORSFilter.methods(required)A comma-separated list of HTTP methods allowed when making CORS requests to AM.
Example:
GET,POST,PUT,PATCH,OPTIONS,DELETEorigins(required)A comma-separated list of the origins allowed when making CORS requests to AM. Wildcards are not supported - each value should be an exact match for the origin of the CORS request.
Example:
http://example.com,https://example.org:8433Tip
During development you may not be using fully-qualified domain names as the origin of a CORS request, for example using the
file://protocol locally. If so, you can add these non-FQDN origins to the list. For example,http://example.com,https://example.org:8433,file://,null.allowCredentials(optional)Whether to take allow requests with credentials in either HTTP cookies or HTTP authentication information. Accepts
false(the default) ortrue.Set to
trueif you sendAuthorizationheaders as part of the CORS requests, or need to include information in cookies when making requests.headers(optional)A comma-separated list of request header names allowed when making CORS requests to AM.
Example:
iPlanetDirectoryPro,X-OpenAM-Username,X-OpenAM-Password,Accept-API-Version,Content-Type,If-Match,If-None-MatchBy default, the following simple headers are explicitly allowed:
Cache-ControlContent-LanguageExpiresLast-ModifiedPragma
If you do not specify a value for this property, the presence of any header in the CORS request, other than the simple headers listed above, will cause the request to be rejected.
Headers commonly used when accessing an AM server include the following:
Header Information iPlanetDirectoryProUsed for session information.
See "Implementing Client-Based Sessions" in the Authentication and Single Sign-On Guide.
X-OpenAM-Username,X-OpenAM-PasswordUsed to pass credentials in REST calls that use the HTTP POST method.
See "Authentication and Logout" in the Authentication and Single Sign-On Guide.
Accept-API-VersionUsed to request a specific AM endpoint version.
See "REST API Versioning" in the Authentication and Single Sign-On Guide.
Content-TypeRequired for cross-origin calls to AM REST API endpoints.
If-Match,If-None-MatchUsed to ensure the correct version of a resource will be affected when making a REST call, for example when updating an UMA resource set.
See "To Update an UMA Resource Set" in the User-Managed Access (UMA) 2.0 Guide .
Caution
If you need to accept all origins by allowing the use of
Access-Control-Allowed-Origin=*headers, do not allowContent-Typeheaders. Allowing the use of both types of headers exposes AM to cross-site request forgery (CSRF) attacks.expectedHostname(optional)The name of the host expected in the
Hostheader of CORS requests to AM. The request will be refused if the specified value does not match.If not specified, any host value is accepted.
If the AM server is behind a load-balancer, specify the public name of the load balancer.
Example:
openam.example.com:8080exposeHeaders(optional)A comma-separated list of response header names that AM returns in the
Access-Control-Expose-Headersheader.User agents can make use of any headers that are listed in this property, as well as the simple response headers, which are as follows:
Cache-ControlContent-LanguageExpiresLast-ModifiedPragmaContent-Type
User agents must filter out all other response headers.
Example:
Access-Control-Allow-Origin,Access-Control-Allow-Credentials,Set-CookiemaxAge(optional)The maximum length of time that the browser is allowed to cache the pre-flight response, in seconds.
The default is
600.
The following is an example excerpt from a configured
web.xmlfile that could be used during testing and development:<filter-mapping> <filter-name>CORSFilter</filter-name> <url-pattern>/uma/*</url-pattern> </filter-mapping> <filter-mapping> <filter-name>CORSFilter</filter-name> <url-pattern>/json/*</url-pattern> </filter-mapping> <filter-mapping> <filter-name>CORSFilter</filter-name> <url-pattern>/oauth2/*</url-pattern> </filter-mapping> <filter> <filter-name>CORSFilter</filter-name> <filter-class>org.forgerock.openam.cors.CORSFilter</filter-class> <init-param> <param-name>methods</param-name> <param-value>POST,PUT,OPTIONS</param-value> </init-param> <init-param> <param-name>origins</param-name> <param-value>http://localhost:8000,null,file://,https://example.org:8433</param-value> </init-param> <init-param> <param-name>allowCredentials</param-name> <param-value>true</param-value> </init-param> <init-param> <param-name>headers</param-name> <param-value>X-OpenAM-Username,X-OpenAM-Password,X-Requested-With,Accept,iPlanetDirectoryPro</param-value> </init-param> <init-param> <param-name>expectedHostname</param-name> <param-value>openam.example.com:8080</param-value> </init-param> <init-param> <param-name>exposeHeaders</param-name> <param-value>Access-Control-Allow-Origin,Access-Control-Allow-Credentials,Set-Cookie</param-value> </init-param> <init-param> <param-name>maxAge</param-name> <param-value>1800</param-value> </init-param> </filter>Save your changes.
If you have not yet deployed AM:
Pack up the AM
.warfile to deploy.$ jar -cf ../openam.war *
Deploy the new
.warfile.In this example, the
.warfile to deploy is/tmp/openam.war.For more information, see "Deploying".
If you have already deployed AM:
Restart AM or the web container where it runs.
For more details on CORS, see the Cross-Origin Resource Sharing specification.
By default, AM uses the Java Cryptography Extension (JCE) encryption class to encrypt and decrypt system password and keys in the configuration store and by other components, such as agents.
If your deployment requires a more secure encryption algorithm, AM supports the Advanced Encryption Standard (AES) Key Wrap algorithm (RFC3394). AM's implementation of AES Key Wrap uses the Password-Based Key Derivation Function 2 (PBKDF2) (RFC2898) with HMAC-SHA1. This allows administrators to choose key size hash algorithms, such as SHA256, SHA384, or SHA512.
Important
The AES Key Wrap Encryption algorithm is only enabled when installing AM. There is no current upgrade path for existing installations.
The Security Token Service (STS) feature does not support the AES Key Wrap Encryption algorithm. Make sure that you do not deploy this feature in an AM instance configured to use the AES Key Wrap Encryption algorithm.
Warning
When implementing AES Key Wrap Encryption, take special care when selecting your encryption key iteration count.
If you select a large iteration count of 20,000, for example, you can effectively slow down a brute-force attack when passwords are of low quality (less than 20 characters and non-randomized). The trade off is that an iteration count of 20,000 can also negatively impact AM startup times if there are many agents in your deployment.
Determine the optimal iteration count for your deployment based on your security and performance requirements. Set the iteration count to a large number only if absolutely necessary.
AM does not have an iteration count requirement. However, it will log a warning if both of the following conditions are true:
The number of iterations is less than 10,000.
The AM encryption key is less than 20 characters long.
Edit your container startup scripts, for example
setenv.sh, to set the following JVM system properties in Tomcat:JAVA_OPTS="$JAVA_OPTS -Dcom.iplanet.security.encryptor=org.forgerock.openam.shared.security.crypto.AESWrapEncryption" JAVA_OPTS="$JAVA_OPTS -Dorg.forgerock.openam.encryption.key.iterations=10000" JAVA_OPTS="$JAVA_OPTS -Dorg.forgerock.openam.encryption.key.size=256" JAVA_OPTS="$JAVA_OPTS -Dorg.forgerock.openam.encryption.key.digest=SHA512"
Only the first line in the example is required. The other lines are configurable to meet the needs of your deployment. Key sizes greater than 128 bits require that the JCE Unlimited Strength policy files be installed in your system. PBKDF2 using SHA256, SHA384, and SHA512 is only available on Java 8.
Note
You cannot change these configuration parameters once AM has been installed.
This section covers acquiring the AM software and deploying it into a web application container.
The topics covered in this section are:
The ForgeRock BackStage website hosts downloads, including
a .zip file with all of the AM components, the
.war file, AM tools, the configurator, web and Java
agents, Identity Gateway, and documentation. Verify that you review the Software License and
Subscription Agreement presented before you download AM files.
For each release of the AM, you can download the
entire package as a .zip file, only the AM
.war file, or only the administrative tools as a
.zip archive. The Archives only have the
AM source code used to build the release.
After you download the .zip file, create a new directory for AM,
and unzip the .zip file to access the content.
$ cd ~/Downloads
$ mkdir openam ; cd openam
$ unzip ~/Downloads/AM-6.0.0.7.zip
When you unzip the archive of the entire package, you get ldif, license, and legal directories in addition to the following files:
| File | Description |
|---|---|
AM-6.0.0.7.war |
The distribution .war file includes the core
server code with an embedded DS server, which stores
configuration data and simplifies deployments. The distribution includes
an administrative graphical user interface (GUI) Web console.
During installation, the .war file accesses properties
to obtain the fully qualified domain name, port, context path, and the
location of the configuration folder. These properties can be obtained
from the boot.json file in the AM
installation directory, from environment variables, or from a combination
of the two.
This file is also available to download individually.
|
AM-Soap-STS-Server-6.0.0.7.war | AM provides a SOAP-based security token service (STS) server that issues tokens based on the WS-Security protocol[a]. |
SSOAdminTools-5.1.1.5.zip |
AM provides an ssoadm command-line tool that
allows administrators to configure and maintain AM as well as
create their own configuration scripts.
The zip distribution file contains binaries, properties
file, script templates, and setup scripts for UNIX and windows servers.
|
SSOConfiguratorTools-5.1.1.5.zip |
AM provides configuration and upgrade tools for installing and maintaining
your server. The zip distribution file contains
libraries, legal notices, and supported binaries for these configuration
tools. Also, you can view example configuration and upgrade properties
files that can be used as a template for your deployments.
|
Config-Upgrader-6.0.0.7.zip |
AM provides a configuration file upgrade tool. For more information
on converting configuration files for import into AM 6,
see the README.md file in the Config-Upgrader-6.0.0.7.zip
file.
|
Fedlet-6.0.0.7.zip | AM provides an AM Fedlet, a light-weight SAML v2.0 service provider. The Fedlet lets you set up a federated deployment without the need of a fully-featured service provider. |
IDPDiscovery-6.0.0.7.war | AM provides an IdP Discovery Profile (SAMLv2 binding profile) for its IdP Discovery service. The profile keeps track of the identity providers for each user. |
sample-trees-6.0.0.7.zip |
Clean installs of AM provide ready-made sample authentication trees to demonstrate how they can be put
together. These sample trees are not installed by default if you are upgrading an existing instance of AM.
The sample-trees-6.0.0.7.zip file contains the sample trees in JSON files,
ready for import by Amster
command-line interface. For information on importing files by using Amster, see
Importing Configuration Data in the
Amster 6 User Guide.
|
[a] AM also provides REST-based STS service endpoints, which you can directly utilize on the AM server. | |
After you have downloaded AM software, deploy it to your installed application container.
Note that deploying AM only extracts the files into the application container, prior to installation and configuration. Deploying AM also makes LDIF files available, which can be used to prepare external data stores for use with AM.
The AM-6.0.0.7.war file contains the AM server.
How you deploy the .war file depends on your web application container.
Deploy the
.warfile on your container.For example, copy the file to deploy on Apache Tomcat.
$ cp AM-6.0.0.7.war /path/to/tomcat/webapps/openam.war
During trials or development, you can change the file name to
openam.warwhen deploying in Tomcat, so that the deployment URI is/openam.When installing AM in a production environment, do not use a predictable deployment URI such as
/openamor/opensso.Note
You change the file name to something other than
openam.warwhen deploying in Tomcat so that the deployment URI is not/openam. For helpful hints on avoiding obvious deployment defaults, see "Avoiding Obvious Defaults".Important
To properly configure AM, AM requires a deployment URI with a non-empty string after
/. Do not deploy AM at the root context. Do not rename the.warfile toROOT.warbefore deploying on Tomcat, for example.It can take several seconds for AM to be deployed in your container.
Navigate to the initial configuration screen, for example
http://openam.example.com:8080/openam.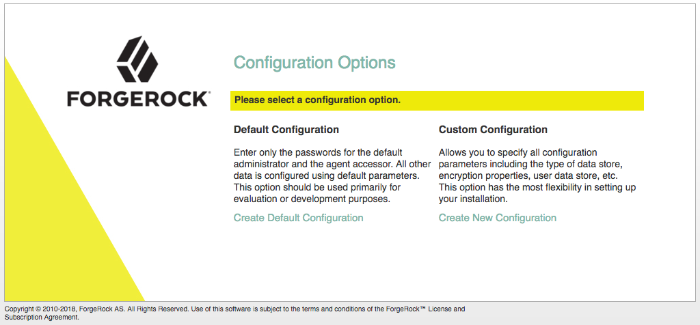
AM is now ready for installation. To proceed, take on of the following actions:
Configure external data stores using the files created during deployment. See "Preparing External Data Stores".
Use the embedded data stores for evaluation purposes, and skip ahead to installing AM. See "Installing a Single Server".
This section covers setting up external data stores for configuration or identity data.
AM includes embedded data stores for configuration and identity data that can be used for evaluation and testing purposes. In production environments, external data stores are preferred.
The topics covered in this section are:
For a list of supported data stores, see "Data Store Requirements" in the Release Notes.
AM accesses user identity data from one or more identity repositories. AM ships with an embedded DS server that you can install as part of the AM configuration process.
In most deployments, AM connects to existing LDAP directory servers for user identity data, as it shares data in an identity repository with other applications.
If you are configuring AM to share data with other applications, or if you expect your deployment will have a large amount of users, connect AM to an external identity repository. For a list of supported external identity repositories, see "Data Store Requirements" in the Release Notes.
AM connects to an external directory by binding to it as a user that you specify in the AM data store configuration. This user is known as the AM data store administrator.
Specifying the directory administrator, for
example, cn=Directory Manager as the AM
data store administrator is not recommended for production
deployments as it will give AM directory administrator privileges to the
identity repository.
Instead, create a separate AM administrator account with fewer access privileges than the directory administrator so that you can assign the appropriate level of privileges for the AM data store administrator.
You need to consider two areas of privileges for the AM data store administrator:
- Schema Update Privileges
AM needs to update the directory schema when you configure a new identity repository and when you upgrade AM software. If the AM data store administrator has schema update privileges, AM can update the schema dynamically during data store configuration and during AM upgrades. If the AM data store administrator does not have schema update privileges, you must update the schema manually before configuring a new identity repository and before upgrading AM.
- Directory Read and Write Access Privileges
If you want AM to create, update, and delete user entries, then the AM data store administrator must have full read and write access to the identity data in the directory. If you are using an external identity repository as a read-only user directory, then the AM data store administrator needs read privileges only.
The level of access privileges you give the AM data store administrator is specific to each AM deployment. Work with your directory server administrator to determine the appropriate level of privileges as part of the process of preparing an external identity repository.
Note
You should not configure more than one writeable identity repository in a single realm. AM will try to perform write operations on each identity repository configured in a realm, and there is no way to configure which repository is written to.
To manage identities and reconcile differences between multiple identity repositories, use ForgeRock Identity Management.
The steps for preparing an external identity repository vary depending on the schema update privileges given to the AM data store administrator.
If the AM data store administrator has schema update privileges, follow the procedure in "Preparing an Identity Repository With Dynamic Schema Updates".
If the AM data store administrator does not have schema update privileges, follow the procedure in "Preparing an Identity Repository With Manual Schema Updates".
After you have completed one of these two procedures, continue by configuring your external identity repository as an AM data store as described in "Configuring Data Stores That Access External Identity Repositories".
Note
Example commands throughout this section use default values for user IDs and port numbers. When running similar commands, be sure to use appropriate values for your directory server.
When running the ldapmodify command,
you might need to specify the --trustAll argument to trust
server certificates if your directory server
uses self-signed certificates and StartTLS or SSL.
If the AM data store administrator has schema update privileges, you can configure the AM data store using dynamic schema updates. With dynamic schema updates, AM automatically updates the directory server schema of the external identity repository as needed. Schema updates might occur when you configure a data store as part of initial AM configuration, when you configure a data store after initial AM configuration, or when you upgrade AM.
The following procedure shows you how to prepare an identity repository with dynamic schema updates. The procedure assumes that you have already created an identity repository in DS and populated it with user data. The instructions that follow do not include steps to install DS, configure directory server backends, and implement replication. For external identity repositories other than DS, you must perform tasks that are analogous to the ones in the example procedure. Consult the documentation for your directory server software to determine the appropriate actions to take.
Create the AM data store administrator account.
This example uses
uid=openam,ou=admins,dc=example,dc=comas the AM data store administrator. It is assumed that thedc=example,dc=comsuffix already exists in the directory.First, create an LDIF file that defines the AM data store administrator account and gives the account the following privileges:
update-schema. Allows the account to update the directory schema.subentry-write. Allows the account to make directory subentry updates.password-reset. Allows the account to reset other users' passwords. Required for the AM forgotten password feature. This privilege is not required for deployments where the AM data store will not modify user entries.proxied-auth. Allows the account to perform operations as another account. Required for the AM forgotten password feature when theforce-change-on-resetpolicy is configured in DS. For more information on the LDAP Proxied Authorization property, see "Directory Services Configuration Properties" in the Setup and Maintenance Guide.
dn: ou=admins,dc=example,dc=com
objectClass: top
objectClass: organizationalunit
ou: AM Administrator

dn: uid=openam,ou=admins,dc=example,dc=com
objectClass: top
objectClass: person
objectClass: organizationalPerson
objectClass: inetOrgPerson
cn: AM Administrator
sn: AM
userPassword: changeMe
ds-privilege-name: update-schema
ds-privilege-name: subentry-write
ds-privilege-name: password-reset
ds-privilege-name: proxied-auth
Then, run the ldapmodify command to create the user. The following example assumes that you are using DS 5 and later:
$ ldapmodify \
 --hostname opendj.example.com \
 --port 1389 \
 --bindDN "cn=Directory Manager" \
 --bindPassword password \
 openam-ds-admin-account.ldif

 Processing ADD request for ou=admins,dc=example,dc=com
 ADD operation successful for DN ou=admins,dc=example,dc=com
 Processing ADD request for uid=openam,ou=admins,dc=example,dc=com
 ADD operation successful for DN uid=openam,ou=admins,dc=example,dc=com
Add a global ACI that lets the AM administrator account modify the directory schema.
$ dsconfig set-access-control-handler-prop \
 --hostname opendj.example.com \
 --port 4444 \
 --bindDN "cn=Directory Manager" \
 --bindPassword password \
 --no-prompt \
 --add \
 'global-aci:(target="ldap:///cn=schema")(targetattr="attributeTypes||objectClasses")
 (version 3.0; acl "Modify schema"; allow (write)
 userdn="ldap:///uid=openam,ou=admins,dc=example,dc=com";)'
If you copy the text from the preceding example, make sure that the value starting with
'global-aciis all on a single line.To verify that you have added the global ACI correctly, list the global ACIs.
$ dsconfig get-access-control-handler-prop \
 --port 4444 \
 --hostname opendj.example.com \
 --bindDN "cn=Directory Manager" \
 --bindPassword password \
 --property global-aci
The global ACI that allows the AM administrator account to modify schema definitions should appear in the list of global ACIs:
"(target="ldap:///cn=schema")(targetattr="attributeTypes||
 objectClasses") (version 3.0; acl "Modify schema"; allow
 (write) userdn="ldap:///uid=openam,ou=admins,dc=example,dc=com");"
Allow AM to read the directory schema. AM needs to read the directory schema to ensure that changes made to identities stored in identity repositories remain compliant with the directory schema.
For DS, no actions are required. Simply retain the default "User-Visible Schema Operational Attributes" global ACI.
Give the AM data store administrator appropriate access rights on the directory. When AM connects to an external identity repository, it binds as the AM data store administrator.
For deployments in which AM will read and write user entries, the AM data store administrator needs privileges to create, modify, delete, search, read, and perform persistent searches on user entries in the directory. For deployments in which AM only reads user entries, the AM data store administrator needs privileges to only read, search, and perform persistent searches on user entries in the directory.
To grant the AM data store administrator account privileges to read and write user entries in DS, create a file with the following LDIF:
dn: dc=example,dc=com
changetype: modify
add: aci
aci: (targetattr="* || aci")(version 3.0;acl "Allow identity modification";
 allow (write)(userdn = "ldap:///uid=openam,ou=admins,dc=example,dc=com");)
aci: (targetattr!="userPassword||authPassword")(version 3.0;
 acl "Allow identity search"; allow (search, read)
 (userdn = "ldap:///uid=openam,ou=admins,dc=example,dc=com");)
aci: (targetcontrol="2.16.840.1.113730.3.4.3")
 (version 3.0;acl "Allow persistent search"; allow (search, read)
 (userdn = "ldap:///uid=openam,ou=admins,dc=example,dc=com");)
aci: (version 3.0;acl "Add or delete identities"; allow (add, delete)
 (userdn = "ldap:///uid=openam,ou=admins,dc=example,dc=com");)
aci: (targetcontrol="1.3.6.1.4.1.42.2.27.8.5.1")(version 3.0;acl "Allow behera draft control"; allow (read)
 (userdn = "ldap:///uid=openam,ou=admins,dc=example,dc=com");)
To grant the AM data store administrator account privileges to read (but not write) user entries in DS, create a file with the following LDIF:
dn: dc=example,dc=com
changetype: modify
add: aci
aci: (targetattr!="userPassword||authPassword")(version 3.0;
 acl "Allow identity search"; allow (search, read)
 (userdn = "ldap:///uid=openam,ou=admins,dc=example,dc=com");)
aci: (targetcontrol="2.16.840.1.113730.3.4.3")
 (version 3.0;acl "Allow persistent search"; allow (search, read)
 (userdn = "ldap:///uid=openam,ou=admins,dc=example,dc=com");)
Then, run the ldapmodify command to implement the ACIs. The following example assumes that you are using DS 5 and later:
$ ldapmodify \
 --hostname opendj.example.com \
 --port 1389 \
 --bindDN "cn=Directory Manager" \
 --bindPassword password \
 add-acis-for-openam-ds-admin-access.ldif

 Processing MODIFY request for dc=example,dc=com
 MODIFY operation successful for DN dc=example,dc=com
Continue by configuring your external identity repository as an AM data store as described in "Configuring Data Stores That Access External Identity Repositories".
If the AM data store administrator does not have schema update privileges, you must configure the AM data store by using manual schema updates. To do this, update the directory server schema of the external identity repository manually before you configure a data store as part of initial AM configuration, before you configure a data store after initial AM configuration, and whenever you upgrade AM.
The following procedure shows you how to prepare an identity repository with manual schema updates. The procedure assumes that you have already deployed DS as a identity repository and populated it with user data. It therefore does not include steps to install DS, configure directory server backends, and implement replication. For external identity repositories other than DS, you must perform tasks that are analogous to the ones in the example procedure. Consult the documentation for your directory server software to determine the appropriate actions to take.
Create the AM data store administrator account.
This example uses uses
uid=openam,ou=admins,dc=example,dc=comas the AM data store administrator. It is assumed that thedc=example,dc=comsuffix already exists in the directory.First, create an LDIF file that defines the AM data store administrator account and gives the account the following privilege:
password-reset. Allows the account to reset other users' passwords. Required for the AM forgotten password feature. For deployments in which AM will not modify user entries, the AM data store administrator does not require this privilege.proxied-auth. Allows the account to perform operations as another account. Required for the AM forgotten password feature when theforce-change-on-resetpolicy is configured in DS. For more information on the LDAP Proxied Authorization property, see "Directory Services Configuration Properties" in the Setup and Maintenance Guide.
dn: ou=admins,dc=example,dc=com
objectClass: top
objectClass: organizationalunit
ou: AM Administrator

dn: uid=openam,ou=admins,dc=example,dc=com
objectClass: top
objectClass: person
objectClass: organizationalPerson
objectClass: inetOrgPerson
cn: AM Administrator
sn: AM
userPassword: changeMe
ds-privilege-name: password-reset
ds-privilege-name: proxied-auth
Then, run the ldapmodify command to create the user. The following example assumes that you are using DS 5 and later:
$ ldapmodify \
 --hostname opendj.example.com \
 --port 1389 \
 --bindDN "cn=Directory Manager" \
 --bindPassword password \
 openam-ds-admin-account.ldif

 Processing ADD request for ou=admins,dc=example,dc=com
 ADD operation successful for DN ou=admins,dc=example,dc=com
 Processing ADD request for uid=openam,ou=admins,dc=example,dc=com
 ADD operation successful for DN uid=openam,ou=admins,dc=example,dc=com
Using the directory administrator account, add the AM schema extensions to your external identity repository.
First, identify the path that contains LDIF file for AM schema extensions. The path is
/path/to/openam/WEB-INF/template/ldif/directory_type, wheredirectory_typeis one of the following:adfor Microsoft Active Directoryadamfor Microsoft Active Directory Lightweight Directory Servicesodseefor Oracle Directory Server Enterprise Editionopendjfor ForgeRock Directory Services and Oracle Unified Directorytivolifor IBM Tivoli Directory Server
Run the ldapmodify command to import the user, device print, and dashboard schema extensions. (For more information on the supported LDIF files, see "Supported LDIF Files".) For example, add schema extensions to DS by running the following ldapmodify commands. The following examples assume that you are using DS 5 and later:
$ cd /path/to/openam/WEB-INF/template/ldif/opendj

$ ldapmodify \
 --hostname opendj.example.com \
 --port 1389 \
 --bindDN "cn=Directory Manager" \
 --bindPassword password \
 opendj_user_schema.ldif

$ ldapmodify \
 --hostname opendj.example.com \
 --port 1389 \
 --bindDN "cn=Directory Manager" \
 --bindPassword password \
 opendj_deviceprint.ldif

$ ldapmodify \
 --hostname opendj.example.com \
 --port 1389 \
 --bindDN "cn=Directory Manager" \
 --bindPassword password \
 opendj_dashboard.ldif
Allow users to manage their own profiles, including changing their passwords:
Edit the
opendj_userinit.ldifLDIF file in the/path/to/openam/WEB-INF/template/ldif/opendjdirectory, replacing all variables that are surrounded by at (@) symbols with a value specific to your directory server.For example, in the
opendj_userinit.ldifLDIF file you must replace all instances of @userStoreRootSuffix@ with the root suffix you specified when configuring the external DS identity store.Tip
For information on downloading and deploying the AM .war file, see "Downloading and Deploying".
Use the ldapmodify command to add the updated LDIF data to the external instance. For example:
$ ./ldapmodify \
 --hostname opendj.example.com \
 --port 1389 \
 --bindDN "cn=Directory Manager" \
 --bindPassword password \
 opendj_userinit.ldif
For more information on this LDIF file, and equivalent files for supported directory servers, see "Supported LDIF Files".
Allow AM to read the directory schema. AM needs to read the directory schema to ensure that changes made to identities stored in identity repositories remain compliant with the directory schema.
For DS, no actions are required. Simply retain the default User-Visible Schema Operational Attributes global ACI.
Give the AM data store administrator appropriate access rights on the directory. When AM connects to an external identity repository, it binds as the AM data store administrator.
For deployments in which AM will read and write user entries, the AM data store administrator needs privileges to create, modify, delete, search, read, and perform persistent searches on user entries in the directory. For deployments in which AM only reads user entries, the AM data store administrator needs privileges to only read, search, and perform persistent searches on user entries in the directory.
To grant the AM data store administrator account privileges to read and write user entries in DS, create a file with the following LDIF:
dn: dc=example,dc=com
changetype: modify
add: aci
aci: (targetattr="* || aci")(version 3.0;acl "Allow identity modification";
 allow (write)(userdn = "ldap:///uid=openam,ou=admins,dc=example,dc=com");)
aci: (targetattr!="userPassword||authPassword")(version 3.0;
 acl "Allow identity search"; allow (search, read)
 (userdn = "ldap:///uid=openam,ou=admins,dc=example,dc=com");)
aci: (targetcontrol="2.16.840.1.113730.3.4.3")
 (version 3.0;acl "Allow persistent search"; allow (search, read)
 (userdn = "ldap:///uid=openam,ou=admins,dc=example,dc=com");)
aci: (version 3.0;acl "Add or delete identities"; allow (add, delete)
 (userdn = "ldap:///uid=openam,ou=admins,dc=example,dc=com");)
aci: (targetcontrol="1.3.6.1.4.1.42.2.27.8.5.1")(version 3.0;acl "Allow behera draft control"; allow (read)
 (userdn = "ldap:///uid=openam,ou=admins,dc=example,dc=com");)
To grant the AM data store administrator account privileges to read (but not write) user entries in DS, create a file with the following LDIF:
dn: dc=example,dc=com
changetype: modify
add: aci
aci: (targetattr!="userPassword||authPassword")(version 3.0;
 acl "Allow identity search"; allow (search, read)
 (userdn = "ldap:///uid=openam,ou=admins,dc=example,dc=com");)
aci: (targetcontrol="2.16.840.1.113730.3.4.3")(version 3.0;
 acl "Allow persistent search"; allow (search, read)
 (userdn = "ldap:///uid=openam,ou=admins,dc=example,dc=com");)
Run the ldapmodify command to implement the ACIs:
$ ldapmodify \
 --hostname opendj.example.com \
 --port 1389 \
 --bindDN "cn=Directory Manager" \
 --bindPassword password \
 add-acis-for-openam-ds-admin-access.ldif

 Processing MODIFY request for dc=example,dc=com
 MODIFY operation successful for DN dc=example,dc=com
Now that you have prepared your external identity repository, you can configure the directory as an AM data store by using one of the following methods:
By specifying your user directory in the User Data Store Settings dialog box when installing AM core services.
If you are using dynamic schema updates, the AM configurator loads required schema definitions into your user directory. If you are using manual schema updates, you already loaded the required schema definitions into your user directory.
For more information about running the AM configurator, see "Installing a Single Server".
By defining a data store after you have installed AM core services.
If you are using dynamic schema updates and you specify the Load Schema option before saving, AM loads required schema definitions into your user directory. If you are using manual schema updates, you will have already loaded the required schema definitions into your user directory.
For more information about defining AM data stores, see "Setting Up Identity Data Stores" in the Setup and Maintenance Guide.
After you have configured a data store to access an external identity repository, you must complete identity repository preparation by indexing several attributes.
Create equality indexes for the
iplanet-am-user-federation-info-keyandsun-fm-saml2-nameid-infokeyattributes. To create the indexes, run the dsconfig command twice. Bind to your user directory as the directory administrator.The dsconfig subcommand used to create the index depends on the version of DS.
Use the following commands with OpenDJ 2.6:
$ dsconfig \
 create-local-db-index \
 --port 4444 \
 --hostname opendj.example.com \
 --bindDN "cn=Directory Manager" \
 --bindPassword password \
 --backend-name userRoot \
 --index-name iplanet-am-user-federation-info-key \
 --set index-type:equality \
 --no-prompt

$ dsconfig \
 create-local-db-index \
 --port 4444 \
 --hostname opendj.example.com \
 --bindDN "cn=Directory Manager" \
 --bindPassword password \
 --backend-name userRoot \
 --index-name sun-fm-saml2-nameid-infokey \
 --set index-type:equality \
 --no-prompt
Use the following commands with OpenDJ 3 and later:
$ dsconfig \
 create-backend-index \
 --port 4444 \
 --hostname opendj.example.com \
 --bindDN "cn=Directory Manager" \
 --bindPassword password \
 --backend-name userRoot \
 --index-name iplanet-am-user-federation-info-key \
 --set index-type:equality \
 --no-prompt

$ dsconfig \
 create-backend-index \
 --port 4444 \
 --hostname opendj.example.com \
 --bindDN "cn=Directory Manager" \
 --bindPassword password \
 --backend-name userRoot \
 --index-name sun-fm-saml2-nameid-infokey \
 --set index-type:equality \
 --no-prompt
Prior to working actively with external identity repositories, you should verify that you have configured the repository and administrator privileges correctly. You can test configuration as follows:
Attempt to create an AM user by navigating to Realms > Realm Name > Identities in the AM console. Run this test only if you have given the AM data store administrator write privileges to your identity repository.
For example, create a
demouser. When you use the embedded identity repository to evaluate AM software, the setup process creates ademouser that is used in many examples in the AM documentation. This user does not exist by default in an external identity repository. When creating ademouser's account, set the fields as follows:Field Value ID demoFirst Name Leave this field blank. Last Name demoFull Name demoPassword changeitUser Status Active Attempt to access an AM user from Realms > Realm Name > Identities in the AM console.
If you receive an LDAP error code 65 while attempting to create a user, it indicates that you did not correctly prepare the external identity repository. Error code 65 is an LDAP object class violation and often indicates a problem with the directory schema. Common reasons for this error while attempting to create a user include the following:
If you configured the external data store after initial configuration, you might have simply forgotten to check the "Load Schema" option. In this case, select this option and resave the data store configuration.
The AM administrator account might not have adequate rights to update the directory schema. Review the DS
accesslog and locate the log records for the schema update operation to determine DS's access rights.
AM stores its configuration in an LDAP
directory server. AM ships with an embedded DS server
that you can install as part of the AM configuration process.
By default, AM installs the embedded directory server and its
configuration settings in the $HOME directory of the
user running AM and runs the embedded directory server in the same JVM
memory space as AM.
AM connects to the embedded DS server as directory superuser, bypassing access control evaluation because AM manages the directory as its private store. Be aware that you cannot configure directory failover and replication when using the embedded store.
When AM starts up, it requires the password of the
cn="Directory Manager" user to unlock the configuration
data store. This password is stored in AM's JCEKS keystore as the
configstorepwd password-protected string alias, and it
must be updated every time the cn="Directory Manager"
user's password changes. For more information about the
configstorepwd alias, see
"To Recreate the configstorepwd Password String Alias" in the Setup and Maintenance Guide.
By default, AM also stores data managed by the Core Token Service (CTS) pertaining to user logins—AM CTS-based sessions, logout blacklists, and several types of authentication tokens—in the same embedded DS server that holds the AM configuration. You can choose to create a separate directory store for CTS data. For information about creating a separate directory store for CTS data, see the chapter, "Implementing the Core Token Service".
Before deploying AM in production, measure the impact of using the embedded directory not only for relatively static configuration data, but also for volatile session and token data. Your tests should subject AM to the same load patterns you expect in production. If it looks like a better choice to use an external directory server, then deploy AM with an external configuration store.
Tip
If you are the directory administrator and do not yet know directory servers very well, take some time to read the documentation for your directory server, especially the sections covering directory schema and procedures on how to configure access to directory data.
The following example procedure shows how to prepare a single DS server as an external configuration data store. The DS instance implements a single backend for the AM configuration data. The procedure assumes that you have also prepared an external identity repository and an external CTS store, separate from the configuration data store.
Note
Example commands throughout this section use example values for user IDs and port numbers. When running similar commands, be sure to use appropriate values for your directory server.
When running the ldapmodify or dsconfig
commands, you might need to specify the --trustAll
argument to trust server certificates if your directory server uses
self-signed certificates and StartTLS or SSL.
Prepare your DS installation, then download the DS software. See the DS documentation about Installing OpenDJ Servers.
$ cd /path/to/opendj
$ ./setup --cli
Example options are as follows:
Parameter Example Inputs Accept LicenseYes Root User DNcn=Directory Manager Root User DN Password(arbitrary) Fully Qualified Domain Nameopendj.example.com LDAP Port1389 Administration Connector Port4444 Create Base DNNo. This will be created in a later step. Enable SSLIf you choose this option, make sure that AM can trust the DS certificate. Enable TLSIf you choose this option, make sure that AM can trust the DS certificate. Start Server After ConfigYes Change to the directory containing DS's binaries.
$ cd /path/to/opendj/bin
Create a directory server backend, and call it
cfgStore.The dsconfig command used to create the backend depends on the version of DS.
Use the following command with OpenDJ 2.6:
$ dsconfig create-backend \
 --backend-name cfgStore \
 --set base-dn:dc=example,dc=com \
 --set enabled:true \
 --type local-db \
 --port 4444 \
 --bindDN "cn=Directory Manager" \
 --bindPassword password \
 --no-prompt
Use the following command with OpenDJ 3.0 and later to create a backend:
$ dsconfig create-backend \
 --backend-name cfgStore \
 --set base-dn:dc=example,dc=com \
 --set enabled:true \
 --type je \
 --port 4444 \
 --bindDN "cn=Directory Manager" \
 --bindPassword password \
 --no-prompt
Create an LDIF file to add the initial entries for the configuration store, and save the file as
add-config-entries.ldif. The entries include the base DN suffix, an organizational unit entry, and the AM user entry needed to access the directory server.When AM connects as
uid=openam,ou=admins,dc=example,dc=comto an external directory server to store its data, it requires read, write, persistent search, and server-side sorting access privileges. You add these privileges by setting access control instructions (ACIs) on the base distinguished name (DN) entry (dc=example,dc=com). If your AM user has a DN other thanuid=openam,ou=admins,dc=example,dc=com, adjust the ACIs where appropriate.You must also give privileges to the AM user to modify the schema and write to subentries, such as the schema entry. To grant these privileges, you include the following attributes on the AM user entry:
ds-privilege-name: subentry-writeandds-privilege-name: update-schema.dn: dc=example,dc=com objectclass: top objectclass: domain dc: example aci: (targetattr="*")(version 3.0;acl "Allow CRUDQ operations"; allow (search, read, write, add, delete) (userdn = "ldap:///uid=openam,ou=admins,dc=example,dc=com");) aci: (targetcontrol="2.16.840.1.113730.3.4.3")(version 3.0; acl "Allow persistent search"; allow (search, read) (userdn = "ldap:///uid=openam,ou=admins,dc=example,dc=com");) aci: (targetcontrol="1.2.840.113556.1.4.473")(version 3.0; acl "Allow server-side sorting"; allow (read) (userdn = "ldap:///uid=openam,ou=admins,dc=example,dc=com");) dn: ou=admins,dc=example,dc=com objectclass: top objectclass: organizationalUnit ou: admins dn: uid=openam,ou=admins,dc=example,dc=com objectclass: top objectclass: person objectclass: organizationalPerson objectclass: inetOrgPerson cn: openam sn: openam uid: openam userPassword: secret12 ds-privilege-name: subentry-write ds-privilege-name: update-schemaAdd the initial entries LDIF file using the ldapmodify command. The following example assumes that you are using DS 5 and later:
If you are having trouble with the preceding LDIF file, consider removing the line feeds for the ACI attributes and let it wrap to the next line. If you are still having trouble using the ldapmodify command, you can use the import-ldif command, although you may have to re-apply the
targetcontrolACI attribute.$ bin/ldapmodify \ --port 1389 \ --bindDN "cn=Directory Manager" \ --bindPassword password \ add-config-entries.ldif
Add the Global Access Control Instruction (ACI) to the access control handler. The Global ACI gives AM the privileges to modify the schema definitions for the custom configuration where the AM entry has DN
uid=openam,ou=admins,dc=example,dc=com.Note
These access rights are only required during configuration, and only if the directory administrator does not add the AM directory schema definitions manually.
If you copy the text from the following example, make sure that the value of
global-aciis all on a single line.$ bin/dsconfig set-access-control-handler-prop \ --add global-aci:'(target = "ldap:///cn=schema")(targetattr = "attributeTypes || objectClasses")(version 3.0; acl "Modify schema"; allow (write) (userdn = "ldap:///uid=openam,ou=admins,dc=example,dc=com");)' --port 4444 \ --bindDN "cn=Directory Manager" \ --bindPassword password \ --no-prompt
(Optional) If the DS server was set up with the
--productionModeoption, grant the additional access that AM requires.When DS servers are set up with the
--productionModeoption, many settings are hardened for a more secure default installation. Compared to evaluation mode, production mode significantly restricts access for non-admin users. For details, see Directory Server Setup Parameters in the ForgeRock Directory Services Installation Guide.The following example grants the additional required ACIs:
$ ./dsconfig \
 set-access-control-handler-prop \
 --port 4444 \
 --bindDN "cn=Directory Manager" \
 --bindPassword password \
 --add 'global-aci: (extop="1.3.6.1.4.1.26027.1.6.1 || 1.3.6.1.4.1.26027.1.6.3 || 1.3.6.1.4.1.4203.1.11.1 || 1.3.6.1.4.1.1466.20037 || 1.3.6.1.4.1.4203.1.11.3")(version 3.0; acl "AM extended operation access"; allow(read) userdn="ldap:///uid=openam,ou=admins,dc=example,dc=com";)' \
 --add 'global-aci: (targetcontrol="2.16.840.1.113730.3.4.2 || 2.16.840.1.113730.3.4.17 || 2.16.840.1.113730.3.4.19 || 1.3.6.1.4.1.4203.1.10.2 || 1.3.6.1.4.1.42.2.27.8.5.1 || 2.16.840.1.113730.3.4.16 || 1.2.840.113556.1.4.1413 || 1.3.6.1.4.1.36733.2.1.5.1 || 1.3.6.1.1.12 || 1.3.6.1.1.13.1 || 1.3.6.1.1.13.2 || 1.2.840.113556.1.4.319 || 1.2.826.0.1.3344810.2.3 || 2.16.840.1.113730.3.4.18 || 2.16.840.1.113730.3.4.9 || 1.2.840.113556.1.4.473 || 1.3.6.1.4.1.42.2.27.9.5.9")(version 3.0; acl "AM extended operation access"; allow(read) userdn="ldap:///uid=openam,ou=admins,dc=example,dc=com";)' \
 --add 'global-aci: (targetattr="createTimestamp||creatorsName||modifiersName||modifyTimestamp||entryDN||entryUUID||subschemaSubentry||etag||governingStructureRule||structuralObjectClass||hasSubordinates||numSubordinates||isMemberOf")(version 3.0; acl "AM Operational Attributes"; allow (read,search,compare) userdn="ldap:///uid=openam,ou=admins,dc=example,dc=com";)' \
 --add 'global-aci: (targetcontrol="1.3.6.1.1.12 || 1.3.6.1.1.13.1")(version 3.0; acl "Allow assertion control";allow (read) userdn = "ldap:///uid=openam,ou=admins,dc=example,dc=com";)' \
 --trustAll \
 --no-prompt
At this point, deploy the AM server if you have not done so already. For additional details on deploying AM, see "Deploying".
AM requires additional schema definitions for attributes used to search for user and configuration data:
Attribute Index Type Description CTS attributes Specifies the CTS attributes required for CTS-based session high availability and persistence. Located in the WEB-INF/template/ldif/sfha/cts-add-schema.ldiffile.iplanet-am-user-federation-info-keyequality Specifies a configuration setting to store an account's federation information key, which is used internally. Located in WEB-INF/template/ldif/opendj/opendj_user_schema.ldiffile.sun-fm-saml2-nameid-infokeyequality Specifies an information key common to an IdP and SP to link accounts. Located in WEB-INF/template/ldif/opendj/opendj_user_schema.ldiffile.sunxmlkeyvalueequality, substring Stores configuration values that may be looked up through searches. Located in WEB-INF/template/ldif/opendj/opendj_config_schema.ldif.Add the required CTS schema definitions. You can find the CTS schema definitions at
/path/to/tomcat/webapps/openam/WEB-INF/template/ldif/sfha/cts-add-schema.ldif.$ cp /path/to/tomcat/webapps/openam/WEB-INF/template/ldif/sfha/cts-add-schema.ldif /tmp
Add the schema file to the directory server.
$ bin/ldapmodify \
 --port 1389 \
 --bindDN "cn=Directory Manager" \
 --bindPassword password \
 /tmp/cts-add-schema.ldif
Add the required user store schema definitions. You can find the schema definitions at
/path/to/tomcat/webapps/openam/WEB-INF/template/ldif/opendj/opendj_user_schema.ldif.$ cp /path/to/tomcat/webapps/openam/WEB-INF/template/ldif/opendj/opendj_user_schema.ldif /tmp
Add the schema file to the directory server.
$ bin/ldapmodify \
 --port 1389 \
 --bindDN "cn=Directory Manager" \
 --bindPassword password \
 /tmp/opendj_user_schema.ldif
Add the schema definitions to the configuration repository. You can find the schema definitions at
/path/to/tomcat/webapps/openam/WEB-INF/template/ldif/opendj/opendj_config_schema.ldif.$ cp /path/to/tomcat/webapps/openam/WEB-INF/template/ldif/opendj/opendj_config_schema.ldif /tmp
Add the schema file to the directory server.
$ bin/ldapmodify \
 --port 1389 \
 --bindDN "cn=Directory Manager" \
 --bindPassword password \
 /tmp/opendj_config_schema.ldif
AM uses the attributes in "Configuration Data Store Attributes" to search for configuration data. On the DS server, use the dsconfig command to add these indexes to your external configuration store. Repeat this step to index the
iplanet-am-user-federation-info-keyandsun-fm-saml2-nameid-infokeyattributes if you are deploying federation.The dsconfig subcommand used to create the index depends on the version of DS.
Use the following commands with OpenDJ 2.6.x:
$ dsconfig create-local-db-index \
 --port 4444 \
 --hostname opendj.example.com \
 --bindDN "cn=Directory Manager" \
 --bindPassword password \
 --backend-name cfgStore \
 --index-name sunxmlkeyvalue \
 --set index-type:equality \
 --set index-type:substring \
 --no-prompt

$ dsconfig create-local-db-index \
 --port 4444 \
 --hostname opendj.example.com \
 --bindDN "cn=Directory Manager" \
 --bindPassword password \
 --backend-name cfgStore \
 --index-name iplanet-am-user-federation-info-key \
 --set index-type:equality \
 --no-prompt

$ dsconfig create-local-db-index \
 --port 4444 \
 --hostname opendj.example.com \
 --bindDN "cn=Directory Manager" \
 --bindPassword password \
 --backend-name cfgStore \
 --index-name sun-fm-saml2-nameid-infokey \
 --set index-type:equality \
 --no-prompt
Use the following commands with OpenDJ 3 and later:
$ dsconfig create-backend-index \
 --port 4444 \
 --hostname opendj.example.com \
 --bindDN "cn=Directory Manager" \
 --bindPassword password \
 --backend-name cfgStore \
 --index-name sunxmlkeyvalue \
 --set index-type:equality \
 --set index-type:substring \
 --no-prompt

$ dsconfig create-backend-index \
 --port 4444 \
 --hostname opendj.example.com \
 --bindDN "cn=Directory Manager" \
 --bindPassword password \
 --backend-name cfgStore \
 --index-name iplanet-am-user-federation-info-key \
 --set index-type:equality \
 --no-prompt

$ dsconfig create-backend-index \
 --port 4444 \
 --hostname opendj.example.com \
 --bindDN "cn=Directory Manager" \
 --bindPassword password \
 --backend-name cfgStore \
 --index-name sun-fm-saml2-nameid-infokey \
 --set index-type:equality \
 --no-prompt
Rebuild the indexes using the
rebuild-indexcommand. You can stop the server and runrebuild-indexin offline mode by specifying the--offlineoption, or you can runrebuild-indexonline using a task as follows:$ bin/rebuild-index --port 4444 --hostname opendj.example.com \ --bindDN "cn=Directory Manager" --bindPassword password \ --baseDN dc=example,dc=com --rebuildAll \ --start 0
Verify the indexes. Note that if you are running OpenDJ 3 and later, you need to stop the server before running this command.
$ bin/verify-index --baseDN dc=example,dc=com
You have successfully installed and prepared the directory server for an external configuration store. When installing the AM server, you need to specify the host name, port and root suffix of the external directory server on the Configuration Data Store Settings screen of the AM Configurator. See "To Custom Configure an Instance" for more information.
AM supports heartbeat monitoring for the configuration data store to prevent idle connections. Idle connections may occur if the external data store is behind a load balancer or firewall. Once the connection is in an idle state, AM no longer receive notification of configuration changes and may become out-of-sync with other servers sharing the configuration store.
By default, AM issues a heartbeat every ten seconds to monitor for idle connections to the configuration data store.
Two JVM options can be used to override the default heartbeat interval or to disable it completely:
org.forgerock.openam.ldap.sm.heartbeat.interval. Sets the heartbeat interval. The default interval is 10 seconds. If you set the JVM property to 0, it will disable the heartbeat.
org.forgerock.openam.ldap.sm.heartbeat.unit. Sets the time unit of the heartbeat interval. Default is
SECONDS. Possible values also include:DAYS,HOURS,MICROSECONDS,MILLISECONDS,MINUTES,NANOSECONDS, andSECONDS.
Important
You must grant access permissions to all heartbeat requests to the configuration stores that go through firewalls or load balancers.
Set the heartbeat interval using the JVM startup property
org.forgerock.openam.ldap.sm.heartbeat.intervalin your container.For example, to set the heartbeat interval to 20 seconds, edit
%CATALINA_HOME%/bin/setenv.sh(Unix) or%CATALINA_HOME%\bin\setenv.bat(Windows) on Tomcat by adding the following line:set CATALINA_OPTS=-Dorg.forgerock.openam.ldap.sm.heartbeat.interval=20Make sure that the heartbeat requests have the permissions necessary for a firewall or load balancer.
Disable the heartbeat interval by setting the JVM startup property
org.forgerock.openam.ldap.sm.heartbeat.intervalto 0.For example, edit
%CATALINA_HOME%/bin/setenv.sh(Unix) or%CATALINA_HOME%\bin\setenv.bat(Windows) on Tomcat by adding the following line:set CATALINA_OPTS=-Dorg.forgerock.openam.ldap.sm.heartbeat.interval=0
By default, DS allows unauthenticated or anonymous connections to directory servers. For external configuration stores, this default is a security vulnerability.
In production deployments, you want to allow unauthenticated connections to the root entry only, so that LDAP clients can obtain server information for the DS server, while at the same time, denying anonymous connections to all directory server instances.
You can prevent anonymous access from LDAP clients to the DS server while allowing unauthenticated access to the root entry by configuring access control instructions (ACIs) and removing global ACIs from the directory server instances.
To allow unauthenticated access to the DS root entry, set the
global-aciusing the dsconfig command:$ ./dsconfig set-access-control-handler-prop --add 'global-aci:(target="ldap:///")(targetscope="base")(targetattr="objectClass||namingContexts||supportedAuthPasswordSchemes||supportedControl||supportedExtension||supportedFeatures||supportedLDAPVersion||supportedSASLMechanisms||vendorName||vendorVersion")(version 3.0; acl "User-Visible Root DSE Operational Attributes"; allow (read,search,compare) userdn="ldap:///anyone";)' --hostname server.example.com --port 4444 --bindDN "cn=Directory Manager" --bindPassword password --trustAll --no-prompt
Remove the default access to anonymous users using the dsconfig command:
On DS 3.x or later:
$ ./dsconfig set-access-control-handler-prop --remove 'global-aci:(targetattr!="userPassword||authPassword||debugsearchindex||changes||changeNumber||changeType||changeTime||targetDN||newRDN||newSuperior||deleteOldRDN")(version 3.0; acl "Anonymous read access"; allow (read,search,compare) userdn="ldap:///anyone";)' --hostname server.example.com --port 4444 --bindDN "cn=Directory Manager" --bindPassword password --trustAll --no-prompt
On OpenDJ 2.6.x:
$ ./dsconfig set-access-control-handler-prop --remove 'global-aci:(targetattr!="userPassword||authPassword||changes||changeNumber||changeType||changeTime||targetDN||newRDN||newSuperior||deleteOldRDN")(version 3.0; acl "Anonymous read access"; allow (read,search,compare) userdn="ldap:///anyone";)' --hostname server.example.com --port 4444 --bindDN "cn=Directory Manager" --bindPassword password --trustAll --no-prompt
If you have other custom ACIs that affect anonymous users, review them and update as necessary.
Repeat these steps for all appropriate DS instances.
For additional information, see How do I prevent anonymous access in DS/OpenDJ (All version) in the ForgeRock Knowledge Base.
This chapter covers installation and startup.
The chapter includes procedures for installing AM on a single server, installing AM on multiple servers, and installing AM's administrative tools. It also covers how to start AM, including overriding default startup options.
The following table contains a list of activities you might perform while installing and starting AM:
| Installation Action | Documentation Reference |
|---|---|
| Install quickly for evaluation using default settings |
Alternatively, follow the full example in Quick Start Guide. |
| Install AM server, choosing settings | "To Custom Configure an Instance" |
| Start an AM server | "Starting Servers" |
| Erase the configuration and start over | "To Delete a Configuration Before Redeploying" |
| Add an AM server to a site | "To Add a Server to a Site" |
| Implement the Core Token Service | "Implementing the Core Token Service" |
| Troubleshoot an AM installation | "To Troubleshoot an Installation" |
| Install ssoadm for CLI configuration | "Installing and Using the Tools" |
| Perform a command-line install | "Installing Silently" |
| Removing AM | "Removing Installations" |
This chapter does not cover installation for enforcing policies on resource servers. To manage access to resources on other servers, you can use IG or AM web and Java agents.
ForgeRock Identity Gateway is a high-performance reverse proxy server with specialized session management and credential replay functionality. It can function as a standards-based policy enforcement point.
AM web and Java agents provide policy enforcement on supported web servers and Java containers, and are tightly integrated with AM. See the ForgeRock Access Management Web Agents User Guide, or the ForgeRock Access Management Java Agents User Guide for instructions on installing AM web or Java agents in supported web servers and Java application containers.
This section covers tasks required to install a single AM server.
The default configuration option configures the embedded DS server using default ports. If the ports are already in use, AM uses free ports as both configuration store and identity store.
The default configuration sets the cookie domain based on the full URL that was used to access the configurator.
Configuration settings are saved to the home directory of the user
running the web application container in a directory named after the
deployment URI. In other words if AM is deployed under
/openam, then the configuration is saved under
$HOME/openam/.
In the initial configuration screen, click Create Default Configuration under Default Configuration.
Review the software license agreement. If you agree to the license, click "I accept the license agreement", and then click Continue.
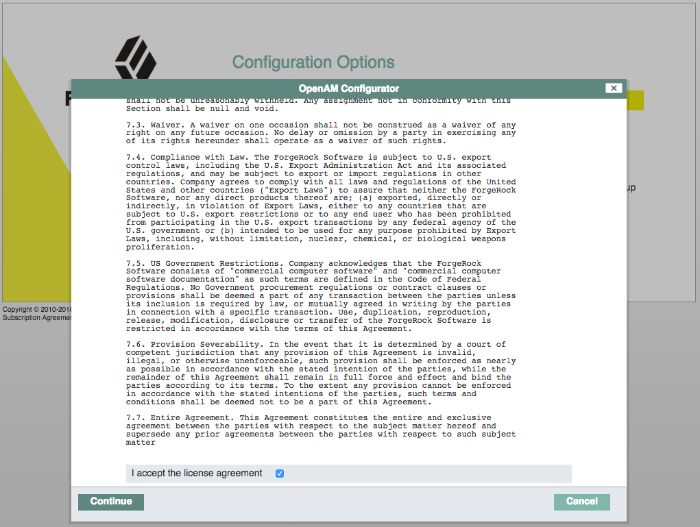
Provide the password for the default AM administrator,
amadmin.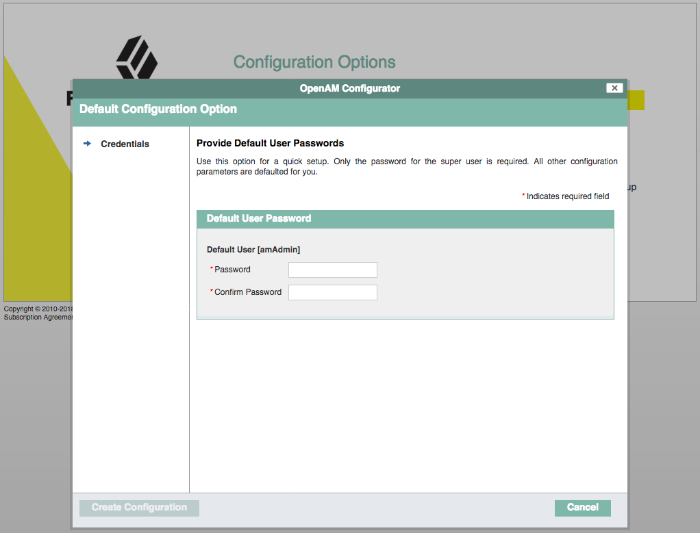
When the configuration completes, click Proceed to Login, and then login as the AM administrator,
amAdmin.
After successful login, AM redirects you to AM Realms.
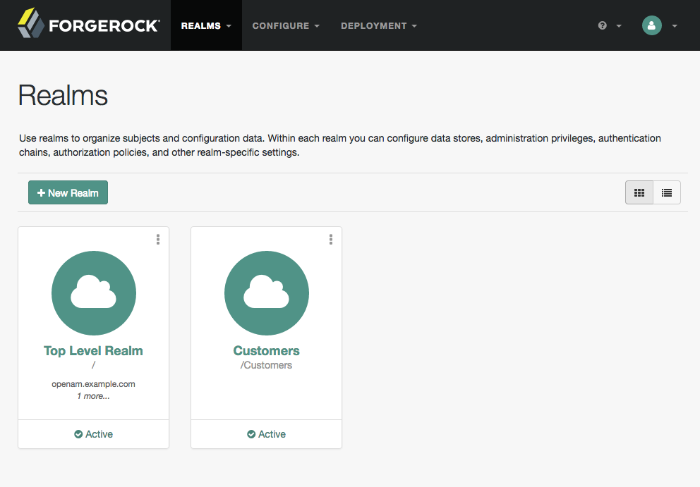


If you need to delete your configuration and start the process from the beginning, follow these steps.
Stop the AM web application to clear the configuration held in memory.
The following example shuts down Apache Tomcat (Tomcat) for example.
$ /path/to/tomcat/bin/shutdown.sh
Password:
Using CATALINA_BASE:   /path/to/tomcat
Using CATALINA_HOME:   /path/to/tomcat
Using CATALINA_TMPDIR: /path/to/tomcat/temp
Using JRE_HOME:        /path/to/jdk/jre
Using CLASSPATH:
       /path/to/tomcat/bin/bootstrap.jar:/path/to/tomcat/bin/tomcat-juli.jar
Delete AM configuration files, by default under the
$HOMEof the user running the web application container.$ rm -rf $HOME/openam $HOME/.openamcfg
When using the internal AM configuration store, this step deletes the embedded directory server and all of its contents. This is why you stop the application server before removing the configuration.
If you use an external configuration store, delete the entries under the configured AM suffix (by default dc=openam,dc=forgerock,dc=org).
Delete any cached files from the container. For example, on Tomcat, files are cached in a folder named after the deployment path, such as
/path/to/tomcat/work/Catalina/localhost/deployment
    path
. Use a command such as the following to delete these cached files:$ rm -rf /path/to/tomcat/work/Catalina/localhost/openam
Restart the AM web application.
The following example starts the Tomcat container.
$ /path/to/tomcat/bin/startup.sh
Password:
Using CATALINA_BASE:   /path/to/tomcat
Using CATALINA_HOME:   /path/to/tomcat
Using CATALINA_TMPDIR: /path/to/tomcat/temp
Using JRE_HOME:        /path/to/jdk/jre
Using CLASSPATH:
       /path/to/tomcat/bin/bootstrap.jar:/path/to/tomcat/bin/tomcat-juli.jar
In the initial configuration screen, click Create New Configuration under Custom Configuration.
Read the license agreement. If you agree to the license, click "I agree to the license agreement", and then click Continue.
On the Default User Password page, provide a password with at least eight characters for the AM Administrator,
amadmin.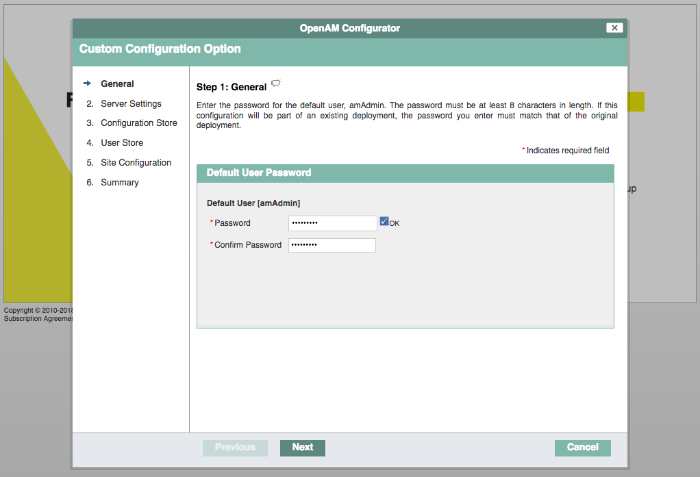
Verify that the server settings are valid for your configuration.
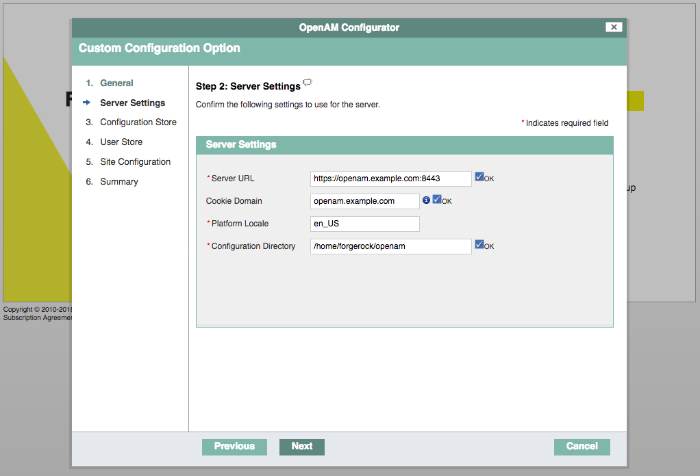
- Server URL
Provide a valid URL to the base of your AM web container, including a FQDN.
In a test environment, you can simulate the FQDN by adding it to your
/etc/hostsas an alias. The following excerpt shows lines from the/etc/hostsfile on a Linux system where AM is installed.127.0.0.1 localhost.localdomain localhost ::1 localhost6.localdomain6 localhost6 127.0.1.1 openam openam.example.com
- Cookie Domain
Domain that created cookies will be valid for, for example
example.com.- Platform Locale
Supported locales include en_US (English), de (German), es (Spanish), fr (French), ja (Japanese), ko (Korean), zh_CN (Simplified Chinese), and zh_TW (Traditional Chinese).
- Configuration Directory
Location on server for AM configuration files. AM must be able to write to this directory.
In the Configuration Store screen, you can accept the defaults to allow AM to store configuration data in an embedded directory. The embedded directory can be configured separately to replicate data for high availability if necessary.

You can also add this AM installation to an existing deployment, providing the URL of the site. See "To Add a Server to a Site" for details.
Alternatively, if you already manage an existing DS deployment, you can store AM configuration data in your existing directory service. You must, however, create the suffix to store configuration data on the directory server before you configure AM. AM does not create the suffix when you use an external configuration store. For instructions to create a configuration store backend, see Step 3 in "To Install an External OpenDJ Directory Server".
In the User Store screen, you configure where AM looks for user identities.
AM must have write access to the directory service you choose, as it adds to the directory schema needed to allow AM to manage access for users in the user store.
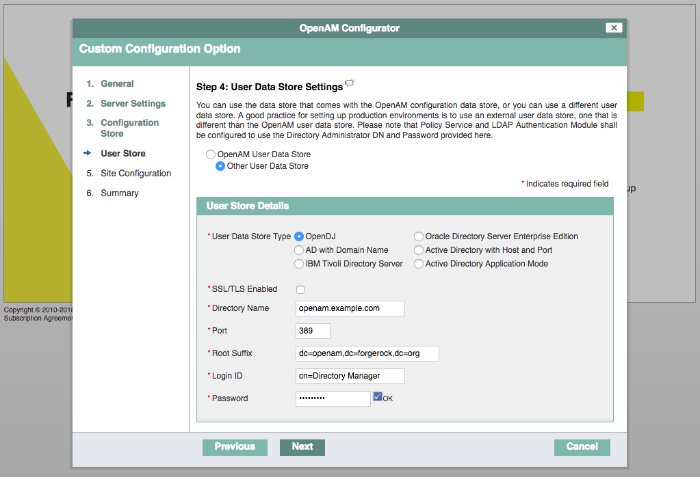
- User Data Store Type
If you have already provisioned a directory service with users in a supported user data store, then select that type of directory from the options available.
- SSL/TLS Enabled
To use a secure connection, check this box, then make sure the port you define corresponds to the port the directory server listens to for StartTLS or SSL connections. When using this option you also need to make sure the trust store used by the JVM running AM has the necessary certificates installed.
- Directory Name
FQDN for the host housing the directory service.
- Port
LDAP directory port. The default for LDAP and LDAP with StartTLS to protect the connection is port 389. The default for LDAP over SSL is port 636. Your directory service might use a different port.
- Root Suffix
Base distinguished name (DN) where user data is stored.
- Login ID
Directory administrator user DN. The administrator must be able to update the schema and user data.
- Password
Password for the directory administrator user.
In the Site Configuration screen, you can set up AM as part of a site where the load is balanced across multiple AM servers.
When you deploy multiple servers, AM automatically enables session high availability.[1] AM stores session data in a directory service that is shared by multiple AM servers. The shared storage means that if an AM server fails, other AM servers in the deployment have access to the user's session data and can serve requests about that user. As a result, the user does not have to log in again.

It is possible to set up a site after initial installation and configuration. See "Deployment Configuration" in the Reference for more information.
Check the summary screen, and if necessary, click Previous to return to earlier screens to fix any configuration errors as needed.
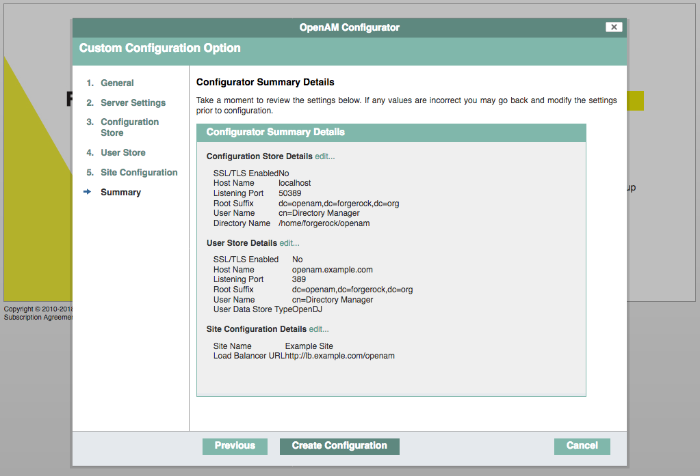
After you click Create Configuration in the summary screen, configuration proceeds, logging progress that you can read in your browser and later, in the installation log. The process ends, and AM shows the Proceed to Login prompt.
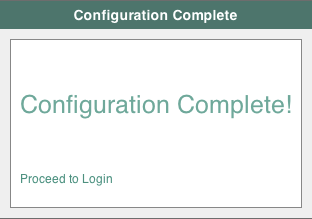
When the configuration completes, click Proceed to Login, and then login as the AM administrator,
amadmin.After login, AM redirects you to the AM Realms page.
You can also access the AM console by browsing to the console URL, for example
http://openam.example.com:8080/openam/console.Restrict permissions to the configuration directory (by default,
$HOME/openam, where $HOME corresponds to the user who runs the web container). Prevent other users from accessing files in the configuration directory.If you specified the Other User Data Store option in the User Data Store Settings screen, you must index several attributes in your external identity repository. See "To Index External Identity Repository Attributes" for more information.


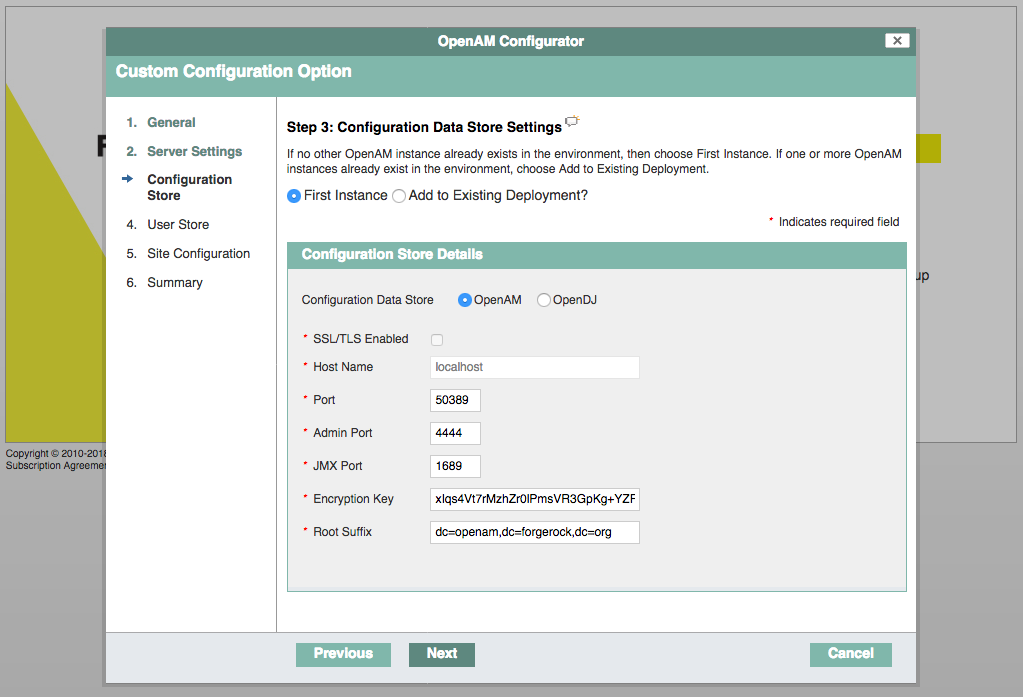

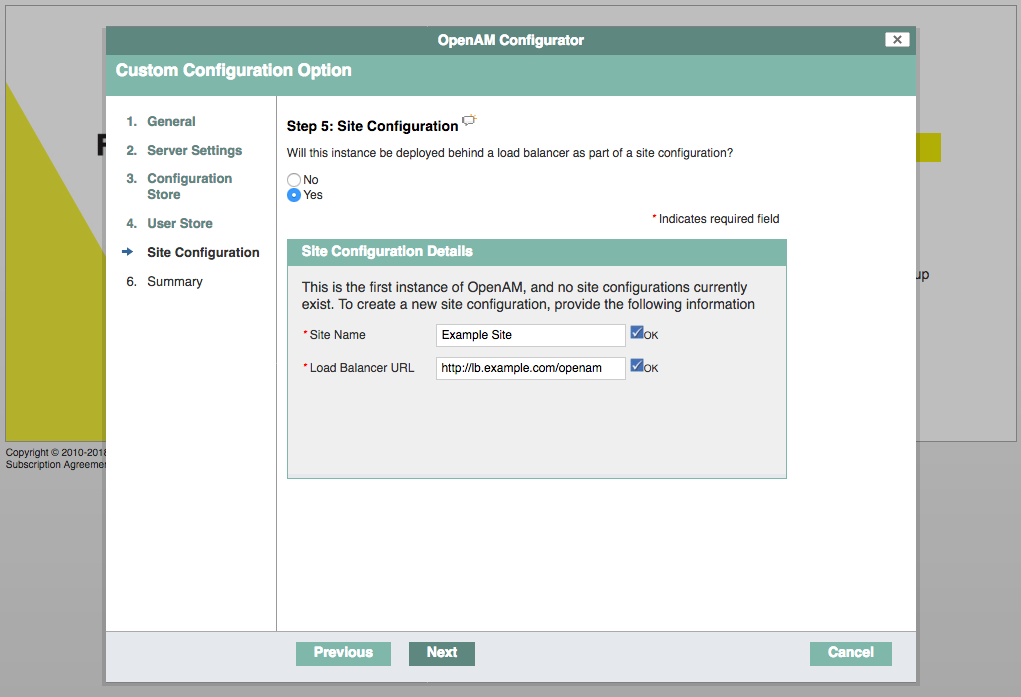
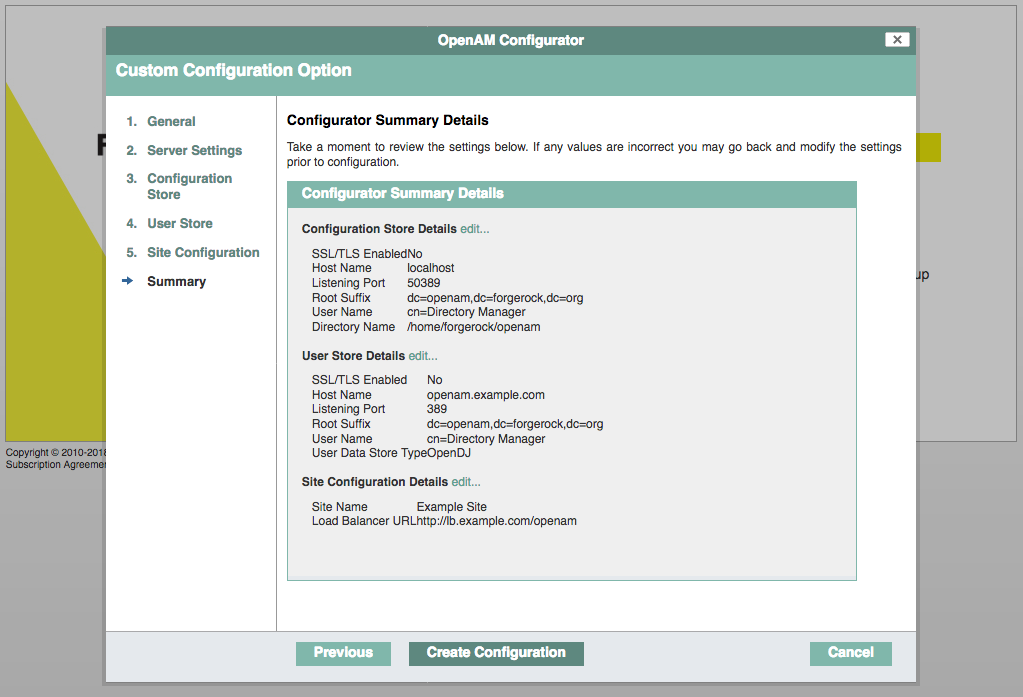

This chapter covers what to do when installing multiple AM servers.
When installing multiple servers, consider the following points:
You generally install multiple servers to provide service availability. If one server is down for any reason, another server can respond instead. This means that you need some type of component, such as a load balancer or a proxying server, between incoming traffic and AM to route around servers that are down.
AM uses a site for this purpose. In an AM site, multiple AM servers are configured in the same way, and accessed through a load balancer layer.[2] The load balancer can be implemented in hardware or software, but it is separate and independent from AM software. When installed properly, a site configuration improves service availability, as the load balancer routes around AM servers that are down, sending traffic to other servers in the site.
The cookie domain is set to the server's full URL that was used to access the configurator, such as
example.net,server.west.example.com, orhelloexample.local.You can use a load balancer layer to protect AM services as well. The load balancer can restrict access to AM services, throttle traffic, offload HTTPS encryption, and so forth.
As an alternative, or in addition, you can use a separate reverse proxy.
When you are protecting AM with a load balancer or proxy service, configure your container so that AM can trust the load balancer or proxy service.
AM authentication can depend on information about the user to authenticate, such as the IP address where the request originated. When AM is accessed through a load balancer or proxy layer, pass this information along using request headers. Also, configure AM to consume and to forward the headers as necessary. See "Handling HTTP Request Headers" for details.
The most expedient way to configure a server in a site is to set the site up during the initial AM configuration. In the GUI configurator, this is done in the Site Configuration screen.
High availability requires redundant servers in case of failure. With AM, you configure an AM site with multiple servers in a pool behind a load balancing service that exposes a single URL as an entry point to the site.
Follow these steps to configure a server to an existing site:
If the site is already using keystore keys in the configuration, such as for signing client-based session cookies, SAML v2.0 assertions, and others, copy the keystore from any of the servers of the site to the configuration directory of the new instance:
Create the configuration directory of the new instance, for example,
/path/to/openam/openam. This directory must be the same as the configuration directory used by other AM servers in the site.Log in to the AM console and navigate to Deployment > Servers > Server Name > Security > Key Store and find the following properties:
Keystore File
Keystore Password File
Private Key Password File
These properties configure the name and path of the keystore files you need to copy to the new instance. By default, they are located in the
/path/to/openam/openamdirectory.Copy the keystore files from one of the instances of the site to the
/path/to/openam/openamdirectory created for the new instance.
Navigate to the deployment URL of the new instance. You should see the AM configurator page.
In the initial configuration screen, under Custom Configuration, click Create New Configuration.
In the first screen, enter the same password entered for the AM Administrator,
amadmin, when you configured the first server in the site.Configure server settings as required.
The cookie domain should be identical to that of the first server in the site.
In the configuration store screen, select Add to Existing Deployment, and enter the URL of the first AM server in the site.
The directory used to store configuration data should use the same directory service used for this purpose by other AM servers in the site. If you use the embedded DS server, for example, you can set up the configurator for data replication with embedded directory servers used by other servers in the site.
Settings for the user store are then shared with the existing server, so the corresponding wizard screen is skipped.
In the site configuration screen, select
Yesand enter the same site configuration details as for the first server in the site.Settings for agent information are also shared with the existing server, so the corresponding wizard screen is skipped.
In the summary screen, verify the settings you chose, and then click Create Configuration.
When the configuration process finishes, click Proceed to Login, and then login as the AM administrator to access the AM console.
Ensure that the cookie domain configuration is appropriate for your site. For more information, see "Changing the Cookie Domain" in the Setup and Maintenance Guide.
It is also possible to configure a site separately. If you did not set up a site during initial configuration, perform the following steps to configure a site:
The following steps show how to set up the site for the first AM server.
Log in to the AM console as administrator, by default
amadmin, and then navigate to Deployment > Sites.Click Add a Site to start configuring the new site.
On the New Site page enter the site name, and set the Primary URL to the load balancer URL that is the entry point for the site, such as
https://lb.example.com/openam.The site URL is the URL to the load balancer in front of the AM servers in the site. For example, if your load balancer listens for HTTPS on host
lb.example.comand port443with AM under/openam, then your site URL ishttps://lb.example.com/openam.Client applications and web or Java agents access the servers in the site through the site URL.
Click Save to keep the site configuration.
Ensure that the cookie domain configuration is appropriate for your site. For more information, see "Changing the Cookie Domain" in the Setup and Maintenance Guide.
Navigate to Deployment > Servers > Server Name > General.
Set the Parent Site drop-down to the name of the site you just created, and save your changes.
At this point, the server is part of the new site you have configured.
For all additional servers in the AM site, add them to the site at configuration time as described in "To Add a Server to a Site".
Load balancer configuration requirements differ depending on where you configure AM to store sessions and authentication sessions, as shown in the following table:
| Storage Location | Load Balancing Requirement | Comments |
|---|---|---|
| CTS token store | None. Session stickiness recommended for performance |
Although the CTS token store is the authoritative source for CTS-based sessions and authentication sessions, AM servers cache the session or authentication session when:
An AM site configured to use CTS-based sessions achieves the best performance when the server that originally authenticated a user continually manages that user's session, since it does not need to retrieve it from the CTS token store. In the same way, an AM realm configured to use CTS-based authentication sessions achieves the best performance when the same server manages every request for the same authentication flow. |
| Client | None. Session stickiness recommended for performance |
Although the user's session or authentication session resides in a JWT stored on the client which is passed to AM server along with the request, client-based sessions should be signed and/or encrypted for security reasons. Because decrypting and verifying the session on each request may be an expensive operation depending on the algorithms configured, AM caches the decrypt sequence in memory to improve performance. Therefore, an AM site configured to use client-based sessions achieves best performance when the same server manages every request for the same session or authentication session. |
| In AM's memory [a] | Session stickiness required | Deployments where AM stores authentication sessions in memory require sticky load balancing to route all requests pertaining to a particular authentication flow to the same AM server. If a request reaches a different AM server, the authentication flow will start anew. |
[a] Authentication sessions only. | ||
For more information about AM session and authentication sessions, see "About Sessions" in the Authentication and Single Sign-On Guide.
Session storage location can be heterogeneous within the same AM deployment to suit the requirements of each of your realms. If your deployment uses a substantial number of CTS-based sessions, follow the recommendations for deployments configured for CTS-based sessions.
Configure AM for sticky load balancing as follows:
Navigate to Deployment > Sites.
Ensure you have a site created and that your servers are part of it. For more information, see "To Configure a Site With the First Server".
Ensure that the
amlbcookiecookie has a unique value for each AM server:Navigate to Deployment > Servers > Server Name > Advanced and review the value of the
com.iplanet.am.lbcookie.valueproperty. By default, the cookie value is set to the AM server ID.Keep the value of the
amlbcookiecookie set to the AM server ID to improve server performance when using:Web Agents 5.x
Web Agents 4.1.x with CDSSO mode enabled
If you have replaced the value of the this property and you need to match the AM server URLs with their corresponding server IDs, query the
global-config/serversendpoint. For example:$ curl \ --header 'Accept: application/json' \ --header "iPlanetDirectoryPro: AQIC5...NDU1*" \ --header "Accept-API-Version: resource=1.0, protocol=2.1" \ 'https://openam.example.com:8443/openam/json/global-config/servers?_queryFilter=true' { "result": [ { "_id": "01", "_rev": "-1541617246", "siteName": null, "url": "https://openam.example.com:8443/openam" } ], "resultCount": 1, "totalPagedResults": -1, "totalPagedResultsPolicy": "NONE" }In the example above, the server ID for server
https://openam.example.com:8443/openamis01.Changes take effect only after you restart the AM server.
Restart the AM server. You can then check the cookie value by logging in to the AM console, and examining the
amlbcookiecookie in your browser.
Repeat the previous steps for each of the AM servers that should be part of the site.
Configure your load balancer to perform sticky load balancing based on the
amlbcookievalue.In other words, the load balancer layer must keep track of which
amlbcookiecookie value corresponds to which AM server.When the load balancer receives a request, it inspects the value of the
amlbcookiecookie, and then forwards the request to the corresponding AM server.
When traffic to and from the load balancer is protected with HTTPS, the approach described in "To Configure Site Load Balancing" requires that you terminate the connection on the load balancer. You then either re-encrypt the traffic from the load balancer to AM, or make connections from the load balancer to AM over HTTP.
Sticky load balancing based on the value of the
amlbcookie cookie does not guarantee request forwarding
to the corresponding AM server in all cases. For example,
ForgeRock Common REST API calls do not typically use cookies. Therefore,
load balancers are not able to route these calls to the AM server
on which a user's session is cached.
The AM server that does not hold the user's session in cache must locate the user's session by retrieving it from the Core Token Service's token store.
HTTP requests can include information needed for access management, such as the client IP address used for adaptive risk-based authentication.
Configure your load balancer or proxy to
pass the information to AM by using request headers.
For example, the load balancer or proxy can send the client IP address
by using the X-Forwarded-For HTTP request header.
Also configure AM to consume and to forward the headers as necessary.
For example, to configure AM to look for the client IP address
in the X-Forwarded-For request header,
set the advanced configuration property
com.sun.identity.authentication.client.ipAddressHeader
to X-Forwarded-For under Deployment > Servers >
Server Name > Advanced.
In a site configuration where one AM server
can forward requests to another AM server,
you can retain the header by adding it to the advanced configuration property
openam.retained.http.request.headers.
If X-Forwarded-For is the only additional header to retain,
set openam.retained.http.request.headers to
X-DSAMEVersion,X-Forwarded-For, for example.
Configure these properties under Deployment > Servers > Server Name > Advanced.
If you are using Wildfly as the AM web container with multiple cookie
domains, you must set the advanced server property,
com.sun.identity.authentication.setCookieToAllDomains,
to false.
Set this property in the AM console under Configure > Server Defaults > Advanced.
The tools are found in .zip files where you unpacked
the archive of the entire package, such as
~/Downloads/openam.
The .zip files containing AM tools are:
SSOAdminTools-5.1.1.5.zipAdministration tools: ampassword, ssoadm, and amverifyarchive
SSOConfiguratorTools-5.1.1.5.zipConfiguration and upgrade tools, alternatives to using the GUI configuration wizard
See "Setting up Configuration Tools" and "Installing Silently".
The ssoadm administration tool requires access to AM configuration files, and therefore must be installed on the same host as AM core services.
Verify that AM is installed and running before proceeding.
Verify that the
JAVA_HOMEenvironment variable is set properly:$ echo $JAVA_HOME /path/to/jdk
Create a file system directory to unpack the tools:
$ mkdir -p /path/to/openam-tools/admin
Unpack the tools:
$ cd /path/to/openam-tools/admin
$ unzip ~/Downloads/openam/SSOAdminTools-5.1.1.5.zip
Add
--acceptLicenseto the java command at the end of the setup or setup.bat script if you want to auto-accept the license agreement and suppress the license acceptance screen to the user:$JAVA_HOME/bin/java -D"load.config=yes" \ -D"help.print=$help_print" \ -D"path.AMConfig=$path_AMConfig" \ -D"path.debug=$path_debug" \ -D"path.log=$path_log" \ -cp "$CLASSPATH" com.sun.identity.tools.bundles.Main \ --acceptLicense(Optional) If you use IBM Java, add
-D"amCryptoDescriptor.provider=IBMJCE"and-D"amKeyGenDescriptor.provider=IBMJCE"options to the setup or setup.bat script before you install the tools.The options should be set for the java command at the end of the script:
$ tail setup
CLASSPATH="$CLASSPATH:resources"

$JAVA_HOME/bin/java -D"load.config=yes" \
                    -D"help.print=$help_print" \
                    -D"path.AMConfig=$path_AMConfig" \
                    -D"path.debug=$path_debug" \
                    -D"path.log=$path_log" \
                    -D"amCryptoDescriptor.provider=IBMJCE" \
                    -D"amKeyGenDescriptor.provider=IBMJCE" \
                    -cp "$CLASSPATH" \
                    com.sun.identity.tools.bundles.Main
Run the setup utility (setup.bat on Windows), providing paths to the directories where AM configuration files are located, and where debug and log information will be located:
$ ./setup
Path to config files of OpenAM server [/home/user/openam]:
Debug Directory [/path/to/openam-tools/admin/debug]:
Log Directory [/path/to/openam-tools/admin/log]:
The scripts are properly setup under directory:
 /path/to/openam-tools/admin/openam
Debug directory is /path/to/openam-tools/admin/debug.
Log directory is /path/to/openam-tools/admin/log.
The version of this tools.zip is: version and date
The version of your server instance is: OpenAM version and date
After setup, the tools are located under a directory named after the instance of AM:
$ ls openam/bin/
ampassword  amverifyarchive  ssoadm
On Windows, these files are
.batscripts.(Optional) If your web container uses a self-signed certificate as described in "To Set Up With HTTPS and Self-Signed Certificates", then the ssoadm command will not trust the certificate when connecting to AM over HTTPS, or when AM connects to the configuration store over LDAPS.
To allow the ssoadm command to trust the certificate, add the
-D"javax.net.ssl.trustStore=/path/to/tomcat/conf/keystore.jks"option to the ssoadm or ssoadm.bat script before using the script.The option should be set before the call to
com.sun.identity.cli.CommandManagerat the end of the script:$ tail -2 /path/to/openam-tools/admin/openam/bin/ssoadm -D"javax.net.ssl.trustStore=/path/to/tomcat/conf/keystore.jks" \ com.sun.identity.cli.CommandManager "$@"Note
In non-production environments, you can configure the ssoadm command to trust all server certificates. For more information, see Q. How do I configure ssoadm to trust all certificates? in the ForgeRock Knowledge Base.
(Optional) If you use IBM Java, add
-D"amCryptoDescriptor.provider=IBMJCE"and-D"amKeyGenDescriptor.provider=IBMJCE"options to the ssoadm or ssoadm.bat script before using the script.The options should be set before the call to
com.sun.identity.cli.CommandManagerat the end of the script:$ tail -3 /path/to/openam-tools/admin/openam/bin/ssoadm -D"amCryptoDescriptor.provider=IBMJCE" \ -D"amKeyGenDescriptor.provider=IBMJCE" \ com.sun.identity.cli.CommandManager "$@"Check that the ssoadm command works properly:
Create a text file, for example
$HOME/.pwd.txt, containing the AM administrative user's password string in cleartext on a single line.Make the text file read-only:
$ chmod 400 $HOME/.pwd.txt
Run the ssoadm command to list the configured servers:
$ cd /path/to/openam-tools/admin/openam/bin/
$ ./ssoadm list-servers -u amadmin -f $HOME/.pwd.txt
http://openam.example.com:8080/openam
If you have deployed AM in a site configuration, edit the ssoadm (ssoadm.bat on Windows) script to map the site URL to the AM server URL.
To do this, set the
com.iplanet.am.naming.map.site.to.serversystem property as a java command option in the script. The option takes the following form:-D"com.iplanet.am.naming.map.site.to.server=lb-url=openam-url[, other-lb-url=openam-url ...]"
The property maps each lb-url key to an openam-url value, where lb-url is the URL to a site load balancer, and openam-url is the URL to the AM server against which you set up the ssoadm command.
Important
The ssoadm command is dependent on the AM server against which you set it up, so always map site load balancer URLs to that server's openam-url.
For example, if your site is behind
https://lb.example.com:443/openam, and the AM server against which you set up the ssoadm command is athttp://openam.example.com:8080/openam, then add the following property to the java command (all on one line without spaces):-D"com.iplanet.am.naming.map.site.to.server= https://lb.example.com:443/openam=http://openam.example.com:8080/openam"
Repeat this step for each AM server in your site configuration. You can install all your instances of ssoadm on the same host, but in each case the command should manage only one AM server.
This section covers setting up the configuration and upgrade tools, which are alternatives to using the GUI configuration wizard.
Verify that the
JAVA_HOMEenvironment variable is properly set:$ echo $JAVA_HOME /path/to/jdk
Create a file system directory to unpack the tools:
$ mkdir -p /path/to/openam-tools/config
Unpack the tools from where you unzipped AM:
$ cd /path/to/openam-tools/config
$ unzip ~/Downloads/openam/SSOConfiguratorTools-5.1.1.5.zip
Archive:  ~/Downloads/openam/SSOConfiguratorTools-5.1.1.5.zip
   creating: legal-notices/
  inflating: legal-notices/LICENSE.DOM-software.html
  inflating: legal-notices/NOTICE.resolver.txt
  inflating: legal-notices/LICENSE.DOM-documentation.html
        ... (more output) ...
 extracting: lib/xml-apis-2.11.0.jar
 extracting: openam-configurator-tool-14.1.1.5.jar
 extracting: lib/servlet-api-2.5.jar
Use the AM configurator tool, openam-configurator-tool-14.1.1.5.jar, to
silently install AM. The AM server must be deployed and running, but
not yet configured, when you use the tool.
Perform the following steps:
Verify that the
JAVA_HOMEenvironment variable is properly set:$ echo $JAVA_HOME /path/to/jdk
The configurator tool relies on a property file to specify the configuration for the AM server. For property file options, see configurator.jar(1).
Copy the sample configuration property file provided with AM, and then modify properties as needed:
$ cd /path/to/openam-tools/config
$ cp sampleconfiguration config.properties
$ grep -v "^#" config.properties | grep -v "^$"
SERVER_URL=http://openam.example.com:8080
DEPLOYMENT_URI=/openam
BASE_DIR=/home/openam/openam
locale=en_US
PLATFORM_LOCALE=en_US
AM_ENC_KEY=
ADMIN_PWD=password
COOKIE_DOMAIN=openam.example.com
ACCEPT_LICENSES=true
DATA_STORE=embedded
DIRECTORY_SSL=SIMPLE
DIRECTORY_SERVER=openam.example.com
DIRECTORY_PORT=50389
DIRECTORY_ADMIN_PORT=4444
DIRECTORY_JMX_PORT=1689
ROOT_SUFFIX=dc=openam,dc=forgerock,dc=org
DS_DIRMGRDN=cn=Directory Manager
DS_DIRMGRPASSWD=password
When setting options in the property file, note the following:
If you include the
ACCEPT_LICENSES=trueproperty, AM auto-accepts the software licensing agreement and suppresses display of the license acceptance screen during silent installation.When installing AM to support HTTPS, make sure the
SERVER_URLproperty specifies a URL with HTTPS, and set theDIRECTORY_SSLproperty toSIMPLE.
Run the AM configurator tool,
openam-configurator-tool-14.1.1.5.jar:java -jar openam-configurator-tool-14.1.1.5.jar --file config.properties
If required, you can specify additional run-time options on the command line:
With the
--acceptLicenseoption, the installer auto-accepts the software licensing agreement and suppresses the display of the license acceptance screen, resulting in the same behavior as specifyingACCEPT_LICENSES=truein the configuration property file.The
-Djavax.net.ssl.trustStore=PATH_TO_JKS_TRUSTSTOREoption is required when installing AM to support HTTPS. Specify the AM web container's trust store forPATH_TO_JKS_TRUSTSTORE.
Output similar to the following appears:
$ java -jar openam-configurator-tool-14.1.1.5.jar --file config.properties
Checking license acceptance...License terms accepted.
Checking configuration directory /home/openam/openam....Success.
Installing OpenAM configuration store...Success RSA/ECB/OAEPWithSHA1AndMGF1...
Extracting OpenDJ, please wait...Complete
Running OpenDJ setupSetup command: --cli --adminConnectorPort 4444
 --baseDN dc=openam,dc=forgerock,dc=org --rootUserDN cn=Directory Manager
 --ldapPort 50389 --skipPortCheck --rootUserPassword xxxxxxx --jmxPort 1689
 --no-prompt --doNotStart --hostname openam.example.com ...
...Success
Installing OpenAM configuration store in /home/openam/openam/... ...Success.
Creating OpenAM suffixImport+task+ ... ...Success
Tag swapping schema files....Success.
Loading Schema opendj_config_schema.ldif...Success.

...

...Success.
Reinitializing system properties....Done
Registering service dashboardService.xml...Success.

...

Configuring system....Done
Configuring server instance....Done
Creating demo user....Done
Creating Web Service Security Agents....Done
Setting up monitoring authentication file.
Configuration complete!
AM is a web application installed in a web container, such as Apache Tomcat. Starting the web container starts the AM application.
At the beginning of its startup process, AM performs an operation called bootstrapping, during which AM obtains startup settings from a bootstrap file in its configuration directory, then uses those settings to initiate its operation. AM creates the bootstrap file during installation, based on values you provide when you run the AM configurator.
After every successful startup, AM rewrites the bootstrap file with its initial contents.
Users who deploy AM with DevOps tooling—for example, Docker and Kubernetes—might want to launch multiple AM servers from a single image, providing startup settings dynamically when AM starts up instead of reading the settings from the bootstrap file created during AM installation.
You can replace the bootstrap file and provide your own static and dynamic startup settings. The following sections describe how to override the bootstrap file created during AM installation:
"Replacing the Bootstrap File" covers how to specify a custom bootstrap file, and describes all the startup settings in the bootstrap file.
"Overriding Startup Settings by Using Environment Variables" covers how to dynamically override startup settings in the bootstrap file with environment variables.
"Overriding Startup Settings by Using Java Properties" covers how to dynamically override startup settings in the bootstrap file with Java properties.
AM's bootstrap file is located at the path
/path/to/openam/boot.json, where
/path/to/openam is the AM configuration directory.
The AM configuration directory is specified during during AM
installation, as follows:
In the Configuration Directory field on the Server Settings page when using GUI installation. See "To Custom Configure an Instance" for details.
In the
BASE_DIRproperty in the installation configuration file when using command-line installation. See configurator.jar(1) for more information.
To override AM's startup configuration, modify the bootstrap file,
boot.json, and then overwrite the existing
bootstrap file with your modified file prior to every AM
restart. You must overwrite the file each time you start AM
because after startup, AM overwrites the bootstrap file with the initial
startup settings created during AM installation, removing any
modifications you might have made to startup settings in the bootstrap file.
Make changes to supporting files and passwords before changing bootstrap
file properties—AM will fail to start up when bootstrap file
properties do not correspond to actual configuration. For example, if you
change the value of the keyStorePasswordFile property to
a file that does not exist, AM will not be able to start up.
The following is an example AM bootstrap file:
{
  "instance" : "http://openam.example.com:8080/openam",
  "dsameUser" : "cn=dsameuser,ou=DSAME Users,dc=openam,dc=forgerock,dc=org",
  "keystores" : {
    "default" : {
      "keyStorePasswordFile" : "/home/openam/openam/.storepass",
      "keyPasswordFile" : "/home/openam/openam/.keypass",
      "keyStoreType" : "JCEKS",
      "keyStoreFile" : "/home/openam/openam/keystore.jceks"
    }
  },
  "configStoreList" : [ {
    "baseDN" : "dc=openam,dc=forgerock,dc=org",
    "dirManagerDN" : "cn=Directory Manager",
    "ldapHost" : "opendj.example.com",
    "ldapPort" : 1389,
    "ldapProtocol" : "ldap"
  } ]
}
The AM bootstrap file has the following properties:
| Property | Description and Derivation |
|---|---|
instance |
AM server URL.
Defaults to the Server URL field on the Server Settings page (GUI
configurator) or the This property's value is the URL for directly accessing an AM server instance, not an AM site using a load balancer URL. Do not modify this bootstrap file property. If you need to change the AM server URL, reinstall AM. |
dsameUser |
Special AM user.
The first part of the user's DN is always created initially as
|
keystores.default
| The AM keystore. Currently, no other keystores are referenced in the bootstrap file. |
keystores.default.keyStorePasswordFile |
Path to the file that contains the password required to open the AM
keystore. Always created initially as
When creating a new |
keystores.default.keyPasswordFile |
Path to the file that contains the password used to encrypt individual
keystore entries. Always created initially as
When creating a new |
keystores.default.keyStoreType |
AM key store type. Currently, the only valid value is
JCEKS.
|
keystores.default.keyStoreFile |
Path to the AM keystore. Always created initially as
The AM keystore is required for startup because it contains the password of the directory manager user of the AM configuration store. |
configStoreList[*] |
Array of one or more objects that describe AM configuration stores. The initial object in the array is mandatory and defines the primary configuration store. Additional objects are optional and define failover configuration stores. |
configStoreList[*].baseDN |
Root suffix of the AM configuration store.
Defaults to the Root Suffix field on the Configuration Data Store
Settings page (GUI configurator) or the |
configStoreList[*].dirManagerDN |
DN of the configuration store directory manager user.
Defaults to |
configStoreList[*].ldapHost |
Fully-qualified domain name (FQDN) of the configuration store's host.
Defaults to the Host Name field on the Configuration Data Store
Settings page (GUI configurator) or the
|
configStoreList[*].ldapPort |
LDAP or LDAPS port number on which to access the configuration store.
Defaults to the Port field on the Configuration Data Store Settings
page (GUI configurator) or the |
configStoreList[*].ldapProtocol |
Protocol with which to access the directory service running the
configuration store. The value can be
Defaults to the SSL/TLS Enabled field on the Configuration Data Store
Settings page (GUI configurator) or the
|
You can dynamically override startup settings in the bootstrap file by defining environment variables in the shell that starts AM and referencing the variables in a modified version of the bootstrap file.
Specify JSON properties that reference environment variables in a modified
bootstrap file that uses the notation
${env.MY_ENVIRONMENT_VARIABLE}.
For example, you could dynamically change the AM instance URL as follows:
Set an environment variable named
MY_INSTANCEin the shell that starts AM.Create a modified version of the bootstrap file with the following line:
"instance" : "${env.MY_INSTANCE}",Overwrite the initial bootstrap file with the modified bootstrap file.
Start AM.
You can dynamically override startup settings in the bootstrap file by
referencing Java system properties in a modified version of the bootstrap
file. You can reference both built-in Java system properties and properties
specified with the -D option in the web container that
runs AM.
Specify JSON properties that reference Java properties in a modified
bootstrap file that uses the notation
${MY_JAVA_PROPERTY}.
For example, you could dynamically change the AM keystore's path to the user's home directory as follows:
Create a modified version of the bootstrap file, specifying the default AM keystore as follows:
"keystores" : {
    "default" : {
      "keyStorePasswordFile" : "${user.home}/.storepass",
      "keyPasswordFile" : "${user.home}/.keypass",
      "keyStoreType" : "JCEKS",
      "keyStoreFile" : "${user.home}/keystore.jceks"
    }
  },
Overwrite the initial bootstrap file with the modified bootstrap file.
Start AM.
[1] You can configure AM to store sessions in the Core Token Service (CTS) token store or on the client. Because client-based sessions reside in HTTP cookies, they do not need to be retrieved from a persistent data store in the event of a server failure—they can be retrieved from the cookies. AM does not store client-based sessions in the CTS token store. For more information about sessions, see "About Sessions" in the Authentication and Single Sign-On Guide.
[2] Technically, it is possible to configure a site with only one AM server.
AM's Core Token Service (CTS) provides generalized, persistent, and highly available storage for sessions and tokens used by AM. AM uses CTS as the authoritative source for CTS-based sessions and caches these sessions in its memory heap to improve performance.[3]
CTS supports session high availability, which lets AM manage a session as long as one of the AM servers in a clustered deployment is available. After a user has successfully authenticated, AM creates a CTS-based session. Any AM instance that is configured to use the same CTS can retrieve the session and allow access to it. The user does not need to log in again unless the entire deployment goes down.[4]
CTS provides storage for the following:
| • AM CTS-based sessions and authentications sessions |
| • OAuth 2.0 |
| • UMA 2.0 |
| • Session blacklist (if enabled for client-based sessions) |
| • Authentication session whitelist (if enabled for client-based sessions) |
| • SAML v2.0 (if enabled for Security Token Service token validation and cancellation) |
| • OAuth 2.0 stateless sessions and session blacklist |
| • Push notification during authentication |
| • Cluster-wide notification |
You can deploy CTS token stores in a number of deployment architectures depending on your system requirements. In particular, four types of deployment exist for CTS:
By default, AM writes CTS entries in the AM configuration store: either an embedded or external configuration store. If you configured AM to use an embedded configuration store, limit your use of this default deployment to very small-scale, single-server test deployments—in multi-server deployments with load balancing, the active-active topology used by multiple embedded configuration stores can lead to write collisions.
Important
Do not use this deployment in production environments.
An active-passive CTS deployment consists of an active DS instance that receives all requests from the AM servers, and one or more passive DS instances on standby. If the active instance becomes unreachable, one of the passive instances takes over and continues to process transactions. Active-passive clusters provide flexible deployment options with AM and are best suited for small to medium-sized deployments.
The following example shows an active-passive DS cluster configured as CTS token stores. The active DS instances use multimaster replication across the CTS cluster to ensure data is up-to-date.
Prioritize the connections to the primary directory server instance on the AM console and designate additional DS instances for failover using the Connection String(s) property in the CTS configuration. This property allows you to configure multiple DS servers for your CTS token stores without a load balancer.
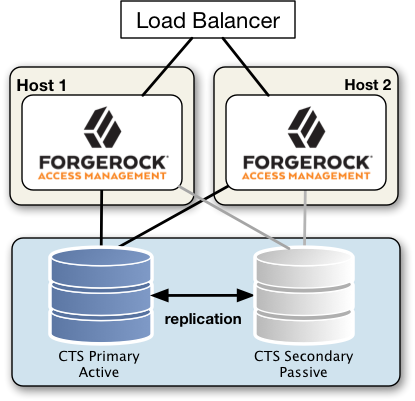
Important
Do not deploy CTS token stores behind a load balancer using a random or round-robin algorithm.
When AM writes to a directory server in the external CTS store, directory server replication pushes the write to other directory servers in the same replication group. Under load, operations in an AM server can happen more quickly than the network can push replication updates. Therefore, balancing the LDAP traffic from AM to the CTS store using a random or round-robin algorithm leads to errors where a read operation arrives at a replica before the expected write operation can cross the network.
If you need to deploy CTS behind a load balancer, make sure that it is configured for session stickiness.
For more information on the Connection String(s) property, see "External Store Configuration" in the Reference.
In an affinity deployment, AM balances LDAP requests across one or more directory servers. AM always routes LDAP requests for a specific CTS token to the same directory server. This prevents attempts to read a token that has been written to another directory server, but not replicated yet. Affinity deployments are well suited for deployments with many AM servers.
Use AM's Connection String(s) property on the AM console to configure server affinity without a load balancer. For more information on the Connection String(s) property, see "External Store Configuration" in the Reference.
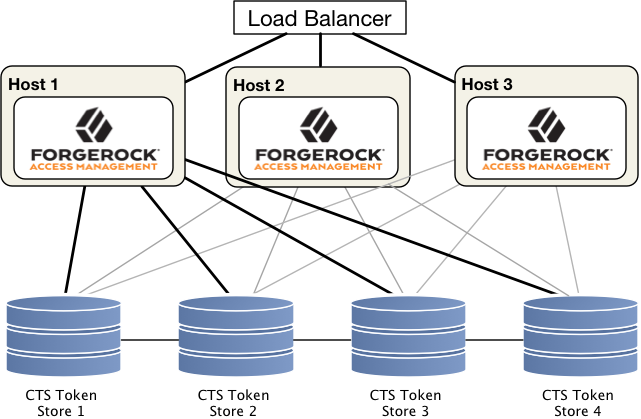
For more information on CTS affinity deployments, see Best practice for using Core Token Service (CTS) Affinity based load balancing in AM (All versions) and OpenAM 13.5.1 in the ForgeRock Knowledge Base.
CTS supports uninterrupted session availability in deployments with multiple sites if all sites use the same global underlying CTS store replicated across all sites. If an entire site fails or becomes unavailable, AM servers in another site can detect the failure of the site's load balancer and attempt to use sessions from the global Core Token Service.
In the event of a failure, client applications can connect to an AM server in an active data center as shown in "Core Token Service For Global Session Failover":
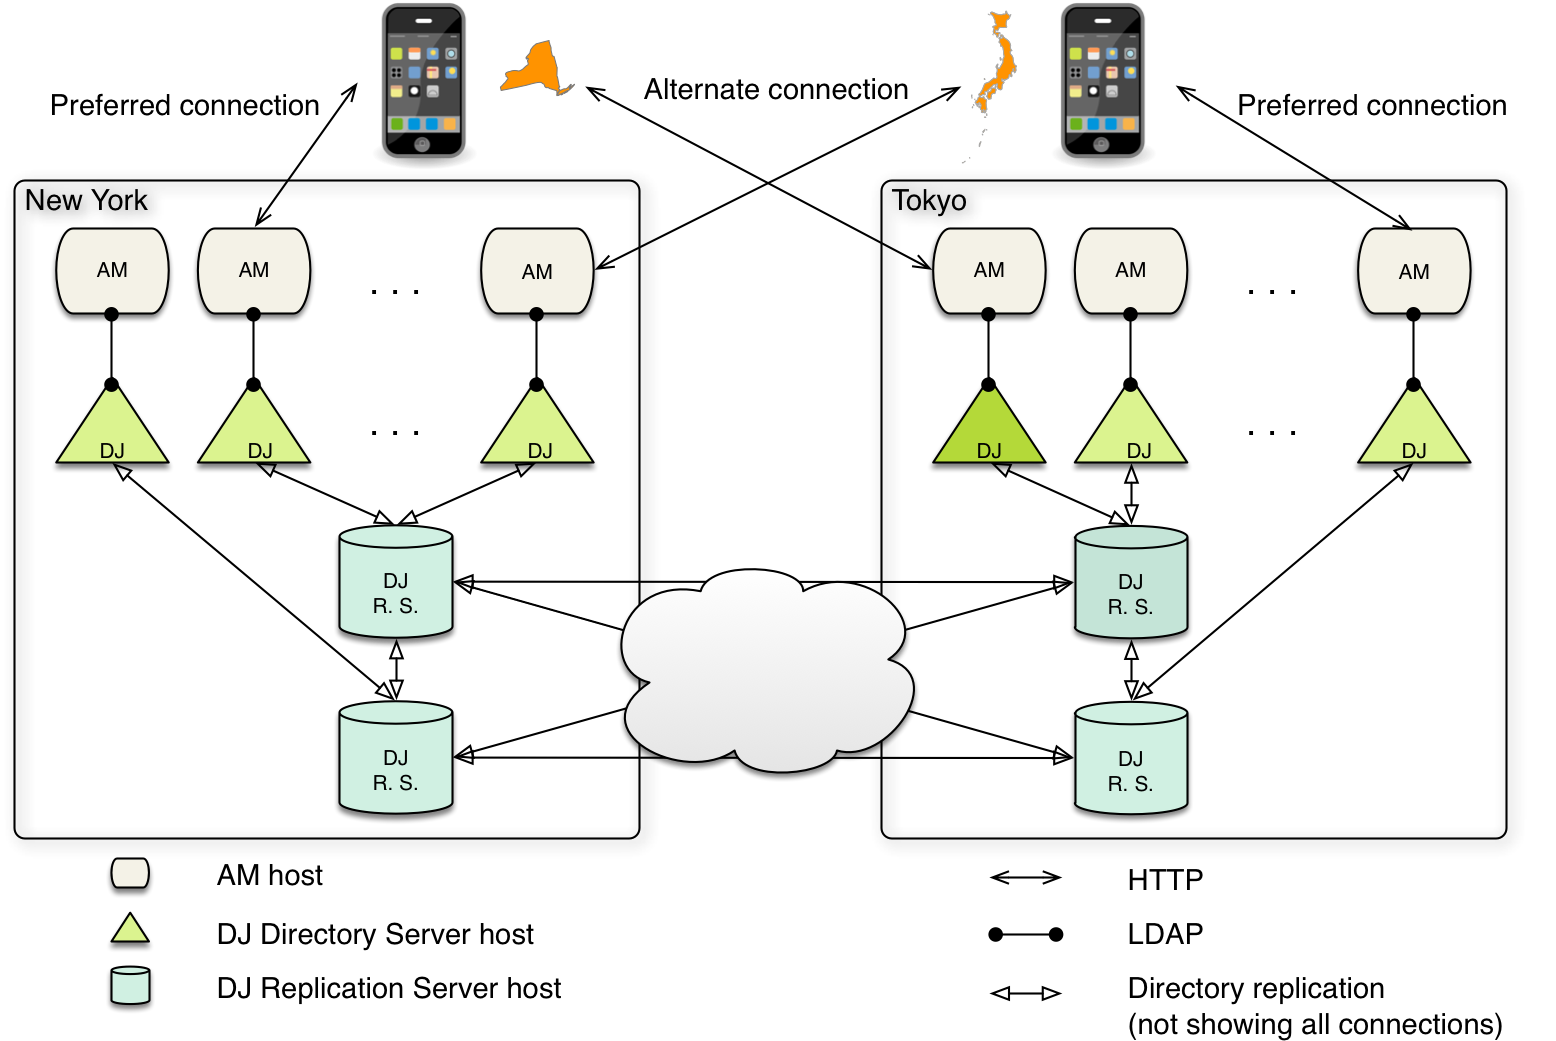
For more information on CTS for global session high availability with DS server, see the DS documentation on Managing Data Replication.
CTS helps your deployment avoid single points of failure (SPOF). To reduce the impact of any given failure, consider the following recommendations:
Configure External CTS Stores for High Volumes. If you require a higher-level performance threshold, you may want to move the CTS token storage to one or more dedicated systems, as CTS generally causes much more replication traffic than less volatile configuration data. The CTS token store is the primary source for session tokens and will experience both high read and write activity depending on session usage. Dedicated external CTS stores provide an extra level of control over the amount of global replication that is occurring.
Isolate the Different Stores. CTS entries are large, around 5KB, but are short-lived, whereas configuration data is static and long-lived. User entries are more dynamic than configuration data but much less volatile than CTS data. Therefore, isolating the user, configuration, and CTS data from AM into separate stores allow for different tuning and storage settings per token store type.
Properly Tune Your DS Servers. To improve performance, ensure that you have properly-sized directory servers for your external CTS stores. In addition, you can enable token compression as discussed in "Managing CTS Tokens". When enabled, token compression reduces load requirements on the network connection between token stores in exchange for processing time-compressing tokens.
Consider Dedicated Replication Servers. Once configured, the DS server replicates CTS data transmitted from AM servers to connected DS servers. The amount of replication traffic can be significant, especially if replication proceeds over a WAN. You can limit this replication traffic by separating DS instances into directory and replication servers as seen in "Core Token Service For Global Session Failover". For more information on how this is done with DS, see the DS documentation on Standalone Replication Servers.
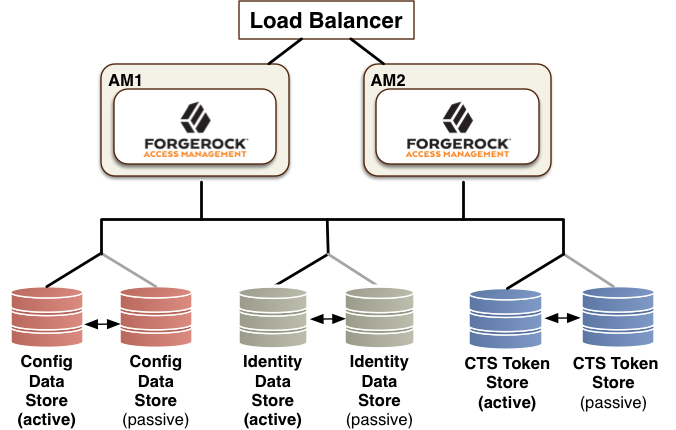
The Default Configuration option installs AM with an embedded DS server that stores both configuration and CTS data. The default option is suitable for AM evaluation purposes, or for single site or smaller-scale environments where lower volume write loads and replication traffic occur.
In general, CTS causes more volatile replication traffic due to the nature of its short-lived tokens compared to regular configuration data. To handle the data volatility, you can configure AM to use the embedded directory server as a dedicated configuration token store, while using an external DS server instance as a CTS store. This type of deployment is useful if you have multiple AM instances in a fully-replicated topology communicating with an external CTS token store over a WAN.
You can deploy CTS using an external directory server by running the instructions in the following sections:
This section assumes that you have deployed two AM instances
in a site. If you have not completed these steps, see
"To Configure Site Load Balancing".
It is also assumed that both AM instances
communicate with the CTS instance, cts.example.com on
port 1389.
The following instructions show how to download, install, and set up the DS server.
Go to the ForgeRock BackStage website, and then download a supported version of DS server.
Unzip the DS distribution and run the setup command.
Install DS with the installation parameters required for your deployment. Note, however, that SSL may be required in production deployments. This example uses the following parameters:
Accept license?: yes
Initial Root User DN for the Directory Server: cn=Directory Manager
Password for the Initial Root User: <password value>
Fully Qualified Hostname: cts.example.com
LDAP Listening Port: 1389
Administration Connector Port: 4444
Create Base DNs: yes
Backend Type*: JE Backend ([1])
Base DN for Directory Data: cn=cts,ou=famrecords,ou=openam-session,ou=tokens
Option for Populating Database: Option 2 - Only create base entry
Do You Want to Enable SSL: no (may be required for your deployment)
Do You Want to Enable StartTLS: no (may be required for your deployment)
Do You Want To Start The Server: yes
What Would You Like To Do: 1 - Set up server with parameters above
* The Backend Type choice is available for OpenDJ 3.0 directory server and later.
Once the DS installation is complete and the instance is operational, import the schema, multivalue, index and container files for CTS as shown in the procedure below.
Copy the CTS schema and then add it the repository.
$ TOMCAT_OPENAM_WEBAPP=/path/to/tomcat/webapps/openam
$ T=/tmp/ldif
$ rm -rf $T
$ mkdir $T
$ cp $TOMCAT_OPENAM_WEBAPP/WEB-INF/template/ldif/sfha/cts-add-schema.ldif $T/cts-add-schema.ldif
If you are using DS 5 or later:
$ ./ldapmodify \
--port 1389 \
--bindDN "cn=Directory Manager" \
--bindPassword password \
$T/cts-add-schema.ldif
If DS runs in production mode, then you must use the
--useStartTlsoption to authenticate as Directory Manager on the LDAP port. This applies to the example above, and to other examples in this chapter.If you are using OpenDJ 3.5 or earlier:
$ ./ldapmodify \
--port 1389 \
--bindDN "cn=Directory Manager" \
--bindPassword password \
--filename $T/cts-add-schema.ldif
The output should be:
# Processing MODIFY request for cn=schema
# MODIFY operation successful for DN cn=schema
Copy the multivalue file and then add it to the repository.
$ cp $TOMCAT_OPENAM_WEBAPP/WEB-INF/template/ldif/sfha/cts-add-multivalue.ldif $T/cts-add-multivalue.ldif
If you are using DS 5 or later:
$ ./ldapmodify \
--port 1389 \
--bindDN "cn=Directory Manager" \
--bindPassword password \
$T/cts-add-multivalue.ldif
If you are using OpenDJ 3.5 or earlier:
$ ./ldapmodify \
--port 1389 \
--bindDN "cn=Directory Manager" \
--bindPassword password \
--filename $T/cts-add-multivalue.ldif
Copy the multivalue index file, and then replace the
@DB_NAME@variable with your repository in the file. Then, add the file to the repository.$ cat $TOMCAT_OPENAM_WEBAPP/WEB-INF/template/ldif/sfha/cts-add-multivalue-indices.ldif \ | sed -e 's/@DB_NAME@/userRoot/' > $T/cts-add-multivalue-indices.ldif
If you are using DS 5 or later:
$ ./ldapmodify \
--port 1389 \
--bindDN "cn=Directory Manager" \
--bindPassword password \
$T/cts-add-multivalue-indices.ldif
If you are using OpenDJ 3.5 or earlier:
$ ./ldapmodify \
--port 1389 \
--bindDN "cn=Directory Manager" \
--bindPassword password \
--filename $T/cts-add-multivalue-indices.ldif
Copy the CTS index file, and then replace the
@DB_NAME@variable with your repository in the file. Then, add the file to the repository.$ cat $TOMCAT_OPENAM_WEBAPP/WEB-INF/template/ldif/sfha/cts-indices.ldif \ | sed -e 's/@DB_NAME@/userRoot/' > $T/cts-indices.ldif
If you are using DS 5 or later:
$ ./ldapmodify \
--port 1389 \
--bindDN "cn=Directory Manager" \
--bindPassword password \
$T/cts-indices.ldif
If you are using OpenDJ 3.5 or earlier:
$ ./ldapmodify \
--port 1389 \
--bindDN "cn=Directory Manager" \
--bindPassword password \
--filename $T/cts-indices.ldif
Copy the container file, and then replace the
@SM_CONFIG_ROOT_SUFFIX@variable with the base DN defined during the external DS installation procedure, for example,cn=cts,ou=famrecords,ou=openam-session,ou=tokens. Then, add the file to the repository.$ ROOT_SUFFIX="cn=cts,ou=famrecords,ou=openam-session,ou=tokens" $ cat $TOMCAT_OPENAM_WEBAPP/WEB-INF/template/ldif/sfha/cts-container.ldif | sed -e 's/@SM_CONFIG_ROOT_SUFFIX@/$ROOT_SUFFIX/' > $T/cts-container.ldif
If you are using DS 5 or later:
$ ./ldapmodify \
--port 1389 \
--bindDN "cn=Directory Manager" \
--bindPassword password \
$T/cts-container.ldif
If you are using OpenDJ 3.5 or earlier:
$ ./ldapmodify \
--port 1389 \
--bindDN "cn=Directory Manager" \
--bindPassword password \
--filename $T/cts-container.ldif
The output should be:
Processing ADD request for ou=tokens,cn=cts,ou=famrecords,ou=openam-session,ou=tokens
ADD operation successful for DN ou=tokens,cn=cts,ou=famrecords,ou=openam-session,ou=tokens
Processing ADD request for ou=openam-session,ou=tokens,cn=cts,ou=famrecords,ou=openam-session,ou=tokens
ADD operation successful for DN ou=openam-session,ou=tokens,cn=cts,ou=famrecords,ou=openam-session,ou=tokens
Processing ADD request for ou=famrecords,ou=openam-session,ou=tokens,cn=cts,ou=famrecords,ou=openam-session,ou=tokens
ADD operation successful for DN ou=famrecords,ou=openam-session,ou=tokens,cn=cts,ou=famrecords,ou=openam-session,ou=tokens
If AM is binding to CTS as the Directory Manager user, you can jump to section "CTS Index Import and Build".
To create a non-admin user, follow the instructions in the next section.
As a best practice, the use of cn=Directory Manager is
not recommended. Instead, you can create a new user with limited
privileges as shown below.
For additional examples creating user entries with DS tools, see
Adding Entries
in the ForgeRock Directory Services Developer's Guide.
Create an LDIF file called
cts_user.ldifthat defines the CTS non-admin user. The following sample LDIF creates a user calledopenam_ctsand assigns theupdate-schema,subentry-write, andpassword-resetprivileges.The LDIF file also overrides the default lookthrough limit of 5000 for this non-admin user to unlimited (0) and sets the maximum number of entries returned for a search to 5000 (default, 1000). The
ds-rlim-size-limit: 5000is arbitrary and can be any value larger than the default maximum number of entries returned for a search, for example, value >= 1001. Setting the max number of entries for a search to 5000 ensures that the CTS reaper can properly delete returned tokens when large bursts of CTS tokens (> 5000 per interval between CTS reaping) are returned. For more information on DS resource limits, see Setting Resource Limits in the ForgeRock Directory Services Administration Guide.If there are more than 100K of expired tokens in the CTS, the search from the CTS reaper will be treated as non-indexed and will fail if the non-admin user does not have the
unindexed-searchprivilege. Therefore, you should add theunindexed-searchprivilege to the user's entry.Finally, make sure that you replace the
userPasswordvalue, shown as password in the LDIF, with your actual password:dn: ou=admins,cn=cts,ou=famrecords,ou=openam-session,ou=tokens objectClass: top objectClass: organizationalunit ou: OpenAM Administrator dn: uid=openam_cts,ou=admins,cn=cts,ou=famrecords,ou=openam-session,ou=tokens objectClass: top objectClass: person objectClass: organizationalPerson objectClass: inetOrgPerson cn: OpenAM Non-Admin-User sn: OpenAM userPassword: password ds-privilege-name: update-schema ds-privilege-name: subentry-write ds-privilege-name: password-reset ds-privilege-name: unindexed-search ds-rlim-lookthrough-limit: 0 ds-rlim-size-limit: 5000
Add the new user to the CTS repository. The following example assumes that you are using DS 5 and later:
$ ./ldapmodify \
 --port 1389 \
 --bindDN "cn=Directory Manager" \
 --bindPassword password \
 cts_user.ldif
If you are using OpenDJ 3.5 or earlier:
$ ./ldapmodify \
 --defaultAdd
 --port 1389 \
 --bindDN "cn=Directory Manager" \
 --bindPassword password \
 --filename cts_user.ldif
The output should be:
Processing ADD request for ou=admins,cn=cts,ou=famrecords,ou=openam-session,ou=tokens
ADD operation successful for DN ou=admins,cn=cts,ou=famrecords,ou=openam-session,ou=tokens
Processing ADD request for uid=openam_cts,ou=admins,cn=cts,ou=famrecords,ou=openam-session,ou=tokens
ADD operation successful for DN uid=openam_cts,ou=admins,cn=cts,ou=famrecords,ou=openam-session,ou=tokens
Add a global ACI to allow the
openam_ctsuser to modify schema:$ ./dsconfig \ set-access-control-handler-prop \ --no-prompt \ --hostname cts.example.com \ --port 4444 \ --bindDN "cn=Directory Manager" \ --bindPassword password \ --add 'global-aci:(target = "ldap:///cn=schema")(targetattr = "attributeTypes || objectClasses")(version 3.0; acl "Modify schema"; allow (write) userdn = "ldap:///uid=openam_cts,ou=admins,cn=cts,ou=famrecords,ou=openam-session,ou=tokens";)'
Use dsconfig to check that the global ACI has been applied:
$ ./dsconfig \
 get-access-control-handler-prop \
 --hostname cts.example.com \
 --port 4444 \
 --bindDN "cn=Directory Manager" \
 --bindPassword password \
 --no-prompt \
 --property global-aci
Verify that the following entry is present:
"(target = "ldap:///cn=schema")(targetattr = "attributeTypes || objectClasses")
 (version 3.0; acl "Modify schema"; allow (write) userdn =
"ldap:///uid=openam_cts,ou=admins,cn=cts,ou=famrecords,ou=openam-session,ou=tokens";)",
Create an LDIF file called
cts_acis.ldifto add the ACIs to allow the CTS user to create, search, modify, delete, and allow persistent search to the CTS repository:dn: cn=cts,ou=famrecords,ou=openam-session,ou=tokens changetype: modify add: aci aci: (targetattr="*")(version 3.0;acl "Allow entry search"; allow (search, read) userdn = "ldap:///uid=openam_cts,ou=admins,cn=cts,ou=famrecords,ou=openam-session,ou=tokens";) aci: (targetattr="*")(version 3.0;acl "Modify entries"; allow (write) userdn = "ldap:///uid=openam_cts,ou=admins,cn=cts,ou=famrecords,ou=openam-session,ou=tokens";) aci: (targetcontrol="2.16.840.1.113730.3.4.3")(version 3.0; acl "Allow persistentsearch";allow (search, read) userdn = "ldap:///uid=openam_cts,ou=admins,cn=cts,ou=famrecords,ou=openam-session,ou=tokens";) aci: (version 3.0;acl "Add config entry"; allow (add) userdn = "ldap:///uid=openam_cts,ou=admins,cn=cts,ou=famrecords,ou=openam-session,ou=tokens";) aci: (version 3.0;acl "Delete entries"; allow (delete) userdn = "ldap:///uid=openam_cts,ou=admins,cn=cts,ou=famrecords,ou=openam-session,ou=tokens";)Import the ACIs into the CTS repository:
$ ./ldapmodify \
 --hostname cts.example.com \
 --port 1389 \
 --bindDN "cn=Directory Manager" \
 --bindPassword password \
 cts_acis.ldif
If you are using OpenDJ 3.5 or earlier:
$ ./ldapmodify \
 --hostname cts.example.com \
 --port 1389 \
 --bindDN "cn=Directory Manager" \
 --bindPassword password \
 --filename cts_acis.ldif
The output should be:
# Processing MODIFY request for cn=cts,ou=famrecords,ou=openam-session,ou=tokens
# MODIFY operation successful for DN cn=cts,ou=famrecords,ou=openam-session,ou=tokens
If the DS server was set up with the
--productionModeoption, grant the additional access that AM requires.When DS servers are set up with the
--productionModeoption, many settings are hardened for a more secure default installation. Compared to evaluation mode, production mode significantly restricts access for non-admin users. For details, see Directory Server Setup Parameters in the ForgeRock Directory Services Installation Guide.The following example grants the same permissions as evaluation mode to the AM non-admin user that you created:
$ ./dsconfig \
 set-access-control-handler-prop \
 --hostname cts.example.com \
 --port 4444 \
 --bindDN "cn=Directory Manager" \
 --bindPassword password \
 --add 'global-aci: (extop="1.3.6.1.4.1.26027.1.6.1 || 1.3.6.1.4.1.26027.1.6.3 || 1.3.6.1.4.1.4203.1.11.1 || 1.3.6.1.4.1.1466.20037 || 1.3.6.1.4.1.4203.1.11.3")(version 3.0; acl "AM extended operation access"; allow(read) userdn="ldap:///uid=openam_cts,ou=admins,cn=cts,ou=famrecords,ou=openam-session,ou=tokens";)' \
 --add 'global-aci: (targetcontrol="2.16.840.1.113730.3.4.2 || 2.16.840.1.113730.3.4.17 || 2.16.840.1.113730.3.4.19 || 1.3.6.1.4.1.4203.1.10.2 || 1.3.6.1.4.1.42.2.27.8.5.1 || 2.16.840.1.113730.3.4.16 || 1.2.840.113556.1.4.1413 || 1.3.6.1.4.1.36733.2.1.5.1 || 1.3.6.1.1.12 || 1.3.6.1.1.13.1 || 1.3.6.1.1.13.2 || 1.2.840.113556.1.4.319 || 1.2.826.0.1.3344810.2.3 || 2.16.840.1.113730.3.4.18 || 2.16.840.1.113730.3.4.9 || 1.2.840.113556.1.4.473 || 1.3.6.1.4.1.42.2.27.9.5.9")(version 3.0; acl "AM extended operation access"; allow(read) userdn="ldap:///uid=openam_cts,ou=admins,cn=cts,ou=famrecords,ou=openam-session,ou=tokens";)' \
 --add 'global-aci: (targetattr="createTimestamp||creatorsName||modifiersName||modifyTimestamp||entryDN||entryUUID||subschemaSubentry||etag||governingStructureRule||structuralObjectClass||hasSubordinates||numSubordinates||isMemberOf")(version 3.0; acl "AM Operational Attributes"; allow (read,search,compare) userdn="ldap:///uid=openam_cts,ou=admins,cn=cts,ou=famrecords,ou=openam-session,ou=tokens";)' \
 --add 'global-aci: (targetcontrol="1.3.6.1.1.12 || 1.3.6.1.1.13.1")(version 3.0; acl "Allow assertion control";allow (read) userdn = "ldap:///uid=openam_cts,ou=admins,cn=cts,ou=famrecords,ou=openam-session,ou=tokens";)' \
 --trustAll \
 --no-prompt
(Optional) If you have not yet imported CTS index files as described in "To Import the CTS Configuration", open the
/tomcat/webapps/openam/WEB-INF/template/ldif/sfha/cts-indices.ldiffile. Apply each index to the CTS repository using the dsconfig command. Note that these indexes may require further tuning depending on environmental load testing.For example, you can apply the first index
coreTokenExpirationDateas shown below. Then, apply the other indexes individually in the same manner:$ ./dsconfig \ --port 4444 \ --bindDN "cn=Directory Manager" \ --bindPassword password \ --backend-name userRoot \ --index-name coreTokenExpirationDate \ --set index-type:ordering \ --trustAll \ --no-prompt
Or, you can obtain a copy of a dsconfig batch file, which adds all of your indexes to the CTS repository at one time. Copy the
cts-add-indexes.txtin "Supported Scripts", save it locally, then run dsconfig in batch mode:$ ./dsconfig \ --port 4444 \ --bindDN "cn=Directory Manager" \ --bindPassword password \ --batchFilePath cts-add-indexes.txt \ --trustAll \ --no-prompt
Stop the DS instance.
$ ./stop-ds
Rebuild all indexes and then verify them:
$ ./rebuild-index --baseDN "cn=cts,ou=famrecords,ou=openam-session,ou=tokens" \
 --rebuildAll --offline
$ ./verify-index --baseDN "cn=cts,ou=famrecords,ou=openam-session, ou=tokens"
. . . msg=Checked 6 entries and found 0 error(s) in 0 seconds . . .
Restart the DS instance.
$ ./start-ds
At this stage, you have successfully set up the external DS server. You must now set up the CTS repository on AM using the AM console.
Important
If AM cannot access the CTS token store, you will be unable to log in to the AM console.
Back up your deployment before making any changes to your CTS token store configuration.
Perform the following steps to configure an external CTS token store:
Open the AM console and navigate to Configure > Server Defaults, and then click CTS.
On the CTS Token Store tab, configure the parameters as follows:
Parameter Value Notes Store Mode External Token StoreRoot Suffix cn=cts,ou=famrecords,ou=openam-session,ou=tokensMax Connections 17For production, this value needs to be tuned. Consider 2^n+1, where n=4, 5, 6, and so on. For example, try setting this to 17, 33, 65, and test performance under load. On the External Store Configuration tab, configure the parameters as follows:
Parameter Value Notes SSL/TLS Enabled False When connecting to a DS server in production mode, enable secure connections. When you enable SSL/TLS, make sure the AM server can trust the DS server certificate and that the certificate matches the CTS store FQDN. Connection String(s) cts.example.com:1389Login ID uid=openam_cts,ou=admins,cn=cts,ou=famrecords,ou=openam-session,ou=tokensPassword password Heartbeat 10For production, this value needs to be tuned. Click Save Changes.
Restart AM or the web container where it runs for the changes to take effect.
To test session high availability, use two browsers: Chrome and Firefox. You can use any two browser types, or run the browsers in incognito mode. You can also view tokens using an LDAP browser.
In Chrome, log in to the second AM instance with the
amadminuser, select the realm, and then click onsessions.In Firefox, log in to the first AM instance with a test user.
In Chrome, verify that the test user exists in the first AM instance's session list and not in the second instance.
Shut down the first AM instance.
In Firefox, rewrite the URL to point to the second AM instance. If successful, the browser should not prompt for login.
Confirm the session is still available. In Chrome, list the sessions on the second instance, the test user's session should be present.
Restart the first AM instance to complete the testing.
Replication is the process of copying updates between directory servers to help all servers converge to identical copies of directory, token, session, SAML v2.0, and OAuth 2.0 data. DS uses advanced data replication methods to ensure that directory services remain available in the event of a server crash or network interruption.
The historical information needed to resolve the latest changes is
periodically purged to prevent it from becoming an unmanageable size.
The age at which the information is purged is known as the
replication-purge-delay.
With CTS, the default replication-purge-delay for DS
is 3 days. Unless you have configured a separate DS server for CTS data,
you may have to balance the needs for backups, the requirements for replication,
disk space, and different useful lifetimes for CTS tokens and other DS data.
Adjustments may be required. One way to set a new period for
replication-purge-delay of n
hours is with the following command:
$ ./dsconfig \
 set-replication-server-prop \
 --port 4444 \
 --hostname opendj-cts.example.org \
 --bindDN "cn=Directory Manager" \
 --bindPassword password \
 --provider-name "Multimaster Synchronization" \
 --set replication-purge-delay:n \
 --no-prompt \
 --trustStorePath /path/to/truststore
At this point, you need to understand whether CTS data backups are important in your deployment. Session, SAML v2.0, and OAuth 2.0 token data is often short-lived. In some deployments, the worst-case scenario is that users have to log in again.
If CTS data backups are important in your deployment, note that DS
backups that are older than the replication-purge-delay
are useless and must be discarded. You can use the DS
backup to schedule backups. For example, the following
command uses crontab format to configure daily backups
for a hypothetical Base DN of ctsData at x minutes
after every hour:
$ ./backup \
 --port 4444 \
 --bindDN "cn="Directory Manager" \
 --bindPassword password \
 --backendID ctsData \
 --backupDirectory /path/to/opendj/backup \
 --recurringTask "x * * * *" \
 --completionNotify backupadmin@example.com \
 --errorNotify backupadmin@example.com
If you adjust the time periods associated with
replication-purge-delay and
backups, you need to backup more frequently so that the change log records
required to restore date are not lost.
You can configure AM to encrypt or compress CTS tokens as they are stored in the token store. The following properties, disabled by default, are associated with token encryption and compression:
com.sun.identity.session.repository.enableEncryptionSupports encryption of CTS tokens. Default:
false.com.sun.identity.session.repository.enableCompressionEnables GZip-based compression of CTS tokens. Default:
false.com.sun.identity.session.repository.enableAttributeCompressionSupports compression over and above the GZip-based compression of CTS tokens. Default:
false.
Important
Compression can undermine the security of encryption. You should evaluate this threat depending on your use cases before enabling compression and encryption together.
Warning
When encryption or compression properties are changed, all previous tokens in the LDAP store will be unreadable; thus, invalidating any user's sessions. As a result, the user will be required to log in again.
Navigate to Configure > Server Defaults > Advanced.
Find the property you want to enable in the Property Name column.
Replace the
falsevalue withtruein the Property Value column.Save your changes.
Enable the same property on every AM instance within the site. Failure to do so may cause unexpected issues storing and reading tokens across the environment.
Restart the AM servers for the changes to take effect.
Tip
Configuring the CTS to encrypt and store tokens incurs a performance penalty for AM. If you need to encrypt the stored tokens in your environment, consider configuring the CTS token store DS instance to encrypt the data instead. For more information about encrypting a DS instance, see the ForgeRock Directory Services Administration Guide.
There are several CTS tuning considerations that you can make for the efficient processing of your CTS token store: reaper cache size, queue size and timeout, and virtual attributes.
AM implements a reaper service that deletes expired tokens from the CTS store.
When an AM server modifies a token in the CTS store, it also takes the responsibility to delete it when it expires. To reduce the number of relatively slow queries to the CTS store to determine which tokens have expired, each AM server maintains a local cache of which tokens to delete, and when.
Use of the local reaper cache means fewer searches of the CTS store to determine expired tokens to delete, improving overall cluster performance. A search of the CTS store for expired tokens is still performed as a fail safe, to ensure expired tokens are not missed when a server in the cluster goes down.
The size of the reaper cache is controlled by the
org.forgerock.services.cts.reaper.cache.size advanced property.
The default size is 500000 tokens.
If an AM server is under sustained heavy load, the reaper cache may reach
capacity, causing degraded performance due to the additional slower searches of the CTS
store. If the reaper cache is full, messages are logged in the Session
debug log, such as the following:
The CTS token reaper cache is full. This will result in degraded performance.
You should increase the cache size by setting the advanced server property
'org.forgerock.services.cts.reaper.cache.size' to a number higher than 500000.
If this debug message appears frequently in the debug logs, increase the value of the
org.forgerock.services.cts.reaper.cache.size property. To alter the
value, in the AM console, navigate to Configure > Server Defaults > Advanced, and
add the property and increased value to the list.
Increasing the size of the reaper cache causes higher memory usage on the AM server. If a cache of the default size of 500000 entries is nearly full, the server memory used could be up to approximately 100 megabytes.
One tuning consideration is to manage the CTS queue size and timeout for efficient throughput. AM makes CTS requests from the following components:
| • AM CTS-based sessions and authentication sessions |
| • OAuth 2.0 |
| • UMA |
| • Session blacklist (if enabled for client-based sessions) |
| • Authentication session whitelist (if enabled for client-based sessions) |
| • SAML v2.0 (if enabled for Security Token Service token validation and cancellation) |
| • OAuth 2.0 stateless sessions and session blacklist |
| • Push notification during authentication |
| • Cluster-wide notification |
Every create, update, and delete requests to CTS are placed into an asynchronous buffer before being handled by an asynchronous processor. This ensures that callers performing write operations can continue without waiting for CTS to complete processing.
Once the queue is full, all new operations are "blocked" before being placed in the queue. Once the queue is frees up, the caller can continue as normal.
CTS is designed to automatically throttle throughput when the buffer fills up with requests. Therefore, if you require a balance between performance versus system memory, AM provides two properties that can be used to tune CTS, queue size and queue timeout.
org.forgerock.services.cts.async.queue.sizeDefault size: 5000. Determines the amount of request operations that can be buffered before the queue size becomes full, after which the caller will be required to wait for the buffered requests to complete processing. All CRUDQ operations are converted to tasks, which are placed on the queue, ensuring that operations happen in the correct sequence.
org.forgerock.services.cts.async.queue.timeoutDefault timeout is 120 seconds. Determines the length of time a caller will wait when the buffer is full. If the timeout expires, the caller receives an error. The timeout property is used in any system configuration where the LDAP server throughput is considerably slower than the AM server, which can result in blocked requests as the backlog increases.
To set the queue size and timeout properties in the AM console, navigate to Configure > Server Defaults > Advanced, enter the key name and value, and then click Add.
For additional information on tuning CTS, see "Tuning CTS LDAP Connection Settings" in the Setup and Maintenance Guide.
You can alter the number of records that are returned in one page when searching the CTS store for expired records.
AM uses the advanced property org.forgerock.services.cts.reaper.search.pageSize to specify
the number of records to return in each page.
Note
The AM property overrides the DS property for controlling page sizes,
ds-rlim-size-limit.
For more information on the DS property, see Limiting Search Resources in the DS Maintenance Guide.
If there are likely to be a large number of CTS tokens that are due to expire at approximately the same time, you
could increase the search page size from the default of 1000, in order to affect more expired
tokens at a time.
For more information on the properties available for tuning CTS search page size, see "Advanced Properties" in the Reference.
DS supports a number of virtual attributes, which dynamically generate entry values that are not persisted in the token store. By default, the following DS virtual attributes are enabled at install:
| • collective-attribute-subentries |
| • entity-tag |
| • entry-dn |
| • entry-uuid |
| • governing-structure-rule |
| • has-subordinates |
| • is-member-of |
| • num-subordinates |
| • password-expiration-time |
| • password-policy-subentry |
| • structural-object-class |
| • subschema-subentry |
To improve CTS throughput, you can disable your virtual attributes using the dsconfig command, except for the Entity Tag virtual attribute, which must remain enabled else it will lead to an inoperable server.
To disable a virtual attribute, use the dsconfig command on DS to disable, for example, the Collective Attribute Subentries virtual attribute:
./dsconfig set-virtual-attribute-prop \
 --name=collective-attribute-subentries-virtual-attribute \
 --set enabled: false \
 --hostname localhost \
 --port 4444 \
 --bindDN "cn=Directory manager" \
 --bindPassword password \
 --no-prompt
Important
The DS entity-tag-virtual-attribute
is required and should never be disabled.
[3] Prior to AM 5, the authoritative source for sessions not stored in the client was the memory heap of AM's web container.
[4] Prior to AM 5, session high availability, formerly referred to as session failover, was optional. Starting with AM 5, session high availability is the default behavior in AM and cannot be disabled.
This chapter identifies best practices for securing your AM installation.
AM includes default settings to make it easier for you to evaluate the software. Avoid these default settings in production deployments:
When connecting to LDAP, bind with a specific administrative account rather than a root DN account, if possible.
Change the default
iPlanetDirectoryProcookie name both in AM (com.iplanet.am.cookie.name) and in your agent profiles (com.sun.identity.agents.config.cookie.name).When installing AM, do not use
/openamor/openssoas the deployment URI.Create an administrator in the Top Level Realm with a different ID than the default
amadmin.Create specific administrator users to track better who makes configuration changes.
Remove the demo user account. For example, if you configure the embedded DS server as a configuration and CTS store, the default demo user account gets created during the installation process. You should remove the user using the AM console under Realms > Top Level Realm > Identities. Select the user you want to remove, and then select Delete.
Set the list of Valid
gotoURL Resources. By default, AM redirects the user to the URL specified in thegotoandgotoOnFailquery string parameters supplied to the authentication interface in the login URL.To increase security against possible phishing attacks through open redirect, you can specify a list of valid URL resources against which AM validates these URLs. AM only redirects a user if the
gotoandgotoOnFailURL matches any of the resources specified in this setting. If no setting is present, it is assumed that thegotoorgotoOnFailURL is valid.To set the Valid
gotoURL Resources, use the AM console, and navigate to Realms > Realm Name > Services. Click Add a Service, select Validation Service, and add one or more validgotoURLs, and then click Create.When setting valid
gotoURLs, you can use the "*" wildcard, where "*" matches all characters except "?". For more specific patterns, use resource names with wildcards as described in the procedure, "Constraining Post-Login Redirects" in the Authentication and Single Sign-On Guide.Disable module based authentication for all AM realms. Module based authentication lets users authenticate using the
module=module-namelogin parameter. To disable module based authentication for a realm, select the realm in the AM console, then select Authentication > Settings > Security and clear the Module Based Authentication check box.
Anytime users interact with a web service, there are risks. With AM, you can reduce those risks by limiting what is exposed through the firewall using the following strategy:
Use a reverse proxy in front of AM to allow access only to the necessary URLs. A reverse proxy exposes only those endpoints needed for an application. For example, if you need to expose the OAuth2/OpenID Connect endpoints and REST interface, then you should implement a reverse proxy.
The following figure shows the recommended architecture with a reverse proxy.
If possible in your deployment, control access to the AM console by network address, such that administrators can only connect from well-known systems and networks.
Restrict access to URIs that you do not use, and prevent internal endpoints, such as
/sessionservicefrom being reachable over the Internet.For a full list of endpoints, see "Service Endpoints" in the Reference.
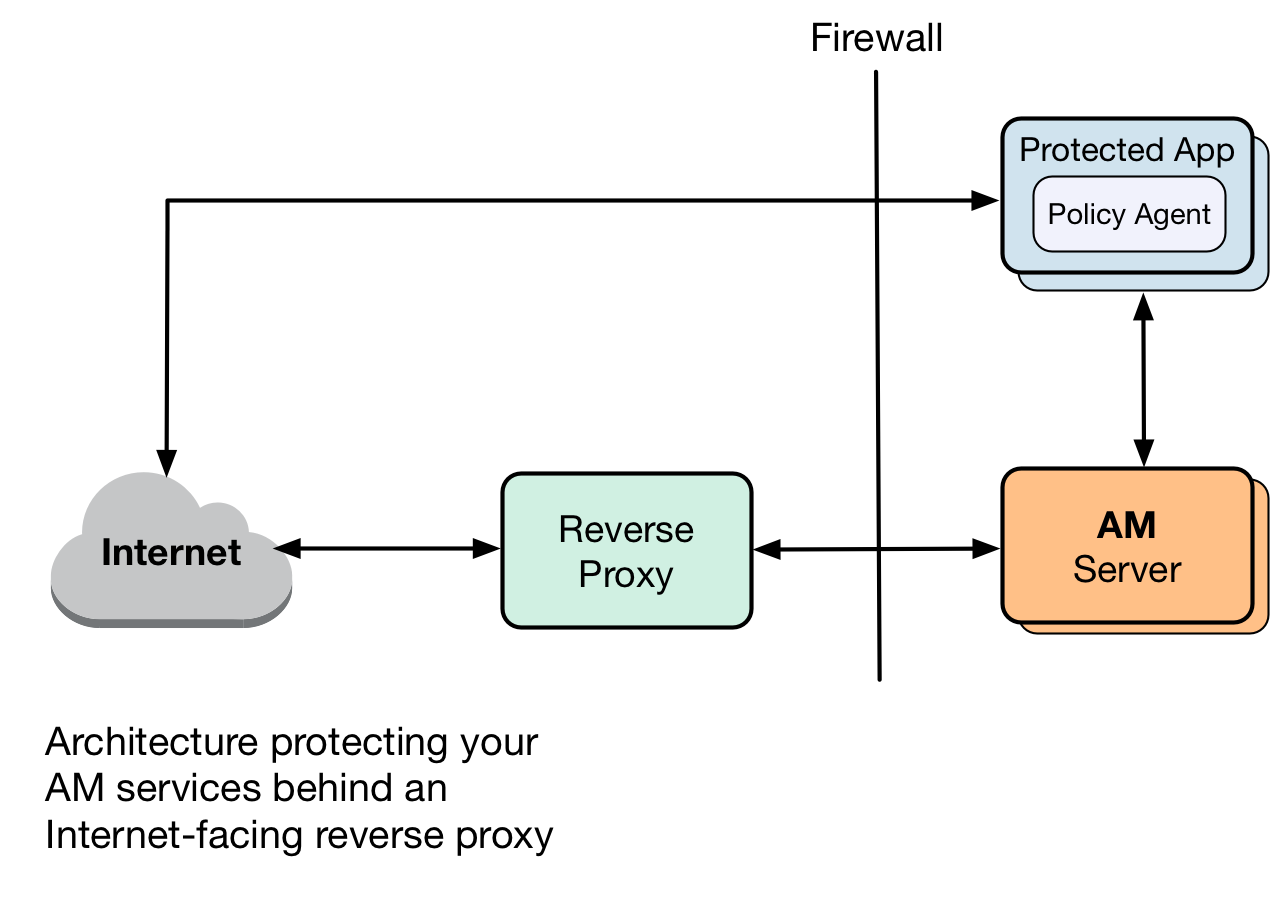
To help protect against snooping of data on public computers, you should configure AM instances to disallow browsers to cache user-submitted information.
You can prevent a browser from caching data by including the following headers in responses from endpoints:
Cache-Control: no-cache, no-store, must-revalidate
Pragma: no-cache
Expires: 0
It is also recommended to set Cache-Control: private on all endpoints that contain /json/ in their path, but not the following endpoints:
/serverinfo/*/serverinfo/version/serverinfo/cookieDomains
You can apply these headers to the specified endpoints by configuring your reverse proxy or gateway, or you can use the
AM SetHeaderFilter feature in your web containers' web.xml file, as follows:
Open the deployment descriptor file
web.xmlin a text editor. The location of the file depends on your web application container, for example in Tomcat it might be located at:/path/to/tomcat/webapps/openam/WEB-INF/web.xml.In the deployment descriptor file, add the following filter and filter mapping, which applies
Cache-Control: privateto the correct endpoints:<filter> <filter-name>CachePrivate</filter-name> <filter-class>org.forgerock.openam.headers.SetHeadersFilter</filter-class> <init-param> <param-name>Cache-Control</param-name> <param-value>private</param-value> </init-param> <init-param> <param-name>excludes</param-name> <param-value>/serverinfo/*,/serverinfo/version,/serverinfo/cookieDomains</param-value> </init-param> </filter> <filter-mapping> <filter-name>CachePrivate</filter-name> <url-pattern>/json/*</url-pattern> </filter-mapping>Restart your web container for the changes to take effect.
Create realms for your organization(s) and separate administrative users from end users. For instructions, see "Setting Up Realms" in the Setup and Maintenance Guide.
To direct relevant users to the correct realms in AM, you can then either:
Use the
realm=realm-namequery string parameter.Create fully qualified domain name DNS aliases for the realms.
When customizing
config/auth/default*/Login.jsp, make sure that you do not introduce any security vulnerabilities, such as cross-site scripting due to unvalidated input.Create an agent profile for each web or Java agent. See "Setting Up Agent Profiles" in the Setup and Maintenance Guide for instructions.
Keep communications secure by using encryption, properly configured cookies, and request and response signatures:
Protect network traffic by using HTTPS and LDAPS where possible.
When using HTTPS, use secure cookies, which are transmitted only over secured connections.
To configure AM server to use secure cookies, in the AM console, navigate to Configure > Server Defaults > Security. On the Cookie tab, select Secure Cookie, and then click Save Changes.
HttpOnly cookies are meant to be transmitted only over HTTP and HTTPS, and not through non-HTTP methods, such as JavaScript functions.
You can configure the AM server to use
HttpOnlycookies by navigating to Configure > Server Defaults > Advanced, and setting thecom.sun.identity.cookie.httponlyproperty's value totrue. Save your changes.Specify an appropriate TLS protocol for communication between AM and one or more of the following:
An external AM configuration store
An external CTS token store
An external user store
An Active Directory repository used for AM authentication with the Active Directory module
An LDAP repository used for AM authentication with the LDAP module
A repository used for AM certificate authentication with the certificate module
To specify the TLS protocol, use the
-Dorg.forgerock.openam.ldap.secure.protocol.versionJVM setting. For more information, see "Security Settings".Where possible, use subdomain cookies, and control subdomains in a specific DNS master.
Use cookie hijacking protection with restricted tokens, where each web or Java agent uses different SSO tokens for the same user. See "Protecting Against Cookie Hijacking" in the Authentication and Single Sign-On Guide for instructions.
Use your own key, not the
testkey provided with AM, to sign:SAML 2.0 authentication requests, authentication responses, and single logout requests
XUI authentication IDs
See "Changing Default Key Aliases" in the Setup and Maintenance Guide for instructions.
When using SAML v2.0, if the other entities in your circle of trust can handle encryption, then use encryption in addition to signing requests and responses.
Digital signatures are constructed and verified as follows:
The signer computes a hash of the data to sign, and encrypts the hash using a private key to get the signature.
The signer then attaches the signature to the data, and sends the message with the recipient.
To validate the digital signature on the message, the recipient decrypts the signature using the public key certificate that corresponds to the private key of the signer.
The recipient computes the hash of the data, then checks that the decrypted signature (the decrypted hash) matches the computed hash.
Parties signing requests, responses, or assertions must share the public key certificates for signing keys. The certificates can either be shared in advance and imported into the trusted partners' trust stores, then referenced in the configuration by their trust store aliases, or shared in each signed message.
You should not have to concern yourself with certificates
when working with AM. AM's core services and Java agents depend
on the certificates installed for use with the web application container in
which they run. AM web agents depend on the certificates installed
for use with the web server. Each certificate has been signed
by a well-known certificate authority (CA), whose certificate is already
installed in the Java CA certificates trust store
($JAVA_HOME/jre/lib/security/cacerts, default password
changeit) and in browsers, and so is recognized by other
software used without you having to configure anything.
However, you may want to configure AM advanced features such as SAML v2.0, OpenID Connect 1.0, and others, which require certificates and key aliases to be maintained in a keystore whose location is configured in AM.
You can use either CA or self-signed certificates with AM, although you should have in mind that you will need to configure your applications to trust your self-signed certificates. For more information about installing AM in a secure container with a self-signed certificate, see "To Set Up With HTTPS and Self-Signed Certificates". For more information about sharing self-signed certificates among applications, see "To Share Self-Signed Certificates".
The container in which you install AM requires a certificate in order to set up secure connections. Perform the following steps to set up Apache Tomcat 8.0 (Tomcat) with an HTTPS connector, using the Java keytool command to create a self-signed key pair:
Stop Tomcat.
Create a certificate and store it in a new keystore:
$ cd /path/to/tomcat/conf/
$ keytool -genkey -alias openam.example.com -storetype JCEKS
-keyalg RSA -keystore keystore.jceks
Enter keystore password:
 What is your first and last name?
 [Unknown]:  openam.example.com
What is the name of your organizational unit?
 [Unknown]:  Eng
What is the name of your organization?
 [Unknown]:  ForgeRock.com
What is the name of your City or Locality?
 [Unknown]:  Grenoble
What is the name of your State or Province?
 [Unknown]:  Isere
What is the two-letter country code for this unit?
 [Unknown]:  FR
Is CN=openam.example.com, OU=Eng, O=ForgeRock.com, L=Grenoble, ST=Isere,
 C=FR correct?
 [no]:  yes
Enter key password for <openam.example.com>
 (RETURN if same as keystore password):
Uncomment the SSL connector configuration in Tomcat's
conf/server.xml, and specify your keystore file, type, and password:<!-- Define a SSL HTTP/1.1 Connector on port 8443 This connector uses the JSSE configuration, when using APR, the connector should be using the OpenSSL style configuration described in the APR documentation --> <!-- --> <Connector port="8443" protocol="org.apache.coyote.http11.Http11NioProtocol" SSLEnabled="true" maxThreads="150" scheme="https" secure="true" keystoreFile="/path/to/tomcat/conf/keystore.jceks" keystorePass="changeit" keystoreType="JCEKS" clientAuth="false" sslProtocol="TLS" />You may need different settings depending on your configuration and version of Apache Tomcat. See the documentation for your version for more information.
Start Tomcat.
Verify that you can connect to Tomcat on port 8443 over HTTPS.
Your browser does not trust the certificate, because the certificate is self-signed and not signed by any of the CAs stored in your browser.
You recognize the subject and issuer of your certificate, and so can choose to trust the certificate, saving it into your browser's trust store.
Deploy and configure AM.
To share the self-signed certificate in your container with other applications or servers, see "To Share Self-Signed Certificates".
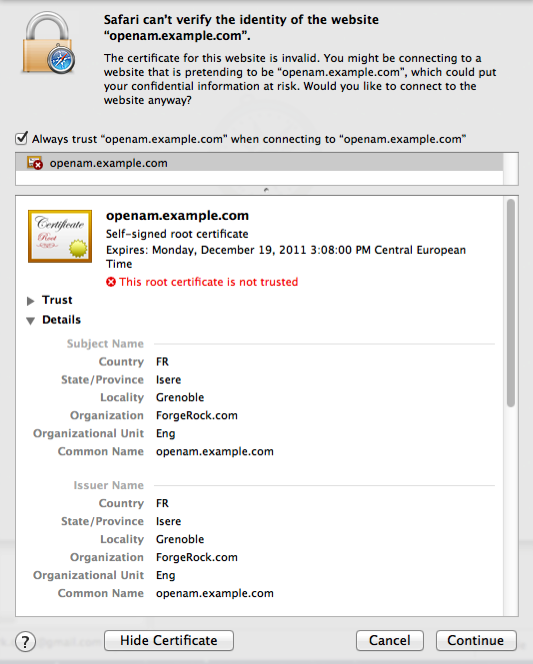
[5] Alternatively,
you can specify the trust store for a Java application, such as
-Djavax.net.ssl.trustStore=/path/to/truststore.jks
     -Djavax.net.ssl.trustStorePassword=changeit
.
This chapter shows you how to uninstall AM.
For instructions on removing AM agents, see the ForgeRock Access Management Web Agents User Guide, or the ForgeRock Access Management Java Agent User Guide.
After you have deployed and configured AM, you may have as many as four locations where AM files are stored on your system.
Following the steps below removes the AM software and the internal configuration store. If you used an external configuration store, you can remove AM configuration data after removing all the software.
Shut down the web application container in which you deployed AM.
$ /etc/init.d/tomcat stop
Password:
Using CATALINA_BASE:   /path/to/tomcat
Using CATALINA_HOME:   /path/to/tomcat
Using CATALINA_TMPDIR: /path/to/tomcat/temp
Using JRE_HOME:        /path/to/jdk/jre
Using CLASSPATH:       /path/to/tomcat/bin/bootstrap.jar:
 /path/to/tomcat/bin/tomcat-juli.jar
Unconfigure AM by removing the configuration files found in the $HOME directory of the user running the web application container.
A full uninstall of AM and configuration files consists of removing the following directories:
The configuration directory, by default
$HOME/openam. If you did not use the default configuration location, check the value of the Base installation directory property under Deployment > Servers > Server Name > General > System.The hidden directory that holds a file pointing to the configuration directory. For example, if you are using Apache Tomcat as the web container, this file could be
$HOME/.openamcfg/AMConfig_path_to_tomcat_webapps_openam_OR$HOME/.openssocfg/AMConfig_path_to_tomcat_webapps_openam_.
$ rm -rf $HOME/openam $HOME/.openamcfg
Or:
$ rm -rf $HOME/openam $HOME/.openssocfg
If you used an external configuration store, you must remove the configuration manually from your external directory server. The default base DN for the AM configuration is
dc=openam,dc=forgerock,dc=org.Note
At this point, you can restart the web container and configure AM anew if you only want to start over with a clean configuration rather than removing AM completely.
Undeploy the AM web application.
For example, if you are using Apache Tomcat as the web container, remove the
.warfile and expanded web application from the container.$ cd /path/to/tomcat/webapps/ $ rm -rf openam.war openam/
AM can capture information in debug log files that are useful when troubleshooting AM problems. "Debug Logging" in the Setup and Maintenance Guide describes how to enable debug logging after AM has been started.
It is also possible to capture debug logs while installing AM. This can be useful if you need to troubleshoot an installation problem.
Follow these steps to capture debug logs while installing AM on Tomcat:
If Tomcat is already started, stop it.
Specify the
-Dcom.iplanet.services.debug.level=messageoption in theCATALINA_OPTSenvironment variable:$ export CATALINA_OPTS=-Dcom.iplanet.services.debug.level=message
There are several ways that you can specify the
CATALINA_OPTSenvironment variable. You can set the variable:In the
/path/to/tomcat/bin/setenv.shfileIn the login shell of the user who runs Tomcat
Run the AM installation. Debug log files containing troubleshooting information appear in the
/path/to/openam/openam/debugdirectory.When you have completed AM installation and no longer need to capture debug logs, stop Tomcat, revert the debug logging options, and restart Tomcat.
This reference section covers settings and other information relating to installing AM.
The OIDs related to SNMP monitoring of CTS follow guidance described in RFC 1271.
The OIDs listed in this section include the prefix assigned to
ForgeRock, enterprises.36733. They also include the
entries associated with AM (1), SNMP (2), and CTS monitoring (3):
1.2.3.
Therefore, the root OID for all CTS monitored components is
enterprises.36733.1.2.3. All individual
monitored CTS components are suffixes that are consistent with
the image shown here.
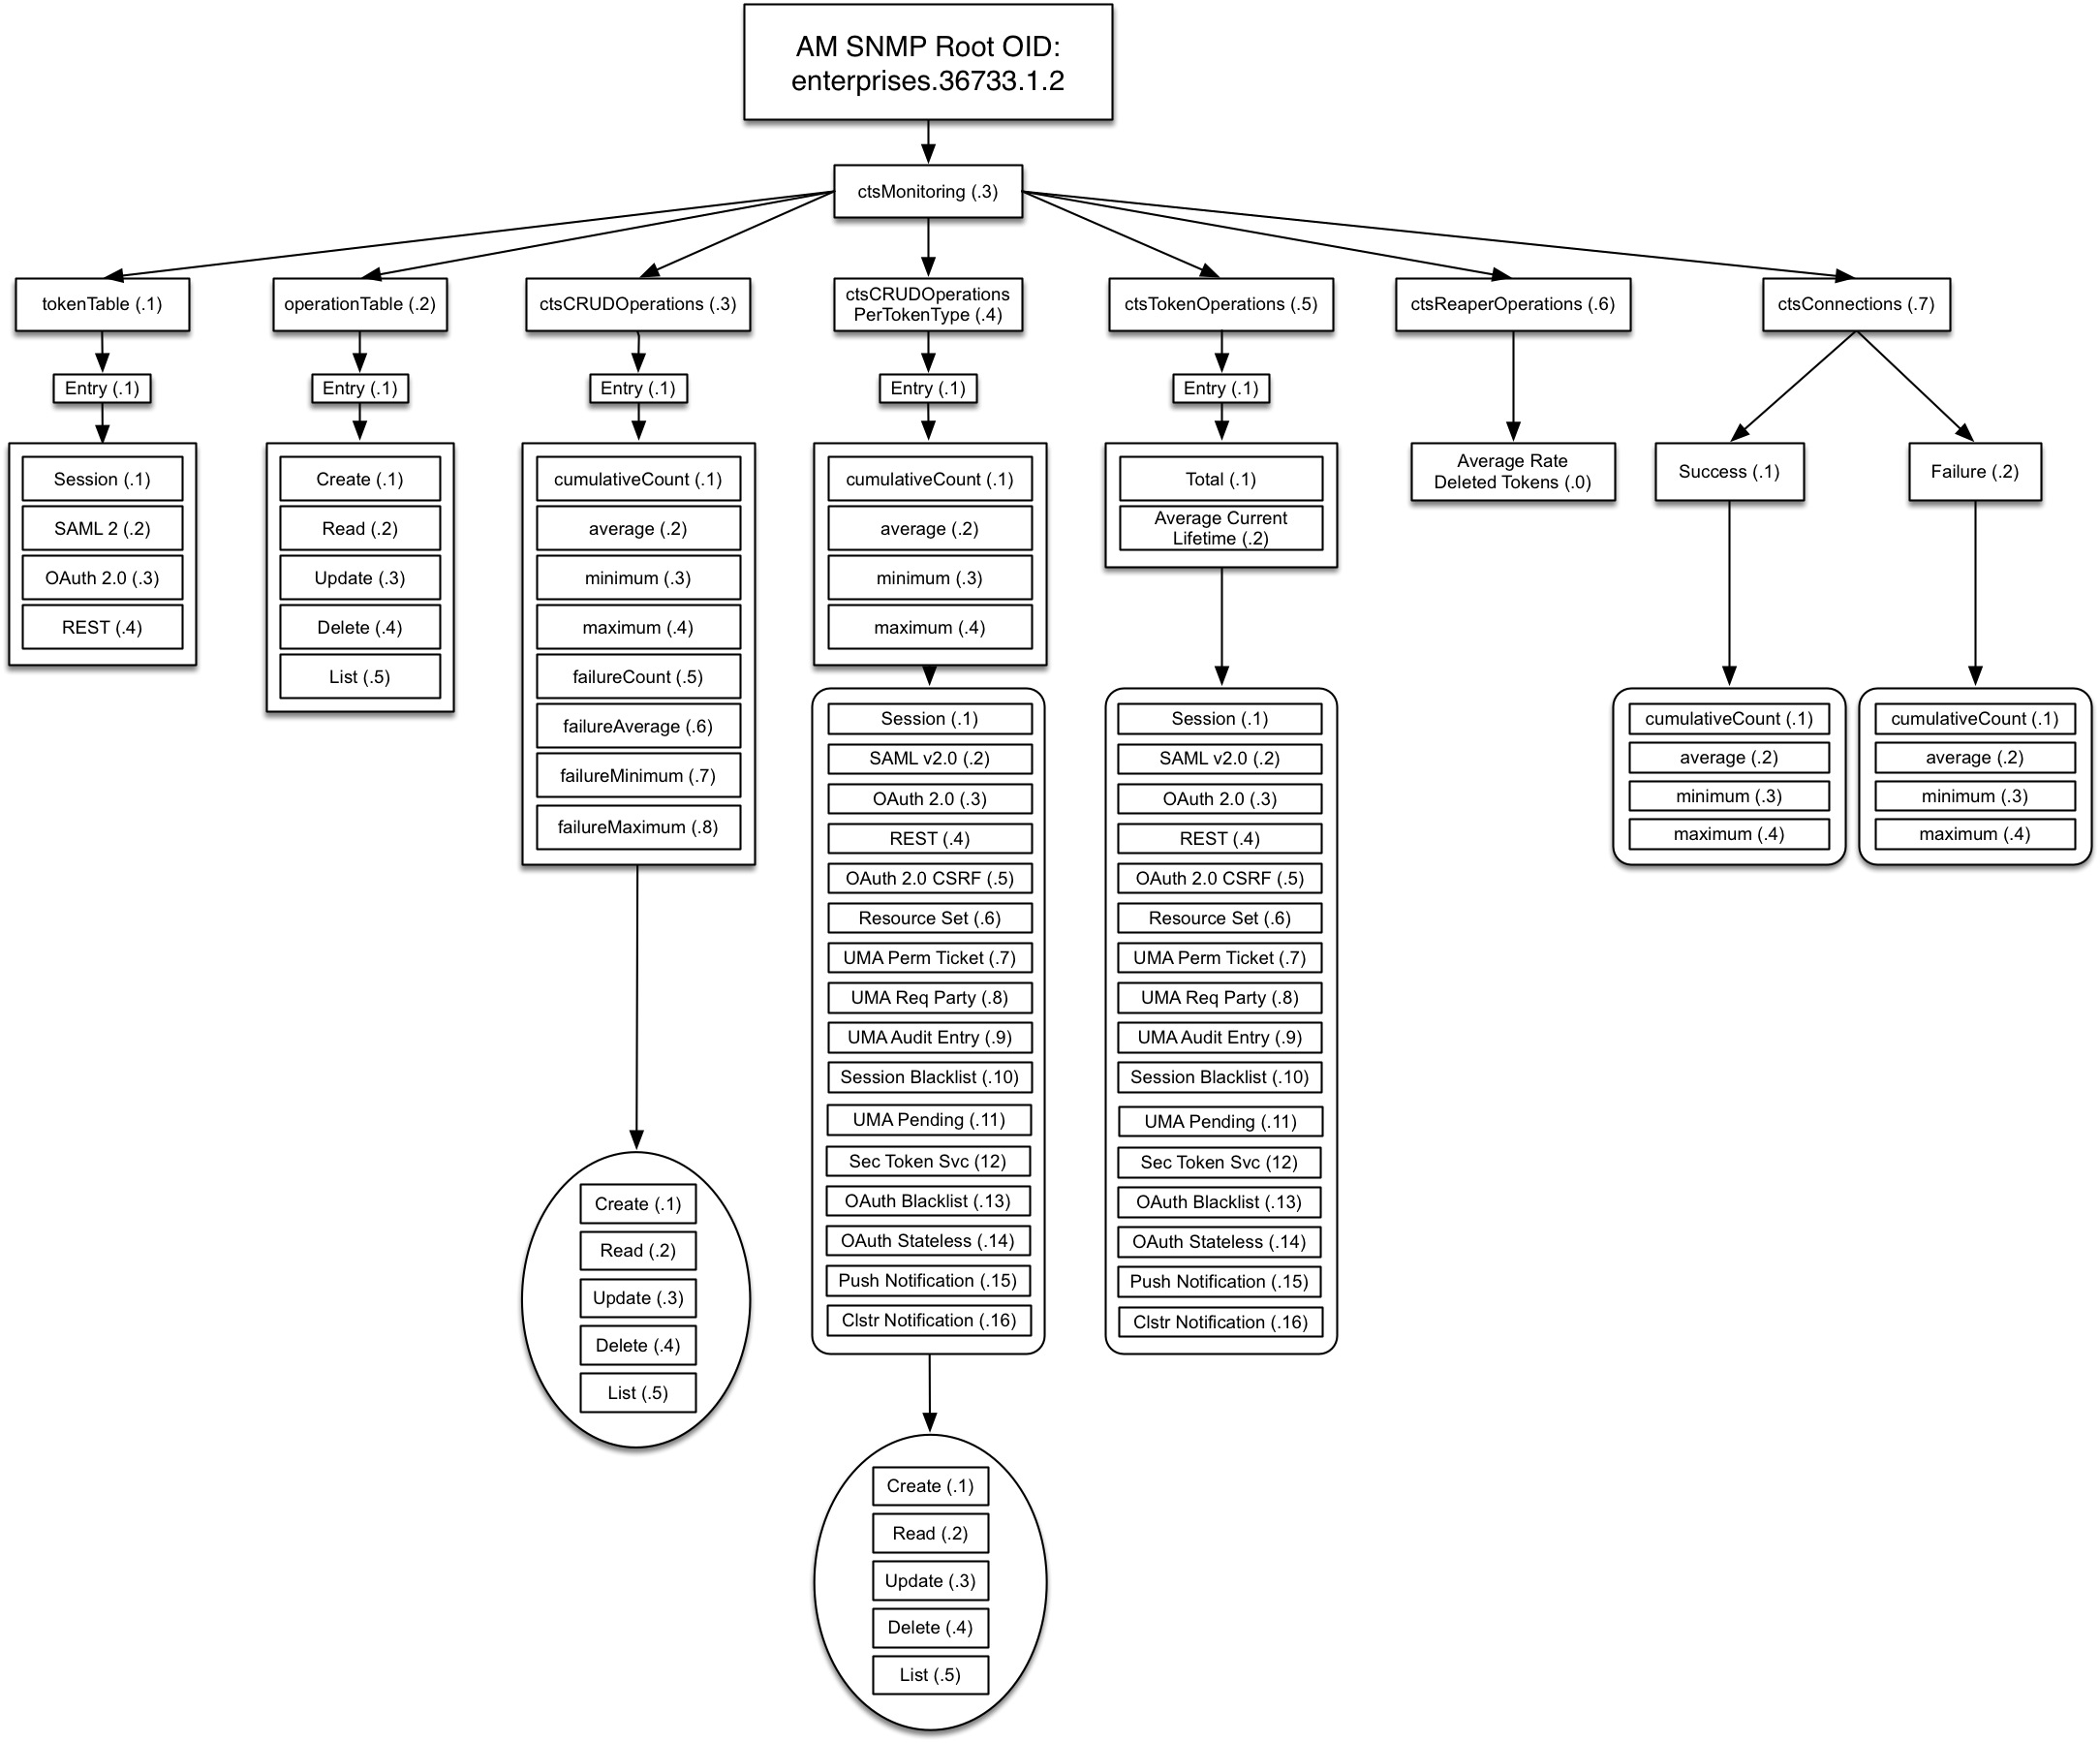
The table below shows how OIDs are split into different
token types. Do not forget the prefix. For example, the complete OID
for monitoring SAML v2.0 tokens is
enterprises.36733.1.2.3.1.1.2
The options for the token table are shown in the following table.
For example, the token table OID for SAML v2.0 is based on
the entries associated with ForgeRock, enterprises.36733,
AM 1, SNMP 2, CTS Monitoring
3, token table 1, entry
1, and SAML v2.0 2, which is
enterprises.36733.1.2.3.1.1.2.
| OID, by Token Type | Description |
|---|---|
enterprises.36733.1.2.3.1.1.1 | Session |
enterprises.36733.1.2.3.1.1.2 | SAML v2.0 |
enterprises.36733.1.2.3.1.1.3 | OAuth 2.0 |
enterprises.36733.1.2.3.1.1.4 | REST |
enterprises.36733.1.2.3.1.1.5 | OAuth 2.0 CSRF Protection |
enterprises.36733.1.2.3.1.1.6 | Resource Set |
enterprises.36733.1.2.3.1.1.7 | UMA Permission Ticket |
enterprises.36733.1.2.3.1.1.8 | UMA Requesting Party |
enterprises.36733.1.2.3.1.1.9 | UMA Audit Entry |
enterprises.36733.1.2.3.1.1.10 | Session Blacklist |
enterprises.36733.1.2.3.1.1.11 | UMA Pending Request |
enterprises.36733.1.2.3.1.1.12 | Security Token Service |
enterprises.36733.1.2.3.1.1.13 | OAuth 2.0 Blacklist |
enterprises.36733.1.2.3.1.1.14 | OAuth 2.0 Stateless |
enterprises.36733.1.2.3.1.1.15 | Push Notification |
enterprises.36733.1.2.3.1.1.16 | Cluster-wide Notification |
OIDs related to CTS monitoring operations are based on basic CRUD operations (plus list).
The options for the operation table are shown in the following table.
| OID, by Operation | Description |
|---|---|
enterprises.36733.1.2.3.2.1.1 | Create |
enterprises.36733.1.2.3.2.1.2 | Read |
enterprises.36733.1.2.3.2.1.3 | Update |
enterprises.36733.1.2.3.2.1.4 | Delete |
enterprises.36733.1.2.3.2.1.5 | List |
CTS monitoring entries use the following data types:
Counter64A 64-bit, unsigned integer type.
Counter64is a standard data type returned by SNMP OIDs. For more information, see Structure of Management Information Version 2.Float2dpA floating point number with the value
d-2in theDISPLAY-HINTclause. SNMP clients that handle theDISPLAY-HINTclause will correctly display the value as a floating point number with two decimal places. Other types of clients that do not handle theDISPLAY-HINTclause will incorrectly display the value as an integer that is one hundred times larger than the correct value.Float2dpis a custom data type returned by some ForgeRock CTS OIDs.
The OIDs in this table relate to all CRUD (and list) operations.
The options for the CRUD operations table are shown in the following tables. Each value is associated with CRUD and list operations.
| OID, by Operation Entry | Data Type | Description |
|---|---|---|
enterprises.36733.1.2.3.3.1.1 | Counter64 | Cumulative count |
enterprises.36733.1.2.3.3.1.2 | Float2dp | Average (in period) |
enterprises.36733.1.2.3.3.1.3 | Counter64 | Minimum (in period) |
enterprises.36733.1.2.3.3.1.4 | Counter64 | Maximum (in period) |
enterprises.36733.1.2.3.3.1.5 | Counter64 | Cumulative failure count |
enterprises.36733.1.2.3.3.1.6 | Float2dp | Average failures (in period) |
enterprises.36733.1.2.3.3.1.7 | Counter64 | Minimum failures (in period) |
enterprises.36733.1.2.3.3.1.8 | Counter64 | Maximum failures (in period) |
Each of the options in this table can be divided into CRUD and list related operations. The suffix OID for such operations is as follows:
1: Create
2: Read
3: Update
4: Delete
5: List
For example, since the OID for
cumulative count is enterprises.36733.1.2.3.3.1.1,
the OID for the cumulative count of delete operations is
enterprises.36733.1.2.3.3.1.1.4
| Cumulative Count Operations OID | Data Type | Description |
|---|---|---|
enterprises.36733.1.2.3.3.1.1.1 | Counter64 | Cumulative count of CREATE operations |
enterprises.36733.1.2.3.3.1.1.2 | Counter64 | Cumulative count of READ operations |
enterprises.36733.1.2.3.3.1.1.3 | Counter64 | Cumulative count of UPDATE operations |
enterprises.36733.1.2.3.3.1.1.4 | Counter64 | Cumulative count of DELETE operations |
enterprises.36733.1.2.3.3.1.1.5 | Counter64 | Cumulative count of LIST operations |
| Average Number Operations OID | Data Type | Description |
|---|---|---|
enterprises.36733.1.2.3.3.1.2.1 | Float2dp | Average number of CREATE operations (in period) |
enterprises.36733.1.2.3.3.1.2.2 | Float2dp | Average number of READ operations (in period) |
enterprises.36733.1.2.3.3.1.2.3 | Float2dp | Average number of UPDATE operations (in period) |
enterprises.36733.1.2.3.3.1.2.4 | Float2dp | Average number of DELETE operations (in period) |
enterprises.36733.1.2.3.3.1.2.5 | Float2dp | Average number of LIST operations (in period) |
| Minimum Number Operations OID | Data Type | Description |
|---|---|---|
enterprises.36733.1.2.3.3.1.3.1 | Counter64 | Minimum number of CREATE operations (in period) |
enterprises.36733.1.2.3.3.1.3.2 | Counter64 | Minimum number of READ operations (in period) |
enterprises.36733.1.2.3.3.1.3.3 | Counter64 | Minimum number of UPDATE operations (in period) |
enterprises.36733.1.2.3.3.1.3.4 | Counter64 | Minimum number of DELETE operations (in period) |
enterprises.36733.1.2.3.3.1.3.5 | Counter64 | Minimum number of LIST operations (in period) |
| Maximum Number Operations OID | Data Type | Description |
|---|---|---|
enterprises.36733.1.2.3.3.1.4.1 | Counter64 | Maximum number of CREATE operations (in period) |
enterprises.36733.1.2.3.3.1.4.2 | Counter64 | Maximum number of READ operations (in period) |
enterprises.36733.1.2.3.3.1.4.3 | Counter64 | Maximum number of UPDATE operations (in period) |
enterprises.36733.1.2.3.3.1.4.4 | Counter64 | Maximum number of DELETE operations (in period) |
enterprises.36733.1.2.3.3.1.4.5 | Counter64 | Maximum number of LIST operations (in period) |
| Cumulative Failure Operations OID | Data Type | Description |
|---|---|---|
enterprises.36733.1.2.3.3.1.5.1 | Counter64 | Cumulative Failure of CREATE operations (in period) |
enterprises.36733.1.2.3.3.1.5.2 | Counter64 | Cumulative Failure of READ operations (in period) |
enterprises.36733.1.2.3.3.1.5.3 | Counter64 | Cumulative Failure of UPDATE operations (in period) |
enterprises.36733.1.2.3.3.1.5.4 | Counter64 | Cumulative Failure of DELETE operations (in period) |
enterprises.36733.1.2.3.3.1.5.5 | Counter64 | Cumulative Failure of LIST operations (in period) |
| Average Number, Failure Operations OID | Data Type | Description |
|---|---|---|
enterprises.36733.1.2.3.3.1.6.1 | Float2dp | Average number of CREATE operations failures (in period) |
enterprises.36733.1.2.3.3.1.6.2 | Float2dp | Average number of READ operations failures (in period) |
enterprises.36733.1.2.3.3.1.6.3 | Float2dp | Average number of UPDATE operations failures (in period) |
enterprises.36733.1.2.3.3.1.6.4 | Float2dp | Average number of DELETE operations failures (in period) |
enterprises.36733.1.2.3.3.1.6.5 | Float2dp | Average number of LIST operations failures (in period) |
| Minimum Number, Operations Failures OID | Data Type | Description |
|---|---|---|
enterprises.36733.1.2.3.3.1.7.1 | Counter64 | Minimum number of CREATE operations failures (in period) |
enterprises.36733.1.2.3.3.1.7.2 | Counter64 | Minimum number of READ operations failures (in period) |
enterprises.36733.1.2.3.3.1.7.3 | Counter64 | Minimum number of UPDATE operations failures (in period) |
enterprises.36733.1.2.3.3.1.7.4 | Counter64 | Minimum number of DELETE operations failures (in period) |
enterprises.36733.1.2.3.3.1.7.5 | Counter64 | Minimum number of LIST operations failures (in period) |
| Maximum Number, Operations Failures OID | Data Type | Description |
|---|---|---|
enterprises.36733.1.2.3.3.1.8.1 | Counter64 | Maximum number of CREATE operations failures (in period) |
enterprises.36733.1.2.3.3.1.8.2 | Counter64 | Maximum number of READ operations failures (in period) |
enterprises.36733.1.2.3.3.1.8.3 | Counter64 | Maximum number of UPDATE operations failures (in period) |
enterprises.36733.1.2.3.3.1.8.4 | Counter64 | Maximum number of DELETE operations failures (in period) |
enterprises.36733.1.2.3.3.1.8.5 | Counter64 | Maximum number of LIST operations failures (in period) |
OIDs that start with enterprises.36733.1.2.3.4.1
are labels for CTS CRUD operations per token type.
Tokens of each type can be created, read, updated, deleted, and listed. Each of these types can be measured cumulatively. They can also be measured over a period of time (default=10 seconds), as an average, minimum, and maximum.
OID suffixes for CRUD operations are defined according to the following rules.
The first part of the OID is enterprises.36733.1.2.3.4.1.
The next OID suffix specifies a metric:
| OID Suffix | Data Type | Metric |
|---|---|---|
| 1 |
Counter64
| Cumulative count |
| 2 |
Float2dp
| Average (in period) |
| 3 |
Counter64
| Minimum (in period) |
| 4 |
Counter64
| Maximum (in period) |
The next OID suffix specifies a token type:
| OID Suffix | Token Type |
|---|---|
| 1 | Session |
| 2 | SAML v2.0 |
| 3 | OAuth 2 |
| 4 | REST |
| 5 | OAuth 2.0 CSRF Protection |
| 6 | Resource Set |
| 7 | UMA Permission Ticket |
| 8 | UMA Requesting Party |
| 9 | UMA Audit Entry |
| 10 | Session Blacklist |
| 11 | UMA Pending Request |
| 12 | Security Token Service |
| 13 | OAuth 2.0 Blacklist |
| 14 | OAuth 2.0 Stateless |
| 15 | Push Notification |
| 16 | Cluster-wide Notification |
The final OID suffix specifies an operation:
| OID Suffix | Operation |
|---|---|
| 1 | Create |
| 2 | Read |
| 3 | Update |
| 4 | Delete |
| 5 | List |
The following examples illustrate OID construction for CTS CRUD operations per token type.
| OID | Data Type | Description |
|---|---|---|
enterprises.36733.1.2.3.4.1.1.1.3
|
Counter64
| Cumulative count of updated Session tokens |
enterprises.36733.1.2.3.4.1.4.3.4
|
Counter64
| Maximum deleted OAuth 2.0 tokens (in period) |
enterprises.36733.1.2.3.4.1.2.10.5
|
Float2dp
| Average listed Session Blacklist tokens (in period) |
The CTS token OIDs defined in this section specify the total number of tokens of each type and their average current lifetimes.
The options for token operations are shown in the following tables. Total and average current lifetimes are associated with each CTS token type.
| Total Tokens, by Type | Data Type | Description |
|---|---|---|
enterprises.36733.1.2.3.5.1.1.1 | Counter64 | Total number of Session tokens |
enterprises.36733.1.2.3.5.1.1.2 | Counter64 | Total number of SAML v2.0 tokens |
enterprises.36733.1.2.3.5.1.1.3 | Counter64 | Total number of OAuth 2.0 tokens |
enterprises.36733.1.2.3.5.1.1.4 | Counter64 | Total number of REST tokens |
enterprises.36733.1.2.3.5.1.1.5 | Counter64 | Total number of OAuth 2.0 CSRF Protection tokens |
enterprises.36733.1.2.3.5.1.1.6 | Counter64 | Total number of Resource Set tokens |
enterprises.36733.1.2.3.5.1.1.7 | Counter64 | Total number of UMA Permission Ticket tokens |
enterprises.36733.1.2.3.5.1.1.8 | Counter64 | Total number of UMA Requesting Party tokens |
enterprises.36733.1.2.3.5.1.1.9 | Counter64 | Total number of UMA Audit Entry tokens |
enterprises.36733.1.2.3.5.1.1.10 | Counter64 | Total number of Session Blacklist tokens |
enterprises.36733.1.2.3.5.1.1.11 | Counter64 | Total number of UMA Pending Request tokens |
enterprises.36733.1.2.3.5.1.1.12 | Counter64 | Total number of Security Token Service tokens |
enterprises.36733.1.2.3.5.1.1.13 | Counter64 | Total number of OAuth 2.0 Blacklist tokens |
enterprises.36733.1.2.3.5.1.1.14 | Counter64 | Total number of OAuth 2.0 Stateless tokens |
enterprises.36733.1.2.3.5.1.1.15 | Counter64 | Total number of Push Notification tokens |
enterprises.36733.1.2.3.5.1.1.16 | Counter64 | Total number of Cluster-wide Notification tokens |
| Average Token Lifetime, by Type | Data Type | Description |
|---|---|---|
enterprises.36733.1.2.3.5.1.2.1 | Counter64 | Average lifetime of Session tokens in seconds |
enterprises.36733.1.2.3.5.1.2.2 | Counter64 | Average lifetime of SAML v2.0 tokens in seconds |
enterprises.36733.1.2.3.5.1.2.3 | Counter64 | Average lifetime of OAuth 2.0 tokens in seconds |
enterprises.36733.1.2.3.5.1.2.4 | Counter64 | Average lifetime of REST tokens in seconds |
enterprises.36733.1.2.3.5.1.2.5 | Counter64 | Average lifetime of OAuth 2.0 CSRF Protection tokens in seconds |
enterprises.36733.1.2.3.5.1.2.6 | Counter64 | Average lifetime of Resource Set tokens in seconds |
enterprises.36733.1.2.3.5.1.2.7 | Counter64 | Average lifetime of UMA Permission Ticket tokens in seconds |
enterprises.36733.1.2.3.5.1.2.8 | Counter64 | Average lifetime of UMA Requesting Party tokens in seconds |
enterprises.36733.1.2.3.5.1.2.9 | Counter64 | Average lifetime of UMA Audit Entry tokens in seconds |
enterprises.36733.1.2.3.5.1.2.10 | Counter64 | Average lifetime of Session Blacklist tokens in seconds |
enterprises.36733.1.2.3.5.1.2.11 | Counter64 | Average lifetime of UMA Pending Request tokens in seconds |
enterprises.36733.1.2.3.5.1.2.12 | Counter64 | Average lifetime of Security Token Service tokens in seconds |
enterprises.36733.1.2.3.5.1.2.13 | Counter64 | Average lifetime of OAuth 2.0 Blacklist tokens in seconds |
enterprises.36733.1.2.3.5.1.2.14 | Counter64 | Average lifetime of OAuth 2.0 Stateless tokens in seconds |
enterprises.36733.1.2.3.5.1.2.15 | Counter64 | Average lifetime of Push Notification tokens in seconds |
enterprises.36733.1.2.3.5.1.2.16 | Counter64 | Average lifetime of Cluster-wide Notification tokens in seconds |
The CTS reaper deletes unused or expired tokens. Unless AM is in a shutdown cycle, the CTS reaper is designed to run continuously. By default, the CTS reaper runs in fixed intervals, unless AM is in the process of shutting down.
A single OID, enterprises.36733.1.2.3.6.0, relates to the
CTS reaper. This OID:
Specifies the average rate of deleted tokens per CTS reaper run
Has the
Float2dpdata type.
Every request for a CTS token is a request to the
CTSConnectionFactory. Such requests can either
succeed or fail. The following OIDs provide measures for both
such connections. The CTSConnectionFactory OIDs are also measured
using a rate window system, similar to all the other CTS OIDs,
except the CTS Reaper.
As there are no indexes required to look up the value of CTSConnectionFactory OIDs, they end in 0. Success or failure of these OIDs are not specific to any operation or token type.
The following tables list the OIDs related to the CTSConnectionFactory.
| Successes, CTSConnectionFactory | Data Type | Description |
|---|---|---|
enterprises.36733.1.2.3.7.1.1.0 | Counter64 | Cumulative number of successful connections |
enterprises.36733.1.2.3.7.1.2.0 | Float2dp | Average number of successful connections (in period) |
enterprises.36733.1.2.3.7.1.3.0 | Counter64 | Minimum number of successful connections (in period) |
enterprises.36733.1.2.3.7.1.4.0 | Counter64 | Maximum number of successful connections (in period) |
| Failures, CTSConnectionFactory | Data Type | Description |
|---|---|---|
enterprises.36733.1.2.3.7.2.1.0 | Counter64 | Cumulative number of failed connections |
enterprises.36733.1.2.3.7.2.2.0 | Float2dp | Average number of failed connections (in period) |
enterprises.36733.1.2.3.7.2.3.0 | Counter64 | Minimum number of failed connections (in period) |
enterprises.36733.1.2.3.7.2.4.0 | Counter64 | Maximum number of failed connections (in period) |
Name
configurator.jar — install or upgrade AM using a configuration file
Synopsis
configurator.jar {options}
Description
This executable .jar file, openam-configurator-tool-14.1.1.5.jar, lets you perform silent installation, configuring a deployed AM server by applying settings from a configuration file.
Options
The following options are supported.
-f | --file configuration-fileConfigure a deployed AM web application archive using the specified configuration file. Installation and upgrade configuration files are described in the sections below.
--acceptLicenseAuto-accept the software license agreement and suppress the display of the licence acceptance screen to the user. If the configuration file contains the
ACCEPT_LICENSESproperty, it will have precedence over the command-line option.-? | --helpDisplay the usage message.
Installation Configuration File
Base your configuration on the sampleconfiguration
file delivered with AM, and using the hints in this section, or the
comments included in the file.
These properties pertain to the AM server instance.
- SERVER_URL
URL to the web container where you want AM to run, such as
http://openam.example.com:8080- DEPLOYMENT_URI
URI where you want to deploy AM on the web container, such as
/openam- BASE_DIR
Configuration directory where AM stores files and embedded configuration directory servers, such as
$HOME/openam- locale
The user locale, such as
en_GB- PLATFORM_LOCALE
The locale of the AM server, such as
en_US- AM_ENC_KEY
The password encryption key, which must be the same on all servers in a multi-server installation, such as
O6QWwHPO4os+zEz3Nqn/2daAYWyiFE32. If left blank, installing AM generates a random password encryption key that you can view in the AM console under Deployment > Servers > Server Name > Security.- ADMIN_PWD
Password of the AM administrator user
amadmin, which must be at least 8 characters in length and must match that of other servers in a multiserver deployment- COOKIE_DOMAIN
Name of the trusted DNS domain AM returns to a browser when it grants a session ID to a user. By default, it is set to the full URL that was used to access the configurator, such as
example.com.- ACCEPT_LICENSES
Optional boolean property that can be set to always auto-accept the software license agreement and suppress the display of the license acceptance screen to the user. A value of
trueauto-accepts the license; any other value will be assumed to equalfalse, resulting in the presentation of the license. Default value isfalse. This property takes precedence over the--acceptLicenseoption, which can also be passed in to the application with the openam-configurator-tool-14.1.1.5.jar file.
These properties pertain to the directory server where AM stores its configuration.
- DATA_STORE
Type of the configuration data store. The value
embeddedmeans set up AM with an embedded, DS configuration store. The valuedirServermeans an external directory server, such as ForgeRock Directory Services, or Oracle Directory Server Enterprise Edition. If you set this todirServer, and the configuration store contains the configuration of other AM servers, then the server is added to the existing multiserver installation.- DIRECTORY_SSL
To use LDAP without SSL, set this to
SIMPLE. To use LDAP with SSL, set this toSSL.- DIRECTORY_SERVER
Fully qualified domain name of the configuration store directory server host, such as
opendj.example.com- DIRECTORY_PORT
LDAP or LDAPS port number for the configuration store directory server, such as 389 or 636
- DIRECTORY_ADMIN_PORT
Administration port number for the configuration store directory server, such as 4444
- DIRECTORY_JMX_PORT
Java Management eXtension port number, such as
1689, used with the DS embedded configuration store- ROOT_SUFFIX
Root suffix distinguished name (DN) for the configuration store, such as
o=openam- DS_DIRMGRDN
Distinguished name of the directory manager of the configuration store, such as
cn=Directory Manager- DS_DIRMGRPASSWD
Password for the directory manager of the configuration store
These properties pertain to the directory server where AM stores user profiles. If you do not include these properties, or you leave these properties commented out, then AM uses the same directory server as it uses for the configuration store.
- USERSTORE_TYPE
The type of directory server used. Valid values include the following.
LDAPv3ForOpenDS: ForgeRock 0penDJ or Sun OpenDSLDAPv3ForAD: Active Directory with host and port settingsLDAPv3ForADDC: Active Directory with a Domain Name settingLDAPv3ForADAM: Active Directory Application ModeLDAPv3ForODSEE: Sun Java System Directory ServerLDAPv3ForTivoli: IBM Tivoli Directory Server
- USERSTORE_SSL
To use LDAP without SSL, set this to
SIMPLE. To use LDAP with SSL, set this toSSL.- USERSTORE_DOMAINNAME
If
USERSTORE_TYPEisLDAPv3ForADDC, you set this to the Active Directory Domain Name, such asad.example.com, and then set only theUSERSTORE_SSL,USERSTORE_MGRDN, andUSERSTORE_PASSWDadditional parameters. This lets Active Directory use DNS to retrieve service locations. Otherwise, do not use.- USERSTORE_HOST
Fully qualified domain name of the user data store directory server, such as
opendj.example.com- USERSTORE_PORT
Port number of the user data store. Default for LDAP is 389, and for LDAP over SSL is 636.
- USERSTORE_SUFFIX
Root suffix distinguished name for the user data in the directory, such as
dc=example,dc=com- USERSTORE_MGRDN
Distinguished name of the directory manager of the user data store, such as
cn=Directory Manager- USERSTORE_PASSWD
Password for the directory manager of the user data store
These properties pertain when you configure multiple AM servers
in a site deployment, where a load balancer spreads request across multiple
servers. Use the DS_EMB_REPL* and
existingserverid properties only for the second and
subsequent servers in a site configuration.
- LB_SITE_NAME
The name of the AM site
- LB_PRIMARY_URL
The load balancer URL for the site, such as
http://lb.example.com:80/openam.- DS_EMB_REPL_FLAG
Enable use of the embedded configuration store by setting this parameter to
embReplFlag, only if theDATA_STOREparameter is set toembedded. Use the otherDS_EMB_REPL*parameters in this section to set up configuration store data replication.- DS_EMB_REPL_REPLPORT1
Replication port number for the new AM server you are installing, such as 58989
- DS_EMB_REPL_HOST2
Host name of an existing AM server housing the configuration store directory server with which to replicate, such as
openam1.example.com- DS_EMB_REPL_ADMINPORT2
Administration port number for the configuration store directory server used by the existing AM server, such as 4444
- DS_EMB_REPL_REPLPORT2
Replication port number for the configuration store directory server used by the existing AM server, such as 50899
- existingserverid
Full URL of the existing AM server, such as
http://server1.example.com:8080/openam
Upgrade Configuration File
Base your configuration on the sampleconfiguration
file delivered with AM, and using the hints in this section, or the
comments included in the file.
- SERVER_URL
URL to the web container where AM runs, such as
http://openam.example.com:8080- DEPLOYMENT_URI
URI where AM is deployed on the web container, such as
/openam- ACCEPT_LICENSES
Optional boolean property that can be set to always auto-accept the software license agreement and suppress displaying the license acceptance screen to the user. A value of
trueauto-accepts the license; any other value will be assumed to equalfalse, resulting in the presentation of the license. Default value isfalse. This property takes precedence over the--acceptLicenseoption, which can also be passed in to the application with the openam-configurator-tool-14.1.1.5.jar file.
Examples
The following example shows a configuration file to install a server with an external user data store.
# Server properties, AM_ENC_KEY="" means generate random key
SERVER_URL=http://openam.example.com:8080
DEPLOYMENT_URI=/openam
BASE_DIR=$HOME/openam
locale=en_US
PLATFORM_LOCALE=en_US
AM_ENC_KEY=
ADMIN_PWD=change3me
COOKIE_DOMAIN=openam.example.com
ACCEPT_LICENSES=true

# Embedded configuration data store
DATA_STORE=embedded
DIRECTORY_SSL=SIMPLE
DIRECTORY_SERVER=openam.example.com
DIRECTORY_PORT=50389
DIRECTORY_ADMIN_PORT=4444
DIRECTORY_JMX_PORT=1689
ROOT_SUFFIX=o=openam
DS_DIRMGRDN=cn=Directory Manager
DS_DIRMGRPASSWD=chang3me

# External OpenDJ based user data store
USERSTORE_TYPE=LDAPv3ForOpenDS
USERSTORE_SSL=SIMPLE
#USERSTORE_DOMAINNAME=ad.example.com
USERSTORE_HOST=opendj.example.com
USERSTORE_PORT=389
USERSTORE_SUFFIX=dc=example,dc=com
USERSTORE_MGRDN=cn=Directory Manager
USERSTORE_PASSWD=secret12

# Uncomment to specify the site for the first server in a site configuration
#LB_SITE_NAME=lb
#LB_PRIMARY_URL=http://lb.example.com:80/openam
The following example shows a configuration file to install the second server in a site configuration.
# Server properties, AM_ENC_KEY from first server
SERVER_URL=http://server2.example.com:8080
DEPLOYMENT_URI=/openam
BASE_DIR=$HOME/openam
locale=en_US
PLATFORM_LOCALE=en_US
AM_ENC_KEY=O6QWwHPO4os+zEz3Nqn/2daAYWyiFE32
ADMIN_PWD=change3me
AMLDAPUSERPASSWD=secret12
COOKIE_DOMAIN=openam.example.com
ACCEPT_LICENSES=true

# Embedded configuration data store
DATA_STORE=embedded
DIRECTORY_SSL=SIMPLE
DIRECTORY_SERVER=server2.example.com
DIRECTORY_PORT=50389
DIRECTORY_ADMIN_PORT=4444
DIRECTORY_JMX_PORT=1689
ROOT_SUFFIX=o=openam
DS_DIRMGRDN=cn=Directory Manager
DS_DIRMGRPASSWD=chang3me

# External OpenDJ based user data store
USERSTORE_TYPE=LDAPv3ForOpenDS
USERSTORE_SSL=SIMPLE
#USERSTORE_DOMAINNAME=ad.example.com
USERSTORE_HOST=opendj.example.com
USERSTORE_PORT=389
USERSTORE_SUFFIX=dc=example,dc=com
USERSTORE_MGRDN=cn=Directory Manager
USERSTORE_PASSWD=secret12

# Site properties
LB_SITE_NAME=lb
LB_PRIMARY_URL=http://lb.example.com:80/openam
DS_EMB_REPL_FLAG=embReplFlag
DS_EMB_REPL_REPLPORT1=58989
DS_EMB_REPL_HOST2=server1.example.com
DS_EMB_REPL_ADMINPORT2=4444
DS_EMB_REPL_REPLPORT2=50889
existingserverid=http://server1.example.com:8080/openam
The following example shows a configuration file to upgrade an AM server.
SERVER_URL=https://openam.example.com:8080
DEPLOYMENT_URI=/openam
ACCEPT_LICENSES=true
The following example uses a configuration file with the
--acceptLicense option on the command line.
$ java \
 -jar openam-configurator-tool-14.1.1.5.jar \
 -f config.file \
 --acceptLicense
For more information or resources about AM and ForgeRock Support, see the following sections:
ForgeRock publishes comprehensive documentation online:
The ForgeRock Knowledge Base offers a large and increasing number of up-to-date, practical articles that help you deploy and manage ForgeRock software.
While many articles are visible to community members, ForgeRock customers have access to much more, including advanced information for customers using ForgeRock software in a mission-critical capacity.
ForgeRock product documentation, such as this document, aims to be technically accurate and complete with respect to the software documented. It is visible to everyone and covers all product features and examples of how to use them.
The ForgeRock.org site has links to source code for ForgeRock open source software, as well as links to the ForgeRock forums and technical blogs.
If you are a ForgeRock customer, raise a support ticket instead of using the forums. ForgeRock support professionals will get in touch to help you.
ForgeRock provides support services, professional services, training through ForgeRock University, and partner services to assist you in setting up and maintaining your deployments. For a general overview of these services, see https://www.forgerock.com.
ForgeRock has staff members around the globe who support our international customers and partners. For details, visit https://www.forgerock.com, or send an email to ForgeRock at info@forgerock.com.
This appendix presents sample scripts to install a Core Token Service (CTS) token store for AM.
You can use the following script to install a CTS token store. If you are using OpenDJ 3.0.0, use the following installation script:
#!/bin/bash
#
#  cts-install.txt
#
#  DO NOT ALTER OR REMOVE COPYRIGHT NOTICES OR THIS HEADER.
#  Copyright (c) 2011-2017 ForgeRock AS. All Rights Reserved
#
#  The contents of this file are subject to the terms
#  of the Common Development and Distribution License
#  (the License). You may not use this file except in
#  compliance with the License.
#
#  You can obtain a copy of the License at
#  http://forgerock.org/license/CDDLv1.0.html
#  See the License for the specific language governing
#  permission and limitations under the License.
#
#  When distributing Covered Code, include this CDDL
#  Header Notice in each file and include the License file
#  at http://forgerock.org/license/CDDLv1.0.html
#  If applicable, add the following below the CDDL Header,
#  with the fields enclosed by brackets [] replaced by
#  your own identifying information:
#  "Portions Copyrighted [year] [name of copyright owner]"
#
USER="cn=Directory Manager"
PASS="password"
SERVER_PORT=3389
TOMCAT_OPENAM_WEBAPP=/root/am-war
ROOT_SUFFIX="cn=cts,ou=famrecords,ou=openam-session,ou=tokens"
T=/tmp/ldif
rm -rf $T
mkdir $T
cp $TOMCAT_OPENAM_WEBAPP/WEB-INF/template/ldif/sfha/cts-add-multivalue.ldif
$T/cts-add-multivalue.ldif
cat $TOMCAT_OPENAM_WEBAPP/WEB-INF/template/ldif/sfha/cts-add-multivalue-indices.ldif |
   sed -e 's/@DB_NAME@/userRoot/' > $T/cts-add-multivalue-indices.ldif

bin/ldapmodify --port $SERVER_PORT --bindDN "$USER" --bindPassword "$PASS" --fileName $T/cts-add-multivalue.ldif
bin/ldapmodify --port $SERVER_PORT --bindDN "$USER" --bindPassword "$PASS" --defaultAdd --fileName $T/cts-add-multivalue-indices.ldif

bin/stop-ds
bin/rebuild-index --baseDN $ROOT_SUFFIX --rebuildAll --offline
bin/verify-index --baseDN $ROOT_SUFFIX
bin/start-ds
If you are using DS 4.0.0, the ldapmodify commands
are slightly different (no --defaultAdd option):
bin/ldapmodify --port $SERVER_PORT --bindDN "$USER" --bindPassword "$PASS" --fileName $T/cts-add-multivalue.ldif
bin/ldapmodify --port $SERVER_PORT --bindDN "$USER" --bindPassword "$PASS" --fileName $T/cts-add-multivalue-indices.ldif
Use the following script, cts-add-indexes.txt,
to add required indexes to the CTS token store using
dsconfig batch mode:
#!/bin/bash
#
#  cts-add-indexes.txt
#
#  DO NOT ALTER OR REMOVE COPYRIGHT NOTICES OR THIS HEADER.
#
#  Copyright (c) 2011-2017 ForgeRock AS. All Rights Reserved
#
#  The contents of this file are subject to the terms
#  of the Common Development and Distribution License
#  (the License). You may not use this file except in
#  compliance with the License.
#
#  You can obtain a copy of the License at
#  http://forgerock.org/license/CDDLv1.0.html
#  See the License for the specific language governing
#  permission and limitations under the License.
#
#  When distributing Covered Code, include this CDDL
#  Header Notice in each file and include the License file
#  at http://forgerock.org/license/CDDLv1.0.html
#  If applicable, add the following below the CDDL Header,
#  with the fields enclosed by brackets [] replaced by
#  your own identifying information:
#  "Portions Copyrighted [year] [name of copyright owner]"
#

#  dsconfig batch file to add CTS indexes
#  1. Save this file locally.
#  2. On OpenDJ server, run:
#     dsconfig -p 4444 -D "cn=Directory Manager" -w password \
#     -F cts-add-indexes.txt -X -n

create-backend-index --backend-name userRoot --index-name coreTokenExpirationDate \
   --set index-type:ordering
create-backend-index --backend-name userRoot --index-name coreTokenUserId \
   --set index-type:equality
create-backend-index --backend-name userRoot --index-name coreTokenString01 \
   --set index-type:equality
create-backend-index --backend-name userRoot --index-name coreTokenString02 \
   --set index-type:equality
create-backend-index --backend-name userRoot --index-name coreTokenString03 \
   --set index-type:equality
create-backend-index --backend-name userRoot --index-name coreTokenString08 \
   --set index-type:equality
create-backend-index --backend-name userRoot --index-name coreTokenString09 \
   --set index-type:equality
create-backend-index --backend-name userRoot --index-name coreTokenString10 \
   --set index-type:equality
create-backend-index --backend-name userRoot --index-name coreTokenString14 \
   --set index-type:equality
create-backend-index --backend-name userRoot --index-name coreTokenString15 \
   --set index-type:equality
create-backend-index --backend-name userRoot --index-name coreTokenInteger01 \
   --set index-type:equality
create-backend-index --backend-name userRoot --index-name coreTokenInteger02 \
   --set index-type:equality
create-backend-index --backend-name userRoot --index-name coreTokenInteger03 \
   --set index-type:equality
create-backend-index --backend-name userRoot --index-name coreTokenInteger04 \
   --set index-type:equality
create-backend-index --backend-name userRoot --index-name coreTokenInteger05 \
   --set index-type:equality
create-backend-index --backend-name userRoot --index-name coreTokenInteger08 \
   --set index-type:equality
create-backend-index --backend-name userRoot --index-name coreTokenInteger09 \
   --set index-type:equality
create-backend-index --backend-name userRoot --index-name coreTokenInteger10 \
   --set index-type:equality
create-backend-index --backend-name userRoot --index-name coreTokenDate01 \
   --set index-type:ordering
create-backend-index --backend-name userRoot --index-name coreTokenDate02 \
   --set index-type:equality
create-backend-index --backend-name userRoot --index-name coreTokenDate03 \
   --set index-type:equality
create-backend-index --backend-name userRoot --index-name coreTokenDate04 \
   --set index-type:equality
create-backend-index --backend-name userRoot --index-name coreTokenDate05 \
   --set index-type:equality
AM installation deploys several LDIF files that can be used to create the schemas required by AM in an external configuration data store. LDIF files are available for Microsoft Active Directory, Microsoft Active Directory Lightweight Directory Services, Oracle Directory Server Enterprise Edition, ForgeRock Directory Services, Oracle Unified Directory, and IBM Tivoli Directory Server.
The following tables provide descriptions for each LDIF file:
| LDIF File | Description |
|---|---|
| ad_config_schema.ldif | LDIF for the configuration schema. |
| ad_dashboard.ldif | LDIF to support the dashboard service. |
| ad_deviceprint.ldif | LDIF to support the device print service. |
| ad_kba.ldif | LDIF to support the User Self-Service's knowledge-based questions and answers service. |
| ad_oathdevices.ldif | LDIF to support registered devices for the OATH authentication service. |
| ad_pushdevices.ldif | LDIF to support registered devices for the PUSH notification service. |
| ad_user_schema.ldif | LDIF for the user schema. |
| LDIF File | Description |
|---|---|
| adam_dashboard.ldif | LDIF to support the dashboard service. |
| adam_deviceprint.ldif | LDIF to support the device print service. |
| adam_kba.ldif | LDIF to support the User Self-Service's knowledge-based questions and answers. |
| adam_oathdevices.ldif | LDIF to support registered devices for the OATH authentication service. |
| adam_pushdevices.ldif | LDIF to support registered devices for the PUSH notification service. |
| adam_user_schema.ldif | LDIF for the user schema. |
| LDIF File | Description |
|---|---|
| amsdk_plugin | Folder containg the AM SDK LDIF files: amsdk_init_template.ldif and amsdk_sunone_schema2.ldif. |
| odsee_config_index.ldif | LDIF for the ODSEE configuration indexes. |
| odsee_config_schema.ldif | LDIF for the ODSEE configuration schema. |
| odsee_dashboard.ldif | LDIF to support the dashboard service. |
| odsee_deviceprint.ldif | LDIF to support the device print service. |
| odsee_kba.ldif | LDIF to support the User Self-Service's knowledge-based questions and answers. |
| odsee_oathdevices.ldif | LDIF to support registered devices for the OATH authentication service. |
| odsee_pushdevices.ldif | LDIF to support registered devices for the PUSH notification service. |
| odsee_user_index.ldif | LDIF for the user respository indexes. |
| odsee_user_schema.ldif | LDIF for the user repository schema. |
| odsee_userinit.ldif | LDIF for the setting up user session initialization. |
| LDIF File | Description |
|---|---|
| oath_2fa.ldif | LDIF for the OATH two-factor authentication service. |
| opendj_aci_lift_user_password_restriction.ldif | LDIF to add an ACI entry to the root suffix to allow users to modify the user password attribute. |
| opendj_aci_remove_blanket_deny_all.ldif | LDIF to lift any user password restrictions for upgrade. |
| opendj_add_kba_attempts.ldif | LDIF to upgrade a user data store from a version earlier than AM 6 to support account lockout when the user fails to answer their security questions a number of times. |
| opendj_config_schema.ldif | LDIF for the DS configuration schema. |
| opendj_dashboard.ldif | LDIF to support the dashboard service. |
| opendj_deviceprint.ldif | LDIF to support the device print service. |
| opendj_embinit.ldif | LDIF for the DS user management and SMS/configuration datastore schema for embedded DS deployments. |
| opendj_kba.ldif | LDIF to support the User Self-Service's knowledge-based questions and answers. |
| opendj_oathdevices.ldif | LDIF to support registered devices for the OATH authentication service. |
| opendj_pushdevices.ldif | LLDIF to support registered devices for the PUSH notification service. |
| opendj_remove_config_schema.ldif | LDIF to remove the configuration schema. |
| opendj_remove_user_schema.ldif | LDIF to remove the user schema. |
| opend_uma_audit.ldif | LDIF to add auditing capabilities for the UMA service. |
| opend_uma_labels_schema.ldif | LDIF to add a schema for the UMA service labels. |
| opend_uma_pending_requests.ldif | LDIF to add pending requests for the UMA service. |
| opend_uma_resource_set_labels.ldif | LDIF to add labels for the UMA service resource sets. |
| opend_uma_resource_sets.ldif | LDIF to add resource sets to the UMA service resource. |
| opendj_update_aci_kba_attempts.ldif | LDIF to upgrade a user data store from a version earlier than AM 6 to support account lockout when the user fails to answer their security questions a number of times. |
| opendj_user_index.ldif | LDIF for the user respository indexes. |
| opendj_user_schema.ldif | LDIF for the user repository schema. |
| opendj_userinit.ldif | LDIF for the setting up user session initialization. |
| LDIF File | Description |
|---|---|
| tivoli_dashboard.ldif | LDIF to support the dashboard service. |
| tivoli_deviceprint.ldif | LDIF to support the device print service. |
| tivoli_kba.ldif | LDIF to support the User Self-Service's knowledge-based questions and answers. |
| tivoli_oathdevices.ldif | LDIF to support registered devices for the OATH authentication service. |
| tivoli_pushdevices.ldif | LDIF to support registered devices for the PUSH notification service. |
| tivoli_user_schema.ldif | LDIF for the user repository schema. |
- Access control
Control to grant or to deny access to a resource.
- Account lockout
The act of making an account temporarily or permanently inactive after successive authentication failures.
- Actions
Defined as part of policies, these verbs indicate what authorized identities can do to resources.
- Advice
In the context of a policy decision denying access, a hint to the policy enforcement point about remedial action to take that could result in a decision allowing access.
- Agent administrator
User having privileges only to read and write agent profile configuration information, typically created to delegate agent profile creation to the user installing a web or Java agent.
- Agent authenticator
Entity with read-only access to multiple agent profiles defined in the same realm; allows an agent to read web service profiles.
- Application
In general terms, a service exposing protected resources.
In the context of AM policies, the application is a template that constrains the policies that govern access to protected resources. An application can have zero or more policies.
- Application type
Application types act as templates for creating policy applications.
Application types define a preset list of actions and functional logic, such as policy lookup and resource comparator logic.
Application types also define the internal normalization, indexing logic, and comparator logic for applications.
- Attribute-based access control (ABAC)
Access control that is based on attributes of a user, such as how old a user is or whether the user is a paying customer.
- Authentication
The act of confirming the identity of a principal.
- Authentication chaining
A series of authentication modules configured together which a principal must negotiate as configured in order to authenticate successfully.
- Authentication level
Positive integer associated with an authentication module, usually used to require success with more stringent authentication measures when requesting resources requiring special protection.
- Authentication module
AM authentication unit that handles one way of obtaining and verifying credentials.
- Authorization
The act of determining whether to grant or to deny a principal access to a resource.
- Authorization Server
In OAuth 2.0, issues access tokens to the client after authenticating a resource owner and confirming that the owner authorizes the client to access the protected resource. AM can play this role in the OAuth 2.0 authorization framework.
- Auto-federation
Arrangement to federate a principal's identity automatically based on a common attribute value shared across the principal's profiles at different providers.
- Bulk federation
Batch job permanently federating user profiles between a service provider and an identity provider based on a list of matched user identifiers that exist on both providers.
- Circle of trust
Group of providers, including at least one identity provider, who have agreed to trust each other to participate in a SAML v2.0 provider federation.
- Client
In OAuth 2.0, requests protected web resources on behalf of the resource owner given the owner's authorization. AM can play this role in the OAuth 2.0 authorization framework.
- Client-based sessions
AM sessions for which AM returns session state to the client after each request, and require it to be passed in with the subsequent request. For browser-based clients, AM sets a cookie in the browser that contains the session information.
For browser-based clients, AM sets a cookie in the browser that contains the session state. When the browser transmits the cookie back to AM, AM decodes the session state from the cookie.
- Conditions
Defined as part of policies, these determine the circumstances under which which a policy applies.
Environmental conditions reflect circumstances like the client IP address, time of day, how the subject authenticated, or the authentication level achieved.
Subject conditions reflect characteristics of the subject like whether the subject authenticated, the identity of the subject, or claims in the subject's JWT.
- Configuration datastore
LDAP directory service holding AM configuration data.
- Cross-domain single sign-on (CDSSO)
AM capability allowing single sign-on across different DNS domains.
- CTS-based sessions
AM sessions that reside in the Core Token Service's token store. CTS-based sessions might also be cached in memory on one or more AM servers. AM tracks these sessions in order to handle events like logout and timeout, to permit session constraints, and to notify applications involved in SSO when a session ends.
- Delegation
Granting users administrative privileges with AM.
- Entitlement
Decision that defines which resource names can and cannot be accessed for a given identity in the context of a particular application, which actions are allowed and which are denied, and any related advice and attributes.
- Extended metadata
Federation configuration information specific to AM.
- Extensible Access Control Markup Language (XACML)
Standard, XML-based access control policy language, including a processing model for making authorization decisions based on policies.
- Federation
Standardized means for aggregating identities, sharing authentication and authorization data information between trusted providers, and allowing principals to access services across different providers without authenticating repeatedly.
- Fedlet
Service provider application capable of participating in a circle of trust and allowing federation without installing all of AM on the service provider side; AM lets you create Java Fedlets.
- Hot swappable
Refers to configuration properties for which changes can take effect without restarting the container where AM runs.
- Identity
Set of data that uniquely describes a person or a thing such as a device or an application.
- Identity federation
Linking of a principal's identity across multiple providers.
- Identity provider (IdP)
Entity that produces assertions about a principal (such as how and when a principal authenticated, or that the principal's profile has a specified attribute value).
- Identity repository
Data store holding user profiles and group information; different identity repositories can be defined for different realms.
- Java agent
Java web application installed in a web container that acts as a policy enforcement point, filtering requests to other applications in the container with policies based on application resource URLs.
- Metadata
Federation configuration information for a provider.
- Policy
Set of rules that define who is granted access to a protected resource when, how, and under what conditions.
- Policy agent
Java, web, or custom agent that intercepts requests for resources, directs principals to AM for authentication, and enforces policy decisions from AM.
- Policy Administration Point (PAP)
Entity that manages and stores policy definitions.
- Policy Decision Point (PDP)
Entity that evaluates access rights and then issues authorization decisions.
- Policy Enforcement Point (PEP)
Entity that intercepts a request for a resource and then enforces policy decisions from a PDP.
- Policy Information Point (PIP)
Entity that provides extra information, such as user profile attributes that a PDP needs in order to make a decision.
- Principal
Represents an entity that has been authenticated (such as a user, a device, or an application), and thus is distinguished from other entities.
When a Subject successfully authenticates, AM associates the Subject with the Principal.
- Privilege
In the context of delegated administration, a set of administrative tasks that can be performed by specified identities in a given realm.
- Provider federation
Agreement among providers to participate in a circle of trust.
- Realm
AM unit for organizing configuration and identity information.
Realms can be used for example when different parts of an organization have different applications and user data stores, and when different organizations use the same AM deployment.
Administrators can delegate realm administration. The administrator assigns administrative privileges to users, allowing them to perform administrative tasks within the realm.
- Resource
Something a user can access over the network such as a web page.
Defined as part of policies, these can include wildcards in order to match multiple actual resources.
- Resource owner
In OAuth 2.0, entity who can authorize access to protected web resources, such as an end user.
- Resource server
In OAuth 2.0, server hosting protected web resources, capable of handling access tokens to respond to requests for such resources.
- Response attributes
Defined as part of policies, these allow AM to return additional information in the form of "attributes" with the response to a policy decision.
- Role based access control (RBAC)
Access control that is based on whether a user has been granted a set of permissions (a role).
- Security Assertion Markup Language (SAML)
Standard, XML-based language for exchanging authentication and authorization data between identity providers and service providers.
- Service provider (SP)
Entity that consumes assertions about a principal (and provides a service that the principal is trying to access).
- Authentication Session
The interval while the user or entity is authenticating to AM.
- Session
The interval that starts after the user has authenticated and ends when the user logs out, or when their session is terminated. For browser-based clients, AM manages user sessions across one or more applications by setting a session cookie. See also CTS-based sessions and Client-based sessions.
- Session high availability
Capability that lets any AM server in a clustered deployment access shared, persistent information about users' sessions from the CTS token store. The user does not need to log in again unless the entire deployment goes down.
- Session token
Unique identifier issued by AM after successful authentication. For a CTS-based sessions, the session token is used to track a principal's session.
- Single log out (SLO)
Capability allowing a principal to end a session once, thereby ending her session across multiple applications.
- Single sign-on (SSO)
Capability allowing a principal to authenticate once and gain access to multiple applications without authenticating again.
- Site
Group of AM servers configured the same way, accessed through a load balancer layer. The load balancer handles failover to provide service-level availability.
The load balancer can also be used to protect AM services.
- Standard metadata
Standard federation configuration information that you can share with other access management software.
- Stateless Service
Stateless services do not store any data locally to the service. When the service requires data to perform any action, it requests it from a data store. For example, a stateless authentication service stores session state for logged-in users in a database. This way, any server in the deployment can recover the session from the database and service requests for any user.
All AM services are stateless unless otherwise specified. See also Client-based sessions and CTS-based sessions.
- Subject
Entity that requests access to a resource
When an identity successfully authenticates, AM associates the identity with the Principal that distinguishes it from other identities. An identity can be associated with multiple principals.
- User data store
Data storage service holding principals' profiles; underlying storage can be an LDAP directory service or a custom
IdRepoimplementation.- Web Agent
Native library installed in a web server that acts as a policy enforcement point with policies based on web page URLs.