Guide to configuring and using UMA features in ForgeRock® Access Management.
This guide covers configuration, concepts and procedures for working with the User-Managed Access (UMA) 2.0 features in ForgeRock Access Management.
ForgeRock Access Management 6 adds support for the User-Managed Access (UMA) 2.0 Grant for OAuth 2.0 Authorization and Federated Authorization for User-Managed Access (UMA) 2.0 specifications. Both specifications define UMA 2.0.
This guide is written for anyone who wants to set up Access Management for UMA 2.0 features.
ForgeRock Identity Platform™ serves as the basis for our simple and comprehensive Identity and Access Management solution. We help our customers deepen their relationships with their customers, and improve the productivity and connectivity of their employees and partners. For more information about ForgeRock and about the platform, see https://www.forgerock.com.
User-Managed Access (UMA) 2.0 is a lightweight access control protocol that defines a centralized workflow to allow an entity (user or corporation) to manage access to their resources.
UMA 2.0 extends the OAuth 2.0 protocol and gives resource owners granular management of their protected resources by creating authorization policies on a centralized authorization server, such as AM. The authorization server grants delegated consent to a requesting party on behalf of the resource owner to authorize who and what can get access to their data and for how long.
AM supports the UMA 2.0 protocol, which is defined by two specifications issued by the Kantara Initiative:
User-Managed Access (UMA) 2.0 Grant for OAuth 2.0 Authorization
This specification defines an OAuth 2.0 extension grant, allowing a party-to-party authorization mechanism where entities in a requesting party role can access protected resources authorized by the resource owner using authorization policies. The specification also defines how a resource owner can configure an authorization server with authorization grant rules to run asynchronously with the resource server using a requesting party token (RPT) versus granting consent at runtime.
Note
The User-Managed Access (UMA) 2.0 Grant for OAuth 2.0 Authorization specification also discusses the use of the authorization server's claims interaction endpoint for interactive claims gathering during the UMA grant flow. AM does not currently support interactive claims gathering. Claims gathering is accomplished by having the client acquire an OpenID Connect (OIDC) ID token[1].
The specification also discusses the optional issuance of a persisted claims token (PCT), which is a correlation handle issued by the authorization server, representing a set of claims collected during one authorization process to be used in later ones. AM does not currently support PCTs, because AM uses an OIDC ID token for its claims.
Federated Authorization for User-Managed Access (UMA) 2.0
This specification defines the loosely coupled federation of the authorization process by means of multiple resource servers in different domains that communicate with the centralized authorization server and acts on behalf of a resource owner. The authorization server can reside locally or in another domain from the resource server(s).
UMA 2.0 protocol introduces actors and their interactions in its protocol. This section provides a brief description to help you better understand the model.
UMA 2.0 uses the OAuth 2.0 actors in slightly extended ways and introduces one new actor:
- resource owner
The resource owner is a user or legal entity that is capable of granting access to a protected resource.
- client
The client is an application that is capable of making requests with the resource owner's authorization and on the requesting party's behalf.
- resource server
The resource server hosts resources on a resource owner's behalf and is capable of accepting and responding to requests for protected resources.
You can configure ForgeRock Identity Gateway 6 or later as an UMA resource server. For more information, see ForgeRock Identity Gateway ${platform.vers.ext} Gateway Guide.
- authorization server
The authorization server protects resources hosted on a resource server on behalf of resource owners.
You can set up AM to fully function as an authorization server in an UMA 2.0 deployment. AM provides an UMA provider service, UMA grant type handler, and endpoints for resource registration, permission ticket generation, and UMA token introspection. AM also uses its OAuth Provider Service to generate OIDC ID tokens (JWTs) to provide claim tokens and its policy engine for UMA resource management.
- requesting party
The requesting party is a user or legal entity that uses a client to access a protected resource. The requesting party may or may not be the same as the resource owner. This actor is specific to the UMA protocol.
UMA 2.0 defines the following actions in the workflow as illustrated in "Actors and Actions in the UMA 2.0 Workflow":
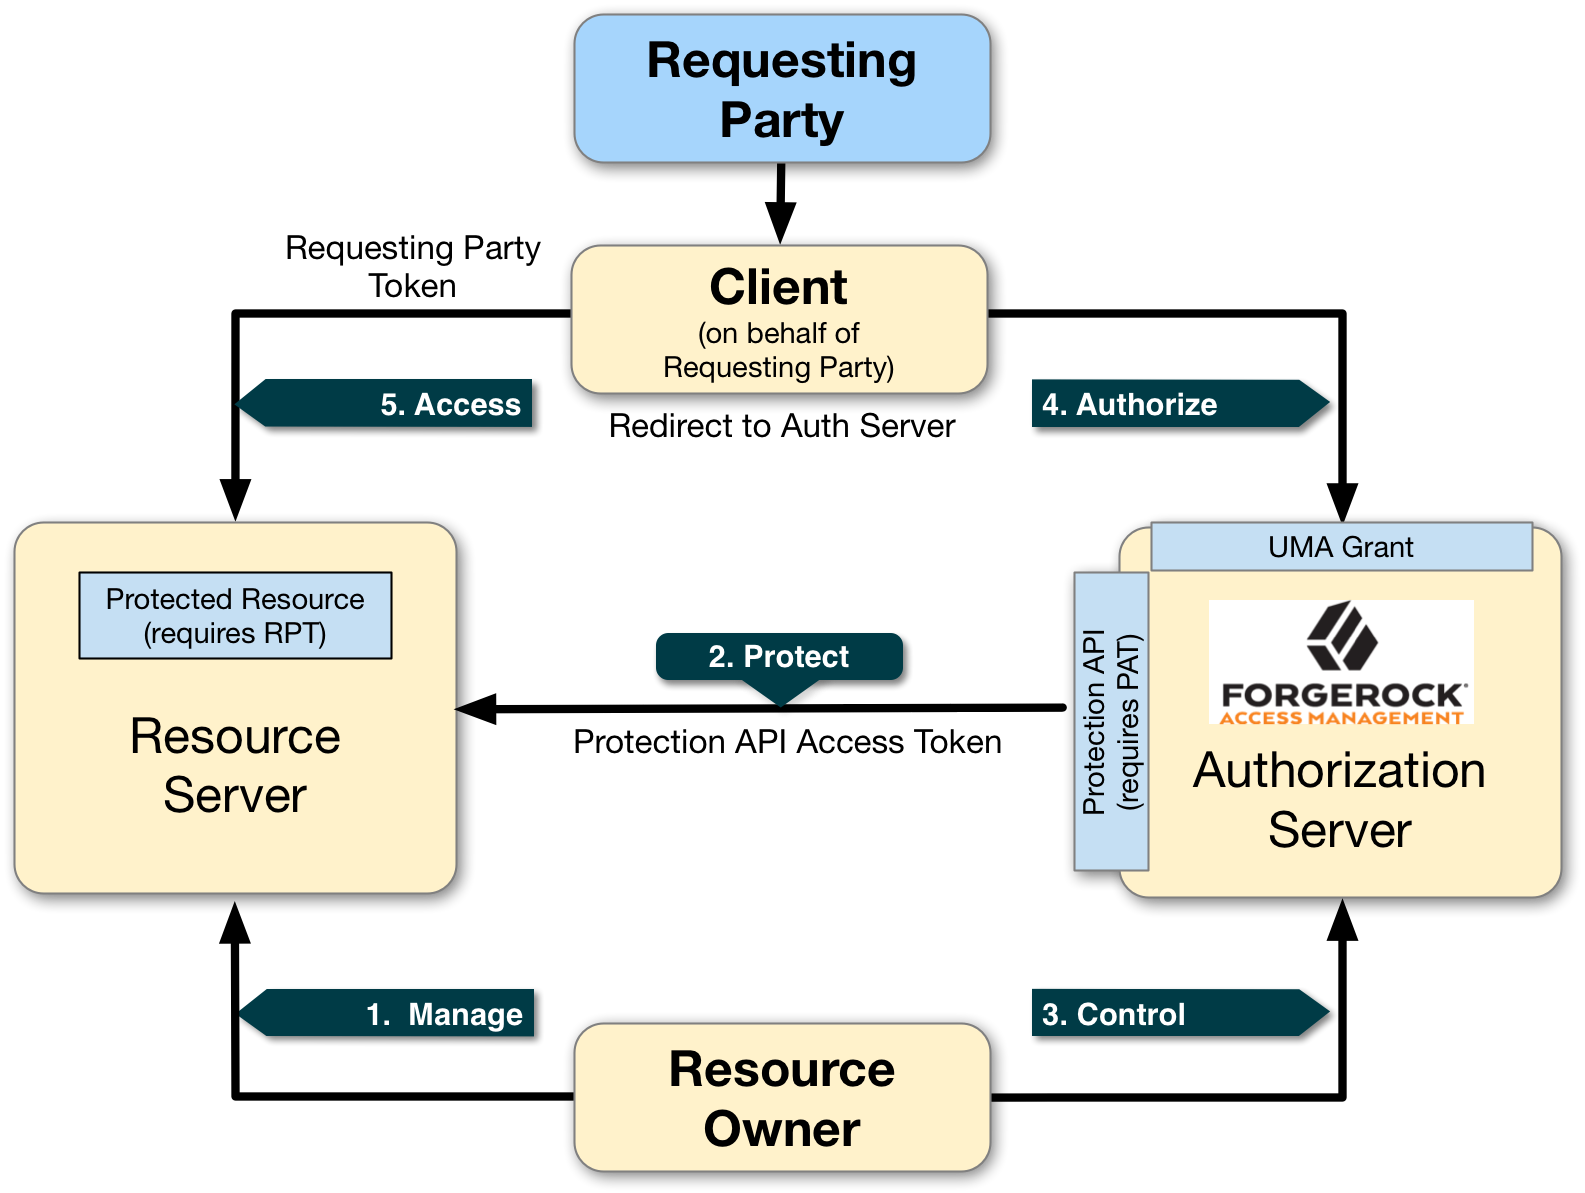
- 1. Manage
The resource owner manages their resources on the resource server.
- 2. Protect
The authorization server and the resource server are loosely coupled elements in an UMA deployment. Because they are loosely couples, the authorization server can onboard multiple resource servers in any domain. To onboard multiple resource servers, the authorization server exposes a protection API that provides resource registration, permission ticket, and token inspection endpoints to bind the resource server and authorization server.
The API endpoints are protected by a protection API access token (PAT)—an OAuth 2.0 token with a specific scope of
uma_protection—which establishes a trust relationship between the two components.For more information, see "Managing UMA Resource Sets".
- 3. Control
The resource owner controls who has access to their registered resources by creating policies on the authorization server. This allows the resource owner to grant consent asynchronously, rather than at resource request time. As a result, the requesting party can access data using a requesting party token (RPT).
For more information, see "Managing UMA 2.0 Policies".
- 4. Authorize
The client, acting on behalf of the requesting party, uses the authorization server's UMA Grant Flow to acquire a requesting party token (RPT), which is a token unique to the requesting party, client, authorization server, resource server, and resource owner. The requesting party and the resource owner can interact with their applications at any time they want [2]. This interaction allows for party-to-party data sharing and access authorization delegation. The resource owner can grant consent by policy using the authorization server, rather than issue a token at runtime; thus, allowing for the asynchronous granting of consent.
- 5. Access
The client presents the RPT to the resource server, which verifies its validity with the authorization server. If the token is valid and contains the sufficient permissions, the resource server returns the protected resource to the requesting party. The RPT is a claims token with time-limited scoped permisions.
The UMA 2.0 process largely involves the UMA 2.0 Grant flow, in which a requesting party obtains a RPT to access the resource, and resource registration which can occur at various stages through the UMA process by the resource owner. These stages could occur at initial resource creation (as shown in the sequence diagram), when needed for policy creation, and at resource access attempt.
See the section, "Considerations Regarding Resource Registration Timing and Mechanism" in the UMA Implementer's Guide for information.
The following sequence diagram outlines a successful registration of a protected resource:

A resource owner wants to make a resource sharable and sends a request to the resource server (labeled 1 in the diagram).
The resource server requires the resource owner to acquire an protection API access token (PAT) on the authorization server (2).
The authorization server returns a PAT, which allows the resource owner to register resources and manage policies (3).
The resource server registers the resource on the authorization server at the resource registration endpoint (4).
The resource owner creates a policy after registering the resource (5).
The following sequence diagram outlines a successful UMA 2.0 grant flow where the client accesses the protected resource:

A requesting party, using a client application, requests access to an UMA-protected resource (labeled 1 and 2 in the diagram above).
The resource server checks the existing token (3) and determines that the requesting party does not have the correct privileges to access the resource. The resource server returns a permission ticket (4) to the client.
The client uses the permission ticket and a claim token to send an RPT from AM (5 and 6).
AM makes a policy decision using the requested scopes, the scopes permitted in the registered resource, and the user-created policy, and if successful returns an RPT (7 and 8).
The client presents the RPT to the resource server (9), which must verify the token is valid using the AM introspection endpoint (10). If the RPT is confirmed to be valid and non-expired (10), the resource server can return the protected resource to the client for access by the requesting party (11).
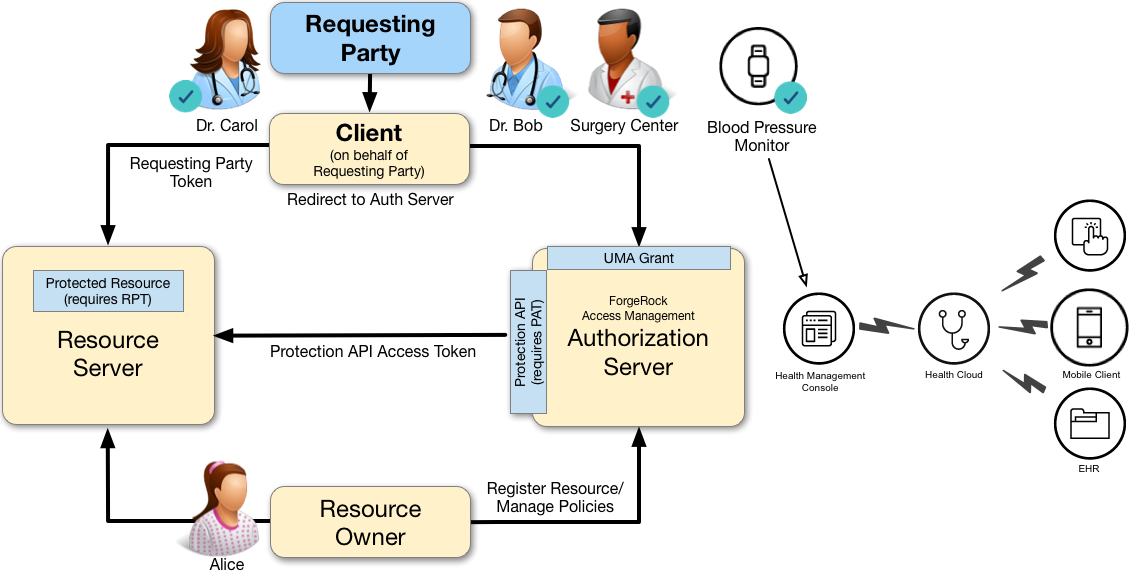
A resource owner, Alice, is a patient who plans to undergo a medical procedure
at a surgery center. Dr. Bob is a specialist surgeon who needs read
access (i.e., read scope) to Alice's electronic health records
in order to operate, and write access (i.e., write scope)
in order to add new entries related to the surgery. These records are a resource
whose contents have built up over time and to which Alice's regular physician, Dr. Carol,
has access already.
Alice, or some party representing Alice, registers her medical health records and sets up permissions using authorization policies, allowing Dr. Bob and Dr. Carol access to her health data. On an online healthcare application, Alice can easily grant consent by clicking a "Share" button to her data, or decline access by clicking a "Deny" button.
UMA also solves managed consent for IoT deployments. For example, Alice will need to be monitored after her operation. Dr. Bob prescribes a smart medical device for Alice, such as a clinical-grade blood pressure monitor, which must be registered by the resource server to place it under the authorization server's protection. The blood pressure monitor sends data to a server that aggregates and transmits the data to external devices, allowing Dr. Bob and Dr. Carol access to Alice's data on their tablets or mobile apps.
AM supports a one-to-many policy that can be shared with many entities, not just targeting a single requesting party. Thus, Alice is able to share her data with Dr. Bob, Dr. Carol, as well as with the clinical and operational employees at the surgery center.
To view other Case Studies, see the Kantara Initiative.
This chapter explains how to set up a simple demo UMA 2.0 system with AM as an authorization server. The demo uses a single AM instance as authorization server, UMA client, and resource server agent. You will enter REST requests to mimic the actions of an UMA client, resource owner, authorization server, and requesting party.
Before you configure an UMA 2.0 deployment, do the following:
Install an AM instance. For this example, install AM default configuration with the embedded directory server. For instructions, see "First Steps" in the Quick Start Guide.
(Optional). Install and configure ForgeRock Identity Gateway as an UMA resource server. For this example, the procedures uses
uri://-*-as a sample resource server URI. See the ForgeRock Identity Gateway Guide.
To set up an UMA 2.0 deployment, set up the components required for an UMA 2.0 deployment on AM:
| Task | Description |
|---|---|
|
Create an UMA provider service | |
|
Create an UMA client agent | |
|
Create an UMA resource server agent | |
|
Create an OAuth2/OIDC server | |
|
Create a resource owner. | |
|
Create a requesting party. |
Log in to the AM console as an administrator.
In the AM console, select Realms > Realm Name > Dashboard > Configure OAuth Provider > Configure User Managed Access.
Important
Some IDM deployments use AM's UMA Provider Service to help support privacy use cases, such as the General Data Protection Regulation (GDPR). If you are configuring the UMA Provider Service as part of an IDM deployment, perform the following steps:
In the AM console, navigate to Realms > Realm Name > Services and add an UMA Provider service.
For information about the available attributes, see "UMA Provider".
Save your changes.
On the Configure UMA page, select the Realm for the provider service.
(Optional) If necessary, adjust the lifetimes for authorization codes, access tokens, and refresh tokens.
(Optional) Select Issue Refresh Tokens unless you do not want the authorization service to supply a refresh token when returning an access token.
(Optional) Select Issue Refresh Tokens on Refreshing Access Tokens if you want the authorization service to supply a new refresh token when refreshing an access token.
(Optional) If you have a custom scope validator implementation, put it on the AM classpath, for example
/path/to/tomcat/webapps/openam/WEB-INF/lib/, and specify the class name in the Scope Implementation Class field. For an example, see "Customizing OAuth 2.0 Scope Handling" in the OAuth 2.0 Guide.Click Create to save your changes. AM creates the following:
An UMA provider service.
An OAuth2 provider service that supports OpenID Connect.
Warning
If an UMA or OAuth 2.0 provider service already exists, it will be overwritten with the new values.
To access the provider service configuration in the AM console, browse to Realms > Realm Name > Services, and then click UMA Provider.
For information about the available attributes, see "UMA Provider".
To complete the configuration, click Save Changes.
Create a profile for the UMA client agent in AM for OAuth 2.0 and UMA 2.0:
Log in to the AM console as an administrator.
In the top level realm, select Applications > OAuth 2.0.
Click Add Client, and enter the following values:
Client ID:
UmaClientClient secret:
passwordRedirection URIs:
redirection URI. For this example, leave it blank.Scope(s):
read openidNote
You will need to enter
read, press Enter, and then enteropenid.Default Scope(s): For this example, leave it blank.
Create a profile for the resource server agent in AM for OAuth 2.0 and UMA 2.0:
Log in to the AM console as an administrator.
In the top level realm, select Applications > OAuth 2.0.
Click Add Client, and enter the following values:
Client ID:
Uma-Resource-ServerClient secret:
passwordRedirection URIs:
redirection URI. For this example, leave it blank.Scope(s):
uma_protectionDefault Scope(s): For this example, leave it blank.
Log in to the AM console as an administrator.
In the top level realm, click Configure OAuth Provider > Configure OpenID Connect. Accept the defaults, and click Create.
Log in to the AM console as an administrator.
In the top level realm, click Identities.
Click New, and create a new requesting party. This example uses the following values:
ID:
aliceFirst Name:
AliceLast Name:
Resource-OwnerFull Name:
Alice Resource-OwnerPassword:
passwordPassword (confirm):
passwordUser Status:
Active
Click OK to save the settings.
Log in to the AM console as an administrator.
In the top level realm, click Identities.
Click New, and create a new requesting party. This example uses the following values:
ID:
bobFirst Name:
BobLast Name:
Requesting-PartyFull Name:
Bob Requesting-PartyPassword:
passwordPassword (confirm):
passwordUser Status:
Active
Click OK to save the settings.
The resource owner must acquire a protection API access token (PAT) to register a resource set and create UMA policies. The general flow to protect a resource can be seen in "UMA 2.0 Protecting a Resource Flow".
Resource registration can occur at three different stages: at initial resource creation, when needed for policy creation, and at resource access attempt. The resource registration process is the same regardless of when it is run.
To register a resource set and create UMA policies, perform the following procedures:
First, register an OAuth 2.0 client with a name, such as
UMA-Resource-Server and a client password, such as
password. Ensure that uma_protection is in
the list of available scopes in the client, and a redirection URI is configured. See
"Registering OAuth 2.0 Clients With the Authorization Service" in the OAuth 2.0 Guide.
This example uses the OAuth 2.0 Resource Owner Password Credentials grant type; however, the UMA resource server can use any of the OAuth 2.0 grants, except the client credentials grant, to obtain the access token.
After a suitable OAuth 2.0 client is configured, perform the following
steps to acquire a PAT on behalf of the resource owner, alice:
Create a POST request to the
/oauth2/access_tokenendpoint. The following example uses the Resource Owner Password Credentials grant type:$ curl \ --request POST \ --data 'grant_type=password' \ --data 'scope=uma_protection' \ --data 'username=alice' \ --data 'password=password' \ --data 'client_id=UMA-Resource-Server' \ --data 'client_secret=password' \ https://openam.example.com:8443/openam/oauth2/realms/root/access_token { "access_token": "057ad16f-7dba-4049-9f34-e609d230d43a", "refresh_token": "340f82a4-9aa9-471c-ac42-f0ca1809c82b",
"scope": "uma_protection",
"token_type": "Bearer",
"expires_in": 4999
}
"refresh_token": "340f82a4-9aa9-471c-ac42-f0ca1809c82b",
"scope": "uma_protection",
"token_type": "Bearer",
"expires_in": 4999
}The value returned in
access_tokenis the Protection API Token, or PAT Bearer token.Note
To use the Resource Owner Password Credentials grant type, as described in RFC 6749, the default authentication chain in the relevant realm must allow authentication using only a username and password, for example by using a
DataStoremodule. Attempting to use the Resource Owner Password Credentials grant type with a chain that requires any additional input returns an HTTP500 Server Errormessage.
After acquiring a PAT, the resource owner can now register a resource set on the authorization server.
Send a POST request to the
/uma/resource_setendpoint to register the resource,my resource 106. Make sure to use theresource_scopesattribute to define your scopes and the PAT as your resource owner's bearer token:$ curl -X POST \ --header 'authorization: Bearer 057ad16f-7dba-4049-9f34-e609d230d43a' \
--header 'cache-control: no-cache' \
--header 'content-type: application/json' \
--data '{
"resource_scopes": [
"view", "comment", "download"
],
"name": "my resource 106",
"type": "type",
"uri": "http://rs.example.com/alice/myresource106"
}' \
https://openam.example.com:8443/openam/uma/resource_set
{
"_id": "0d7790de-9066-4bb6-8e81-25b6f9d0b8853",  "user_access_policy_uri": "https://openam.example.com:8443/openam/XUI/?realm=/#uma/share/0d7790de-9066-4bb6-8e81-25b6f9d0b8853"
}
"user_access_policy_uri": "https://openam.example.com:8443/openam/XUI/?realm=/#uma/share/0d7790de-9066-4bb6-8e81-25b6f9d0b8853"
}Use the PAT Bearer Token previously acquired on behalf of the resource owner. See "To Acquire a Protection API Token (PAT)".
The value returned in the
_idproperty is the ID of the created UMA resource set.
To create a policy, the resource owner must be logged in to the authorization server and have an SSO token issued to them, and must also have the resource set ID to be protected. This information is used when creating policies.
For more information on authenticating to AM to obtain an SSO token for a user, see "Using Authentication" in the Authentication and Single Sign-On Guide.
Note
Only the resource owner can create a policy to protect
a resource set. Administrator users, such as amAdmin, cannot
create policies on behalf of a resource owner.
Create a PUT request to the policies endpoint, including the SSO token in a header based on the configured session cookie name (default:
iPlanetDirectoryPro), and the resource set ID as the value ofpolicyIdin the body, and also in the URI.Note
The SSO token must have been issued to the resource owner. In this example, the resource owner is
alice. The following is an example of how to obtain the SSO token for a user:$ curl \ --request POST \ --header "Content-Type: application/json" \ --header "X-OpenAM-Username: alice" \ --header "X-OpenAM-Password: password" \ --header "Accept-API-Version: resource=2.0, protocol=1.0" \ --data "{}" \ https://openam.example.com:8443/openam/json/realms/root/authenticate { "tokenId":"AQIC5wM2LY4S...Q4MTE4NTA2*",
"successUrl":"/openam/console",
"realm":"/"
}The value returned in the
tokenIdelement is the SSO token of the resource owner, Alice. Use this value as the contents of theiPlanetDirectoryProcookie when creating the policy below.The following example uses the policy owner's SSO token (
iPlanetDirectoryProcookie). The command below creates a policy to share a resource set belonging to user alice with userbob:$ curl -X PUT \ --header 'Accept-API-Version: resource=1.0' \ --header 'cache-control: no-cache' \ --header 'content-type: application/json' \ --header "iPlanetDirectoryPro: AQIC5wM2LY4S...Q4MTE4NTA2*" \
--header "If-None-Match: *" \
--data '{
"policyId": "0d7790de-9066-4bb6-8e81-25b6f9d0b8853",
"permissions":
[
{
"subject": "bob",
"scopes": [
"view",
"comment"
]
}
]
}' \
https://openam.example.com:8443/openam/json/users/alice/uma/policies/0d7790de-9066-4bb6-8e81-25b6f9d0b8853
{
"_id": "0d7790de-9066-4bb6-8e81-25b6f9d0b8853",  "_rev": "-1985914901"
}
"_rev": "-1985914901"
}Specify the SSO token of the resource owner. Administrative users such as
amAdmincannot create UMA resource policies on behalf of a resource owner.Specify the ID of the registered resource set that this policy will protect. The same resource set ID must also be included in the URI of the REST call. See "Register an UMA Resource Set".
Note that the returned
_idvalue of the new policy set is identical to the ID of the registered resource set.On success, an HTTP 201 Created status code is returned, with the ID of the created policy.
If the permissions are not correct, an HTTP 400 Bad Request status code is returned, for example:
{
    "code": 400,
    "reason": "Bad Request",
    "message": "Invalid UMA policy permission. Missing required attribute, 'subject'."
}
The UMA grant flow grants a requesting party access token (RPT) to the requesting party to allow access to a resource. The general UMA grant flow can be seen in "UMA 2.0 Grant Flow Process".
To issue an RPT to a requesting party, run the following procedures:
| Task | Description |
|---|---|
|
Create a permission ticket | |
|
Gather claims to create a claim token | |
|
Obtain an RPT |
When the resource server receives a request for access to a resource, it contacts the authorization server to acquire a permission ticket. The permission ticket associates a request for a particular resource with the corresponding scopes. The PAT bearer token of the resource owner is used to map the request to the correct identity.
The permission ticket and the claim token are used to obtain a requesting party access token (RPT). A new permission ticket must be used for each attempt to acquire an RPT.
Send a POST request to the
/uma/permission_request:curl -X POST \ --header 'authorization: Bearer 057ad16f-7dba-4049-9f34-e609d230d43a' \
--header 'cache-control: no-cache' \
--header 'content-type: application/json' \
--data '[
{
"resource_id" : "ef4d750e-3831-483b-b395-c6f059b5e15d0",
"resource_scopes" : ["download"]
}
]' \
https://openam.example.com:8443/openam/uma/permission_request
{
"ticket": "eyJ0eXAiOiJKV1QiLCJhbGciOiJIUzI1NiJ9.eyJhdWQiOiJodHRwOi8vb3BlbmFt
LmRlZmF1bHQuZXhhbXBsZS5jb206ODAvb3BlbmFtL29hdXRoMiIsImlzcyI6Imh0d
HA6Ly9vcGVuYW0uZGVmYXVsdC5leGFtcGxlLmNvbTo4MC9vcGVuYW0vb2F1dGgyIi
wiaXQiOjAsImV4cCI6MTUwNzE0ODI2MiwidGlkIjoiZWY0ZDc1MGUtMzgzMS00ODN
iLWIzOTUtYzZmMDU5YjVlMTVkMiIsImZvcmdlcm9jayI6eyJzaWciOiIzUylGOk1u
N0N0dVlIZVpQVVtrMGZlajJmL2JAVDBYfWI4dH1hOEQmIn19.vi6RxLMxl5MiB1uK
60P1yE2HIhWnF7CDFgz4agM5YAQ"
}Use the PAT Bearer Token previously acquired on behalf of the resource owner. See "To Acquire a Protection API Token (PAT)".
Specify the ID of the registered resource set for which this permission ticket will maintain permission state information. See "Register an UMA Resource Set".
The value returned in the
ticketproperty is the permission ticket, which is used to obtain an RPT. See "Obtain a Requesting Party Token (RPT)".Note
The default lifetime for an UMA permission ticket is 120 seconds. Attempting to obtain a requesting party token after the permission ticket has expired will fail with an error message as follows:
{
    "error_description": "The provided access grant is invalid, expired, or revoked.", "error": "invalid_grant"
}
You can alter the default lifetime of a permission ticket by navigating to Realms > Realm Name > Services > UMA Provider, and editing the Permission Ticket Lifetime (seconds) property.
The authorization server must gather claims from the requesting party to create a claim token.
Send a POST request to the
/oauth2/access_tokenendpoint. The value returned in theid_tokenproperty is the claim token required to obtain an RPT, along with the permission ticket acquired earlier:$ curl -X POST \ --header 'authorization: Basic VW1hQ2xpZW50OnBhc3N3b3Jk' \
--header 'cache-control: no-cache' \
--header 'content-type: application/x-www-form-urlencoded' \
--data 'grant_type=password' \
--data 'scope=openid' \
--data 'username=bob' \
--data 'password=password' \
https://openam.example.com:8443/openam/oauth2/access_token
{
"access_token": "f09f55e5-5e9c-48fe-aeaa-d377de88e8e6",
"refresh_token": "ee2d35f6-5819-4734-8b3e-9af77a545563",
"scope": "openid",
"id_token": "eyJ0eXAiOiJKV1QiLCJraWQiOiJiL082T3ZWdjEreStXZ3JINVVpOVdUaW9MdDA
9IiwiYWxnIjoiUlMyNTYifQ.eyJhdF9oYXNoIjoiMWpodGpUQ0JmLWdKeDFUZGR
EdFlIdyIsInN1YiI6ImJvYiIsImF1ZGl0VHJhY2tpbmdJZCI6IjBmZjAxNzQ0LW
Y5ZDMtNGFhMi04NmU4LTcyNTJlYTUyMWQ4Yi04MDIiLCJpc3MiOiJodHRwOi8vb
3BlbmFtLmRlZmF1bHQuZXhhbXBsZS5jb206ODAvb3BlbmFtL29hdXRoMiIsInRv
a2VuTmFtZSI6ImlkX3Rva2VuIiwiYXVkIjoiVW1hQ2xpZW50IiwidXBkYXRlZF9
hdCI6IjE1MDcwODc5MDEiLCJhenAiOiJVbWFDbGllbnQiLCJhdXRoX3RpbWUiOj
E1MDcwODgyNjcsInJlYWxtIjoiLyIsImV4cCI6MTUwNzE0ODI2NywidG9rZW5Ue
XBlIjoiSldUVG9rZW4iLCJpYXQiOjE1MDcwODgyNjd9.aVEF0P0pSUsifl_aPuZ
QwWxhv6CvqNEbK6_kDpat_u-gfwKZZRWmdvouLa9dNmGr33EQJY4LifCUHA_AKn
048G3W6czBupC4TJESK4rDwKr2OXPQVzTrGNk25ix5Dw_BdngW-YJfnXmlSByKt
ZmaYT7FGS0bdGMedtkypVpM6uZAQcc9JEmOlOCHF-l57NH88pOP7MkY9gszlGJi
3cFEMHONTBB6-yroJyU-vaDJzWeCX3uGVqY8K3nUMqMguRSIkqrltabyX4CuKtN
JlthJUEnX4mZFBNf7un7Qs3nx3BUAzclKjL2H1FNyD2a-zx3YOJ9Wm4kj_SlgTg
FBznEB5A",
"token_type": "Bearer",
"expires_in": 4999
}Authorize using the credentials of the UMA client. Use the client ID and client secret, separated by a colon character, for example
UmaClient:password. Base64-encode the result. See "To Create an UMA Client Agent".The value returned in the
id_tokenproperty is the claim token, which is used to obtain an RPT. See "Obtain a Requesting Party Token (RPT)".Note
To use the Resource Owner Password Credentials grant type, as described in RFC 6749, the default authentication chain in the relevant realm must allow authentication using only a username and password, for example by using a
DataStoremodule. Attempting to use the Resource Owner Password Credentials grant type with a chain that requires any additional input returns an HTTP500 Server Errormessage.
The requesting party makes a request using the permission ticket and the claim token, in exchange for a Requesting Party Token.
Send a POST request to the
/oauth2/access_tokenendpoint. Make sure to include the permission ticket,ticket, and theclaim_token. The following example results in an error description, indicating that "The client is not authorised to access the requested resource set." The authorization server sends a request to the resource owner to allow or deny access to the requesting party.curl -X POST \ --header 'authorization: Basic VW1hQ2xpZW50OnBhc3N3b3Jk' \
--header 'cache-control: no-cache' \
--header 'content-type: application/x-www-form-urlencoded' \
--data 'grant_type=urn:ietf:params:oauth:grant-type:uma-ticket' \
--data 'ticket=eyJ0eXAiOiJKV1QiLCJhbGciOiJIUzI1NiJ9.eyJhdWQiOiJodHRwOi8vb3BlbmFt
LmRlZmF1bHQuZXhhbXBsZS5jb206ODAvb3BlbmFtL29hdXRoMiIsImlzcyI6Imh0d
HA6Ly9vcGVuYW0uZGVmYXVsdC5leG$' \
--data 'scope=download' \
--data 'claim_token=eyJ0eXAiOiJKV1QiLCJraWQiOiJiL082T3ZWdjEreStXZ3JINVVpOVdUaW9MdDA
9IiwiYWxnIjoiUlMyNTYifQ.eyJhdF9oYXNoIjoieWExdHlyZFdBTTYwWGlfLU5
EUTc4ZyIsInN1YiI6ImJvYiIsImF1ZG$' \
--data 'claim_token_format=http://openid.net/specs/openid-connect-core-1_0.html#IDToken' \
https://openam.example.com:8443/openam/oauth2/access_token
{
"ticket": "eyJ0eXAiOiJKV1QiLCJhbGciOiJIUzI1NiJ9.eyJhdWQiOiJodHRwOi8vb3BlbmFt
LmRlZmF1bHQuZXhhbXBsZS5jb206ODAvb3BlbmFtL29hdXRoMiIsImlzcyI6Imh0d
HA6Ly9vcGVuYW0uZGVmYXVsdC5leGFtcGxlLmNvbTo4MC9vcGVuYW0vb2F1dGgyIi
wiaXQiOjEsImV4cCI6MTUwNzE0ODEzNSwidGlkIjoiNTkzNmExOGMtOGE2OC00YTI
xLTliOGQtZWViNzIyOGEwMDY3MCIsImZvcmdlcm9jayI6eyJzaWciOiIqP2pMUEVV
M3hYNm5RbU8-YXFXZ0d9aTJ1OjNnLlRrc2FKI3UpXnokIn19.a9JpfsXS09CNvr2B
RtLDO-t4ZCnmrHr2h3auXPeJi3E",
"error_description": "The client is not authorised to access the requested resource set. A request has been submitted to the resource owner requesting access to the resource",
"error": "request_submitted"
}Authorize using the credentials of the UMA client. Use the username and password, separated by a colon character, for example
UmaClient:password, and base64-encode the result. See "To Create an UMA Client Agent".Specify the permission ticket acquired earlier. See "Create a Permission Ticket".
Specify the claim token acquired earlier. See "Gather Claims".
Note
The default lifetime for an UMA permission ticket is 120 seconds. Attempting to obtain a requesting party token after the permission ticket has expired will fail with an error message as follows:
{
      "error_description": "The provided access grant is invalid, expired, or revoked.", "error": "invalid_grant"
      }
If the ticket has expired, obtain another by repeating the steps in "Create a Permission Ticket".
You can alter the default lifetime of a permission ticket by navigating to Realms > Realm Name > Services > UMA Provider, and editing the Permission Ticket Lifetime (seconds) property.
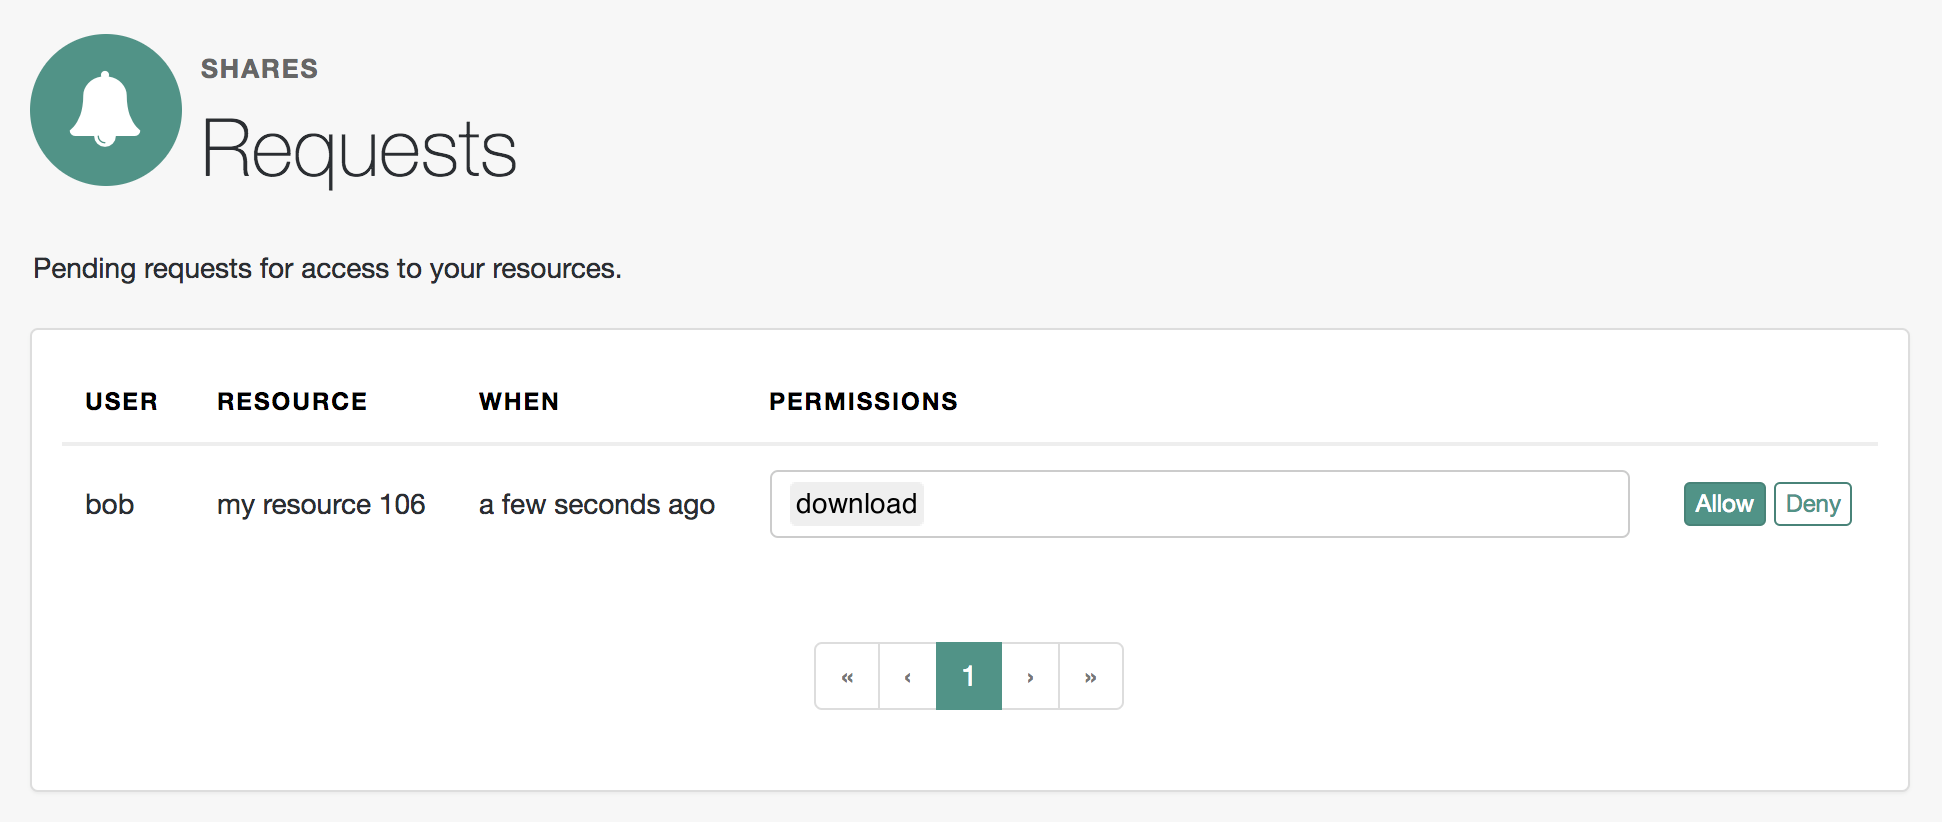
The resource owner, Alice, logs into AM to view the access request. She clicks Shares > Requests, and clicks Allow to grant read access to Bob, the requesting party.
Because each permission token can only be used once, request a new permission token by performing the steps in "Create a Permission Ticket".
Resubmit the previous POST request for the RPT, with the new permission ticket obtained in the previous step and the original claim token:
curl -X POST \
--header 'authorization: Basic VW1hQ2xpZW50OnBhc3N3b3Jk' \
--header 'cache-control: no-cache' \
--header 'content-type: application/x-www-form-urlencoded' \
--data 'grant_type=urn:ietf:params:oauth:grant-type:uma-ticket' \
--data 'ticket=eyJ0eXAiOiJKV1QiLCJhbGciOiJIUzI1NiJ9.eyJhdWQiOiJodHRwOi8vb3BlbmFt
        LmRlZmF1bHQuZXhhbXBsZS5jb206ODAvb3BlbmFtL29hdXRoMiIsImlzcyI6Imh0d
        HA6Ly9vcGVuYW0uZGVmYXVsdC5leG$' \
--data 'scope=download' \
--data 'claim_token=eyJ0eXAiOiJKV1QiLCJraWQiOiJiL082T3ZWdjEreStXZ3JINVVpOVdUaW9MdDA
        9IiwiYWxnIjoiUlMyNTYifQ.eyJhdF9oYXNoIjoieWExdHlyZFdBTTYwWGlfLU5
        EUTc4ZyIsInN1YiI6ImJvYiIsImF1ZG$' \
--data 'claim_token_format=http://openid.net/specs/openid-connect-core-1_0.html#IDToken' \
https://openam.example.com:8443/openam/oauth2/access_token
{
    "access_token": "Aw4a92ZoKsjadWKw2d4Rmcjv7DM",
    "token_type": "Bearer",
    "expires_in": 3599
}
Authorize using the same credentials of the UMA client as the first request for an RPT.
Specify a refreshed permission ticket acquired earlier, otherwise you will receive a response such as:
The provided access grant is invalid, expired, or revoked. See "Create a Permission Ticket".Specify the same claim token as the first request for an RPT.
The
access_tokenis the RPT, which allows the requesting party to access the resource through a client.You have successfully configured and tested an UMA 2.0 example demo deployment.
(Optional) You can use the
/oauth2/introspectendpoint to inspect the properties of the RPT. Use the PAT issued to the resource owner for authenticating to the authorization server, and specify the RPT token in a query parameter namedtoken, as follows:$ curl --header 'authorization: Bearer 057ad16f-7dba-4049-9f34-e609d230d43a' \ 'https://openam.example.com:8443/openam/oauth2/introspect?token=Aw4a92ZoKsjadWKw2d4Rmcjv7DM' { "active": true, "permissions": [ { "resource_id": "ef4d750e-3831-483b-b395-c6f059b5e15d0", "resource_scopes": [ "download" ], "exp": 1522334692 } ], "token_type": "access_token", "exp": 1522334692, "iss": "https://openam.example.com:8443/openam/oauth2" }
The functionality covered is described in the following procedures:
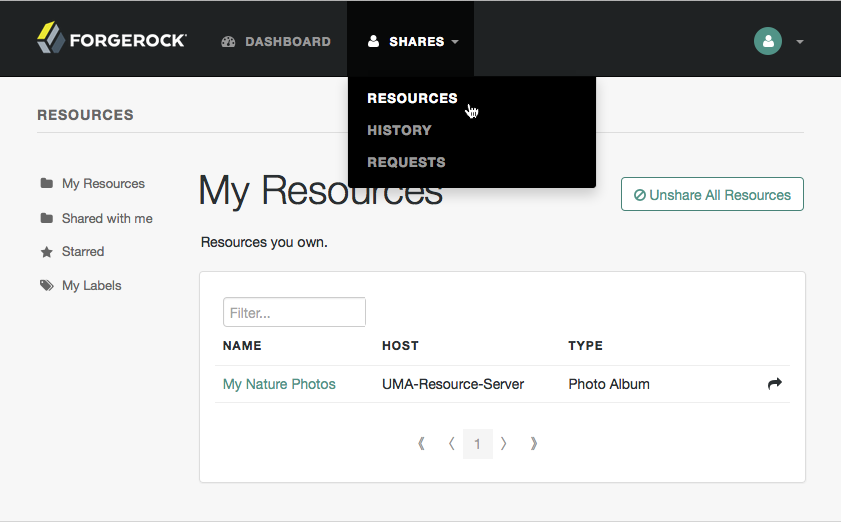
Log in to AM. Your user profile page appears.
On the Shares menu, click Resources. A list of the resources you own appears.
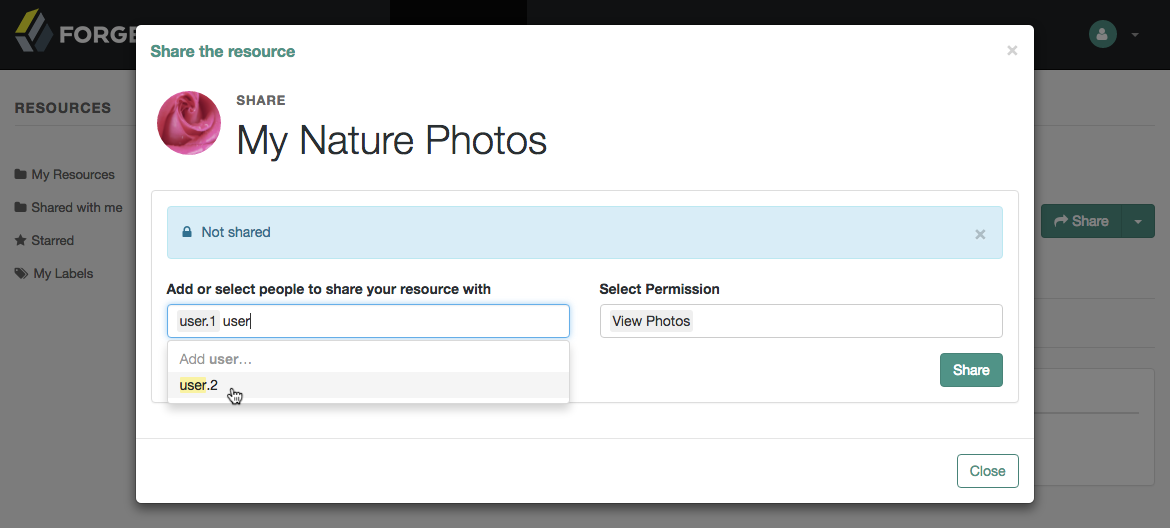
To share a resource, click the name of the resource to open the resource details page, and then click the Share button.
On the Share the resource form:
Enter the username of the user with whom to share the resource.
From the Select Permission drop-down list, choose the permissions to assign to the user for the selected resource.
Click Share.
Repeat these steps to share the resources with additional users.
When finished, click Close.
To apply labels to a resource:
Log in to AM as a user. The profile page is displayed.
Navigate to Shares > Resources > My Resources, and then click the name of the resource to add labels to.
On the resource details page, click Edit Labels.
In the edit box that appears, you can:
Enter the label you want to add to the resource, and then press Enter.
If you enter a label containing forward slash (/) characters, a hierarchy of each component of the label is created. The resource only appears in the last component of the hierarchy.
For example, the screenshot below shows the result of the label:
2015/October/Bristol: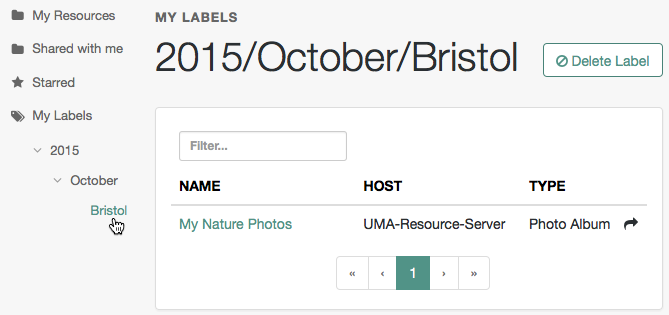
Click an existing label, and then press Delete or Backspace to delete the label from the resource.
When you have finished editing labels you can:
Click the checkmark button to save any changes made.
Click the X button to cancel any changes made.

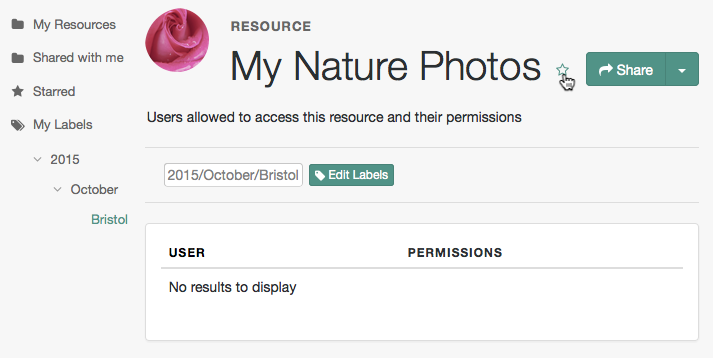
Mark resources as favorites to have them appear on the Starred page.
Log in to AM as a user. The profile page is displayed.
Navigate to Shares > Resources > My Resources, and then click the name of the resource to add to the list of favorites.
On the resource details page, click the star icon, as shown below:
To view the list of favorite resources, click Starred.
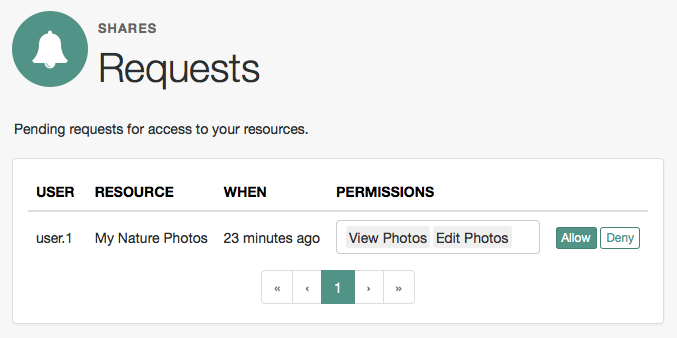
AM supports an UMA workflow in which a user can request access to a resource that has not been explicitly shared with them. The resource owner receives a notification of the request and can choose to allow or deny access.
Manage pending requests for access to resources by using the steps below:
Login to AM as the resource owner, and then navigate to Shares > Requests.
The Requests page is displayed:
Review the pending request, and take one of the following actions:
Click Allow to approve the request.
Tip
You can remove permissions from the request by clicking the permission, and then press either Delete or Backspace. Select the permission from the drop-down list to return it to the permissions granted to the resource owner.
The required UMA policy will be created, and optionally the requesting party will be notified that they can now access the resource.
The requesting party can view a list of resources to which they have access by navigating to Shares > Resources > Shared with me.
Click Deny to prevent the requesting party from accessing the resource. The pending request is removed, and the requesting party will not be notified.
After allowing or denying access to a resource, an entry is created in the History page.
To view a list of actions that have occurred, navigate to Shares > History.
This chapter shows how to use UMA 2.0 features that AM provides for administrators and developers.
AM exposes an endpoint for discovering information about the UMA provider configuration.
When making a REST API call, specify the realm in the path component of the
endpoint. You must specify the entire hierarchy of the realm, starting at the top-level realm.
Prefix each realm in the hierarchy with the realms/ keyword. For example
/realms/root/realms/customers/realms/europe.
A resource server or client can perform an HTTP GET on
/uma/.well-known/uma2-configuration to
retrieve a JSON object indicating the UMA configuration.
To use the endpoint, you must first create both an OAuth 2.0 Provider service, and an UMA Provider service in AM. For more information on creating these services, see "Configuring the OAuth 2.0 Authorization Service" in the OAuth 2.0 Guide and "To Create the UMA Provider Service".
Tip
Resource servers and clients need to be able to discover the
UMA provider for a resource owner. You should consider
redirecting requests to URIs at the server root, such as
https://www.example.com/.well-known/uma2-configuration,
to the well-known URIs in AM's space:
https://www.example.com:8080/openam/uma/realms/root/realms/subrealm/.well-known/uma2-configuration.
Note
AM supports a provider service that allows a realm to have a configured
option for obtaining the base URL (including protocol) for components that
need to return a URL to the client. This service is used to provide the
URL base that is used in the .well-known endpoints used in
OpenID Connect 1.0 and UMA.
For more information, see "Configuring the Base URL Source Service" in the OpenID Connect 1.0 Guide.
The following is an example of a GET request to the UMA 2.0 configuration discovery endpoint
for a subrealm named subrealm in the
top-level realm:
$ curl \
--request GET \
https://openam.example.com:8443/openam/uma/realms/root/.well-known/uma2-configuration
{
    "issuer": "https://openam.example.com:8443/openam/oauth2/subrealm",
    "grant_types_supported": [
        "urn:ietf:params:oauth:grant-type:saml2-bearer",
        "urn:ietf:params:oauth:grant-type:uma-ticket",
        "client_credentials",
        "password",
        "authorization_code",
        "urn:ietf:params:oauth:grant-type:device_code",
        "http://oauth.net/grant_type/device/1.0"
    ],
    "token_endpoint_auth_methods_supported": [
        "client_secret_post",
        "private_key_jwt",
        "client_secret_basic"
    ],
    "revocation_endpoint_auth_methods_supported": [
        "client_secret_post",
        "private_key_jwt",
        "client_secret_basic"
    ],
    "response_types_supported": [
        "code token id_token",
        "code",
        "code id_token",
        "device_code",
        "id_token",
        "code token",
        "token",
        "token id_token"
    ],
    "jwks_uri": "https://openam.example.com:8443/openam/oauth2/realms/root/connect/jwk_uri",
    "dynamic_client_endpoint": "https://openam.example.com:8443/openam/oauth2/realms/root/register",
    "token_endpoint": "https://openam.example.com:8443/openam/oauth2/realms/root/access_token",
    "authorization_endpoint": "https://openam.example.com:8443/openam/oauth2/realms/root/authorize",
    "revocation_endpoint": "https://openam.example.com:8443/openam/oauth2/realms/root/token/revoke",
    "introspection_endpoint": "https://openam.example.com:8443/openam/oauth2/realms/root/introspect",
    "resource_registration_endpoint": "https://openam.example.com:8443/openam/uma/realms/root/resource_set",
    "permission_endpoint": "https://openam.example.com:8443/openam/uma/realms/root/permission_request"
}
The JSON object returned includes the following configuration information:
issuerThe URI of the issuing authorization server.
grant_types_supportedThe supported OAuth 2.0 grant types.
token_endpointThe URI to request tokens.
authorization_endpointThe URI to request authorization for issuing a token.
introspection_endpointThe URI to introspect an RPT.
For more information, see "OAuth 2.0 Client and Resource Server Endpoints" in the OAuth 2.0 Guide.
resource_registration_endpointThe URI for a resource server to register a resource set.
For more information, see "Managing UMA Resource Sets".
dynamic_client_endpointThe URI for registering a dynamic client.
AM stores information about registered resource sets, audit information generated when users manage access to their protected resources, pending requests, and resource set labels. AM provides a default store, which uses the embedded data store, or you can configure external stores to maintain this information.
Tip
If you cannot find the attribute you are looking for, click on the dropdown button on the left-hand side of the tabs or use the Search box. For more information, see "AM Console Responsiveness" in the Setup and Maintenance Guide and "The AM Console Search Feature" in the Setup and Maintenance Guide.
Resource Sets Store properties are inherited from the defaults. For more information about inherited properties, see "Configuring Servers" in the Reference
Log in to the AM console as an administrator, for example
amadmin.Navigate to Deployment > Servers > Server Name > UMA > Resource Sets Store.
Unlock the Store Mode property and choose External Token Store.
Unlock the Root Suffix property and enter the base DN of the store. For example
dc=uma-rs,dc=example,dc=com.Save your work.
Navigate to Deployment > Servers > Server Name > UMA > External Resource Sets Store Configuration.
Enter the properties for the store. For information about the available settings, see "UMA Properties".
Save your work.
UMA Audit Store properties are inherited from the defaults. For more information about inherited properties, see "Configuring Servers" in the Reference
Log in to the AM console as an administrator, for example
amadmin.Navigate to Deployment > Servers > Server Name > UMA > UMA Audit Store.
Unlock the Store Mode property and choose External Token Store.
Unlock the Root Suffix property and enter the base DN of the store. For example
dc=uma-audit,dc=example,dc=com.Save your work.
Navigate to Deployment > Servers > Server Name> UMA > External UMA Audit Store Configuration.
Enter the properties for the store. For information about the available settings, see "UMA Properties".
Save your work.
UMA Pending Requests Store properties are inherited from the defaults. For more information about inherited properties, see "Configuring Servers" in the Reference
Navigate to Deployment > Servers > Server Name> UMA > Pending Requests Store.
Unlock the Store Mode property and choose External Token Store.
Unlock the Root Suffix property and enter the base DN of the store. For example
dc=uma-pending,dc=example,dc=com.Save your work.
Navigate to Deployment > Servers > Server Name> UMA > External Pending Requests Store Configuration.
Enter the properties for the store. For information about the available settings, see "UMA Properties".
Save your work.
UMA Resource Sets Labels Store properties are inherited from the defaults. For more information about inherited properties, see "Configuring Servers" in the Reference
Log in to the AM console as an administrator, for example
amadmin.Navigate to Deployment > Servers > Server Name > UMA > UMA Resource Set Labels Store.
Unlock the Store Mode property and choose External Token Store.
Unlock the Root Suffix property and enter the base DN of the store. For example
dc=uma-labels,dc=example,dc=com.Save your work.
Navigate to Deployment > Servers > Server Name> UMA > External Resource Set Labels Store Configuration.
Enter the properties for the store. For information about the available settings, see "UMA Properties".
Save your work.
UMA resource servers register resource sets with the resource owner's chosen authorization server. Registered resources can then be protected, and are available for user-created policies.
AM supports optional system labels when registering resource sets to help resource owners organize their resources. For information on labelling resources, see "Managing UMA Labels".
AM provides the /uma/resource_set REST
endpoint, as documented in the OAuth 2.0 Resource Set Registration
specification, to allow UMA resource servers to register and manage
resource sets.
The endpoint requires a Protection API Token (PAT),
which is an OAuth 2.0 access token with a scope of uma_protection.
A resource server must acquire a PAT in order to use the resource
set endpoint. For more information, see "To Acquire a Protection API Token (PAT)".
After acquiring a PAT, use the /uma/resource_set REST
endpoint for the following operations:
To register a resource set, the resource server must first acquire a PAT token on behalf of the resource owner, as described in "To Acquire a Protection API Token (PAT)".
Once you have the PAT bearer token, you can access the
/uma/resource_set endpoint to register resources,
as shown in the following steps.
Create a POST request to the
/uma/resource_setendpoint, including the PAT bearer token in an Authorization header.The following example uses a resource owner's PAT bearer token to register a photo album resource set and a pair of system labels in a realm named
subrealm:$ curl \ --request POST \ --header "Content-Type: application/json" \ --header "Authorization: Bearer 515d6551-6512-5279-98b6-c0ef3f03a723" \ --data \ '{ "name" : "Photo Album", "icon_uri" : "http://photoz.example.com/icons/flower.png", "resource_scopes" : [ "edit", "view", "http://photoz.example.com/dev/scopes/print" ], "labels" : [ "3D", "VIP" ], "type" : "http://photoz.example.com/dev/rtypes/photoalbum" }' \ https://openam.example.com:8443/openam/uma/realms/root/resource_set { "_id": "126615ba-b7fd-4660-b281-bae81aa45f7c0", "user_access_policy_uri": "https://openam.example.com:8443/openam/XUI/?realm=/#uma/share/126615ba-b7fd-4660-b281-bae81aa45f7c0" }
To list the resource sets registered to a user, you must first acquire a PAT token as that user, as described in "To Acquire a Protection API Token (PAT)".
Once you have the PAT token, you can access the
/uma/resource_set endpoint to list resource sets,
as shown below:
Create a GET request to the
/uma/resource_setendpoint, including the PAT bearer token in an Authorization header.The following example uses a PAT bearer token to list the registered resource sets in a realm named
subrealm:$ curl \ --header "Authorization: Bearer 515d6551-6512-5279-98b6-c0ef3f03a723" \ https://openam.example.com:8443/openam/uma/realms/root/resource_set { "126615ba-b7fd-4660-b281-bae81aa45f7c0", "3a2fe6d5-67c8-4a5a-83fb-09734f1dd5b10", "8ed24623-fcb5-46b8-9a64-18ee1b9b7d5d0" }On success, an array of the registered resource set IDs is returned. Use the ID to identify a resource set in the following procedures:
To read a resource set, you must first acquire a PAT token on behalf of the resource owner, as described in "To Acquire a Protection API Token (PAT)".
Once you have the PAT token, you can access the
/uma/resource_set endpoint to read resources,
as shown below:
Create a GET request to the resource_set endpoint, including the PAT bearer token in an Authorization header.
Note
You must provide the ID of the resource set to read, specified at the end of the request, as follows:
https://openam.example.com:8443/openam/uma/resource_set/resource_set_ID.The following example uses a PAT bearer token and a resource set ID to read a specific resource set in a realm named
subrealm:$ curl \ --header "Authorization: Bearer 515d6551-6512-5279-98b6-c0ef3f03a723" \ https://openam.example.com:8443/openam/uma/realms/root/resource_set/126615ba-b7fd-4660-b281-bae81aa45f7c0 { "resource_scopes": [ "read", "view", "http://photoz.example.com/dev/scopes/print" ], "name": "Photo Album", "_id": "126615ba-b7fd-4660-b281-bae81aa45f7c0", "type": "https//www.example.com/rsets/photoalbum", "icon_uri": "http://www.example.com/icons/flower.png", "labels": [ "VIP", "3D" ], "user_access_policy_uri": "https://openam.example.com:8443/openam/XUI/?realm=/#uma/share/126615ba-b7fd-4660-b281-bae81aa45f7c0" }On success, an HTTP 200 OK status code is returned, as well as a representation of the resource set in the JSON body of the response.
If the resource set ID does not exist, an HTTP 404 Not Found status code is returned, as follows:
{
 "error": "not_found",
 "error_description":
     "Resource set corresponding to id: 43225628-4c5b-4206-b7cc-5164da81decd0 not found"
}
To read a resource set, you must first acquire a PAT token on behalf of the resource owner, as described in "To Acquire a Protection API Token (PAT)".
Once you have the PAT token, you can access the
/uma/resource_set endpoint to update resources,
as shown below:
Create a PUT request to the
/uma/resource_setendpoint, including the PAT bearer token in a header namedAuthorization, and any new or changed parameters as part of a complete replacement of the existing values.Note
You must provide the ID of the resource set to update, specified at the end of the request, as follows:
https://openam.example.com:8443/openam/uma/resource_set/resource_set_ID.The following example uses a PAT bearer token and a resource set ID to update a specific resource set in a realm named
subrealmwith an additionaldeleteresource scope:$ curl \ --request PUT \ --header "Authorization: Bearer 515d6551-6512-5279-98b6-c0ef3f03a723" \ --data \ '{ "name" : "Photo Album", "icon_uri" : "http://photoz.example.com/icons/flower.png", "resource_scopes" : [ "delete", "edit", "view", "http://photoz.example.com/dev/scopes/print" ], "labels" : [ "3D", "VIP" ], "type" : "http://photoz.example.com/dev/rsets/photoalbum" }' \ https://openam.example.com:8443/openam/uma/realms/root/resource_set/126615ba-b7fd-4660-b281-bae81aa45f7c0 { "_id": "126615ba-b7fd-4660-b281-bae81aa45f7c0", "user_access_policy_uri": "https://openam.example.com:8443/openam/XUI/?realm=/#uma/share/126615ba-b7fd-4660-b281-bae81aa45f7c0" }On success, an HTTP 200 OK status code is returned, with the resource set ID, and a user access policy URI that the resource owner can visit in order to manage access to the resource set.
If the resource set ID is not found, an HTTP 404 Not Found status code is returned, as follows:
{
    "error": "not_found",
    "error_description":
        "ResourceSet corresponding to id: 43225628-4c5b-4206-b7cc-5164da81decd0 not found"
}
To delete a resource set, you must first acquire a PAT token, as described in "To Acquire a Protection API Token (PAT)".
Once you have the PAT token, you can access the /uma/resource_set
endpoint to delete resources, as shown below:
Create a DELETE request to the
resource_setendpoint, including the PAT bearer token in a header namedAuthorization.Provide the ID of the resource set to delete, specified at the end of the request as follows:
https://openam.example.com:8443/openam/uma/resource_set/resource_set_ID$ curl \ --request DELETE \ --header "Authorization: Bearer 515d6551-6512-5279-98b6-c0ef3f03a723" \ https://openam.example.com:8443/openam/uma/realms/root/resource_set/126615ba-b7fd-4660-b281-bae81aa45f7c0 {}On success, an HTTP 204 No Content status code is returned as well as an empty response body.
If the resource set ID does not exist, an HTTP 404 Not Found status code is returned as follows:
{
    "error": "not_found",
    "error_description":
        "Resource set corresponding to id: 43225628-4c5b-4206-b7cc-5164da81decd0 not found"
}
Apply labels to resources to help organize and locate them more easily. Resources can have multiple labels applied to them, and labels can apply to multiple resources.
Resources support three types of label:
- User Labels
Managed by the resource owner after the resource set has been registered to them.
Can be created and deleted. Deleting a label does not delete the resources to which it was applied.
Support nested hierarchies. Separate levels of the hierarchy with forward slashes (/) when creating a label. For example
Top Level/Second Level/My Label.Are only visible to the user who created them.
You can manage user labels by using the AM console, or by using a REST interface. For more information, see "UMA Labels Endpoint for Users" and "To Apply User Labels to a Resource".
- System Labels
Created by the resource server when registering a resource set.
Cannot be deleted.
Do not support a hierarchy of levels.
Are only visible to the owner of the resource.
Note
Each resource set is automatically assigned a system label containing the name of the resource server that registered it, as well as a system label allowing users to add the resource to a list of favorites.
For information on creating system labels, see "To Register an UMA Resource Set".
- Favourite Labels
Each user can assign the builtin star label to a resource to mark it as a favorite.
For more information, see "To Mark a Resource as a Favorite".
AM provides the
/json/users/username/oauth2/resources/labels
REST endpoint to allow users to manage user labels.
Specify the
username in the
URL, and provide the SSO token of that user in the
iPlanetDirectoryPro header.
Use the /json/users/username/oauth2/resources/labels REST endpoint for the following
operations:
To create a new user label, create a POST request with the name of the new user label and the type,
USER, as shown below:$ curl \ --request POST \ --header 'Accept-API-Version: resource=1.0' \ --header "Content-Type: application/json" \ --header "iPlanetDirectoryPro: AQIC5wM2LY4S...Q4MTE4NTA2*" \ --data \ '{ "name" : "New Resource Set Label", "type" : "USER" }' \ https://openam.example.com:8443/openam/json/realms/root/users/demo/oauth2/resources/labels { "_id": "db2161c0-167e-4195-a832-92b2f578c96e3", "_rev": "-785293115", "name": "New Resource Set Label", "type": "USER" }On success, an HTTP 201 Created status code is returned, as well as the unique identifier of the new user label in the
_idproperty in the JSON-formatted body. Note that the user label is not yet associated with a resource set. To apply the new label to a resource set, see "To Update an UMA Resource Set".
To query the labels belonging to a user, create a GET request including
_queryFilter=truein the query string, as shown below:$ curl \ --header "iPlanetDirectoryPro: AQIC5wM2LY4S...Q4MTE4NTA2*" \ https://openam.example.com:8443/json/realms/root/users/demo/oauth2/resources/labels?_queryFilter=true { "result": [ { "_id": "46a3392f-1d2f-4643-953f-d51ecdf141d44", "name": "2015/October/Bristol", "type": "USER" }, { "_id": "60b785c2-9510-40f5-85e3-9837ac272f1b1", "name": "Top Level/Second Level/My Label", "type": "USER" }, { "_id": "ed5fad66-c873-4b80-93bb-92656eb06deb0", "name": "starred", "type": "STAR" }, { "_id": "db2161c0-167e-4195-a832-92b2f578c96e3", "name": "New Resource Set Label", "type": "USER" } ], "resultCount": 4, "pagedResultsCookie": null, "totalPagedResultsPolicy": "NONE", "totalPagedResults": -1, "remainingPagedResults": -1 }
To delete a user label belonging to a user, create a DELETE request including the ID of the user label to delete in the URL, as shown below:
$ curl \
--request DELETE \
--header "iPlanetDirectoryPro: AQIC5wM2LY4S...Q4MTE4NTA2*" \
https://openam.example.com:8443/json/users/demo/oauth2/resources/labels/46a3392f-1d2f-4643-953f-d51ecdf141d44
{
    "_id": "46a3392f-1d2f-4643-953f-d51ecdf141d44",
    "name": "2015/October/Bristol",
    "type": "USER"
}
On success, an HTTP 200 OK status code is returned, as well as a JSON representation of the user label that was removed.
UMA 2.0 authorization servers must manage the resource owner's authorization policies, so that registered resource sets can be protected.
AM provides the
/json/users/{user}/uma/policies/ REST
endpoint for creating and managing user-managed authorization policies.
Managing UMA policies requires that a resource set is registered to the user in the URL. For information on registering resource sets, see "Managing UMA Resource Sets".
Once a resource set is registered to the user, use the
/json/users/{user}/uma/policies/
REST endpoint for managing UMA resource policies.
To create an UMA policy, see "To Create an UMA Policy".
To read a policy, the resource owner or an administrator user must be logged in to the authorization server and have an SSO token issued to them. The policy ID to read must also be known.
Tip
The ID used for a policy is always identical to the ID of the resource set it protects.
Create a GET request to the policies endpoint, including the SSO token in a header based on the configured session cookie name (default:
iPlanetDirectoryPro), and the resource set ID as part of the URL.Note
The SSO token must have been issued to the user specified in the URL, or to an administrative user such as
amadmin. In this example, the user isdemo.The following example uses an SSO token to read a specific policy with ID
43225628-4c5b-4206-b7cc-5164da81decd0belonging to user demo:$ curl \ --header "iPlanetDirectoryPro: AQIC5wM2LY4S...Q4MTE4NTA2*" \ https://openam.example.com:8443/openam/json/realms/root/users/demo\ /uma/policies/0d7790de-9066-4bb6-8e81-25b6f9d0b8853 { "_id": "0d7790de-9066-4bb6-8e81-25b6f9d0b8853", "_rev": "1444644662", "policyId": "0d7790de-9066-4bb6-8e81-25b6f9d0b8853", "name": "Photo Album", "permissions": [ { "subject": "bob", "scopes": [ "view", "comment" ] } ] }On success, an HTTP 200 OK status code is returned, with a JSON body representing the policy.
If the policy ID does not exist, an HTTP 404 Not Found status code is returned, as follows:
{
    "code": 404,
    "reason": "Not Found",
    "message": "UMA Policy not found, 43225628-4c5b-4206-b7cc-5164da81decd0"
}
To update a policy, the resource owner or an administrator user must be logged in to the authorization server and have an SSO token issued to them. The policy ID to read must also be known.
Tip
The ID used for a policy is always identical to the ID of the resource set it protects.
Create a PUT request to the policies endpoint, including the SSO token in a header based on the configured session cookie name (default:
iPlanetDirectoryPro), and the resource set ID as both the value ofpolicyIdin the body and also as part of the URL.Note
The SSO token must have been issued to the user specified in the URL. In this example, the user is
demo.The following example uses an SSO token to update a policy with ID
0d7790de-9066-4bb6-8e81-25b6f9d0b8853belonging to user demo with an additional subject,chris:$ curl \ --request PUT \ --header "iPlanetDirectoryPro: AQIC5wM2LY4S...Q4MTE4NTA2*" \ --header "Content-Type: application/json" \ --header "If-Match: *" \ --header "Accept-API-Version: resource=1.0" \ --data \ '{ "policyId": "0d7790de-9066-4bb6-8e81-25b6f9d0b8853", "permissions": [ { "subject": "bob", "scopes": [ "view", "comment" ] }, { "subject": "chris", "scopes": [ "comment" ] } ] }' \ https://openam.example.com:8443/openam/json/realms/root/users/demo\ /uma/policies/0d7790de-9066-4bb6-8e81-25b6f9d0b8853 { "_id": "0d7790de-9066-4bb6-8e81-25b6f9d0b8853", "_rev": "-1844449592", "policyId": "0d7790de-9066-4bb6-8e81-25b6f9d0b8853", "permissions": [ { "subject": "bob", "scopes": [ "view", "comment" ] }, { "subject": "chris", "scopes": [ "view" ] } ] }On success, an HTTP 200 OK status code is returned, with a JSON representation of the policy in the body as the response.
If the policy ID does not exist, an HTTP 404 Not Found status code is returned, as follows:
{
    "code": 404,
    "reason": "Not Found",
    "message": "UMA Policy not found, 43225628-4c5b-4206-b7cc-5164da81decd0"
}
If the permissions are not correct, an HTTP 400 Bad Request status code is returned, for example:
{
    "code": 400,
    "reason": "Bad Request",
    "message": "Invalid UMA policy permission. Missing required attribute, 'subject'."
}
If the policy ID in the URL does not match the policy ID used in the sent JSON body, an HTTP 400 Bad Request status code is returned, for example:
{
    "code": 400,
    "reason": "Bad Request",
    "message": "Policy ID does not match policy ID in the body."
}
To delete a policy, the resource owner or an administrator user must be logged in to the authorization server and have an SSO token issued to them. The policy ID to read must also be known.
Tip
The ID used for a policy is always identical to the ID of the resource set it protects.
Create a DELETE request to the policies endpoint, including the SSO token in a header based on the configured session cookie name (default:
iPlanetDirectoryPro), and the resource set ID as part of the URL.Note
The SSO token must have been issued to the user specified in the URL. In this example, the user is
demo.The following example uses an SSO token to delete a policy with ID
0d7790de-9066-4bb6-8e81-25b6f9d0b8853belonging to user demo:$ curl \ --request DELETE \ --header "iPlanetDirectoryPro: AQIC5wM2LY4S...Q4MTE4NTA2*" \ --header "Accept-API-Version: resource=1.0" \ https://openam.example.com:8443/openam/json/realms/root/realms/root/users/demo\ /json/policies/0d7790de-9066-4bb6-8e81-25b6f9d0b8853 {}On success, an HTTP 200 OK status code is returned, with an empty JSON body as the response.
If the policy ID does not exist, an HTTP 404 Not Found status code is returned, as follows:
{
    "code": 404,
    "reason": "Not Found",
    "message": "UMA Policy not found, 43225628-4c5b-4206-b7cc-5164da81decd0"
}
To query policies, the resource owner or an administrator user must be logged in to the authorization server and have an SSO token issued to them.
Create a GET request to the policies endpoint, including the SSO token in a header based on the configured session cookie name (default:
iPlanetDirectoryPro).Note
The SSO token must have been issued to the user specified in the URL, or to an administrative user such as
amadmin.In this example, the user is
demo.Use the following query string parameters to affect the returned results:
_sortKeys=[+-]field[,field...]Sort the results returned, where field represents a field in the JSON policy objects returned.
For UMA policies, only the
policyIdandnamefields can be sorted.Optionally use the
+prefix to sort in ascending order (the default), or-to sort in descending order._pageSize=integerLimit the number of results returned.
_pagedResultsOffset=integerStart the returned results from the specified index.
_queryFilterThe _queryFilter parameter can take
trueto match every policy,falseto match no policies, or a filter of the following form to match field values:field operator valuewhere field represents the field name, operator is the operator code, value is the value to match, and the entire filter is URL-encoded. Only the equals (eq) operator is supported by the/uma/policiesendpoint.The field value can take the following values:
resourceServer- the resource server that created the resource set.permissions/subject- the list of subjects that are assigned scopes in the policy.
Filters can be composed of multiple expressions by a using boolean operator
AND, and by using parentheses,(expression), to group expressions.Note
You must URL-encode the filter expression in
_queryFilter=filter. So, for example, the following filter:resourceServer eq "UMA-Resource-Server" AND permissions/subject eq "bob"When URL-encoded becomes:
resourceServer+eq+%22UMA-Resource-Server%22+AND+permissions%2Fsubject+eq+%22bob%22
The following example uses an SSO token to query the policies belonging to user demo, which have a subject
bobin the permissions:$ curl \ --header "iPlanetDirectoryPro: AQIC5wM2LY4S...Q4MTE4NTA2*" \ --header "Accept-API-Version: resource=1.0" \ --get \ --data-urlencode '_sortKeys=policyId,name' \ --data-urlencode '_pageSize=1' \ --data-urlencode '_pagedResultsOffset=0' \ --data-urlencode \ '_queryFilter=permissions/subject eq "bob"' \ https://openam.example.com:8443/openam/json/realms/root/users/demo/uma/policies { "result": [ { "_id": "0d7790de-9066-4bb6-8e81-25b6f9d0b8853", "policyId": "0d7790de-9066-4bb6-8e81-25b6f9d0b8853", "name": "Photo Album", "permissions": [ { "subject": "bob", "scopes": [ "view", "comment" ] }, { "subject": "chris", "scopes": [ "view" ] } ] } ], "resultCount": 1, "pagedResultsCookie": null, "remainingPagedResults": 0 }On success, an HTTP 200 OK status code is returned, with a JSON body representing the policies that match the query.
If the query is not formatted correctly, for example, an incorrect field is used in the
_queryFilter, an HTTP 500 Server Error is returned, as follows:{ "code": 500, "reason": "Internal Server Error", "message": "'/badField' not queryable" }
AM exposes extension points that enable you to extend UMA services when built-in functionality does not fit your deployment.
AM provides a number of extension points for extending the UMA
workflow that are provided as filters and that are
dynamically loaded by using the Java ServiceLoader framework during the UMA workflow.
The extension points available are described in the sections below:
AM provides the ResourceRegistrationFilter
extension point, which can be used to extend UMA resource set
registration functionality.
| Method | Parameters | Description |
|---|---|---|
|
|
resourceSet
(type: |
Invoked before a resource set is registered in the backend. Changes made to the resourceSet object at this stage will be persisted. |
|
|
resourceSet
(type: |
Invoked after a resource set is registered in the backend. Changes made to the resourceSet object at this stage will not be persisted. |
AM provides the PermissionRequestFilter
extension point, which can be used to extend UMA permission request
functionality.
| Method | Parameters | Description |
|---|---|---|
|
|
resourceSet
(type:
requestedScopes
(type:
requestingClientId
(type: |
Invoked before a permission request is created. |
AM provides the RequestAuthorizationFilter
extension point, which can be used to extend UMA authorization
functionality.
| Method | Parameters | Description |
|---|---|---|
|
|
permissionTicket
(type:
requestingParty
(type:
resourceOwner
(type:
requestedScope
(type: |
Invoked before authorization of a request is attempted. Throws |
|
|
permissionTicket
(type:
requestingParty
(type:
resourceOwner
(type:
requestedScope
(type:
grantedScope
(type: |
Invoked after a successful request authorization attempt. |
|
|
permissionTicket
(type:
requestingParty
(type:
resourceOwner
(type:
requestedScope
(type: |
Invoked after a failed request authorization attempt. |
AM provides the ResourceDelegationFilter
extension point, which can be used to extend UMA resource sharing
functionality.
| Method | Parameters | Description |
|---|---|---|
|
|
umaPolicy
(type: |
Invoked before creating a sharing policy for a resource. Changes to the umaPolicy object at this stage will be persisted. Throws |
|
|
umaPolicy
(type: |
Invoked after creating a sharing policy for a resource. Changes to the umaPolicy object at this stage will not be persisted. |
|
|
currentUmaPolicy
(type:
updatedUmaPolicy
(type: |
Invoked before altering the sharing policy of a resource. Changes to the updatedUmaPolicy object at this stage will be persisted. Throws |
|
|
umaPolicy
(type: |
Invoked before deleting the sharing policy of a resource. Throws |
|
|
userId
(type:
queryFilter
(type: |
Invoked before querying the resource sets owned or shared with a user. The userId parameter provides the ID of the user making the query request. The queryFilter parameter provides the incoming request query filter. Returns a |
This reference section covers supported standards, settings and other information related to UMA.
This section covers information related to UMA support in AM:
- User-Managed Access (UMA) 2.0
User-Managed Access (UMA) 2.0 is a protocol comprised of two specifications:
User-Managed Access (UMA) 2.0 Grant for OAuth 2.0 Authorization
This section covers reference for UMA global settings and UMA datastore server settings:
To configure UMA global settings, navigate to Configure > Global Settings > UMA Provider. For more information, see "UMA Provider".
To configure UMA data store settings:
Navigate to Configure > Server Defaults > UMA to configure the settings for all your servers.
Navigate to Deployment > Servers > Server Name > UMA to configure the settings for one server.
For more information, see "UMA Properties".
amster service name: uma
The following settings appear on the Realm Defaults tab:
- Permission Ticket Lifetime (seconds)
The maximum life of a permission ticket before it expires, in seconds.
Default value:
120amster attribute:
permissionTicketLifetime- Delete user policies when Resource Server is removed
Delete all user policies that relate to a Resource Server when removing the OAuth2 agent entry or removing the
uma_protectionscope from the OAuth2 agent.Default value:
trueamster attribute:
deletePoliciesOnDeleteRS- Delete resource sets when Resource Server is removed
Delete all resource sets that relate to a Resource Server when removing the OAuth2 agent entry or removing the
uma_protectionscope from the OAuth2 agent.Default value:
trueamster attribute:
deleteResourceSetsOnDeleteRS- Pending Requests Enabled
Specifies whether to use the Pending Requests subsystem that notifies the resource owner that an attempt to access a resource was made.
Default value:
trueamster attribute:
pendingRequestsEnabled- Email Resource Owner on Pending Request creation
Specifies whether to send an email to the Resource Owner when a Pending Request is created when a Requesting Party requests authorization to a resource.
Default value:
trueamster attribute:
emailResourceOwnerOnPendingRequestCreation- Email Requesting Party on Pending Request approval
Specifies whether to send an email to the Requesting Party when a Pending Request is approved by the Resource Owner.
Default value:
trueamster attribute:
emailRequestingPartyOnPendingRequestApproval- User profile preferred Locale attribute
User profile attribute storing the user's preferred locale.
Default value:
inetOrgPersonamster attribute:
userProfileLocaleAttribute- Re-Sharing Mode
Specifies whether re-sharing is off or on implicitly for all users, allowing all users to re-share resource sets that have been shared with them.
The possible values for this property are:
OFFIMPLICIT
Default value:
IMPLICITamster attribute:
resharingMode- Grant RPTs...
In UMA, scope comes from both the permission ticket and from the token request. An RPT is always granted when all scope matches, and is never granted when no scope matches. You can configure when RPTs are granted for partial match conditions here. For more information, see the UMA Grant Type specification section onAuthorization Assessment and Results Determination.
Default value:
REQUEST_PARTIAL
REQUEST_NONE
TICKET_PARTIALamster attribute:
grantRptConditions
UMA server settings are inherited by default.
The following settings appear on the Resource Sets Store tab:
- Store Mode
Specifies the data store where AM stores UMA tokens. Possible values are:
Default Token Store: AM stores UMA tokens in the embedded data store.External Token Store: AM stores UMA tokens in an external data store.
- Root Suffix
Specifies the base DN for storage information in LDAP format, such as
dc=uma-rs,dc=forgerock,dc=com.- Max Connections
Specifies the maximum number of connections to the data store.
AM honors the following properties when
External Token Store is selected under the Resource
Sets Store tab:
- SSL/TLS Enabled
When enabled, AM uses SSL or TLS to connect to the external data store. Make sure AM trusts the data store's certificate when using this option.
- Connection String(s)
Specifies an ordered list of connection strings for external data stores. The format is
HOST:PORT[|SERVERID[|SITEID]], whereHOST:PORTspecify the FQDN and port of the data store, andSERVERIDandSITEIDare optional parameters that let you prioritize the particular connection when used by the specified node(s).Multiple connection strings must be comma-separated, for example,
uma-ldap1.example.com:389|1|1, uma-ldap2.example.com:389|2|1.See the entry for Connection String(s) in "CTS Properties" in the Reference for more syntax examples.
- Login Id
Specifies the username AM uses to authenticate to the data store. This user must be able to read and write to the root suffix of the data store.
- Password
Specifies the password associated with the login ID property.
- Heartbeat
Specifies, in seconds, how often AM should send a heartbeat request to the data store to ensure that the connection does not remain idle.
Default:
10
The following settings appear on the UMA Audit Store tab:
- Store Mode
Specifies the data store where AM stores audit information generated when users access UMA resources. Possible values are:
Default Token Store: AM stores UMA audit information in the embedded data store.External Token Store: AM stores UMA audit information in an external data store.
- Root Suffix
Specifies the base DN for storage information in LDAP format, such as
dc=uma-rs,dc=forgerock,dc=com.- Max Connections
Specifies the maximum number of connections to the data store.
AM honors the following properties when
External Token Store is selected under the
UMA Audit Store tab:
- SSL/TLS Enabled
When enabled, AM uses SSL or TLS to connect to the external data store. Make sure AM trusts the data store's certificate when using this option.
- Connection String(s)
Specifies an ordered list of connection strings for external data stores. The format is
HOST:PORT[|SERVERID[|SITEID]], whereHOST:PORTspecify the FQDN and port of the data store, andSERVERIDandSITEIDare optional parameters that let you prioritize the particular connection when used by the specified node(s).Multiple connection strings must be comma-separated, for example,
uma-ldap1.example.com:389|1|1, uma-ldap2.example.com:389|2|1.See the entry for Connection String(s) in "CTS Properties" in the Reference for more syntax examples.
- Login Id
Specifies the username AM uses to authenticate to the data store. This user must be able to read and write to the root suffix of the data store.
- Password
Specifies the password associated with the login ID property.
- Heartbeat
Specifies, in seconds, how often AM should send a heartbeat request to the data store to ensure that the connection does not remain idle.
Default:
10
The following settings appear on the Pending Requests Store tab:
- Store Mode
Specifies the data store where AM stores pending requests to UMA resources. Possible values are:
Default Token Store: AM stores UMA pending requests in the embedded data store.External Token Store: AM stores UMA pending requests in an external data store.
- Root Suffix
Specifies the base DN for storage information in LDAP format, such as
dc=uma-rs,dc=forgerock,dc=com.- Max Connections
Specifies the maximum number of connections to the data store.
AM honors the following properties when
External Token Store is selected under the Pending Requests
Store tab:
- SSL/TLS Enabled
When enabled, AM uses SSL or TLS to connect to the external data store. Make sure AM trusts the data store's certificate when using this option.
- Connection String(s)
Specifies an ordered list of connection strings for external data stores. The format is
HOST:PORT[|SERVERID[|SITEID]], whereHOST:PORTspecify the FQDN and port of the data store, andSERVERIDandSITEIDare optional parameters that let you prioritize the particular connection when used by the specified node(s).Multiple connection strings must be comma-separated, for example,
uma-ldap1.example.com:389|1|1, uma-ldap2.example.com:389|2|1.See the entry for Connection String(s) in "CTS Properties" in the Reference for more syntax examples.
- Login Id
Specifies the username AM uses to authenticate to the data store. This user must be able to read and write to the root suffix of the data store.
- Password
Specifies the password associated with the login ID property.
- Heartbeat
Specifies, in seconds, how often AM should send a heartbeat request to the data store to ensure that the connection does not remain idle.
Default:
10
The following settings appear on the UMA Resource Set Labels Store tab:
- Store Mode
Specifies the data store where AM stores user-created labels used for organizing UMA resource sets. Possible values are:
Default Token Store: AM stores user-created labels in the embedded data store.External Token Store: AM stores user-created labels in an external data store.
- Root Suffix
Specifies the base DN for storage information in LDAP format, such as
dc=uma-rs,dc=forgerock,dc=com.- Max Connections
Specifies the maximum number of connections to the data store.
AM honors the following properties when
External Token Store is selected under the UMA Resource Set
Labels Store tab.
- SSL/TLS Enabled
When enabled, AM uses SSL or TLS to connect to the external data store. Make sure AM trusts the data store's certificate when using this option.
- Connection String(s)
Specifies an ordered list of connection strings for external data stores. The format is
HOST:PORT[|SERVERID[|SITEID]], whereHOST:PORTspecify the FQDN and port of the data store, andSERVERIDandSITEIDare optional parameters that let you prioritize the particular connection when used by the specified node(s).Multiple connection strings must be comma-separated, for example,
uma-ldap1.example.com:389|1|1, uma-ldap2.example.com:389|2|1.See the entry for Connection String(s) in "CTS Properties" in the Reference for more syntax examples.
- Login Id
Specifies the username AM uses to authenticate to the data store. This user must be able to read and write to the root suffix of the data store.
- Password
Specifies the password associated with the login ID property.
- Heartbeat
Specifies, in seconds, how often AM should send a heartbeat request to the data store to ensure that the connection does not remain idle.
Default:
10
For more information or resources about AM and ForgeRock Support, see the following sections:
ForgeRock publishes comprehensive documentation online:
The ForgeRock Knowledge Base offers a large and increasing number of up-to-date, practical articles that help you deploy and manage ForgeRock software.
While many articles are visible to community members, ForgeRock customers have access to much more, including advanced information for customers using ForgeRock software in a mission-critical capacity.
ForgeRock product documentation, such as this document, aims to be technically accurate and complete with respect to the software documented. It is visible to everyone and covers all product features and examples of how to use them.
The ForgeRock.org site has links to source code for ForgeRock open source software, as well as links to the ForgeRock forums and technical blogs.
If you are a ForgeRock customer, raise a support ticket instead of using the forums. ForgeRock support professionals will get in touch to help you.
ForgeRock provides support services, professional services, training through ForgeRock University, and partner services to assist you in setting up and maintaining your deployments. For a general overview of these services, see https://www.forgerock.com.
ForgeRock has staff members around the globe who support our international customers and partners. For details, visit https://www.forgerock.com, or send an email to ForgeRock at info@forgerock.com.
- Access control
Control to grant or to deny access to a resource.
- Account lockout
The act of making an account temporarily or permanently inactive after successive authentication failures.
- Actions
Defined as part of policies, these verbs indicate what authorized identities can do to resources.
- Advice
In the context of a policy decision denying access, a hint to the policy enforcement point about remedial action to take that could result in a decision allowing access.
- Agent administrator
User having privileges only to read and write agent profile configuration information, typically created to delegate agent profile creation to the user installing a web or Java agent.
- Agent authenticator
Entity with read-only access to multiple agent profiles defined in the same realm; allows an agent to read web service profiles.
- Application
In general terms, a service exposing protected resources.
In the context of AM policies, the application is a template that constrains the policies that govern access to protected resources. An application can have zero or more policies.
- Application type
Application types act as templates for creating policy applications.
Application types define a preset list of actions and functional logic, such as policy lookup and resource comparator logic.
Application types also define the internal normalization, indexing logic, and comparator logic for applications.
- Attribute-based access control (ABAC)
Access control that is based on attributes of a user, such as how old a user is or whether the user is a paying customer.
- Authentication
The act of confirming the identity of a principal.
- Authentication chaining
A series of authentication modules configured together which a principal must negotiate as configured in order to authenticate successfully.
- Authentication level
Positive integer associated with an authentication module, usually used to require success with more stringent authentication measures when requesting resources requiring special protection.
- Authentication module
AM authentication unit that handles one way of obtaining and verifying credentials.
- Authorization
The act of determining whether to grant or to deny a principal access to a resource.
- Authorization Server
In OAuth 2.0, issues access tokens to the client after authenticating a resource owner and confirming that the owner authorizes the client to access the protected resource. AM can play this role in the OAuth 2.0 authorization framework.
- Auto-federation
Arrangement to federate a principal's identity automatically based on a common attribute value shared across the principal's profiles at different providers.
- Bulk federation
Batch job permanently federating user profiles between a service provider and an identity provider based on a list of matched user identifiers that exist on both providers.
- Circle of trust
Group of providers, including at least one identity provider, who have agreed to trust each other to participate in a SAML v2.0 provider federation.
- Client
In OAuth 2.0, requests protected web resources on behalf of the resource owner given the owner's authorization. AM can play this role in the OAuth 2.0 authorization framework.
- Client-based sessions
AM sessions for which AM returns session state to the client after each request, and require it to be passed in with the subsequent request. For browser-based clients, AM sets a cookie in the browser that contains the session information.
For browser-based clients, AM sets a cookie in the browser that contains the session state. When the browser transmits the cookie back to AM, AM decodes the session state from the cookie.
- Conditions
Defined as part of policies, these determine the circumstances under which which a policy applies.
Environmental conditions reflect circumstances like the client IP address, time of day, how the subject authenticated, or the authentication level achieved.
Subject conditions reflect characteristics of the subject like whether the subject authenticated, the identity of the subject, or claims in the subject's JWT.
- Configuration datastore
LDAP directory service holding AM configuration data.
- Cross-domain single sign-on (CDSSO)
AM capability allowing single sign-on across different DNS domains.
- CTS-based sessions
AM sessions that reside in the Core Token Service's token store. CTS-based sessions might also be cached in memory on one or more AM servers. AM tracks these sessions in order to handle events like logout and timeout, to permit session constraints, and to notify applications involved in SSO when a session ends.
- Delegation
Granting users administrative privileges with AM.
- Entitlement
Decision that defines which resource names can and cannot be accessed for a given identity in the context of a particular application, which actions are allowed and which are denied, and any related advice and attributes.
- Extended metadata
Federation configuration information specific to AM.
- Extensible Access Control Markup Language (XACML)
Standard, XML-based access control policy language, including a processing model for making authorization decisions based on policies.
- Federation
Standardized means for aggregating identities, sharing authentication and authorization data information between trusted providers, and allowing principals to access services across different providers without authenticating repeatedly.
- Fedlet
Service provider application capable of participating in a circle of trust and allowing federation without installing all of AM on the service provider side; AM lets you create Java Fedlets.
- Hot swappable
Refers to configuration properties for which changes can take effect without restarting the container where AM runs.
- Identity
Set of data that uniquely describes a person or a thing such as a device or an application.
- Identity federation
Linking of a principal's identity across multiple providers.
- Identity provider (IdP)
Entity that produces assertions about a principal (such as how and when a principal authenticated, or that the principal's profile has a specified attribute value).
- Identity repository
Data store holding user profiles and group information; different identity repositories can be defined for different realms.
- Java agent
Java web application installed in a web container that acts as a policy enforcement point, filtering requests to other applications in the container with policies based on application resource URLs.
- Metadata
Federation configuration information for a provider.
- Policy
Set of rules that define who is granted access to a protected resource when, how, and under what conditions.
- Policy agent
Java, web, or custom agent that intercepts requests for resources, directs principals to AM for authentication, and enforces policy decisions from AM.
- Policy Administration Point (PAP)
Entity that manages and stores policy definitions.
- Policy Decision Point (PDP)
Entity that evaluates access rights and then issues authorization decisions.
- Policy Enforcement Point (PEP)
Entity that intercepts a request for a resource and then enforces policy decisions from a PDP.
- Policy Information Point (PIP)
Entity that provides extra information, such as user profile attributes that a PDP needs in order to make a decision.
- Principal
Represents an entity that has been authenticated (such as a user, a device, or an application), and thus is distinguished from other entities.
When a Subject successfully authenticates, AM associates the Subject with the Principal.
- Privilege
In the context of delegated administration, a set of administrative tasks that can be performed by specified identities in a given realm.
- Provider federation
Agreement among providers to participate in a circle of trust.
- Realm
AM unit for organizing configuration and identity information.
Realms can be used for example when different parts of an organization have different applications and user data stores, and when different organizations use the same AM deployment.
Administrators can delegate realm administration. The administrator assigns administrative privileges to users, allowing them to perform administrative tasks within the realm.
- Resource
Something a user can access over the network such as a web page.
Defined as part of policies, these can include wildcards in order to match multiple actual resources.
- Resource owner
In OAuth 2.0, entity who can authorize access to protected web resources, such as an end user.
- Resource server
In OAuth 2.0, server hosting protected web resources, capable of handling access tokens to respond to requests for such resources.
- Response attributes
Defined as part of policies, these allow AM to return additional information in the form of "attributes" with the response to a policy decision.
- Role based access control (RBAC)
Access control that is based on whether a user has been granted a set of permissions (a role).
- Security Assertion Markup Language (SAML)
Standard, XML-based language for exchanging authentication and authorization data between identity providers and service providers.
- Service provider (SP)
Entity that consumes assertions about a principal (and provides a service that the principal is trying to access).
- Authentication Session
The interval while the user or entity is authenticating to AM.
- Session
The interval that starts after the user has authenticated and ends when the user logs out, or when their session is terminated. For browser-based clients, AM manages user sessions across one or more applications by setting a session cookie. See also CTS-based sessions and Client-based sessions.
- Session high availability
Capability that lets any AM server in a clustered deployment access shared, persistent information about users' sessions from the CTS token store. The user does not need to log in again unless the entire deployment goes down.
- Session token
Unique identifier issued by AM after successful authentication. For a CTS-based sessions, the session token is used to track a principal's session.
- Single log out (SLO)
Capability allowing a principal to end a session once, thereby ending her session across multiple applications.
- Single sign-on (SSO)
Capability allowing a principal to authenticate once and gain access to multiple applications without authenticating again.
- Site
Group of AM servers configured the same way, accessed through a load balancer layer. The load balancer handles failover to provide service-level availability.
The load balancer can also be used to protect AM services.
- Standard metadata
Standard federation configuration information that you can share with other access management software.
- Stateless Service
Stateless services do not store any data locally to the service. When the service requires data to perform any action, it requests it from a data store. For example, a stateless authentication service stores session state for logged-in users in a database. This way, any server in the deployment can recover the session from the database and service requests for any user.
All AM services are stateless unless otherwise specified. See also Client-based sessions and CTS-based sessions.
- Subject
Entity that requests access to a resource
When an identity successfully authenticates, AM associates the identity with the Principal that distinguishes it from other identities. An identity can be associated with multiple principals.
- User data store
Data storage service holding principals' profiles; underlying storage can be an LDAP directory service or a custom
IdRepoimplementation.- Web Agent
Native library installed in a web server that acts as a policy enforcement point with policies based on web page URLs.