Guide to working with authentication and single sign-on support. ForgeRock® Access Management provides authentication, authorization, entitlement and federation software.
This guide covers concepts, implementation procedures, and customization techniques for working with the authentication and single sign-on features of ForgeRock Access Management.
This guide is written for anyone using Access Management to manage authentication, sessions, and implement single sign-on.
ForgeRock Identity Platform™ serves as the basis for our simple and comprehensive Identity and Access Management solution. We help our customers deepen their relationships with their customers, and improve the productivity and connectivity of their employees and partners. For more information about ForgeRock and about the platform, see https://www.forgerock.com.
Authentication is the process of verifying login credentials submitted by a user or an entity comparing them to a database of authorized users. This guide covers how to set up, customize, and use the authentication process.
Access management is about controlling access to resources using two processes: authentication and authorization.
Authentication is how AM verifies the identity of a user or an entity. Authorization is how AM determines whether a user has sufficient privileges to access to a protected resource, and if so, access is granted to that user or entity. AM's authorization process is covered in the Authorization Guide.
AM plays a role similar to border control at an international airport. Instead of having each and every airline company deal with access to each destination, all airlines redirect passengers to border control. Border control then determines, or authenticates, the identity of each passenger according to passport credentials.
Redirect control also checks whether the identified passenger is authorized to fly to the destination corresponding to the ticket, perhaps based on visa credentials. Then, at the departure gate, an agent enforces the authorization from border control, allowing the passenger to board the plane as long as the passenger has not gotten lost, or tried to board the wrong plane, or swapped tickets with someone else. Thus, border control handles access management at the airport.
AM uses defined mechanisms to validate credentials and complete the authentication process. The authentication methods can vary. For example, AM is most frequently used to protect web application pages.
Consider a user who wants access to a protected web page. You can deploy an agent on the web application server. The agent redirects the user's request to an AM login page, where the user enters their credentials, such as username and password. AM determines who the user is, and whether the user has the right to access the protected page. AM then redirects the user back to the protected page with authorization credentials that can be verified by the agent. The agent allows the user authorized by AM to access the page.
You can use AM to protect physical devices connected on the Internet of things (IoT). For example, a delivery van tracking system could have its proxying gateway authenticate to a brokering system using an X.509 certificate to allow it to enable an HTTPS protocol and then connect to sensors in its delivery trucks. If the X.509 certificate is valid, the brokering system can monitor a van's fuel consumption, speed, mileage, and overall engine condition to maximize each van's operating efficiency.
AM supports a number of authentication features and services for use in your deployment:
Authentication Nodes and Trees. AM provides a number of authentication nodes to handle different modes of authenticating users. The nodes must be connected together in a tree to provide multiple authentication paths to users. For more information, see "About Authentication Trees".
Authentication Modules and Chains. AM provides a number of authentication modules to handle different modes of authenticating users or entities. The modules also can be chained together to provide multiple authentication mechanisms, so that a user's or entity's credentials must be evaluated by one module before control passes to another module. For more information, see "About Authentication Modules and Chains".
Authentication Levels. AM allows each module to be configured with an authentication level, which indicates the security level of the user's or entity's credentials. If the user needs to gain access to more sensitive resources, AM may require the user or entity to reauthenticate, providing an additional credential of another type. For more information, see "About Authentication Levels".
Social Authentication. You can configure AM to accept authentication provided by popular third-party identity providers, such as Facebook, Google, and Microsoft. For more information, see "About Social Authentication".
Multi-Factor Authentication. AM supports multi-factor authentication, which requires a user to provide multiple forms of credentials, such as username and password, and a one-time password sent to a user's mobile phone. For more information, see "About Multi-Factor Authentication".
Account Lockout. AM can lock accounts after a pre-configured number of failed authentication attempts. Account lockout works with modules for which users enter a password. For more information, see "About Account Lockout".
Sessions. AM creates an
authentication sessionto track the progress of a user or entity as they authenticate. Once the user is authenticated, AM creates asessionto identify the user or entity during any flow.For more information, see "About Sessions".
Single Sign-On. AM allows a user or an entity to use one set of credentials to access multiple applications within a single domain. This is known as single sign-on (SSO). AM also supports Cross-Domain Single Sign-On (CDSSO). For more information, see "About Single Sign-On".
Authentication trees provide fine-grained authentication by allowing multiple paths and decision points throughout the authentication flow.
Authentication trees are made up of authentication nodes, which define actions taken during authentication, similar to authentication modules within chains. Authentication nodes are more granular than modules, with each node performing a single task such as collecting a username or making a simple decision. Unlike authentication modules, authentication nodes can have multiple outcomes rather than just success or failure.
You can create complex yet customer-friendly authentication experiences by linking nodes together, creating loops, and nesting nodes within a tree.

The authentication trees technology demonstrates the direction AM is taking for administration of complex authorization scenarios, while offering a streamlined login experience to users.
Authentication trees differ in the following ways to traditional authentication chains:
Authentication nodes are not yet available for all the functionality provided by authentication modules.
Authentication trees cannot mix with authentication chains. Each authentication to AM can use either a tree or a chain, but not both together.
The functionality derived from post-authentication plugins, used traditionally with authentication chains, is handled differently when using trees. For example:
Session property management is handled by individual nodes. See "Set Session Properties Node".
Calling out to third-party systems is handled by scripted nodes. See "Scripted Decision Node".
Registering events to make HTTP POST calls to a server is handled by webhooks. See "Configuring Authentication Webhooks". Note that post-authentication plugins do not get triggered when authenticating to a tree, only to a chain.
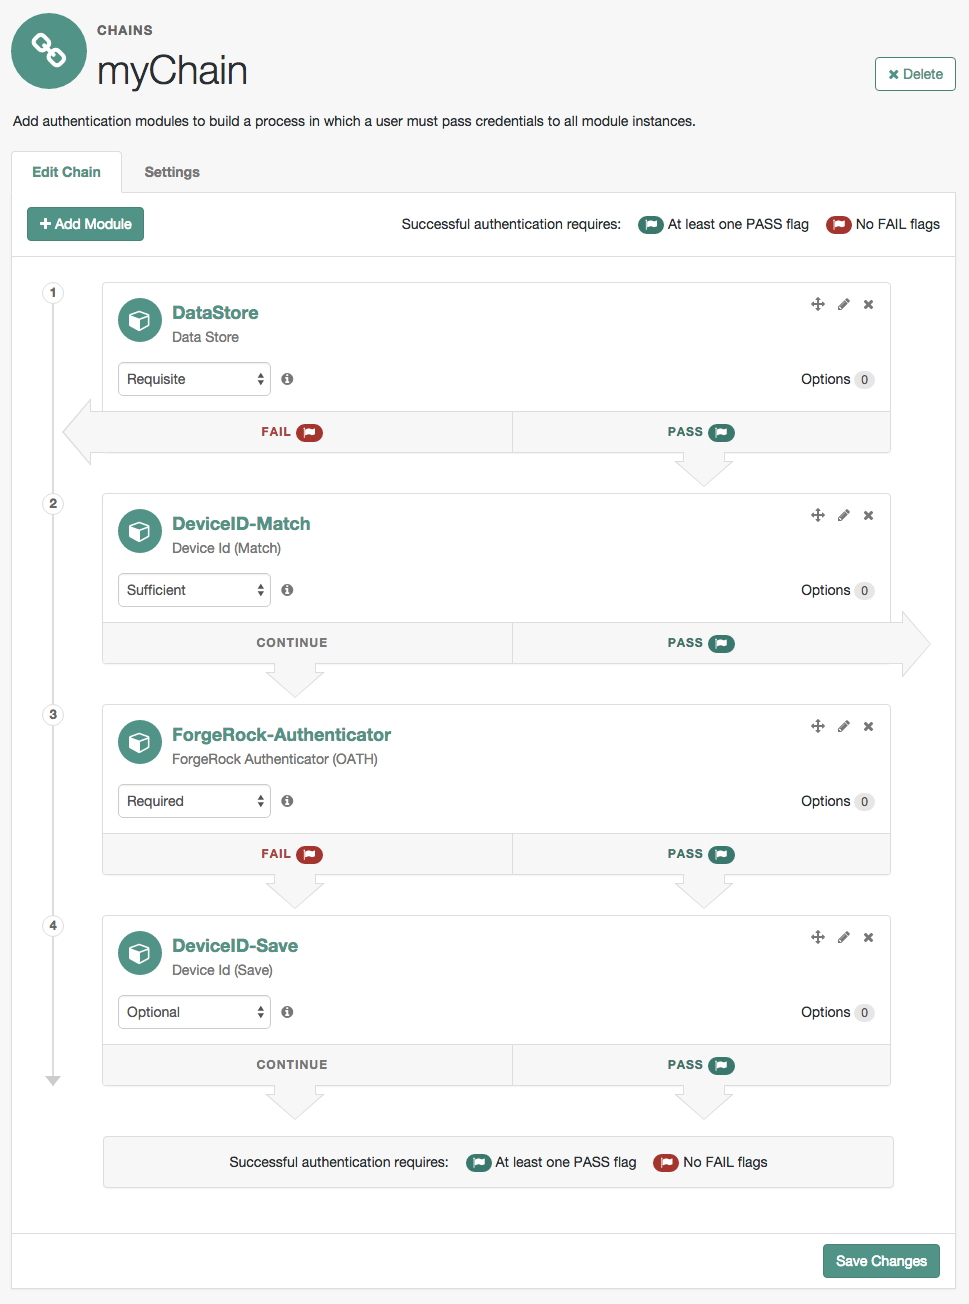
AM allows you to configure authentication processes and then customize how they are applied. AM uses authentication modules to handle different ways of authenticating. Basically, each authentication module handles one way of obtaining and verifying credentials. You can chain different authentication modules together. In AM, this is called authentication chaining. Each authentication module can be configured to specify the continuation and failure semantics with one of the following four criteria: requisite, sufficient, required, or optional.
Authentication modules in a chain can assign a pass or fail flag to the authorization request. To successfully complete an authentication chain at least one pass flag must have been achieved, and there must be no fail flags.
Flags are assigned when completing a module as shown in the table below:
| Criteria | Fail | Pass | Example |
|---|---|---|---|
Requisite |
Assigns fail flag. Exits chain. |
Assigns pass flag. Continues chain. |
Active Directory, Data Store, and LDAP authentication modules are often set as requisite because of a subsequent requirement in the chain to identify the user. For example, the Device ID (Match) authentication module needs a user's ID before it can retrieve information about the user's devices. |
Sufficient | Assigns no flag. Continues chain. | Assigns pass flag. Exits chain. |
You could set Windows Desktop SSO as sufficient, so authenticated Windows users are let through, whereas web users must traverse another authentication module, such as one requiring a username and password. One exception is that if you pass a sufficient module after having failed a required module, you will continue through the chain and will not exit at that point. Consider using a requisite module instead of a required module in this situation. |
Required |
Assigns fail flag.
Continues chain. |
Assigns pass flag. Continues chain. | You could use a required module for login with email and password, so that it can fail through to another module to handle new users who have not yet signed up. |
Optional | Assigns no flag. Continues chain. |
Assigns pass flag.
Continues chain. | You could use an optional module to assign a higher authentication level if it passes. Consider a chain with a requisite Data Store module and an optional Certificate module. Users who only passed the Data Store module could be assigned a lower authentication level than users who passed both the Data Store and Certificate modules. The users with the higher authentication level could be granted access to more highly-secured resources. |
Tip
In authentication chains with a single module, requisite and required are equivalent. For authentication chains with multiple modules, use required only when you want the authentication chain to continue evaluating modules even after the required criterion fails.
The AM authentication chain editor displays the flags that could be assigned by each module in the chain, and whether execution of the chain continues downwards through the chain or exits out, as shown below:
With AM, you can further set authentication levels per module, with higher levels being used typically to allow access to more restricted resources. The AM SPIs also let you develop your own authentication modules, and post authentication plugins. Client applications can specify the authentication level, module, user, and authentication service to use among those you have configured. As described later in this guide, you can use realms to organize which authentication process applies for different applications or different domains, perhaps managed by different people.
AM leaves the authentication process flexible so that you can adapt how it works to your situation. Although at first the number of choices can seem daunting, now that you understand the basic process, you begin to see how choosing authentication modules and arranging them in authentication chains lets you use AM to protect access to a wide range of applications used in your organization.
When a user successfully authenticates, AM creates a session, which allows AM to manage the user's access to resources. The session is assigned an authentication level, which is calculated to be the highest authentication level of any authentication module that passed. If the user's session does not have the appropriate authentication level, then the user may need to reauthenticate again at a higher authentication level to access the requested resource.
The authentication level sets the level of security associated with a module or a tree path. Typically, the strongest form of authentication is assigned the highest authentication level.
If an authentication chain contains requisite or
required modules that were not executed due to the
presence of a passing sufficient module in front of them,
the session's authentication level is calculated to be whichever
is greater: the highest authentication level of any authentication module
that passed, or the highest authentication level of
requisite or required modules that were
not executed.
You can modify AM's default behavior, so that a session's authentication
level is always the highest authentication level of any
authentication module that passed, even if there are
requisite or required modules in the
authentication chain that were not executed.
To modify the default behavior, set the
org.forgerock.openam.authLevel.excludeRequiredOrRequisite
property to true under Deployment > Servers >
Server Name > Advanced and restart the
AM server.
Authorization policies may also require a particular authentication level to access sensitive resources, which might be at a higher level than the user currently has in the session. When an authenticated user tries to access a sensitive resource with a valid session that does not have the required authentication level, AM returns an authorization decision that denies access to the resource and returns an advice indicating that the user needs to reauthenticate at the required authentication level to access the resource. The web or Java agent or policy enforcement point can then send the user back to AM for session upgrade. For more information, see "Session Upgrade".
AM supports delegated authentication through third-party identity providers, such as Facebook, Google, and VKontakte. The AM console provides setup wizards to configure authentication with each identity provider. An additional wizard provides the ability to configure other third-party authenticators. The following table summarizes the social authentication providers and standards that AM 6 supports:
| Provider/Standard | Authentication Module? | Wizard? |
|---|---|---|
| OpenID Connect 1.0 | Yes | Yes |
| OAuth 2.0 | Yes | No |
| Yes [a] | Yes | |
| Yes [a] | Yes | |
| Yes | No | |
| VKontakte | Yes | Yes |
| Yes | No | |
| WeChat Mobile | Yes | No |
[a] Configure a Social Auth OpenID authentication module. | ||
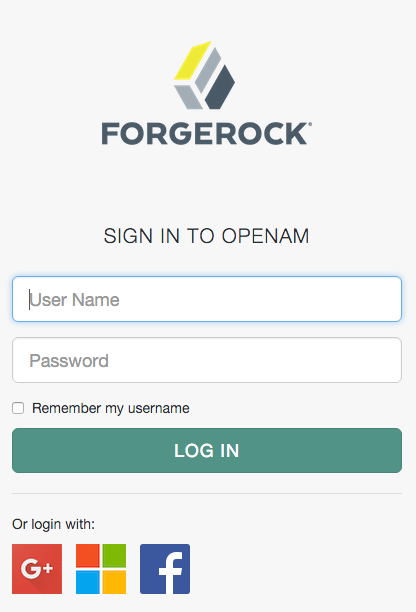
Each AM wizard creates an authentication module and an authentication chain containing the correct configuration needed to authenticate with the third party. The wizard also adds configuration data to the realm's Social Authentication Implementations Service and provisions the service to enable the display of logos of the configured third-party authentication providers on the AM login screen, as shown below.
"Implementing Social Authentication" describes how to set up social authentication in AM.
Multi-factor authentication is an authentication technique that requires users to provide multiple forms of identification when logging in to AM.
This section describes multi-factor authentication features in AM. See "Implementing Multi-Factor Authentication" for information about how to set up multi-factor authentication in AM.
Multi-factor authentication provides a more secure method for users to access their accounts with the help of a device. Note that the word device is used in this section to mean a piece of equipment that can display a one-time password or that supports push notifications using protocols supported by AM multi-factor authentication. Devices are most commonly mobile phones with authenticator apps that support the OATH protocol or push notifications, but could also include other equipment.
The following is an example scenario of multi-factor authentication in AM:
An AM administrator configures an authentication chain with the Data Store and ForgeRock Authenticator (OATH) authentication modules.
An end user authenticates to AM using that authentication chain.
AM prompts the user to enter the user ID and password as required by the Data Store authentication module—the first factor in multi-factor authentication.
If the user ID and password were correct, AM prompts the user to obtain a one-time password.
The user runs an authenticator app on a mobile phone that generates and displays a one-time password.
The user provides the one-time password to AM to successfully complete authentication—the second factor in multi-factor authentication.
Administrators set up multi-factor authentication by creating authentication chains with two or more authentication modules. The initial module in the chain defines the first authentication module for multi-factor authentication. In the preceding scenario, the first authentication module is the Data Store authentication module. Subsequent modules in the chain define the additional factors required to log in, for example the ForgeRock Authenticator (OATH) or ForgeRock Authenticator (Push) authentication modules.
AM supports the Open AuTHentication (OATH) protocols, and also push notification for multi-factor authentication.
The ForgeRock Authenticator (OATH) module supports HMAC one-time password (HOTP) and time-based one-time password (TOTP) authentication as defined in the OATH standard protocols for HOTP (RFC 4226) and TOTP (RFC 6238). Both HOTP and TOTP authentication require an OATH-compliant device that can provide the password.
HOTP authentication generates the one-time password every time the user requests a new password on their device. The device tracks the number of times the user requests a new one-time password with a counter. The one-time password displays for a period of time you designate in the setup, so the user may be further in the counter on their device than on their account.
AM will resynchronize the counter when the user finally logs in. To accommodate this, you set the number of passwords a user can generate before their device cannot be resynchronized. For example, if you set the number of HOTP Window Size to 50 and someone presses the button 30 times on the user's device to generate a new password, the counter in AM will review the passwords until it reaches the one-time password entered by the user. If someone presses the button 51 times, you will need to reset the counter to match the number on the device's counter before the user can login to AM. HOTP authentication does not check earlier passwords, so if the user attempts to reset the counter on their device, they will not be able to login until you reset the counter in AM to match their device. For more information, see "Resetting Registered Devices by using REST".
TOTP authentication constantly generates a new one-time password based on a time interval you specify. The device tracks the last several passwords generated and the current password. The TOTP Time Steps setting configures the number of passwords tracked. The Last Login Time setting monitors the time when a user logs in to make sure that user is not logged in several times within the present time period. The TOTP Time-Step Interval should not be so long as to lock users out, with a recommended time of 30 seconds.
The ForgeRock Authenticator (OATH), OATH, and HOTP authentication modules let you configure authentication that prompts users to enter HMAC one-time passwords. It is important that administrators understand the differences among these authentication modules:
The ForgeRock Authenticator (OATH) and OATH authentication modules accept one-time passwords generated by the end user's device, while the HOTP authentication module generates passwords and sends them to users by e-mail or SMS.
All three of the authentication modules support HOTP passwords. The ForgeRock Authenticator (OATH) and OATH authentication modules also support TOTP passwords.
The ForgeRock Authenticator (OATH) and OATH authentication modules require users to register their devices, and store the device registration details in the user profile. The HOTP authentication module requires the presence of mobile phone numbers and/or e-mail addresses in user profiles.
The ForgeRock Authenticator (OATH) authentication module can encrypt stored device registration details.
Before deciding on an implementation strategy, assess your requirements against the following capabilities in AM:
| Requirement | Available With the ForgeRock Authenticator (OATH) Authentication Module? | Available With the HOTP Authentication Module? |
|---|---|---|
| End users can authenticate using a HOTP password | Yes | Yes |
| AM can generate a HOTP password and send it to end users in a text message or an e-mail | No | Yes |
| End users can register a mobile phone with AM, and an authenticator app on the phone can generate a HOTP or TOTP password that AM accepts as proof of authentication | Yes | No |
| End users can authenticate with a TOTP password | Yes | No |
| End users can opt out of providing a one-time password | Yes | No |
| End users can authenticate using XUI | Yes | Yes |
| End users can authenticate using the legacy UI | No | Yes |
You can use push notifications as part of the authentication process in AM.
To receive push notifications when authenticating, end users must register an Android or iOS device with AM. The registered device can then be used as an additional factor when authenticating to AM. AM can send the device a push notification, which can be accepted by the ForgeRock Authenticator app. In the app, the user can allow or deny the request that generated the push notification and return the response to AM.
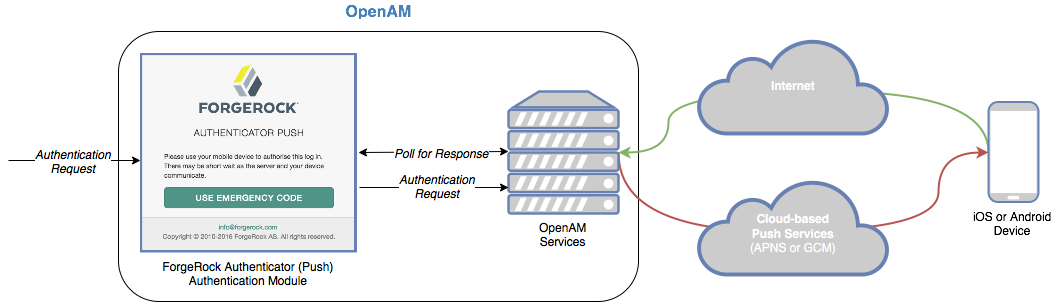
The following steps occur when AM receives an authentication request and is configured for multi-factor authentication using push notifications:
The user must provide credentials to enable AM to locate the user in the identity store and determine if they have a registered mobile device.
AM prompts the user to register a mobile device if they have not done so already. Registering a device associates metadata about the device essential for enabling push notifications with the user's profile in the identity store.
For more information, see "Managing Devices for Multi-Factor Authentication".
Once the details of the registered device are obtained, AM creates a push message specific to the registered device. The message has a unique ID, which AM stores in anticipation of a response from the registered device.
A pending record using the same message ID is also written to the CTS store, providing redundancy should an individual server go offline during the authentication process.
AM sends the push message to the registered device.
AM uses cloud-based push notification services to deliver the messages to the devices. Depending on the registered device, AM uses either Apple Push Notification Services (APNS) or Google Cloud Messaging (GCM) to deliver the push notification.
The ForgeRock Authenticator (Push) authentication module begins to poll AM and the CTS for an accepted response from the registered device.
The user responds to the notification on the registered device, which will open the ForgeRock Authenticator app. In the ForgeRock Authenticator app, the user approves the authentication request with either a swipe, or by using a fingerprint on supported hardware.
For more information, see "To Perform Authentication using Push Notifications".
The app returns the response to the AM cluster.
AM verifies the message is from the correct registered phone and has not been tampered with, and marks the pending record as accepted if valid.
The ForgeRock Authenticator (Push) module detects the accepted record and redirects the user to their profile page, completing the authentication.
The ForgeRock Authenticator (Push) authentication module operates in passwordless mode if not preceded by a Data Store module in an authentication chain. When authenticating using such a chain, the user will be asked to enter their user ID, but not their password. A push notification is then sent to their registered device to complete the authentication by using the ForgeRock Authenticator app.
You should be aware of the following potential limitations before deciding to implement passwordless push authentication:
Unsolicited push messages could be sent to a user's registered device by anyone who knew or was able to guess their user ID.
If a malicious user attempted to authenticate by using push at the same time as a legitimate user, the legitimate user might unintentionally approve the malicious attempt. This is because push notifications only contain the username and issuer in the text, and it is not easy to determine which notification relates to which authentication attempt.
Consider using push notifications as part of a multi-factor authentication chain For an example, see "Creating Authentication Chains for Push Authentication".
AM can lock accounts after repeated authentication failures. Account lockout works with modules for which users can enter a password incorrectly.
"Implementing Account Lockout" describes how to set up account lockout in AM.
AM creates an authentication session to track the user's authentication progress through an authentication chain or tree. Once the user has authenticated, AM creates a session to manage the user's or entity's access to resources.
AM session-related services are stateless unless otherwise indicated; they do not hold any session information local to the AM instances. Instead, they store session information either in the CTS token store or on the client. This architecture allows you to scale your AM infrastructure horizontally since any server in the deployment can satisfy any session's request.
Sessions are highly configurable. We recommend you become familiar with basic session concepts before attempting to configure sessions for your environment:
Sessions have different characteristics depending on where AM stores the sessions. For more information, see "Session Storage Location".
Sessions require the user or client to be able to hold on to cookies. Cookies provided by AM's Session Service may contain a JSON Web Token (JWT) with the session or just a reference to where the session is stored. For more information, see "Session Cookies".
Session termination effectively logs the user or entity out of all realms, but the way AM terminates sessions is different depending on where AM stores the sessions. For more information, see "Session Termination".
Sessions can be upgraded to provide access to sensitive resources. For more information, see "Session Upgrade".
Sessions can be configured to limit the number of active sessions a user can have at a given time. For more information, see "Session Quotas".
Sessions can store custom information using post-authentication plugins. For more information about post-authentication plugins, see "Creating Post-Authentication Plugins for Chains".
Session storage location is configured at the realm level. The following table illustrates where AM can store sessions:
Session storage location can be heterogeneous within the same AM deployment to suit the requirements of each of your realms.
CTS-based sessions reside in the CTS token store and can be cached in memory on one or more AM servers to improve system performance [1]. If the session request is redirected to an AM server that does not have the session cached, that server must retrieve the session from the CTS token store.
AM sends a reference to the session to the client, but the reference does not contain any of the session state information. AM can modify a session during its lifetime without changing the client's reference to the session.
CTS-Based Authentication Sessions Specifics
CTS-based authentication sessions are supported for authentication trees only.
During authentication, the session reference is returned to the client after a call to the
authenticateendpoint and stored in theauthIdobject of the JSON response.AM maintains the authenticating user's session in the CTS token store. After the authentication flow has completed, if the realm to which the user has authenticated is configured for client-based sessions, AM returns session state to the client and deletes the CTS-based session.
Authentication session whitelisting is an optional feature that maintains a list of in-progress authentication sessions and their progress in the authentication flow to protect against replay attacks. For more information, see "Implementing Authentication Session Whitelisting".
CTS-Based Sessions
Once the user is authenticated, the session reference is known as an SSO token. For browser clients, AM sets a cookie in the browser that contains the session reference. For REST clients, AM returns the session reference in response to calls to the
authenticationendpoint.For more information about session cookies, see "Session Cookies".
Client-based sessions are those where AM returns session state to the client after each request, and require it to be passed in with the subsequent request.
Important
Some features are not supported in realms configured for client-based sessions. For more information, see "Limitations When Using Client-Based Sessions".
You should configure AM to sign and/or encrypt client-based sessions and authentication sessions for security reasons. As decrypting and verifying the session may be an expensive operation to perform on each request, AM caches[1] the decrypt sequence in memory to improve performance.
For more information about configuring client-based security, see "Configuring Client-Based Session and Authentication Session Security".
Client-Based Authentication Sessions Specifics
Client-based authentication sessions are supported for authentication trees only, and are configured by default in new installations.
During authentication, authentication session state is returned to the client after each call to the
authenticateendpoint and stored in theauthIdobject of the JSON response.After the authentication flow has completed, if the realm to which the user has authenticated is configured for CTS-based sessions, AM creates the user's session in the CTS token store. Then, AM attempts to invalidate the client-based authentication session.
Storing authentication sessions on the client allows any AM server to handle the authentication flow at any point in time without load-balancing requirements.
Authentication session whitelisting is an optional feature that maintains a list of in-progress authentication sessions and their progress in the authentication flow to protect against replay attacks. For more information, see "Implementing Authentication Session Whitelisting".
Client-Based Sessions Specifics
For browser-based clients, AM sets a cookie in the browser that contains the session state. When the browser transmits the cookie back to AM, AM decodes the session state from the cookie. For REST-based clients, AM sends the cookie in a header. For more information about session cookies, see "Session Cookies".
Session blacklisting is an optional feature that maintains a list of logged out client-based sessions in the CTS token store. For more information about session termination and session blacklisting, see "Session Termination" and "Configuring Session Blacklisting".
In-memory sessions reside in AM's memory. AM sends clients a reference to the session, but the reference does not contain any of the session state information.
In-Memory Authentication Sessions Specifics
In-memory authentication sessions are the only configuration supported for authentication chains. They are also configured by default for authentication trees after an upgrade.
During authentication, the authentication session reference is returned to the client after a call to the
authenticateendpoint and stored in theauthIdobject of the JSON response.AM maintains the user's authentication session in its memory. After the authentication flow has completed, AM performs the following tasks:
If the realm to which the user has authenticated is configured for CTS-based sessions, AM stores the user's session in the CTS token store and deletes the authentication session from memory.
If the realm to which the user has authenticated is configured for client-based sessions, AM stores the user's session in a cookie on the user's browser and deletes the authentication session from memory.
Authentication session whitelisting is an optional feature that maintains a list of in-progress authentication sessions and their progress in the authentication flow to protect against replay attacks. For more information, see "Implementing Authentication Session Whitelisting".
Important
Deployments where AM stores authentication sessions in memory require sticky load balancing to route all requests pertaining to a particular authentication flow to the same AM server. If a request reaches a different AM server, the authentication flow will start anew.
Authentication chains only support storing authentication sessions in memory. ForgeRock recommends switching to authentication trees with CTS-based or client-based authentication sessions.
For information about configuring AM with sticky load balancing, see "Configuring Load Balancing for a Site" in the Installation Guide.
In-Memory Sessions Specifics
AM does not support in-memory sessions for authenticated users.
AM stores CTS-based sessions in the CTS token store and caches sessions in server memory. If a server with cached sessions fails, or if the load balancer in front of AM servers directs a request to a server that does not have the user's session cached, the AM server retrieves the session from the CTS token store, incurring performance overhead.
Choosing where to store sessions is an important decision you must make by realm. Consider the information in the following tables before configuring sessions:
CTS-based sessions provide the following advantages:
| Advantage | Applies to Authentication Sessions? | Applies to Sessions? |
|---|---|---|
|
Full Feature Support CTS-based sessions support all AM features, such as CDSSO and quotas. Client-based sessions do not. For information about restrictions on AM usage with client-based sessions, see "Limitations When Using Client-Based Sessions". This advantage does not apply to authentication sessions, since they do not provide features. | | |
|
Session Information Is Not Resident In Browser Cookies With CTS-based sessions, all the information about the session resides in CTS and might be cached on one or more AM servers. With client-based sessions, session information is held in browser cookies. This information could be very long-lived. | | |
Client-based sessions provide the following advantages:
| Advantage | Applies to Authentication Sessions? | Applies to Sessions? |
|---|---|---|
|
Unlimited Horizontal Scalability for Session Infrastructure Client-based sessions provides unlimited horizontal scalability for your sessions by storing the session state on the client as a signed and encrypted JWT. Overall performance on hosts using client-based sessions can be easily improved by adding more hosts to the AM deployment. | | |
|
Replication-Free Deployments Global deployments may struggle to keep their CTS token store replication in sync when distances are long and updates are frequent. Client-based sessions are not constrained by the replication speed of the CTS token store. Therefore, client-based sessions are usually more suitable for deployments where a session can be serviced at any time by any server. | | |
In-memory authentication sessions provide the following advantages:
| Advantage | Applies to Authentication Sessions? | Applies to Sessions? |
|---|---|---|
|
Faster Performance With Equivalent Host AM servers configured for in-memory authentication sessions can validate more sessions per second per host than those configured for client-based or CTS-based authentication sessions. | | |
|
Session Information Is Not Resident in Browser Cookies Authentication session information resides in AM's memory and it is not accessible to users. With client-based sessions, authentication session information is held in browser cookies. | | |
The following table contrasts the impact of storing authentication sessions in different locations:
| CTS-Based Authentication Sessions | Client-Based Authentication Sessions | In-Memory Authentication Sessions | |
|---|---|---|---|
| Authentication Method | Authentication trees. | Authentication trees. | Authentication trees and authentication chains. |
| Session Location | Authoritative source: CTS token store. Sessions might also be cached in AM's memory for improved performance. | On the client. | In AM server's memory. |
| Load Balancer Requirements | None. Session stickiness recommended for performance. | None. Session stickiness recommended for performance. | Session stickiness. |
| Core Token Service Usage | Authoritative source for user sessions. Session whitelisting, when enabled. | Session whitelisting, when enabled. | None. |
| Uninterrupted Session Availability | No special configuration required. | No special configuration required. | Not available. |
| Session Security | Sessions reside in the CTS token store, and are not accessible to users. | Sessions reside on the client and should be signed and encrypted. | Sessions reside in AM's memory, and are not accessible to users. |
The following table contrasts the impact of storing sessions in different locations:
| CTS-Based Sessions | Client-Based Sessions | |
|---|---|---|
| Hardware | Higher I/O and memory consumption. | Higher CPU consumption. |
| Logical Hosts | Variable or large number of hosts. | Variable or large number of hosts. |
| Session Monitoring | Available. | Not available. |
| Session Location |
Authoritative source: CTS token store. Sessions might also be cached in AM's memory for improved performance. | In a cookie in the client. |
| Load Balancer Requirements | None. Session stickiness recommended for performance. | None. Session stickiness recommended for performance. |
| Uninterrupted Session Availability | No special configuration required. | No special configuration required. |
| Core Token Service Usage | Authoritative source for user sessions. | Provides session blacklisting for logged out sessions. |
| Core Token Service Demand | Heavier. | Lighter. |
| Session Security | Sessions reside in the CTS token store, and are not accessible to users. | Sessions should be signed and encrypted. [a] |
| Cross-Domain Single Sign-On Support | All AM capabilities supported. |
|
[a] Web Agents 5.x and Java Agents 5.x support either signing or encrypting client-based sessions, but not both. For more information, see "Configure Client-Based Session Security for Agents". | ||
AM issues a cookie to the user or entity regardless
of the session location for client-based and CTS-based sessions. By default,
the cookie's name is iPlanetDirectoryPro.
For sessions stored in the CTS
token store, the cookie contains a reference to the session in the CTS token store and
several other pieces of information. For sessions stored on the client, the
iPlanetDirectoryPro cookie contains
all the information that would be held in the CTS token store.
Client-based session cookies are comprised of two parts. The first part of the cookie is identical to the cookie used by CTS-based sessions, which ensures the compatibility of the cookies regardless of the session location. The second part is a JSON Web Token (JWT), and it contains session information, as illustrated below:
iPlanetDirectoryProcookie for CTS-based sessions:AQIC...sswo.*AAJ...MA..*
iPlanetDirectoryProcookie for Client-based sessions:AQIC...sswo.*AAJ...MA..*ey....................................fQ.
Note that the examples are not to scale. The size of the client-based session cookie increases when you customize AM to store additional attributes in users' sessions. You are responsible for ensuring that the size of the cookie does not exceed the maximum cookie size allowed by your end users' browsers.
Note
You should configure AM to sign and/or encrypt client-based sessions to ensure a malicious user cannot tamper with the session or read its contents. For more information, see "Configuring Client-Based Session and Authentication Session Security".
AM manages active sessions, allowing single sign-on when authenticated users attempt to access system resources in AM's control.
AM ensures that user sessions are terminated when a configured timeout is reached, or when AM users perform actions that cause session termination. Session termination effectively logs the user out of all systems protected by AM.
With CTS-based sessions, AM terminates sessions in four situations:
When a user explicitly logs out
When an administrator monitoring sessions explicitly terminates a session
When a session exceeds the maximum time-to-live
When a user is idle for longer than the maximum session idle time
Under these circumstances, AM responds by removing CTS-based sessions from the CTS token store and from AM server memory caches. With the user's session no longer present in CTS, AM forces the user to reauthenticate during subsequent attempts to access resources protected by AM.
When a user explicitly logs out of AM, AM also attempts to
invalidate the iPlanetDirectoryPro cookie in users'
browsers by sending a Set-Cookie header with an invalid
session ID and a cookie expiration time that is in the past. In the case of
administrator session termination and session timeout, AM cannot
invalidate the iPlanetDirectoryPro cookie until the next
time the user accesses AM.
Session termination differs for client-based sessions. Since client-based
sessions are not maintained in the CTS token store, administrators cannot
monitor or terminate them. Because AM does not modify
the iPlanetDirectoryPro cookie for client-based sessions
after authentication, the session idle time is not maintained in the cookie.
Therefore, AM does not automatically terminate client-based sessions
that have exceeded the idle timeout.
As with CTS-based sessions, AM attempts to invalidate the
iPlanetDirectoryPro cookie from a user's browser when the
user logs out. When the maximum session time is exceeded, AM also
attempts to invalidate the iPlanetDirectoryPro cookie
in the user's browser the next time the user accesses AM.
It is important to understand that AM cannot guarantee cookie
invalidation. For example, the HTTP response containing the
Set-Cookie header might be lost. This is not an issue for
CTS-based sessions, because a logged out session no longer exists in
the CTS token store, and a user who attempts to access AM after
previously logging out will be forced to reauthenticate.
However, the lack of a guarantee of cookie invalidation is an issue for
deployments with client-based sessions. It could be possible for a
logged out user to have an iPlanetDirectoryPro cookie.
AM could not determine that the user previously logged out. Therefore,
AM supports a feature that takes additional action when users log out of
client-based sessions. AM can maintain a list of logged out client-based
sessions in a session blacklist in the CTS token store.
Whenever users attempt to access AM with client-based sessions, AM
checks the session blacklist to validate that the user has not, in fact,
logged out.
For more information about session blacklist options, see "Configuring Session Blacklisting".
Consider a website for a University. Some information, such as courses and degree catalogs, are free for anyone to see and therefore, do not need to be protected. The University also provides the students with a portal they can use to see their grades, which is protected with a policy that requires users to authenticate. However, to pay tuition, students are required to present additional credentials to increase their authentication level and gain access to these functions.
Allowing authenticated users to provide additional credentials to access sensitive resources is called session upgrade, which is AM's mechanism to perform step-up authentication.
Session upgrade triggers during the following events:
An authenticated user is redirected to a URL that has the
ForceAuthparameter set totrue. For example,https://openam.example.com:8443/openam/XUI/#login/myRealm&ForceAuth=trueIn this case, the user is asked to reauthenticate to the default chain in the realm
myRealm.Important
Session upgrade using the
ForceAuthparameter is only supported for CTS-based sessions.An authenticated user tries to access a protected resource and AM sends the policy enforcement point (PEP) advice that the user should perform one of the following actions:
Authenticate at an authentication level greater than the current level
Authenticate to a module
Authenticate to a service
The flow of the session upgrade during policy evaluation is as follows:
An authenticated user tries to access a resource.
The PEP, for example a web or Java agent, sends the request to AM for policy decision.
AM returns an authorization decision that denies access to the resource, and returns an advice indicating that the user needs to present additional credentials to access the resource.
The policy enforcement point sends the user back to AM for session upgrade.
The user provides additional credentials. For example, they may provide a one-time password or swipe their phone screen.
AM authenticates the user.
The user can access now the sensitive resource.
If session upgrade is successful, one of the following will happen depending on the type of sessions configured for the realm:
If the realm is configured for CTS-based sessions, one of the following will happen depending on the mechanism used to perform session upgrade:
If you used the
ForceAuthparameter, AM modifies the user's session in the CTS store to reflect the successful authentication to a higher level.If you used advices, AM copies the session properties to a new session and hands the client a new session token to replace the original one. The new session reflects the successful authentication to a higher level.
If the realm is configured for client-based sessions, AM hands the client a new session token to replace the original one. The new session reflects the successful authentication to a higher level.
If session upgrade is unsuccessful, AM leaves the user session as it was before the attempt at stronger authentication. If session upgrade failed because the login page times out, AM redirects the user's browser to the success URL from the last successful authentication.
For more information about performing session upgrade, see "Performing Session Upgrade".
In some deployments, you need to limit how many active sessions a user can have at a given time. For example, you might want to prevent a user from using more than two devices at once.
AM lets you limit the number of active sessions for a user by setting session quotas. You also configure session quota exhaustion actions so that when a user goes beyond the session quota, AM takes the appropriate action.
See "Implementing Session Quotas" for instructions.
AM's support for session quotas requires CTS-based sessions. Be sure that AM is configured for CTS-based sessions—the default configuration—before attempting to configure session quotas.
Single sign-on (SSO) lets users who have authenticated to AM access multiple independent services from a single login session by storing user sessions as HTTP cookies. If you are unfamiliar with HTTP cookies, see "About HTTP Cookies" for more information.
AM supports SSO within a single domain or across domains:
Cross-Domain SSO (CDSSO). Provides SSO when:
AM and the web and Java agents are in the same DNS domain. For example, both the agents and AM servers are in the
.example.netDNS domain.AM and the web and Java agents are in different DNS domains. For example, the AM servers are in the
.internal.netDNS domain, and the agents are in the.example.netdomain.
CDSSO removes the constraint of configuring SSO depending on the DNS domain of AM and the web or Java agents, simplifying the deployment of SSO in the environment.
For more information, see "Cross-Domain SSO"
Classic Cross-Domain SSO. Provides SSO to web and Java agents earlier than version 5 when AM and the agents are in different DNS domains. For example, CDSSO allows AM servers in the DNS domain
.internal.netto provide authentication and authorization to agents from other DNS domains, such as.example.net.For more information, see "Classic Cross-Domain SSO"
Classic Single Domain SSO. Provides SSO to web and Java agents earlier than version 5 when AM and the agents are in the same DNS domain. For example, both the agents and AM servers are in the
.example.netDNS domain.For more information, see "Classic Single Domain SSO".
Cross-domain single sign-on (CDSSO) provides
a safe mechanism for managing access across one or multiple domains in
a single organization. For example, CDSSO allows your AM servers in
the DNS domain .internal.net to provide authentication and
authorization to web and Java agents from the .internal.net domain
and other DNS domains, such as .example.net.
When implementing CDSSO in your deployment, take into account the following points:
CDSSO is an AM-specific capability to provide SSO inside the same organization. For SSO across multiple organizations or when integrating with other access management software, use AM's federation capabilities.
CDSSO is the only mode available for Web Agents 5.x and Java Agents 5.x, and it provides SSO for AM servers and the agents within a single domain or across domains in the same organization.
CDSSO is also supported with IG version 6 or later. For more information, see Single Sign-On and Cross-Domain Single Sign-On in the ForgeRock Identity Gateway Gateway Guide.
CDSSO supports CTS-based and client-based sessions. For more information about session state impact on CDSSO, see "Impact of Storage Location for Sessions".
CDSSO does not support web and Java agents earlier than version 5. If you need to configure CDSSO for agents earlier than version 5, see "Classic Cross-Domain SSO".
Web Agents 5.x and Java Agents 5.x wrap the SSO session token inside an OpenID Connect (OIDC)
JSON Web Token (JWT) [2].
During the CDSSO flow, the agents create cookies for the different domains
specified in the agent profile, and the oauth2/authorize
endpoint authorizes the different cookie domains as required.
The following diagram illustrates the CDSSO flow for Web Agents 5.x and Java Agents 5.x:

For information about how to configure CDSSO, see "Implementing Cross-Domain Single Sign-On".
When changing authentication realms, a subject leaves the current SSO realm. The new SSO realm might apply to different applications, and use a different authentication process. For AM, logging in to a new realm means logging out of the current realm.
When a user interactively changes realms through the AM console, AM offers the option of logging out of the current realm to log in to the new realm, or choosing to remain logged in to the current realm.
The result depends on the user's choice:
If the user cancels the change at this point, the user remains logged in to the current realm, and is not logged in to the new realm.
If the user chooses to log in to the new realm, AM first logs the user out of the current realm, and then prompts the user to log in to the new realm.
Classic cross-domain single sign-on (CDSSO) provides
a mechanism for web and Java agents earlier than version 5 to manage access across
multiple domains in a single organization. For example, CDSSO allows your
AM servers in the DNS domain .internal.net to
provide authentication and authorization to agents from other DNS
domains, such as .example.net.
When implementing classic CDSSO in your deployment, take into account the following points:
Classic CDSSO is an AM-specific capability to provide SSO inside the same organization. For SSO across multiple organizations or when integrating with other access management software, use AM's federation capabilities.
Classic CDSSO requires CTS-based sessions.
Classic CDSSO does not support Web or Java Agents 5.x. If you need to configure CDSSO for Web Agents 5.x and Java Agents 5.x, see "Cross-Domain SSO".
Java agents [3] use a mechanism to write the SSO token from AM authentication to a cookie with the domain of the host where the agent runs. The following sequence diagram illustrates this mechanism:

Whereas Java agents[3] have an endpoint specifically to handle the cookie domain translation, web agents [3] handle the request directly as shown in the following sequence diagram:

For information about how to configure cross-domain SSO, see "Implementing Classic Single Domain and Cross-Domain SSO".
Classic single domain SSO provides web and Java agents earlier than version 5 with SSO capabilities when AM and the agents are in the same DNS domain.
The following diagram illustrates single domain SSO:

The domain shown in the description is
example.net.The protected resource application can be found on
app.example.net.The AM server is located on
sso.example.net.
A client points their browser to a protected resource application. An agent protecting the application checks the client browser cookies for the presence of a session. If a session cookie exists and is valid, the agent requests validation (see arrow 8).
If no valid session cookie exists, the agent redirects the client to AM for authentication (AuthN). If the client submits valid credentials, the AuthN service creates a session cookie for the configured domain. The contents of the session cookie varies, depending on the configuration of the realm to which the user authenticates:
If the realm is configured for CTS-based sessions, an SSO token is embedded in the cookie.
If the realm is configured for client-based sessions, the session itself is embedded in the cookie.
AM issues an HTTP redirect to send the client browser back to the protected resource.
The agent then verifies the validity of the session with the AM session service, before granting access.
For information about how to configure SSO in a single domain, see "Implementing Classic Single Domain and Cross-Domain SSO".
[1] For information about configuring AM with sticky load balancing, see "Configuring Load Balancing for a Site" in the Installation Guide.
[2] For information about the OIDC standards, see "OpenID Connect 1.0 Standards" in the OpenID Connect 1.0 Guide.
[3] Earlier than version 5
AM supports a wide range of authentication modules that can be configured together using authentication chains, and authentication nodes that can be configured together using authentication trees.
AM also supports post-authentication plugins to customize any process after the user or the entity has been authenticated.
After you configure AM authentication, users can authenticate to AM using a browser or a REST API call as described in "Using Authentication".
This chapter presents the available authentication modules and nodes, and procedures to configure chains, trees, and post-authentication plugins:
| • "Setting up a Realm for Authentication" |
| • "Configuring Authentication Trees" |
| • "Configuring Authentication Chains and Modules" |
| • "Configuring the Default Authentication Tree or Chain" |
In AM, users always authenticate to a realm. Every AM realm has a set of authentication properties that applies to all authentication performed to that realm. The settings are referred to as core authentication attributes.
To configure core authentication attributes for an entire AM deployment, navigate to Configure > Authentication in the AM console, and then click Core Attributes.
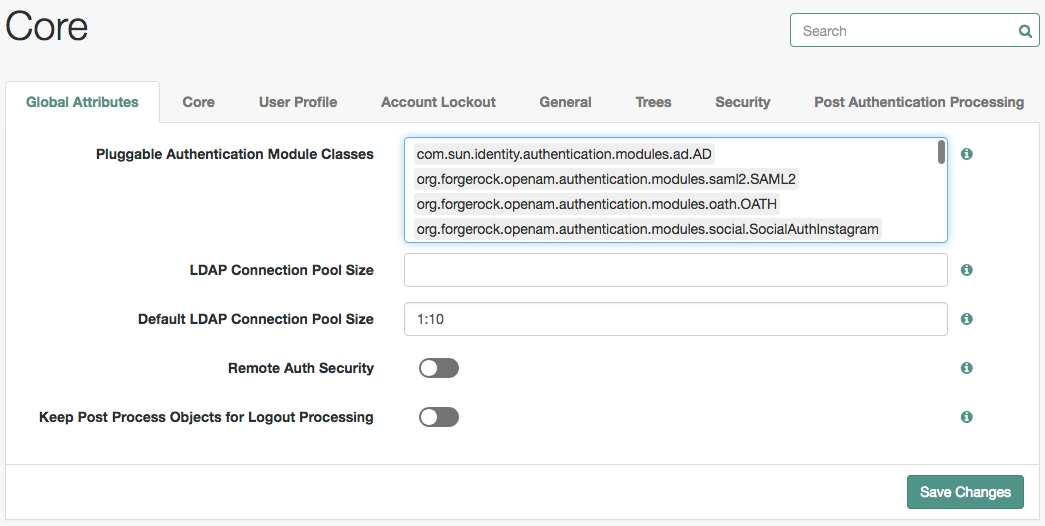
To override the global core authentication configuration in a realm, navigate to Realms > Realm Name > Authentication > Settings in the AM console. Note that when you configure core authentication attributes in a realm, the Global tab does not appear.
Use core authentication attributes to configure:
The list of available authentication modules
Which types of clients can authenticate with which modules
Connection pools for access to directory servers
Whether to retain objects used during authentication so they can be used at logout
Defaults for configuring authentication in a particular realm
For detailed information about the core configuration attributes, see "Core Authentication Attributes".
This section covers creating authentication trees and configuring authentication nodes.
Authenticating to a tree uses the same syntax as authenticating to a chain. For example, to
authenticate to a tree called myAuthTree in the top level realm,
use a URL similar to the following:
https://openam.example.com:8443/openam/XUI/?realm=/#login/&service=myAuthTree
On the Realms page of the AM console, select the realm in which to create the authentication tree.
On the Realm Overview page, select Authentication in the left-hand menu, and then select Trees.
On the Trees page, select Create Tree. Enter a tree name, for example
myAuthTree, and then select Create.The authentication tree designer is displayed, with the Start entry point connected to the Failure exit point.
The authentication tree designer provides the following features on the toolbar:
Button Usage 
Lay out and align nodes according to the order they are connected. 
Toggle the designer window between normal and full screen layout. 
Remove the selected node. Note that the Start entry point cannot be deleted. Add a node to the tree by dragging the node from the Components panel on the left-hand side and dropping it into the designer area.
(Optional) Configure the node properties by using the right-hand panel. For more information on the available properties for each node, see "Configuring Authentication Nodes"
Connect the node to the tree as follows:
Select and drag the output connector from an existing node and drop it onto the new node.
Select and drag the output connector from the new node and drop it onto an existing node.
Nodes have one or more connectors, displayed as dots on the node. Unconnected connectors are colored red and must be connected to other nodes in the tree.
Tip
Input connectors appear on the left of the node, output connectors appear on the right.
A line is drawn between the connectors of connected nodes, and the connectors will no longer be red.
(Optional) Alter a connection by selecting and dragging the green connector in the connection and dropping it onto the new location.
Continue adding, connecting and removing nodes until the tree is complete, and then select Save.
Test your authentication tree by navigating to a URL similar to the following:
https://openam.example.com:8443/openam/XUI/?realm=/#login/&service=myAuthTree
Tip
Clean installs of AM provide ready-made sample authentication trees to demonstrate how they can be put
together. These sample trees are not installed by default if you are upgrading an existing instance of AM.
The sample-trees-6.0.0.7.zip file, in the main AM-6.0.0.7.zip
download package, contains the sample trees in JSON files, ready for import by Amster
command-line interface. For information on importing files by using Amster, see
Importing Configuration Data in the
Amster 6 User Guide.
This section covers the configuration of the authentication nodes that are built into AM.
Tip
A number of additional authentication nodes are available from the ForgeRock Marketplace website.
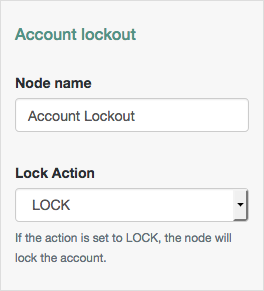
The Account lockout node can lock or unlock the authenticating user's account profile.
Properties:
| Property | Usage |
|---|---|
| Lock Action |
Choose whether to The "Data Store Decision Node" and "Data Store Decision Node" both check if the account profile is in the LOCK state. |
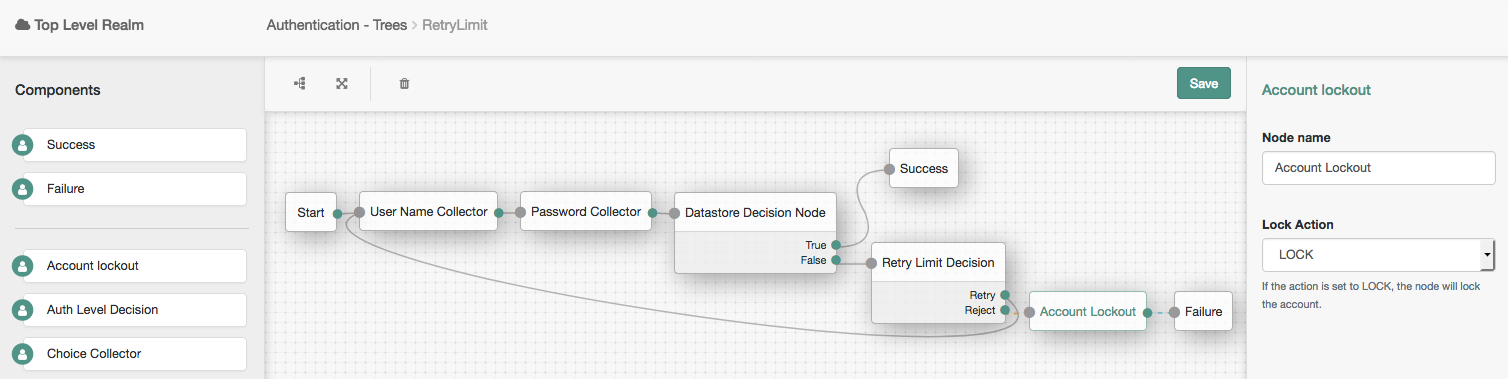
Example:
The following example uses the Account lockout Decision authentication node with the Retry Limit Decision Node to lock an account after a number of invalid attempts:
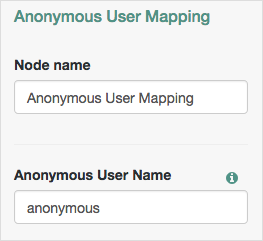
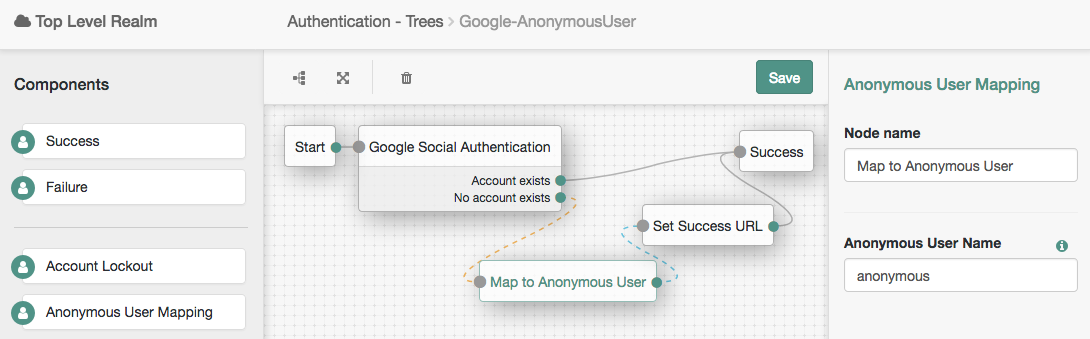
The Anonymous User Mapping node allows users to log in to your application or web site without providing
credentials, by assuming the identity of a specified, existing user account. The default user for this purpose
is named anonymous.
Typically, you would provide such users with very limited access, for example, anonymous users may have access to public downloads on your site.

Properties:
| Property | Usage |
|---|---|
| Anonymous User Name |
Specifies the username of an account that represents anonymous users. This user must already exist in the realm. |
Example:
The following example uses the Anonymous User Mapping authentication node to allow users who have performed social authentication using Google to access AM as an anonymous user if they do not have a matching existing profile.
The Auth Level Decision authentication node compares the current authentication level value against a configured value.
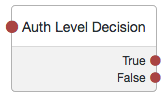
Properties:
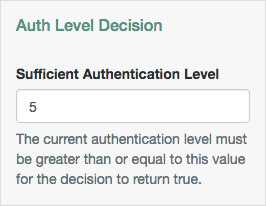
| Property | Usage |
|---|---|
| Sufficient Authentication Level |
The tree evaluation continues along the True path if the current authentication level
is equal to or greater than the entered integer. Otherwise, the tree evaluation continues along the
False
path.
|
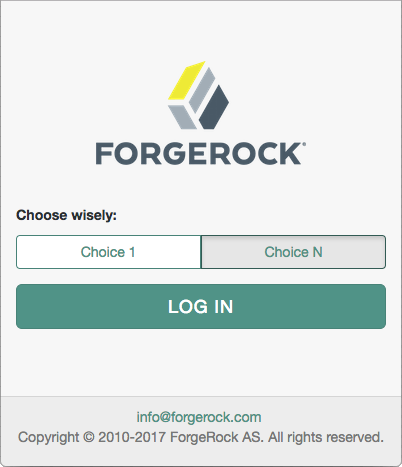
The Choice Collector authentication node lets you define two or more options to present to the user when authenticating.

Properties:
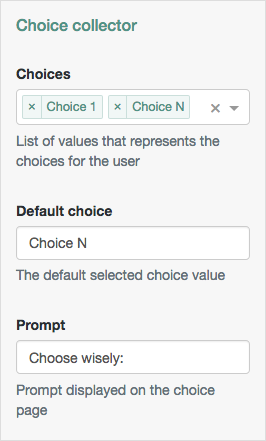
| Property | Usage |
|---|---|
| Choices |
Enter two or more choice strings to display to the user. To remove a choice, select its Delete icon (x). To delete all choices, select the Clear all button in the Choices field. |
| Default choice | Enter the value of the choice to be selected by default. |
| Prompt | Enter the prompt string to display to the user when presenting the choices. |
Example:
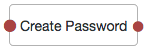
The Create Password node allows users to create a password when provisioning an account.
The social identity provider will not provide a user's password. Use this node to provide a password to complete the user's credentials before provisioning an account.
The tree must provision an account after asking the user for a password, for example by using the
Provision Dynamic Account authentication node. If an account is not provisioned the entered
password will not be saved.
Note
You must not place any nodes that request additional input from the user between the Create Password node and the provisioning node, otherwise the password will be lost.
Properties:
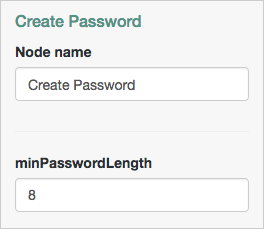
| Property | Usage |
|---|---|
| minPasswordLength |
Specifies the minimum number of characters the password must contain. |
Example:
The following example uses the Create Password authentication node to allow users who have performed social authentication using Google to provide a password and provision an account, if they do not have a matching existing profile. They must enter a one-time password to verify they are the owner of the Google account.

The Data Store Decision authentication node verifies that the username and password values exist in the data store configured in the realm.
For example, the username and password could be obtained by a combination of the Username Collector and Password Collector nodes, or the Zero Page Login Collector node.
The tree evaluation continues along the True path if the credentials are located in the
configured data store and the user account profile is not locked. Otherwise, the tree evaluation continues along
the False path.
Note
Unlike the "LDAP Decision Node", which supports LDAP Behera Password Policies, the data
store decision node does not have separate outcomes for accounts that are locked or their password has
expired; both result in the False path.
The node will also not lockout an account by itself. Instead use a combination of the "Retry Limit Decision Node" and the "Account lockout Node" to lockout an account after repeated failed attempts to authenticate.
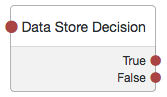
Properties:
This node has no configurable properties.
The Failure URL authentication node sets the URL to be redirected to when authentication fails.
Note
Specifying a failure URL in a tree overrides any gotoOnFail query string parameters.
If not specified, the tree uses the value specified in the Default Failure Login URL property under Realms > Realm Name > Authentication > Settings > Post Authentication Processing.
Tip
The URL is also saved into the sharedState object, under a property named
failureUrl, which can be useful for custom node developers. For more information, see
"Customizing Authentication Trees".
Properties:

| Property | Usage |
|---|---|
| Failure URL | Specify the full URL to be redirected to when authentication fails. |
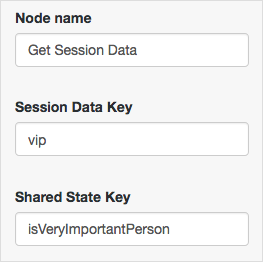
The Get Session Data authentication node retrieves the value of a specified key from a user's session data, and
stores it in the specified key in the tree's sharedState object.
The Get Session Data authentication node is only used during session upgrade—when the user has already successfully authenticated previously—and is now upgrading their session for additional access. For more information on upgrading a session, see "Session Upgrade"
The following table includes example keys that may be available in an existing session, and sample data that they might contain:
| Key | Sample value |
|---|---|
AMCtxId | e370cca2-02d6-41f9-a244-2b107206bd2a-122934 |
amlbcookie | 01 |
authInstant | 2018-04-04T09:19:05Z |
AuthLevel | 0 |
CharSet | UTF-8 |
clientType | genericHTML |
FullLoginURL | /openam/UI/Login?realm=%2F |
Host | 198.51.100.1 |
HostName | openam.example.com |
Locale | en_US |
Organization | dc=openam,dc=forgerock,dc=org |
Principal | id=amadmin,ou=user,dc=openam,dc=forgerock,dc=org |
Principals | amadmin |
Service | ldapService |
successURL | /openam/console |
sun.am.UniversalIdentifier | id=amadmin,ou=user,dc=openam,dc=forgerock,dc=org |
UserId | amadmin |
UserProfile | Required |
UserToken | amadmin |
webhooks | myWebHook |

Properties:
| Property | Usage |
|---|---|
| Session Data Key | Specify the name of a key in the user's session data from which to retrieve the value. |
| Shared State Key |
Specify the name of a key in the sharedState object in which to store the retrieved value.
|
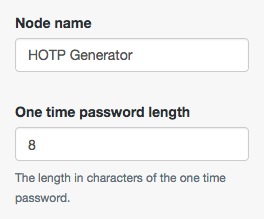
The HOTP Generator authentication node creates a string of random digits, of the length specified. The default length is 8 digits.
Properties:
| Property | Usage |
|---|---|
| One-time password length | Specify the number of digits in the one-time password. |
Use alongside the following authentication nodes to add one-time password verification to the authentication tree:
Example:

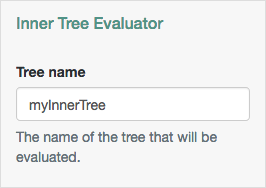
The Inner Tree Evaluator authentication node allows the nesting and evaluation of authentication trees as children within a parent tree. There is no limit to the depth of nested trees.
Any information collected or set by the parent tree, for example, a username or the authentication level, is available to the child trees. Information collected by child trees is available to the parent once evaluation of the child is complete.
The tree evaluation continues along the True path if the child tree reached the Success exit
point. Otherwise, the tree evaluation continues along the False path.

Properties:
| Property | Usage |
|---|---|
| Tree name | Enter the name of the tree to evaluate. |
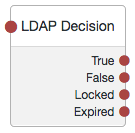
The LDAP Decision authentication node verifies that the provided username and password values exist in a specified LDAP user data store, and whether they are expired or locked out.
For example, the username and password could be obtained by a combination of the Username Collector and Password Collector nodes, or by using the Zero Page Login Collector node.
The tree evaluation continues along the True outcome path if the credentials are located in the
specified LDAP user data store. If the profile associated with the username and password is locked, or the
password has expired, tree evaluation continues along the respective Locked or
Expired outcome paths.
If the credentials are not found, the tree evaluation continues along the False outcome path.
Properties:

| Property | Usage |
|---|---|
|
Primary LDAP Server |
Specify one or more primary directory servers. Specify each directory server in the following format:
For example, |
|
Secondary LDAP Server |
Specify one or more secondary directory servers. Specify each directory server in the following format:
Secondary servers are used when none of the primary servers are available.
For example, |
|
DN to Start User Search |
Specify the DN from which to start the user search. More specific DNs, such as
If multiple entries exist in the store with identical attribute values, ensure this property is specific enough to return only one entry. |
|
Bind User DN, Bind User Password |
Specifies the credentials used to bind to the LDAP user data store. |
|
Attribute Used to Retrieve User Profile |
Specifies the attribute used to retrieve the profile of a user from the directory server. The user search will have already happened, as specified by the Attributes Used to Search for a User to be Authenticated and User Search Filter properties. |
|
Attributes Used to Search for a User to be Authenticated |
Specifies the attributes used to match an entry in the directory server to the credentials provided by the user.
The default value of Multiple attribute values allow the user to authenticate with any one of the values. For
example, if you have both |
|
User Search Filter |
Specifies an additional filter to append to user searches. For example, searching for |
| Search Scope |
Specifies the extent of searching for users in the directory server. Scope Default: |
|
LDAP Connection Mode |
Specifies whether to use SSL or StartTLS to connect to the LDAP user data store. AM must be able to trust the certificates used.
Possible values: Default: LDAP |
|
Return User DN to DataStore |
When enabled, the node returns the DN rather than the User ID. From the DN value, AM uses the
RDN to search for the user profile. For example, if a returned DN value is
Default: Enabled |
|
User Creation Attributes |
This list lets you map (external) attribute names from the LDAP directory server to (internal) attribute names used by AM. |
|
Minimum Password Length |
Specifies the minimum acceptable password length. Default: |
|
LDAP Behera Password Policy Support |
When enabled, support interoperability with servers that implement the Internet-Draft, Password Policy for LDAP Directories. Default: Enabled |
|
Trust All Server Certificates |
When enabled, blindly trust server certificates, including self-signed test certificates. Default: Disabled |
|
LDAP Connection Heartbeat Interval |
Specifies how often AM should send a heartbeat request to the directory server to ensure that the connection does not remain idle.
Some network administrators configure firewalls and load balancers to drop connections that are idle for
too long. You can turn this off by setting the value to Default: |
|
LDAP Connection Heartbeat Time Unit |
Specifies the time unit corresponding to LDAP Connection Heartbeat Interval. Default: Seconds |
|
LDAP Operations Timeout |
Defines the timeout in milliseconds that AM should wait for a response from the directory server.
Default: |
The Meter authentication node increments a specified metric key each
time tree evaluation passes through the node. For information
on the Meter metric type, see
"Monitoring Metric Types" in the Setup and Maintenance Guide.
The metric is exposed in all available interfaces, as described in
"Monitoring Interfaces" in the Setup and Maintenance Guide.

Properties:
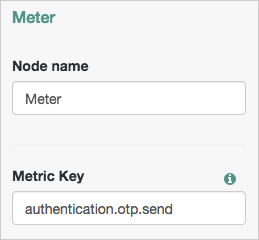
| Property | Usage |
|---|---|
| Metric Key | Specify the name of a metric to increment when tree evaluation passes through the node. |
The Modify Auth Level authentication node lets you increase or decrease the current authentication level value.
The tree evaluation continues along the single outcome path after modifying the authentication level.
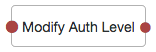
Properties:

| Property | Usage |
|---|---|
| Value to add | Enter a positive integer to increase the current authentication level, or a negative integer to decrease the current authentication level by the specified value. |
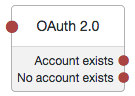
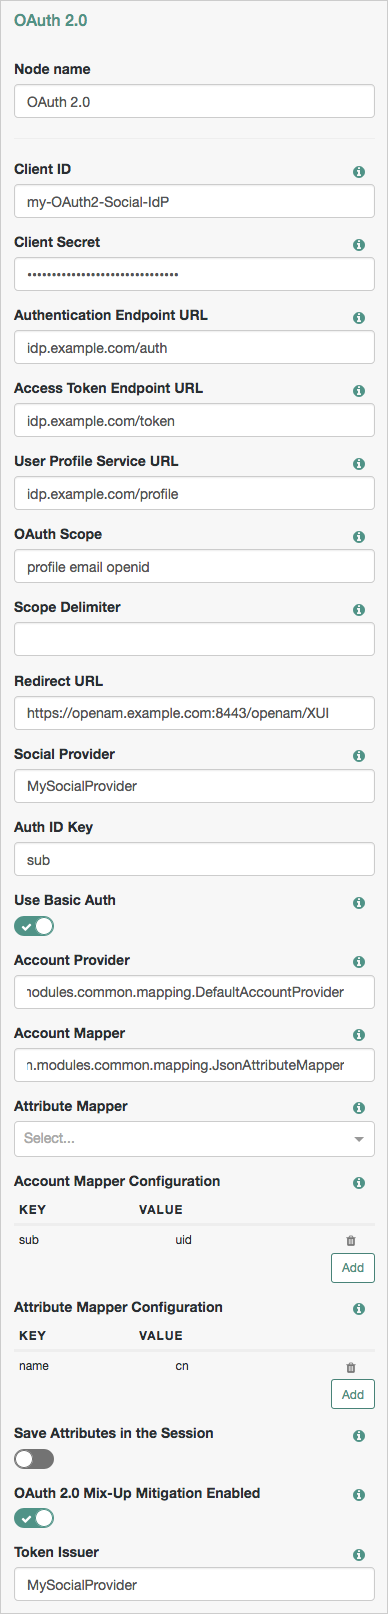
The OAuth 2.0 authentication node lets AM authenticate users of OAuth 2.0-compliant resource servers. References in this section are to RFC 6749, The OAuth 2.0 Authorization Framework.
The tree evaluation continues along the Account Exists path if an account
matching the attributes retrieved from the social identity provider is found in the user data store.
Otherwise, the tree evaluation continues along the No account exists path.
Properties:
| Property | Usage |
|---|---|
| Client ID |
Specifies the |
| Client Secret |
Specifies the |
| Authentication Endpoint URL |
Specifies the URL to the social provider's endpoint handling authentication as described in section 3.1 of The OAuth 2.0 Authorization Framework (RFC 6749).
Example:
|
| Access Token Endpoint URL |
Specifies the URL to the endpoint handling access tokens as described in section 3.2 of The OAuth 2.0 Authorization Framework (RFC 6749).
Example:
|
| User Profile Service URL |
Specifies the user profile URL that returns profile information.
Exaple:
|
| OAuth Scope |
Specifies a list of user profile attributes that the client application requires, according to The OAuth 2.0 Authorization Framework (RFC 6749). Ensure you use the correct scope delimiter as required by the identity provider, for example commas or spaces. The list depends on the permissions that the resource owner, such as the end user, grants to the client application. |
| Scope Delimiter |
Specifies the delimiter used to separate scope values. Some authorization servers use non-standard separators for scopes, for example commas. |
| Redirect URL |
Specifies the URL the user is redirected to by the social identity provider after authenticating.
For authentication trees in AM, set this property to the URL of the XUI, for example
|
| Social Provider |
Specifies the name of the social provider for which this module is being set up. Example:
|
| Auth ID Key |
Specifies the attribute the social identity provider uses to identify an authenticated individual. Example:
|
| Use Basic Auth |
Specifies that the client uses HTTP Basic authentication when authenticating to the social provider.
Default:
|
| Account Provider |
Specifies the name of the class that implements the account provider.
Default:
|
| Account Mapper |
Specifies the name of the class that implements the method of locating local accounts based on the attributes returned from the social identity provider. Provided implementations are:
The Account Mapper classes can take two constructor parameters: a comma-separated list
of attributes and a prefix to apply to their values. For example, to prefix all received
property values with org.forgerock.openam.authentication.modules.common.mapping.JsonAttributeMapper|*|facebook- |
| Attribute Mapper |
Specifies the list of fully qualified class names for implementations that map attributes from the OAuth 2.0 authorization server to AM profile attributes. Provided implementations are:
The Attribute Mapper classes can take two constructor parameters: a comma-separated list
of attributes and a prefix to apply to their values, to help differentiate between the providers.
For example, to prefix all incoming values with org.forgerock.openam.authentication.modules.common.mapping.JsonAttributeMapper|*|facebook- Be aware however using an asterisk applies the prefix to all values, including email addresses, postal addresses, and so on. |
| Account Mapper Configuration |
Specifies the attribute configuration used to map the account of the user authenticated in
the OAuth 2.0 provider to the local data store in AM. Valid values are in the form
Examples: |
| Attribute Mapper Configuration |
Map of OAuth 2.0 provider user account attributes to local user profile attributes, with
values in the form
Examples: |
| Save attributes in the session |
When enabled, saves the attributes in the Attribute Mapper Configuration field to the AM session. |
| OAuth 2.0 Mix-Up Mitigation Enabled |
Controls whether the OAuth 2.0 authentication node carries out additional verification steps when it receives the authorization code from the authorization server.
Specifies that the client must compare the issuer identifier of the authorization server
upon registration with the issuer value returned in the
The Token Issuer property must be entered when the OAuth 2.0 Mix-Up Mitigation feature is
enabled, so that the validation can succeed. The authorization code response will contain
an issuer value ( NoteConsult with the authorization server's documentation on what value it uses for the issuer field. For more information, see section 4 of OAuth 2.0 Mix-Up Mitigation Draft. |
| Token Issuer |
Corresponds to the expected issuer identifier value in the
Example:
|
The OTP Collector Decision authentication node requests and verifies one-time passwords.
The tree evaluation continues along the True outcome path if the entered one-time password
is valid for the authentication in progress. Otherwise, the tree evaluation continues along the
False outcome path.
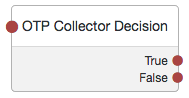
Properties:
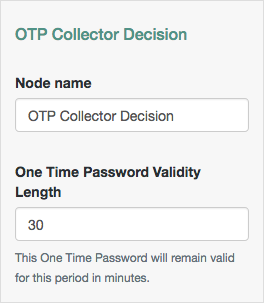
| Property | Usage |
|---|---|
| One Time Password Validity Length |
Specify the length of time, in minutes, that a one-time password remains valid. Default: |
The OTP Email Sender authentication node sends an email containing a generated one-time password to the user.
Properties:
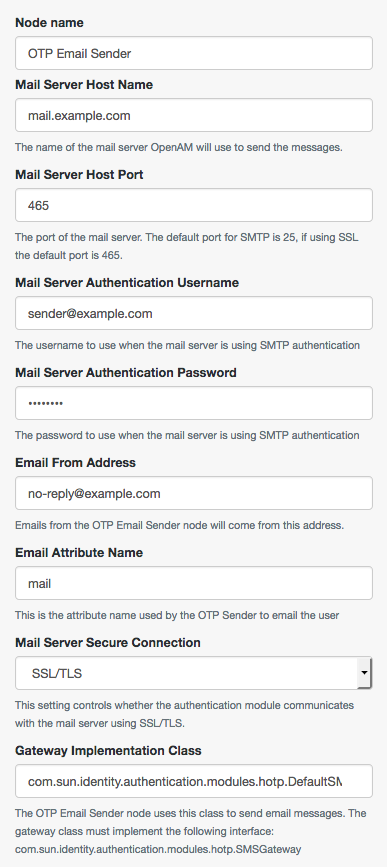
| Property | Usage |
|---|---|
| Mail Server Host Name |
Specifies the hostname of the SMTP email server. |
| Mail Server Host Port |
Specifies the outgoing mail server port. Common ports are 25, 465 (when connecting over SSL), or 587 (for StartTLS). |
| Mail Server Authentication Username |
Specifies the username AM uses to connect to the mail server. |
| Mail Server Authentication Password |
Specifies the password AM uses to connect to the mail server. |
| Email From Address |
Specifies the email address from which the one-time password will appear to have been sent. |
| Email Attribute Name |
Specifies the user's profile attribute containing the email address to which to email the OTP. Default: |
| Mail Server Secure Connection |
Specifies how to connect to the mail server. If a secure method is specified, AM must trust the server certificate of the mail server. The possible values for this property are:
Default: |
| Gateway Implementation Class |
Specifies the class the node uses to send SMS and email messages. A custom class
must implement the Default: |
The OTP SMS Sender authentication node uses an email-to-SMS gateway provider to send an SMS message containing a generated one-time password to the user.
The node sends an email to an address formed by joining the following values together:
The user's telephone number, obtained by querying a specified profile attribute, for example
telephoneNumber.The @ character.
The email-to-SMS gateway domain, obtained by querying the profile attribute specified by the Mobile Carrier Attribute Name property.
For example, if configured to use the TextMagic email-to-SMS service, the node might send
an email through the specified SMTP server to the address: 18005550187@textmagic.com.
Properties:
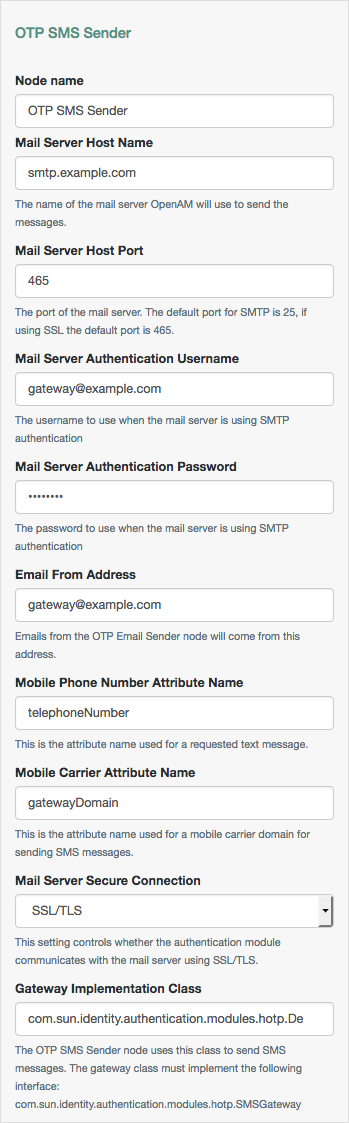
| Property | Usage |
|---|---|
| Mail Server Host Name |
Specifies the hostname of the SMTP email server. |
| Mail Server Host Port |
Specifies the outgoing mail server port. Common ports are 25, 465 (when connecting over SSL), or 587 (for StartTLS). |
| Mail Server Authentication Username |
Specifies the username AM uses to connect to the mail server. |
| Mail Server Authentication Password |
Specifies the password AM uses to connect to the mail server. |
| Email From Address |
Specifies the email address from which the one-time password will appear to have been sent. |
| Mobile Phone Number Attribute Name |
Specifies the user's profile attribute containing the mobile phone number to which to send the SMS containing the OTP. Default: |
| Mobile Carrier Attribute Name |
Specifies the user's profile attribute containing the mobile carrier domain used as the email to SMS gateway. |
| Mail Server Secure Connection |
Specifies how to connect to the mail server. If a secure method is specified, AM must trust the server certificate of the mail server. The possible values for this property are:
Default: |
| Gateway Implementation Class |
Specifies the class the node uses to send SMS and email messages. A custom class
must implement the Default: |
The Page authentication node combines multiple nodes that request input into a single page for display to the user. Drag and drop nodes on to the page node to combine them.
The outcome paths are determined by the last node in the page node. Only the last node in the page can have more than one outcome path.
Only nodes that use callbacks to request input can be added to a page node. Other nodes, such as the Data Store Decision Node and Push Sender Node must not be added to a page node.
Properties:
This node has no configurable properties.
Example:
The following example uses a page node containing a username collector, a password collector, and a choice collector:
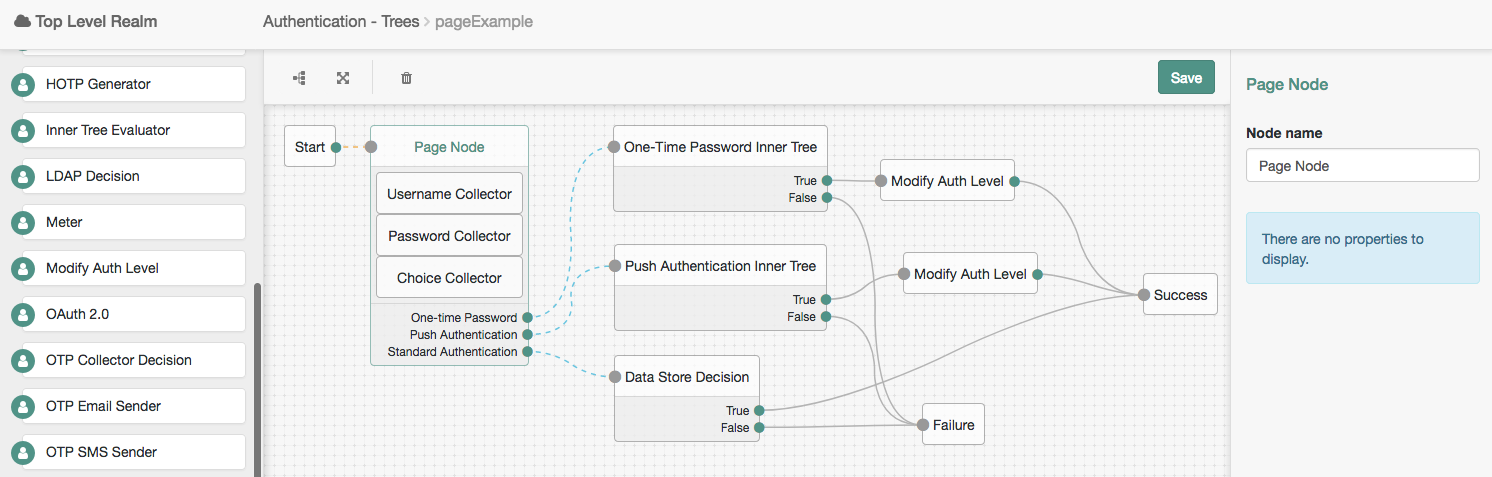
The user is presented with all of the requests for input on a single page:
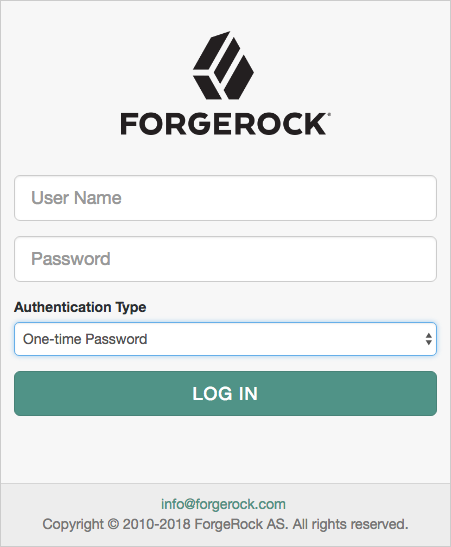
The Password Collector authentication node prompts the user to enter their password. The captured password is transient, persisting only until the authentication flow reaches the next node requiring user interaction.
The tree evaluation continues along the single outcome path after capturing the password.
Properties:
This node has no configurable properties.
The Polling Wait authentication node pauses progress of the authentication tree for a specified number of seconds, for example in order to wait for a response to a one-time password email or push notification.
Requests to the tree made during the wait period are sent a PollingWaitCallback callback and an
authentication ID. For example, the following callback indicates a wait time of 10 seconds:
{
    "authId": "eyJ0eXAiOiJK...u4WvZmiI",
    "callbacks": [
        {
            "type": "PollingWaitCallback",
            "output": [
                {
                    "name": "waitTime",
                    "value": "10000"
                },
                {
                    "name": "message",
                    "value": "Waiting for response..."
                }
            ]
        }
    ]
}
The client must wait 10 seconds before returning the callback data, including the
authId. For example:
$ curl \
--request POST \
--header 'Accept-API-Version: resource=2.0, protocol=1.0' \
--header 'Content-Type: application/json' \
--data '{
  "authId": "eyJ0eXAiOiJK...u4WvZmiI",
  "callbacks": [
      {
          "type": "PollingWaitCallback",
          "output": [
              {
                  "name": "waitTime",
                  "value": "10000"
              },
              {
                  "name": "message",
                  "value": "Waiting for response..."
              }
          ]
      }
  ]
}' 'https://openam.example.com:8443/openam/json/realms/root/authenticate?authIndexType=service&authIndexValue=Example'
For more information on authenticating using the REST API, see "Authentication and Logout".
When using the XUI for authentication, it automatically waits for the required amount of time and resubmit the page in order to continue tree evaluation. The message displayed whilst waiting is configurable by using the Waiting Message property.
Tree evaluation continues along the Done outcome path when the next request is received after
the wait time has passed.
Enabling Spam detection adds a Spam outcome path to the node. Tree evaluation continues along the
Spam outcome path if more than the specified number of requests are received during the wait
time.
Enabling the user to exit without waiting adds an Exited outcome path to the node. Tree
evaluation continues along the Exited outcome path if the user clicks the button that
appears when the option is enabled. The message displayed on the exit button is configurable by using the Exit
Message property.

Properties:
| Property | Usage |
|---|---|
| Seconds To Wait |
Specify the number of seconds to pause the authentication tree. Default: |
| Enable Spam Detection |
Specify whether to track the number of responses received during the wait time, and continue tree
evaluation along the Default: Disabled |
| Spam Tolerance |
Specify the number of responses to allow during the wait time before continuing tree evaluation
along the Default: |
| Waiting Message |
Specifies the optional message to display to the user.
You can provide the message in multiple languages by specifying the locale in the Messages provided in the node override the defaults provided by AM. For information about customizing and translating the default messages, see "Localizing an Authentication Node". |
| Exitable |
Specify whether the user can exit the node during the wait period. Enabling this option adds
a button with a configurable message to the page. Clicking the button causes tree evaluation to
continue along the Default: Disabled |
| Exit Message |
Specifies the optional message to display to the user on the button used to exit the node before the
wait period has elapsed. For example,
You can provide the message in multiple languages by specifying the locale in the Messages provided in the node override the defaults provided by AM. For information about customizing and translating the default messages, see "Localizing an Authentication Node". |
The Provision Dynamic Account node provisions an account following successful authentication by a social identity provider node. Accounts are provisioned using properties defined in the attribute mapper configuration of a social authentication node earlier in the tree evaluation, for example the OAuth 2.0 Node.
If a password has been acquired from the user, for example by using the Create Password Node, it is used when provisioning the account. Otherwise, a 20 character random string is used.
Properties:
| Property | Usage |
|---|---|
| Account Provider |
Specifies the name of the class that implements the account provider.
Default:
|
Example:
The following example uses the Provision Dynamic Account authentication node to allow users who have performed social authentication using Google to provide a password and provision an account, if they do not have a matching existing profile. They must enter a one-time password to verify they are the owner of the Google account.
The Provision IDM Account node redirects users to an IDM instance to provision an account.
Ensure you have configured the details of the IDM instance in AM, by navigating to Configure > Global Services > IDM Provisioning.
For information on using IDM for provisioning, see Integrating IDM With the ForgeRock Identity Platform in the Samples Guide.
Properties:
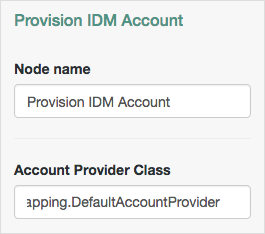
| Property | Usage |
|---|---|
| Account Provider |
Specifies the name of the class that implements the account provider.
Default:
|
Example:
The following example uses the Provision IDM Account authentication node to allow users who have performed social authentication using Facebook to provision an account using IDM, if they do not have a matching existing profile.
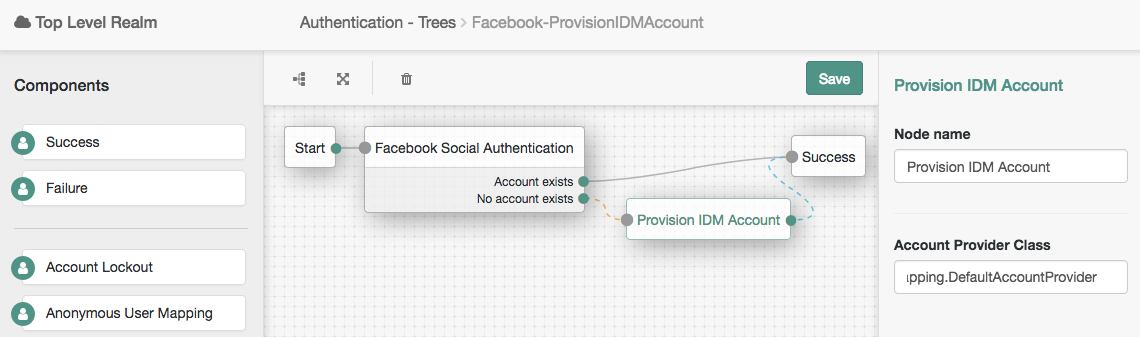
The Push Result Verifier node works together with the Push Sender Node to validate the user's response to a previously sent push notification message.
Tree evaluation continues along the Success outcome path if the push notification was
positively responded to by the user. For example, using the ForgeRock Authenticator app, the user slid the switch
with a checkmark on horizontally to the right.
Tree evaluation continues along the Failure outcome path if the push notification was
negatively responded to by the user. For example, using the ForgeRock Authenticator app, the user tapped the
cancel icon in the top-right of the screen.
If the push notification was not responded to within the Message Timeout value specified in the
Push Sender Node then tree evaluation continues along the
Expired outcome path.
If a response to the push message has not yet been received, then tree evaluation continues along the
Waiting outcome path.
Tip
If the push message contained any additional information, for example if it was a registration request, the
values are stored in the sharedState object of the tree, in a key named
pushContent. For information on creating or customizing authentication nodes, see
"Creating or Modifying an Authentication Node".
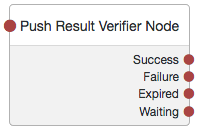
Properties:
This node has no configurable properties.
The Push Sender authentication node sends push notification messages to a device such as a mobile phone, enabling multi-factor authentication.
The Push Sender authentication node requires that the Push Notification Service has also been configured. For information on the properties used by the service, see "Push Notification Service". For information on provisioning the credentials used by the service, see How to set up AM Push Notification Service credentials in the ForgeRock Knowledge Base.
Tree evaluation continues along the Sent outcome path if the push notification was successfully
sent to the handling service.
If the user does not have a registered device, tree evaluation continues along the Not Registered outcome
path. To determine whether the user has a registered device, the tree must have already acquired a username, for
example by using a Username Collector Node.
Note
Authentication trees are not capable of registering a device to a profile. For information on using authentication chains to register devices, see "Creating Authentication Chains for Push Authentication".
If the user chooses to skip push authentication, tree evaluation continues along the Skipped
outcome path. You can configure whether the user is able to skip the node by setting the Two Factor Authentication
Mandatory property. See "Letting Users Opt Out of One-Time Password Authentication".

Properties:
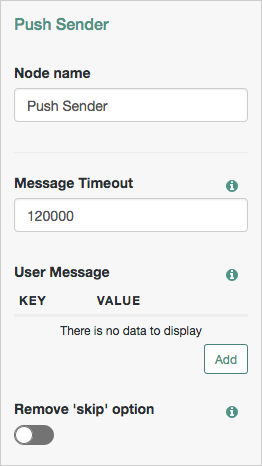
| Property | Usage |
|---|---|
| Message Timeout |
Specifies the number of milliseconds the push notification message will remain valid. The Push Result Verifier Node rejects responses to push messages that have timed out. |
| User Message |
Specifies the optional message to send to the user.
You can provide the message in multiple languages by specifying the locale in the Messages provided in the node override the defaults provided by AM. For information about customizing and translating the default messages, see "Localizing an Authentication Node".
The following variables can be used in the
Example: |
| Remove 'skip' option |
Enable this option in the node to make the push authentication mandatory. When set to Disabled the user can skip the push authentication requested by the node, and tree evaluation continues along the Default: Disabled NoteNodes in authentication trees are not affected by the
|
Example:
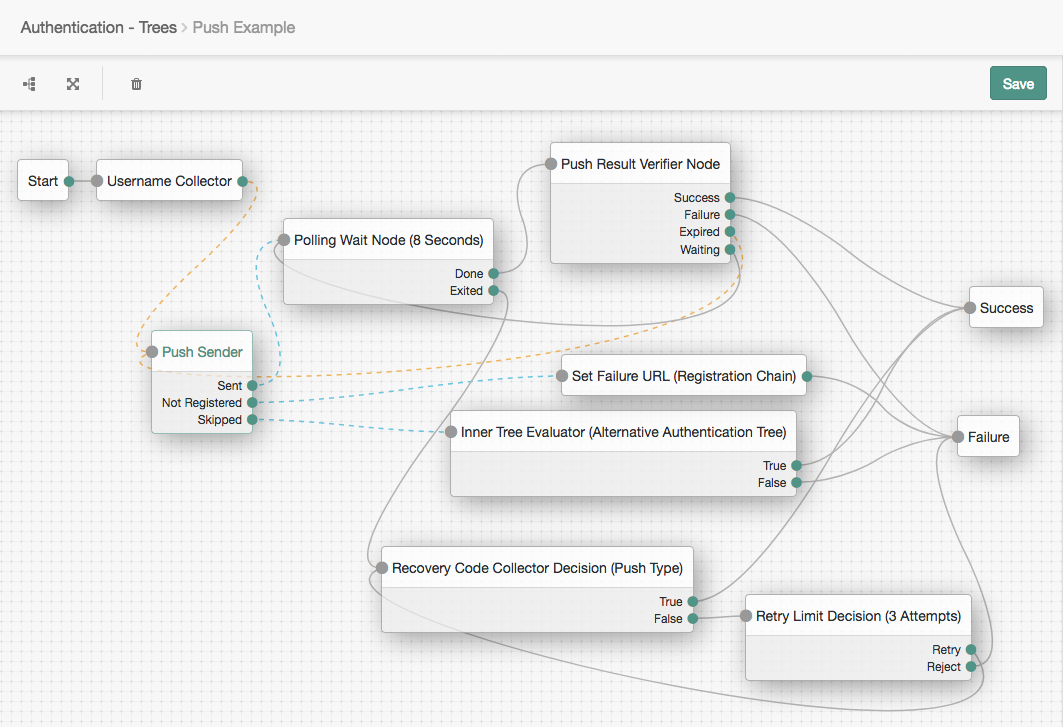
The example tree above shows one possible implementation of multi-factor push authentication.
If the user has a registered device:
A push notification is sent to their registered device.
The Polling Wait Node pauses the authentication tree for 8 seconds, during which time the user can respond to the push notification on their device, for example by using the ForgeRock Authenticator application.
If the user responds positively, they are authenticated successfully and logged in.
If the user responds negatively, they are not authenticated successfully and do not receive a session.
If the push notification expires, the tree will send a new push notification.
Tip
A Retry Limit Decision node could be used here to constrain the number of times a new code is sent.
If the user has not yet responded, the tree loops back a step and the Polling Wait Node pauses the authentication tree for another 8 seconds.
If the user exits the Polling Wait Node, they can enter a recovery code in order to authenticate.
Tip
In this situation, configure the Exit Message property in the Polling Wait node with a message such as:
Lost phone? Use a Recovery Code, which appears as follows: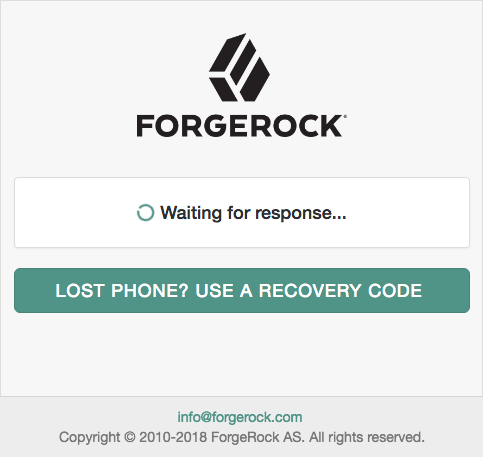
A Retry Limit Decision node allows three attempts at entering a recovery code before failing the authentication.

If the user does not have a registered device:
Because trees cannot currently register devices, a Set Failure URL node redirects the user to an authentication chain which can register a device to the user's profile.
That registration chain redirects the user back to the push example tree when registration is complete.
If the configuration allows it and the user chooses to skip multi-factor authentication:
An Inner Tree Evaluator node provides an alternative method of authentication, for example an LDAP Decision node.
Depending on the outcome of the inner tree, the push example tree evaluation continues to the
SuccessorFailureoutcome.
The Persistent Cookie Decision authentication node checks for the existence of the persistent cookie specified in
the Persistent cookie name property, the default being session-jwt.
If the cookie is present, the node verifies the signature of the JWT stored in the cookie by using the signing key specified in the HMAC signing key property.
If the signature is valid, the node will decrypt the payload of the JWT by using the key pair specified in the Persistent Cookie Encryption Certificate Alias property. This property can be found by navigating to Configure > Authentication > Core Attributes > Security.
Within the decrypted JSON payload is information such as the UID of the identity, and the client IP address. Enable the Enforce client IP property to verify that the current IP address and the client IP address in the cookie are identical.
Note
The Persistent Cookie Decision authentication node recreates the received persistent cookie, updating the value for the idle time property. Therefore, cookie creation properties as used by the Set Persistent Cookie Node are also available in the Persistent Cookie Decision authentication node.
The tree evaluation continues along the True outcome path if the persistent cookie is present
and all the verification checks above are satisfied. Otherwise, tree evaluation continues along the
False outcome path.

Properties:
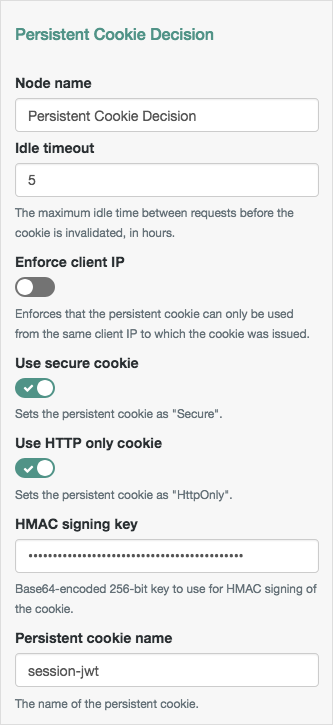
| Property | Usage |
|---|---|
|
Idle Timeout |
Specifies the maximum amount of idle time allowed before the persistent cookie is invalidated, in hours. If no requests are received and the time is exceeded, the cookie is no longer valid. |
|
Enforce Client IP |
When enabled, ensures that the persistent cookie is only used from the same client IP to which the cookie was issued. |
|
Use secure cookie |
When enabled, adds the If the |
|
Use HTTP only cookie |
When enabled, adds the
When the
|
|
HMAC Signing Key |
Specifies a key to use for HMAC signing of the persistent cookie. Values must be base64-encoded and at least 256 bits (32 bytes) long. ImportantTo consume the persistent cookies generated by instances of the Set Persistent Cookie Node in the tree, ensure they are using the same HMAC signing key. To generate an HMAC signing key, run one of the the following commands: $ openssl rand -base64 32 or $ cat /dev/urandom | LC_ALL=C tr -dc 'a-zA-Z0-9' | fold -w 32 | head -n 1|base64
|
|
Persistent cookie name |
Specifies the name of the persistent cookie to check. |
Example:
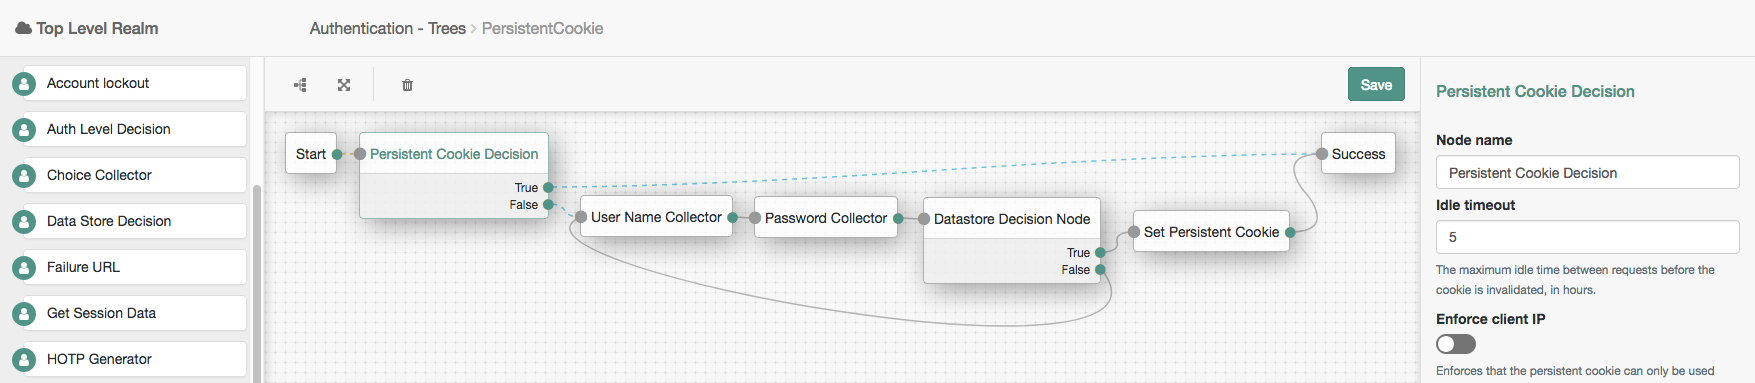
The Recovery Code Collector Decision authentication node allows users to authenticate using a recovery code provided when registering a device for multi-factor authentication.
Use this node when a tree is configured to use push notifications or one-time passwords but the user has lost the registered device, and must therefore use an alternative method for authentication. For more information on obtaining the recovery codes for a registered device, see "Accessing Your Recovery Codes".
Tree evaluation continues along the True outcome path if the provided recovery code matches one
belonging to the user. To determine whether the provided code belongs to the user, the tree must have already
acquired the username, for example by using a Username Collector Node.
If the recovery code does not match, or a username has not been acquired, tree evaluation continues along the
False outcome path.
Properties:
| Property | Usage |
|---|---|
| Recovery Code Type |
Specify the type of recovery code the user will submit for verification. Default: |
The Register Logout Webhook authentication node registers the specified webhook to trigger when a user's session ends. The webhook triggers when a user explicitly logs out, or the maximum idle time or expiry time of the session is reached.
The webhook is only registered if tree evaluation passes through the Register Logout Webhook node. You can register multiple webhooks during the authentication process, but they must be unique.
For more information on webhooks, see "Configuring Authentication Webhooks".
Properties:
| Property | Usage |
|---|---|
| Webhook name | Specify the name of the webhook to register. |
The Remove Session Properties authentication node enables the removal of properties from the session. The session properties may have been set by a Set Session Properties node elsewhere in the tree.
If a specified key is not found in the list of session properties that will be added to the session upon successful authentication, no error is thrown and tree evaluation continues along the single outcome path.
If a specified key is found, the tree evaluation continues along the single outcome path after setting the
value of the property to null.
Properties:
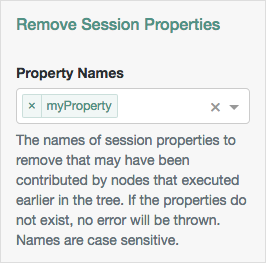
| Property | Usage |
|---|---|
| Property Names | Enter one or more key names of properties to remove from the session. |
The Retry Limit Decision authentication node allows the specified number of passes through to the
Retry outcome path, before continuing tree evaluation along the Reject
outcome path.
Properties:
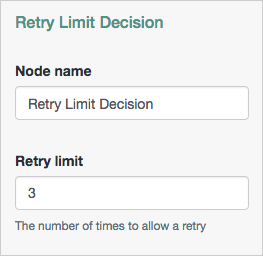
| Property | Usage |
|---|---|
| Retry limit |
Specify the number of times to allow a retry. Default: |
Example:

The Scripted Decision authentication node allows execution of scripts during authentication. Tree evaluation continues along the path matching the result.
The script defines the possible outcome paths by setting one or more values of a string variable named
outcome. For more information on creating scripts, see "Managing Scripts With the AM Console".
The tree evaluation continues along the outcome path that matches the value of the outcome
variable when script execution completes.
For information about the API available for use in the Scripted Decision Node, see "Scripted Decision Node API Functionality".
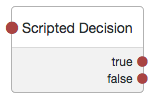
Properties:
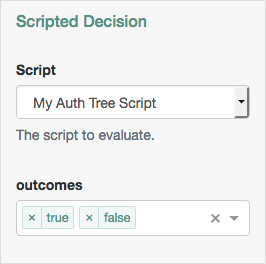
| Property | Usage |
|---|---|
| Script | Select the script to execute from the drop-down field. |
| outcomes |
Enter the possible strings that can be assigned to the outcome variable by the script.
These strings provide the possible outcome paths the tree can continue along.
|
The Set Persistent Cookie authentication node creates a persistent cookie named after the value specified in the
Persistent cookie name property, the default being session-jwt.
The cookie contains a JWT, inside which there is a JSON payload with information such as the UID of the identity, and the client IP address.
The node encrypts the JWT using the key pair specified in the Persistent Cookie Encryption Certificate Alias property. This property can be found by navigating to Configure > Authentication > Core Attributes > Security.
The node signs the cookie with the signing key specified in the HMAC signing key property. Any node that will read the persistent cookie must be configured with the same HMAC signing key.

Properties:
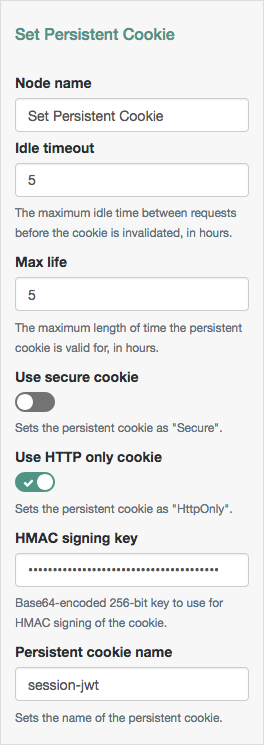
| Property | Usage |
|---|---|
|
Idle Timeout |
Specifies the maximum amount of idle time allowed before the persistent cookie is invalidated, in hours. If no requests are received and the time is exceeded, the cookie is no longer valid. |
|
Max life |
Specifies the length of time the persistent cookie remains valid, in hours. If that time is exceeded, the cookie is no longer valid. |
|
Use secure cookie |
When enabled, adds the If the |
|
Use HTTP only cookie |
When enabled, adds the
When the
|
|
HMAC Signing Key |
Specifies a key to use for HMAC signing of the persistent cookie. Values must be base64-encoded and at least 256 bits (32 bytes) long. ImportantTo consume the persistent cookies generated by instances of the Set Persistent Cookie Node in the tree, ensure they are using the same HMAC signing key. To generate an HMAC signing key, run one of the the following commands: $ openssl rand -base64 32 or $ cat /dev/urandom | LC_ALL=C tr -dc 'a-zA-Z0-9' | fold -w 32 | head -n 1|base64
|
|
Persistent cookie name |
Specifies the name used for the persistent cookie. |
The Set Session Properties authentication node allows the addition of key:value properties to the user's session if authentication is successful.
Tip
You can access session properties using a variable in a webhook. For more information, see "Configuring Authentication Webhooks".
The tree evaluation continues along the single outcome path after setting the specified properties in the session.
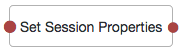
Properties:
| Property | Usage |
|---|---|
| Properties | To add a session property, select the Add button, enter a key name and a value, and then select the plus icon. Repeat the steps to add multiple properties. |
The Social Facebook authentication node is a duplicate of the OAuth 2.0 Node node,
preconfigured to work with Facebook. Only the Client ID and Client Secret
are required to be populated.
The tree evaluation continues along the Account Exists path if an account
matching the attributes retrieved from Facebook are found in the user data store.
Otherwise, the tree evaluation continues along the No account exists path.

Properties:
| Property | Usage |
|---|---|
| Client ID |
Specifies the |
| Client Secret |
Specifies the |
| Authentication Endpoint URL |
Specifies the URL to the social provider's endpoint handling authentication as described in section 3.1 of The OAuth 2.0 Authorization Framework (RFC 6749).
Default:
|
| Access Token Endpoint URL |
Specifies the URL to the endpoint handling access tokens as described in section 3.2 of The OAuth 2.0 Authorization Framework (RFC 6749).
Default:
|
| User Profile Service URL |
Specifies the user profile URL that returns profile information.
Default:
|
| OAuth Scope |
Specifies a comma-separated list of user profile attributes that the client application requires, according to The OAuth 2.0 Authorization Framework (RFC 6749) . The list depends on the permissions that the resource owner, such as the end user, grants to the client application. |
| Redirect URL |
Specifies the URL the user is redirected to by Facebook after authenticating, to continue the authentication tree flow.
Set this property to the URL of the AM XUI, for example
Tip
If the tree is not in the top-level realm, you can specify the realm in the redirect URL. Use a DNS alias
for the realm, or add the realm as a query parameter, for example
For more information, see "To Configure DNS Aliases for Accessing a Realm" in the Setup and Maintenance Guide. |
| Social Provider |
Specifies the name of the social provider for which this node is being set up. Default:
|
| Auth ID Key |
Specifies the attribute the social identity provider uses to identify an authenticated individual. Default:
|
| Use Basic Auth |
Specifies that the client uses HTTP Basic authentication when authenticating to the social provider.
Default:
|
| Account Provider |
Specifies the name of the class that implements the account provider.
Default:
|
| Account Mapper |
Specifies the name of the class that implements the method of locating local accounts based on the attributes returned from Facebook. Default:
|
| Attribute Mapper |
Specifies the list of fully qualified class names for implementations that map attributes from Facebook to AM profile attributes. Default:
|
| Account Mapper Configuration |
Specifies the attribute configuration used to map the account of the user authenticated in
the Social Facebook provider to the local data store in AM. Valid values are in the form
Default: |
| Attribute Mapper Configuration |
Map of Facebook user account attributes to local user profile attributes, with
values in the form
Default:
|
| Save attributes in the session |
When enabled, saves the attributes in the Attribute Mapper Configuration field to the AM session. Default: |
| OAuth 2.0 Mix-Up Mitigation Enabled |
Controls whether the authentication node carries out additional verification steps when it receives the authorization code from the authorization server.
Specifies that the client must compare the issuer identifier of the authorization server
upon registration with the issuer value returned in the
The Token Issuer property must be entered when the OAuth 2.0 Mix-Up Mitigation feature is
enabled, so that the validation can succeed. The authorization code response will contain
an issuer value ( NoteConsult with the authorization server's documentation on what value it uses for the issuer field. For more information, see section 4 of OAuth 2.0 Mix-Up Mitigation Draft. |
| Token Issuer |
Corresponds to the expected issuer identifier value in the
Example:
|
Example:
The following example uses the Provision IDM Account authentication node to allow users who have performed social authentication using Facebook to provision an account using IDM, if they do not have a matching existing profile.
The Social Google authentication node is a duplicate of the OAuth 2.0 Node node,
preconfigured to work with Google. Only the Client ID and Client Secret
are required to be populated.
The tree evaluation continues along the Account Exists path if an account
matching the attributes retrieved from Google are found in the user data store.
Otherwise, the tree evaluation continues along the No account exists path.

Properties:
| Property | Usage |
|---|---|
| Client ID |
Specifies the |
| Client Secret |
Specifies the |
| Authentication Endpoint URL |
Specifies the URL to the social provider's endpoint handling authentication as described in section 3.1 of The OAuth 2.0 Authorization Framework (RFC 6749).
Default:
|
| Access Token Endpoint URL |
Specifies the URL to the endpoint handling access tokens as described in section 3.2 of The OAuth 2.0 Authorization Framework (RFC 6749).
Default:
|
| User Profile Service URL |
Specifies the user profile URL that returns profile information.
Default:
|
| OAuth Scope |
Specifies a space-separated list of user profile attributes that the client application requires, according to The OAuth 2.0 Authorization Framework (RFC 6749) . The list depends on the permissions that the resource owner, such as the end user, grants to the client application. Default: |
| Redirect URL |
Specifies the URL the user is redirected to by Google after authenticating, to continue the authentication tree flow.
Set this property to the URL of the AM XUI, for example
Tip
If the tree is not in the top-level realm, you can specify the realm in the redirect URL. Use a DNS alias
for the realm, or add the realm as a query parameter, for example
For more information, see "To Configure DNS Aliases for Accessing a Realm" in the Setup and Maintenance Guide. |
| Social Provider |
Specifies the name of the social provider for which this node is being set up. Default:
|
| Auth ID Key |
Specifies the attribute the social identity provider uses to identify an authenticated individual. Default:
|
| Use Basic Auth |
Specifies that the client uses HTTP Basic authentication when authenticating to Google.
Default:
|
| Account Provider |
Specifies the name of the class that implements the account provider.
Default:
|
| Account Mapper |
Specifies the name of the class that implements the method of locating local accounts based on the attributes returned from Google. Default:
|
| Attribute Mapper |
Specifies the list of fully qualified class names for implementations that map attributes from Google to AM profile attributes. Default:
|
| Account Mapper Configuration |
Specifies the attribute configuration used to map the account of the user authenticated in
the Social Google provider to the local data store in AM. Valid values are in the form
Default: |
| Attribute Mapper Configuration |
Map of Google user account attributes to local user profile attributes, with
values in the form
Default:
|
| Save attributes in the session |
When enabled, saves the attributes in the Attribute Mapper Configuration field to the AM session. Default: |
| OAuth 2.0 Mix-Up Mitigation Enabled |
Controls whether the authentication node carries out additional verification steps when it receives the authorization code from the authorization server.
Specifies that the client must compare the issuer identifier of the authorization server
upon registration with the issuer value returned in the
The Token Issuer property must be entered when the OAuth 2.0 Mix-Up Mitigation feature is
enabled, so that the validation can succeed. The authorization code response will contain
an issuer value ( NoteConsult with the authorization server's documentation on what value it uses for the issuer field. For more information, see section 4 of OAuth 2.0 Mix-Up Mitigation Draft. |
| Token Issuer |
Corresponds to the expected issuer identifier value in the
Example:
|
Example:
The following example uses the Anonymous User Mapping authentication node to allow users who have performed social authentication using Google to access AM as an anonymous user if they do not have a matching existing profile.
The Social Ignore Profile authentication node specifies if a local user profile should be ignored. If tree evaluation passes through this node, after successful social authentication, AM issues an SSO token regardless of whether a user profile exists in the data store. The presence of a user profile is not checked.
Properties:
This node has no configurable properties.
The Success URL authentication node sets the URL to be redirected to when authentication succeeds.
Note
Specifying a success URL in a tree overrides any goto query string parameters.
If not specified, the tree uses the value specified in the Default Success Login URL property under Realms > Realm Name > Authentication > Settings > Post Authentication Processing.
Tip
The URL is also saved into the sharedState object, under a property named
successUrl, which can be useful for custom node developers. For more information, see
"Customizing Authentication Trees".

Properties:
| Property | Usage |
|---|---|
| Success URL | Specify the full URL to be redirected to when the authentication succeeds. |
The Timer Start authentication node starts a named timer metric, which can be stopped elsewhere in the tree by using the Timer Stop Node.
Properties:
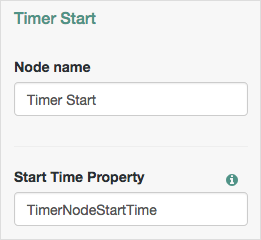
| Property | Usage |
|---|---|
| Start Time Property | Specify a property name into which to store the current time. Specify the same value in any instances of the Timer Stop Node that measure the time elapsed since tree evaluation passed through this node. |
The Timer Stop authentication node records the time elapsed since tree evaluation passed through the specified
Timer Start Node in the specified metric name. For information
on the Timer metric type, see
"Monitoring Metric Types" in the Setup and Maintenance Guide.
Note that the time stored in the specified Start Time Property property is not reset by the
Timer Stop Node, so other Timer Stop Nodes in the tree can also calculate the time elapsed since tree
evaluation passed through the same Timer Start Node.
The metric is exposed in all available interfaces, as described in "Monitoring Interfaces" in the Setup and Maintenance Guide.
Properties:

| Property | Usage |
|---|---|
| Start Time Property | Specify the property name containing the time from which to calculate the elapsed time. |
| Metric Key | Specify the name of a metric in which to store the calculated elapsed time. |
The Username Collector authentication node prompts the user to enter their username.
The tree evaluation continues along the single outcome path after capturing the username.
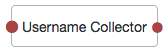
Properties:
This node has no configurable properties.
The Zero Page Login Collector authentication node checks whether selected headers are provided in the incoming authentication request, and if so, uses their value as the provided username and password.
The tree evaluation continues along the Has Credentials outcome path if the specified headers
are available in the request, or the
No Credentials
path if the specified headers are not present.
A common use for the Zero Page Login Collector authentication node is to connect the
Has Credentials
outcome connector to the input of a Data Store Decision
node, and the
No Credentials
outcome connector to the input of a Username Collector
node followed by a
Password Collector
node, and then into the same Data Store Decision node as
earlier. For an example of this layout, see the default
Example
authentication tree provided in AM. See "Example Tree With Zero Page Login Node".
The password collected by the Zero Page Login Collector node is transient, persisting only until the authentication flow reaches the next node requiring user interaction.
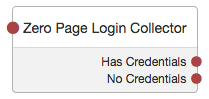
Properties:

| Property | Usage |
|---|---|
| Username Header name |
Enter the name of the header that contains the username value. Default:
|
| Password Header name |
Enter the name of the header that contains the password value. Default:
|
| Allow without referer |
If enabled, the node accepts incoming requests that do not contain a If disabled, a Default:
|
| Referer whitelist |
Specify a list of URLs allowed in the NoteYou must disable the Allow without referer property for the Referer whitelist property to take effect. |
Example:
This section covers creating webhooks, which are used to send HTTP POST calls to a server with contextual information about an authentication session when a predefined event occurs, for example, logging out.
Webhooks are used from within authentication trees, by the following nodes:
Perform the following steps to create an authentication webhook for use within an authentication tree:
Log in to the AM console as an administrator, for example,
amadmin.Navigate to Realms > Realm Name > Authentication > Webhooks.
To create a new webhook, select Create Webhook, specify a Webhook Name, and then select Create.
To edit an existing webhook, select the name of the webhook.
A screen similar to the following appears:
Complete the fields as required:
- Url
Specifies the URL to which the HTTP POST is sent when the event occurs.
- Body
Specifies the body of the HTTP POST. You can send different formats by also setting the correct Content-Type header in the
Headerproperty, for example:Form Data. Enter the body value in the format
parameter=value¶meter2=value2, and set aContent-Typeheader ofapplication/x-www-form-urlencoded.JSON Data. Enter the body value in the format
{"parameter":"value","parameter2":"value2"}, and set aContent-Typeheader ofapplication/json.
- Headers
Specifies any HTTP headers to add to the POST.
To add a header, enter the name of the header in the
Keyfield, and the value, and then click the Add button ().To remove a header, select the Delete button ().
Each of the fields in a webhook supports variables for retrieving values from the user's session after successfully authenticating. Specify a variable in the following format:
${variable_name}Any custom properties added to the session using the Set Session Properties Node can be accessed by using a variable, as well as the following session properties:
AMCtxIdamlbcookieauthInstantAuthLevelCharSetclientTypeFullLoginURLHostHostNameIndexTypeLocaleOrganizationPrincipalPrincipalsServicesuccessURLsun.am.UniversalIdentifierUserIdUserProfileUserTokenwebhooksThe following figure shows an example webhook, using variable substitutions:
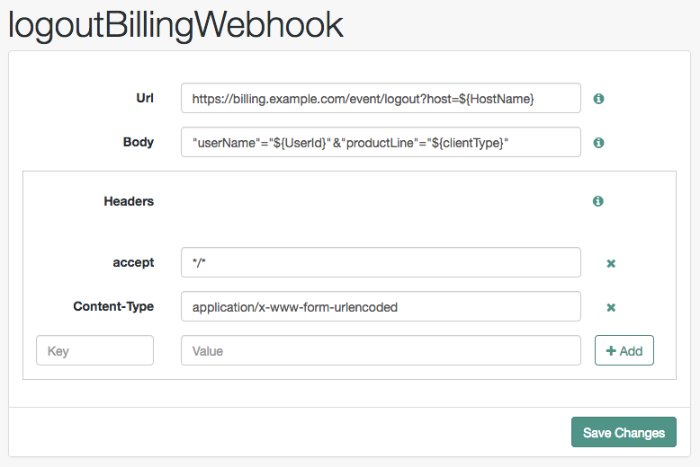
Warning
Specifying a variable that is not present in the user's session places the literal variable text in to the HTTP POST, for example
user=${UserId}, rather thanuser=demo.


AM provides several authentication modules and chains, the most important being the following:
The
Amsterauthentication module andamsterServiceauthentication chain, used by Amster clients.The
DataStoreauthentication module andldapServiceauthentication chain, configured for all users in new installations.
To configure authentication modules and chains, see the following sections:
| • "Configuring Authentication Modules" |
| • "Configuring Authentication Chains" |
The AM console provides two places where you can configure authentication modules:
Under Configure > Authentication, you configure default properties for global authentication modules.
Under Realms > Realm Name > Authentication > Modules, you configure modules for your realm.
The configuration of individual modules depend on its function. The configuration of an Active Directory instead of the LDAP authentication module requires connection information and details about where to search for users. In contrast, the configuration of the HOTP module for OTP authentication requires data about the password length and the mail server or SMS gateway to send the password during authentication.
AM connects to Active Directory over Lightweight Directory Access Protocol (LDAP). AM provides separate Active Directory and LDAP modules to support the use of both Active Directory and another directory service in an authentication chain.
For detailed information about this module's configuration properties, see "Active Directory Module Properties".
The Adaptive Risk module is designed to assess risk during authentication, so that AM can determine whether to require the user to complete further authentication steps. After configuring the Adaptive Risk module, insert it in your authentication chain with criteria set to Sufficient as shown in the following example:

In the example authentication chain shown, AM has users authenticate first using the LDAP module providing a user ID and password combination. Upon success, AM calls the Adaptive Risk module. The Adaptive Risk module assesses the risk based on your configured parameters. If the Adaptive Risk module calculates a total score below the threshold you set, the module returns success, and AM finishes authentication processing without requiring further credentials. Otherwise, the Adaptive Risk module evaluates the score to be above the risk threshold, and returns failure. AM then calls the HOTP module, requiring the user to authenticate with a one-time password delivered to her by email or by SMS to her mobile phone.
When you configure the Adaptive Risk module to save cookies and
profile attributes after successful authentication, AM performs the
save as post-authentication processing, only after the entire authentication
chain returns success. You must set up AM to save the data as part of
post-authentication processing by editing the authentication chain to add
org.forgerock.openam.authentication.modules.adaptive.AdaptivePostAuthenticationPlugin
to the list of post-authentication plugins.
When the Adaptive Risk module relies on the client IP address,
and AM lies behind a load balancer or proxy layer,
configure the load balancer or proxy to send the address
by using the X-Forwarded-For header,
and configure AM to consume and forward the header as necessary.
For details, see "Handling HTTP Request Headers" in the Installation Guide.
For detailed information about this module's configuration properties, see "Adaptive Risk Authentication Module Properties".
This module lets you configure and track anonymous users, who can log in to your application or web site without login credentials. Typically, you would provide such users with very limited access, for example, an anonymous user may have access to public downloads on your site. When the user attempts to access resources that require more protection, the module can force further authentication for those resources.
For detailed information about this module's configuration properties, see "Anonymous Authentication Module Properties".
X.509 digital certificates can enable secure authentication without the need for user names and passwords or other credentials. Certificate authentication can be used to manage authentication by applications. If all certificates are signed by a recognized Certificate Authority (CA), then you might not need additional configuration. If you need to look up public keys of AM clients, this module can also look up public keys in an LDAP directory server.
When you store certificates and certificate revocation lists (CRL) in an LDAP directory service, you must configure:
How to access the directory service.
How to look up the certificates and CRLs, based on the fields in the certificates that AM clients present to authenticate.
Access to the LDAP server and how to search for users is similar
to LDAP module configuration as in "LDAP Authentication Module".
The primary difference is that, unlike for LDAP configuration, AM
retrieves the user identifier from a field in the certificate that the
client application presents, then uses that identifier to search for the
LDAP directory entry that holds the certificate, which should match the
certificate presented. For example, if the Subject field of a typical
certificate has a DN C=FR, O=Example Corp, CN=Barbara
Jensen, and Barbara Jensen's entry in the directory has
cn=Barbara Jensen, then you can use CN=Barbara
Jensen from the Subject DN to search for the entry with
cn=Barbara Jensen in the directory.
For detailed information about this module's configuration properties, see "Certificate Authentication Module Properties".
The Data Store authentication module allows a login using the identity repository of the realm to authenticate users. The Data Store module removes the requirement to write an authentication plugin module, load, and then configure the authentication module if you need to authenticate against the same data store repository. Additionally, you do not need to write a custom authentication module where flatfile authentication is needed for the corresponding repository in that realm.
The Data Store module is generic. It does not implement data store-specific capabilities, such as the password policy and password reset features provided by LDAP modules. Therefore, the Data Store module returns failure when such capabilities are invoked.
For detailed information about this module's configuration properties, see "Data Store Authentication Module Properties".
The Device ID (Match) module provides device fingerprinting functionality for risk-based authentication. The Device ID (Match) module collects the unique characteristics of a remote user's computing device and compares them to characteristics on a saved device profile. The module computes any variances between the collected characteristics to those stored on the saved device profile and assigns penalty points for each difference.
For detailed information about this module's configuration properties, see "Device ID (Match) Authentication Module Properties".
In general, you can configure and gather the following device characteristics:
User agents associated with the configuration of a web browser
Installed fonts
Plugins installed for the web browser
Resolution and color depth associated with a display
Timezone or geolocation of a device
For example, when a user who typically authenticates to AM using Firefox and then logs on using Chrome, the Device ID (Match) module notes the difference and assigns penalty points to this change in behavior. If the module detects additional differences in behavior, such as browser fonts, geolocation, and so forth, then additional points are assessed and calculated.
If the total number of penalty points exceeds a pre-configured threshold value, the Device ID (Match) module fails and control is determined by how you configured your authentication chain. If you include the HOTP module in your authentication chain, and if the Device ID (Match) module fails after the maximum number of penalty points have been exceeded, then the authentication chain issues a HOTP request to the user, requiring the user to identify themselves using two-factor authentication.
Important
By default, the maximum penalty points is set to 0, which you can adjust in the server-side script.
The Device ID (Match) module comes pre-configured with default client-side and server-side JavaScript code, supplying the logic necessary to fingerprint the user agent and computer. Scripting allows you to customize the code, providing more control over the device fingerprint elements that you would like to collect. While AM scripting supports both the JavaScript (default) and Groovy languages, only server-side scripts can be written in either language. The client-side scripts must be written in the JavaScript language.
Caution
The Device ID (Match) module's default JavaScript client-side and server-side scripts are fully functional. If you change the client-side script, you must also make a corresponding change to the server-side script. For a safer option, if you want to change the behavior of the module, you can make a copy of the scripts, customize the behavior, and update the Device ID (Match) modules to use the new scripts.
The Device ID (Match) module does not stand on its own within an authentication chain and requires additional modules. For example, you can have any module that identifies the user (for example, DataStore, Active Directory or others), Device ID (Match), any module that provides two-factor authentication, for example the ForgeRock Authenticator (OATH) or ForgeRock Authenticator (Push) authentication modules, and Device ID (Save) within your authentication chain.
As an example, you can configure the following modules with the specified criteria:
DataStore - Requisite. The Device ID (Match) module requires user authentication information to validate the username. You can also use other modules that identify the username, such as LDAP, Active Directory, or RADIUS.
Device ID (Match) - Sufficient. The Device ID (Match) runs the client-side script, which invokes the device fingerprint collectors, captures the data, and converts it into a JSON string. It then auto-submits the data in a JSP page to the server-side scripting engine.
The server-side script calculates the penalty points based on differences between the client device and stored device profile, and whether the client device successfully "matches" the stored profile. If a match is successful, AM determines that the client's device has the required attributes for a successful authentication.
If the device does not have a match, then the module fails and falls through to the HOTP module for further processing.
HOTP - Requisite. If the user's device does not match a stored profile, AM presents the user with a HMAC One-Time Password (HOTP) screen either by SMS or email, prompting the user to enter a password.
You can also use any other module that provides two-factor authentication.
After the HOTP has successfully validated the user, the Device ID (Save) module gathers additional data from the user. For specific information about the HOTP module, see "HOTP Authentication Module".
Device ID (Save) - Required. The Device ID (Save) module provides configuration options to enable an auto-save feature on the device profile as well as set a maximum number of stored device profiles on the user entry or record. Once the maximum number of stored device profiles is reached, AM deletes the old data from the user record as new ones are added. User records could thus contain both old and new device profiles.
If the auto-save feature is not enabled, AM presents the user with a screen to save the new device profile.
The module also takes the device print and creates a JSON object that includes the ID, name, last selected date, selection counter, and device print. For specific information about the Device ID (Save) module, see "Device ID (Save) Module".
Note
If a user has multiple device profiles, the profile that is the closest match to the current client details is used for the comparison result.
Log into the AM console as an administrator.
On the Realms page, click the realm from which you want to work.
Click Authentication > Modules.
To add the Device ID (Match) module, do the following substeps:
Click Add Module.
In the Module Name box, enter
Device-ID-Match.In the Type box, select
Device Id (Match), and then click Create.Click Save Changes.
To make adjustments to the default scripts, click Scripts drop-down list, and then click
Device Id (Match) - Client Side.To make corresponding changes to the server-side script, click Scripts drop-down list, and then click
Device Id (Match) - Server Side. For more information, see "Managing Scripts".
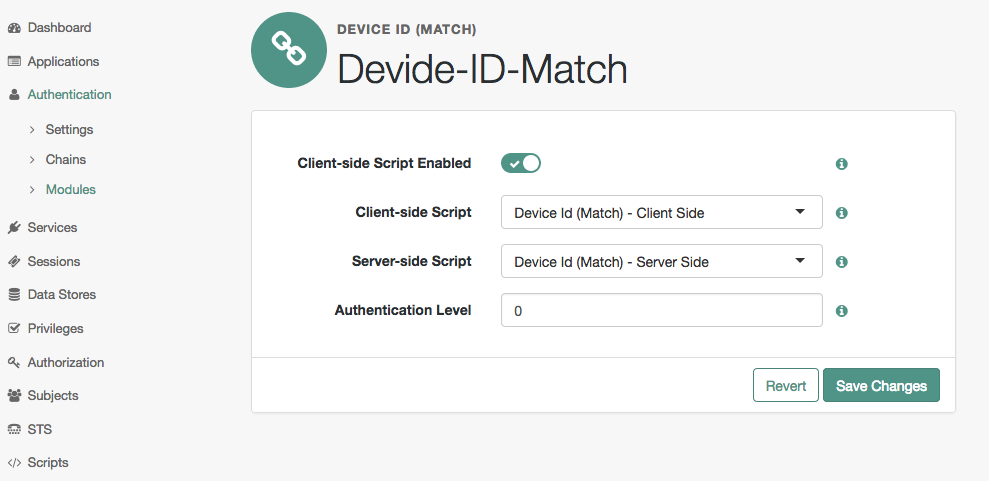
Log into the AM console as an administrator.
On the Realms page, click the realm from which you want to work.
Click Authentication > Chains.
On the Authentication Chains page, do the following steps:
Click Add Chain. In the Chain Name box, enter a descriptive label for your authentication chain, and then click Create.
Click Add Module.
On the New Module dialog, select the authentication module, select the criteria, and then click Ok to save your changes. Repeat the last two steps to enter each module to your chain.
For example, you can enter the following modules and criteria:
Module Criteria DataStore REQUISITE Device-ID-Match SUFFICIENT HOTP REQUISITE Device-ID-Save REQUIRED It is assumed that you have added the Device Id (Match) and Device Id (Save) modules. If you have not added these modules, see "To Configure the Device ID (Match) Authentication Module" and "To Configure the Device ID (Save) Authentication Module".
Review your authentication chain, and then click Save Changes.
When the user logs on to the AM console, AM determines if the user's device differs from that of the stored profile. If the differences exceed the maximum number of penalty points or a device profile has not yet been stored, AM sends an "Enter OTP" page, requiring the user to enter a one-time password, which is sent to the user via email or SMS. The user also has the option to request a one-time password.
Next, because the Device ID (Save) module is present, AM presents the user with a "Add to Trusted Devices?" page, asking if the user wants to add the device to the list of trusted device profiles. If the user clicks "Yes", AM prompts the user to enter a descriptive name for the trusted device.
Next, AM presents the user with the User Profile page, where the user can click the Dashboard link at top to access the My Applications and Authentication Devices page. Once on the Dashboard, the user can view the list of trusted devices or remove the device by clicking the Delete Device link.
The Device ID (Save) module saves a user's device profile. The module can either save the profile upon request, requiring the user to provide a name for the device and explicitly save it, or it can save the profile automatically. If a user has multiple device profiles, the profile that is the closest match to the current client details is used for the comparison result.
For detailed information about this module's configuration properties, see "Device ID (Save) Authentication Module Properties".
Within its configured authentication chain, the Device ID (Save) module also takes the device print and creates a JSON object that consists of the ID, name, last selected date, selection counter, and device print itself.
Log into the AM console as an administrator.
Click the realm from which you want to work.
Click Authentication > Modules.
To add the Device ID (Save) module, click Add Module.
In the Module Name box, enter
Device-ID-Save.In the Type box, select
Device Id (Save), and then click Create.To configure the Device-Id (Save) module, do the following:
Click the Automatically store new profiles checkbox. If this box is left unchecked, the user will be prompted to give consent to store new profiles.
In the Maximum stored profile quantity box, enter the max number of stored profiles. Any profile that exceeds this number will not be stored.
In the Authentication Level box, enter a number corresponding to the authentication level of the module.
Click Save Changes.
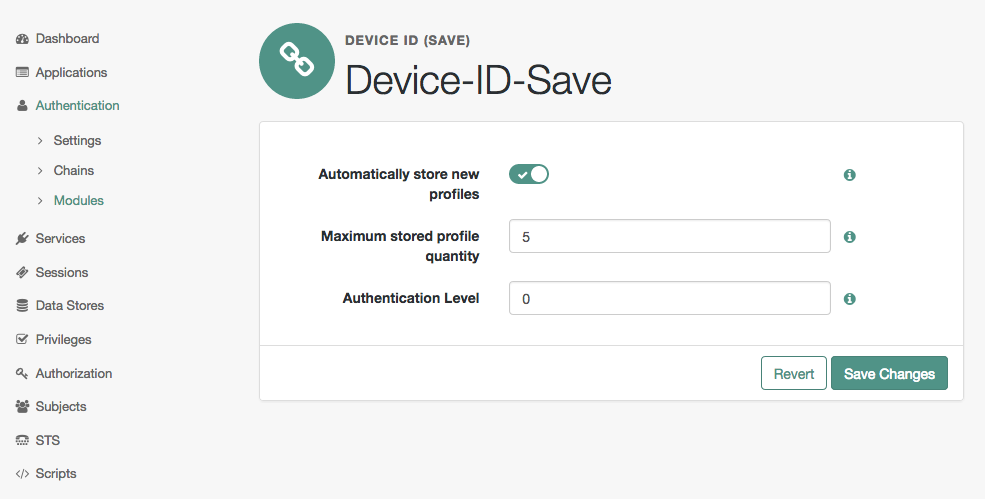
The Federation authentication module is used by a service provider to create a user session after validating single sign-on protocol messages. This authentication module is used by the SAML, SAMLv2, ID-FF, and WS-Federation protocols.
For detailed information about this module's configuration properties, see "Federation Authentication Module Properties".
The ForgeRock Authenticator (OATH) module provides a more secure method for users to access their accounts with the help of a device such as a mobile phone. For detailed information about two-step verification with the ForgeRock Authenticator (OATH) module in AM, see "Implementing Multi-Factor Authentication".
For detailed information about this module's configuration properties, see "ForgeRock Authenticator (OATH) Authentication Module Properties".
Note
AM provides two authentication modules that support OATH:
The ForgeRock Authenticator (OATH) authentication module, which is optimized for use with the ForgeRock Authenticator app and provides device profile encryption.
The OATH authentication module, which is a raw OATH implementation requiring more configuration for users and the AM administrator.
We recommend using the ForgeRock Authenticator (OATH) authentication module when possible.
Also, the ForgeRock Authenticator (OATH), HOTP, and OATH authentication modules all support HOTP passwords, but the way that users obtain passwords differs. See "Differences Among Authentication Modules That Support HOTP" for more information.
The ForgeRock Authenticator (Push) module provides a way to send push notification messages to a device such as a mobile phone, enabling multi-factor authentication. For detailed information about multi-factor authentication with the ForgeRock Authenticator (Push) module in AM, see "Implementing Multi-Factor Authentication".
For detailed information about this module's configuration properties, see "ForgeRock Authenticator (Push) Authentication Module Properties".
The ForgeRock Authenticator (Push) Registration module provides a way to register a device such as a mobile phone for multi-factor authentication. For detailed information about multi-factor authentication with the ForgeRock Authenticator (Push) module in AM, see "Managing Devices for Multi-Factor Authentication".
For detailed information about this module's configuration properties, see "ForgeRock Authenticator (Push) Registration Authentication Module Properties".
The HOTP authentication module works with an
authentication chain with any module that stores the username
attribute.
The module uses the username from the sharedState
set by the previous module in the chain and retrieves the user's email address
or telephone number to send a one-time password to the user. The user then
enters the password on a Login page and completes the authentication process if
successful.
For example, to set up HOTP in an authentication chain, you can configure
the Data Store module (or any module that stores the user's
username) as the requisite first module,
and the HOTP module as the second requisite module.
When authentication succeeds against the Data Store module, the HOTP module
retrieves the Email Address and Telephone Number attributes from the data store
based on the username value.
For the HOTP module to use either attribute, the Email Address must contain
a valid email address, or the Telephone Number must contain a valid
SMS telephone number.
You can set the HOTP module to automatically generate a password when users begin logging into the system. You can also set up mobile phone, mobile carrier, and email attributes for tighter controls over where the messages are generated and what provider the messages go through to reach the user.
For detailed information about this module's configuration properties, see "HOTP Authentication Module Properties".
Note
The ForgeRock Authenticator (OATH), HOTP, and OATH authentication modules all support HOTP passwords, but the way that users obtain passwords differs. See "Differences Among Authentication Modules That Support HOTP" for more information.
HTTP basic authentication takes a user name and password from HTTP authentication and tries authentication against the backend module in AM, depending on what you configure as the Backend Module Name.
For detailed information about this module's configuration properties, see "HTTP Basic Authentication Module Properties".
The Java Database Connectivity (JDBC) module lets AM connect to a database, such as MySQL or Oracle DB to authenticate users.
For detailed information about this module's configuration properties, see "JDBC Authentication Module Properties".
AM connects to directory servers using Lightweight Directory Access Protocol (LDAP). To build an easy-to-manage, high-performance, pure Java directory service, try ForgeRock Directory Services.
For detailed information about this module's configuration properties, see "LDAP Authentication Module Properties".
Note
Use of this authentication module is deprecated. Use the replacements instead, as described in "Social Authentication Modules"
The Legacy OAuth 2.0/OpenID Connect authentication module lets AM authenticate clients of OAuth resource servers. References in this section are to RFC 6749, The OAuth 2.0 Authorization Framework.
If the module is configured to create an account if none exists, then you must provide valid SMTP settings. As part of account creation, the OAuth 2.0/OpenID Connect client authentication module sends the resource owner an email with an account activation code. To send email, AM uses the SMTP settings from the configuration for the OAuth 2.0/OpenID Connect authentication module.
For detailed information about this module's configuration properties, see "Legacy OAuth 2.0/OpenID Connect Authentication Module Properties".
The Mobile Station Integrated Services Digital Network (MSISDN) authentication module enables non-interactive authentication using a mobile subscriber ISDN associated with a terminal, such as a mobile phone. The module checks the subscriber ISDN against the value found on a user's entry in an LDAP directory service.
For detailed information about this module's configuration properties, see "MSISDN Authentication Module Properties".
The Open Authentication (OATH) module provides a more secure method for users to access their accounts with the help of a device, such as their mobile phone or Yubikey. Users can log into AM and update their information more securely from a one-time password (OTP) displayed on their device. The OATH module includes the OATH standard protocols (RFC 4226 and RFC 6238). The OATH module has several enhancements to the HMAC One-Time Password (HOTP) Authentication Module, but does not replace the original module for those already using HOTP prior to the 10.1.0 release. The OATH module includes HOTP authentication and Time-Based One-Time Password (TOTP) authentication. Both types of authentication require an OATH compliant device that can provide the OTP.
HOTP authentication generates the OTP every time the user requests a new OTP on their device. The device tracks the number of times the user requests a new OTP, called the counter. The OTP displays for a period of time you designate in the setup, so the user may be further in the counter on their device than on their account. AM will resynchronize the counter when the user finally logs in. To accommodate this, you set the number of passwords a user can generate before their device cannot be resynchronized. For example, if you set the number of HOTP Window Size to 50 and someone presses the button 30 on the user's device to generate a new OTP, the counter in AM will review the OTPs until it reaches the OTP entered by the user. If someone presses the button 51 times, you will need to reset the counter to match the number on the device's counter before the user can login to AM. HOTP authentication does not check earlier passwords, so if the user attempts to reset the counter on their device, they will not be able to login until you reset the counter in AM to match their device. See "Resetting Registered Devices by using REST" for more information.
TOTP authentication constantly generates a new OTP based on a time interval you specify. The device tracks the last two passwords generated and the current password. The Last Login Time monitors the time when a user logs in to make sure that user is not logged in several times within the present time period. Once a user logs into AM, they must wait for the time it takes TOTP to generate the next two passwords and display them. This prevents others from being able to access the users account using the OTP they entered. The user's account can be accessed again after the generation of the third new OTP is generated and displayed on their device. For this reason, the TOTP Time-Step Interval should not be so long as to lock users out, with a recommended time of 30 seconds.
An authentication chain can be created to generate an OTP from either HOTP or TOTP.
For detailed information about this module's configuration properties, see "OATH Authentication Module Properties".
Note
AM provides two authentication modules that support OATH:
The ForgeRock Authenticator (OATH) authentication module, which is optimized for use with the ForgeRock Authenticator app and provides device profile encryption.
The OATH authentication module, which is a raw OATH implementation requiring more configuration for users and the AM administrator.
We recommend using the ForgeRock Authenticator (OATH) authentication module when possible.
Also, the ForgeRock Authenticator (OATH), HOTP, and OATH authentication modules all support HOTP passwords, but the way that users obtain passwords differs. See "Differences Among Authentication Modules That Support HOTP" for more information.
The OpenID Connect id_token bearer module lets AM rely on an OpenID Connect 1.0 provider's ID Token to authenticate an end user.
Note
This module validates an OpenID Connect ID token and matches it with a user profile. You should not use this module if you want AM to act as a client in the full OpenID Connect authentication flow.
To provision AM as an OpenID Connect client, you should instead configure an OAuth 2.0 or OpenID Connect social auth module. AM also provides a wizard to configure an OpenID Connect module that will authenticate against an OpenID Connect 1.0 provider. For more information, see "Configuring Custom Social Authentication Providers".
The OpenID Connect id_token bearer module expects an OpenID Connect ID Token in an HTTP request header. It validates the ID Token, and if successful, looks up the AM user profile corresponding to the end user for whom the ID Token was issued. Assuming the ID Token is valid and the profile is found, the module authenticates the AM user.
You configure the OpenID Connect id_token bearer module to specify how AM gets the information needed to validate the ID Token, which request header contains the ID Token, the issuer identifier for the provider who issued the ID Token, and how to map the ID Token claims to an AM user profile.
The OpenID Connect id_token bearer module configuration must match
the claims returned in the id_token JWT used to authenticate.
Before configuring the module, use an OpenID Connect client to obtain an id_token.
Decode the id_token value to see the claims in the middle portion of the JWT.
The claims in the decoded id_token look something like the following example,
which was obtained at Google's
OAuth 2.0 Playground:
{
      azp: "azp_id.apps.googleusercontent.com",
      aud: "aud_id.apps.googleusercontent.com",
      sub: "subject_id",
      at_hash: "access_token_hash",
      iss: "https://accounts.google.com",
      iat: 1505814261,
      exp: 1505817861,
      name: "Google User",
      picture: "https://lh5.googleusercontent.com/***/photo.jpg",
      given_name: "Google",
      family_name: "User",
      locale: "en"
      }
The azp, aud, and iss values
are literally reused in the module configuration.
Also notice that, in this example, name is mapped to cn
for user accounts in the identity repository.
The following figure shows an example configuration for this id_token format.
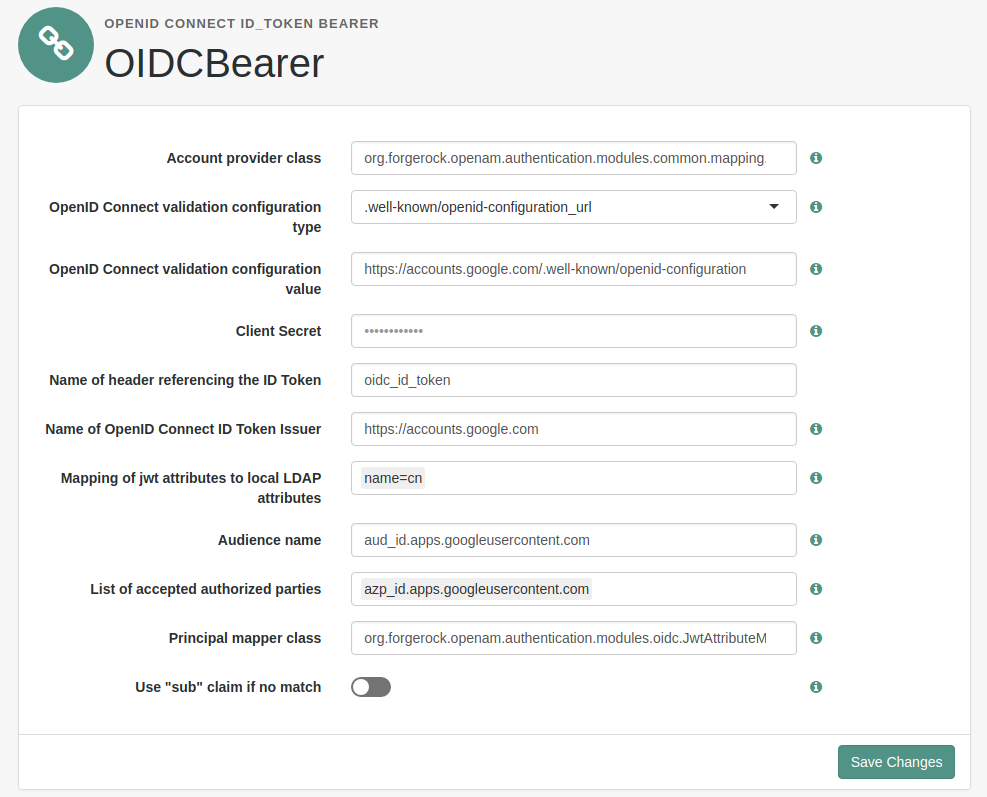
The following example command demonstrates a REST call that authenticates the user using the module:
$ curl \
--request POST \
--header "Content-Type: application/json" \
--header "Accept-API-Version: resource=2.0, protocol=1.0" \
--header "oidc_id_token: eyJ...ifQ.eyJ...In0.BT1...iZA" \
https://openam.example.com:8443/openam/json/realms/root/authenticate?authIndexType=module&authIndexValue=OIDCBearer
{
    "tokenId": "nIq...AA*",
    "successUrl": "/openam/console",
    "realm": "/"
}
Notice that the id_token value,
abbreviated as eyJ...ifQ.eyJ...In0.BT1...iZA,
is the value of the oidc_id_token header as seen in the configuration.
The request targets a module named OIDCBearer
as specified by the authIndexType and authIndexValue parameters.
For detailed information about the authentication REST API,
see "Authentication and Logout".
For detailed information about this module's configuration properties, see "OpenID Connect id_token bearer Authentication Module Properties".
The Persistent Cookie module supports the configuration of cookie lifetimes
based on requests and a maximum time. Note that by default, the persistent
cookie is called session-jwt.
Important
If Secure Cookie is enabled (Deployment > Servers > Server Name > Security > Cookie), the Persistent Cookie module only works over HTTPS.
Before you begin, make sure a public key alias is defined in AM.
The Persistent Cookie module encrypts a JSON Web Token (JWT) using a public
key from the AM keystore. The keystore must be configured under Realms
> Realm Name > Authentication > Settings
> Security > Persistent Cookie Encryption Certificate Alias. If the
keystore changes and the default test key is no longer
present, the public key alias must be updated to reflect the change,
otherwise the module will fail. Similarly, in multi-instance deployments,
the keypair must be available on all AM instances.
When the Persistent Cookie module enforces the client IP address,
and AM lies behind a load balancer or proxy layer,
configure the load balancer or proxy to send the address
by using the X-Forwarded-For header,
and configure AM to consume and forward the header as necessary.
For details, see
"Handling HTTP Request Headers" in the Installation Guide.
The Persistent Cookie module belongs with a second module in an authentication chain. To see how this works, navigate to Realms > Realm Name > Authentication > Chains. Create a new chain and add modules as shown in the figure. The following example shows how a Persistent Cookie module is sufficient. If the persistent cookie does not yet exist, authentication relies on LDAP:
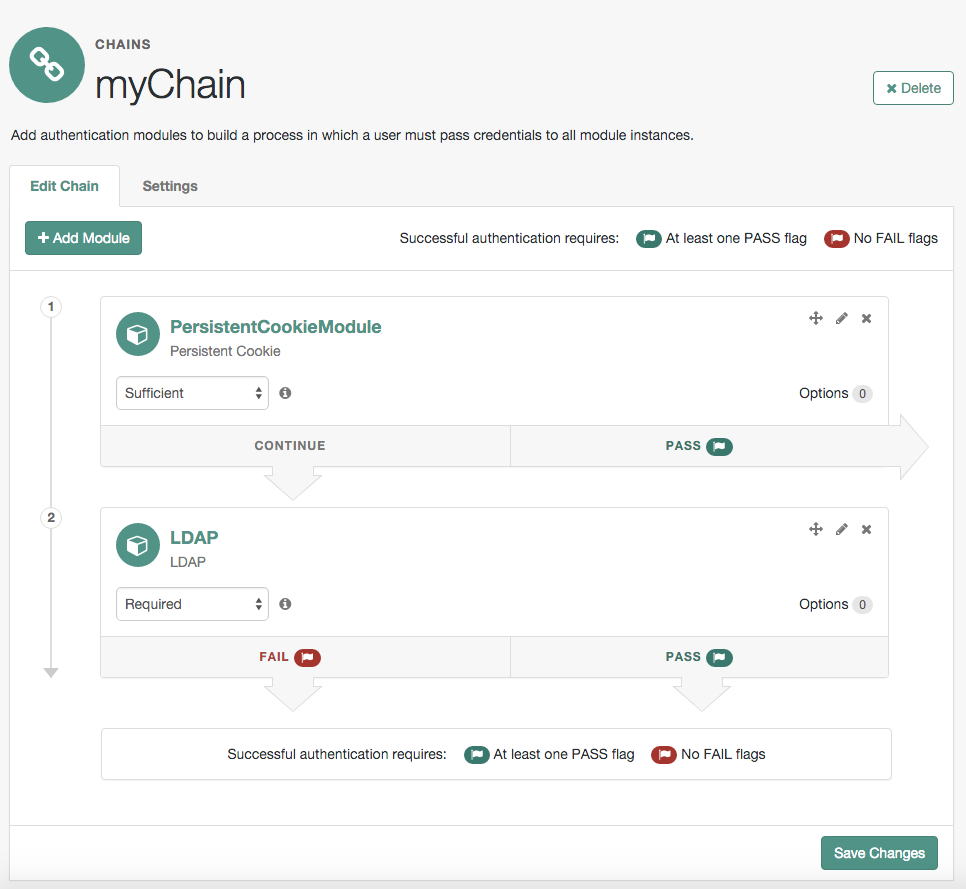
Select the Settings tab and locate settings for the post-authentication
processing class. Set the Class Name to
org.forgerock.openam.authentication.modules.persistentcookie.PersistentCookieAuthModulePostAuthenticationPlugin,
as shown in the following figure:

You should now be able to authenticate automatically, as long as the cookie exists for the associated domain.
Tip
To configure the Persistent Cookie module globally in the AM console, navigate to Configure > Authentication, and then click Persistent Cookie.
For detailed information about this module's configuration properties, see "Persistent Cookie Authentication Module Properties".
The Remote Authentication Dial-In User Service (RADIUS) module lets AM authenticate users against RADIUS servers.
For detailed information about this module's configuration properties, see "RADIUS Authentication Module Properties".
The Secure Attribute Exchange (SAE) module lets AM authenticate a user who has already authenticated with an entity that can vouch for the user to AM, so that AM creates a session for the user. This module is useful in virtual federation, where an existing entity instructs the local AM instance to use federation protocols to transfer authentication and attribute information to a partner application.
For detailed information about this module's configuration properties, see "SAE Authentication Module Properties".
The SAML2 authentication module lets administrators integrate SAML v2.0 single sign-on and single logout into an AM authentication chain.
You use the SAML2 authentication module when deploying SAML v2.0 single sign-on in integrated mode. In addition to configuring SAML2 authentication module properties, integrated mode deployment requires that you make several changes to service provider configurations. Before attempting to configure a SAML2 authentication module instance, review "Implementing SAML v2.0 Single Sign-On in Integrated Mode" in the SAML v2.0 Guide and make sure that you have made any required changes to your service provider configuration.
For detailed information about this module's configuration properties, see "SAML2 Authentication Module Properties".
A scripted authentication module runs scripts to authenticate a user. The configuration for the module can hold two scripts, one to include in the web page run on the client user-agent, another to run in AM on the server side.
The client-side script is intended to retrieve data from the user-agent. This must be in a language the user-agent can run, such as JavaScript, even if the server-side script is written in Groovy.
The server-side script is intended to handle authentication.
Scripts are stored not as files, but instead as AM configuration data. This makes it easy to update a script on one AM server, and then to allow replication to copy it to other servers. You can manage the scripts through the AM console, where you can write them in the text boxes provided or upload them from files.
You can also upload scripts and associate them with a scripted authentication module by using the ssoadm command.
The following example shows how to upload a server-side script from a file, create a scripted authentication module, and then associate the uploaded script with the new module.
     #
     # Upload a server-side script from a script file, myscript.groovy.
     #

     ssoadm create-sub-cfg \
     --realm / \
     --adminid amadmin \
     --password-file /tmp/pwd.txt \
     --servicename ScriptingService \
     --subconfigname scriptConfigurations/scriptConfiguration \
     --subconfigid myScriptId \
     --attributevalues \
     "name=My Scripted Auth Module Script" \
     "script-file=myscript.groovy" \
     "context=AUTHENTICATION_SERVER_SIDE" \
     "language=GROOVY"
     #
     # Create a scripted authentication module, myScriptedAuthModule.
     #

     ssoadm create-auth-instance \
     --realm / \
     --adminid amadmin \
     --password-file /tmp/pwd.txt \
     --authtype Scripted \
     --name myScriptedAuthModule

     #
     # Associate the script with the auth module, and disable client-side scripts.
     #

     ssoadm update-auth-instance \
     --realm / \
     --adminid amadmin \
     --password-file /tmp/pwd.txt \
     --name myScriptedAuthModule \
     --attributevalues \
     "iplanet-am-auth-scripted-server-script=myScriptId" \
     "iplanet-am-auth-scripted-client-script-enabled=false"
If you have multiple separate sets of client-side and server-side scripts, then configure multiple modules, one for each set of scripts.
For details on writing authentication module scripts, see "Using Server-side Authentication Scripts in Authentication Modules".
For detailed information about this module's configuration properties, see "Scripted Authentication Module Properties".
The SecurID module lets AM authenticate users with RSA Authentication Manager software and RSA SecurID authenticators.
Important
To use the SecurID authentication module, you must first build an
AM .war file that includes the supporting library.
For more information, see
"Enabling RSA SecurID Support" in the Installation Guide.
For detailed information about this module's configuration properties, see "SecurID Authentication Module Properties".
The Windows Desktop SSO module uses Kerberos authentication. The user presents a Kerberos token to AM through the Simple and Protected GSS-API Negotiation Mechanism (SPNEGO) protocol. The Windows Desktop SSO authentication module enables desktop single sign on such that a user who has already authenticated with a Kerberos Key Distribution Center can authenticate to AM without having to provide the login information again. Users might need to set up Integrated Windows Authentication in Internet Explorer or Microsoft Edge to benefit from single sign on when logged on to a Windows desktop.
For detailed information about this module's configuration properties, see "Windows Desktop SSO Authentication Module Properties".
Warning
If you are using the Windows Desktop SSO module as part of an
authentication chain and Windows Desktop SSO fails, you may no longer be
able to POST data to non-NTLM-authenticated web sites.
For information on a possible workaround, see
Microsoft knowledge base article KB251404.
The Windows NT module lets AM authenticate against a Microsoft Windows NT server.
This module requires that you install a Samba client in a
bin directory under the AM configuration directory,
such as $HOME/openam/openam/bin.
For detailed information about this module's configuration properties, see "Windows NT Authentication Module Properties".
Once you have configured authentication modules and added the modules to the list of module instances, you can configure authentication chains. Authentication chains let you handle cases where alternate modules or credentials are needed. If you need modules in the chain to share user credentials, then set options for the module.
Tip
AM provides a wizard for configuring authentication providers, including Facebook, Google, and Microsoft. The wizard creates a relevant authentication chain as part of the process. For more information, see "Implementing Social Authentication".
On the Realms page of the AM console, click the realm for which to create the authentication chain.
On the Realm Overview page, click Authentication in the left-hand menu, and then click Chains.
On the Authentication Chains page, click Add Chain. Enter new chain name, and then click Create.
On the New Module dialog, select the authentication module in the chain, and then assign appropriate criteria (Optional, Required, Requisite, Sufficient) as described in "About Authentication Modules and Chains". You can also configure where AM redirects the user upon successful and failed authentication, and plug in your post-authentication processing classes as necessary.
(Optional) If you need modules in the chain to share user credentials, consider the following available options. Enter the key and its value, and then click Plus (+). When you finish entering the options, click OK.
iplanet-am-auth-store-shared-state-enabledSet
iplanet-am-auth-store-shared-state-enabled=trueto store the credentials captured by this module in shared state. This enables subsequent modules in the chain to access the credentials captured by this module. The shared state is cleared when the user successfully authenticates, quits the chain, or logs out.Default:
trueNote
OATH and OTP codes are never added to the shared state, and cannot be shared between other modules in the chain.
iplanet-am-auth-shared-state-enabledSet
iplanet-am-auth-shared-state-enabled=trueto allow this module to access the credentials, such as user name and password, that have been stored in shared state by previous modules in the authentication chain.Default:
falseiplanet-am-auth-shared-state-behavior-patternSet
iplanet-am-auth-shared-state-behavior-pattern=tryFirstPassto try authenticating with the username and password stored in shared state. If authentication fails, AM displays the login screen of this module for the user to re-enter their credentials.Set
iplanet-am-auth-shared-state-behavior-pattern=useFirstPassto prevent the user from entering the username and password twice during authentication. Typically, you set the property touseFirstPassfor all modules in the chain except the first module. If authentication fails, then the module fails.Default:
tryFirstPass
For example, consider a chain with two modules sharing credentials according to the following settings: the first module in the chain has the option
iplanet-am-auth-store-shared-state-enabled=true, and criteriaREQUIRED.The second module in the chain has options
iplanet-am-auth-shared-state-enabled=true,iplanet-am-auth-shared-state-behavior-pattern=useFirstPasswith criteriaREQUIRED.Click Save Changes.
The following authentication sequence would occur: the user enters their credentials for the first module and successfully authenticates. The first module shares the credentials with the second module, successfully authenticating the user without prompting again for their credentials, unless the credentials for the first module do not successfully authenticate the user to the second module.
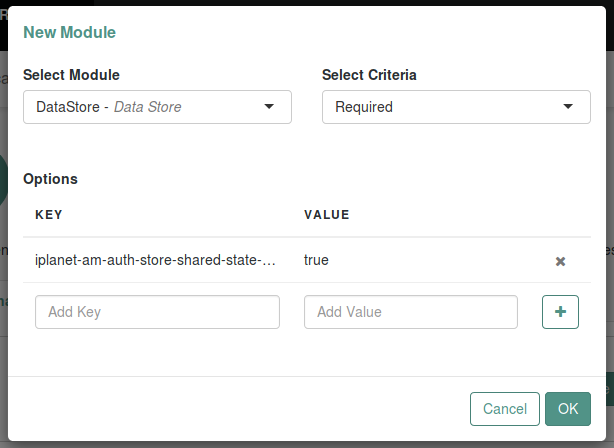
Post-authentication plugins (PAP) let you include custom processing at the end of the authentication process and when users log out of AM.
In the AM console, you add post-authentication plugins to an authentication chain. Navigate to Realms > Realm Name > Authentication > Chains > Auth Chain Name > Settings > Post Authentication Processing Class > Class Name.
See "Creating Post-Authentication Plugins for Chains" for more information about post authentication plugins.
AM provides some post-authentication plugins as part of the standard product delivery.
- Class name:
org.forgerock.openam.authentication.modules.adaptive.AdaptivePostAuthenticationPlugin The adaptive authentication plugin serves to save cookies and profile attributes after successful authentication.
Add it to your authentication chains that use the adaptive authentication module configured to save cookies and profile attributes.
- Class name:
org.forgerock.openam.authentication.modules.common.JaspiAuthLoginModulePostAuthenticationPlugin The Java Authentication Service Provider Interface (JASPI) post authentication plugin initializes the underlying JASPI
ServerAuthmodule.JASPI defines a standard service provider interface (SPI) where developers can write message level authentication agents for Java containers on either the client side or the server side.
- Class name:
org.forgerock.openam.authentication.modules.oauth2.OAuth2PostAuthnPlugin The OAuth 2.0 post-authentication plugin builds a global logout URL used by
/oauth2c/OAuthLogout.jspafter successful OAuth 2.0 client authentication. This logs the resource owner out with the OAuth 2.0 provider when logging out of AM.Before using this plugin, configure the OAuth 2.0 authentication module with the correct OAuth 2.0 Provider logout service URL, and set the Logout options to Log out or Prompt. This plugin cannot succeed unless those parameters are correctly set.
Sometimes OAuth 2.0 providers change their endpoints, including their logout URLs. When using a provider like Facebook, Google, or MSN, make sure you are aware when they change their endpoint locations so that you can change your client configuration accordingly.
- Class name:
org.forgerock.openam.authentication.modules.saml2.SAML2PostAuthenticationPlugin The SAML v2.0 post-authentication plugin that gets activated for single logout. Supports HTTP-Redirect for logout-sending messages only.
Set the post-authentication processing class for the authentication chain that contains the SAML v2.0 authentication module.
- Class name:
org.forgerock.openam.authentication.modules.persistentcookie.PersistentCookieAuthModule The Persistent Cookie Authentication Module provides logic for persistent cookie authentication in AM. It makes use of the JASPI
JwtSessionmodule to create and verify the persistent cookie.- Class name:
com.sun.identity.authentication.spi.ReplayPasswd[4] Password replay post-authentication plugin class that uses a DES/ECB/NoPadding encryption algorithm. This class is deprecated in favor of the
com.sun.identity.authentication.spi.JwtReplayPasswordclass.The plugin encrypts the password captured by AM during the authentication process and stores it in a session property. IG or a web agent looks up for the property, decrypts it, and replays the password into legacy applications.
To configure password replay for AM and IG, see the ForgeRock Identity Gateway Gateway Guide.
- Class name:
com.sun.identity.authentication.spi.JwtReplayPassword[4] Password replay post-authentication plugin class that uses a JWT-based AES A128CBC-HS256 encryption algorithm.
The plugin encrypts the password captured by AM during the authentication process and stores it in a session property. IG looks up for the property, decrypts it, and replays the password into legacy applications.
Only IG 6 or later is supported.
To configure password replay for AM and IG, see the ForgeRock Identity Gateway Gateway Guide.
If necessary, you can also write your own custom post-authentication plugin as described in "Creating Post-Authentication Plugins for Chains".
By default, AM configures a default authentication chain,
ldapService, which uses the DataStore
module for authentication. This default authentication chain is configured
for both administrators and non-administrators out-of-the-box after installation.
Warning
Special care must be given when setting your default authentication tree or chain.
If you leave the default authentication to the ldapService chain,
the user can still post their username and password into the authentication
endpoint to retrieve a session, regardless of the services configured for
authentication.
For example, consider a deployment where you disable module-based authentication
and keep the default authentication chain to the out-of-the-box ldapStore
authentication chain using DataStore module.
If you have set up two factor authentication for your users, your users can
still access their accounts without performing the correct two factor
authentication chain login sequence by using the default ldapService chain.
When you set the default authentication tree or chain, make sure it is
set to your most secure tree or chain once you are ready to go to production and
not left to the default ldapService chain.
Before you select the default tree or chain for users, and especially for administrators, test the authentication tree or chain first.
When making a request to the XUI, specify the realm or realm alias as the value of a
realmparameter in the query string, or the DNS alias in the domain component of the URL. If you do not use a realm alias, then you must specify the entire hierarchy of the realm, starting at the top-level realm. For examplehttps://openam.example.com:8443/openam/XUI/?realm=/customers/europe#login/.For example, to test an authentication chain named
NewChainin a subrealm calledsubrealm, the URL would be:http://openam.example.com:8080/openam/XUI/?realm=/subrealm#login&service=NewChain. If you cannot log in, then go back and fix the authentication chain's configuration before making it the default.Navigate to Realms > Realm Name > Authentication > Settings > Core.
Adjust the Administrator Authentication Configuration drop-down to the required tree or chain. Administrative users, such as
amAdmin, use this tree or chain to log in.By default,
amAdmincan log in at/openam/XUI/#Login. You can change the URL for your deployment.Adjust the Organization Authentication Configuration drop-down to the required tree or chain. Non-administrative users use this tree or chain to log in.
Save your work.
[4] Only one password replay post-authentication plugin class can be active for a given AM deployment.
Social authentication refers to AM's ability to delegate authentication through third-party identity providers, such as Facebook and Google, and other third-party providers.
AM allows delegation of authentication by providing provider-specific, and also generic OAuth 2.0 and OpenID Connect 1.0 authentication modules. For background information, see "About Social Authentication".
Note
To allow AM to contact internet services through a proxy, see "Settings for Configuring a JVM Proxy" in the Installation Guide.
This chapter explains the server configuration required to implement social authentication in AM:
| • "Configuring Pre-Populated Social Authentication Providers" |
| • "Configuring Custom Social Authentication Providers" |
| • "Configuring the Social Authentication Implementations Service" |
AM provides wizards to quickly enable authentication with Facebook, Google, and VKontakte. Most settings are pre-populated, only a Client ID and Client Secret are required.
To obtain a Client ID and Client Secret you should register an application with the third party provider, at the following links:
Note
You must enable the Google+ API in order to authenticate with Google. To enable the Google+ API, login to the Google Developers Console, select your project, navigate to APIs and auth > APIs, and then set the status of the
Google+ APItoON.- VKontakte
Once you have registered an application and obtained credentials from the social authentication provider, follow the steps below to configure authentication with the provider:
Select Realms > Realm Name > Dashboard > Configure Social Authentication, and then click the link for the social authentication provider you want to configure—Configure Facebook Authentication, Configure Google Authentication, or Configure VKontakte Authentication.
On the configure third party authentication page:
Select the realm in which to enable social authentication.
Enter the Client ID obtained from the third party authentication provider.
Enter the Client Secret obtained from the third party authentication provider, and repeat it in the
Confirm Client Secretfield.Leave the default
Redirect URL, unless you are using an external server as a proxy.Click
Create.
On completion, the wizard displays a message confirming the successful creation of a new authentication module and an authentication chain for the provider, and either the creation of a new Social Authentication Implementations service named
socialAuthNService, or an update if it already existed.

You can configure the authentication module, authentication chain, and Social Authentication Implementations service that you created by using the wizards in the same way as manually created versions. For more information, see "Configuring Authentication Modules", "Configuring Authentication Chains", and "Configuring the Social Authentication Implementations Service".
The wizards configure the settings for logging in to AM using social identity providers such as Google, Facebook, and VKontakte.
To use AM social authentication as part of an IDM deployment, some additional configuration of the created authentication modules is required.
After using the social authentication wizard, perform the following additional steps to configure AM to work with an IDM deployment:
When using Google as the social identity provider, in the AM console navigate to Realms > Realm Name > Authentication > Modules > GoogleSocialAuthentication.
Modify the configuration as follows:
Add
sub=iplanet-am-user-alias-listto the Account Mapper Configuration property.The
iplanet-am-user-alias-listproperty defines one or more aliases for mapping a user's multiple profiles.Add
org.forgerock.openam.authentication.modules.common.mapping.JsonAttributeMapper|iplanet-am-user-alias-list|google-to the Attribute Mapper property.Add
org.forgerock.openam.authentication.modules.oidc.JwtAttributeMapper|iplanet-am-user-alias-list|google-to the Attribute Mapper property.
When using Facebook as the social identity provider, in the AM console navigate to Realms > Realm Name > Authentication > Modules > FacebookSocialAuthentication.
Modify the configuration as follows:
Add
id=iplanet-am-user-alias-listto the Account Mapper Configuration property.The
iplanet-am-user-alias-listproperty defines one or more aliases for mapping a user's multiple profiles.Add
org.forgerock.openam.authentication.modules.common.mapping.JsonAttributeMapper|iplanet-am-user-alias-list|facebook-to the Attribute Mapper property.
Enable the Create account if it does not exist property.
Save your changes.
AM provides a wizard to quickly enable authentication with any third party provider that supports the OpenID Connect Discovery 1.0 specification.
You must first register an application with the third party provider to obtain a Client ID, Client Secret, and the OpenID Discovery URL.
Once you have registered an application and obtained your credentials from the social authentication provider, follow the steps below to configure authentication with the provider:
Select Realms > Realm Name > Dashboard > Configure Social Authentication, and then click the Configure Other Authentication link.
On the configure social authentication page:
Select the realm in which to enable social authentication.
Enter the OpenID Discovery URL obtained from the third party authentication provider.
Enter a name for the provider in the
Provider
       Name
field. AM uses this as a label on the login page to identify the provider.Enter the URL of an image to be used on the login page in the
Image URLfield. AM places the image on the login page, to enable authentication with the provider.Enter the Client ID obtained from the third party authentication provider.
Enter the Client Secret obtained from the third party authentication provider, and repeat it in the
Confirm Client Secretfield.Leave the default
Redirect URL, unless you are using an external server as a proxy.Click
Create.
On completion, the wizard displays a message confirming the successful creation of a new authentication module and an authentication chain for the provider, and either the creation of a new Social Authentication Implementations service named
socialAuthNService, or an update if it already existed.

You can configure the authentication module, authentication chain, and Social Authentication Implementations service that you created by using the wizard in the same way as manually created versions. For more information, see "Configuring Authentication Modules", "Configuring Authentication Chains", and "Configuring the Social Authentication Implementations Service".
You can add logos to the login page to allow users to authenticate using configured social authentication providers.
Wizards are provided to configure common social authentication providers, which also configure the Social Authentication Implementations Service to add logos to the login page. You can manually add other authentication chains that contain an social authentication modules.
To add a social authentication provider to the login screen, you must first configure a social authentication module, and an authentication chain that contains it:
Use a wizard. See "Configuring Pre-Populated Social Authentication Providers" and "Configuring Custom Social Authentication Providers".
Configure the Social Authentication Implementations Service, and then create an authentication module and a chain. See "To Configure the Social Authentication Implementations Service", "Configuring Authentication Modules" and "Configuring Authentication Chains".
Once you have created an authentication chain containing a social authentication module, perform the following steps to add a logo for the authentication provider to the AM login screen:
On the Realms page of the AM console, click the realm containing the authentication module and authentication chain to be added to the login screen.
On the Services page for the realm:
If the
Social Authentication Implementations Serviceexists, click on it.
If the
Social Authentication Implementations Servicedoes not exist, click Add a Service, and then select Social Authentication Implementations, and then click Create.
On the Social Authentication Implementations page:
In the Display Names section, enter a Map Key, enter the text to display as ALT text on the logo in the Corresponding Map Value field, and then click Add.
Note
AM uses the value in the Map Key fields throughout the configuration to tie the various implementation settings to each other. The value is case-sensitive.
In the Authentication Chains section, re-enter the Map Key used in the previous step, select the authentication chain from the Corresponding Map Value list, and then click Add.
In the Icons section, re-enter the Map Key used in the previous steps, enter the path to a logo image to be used on the login screen in the Corresponding Map Value list, and then click Add.
In the Enabled Implementations field, re-enter the Map Key used in the previous steps, and then click Add.
Tip
Removing a Map Key from the Enabled Implementations list removes the associated logo from the login screen. There is no need to delete the Display Name, Authentication Chain or Icon configuration to remove the logo from the login screen.
Click Save Changes.

An icon now appears on the AM login screen, allowing users to authenticate with the third party authentication provider.
Multi-factor authentication is a security process that requires users to provide more than one form of credentials when logging in or accessing a resource. A common multi-factor authentication scenario is for users to submit a user ID and password, and then submit a one-time password generated by an authenticator application on their mobile phone to access a resource.
This chapter covers how administrators implement and support multi-factor authentication, and how end users authenticate using multi-factor authentication. See the following sections:
For conceptual information about multi-factor authentication, see "About Multi-Factor Authentication".
AM provides a number of services that must be configured to provide multi-factor authentication with the ForgeRock Authenticator app.
The service for customizing one-time password implementation is:
- ForgeRock Authenticator (OATH) Service
Specifies the attribute in which to store information about a registered device, and whether to encrypt that information.
Also specifies the attribute used to indicate if a user has opted out of one-time passwords.
For detailed information about the available properties, see "ForgeRock Authenticator (OATH) Service" in the Reference.
The services required for implementing push notifications are:
- ForgeRock Authenticator (Push) Service
Specifies the attribute in which to store information about a registered device, and whether to encrypt the data.
For detailed information about the available properties, see "ForgeRock Authenticator (Push) Service" in the Reference.
- Push Notification Service
Configures how AM sends push notifications to registered devices, including endpoints, and access credentials.
For information on provisioning the credentials required by the Push Notification Service, see How to set up AM Push Notification Service credentials in the ForgeRock Knowledge Base.
For detailed information about the available properties, see "Push Notification Service" in the Reference.
To configure these services globally for an AM deployment, navigate to Configure > Global Services, and then click the service to configure.
To configure these services for a realm, navigate to Realms > Realm Name, and then click Services. Add an instance of the service to the realm and configure settings in the service as required.
Letting users opt out of providing one-time passwords when they perform multi-factor authentication is an important implementation decision. The Two Factor Authentication Mandatory setting under Realms > Realm Name > Authentication > Settings > General configures whether users can opt out.
When the Two Factor Authentication Mandatory setting is enabled, users must provide a one-time password every time they authenticate to a chain that includes a ForgeRock Authenticator (OATH) authentication module. When the setting is disabled, the user can optionally skip one-time passwords.
By default, AM lets users opt out of providing one-time passwords. Users authenticating with one-time passwords for the first time are prompted with a screen that lets them opt out of providing one-time passwords.
With the Two Factor Authentication Mandatory setting enabled, the user experience differs from the default behavior. AM does not provide an option to skip multi-factor authentication during the initial attempt at multi-factor authentication:
When configuring an authentication chain that implements one-time passwords, you need to be aware that a user's decision to opt out affects the authentication process. When a user who has opted out of providing one-time passwords authenticates to a chain that includes a ForgeRock Authenticator (OATH) authentication module, that module always passes authentication.
Consider the example authentication chain in "Creating Authentication Chains for One-Time Password Authentication". The first authentication module is a Data Store module and the second authentication module is a ForgeRock Authenticator (OATH) module. Both authentication modules have the Requisite flag setting.
A user who has opted out of providing one-time passwords might experience the following sequence of events when authenticating to the chain:
The Data Store authentication module prompts the user to provide a user ID and password.
The user provides a valid user ID and password.
Data Store authentication passes, and authentication proceeds to the next module in the chain—the ForgeRock Authenticator (OATH) module.
The ForgeRock Authenticator (OATH) authentication module determines that the user has opted out of providing one-time passwords.
ForgeRock Authenticator (OATH) authentication passes. Because it is the last authentication module in the chain, AM considers authentication to have completed successfully.
Contrast the preceding sequence of events to the experience of a user who has not opted out of providing one-time passwords, or who is required to provide one-time passwords, while authenticating to the same chain:
The Data Store authentication module prompts the user to provide a user ID and password.
The user provides a valid user ID and password.
Data Store authentication passes, and authentication proceeds to the next module in the chain—the ForgeRock Authenticator (OATH) module.
The ForgeRock Authenticator (OATH) authentication module determines that the user has not opted out of providing one-time passwords, and prompts the user for a one-time password.
The user obtains a one-time password from the authenticator app on their mobile phone.
If the one-time password is valid, ForgeRock Authenticator (OATH) authentication passes. Because it is the last authentication module in the chain, AM considers authentication to have completed successfully. However, if the one-time password is not valid, ForgeRock Authenticator (OATH) authentication fails, and AM considers authentication to have failed.
The following procedures provide steps for creating authentication chains that implement multi-factor authentication.
Push authentication uses two separate authentication modules:
A module to register a device to receive push notifications called ForgeRock Authenticator (Push) Registration.
A module to perform the actual authentication itself, called ForgeRock Authenticator (Push).
You can insert both modules into a single chain to register devices and then authenticate with push notifications. See "To Create an Authentication Chain for Push Registration and Authentication".
The ForgeRock Authenticator (Push) module can also be used for passwordless authentication using push notifications. If the module is placed at the start of a chain, it will ask the user to enter their user ID, but not their password. A push notification is then sent to their registered device to complete the authentication by using the ForgeRock Authenticator app.
For information on configuring an authentication chain for passwordless authentication, see "To Create an Authentication Chain for Push Registration and Passwordless Authentication".
For information on the potential limitations of passwordless authentication, see "Limitations When Using Passwordless Push Authentication".
The procedure assumes the following:
Users will provide user IDs and passwords as the first step of multi-factor authentication.
If the user does not have a device registered to receive push notifications, they will be asked to register a device. After successfully registering a device for push, authentication will proceed to the next step.
A push notification will be sent to the device as a second factor to complete authentication.
To create a multi-factor authentication chain that uses the ForgeRock Authenticator (Push) Registration and ForgeRock Authenticator (Push) modules, follow these steps:
Log in to the AM console as an AM administrator, for example
amadmin.Select the realm that will contain the authentication chain.
Create a ForgeRock Authenticator (Push) Registration authentication module as follows:
Select Authentication > Modules, and then click Add Module.
The New Module page appears.
Fill in fields in the Create New Module dialog box as follows:
Name: Specify a module name of your choosing, for example push-reg.
Type: Select ForgeRock Authenticator (Push) Registration.
Click Create.
A page that lets you configure the authentication module appears.
Configure the module to meet your organization's requirements.
For more information about the authentication module's configuration settings, see "ForgeRock Authenticator (Push) Registration Authentication Module".
Create a ForgeRock Authenticator (Push) authentication module as follows:
Select Authentication > Modules, and then click Add Module.
The New Module page appears.
Fill in fields in the Create New Module dialog box as follows:
Name: Specify a module name of your choosing, for example push-authn.
Type: Select ForgeRock Authenticator (Push).
Click Create.
A page that lets you configure the authentication module appears.
Configure the module to meet your organization's requirements.
For more information about the authentication module's configuration settings, see "ForgeRock Authenticator (Push) Authentication Module".
Create the authentication chain as follows:
Select Authentication > Chains, and then click Add Chain.
The Add Chain page appears.
Specify a name of your choosing, for example
myPushAuthChain, and then click Create.A page appears with the Edit Chain tab selected.
Add the Data Store authentication module to the authentication chain as follows:
Click Add a Module.
The New Module dialog box appears.
Fill in the New Module dialog box, specifying the Data Store authentication module. For this example, specify the
Requisiteflag.Click OK.
The graphic showing your authentication chain now includes a Data Store authentication module.
Add the ForgeRock Authenticator (Push) Registration authentication module to the authentication chain as follows:
Click Add a Module.
The New Module dialog box appears.
Fill in the New Module dialog box, specifying the ForgeRock Authenticator (Push) Registration authentication module that you just created. For this example, specify the
Requisiteflag.Click OK.
The graphic showing your authentication chain now includes a Data Store, and a ForgeRock Authenticator (Push) Registration authentication module.
Add the ForgeRock Authenticator (Push) authentication module to the authentication chain as follows:
Click Add a Module.
The New Module dialog box appears.
Fill in the New Module dialog box, specifying the ForgeRock Authenticator (Push) authentication module that you created. For this example, specify the
Requiredflag.Click OK.
The graphic showing your authentication chain now includes a Data Store, a ForgeRock Authenticator (Push) Registration, and a ForgeRock Authenticator (Push) authentication module.

Click Save Changes to save the authentication chain.
Test your authentication chain as follows:
Navigate to a URL similar to the following:
http://openam.example.com:8080/openam/XUI/?realm=/#login/&service=myPushAuthChainA login screen prompting you to enter your user ID and password appears.
Follow the procedure described in "To Perform Authentication using Push Notifications" to verify that you can use the ForgeRock Authenticator app to perform multi-factor authentication. If the chain is correctly configured, authentication is successful and AM displays the user profile page.
The procedure assumes the following:
Users will provide only their user IDs as the first step of multi-factor authentication.
The user already has a device registered for receiving push notifications. For details of an authentication chain which can register a device for push notifications, see "To Create an Authentication Chain for Push Registration and Authentication".
A push notification will be sent to the device as a second factor, to complete authentication without the need to enter a password.
To create a multi-factor authentication chain that uses the ForgeRock Authenticator (Push) module for passwordless authentication, follow these steps:
Log in to the AM console as an AM administrator, for example
amadmin.Select the realm that will contain the authentication chain.
Create a ForgeRock Authenticator (Push) authentication module as follows:
Select Authentication > Modules, and then click Add Module.
The New Module page appears.
Fill in fields in the Create New Module dialog box as follows:
Name: Specify a module name of your choosing, for example push-authn.
Type: Select ForgeRock Authenticator (Push).
Click Create.
A page that lets you configure the authentication module appears.
Configure the module to meet your organization's requirements.
For more information about the authentication module's configuration settings, see "ForgeRock Authenticator (Push) Authentication Module".
Create the authentication chain as follows:
Select Authentication > Chains, and then click Add Chain.
The Add Chain page appears.
Specify a name of your choosing, for example myPasswordlessAuthChain, and then click Create.
A page appears with the Edit Chain tab selected.
Add the ForgeRock Authenticator (Push) authentication module to the authentication chain as follows:
Click Add a Module.
The New Module dialog box appears.
Fill in the New Module dialog box, specifying the ForgeRock Authenticator (Push) authentication module that you created. For this example, specify the
Requisiteflag.Click OK.
The graphic showing your authentication chain now includes a ForgeRock Authenticator (Push) authentication module.

Click Save Changes to save the authentication chain.
Test your authentication chain as follows:
Navigate to a URL similar to the following:
http://openam.example.com:8080/openam/XUI/?realm=/#login/&service=myPasswordlessAuthChainA login screen prompting you to enter your user ID appears.
Follow the procedure described in "To Perform Authentication using Push Notifications" to verify that you can use the ForgeRock Authenticator app to perform multi-factor authentication. If the chain is correctly configured, authentication is successful and AM displays the user profile page, without having to enter a password.
This section covers one-time password authentication.
The procedure assumes the following:
Users will provide user IDs and passwords as the first step of multi-factor authentication.
An existing Data Store authentication module will collect and verify user IDs and passwords.
All authentication modules in the chain will use the
Requisiteflag setting. See "About Authentication Modules and Chains" for details about authentication module flag settings.Users can opt out of one-time password authentication.
To create a multi-factor authentication chain that uses the ForgeRock Authenticator (OATH) module, follow these steps:
Log in to the AM console as an AM administrator, for example
amadmin.Select the realm that will contain the authentication chain.
You can allow users to opt out of using OATH-based one-time passwords as follows:
Select Authentication > Settings > General.
Make sure that the Two Factor Authentication Mandatory is not enabled.
See "General" for details about this configuration setting.
For information about how letting users skip multi-factor authentication impacts the behavior of authentication chains, see "Letting Users Opt Out of One-Time Password Authentication".
Create a ForgeRock Authenticator (OATH) authentication module as follows:
Select Authentication > Modules, and then click Add Module.
The New Module page appears.
Fill in fields in the Create New Module dialog box as follows:
Name: Specify a module name of your choosing.
Type: Select ForgeRock Authenticator (OATH).
Click Create.
A page that lets you configure the authentication module appears.
Configure the ForgeRock Authenticator authentication module to meet your organization's requirements.
For more information about the authentication module's configuration settings, see "ForgeRock Authenticator (OATH) Authentication Module".
Create the authentication chain as follows:
Select Authentication > Chains, and then click Add Chain.
The Add Chain page appears.
Specify a name of your choosing, for example myOathAuthChain, and then click Create.
A page appears with the Edit Chain tab selected.
Click Add a Module. Fill in fields in the New Module dialog box as follows:
Select Module: Select the existing Data Store module to use in this chain.
Select Criteria: Select a flag setting for the module in the authentication chain. For this example, specify the
Requisiteflag.See "About Authentication Modules and Chains" for information about authentication module flag settings.
Click OK.
A graphic showing an authentication chain with a single Data Store module appears on the page.
Add the ForgeRock Authenticator (OATH) authentication module to the authentication chain as follows:
Click Add a Module.
The New Module dialog box appears.
Fill in the New Module dialog box, specifying the ForgeRock Authenticator (OATH) authentication module that you just created. For this example, specify the
Requisiteflag.Click OK.
The graphic showing your authentication chain now includes the Data Store and ForgeRock Authenticator (OATH) authentication module.
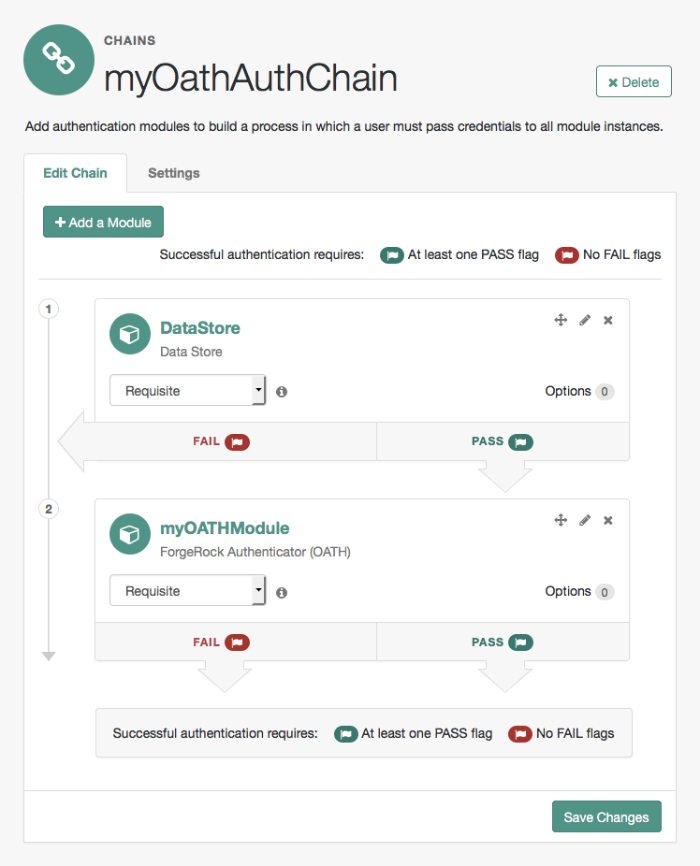
Click Save Changes to save the authentication chain.
Test your authentication chain as follows:
Navigate to a URL similar to the following:
http://openam.example.com:8080/openam/XUI/?realm=/#login/&service=myOathAuthChainA login screen prompting you to enter your user ID and password appears.
Follow the procedure described in "To Perform Authentication using a One-Time Password" to verify that you can use the ForgeRock Authenticator app to perform multi-factor authentication. If the chain is correctly configured, authentication is successful and AM displays the user profile page.

Multi-factor authentication requires you to register a device, which is used as an additional factor when you log in to AM.
This section covers the following topics relating to devices used for multi-factor authentication:
If you have not already done so, download and install the ForgeRock Authenticator app on your phone, so that you can perform multi-factor authentication.
The ForgeRock Authenticator app supports push authentication notifications and one-time passwords.
The app is available for both Android and iOS devices, and is free to download. Source code is also available:
- Android
Download: Google Play
Source code: https://stash.forgerock.org/projects/OPENAM/repos/forgerock-authenticator-android
- iOS
Download: App Store
Source code: https://stash.forgerock.org/projects/OPENAM/repos/forgerock-authenticator-ios
Registering a device with AM by using the ForgeRock Authenticator app enables it to be used as an additional factor when logging in.
The ForgeRock Authenticator app supports registration of multiple accounts and multiple different authentication methods in each account, such as push notifications and one-time passwords.
Device registration only needs to be completed the first time an authentication method is used with an identity provider. Use of a different authentication method may require that device registration with the identity provider is repeated for that additional method.
The device needs access to the internet to register to receive push notifications. Registering for one-time password authentication does not require a connection to the internet.
When visiting a protected resource without having any registered devices for multi-factor authentication, AM requires that you register a device.
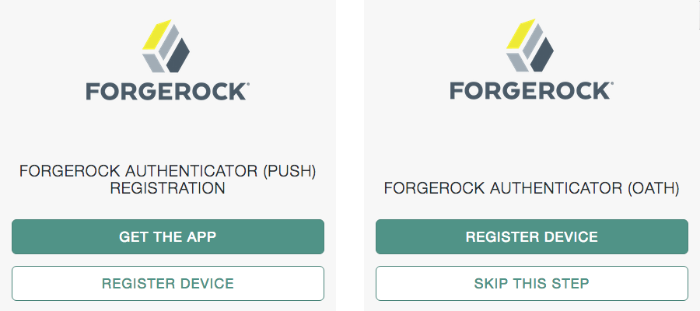
To register your mobile phone with AM, click Register Device. A screen with a QR code appears:
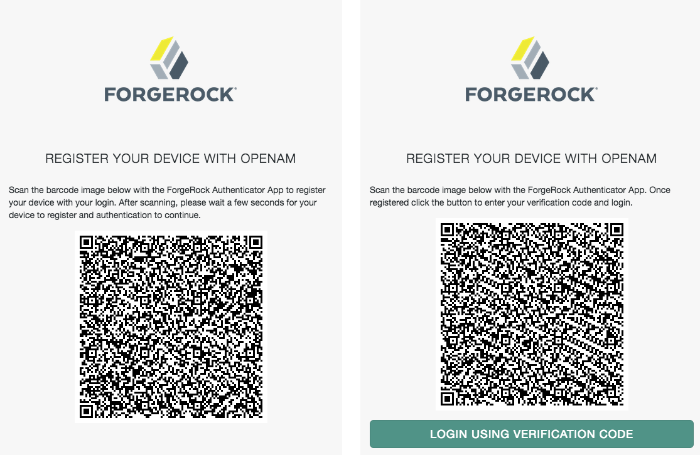
Start the ForgeRock Authenticator app on the device to register, and then click the plus icon:
The screen on the device changes to an interface similar to your camera app.
Point the camera at the QR code on the AM page and the ForgeRock Authenticator app will acquire the QR code and read the data encoded within.
If you are logging in to AM on the registered device and cannot scan the screen, click the button labelled On a mobile device?. The ForgeRock Authenticator app will request permission to launch. If allowed, the information required to register the device will be transferred to the ForgeRock Authenticator app directly, without the need to scan the QR code.

After registering, the app displays the registered accounts and the authentication methods they support, for example one-time passwords (a timer icon) or push notifications (a bell icon):
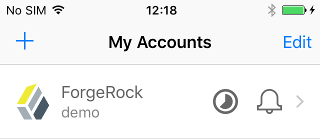


Your device is now registered. You will able to use it to perform multi-factor authentication.
Important
After registering a new device and successfully performing multi-factor authentication, you should obtain the recovery codes for the registered device and store them somewhere safe. See "Accessing Your Recovery Codes".
After successful first-time authentication with multi-factor authentication, you should safeguard your ability to use multi-factor authentication in case you lose your phone. AM provides each device you register with a set of one-time recovery codes that you can use in cases where you cannot complete multi-factor authentication using your registered device.
After registering a new device with AM, use the following steps to access your recovery codes:
Log in to AM.
Select Dashboard from the top-level menu.
Locate the entry for the device type in the Authentication Devices section, click the context menu button, and then click Recovery Codes:
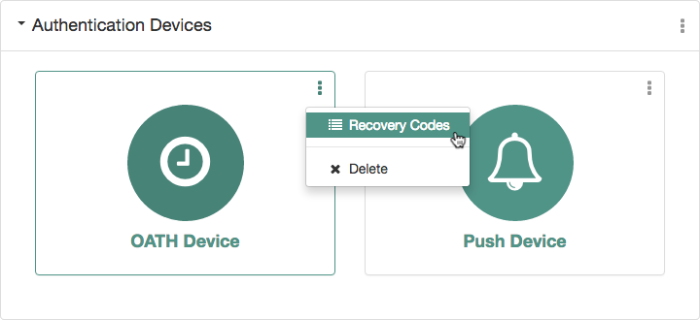
A list of recovery codes appears:

Keep a copy of the codes for each of your registered device types in a safe place. You will need to use one of your recovery codes to authenticate to AM if you lose your phone.

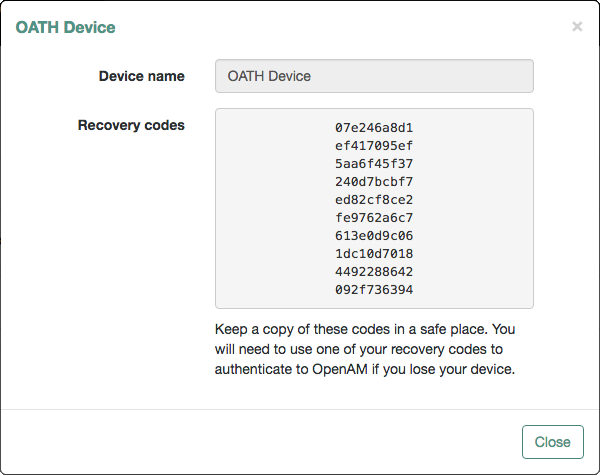
See "Recovering After Replacing a Lost Device" for the procedure to authenticate to AM using a recovery code instead of performing multi-factor authentication.
Unless the AM administrator has made one-time password authentication mandatory, users can choose to opt out of using one-time passwords by clicking the Skip This Step button on the ForgeRock Authenticator (OATH) screen. [5] This button appears:
When users are prompted to register their mobile devices during their initial login from a new device.
Every time users are prompted by the ForgeRock Authenticator (OATH) authentication module to enter one-time passwords.
Users who decide to opt out of using one-time passwords are not prompted to enter one-time passwords when authenticating to AM.
The decision to opt out of using one-time passwords in AM is revocable: users who have decided to opt out of using one-time passwords can reverse their decisions, so that one-time password authentication is once again required.
End users should follow these steps to opt out or opt in to using one-time passwords:
Log in to AM.
Select Dashboard from the top navigation bar.
In the Authentication Devices section of the Dashboard page, click the context menu button, and then click Settings:

Enable or disable the 2-Step Authentication option:
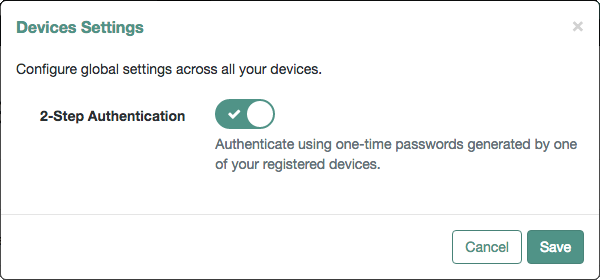
Click Save.
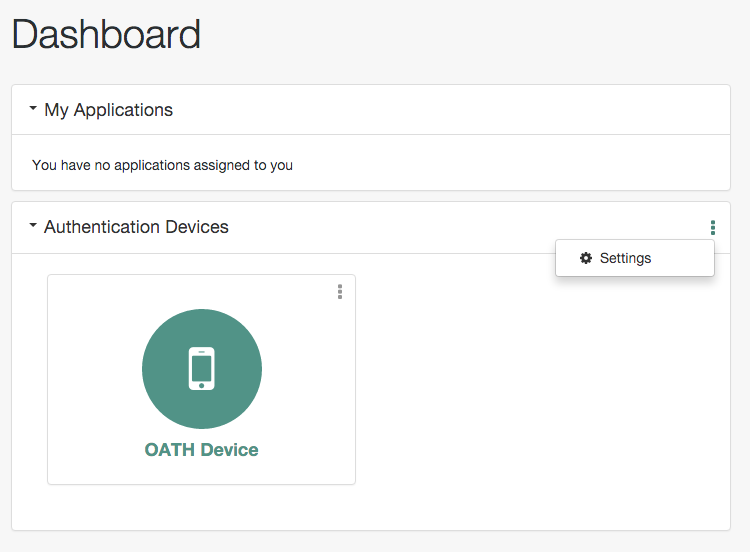

If you register a device with AM and then lose it, you must authenticate to AM using a recovery code, delete the lost device, and then register the new device. Follow these steps:
Log in to AM. If push authentication is enabled, enter your user ID, click Log In, and then click Use Emergency Code. If one-time passwords are enabled, when prompted to enter a verification code, instead enter one of your recovery codes.
Because recovery codes are valid for a single use only, make a note to yourself not to attempt to reuse this code.
If you did not save the recovery codes for the lost device, contact your administrator to remove the registered device from your AM user profile.
Select Dashboard from the top-level menu.
Locate the entry for your phone in the Authentication Devices section, click the context menu button, and then click Delete:

If you have not already done so, install the ForgeRock Authenticator app on your new phone. See "Downloading the ForgeRock Authenticator App".
Register your new device. See "Registering a Device for Multi-Factor Authentication".
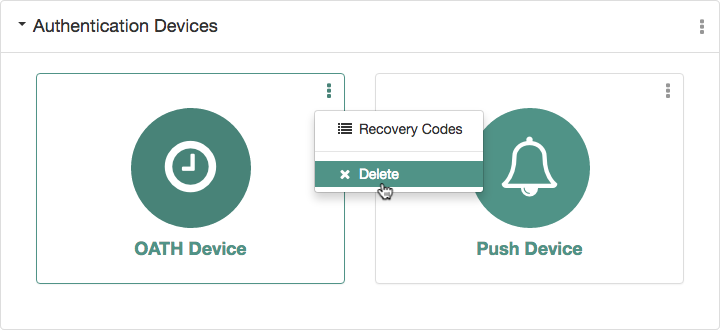
Users who do not save recovery codes or who run out of recovery codes and cannot authenticate to AM without a verification code require administrative support to reset their device profiles. See "Resetting Registered Devices by using REST" for more information.
If you repeatedly enter valid one-time passwords that appear to be valid passwords, but AM rejects the passwords as unauthorized, it is likely that your device has become out of sync with AM.
When a registered device becomes out of sync with AM, you must authenticate to AM using a recovery code, delete your device, and then re-register your device. You can do so by performing the steps in "To Register a New Device After Losing a Registered Device".
Users who do not save recovery codes or who run out of recovery codes and cannot authenticate to AM without a verification code require administrative support to reset their device profiles. See "Resetting Registered Devices by using REST" for more information.
As described in "Recovering After Replacing a Lost Device", a user who has lost a mobile phone registered with AM can register a replacement device by authenticating using a recovery code, deleting their existing device, and then re-registering a new device.
Additional support is required for users who lose mobile phones but did not save their recovery codes when they initially registered the phone, and for users who have used up all their recovery codes.
AM provides a REST API to reset a device profile by deleting information about a user's registered device. Either the user or an administrator can call the REST API to reset a device profile. Device profile reset can be implemented as follows:
Administrators provide authenticated users with a self-service page that calls the REST API to let the users reset their own device profiles.
Administrators can call the REST API themselves to reset users' device profiles.
Administrators can call the REST API themselves to reset a device when the HOTP counter exceeds the HOTP threshold window and requires a reset.
Note
The reset action deletes the OATH device profile, which by default has a limit of one profile per device, and sets the
Select to Enable Skipoption to its default value ofNot Set.
Reset OATH Devices
To reset a user's OATH device profile, perform an HTTP POST to the
/users/user/devices/2fa/oath?_action=reset
endpoint.
When making a REST API call, specify the realm in the path component of the
endpoint. You must specify the entire hierarchy of the realm, starting at the top-level realm.
Prefix each realm in the hierarchy with the realms/ keyword. For example
/realms/root/realms/customers/realms/europe.
The following example resets the OATH devices of a user named
myUser in a subrealm of the top-level realm called
mySubrealm:
$ curl \
--request POST \
--header "Content-Type: application/json" \
--header "Accept-API-Version: resource=1.0" \
--header "iplanetDirectoryPro: AQIC5w...2NzEz*" \
--data '{}' \
https://openam.example.com:8443/openam/json/realms/root/realms/mySubrealm/users/myUser/devices/2fa/oath?_action=reset
{
    "result":true
}
Reset Push Devices
To reset push devices over REST, perform an HTTP POST to the
/users/user/devices/push?_action=reset
endpoint as follows:
$ curl \
--request POST \
--header "Content-Type: application/json" \
--header "Accept-API-Version: resource=1.0" \
--header "iplanetDirectoryPro: AQIC5w...2NzEz*" \
--data '{}' \
http://openam.example.com:8080/openam/json/realms/root/realms/mySubrealm/users/myUSER/devices/push?_action=reset"
{
    "result":true
}This section provides an example of how end users might authenticate with AM configured for multi-factor authentication. Use the following procedures to complete multi-factor authentication using the ForgeRock Authenticator:
| • "To Perform Authentication using a One-Time Password" |
| • "To Perform Authentication using Push Notifications" |
This example uses the authentication chain as created in "Creating Authentication Chains for One-Time Password Authentication".
Because the first module in the authentication chain is a Data Store module, AM presents you with a page for entering your user ID and password. After you provide those credentials, AM verifies them. If your credentials are valid, AM proceeds to the ForgeRock Authenticator (OATH) authentication module.
On the ForgeRock Authenticator (OATH) screen, follow these steps to complete one-time password authentication:
On your registered device, open the ForgeRock Authenticator app, and then tap the account matching the user ID you entered earlier. The registered authentication methods for that account are displayed:
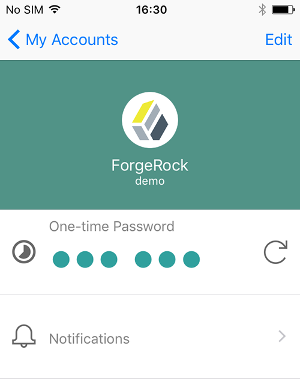
In the One-time Password section, click the refresh icon. A one-time password is displayed:
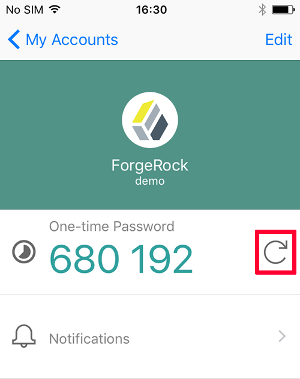
On the ForgeRock Authenticator (OATH) page in AM, enter the one-time password that the authenticator app generated on your phone, and then click Submit:

AM will display the user's profile page.


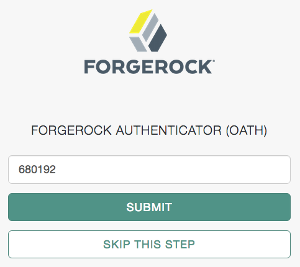
This example uses one of the authentication chains as created in "Creating Authentication Chains for Push Authentication".
AM presents you with a page for entering only your user ID, or user ID and password. After you provide those credentials, AM verifies them. If your credentials are valid and the account has a device registered for push notifications, AM proceeds to the ForgeRock Authenticator (Push) authentication module, and a push notification is sent to the registered device.
Note
The device needs access to the Internet to receive push notifications, and the AM server must be able to receive responses from the device.
Follow these steps to complete authentication using push notifications:
On your registered device, you will receive a push notification from AM. Depending on the state of the phone and the ForgeRock Authenticator app, respond to the notification as follows:
If the phone is locked, the notification may appear similar to the following:

Slide the notification across the screen, then unlock the phone. The ForgeRock Authenticator app will automatically open and display the push notification authentication screen.
If the phone is not locked, and the ForgeRock Authenticator app is not open, the notification may appear similar to the following:

Tap the notification. The ForgeRock Authenticator app will automatically open and display the push notification authentication screen.
If the phone is not locked, and the ForgeRock Authenticator app is open, the app will open the push notification authentication screen automatically.
On the push notification authentication screen, you can approve the request or deny it:
Slide the switch with a checkmark on horizontally to the right.
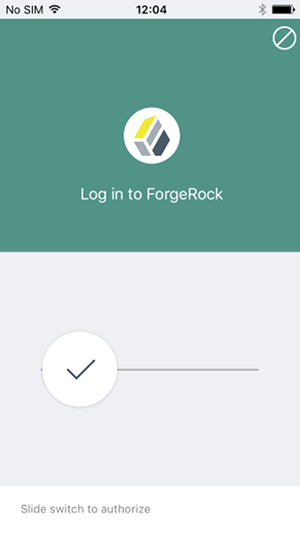
AM will display the user's profile page.
If the registered device supports Touch ID, and fingerprints have been provided, you can approve the request by using a registered fingerprint.

AM will display the user's profile page.
To deny the request, tap the cancel icon in the top-right of the screen, or if Touch ID is enabled, click the Cancel button.
After a timeout has passed, AM will report that authentication has failed and return to the first screen in the chain.
Note
If you do not approve or deny the request on the registered device, the AM Push Authentication page will timeout and the authentication will fail. The timeout can be configured in the ForgeRock Authenticator (Push) authentication module settings. See "ForgeRock Authenticator (Push) Authentication Module".


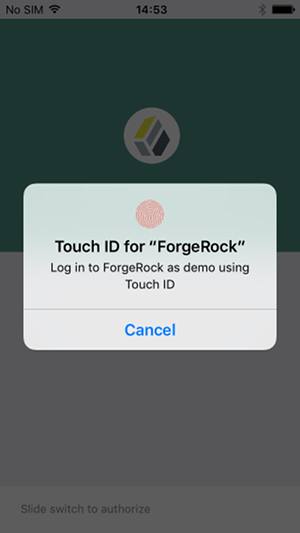
[5] For information about making the usage of one-time passwords mandatory in AM, see "Letting Users Opt Out of One-Time Password Authentication".
Account lockout is a security mechanism that locks a user after repeated failed login attempts.
Most deployments implement the backend user store's password policy to control account lockout. If that is not an option to your deployment, you can configure account lockout.
Note
Account lockout settings only apply to authentication modules and chains.
To implement account lockout in authentication trees, use an Account lockout Node together with a Retry Limit Decision Node.
AM supports two different approaches to account lockout, where AM locks an account after repeated authentication failures—persistent lockout and memory lockout:
Persistent (physical) lockout sets the user account status to
inactivein the user profile. For persistent lockout, AM tracks failed authentication attempts by writing to the user repository.Persistent account lockout works independently of account lockout mechanisms in the underlying directory server that serves as the user data store.
Memory lockout locks the user account, keeping track of the locked state only in memory, and then unlocking the account after a specified delay. Memory lockout is also released when AM restarts.
Note
Failed login attempts during the transactional authorization flow do not increment account lockout counters. For more information on transactional authorization, see "Implementing Transactional Authorization" in the Authorization Guide.
If login failures are stored in AM's memory, this may result in user accounts not being locked out even after multiple login failures. To avoid this issue, make sure to implement persistent lockout instead. For more information, see "Configuring Account Lockout".
This chapter describes how to configure account lockout in AM.
You configure account lockout by editing settings for the core authentication module. For details, see "Setting up a Realm for Authentication".
Access the settings in the AM console under Realms > Realm Name > Authentication > Settings > Account Lockout.
Enable lockout by checking Login Failure Lockout Mode, setting the number of attempts, and setting the lockout interval and duration.
You can also opt to warn users after several consecutive failures, or to multiply the lockout duration on each successive lockout.
(Optional) If you have configured CTS-based or client-based authentication sessions, ensure the Store Invalid Attempts in Data Store switch is enabled. Failure to do so may result in users not being locked out even after multiple login failures.
To save account login failures to the Data Store, enable Store Invalid Attempts in Data Store. This step is necessary when using CTS-based or client-based authentication sessions.
You can set up email notification upon lockout to an administrator if AM is configured to send mail. You can configure AM to send mail in Configure > Server Defaults > General > Mail Server.
For persistent lockout, AM sets the value of the user's
inetuserstatusprofile attribute toinactive. You can also specify another attribute to update on lockout. You can further set a non-default attribute on which to store the number of failed authentication attempts. When you do store the number of failed attempts in the data store, other AM servers accessing the user data store can also see the number.
Note
To unlock a user's account, find the user under Realms > Realm Name > Identities. Select the user you want to unlock, and set the user's User Status to Active. Save your changes.
Before you configure sessions in your environment, ensure you are familiar with the differences between sessions and authentication sessions, and where they are stored. For more information, see "About Sessions".
You can configure authentication session storage location independently from session storage location. For example, you could configure the same realm for client-based authentication sessions and CTS-based sessions if it suits your environment.
To configure sessions, see the following sections:
| • "Implementing CTS-Based Sessions" |
| • "Implementing Client-Based Sessions" |
| • "Implementing In-Memory Authentication Sessions" |
To configure authentication session whitelisting, a feature that protects authentication sessions from replay attacks, see "Implementing Authentication Session Whitelisting".
By default, AM configures the CTS token store schema in the AM configuration store. Before configuring your AM deployment to use CTS-based sessions or authentication sessions, we recommend you install and configure an external CTS token store. For more information, see "Implementing the Core Token Service" in the Installation Guide.
CTS-based sessions and authentication sessions benefit from configuring sticky load balancing. For more information, see "Configuring Load Balancing for a Site" in the Installation Guide.
To configure CTS-based sessions and authentication sessions, see the following procedures:
To configure session quotas, a feature that lets you limit the amount of active sessions for a user, see "Implementing Session Quotas".
Important
Configuring storage location for authentication sessions is only supported for authentication trees. Authentication chains always store authentication sessions in AM's memory. For more information, see "Session Storage Location".
Log in to the AM console as an administrative user, for example,
amAdmin.Navigate to Realms > Realm Name > Authentication > Settings > Trees.
From the Authentication session state management scheme drop-down list, select
CTS.In the Max duration (minutes) field, enter the maximum life of the authentication session in minutes.
Save your changes.
Navigate to Configure > Authentication > Core > Security.
In the Organization Authentication Signing Secret field, enter a base64-encoded HMAC secret that AM uses to sign the JWT that is passed back and forth between the client and AM during the authentication process. The secret must be, at least, 128-bits in length.
Save your changes.
Log in to the AM console as an administrative user, for example,
amAdmin.Navigate to Realms > Realm Name > Authentication > Settings > General.
Ensure the Use Client-based Sessions check box is not selected.
Save your changes.
Verify that AM creates a CTS-based session when non-administrative users authenticate to the realm. Perform the following steps:
Authenticate to AM as a non-administrative user in the realm you enabled for CTS-based sessions.
In a different browser, authenticate to AM as an administrative user, for example,
amAdmin.Navigate to Realms > Realm Name > Sessions.
Verify that a session is present for the non-administrative user.
AM lets you limit the number of active sessions for a user by setting session quotas. You also configure session quota exhaustion actions so that when a user goes beyond the session quota, AM takes the appropriate action.
AM's support for session quotas requires CTS-based sessions.
The session quota applies to all sessions opened for the same user (as represented by the user's universal identifier). To configure:
Log in to the AM console as an administrative user, for example,
amAdmin.Navigate to Configure > Global Services > Sessions.
Set Enable Quota Constraints to
ON.Set Resulting behavior if session quota exhausted.
The following settings are available by default:
DENY_ACCESSDeny access, preventing the user from creating an additional session.
DESTROY_NEXT_EXPIRINGRemove the next session to expire, and create a new session for the user. The next session to expire is the session with the minimum time left until expiration.
This is the default setting.
DESTROY_OLDEST_SESSIONRemove the oldest session, and create a new session for the user.
DESTROY_OLD_SESSIONSRemove all existing sessions, and create a new session for the user.
If none of these session quota exhaustion actions fit your deployment, you can implement a custom session quota exhaustion action. For an example, see "Customizing CTS-Based Session Quota Exhaustion Actions".
Set Active User Sessions to the session quota.
The default is 5 sessions.
Save your work.
To configure client-based sessions and authentication sessions for a realm, see the following sections:
Before configuring your AM deployment to use client-based sessions or client-based authentication sessions, perform the following tasks:
Ensure the trust store used by AM has the necessary certificates installed:
A certificate is required for encrypting JWTs containing client-based sessions.
If you are using RS256 signing, then a certificate is required to sign JWTs. (HMAC signing uses a shared secret.)
The same certificates must be stored on all servers participating in an AM site.
For more information about managing certificates for AM, see "Setting Up Keys and Keystores" in the Setup and Maintenance Guide.
Ensure that your users' browsers can accommodate larger session cookie sizes required by client-based sessions. For more information about session cookie sizes, see "Session Cookies".
Ensure that the AM web container can accommodate an HTTP header that is 16K in size or greater. When using Apache Tomcat as the AM web container, configure the
server.xmlfile'smaxHttpHeaderSizeproperty to16384or higher.Ensure that your deployment does not require any of the capabilities specified in the list of limitations that apply to client-based sessions.
To configure client-based sessions and authentication sessions, see the following procedures:
Important
Configuring storage location for authentication sessions is only supported for authentication trees. Authentication chains always store authentication sessions in AM's memory. For more information, see "Session Storage Location".
Log in to the AM console as an administrative user, for example,
amAdmin.Navigate to Realms > Realm Name > Authentication > Settings > Trees.
From the Authentication session state management scheme drop-down list, select
JWT.In the Max duration (minutes) field, enter the maximum life of the authentication session in minutes.
Save your changes.
Navigate to Configure > Authentication > Core > Security.
In the Organization Authentication Signing Secret field, enter a base64-encoded HMAC secret that AM uses to sign the JWT that is passed back and forth between the client and AM during the authentication process. The secret must be, at least, 128-bits in length.
Save your changes.
Log in to the AM console as an administrative user, for example,
amAdmin.Navigate to Realms > Realm Name > Authentication > Settings > General.
Select the Use Client-based Sessions check box.
Save your changes.
Verify that AM creates a client-based session when non-administrative users authenticate to the realm. Perform the following steps:
Authenticate to the AM console as the top-level administrator (by default, the
amAdminuser). Note that sessions for the top-level administrator are always stored in the CTS token store.Navigate to Realms > Realm Name > Sessions.
Verify that a session is present for the
amAdminuser.In your browser, examine the AM cookie, named
iPlanetDirectoryProby default. Copy and paste the cookie's value into a text file and note its size.Start up a private browser session that will not have access to the
iPlanetDirectoryProcookie for theamAdminuser:On Chrome, open an incognito window.
On Internet Explorer or Microsoft Edge, start InPrivate browsing.
On Firefox, open a new private window.
On Safari, open a new private window.
Authenticate to AM as a non-administrative user in the realm for which you enabled client-based sessions. Be sure not to authenticate as the
amAdminuser this time.In your browser, examine the
iPlanetDirectoryProcookie. Copy and paste the cookie's value into a second text file and note its size. The size of the client-based session cookie's value should be considerably larger than the size of the cookie used by the CTS-based session for theamAdminuser. If the cookie is not larger, you have not enabled client-based sessions correctly.Return to the original browser window in which the AM console appears.
Refresh the window containing the Sessions page.
Verify that a session still appears for the
amAdminuser, but that no session appears for the non-administrative user in the realm with client-based sessions enabled.
When using client-based sessions and authentication sessions, you should configure AM to sign and/or encrypt the JWT containing session information:
AM verifies that the JWT is authentic by validating a signature configured in the Session Service. AM thwarts attackers who might attempt to tamper with the contents of the JWT or its signature, or who might attempt to sign the JWT with an incorrect signature.
Knowledgeable users can easily decode JWTs. Because an AM session or authentication session contains information that might be considered sensitive, encrypting the JWT that contains it protects its contents, ensuring opaqueness.
Encrypting the JWT prevents man-in-the-middle attacks that could log the state of every AM session. Encryption also ensures that end users are unable to access the information in their AM session.
Signing and encryption require certificates and shared secrets. When deploying multiple AM servers in a site, every server must have the same security configuration. Shared secrets and security keys must be identical. If you modify shared secrets or keys, you must update all the servers in the site. For more information about managing certificates for AM, see "Setting Up Keys and Keystores" in the Setup and Maintenance Guide.
Client-based sessions and authentication sessions share the same encryption and signing configuration for the realm.
Important
To ensure that the client-based session cookie size does not surpass the browser supported size, Web Agents 5.x and Java Agents 5.x do not support both signing and encrypting the session cookie. For more information, see "Configure Client-Based Session Security for Agents".
The following sections provide detailed steps for configuring client-based session and authentication session cookie security:
Configure a JWT signature to prevent malicious tampering of client-based session and authentication session JWTs.
Perform the following steps to configure the JWT signature:
Navigate to Configure > Global Services > Session > Client-based Sessions.
From the Signing Algorithm Type drop-down list, select one of the following algorithms:
• HS256. HMAC using SHA-256 • HS384. HMAC using SHA-384 • HS512. HMAC using SHA-512 • RS256. RSASSA-PKCS1-v1_5 using SHA-256 • ES256. ECDSA using SHA-256 and NIST standard P-256 elliptic curve • ES384. ECDSA using SHA-384 and NIST standard P-384 elliptic curve • ES512. ECDSA using SHA-512 and NIST standard P-521 elliptic curve The default value is
RS256.Note
You should disable signing the JWT if you plan to encrypt the JWT with the Direct AES Encryption algorithm. To disable JWT signing, perform the following steps:
Navigate to Deployment > Servers > Server Name > Advanced.
Set the
org.forgerock.openam.session.stateless.signing.allownoneproperty totrue.Save your changes.
Navigate to Configure > Global Services > Session > Client-based Sessions.
From the Signing Algorithm Type drop-down list, select
NONE.Save your changes.
If you specified an HMAC signing algorithm, change the value in the Signing HMAC Shared Secret field if you do not want to use the generated default value.
If you specified the RS256 signing algorithm, specify a value in the Encryption RSA Certificate Alias field to use for signing the JWT signature.
Save your changes.
For detailed information about Session Service configuration attributes, see the entries for "Session" in the Reference.
Configure JWT encryption to prevent man-in-the-middle attackers from accessing users' session details, and to prevent end users from examining the content in the JWT.
Perform the following steps to encrypt the JWT:
Navigate to Configure > Global Services > Session > Client-based Sessions.
From the Encryption Algorithm drop-down list, select one of the following algorithms:
NONE. No encryption algorithm is selected.
RSA. Session content is encrypted with AES using a unique key. The key is then encrypted with an RSA public key and appended to the JWT.
AES KeyWrapping. Session content is encrypted with AES using a unique key and is then wrapped using AES key wrap and the master key. This algorithm provides additional security, compared to RSA, at the cost of 128 or 256 bits (or 32 bytes) depending on the size of the master key. It also provides authenticated encryption, which removes the need for a separate signature and decreases the byte size of the JWT.
Direct AES Encryption. Session content is encrypted with direct AES encryption with a symmetric key. This method provides authenticated encryption, which removes the need for a separate signature and decreases the byte size of the JWT.
If you selected
RSAin the previous step, you can select one of three padding options using the advanced propertyorg.forgerock.openam.session.stateless.rsa.padding:• RSA1_5. RSA with PKCS#1 v1.5 padding. • RSA-OAEP. RSA with OAEP and SHA-1. • RSA-OAEP-256. RSA with OAEP padding and SHA-256. In the AM console, select Configure > Server Defaults > Advanced.
In the Add a Value field, enter:
org.forgerock.openam.session.stateless.rsa.padding.In the corresponding Add a Value field, enter one of the padding options. For example,
RSA-OAEP. The default isRSA-OAEP-256.Click the plus sign ("+"), and then click Save Changes.
For the underlying content encryption method, select one of the following encryption methods supported in AM:
• A128CBC-HS256. AES 128-bit in CBC mode with HMAC-SHA-256-128 hash (HS256 truncated to 128 bits) • A192CBC-HS384. AES 192-bit in CBC mode with HMAC-SHA-384-192 hash (HS384 truncated to 192 bits) • A256CBC-HS512. AES 256-bit in CBC mode with HMAC-SHA-512-256 hash (HS512 truncated to 256 bits) • A128GCM. AES 128-bit in GCM mode • A192GCM. AES 192-bit in GCM mode • A256GCM. AES 256-bit in GCM mode In the AM console, select Configure > Server Defaults > Advanced.
In the Add a Value field, enter:
org.forgerock.openam.session.stateless.encryption.method.In the corresponding Add a Value field, enter one of the padding options. For example,
A128CBC-HS512. The default isA128CBC-HS256.Click the plus sign ("+"), and then click Save Changes.
In the Encryption RSA Certificate Alias field, enter an alias value to use for encrypting the JWT signature.
AM retrieves the certificate from the keystore specified by the
com.sun.identity.saml.xmlsig.keystoreproperty.If you selected AES KeyWrapping or Direct AES Encryption, enter the key in the Encryption Symmetric AES Key field.
This should be a base64-encoded random key. For direct encryption with AES-GCM or for AES-KeyWrap with any content encryption method, this should be 128, 192 or 256 bits.
For direct encryption with AES-CBC-HMAC it should be double those sizes (one half for the AES key, the other half for the HMAC key). AES key sizes greater than 128 bits require installation of the JCE Unlimited Strength policy files in your JRE.
Save your changes.
Ensure that the JWT signature configuration is identical on every AM server in your AM site.
(Optional) To compress the session state, select
Deflate Compressionfrom the Compression Algorithm drop-down list.Warning
When set to
Deflate compression, this option may lead to possible vulnerability with session state information leakage. Because the session token compression depends on the data in the session, an attacker can vary one part of the session (for example, the username or some other property) and then deduce some secret parts of the session state by examining how the session compresses. You should evaluate this threat depending on your use cases before enabling compression and encryption together.
For detailed information about Session Service configuration attributes, see the entries for "Session" in the Reference.
AM supports Elliptic Curve Digital Signature Algorithms (ECDSA) as an alternative to RSA cryptography (RS256) or HMAC with SHA (HS256, HS384, HS512) signatures (see the JSON Web Algorithms specification, RFC 7518). The elliptic curve algorithms provide smaller key lengths for the same level of security that RSA provides (256-bit elliptic curve key vs 2048-bits RSA). The smaller key lengths result in faster signature and key generation times, and faster data transmission over TLS. One disadvantage for ECDSA is that signature verification can be significantly slower on the JVM.
AM supports the following elliptic curve signature algorithms:
ES256. Elliptic Curve Digital Signature Algorithm (ECDSA) using SHA-256 hashes and the NIST standard P-256 elliptic curve. For more information on the NIST curves, see Digital Signature Standard (DSS).
ES384. ECDSA using SHA-384 hashes and NIST standard P-384 curve.
ES512. ECDSA using SHA-512 hashes and NIST standard P-521 curve.
Generate the public and private keys to use with the ECDSA algorithms using the standard curves parameters. You can use keytool to generate these key pairs. The following examples use a JCEKS keystore to store the keys:
To generate an ES256-compatible keypair (picks the P-256 NIST curve):
$ keytool -genkeypair -keystore mykeystore.jceks -alias ecdsa-test-cert -storepass xxx \
 -keypass yyy -dname 'CN=...' -storetype JCEKS -keyalg ec -keysize 256 \
 -validity 365
To generate an ES384-compatible keypair (picks the P-384 NIST curve):
$ keytool -genkeypair -keystore mykeystore.jceks -alias ecdsa-test-cert -storepass xxx \
 -keypass yyy -dname 'CN=...' -storetype JCEKS  -keyalg ec -keysize 384 \
 -validity 365
To generate an ES512-compatible keypair (picks the P-521 NIST curve):
$ keytool -genkeypair -keystore mykeystore.jceks -alias ecdsa-test-cert -storepass xxx \
 -keypass yyy -dname 'CN=...' -storetype JCEKS  -keyalg ec -keysize 521 \
 -validity 365
Note
For ES512, the
-keysizeis521, not512.
Configure the ECDSA on AM:
On the AM console, navigate to Configure > Global Services > Session. Click the Client-based Session tab.
From the Signing Algorithm Type drop-down list, select the ECDSA algorithm that matches the alias in your keystore. For example, select
ES256if you generated a ES256-compatible keypair.In the Signing RSA/ECDSA Certificate Alias field, enter the certificate alias that points to the ECDSA keypair.
Save your changes.
To ensure that the client-based session cookie size does not surpass the browser supported size, Web Agents 5.x and Java Agents 5.x do not support both signing and encrypting the session cookie. To configure agents with client-based sessions, implement one of the following configurations:
Configure signing and compression:
Enable HS256 signing for the client-based session cookie. For more information, see "To Configure the JWT Signature".
Enable compression by navigating to Configure > Global Services > Session > Client-based Sessions and selecting
Deflate Compressionfrom the Compression Algorithm drop-down.
Configure encryption and compression:
Set the
org.forgerock.openam.session.stateless.signing.allownoneadvanced server property totrueon every AM instance in the site.Disable signing for the client-based session cookie by navigating to Configure > Global Services > Session > Client-based Sessions and selecting
NONEfrom the Signing Algorithm Type drop-down.Enable Direct AES Encryption. For more information, see "To Configure JWT Encryption".
Enable compression by navigating to Configure > Global Services > Session > Client-based Sessions and selecting
Deflate Compressionfrom the Compression Algorithm drop-down.
Failure to set up client-based sessions correctly may cause unexpected errors when accessing a protected resource, such as blank pages and redirection loops.
Client-based sessions do not support restricted tokens. Therefore, Web Agents 5.x and Java Agents 5.x configured in a realm configured for client-based sessions are not protected against cookie hijacking. ForgeRock recommends using web or Java agents with CTS-based sessions.
Session blacklisting ensures that users who have logged out of client-based sessions cannot achieve single sign-on without reauthenticating to AM. Session blacklisting does not apply to authentication sessions.
Perform the following steps to configure session blacklisting:
Make sure that you deployed the Core Token Service during AM installation. The session blacklist is stored in the Core Token Service's token store.
Navigate to Configure > Global Services, click Session, and then locate the Client-based Sessions section.
Select the Enable Session Blacklisting option to enable session blacklisting for client-based sessions. When you configure one or more AM realms for client-based sessions, you should enable session blacklisting in order to track session logouts across multiple AM servers.
Configure the Session Blacklist Cache Size property.
AM maintains a cache of logged out client-based sessions. The cache size should be around the number of logouts expected in the maximum session time. Change the default value of 10,000 when the expected number of logouts during the maximum session time is an order of magnitude greater than 10,000. An underconfigured session blacklist cache causes AM to read blacklist entries from the Core Token Service store instead of obtaining them from cache, which results in a small performance degradation.
Configure the Blacklist Poll Interval property.
AM polls the Core Token Service for changes to logged out sessions if session blacklisting is enabled. By default, the polling interval is 60 seconds. The longer the polling interval, the more time a malicious user has to connect to other AM servers in a cluster and make use of a stolen session cookie. Shortening the polling interval improves the security for logged out sessions, but might incur a minimal decrease in overall AM performance due to increased network activity.
Configure the Blacklist Purge Delay property.
When session blacklisting is enabled, AM tracks each logged out session for the maximum session time plus the blacklist purge delay. For example, if a session has a maximum time of 120 minutes and the blacklist purge delay is one minute, then AM tracks the session for 121 minutes. Increase the blacklist purge delay if you expect system clock skews in a cluster of AM servers to be greater than one minute. There is no need to increase the blacklist purge delay for servers running a clock synchronization protocol, such as Network Time Protocol.
Click Save.
For detailed information about Session Service configuration attributes, see the entries for "Session" in the Reference.
The following AM features are not supported in realms that use client-based sessions:
Session quotas. See "Implementing Session Quotas".
Session idle timeout. See "Session Termination".
Cross-domain single sign-on (web and Java Agents earlier than version 5). See "Cross-Domain SSO".
Cross-domain single sign-on with restricted tokens (Web Agents 5.x and Java Agents 5.x). See "Protecting Against Cookie Hijacking".
Both session signing and encryption (Web Agents 5.x and and Java Agents 5.x). See "Configure Client-Based Session Security for Agents".
Uncompressed sessions (Web Agents 5.x and Java Agents 5.x). See "Configure Client-Based Session Security for Agents".
SAML v2.0 single logout using the SOAP binding. See "AM Deployment Requirements for SAML v2.0" in the SAML v2.0 Guide.
SAML 1.x single sign-on. See the SAML v1.x Guide.
SNMP session monitoring. See "SNMP Monitoring for Sessions" in the Setup and Maintenance Guide.
Session management by using the AM console. See "Managing Sessions" in the Setup and Maintenance Guide.
Session notification. See "Session" in the Reference.
Authentication chains always store authentication sessions in AM's memory. Perform the steps in the following procedure only for realms that configure authentication trees:
Ensure you have configured AM for sticky load-balancing. For more information, see "Configuring Load Balancing for a Site" in the Installation Guide.
Log in to the AM console as an administrative user, for example,
amAdmin.Navigate to Realms > Realm Name > Authentication > Settings > Trees.
From the Authentication session state management scheme drop-down list, select
In-Memory.In the Max duration (minutes) field, enter the maximum life of the authentication session in minutes.
Save your changes.
Navigate to Configure > Authentication > Core > Security.
In the Organization Authentication Signing Secret field, enter a base64-encoded HMAC secret that AM uses to sign the JWT that is passed back and forth between the client and AM during the authentication process. The secret must be, at least, 128-bits in length.
Save your changes.
Enable authentication session whitelisting to protect authentication sessions from replay attacks.
When authentication session whitelisting is enabled, AM generates a key-value pair for each authentication session and stores it for the length of the authentication flow in the following ways:
For client-based authentication sessions, AM stores the key-value pair in the CTS token store.
For CTS-based authentication sessions, AM creates the key-value pair as a session property in the authentication session.
For in-memory sessions, AM creates the key-value pair as a session property in the authentication session.
Each time the authentication flow reaches an authentication node, AM modifies the value of the stored key-value pair and sends it to the user or client that it is authenticating. The next request to AM to continue the authentication flow must contain the key-value pair and must match the value expected by AM.
If the authenticating user or client cannot provide the key-value pair with the values AM expects, AM would not continue the authentication flow, therefore protecting the authentication flow against malicious users wanting to rewind the authentication flow to a previous node.
Perform the following steps to configure authentication session whitelisting:
Navigate to Realms > Realm Name > Authentication > Settings > Trees.
Select Enable whitelisting.
Save your changes.
Single sign-on (SSO) allows a user or an entity to access multiple independent services from a single login session. AM supports SSO on the domain level and across multiple domains using cross-domain single sign-on (CDSSO).
To understand how SSO works, you need to understand some key elements of the HTTP cookie, as described in RFC 6525, HTTP State Management Mechanism .
Within an HTTP cookie, you can store a single custom
name=value
pair, such as
sessionid=value.
Other custom names within a cookie are as follows:
- Domain
Normally set to the full URL that was used to access the configurator. To work with multiple subdomains, the
Domainshould be set to a URL likeDomain=server.example.net. This is also known as the cookie domain.- Path
The directory in the URL to which the cookie applies. If the
Path=/openam, the cookie applies to the/openamsubdirectory of the URL, and lower level directories, includingopenam/XUI.- Secure
If the
Securename is included, the cookie can be transferred only over HTTPS. When a request is made over HTTP, the cookie is not made available to the application.- HttpOnly
When the
HttpOnlyflag is included, that cookie will not be accessible through JavaScript. According to RFC 6265, the noted flag "instructs the user agent to omit the cookie when providing access to cookies via 'non-HTTP' APIs (for example, a web browser API that exposes cookies to scripts)."For more information, see "Configuring HttpOnly".
- Expires
The lifetime of a cookie can be limited, with an
Expiresname configured with a time, based on UTC (GMT).
Warning
Do not take a shortcut with a top-level domain. Web browser
clients today are designed to ignore cookies set to top-level domains including
com, net, and co.uk.
In addition, a cookie with a value like Domain=
app1.example.net will not work for similar subdomains, such as
app2.example.net.
AM supports an HttpOnly flag, which is affixed to
the Set-cookie HTTP response header transmitted
from the server to the browser. The HttpOnly flag mitigates against
cross-site scripting (XSS) vulnerabilities that can be exploited through JavaScript
or other scripting languages.
When the HttpOnly flag is enabled:
AM sets the token as HttpOnly. For example, AM returns a
Set-Cookieheader upon successful authentication. When HttpOnly is enabled, the header will include anHttpOnlyflag with the original token in the payload of theSet-Cookieheader as shown in the following example:Set-Cookie: iPlanetDirectoryPro='AQIC5..*; Domain=example.com; Path=/; HttpOnly ...
When an invalid token is detected during the authentication process, the token is ignored and authentication continues. An additional
Set-Cookieheader is set to remove the invalid token from the client.Upon logout, the session cookie on the client is cleared by the
Set-Cookieheader in the response. For example:Set-Cookie: iPlanetDirectoryPro=""; Expires=Thu, 01 Jan 1970 00:00:10 GMT; Path=/; Domain=example.com; HttpOnly Set-Cookie: amlbcookie=LOGOUT; Expires=Thu, 01 Jan 1970 00:00:10 GMT; Path=/; Domain=example.com ...
The User self-service auto login feature during the user registration process returns a
Set-Cookieheader in the response.Session upgrade automatically occurs upon the current SSO token when the authentication flow is called again and the token was previously passed in.
Perform the following steps to configure the HttpOnly flag:
Log into the AM console as an administrator.
In the AM console, navigate to Configure > Server Defaults > Advanced.
Set the value of the
com.sun.identity.cookie.httponlyproperty totrue.Save your changes, and restart the AM instances.
CDSSO provides SSO capabilities for AM servers and web or Java agents within a single domain or across domains in the same organization. For general information about how CDSSO works in AM, see "Cross-Domain SSO".
Implementing CDSSO in AM requires a working web or Java agent 5 and little to none additional configuration:
Install and configure an appropriate web or Java agent for your environment. For more information, see the ForgeRock Access Management Web Agents User Guide and the ForgeRock Access Management Java Agents User Guide.
Make sure that the clocks on the servers where you run AM and agents are synchronized. This ensures the timestamps stored in the web or Java agent and AM logs are consistent.
Navigate to Realms > Realm Name > Applications > Agents > Web / Java > Agent Name > SSO.
(Optional) To protect the SSO token from network snooping:
For web agents, enable Cookie Security (
com.sun.identity.agents.config.cookie.secure.For Java agents, enable CDSSO Secure Enable (
com.sun.identity.agents.config.cdsso.secure.enable).
(Optional) If AM and the web or Java agent are configured in different DNS domains, add the agent domain to the CDSSO list:
For web agents, configure the agent domain in the Cookies Domain List property.
For Java agents, configure the agent domain in the CDSSO Domain List property (
com.sun.identity.agents.config.cdsso.domain).
(Optional) If necessary, update the Agent Root URL for CDSSO list on the Global tab page:
Navigate to Realms > Realm Name > Applications > Agents > Web / Java > Agent Name > Global.
Update the Agent Root URL for CDSSO list (
sunIdentityServerDeviceKeyValue):If the web or Java agent is on a server with virtual host names, add the virtual host URLs to the list.
If the web or Java agent is behind a load balancer, add the load balancer URL to the list.
Protect your environment against cookie hijacking by configuring restricted tokens. See "Protecting Against Cookie Hijacking".
A malicious user who steals a CDSSO cookie can potentially use it
to access any realms that session has logged into, which may span
multiple domains. For example, a token stolen from myapp.example.com
could be used to access payroll.internal.com
or any other protected domain in the same realm. Cookie hijacking protection
restricts cookies to the fully-qualified domain
name (FQDN) of the host where they are issued, such as
openam-server.example.com and
server-with-agent.example.com, using CDSSO to handle
authentication and authorization.
For CDSSO with cookie hijacking protection, when a client successfully authenticates, AM issues the master SSO token cookie for its FQDN. AM issues restricted token cookies for the other FQDNs where the web or Java agents reside. The client ends up with cookies having different session identifiers for different FQDNs, and the AM server stores the correlation between the master SSO token and restricted tokens, such that the client only has one master session internally in AM.
To protect against cookie hijacking, you restrict the AM server domain to the server where AM runs. This sets the domain of the SSO token cookie to the host running the AM server that issued the token. You also enable use of a unique SSO token cookie. For your Java agents, you enable use of the unique SSO token cookie in the agent configuration.
Important
Client-based sessions do not support restricted tokens. Therefore, Web Agents 5.x and Java Agents 5.x configured in a realm configured for client-based sessions are not protected against cookie hijacking. ForgeRock recommends using web or Java agents with CTS-based sessions.
In the AM console, navigate to Configure > Global Services > Platform.
Remove all domains from the Cookies Domains list.
Save your work.
Navigate to Configure > Server Defaults > Advanced.
Set the
com.sun.identity.enableUniqueSSOTokenCookieadvanced property totrue.Save your work.
Restart AM or the container in which it runs for the configuration changes to take effect.
This section contains procedures about configuring AM for legacy single domain and cross-domain SSO, for example, for web or Java agents earlier than 5.
The federation mechanism associated with SAML v2.0 can be used as an alternative to CDSSO for both Web and Java agents. While using SAML v2.0 adds complexity, it supports attribute mapping, which may be useful when the two domains are associated with data stores that use different attribute names. For details, see "Using Web or Java Agents with SAML v2.0 SSO and SLO" in the SAML v2.0 Guide.
This section describes how to configure AM for classic SSO on a single domain, for example, when using web or Java agents earlier than version 5. For general information about how classic single domain SSO works in AM, see "Classic Single Domain SSO".
The following procedure assumes that you know how to configure AM, the Apache Web server, and associated AM Apache agent.
Install and configure an appropriate web or Java agent of a version earlier than 5. For more information, see the ForgeRock Access Management Web Agents documentation and the ForgeRock Access Management Java Agents documentation.
Ensure you have configured the SSO domain, for example,
example.net, in AM:Navigate to Configure > Global Services > Platform.
Check if your cookie domain is present in the Cookie Domains field. If not present, configure it, save your changes, and restart AM.
Navigate to a URL protected by the agent, for example,
http://app.example.net. You should be redirected to AM for authentication and returned back to the protected resource once AM verifies your credentials.
If you want to configure AM and an application on two different cookie
domains, such as example.org and example.net,
you need to set up cross-domain SSO (CDSSO). For more information, see
"Implementing Cross-Domain Single Sign-On".
This section describes how to configure AM for classic CDSSO, which concerns web or Java agents earlier than version 5. For general information about how classic CDSSO works in AM, see "Classic Cross-Domain SSO".
Important
When implementing classic CDSSO, protect against session cookie hijacking by configuring restricted tokens. For more information, see "Protecting Against Cookie Hijacking".
This section comprises several procedures:
In the AM console, navigate to Realms > Realm Name > Applications > Agents > Java > Agent Name > SSO.
Scroll down and enable Cross Domain SSO.
Check that the CDSSO Redirect URI is set.
Depending on where you deployed your Java agent application, the default may resemble
/agentapp/sunwCDSSORedirectURI.Set the list of URLs for CDSSO Servlet URL to the Cross Domain Controller Servlet URLs of the servers the agent accesses, such as
https://openam.example.com:8443/openam/cdcservlet.If the agent accesses AM through a load balancer, use the load balancer URLs, such as
https://load-balancer.example.com:8443/openam/cdcservlet.Leave the CDSSO Clock Skew set to 0.
Make sure instead that the clocks on the servers where you run AM and Java agents are synchronized.
Set the list of URLs for CDSSO Trusted ID Provider to the Cross Domain Controller Servlet URLs of the AM servers the agent accesses, such as
https://openam.example.com:8443/openam/cdcservlet.This list should include one CDC Servlet URL for every AM server the agent might access. You do not need to include site or load balancer URLs.
(Optional) To protect the SSO token from network snooping, you can select CDSSO Secure Enable to mark the SSO token cookie as secure.
If you select this, then the SSO token cookie can only be sent over a secure connection (HTTPS).
Add the domains involved in CDSSO in the CDSSO Domain List.
If necessary, update the Agent Root URL for CDSSO list on the Global tab page.
If the Java agent is on a server with virtual host names, add the virtual host URLs to the list.
If the Java agent is behind a load balancer, add the load balancer URL to the list.
Save your work.
In the AM console, navigate to Realms > Realm Name > Applications > Agents > Web > Agent Name > SSO.
Enable Cross Domain SSO.
Set the list of URLs for CDSSO Servlet URL to the Cross Domain Controller Servlet URLs of the servers the agent accesses, such as
http://openam.example.com:8080/openam/cdcservlet.If the agent accesses AM through a load balancer, use the load balancer URLs, such as
http://load-balancer.example.com:8080/openam/cdcservlet.Add the domains involved in CDSSO in the Cookies Domain List.
If necessary, update the Agent Root URL for CDSSO list on the Global tab page.
If the web agent is on a server with virtual host names, add the virtual host URLs to the list.
If the web agent is behind a load balancer, add the load balancer URL to the list.
Save your work.
When a client makes an access request to some protected resource in a cross
domain single sign-on deployment (CDSSO), the web or Java agent
redirects the client to the Cross Domain Controller Servlet (CDCServlet) URL.
The CDCServlet determines that the client needs to be authenticated and proxies
the request to an authentication interface, typically at /XUI/#login,
for example, http://openam.example.com:8080/openam/XUI/#login.
If your application requires access to a specific URL, use the
loginURI parameter. For example, you can access the
http://openam.example.com:8080/openam/XUI/#login URL
navigating
to http://openam.example.com:8080/openam/cdcservlet?loginURI=/XUI/#login.
If you have another authentication UI deployed at /openam/customLoginURI,
you can access this URL by navigating to
http://openam.example.com:8080/openam/cdcservlet?loginURI=/customLoginURI.
In this case, add the custom login URI to the whitelist
specified by the org.forgerock.openam.cdc.validLoginURIs property
by performing the following steps:
In the AM console, navigate to Configure > Server Defaults > Advanced.
Set the value of the
org.forgerock.openam.cdc.validLoginURIsproperty to/XUI/#login,/customLoginURI.For more information about this property, see "Advanced Properties" in the Reference.
Save your work.
The default self-submitting form page that AM presents to users contains hidden fields, but is otherwise blank. If you want to show users that the operation is in progress, then customize the necessary JSP.
Edit a copy of the file
config/federation/default/cdclogin.jspto add a clue that SSO is in progress, such as an image.You can find this file where you deployed AM, such as
/path/to/tomcat/webapps/openam/config/federation/default/cdclogin.jsp.When you add an image or other presentation element, make sure that you retain the form and JavaScript as is.
Unpack the
AM-6.0.0.7.warfile and replace thecdclogin.jspfile with your modified version. Also, include in the.warfile any images referenced in your file.Pack up your custom version of AM, and then deploy it in your web container.
In general, problems with single sign-on relate to some sort of
mismatch of domain names. For example, a cookie that is configured on a
third-level domain, such as sso.example.net will not work
with an application on a similar domain, such as app.example.net.
The following list describes scenarios that may lead to similar problems:
When a cookie domain does not match a domain for the protected application.
Assume the application is configured on a domain named
example.org. That application will not receive an SSO token configured on theexample.netdomain.When a third-level domain is used for the SSO token.
If an SSO token is configured on
sso.example.net, an application onapp.example.netdoes not receive the corresponding session token. In this case, the solution is to configure the SSO token onexample.net.When the
Cookie Securityor theCDSSO Secure Enableproperties are configured in the agent profile with a regular HTTP application.If you need encrypted communications for an application protected by AM, use the
Cookie Securityor theCDSSO Secure Enableproperties and make sure the application is accessible over HTTPS.When the path listed in the cookie does not match the path for the application.
Perhaps the cookie is configured with a
/helloworldpath; that will not match an application that might be configured with a/hellomarspath. In that case, the application will not receive the cookie.When an inappropriate name is used for the cookie domain
As noted earlier, client browsers are configured to ignore first-level domains, such as
comandnetas well as functional equivalents, such asco.ukandco.jp.When working with different browsers
The
name=valuepairs described earlier may not apply to all browsers. The requirements for an HTTP cookie sent to an IE browser may differ from the requirements for other standard browsers, such as Firefox and Chrome. Based on anecdotal reports, IE does not recognize domain names that start with a number. In addition, IE reportedly refuses cookies that include the underscore (_) character in the FQDN.When a client-based session cookie exceeds the maximum size permitted by the browser
As described in "Session Cookies", the default size of the
iPlanetDirectoryProcookie is approximately 2,000 bytes. When you customize AM sessions by adding attributes, the cookie size grows. Browsers allow cookie sizes between 4,000 and 5,200 bytes, depending on the browser. AM single sign-on does not support a cookie size that exceeds the maximum cookie size allowed by the browser.
This chapter covers how to authenticate and log out.
You can authenticate:
From a browser, using the extended user interface (XUI). See "Authenticating Using the XUI".
By using the REST API. See "Authenticating by Using the REST API".
You can use the XUI to authenticate from a browser.
When using the XUI, the base URL to authenticate to points to
/XUI/#login under the deployment URL, such as
http://openam.example.com:8080/openam/XUI/#login.
The base URL to log out is similar, for example,
http://openam.example.com:8080/openam/XUI/#logout/.
When making a request to the XUI, specify the realm or realm alias as the value of a
realm parameter in the query string, or the DNS alias in the
domain component of the URL. If you do not use a realm alias, then you must specify the entire
hierarchy of the realm, starting at the top-level realm. For example
https://openam.example.com:8443/openam/XUI/?realm=/customers/europe#login/.
The following table demonstrates additional examples:
| Description | Example URL |
|---|---|
Full path of the realm as a parameter of XUI
|
|
Realm alias of the realm as a parameter of XUI
|
|
| DNS Alias of the realm as the fully-qualified host name in the URL |
|
The DNS alias is overridden by any use of either the full path or a realm alias as a query string parameter.
Use any of the options listed in "Authentication Parameters" as URL parameters. The following are example URLs with parameters:
| Description | Example URL |
|---|---|
| Log in to the top level realm, requesting that AM display the user interface in German. |
|
Log in to the myRealm subrealm whose parent is the top-level realm,
requesting that AM display the user interface in German.
|
|
Log in to the myRealm subrealm whose parent is the top-level realm using the
HOTPChain authentication chain, requesting that AM display the user interface in German.
|
|
AM accepts the following parameters in the query string. With
the exception of IDToken parameters, use no more than
one occurrence of each.
- arg=newsession
Request that AM end the user's current session and start a new session.
- authlevel
Request that AM authenticate the user using a module with at least the specified authentication level that you have configured.
As this parameter determines authentication module selection, do not use it with
module,service, oruser.- ForceAuth
If
ForceAuth=true, request that AM force the user to authenticate even if they already has a valid session. On successful authentication, AM updates the session token.- goto
On successful authentication, or successful logout, request that AM redirect the user to the specified location. Values must be URL-encoded. See "Constraining Post-Login Redirects" for more information.
- gotoOnFail
On authentication failure, request that AM redirect the user to the specified location. Values must be URL-encoded. See "Constraining Post-Login Redirects" for more information.
- IDToken1, IDToken2, ..., IDTokenN
Pass the specified credentials as
IDTokenparameters in the URL. TheIDTokencredentials map to the fields in the login page for the authentication module, such asIDToken1as user ID andIDToken2as password for basic user name, password authentication. The order depends on the callbacks in login page for the module;IDTokenNrepresents the Nth callback of the login page.- locale
Request that AM display the user interface in the specified, supported locale. Locale can also be set in the user's profile, in the HTTP header from her browser, configured in AM, and so on.
- module
Request that AM use the authentication module instance as configured for the realm where the user is authenticating.
As this parameter determines authentication module selection, do not use it with
authlevel,service, oruser.- realm
Request that AM authenticate the user to the specified realm.
- resource
Set this parameter to
trueto request resource-based authentication.For resource-based authentication, also set the
resourceURLparameter.- resourceURL
Set this parameter to the URL of the resource for resource-based authentication.
Resource-based authentication applies when an authorization policy has an environment setting of type Authentication by Module Chain or Authentication by Module Instance. When the specified resource URL matches a policy resource, AM finds the chain or module configured in the policy environment settings. AM then uses the specified chain or module to perform authentication.
For example, if you configure a policy with the resource
https://www.example.com:443/index.htmland the environment Authentication by Module Chain: DataStore, then the following login URL causes AM to use the DataStore chain to authenticate the user:https://openam.example.com:8443/openam/XUI/?resource=true&resourceURL=https://www.example.com:443/index.html&goto=https://www.example.com/
On successful authentication, AM redirects the user-agent to
https://www.example.com/.As shown in the example, when setting the
resourceURLparameter, also setresource=true.- service
Request that AM authenticate the user with the specified authentication chain.
As this parameter determines authentication module selection, do not use it with
authlevel,module, oruser.- user
Request that the user, specified by their AM universal ID, authenticates according to the chain specified by the User Authentication Configuration property in their user profile. You can configure this property for a user under Realms > Realm Name > Identities > UserName.
In order for the User Authentication Configuration property to appear in user profiles, the
iplanet-am-user-serviceobject class must contain theiplanet-am-user-auth-configattribute in the identity repository schema. The default identity repository schemas provided with AM include this object class and attribute. See "Preparing an External Identity Repository" in the Installation Guide for information about identity repository schema.As this parameter determines authentication module selection, do not use it with
authlevel,module, orservice.
By default, AM redirects the user to the URL specified in the
goto and gotoOnFail query string parameters
supplied to the authentication interface during login and logout.
You can increase security against possible phishing attacks through open redirect
by specifying a list of valid URL resources using the Validation Service.
AM only redirects a user if the goto and
gotoOnFail URL matches any of the resources specified in
this setting.
If no setting is present, it is assumed that the goto or
gotoOnFail URL is valid.
The URL whitelisting and pattern matching follow the wildcard rules as specified in "Specifying Resource Patterns with Wildcards" in the Authorization Guide.
Here are some general examples of URL pattern matching:
If no port is specified,
http://www.example.comcanonicalizes tohttp://www.example.com:80andhttps://www.example.comcanonicalizes tohttp://www.example.com:443.A wildcard before "://" only matches up to "://"
For example,
http*://*.com/*matcheshttp://www.example.com/hello/worldandhttps://www.example.com/hello.A wildcard between "://" and ":" matches up to ":"
For example,
http://*:85matcheshttp://www.example.com:85.A wildcard between ":" and "/" only matches up to the first "/"
For example,
http://www.*:*/matcheshttp://www.example.com:80. In another example,http://www.example.com:*matcheshttp://www.example.com:[any port]andhttp://www.example.com:[any port]/, but nothing more.A wildcard after "/" matches anything, depending on whether it is single-level or a wildcard appropriately.
For example,
https://www.example.com/*matcheshttps://www.example.com:443/foo/bar/baz/meIf you do not use any wildcards, AM exactly matches the string, so
http://www.example.comonly matcheshttp://www.example.com, but NOThttp://www.example.com/(trailing slash).If you put the wildcard after the path, AM expects a path (even if it is blank), so
http://www.example.com/*matcheshttp://www.example.com/andhttp://www.example.com/foo/bar/baz.html, but NOThttp://www.example.com.http://www.example.com:*/matcheshttp://www.example.com/, which also canonicalizes tohttp://www.example.com:80/.https://www.example.com:*/matcheshttps://www.example.com/, which also canonicalizes tohttps://www.example.com:443/.
In the AM console, navigate to Realms > Realm Name > Services.
Click Add a Service.
From the Choose a service type drop-down list, select Validation Service.
In the Valid goto URL Resources field, enter a valid URL pattern to whitelist.
For example,
http://app.example.com:80/*?*Click Create to save your settings.
For information about how to authenticate to AM using the REST API, see "Authentication and Logout".
For information about how to use the session token returned from the REST API when authentication is successful, see "Using the Session Token After Authentication".
Source code for sample mobile applications is available in sample repositories in the ForgeRock commons project. Get local clones of one or more of the following repositories so that you can try these sample applications on your system:
This chapter covers how to use the REST API to work with AM sessions.
AM provides REST APIs under /json/sessions for
validating SSO tokens and getting information about active sessions.
To obtain information about a session, perform an HTTP POST to the
/json/sessions/ endpoint, using the getSessionInfo
action. The endpoint will return information about the session
token provided in the iPlanetDirectoryPro header by default. To
get information about a different session token, include it as the value of the
tokenId query parameter.
For example, the following shows an administrative user passing their session token
in the iPlanetDirectoryPro header, and the session token of
the demo user as the tokenId query parameter:
$ curl \
--request POST \
--header "iplanetDirectoryPro: AQIC4Dm...NTcy*" \
--header "Accept-API-Version: resource=3.1, protocol=1.0" \
https://openam.example.com:8443/openam/json/realms/root/sessions/?_action=getSessionInfo&tokenId=AQIC5...QAA*
{
    "username": "demo",
    "universalId": "id=demo,ou=user,dc=openam,dc=forgerock,dc=org",
    "realm": "/",
    "sessionHandle": "shandle:AQIC5wM2LY4SfcwbAHB6MVwCq-0Yvy9j0vjlbjLrT-797oE.*AAJTSQACMDEAAlNLABQtMzQ2OTAwMTU3MTg5MTUzNDUzOAACUzEAAA..*",
    "latestAccessTime": "2017-01-16T13:37:44Z",
    "maxIdleExpirationTime": "2017-01-16T14:07:44Z",
    "maxSessionExpirationTime": "2017-01-16T15:34:41Z"
}
The getSessionInfo action does not refresh the session
idle timeout.
To check over REST whether a session token is valid,
perform an HTTP POST to the /json/sessions/ endpoint
using the validate action.
To validate a user session token, provide the token as the value of the
tokenId parameter. You must also provide the session token
of an administrative user in the iPlanetDirectoryPro header.
If you don't specify the tokenId parameter, the
session in the iPlanetDirectoryPro header is validated instead.
The following example shows an administrative user, such as amAdmin,
validating a session token for the demo user:
$ curl \
--request POST \
--header "Content-type: application/json" \
--header "iPlanetDirectoryPro: AQICS...NzEz*" \
--header "Accept-API-Version: resource=2.1, protocol=1.0" \
--data '{ "tokenId": "S9DSqBv...AlMxAAA.*" }'
https://openam.example.com:8443/openam/json/realms/root/sessions?_action=validate
If the session token is valid, the user ID and its realm is returned, as shown below:
{
  "valid":true,
  "sessionUid":"209331b0-6d31-4740-8d5f-740286f6e69f-326295",
  "uid":"demo",
  "realm":"/"
}
By default, validating a session resets the session's idle time, which
triggers a write operation to the Core Token Service token store. To avoid this,
perform a call using the validate&refresh=false
action.
To reset the idle time of a CTS-based session using REST,
perform an HTTP POST to the /json/sessions/ endpoint,
using the refresh action. The endpoint will refresh the session
token provided in the iPlanetDirectoryPro header by default. To
refresh a different session token, include it as the value of the
tokenId query parameter.
The following example shows an administrative user passing their session token
in the iPlanetDirectoryPro header, and the session token of
the demo user as the tokenId query parameter:
$ curl \
--request POST \
--header 'Content-Type: application/json' \
--header 'Accept: application/json' \
--header "iplanetDirectoryPro: AQIC5w...NTcy*" \
--header "Accept-API-Version: resource=3.1, protocol=1.0" \
--data '{ "tokenId": "BXCCq...NX*1*" }' \
https://openam.example.com:8443/openam/json/realms/root/sessions/?_action=refresh
{
  "uid": "demo",
  "realm": "/",
  "idletime": 17,
  "maxidletime": 30,
  "maxsessiontime": 120,
  "maxtime": 7106
}
On success, AM resets the idle time for the CTS-based session, and returns timeout details of the session.
Resetting a CTS-based session's idle time triggers a write
operation to the Core Token Service token store. Therefore, to avoid the
overhead of write operations to the token store, be careful to use the
refresh action only if you want to reset a
CTS-based session's idle time.
Because AM does not monitor idle time for client-based sessions,
do not use the tokenId of a
client-based session when refreshing a session's idle time.
To invalidate a session, perform an HTTP POST to the /json/sessions/
endpoint using the logout action. The endpoint will invalidate the
session token provided in the iPlanetDirectoryPro header:
$ curl \
--request POST \
--header "iplanetDirectoryPro: BXCCq...NX*1*" \
--header "Accept-API-Version: resource=3.1, protocol=1.0" \
https://openam.example.com:8443/openam/json/realms/root/sessions/?_action=logout
{
    "result": "Successfully logged out"
}
On success, AM invalidates the session and returns a success message.
If the token is not valid and cannot be invalidated an error message is returned, as follows:
{
  "result": "Token has expired"
}
To invalidate a different session token, include it as the value of the tokenId
query parameter.
For example, the following command shows an administrative user passing their session token
in the iPlanetDirectoryPro header, and the session token of
the demo user as the tokenId query parameter:
$ curl \
--request POST \
--header "iplanetDirectoryPro: AQIC5w...NTcy*" \
--header "Accept-API-Version: resource=3.1, protocol=1.0" \
"https://openam.example.com:8443/openam/json/realms/root/sessions/?_action=logout&tokenId=BXCCq...NX*1*"
{
    "result": "Successfully logged out"
}AM lets you read and update properties on users' sessions using REST API calls.
Before you can perform operations on session properties using the REST API, you must first define the properties you want to set in the Session Property Whitelist Service configuration. For information on whitelisting session properties, see "Session Property Whitelist Service" in the Reference.
You can use REST API calls for the following purposes:
To retrieve the names of the properties that you can read or update. This is the same set of properties configured in the Session Property Whitelist Service.
To read property values.
To update property values.
Session state affects the ability to set and delete properties as follows:
You can set and delete properties on a CTS-based session at any time during the session's lifetime.
You can only set and update properties on a client-based session during the authentication process, before the user receives the session token from AM. For example, you could set or delete properties on a client-based session from within a post-authentication plugin.
Differentiate the user who performs the operation on session properties from the session affected by the operation as follows:
Specify the session token of the user performing the operation on session properties in the
iPlanetDirectoryProheader.Specify the session token of the user whose session is to be read or modified as the
tokenIdparameter to the REST API call.Omit the
tokenIdparameter from the REST API call if the session of the user performing the operation is the session that you want to read or modify.
The following examples assume that you configured a property named
LoginLocation in the Session Property Whitelist Service
configuration.
To retrieve the names of the properties you can get or set, and their values, perform an
an HTTP POST to the resource URL, /json/sessions/,
using the getSessionProperties action as shown in the
following example:
$ curl \
--request POST \
--header "iplanetDirectoryPro: AQIC5w...NTcy*" \
--header "Accept-API-Version: resource=3.1, protocol=1.0" \
https://openam.example.com:8443/openam/json/realms/root/sessions/?_action=getSessionProperties&tokenId=BXCCq...NX*1*
{
    "LoginLocation": ""
}
To set the value of a session property, perform an HTTP POST to the
resource URL, /json/sessions/, using the
updateSessionProperties action. If no tokenId
parameter is present in the REST API call, the session affected by the operation
is the session specified in the iPlanetDirectoryPro header, as follows:
$ curl \
--request POST \
--header "Content-Type: application/json" \
--header "iplanetDirectoryPro: BXCCq...NX*1*" \
--header "Accept-API-Version: resource=3.1, protocol=1.0" \
--data '{"LoginLocation":"40.748440, -73.984559"}' \
https://openam.example.com:8443/openam/realms/root/json/sessions/?_action=updateSessionProperties
{
    "LoginLocation": "40.748440, -73.984559"
}
You can set multiple properties in a single REST API call by specifying a set of fields and their values in the JSON data. For example:
--data '{"property1":"value1", "property2":"value2"}'
To set the value of a session property on another user's session, specify
the session token of the user performing the updateSessionProperties
action in the iPlanetDirectoryPro, and specify the
session token to be modified as the value of the tokenId
parameter:
$ curl \
--request POST \
--header "Content-Type: application/json" \
--header "iplanetDirectoryPro: AQIC5w...NTcy*" \
--header "Accept-API-Version: resource=3.1, protocol=1.0" \
--data '{"LoginLocation":"40.748440, -73.984559"}' \
https://openam.example.com:8443/openam/json/realms/root/sessions/?_action=updateSessionProperties&a;tokenId=BXCCq...NX*1*
{
    "LoginLocation": "40.748440, -73.984559"
}
If the user attempting to modify the session does not have sufficient access privileges, the preceding examples result in a 403 Forbidden error.
You cannot set properties internal to AM sessions. If you try to modify an internal property in a REST API call, a 403 Forbidden error is returned. For example:
$ curl \
--request POST \
--header "Content-Type: application/json" \
--header "iplanetDirectoryPro: AQIC5w...NTcy*" \
--header "Accept-API-Version: resource=3.1, protocol=1.0" \
--data '{"AuthLevel":"5"}' \
https://openam.example.com:8443/openam/json/realms/root/sessions/?_action=updateSessionProperties&tokenId=BXCCq...NX*1*
{
    "code": 403,
    "reason": "Forbidden",
    "message": "Forbidden"
}This section demonstrates how to set up AM to allow users to upgrade their sessions during policy evaluation. For general information information about session upgrade, see "Session Upgrade".
Before attempting to upgrade sessions, perform the following prerequisite tasks:
Configure a policy enforcement point (PEP), for example, a web or Java agent, that enforces AM policies on a website or application.
AM web and Java agents handle session upgrade without additional configuration because the agents are built to handle AM's advices. If you build your own PEPs, however, you must take advices and session upgrade into consideration.
For information about configuring web agents, see the ForgeRock Web Agent User Guide.
For information, about configuring Java agents, see the ForgeRock Java Agent User Guide.
For information on how to handle advices on RESTful PEPs, see "Requesting Policy Decisions" in the Authorization Guide.
Configure an authorization policy to protect a resource protected by the Java or web agent, or a RESTful PEP. The following example of authorization policy allows GET and POST access to the
*://*:*/sample/*resource to any authenticated user:
Once you have set up your environment, ensure that you are required to log in to access your protected resource.
Tip
To configure your environment quickly with a web agent to test session upgrade, see "Setting Up the Software" in the Quick Start Guide.
To configure your environment to attempt a session upgrade, perform the steps in the following procedure:
Configure an authentication tree or chain to validate users' credentials during session upgrade.
Authentication trees and chains do not require additional configuration to perform session upgrade. However, because session upgrade is a mechanism which may be used to grant users access to sensitive information, you should consider configuring a strong authentication method such as multi-factor authentication. Also, you may want to consider how long-lived sessions in your environment are. For example, if users should only have access to the protected resource to perform an operation, such as check the balance of an account, you may want to consider implementing transactional authorization instead. For more information, see "Implementing Transactional Authorization" in the Authorization Guide.
For more information about configuring authentication trees, see "Configuring Authentication Trees".
For more information about configuring authentication chains, see "Configuring Authentication Chains and Modules".
Configure at least one of the following environment conditions in the authentication policy reated as part of the prerequisites:
Authentication by Module Instance (Authentication modules only)
Note
The following examples feature simple policy conditions. For more information about configuring policies and environment conditions, see "Configuring Policies" in the Authorization Guide.
- Authentication Level (greater than or equal to)
Use this condition to present a list of authentication services (trees or chains) which provide a greater or equal authentication level to the one specified in the condition. The user selects their service of choice if multiple services are able to meet the criteria of the condition. For example, the following policy requires a chain or tree that provides authentication level
3or greater:Tip
Configure the authentication level by authentication module or as an authentication tree node. For more information, see "About Authentication Levels" and "Auth Level Decision Node".
- Authentication by Module Instance (Authentication modules only)
Use this condition to enforce that a user has gone through a specific authentication module. For example, the following policy requires the user to log in with the
DataStoremodule:- Authentication by Service
Use this condition to specify the chains or authentication trees to which the user needs to use to authenticate. For example, the following policy requires the user to log in with the
Exampletree:Note that the names of the authentication trees and chains are case-sensitive.
Test session upgrade:
To test session upgrade with a browser, see "Performing Session Upgrade Using a Browser".
To test session upgrade with REST, see "Performing Session Upgrade Using REST".
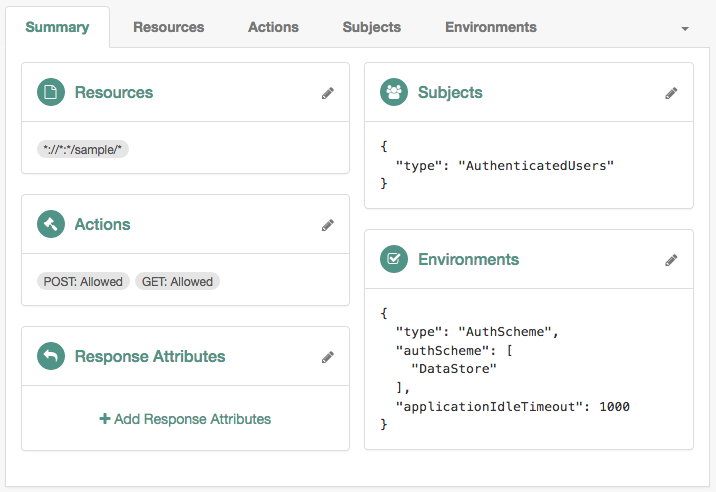
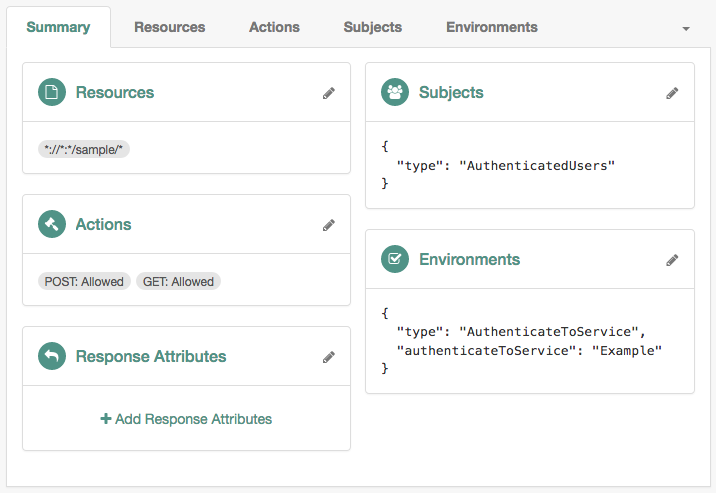
The following procedure demonstrates how to upgrade a session when using a browser:
To upgrade a session using a browser, perform the following steps:
Ensure you have performed the tasks in "Session Upgrade Prerequisites" and "To Configure the Environment for Session Upgrade".
In a browser, navigate to your protected resource. For example,
http://www.example.com:9090/sample.The agent redirects the browser to the AM login screen.
Authenticate to AM as the
demouser.AM requires additional credentials to grant access to the resource. For example, if you set the policy environment condition to
Authentication by ServiceandExample, you will be required to log in again as thedemouser.Authenticate as the
demouser. Note that providing credentials for a different user will fail.You can now access the protected resource.
The following procedure demonstrates the REST flow to upgrade a session:
To upgrade a session using REST, perform the following steps:
Ensure you have performed the tasks in "Session Upgrade Prerequisites" and "To Configure the Environment for Session Upgrade".
Log in with an administrative user that has permission to evaluate policies, such as
amAdmin. For example:$ curl \ --request POST \ --header "Content-Type: application/json" \ --header "X-OpenAM-Username: amadmin" \ --header "X-OpenAM-Password: password" \ --header "Accept-API-Version: resource=2.0, protocol=1.0" \ --data "{}" \ https://openam.example.com:8443/openam/json/realms/root/authenticate { "tokenId":"AQIC5wM2...", "successUrl":"/openam/console", "realm":"/" }Tip
You can also assign privileges to a user to evaluate policies. For more information, see "To Allow a User to Evaluate Policies" in the Authorization Guide.
Log in with the user that should access the resources. For example, log in as the
demouser:$ curl \ --request POST \ --header "Content-Type: application/json" \ --header "X-OpenAM-Username: demo" \ --header "X-OpenAM-Password: changeit" \ --header "Accept-API-Version: resource=2.0, protocol=1.0" \ --data "{}" \ https://openam.example.com:8443/openam/json/realms/root/authenticate { "tokenId":"AQIC5wM...TU3OQ*", "successUrl":"/openam/console", "realm":"/" }Request a policy decision from AM for a protected resource, in this case,
http://openam.example.com:9090/sample. TheiPlanetDirectoryProheader sets the SSO token for the administrative user, and thesubjectelement of the payload sets the SSO token for thedemouser:$ curl --request POST \ --header "Content-Type: application/json" \ --header "iPlanetDirectoryPro: AQIC5wM2..." \ --header "Accept-API-Version:protocol=1.0,resource=2.1" \ --data '{ "resources": [ "http://www.example.com:9090/sample" ], "application": "iPlanetAMWebAgentService", "subject": { "ssoToken": "AQIC5wM...TU3OQ*"} }' \ "https://openam.example.com:8443/openam/json/policies?_action=evaluate" [ { "resource":"http://www.example.com:9090/sample", "actions":{ }, "attributes":{ }, "advices":{ "AuthLevelConditionAdvice":[ "3" ] }, "ttl":9223372036854775807 } ]AM returns with advice, which means the user must present additional credentials to access that resource.
For more information about requesting policy decision, see "Requesting Policy Decisions" in the Authorization Guide.
Format the advice as XML, without spaces or line breaks. The following example is spaced and tabulated for readability purposes only:
<Advices>
    <AttributeValuePair>
       <Attribute name="AuthLevelConditionAdvice"/>
       <Value>3</Value>
    </AttributeValuePair>
</Advices>
Note
The example shows the XML render of a single advice. Depending on the conditions configured in the policy, the advice may contain several lines. For more information about advices, see "Policy Decision Advice" in the Authorization Guide.
URL-encode the XML advice. For example:
%3CAdvices%3E%3CAttributeValuePair%3E%3CAttribute%20name%3D%22AuthLevelConditionAdvice%22%2F%3E%3CValue%3E3%3C%2FValue%3E%3C%2FAttributeValuePair%3E%3C%2FAdvices%3E.Ensure there are no spaces between tags when URL-encoding the advice.
Call AM's
authenticateendpoint to request information about the advice. Use the following details:Add the following URL parameters:
authIndexType=COMPOSITEauthIndexValue=URL-encoded_Advice
Set the
iPlanetDirectoryProcookie as the SSO token for thedemouser.
For example:
$ curl --request POST \
--header "Content-Type: application/json" \
--cookie "iPlanetDirectoryPro=AQIC5wM...TU3OQ*" \
--header "Accept-API-Version: protocol=1.0,resource=2.1" \
"https://openam.example.com:8443/openam/json/realms/root/authenticate?authIndexType=COMPOSITE&authIndexValue=%3CAdvices%3E%3CAttributeValuePair%3E..."
{
   "authId":"eyJ0eXAiOiJKV1QiLCJhbGciOiJIUzI1NiJ9.eyJhdXRoSW5kZ...",
   "template":"",
   "stage":"DataStore1",
   "header":"Sign in",
   "callbacks":[
      {
         "type":"NameCallback",
         "output":[
            {
               "name":"prompt",
               "value":"User Name:"
            }
         ],
         "input":[
            {
               "name":"IDToken1",
               "value":""
            }
         ]
      },
      {
         "type":"PasswordCallback",
         "output":[
            {
               "name":"prompt",
               "value":"Password:"
            }
         ],
         "input":[
            {
               "name":"IDToken2",
               "value":""
            }
         ]
      }
   ]
}
AM returns information about how the user can authenticate in a callback; in this case, providing a username and password. For a list of possible callbacks, and more information about the
/json/authenticateendpoint, see "Authentication and Logout".Call AM's
authenticateendpoint to provide the required callback information. Use the following details:Add the following URL query parameters:
authIndexType=COMPOSITEauthIndexValue=URL-encoded_Advice
Set the
iPlanetDirectoryProcookie as the SSO token for thedemouser.Send as data the complete payload AM returned in the previous step, ensuring you provide the requested callback information.
In this example, provide the username and password for the
demouser in theinputobjects, as follows:$ curl --request POST \ --header 'Content-Type: application/json' \ --header "Accept-API-Version: protocol=1.0,resource=2.1" \ --cookie "iPlanetDirectoryPro=AQIC5wM...TU3OQ*" \ --data '{ "authId":"eyJ0eXAiOiJKV1QiLCJhbGciOiJIUzI1NiJ9.eyJhdXRoSW5kZ...", "template":"", "stage":"DataStore1", "header":"Sign in", "callbacks":[ { "type":"NameCallback", "output":[ { "name":"prompt", "value":"User Name:" } ], "input":[ { "name":"IDToken1", "value":"demo" } ] }, { "type":"PasswordCallback", "output":[ { "name":"prompt", "value":"Password:" } ], "input":[ { "name":"IDToken2", "value":"changeit" } ] } ] } }' \ "https://openam.example.com:8443/openam/json/realms/root/authenticate?authIndexType=COMPOSITE&authIndexValue=%3CAdvices%3E%3CAttributeValuePair%3E..." { "tokenId":"wpU01SaTq4X2x...NDVFMAAlMxAAA.*", "successUrl":"/openam/console", "realm":"/" }Note that AM returns a new SSO token for the
demouser.Request a new policy decision from AM for the protected resource. The
iPlanetDirectoryProheader sets the SSO token for the administrative user, and the subject element of the payload sets the new SSO token for the demo user:$ curl --request POST \ --header "Content-Type: application/json" \ --header "iPlanetDirectoryPro: AQIC5wM2..." \ --header "Accept-API-Version:protocol=1.0,resource=2.1" \ --data '{ "resources":[ "http://www.example.com:9090/sample" ], "application":"iPlanetAMWebAgentService", "subject":{ "ssoToken":"wpU01SaTq4X2x...NDVFMAAlMxAAA.*" } }' \ "https://openam.example.com:8443/openam/json/policies?_action=evaluate" [ { "resource":"http://www.example.com:9090/sample", "actions":{ "POST":true, "GET":true }, "attributes":{ }, "advices":{ }, "ttl":9223372036854775807 } ]AM returns that
democan performPOSTandGEToperations on the resource.
This chapter describes how to extend AM authentication features by developing custom modules, nodes, and plugins.
Your deployment might require customizing standard authentication tree features. See the following sections for customization examples:
This section shows how to customize authentication trees by creating a new node, or modifying one of the sample authentication nodes. For deployments with particular requirements not met by existing AM authentication nodes, determine whether you can adapt one of the built-in or extension nodes for your needs. If not, build the functionality into a custom authentication node.
For information on creating or modifying authentication nodes, see the following sections:
This section explains the prerequisites for customizing authentication nodes, and how to use a Maven archetype or the samples provided with AM to set up a project for building nodes.
To prepare for creating or modifying authentication nodes, complete the following procedures:
Complete the following steps to set up your environment for building custom authentication nodes:
Ensure your BackStage account is part of a subscription:
In a browser, navigate to the ForgeRock BackStage website and log in or register for an account.
Confirm or request that your account is added to a subscription. For more details, see "Getting access to product support" in the ForgeRock Knowledge Base.
Install Apache Maven 3.2.5 or later, and Oracle JDK or OpenJDK 1.8.
Tip
To verify the installed versions, run the mvn --version command:
$ mvn --version
Apache Maven 3.2.5 (12a6b3acb947671f09b81f49094c53f426d8cea1; 2014-12-14T17:29:23+00:00)
Maven home: /usr/local/apache-maven/apache-maven-3.2.5 Java version: 1.8.0_121, vendor: Oracle Corporation
Java home: /Library/Java/JavaVirtualMachines/jdk1.8.0_121.jdk/Contents/Home/jre Default locale: en_US,
platform encoding: UTF-8 OS name: "mac os x", version: "10.11.6", arch: "x86_64", family: "mac"
Configure Maven to be able to access the ForgeRock repositories by adding your BackStage credentials to the Maven
settings.xmlfile. For details, see "How do I access the ForgeRock protected Maven repositories?" in the ForgeRock Knowledge Base.As well as access to the authentication node source code, if you want to use the archetype to create a project for custom authentication nodes, you need access to the
forgerock-private-releasesrepository. Ensure yoursettings.xmlfile contains a profile similar to the following:<profiles> <profile> <id>forgerock</id> <repositories> <repository> <id>forgerock-private-releases</id> <url>https://maven.forgerock.org:443/repo/private-releases</url> <releases> <enabled>true</enabled> <checksumPolicy>fail</checksumPolicy> </releases> <snapshots> <enabled>false</enabled> <checksumPolicy>warn</checksumPolicy> </snapshots> </repository> </repositories> </profile> </profiles> <activeProfiles> <activeProfile>forgerock</activeProfile> </activeProfiles>
ForgeRock provides a Maven archetype for creating a starter project suitable for building an authentication node. You can also download the projects used to build the authentication nodes included with AM and modify those to match your requirements.
Note
Ensure you have completed the steps in "To Prepare an Environment For Building Custom Authentication Nodes" before proceeding.
Complete either of the following steps to set up or download a Maven project for building custom authentication nodes:
To use the ForgeRock
auth-tree-node-archetypearchetype to generate a starter Maven project:In a terminal window, navigate to a folder in which to create the new Maven project. For example:
$ cd ~/Repositories
Run the mvn archetype:generate command, providing the following information:
-
groupId A domain name that you control, used for identifying the project.
-
artifactId The name of the JAR created by the project, without version information. Also the name of the folder created to store the project.
-
version The version assigned to the project.
-
package The package name in which your custom authentication node classes are generated.
-
authNodeName The name of the custom authentication node, also used in the generated
README.mdfile and for class file names.
For example:
$ mvn archetype:generate \
-DgroupId=com.example \
-DartifactId=customAuthNode \
-Dversion=1.0.0-SNAPSHOT \
-Dpackage=com.example.customAuthNode \
-DauthNodeName=myCustomAuthNode \
-DarchetypeGroupId=org.forgerock.am \
-DarchetypeArtifactId=auth-tree-node-archetype \
-DarchetypeVersion=6.0.0 \
-DinteractiveMode=false
[INFO] Project created from Archetype in dir: /Users/ForgeRock/Repositories/customAuthNode
[INFO] ------------------------------------------------------------------------
[INFO] BUILD SUCCESS
[INFO] ------------------------------------------------------------------------
[INFO] Total time: 1.397 s
[INFO] Finished at: 2018-01-18T15:45:06+00:00
[INFO] Final Memory: 16M/491M
[INFO] ------------------------------------------------------------------------
A new custom authentication node project is created, for example in the
/Users/ForgeRock/Repositories/customAuthNodefolder.The project resembles the following:
-
To download the project containing the default AM authentication nodes from the
am-externalrepository:If you do not already have a ForgeRock BackStage account, get one from https://backstage.forgerock.com. You cannot clone the
am-externalrepository without a BackStage account.Clone the
am-externalrepository:$ git clone https://myBackStageID@stash.forgerock.org/scm/openam/am-external.git
Tip
URL encode your BackStage ID if it contains special characters. For example : becomes
%3Aand @ becomes%40.Enter your BackStage password when prompted to do so.
Check out the
release/6.0.0.7branch:$ cd am-external $ git checkout releases/6.0.0.7
The AM authentication nodes project is located in the
am-external/openam-auth-trees/auth-nodes/folder.The project resembles the following:
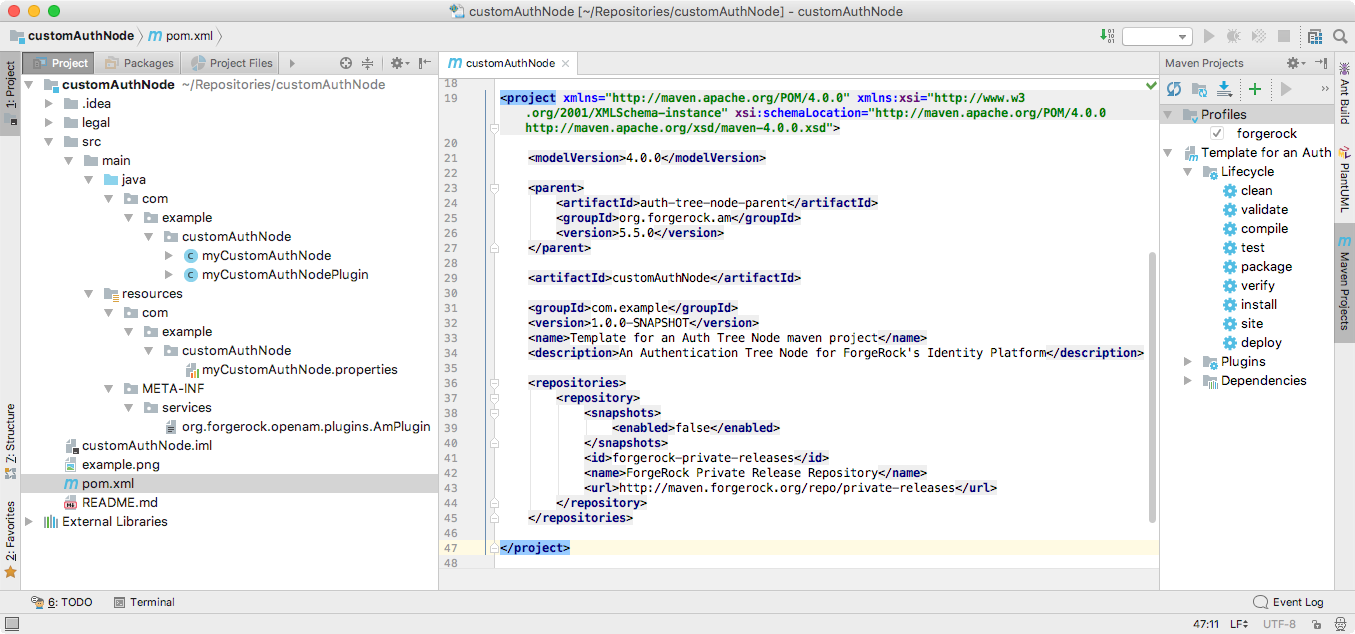
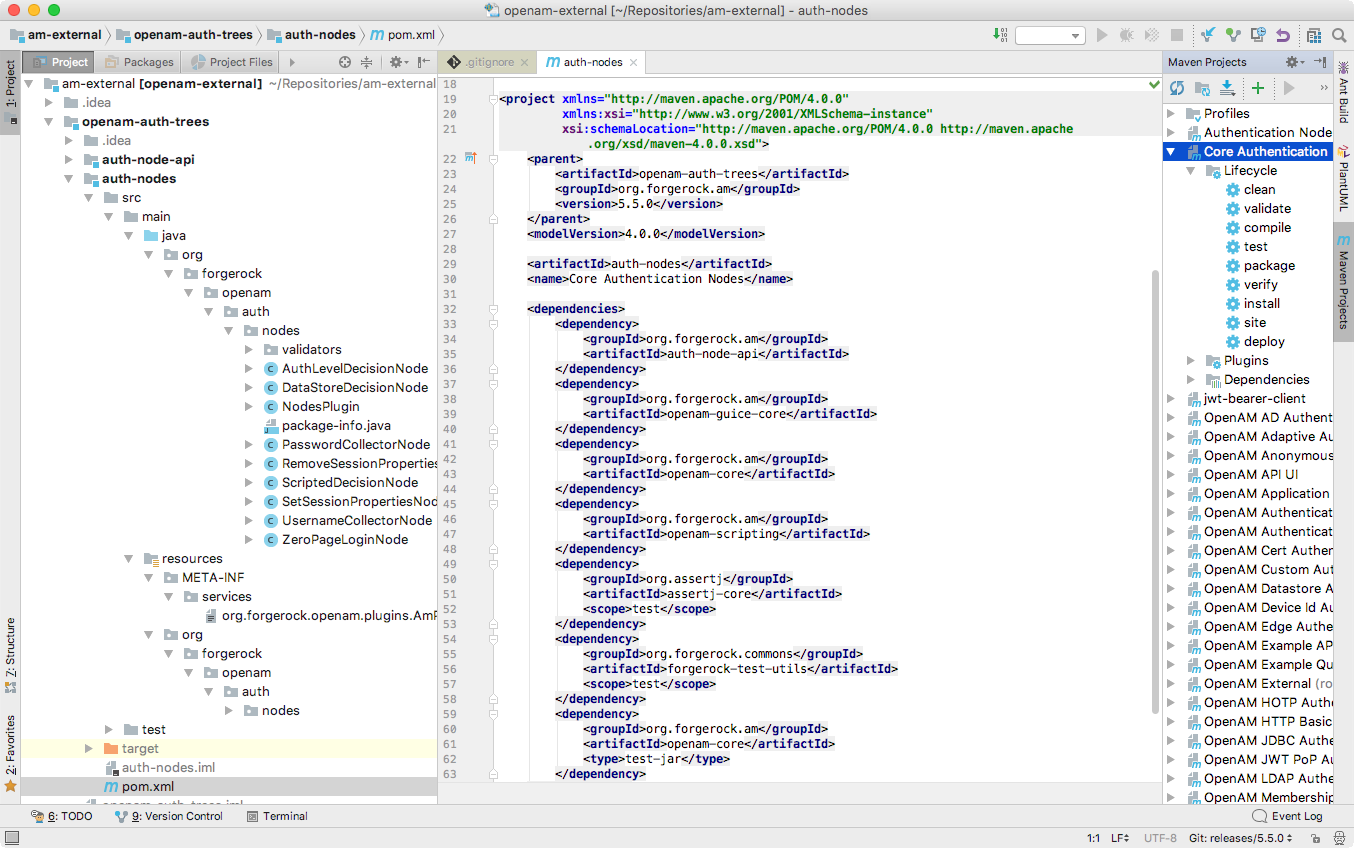
The Maven project for an authentication node contains the following files:
-
pom.xml Apache Maven project file for the custom authentication node.
This file specifies how to build the custom authentication node, and also specifies its dependencies on AM components.
-
authModuleName.java Core class for the custom authentication node. See "The Core Class of an Authentication Node".
-
authModuleNamePlugin.java Plugin class for the custom authentication node. See "The Plugin Class of an Authentication Node".
-
authModuleName.properties Properties file containing the localized strings displayed by the custom authentication node. See "Localizing an Authentication Node".
-
org.forgerock.openam.plugins.AmPlugin Specifies the name of the plugin class AM uses to import the custom authentication node. See "The Plugin Class of an Authentication Node".
For example:
com.example.customAuthNode.myCustomAuthNodePlugin
The core class may access and modify the persisted state that is shared between the nodes within a tree, and may request input by using callbacks. The class also defines the possible exit paths from the node.
The following example is the SetSessionPropertiesNode class, taken from the
Set Session Properties Node:
/*
* CCPL HEADER START
*
* This work is licensed under the Creative Commons
* Attribution-NonCommercial-NoDerivs 3.0 Unported License.
* To view a copy of this license, visit
* https://creativecommons.org/licenses/by-nc-nd/3.0/
* or send a letter to Creative Commons, 444 Castro Street,
* Suite 900, Mountain View, California, 94041, USA.
*
* You can also obtain a copy of the license at legal-notices/CC-BY-NC-ND.txt.
* See the License for the specific language governing permissions
* and limitations under the License.
*
* If applicable, add the following below this CCPL HEADER, with the fields
* enclosed by brackets "[]" replaced with your own identifying information:
* Portions Copyright [yyyy] [name of copyright owner]
*
* CCPL HEADER END
*
* Copyright 2018 ForgeRock AS.
*
*/
package org.forgerock.openam.auth.nodes;
import com.google.inject.assistedinject.Assisted;
import org.forgerock.openam.annotations.sm.Attribute;
import org.forgerock.openam.auth.node.api.Action;
import org.forgerock.openam.auth.node.api.Node;
import org.forgerock.openam.auth.node.api.SingleOutcomeNode;
import org.forgerock.openam.auth.node.api.TreeContext;
import org.forgerock.openam.auth.nodes.validators.SessionPropertyValidator;
import javax.inject.Inject;
import java.util.Map;
/**
* A node which contributes a configurable set of properties to be added to the user's session, if/when it is created.
*/
@Node.Metadata(outcomeProvider = SingleOutcomeNode.OutcomeProvider.class,
configClass = org.forgerock.openam.auth.nodes.SetSessionPropertiesNode.Config.class)  public class SetSessionPropertiesNode extends SingleOutcomeNode {
  /**
* Configuration for the node.
*/
public interface Config {
/**
* Configuration for the node.
*/
public interface Config {  /**
* A map of property name to value.
* @return a map of properties.
*/
@Attribute(order = 100, validators = SessionPropertyValidator.class)
Map<String, String> properties();
}
private final Config config;
/**
* Constructs a new SetSessionPropertiesNode instance.
* @param config Node configuration.
*/
@Inject
/**
* A map of property name to value.
* @return a map of properties.
*/
@Attribute(order = 100, validators = SessionPropertyValidator.class)
Map<String, String> properties();
}
private final Config config;
/**
* Constructs a new SetSessionPropertiesNode instance.
* @param config Node configuration.
*/
@Inject  public SetSessionPropertiesNode(@Assisted Config config) {
this.config = config;
}
@Override
public Action process(TreeContext context) {
public SetSessionPropertiesNode(@Assisted Config config) {
this.config = config;
}
@Override
public Action process(TreeContext context) {  Action.ActionBuilder actionBuilder = goToNext();
config.properties().forEach(actionBuilder::putSessionProperty);
return actionBuilder.build();
}
}
Action.ActionBuilder actionBuilder = goToNext();
config.properties().forEach(actionBuilder::putSessionProperty);
return actionBuilder.build();
}
}
| The |
|
Implementing the |
|
Implementing the |
|
Injecting the |
| Creating an |
Before defining the class, use a Java @Node.Metadata annotation to specify the classes
the node uses for various functions. The supported properties are as follows:
outcomeProviderThe class name that the node uses to set up the possible outcomes.
The
SingleOutcomeNodeandAbstractDecisionNodebase classes provide suitable outcome provider classes for those node types. You can create a custom outcome provider for other circumstances.For example, the following is the custom outcome provider from the LDAP Decision node, which has
True,False,LockedandExpiredexit paths:/** * Defines the possible outcomes from this Ldap node. */ public static class LdapOutcomeProvider implements OutcomeProvider { @Override public List<Outcome> getOutcomes(PreferredLocales locales, JsonValue nodeAttributes) { ResourceBundle bundle = locales.getBundleInPreferredLocale(LdapDecisionNode.BUNDLE, LdapOutcomeProvider.class.getClassLoader()); return ImmutableList.of( new Outcome(LdapOutcome.TRUE.name(), bundle.getString("trueOutcome")), new Outcome(LdapOutcome.FALSE.name(), bundle.getString("falseOutcome")), new Outcome(LdapOutcome.LOCKED.name(), bundle.getString("lockedOutcome")), new Outcome(LdapOutcome.EXPIRED.name(), bundle.getString("expiredOutcome"))); } }configClassThe class name that contains the configuration of any attributes requested by the node.
configValidatorAn optional class name used to validate the provided configuration.
For example, the following is the @Node.Metadata annotation from the
Set Session Properties Node:
@Node.Metadata(outcomeProvider = SingleOutcomeNode.OutcomeProvider.class,
             configClass = SetSessionPropertiesNode.Config.class)
For more information on the @Node.Metadata annotation, see the
Node.Metadata
annotation type in the AM 6.0.0.7 Public API Javadoc.
The core class must implement the Node interface. For more information, see the
Node
interface in the AM 6.0.0.7 Public API Javadoc.
AM provides base classes you can extend to implement the Node interface, depending on
the type of custom authentication node you are creating. The available base classes are as follows:
-
SingleOutcomeNode Used in nodes that only have a single exit path.
The Modify Auth Level Node is an example of a node that uses the
SingleOutcomeNodebase class.For more information, see the SingleOutcomeNode class in the AM 6.0.0.7 Public API Javadoc.
-
AbstractDecisionNode Used in nodes that have a boolean-type exit path, for example true or false, yes or no, or allow or deny.
The Data Store Decision Node is an example of a node that uses the
AbstractDecisionNodebase class.For more information, see the AbstractDecisionNode class in the AM 6.0.0.7 Public API Javadoc.
Implement the Node interface yourself if your custom node exit paths do not match the
scenarios outlined above.
Within the Node interface implementation, define the properties the node will use
in the Config interface, by using the @Attribute annotation.
The defined properties appear as configurable options in the tree designer view when adding a node of the relevant type.
For example, the following is the Config interface from the
Set Session Properties Node, defining a
property named properties that displays when configuring the node in the AM
administration console:
public interface Config {
    /**
    * A map of property name to value.
    * @return a map of properties.
    */
    @Attribute(order = 100, validators = SessionPropertyValidator.class)
    Map<String, String> properties();
}

private final Config config;
The example above defines an attribute named properties as a map of property names and
the value to set.
Use the default keyword to assign a default value to an attribute. For example:
public interface Config {
    /**
     * The number of times to allow a retry.
     * @return The number of retries.
     */
    @Attribute(order = 100, validators = GreaterThanZeroValidator.class)
    default int retryLimit() {
        return 3;
    }
}

private final Config config;
Note that attribute names are used when localizing the node's text, see "Localizing an Authentication Node".
For more information, see the Config annotation type and the Attribute annotation type in the AM 6.0.0.7 Public API Javadoc.
AM uses Google's Guice dependency injection framework for
authentication nodes. Use the @Inject annotation to construct a new instance of the
custom authentication node, specifying the configuration interface set up earlier.
For example, the following is the injection used by the Modify Auth Level Node:
/**
 * Constructs a new SetSessionPropertiesNode instance.
 * @param config Node configuration.
 */
@Inject
public SetSessionPropertiesNode(@Assisted Config config) {
    this.config = config;
}
For more information, see the Inject annotation type and the Assisted annotation type in the Google Guice Javadoc.
The main logic of a node is handled by the Action class.
The Action class uses the following fields:
callbacksA list of the callbacks that have been requested by the node. This list may be
null.outcomeThe result of the node.
sessionPropertiesA map of properties that will be added to the final session if the authentication tree completes successfully.
Use the
putSessionProperty(String key, String value)andremoveSessionProperty(String key)methods to add or remove entries from the map.sharedStateA JSON representation of the properties set so far by nodes in the tree.
For example, if a Username Collector Node has been completed earlier in the authentication tree, the
USERNAMEvalue collected will be available in thesharedStateJSON. Access the value as follows:String username = context.sharedState.get(USERNAME).asString();
transientStateA JSON representation of any transient properties set by the previous node in the tree. Transient state is not persisted to the authentication session, and is only available until the authentication flow reaches the next node requiring user interaction.
For example, if a Password Collector Node has been completed in the previous node in the authentication tree, the
PASSWORDvalue collected will be available in thetransientStateJSON. Access the value as follows:String password = context.transientState.get(PASSWORD).asString();
The methods provided within the Action class are as follows:
goTo()Specify the exit path to take, and move on to the next node in the tree.
For example:
return goTo(false).build();See the goTo method in the AM 6.0.0.7 Public API Javadoc.
send()Send the specified callbacks to the user for them to interact with.
For example, the Username Collector Node uses the following code to send the
NameCallbackcallback to the user to request theUSERNAMEvalue:return send(new NameCallback(bundle.getString("callback.username"))).build();See the send methods in the AM 6.0.0.7 Public API Javadoc.
sendingCallbacks()Returns true if the action is a request for input from the user.
See the sendingCallbacks method in the AM 6.0.0.7 Public API Javadoc.
For example, the following is the Action class from the
Auth Level Decision Node:
@Override
public Action process(TreeContext context) throws NodeProcessException {
    JsonValue authLevel = context.sharedState.get(AUTH_LEVEL);
    boolean authLevelSufficient = !authLevel.isNull()
                                  && authLevel.asInteger()
                                  >= config.authLevelRequirement();
    return goTo(authLevelSufficient).build();
}
For more information, see the Action class in the AM 6.0.0.7 Public API Javadoc.
The plugin class is responsible for informing AM about the details of the customized authentication node. There is little variation between the plugin class for each authentication node, other than the version number and class names within.
The following example is from the plugin class taken from a project generated by the
auth-tree-node-archetype archetype:
public class myCustomAuthNodePlugin extends AbstractNodeAmPlugin {

    private final AnnotatedServiceRegistry serviceRegistry;

    /**
     * DI-enabled constructor.
     * @param serviceRegistry A service registry instance.
     */
    @Inject
    public myCustomAuthNodePlugin(AnnotatedServiceRegistry serviceRegistry) {
        this.serviceRegistry = serviceRegistry;
    }

    @Override
    public String getPluginVersion() {
        return "1.0.0";
    }

    @Override
    public void onStartup() throws PluginException {
        for (Class<? extends Node> nodeClass : getNodes()) {
            pluginTools.registerAuthNode(nodeClass);
        }
    }

    @Override
    protected Iterable<? extends Class<? extends Node>> getNodes() {
        return asList(
                myCustomAuthNode.class
        );
    }
}
| Name the plugin class after the core class, and append Plugin, for example |
| Use the |
| Provide a version number for the authentication node. |
| Loop through the available nodes and register them with AM. For more information, see the PluginTools interface in the AM 6.0.0.7 Public API Javadoc. |
| Ensure a call to the |
Use Java resource bundles containing translations to localize the text that a node displays.
Create a Java resource bundle under the
resourcesfolder in the Maven project for your node.The path and filename must match that of the core class that will use the translated text.
For example, the resource bundle for the "Username Collector Node" is located in the following path:
src/main/resources/org/forgerock/openam/auth/nodes/UsernameCollectorNodeAdd the properties and strings that the node will display to the user. For example:
callback.username=User Name
Create a
.propertiesfile in the resource bundle for each language your node will display. The filename must include the language identifier, as per rfc5646 - Tags for Identifying Languages.For example, for French translations your
.propertiesfile could be calledUsernameCollectorNode_fr.properties.Replicate the properties and translate the values in each
.propertiesfiles. For example:callback.username=Nom d'utilisateurIn the core class for the node, specify the path to the resource bundle the node will retrieve the translated strings from:
private static final String BUNDLE = "org/forgerock/openam/auth/nodes/UsernameCollectorNode"Define a reference to the bundle using the
getBundleInPreferredLocalefunction to enable retrieval of translated strings:ResourceBundle bundle = context.request.locales.getBundleInPreferredLocale(BUNDLE, getClass().getClassLoader());
Use the
getStringfunction whenever you need to retrieve a translation from the resource bundle:return send(new NameCallback(bundle.getString("callback.username"))).build();
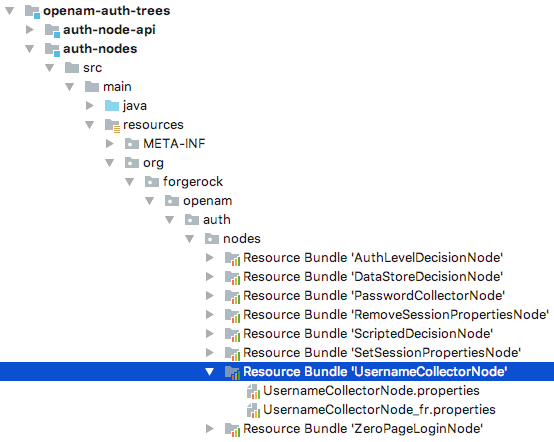
This section explains how to build and install authentication nodes for use in authentication trees.
Change to the root directory of the Maven project of the custom nodes. For example:
$ cd /Users/Forgerock/Repositories/am-external/openam-auth-trees/auth-nodes
Run the
mvn packagecommand.The project will generate a
.jarfile containing your custom nodes. For example,auth-nodes-6.0.0.7.jar.Copy the
.jarfile to theWEB-INF/lib/folder where AM is deployed:$ cp auth-nodes-6.0.0.7.jar /path/to/tomcat/webapps/openam/WEB-INF/lib/
Note
Delete or overwrite older versions of the nodes
.jarfile from theWEB-INF/lib/folder, to avoid clashes.Restart AM for the new nodes to become available.
The custom authentication node is now available in the tree designer to add to authentication trees:
For more information on using the tree designer to manage authentication trees, see "Configuring Authentication Trees".
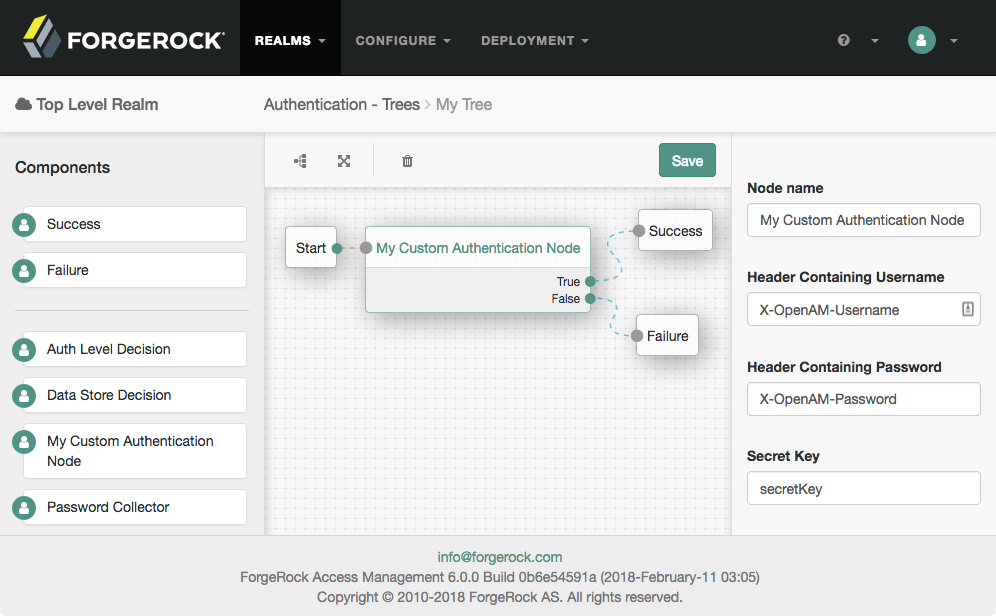
This section explains how to create a hook used by a node within an authentication tree. These tree hooks can perform custom processing after an authentication tree has successfully completed and a session created.
AM includes the following authentication tree hooks:
-
CreatePersistentCookieJwt Used by the
SetPersistentCookieNodeauthentication node.-
UpdatePersistentCookieJwt Used by the
PersistentCookieDecisionNodeauthentication node.
The following example shows the UpdatePersistentCookieTreehook class, as used by the the
Persistent Cookie Decision node:
/*
 * CCPL HEADER START
 *
 * This work is licensed under the Creative Commons
 * Attribution-NonCommercial-NoDerivs 3.0 Unported License.
 * To view a copy of this license, visit
 * https://creativecommons.org/licenses/by-nc-nd/3.0/
 * or send a letter to Creative Commons, 444 Castro Street,
 * Suite 900, Mountain View, California, 94041, USA.
 *
 * You can also obtain a copy of the license at legal-notices/CC-BY-NC-ND.txt.
 * See the License for the specific language governing permissions
 * and limitations under the License.
 *
 * If applicable, add the following below this CCPL HEADER, with the fields
 * enclosed by brackets "[]" replaced with your own identifying information:
 *      Portions Copyright [yyyy] [name of copyright owner]
 *
 * CCPL HEADER END
 *
 *      Copyright 2018 ForgeRock AS.
 *
 */

package org.forgerock.openam.auth.nodes.treehook;

import java.util.List;
import java.util.concurrent.TimeUnit;

import javax.inject.Inject;

import org.forgerock.guice.core.InjectorHolder;
import org.forgerock.http.protocol.Cookie;
import org.forgerock.http.protocol.Request;
import org.forgerock.http.protocol.Response;
import org.forgerock.openam.auth.node.api.TreeHook;
import org.forgerock.openam.auth.node.api.TreeHookException;
import org.forgerock.openam.auth.nodes.PersistentCookieDecisionNode;
import org.forgerock.openam.auth.nodes.jwt.InvalidPersistentJwtException;
import org.forgerock.openam.auth.nodes.jwt.PersistentJwtStringSupplier;
import org.slf4j.Logger;
import org.slf4j.LoggerFactory;

import com.google.inject.assistedinject.Assisted;

/**
 * A TreeHook for updating a persistent cookie.
 */
@TreeHook.Metadata(configClass = PersistentCookieDecisionNode.Config.class)
public class UpdatePersistentCookieTreeHook implements TreeHook {

    private final Request request;
    private final Response response;
    private final PersistentCookieDecisionNode.Config config;
    private final PersistentJwtStringSupplier persistentJwtStringSupplier;
    private final PersistentCookieResponseHandler persistentCookieResponseHandler;
    private final Logger logger = LoggerFactory.getLogger("amAuth");

    /**
     * The UpdatePersistentCookieTreeHook Constructor.
     *
     * @param request The request.
     * @param response The response.
     * @param config the config for updating the cookie.
     */
    @Inject
    public UpdatePersistentCookieTreeHook(@Assisted Request request, @Assisted Response response,
                                          @Assisted PersistentCookieDecisionNode.Config config) {
        this.request = request;
        this.response = response;
        this.config = config;
        this.persistentJwtStringSupplier = InjectorHolder.getInstance(PersistentJwtStringSupplier.class);
        this.persistentCookieResponseHandler = InjectorHolder.getInstance(PersistentCookieResponseHandler.class);
    }

    @Override
    public void accept() throws TreeHookException {
        logger.debug("UpdatePersistentCookieTreeHook.accept");
        String orgName = PersistentCookieResponseHandler.getOrgName(response);
        Cookie originalJwt = getJwtCookie(request, config.persistentCookieName());
        if (originalJwt != null) {
            String jwtString;
            try {
                jwtString = persistentJwtStringSupplier.getUpdatedJwt(originalJwt.getValue(), orgName,
                        String.valueOf(config.hmacSigningKey()), config.idleTimeout().to(TimeUnit.HOURS));
            } catch (InvalidPersistentJwtException e) {
                logger.error("Invalid jwt", e);
                throw new TreeHookException(e);
            }

            if (jwtString != null && !jwtString.isEmpty()) {
                persistentCookieResponseHandler.setCookieOnResponse(response, request, config.persistentCookieName(),
                        jwtString, originalJwt.getExpires(), config.useSecureCookie(), config.useHttpOnlyCookie());
            }
        }
    }

    private Cookie getJwtCookie(Request request, String cookieName) {
        if (request.getCookies().containsKey(cookieName)) {
            List<Cookie> cookies = request.getCookies().get(cookieName);
            for (Cookie cookie : cookies) {
                if (cookie.getName().equals(cookieName)) {
                    return cookie;
                }
            }
        }
        return null;
    }
}
| The Before defining the core class, use a Java |
| The core class must implement the |
| AM uses Google's Guice dependency injection framework for
authentication nodes and tree hooks. Use the For more information, see the Inject annotation type and the Assisted annotation type in the Google Guice Javadoc. |
| Creating an |
Your deployment might require customizing standard authentication chain features. See the following sections for customization examples:
This section shows how to customize authentication with a sample custom authentication module. For deployments with particular requirements not met by existing AM authentication modules, determine whether you can adapt one of the built-in or extension modules for your needs. If not, build the functionality into a custom authentication module.
The sample authentication module prompts for a user name and password to authenticate the user, and handles error conditions. The sample shows how you integrate an authentication module into AM such that you can configure the module through the AM console, and also localize the user interface.
For information on downloading and building AM sample source code, see How do I access and build the sample code provided for OpenAM 12.x, 13.x and AM (All versions)? in the Knowledge Base.
Get a local clone so that you can try the sample
on your system. In the sources, you find the following files under the
/path/to/openam-samples-external/custom-authentication-module
directory:
pom.xmlApache Maven project file for the module
This file specifies how to build the sample authentication module, and also specifies its dependencies on AM components and on the Java Servlet API.
src/main/java/org/forgerock/openam/examples/SampleAuth.javaCore class for the sample authentication module
This class is called by AM to initialize the module and to process authentication. See "The Sample Authentication Logic" for details.
src/main/java/org/forgerock/openam/examples/SampleAuthPrincipal.javaClass implementing
java.security.Principalinterface that defines how to map credentials to identitiesThis class is used to process authentication. See "The Sample Auth Principal" for details.
src/main/resources/amAuthSampleAuth.propertiesProperties file mapping UI strings to property values
This file makes it easier to localize the UI. See "Sample Auth Properties" for details.
src/main/resources/amAuthSampleAuth.xmlConfiguration file for the sample authentication service
This file is used when registering the authentication module with AM. See "The Sample Auth Service Configuration" for details.
src/main/resources/config/auth/default/SampleAuth.xmlCallback file for deprecated AM classic UI authentication pages
The sample authentication module does not include localized versions of this file. See "Sample Auth Callbacks" for details.
src/main/java/org/forgerock/openam/examples/SampleAuthPlugin.java,src/main/resources/META-INF/services/org.forgerock.openam.plugins.AmPluginThese files serve to register the plugin with AM.
The Java class,
SampleAuthPlugin, implements theorg.forgerock.openam.plugins.AmPlugininterface. In the sample, this class registers theSampleAuthimplementation, and theamAuthSampleAuthservice schema for configuration.The services file,
org.forgerock.openam.plugins.AmPlugin, holds the fully qualified class name of theAmPluginthat registers the custom implementations. In this case,org.forgerock.openam.examples.SampleAuthPlugin.For an explanation of service loading, see the
ServiceLoaderAPI specification.
AM uses a Java properties file per locale to retrieve the appropriate, localized strings for the authentication module.
The following is the Sample Authentication Module properties file,
amAuthSampleAuth.properties.
sampleauth-service-description=Sample Authentication Module
a500=Authentication Level
a501=Service Specific Attribute

sampleauth-ui-login-header=Login
sampleauth-ui-username-prompt=User Name:
sampleauth-ui-password-prompt=Password:

sampleauth-error-1=Error 1 occurred during the authentication
sampleauth-error-2=Error 2 occurred during the authenticationAM callbacks XML files are used to build the deprecated classic UI to prompt
the user for identity information needed to process the authentication.
The document type for a callback XML file is described in
WEB-INF/Auth_Module_Properties.dtd where AM is
deployed.
The value of the moduleName property in the callbacks
file must match your custom authentication module's class name. Observe that
the module name SampleAuth, shown in the example below,
matches the class name in
"The Sample Authentication Logic".
The following is the SampleAuth.xml callbacks
file.
<!DOCTYPE ModuleProperties PUBLIC
 "=//iPlanet//Authentication Module Properties XML Interface 1.0 DTD//EN"
        "jar://com/sun/identity/authentication/Auth_Module_Properties.dtd">

<ModuleProperties moduleName="SampleAuth" version="1.0" >
    <Callbacks length="0" order="1" timeout="600" header="#NOT SHOWN#" />
    <Callbacks length="2" order="2" timeout="600" header="#TO BE SUBSTITUTED#">
        <NameCallback isRequired="true">
            <Prompt>#USERNAME#</Prompt>
        </NameCallback>
        <PasswordCallback echoPassword="false" >
            <Prompt>#PASSWORD#</Prompt>
        </PasswordCallback>
    </Callbacks>
    <Callbacks length="1" order="3" timeout="600" header="#TO BE SUBSTITUTED#"
        error="true" >
        <NameCallback>
            <Prompt>#THE DUMMY WILL NEVER BE SHOWN#</Prompt>
        </NameCallback>
    </Callbacks>
</ModuleProperties>
This file specifies three states.
The initial state (order="1") is used dynamically to replace the dummy strings shown between hashes (for example,
#USERNAME#) by thesubstituteUIStrings()method inSampleAuth.java.The next state (order="2") handles prompting the user for authentication information.
The last state (order="3") has the attribute
error="true". If the authentication module state machine reaches this order then the authentication has failed. TheNameCallbackis not used and not displayed to user. AM requires that the callbacks array have at least one element. Otherwise AM does not permit header substitution.
An AM authentication module must extend the
com.sun.identity.authentication.spi.AMLoginModule abstract
class, and must implement the methods shown below.
Tip
The account lockout functionality in AM is triggered by counting invalid password exceptions, rather than invalid login exceptions.
To trigger account lockouts after repeated failed attempts, ensure your
modules throw InvalidPasswordException exceptions
instead of AuthLoginException exceptions when
appropriate, as per the code below.
See the ForgeRock Access Management Java SDK API Specification for reference.
public void init(Subject subject, Map sharedState, Map options)

// OpenAM calls the process() method when the user submits authentication
// information. The process() method determines what happens next:
// success, failure, or the next state specified by the order
// attribute in the callbacks XML file.
public int process(Callback[] callbacks, int state) throws LoginException

// OpenAM expects the getPrincipal() method to return an implementation of
// the java.security.Principal interface.
public Principal getPrincipal()
AM does not reuse authentication module instances. This means that you can store information specific to the authentication process in the instance.
The implementation, SampleAuth.java, is shown
below.
/**
 * DO NOT ALTER OR REMOVE COPYRIGHT NOTICES OR THIS HEADER.
 *
 * Copyright (c) 2011-2016 ForgeRock AS. All Rights Reserved
 *
 * The contents of this file are subject to the terms
 * of the Common Development and Distribution License
 * (the License). You may not use this file except in
 * compliance with the License.
 *
 * You can obtain a copy of the License at legal/CDDLv1.0.txt.
 * See the License for the specific language governing
 * permission and limitations under the License.
 *
 * When distributing Covered Code, include this CDDL
 * Header Notice in each file and include the License file at legal/CDDLv1.0.txt.
 * If applicable, add the following below the CDDL Header,
 * with the fields enclosed by brackets [] replaced by
 * your own identifying information:
 * "Portions Copyrighted [year] [name of copyright owner]"
 *
 */

package org.forgerock.openam.examples;

import java.security.Principal;
import java.util.Map;
import java.util.ResourceBundle;

import javax.security.auth.Subject;
import javax.security.auth.callback.Callback;
import javax.security.auth.callback.NameCallback;
import javax.security.auth.callback.PasswordCallback;
import javax.security.auth.login.LoginException;

import com.sun.identity.authentication.spi.AMLoginModule;
import com.sun.identity.authentication.spi.AuthLoginException;
import com.sun.identity.authentication.spi.InvalidPasswordException;
import com.sun.identity.authentication.util.ISAuthConstants;
import com.sun.identity.shared.datastruct.CollectionHelper;
import com.sun.identity.shared.debug.Debug;

/**
 * SampleAuth authentication module example.
 *
 * If you create your own module based on this example, you must modify all
 * occurrences of "SampleAuth" in addition to changing the name of the class.
 *
 * Please refer to OpenAM documentation for further information.
 *
 * Feel free to look at the code for authentication modules delivered with
 * OpenAM, as they implement this same API.
 */
public class SampleAuth extends AMLoginModule {

    // Name for the debug-log
    private final static String DEBUG_NAME = "SampleAuth";
    private final static Debug debug = Debug.getInstance(DEBUG_NAME);

    // Name of the resource bundle
    private final static String amAuthSampleAuth = "amAuthSampleAuth";

    // User names for authentication logic
    private final static String USERNAME = "demo";
    private final static String PASSWORD = "changeit";

    private final static String ERROR_1_USERNAME = "test1";
    private final static String ERROR_2_USERNAME = "test2";

    // Orders defined in the callbacks file
    private final static int STATE_BEGIN = 1;
    private final static int STATE_AUTH = 2;
    private final static int STATE_ERROR = 3;

    // Errors properties
    private final static String SAMPLE_AUTH_ERROR_1 = "sampleauth-error-1";
    private final static String SAMPLE_AUTH_ERROR_2 = "sampleauth-error-2";

    private Map<String, String> options;
    private ResourceBundle bundle;
    private Map<String, String> sharedState;

    public SampleAuth() {
        super();
    }


    /**
     * This method stores service attributes and localized properties for later
     * use.
     * @param subject
     * @param sharedState
     * @param options
     */
    @Override
    public void init(Subject subject, Map sharedState, Map options) {

        debug.message("SampleAuth::init");

        this.options = options;
        this.sharedState = sharedState;
        this.bundle = amCache.getResBundle(amAuthSampleAuth, getLoginLocale());
    }

    @Override
    public int process(Callback[] callbacks, int state) throws LoginException {

        debug.message("SampleAuth::process state: {}", state);

        switch (state) {

            case STATE_BEGIN:
                // No time wasted here - simply modify the UI and
                // proceed to next state
                substituteUIStrings();
                return STATE_AUTH;

            case STATE_AUTH:
                // Get data from callbacks. Refer to callbacks XML file.
                NameCallback nc = (NameCallback) callbacks[0];
                PasswordCallback pc = (PasswordCallback) callbacks[1];
                String username = nc.getName();
                String password = String.valueOf(pc.getPassword());

                //First errorstring is stored in "sampleauth-error-1" property.
                if (ERROR_1_USERNAME.equals(username)) {
                    setErrorText(SAMPLE_AUTH_ERROR_1);
                    return STATE_ERROR;
                }

                //Second errorstring is stored in "sampleauth-error-2" property.
                if (ERROR_2_USERNAME.equals(username)) {
                    setErrorText(SAMPLE_AUTH_ERROR_2);
                    return STATE_ERROR;
                }

                if (USERNAME.equals(username) && PASSWORD.equals(password)) {
                    debug.message("SampleAuth::process User '{}' " +
                            "authenticated with success.", username);
                    return ISAuthConstants.LOGIN_SUCCEED;
                }

                throw new InvalidPasswordException("password is wrong",
                        USERNAME);

            case STATE_ERROR:
                return STATE_ERROR;
            default:
                throw new AuthLoginException("invalid state");
        }
    }

    @Override
    public Principal getPrincipal() {
        return new SampleAuthPrincipal(USERNAME);
    }

    private void setErrorText(String err) throws AuthLoginException {
        // Receive correct string from properties and substitute the
        // header in callbacks order 3.
        substituteHeader(STATE_ERROR, bundle.getString(err));
    }

    private void substituteUIStrings() throws AuthLoginException {
        // Get service specific attribute configured in OpenAM
        String ssa = CollectionHelper.getMapAttr(options, "specificAttribute");

        // Get property from bundle
        String new_hdr = ssa + " " +
                bundle.getString("sampleauth-ui-login-header");
        substituteHeader(STATE_AUTH, new_hdr);

        replaceCallback(STATE_AUTH, 0, new NameCallback(
                bundle.getString("sampleauth-ui-username-prompt")));
        replaceCallback(STATE_AUTH, 1, new PasswordCallback(
                bundle.getString("sampleauth-ui-password-prompt"), false));
    }
}The implementation, SampleAuthPrincipal.java, is
shown below.
/**
 * DO NOT ALTER OR REMOVE COPYRIGHT NOTICES OR THIS HEADER.
 *
 * Copyright (c) 2011-2016 ForgeRock AS. All Rights Reserved
 *
 * The contents of this file are subject to the terms
 * of the Common Development and Distribution License
 * (the License). You may not use this file except in
 * compliance with the License.
 *
 * You can obtain a copy of the License at legal/CDDLv1.0.txt.
 * See the License for the specific language governing
 * permission and limitations under the License.
 *
 * When distributing Covered Code, include this CDDL
 * Header Notice in each file and include the License file at legal/CDDLv1.0.txt.
 * If applicable, add the following below the CDDL Header,
 * with the fields enclosed by brackets [] replaced by
 * your own identifying information:
 * "Portions Copyrighted [year] [name of copyright owner]"
 *
 */

package org.forgerock.openam.examples;

import java.io.Serializable;
import java.security.Principal;

/**
 * SampleAuthPrincipal represents the user entity.
 */
public class SampleAuthPrincipal implements Principal, Serializable {
    private final static String COLON = " : ";

    private final String name;

    public SampleAuthPrincipal(String name) {

        if (name == null) {
            throw new NullPointerException("illegal null input");
        }

        this.name = name;
    }

    /**
     * Return the LDAP username for this SampleAuthPrincipal.
     *
     * @return the LDAP username for this SampleAuthPrincipal
     */
    @Override
    public String getName() {
        return name;
    }

    /**
     * Return a string representation of this SampleAuthPrincipal.
     *
     * @return a string representation of this
     *         TestAuthModulePrincipal.
     */
    @Override
    public String toString() {
        return new StringBuilder().append(this.getClass().getName())
                .append(COLON).append(name).toString();
    }

    /**
     * Compares the specified Object with this SampleAuthPrincipal
     * for equality. Returns true if the given object is also a
     *  SampleAuthPrincipal  and the two SampleAuthPrincipal have
     * the same username.
     *
     * @param o Object to be compared for equality with this
     *          SampleAuthPrincipal.
     * @return true if the specified Object is equal equal to this
     *         SampleAuthPrincipal.
     */
    @Override
    public boolean equals(Object o) {
        if (o == null) {
            return false;
        }

        if (this == o) {
            return true;
        }

        if (!(o instanceof SampleAuthPrincipal)) {
            return false;
        }
        SampleAuthPrincipal that = (SampleAuthPrincipal) o;

        if (this.getName().equals(that.getName())) {
            return true;
        }
        return false;
    }

    /**
     * Return a hash code for this SampleAuthPrincipal.
     *
     * @return a hash code for this SampleAuthPrincipal.
     */
    @Override
    public int hashCode() {
        return name.hashCode();
    }
}AM requires that all authentication modules be configured by means
of an AM service. At minimum, the service must include an authentication
level attribute. Your module can access these configuration attributes in
the options parameter passed to the
init() method.
Some observations about the service configuration file follow in the list below.
The document type for a service configuration file is described in
WEB-INF/sms.dtdwhere AM is deployed.The service name is derived from the module name. The service name must have the following format:
It must start with either
iPlanetAMAuthorsunAMAuth.The module name must follow. The case of the module name must match the case of the class that implements the custom authentication module.
It must end with
Service.
In the Sample Auth service configuration, the module name is
SampleAuthand the service name isiPlanetAMAuthSampleAuthService.The service must have a localized description, retrieved from a properties file.
The
i18nFileNameattribute in the service configuration holds the default (non-localized) base name of the Java properties file. Thei18nKeyattributes indicate properties keys to string values in the Java properties file.The authentication level attribute name must have the following format:
It must start with
iplanet-am-auth-,sun-am-auth-, orforgerock-am-auth-.The module name must follow, and must appear in lower case if the attribute name starts with
iplanet-am-auth-orforgerock-am-auth-. If the attribute name starts withsun-am-auth-, it must exactly match the case of the module name as it appears in the service name.It must end with
-auth-level.
In the Sample Auth service configuration, the authentication level attribute name is
iplanet-am-auth-sampleauth-auth-level.The Sample Auth service configuration includes an example
sampleauth-service-specific-attribute, which can be configured through the AM console.
The service configuration file,
amAuthSampleAuth.xml, is shown below.
Save a local copy of this file, which you use when registering the module.
<?xml version="1.0" encoding="UTF-8"?>
<!--
   DO NOT ALTER OR REMOVE COPYRIGHT NOTICES OR THIS HEADER.

   Copyright (c) 2011-2016 ForgeRock AS.

   The contents of this file are subject to the terms
   of the Common Development and Distribution License
   (the License). You may not use this file except in
   compliance with the License.

   You can obtain a copy of the License at legal/CDDLv1.0.txt.
   See the License for the specific language governing
   permission and limitations under the License.

   When distributing Covered Code, include this CDDL
   Header Notice in each file and include the License file at legal/CDDLv1.0.txt.
   If applicable, add the following below the CDDL Header,
   with the fields enclosed by brackets [] replaced by
   your own identifying information:
   "Portions Copyrighted [year] [name of copyright owner]"
-->
<!DOCTYPE ServicesConfiguration
    PUBLIC "=//iPlanet//Service Management Services (SMS) 1.0 DTD//EN"
    "jar://com/sun/identity/sm/sms.dtd">

<ServicesConfiguration>
 <Service name="iPlanetAMAuthSampleAuthService" version="1.0">
  <Schema
   serviceHierarchy="/DSAMEConfig/authentication/iPlanetAMAuthSampleAuthService"
   i18nFileName="amAuthSampleAuth" revisionNumber="10"
   i18nKey="sampleauth-service-description" resourceName="sample">
   <Organization>
    <!-- Specify resourceName for a JSON-friendly property in the REST SMS -->
    <AttributeSchema name="iplanet-am-auth-sampleauth-auth-level" resourceName="authLevel"
     type="single" syntax="number_range" rangeStart="0" rangeEnd="2147483647"
     i18nKey="a500">
     <DefaultValues>
      <Value>1</Value>
     </DefaultValues>
    </AttributeSchema>

    <!-- No need for resourceName when the name is JSON-compatible -->
    <AttributeSchema name="specificAttribute"
     type="single" syntax="string" validator="no" i18nKey="a501" />

    <!--
     For Auth Modules, the parent Schema element specifies the REST SMS resourceName,
     and the nested SubSchema must have resourceName="USE-PARENT"
    -->
    <SubSchema name="serverconfig" inheritance="multiple" resourceName="USE-PARENT">
     <AttributeSchema name="iplanet-am-auth-sampleauth-auth-level" resourceName="authLevel"
      type="single" syntax="number_range" rangeStart="0" rangeEnd="2147483647"
      i18nKey="a500">
      <DefaultValues>
       <Value>1</Value>
      </DefaultValues>
     </AttributeSchema>

     <!-- No need for a DefaultValues element when the default is blank -->
     <AttributeSchema name="specificAttribute"
      type="single" syntax="string" validator="no" i18nKey="a501" />

    </SubSchema>
   </Organization>
  </Schema>
 </Service>
</ServicesConfiguration>Build the module with Apache Maven, and install the module in AM.
For information on downloading and building AM sample source code, see How do I access and build the sample code provided for OpenAM 12.x, 13.x and AM (All versions)? in the Knowledge Base.
Installing the sample authentication module consists of copying the
.jar file to AM's WEB-INF/lib/
directory, registering the module with AM, and then restarting AM or
the web application container where it runs.
Copy the sample authentication module
.jarfile toWEB-INF/lib/where AM is deployed.$ cp target/custom*.jar /path/to/tomcat/webapps/openam/WEB-INF/lib/
Restart AM or the container in which it runs.
For example if you deployed AM in Apache Tomcat, then you shut down Tomcat and start it again.
$ /path/to/tomcat/bin/shutdown.sh
$ /path/to/tomcat/bin/startup.sh
$ tail -1 /path/to/tomcat/logs/catalina.out
INFO: Server startup in 14736 ms
Authentication modules are registered as services with AM globally, and then set up for use in a particular realm. In this example, you set up the sample authentication module for use in the realm / (Top Level Realm).
Log in to the AM console as an administrator,
such as amadmin, and browse to Realms
> Top Level Realm > Authentication > Modules.
Click Add Module to create an instance of the Sample Authentication Module.
Name the module Sample.
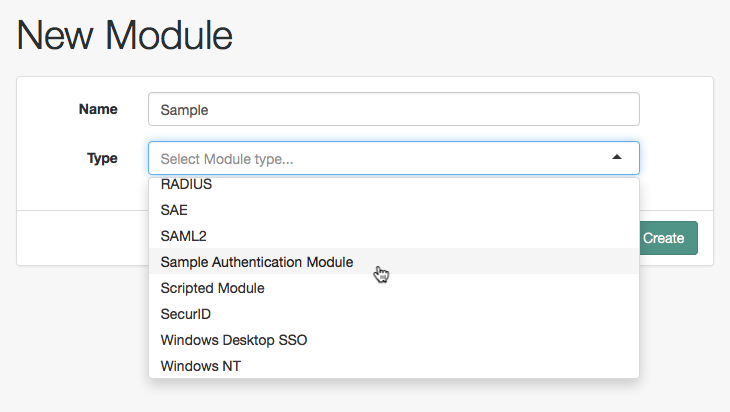
Click Create, and then configure the authentication module as appropriate.
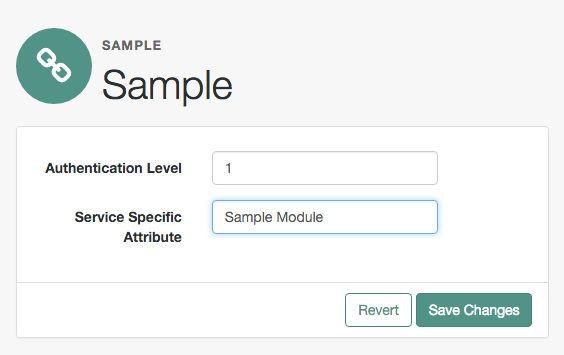
Now that the module is configured, log out of the AM console.
Finally, try the module by specifying the Sample
module. Browse to the login URL such as
https://openam.example.com:8443/openam/XUI/?realm=/&module=Sample#login,
and then authenticate with user name demo and password
changeit.

After authentication you are redirected to the end user page for
the demo user. You can logout of the AM console, and then try to
authenticate as the non-existent user test123
to see what the error handling looks like to the user.
This section demonstrates how to use the default server-side authentication script. An authentication script can be called from a Scripted authentication module.
The default server-side authentication script only authenticates a
subject when the current time on the AM server is between 09:00 and 17:00.
The script also uses the logger and
httpClient functionality provided in the scripting
API.
To examine the contents of the default server-side authentication script in the AM console browse to Realms > Top Level Realm > Scripts, and then click Scripted Module - Server Side.
For general information about scripting in AM, see "About Scripting".
For information about APIs available for use when scripting authentication, see the following sections:
AM requires a small amount of configuration before trying the example
server-side authentication script. You must create an authentication module of the
Scripted type, and then include it in an authentication chain, which
can then be used when logging in to AM. You must also ensure the
demo user has an associated postal address.
The procedures in this section are:
In this procedure, create a Scripted Authentication module, and link it to the default server-side authentication script.
Log in as an AM administrator, for example
amadmin.Navigate to Realms > Top Level Realm > Authentication > Modules.
On the Authentication Modules page, click Add Module.
On the New Module page, enter a module name, such as
myScriptedAuthModule, from the Type drop-down list, selectScripted Module, and then click Create.On the module configuration page:
Uncheck the Client-side Script Enabled checkbox.
From the Server-side Script drop-down list, select
Scripted Module - Server Side.Click Save Changes.
In this procedure, create an authentication chain that uses a Data Store authentication module and the Scripted authentication module created in the previous procedure.
Log in as an AM administrator, for example
amadmin.Navigate to Realms > Top Level Realm > Authentication > Chains.
On the Authentication Chains page, click Add Chain.
On the Add Chain page, enter a name, such as
myScriptedChain, and then click Create.On the Edit Chain tab, click Add a Module.
In the New Module dialog box:
From the Select Module drop-down list, select
DataStore.From the Select Criteria drop-down list, select
Required.Click OK.
Note
The Data Store authentication module checks the user credentials, whereas the Scripted authentication module does not check credentials, but instead only checks that the authentication request is processed during working hours. Without the Data Store module, the username in the Scripted authentication module cannot be determined. Therefore, do not configure the Scripted authentication module (server-side script) as the first module in an authentication chain, because it needs a username.
On the Edit Chain tab, click Add Module.
In the New Module dialog box:
From the Select Module drop-down list, select the Scripted Module from the previous procedure, for example
myScriptedAuthModule.From the Select Criteria drop-down list, select
Required.Click OK.
The resulting chain resembles the following:
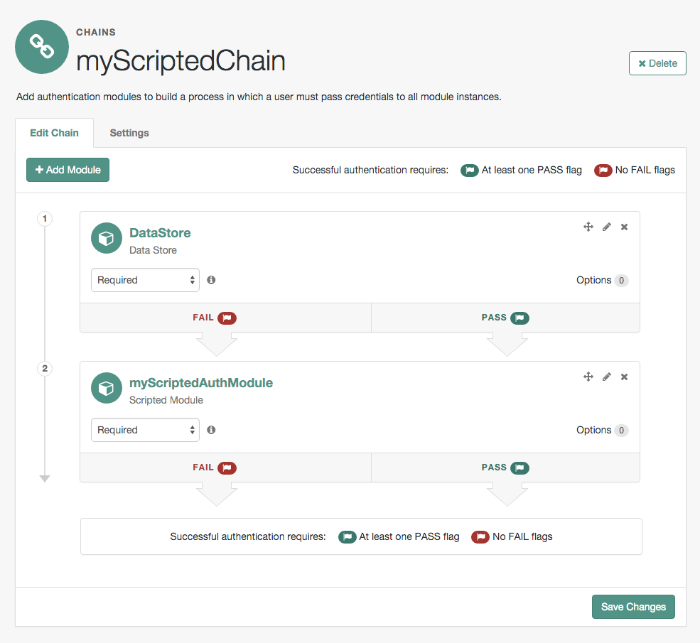
On the Edit Chain tab, click Save Changes.
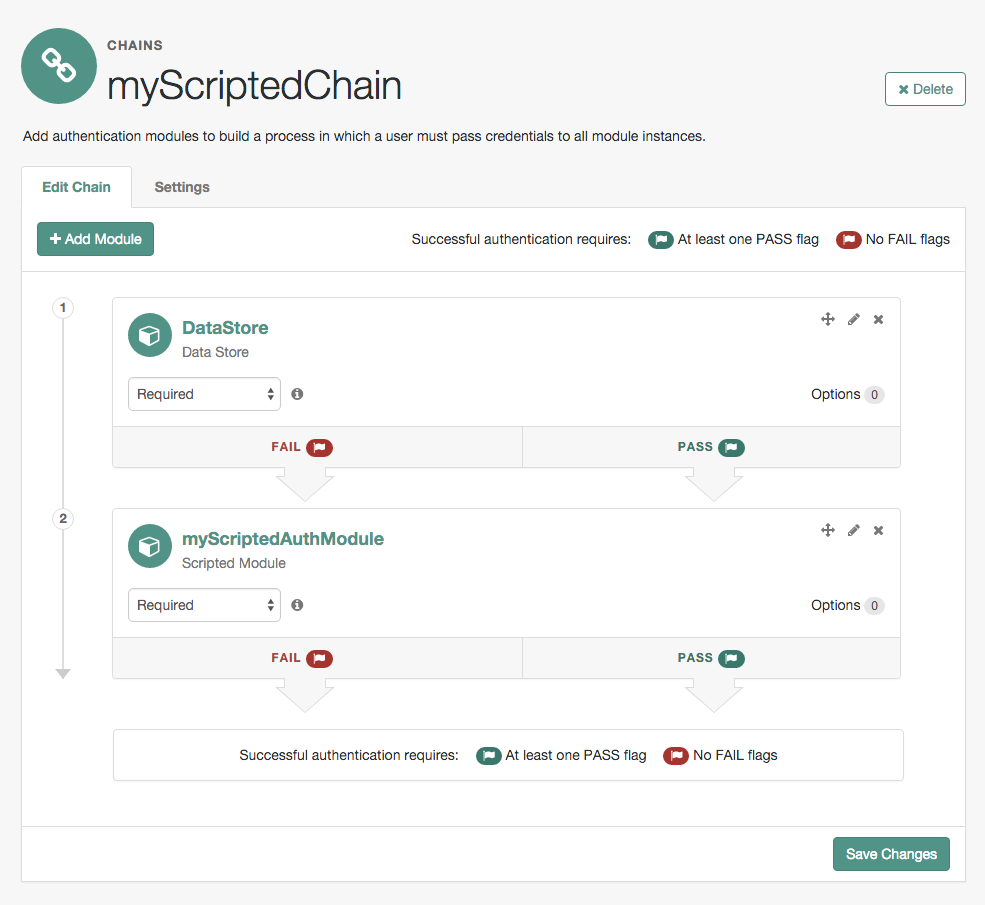
Log in as an AM administrator, for example
amadmin.Navigate to Realms > Top Level Realm > Identities.
On the Identities tab, click the
demouser.In the Home Address field, enter a valid postal address, with lines separated by commas.
For example:
ForgeRock Inc., 201 Mission St #2900, San Francisco, CA 94105, USASave your changes.
This section shows how to log in using an authentication chain that contains a Scripted authentication module, which in turn uses the default server-side authentication script.
The default server-side authentication script gets the postal address of a user after they authenticate using a Data Store authentication module, and then makes an HTTP call to an external web service to determine the longitude and latitude of the address. Using these details, a second HTTP call is performed to get the local time at those coordinates. If that time is between two preset limits, authentication is allowed, and the user is given a session and redirected to the profile page.
Log out of AM.
In a browser, navigate to the AM login URL, and specify the authentication chain created in the previous procedure as the value of the
serviceparameter.For example:
https://openam.example.com:8443/openam/XUI/#login/&service=myScriptedChain
Log in as user
demowith passwordchangeit.If login is successful, the user profile page appears. The script will also output messages, such as the following in the
debug/Authenticationlog file:Starting scripted authentication amScript:02/27/2017 03:22:42:881 PM GMT: Thread[ScriptEvaluator-5,5,main]: TransactionId[7635cd7c-ea97-4be6-8694-9e2be8642d56-8581] User: demo amScript:02/27/2017 03:22:42:882 PM GMT: Thread[ScriptEvaluator-5,5,main]: TransactionId[7635cd7c-ea97-4be6-8694-9e2be8642d56-8581] User address: ForgeRock Inc., 201 Mission St #2900, San Francisco, CA 94105, USA amScript:02/27/2017 03:22:42:929 PM GMT: Thread[ScriptEvaluator-5,5,main]: TransactionId[7635cd7c-ea97-4be6-8694-9e2be8642d56-8581] User REST Call. Status: [Status: 200 OK] amScript:02/27/2017 03:27:31:646 PM GMT: Thread[ScriptEvaluator-7,5,main]: TransactionId[7635cd7c-ea97-4be6-8694-9e2be8642d56-8581] latitude:37.7914374 longitude:-122.3950694 amScript:02/27/2017 03:27:31:676 PM GMT: Thread[ScriptEvaluator-7,5,main]: TransactionId[7635cd7c-ea97-4be6-8694-9e2be8642d56-8581] User REST Call. Status: [Status: 200 OK] amScript:02/27/2017 03:27:31:676 PM GMT: Thread[ScriptEvaluator-7,5,main]: TransactionId[7635cd7c-ea97-4be6-8694-9e2be8642d56-8581] Current time at the users location: 10 amScript:02/27/2017 03:27:31:676 PM GMT: Thread[ScriptEvaluator-7,5,main]: TransactionId[7635cd7c-ea97-4be6-8694-9e2be8642d56-8581] Authentication allowed! amLoginModule:02/27/2017 03:27:31:676 PM GMT: Thread[http-nio-8080-exec-4,5,main]: TransactionId[7635cd7c-ea97-4be6-8694-9e2be8642d56-8581] Login NEXT State : -1 amLoginModule:02/27/2017 03:27:31:676 PM GMT: Thread[http-nio-8080-exec-4,5,main]: TransactionId[7635cd7c-ea97-4be6-8694-9e2be8642d56-8581] SETTING Module name.... :myScriptedAuthModule amAuth:02/27/2017 03:27:31:676 PM GMT: Thread[http-nio-8080-exec-4,5,main]: TransactionId[7635cd7c-ea97-4be6-8694-9e2be8642d56-8581] Module name is .. myScriptedAuthModule amAuth:02/27/2017 03:27:31:676 PM GMT: Thread[http-nio-8080-exec-4,5,main]: TransactionId[7635cd7c-ea97-4be6-8694-9e2be8642d56-8581] successModuleSet is : [DataStore, myScriptedAuthModule] amJAAS:02/27/2017 03:27:31:676 PM GMT: Thread[http-nio-8080-exec-4,5,main]: TransactionId[7635cd7c-ea97-4be6-8694-9e2be8642d56-8581] login successTip
The default server-side authentication script outputs log messages at the
messageanderrorlevel.AM does not log debug messages from scripts by default. You can configure AM to log such messages by setting the debug log level for the
amScriptservice. For details, see "Debug Logging By Service" in the Setup and Maintenance Guide.(Optional) To test that the script is being used as part of the login process, edit the script to alter the times when authentication is allowed:
Log out the
demouser.Log in as an AM administrator, for example
amadmin.Navigate to Realms > Top Level Realm > Scripts > Scripted Module - Server Side.
In the script, swap the values for
START_TIMEandEND_TIME, for example:var START_TIME = 17; var END_TIME = 9; //
Click Save.
Repeat steps 1, 2, and 3 above, logging into the module as the
demouser as before. The authentication result will be the opposite of the previous result, as the allowed times have inverted.
Post-authentication plugins (PAP) let you include custom processing at the following places in the authentication cycle:
At the end of the authentication process, immediately before a user is authenticated
When a user logs out of an AM session
A common use of post-authentication plugins is to set state information in the session object in conjunction with web or Java agents. The post-authentication plugin sets custom session properties, and then the web or Java agent injects the custom properties into the header sent to the protected application.
Two issues should be considered when writing a post-authentication plugin for an AM deployment that uses client-based sessions:
- Cookie size
You can set an unlimited number of session properties in a post authentication plugin. When AM creates a client-based session, it writes the session properties into the session cookie, increasing the size of the cookie. Very large session cookies can exceed browser limitations. Therefore, when implementing a post-authentication plugin in a deployment with client-based sessions, be sure to monitor the session cookie size and verify that you have not exceeded browser cookie size limits.
For more information about client-based session cookies, see "Session Cookies".
- Cookie security
The AM administrator secures custom session properties in sessions residing in the CTS token store by using firewalls and other typical security techniques.
However, when using client-based sessions, custom session properties are written in cookies and reside on end users' systems. Cookies can be long-lasting and might represent a security issue if any session properties are of a sensitive nature. When developing a post authentication plugin for a deployment that uses client-based sessions, be sure that you are aware of the measures securing the session contained within the cookie.
For more information about client-based session cookie security, see "Configuring Client-Based Session and Authentication Session Security".
This section explains how to create a post-authentication plugin.
Your post-authentication plugin class implements the
AMPostAuthProcessInterface interface, and in particular
the following three methods.
public void onLoginSuccess(
  Map requestParamsMap,
  HttpServletRequest request,
  HttpServletResponse response,
  SSOToken token
) throws AuthenticationException

public void onLoginFailure(
  Map requestParamsMap,
  HttpServletRequest request,
  HttpServletResponse response
) throws AuthenticationException

public void onLogout(
  HttpServletRequest request,
  HttpServletResponse response,
  SSOToken token
) throws AuthenticationException
AM calls the onLoginSuccess() and
onLoginFailure() methods immediately before informing the
user of login success or failure, respectively. AM calls the
onLogout() method only when the user actively logs out,
not when a user's session times out.
See the ForgeRock Access Management Java SDK API Specification for
reference.
These methods can perform whatever processing you require. Yet, know that AM calls your methods synchronously as part of the authentication process. Therefore, if your methods take a long time to complete, you will keep users waiting. Minimize the processing done in your post-authentication methods.
Important
Implementing a post-authentication processing plugin in the top level realm can have unexpected effects. OpenAM invokes a post-authentication plugin when the plugin is configured in the top level realm, which will then run for all types of authentication during startup, including user logins and internal administrative logins. The best practice first and foremost is to configure end-users to only log into subrealms, while administrators only log into the top level realm. If you need to execute the post-authentication plugin for administrative logins, make sure that the plugin can also handle internal authentications.
An alternate solution is to configure the post-authentication plugin on a per authentication chain basis, which can be configured separately for user logins or internal administrative logins.
Post-authentication plugins must be stateless: they do not maintain state between login and logout. Store any information that you want to save between login and logout in a session property. AM stores session properties in the CTS token store after login, and retrieves them from the token store as part of the logout process.
The following example post-authentication plugin sets a session property during successful login, writing to its debug log if the operation fails.
package com.forgerock.openam.examples;

import java.util.Map;

import com.iplanet.sso.SSOException;
import com.iplanet.sso.SSOToken;

import com.sun.identity.authentication.spi.AMPostAuthProcessInterface;
import com.sun.identity.authentication.spi.AuthenticationException;
import com.sun.identity.shared.debug.Debug;

import javax.servlet.http.HttpServletRequest;
import javax.servlet.http.HttpServletResponse;

public class SamplePAP implements AMPostAuthProcessInterface {
    private final static String PROP_NAME = "MyProperty";
    private final static String PROP_VALUE = "MyValue";
    private final static String DEBUG_FILE = "SamplePAP";

    protected Debug debug = Debug.getInstance(DEBUG_FILE);

    public void onLoginSuccess(
            Map requestParamsMap,
            HttpServletRequest request,
            HttpServletResponse response,
            SSOToken token
    ) throws AuthenticationException {
        try {
            token.setProperty(PROP_NAME, PROP_VALUE);
        } catch (SSOException e) {
            debug.error("Unable to set property");
        }
    }

    public void onLoginFailure(
            Map requestParamsMap,
            HttpServletRequest request,
            HttpServletResponse response
    ) throws AuthenticationException {
        // Not used
    }

    public void onLogout(
            HttpServletRequest request,
            HttpServletResponse response,
            SSOToken token
    ) throws AuthenticationException {
        // Not used
    }
}
If you have not already done so, download and build the sample code.
For information on downloading and building AM sample source code, see How do I access and build the sample code provided for OpenAM 12.x, 13.x and AM (All versions)? in the Knowledge Base.
In the sources, you find the following files:
pom.xmlApache Maven project file for the module
This file specifies how to build the sample post-authentication plugin, and also specifies its dependencies on AM components and on the Servlet API.
src/main/java/com/forgerock/openam/examples/SamplePAP.javaCore class for the sample post-authentication plugin
Once built, copy the .jar to the WEB-INF/lib directory
where you deployed AM.
$ cp target/*.jar /path/to/tomcat/webapps/openam/WEB-INF/lib/
Restart AM or the container in which it runs.
You can associate post-authentication plugins with realms or services (authentication chains). Where you configure the plugin depends on the scope to which the plugin should apply:
Plugins configured at the realm level are executed when authenticating to any authentication chain in the realm, provided the authentication chain does not have an associated plugin.
Plugins configured at the service level are executed if that authentication chain is used for authentication. Any plugins configured at the realm level will not execute.
In OpenAM Console, navigate to Realms > Realm
Name > Authentication > Settings > Post Authentication
Processing. In the Authentication Post Processing Classes list,
add the sample plugin class,
com.forgerock.openam.examples.SamplePAP,
and then click Save.
Alternatively, you can configure sample plugin for the realm by using the ssoadm command.
$ ssoadm set-svc-attrs \
 --adminid amadmin \
 --password-file /tmp/pwd.txt \
 --servicename iPlanetAMAuthService \
 --realm /myRealm \
 --attributevalues iplanet-am-auth-post-login-process-class=
 com.forgerock.openam.examples.SamplePAP
iPlanetAMAuthService under /myRealm was
 modified.
To test the sample post-authentication plugin,
login successfully to AM in the scope where the plugin is configured.
For example, if you configured your plugin for the realm,
/myRealm, specify the realm in the login URL.
http://openam.example.com:8080/openam/XUI/?realm=/myRealm#login
Although you will not notice anywhere in the user interface that AM calls your plugin, a web or Java agent or custom client code could retrieve the session property that your plugin added to the user session.
This section demonstrates a custom session quota exhaustion action plugin. AM calls a session quota exhaustion action plugin when a user tries to open more CTS-based sessions than their quota allows. Note that session quotas are not available for client-based sessions.
You only need a custom session quota exhaustion action plugin if the built-in actions are not flexible enough for your deployment. See "Implementing Session Quotas".
You build custom session quota exhaustion actions into a .jar that you then plug in to AM. You must also add your new action to the Session service configuration, and restart AM in order to be able to configure it for your use.
Your custom session quota exhaustion action implements the
com.iplanet.dpro.session.service.QuotaExhaustionAction
interface, overriding the action method.
The action method performs the action
when the session quota is met, and returns true
only if the request for a new session should not be granted.
The example in this section simply removes the first session it finds as the session quota exhaustion action.
package org.forgerock.openam.examples.quotaexhaustionaction;

import static org.forgerock.openam.session.SessionConstants.SESSION_DEBUG;
import com.google.inject.Key;
import com.google.inject.name.Names;
import com.iplanet.dpro.session.SessionException;
import com.iplanet.dpro.session.SessionID;
import com.iplanet.dpro.session.service.InternalSession;
import com.iplanet.dpro.session.service.QuotaExhaustionAction;
import com.sun.identity.shared.debug.Debug;
import org.forgerock.guice.core.InjectorHolder;
import org.forgerock.openam.session.Session;
import org.forgerock.openam.session.clientsdk.SessionCache;

import javax.inject.Inject;
import java.util.Map;

/**
 * This is a sample {@link QuotaExhaustionAction} implementation,
 * which randomly kills the first session it finds.
 */
public class SampleQuotaExhaustionAction implements QuotaExhaustionAction {

    private static Debug debug = InjectorHolder.getInstance(Key.get(Debug.class, Names.named(SESSION_DEBUG)));

    private final SessionCache sessionCache;

    public SampleQuotaExhaustionAction() {
        this.sessionCache = InjectorHolder.getInstance(SessionCache.class);
    }

    @Inject
    public SampleQuotaExhaustionAction(SessionCache sessionCache) {
        this.sessionCache = sessionCache;
    }

    /**
     * Check if the session quota for a given user has been exhausted and
     * if so perform the necessary actions. This implementation randomly
     * destroys the first session it finds.
     *
     * @param is               The InternalSession to be activated.
     * @param existingSessions All existing sessions that belong to the same
     *                         uuid (Map:sid->expiration_time).
     * @return true If the session activation request should be rejected,
     *              otherwise false.
     */
    @Override
    public boolean action(
            InternalSession is,
            Map<String, Long> existingSessions) {
        for (Map.Entry<String, Long> entry : existingSessions.entrySet()) {
            try {
                // Get a Session from the cache based on the session ID, and destroy it.
                SessionID sessionId = new SessionID(entry.getKey());
                Session session = sessionCache.getSession(sessionId);
                session.destroySession(sessionId);
                // Only destroy the first session.
                break;
            } catch (SessionException se) {
                if (debug.messageEnabled()) {
                    debug.message("Failed to destroy existing session.", se);
                }
                // In this case, deny the session activation request.
                return true;
            }
        }
        return false;
    }
}
If you have not already done so, download and build the sample code.
For information on downloading and building AM sample source code, see How do I access and build the sample code provided for OpenAM 12.x, 13.x and AM (All versions)? in the Knowledge Base.
In the sources, you find the following files:
pom.xmlApache Maven project file for the module
This file specifies how to build the sample plugin, and also specifies its dependencies on AM components and on the Servlet API.
src/main/java/org/forgerock/openam/examples/quotaexhaustionaction/SampleQuotaExhaustionAction.javaCore class for the sample quota exhaustion action plugin
Once built, copy the .jar to WEB-INF/lib/ where AM is deployed.
$ cp target/*.jar /path/to/tomcat/webapps/openam/WEB-INF/lib/
Using the ssoadm command, update the Session Service configuration:
$ ssoadm \
 set-attr-choicevals \
 --adminid amadmin \
 --password-file /tmp/pwd.txt \
 --servicename iPlanetAMSessionService \
 --schematype Global \
 --attributename iplanet-am-session-constraint-handler \
 --add \
 --choicevalues myKey=\
org.forgerock.openam.examples.quotaexhaustionaction.SampleQuotaExhaustionAction
Choice Values were set.
Extract amSession.properties
and if necessary the localized versions of this file
from openam-core-6.0.0.7.jar
to WEB-INF/classes/ where AM is deployed.
For example, if AM is deployed under
/path/to/tomcat/webapps/openam,
then you could run the following commands.
$ cd /path/to/tomcat/webapps/openam/WEB-INF/classes/
$ jar -xvf ../lib/openam-core-6.0.0.7.jar amSession.properties
inflated: amSession.properties
Add the following line to amSession.properties.
myKey=Randomly Destroy SessionRestart AM or the container in which it runs.
You can now use the new session quota exhaustion action. In the AM console, navigate to Configure > Global Services, click Session, scroll to Resulting behavior if session quota exhausted, and then choose an option.
Before moving to your test and production environments,
be sure to add your .jar file and updates to
amSession.properties
into a custom .war file that you can then deploy.
You must still update the Session service configuration
in order to use your custom session quota exhaustion action.
List session quota exhaustion actions by using the ssoadm command:
$ ssoadm \
 get-attr-choicevals \
 --adminid amadmin \
 --password-file /tmp/pwd.txt \
 --servicename iPlanetAMSessionService \
 --schematype Global \
 --attributename iplanet-am-session-constraint-handler

I18n Key                  Choice Value
------------------------- ---...-----------------------------------------
choiceDestroyOldSession   org...session.service.DestroyOldestAction
choiceDenyAccess          org...session.service.DenyAccessAction
choiceDestroyNextExpiring org...session.service.DestroyNextExpiringAction
choiceDestroyAll          org...session.service.DestroyAllAction
myKey                     org...examples...SampleQuotaExhaustionAction
Remove a session quota exhaustion action by using the ssoadm command:
$ ssoadm \
 remove-attr-choicevals \
 --adminid amadmin \
 --password-file /tmp/pwd.txt \
 --servicename iPlanetAMSessionService \
 --schematype Global \
 --attributename iplanet-am-session-constraint-handler \
 --choicevalues \
 org.forgerock.openam.examples.quotaexhaustionaction.SampleQuotaExhaustionAction
Choice Values were removed.
This reference section covers settings and the scripting API relating to authentication in AM.
Every AM realm has a set of authentication properties that applies to all authentication performed to that realm. The settings are referred to as core authentication attributes.
To configure core authentication attributes for an entire AM deployment, navigate to Configure > Authentication in the AM console, and then click Core Attributes.
To override the global core authentication configuration in a realm, navigate to Realms > Realm Name > Authentication > Settings in the AM console. Note that when you configure core authentication attributes in a realm, the Global Attributes tab does not appear.
ssoadm service name:
iPlanetAMAuthService
The following properties are available under the Global Attributes tab:
- Pluggable Authentication Module Classes
Lists the authentication modules classes available to AM. If you have custom authentication modules, add classes to this list that extend from the
com.sun.identity.authentication.spi.AMLoginModuleclass.For more information about custom authentication modules, see "Creating a Custom Authentication Module".
ssoadm attribute:
iplanet-am-auth-authenticators- LDAP Connection Pool Size
Sets a minimum and a maximum number of LDAP connections to be used by any authentication module that connects to a specific directory server. This connection pool is different than the SDK connection pool configured in
serverconfig.xmlfile.Format is
host:port:minimum:maximum.This attribute is for LDAP and Membership authentication modules only.
ssoadm attributes:
iplanet-am-auth-ldap-connection-pool-size- Default LDAP Connection Pool Size
Sets the default minimum and maximum number of LDAP connections to be used by any authentication module that connects to any directory server. This connection pool is different than the SDK connection pool configured in
serverconfig.xmlfile.Format is
minimum:maximum.When tuning for production, start with 10 minimum, 65 maximum. For example,
10:65.This attribute is for LDAP and Membership authentication modules only.
ssoadm attributes:
iplanet-am-auth-ldap-connection-pool-default-size- Remote Auth Security
When enabled, AM requires the authenticating application to send its SSO token. This allows AM to obtain the username and password associated with the application.
ssoadm attribute:
sunRemoteAuthSecurityEnabled- Keep Post Process Objects for Logout Processing
When enabled, AM stores instances of post-processing classes into the user session. When the user logs out, the original post-processing classes are called instead of new instances. This may be required for special logout processing.
Enabling this setting increases the memory usage of AM.
ssoadm attribute:
sunAMAuthKeepPostProcessInstances
The following properties are available under the Core tab:
- Administrator Authentication Configuration
Specifies the default authentication chain used when an administrative user, such as
amAdmin, logs in to the AM console.ssoadm attribute:
iplanet-am-auth-admin-auth-module- Organization Authentication Configuration
Specifies the default authentication chain used when a non-administrative user logs in to AM.
ssoadm attribute:
iplanet-am-auth-org-config
The following properties are available under the User Profile tab:
User ProfileSpecifies whether a user profile needs to exist in the user data store, or should be created on successful authentication. The possible values are:
true. Dynamic.After successful authentication, AM creates a user profile if one does not already exist. AM then issues the SSO token. AM creates the user profile in the user data store configured for the realm.
createAlias. Dynamic with User Alias.After successful authentication, AM creates a user profile that contains the
User Alias Listattribute, which defines one or more aliases for mapping a user's multiple profiles.ignore. Ignored.After successful authentication, AM issues an SSO token regardless of whether a user profile exists in the data store. The presence of a user profile is not checked.
Warning
Any functionality which needs to map values to profile attributes, such as SAML or OAuth 2.0, will not operate correctly if the User Profile property is set to
ignore.false. Required.After successful authentication, the user must have a user profile in the user data store configured for the realm in order for AM to issue an SSO token.
ssoadm attribute:
iplanet-am-auth-dynamic-profile-creation. Set this attribute's value to one of the following:true,createAlias,ignore, orfalse.- User Profile Dynamic Creation Default Roles
Specifies the distinguished name (DN) of a role to be assigned to a new user whose profile is created when either the
trueorcreateAliasoptions are selected under the User Profile property. There are no default values. The role specified must be within the realm for which the authentication process is configured.This role can be either an AM or Sun DSEE role, but it cannot be a filtered role. If you wish to automatically assign specific services to the user, you have to configure the Required Services property in the user profile.
This functionality is deprecated in the Release Notes.
ssoadm attribute:
iplanet-am-auth-default-role- Alias Search Attribute Name
After a user is successfully authenticated, the user's profile is retrieved. AM first searches for the user based on the data store settings. If that fails to find the user, AM will use the attributes listed here to look up the user profile. This setting accepts any data store specific attribute name.
ssoadm attribute:
iplanet-am-auth-alias-attr-nameNote
If the
Alias Search Attribute Nameproperty is empty, AM uses theiplanet-am-auth-user-naming-attrproperty from theiPlanetAmAuthService. Theiplanet-am-auth-user-naming-attrproperty is only configurable through the ssoadm command-line tool and not through the AM console.$ ssoadm get-realm-svc-attrs \ --adminid amadmin \ --password-file PATH_TO_PWDFILE \ --realm REALM \ --servicename iPlanetAMAuthService $ ssoadm set-realm-svc-attrs \ --adminid amadmin \ --password-file PATH_TO_PWDFILE \ --realm REALM \ --servicename iPlanetAMAuthService \ --attributevalues iplanet-am-auth-user-naming-attr=SEARCH_ATTRIBUTE
The following properties are available under the Account Lockout tab:
- Login Failure Lockout Mode
When enabled, AM deactivates the LDAP attribute defined in the Lockout Attribute Name property in the user's profile upon login failure. This attribute works in conjunction with the other account lockout and notification attributes.
ssoadm attribute:
iplanet-am-auth-login-failure-lockout-mode- Login Failure Lockout Count
Defines the number of attempts that a user has to authenticate within the time interval defined in Login Failure Lockout Interval before being locked out.
ssoadm attribute:
iplanet-am-auth-login-failure-count- Login Failure Lockout Interval
Defines the time in minutes during which failed login attempts are counted. If one failed login attempt is followed by a second failed attempt within this defined lockout interval time, the lockout count starts, and the user is locked out if the number of attempts reaches the number defined by the Login Failure Lockout Count property. If an attempt within the defined lockout interval time proves successful before the number of attempts reaches the number defined by the Login Failure Lockout Count property, the lockout count is reset.
ssoadm attribute:
iplanet-am-auth-login-failure-duration- Email Address to Send Lockout Notification
Specifies one or more email addresses to which notification is sent if a user lockout occurs.
Separate multiple addresses with spaces, and append
|locale|charsetto addresses for recipients in non-English locales.ssoadm attribute:
iplanet-am-auth-lockout-email-address- Warn User After N Failures
Specifies the number of authentication failures after which AM displays a warning message that the user will be locked out.
ssoadm attribute:
iplanet-am-auth-lockout-warn-user- Login Failure Lockout Duration
Defines how many minutes a user must wait after a lockout before attempting to authenticate again. Entering a value greater than 0 enables memory lockout and disables physical lockout. Memory lockout means the user's account is locked in memory for the number of minutes specified. The account is unlocked after the time period has passed.
ssoadm attribute:
iplanet-am-auth-lockout-duration- Lockout Duration Multiplier
Defines a value with which to multiply the value of the Login Failure Lockout Duration attribute for each successive lockout. For example, if Login Failure Lockout Duration is set to 3 minutes, and the Lockout Duration Multiplier is set to 2, the user is locked out of the account for 6 minutes. After the 6 minutes has elapsed, if the user again provides the wrong credentials, the lockout duration is then 12 minutes. With the Lockout Duration Multiplier, the lockout duration is incrementally increased based on the number of times the user has been locked out.
ssoadm attribute:
sunLockoutDurationMultiplier- Lockout Attribute Name
Defines the LDAP attribute used for physical lockout. The default attribute is
inetuserstatus, although the field in the AM console is empty. The Lockout Attribute Value field must also contain an appropriate value.ssoadm attribute:
iplanet-am-auth-lockout-attribute-name- Lockout Attribute Value
Specifies the action to take on the attribute defined in Lockout Attribute Name. The default value is
inactive, although the field in the AM console is empty. The Lockout Attribute Name field must also contain an appropriate value.ssoadm attribute:
iplanet-am-auth-lockout-attribute-value- Invalid Attempts Data Attribute Name
Specifies the LDAP attribute used to hold the number of failed authentication attempts towards Login Failure Lockout Count. Although the field appears empty in the AM console, AM stores this data in the
sunAMAuthInvalidAttemptsDataAttrNameattribute defined in thesunAMAuthAccountLockoutobjectclass by default.ssoadm attribute:
sunAMAuthInvalidAttemptsDataAttrName- Store Invalid Attempts in Data Store
When enabled, AM stores the information regarding failed authentication attempts as the value of the Invalid Attempts Data Attribute Name in the user data store. Information stored includes number of invalid attempts, time of last failed attempt, lockout time and lockout duration. Storing this information in the identity repository allows it to be shared among multiple instances of AM.
Enable this property to track invalid log in attempts when using CTS-based or client-based authentication sessions.
ssoadm attribute:
sunStoreInvalidAttemptsInDS
The following properties are available under the General tab:
- Default Authentication Locale
Specifies the default language subtype to be used by the Authentication Service. The default value is
en_US.ssoadm attribute:
iplanet-am-auth-locale- Identity Types
Lists the type or types of identities used during a profile lookup. You can choose more than one to search on multiple types if you would like AM to conduct a second lookup if the first lookup fails. The possible values are:
AgentSearches for identities under your agents.
agentgroupSearches for identities according to your established agent group.
agentonlySearches for identities only under your agents.
GroupSearches for identities according to your established groups.
UserSearches for identities according to your users.
Default:
AgentandUser.ssoadm attribute:
sunAMIdentityType- Pluggable User Status Event Classes
Specifies one or more Java classes used to provide a callback mechanism for user status changes during the authentication process. The Java class must implement the
com.sun.identity.authentication.spi.AMAuthCallBackinterface. AM supports account lockout and password changes. AM supports password changes through the LDAP authentication module, and so the feature is only available for the LDAP module.A
.jarfile containing the user status event class belongs in theWEB-INF/libdirectory of the deployed AM instance. If you do not build a.jarfile, add the class files underWEB-INF/classes.ssoadm attribute:
sunAMUserStatusCallbackPlugins- Use Client-Based Sessions
When enabled, AM assigns client-based sessions to users authenticating to this realm. Otherwise, AM users authenticating to this realm are assigned CTS-based sessions.
For more information about sessions, see "About Sessions".
ssoadm attribute:
openam-auth-stateless-sessions- Two Factor Authentication Mandatory
When enabled, users authenticating to a chain that includes a ForgeRock Authenticator (OATH) module are always required to perform authentication using a registered device before they can access AM. When not selected, users can opt to forego registering a device and providing a token and still successfully authenticate.
Letting users choose not to provide a verification token while authenticating carries implications beyond the
required,optional,requisite, orsufficientflag settings on the ForgeRock Authenticator (OATH) module in the authentication chain. For example, suppose you configured authentication as follows:The ForgeRock Authenticator (OATH) module is in an authentication chain.
The ForgeRock Authenticator (OATH) module has the
requiredflag set.Two Factor Authentication Mandatory is not selected.
Users authenticating to the chain can authenticate successfully without providing tokens from their devices. The reason for successful authentication in this case is that the
requiredsetting relates to the execution of the ForgeRock Authenticator (OATH) module itself. Internally, the ForgeRock Authenticator (OATH) module has the ability to forego processing a token while still returning a passing status to the authentication chain.Note
The
Two Factor Authentication Mandatoryproperty only applies to modules within authentication chains, and does not affect nodes within authentication trees.ssoadm attribute:
forgerockTwoFactorAuthMandatory- Default Authentication Level
Specifies the default authentication level for authentication modules.
ssoadm attribute:
iplanet-am-auth-default-auth-level
The following properties are available under the Trees tab:
- Authentication session state management scheme
Specifies the location where AM stores authentication sessions.
Possible values are:
CTS. AM stores authentication sessions in the CTS token store.JWT. AM sends the authentication session to the client as a JWT.In-Memory. AM stores authentication sessions in its memory.
Default:
JWT(new installations),In-Memory(after upgrade)ssoadm attribute:
openam-auth-authentication-sessions-state-management-scheme- Max duration (minutes)
Specifies the duration of the authentication session in minutes.
Default:
5ssoadm attribute:
openam-auth-authentication-sessions-max-duration- Enable whitelisting
When enabled, AM whitelists authentication sessions to protect them against replay attacks.
Default: Disabled
ssoadm attribute:
openam-auth-authentication-sessions-whitelist
The following properties are available under the Security tab:
- Module Based Authentication
When enabled, users can authenticate using module-based authentication. Otherwise, all attempts at authentication using the
module=module-namelogin parameter result in failure.ForgeRock recommends disabling module-based authentication in production environments.
ssoadm attribute:
sunEnableModuleBasedAuth- Persistent Cookie Encryption Certificate Alias
Specifies the key pair alias in the AM keystore to use for encrypting persistent cookies.
Default:
testssoadm attribute:
iplanet-am-auth-key-alias- Zero Page Login
When enabled, AM allows users to authenticate using only GET request parameters without showing a login screen.
Caution
Enable with caution as browsers can cache credentials and servers can log credentials when they are part of the URL.
AM always allows HTTP POST requests for zero page login.
Default: false (disabled)
ssoadm attribute:
openam.auth.zero.page.login.enabled- Zero Page Login Referer Whitelist
Lists the HTTP referer URLs for which AM allows zero page login. These URLs are supplied in the
RefererHTTP request header, allowing clients to specify the web page that provided the link to the requested resource.When zero page login is enabled, including the URLs for the pages from which to allow zero page login will provide some mitigation against Login Cross-Site Request Forgery (CSRF) attacks. Leave this list blank to allow zero page login from any Referer.
This setting applies for both HTTP GET and also HTTP POST requests for zero page login.
ssoadm attribute:
openam.auth.zero.page.login.referer.whitelist- Zero Page Login Allowed Without Referer?
When enabled, allows zero page login for requests without an HTTP
Refererrequest header. Zero page login must also be enabled.Enabling this setting reduces the risk of login CSRF attacks with zero page login enabled, but may potentially deny legitimate requests.
ssoadm attribute:
openam.auth.zero.page.login.allow.null.referer- Organization Authentication Signing Secret
Specifies a cryptographically-secure random-generated HMAC shared secret for signing RESTful authentication requests. When users attempt to authenticate to the XUI, AM signs a JSON Web Token (JWT) containing this shared secret. The JWT contains the authentication session ID, realm, and authentication index type value, but does not contain the user's credentials.
When modifying this value, ensure the new shared secret is Base-64 encoded and at least 128 bits in length.
ssoadm attribute:
iplanet-am-auth-hmac-signing-shared-secret
The following properties are available under the Post Authentication Processing tab:
- Default Success Login URL
Accepts a list of values that specifies where users are directed after successful authentication. The format of this attribute is
client-type|URLalthough the only value you can specify at this time is a URL which assumes the type HTML. The default value is/openam/console. Values that do not specify HTTP have that appended to the deployment URI.ssoadm attribute:
iplanet-am-auth-login-success-url- Default Failure Login URL
Accepts a list of values that specifies where users are directed after authentication has failed. The format of this attribute is
client-type|URLalthough the only value you can specify at this time is a URL which assumes the type HTML. Values that do not specify HTTP have that appended to the deployment URI.ssoadm attribute:
iplanet-am-auth-login-failure-url- Authentication Post Processing Classes
Specifies one or more Java classes used to customize post authentication processes for successful or unsuccessful logins. The Java class must implement the
com.sun.identity.authentication.spi.AMPostAuthProcessInterfaceAM interface.A
.jarfile containing the post processing class belongs in theWEB-INF/libdirectory of the deployed AM instance. If you do not build a.jarfile, add the class files underWEB-INF/classes. For deployment, add the.jarfile or classes into a custom AM.warfile.For information on creating post-authentication plugins, see "Creating Post-Authentication Plugins for Chains".
ssoadm attribute:
iplanet-am-auth-post-login-process-class- Generate UserID Mode
When enabled, the Membership module generates a list of alternate user identifiers if the one entered by a user during the self-registration process is not valid or already exists. The user IDs are generated by the class specified in the Pluggable User Name Generator Class property.
ssoadm attribute:
iplanet-am-auth-username-generator-enabled- Pluggable User Name Generator Class
Specifies the name of the class used to generate alternate user identifiers when Generate UserID Mode is enabled. The default value is
com.sun.identity.authentication.spi.DefaultUserIDGenerator.ssoadm attribute:
iplanet-am-auth-username-generator-class- User Attribute Mapping to Session Attribute
Enables the authenticating user's identity attributes (stored in the identity repository) to be set as session properties in the user's SSO token. The value takes the format
User-Profile-Attribute|Session-Attribute-Name. If Session-Attribute-Name is not specified, the value of User-Profile-Attribute is used. All session attributes contain theam.protectedprefix to ensure that they cannot be edited by the client applications.For example, if you define the user profile attribute as
mailand the user's email address, available in the user session, asuser.mail, the entry for this attribute would bemail|user.mail. After a successful authentication, theSSOToken.getProperty(String)method is used to retrieve the user profile attribute set in the session. The user's email address is retrieved from the user's session using theSSOToken.getProperty("am.protected.user.mail")method call.Properties that are set in the user session using User Attribute Mapping to Session Attributes cannot be modified (for example,
SSOToken.setProperty(String, String)). This results in anSSOException. Multivalued attributes, such asmemberOf, are listed as a single session variable with a|separator.When configuring authentication for a realm configured for client-based sessions, be careful not to add so many session attributes that the session cookie size exceeds the maximum allowable cookie size. For more information about client-based session cookies, see "Session Cookies".
ssoadm attribute:
sunAMUserAttributesSessionMapping
This section provides a reference to configuration properties for AM authentication modules.
ssoadm service name:
sunAMAuthADService
- Primary Active Directory Server, Secondary Active Directory Server
Specify the primary and secondary Active Directory server(s). AM attempts to contact the primary server(s) first, If no primary server is available, then AM attempts to contact the secondary server(s).
When authenticating users from a directory server that is remote to AM, set the primary server values, and optionally the secondary server values. Primary servers have priority over secondary servers.
To allow users to change passwords through AM, Active Directory requires that you connect over SSL. The default port for LDAP is 389. If you are connecting to Active Directory over SSL, the default port for LDAP/SSL is 636.
For SSL or TLS security, enable the SSL/TLS Access to Active Directory Server property. Make sure that AM can trust the Active Directory certificate when using this option.
ssoadm attributes are: primary is
iplanet-am-auth-ldap-server; secondary isiplanet-am-auth-ldap-server2.Both properties may take a single value in the form of
server:port, or more than one value in the form ofopenam_full_server_name | server:port; thus, allowing more than one primary or secondary remote server, respectively.Assuming a multi-data center environment, AM determines priority within the primary and secondary remote servers as follows:
Every LDAP server that is mapped to the current AM instance has highest priority.
For example, if you are connected to
openam1.example.comandldap1.example.comis mapped to that AM instance, then AM usesldap1.example.com.Every LDAP server that was not specifically mapped to a given AM instance has the next highest priority.
For example, if you have another LDAP server,
ldap2.example.com, that is not connected to a specific AM server and ifldap1.example.comis unavailable, AM connects to the next highest priority LDAP server,ldap2.example.com.LDAP servers that are mapped to different AM instances have the lowest priority.
For example, if
ldap3.example.comis connected toopenam3.example.comandldap1.example.comandldap2.example.comare unavailable, thenopenam1.example.comconnects toldap3.example.com.
- DN to Start User Search
Specifies the base DN from which AM searches for users to authenticate.
LDAP data is organized hierarchically, a bit like a file system on Windows or UNIX. More specific DNs likely result in better performance. When configuring the module for a particular part of the organization, you can perhaps start searches from a specific organizational unit, such as
OU=sales,DC=example,DC=com.If multiple entries exist with identical search attribute values, make this value specific enough to return only one entry.
ssoadm attribute:
iplanet-am-auth-ldap-base-dn- Bind User DN, Bind User Password
Specify the user and password to authenticate to Active Directory.
If AM stores attributes in Active Directory, for example to manage account lockout, or if Active Directory requires that AM authenticate in order to read users' attributes, then AM needs the DN and password to authenticate to Active Directory.
If the administrator authentication chain (default:
ldapService) has been configured to include only the Active Directory module, then make sure that the password is correct before you logout. If it is incorrect, you will be locked out. If you do get locked out, you can login with the superuser DN, which by default isuid=amAdmin,ou=People,AM-deploy-base, where AM-deploy-base was set during AM configuration.ssoadm attributes:
iplanet-am-auth-ldap-bind-dnandiplanet-am-auth-ldap-bind-passwd- Attribute Used to Retrieve User Profile, Attributes Used to Search for a User to be Authenticated, User Search Filter, Search Scope
LDAP searches for user entries with attribute values matching the filter you provide. For example, if you search under
CN=Users,DC=example,DC=comwith a filter"(MAIL=bjensen@example.com)", then the directory returns the entry that hasMAIL=bjensen@example.com. In this example the attribute used to search for a user ismail. Multiple attribute values mean the user can authenticate with any one of the values. For example, if you have bothuidandmail, then Barbara Jensen can authenticate with eitherbjensenorbjensen@example.com.The User Search Filter text box provides a more complex filter. For example, if you search on
mailand add User Search Filter(objectClass=inetOrgPerson), then AM uses the resulting search filter(&(mail=address) (objectClass=inetOrgPerson)), where address is the mail address provided by the user.This controls how and the level of the directory that will be searched. You can set the search to run at a high level or against a specific area:
OBJECT will search only for the entry specified as the DN to Start User Search.
ONELEVEL will search only the entries that are directly children of that object.
SUBTREE will search the entry specified and every entry under it.
ssoadm attributes:
iplanet-am-auth-ldap-user-naming-attribute,iplanet-am-auth-ldap-user-search-attributes,iplanet-am-auth-ldap-search-filter, andiplanet-am-auth-ldap-search-scope- LDAP Connection Mode
If you want to initiate secure communications to data stores using SSL or StartTLS, AM must be able to trust Active Directory certificates, either because the Active Directory certificates were signed by a CA whose certificate is already included in the trust store used by the container where AM runs, or because you imported the certificates into the trust store.
ssoadm attribute:
openam-auth-ldap-connection-modePossible values:
LDAP,LDAPS, andStartTLS- Return User DN to DataStore
When enabled, and AM uses Active Directory as the user store, the module returns the DN rather than the User ID, so the bind for authentication can be completed without a search to retrieve the DN.
ssoadm attribute:
iplanet-am-auth-ldap-return-user-dn- User Creation Attributes
Maps internal attribute names used by AM to external attribute names from Active Directory for dynamic profile creation. Values are of the format
internal_attr1|external_attr1.ssoadm attribute:
iplanet-am-ldap-user-creation-attr-list- Trust All Server Certificates
When enabled, the module trusts all server certificates, including self-signed certificates.
ssoadm attribute:
iplanet-am-auth-ldap-ssl-trust-all- LDAP Connection Heartbeat Interval
Specifies how often AM should send a heartbeat request to the directory server to ensure that the connection does not remain idle. Some network administrators configure firewalls and load balancers to drop connections that are idle for too long. You can turn this off by setting the value to 0 or to a negative number. To set the units for the interval, use LDAP Connection Heartbeat Time Unit.
Default: 1
ssoadm attribute:
openam-auth-ldap-heartbeat-interval- LDAP Connection Heartbeat Time Unit
Specifies the time unit corresponding to LDAP Connection Heartbeat Interval. Possible values are
SECONDS,MINUTES, andHOURS.ssoadm attribute:
openam-auth-ldap-heartbeat-timeunit- LDAP operations timeout
Defines the timeout in milliseconds that AM should wait for a response from the directory server.
Default: 0 (means no timeout)
ssoadm attribute:
openam-auth-ldap-operation-timeout- Authentication Level
Sets the authentication level used to indicate the level of security associated with the module. The value can range from 0 to any positive integer.
ssoadm attribute:
sunAMAuthADAuthLevel
ssoadm service name:
sunAMAuthAdaptiveService
The following properties are available under the General tab:
- Authentication Level
Sets the authentication level used to indicate the level of security associated with the module. The value can range from 0 to any positive integer.
ssoadm attribute:
openam-auth-adaptive-auth-level- Risk Threshold
Sets the risk threshold score. If the sum of the scores is greater than the threshold, the Adaptive Risk module fails.
Default: 1
ssoadm attribute:
openam-auth-adaptive-auth-threshold
The following properties are available under the Failed Authentications tab:
- Failed Authentication Check
When enabled, checks the user profile for authentication failures since the last successful login. This check therefore requires AM to have access to the user profile, and Account Lockout to be enabled (otherwise, AM does not record authentication failures).
ssoadm attribute:
openam-auth-adaptive-failure-check- Score
Sets the value to add to the total score if the user fails the Failed Authentication Check. Default: 1
ssoadm attribute:
openam-auth-adaptive-failure-score- Invert Result
When enabled, adds the score to the total score if the user passes the Failed Authentication Check.
ssoadm attribute:
openam-auth-adaptive-failure-invert
The following properties are available under the IP Address Range tab:
- IP Range Check
When enabled, checks whether the client IP address is within one of the specified IP Ranges.
ssoadm attribute:
openam-auth-adaptive-ip-range-check- IP Range
For IPv4, specifies a list of IP ranges either in CIDR-style notation (
x.x.x.x/YY) or as a range from one address to another (x.x.x.x-y.y.y.y, meaning from x.x.x.x to y.y.y.y).For IPv6, specifies a list of IP ranges either in CIDR-style notation (
X:X:X:X:X:X:X:X/YY) or as a range from one address to another (X:X:X:X:X:X:X:X-Y:Y:Y:Y:Y:Y:Y:Y, (X:X:X:X:X:X:X:X-Y:Y:Y:Y:Y:Y:Y:Y, meaning from X:X:X:X:X:X:X:X to Y:Y:Y:Y:Y:Y:Y:Y).ssoadm attribute:
openam-auth-adaptive-ip-range-range- Score
Sets the value to add to the total score if the user fails the IP Range Check.
ssoadm attribute:
openam-auth-adaptive-ip-range-score- Invert Result
When enabled, adds the Score to the total score if the user passes the IP Range Check.
ssoadm attribute:
openam-auth-adaptive-ip-range-invert
The following properties are available under the IP Address History tab:
- IP History Check
When enabled, checks whether the client IP address matches one of the known values stored on the profile attribute you specify. This check therefore requires that AM have access to the user profile.
ssoadm attribute:
openam-auth-adaptive-ip-history-check- History size
Specifies how many IP address values to retain on the profile attribute you specify.
Default: 5
ssoadm attribute:
openam-auth-ip-adaptive-history-count- Profile Attribute Name
Specifies the name of the user profile attribute in which to store known IP addresses. Ensure the specified attribute exists in your user data store; the
iphistoryattribute does not exist by default, and it is not created when performing AM schema updates.Default:
iphistoryssoadm attribute:
openam-auth-adaptive-ip-history-attribute- Save Successful IP Address
When enabled, saves new client IP addresses to the known IP address list following successful authentication.
ssoadm attribute:
openam-auth-adaptive-ip-history-save- Score
Sets the value to add to the total score if the user fails the IP History Check.
Default: 1
ssoadm attribute:
openam-auth-adaptive-ip-history-score- Invert Result
When enabled, adds the Score to the total score if the user passes the IP History Check.
ssoadm attribute:
openam-auth-adaptive-ip-history-invert
The following properties are available under the Known Cookie tab:
- Cookie Value Check
When enabled, checks whether the client browser request has the specified cookie and optional cookie value.
ssoadm attribute:
openam-auth-adaptive-known-cookie-check- Cookie Name
Specifies the name of the cookie for which AM checks when you enable the Cookie Value Check.
ssoadm attribute:
openam-auth-adaptive-known-cookie-name- Cookie Value
Specifies the value of the cookie for which AM checks. If no value is specified, AM does not check the cookie value.
ssoadm attribute:
openam-auth-adaptive-known-cookie-value- Save Cookie Value on Successful Login
When enabled, saves the cookie as specified in the client's browser following successful authentication. If no Cookie Value is specified, the value is set to 1.
ssoadm attribute:
openam-auth-adaptive-known-cookie-save- Score
Sets the value to add to the total score if user passes the Cookie Value Check.
Default: 1
ssoadm attribute:
openam-auth-adaptive-known-cookie-score- Invert Result
When enabled, adds the Score to the total score if the user passes the Cookie Value Check.
ssoadm attribute:
openam-auth-adaptive-known-cookie-invert
The following properties are available under the Device Cookie tab:
- Device Registration Cookie Check
When enabled, the cookie check passes if the client request contains the cookie specified in Cookie Name.
ssoadm attribute:
openam-auth-adaptive-device-cookie-check- Cookie Name
Specifies the name of the cookie for the Device Registration Cookie Check.
Default: Device
ssoadm attribute:
openam-auth-adaptive-device-cookie-name- Save Device Registration on Successful Login
When enabled, saves the specified cookie with a hashed device identifier value in the client's browser following successful authentication.
ssoadm attribute:
openam-auth-adaptive-device-cookie-save- Score
Sets the value to add to the total score if the user fails the Device Registration Cookie Check.
Default: 1
ssoadm attribute:
openam-auth-adaptive-device-cookie-score- Invert Result
When enabled, adds the Score to the total score if the user passes the Device Registration Cookie Check.
ssoadm attribute:
openam-auth-adaptive-device-cookie-invert
The following properties are available under the Time Since Last Login tab:
- Time since Last login Check
When enabled, checks whether the client browser request has the specified cookie that holds the encrypted last login time, and check that the last login time is more recent than a maximum number of days you specify.
ssoadm attribute:
openam-auth-adaptive-time-since-last-login-check- Cookie Name
Specifies the name of the cookie holding the encrypted last login time value.
ssoadm attribute:
openam-auth-adaptive-time-since-last-login-cookie-name- Max Time since Last login
Specifies a threshold age of the last login time in days. If the client's last login time is more recent than the number of days specified, then the client successfully passes the check.
ssoadm attribute:
openam-auth-adaptive-time-since-last-login-value- Save time of Successful Login
When enabled, saves the specified cookie with the current time encrypted as the last login value in the client's browser following successful authentication.
ssoadm attribute:
openam-auth-adaptive-time-since-last-login-save- Score
Sets the value to add to the total score if the user fails the Time Since Last Login Check.
Default: 1
ssoadm attribute:
openam-auth-adaptive-time-since-last-login-score- Invert Result
When enabled, adds the Score to the total score if the user passes the Time Since Last Login Check.
ssoadm attribute:
openam-auth-adaptive-time-since-last-login-invert
The following properties are available under the Profile Attribute tab:
- Profile Risk Attribute check
When enabled, checks whether the user profile contains the specified attribute and value.
ssoadm attribute:
openam-auth-adaptive-risk-attribute-check- Attribute Name
Specifies the attribute to check on the user profile for the specified value.
ssoadm attribute:
openam-auth-adaptive-risk-attribute-name- Attribute Value
Specifies the value to match on the profile attribute. If the attribute is multi-valued, a single match is sufficient to pass the check.
ssoadm attribute:
openam-auth-adaptive-risk-attribute-value- Score
Sets the value to add to the total score if the user fails the Profile Risk Attribute Check.
Default: 1
ssoadm attribute:
openam-auth-adaptive-risk-attribute-score- Invert Result
When enabled, adds the Score to the total score if the user passes the Profile Risk Attribute Check.
ssoadm attribute:
openam-auth-adaptive-risk-attribute-invert
The following properties are available under the Geo Location tab:
- Geolocation Country Code Check
When enabled, checks whether the client IP address location matches a country specified in the Valid Country Codes list.
ssoadm attribute:
forgerock-am-auth-adaptive-geo-location-check- Geolocation Database Location
Path to GeoIP data file used to convert IP addresses to country locations. The geolocation database is not packaged with AM. You can download the GeoIP Country database from MaxMind. Use the binary
.mmdbfile format, rather than.csv. You can use the GeoLite Country database for testing.ssoadm attribute:
openam-auth-adaptive-geo-location-database- Valid Country Codes
Specifies the list of country codes to match. Use
|to separate multiple values.ssoadm attribute:
openam-auth-adaptive-geo-location-values.- Score
Value to add to the total score if the user fails the Geolocation Country Code Check.
Default: 1
ssoadm attribute:
openam-auth-adaptive-geo-location-score- Invert Result
When enabled, adds the Score to the total score if the user passes the Geolocation Country Code Check.
ssoadm attribute:
openam-auth-adaptive-geo-location-invert
The following properties are available under the Request Header tab:
- Request Header Check
When enabled, checks whether the client browser request has the specified header with the correct value.
ssoadm attribute:
openam-auth-adaptive-req-header-check- Request Header Name
Specifies the name of the request header for the Request Header Check.
ssoadm attribute:
openam-auth-adaptive-req-header-name- Request Header Value
Specifies the value of the request header for the Request Header Check.
ssoadm attribute:
openam-auth-adaptive-req-header-value- Score
Value to add to the total score if the user fails the Request Header Check.
Default: 1
ssoadm attribute:
openam-auth-adaptive-req-header-score- Invert Result
When enabled, adds the Score to the total score if the user passes the Request Header Check.
ssoadm attribute:
openam-auth-adaptive-req-header-invert
ssoadm service name:
iPlanetAMAuthAnonymousService
- Valid Anonymous Users
Specifies the list of valid anonymous user IDs that can log in without submitting a password.
ssoadm attribute:
iplanet-am-auth-anonymous-users-listWhen user accesses the default module instance login URL, then the module prompts the user to enter a valid anonymous user name.
The default module instance login URL is defined as follows:
protocol://hostname:port/deploy_URI/XUI/#login?module=Anonymous&org=org_name
- Default Anonymous User Name
Specifies the user ID assigned by the module if the Valid Anonymous Users list is empty. The default value is
anonymous. Note that the anonymous user must be defined in the realm.ssoadm attribute:
iplanet-am-auth-anonymous-default-user-name- Case Sensitive User IDs
When enabled, determines whether case matters for anonymous user IDs.
ssoadm attribute:
iplanet-am-auth-anonymous-case-sensitive- Authentication Level
Sets the authentication level used to indicate the level of security associated with the module. The value can range from 0 (default) to any positive integer and is set for each authentication method. The higher number corresponds to a higher level of authentication. If you configured your authentication levels from a 0 to 5 scale, then an authentication level of 5 will require the highest level of authentication.
After a user has authenticated, AM stores the authentication level in the session token. When the user attempts to access a protected resource, the token is presented to the application. The application uses the token's value to determine if the user has the correct authentication level required to access the resource. If the user does not have the required authentication level, the application can prompt the user to authenticate with a higher authentication level.
ssoadm attribute:
iplanet-am-auth-anonymous-auth-level
ssoadm service name:
iPlanetAMAuthCertService
- Match Certificate in LDAP
When enabled, AM searches for a match for the user's certificate in the LDAP directory. If a match is found and not revoked according to a CRL or OCSP validation, then authentication succeeds.
ssoadm attribute:
iplanet-am-auth-cert-check-cert-in-ldap- Subject DN Attribute Used to Search LDAP for Certificates
Indicates which attribute and value in the certificate Subject DN is used to find the LDAP entry holding the certificate.
Default: CN
ssoadm attribute:
iplanet-am-auth-cert-attr-check-ldap- Match Certificate to CRL
When enabled, AM checks whether the certificate has been revoked according to a CRL in the LDAP directory.
ssoadm attribute:
iplanet-am-auth-cert-check-crl- Issuer DN Attribute Used to Search LDAP for CRLs
Indicates which attribute and value in the certificate Issuer DN is used to find the CRL in the LDAP directory.
Default: CN
If only one attribute is specified, the LDAP search filter used to find the CRL based on the Subject DN of the CA certificate is
(attr-name=attr-value-in-subject-DN).For example, if the subject DN of the issuer certificate is
C=US, CN=Some CA, serialNumber=123456, and the attribute specified isCN, then the LDAP search filter used to find the CRL is(CN=Some CA).In order to distinguish among different CRLs for the same CA issuer, specify multiple attributes separated by commas (
,) in the same order they occur in the subject DN. When multiple attribute names are provided in a comma-separated list, the LDAP search filter used is(cn=attr1=attr1-value-in-subject-DN,attr2=attr2-value-in-subject-DN,...,attrN=attrN-value-in-subject-DN).For example, if the subject DN of the issuer certificate is
C=US, CN=Some CA, serialNumber=123456, and the attributes specified areCN,serialNumber, then the LDAP search filter used to find the CRL is(cn=CN=Some CA,serialNumber=123456).ssoadm attribute:
iplanet-am-auth-cert-attr-check-crl- HTTP Parameters for CRL Update
Specifies parameters to be included in any HTTP CRL call to the CA that issued the certificate.
This property supports key pairs of values separated by commas, for example,
param1=value1,param2=value2.If the client or CA contains the Issuing Distribution Point Extension, AM uses this information to retrieve the CRL from the distribution point.
ssoadm attribute:
iplanet-am-auth-cert-param-get-crl- Match CA Certificate to CRL
When enabled, AM checks the CRL against the CA certificate to ensure it has not been compromised.
ssoadm attribute:
sunAMValidateCACert- Cache CRLs in memory
(LDAP distribution points only) When enabled, AM caches CRLs.
ssoadm attribute:
openam-am-auth-cert-attr-cache-crl- Update CA CRLs from CRLDistributionPoint
When enabled, AM updates the CRLs stored in the LDAP directory store.
ssoadm attribute:
openam-am-auth-cert-update-crl- OCSP Validation
When enabled, AM checks the revocation status of certificates using the Online Certificate Status Protocol (OCSP).
You must configure OSCP for AM under Configure > Server Defaults or Deployment > Servers > Server Name > Security.
ssoadm attribute:
iplanet-am-auth-cert-check-ocsp- LDAP Server Where Certificates are Stored
Identifies the LDAP server that holds users; certificates. The property has the format
ldap_server:port, for example,ldap1.example.com:636. To configure a secure connection, enable the Use SSL/TLS for LDAP Access property.AM servers can be associated with LDAP servers by writing multiple chains with the format
openam_server|ldapserver:port, for example,openam.example.com|ldap1.example.com:636.ssoadm attribute:
iplanet-am-auth-cert-ldap-provider-url- LDAP Search Start or Base DN
Valid base DN for the LDAP search, such as
dc=example,dc=com. To associate AM servers with§ different search base DNs, use the formatopenam_server|base_dn, for example,openam.example.com|dc=example,dc=com openam1.test.com|dc=test, dc=comssoadm attribute:
iplanet-am-auth-cert-start-search-loc- LDAP Server Authentication User, LDAP Server Authentication Password
If AM stores attributes in the LDAP directory, for example to manage account lockout, or if the LDAP directory requires that AM authenticate in order to read users' attributes, then AM needs the DN and password to authenticate to the LDAP directory.
ssoadm attributes:
iplanet-am-auth-cert-principal-user, andiplanet-am-auth-cert-principal-passwd- Use SSL/TLS for LDAP Access
If you use SSL/TLS for LDAP access, AM must be able to trust the LDAP server certificate.
ssoadm attribute:
iplanet-am-auth-cert-use-ssl- Certificate Field Used to Access User Profile
If the user profile is in a different entry from the user certificate, then this can be different from subject DN attribute used to find the entry with the certificate. When you select other, provide an attribute name in the Other Certificate Field Used to Access User Profile text box.
ssoadm attribute:
iplanet-am-auth-cert-user-profile-mapperValid values:
subject DN,subject CN,subject UID,email address,other, andnone.- Other Certificate Field Used to Access User Profile
This field is only used if the Certificate Field Used to Access User Profile attribute is set to other. This field allows a custom certificate field to be used as the basis of the user search.
ssoadm attribute:
iplanet-am-auth-cert-user-profile-mapper-other- SubjectAltNameExt Value Type to Access User Profile
Specifies how to look up the user profile:
Let the property default to
noneto give preference to the Certificate Field Used to Access User Profile or Other Certificate Field Used to Access User Profile attributes when looking up the user profile.Select
RFC822Nameif you want AM to look up the user profile from an RFC 822 style name.Select
UPNif you want AM to look up the user profile as the User Principal Name attribute used in Active Directory.
ssoadm attribute:
iplanet-am-auth-cert-user-profile-mapper-ext- Trusted Remote Hosts
Defines a list of hosts trusted to send certificates to AM, such as load balancers doing SSL termination.
Valid values are
none,any, andIP_ADDR, whereIP_ADDRis one or more IP addresses of trusted hosts that can send client certificates to AM.ssoadm attribute:
iplanet-am-auth-cert-gw-cert-auth-enabled- HTTP Header Name for Client Certificates
Specifies the name of the HTTP request header containing the PEM-encoded certificate. If Trusted Remote Hosts is set to
anyor specifies the IP address of the trusted host (for example, an SSL-terminated load balancer) that can supply client certificates to AM, the administrator must specify the header name in this attribute.ssoadm attribute:
sunAMHttpParamName- Use only Certificate from HTTP request header
When enabled, AM always uses the client certificate from the HTTP header rather than the certificate the servlet container receives during the SSL handshake.
Default: false
ssoadm attribute:
iplanet-am-auth-cert-gw-cert-preferred- Authentication Level
Sets the authentication level used to indicate the level of security associated with the module. The value can range from 0 to any positive integer.
ssoadm attribute:
iplanet-am-auth-cert-auth-level
ssoadm service name:
sunAMAuthDataStoreService
- Authentication Level
Sets the authentication level used to indicate the level of security associated with the module. The value can range from 0 to any positive integer.
ssoadm attribute:
sunAMAuthDataStoreAuthLevel
ssoadm service name:
iPlanetAMAuthDeviceIdMatchService
- Client-Side Script Enabled
Enable Device ID (Match) to send JavaScript in an authentication page to the device to collect data about the device by a self-submitting form.
ssoadm attribute:
iplanet-am-auth-scripted-client-script-enabled- Client-Side Script, Server-Side Script
Specify the client-side and server-side Javascript scripts to use with the Device Id (Match) module.
To view and modify the contents of the scripts, navigate to Realms > Realm Name > Scripts and select the name of the script.
If you change the client-side script, you must make a corresponding change in the server-side script to account for the specific addition or removal of an element.
ssoadm attribute:
iplanet-am-auth-scripted-client-scriptandiplanet-am-auth-scripted-server-script- Authentication Level
Sets the authentication level used to indicate the level of security associated with the module. The value can range from 0 to any positive integer.
ssoadm attribute:
iplanet-am-auth-scripted-auth-level
ssoadm service name:
iPlanetAMAuthDeviceIdSaveService
- Automatically store new profiles
When enabled, AM assumes user consent to store new profiles. After successful HOTP confirmation, AM stores the new profile automatically.
ssoadm attribute:
iplanet-am-auth-device-id-save-auto-store-profile- Maximum stored profile quantity
Sets the maximum number of stored profiles on the user's record.
ssoadm attribute:
iplanet-am-auth-device-id-save-max-profiles-allowed- Authentication Level
Sets the authentication level used to indicate the level of security associated with the module. The value can range from 0 to any positive integer.
ssoadm attribute:
iplanet-am-auth-device-id-save-auth-level
ssoadm service name:
sunAMAuthFederationService
- Authentication Level
Sets the authentication level used to indicate the level of security associated with the module. The value can range from 0 to any positive integer.
ssoadm attribute:
sunAMAuthFederationAuthLevel
amster service name:
iPlanetAMAuthAmsterService
- Authorized Keys
Specifies the location of the
authorized_keysfile that contains the private and public keys used to validate remote amster client connections.The default location for the
authorized_keysfile is the/path/to/openam/path. Its content is similar to an OpenSSHauthorized_keysfile.amster attribute:
forgerock-am-auth-amster-authorized-keys- Enabled
When enabled, allows amster clients to authenticate using PKI. When disabled, allows amster clients to authenticate using interactive login only.
amster attribute:
forgerock-am-auth-amster-enabled- Authentication Level
Sets the authentication level used to indicate the level of security associated with the module. The value can range from 0 to any positive integer.
amster attribute:
forgerock-am-auth-amster-auth-level
ssoadm service name:
iPlanetAMAuthAuthenticatorOATHService
- Authentication Level
Sets the authentication level used to indicate the level of security associated with the module. The value can range from 0 to any positive integer.
ssoadm attribute:
iplanet-am-auth-fr-oath-auth-level- One-Time Password Length
Sets the length of the OTP to six digits or longer. The default value is six.
ssoadm attribute:
iplanet-am-auth-fr-oath-password-length- Minimum Secret Key Length
The minimum number of hexadecimal characters allowed for the secret key.
ssoadm attribute:
iplanet-am-auth-fr-oath-min-secret-key-length- OATH Algorithm to Use
Select whether to use HOTP or TOTP. You can create an authentication chain to allow for a greater variety of devices. The default value is HOTP.
ssoadm attribute:
iplanet-am-auth-fr-oath-algorithm- HOTP Window Size
The window that the OTP device and the server counter can be out of sync. For example, if the window size is 100 and the server's last successful login was at counter value 2, then the server will accept an OTP from device counter 3 to 102. The default value is 100.
ssoadm attribute:
iplanet-am-auth-fr-oath-hotp-window-size- Add Checksum Digit
Adds a checksum digit at the end of the HOTP password to verify the OTP was generated correctly. This is in addition to the actual password length. Set this only if your device supports it. The default value is No.
ssoadm attribute:
iplanet-am-auth-fr-oath-add-checksum- Truncation Offset
Advanced feature that is device-specific. Let this value default unless you know your device uses a truncation offset. The default value is -1.
ssoadm attribute:
iplanet-am-auth-fr-oath-truncation-offset- TOTP Time Step Interval
The time interval for which an OTP is valid. For example, if the time step interval is 30 seconds, a new OTP will be generated every 30 seconds, and an OTP will be valid for 30 seconds. The default value is 30 seconds.
ssoadm attribute:
iplanet-am-auth-fr-oath-size-of-time-step- TOTP Time Steps
The number of time step intervals that the system and the device can be off before password resynchronization is required. For example, if the number of TOTP time steps is 2 and the TOTP time step interval is 30 seconds, the server will allow an 89 second clock skew between the client and the server—two 30 second steps plus 29 seconds for the interval in which the OTP arrived. The default value is 2.
ssoadm attribute:
iplanet-am-auth-fr-oath-steps-in-window- One Time Password Max Retry
The number of times entry of the OTP may be attempted. Minimum is 1, maximum is 10.
Default: 3
ssoadm attribute:
forgerock-oath-max-retry- Maximum Allowed Clock Drift
The maximum acceptable clock skew before authentication fails. When this value is exceeded, the user must re-register the device.
ssoadm attribute:
openam-auth-fr-oath-maximum-clock-drift- Name of the Issuer
A value that appears as an identifier on the user's device. Common choices are a company name, a web site, or an AM realm.
ssoadm attribute:
openam-auth-fr-oath-issuer-name
ssoadm service name:
iPlanetAMAuthAuthenticatorPushService
- Authentication Level
Sets the authentication level used to indicate the level of security associated with the module. The value can range from 0 to any positive integer.
ssoadm attribute:
forgerock-am-auth-authenticatorpush-auth-level- Return Message Timeout (ms)
The period of time (in milliseconds) within which a push notification should be replied to.
Default:
120000ssoadm attribute:
forgerock-am-auth-push-message-response-timeout- Login Message
Text content of the push message, which is used for the notification displayed on the registered device. The following variables can be used in the message:
{{user}}Replaced with the username value of the account registered in the ForgeRock Authenticator app, for example Demo.
{{issuer}}Replaced with the issuer value of the account registered in the ForgeRock Authenticator app, for example ForgeRock.
Default:
Login attempt from {{user}} at {{issuer}}ssoadm attribute:
forgerock-am-auth-push-message
ssoadm service name:
iPlanetAMAuthAuthenticatorPushRegistrationService
- Authentication Level
Sets the authentication level used to indicate the level of security associated with the module. The value can range from 0 to any positive integer.
ssoadm attribute:
forgerock-am-auth-push-reg-auth-level- Issuer Name
A value that appears as an identifier on the user's device. Common choices are a company name, a web site, or an AM realm.
ssoadm attribute:
forgerock-am-auth-push-reg-issuer- Registration Response Timeout (ms)
The period of time (in milliseconds) to wait for a response to the registration QR code. If no response is received during this time the QR code times out and the registration process fails.
Default:
120000ssoadm attribute:
forgerock-am-auth-push-message-registration-response-timeout- Background Color
The background color in hex notation to display behind the issuer's logo within the ForgeRock Authenticator app.
Default:
#519387ssoadm attribute:
forgerock-am-auth-hex-bgcolour- Image URL
The location of an image to download and display as the issuer's logo within the ForgeRock Authenticator app.
ssoadm attribute:
forgerock-am-auth-img-url- App Store App URL
URL of the app to download on the App Store.
Default:
https://itunes.apple.com/app/forgerock-authenticator
     /id1038442926
(the ForgeRock Authenticator app)ssoadm attribute:
forgerock-am-auth-apple-link- Google Play URL
URL of the app to download on Google Play.
Default:
https://play.google.com/store/apps/details?id=com.forgerock.authenticator(the ForgeRock Authenticator app)ssoadm attribute:
forgerock-am-auth-google-link
ssoadm service name:
sunAMAuthHOTPService
- Authentication Level
Sets the authentication level used to indicate the level of security associated with the module. The value can range from 0 to any positive integer.
ssoadm attribute:
sunAMAuthHOTPAuthLevel- SMS Gateway Implementation Class
Specifies the class the HOTP module uses to send SMS or email messages. Specify a class that implements the
com.sun.identity.authentication.modules.hotp.SMSGatewayinterface to customize the SMS gateway implementation.ssoadm attribute:
sunAMAuthHOTPSMSGatewayImplClassName- Mail Server Host Name
Specifies the hostname of the mail server supporting SMTP for electronic mail.
ssoadm attribute:
sunAMAuthHOTPSMTPHostName- Mail Server Host Port
Specifies the outgoing mail server port. The default port is 25, 465 (when connecting over SSL), or 587 (for StartTLS).
ssoadm attribute:
sunAMAuthHOTPSMTPHostPort- Mail Server Authentication Username
Specifies the username for AM to connect to the mail server.
ssoadm attribute:
sunAMAuthHOTPSMTPUserName- Mail Server Authentication Password
Specifies the password for AM to connect to the mail server.
ssoadm attribute:
sunAMAuthHOTPSMTPUserPassword- Mail Server Secure Connection
Specifies whether to connect to the mail server securely. If enabled, AM must be able to trust the server certificate.
The possible values for this property are:
SSL
Non SSL
Start TLSssoadm attribute:
sunAMAuthHOTPSMTPSSLEnabled- Email From Address
Specifies the
From:address when sending a one-time password by mail.ssoadm attribute:
sunAMAuthHOTPSMTPFromAddress- One-Time Password Validity Length (in minutes)
Specifies the amount of time, in minutes, the one-time passwords are valid after they are generated. The default is
5minutes.ssoadm attribute:
sunAMAuthHOTPPasswordValidityDuration- One-Time Password Length
Sets the length of one-time passwords.
ssoadm attribute:
sunAMAuthHOTPPasswordLengthValid values:
6and8.- One Time Password Max Retry
The number of times entry of the OTP may be attempted. Minimum is 1, maximum is 10.
Default: 3
ssoadm attribute:
forgerock-oath-max-retry- One-Time Password Delivery
Specifies whether to send the one-time password by SMS, by mail, or both.
ssoadm attribute:
sunAMAuthHOTPasswordDeliveryValid values:
SMS,E-mail, andSMS and E-mail.- Mobile Phone Number Attribute Name
Provides the attribute name used for the text message. The default value is
telephoneNumber.ssoadm attribute:
openamTelephoneAttribute- Mobile Carrier Attribute Name
Specifies a user profile attribute that contains a mobile carrier domain for sending SMS messages.
The uncustomized AM user profile does not have an attribute for the mobile carrier domain. You can:
Customize the AM user profile by adding a new attribute to it. Then you can populate the new attribute with users' SMS messaging domains.
All mobile carriers and bulk SMS messaging services have associated SMS messaging domains. For example, Verizon uses
vtext.com, T-Mobile usestmomail.net, and the TextMagic service usestextmagic.com. If you plan to send text messages internationally, determine whether the messaging service requires a country code.Leave the value for Mobile Carrier Attribute Name blank, and let AM default to sending SMS messages using
txt.att.netfor all users.
ssoadm attribute:
openamSMSCarrierAttribute- Email Attribute Name
Provides the attribute name used to email the OTP. The default value is
mail(email).ssoadm attribute:
openamEmailAttribute- Auto Send OTP Code
When enabled, configures the HOTP module to automatically generate an email or text message when users begin the login process.
ssoadm attribute:
sunAMAuthHOTPAutoClicking
ssoadm service name:
iPlanetAMAuthHTTPBasicService
- Backend Module Name
Specifies the module that checks the user credentials. The credentials are then supplied to either a data store or other identity repository module for authentication.
ssoadm attribute:
iplanet-am-auth-http-basic-module-configuredValid values:
LDAPandDataStore.- Authentication Level
Sets the authentication level used to indicate the level of security associated with the module. The value can range from 0 to any positive integer.
ssoadm attribute:
iplanet-am-auth-httpbasic-auth-level
ssoadm service name:
sunAMAuthJDBCService
- Connection Type
Determines how the module obtains the connection to the database.
ssoadm attribute:
sunAMAuthJDBCConnectionTypeValid values:
JNDIandJDBC.- Connection Pool JNDI Name
Specifies the URL of the connection pool for JNDI connections. Refer to your web container's documentation for instructions on setting up the connection pool.
ssoadm attribute:
sunAMAuthJDBCJndiName- JDBC Driver
Specifies the JDBC driver to use for JDBC connections.
Install a suitable Oracle or MySQL driver in the container where AM is installed, for example in the
/path/to/tomcat/webapps/openam/WEB-INF/libpath. You can add it to the AM.warfile when you deploy AM.ssoadm attribute:
sunAMAuthJDBCDriver- JDBC URL
Specifies the URL to connect to the database when using a JDBC connection.
ssoadm attribute:
sunAMAuthJDBCUrl- Database Username, Database Password
Specifies the user name and password used to authenticate to the database when using a JDBC connection.
ssoadm attribute:
sunAMAuthJDBCDbuserandsunAMAuthJDBCDbpassword- Password Column Name
Specifies the database column name where passwords are stored.
ssoadm attribute:
sunAMAuthJDBCPasswordColumn- Prepared Statement
Specifies the SQL query to return the password corresponding to the user to authenticate.
ssoadm attribute:
sunAMAuthJDBCStatement- Class to Transform Password Syntax
Specifies the class that transforms the password retrieved to the same format as provided by the user.
The default class expects the password in cleartext. Custom classes must implement the
JDBCPasswordSyntaxTransforminterface.ssoadm attribute:
sunAMAuthJDBCPasswordSyntaxTransformPlugin- Authentication Level
Sets the authentication level used to indicate the level of security associated with the module. The value can range from 0 to any positive integer.
ssoadm attribute:
sunAMAuthJDBCAuthLevel
Note
AM provides two properties, iplanet-am-admin-console-invalid-chars and
iplanet-am-auth-ldap-invalid-chars, that store
LDAP-related special characters that are not allowed in username searches.
When using JDBC databases, consider adding the '%' wildcard character to
the iplanet-am-admin-console-invalid-chars and
iplanet-am-auth-ldap-invalid-chars properties. By default,
the '%' character is not included in the properties.
ssoadm service name:
iPlanetAMAuthLDAPService
- Primary LDAP Server, Secondary LDAP Server
Directory servers generally use built-in data replication for high availability. Thus, a directory service likely consists of a pool of replicas to which AM can connect to retrieve and update directory data. You set up primary and secondary servers in case a replica is down due to maintenance or to a problem with a particular server.
Set one or more primary and optionally, one or more secondary directory server for each AM server. For the current AM server, specify each directory server as a
host:portcombination. For other AM servers in the deployment, you can specify each directory server asserver-name|host:port, where server-name is the FQDN portion of the AM server from the list under Deployment > Servers, and host:port identifies the directory server.For example, if the server-name that is listed is
http://openam.example.com:8080/openam, and the directory server is accessible atopendj.example.com:1389, you would enteropenam.example.com|opendj.example.com:1389.When authenticating users from a directory server that is remote to AM, set the primary server values, and optionally the secondary server values. Primary servers have priority over secondary servers.
ssoadm attributes are: primary is
iplanet-am-auth-ldap-server; secondary isiplanet-am-auth-ldap-server2.Both properties take more than one value; thus, allowing more than one primary or secondary remote server, respectively. Assuming a multi-data center environment, AM determines priority within the primary and secondary remote servers, respectively, as follows:
Every LDAP server that is mapped to the current AM instance has highest priority.
For example, if you are connected to
openam1.example.comandldap1.example.comis mapped to that AM instance, then AM usesldap1.example.com.Every LDAP server that was not specifically mapped to a given AM instance has the next highest priority.
For example, if you have another LDAP server,
ldap2.example.com, that is not connected to a specific AM server and ifldap1.example.comis unavailable, AM connects to the next highest priority LDAP server,ldap2.example.com.LDAP servers that are mapped to different AM instances have the lowest priority.
For example, if
ldap3.example.comis connected toopenam3.example.comandldap1.example.comandldap2.example.comare unavailable, thenopenam1.example.comconnects toldap3.example.com.
If you want use SSL or StartTLS to initiate a secure connection to a data store, then scroll down to enable SSL/TLS Access to LDAP Server. Make sure that AM can trust the server's certificates when using this option.
ssoadm attributes:
openam-auth-ldap-connection-modePossible values:
LDAP,LDAPS, andStartTLS- DN to Start User Search
LDAP data is organized hierarchically, a bit like a file system on Windows or UNIX. More specific DNs likely result in better search performance. When configuring the module for a particular part of the organization, you can perhaps start searches from a specific organizational unit, such as
ou=sales,dc=example,dc=com.If multiple entries exist with identical search attribute values, make this value specific enough to return only one entry.
ssoadm attribute:
iplanet-am-auth-ldap-base-dn- Bind User DN, Bind User Password
If AM stores attributes in the directory, for example to manage account lockout, or if the directory requires that AM authenticate in order to read users' attributes, then AM needs the DN and password to authenticate to the directory.
The default is
cn=Directory Manager. Make sure that password is correct before you log out. If it is incorrect, you will be locked out. If this should occur, you can login with the superuser DN, which by default isuid=amAdmin,ou=People,AM-deploy-base, where AM-deploy-base is the value you set during AM configuration.ssoadm attributes:
iplanet-am-auth-ldap-bind-dn,iplanet-am-auth-ldap-bind-passwd- Attribute Used to Retrieve User Profile, Attributes Used to Search for a User to be Authenticated, User Search Filter, Search Scope
LDAP searches for user entries return entries with attribute values matching the filter you provide. For example, if you search under
ou=people,dc=example,dc=comwith a filter"(mail=bjensen@example.com)", then the directory returns the entry that hasmail=bjensen@example.com. In this example the attribute used to search for a user ismail. Multiple attribute values mean the user can authenticate with any one of the values. For example, if you have bothuidandmail, then Barbara Jensen can authenticate with eitherbjensenorbjensen@example.com.Should you require a more complex filter for performance, you add that to the User Search Filter text box. For example, if you search on
mailand add User Search Filter(objectClass=inetOrgPerson), then AM uses the resulting search filter(&(mail=address)(objectClass=inetOrgPerson)), where address is the mail address provided by the user.Scope OBJECT means search only the entry specified as the DN to Start User Search, whereas ONELEVEL means search only the entries that are directly children of that object. SUBTREE means search the entry specified and every entry under it.
ssoadm attributes:
iplanet-am-auth-ldap-user-naming-attribute,iplanet-am-auth-ldap-user-search-attributes,iplanet-am-auth-ldap-search-filter, andiplanet-am-auth-ldap-search-scope- LDAP Connection Mode
If you want use SSL or StartTLS to initiate a secure connection to a data store, AM must be able to trust LDAP certificates, either because the certificates were signed by a CA whose certificate is already included in the trust store used by the container where AM runs, or because you imported the certificates into the trust store.
ssoadm attribute:
openam-auth-ldap-connection-modePossible values:
LDAP,LDAPS, andStartTLS- Return User DN to DataStore
When enabled, and AM uses the directory service as the user store, the module returns the DN, rather than the User ID. From the DN value, AM uses the RDN to search for the user profile. For example, if a returned DN value is
uid=demo,ou=people,dc=openam,dc=example,dc=org, AM usesuid=demoto search the data store.ssoadm attribute:
iplanet-am-auth-ldap-return-user-dn- User Creation Attributes
This list lets you map (external) attribute names from the LDAP directory server to (internal) attribute names used by AM.
ssoadm attribute:
iplanet-am-ldap-user-creation-attr-list- Minimum Password Length
Specifies the minimum acceptable password length.
ssoadm attribute:
iplanet-am-auth-ldap-min-password-length- LDAP Behera Password Policy Support
When enabled, support interoperability with servers that implement the Internet-Draft, Password Policy for LDAP Directories.
Support for this Internet-Draft is limited to the LDAP authentication module. Other components of AM, such as the password change functionality in the
/idm/EndUserpage, do not support the Internet-Draft. In general, outside of the LDAP authentication module, AM binds to the directory server as an administrator, such as Directory Manager. When AM binds to the directory server as an administrator rather than as an end user, many features of the Internet-Draft password policies do not apply.ssoadm attribute:
iplanet-am-auth-ldap-behera-password-policy-enabled- Trust All Server Certificates
When enabled, blindly trust server certificates, including self-signed test certificates.
ssoadm attribute:
iplanet-am-auth-ldap-ssl-trust-all- LDAP Connection Heartbeat Interval
Specifies how often AM should send a heartbeat request to the directory server to ensure that the connection does not remain idle. Some network administrators configure firewalls and load balancers to drop connections that are idle for too long. You can turn this off by setting the value to 0 or to a negative number. To set the units for the interval use LDAP Connection Heartbeat Time Unit.
Default: 1
ssoadm attribute:
openam-auth-ldap-heartbeat-interval- LDAP Connection Heartbeat Time Unit
Specifies the time unit corresponding to LDAP Connection Heartbeat Interval.
Default: minute
ssoadm attribute:
openam-auth-ldap-heartbeat-timeunit- LDAP operations timeout
Defines the timeout in milliseconds that AM should wait for a response from the directory server.
Default: 0 (means no timeout)
ssoadm attribute:
openam-auth-ldap-operation-timeout- Authentication Level
Sets the authentication level used to indicate the level of security associated with the module. The value can range from 0 to any positive integer.
ssoadm attribute:
iplanet-am-auth-ldap-auth-level
Important
Usage of this authentication module is deprecated. Equivalent functionality is provided by the following authentication modules:
The Legacy OAuth 2.0/OpenID Connect Authentication Module will only be available in AM 6 when upgrading from a previous version that was making use of the module in a chain. It is not available in new, clean installations since $[am.abbr} 5.5.
The default settings are for Facebook.
ssoadm service name:
sunAMAuthOAuthService
- Client id
Specifies the OAuth 2.0
client_idparameter as described in section 2.2 of RFC 6749.ssoadm attribute:
iplanet-am-auth-oauth-client-id- Client Secret
Specifies the OAuth 2.0
client_secretparameter as described in section 2.3 of RFC 6749.ssoadm attribute:
iplanet-am-auth-oauth-client-secret- Authentication Endpoint URL
Specifies the URL to the endpoint handling OAuth 2.0 authentication as described in section 3.1 of RFC 6749.
Default:
https://www.facebook.com/dialog/oauth.ssoadm attribute:
iplanet-am-auth-oauth-auth-service- Access Token Endpoint URL
Specifies the URL to the endpoint handling access tokens as described in section 3.2 of RFC 6749.
Default:
https://graph.facebook.com/oauth/access_token.ssoadm attribute:
iplanet-am-auth-oauth-token-service- User Profile Service URL
Specifies the user profile URL that returns profile information in JSON format.
Default:
https://graph.facebook.com/me.ssoadm attribute:
iplanet-am-auth-oauth-user-profile-service- Scope
Specifies a space-delimited list of user profile attributes that the client application requires, according to The OAuth 2.0 Authorization Framework. The list depends on the permissions that the resource owner, such as the end user, grants to the client application.
Some authorization servers use non-standard separators for scopes. Facebook, for example, takes a comma-separated list.
Default:
email,read_stream(Facebook example)ssoadm attribute:
iplanet-am-auth-oauth-scope- OAuth2 Access Token Profile Service Parameter name
Specifies the name of the parameter that contains the access token value when accessing the profile service.
Default:
access_token.ssoadm attribute:
iplanet-am-auth-oauth-user-profile-param- Proxy URL
Sets the URL to the
/oauth2c/OAuthProxy.jspfile, which provides AM with GET to POST proxying capabilities. Change this URL only if an external server performs the GET to POST proxying.Default:
@SERVER_PROTO@://@SERVER_HOST@:@SERVER_PORT@/@SERVER_URI@/oauth2c/OAuthProxy.jsp.ssoadm attribute:
iplanet-am-auth-oauth-sso-proxy-url- Account Provider
Specifies the name of the class that implements the account provider.
Default:
org.forgerock.openam.authentication.modules.common.mapping.DefaultAccountProviderssoadm attribute:
org-forgerock-auth-oauth-account-provider- Account Mapper
Specifies the name of the class that implements the attribute mapping for the account search.
Default: Depends on how the module is created:
If the OAuth 2.0 authentication module is created from the AM console authentication tab of a realm, the default is:
org.forgerock.openam.authentication.modules.common.mapping.JsonAttributeMapper.If the OAuth 2.0 authentication module is created from the AM console Facebook authentication wizard, the default is:
org.forgerock.openam.authentication.modules.common.mapping.JsonAttributeMapper|*|facebook-.If the OAuth 2.0 authentication module is created from the AM console Google authentication wizard, the default is:
org.forgerock.openam.authentication.modules.oidc.JwtAttributeMapper|*|Google-.
ssoadm attribute:
org-forgerock-auth-oauth-account-mapper- Account Mapper Configuration
Specifies the attribute configuration used to map the account of the user authenticated in the OAuth 2.0 provider to the local data store in AM. Valid values are in the form
provider-attr=local-attr.Default:
email=mailandid=facebook-id.ssoadm attribute:
org-forgerock-auth-oauth-account-mapper-configuration- Attribute Mapper
Specifies the list of fully qualified class names for implementations that map attributes from the OAuth 2.0 authorization server or OpenID Connect provider to AM profile attributes.
Default:
org.forgerock.openam.authentication.modules.common.mapping.JsonAttributeMapperProvided implementations are:
org.forgerock.openam.authentication.modules.common.mapping.JsonAttributeMapperorg.forgerock.openam.authentication.modules.oidc.JwtAttributeMapper(can only be used when using theopenidscope)Tip
You can provide string constructor parameters by appending pipe (
|) separated values.For example, the
org.forgerock.openam.authentication.modules.oidc.JwtAttributeMapperclass can take two constructor parameters: a comma-separated list of attributes and a prefix to apply to their values. Specify these as follows:org.forgerock.openam.authentication.modules.oidc.JsonAttributeMapperssoadm attribute:
org-forgerock-auth-oauth-attribute-mapper- Attribute Mapper Configuration
Map of OAuth 2.0 provider user account attributes to local user profile attributes, with values in the form
provider-attr=local-attr.Default:
first_name=givenname,last_name=sn,name=cn,email=mail,id=facebook-id,first_name=facebook-fname,last_name=facebook-lname,email=facebook-email.ssoadm attribute:
org-forgerock-auth-oauth-attribute-mapper-configuration- Save attributes in the session
When enabled, saves the attributes in the Attribute Mapper Configuration field to the AM session.
ssoadm attribute:
org-forgerock-auth-oauth-save-attributes-to-session-flag- Email attribute in OAuth2 Response
Specifies the attribute identifying the authenticated user's email address in the response from the profile service in the OAuth 2.0 provider. This setting is used to send an email message with an activation code for accounts created dynamically.
ssoadm attribute:
org-forgerock-auth-oauth-mail-attribute- Create account if it does not exist
When enabled, AM creates an account for the user if the user profile does not exist. If the Prompt for password setting and activation code attribute is enabled, AM prompts the user for a password and activation code before creating the account.
When the OAuth 2.0/OpenID Connect client is configured to create new accounts, the SMTP settings must also be valid. As part of account creation, the OAuth 2.0/OpenID Connect client authentication module sends the resource owner an email with an account activation code. To send the mail, AM uses the SMTP settings you provide here in the OAuth 2.0/OpenID Connect client configuration.
When disabled, a user without a profile may still log into AM if the Ignore Profile attribute is set in the authentication service of the realm, or if the account is mapped to an anonymous account.
ssoadm attribute:
org-forgerock-auth-oauth-createaccount-flag- Prompt for password setting and activation code
When enabled, the user must set a password before AM creates an account dynamically. An activation code is also sent to the user's email address. Both the password and the code are required before the account is created.
ssoadm attribute:
org-forgerock-auth-oauth-prompt-password-flag- Map to anonymous user
When enabled, maps the OAuth 2.0 authenticated user to the specified anonymous user. If the Create account if it does not exist property is enabled, AM creates an account for the authenticated user instead of mapping the account to the anonymous user.
ssoadm attribute:
org-forgerock-auth-oauth-map-to-anonymous-flag- Anonymous User
Specifies an anonymous user that exists in the current realm. The Map to anonymous user property maps authorized users without a profile to this anonyomus user, if enabled.
Default:
anonymous.ssoadm attribute:
org-forgerock-auth-oauth-anonymous-user- OAuth 2.0 Provider logout service
Specifies the optional URL of the OAuth 2.0 provider's logout service, if required.
ssoadm attribute:
org-forgerock-auth-oauth-logout-service-url- Logout options
Specifies whether not to log the user out without prompting from the OAuth 2.0 provider on logout, to log the user out without prompting, or to prompt the user regarding whether to log out from the OAuth 2.0 provider.
Valid values are:
prompt, to ask the user whether or not to log out from the OAuth 2.0 provider.logout, to log the user out of the OAuth 2.0 provider without prompting.donotlogout, to keep the user logged in to the OAuth 2.0 provider. There is no prompt to the user.
Default:
prompt.ssoadm attribute:
org-forgerock-auth-oauth-logout-behaviour- Mail Server Gateway implementation class
Specifies the class used by the module to send email. A custom subclass of
org.forgerock.openam.authentication.modules.oauth2.EmailGatewayclass can be provided.Default:
org.forgerock.openam.authentication.modules.oauth2.DefaultEmailGatewayImplssoadm attribute:
org-forgerock-auth-oauth-email-gwy-impl- SMTP host
Specifies the host name of the mail server.
Default:
localhost.ssoadm attribute:
org-forgerock-auth-oauth-smtp-hostname- SMTP port
Specifies the SMTP port number for the mail server.
Default:
25.ssoadm attribute:
org-forgerock-auth-oauth-smtp-port- SMTP User Name, SMTP User Password
Specifies the username and password AM uses to authenticate to the mail server.
ssoadm attribute:
org-forgerock-auth-oauth-smtp-usernameandorg-forgerock-auth-oauth-smtp-password.- SMTP SSL Enabled
When enabled, connects to the mail server over SSL. AM must be able to trust the SMTP server certificate.
ssoadm attribute:
org-forgerock-auth-oauth-smtp-ssl_enabled- SMTP From address
Specifies the address of the email sender, such as
no-reply@example.com.Default:
info@forgerock.com.ssoadm attribute:
org-forgerock-auth-oauth-smtp-email-from- Authentication Level
Sets the authentication level used to indicate the level of security associated with the module. The value can range from 0 to any positive integer.
Default: 0.
ssoadm attribute:
iplanet-am-auth-oauth-auth-level- OpenID Connect validation configuration type
Validates the ID token from the OpenID Connect provider. The module needs either a URL to get the public keys for the provider or the symmetric key for an ID token signed with a HMAC-based algorithm.
By default, the configuration type is
.well-known/openid-configuration_url. This means the module should retrieve the keys based on information in the OpenID Connect provider configuration document.You can instead configure the authentication module to validate the ID token signature with the client secret key you provide, or to validate the ID token with the keys retrieved from the URL to the OpenID Connect provider's JSON web key set.
/oauth2/realms/root/.well-known/openid-configuration_url(Default)Retrieve the provider keys based on the information provided in the OpenID Connect Provider Configuration Document.
Specify the URL to the document as the discovery URL.
client_secretUse the client secret that you specify as the key to validate the ID token signature according to the HMAC by using the client secret to the decrypt the hash, and then checking that the hash matches the hash of the ID token JWT.
jwk_urlRetrieve the provider's JSON web key set as the URL that you specify.
ssoadm attribute:
openam-auth-openidconnect-crypto-context-type- OpenID Connect validation configuration value
Edit this field depending on the Configuration type you specified in the OpenId Connect validation configuration type field.
ssoadm attribute:
openam-auth-openidconnect-crypto-context-value- Token Issuer
Required when the
openidscope is included. Value must match theissfield in the issued ID token. For example,accounts.google.com.The issuer value MUST be provided when OAuth 2.0 Mix-Up Mitigation is enabled. For more information, see "OAuth 2.0 Mix-Up Mitigation".
ssoadm attribute:
openam-auth-openidconnect-issuer-name
Note
Old uses of DefaultAccountMapper are automatically
upgraded to the equivalent default implementations.
The following table shows endpoint URLs for AM when configured as an OAuth 2.0 provider. For details, see the OAuth 2.0 Guide. The default endpoints are for Facebook as the OAuth 2.0 provider.
In addition to the endpoint URLs you can set other fields, like scope and attribute mapping, depending on the provider you use:
| AM Field | Details |
|---|---|
| Authorization Endpoint URL |
Example: |
| Access Token Endpoint URL |
Example: |
| User Profile Service URL |
Example: |
[a] This AM endpoint can take additional parameters. In particular, you must specify the realm if the AM OAuth 2.0 provider is configured for a subrealm rather than the top-level realm.
When making a REST API call, specify the realm in the path component of the
endpoint. You must specify the entire hierarchy of the realm, starting at the top-level realm.
Prefix each realm in the hierarchy with the For example, if the OAuth 2.0 provider is configured for the
subrealm The | |
AM has added a new property to the OAuth 2.0 authentication module,
openam-auth-oauth-mix-up-mitigation-enabled. This OAuth 2.0
Mix-Up Mitigation property controls whether the OAuth 2.0 authentication module
carries out additional verification steps when it receives the authorization
code from the authorization server. This setting should be only enabled when
the authorization server also supports OAuth 2.0 Mix-Up Mitigation.
- OAuth 2.0 Mix-Up Mitigation Enabled
Specifies that the client must compare the issuer identifier of the authorization server upon registration with the issuer value returned in the
issresponse parameter. If they do not match, the client must abort the authorization process. The client must also confirm that the authorization server's response is intended for the client by comparing the client's client identifier to the value of theclient_idresponse parameter.For more information, see section 4 of OAuth 2.0 Mix-Up Mitigration Draft.
Note
At the time of this release, Facebook, Google, and Microsoft identity providers do not support this draft.
ssoadm attribute:
openam-auth-oauth-mix-up-mitigation-enabledOn the AM console, the field Token Issuer must be provided when the OAuth 2.0 Mix-Up Mitigation feature is enabled. The authorization code response will contain an issuer value (
iss) that will be validated by the client. When the module is an OAuth2-only module (that is, OIDC is not used), the issuer value needs to be explicitly set in the Token Issuer field, so that the validation can succeed.Note
Consult with the authorization server's documentation on what value it uses for the issuer field.
ssoadm service name:
sunAMAuthMSISDNService
- Trusted Gateway IP Address
Specifies a list of IP addresses of trusted clients that can access MSISDN modules. Either restrict the clients allowed to access the MSISDN module by adding each IPv4 or IPv6 address here, or leave the list empty to allow all clients to access the module. If you specify the value
none, no clients are allowed access.ssoadm attribute:
sunAMAuthMSISDNTrustedGatewayList- MSISDN Number Search Parameter Name
Specifies a list of parameter names that identify which parameters to search in the request header or cookie header for the MSISDN number. For example, if you define x-Cookie-Param, AM_NUMBER, and COOKIE-ID, the MSISDN authentication service checks those parameters for the MSISDN number.
ssoadm attribute:
sunAMAuthMSISDNParameterNameList- LDAP Server and Port
Specifies the LDAP server FQDN and its port in the format
ldap_server:port. AM servers can be paired with LDAP servers and ports by adding entries with the formatAM_server|ldap_server:port, for example,openam.example.com|ldap1.example.com:649.To use SSL or TLS for security, enable the SSL/TLS Access to LDAP property. Make sure that AM can trust the servers' certificates when using this option.
ssoadm attribute:
sunAMAuthMSISDNLdapProviderUrl- LDAP Start Search DN
Specifies the DN of the entry where the search for the user's MSISDN number should start. AM servers can be paired with search base DNs by adding entries with the format
AM_server|base_dn. For example,openam.example.com|dc=openam,dc=forgerock,dc=com.ssoadm attribute:
sunAMAuthMSISDNBaseDn- Attribute To Use To Search LDAP
Specifies the name of the attribute in the user's profile that contains the MSISDN number to search for the user. The default is
sunIdentityMSISDNNumber.ssoadm attribute:
sunAMAuthMSISDNUserSearchAttribute- LDAP Server Authentication User, LDAP Server Authentication Password
Specifies the bind DN and password to authenticate to the directory server. The default is
cn=Directory Manager.ssoadm attribute:
sunAMAuthMSISDNPrincipalUserandsunAMAuthMSISDNPrincipalPasswd.- SSL/TLS for LDAP Access
When enabled, AM uses LDAPS or StartTLS to connect to the directory server. If you choose to enable SSL or TLS, then make sure that AM can trust the servers' certificates.
ssoadm attribute:
sunAMAuthMSISDNUseSsl- MSISDN Header Search Attribute
Specifies which elements are searched for the MSISDN number.The possible values are:
searchCookieTo search the cookie.
searchRequestTo search the request header.
searchParamTo search the request parameters.
ssoadm attribute:
sunAMAuthMSISDNHeaderSearch- LDAP Attribute Used to Retrieve User Profile
Specify the LDAP attribute that is used during a search to return the user profile for MSISDN authentication service. The default is
uid.ssoadm attribute:
sunAMAuthMSISDNUserNamingAttribute- Return User DN to DataStore
When enabled, this option allows the authentication module to return the DN instead of the User ID. AM thus does not need to perform an additional search with the user ID to find the user's entry.
Enable this option only when the AM directory is the same as the directory configured for MSISDN searches.
ssoadm attribute:
sunAMAuthMSISDNReturnUserDN- Authentication Level
Sets the authentication level used to indicate the level of security associated with the module. The value can range from 0 to any positive integer.
ssoadm attribute:
sunAMAuthMSISDNAuthLevel
ssoadm service name:
iPlanetAMAuthOATHService
- Authentication Level
Sets the authentication level used to indicate the level of security associated with the module. The value can range from 0 to any positive integer.
ssoadm attribute:
iplanet-am-auth-oath-auth-level- One Time Password Length
Sets the length of the OTP to six digits or longer. The default value is six.
ssoadm attribute:
iplanet-am-auth-oath-password-length- Minimum Secret Key Length
The minimum number of hexadecimal characters allowed for the secret key.
ssoadm attribute:
iplanet-am-auth-oath-min-secret-key-length- Secret Key Attribute Name
The name of the attribute where the key will be stored in the user profile.
ssoadm attribute:
iplanet-am-auth-oath-secret-key-attribute- OATH Algorithm to Use
Select whether to use HOTP or TOTP. You can create an authentication chain to allow for a greater variety of devices. The default value is HOTP.
ssoadm attribute:
iplanet-am-auth-oath-algorithm- HOTP Window Size
The window that the OTP device and the server counter can be out of sync. For example, if the window size is 100 and the server's last successful login was at counter value 2, then the server will accept an OTP from device counter 3 to 102. The default value is 100.
ssoadm attribute:
iplanet-am-auth-oath-hotp-window-sizeNote
For information on resetting the HOTP counter, see "Resetting Registered Devices by using REST".
- Counter Attribute Name
The name of the HOTP attribute where the counter will be stored in the user profile.
ssoadm attribute:
iplanet-am-auth-oath-hotp-counter-attribute- Add Checksum Digit
Adds a checksum digit at the end of the HOTP password to verify the OTP was generated correctly. This is in addition to the actual password length. Set this only if your device supports it. The default value is No.
ssoadm attribute:
iplanet-am-auth-oath-add-checksum- Truncation Offset
Advanced feature that is device-specific. Let this value default unless you know your device uses a truncation offset. The default value is -1.
ssoadm attribute:
iplanet-am-auth-oath-truncation-offset- TOTP Time Step Interval
The time interval for which an OTP is valid. For example, if the time step interval is 30 seconds, a new OTP will be generated every 30 seconds, and an OTP will be valid for 30 seconds. The default value is 30 seconds.
ssoadm attribute:
iplanet-am-auth-oath-size-of-time-step- One Time Password Max Retry
The number of times entry of the OTP may be attempted. Minimum is 1, maximum is 10.
Default: 3
ssoadm attribute:
forgerock-oath-max-retry- TOTP Time Steps
The number of time step intervals that the system and the device can be off before password resynchronization is required. For example, if the number of TOTP time steps is 2 and the TOTP time step interval is 30 seconds, the server will allow an 89 second clock skew between the client and the server—two 30 second steps plus 29 seconds for the interval in which the OTP arrived. The default value is 2.
ssoadm attribute:
iplanet-am-auth-oath-steps-in-window- Last Login Time Attribute
The name of the attribute where both HOTP and TOTP authentication will store information on when a person last logged in.
ssoadm attribute:
iplanet-am-auth-oath-last-login-time-attribute-name- The Shared Secret Provider Class
The class that processes the user profile attribute where the user's secret key is stored. The name of this attribute is specified in the Secret Key Attribute Name property.
Default:
org.forgerock.openam.authentication.modules.oath.plugins.DefaultSharedSecretProviderssoadm attribute:
forgerock-oath-sharedsecret-implementation-class- Clock Drift Attribute Name
The user profile attribute where the clock drift is stored. If this field is not specified, then AM does not check for clock drift.
ssoadm attribute:
forgerock-oath-observed-clock-drift-attribute-name- Maximum Allowed Clock Drift
The maximum acceptable clock drift before authentication fails. If this value is exceeded, the user must register their device again.
The Maximum Allowed Clock Drift value should be greater than the TOTP Time Steps value.
ssoadm attribute:
forgerock-oath-maximum-clock-drift
The default settings are for Google's provider.
ssoadm service name:
amAuthOpenIdConnect
- Account provider class
The account provider provides the means to search for and create OpenID Connect users given a set of attributes.
Default:
org.forgerock.openam.authentication.modules.common.mapping.DefaultAccountProviderssoadm attribute:
openam-auth-openidconnect-account-provider-class- OpenID Connect validation configuration type
In order to validate the ID token from the OpenID Connect provider, the module needs either a URL to get the public keys for the provider, or the symmetric key for an ID token signed with a HMAC-based algorithm.
By default, the configuration type is
.well-known/openid-configuration_url. This means the module should retrieve the keys based on information in the OpenID Connect Provider Configuration Document.You can instead configure the authentication module to validate the ID token signature with the client secret key you provide, or to validate the ID token with the keys retrieved from the URL to the OpenID Connect provider's JSON web key set.
.well-known/openid-configuration_url(Default)Retrieve the provider keys based on the information provided in the OpenID Connect Provider Configuration Document.
Specify the URL to the document as the discovery URL.
client_secretUse the client secret that you specify as the key to validate the ID token signature according to the HMAC, using the client secret to the decrypt the hash and then checking that the hash matches the hash of the ID token JWT.
jwk_urlRetrieve the provider's JSON web key set at the URL that you specify.
ssoadm attribute:
openam-auth-openidconnect-crypto-context-type- OpenID Connect validation configuration value
Specifies the discovery URL, JWK or the client secret corresponding to the configuration type selected in the OpenID Connect validation configuration type property.
ssoadm attribute:
openam-auth-openidconnect-crypto-context-value- Name of header referencing the ID Token
Specifies the name of the HTTP request header to search for the ID token.
Default:
oidc_id_tokenssoadm attribute:
openam-auth-openidconnect-header-name- Name of OpenID Connect ID Token Issuer
Corresponds to the expected issue identifier value in the
issfield of the ID token.Default:
accounts.google.comssoadm attribute:
openam-auth-openidconnect-issuer-name- Mapping of jwt attributes to local LDAP attributes
Maps OpenID Connect ID token claims to local user profile attributes, allowing the module to retrieve the user profile based on the ID token.
In OpenID Connect, an ID token is represented as a JSON Web Token (JWT). The ID Token section of the OpenID Connect Core 1.0 specification defines a number of claims included in the ID token for all flows. Additional claims depend on the scopes requested of the OpenID Connect provider.
For each item in the map, the key is the ID token field name and the value is the local user profile attribute name.
Default:
mail=email,uid=subssoadm attribute:
openam-auth-openidconnect-local-to-jwt-attribute-mappings- Audience name
Specifies a case-sensitive audience name for this OpenID Connect authentication module. Used to check that the ID token received is intended for this module as an audience.
Default:
examplessoadm attribute:
openam-auth-openidconnect-audience-name- List of accepted authorized parties
Specifies a list of case-sensitive strings and/or URIs from which this authentication module accepts ID tokens. This list is checked against the authorized party claim of the ID token.
Default:
AuthorizedPartyExamplehttp://www.example.com/authorized/partyssoadm attribute:
openam-auth-openidconnect-accepted-authorized-parties- Principal Mapper class
Specifies the class that implements the mapping of the OpenID Connect end user to an AM account. The default principal mapper uses the mapping of local attributes to ID token attributes to find a user profile.
Default:
org.forgerock.openam.authentication.modules.oidc.JwtAttributeMapperssoadm attribute:
openam-auth-openidconnect-principal-mapper-class
ssoadm service name:
iPlanetAMAuthPersistentCookieService
- Idle Timeout
Specifies the maximum idle time between requests in hours. If that time is exceeded, the cookie is no longer valid.
ssoadm attribute:
openam-auth-persistent-cookie-idle-time- Max Life
Specifies the maximum life of the cookie in hours.
ssoadm attribute:
openam-auth-persistent-cookie-max-life- Enforce Client IP
When enabled, enforces that the persistent cookie can only be used from the same client IP to which the cookie was issued.
ssoadm attribute:
openam-auth-persistent-cookie-enforce-ip- Use secure cookie
When enabled, adds the "Secure" attribute to the persistent cookie.
ssoadm attribute:
openam-auth-persistent-cookie-secure-cookie- Use HTTP only cookie
When enabled, adds the
HttpOnlyattribute to the persistent cookie.ssoadm attribute:
openam-auth-persistent-cookie-http-only-cookie- HMAC Signing Key
Specifies a key to use for HMAC signing of the persistent cookie. Values must be base64-encoded and at least 256 bits (32 bytes) long.
For example, to generate an HMAC signing key, run the following:
openssl rand -base64 32
or
cat /dev/urandom | tr -dc 'a-zA-Z0-9' | fold -w 32 | head -n 1|base64
Default: a random 256-bit secret key.
ssoadm attribute:
openam-auth-persistent-cookie-hmac-key
ssoadm service name:
iPlanetAMAuthRadiusService
- Primary Radius Servers, Secondary Radius Servers
Specify one or more primary and secondary RADIUS servers.
When configuring RADIUS servers, specify their IP address or FQDN. Configuring multiple servers allows you to map a RADIUS server to a specific AM instance in the the form of
AM_instance | RADIUS_server, where the AM instance is also specified by its IP address or FQDN.Tip
Ensure each RADIUS server listens to the port specified in the Port Number field.
When authenticating users from a directory server that is remote to AM, set the primary values and, optionally, the secondary server values. Assuming a multi-data center environment, AM determines priority within the primary and secondary remote servers, respectively, as follows:
Every RADIUS server that is mapped to the current AM instance has highest priority.
Every RADIUS server that was not specifically mapped to a given AM instance has the next highest priority.
RADIUS servers that are mapped to different AM instances have the lowest priority.
ssoadm attribute:
primary is iplanet-am-auth-radius-server1; secondary isiplanet-am-auth-radius-server2- Shared Secret
Specify the shared secret for RADIUS authentication. The shared secret should be as secure as a well-chosen password.
ssoadm attribute:
iplanet-am-auth-radius-secret- Port Number
Specify the RADIUS server port.
Default is 1645.
ssoadm attribute:
iplanet-am-auth-radius-server-port- Timeout
Specify how many seconds to wait for the RADIUS server to respond. The default value is 3 seconds.
ssoadm attribute:
iplanet-am-auth-radius-timeout- Health Check Interval
Used for failover. Specify how often AM performs a health check on a previously unavailable RADIUS server by sending an invalid authentication request.
Default: 5 minutes
ssoadm attribute:
openam-auth-radius-healthcheck-interval- Authentication Level
Sets the authentication level used to indicate the level of security associated with the module. The value can range from 0 to any positive integer.
ssoadm attribute:
iplanet-am-auth-radius-auth-level
ssoadm attribute:
sunAMAuthSAEService
- Authentication Level
Sets the authentication level used to indicate the level of security associated with the module. The value can range from 0 to any positive integer.
ssoadm service name:
sunAMAuthSAEAuthLevel
ssoadm service name:
iPlanetAMAuthSAML2Service
- Authentication Level
Sets the authentication level used to indicate the level of security associated with the module. The value can range from 0 to any positive integer.
ssoadm attribute:
iplanet-am-auth-saml2-auth-level- IdP Entity ID
Specifies the identity provider (IdP) for authentication requests to this module. Specify the name of a SAML v2.0 entity provider that is defined in the SAML2 authentication module's realm.
You can find configured entity providers in the AM console under Federation. The Realm column identifies the realm in which an entity provider has been configured.
ssoadm attribute:
forgerock-am-auth-saml2-entity-name- SP MetaAlias
Specifies the local alias for the service provider (SP).
For service providers configured in the Top Level Realm, use the format /SP Name.
For service providers configured in subrealms, use the format /Realm Name/SP Name.
To find the local aliases for entity providers in the AM console, navigate to Realms > Realm Name > Applications > Federation > Entity Providers > Entity Provider Name > Services.
ssoadm attribute:
forgerock-am-auth-saml2-meta-alias- Allow IdP to Create NameID
Specifies whether the IdP should create a new identifier for the authenticating user if none exists.
A value of
truepermits the IdP to create an identifier for the authenticating user if none exists. A value offalseindicates a request to constrain the IdP from creating an identifier.For detailed information, see the section on the
AllowCreateproperty in SAML Version 2.0 Errata 05.Default:
truessoadm attribute:
forgerock-am-auth-saml2-allow-create- Linking Authentication Chain
Specifies an authentication chain that is invoked when a user requires authentication to the SP.
Authentication to the SP is required when the authentication module running on the SP is unable to determine the user's identity based on the assertion received from the IdP. In this case, the linking authentication chain is invoked to allow the end user to link their remote and local accounts.
ssoadm attribute:
forgerock-am-auth-saml2-login-chain- Comparison Type
Specifies a comparison method to evaluate authentication context classes or statements. The value specified in this property overrides the value set in the SP configuration under Realms > Realm Name > Applications > Federation > Entity Providers > Service Provider Name > Assertion Content > Authentication Context > Comparison Type.
Valid comparison methods are
exact,minimum,maximum, orbetter.For more information about the comparison methods, see the section on the
<RequestedAuthnContext>element in Assertions and Protocols for the OASIS Security Assertion Markup Language (SAML) V2.0.Default:
exactssoadm attribute:
forgerock-am-auth-saml2-auth-comparison- Authentication Context Class Reference
Specifies one or more URIs for authentication context classes to be included in the SAML request. Authentication context classes are unique identifiers for an authentication mechanism. The SAML v2.0 protocol supports a standard set of authentication context classes, defined in Authentication Context for the OASIS Security Assertion Markup Language (SAML) V2.0. In addition to the standard authentication context classes, you can specify customized authentication context classes.
Any authentication context class that you specify in this field must be supported for the service provider. To determine which authentication context classes are supported, locate the list of authentication context classes that are available to the SP under Realms > Realm Name > Applications > Federation > Entity Providers > Service Provider Name > Assertion Content > Authentication Context, and then review the values in the Supported column.
When specifying multiple authentication context classes, use the | character to separate the classes.
Example value:
urn:oasis:names:tc:SAML:2.0:ac:classes:Password|urn:oasis:names:tc:SAML:2.0:ac:classes:TimesyncTokenssoadm attribute:
forgerock-am-auth-saml2-authn-context-class-ref- Authentication Context Declaration Reference
Specifies one or more URIs that identify authentication context declarations.
This field is optional.
When specifying multiple URIs, use the | character to separate the URIs.
For more information, see the section on the
<RequestedAuthnContext>element in Assertions and Protocols for the OASIS Security Assertion Markup Language (SAML) V2.0.ssoadm attribute:
forgerock-am-auth-saml2-authn-context-decl-ref- Request Binding
Specifies the format used to send the authentication request from the SP to the IdP.
Valid values are
HTTP-RedirectandHTTP-POST.Default:
HTTP-Redirectssoadm attribute:
forgerock-am-auth-saml2-req-binding. When using the ssoadm command, set this attribute's value tourn:oasis:names:tc:SAML:2.0:bindings:HTTP-Redirectorurn:oasis:names:tc:SAML:2.0:bindings:HTTP-POST.- Response Binding
Specifies the format used to send the response from the IdP to the SP.
A value of
HTTP-POSTindicates that the HTTP POST binding with a self-submitting form should be used in assertion processing. A value ofHTTP-Artifactindicates that the HTTP Artifact binding should be used.Default:
HTTP-Artifactssoadm attribute:
forgerock-am-auth-saml2-binding. When using the ssoadm command, set this attribute's value tourn:oasis:names:tc:SAML:2.0:bindings:HTTP-Artifactorurn:oasis:names:tc:SAML:2.0:bindings:HTTP-POST.- Force IdP Authentication
Specifies whether the IdP should force authentication or can reuse existing security contexts.
A value of
trueindicates that the IdP should force authentication. A value offalseindicates that the IdP can reuse existing security contexts.ssoadm attribute:
forgerock-am-auth-saml2-force-authn- Passive Authentication
Specifies whether the IdP should use passive authentication or not. Passive authentication requires the IdP to only use authentication methods that do not require user interaction. For example, authenticating using an X.509 certificate.
A value of
trueindicates that the IdP should authenticate passively. A value offalseindicates that the IdP should not authenticate passively.ssoadm attribute:
forgerock-am-auth-saml2-is-passive- NameID Format
Specifies a SAML name ID format to be requested in the SAML authentication request.
Default:
urn:oasis:names:tc:SAML:2.0:nameid-format:persistentssoadm attribute:
forgerock-am-auth-saml2-name-id-format- Single Logout Enabled
Specifies whether AM should attempt to log out of the user's IdP session during session logout.
When enabling SAML v2.0 single logout, you must also configure the post-authentication processing class for the authentication chain containing the SAML2 authentication module to
org.forgerock.openam.authentication.modules.saml2.SAML2PostAuthenticationPlugin.For more information about configuring single logout when implementing SAML v2.0 federation using the SAML2 authentication module, see "Configuring Single Logout in an Integrated Mode Implementation" in the SAML v2.0 Guide.
Default:
falsessoadm attribute:
forgerock-am-auth-saml2-slo-enabled- Single Logout URL
Specifies the URL to which the user is forwarded after successful IdP logout. Configure this property only if you have enabled SAML v2.0 single logout by selecting the Single Logout Enabled check box.
ssoadm attribute:
forgerock-am-auth-saml2-slo-relay
ssoadm service name:
iPlanetAMAuthScriptedService
Use the following settings at the realm level when configuring an individual scripted authentication module, in the AM console under Realms > Realm Name > Authentication > Modules.
- Client-Side Script Enabled
When enabled, the module includes the specified client-side script in the login page to be executed on the user-agent prior to the server-side script.
ssoadm attribute:
iplanet-am-auth-scripted-client-script-enabled- Client-Side Script
Specifies the ID of the script to include in the login page. This script is run on the user-agent prior to the server-side script. This script must be written in a language the user-agent can interpret, such as JavaScript, even if the server-side script is written in Groovy.
To create, view, or modify the content of the scripts, navigate to Realms > Realm Name > Scripts.
ssoadm attribute:
iplanet-am-auth-scripted-client-script- Server Side Script
Specifies the ID of the script to run in AM after the client-side script has completed.
To create, view, or modify the content of the scripts, navigate to Realms > Realm Name > Scripts.
ssoadm attribute:
iplanet-am-auth-scripted-server-script- Authentication Level
Sets the authentication level used to indicate the level of security associated with the scripted authentication module.
The value can range from 0 to any positive integer.
ssoadm attribute:
iplanet-am-auth-scripted-auth-level
In the AM console, navigate to Configure > Global Services > Scripting > Secondary Configurations > Server-Side Script Type,> Secondary Configurations > EngineConfiguration.
On the EngineConfiguration page, configure the following settings for the scripting engine of the selected type:
- Server-side Script Timeout
Specifies the maximum execution time any individual script should take on the server (in seconds). AM terminates scripts which take longer to run than this value.
ssoadm attribute:
serverTimeout- Core thread pool size
Specifies the initial number of threads in the thread pool from which scripts operate. AM will ensure the pool contains at least this many threads.
ssoadm attribute:
coreThreads- Maximum thread pool size
Specifies the maximum number of threads in the thread pool from which scripts operate. If no free thread is available in the pool, AM creates new threads in the pool for script execution up to the configured maximum.
ssoadm attribute:
maxThreads- Thread pool queue size
Specifies the number of threads to use for buffering script execution requests when the maximum thread pool size is reached.
ssoadm attribute:
queueSize- Thread idle timeout (seconds)
Specifies the length of time (in seconds) for a thread to be idle before AM terminates created threads. If the current pool size contains the number of threads set in
Core thread pool size, then idle threads will not be terminated, maintaining the initial pool size.ssoadm attribute:
idleTimeout- Java class whitelist
Specifies the list of class name patterns allowed to be invoked by the script. Every class accessed by the script must match at least one of these patterns.
You can specify the class name as-is or use a regular expression.
ssoadm attribute:
whiteList- Java class blacklist
Specifies the list of class name patterns that are NOT allowed to be invoked by the script. The blacklist is applied AFTER the whitelist to exclude those classes. Access to a class specified in both the whitelist and the blacklist will be denied.
You can specify the class name to exclude as-is or use a regular expression.
ssoadm attribute:
blackList- Use system SecurityManager
When enabled, AM makes a call to the
System.getSecurityManager().checkPackageAccess(...)method for each class that is accessed. The method throwsSecurityExceptionif the calling thread is not allowed to access the package.Note
This feature only takes effect if the security manager is enabled for the JVM.
ssoadm attribute:
useSecurityManager
Important
To use the SecurID authentication module, you must first build an
AM .war file that includes the supporting library.
For more information, see
"Enabling RSA SecurID Support" in the Installation Guide.
ssoadm service name:
iPlanetAMAuthSecurIDService
- ACE/Server Configuration Path
Specify the directory where the SecurID ACE/Server
sdconf.recfile is located, which by default is expected under the AM configuration directory, such as$HOME/openam/openam/auth/ace/data. The directory must exist before AM can use SecurID authentication.ssoadm attribute:
iplanet-am-auth-securid-server-config-path- Authentication Level
Sets the authentication level used to indicate the level of security associated with the module. The value can range from 0 to any positive integer.
ssoadm attribute:
iplanet-am-auth-securid-auth-level
amster service name:
authSocialInstagram
The following properties are available under the Core tab:
- Authentication Level
Specifies the authentication level used to indicate the level of security associated with the module. The value can range from 0 to any positive integer.
Default:
0amster data attribute:
authenticationLevel- Social Provider
Specifies the name of the social provider for which this module is being set up.
Default:
Instagramamster data attribute:
provider- Client Id
Specifies the
client_idparameter as described in section 2.2 of The OAuth 2.0 Authorization Framework (RFC 6749).Tip
To register an application with Instagram and obtain an OAuth 2.0
client_idandclient_secret, visit https://www.instagram.com/developer/.amster attribute:
clientId- Client Secret
Specifies the
client_secretparameter as described in section 2.3 of The OAuth 2.0 Authorization Framework (RFC 6749).amster attribute:
clientSecret- Authentication Endpoint URL
Specifies the URL to the social provider's endpoint handling authentication as described in section 3.1 of The OAuth 2.0 Authorization Framework (RFC 6749).
Default:
https://api.instagram.com/oauth/authorizeamster attribute:
authorizeEndpoint- Access Token Endpoint URL
Specifies the URL to the endpoint handling access tokens as described in section 3.2 of The OAuth 2.0 Authorization Framework (RFC 6749).
Default:
https://api.instagram.com/oauth/access_tokenamster attribute:
tokenEndpoint- User Profile Service URL
Specifies the user profile URL that returns profile information in JSON format.
Default:
https://api.instagram.com/v1/users/selfamster attribute:
userInfoEndpoint- Scope
Specifies a list of user profile attributes that the client application requires, according to The OAuth 2.0 Authorization Framework (RFC 6749). The list depends on the permissions that the resource owner, such as the end user, grants to the client application.
Default:
basicamster attribute:
scope- Scope Delimiter
Specifies the delimiter used to separate scope values.
Some authorization servers use non-standard separators for scopes. Facebook, for example, uses commas.
Default: space character
amster attribute:
scopeDelimiter- Subject Property
Specifies the attribute the social provider uses to identify a user.
Default:
idamster attribute:
subjectProperty- Use Basic Auth
Specifies that the client uses HTTP Basic authentication when authenticating to the social provider.
Valid values are:
truefalse
Default:
falseamster attribute:
usesBasicAuth- Proxy URL
Specifies the URL to the
/oauth2c/OAuthProxy.jspfile, which provides AM with GET to POST proxying capabilities. Change this URL only if an external server performs the GET to POST proxying.Default:
@SERVER_PROTO@://@SERVER_HOST@:@SERVER_PORT@/@SERVER_URI@/oauth2c/OAuthProxy.jspExample:
https://openam.example.com:8443/openam/oauth2c/OAuthProxy.jspamster attribute:
ssoProxyUrl- OAuth 2.0 Provider Logout Service
Specifies the URL of the social provider's logout service.
To enable logout of the social authentication provider when logging out of AM, you must add
org.forgerock.openam.authentication.modules.oauth2.OAuth2PostAuthnPluginto the Authentication Post Processing Classes property. To add the class, navigate to Authentication > Settings > Post Authentication Processing.Default:
https://instagram.com/accounts/logoutamster attribute:
logoutServiceUrl- Logout Options
Specifies the social provider logout actions to take when logging out of AM.
Valid options are:
promptAsks the user whether or not to log out from the social provider.
logoutLogs the user out of the social provider without prompting.
donotlogoutKeeps the user logged in to the social provider. There is no prompt to the user.
Default:
promptamster attribute:
logoutBehaviour
The following properties are available under the Account Provisioning tab:
- Use IDM as Registration Service
Whether to use IDM as an external registration service to complete registration for new users. You must configure and enable the IDM Provisioning service to use this option. See "IDM Provisioning".
AM passes IDM these parameters:
clientToken: Signed, encrypted JWT of the OAuth 2.0 authentication state.returnParams: Encoded URL parameters, required to be returned to AM to resume authentication after registration in IDM is complete.
Default:
Falseamster attribute:
enableRegistrationService- Create account if it does not exist
When enabled, AM creates an account for the user if the user profile does not exist.
When disabled, a user without a profile may still log into AM if the Ignore Profile attribute is set in the authentication service of the realm, or if the account is mapped to an anonymous account.
Valid values are:
truefalse
Default:
trueamster attribute:
createAccount- Account Provider
Specifies the name of the class that implements the account provider.
Default:
org.forgerock.openam.authentication.modules.common.mapping.DefaultAccountProvideramster attribute:
accountProviderClass- Account Mapper
Specifies the name of the class that implements the attribute mapping for the account search.
Tip
You can provide string constructor parameters by appending pipe-separated (|) values.
Default:
org.forgerock.openam.authentication.modules.common.mapping.JsonAttributeMapper|*|instagram-amster attribute:
accountMapperClass- Account Mapper Configuration
Specifies the attribute configuration used to map the account of the user authenticated in the social provider to the local data store in AM. Valid values take the form
provider-attr=local-attr.Default:
id=uidamster attribute:
accountMapperConfiguration- Attribute Mapper
Specifies the list of fully qualified class names for implementations that map attributes from the social provider to AM profile attributes.
You can provide a custom attribute mapper. A custom attribute mapper must implement the
org.forgerock.openam.authentication.modules.common.mapping.AttributeMapperinterface.Provided implementations are:
org.forgerock.openam.authentication.modules.common.mapping.JsonAttributeMapperorg.forgerock.openam.authentication.modules.oidc.JwtAttributeMapper- can only be used when using theopenidscope
Tip
You can provide string constructor parameters by appending pipe-separated (|) values.
For example, the
org.forgerock.openam.authentication.modules.oidc.JwtAttributeMapperclass can take two constructor parameters: a comma-separated list of attributes, and a prefix to apply to their values. Specify these as follows:org.forgerock.openam.authentication.modules.oidc.JsonAttributeMapper|uid|instagram-Default:
org.forgerock.openam.authentication.modules.common.mapping.JsonAttributeMapper|uid|instagram-amster attribute:
attributeMappingClasses- Attribute Mapper Configuration
Specifies a map of social provider user account attributes to local user profile attributes with values in the form
provider-attr=local-attr.Default:
id=uid
full_name=sn
username=cn
username=givenNameamster attribute:
attributeMapperConfiguration- Map to anonymous user
When enabled, maps the social provider authenticated user to a specified anonymous user. If the Create account if it does not exist property is enabled, AM creates an account for the authenticated user instead of mapping the account to an anonymous user.
Valid values are:
truefalse
Default:
falseamster attribute:
mapToAnonymousUser- Anonymous User
Specifies an anonymous user that exists in the current realm. The Map to anonymous user property maps authorized users without a profile to this anonyomus user, if enabled.
Default:
anonymousamster attribute:
anonymousUserName- Save attributes in the session
When enabled, saves the values of attributes specified in the Attribute Mapper Configuration property in the AM session.
Valid values are:
truefalse
Default:
trueamster attribute:
saveAttributesInSession
amster service name:
authSocialOAuth2
The following properties are available under the Core tab:
- Authentication Level
Specifies the authentication level used to indicate the level of security associated with the module. The value can range from 0 to any positive integer.
Default:
0amster data attribute:
authenticationLevel- Social Provider
Specifies the name of the social provider for which this module is being set up.
Example:
Googleamster data attribute:
provider- Client Id
Specifies the
client_idparameter as described in section 2.2 of The OAuth 2.0 Authorization Framework (RFC 6749).amster attribute:
clientId- Client Secret
Specifies the
client_secretparameter as described in section 2.3 of The OAuth 2.0 Authorization Framework (RFC 6749).amster attribute:
clientSecret- Authentication Endpoint URL
Specifies the URL to the social provider's endpoint handling authentication as described in section 3.1 of The OAuth 2.0 Authorization Framework (RFC 6749).
Example:
https://accounts.google.com/o/oauth2/v2/authamster attribute:
authorizeEndpoint- Access Token Endpoint URL
Specifies the URL to the endpoint handling access tokens as described in section 3.2 of The OAuth 2.0 Authorization Framework (RFC 6749).
Example:
https://www.googleapis.com/oauth2/v4/tokenamster attribute:
tokenEndpoint- User Profile Service URL
Specifies the user profile URL that returns profile information in JSON format.
Exaple:
https://www.googleapis.com/oauth2/v3/userinfoamster attribute:
userInfoEndpoint- Scope
Specifies a list of user profile attributes that the client application requires, according to The OAuth 2.0 Authorization Framework (RFC 6749). The list depends on the permissions that the resource owner, such as the end user, grants to the client application.
amster attribute:
scope- Scope Delimiter
Specifies the delimiter used to separate scope values.
Some authorization servers use non-standard separators for scopes. Facebook, for example, uses commas.
amster attribute:
scopeDelimiter- Subject Property
Specifies the attribute the social provider uses to identify a user.
Example:
subamster attribute:
subjectProperty- Use Basic Auth
Specifies that the client uses HTTP Basic authentication when authenticating to the social provider.
Valid values are:
truefalse
Default:
trueamster attribute:
usesBasicAuth- Proxy URL
Specifies the URL to the
/oauth2c/OAuthProxy.jspfile, which provides AM with GET to POST proxying capabilities. Change this URL only if an external server performs the GET to POST proxying.Default:
@SERVER_PROTO@://@SERVER_HOST@:@SERVER_PORT@/@SERVER_URI@/oauth2c/OAuthProxy.jspExample:
https://openam.example.com:8443/openam/oauth2c/OAuthProxy.jspamster attribute:
ssoProxyUrl- OAuth 2.0 Provider Logout Service
Specifies the URL of the social provider's logout service.
To enable logout of the social authentication provider when logging out of AM, you must add
org.forgerock.openam.authentication.modules.oauth2.OAuth2PostAuthnPluginto the Authentication Post Processing Classes property. To add the class, navigate to Authentication > Settings > Post Authentication Processing.amster attribute:
logoutServiceUrl- Logout Options
Specifies the social provider logout actions to take when logging out of AM.
Valid options are:
promptAsks the user whether or not to log out from the social provider.
logoutLogs the user out of the social provider without prompting.
donotlogoutKeeps the user logged in to the social provider. There is no prompt to the user.
Default:
promptamster attribute:
logoutBehaviour- Token Issuer
Corresponds to the expected issue identifier value in the
issfield of the ID token.Example:
https://accounts.google.comamster attribute:
issuerName- OAuth 2.0 Mix-Up Mitigation Enabled
Controls whether the OAuth 2.0 authentication module carries out additional verification steps when it receives the authorization code from the authorization server.
Specifies that the client must compare the issuer identifier of the authorization server upon registration with the issuer value returned in the
issresponse parameter. If they do not match, the client must abort the authorization process. The client must also confirm that the authorization server's response is intended for the client by comparing the client's client identifier to the value of theclient_idresponse parameter.The Token Issuer property must be entered when the OAuth 2.0 Mix-Up Mitigation feature is enabled, so that the validation can succeed. The authorization code response will contain an issuer value (
iss) that will be validated by the client.Note
Consult with the authorization server's documentation on what value it uses for the issuer field.
For more information, see section 4 of OAuth 2.0 Mix-Up Mitigration Draft.
amster attribute:
mixUpMitigation
The following properties are available under the Account Provisioning tab:
- Use IDM as Registration Service
Whether to use IDM as an external registration service to complete registration for new users. You must configure and enable the IDM Provisioning service to use this option. See "IDM Provisioning".
AM passes IDM these parameters:
clientToken: Signed, encrypted JWT of the OAuth 2.0 authentication state.returnParams: Encoded URL parameters, required to be returned to AM to resume authentication after registration in IDM is complete.
Default:
Falseamster attribute:
enableRegistrationService- Create account if it does not exist
When enabled, AM creates an account for the user if the user profile does not exist. If the Prompt for password setting and activation code attribute is enabled, AM prompts the user for a password and activation code before creating the account.
Important
When configured to create new accounts, the SMTP settings must also be valid. As part of account creation, the authentication module sends the resource owner an email with an account activation code. To send the mail, AM uses the SMTP settings you provide in the module configuration.
When disabled, a user without a profile may still log into AM if the Ignore Profile attribute is set in the authentication service of the realm, or if the account is mapped to an anonymous account.
Valid values are:
truefalse
Default:
trueamster attribute:
createAccount- Account Provider
Specifies the name of the class that implements the account provider.
Default:
org.forgerock.openam.authentication.modules.common.mapping.DefaultAccountProvideramster attribute:
accountProviderClass- Account Mapper
Specifies the name of the class that implements the attribute mapping for the account search.
Example:
org.forgerock.openam.authentication.modules.common.mapping.JsonAttributeMapper|*|google-amster attribute:
accountMapperClass- Account Mapper Configuration
Specifies the attribute configuration used to map the account of the user authenticated in the social provider to the local data store in AM. Valid values take the form
provider-attr=local-attr.amster attribute:
accountMapperConfiguration- Attribute Mapper
Specifies the list of fully qualified class names for implementations that map attributes from the social provider to AM profile attributes.
You can provide a custom attribute mapper. A custom attribute mapper must implement the
org.forgerock.openam.authentication.modules.common.mapping.AttributeMapperinterface.Provided implementations are:
org.forgerock.openam.authentication.modules.common.mapping.JsonAttributeMapperorg.forgerock.openam.authentication.modules.oidc.JwtAttributeMapper- can only be used when using theopenidscope
Tip
You can provide string constructor parameters by appending pipe-separated (|) values.
For example, the
org.forgerock.openam.authentication.modules.oidc.JwtAttributeMapperclass can take two constructor parameters: a comma-separated list of attributes, and a prefix to apply to their values. Specify these as follows:org.forgerock.openam.authentication.modules.oidc.JwtAttributeMapper|*|google-amster attribute:
attributeMappingClasses- Attribute Mapper Configuration
Specifies a map of social provider user account attributes to local user profile attributes with values in the form
provider-attr=local-attr.amster attribute:
attributeMapperConfiguration- Prompt for password setting and activation code
When enabled, the user must set a password before AM creates an account dynamically. An activation code is also sent to the user's email address. Both the password and the code are required before the account is created.
Valid values are:
truefalse
Default:
falseamster attribute:
promptPasswordFlag- Map to anonymous user
When enabled, maps the social provider authenticated user to a specified anonymous user. If the Create account if it does not exist property is enabled, AM creates an account for the authenticated user instead of mapping the account to an anonymous user.
Valid values are:
truefalse
Default:
falseamster attribute:
mapToAnonymousUser- Anonymous User
Specifies an anonymous user that exists in the current realm. The Map to anonymous user property maps authorized users without a profile to this anonyomus user, if enabled.
Default:
anonymousamster attribute:
anonymousUserName- Save attributes in the session
When enabled, saves the values of attributes specified in the Attribute Mapper Configuration property in the AM session.
Valid values are:
truefalse
Default:
trueamster attribute:
saveAttributesInSession
The following properties are available under the Email tab:
- Email attribute in the Response
Specifies the attribute identifying the authenticated user's email address in the response from the profile service in the social provider. This setting is used to send an email message with an activation code for accounts created dynamically.
amster attribute:
emailAttribute- Mail Server Gateway implementation class
Specifies the class used by the module to send email. A custom subclass of
org.forgerock.openam.authentication.modules.oauth2.EmailGatewayclass can be provided.Default:
org.forgerock.openam.authentication.modules.oauth2.DefaultEmailGatewayImplamster attribute:
emailGateway- SMTP host
Specifies the host name of the mail server.
Default:
localhostamster attribute:
smtpHost- SMTP port
Specifies the SMTP port number for the mail server.
Default:
25amster attribute:
smtpPort- SMTP User Name
Specifies the username AM uses to authenticate to the mail server.
amster attribute:
smtpUsername- SMTP User Password
Specifies the password AM uses to authenticate to the mail server.
amster attribute:
smtpPassword- SMTP SSL Enabled
When enabled, connects to the mail server over SSL. AM must be able to trust the SMTP server certificate.
Valid values are:
truefalse
Default:
falseamster attribute:
smtpSslEnabled- SMTP From address
Specifies the address of the email sender, such as
no-reply@example.com.amster attribute:
smtpFromAddress
The example settings are for Google.
amster service name:
authSocialOpenID
The following properties are available under the Core tab:
- Social Provider
Specifies the name of the social provider for which this module is being set up.
Example:
Googleamster data attribute:
provider- Client Id
Specifies the
client_idparameter as described in section 2.2 of The OAuth 2.0 Authorization Framework (RFC 6749).amster attribute:
clientId- Client Secret
Specifies the
client_secretparameter as described in section 2.3 of The OAuth 2.0 Authorization Framework (RFC 6749).amster attribute:
clientSecret- Authentication Level
Specifies the authentication level used to indicate the level of security associated with the module. The value can range from 0 to any positive integer.
Default:
0amster data attribute:
authenticationLevel- Authentication Endpoint URL
Specifies the URL to the social provider's endpoint handling authentication as described in section 3.1 of The OAuth 2.0 Authorization Framework (RFC 6749).
Example:
https://accounts.google.com/o/oauth2/v2/authamster attribute:
authorizeEndpoint- Access Token Endpoint URL
Specifies the URL to the endpoint handling access tokens as described in section 3.2 of The OAuth 2.0 Authorization Framework (RFC 6749).
Example:
https://www.googleapis.com/oauth2/v4/tokenamster attribute:
tokenEndpoint- User Profile Service URL
Specifies the user profile URL that returns profile information in JSON format.
Exaple:
https://www.googleapis.com/oauth2/v3/userinfoamster attribute:
userInfoEndpoint- Scope
Specifies a list of user profile attributes that the client application requires, according to The OAuth 2.0 Authorization Framework (RFC 6749). The list depends on the permissions that the resource owner, such as the end user, grants to the client application.
Default:
openidamster attribute:
scope- Scope Delimiter
Specifies the delimiter used to separate scope values.
Some authorization servers use non-standard separators for scopes. Facebook, for example, uses commas.
amster attribute:
scopeDelimiter- Subject Property
Specifies the attribute the social provider uses to identify a user.
Example:
subamster attribute:
subjectProperty- Use Basic Auth
Specifies that the client uses HTTP Basic authentication when authenticating to the social provider.
Valid values are:
truefalse
Default:
trueamster attribute:
usesBasicAuth- Proxy URL
Specifies the URL to the
/oauth2c/OAuthProxy.jspfile, which provides AM with GET to POST proxying capabilities. Change this URL only if an external server performs the GET to POST proxying.Default:
@SERVER_PROTO@://@SERVER_HOST@:@SERVER_PORT@/@SERVER_URI@/oauth2c/OAuthProxy.jspExample:
https://openam.example.com:8443/openam/oauth2c/OAuthProxy.jspamster attribute:
ssoProxyUrl- OAuth 2.0 Provider Logout Service
Specifies the URL of the social provider's logout service.
To enable logout of the social authentication provider when logging out of AM, you must add
org.forgerock.openam.authentication.modules.oauth2.OAuth2PostAuthnPluginto the Authentication Post Processing Classes property. To add the class, navigate to Authentication > Settings > Post Authentication Processing.amster attribute:
logoutServiceUrl- Logout Options
Specifies the social provider logout actions to take when logging out of AM.
Valid options are:
promptAsks the user whether or not to log out from the social provider.
logoutLogs the user out of the social provider without prompting.
donotlogoutKeeps the user logged in to the social provider. There is no prompt to the user.
Default:
promptamster attribute:
logoutBehaviour- Token Issuer
Corresponds to the expected issue identifier value in the
issfield of the ID token.Example:
https://accounts.google.comamster attribute:
issuerName- OAuth 2.0 Mix-Up Mitigation Enabled
Controls whether the OAuth 2.0 authentication module carries out additional verification steps when it receives the authorization code from the authorization server.
Specifies that the client must compare the issuer identifier of the authorization server upon registration with the issuer value returned in the
issresponse parameter. If they do not match, the client must abort the authorization process. The client must also confirm that the authorization server's response is intended for the client by comparing the client's client identifier to the value of theclient_idresponse parameter.The Token Issuer property must be entered when the OAuth 2.0 Mix-Up Mitigation feature is enabled, so that the validation can succeed. The authorization code response will contain an issuer value (
iss) that will be validated by the client.Note
Consult with the authorization server's documentation on what value it uses for the issuer field.
For more information, see section 4 of OAuth 2.0 Mix-Up Mitigration Draft.
amster attribute:
mixUpMitigation
The following properties are available under the OpenID Connect tab:
- OpenID Connect validation configuration type
In order to validate the ID token from the OpenID Connect provider, the module needs either a URL to get the public keys for the provider, or the symmetric key for an ID token signed with a HMAC-based algorithm.
By default, the configuration type is
.well-known/openid-configuration_url. This means the module should retrieve the keys based on information in the OpenID Connect Provider Configuration Document.You can instead configure the authentication module to validate the ID token signature with the client secret key you provide, or to validate the ID token with the keys retrieved from the URL to the OpenID Connect provider's JSON web key set.
.well-known/openid-configuration_url(Default)Retrieve the provider keys based on the information provided in the OpenID Connect Provider Configuration Document.
Specify the URL to the document in the OpenID Connect validation configuration value property
client_secretUse the client secret that you specify in the Client Secret property (not the OpenID Connect validation configuration value property, which is ignored) as the key to validate the ID token signature according to the HMAC, using the client secret to the decrypt the hash and then checking that the hash matches the hash of the ID token JWT.
jwk_urlRetrieve the provider's JSON web key set at the URL that you specify in the OpenID Connect validation configuration value property.
amster attribute:
cryptoContextType- OpenID Connect validation configuration value
Specifies the full URL to the discovery or JWK location, corresponding to the configuration type selected in the OpenID Connect validation configuration type property.
Example:
https://accounts.google.com/.well-known/openid-configurationamster attribute:
cryptoContextValue
The following properties are available under the Account Provisioning tab:
- Use IDM as Registration Service
Whether to use IDM as an external registration service to complete registration for new users. You must configure and enable the IDM Provisioning service to use this option. See "IDM Provisioning".
AM passes IDM these parameters:
clientToken: Signed, encrypted JWT of the OAuth 2.0 authentication state.returnParams: Encoded URL parameters, required to be returned to AM to resume authentication after registration in IDM is complete.
Default:
Falseamster attribute:
enableRegistrationService- Create account if it does not exist
When enabled, AM creates an account for the user if the user profile does not exist. If the Prompt for password setting and activation code attribute is enabled, AM prompts the user for a password and activation code before creating the account.
Important
When configured to create new accounts, the SMTP settings must also be valid. As part of account creation, the authentication module sends the resource owner an email with an account activation code. To send the mail, AM uses the SMTP settings you provide in the module configuration.
When disabled, a user without a profile may still log into AM if the Ignore Profile attribute is set in the authentication service of the realm, or if the account is mapped to an anonymous account.
Valid values are:
truefalse
Default:
trueamster attribute:
createAccount- Account Provider
Specifies the name of the class that implements the account provider.
Default:
org.forgerock.openam.authentication.modules.common.mapping.DefaultAccountProvideramster attribute:
accountProviderClass- Account Mapper
Specifies the name of the class that implements the attribute mapping for the account search.
Tip
You can provide string constructor parameters by appending pipe-separated (|) values.
Example:
org.forgerock.openam.authentication.modules.common.mapping.JsonAttributeMapper|*|google-amster attribute:
accountMapperClass- Account Mapper Configuration
Specifies the attribute configuration used to map the account of the user authenticated in the social provider to the local data store in AM. Valid values take the form
provider-attr=local-attr.amster attribute:
accountMapperConfiguration- Attribute Mapper
Specifies the list of fully qualified class names for implementations that map attributes from the social provider to AM profile attributes.
You can provide a custom attribute mapper. A custom attribute mapper must implement the
org.forgerock.openam.authentication.modules.common.mapping.AttributeMapperinterface.Provided implementations are:
org.forgerock.openam.authentication.modules.common.mapping.JsonAttributeMapperorg.forgerock.openam.authentication.modules.oidc.JwtAttributeMapper- can only be used when using theopenidscope
Tip
You can provide string constructor parameters by appending pipe-separated (|) values.
For example, the
org.forgerock.openam.authentication.modules.oidc.JwtAttributeMapperclass can take two constructor parameters: a comma-separated list of attributes, and a prefix to apply to their values. Specify these as follows:org.forgerock.openam.authentication.modules.oidc.JwtAttributeMapper|*|google-amster attribute:
attributeMappingClasses- Attribute Mapper Configuration
Specifies a map of social provider user account attributes to local user profile attributes with values in the form
provider-attr=local-attr.amster attribute:
attributeMapperConfiguration- Prompt for password setting and activation code
When enabled, the user must set a password before AM creates an account dynamically. An activation code is also sent to the user's email address. Both the password and the code are required before the account is created.
Valid values are:
truefalse
Default:
falseamster attribute:
promptPasswordFlag- Map to anonymous user
When enabled, maps the social provider authenticated user to a specified anonymous user. If the Create account if it does not exist property is enabled, AM creates an account for the authenticated user instead of mapping the account to an anonymous user.
Valid values are:
truefalse
Default:
falseamster attribute:
mapToAnonymousUser- Anonymous User
Specifies an anonymous user that exists in the current realm. The Map to anonymous user property maps authorized users without a profile to this anonyomus user, if enabled.
Default:
anonymousamster attribute:
anonymousUserName- Save attributes in the session
When enabled, saves the values of attributes specified in the Attribute Mapper Configuration property in the AM session.
Valid values are:
truefalse
Default:
trueamster attribute:
saveAttributesInSession
The following properties are available under the Email tab:
- Email attribute in the Response
Specifies the attribute identifying the authenticated user's email address in the response from the profile service in the social provider. This setting is used to send an email message with an activation code for accounts created dynamically.
amster attribute:
emailAttribute- Mail Server Gateway implementation class
Specifies the class used by the module to send email. A custom subclass of
org.forgerock.openam.authentication.modules.oauth2.EmailGatewayclass can be provided.Default:
org.forgerock.openam.authentication.modules.oauth2.DefaultEmailGatewayImplamster attribute:
emailGateway- SMTP host
Specifies the host name of the mail server.
Default:
localhostamster attribute:
smtpHost- SMTP port
Specifies the SMTP port number for the mail server.
Default:
25amster attribute:
smtpPort- SMTP User Name
Specifies the username AM uses to authenticate to the mail server.
amster attribute:
smtpUsername- SMTP User Password
Specifies the password AM uses to authenticate to the mail server.
amster attribute:
smtpPassword- SMTP SSL Enabled
When enabled, connects to the mail server over SSL. AM must be able to trust the SMTP server certificate.
Valid values are:
truefalse
Default:
falseamster attribute:
smtpSslEnabled- SMTP From address
Specifies the address of the email sender, such as
no-reply@example.com.amster attribute:
smtpFromAddress
amster service name:
authSocialVk
The following properties are available under the Core tab:
- Social Provider
Specifies the name of the social provider for which this module is being set up.
Default:
VKontakteamster data attribute:
provider- Client Id
Specifies the
client_idparameter as described in section 2.2 of The OAuth 2.0 Authorization Framework (RFC 6749).Tip
To register an application with VKontakte and obtain an OAuth 2.0
client_idandclient_secret, visit https://vk.com/apps?act=manage.amster attribute:
clientId- Client Secret
Specifies the
client_secretparameter as described in section 2.3 of The OAuth 2.0 Authorization Framework (RFC 6749).amster attribute:
clientSecret- Authentication Level
Specifies the authentication level used to indicate the level of security associated with the module. The value can range from 0 to any positive integer.
Default:
0amster data attribute:
authenticationLevel- Authentication Endpoint URL
Specifies the URL to the endpoint handling authentication as described in section 3.1 of The OAuth 2.0 Authorization Framework (RFC 6749).
Default:
https://oauth.vk.com/authorizeamster attribute:
authorizeEndpoint- Access Token Endpoint URL
Specifies the URL to the social provider's endpoint handling access tokens as described in section 3.2 of The OAuth 2.0 Authorization Framework (RFC 6749).
Default:
https://oauth.vk.com/access_tokenamster attribute:
tokenEndpoint- User Profile Service URL
Specifies the user profile URL that returns profile information in JSON format.
Default:
https://api.vk.com/method/users.getamster attribute:
userInfoEndpoint- Scope
Specifies a list of user profile attributes that the client application requires, according to The OAuth 2.0 Authorization Framework (RFC 6749). The list depends on the permissions that the resource owner, such as the end user, grants to the client application.
amster attribute:
scope- Proxy URL
Specifies the URL to the
/oauth2c/OAuthProxy.jspfile, which provides AM with GET to POST proxying capabilities. Change this URL only if an external server performs the GET to POST proxying.Default:
@SERVER_PROTO@://@SERVER_HOST@:@SERVER_PORT@/@SERVER_URI@/oauth2c/OAuthProxy.jspExample:
https://openam.example.com:8443/openam/oauth2c/OAuthProxy.jspamster attribute:
ssoProxyUrl- Subject Property
Specifies the attribute the social provider uses to identify a user.
Default:
idamster attribute:
subjectProperty
The following properties are available under the Account Provisioning tab:
- Account Provider
Specifies the name of the class that implements the account provider.
Default:
org.forgerock.openam.authentication.modules.common.mapping.DefaultAccountProvideramster attribute:
accountProviderClass- Use IDM as Registration Service
Whether to use IDM as an external registration service to complete registration for new users. You must configure and enable the IDM Provisioning service to use this option. See "IDM Provisioning".
AM passes IDM these parameters:
clientToken: Signed, encrypted JWT of the OAuth 2.0 authentication state.returnParams: Encoded URL parameters, required to be returned to AM to resume authentication after registration in IDM is complete.
Default:
Falseamster attribute:
enableRegistrationService- Create account if it does not exist
When enabled, AM creates an account for the user if the user profile does not exist. If the Prompt for password setting and activation code attribute is enabled, AM prompts the user for a password and activation code before creating the account.
Important
When configured to create new accounts, the SMTP settings must also be valid. As part of account creation, the authentication module sends the resource owner an email with an account activation code. To send the mail, AM uses the SMTP settings you provide in the module configuration.
When disabled, a user without a profile may still log into AM if the Ignore Profile attribute is set in the authentication service of the realm, or if the account is mapped to an anonymous account.
Valid values are:
truefalse
Default:
trueamster attribute:
createAccount- Account Mapper
Specifies the name of the class that implements the attribute mapping for the account search.
Default:
org.forgerock.openam.authentication.modules.common.mapping.JsonAttributeMapper|uid|vkontakte-amster attribute:
accountMapperClass- Account Mapper Configuration
Specifies the attribute configuration used to map the account of the user authenticated in the social provider to the local data store in AM. Valid values take the form
provider-attr=local-attr.Default:
uid=uidamster attribute:
accountMapperConfiguration- Attribute Mapper
Specifies the list of fully qualified class names for implementations that map attributes from the social provider to AM profile attributes.
You can provide a custom attribute mapper. A custom attribute mapper must implement the
org.forgerock.openam.authentication.modules.common.mapping.AttributeMapperinterface.Provided implementations are:
org.forgerock.openam.authentication.modules.common.mapping.JsonAttributeMapperorg.forgerock.openam.authentication.modules.oidc.JwtAttributeMapper- can only be used when using theopenidscope
Tip
You can provide string constructor parameters by appending pipe-separated (|) values.
For example, the
org.forgerock.openam.authentication.modules.oidc.JwtAttributeMapperclass can take two constructor parameters: a comma-separated list of attributes, and a prefix to apply to their values. Specify these as follows:org.forgerock.openam.authentication.modules.oidc.JwtAttributeMapper|uid|vkontakte-Default:
org.forgerock.openam.authentication.modules.common.mapping.JsonAttributeMapper|uid|vkontakte-amster attribute:
attributeMappingClasses- Attribute Mapper Configuration
Specifies a map of social provider user account attributes to local user profile attributes with values in the form
provider-attr=local-attr.Default:
uid=uid
full_name=givenName
first_name=cn
last_name=sn
email=mailamster attribute:
attributeMapperConfiguration- Prompt for password setting and activation code
When enabled, the user must set a password before AM creates an account dynamically. An activation code is also sent to the user's email address. Both the password and the code are required before the account is created.
Valid values are:
truefalse
Default:
falseamster attribute:
promptPasswordFlag- Map to anonymous user
When enabled, maps the social provider authenticated user to a specified anonymous user. If the Create account if it does not exist property is enabled, AM creates an account for the authenticated user instead of mapping the account to an anonymous user.
Valid values are:
truefalse
Default:
falseamster attribute:
mapToAnonymousUser- Anonymous User
Specifies an anonymous user that exists in the current realm. The Map to anonymous user property maps authorized users without a profile to this anonyomus user, if enabled.
Default:
anonymousamster attribute:
anonymousUserName- Save attributes in the session
When enabled, saves the values of attributes specified in the Attribute Mapper Configuration property in the AM session.
Valid values are:
truefalse
Default:
trueamster attribute:
saveAttributesInSession
The following properties are available under the Email tab:
- Email attribute in the Response
Specifies the attribute identifying the authenticated user's email address in the response from the profile service in the social provider. This setting is used to send an email message with an activation code for accounts created dynamically.
amster attribute:
emailAttribute- Mail Server Gateway implementation class
Specifies the class used by the module to send email. A custom subclass of
org.forgerock.openam.authentication.modules.oauth2.EmailGatewayclass can be provided.Default:
org.forgerock.openam.authentication.modules.oauth2.DefaultEmailGatewayImplamster attribute:
emailGateway- SMTP host
Specifies the host name of the mail server.
Default:
localhostamster attribute:
smtpHost- SMTP port
Specifies the SMTP port number for the mail server.
Default:
25amster attribute:
smtpPort- SMTP User Name
Specifies the username AM uses to authenticate to the mail server.
amster attribute:
smtpUsername- SMTP User Password
Specifies the password AM uses to authenticate to the mail server.
amster attribute:
smtpPassword- SMTP SSL Enabled
When enabled, connects to the mail server over SSL. AM must be able to trust the SMTP server certificate.
Valid values are:
truefalse
Default:
falseamster attribute:
smtpSslEnabled- SMTP From address
Specifies the address of the email sender, such as
no-reply@example.com.Default:
info@forgerock.comamster attribute:
smtpFromAddress
amster service name:
authSocialWeChat
The following properties are available under the Core tab:
- Authentication Level
Specifies the authentication level used to indicate the level of security associated with the module. The value can range from 0 to any positive integer.
Default:
0amster data attribute:
authenticationLevel- Social Provider
Specifies the name of the social provider for which this module is being set up.
Default:
WeChatamster data attribute:
provider- Client Id
Specifies the
client_idparameter as described in section 2.2 of The OAuth 2.0 Authorization Framework (RFC 6749).Tip
To register an application with WeChat and obtain an OAuth 2.0
client_idandclient_secret, visit https://open.weixin.qq.com/cgi-bin/frame?t=home/web_tmpl.amster attribute:
clientId- Client Secret
Specifies the
client_secretparameter as described in section 2.3 of The OAuth 2.0 Authorization Framework (RFC 6749).amster attribute:
clientSecret- Authentication Endpoint URL
Specifies the URL to the social provider's endpoint handling authentication as described in section 3.1 of The OAuth 2.0 Authorization Framework (RFC 6749).
Default:
https://open.weixin.qq.com/connect/qrconnectamster attribute:
authorizeEndpoint- Access Token Endpoint URL
Specifies the URL to the endpoint handling access tokens as described in section 3.2 of The OAuth 2.0 Authorization Framework (RFC 6749).
Default:
https://api.wechat.com/sns/oauth2/access_tokenamster attribute:
tokenEndpoint- User Profile Service URL
Specifies the user profile URL that returns profile information in JSON format.
Default:
https://api.wechat.com/sns/userinfoamster attribute:
userInfoEndpoint- Scope
Specifies a list of user profile attributes that the client application requires, according to The OAuth 2.0 Authorization Framework (RFC 6749). The list depends on the permissions that the resource owner, such as the end user, grants to the client application.
amster attribute:
scope- Scope Delimiter
Specifies the delimiter used to separate scope values.
Some authorization servers use non-standard separators for scopes. Facebook, for example, uses commas.
Default: space character
amster attribute:
scopeDelimiter- Subject Property
Specifies the attribute the social provider uses to identify a user.
Default:
openidamster attribute:
subjectProperty- Use Basic Auth
Specifies that the client uses HTTP Basic authentication when authenticating to the social provider.
Valid values are:
truefalse
Default:
falseamster attribute:
usesBasicAuth- Proxy URL
Specifies the URL to the
/oauth2c/OAuthProxy.jspfile, which provides AM with GET to POST proxying capabilities. Change this URL only if an external server performs the GET to POST proxying.Default:
@SERVER_PROTO@://@SERVER_HOST@:@SERVER_PORT@/@SERVER_URI@/oauth2c/OAuthProxy.jspExample:
https://openam.example.com:8443/openam/oauth2c/OAuthProxy.jspamster attribute:
ssoProxyUrl
The following properties are available under the Account Provisioning tab:
- Use IDM as Registration Service
Whether to use IDM as an external registration service to complete registration for new users. You must configure and enable the IDM Provisioning service to use this option. See "IDM Provisioning".
AM passes IDM these parameters:
clientToken: Signed, encrypted JWT of the OAuth 2.0 authentication state.returnParams: Encoded URL parameters, required to be returned to AM to resume authentication after registration in IDM is complete.
Default:
Falseamster attribute:
enableRegistrationService- Create account if it does not exist
When enabled, AM creates an account for the user if the user profile does not exist. If the Prompt for password setting and activation code attribute is enabled, AM prompts the user for a password and activation code before creating the account.
Important
When configured to create new accounts, the SMTP settings must also be valid. As part of account creation, the authentication module sends the resource owner an email with an account activation code. To send the mail, AM uses the SMTP settings you provide in the module configuration.
When disabled, a user without a profile may still log into AM if the Ignore Profile attribute is set in the authentication service of the realm, or if the account is mapped to an anonymous account.
Valid values are:
truefalse
Default:
trueamster attribute:
createAccount- Account Provider
Specifies the name of the class that implements the account provider.
Default:
org.forgerock.openam.authentication.modules.common.mapping.DefaultAccountProvideramster attribute:
accountProviderClass- Account Mapper
Specifies the name of the class that implements the attribute mapping for the account search.
Default:
org.forgerock.openam.authentication.modules.common.mapping.JsonAttributeMapper|*|wechat-amster attribute:
accountMapperClass- Account Mapper Configuration
Specifies the attribute configuration used to map the account of the user authenticated in the social provider to the local data store in AM. Valid values take the form
provider-attr=local-attr.Default:
openid=uidamster attribute:
accountMapperConfiguration- Attribute Mapper
Specifies the list of fully qualified class names for implementations that map attributes from the social provider to AM profile attributes.
You can provide a custom attribute mapper. A custom attribute mapper must implement the
org.forgerock.openam.authentication.modules.common.mapping.AttributeMapperinterface.Provided implementations are:
org.forgerock.openam.authentication.modules.common.mapping.JsonAttributeMapperorg.forgerock.openam.authentication.modules.oidc.JwtAttributeMapper- can only be used when using theopenidscope
Tip
You can provide string constructor parameters by appending pipe-separated (|) values.
For example, the
org.forgerock.openam.authentication.modules.oidc.JwtAttributeMapperclass can take two constructor parameters: a comma-separated list of attributes, and a prefix to apply to their values. Specify these as follows:org.forgerock.openam.authentication.modules.oidc.JwtAttributeMapper|*|wechat-Default:
org.forgerock.openam.authentication.modules.common.mapping.JsonAttributeMapper|*|wechat-amster attribute:
attributeMappingClasses- Attribute Mapper Configuration
Specifies a map of social provider user account attributes to local user profile attributes with values in the form
provider-attr=local-attr.Default:
openid=uid
nickname=sn
nickname=cn
nickname=givenNameamster attribute:
attributeMapperConfiguration- Prompt for password setting and activation code
When enabled, the user must set a password before AM creates an account dynamically. An activation code is also sent to the user's email address. Both the password and the code are required before the account is created.
Valid values are:
truefalse
Default:
falseamster attribute:
promptPasswordFlag- Map to anonymous user
When enabled, maps the social provider authenticated user to a specified anonymous user. If the Create account if it does not exist property is enabled, AM creates an account for the authenticated user instead of mapping the account to an anonymous user.
Valid values are:
truefalse
Default:
falseamster attribute:
mapToAnonymousUser- Anonymous User
Specifies an anonymous user that exists in the current realm. The Map to anonymous user property maps authorized users without a profile to this anonyomus user, if enabled.
Default:
anonymousamster attribute:
anonymousUserName- Save attributes in the session
When enabled, saves the values of attributes specified in the Attribute Mapper Configuration property in the AM session.
Valid values are:
truefalse
Default:
trueamster attribute:
saveAttributesInSession
The following properties are available under the Email tab:
- Email attribute in the Response
Specifies the attribute identifying the authenticated user's email address in the response from the profile service in the social provider. This setting is used to send an email message with an activation code for accounts created dynamically.
amster attribute:
emailAttribute- Mail Server Gateway implementation class
Specifies the class used by the module to send email. A custom subclass of
org.forgerock.openam.authentication.modules.oauth2.EmailGatewayclass can be provided.Default:
org.forgerock.openam.authentication.modules.oauth2.DefaultEmailGatewayImplamster attribute:
emailGateway- SMTP host
Specifies the host name of the mail server.
Default:
localhostamster attribute:
smtpHost- SMTP port
Specifies the SMTP port number for the mail server.
Default:
25amster attribute:
smtpPort- SMTP User Name
Specifies the username AM uses to authenticate to the mail server.
amster attribute:
smtpUsername- SMTP User Password
Specifies the password AM uses to authenticate to the mail server.
amster attribute:
smtpPassword- SMTP SSL Enabled
When enabled, connects to the mail server over SSL. AM must be able to trust the SMTP server certificate.
Valid values are:
truefalse
Default:
falseamster attribute:
smtpSslEnabled- SMTP From address
Specifies the address of the email sender, such as
no-reply@example.com.Default:
info@forgerock.comamster attribute:
smtpFromAddress
amster service name:
authSocialWeChatMobile
The following properties are available under the Core tab:
- Authentication Level
Specifies the authentication level used to indicate the level of security associated with the module. The value can range from 0 to any positive integer.
Default:
0amster data attribute:
authenticationLevel- Social Provider
Specifies the name of the social provider for which this module is being set up.
Default:
WeChatamster data attribute:
provider- User Profile Service URL
Specifies the user profile URL that returns profile information in JSON format.
Default:
https://api.wechat.com/sns/userinfoamster attribute:
userInfoEndpoint- Scope
Specifies a list of user profile attributes that the client application requires, according to The OAuth 2.0 Authorization Framework (RFC 6749). The list depends on the permissions that the resource owner, such as the end user, grants to the client application.
Default:
snsapi_userinfoamster attribute:
scope- Subject Property
Specifies the attribute the social provider uses to identify a user.
Default:
openidamster attribute:
subjectProperty- Proxy URL
Specifies the URL to the
/oauth2c/OAuthProxy.jspfile, which provides AM with GET to POST proxying capabilities. Change this URL only if an external server performs the GET to POST proxying.Default:
@SERVER_PROTO@://@SERVER_HOST@:@SERVER_PORT@/@SERVER_URI@/oauth2c/OAuthProxy.jspExample:
https://openam.example.com:8443/openam/oauth2c/OAuthProxy.jspamster attribute:
ssoProxyUrl
The following properties are available under the Account Provisioning tab:
- Use IDM as Registration Service
Whether to use IDM as an external registration service to complete registration for new users. You must configure and enable the IDM Provisioning service to use this option. See "IDM Provisioning".
AM passes IDM these parameters:
clientToken: Signed, encrypted JWT of the OAuth 2.0 authentication state.returnParams: Encoded URL parameters, required to be returned to AM to resume authentication after registration in IDM is complete.
Default:
Falseamster attribute:
enableRegistrationService- Create account if it does not exist
When enabled, AM creates an account for the user if the user profile does not exist. If the Prompt for password setting and activation code attribute is enabled, AM prompts the user for a password and activation code before creating the account.
Important
When configured to create new accounts, the SMTP settings must also be valid. As part of account creation, the authentication module sends the resource owner an email with an account activation code. To send the mail, AM uses the SMTP settings you provide in the module configuration.
When disabled, a user without a profile may still log into AM if the Ignore Profile attribute is set in the authentication service of the realm, or if the account is mapped to an anonymous account.
Valid values are:
truefalse
Default:
trueamster attribute:
createAccount- Account Provider
Specifies the name of the class that implements the account provider.
Default:
org.forgerock.openam.authentication.modules.common.mapping.DefaultAccountProvideramster attribute:
accountProviderClass- Account Mapper
Specifies the name of the class that implements the attribute mapping for the account search.
Default:
org.forgerock.openam.authentication.modules.common.mapping.JsonAttributeMapper|*|wechat-amster attribute:
accountMapperClass- Account Mapper Configuration
Specifies the attribute configuration used to map the account of the user authenticated in the social provider to the local data store in AM. Valid values take the form
provider-attr=local-attr.Default:
openid=uidamster attribute:
accountMapperConfiguration- Attribute Mapper
Specifies the list of fully qualified class names for implementations that map attributes from the social provider to AM profile attributes.
You can provide a custom attribute mapper. A custom attribute mapper must implement the
org.forgerock.openam.authentication.modules.common.mapping.AttributeMapperinterface.Provided implementations are:
org.forgerock.openam.authentication.modules.common.mapping.JsonAttributeMapperorg.forgerock.openam.authentication.modules.oidc.JwtAttributeMapper- can only be used when using theopenidscope
Tip
You can provide string constructor parameters by appending pipe-separated (|) values.
For example, the
org.forgerock.openam.authentication.modules.oidc.JwtAttributeMapperclass can take two constructor parameters: a comma-separated list of attributes, and a prefix to apply to their values. Specify these as follows:org.forgerock.openam.authentication.modules.oidc.JwtAttributeMapper|*|wechat-Default:
org.forgerock.openam.authentication.modules.common.mapping.JsonAttributeMapper|*|wechat-amster attribute:
attributeMappingClasses- Attribute Mapper Configuration
Specifies a map of social provider user account attributes to local user profile attributes with values in the form
provider-attr=local-attr.Default:
openid=uid
nickname=sn
nickname=cn
nickname=givenNameamster attribute:
attributeMapperConfiguration- Prompt for password setting and activation code
When enabled, the user must set a password before AM creates an account dynamically. An activation code is also sent to the user's email address. Both the password and the code are required before the account is created.
Valid values are:
truefalse
Default:
falseamster attribute:
promptPasswordFlag- Map to anonymous user
When enabled, maps the social provider authenticated user to a specified anonymous user. If the Create account if it does not exist property is enabled, AM creates an account for the authenticated user instead of mapping the account to an anonymous user.
Valid values are:
truefalse
Default:
falseamster attribute:
mapToAnonymousUser- Anonymous User
Specifies an anonymous user that exists in the current realm. The Map to anonymous user property maps authorized users without a profile to this anonyomus user, if enabled.
Default:
anonymousamster attribute:
anonymousUserName- Save attributes in the session
When enabled, saves the values of attributes specified in the Attribute Mapper Configuration property in the AM session.
Valid values are:
truefalse
Default:
trueamster attribute:
saveAttributesInSession
The following properties are available under the Email tab:
- Email attribute in the Response
Specifies the attribute identifying the authenticated user's email address in the response from the profile service in the social provider. This setting is used to send an email message with an activation code for accounts created dynamically.
amster attribute:
emailAttribute- Mail Server Gateway implementation class
Specifies the class used by the module to send email. A custom subclass of
org.forgerock.openam.authentication.modules.oauth2.EmailGatewayclass can be provided.Default:
org.forgerock.openam.authentication.modules.oauth2.DefaultEmailGatewayImplamster attribute:
emailGateway- SMTP host
Specifies the host name of the mail server.
Default:
localhostamster attribute:
smtpHost- SMTP port
Specifies the SMTP port number for the mail server.
Default:
25amster attribute:
smtpPort- SMTP User Name
Specifies the username AM uses to authenticate to the mail server.
amster attribute:
smtpUsername- SMTP User Password
Specifies the password AM uses to authenticate to the mail server.
amster attribute:
smtpPassword- SMTP SSL Enabled
When enabled, connects to the mail server over SSL. AM must be able to trust the SMTP server certificate.
Valid values are:
truefalse
Default:
falseamster attribute:
smtpSslEnabled- SMTP From address
Specifies the address of the email sender, such as
no-reply@example.com.Default:
info@forgerock.comamster attribute:
smtpFromAddress
ssoadm service name:
iPlanetAMAuthWindowsDesktopSSOService
Tip
Before configuring the authentication module, create an Active Directory
account and a keytab file.
- Service Principal
Specifies the Kerberos principal for authentication in the format
HTTP/host.domain@DC-DOMAIN-NAME, where host.domain corresponds to the host and domain names of the AM instance and DC-DOMAIN-NAME is the domain name of the Kerberos realm (the FQDN of the Active Directory domain). DC-DOMAIN-NAME can differ from the domain name for AM.In multi-server deployments, configure host.domain as the load balancer FQDN or IP address in front of the AM instances. For example,
HTTP/openamLB.example.com@KERBEROSREALM.INTERNAL.COM.For more information, see the KB article How do I set up the WDSSO authentication module in AM in a load-balanced environment?.
ssoadm attribute:
iplanet-am-auth-windowsdesktopsso-principal-name- Keytab File Name
Specifies the full path of the keytab file for the Service Principal. You generate the keytab file using the Windows ktpass utility.
ssoadm attribute:
iplanet-am-auth-windowsdesktopsso-keytab-file- Kerberos Realm
Specifies the Kerberos Key Distribution Center realm. For the Windows Kerberos service, this is the domain controller server domain name.
ssoadm attribute:
iplanet-am-auth-windowsdesktopsso-kerberos-realm- Kerberos Server Name
Specifies the fully qualified domain name of the Kerberos Key Distribution Center server, such as that of the domain controller server.
ssoadm attribute:
iplanet-am-auth-windowsdesktopsso-kdc- Return Principal with Domain Name
When enabled, AM automatically returns the Kerberos principal with the domain controller's domain name during authentication.
ssoadm attribute:
iplanet-am-auth-windowsdesktopsso-returnRealm- Authentication Level
Sets the authentication level used to indicate the level of security associated with the module. The value can range from 0 to any positive integer.
ssoadm attribute:
iplanet-am-auth-windowsdesktopsso-auth-level- Trusted Kerberos realms
List of trusted Kerberos realms for user Kerberos tickets. If realms are configured, then Kerberos tickets are only accepted if the realm part of the user principal name of the user's Kerberos ticket matches a realm from the list.
ssoadm attribute:
iplanet-am-auth-windowsdesktopsso-kerberos-realms-trusted- isInitiator
Configuration used for the JDK Kerberos LoginModule (
Krb5LoginModule), which authenticates users using Kerberos principals. Possible values aretruefor initiator credentials, andfalsefor acceptor credentials.Default value:
truessoadm attribute:
iplanet-am-auth-windowsdesktopsso-kerberos-isinitiator- Search for the user in the realm
Validates the user against the configured data stores. If the user from the Kerberos token is not found, authentication will fail. If an authentication chain is set, the user is able to authenticate through another module. This search uses the
Alias Search Attribute Namefrom the core realm attributes. See "User Profile" for more information about this property.ssoadm attribute:
iplanet-am-auth-windowsdesktopsso-lookupUserInRealm
Note
Sending a ForceAuth=true authentication request when the user
has a valid session may result in failed authentication unless the request
hits the authoritative AM server.
Authentication cross-talk requires an authorization header in the request that grants the new server access to the user's authentication token.
To ensure the authorization headers are included in the cross-talk requests, perform the following steps:
Navigate to Deployment > Servers > Server Name > Advanced.
Modify the following advanced properties:
Add the
WWW-Authenticatevalue to theopenam.retained.http.headersproperty.Add the
Authorizationvalue to theopenam.retained.http.request.headersproperty.
Save your changes.
ssoadm service name:
iPlanetAMAuthNTService
- Authentication Domain
Specifies the Windows domain name to which users belong.
ssoadm attribute:
iplanet-am-auth-nt-domain- Authentication Host
Specifies the NetBIOS name of the Windows NT domain controller to which to authenticate users.
ssoadm attribute:
iplanet-am-auth-nt-host- Samba Configuration File Name
Specifies the full path to the Samba configuration file, for example,
/opt/openam/smb.conf.AM uses the smbclient command to validate user credentials against the domain controller, which must be available in the
$PATHvariable associated with AM.ssoadm attribute:
iplanet-am-auth-samba-config-file-name- Authentication Level
Sets the authentication level used to indicate the level of security associated with the module. The value can range from 0 to any positive integer.
ssoadm attribute:
iplanet-am-auth-nt-auth-level
The following sections document AM services with configuration properties that affect AM authentication, sessions, and single sign-on:
amster service name: authenticatorOathService
The following settings appear on the Realm Defaults tab:
- Profile Storage Attribute
Attribute for storing ForgeRock Authenticator OATH profiles.
The default attribute is added to the user store during OpenAM installation. If you want to use a different attribute, you must make sure to add it to your user store schema prior to deploying two-step verification with a ForgeRock OATH authenticator app in OpenAM. OpenAM must be able to write to the attribute.
Default value:
oathDeviceProfilesamster attribute:
oathAttrName- Device Profile Encryption Scheme
Encryption scheme for securing device profiles stored on the server.
If enabled, each device profile is encrypted using a unique random secret key using the given strength of AES encryption in CBC mode with PKCS#5 padding. An HMAC-SHA of the given strength (truncated to half-size) is used to ensure integrity protection and authenticated encryption. The unique random key is encrypted with the given RSA key pair and stored with the device profile.
Note: AES-256 may require installation of the JCE Unlimited Strength policy files.
The possible values for this property are:
RSAES_AES256CBC_HS512. AES-256/HMAC-SHA-512 with RSA Key WrappingRSAES_AES128CBC_HS256. AES-128/HMAC-SHA-256 with RSA Key WrappingNONE. No encryption of device settings.
Default value:
NONEamster attribute:
authenticatorOATHDeviceSettingsEncryptionScheme- Encryption Key Store
Path to the key store from which to load encryption keys.
Default value:
/path/to/openam/openam/keystore.jksamster attribute:
authenticatorOATHDeviceSettingsEncryptionKeystore- Key Store Type
Type of encryption key store.
Note: PKCS#11 keys tores require hardware support such as a security device or smart card and is not available by default in most JVM installations.
See the JDK 8 PKCS#11 Reference Guide for more details.
The possible values for this property are:
JKS. Java Key Store (JKS).JCEKS. Java Cryptography Extension Key Store (JCEKS).PKCS11. PKCS#11 Hardware Crypto Storage.PKCS12. PKCS#12 Key Store.
Default value:
JKSamster attribute:
authenticatorOATHDeviceSettingsEncryptionKeystoreType- Key Store Password
Password to unlock the key store. This password will be encrypted.
amster attribute:
authenticatorOATHDeviceSettingsEncryptionKeystorePassword- Key-Pair Alias
Alias of the certificate and private key in the key store. The private key is used to encrypt and decrypt device profiles.
amster attribute:
authenticatorOATHDeviceSettingsEncryptionKeystoreKeyPairAlias- Private Key Password
Password to unlock the private key.
amster attribute:
authenticatorOATHDeviceSettingsEncryptionKeystorePrivateKeyPassword- ForgeRock Authenticator (OATH) Device Skippable Attribute Name
The data store attribute that holds the user's decision to enable or disable obtaining and providing a password obtained from the ForgeRock Authenticator app. This attribute must be writeable.
Default value:
oath2faEnabledamster attribute:
authenticatorOATHSkippableName
amster service name: authenticatorPushService
The following settings appear on the Realm Defaults tab:
- Profile Storage Attribute
The user's attribute in which to store Push Notification profiles.
The default attribute is added to the schema when you prepare a user store for use with OpenAM. If you want to use a different attribute, you must make sure to add it to your user store schema prior to deploying push notifications with the ForgeRock Authenticator app in OpenAM. OpenAM must be able to write to the attribute.
Default value:
pushDeviceProfilesamster attribute:
pushAttrName- Device Profile Encryption Scheme
Encryption scheme to use to secure device profiles stored on the server.
If enabled, each device profile is encrypted using a unique random secret key using the given strength of AES encryption in CBC mode with PKCS#5 padding. An HMAC-SHA of the given strength (truncated to half-size) is used to ensure integrity protection and authenticated encryption. The unique random key is encrypted with the given RSA key pair and stored with the device profile.
Note: AES-256 may require installation of the JCE Unlimited Strength policy files.
The possible values for this property are:
RSAES_AES256CBC_HS512. AES-256/HMAC-SHA-512 with RSA Key WrappingRSAES_AES128CBC_HS256. AES-128/HMAC-SHA-256 with RSA Key WrappingNONE. No encryption of device settings.
Default value:
NONEamster attribute:
authenticatorPushDeviceSettingsEncryptionScheme- Encryption Key Store
Path to the key store from which to load encryption keys.
Default value:
/path/to/openam/openam/keystore.jksamster attribute:
authenticatorPushDeviceSettingsEncryptionKeystore- Key Store Type
Type of key store to load.
Note: PKCS#11 key stores require hardware support such as a security device or smart card and is not available by default in most JVM installations.
See the JDK 8 PKCS#11 Reference Guide for more details.
The possible values for this property are:
JKS. Java Key Store (JKS).JCEKS. Java Cryptography Extension Key Store (JCEKS).PKCS11. PKCS#11 Hardware Crypto Storage.PKCS12. PKCS#12 Key Store.
Default value:
JKSamster attribute:
authenticatorPushDeviceSettingsEncryptionKeystoreType- Key Store Password
Password to unlock the key store. This password is encrypted when it is saved in the OpenAM configuration. You should modify the default value.
amster attribute:
authenticatorPushDeviceSettingsEncryptionKeystorePassword- Key-Pair Alias
Alias of the certificate and private key in the key store. The private key is used to encrypt and decrypt device profiles.
amster attribute:
authenticatorPushDeviceSettingsEncryptionKeystoreKeyPairAlias- Private Key Password
Password to unlock the private key.
amster attribute:
authenticatorPushDeviceSettingsEncryptionKeystorePrivateKeyPassword- ForgeRock Authenticator (Push) Device Skippable Attribute Name
Name of the attribute on a user's profile used to store their selection of whether to skip ForgeRock Authenticator (Push) 2FA modules.
Default value:
oath2faEnabledamster attribute:
authenticatorPushSkippableName
amster service name: idm-integration
The following settings appear on the Realm Defaults tab:
- Enabled
Default value:
falseamster attribute:
enabled- Deployment URL
URL of the IDM deployment.
For example, you might set this property to: https://openidm.example.com
amster attribute:
idmDeploymentUrl- Signing Key Alias
Alias of the signing symmetric key in AM's default keystore. Must be a duplicate of the symmetric key used by IDM.
Default value:
openidm-selfservice-keyamster attribute:
provisioningSigningKeyAlias- Encryption Key Alias
Alias of the encryption asymmetric key in AM's default keystore. Must be a duplicate of the asymmetric key used by IDM.
Default value:
selfserviceamster attribute:
provisioningEncryptionKeyAlias- Signing Algorithm
JWT signing algorithm.
Default value:
HS256amster attribute:
provisioningSigningAlgorithm- Encryption Algorithm
JWT encryption algorithm.
Default value:
RSAES_PKCS1_V1_5amster attribute:
provisioningEncryptionAlgorithm- Encryption Method
JWT encryption method.
Default value:
A128CBC_HS256amster attribute:
provisioningEncryptionMethod
amster service name: pushNotification
The following settings appear on the Realm Defaults tab:
- SNS Access Key ID
Amazon Simple Notification Service Access Key ID. For more information, see https://aws.amazon.com/developers/access-keys/.
For example, you might set this property to: AKIAIOSFODNN7EXAMPLE
amster attribute:
accessKey- SNS Access Key Secret
Amazon Simple Notification Service Access Key Secret. For more information, see https://aws.amazon.com/developers/access-keys/.
For example, you might set this property to: wJalrXUtnFEMI/K7MDENG/bPxRfiCYEXAMPLEKEY
amster attribute:
secret- SNS Endpoint for APNS
The Simple Notification Service endpoint in Amazon Resource Name format, used to send push messages to the Apple Push Notification Service (APNS).
For example, you might set this property to: arn:aws:sns:us-east-1:1234567890:app/APNS/production
amster attribute:
appleEndpoint- SNS Endpoint for GCM
The Simple Notification Service endpoint in Amazon Resource Name format, used to send push messages over Google Cloud Messaging (GCM).
For example, you might set this property to: arn:aws:sns:us-east-1:1234567890:app/GCM/production
amster attribute:
googleEndpoint- SNS Client Region
Region of your registered Amazon Simple Notification Service client. For more information, see https://docs.aws.amazon.com/general/latest/gr/rande.html.
The possible values for this property are:
us-gov-west-1us-east-1us-west-1us-west-2eu-west-1eu-central-1ap-southeast-1ap-southeast-2ap-northeast-1ap-northeast-2sa-east-1cn-north-1
Default value:
us-east-1amster attribute:
region- Message Transport Delegate Factory
The fully qualified class name of the factory responsible for creating the PushNotificationDelegate. The class must implement
org.forgerock.openam.services.push.PushNotificationDelegate.Default value:
org.forgerock.openam.services.push.sns.SnsHttpDelegateFactoryamster attribute:
delegateFactory- Response Cache Duration
The minimum lifetime to keep unanswered message records in the message dispatcher cache, in seconds. To keep unanswered message records indefinitely, set this property to
0.Should be tuned so that it is applicable to the use case of this service. For example, the ForgeRock Authenticator (Push) authentication module has a default timeout of 120 seconds.Default value:
120amster attribute:
mdDuration- Response Cache Concurrency
Level of concurrency to use when accessing the message dispatcher cache. Defaults to
16, and must be greater than0. Choose a value to accommodate as many threads as will ever concurrently access the message dispatcher cache.Default value:
16amster attribute:
mdConcurrency- Response Cache Size
Maximum size of the message dispatcher cache, in number of records. If set to
0the cache can grow indefinitely. If the number of records that need to be stored exceeds this maximum, then older items in the cache will be removed to make space.Default value:
10000amster attribute:
mdCacheSize
amster service name: session
The following settings appear on the Global Attributes tab:
- Resulting behavior if session quota exhausted
Specify the action to take if a session quota is exhausted:
Deny Access. New session creation requests will be denied.
Destroy Next Expiring. The session that would expire next will be destroyed.
Destroy Oldest. The oldest session will be destroyed.
Destroy All. All previous sessions will be destroyed.
The possible values for this property are:
DENY_ACCESSDESTROY_OLD_SESSION. DESTROY_OLDEST_SESSION
Default value:
DESTROY_OLD_SESSIONamster attribute:
iplanet-am-session-constraint-resulting-behavior
The following settings appear on the General tab:
- Latest Access Time Update Frequency
Defaults to
60seconds. At most, AM updates a session's latest access time this often.Subsequent touches to the session that occur within the specified number of seconds after an update will not cause additional updates to the session's access time.
Refreshing a session returns the idle time as the number of seconds since an update has occurred, which will be between
0and the specified Latest Access Time Update Frequency.Default value:
60amster attribute:
latestAccessTimeUpdateFrequency- DN Restriction Only Enabled
If enabled, OpenAM will not perform DNS lookups when checking restrictions in cookie hijacking mode.
Default value:
falseamster attribute:
dnRestrictionOnly- Session Timeout Handler implementations
Lists plugin classes implementing session timeout handlers. Specify the fully qualified name.
amster attribute:
timeoutHandlers
The following settings appear on the Session Search tab:
- Maximum Number of Search Results
Maximum number of results from a session search. Do not set this attribute to a large value, for example more than 1000, unless sufficient system resources are allocated.
Default value:
120amster attribute:
maxSessionListSize- Timeout for Search
Time after which OpenAM sees an incomplete search as having failed, in seconds.
Default value:
5amster attribute:
sessionListRetrievalTimeout
The following settings appear on the Session Property Change Notifications tab:
- Enable Property Change Notifications
If on, then OpenAM notifies other applications participating in SSO when a session property in the Notification Properties list changes on a stateful session.
The possible values for this property are:
ONOFF
Default value:
OFFamster attribute:
propertyChangeNotifications- Notification Properties
Lists session properties for which OpenAM can send notifications upon modification. Session notification applies to stateful sessions only.
amster attribute:
notificationPropertyList
The following settings appear on the Session Quotas tab:
- Enable Quota Constraints
If on, then OpenAM allows you to set quota constraints on stateful sessions.
The possible values for this property are:
ONOFF
Default value:
OFFamster attribute:
iplanet-am-session-enable-session-constraint- Read Timeout for Quota Constraint
Maximum wait time after which OpenAM considers a search for live session count as having failed if quota constraints are enabled, in milliseconds.
Default value:
6000amster attribute:
quotaConstraintMaxWaitTime- Resulting behavior if session quota exhausted
Specify the action to take if a session quota is exhausted:
Deny Access. New session creation requests will be denied.
Destroy Next Expiring. The session that would expire next will be destroyed.
Destroy Oldest. The oldest session will be destroyed.
Destroy All. All previous sessions will be destroyed.
The possible values for this property are:
org.forgerock.openam.session.service.DenyAccessAction. DENY_ACCESSorg.forgerock.openam.session.service.DestroyNextExpiringAction. DESTROY_NEXT_EXPIRINGorg.forgerock.openam.session.service.DestroyOldestAction. DESTROY_OLDEST_SESSIONorg.forgerock.openam.session.service.DestroyAllAction. DESTROY_OLD_SESSIONS
Default value:
org.forgerock.openam.session.service.DestroyNextExpiringActionamster attribute:
behaviourWhenQuotaExhausted- Deny user login when session repository is down
This property only takes effect when the session quota constraint is enabled, and the session data store is unavailable.
The possible values for this property are:
YESNO
Default value:
NOamster attribute:
denyLoginWhenRepoDown
The following settings appear on the Client-based Sessions tab:
- Signing Algorithm Type
Specifies the algorithm that AM uses to sign the JSON Web Token (JWT) containing the session content. Signing the JWT enables tampering detection.
AM supports the following signing algorithms:
HS256. HMAC using SHA-256.
HS384. HMAC using SHA-384.
HS512. HMAC using SHA-512.
RS256. RSASSA-PKCS1-v1_5 using SHA-256.
ES256. ECDSA using SHA-256 and NIST standard P-256 elliptic curve.
ES384. ECDSA using SHA-384 and NIST standard P-384 elliptic curve.
ES512. ECDSA using SHA-512 and NIST standard P-521 elliptic curve.
The possible values for this property are:
NONEHS256HS384HS512RS256ES256ES384ES512
Default value:
HS256amster attribute:
statelessSigningType- Signing HMAC Shared Secret
Specifies the shared secret that AM uses when performing HMAC signing on the session JWT.
Specify a shared secret when using a "Signing Algorithm Type" of
HS256,HS384, orHS512.amster attribute:
statelessSigningHmacSecret- Signing RSA/ECDSA Certificate Alias
Specify the alias of a certificate containing a public/private key pair that AM uses when performing RSA or ECDSA signing on the session JWT. Specify a signing certificate alias when using a "Signing Algorithm Type" of
RS256,ES256,ES384, orES512.The certificate is retrieved from the keystore specified by the
com.sun.identity.saml.xmlsig.keystoreproperty.Default value:
testamster attribute:
statelessSigningRsaCertAlias- Encryption Algorithm
Specifies the algorithm that AM uses to encrypt the JSON Web Token (JWT) containing the session content.
AM supports the following encryption algorithms:
NONE. No encryption is selected.
RSA. Session content is encrypted with AES using a unique key. The key is then encrypted with an RSA public key and appended to the JWT.
AM supports the following padding modes, which you can set using the
org.forgerock.openam.session.stateless.rsa.paddingadvanced property:RSA1_5. RSA with PKCS#1 v1.5 padding.RSA-OAEP. RSA with optimal asymmetric encryption padding (OAEP) and SHA-1.RSA-OAEP-256. RSA with OAEP padding and SHA-256.
AES KeyWrapping. Session content is encrypted with AES using a unique key and is then wrapped using AES KeyWrap and the master key. This provides additional security, compared to RSA, at the cost of 128 or 256 bits (or 32 bytes) depending on the size of the master key. This method provides authenticated encryption, which removes the need for a separate signature and decreases the byte size of the JWT. See RFC 3394.
Direct AES Encryption. Session content is encrypted with direct AES encryption with a symmetric key. This method provides authenticated encryption, which removes the need for a separate signature and decreases the byte size of the JWT.
Important: To prevent users from accidentally disabling all authentication support, which can be accomplished by disabling signing and not using an authenticated encryption mode, you must set the
org.forgerock.openam.session.stateless.signing.allownonesystem property totrueto turn off signing completely.The possible values for this property are:
NONERSAAES_KEYWRAP. AES KeyWrappingDIRECT. Direct AES encryption
Default value:
DIRECTamster attribute:
statelessEncryptionType- Encryption RSA Certificate Alias
Specifies the alias of a certificate containing a public/private key pair that AM uses when encrypting a JWT. Specify an encryption certificate alias when using an Encryption Algorithm Type of
RSA.The certificate is retrieved from the keystore referenced by the
com.sun.identity.saml.xmlsig.keystoreproperty.Default value:
testamster attribute:
statelessEncryptionRsaCertAlias- Encryption Symmetric AES Key
AES key for use with Direct or AES KeyWrap encryption modes.
The symmetric AES key is a base64-encoded random key.
For direct encryption with
AES-GCMor forAES-KeyWrapwith any content encryption method, this should be 128, 192, or 256 bits.For direct encryption with
AES-CBC-HMAC, the key should be double those sizes (one half for the AES key, the other have for the HMAC key).AES key sizes greater than 128 bits require installation of the JCE Unlimited Strength policy files in your JRE.
amster attribute:
statelessEncryptionAesKey- Compression Algorithm
If enabled the session state is compressed before signing and encryption.
WARNING: Enabling compression may compromise encryption. This may leak information about the content of the session state if encryption is enabled.
The possible values for this property are:
NONEDEF. Deflate Compression.
Default value:
NONEamster attribute:
statelessCompressionType- Enable Session Blacklisting
Blacklists client-based sessions that log out.
We recommend enabling this setting if the maximum session time is high. Blacklist state is stored in the Core Token Service (CTS) token store until the session expires, in order to ensure that sessions cannot continue to be used. Requires a server restart for changes to take effect.
Default value:
falseamster attribute:
openam-session-stateless-enable-session-blacklisting- Session Blacklist Cache Size
Number of blacklisted sessions to cache in memory to speed up blacklist checks and reduce load on the CTS. The cache size should be approximately the number of logouts expected in the maximum session time.
Default value:
10000amster attribute:
openam-session-stateless-blacklist-cache-size- Blacklist Poll Interval (seconds)
Specifies the interval at which AM polls the Core Token Service to update the list of logged out sessions, in seconds.
The longer the polling interval, the more time a malicious user has to connect to other AM servers in a deployment and make use of a stolen session cookie. Shortening the polling interval improves the security for logged out sessions, but might incur a minimal decrease in overall AM performance due to increased network activity. Set to
0to disable this feature completely.Default value:
60amster attribute:
openam-session-stateless-blacklist-poll-interval- Blacklist Purge Delay (minutes)
When added to the maximum session time, specifies the amount of time that AM tracks logged out sessions.
Increase the blacklist purge delay if you expect system clock skews in a deployment of AM servers to be greater than one minute. There is no need to increase the blacklist purge delay for servers running a clock synchronization protocol, such as Network Time Protocol.
Default value:
1amster attribute:
openam-session-stateless-blacklist-purge-delay
Note
Configuring any of the following properties at the realm level (Realms > Realm Name > Services > Session) causes the values to be stored in the identity data store configured in that realm.
If you remove the identity data store from the realm, the properties will use the values configured at the global level (Configure > Global Services > Session).
The following settings appear on the Dynamic Attributes tab:
- Maximum Session Time
Maximum time a session can remain valid before OpenAM requires the user to authenticate again, in minutes.
Default value:
120amster attribute:
maxSessionTime- Maximum Idle Time
Maximum time a stateful session can remain idle before OpenAM requires the user to authenticate again, in minutes.
Default value:
30amster attribute:
maxIdleTime- Maximum Caching Time
Maximum time before OpenAM refreshes a session that has been cached, in minutes.
Default value:
3amster attribute:
maxCachingTime- Active User Sessions
Maximum number of concurrent stateful sessions OpenAM allows a user to have.
Default value:
5amster attribute:
quotaLimit
amster service name: amSessionPropertyWhitelist
The following settings appear on the Realm Defaults tab:
- Whitelisted Session Property Names
A list of properties that users may read, edit the value of, or delete from their session.
Adding properties to sessions can impact OpenAM's performance. Because there is no size constraint limiting the set of properties that you can add to sessions, and no limit on the number of session properties you can add, keep in mind that adding session properties can increase the load on an OpenAM deployment in the following areas:
OpenAM server memory
OpenDJ storage
OpenDJ replication
Protected attributes will NOT be allowed to be set, edited or deleted, even if they are included in this whitelist.
Default value:
AMCtxIdamster attribute:
sessionPropertyWhitelist
amster service name: socialauthentication
The following settings appear on the Realm Defaults tab:
- Display Names
The display names for the implementations - this will be used to provide a name for the icon displayed on the login page. The key should be used across all the settings on this page to join them together.
For example:
Key Value google Google amster attribute:
displayNames- Authentication Chains
The name of the authentication chains that are the entry points to being authenticated by each respective social authentication provider. The key should correspond to a key used to define a Display Name above.
For example:
Key Value google socialAuthChainGoogle amster attribute:
authenticationChains- Icons
Either a full URL or a path relative to the base of the site/server where the image can be found. The image will be used on the login page to link to the authentication chain defined above. The key should correspond to a key used to define a Display Name above.
For example:
Key Value google /images/google-sign-in.png amster attribute:
icons- Enabled Implementations
Provide a key that has been used to define the settings above to enable that set of settings.
For example: google
amster attribute:
enabledKeys
This section covers the available functionality when Scripting authentication modules use client-side and server-side authentication script types.
Authentication API functionality includes:
AM passes authState and sharedState
objects to server-side scripts in order for the scripts to access
authentication state.
Server-side scripts can access the current authentication state
through the authState object.
The authState value is SUCCESS
if the authentication is currently successful,
or FAILED if authentication has failed.
Server-side scripts must set a value for authState
before completing.
If an earlier authentication module in the authentication chain
has set the login name of the user,
server-side scripts can access the login name
through username.
The following authentication modules set the login name of the user:
Anonymous
Certificate
Data Store
Federation
HTTP Basic
JDBC
LDAP
Membership
RADIUS
SecurID
Windows Desktop SSO
Windows NT
Server-side authentication scripts can access profile data through
the methods of the idRepository object.
| Method | Parameters | Return Type | Description |
|---|---|---|---|
|
|
|
|
Return the values of the named attribute for the named user. |
|
|
|
|
Set the named attribute as specified by the attribute value for the named user, and persist the result in the user's profile. |
|
|
|
|
Add an attribute value to the list of attribute values associated with the attribute name for a particular user. |
Client-side scripts add data they gather into a String object
named clientScriptOutputData.
Client-side scripts then cause the user-agent automatically
to return the data to AM by HTTP POST of a self-submitting form.
Server-side scripts can get access to the login request
by using the methods of the requestData object.
The following table lists the methods
of the requestData object. Note that this object differs
from the client-side requestData object and contains information about
the original authentication request made by the user.
| Method | Parameters | Return Type | Description |
|---|---|---|---|
|
|
|
|
Return the String value of the named request header,
or |
|
|
|
|
Return the array of String values of the named request header,
or |
|
|
|
|
Return the String value of the named request parameter,
or |
|
|
|
|
Return the array of String values of the named request parameter,
or |
This section covers the functionality provided by the Decision node script for authentication trees script type.
Scripted Decision Node API functionality includes:
The node also has access to the logger functionality provided in the global scripting API.
For more information, see "Global Scripting API Functionality".
Scripted Decision Node scripts can access the headers provided by the login request
by using the methods of the requestHeaders object.
The following table lists the methods of the requestHeaders object:
| Method | Parameters | Return Type | Description |
|---|---|---|---|
|
|
|
|
Return the array of string values of the named request header,
or For example: var headerName = "user-agent";
if (requestHeaders.get(headerName).get(0).indexOf("Chrome") !== -1) {
outcome = "true";
} else {
outcome = "false";
}
|
Scripted Decision Node scripts can access any existing session information provided during a session upgrade
request by using the existingSession variable.
The following table lists the methods of the existingSession object:
| Method | Parameters | Return Type | Description |
|---|---|---|---|
|
|
|
|
Return the string value of the named existing session property, or WarningIf the current request is not a session upgrade and does not provide an existing session, the
For example, use the following code to get the authentication level of the existing session: if (typeof existingSession !== 'undefined')
{
existingAuthLevel = existingSession.get("AuthLevel");
}
else
{
logger.error("Variable existingSession not declared - not a session upgrade.");
}
|
AM determines the redirection URL based on authentication success or failure.
Upon a successful authentication, AM determines the redirection URL in the following order:
The URL set in the authentication chain.
In the AM console, you can set the Successful Login URL parameter by navigating to Realm Name > Authentication > Chains > chain > Settings.
The URL set in the
gotologin URL parameter. For example,http://openam.example.com:8080/openam/XUI/?realm=/#login/&goto=http%3A%2F%2Fwww.example.comThe URL set in the Success URL attribute in the user's profile.
In the AM console, you can set the Success URL parameter by navigating to Realm Name > Identities > identity. In Success URL, enter a URL, and then click Save Changes.
You can also specify the client type by entering
ClientType|URLas the property value. If the client type is specified, it will have precedence over a regular URL in the user's profile.The URL set in the Default Success Login URL attribute in the Top Level realm.
You can set this property on the AM console by navigating to Configure > Authentication > Core Attributes > Post Authentication Processing.
You can also specify the client type by entering
ClientType|URLas the property value. If the client type is specified, it will have precedence over a Default Success Login URL in the Top Level realm.
Upon a failed authentication, AM determines the redirection URL in the following order:
The URL set in the authentication chain.
In the AM console, you can set the Failed Login URL parameter by navigating to Realm Name > Authentication > Chains > chain > Settings.
The URL set in the
gotoOnFailURL parameter. For example,http://openam.example.com:8080/openam/XUI/?realm=/#login/&gotoOnFail=http%3A%2F%2Fwww.example.comThe URL set in the Failure URL attribute in the user's profile.
In the AM console, you can set the Failure URL parameter by navigating to Realm Name > Identities > identity. Under Failure URL, enter a URL, and then click Save Changes.
You can also specify the client type by entering
ClientType|URLas the property value. If the client type is specified, it will have precedence over a regular URL in the user's profile.The URL set in the Default Failure Login URL attribute in the Top Level realm.
You can set this property on the AM console by navigating to Configure > Authentication > Core Attributes > Post Authentication Processing.
You can also specify the client type by entering
ClientType|URLas the property value. If the client type is specified, it will have precedence over a Default Failure Login URL in the Top Level realm.
This appendix shows how to use the RESTful interfaces for direct integration between web client applications and ForgeRock Access Management.
Representational State Transfer (REST) is an architectural style that sets certain constraints for designing and building large-scale distributed hypermedia systems.
As an architectural style, REST has very broad applications. The designs of both HTTP 1.1 and URIs follow RESTful principles. The World Wide Web is no doubt the largest and best known REST application. Many other web services also follow the REST architectural style. Examples include OAuth 2.0, OpenID Connect 1.0, and User-Managed Access (UMA).
The ForgeRock Common REST (CREST) API applies RESTful principles to define common verbs for HTTP-based APIs that access web resources and collections of web resources.
Interface Stability: Evolving
Most native AM REST APIs use the CREST verbs. (In contrast, OAuth 2.0, OpenID Connect 1.0 and UMA APIs follow their respective standards.)
ForgeRock® Common REST is a common REST API framework. It works across the ForgeRock platform to provide common ways to access web resources and collections of resources. Adapt the examples in this section to your resources and deployment.
Servers generally return JSON-format resources, though resource formats can depend on the implementation.
Resources in collections can be found by their unique identifiers (IDs).
IDs are exposed in the resource URIs.
For example, if a server has a user collection under /users,
then you can access a user at
/users/user-id.
The ID is also the value of the _id field of the resource.
Resources are versioned using revision numbers.
A revision is specified in the resource's _rev field.
Revisions make it possible to figure out whether to apply changes
without resource locking and without distributed transactions.
The Common REST APIs use the following verbs, sometimes referred to collectively as CRUDPAQ. For details and HTTP-based examples of each, follow the links to the sections for each verb.
- Create
Add a new resource.
This verb maps to HTTP PUT or HTTP POST.
For details, see "Create".
- Read
Retrieve a single resource.
This verb maps to HTTP GET.
For details, see "Read".
- Update
Replace an existing resource.
This verb maps to HTTP PUT.
For details, see "Update".
- Delete
Remove an existing resource.
This verb maps to HTTP DELETE.
For details, see "Delete".
- Patch
Modify part of an existing resource.
This verb maps to HTTP PATCH.
For details, see "Patch".
- Action
Perform a predefined action.
This verb maps to HTTP POST.
For details, see "Action".
- Query
Search a collection of resources.
This verb maps to HTTP GET.
For details, see "Query".
Common REST reserved query string parameter names start with an underscore,
_.
Reserved query string parameters include, but are not limited to, the following names:
_action |
_api |
_crestapi |
_fields |
_mimeType |
_pageSize |
_pagedResultsCookie |
_pagedResultsOffset |
_prettyPrint |
_queryExpression |
_queryFilter |
_queryId |
_sortKeys |
_totalPagedResultsPolicy |
Note
Some parameter values are not safe for URLs, so URL-encode parameter values as necessary.
Continue reading for details about how to use each parameter.
The action verb is the main vehicle for extensions.
For example, to create a new user with HTTP POST rather than HTTP PUT,
you might use /users?_action=create.
A server can define additional actions.
For example, /tasks/1?_action=cancel.
A server can define stored queries to call by ID.
For example, /groups?_queryId=hasDeletedMembers.
Stored queries can call for additional parameters.
The parameters are also passed in the query string.
Which parameters are valid depends on the stored query.
Common REST APIs often depend at least in part on runtime configuration. Many Common REST endpoints therefore serve API descriptors at runtime. An API descriptor documents the actual API as it is configured.
Use the following query string parameters to retrieve API descriptors:
_apiServes an API descriptor that complies with the OpenAPI specification.
This API descriptor represents the API accessible over HTTP. It is suitable for use with popular tools such as Swagger UI.
_crestapiServes a native Common REST API descriptor.
This API descriptor provides a compact representation that is not dependent on the transport protocol. It requires a client that understands Common REST, as it omits many Common REST defaults.
Note
Consider limiting access to API descriptors in production environments in order to avoid unnecessary traffic.
To provide documentation in production environments, see "To Publish OpenAPI Documentation" instead.
In production systems, developers expect stable, well-documented APIs. Rather than retrieving API descriptors at runtime through Common REST, prepare final versions, and publish them alongside the software in production.
Use the OpenAPI-compliant descriptors to provide API reference documentation for your developers as described in the following steps:
Configure the software to produce production-ready APIs.
In other words, the software should be configured as in production so that the APIs are identical to what developers see in production.
Retrieve the OpenAPI-compliant descriptor.
The following command saves the descriptor to a file,
myapi.json:$ curl -o myapi.json endpoint?_api(Optional) If necessary, edit the descriptor.
For example, you might want to add security definitions to describe how the API is protected.
If you make any changes, then also consider using a source control system to manage your versions of the API descriptor.
Publish the descriptor using a tool such as Swagger UI.
You can customize Swagger UI for your organization as described in the documentation for the tool.
There are two ways to create a resource, either with an HTTP POST or with an HTTP PUT.
To create a resource using POST, perform an HTTP POST
with the query string parameter _action=create
and the JSON resource as a payload.
Accept a JSON response.
The server creates the identifier if not specified:
POST /users?_action=create HTTP/1.1
Host: example.com
Accept: application/json
Content-Length: ...
Content-Type: application/json
{ JSON resource }
To create a resource using PUT, perform an HTTP PUT
including the case-sensitive identifier for the resource in the URL path,
and the JSON resource as a payload.
Use the If-None-Match: * header.
Accept a JSON response:
PUT /users/some-id HTTP/1.1
Host: example.com
Accept: application/json
Content-Length: ...
Content-Type: application/json
If-None-Match: *
{ JSON resource }
The _id and content of the resource depend on the server implementation.
The server is not required to use the _id that the client provides.
The server response to the create request indicates the resource location
as the value of the Location header.
If you include the If-None-Match header, its value must be
*. In this case, the request creates the object if it
does not exist, and fails if the object does exist. If you include the
If-None-Match header with any value other than
*, the server returns an HTTP 400 Bad Request error. For
example, creating an object with
If-None-Match: revision returns
a bad request error. If you do not include If-None-Match: *,
the request creates the object if it does not exist, and
updates the object if it does exist.
You can use the following parameters:
_prettyPrint=trueFormat the body of the response.
_fields=field[,field...]Return only the specified fields in the body of the response.
The
fieldvalues are JSON pointers. For example if the resource is{"parent":{"child":"value"}},parent/childrefers to the"child":"value".If the
fieldis left blank, the server returns all default values.
To retrieve a single resource, perform an HTTP GET on the resource
by its case-sensitive identifier (_id)
and accept a JSON response:
GET /users/some-id HTTP/1.1
Host: example.com
Accept: application/json
You can use the following parameters:
_prettyPrint=trueFormat the body of the response.
_fields=field[,field...]Return only the specified fields in the body of the response.
The
fieldvalues are JSON pointers. For example if the resource is{"parent":{"child":"value"}},parent/childrefers to the"child":"value".If the
fieldis left blank, the server returns all default values._mimeType=mime-typeSome resources have fields whose values are multi-media resources such as a profile photo for example.
By specifying both a single field and also the mime-type for the response content, you can read a single field value that is a multi-media resource.
In this case, the content type of the field value returned matches the mime-type that you specify, and the body of the response is the multi-media resource.
The
Acceptheader is not used in this case. For example,Accept: image/pngdoes not work. Use the_mimeTypequery string parameter instead.
To update a resource, perform an HTTP PUT
including the case-sensitive identifier (_id)
as the final element of the path to the resource,
and the JSON resource as the payload.
Use the If-Match: _rev header
to check that you are actually updating the version you modified.
Use If-Match: * if the version does not matter.
Accept a JSON response:
PUT /users/some-id HTTP/1.1
Host: example.com
Accept: application/json
Content-Length: ...
Content-Type: application/json
If-Match: _rev
{ JSON resource }
When updating a resource, include all the attributes to be retained. Omitting an attribute in the resource amounts to deleting the attribute unless it is not under the control of your application. Attributes not under the control of your application include private and read-only attributes. In addition, virtual attributes and relationship references might not be under the control of your application.
You can use the following parameters:
_prettyPrint=trueFormat the body of the response.
_fields=field[,field...]Return only the specified fields in the body of the response.
The
fieldvalues are JSON pointers. For example if the resource is{"parent":{"child":"value"}},parent/childrefers to the"child":"value".If the
fieldis left blank, the server returns all default values.
To delete a single resource, perform an HTTP DELETE
by its case-sensitive identifier (_id)
and accept a JSON response:
DELETE /users/some-id HTTP/1.1
Host: example.com
Accept: application/json
You can use the following parameters:
_prettyPrint=trueFormat the body of the response.
_fields=field[,field...]Return only the specified fields in the body of the response.
The
fieldvalues are JSON pointers. For example if the resource is{"parent":{"child":"value"}},parent/childrefers to the"child":"value".If the
fieldis left blank, the server returns all default values.
To patch a resource, send an HTTP PATCH request with the following parameters:
operationfieldvaluefrom(optional with copy and move operations)
You can include these parameters in the payload for a PATCH request, or in a JSON PATCH file. If successful, you'll see a JSON response similar to:
PATCH /users/some-id HTTP/1.1
Host: example.com
Accept: application/json
Content-Length: ...
Content-Type: application/json
If-Match: _rev
{ JSON array of patch operations }
PATCH operations apply to three types of targets:
single-valued, such as an object, string, boolean, or number.
list semantics array, where the elements are ordered, and duplicates are allowed.
set semantics array, where the elements are not ordered, and duplicates are not allowed.
ForgeRock PATCH supports several different operations.
The following sections show each of these operations, along with options
for the field and value:
The add operation ensures that the target field contains
the value provided, creating parent fields as necessary.
If the target field is single-valued, then the value you include in the PATCH replaces the value of the target. Examples of a single-valued field include: object, string, boolean, or number.
An add operation has different results on two standard
types of arrays:
List semantic arrays: you can run any of these
addoperations on that type of array:If you
addan array of values, the PATCH operation appends it to the existing list of values.If you
adda single value, specify an ordinal element in the target array, or use the{-}special index to add that value to the end of the list.
Set semantic arrays: The list of values included in a patch are merged with the existing set of values. Any duplicates within the array are removed.
As an example, start with the following list semantic array resource:
{
    "fruits" : [ "orange", "apple" ]
}
The following add operation includes the pineapple to the end of the list of
fruits, as indicated by the - at the end of the
fruits array.
{
    "operation" : "add",
    "field" : "/fruits/-",
    "value" : "pineapple"
}
The following is the resulting resource:
{
    "fruits" : [ "orange", "apple", "pineapple" ]
}
The copy operation takes one or more existing values from the source field.
It then adds those same values on the target field. Once the values are
known, it is equivalent to performing an add operation
on the target field.
The following copy operation takes the value from a field
named mail, and then runs a replace
operation on the target field, another_mail.
[
  {
     "operation":"copy",
     "from":"mail",
     "field":"another_mail"
  }
]
If the source field value and the target field value are configured as arrays, the result depends on whether the array has list semantics or set semantics, as described in "Patch Operation: Add".
The increment operation changes the value or values of
the target field by the amount you specify. The value that you include
must be one number, and may be positive or negative. The value of the
target field must accept numbers. The following increment
operation adds 1000 to the target value of
/user/payment.
[
  {
    "operation" : "increment",
    "field" : "/user/payment",
    "value" : "1000"
  }
]
Since the value of the increment is
a single number, arrays do not apply.
The move operation removes existing values on the source field. It
then adds those same values on the target field. It is equivalent to
performing a remove operation on the source, followed
by an add operation with the same values, on the target.
The following move operation is equivalent to a
remove operation on the source field,
surname, followed by a replace
operation on the target field value, lastName. If the
target field does not exist, it is created.
[
  {
     "operation":"move",
     "from":"surname",
     "field":"lastName"
  }
]
To apply a move operation on an array, you need a
compatible single-value, list semantic array, or set semantic array on
both the source and the target. For details, see the criteria described
in "Patch Operation: Add".
The remove operation ensures that the target field no
longer contains the value provided. If the remove operation does not include
a value, the operation removes the field. The following
remove deletes the value of the
phoneNumber, along with the field.
[
  {
    "operation" : "remove",
    "field" : "phoneNumber"
  }
]
If the object has more than one phoneNumber, those
values are stored as an array.
A remove operation has different results on two standard
types of arrays:
List semantic arrays: A
removeoperation deletes the specified element in the array. For example, the following operation removes the first phone number, based on its array index (zero-based):[ { "operation" : "remove", "field" : "/phoneNumber/0" } ]Set semantic arrays: The list of values included in a patch are removed from the existing array.
The replace operation removes any existing value(s) of
the targeted field, and replaces them with the provided value(s). It is
essentially equivalent to a remove followed by a
add operation. If the arrays are used, the criteria is
based on "Patch Operation: Add". However, indexed updates are
not allowed, even when the target is an array.
The following replace operation removes the existing
telephoneNumber value for the user, and then adds the
new value of +1 408 555 9999.
[
  {
    "operation" : "replace",
    "field" : "/telephoneNumber",
    "value" : "+1 408 555 9999"
  }
]
A PATCH replace operation on a list semantic array works in the same fashion as a PATCH remove operation. The following example demonstrates how the effect of both operations. Start with the following resource:
{
    "fruits" : [ "apple", "orange", "kiwi", "lime" ],
}
Apply the following operations on that resource:
[
  {
    "operation" : "remove",
    "field" : "/fruits/0",
    "value" : ""
  },
  {
    "operation" : "replace",
    "field" : "/fruits/1",
    "value" : "pineapple"
  }
]
The PATCH operations are applied sequentially. The remove
operation removes the first member of that resource, based on its array
index, (fruits/0), with the following result:
[
  {
    "fruits" : [ "orange", "kiwi", "lime" ],
  }
]
The second PATCH operation, a replace, is applied on the
second member (fruits/1) of the intermediate resource,
with the following result:
[
  {
    "fruits" : [ "orange", "pineapple", "lime" ],
  }
]
The transform operation changes the value of a field
based on a script or some other data transformation command. The following
transform operation takes the value from the field
named /objects, and applies the
something.js script as shown:
[
  {
    "operation" : "transform",
    "field" : "/objects",
    "value" : {
      "script" : {
        "type" : "text/javascript",
        "file" : "something.js"
      }
    }
  }
]Some HTTP client libraries do not support the HTTP PATCH operation. Make sure that the library you use supports HTTP PATCH before using this REST operation.
For example, the Java Development Kit HTTP client does not support
PATCH as a valid HTTP method. Instead, the method
HttpURLConnection.setRequestMethod("PATCH")
throws ProtocolException.
You can use the following parameters. Other parameters might depend on the specific action implementation:
_prettyPrint=trueFormat the body of the response.
_fields=field[,field...]Return only the specified fields in the body of the response.
The
fieldvalues are JSON pointers. For example if the resource is{"parent":{"child":"value"}},parent/childrefers to the"child":"value".If the
fieldis left blank, the server returns all default values.
Actions are a means of extending Common REST APIs and are defined by the resource provider, so the actions you can use depend on the implementation.
The standard action indicated by _action=create
is described in "Create".
You can use the following parameters. Other parameters might depend on the specific action implementation:
_prettyPrint=trueFormat the body of the response.
_fields=field[,field...]Return only the specified fields in the body of the response.
The
fieldvalues are JSON pointers. For example if the resource is{"parent":{"child":"value"}},parent/childrefers to the"child":"value".If the
fieldis left blank, the server returns all default values.
To query a resource collection
(or resource container if you prefer to think of it that way),
perform an HTTP GET and accept a JSON response, including at least
a _queryExpression,
_queryFilter, or _queryId parameter.
These parameters cannot be used together:
GET /users?_queryFilter=true HTTP/1.1
Host: example.com
Accept: application/json
The server returns the result as a JSON object including a "results" array and other fields related to the query string parameters that you specify.
You can use the following parameters:
_queryFilter=filter-expressionQuery filters request that the server return entries that match the filter expression. You must URL-escape the filter expression.
The string representation is summarized as follows. Continue reading for additional explanation:
Expr           = OrExpr
OrExpr         = AndExpr ( 'or' AndExpr ) *
AndExpr        = NotExpr ( 'and' NotExpr ) *
NotExpr        = '!' PrimaryExpr | PrimaryExpr
PrimaryExpr    = '(' Expr ')' | ComparisonExpr | PresenceExpr | LiteralExpr
ComparisonExpr = Pointer OpName JsonValue
PresenceExpr   = Pointer 'pr'
LiteralExpr    = 'true' | 'false'
Pointer        = JSON pointer
OpName         = 'eq' |  # equal to
                 'co' |  # contains
                 'sw' |  # starts with
                 'lt' |  # less than
                 'le' |  # less than or equal to
                 'gt' |  # greater than
                 'ge' |  # greater than or equal to
                 STRING  # extended operator
JsonValue      = NUMBER | BOOLEAN | '"' UTF8STRING '"'
STRING         = ASCII string not containing white-space
UTF8STRING     = UTF-8 string possibly containing white-space
JsonValue components of filter expressions follow RFC 7159: The JavaScript Object Notation (JSON) Data Interchange Format. In particular, as described in section 7 of the RFC, the escape character in strings is the backslash character. For example, to match the identifier
test\, use_id eq 'test\\'. In the JSON resource, the\is escaped the same way:"_id":"test\\".When using a query filter in a URL, be aware that the filter expression is part of a query string parameter. A query string parameter must be URL encoded as described in RFC 3986: Uniform Resource Identifier (URI): Generic Syntax For example, white space, double quotes (
"), parentheses, and exclamation characters need URL encoding in HTTP query strings. The following rules apply to URL query components:query = *( pchar / "/" / "?" ) pchar = unreserved / pct-encoded / sub-delims / ":" / "@" unreserved = ALPHA / DIGIT / "-" / "." / "_" / "~" pct-encoded = "%" HEXDIG HEXDIG sub-delims = "!" / "$" / "&" / "'" / "(" / ")" / "*" / "+" / "," / ";" / "="ALPHA,DIGIT, andHEXDIGare core rules of RFC 5234: Augmented BNF for Syntax Specifications:ALPHA = %x41-5A / %x61-7A ; A-Z / a-z DIGIT = %x30-39 ; 0-9 HEXDIG = DIGIT / "A" / "B" / "C" / "D" / "E" / "F"As a result, a backslash escape character in a JsonValue component is percent-encoded in the URL query string parameter as
%5C. To encode the query filter expression_id eq 'test\\', use_id+eq+'test%5C%5C', for example.A simple filter expression can represent a comparison, presence, or a literal value.
For comparison expressions use json-pointer comparator json-value, where the comparator is one of the following:
eq(equals)co(contains)sw(starts with)lt(less than)le(less than or equal to)gt(greater than)ge(greater than or equal to)For presence, use json-pointer pr to match resources where:
The JSON pointer is present.
The value it points to is not
null.
Literal values include true (match anything) and false (match nothing).
Complex expressions employ
and,or, and!(not), with parentheses,(expression), to group expressions._queryId=identifierSpecify a query by its identifier.
Specific queries can take their own query string parameter arguments, which depend on the implementation.
_pagedResultsCookie=stringThe string is an opaque cookie used by the server to keep track of the position in the search results. The server returns the cookie in the JSON response as the value of
pagedResultsCookie.In the request
_pageSizemust also be set and non-zero. You receive the cookie value from the provider on the first request, and then supply the cookie value in subsequent requests until the server returns anullcookie, meaning that the final page of results has been returned.The
_pagedResultsCookieparameter is supported when used with the_queryFilterparameter. The_pagedResultsCookieparameter is not guaranteed to work when used with the_queryExpressionand_queryIdparameters.The
_pagedResultsCookieand_pagedResultsOffsetparameters are mutually exclusive, and not to be used together._pagedResultsOffset=integerWhen
_pageSizeis non-zero, use this as an index in the result set indicating the first page to return.The
_pagedResultsCookieand_pagedResultsOffsetparameters are mutually exclusive, and not to be used together._pageSize=integerReturn query results in pages of this size. After the initial request, use
_pagedResultsCookieor_pageResultsOffsetto page through the results._totalPagedResultsPolicy=stringWhen a
_pageSizeis specified, and non-zero, the server calculates the "totalPagedResults", in accordance with thetotalPagedResultsPolicy, and provides the value as part of the response. The "totalPagedResults" is either an estimate of the total number of paged results (_totalPagedResultsPolicy=ESTIMATE), or the exact total result count (_totalPagedResultsPolicy=EXACT). If no count policy is specified in the query, or if_totalPagedResultsPolicy=NONE, result counting is disabled, and the server returns value of -1 for "totalPagedResults"._sortKeys=[+-]field[,[+-]field...]Sort the resources returned based on the specified field(s), either in
+(ascending, default) order, or in-(descending) order.Because ascending order is the default, including the
+character in the query is unnecessary. If you do include the+, it must be URL-encoded as%2B, for example:http://localhost:8080/api/users?_prettyPrint=true&_queryFilter=true&_sortKeys=%2Bname/givenName
The
_sortKeysparameter is not supported for predefined queries (_queryId)._prettyPrint=trueFormat the body of the response.
_fields=field[,field...]Return only the specified fields in each element of the "results" array in the response.
The
fieldvalues are JSON pointers. For example if the resource is{"parent":{"child":"value"}},parent/childrefers to the"child":"value".If the
fieldis left blank, the server returns all default values.
When working with a Common REST API over HTTP, client applications should expect at least the following HTTP status codes. Not all servers necessarily return all status codes identified here:
- 200 OK
The request was successful and a resource returned, depending on the request.
- 201 Created
The request succeeded and the resource was created.
- 204 No Content
The action request succeeded, and there was no content to return.
- 304 Not Modified
The read request included an
If-None-Matchheader, and the value of the header matched the revision value of the resource.- 400 Bad Request
The request was malformed.
- 401 Unauthorized
The request requires user authentication.
- 403 Forbidden
Access was forbidden during an operation on a resource.
- 404 Not Found
The specified resource could not be found, perhaps because it does not exist.
- 405 Method Not Allowed
The HTTP method is not allowed for the requested resource.
- 406 Not Acceptable
The request contains parameters that are not acceptable, such as a resource or protocol version that is not available.
- 409 Conflict
The request would have resulted in a conflict with the current state of the resource.
- 410 Gone
The requested resource is no longer available, and will not become available again. This can happen when resources expire for example.
- 412 Precondition Failed
The resource's current version does not match the version provided.
- 415 Unsupported Media Type
The request is in a format not supported by the requested resource for the requested method.
- 428 Precondition Required
The resource requires a version, but no version was supplied in the request.
- 500 Internal Server Error
The server encountered an unexpected condition that prevented it from fulfilling the request.
- 501 Not Implemented
The resource does not support the functionality required to fulfill the request.
- 503 Service Unavailable
The requested resource was temporarily unavailable. The service may have been disabled, for example.
AM includes a global filter to harden AM's protection
against CSRF attacks. The filter applies to all REST endpoints under
json/ and requires that all requests other than GET, HEAD,
or OPTIONS include, at least, one of the following headers:
X-Requested-WithThis header is often sent by Javascript frameworks, and the XUI already sends it on all requests.
Accept-API-VersionThis header specifies which version of the REST API to use. Use this header in your requests to ensure future changes to the API do not affect your clients.
For more information about API versioning, see "REST API Versioning".
Failure to include at least one of the headers would cause the REST call
to fail with a 403 Forbidden error, even if the
SSO token is valid.
To disable the filter, navigate to Configure > Global Services > REST APIs > and turn off Enable CSRF Protection.
The json/ endpoint is not vulnerable to CSRF attacks
when the filter is disabled, since it requires the
"Content-Type: application/json" header, which currently
triggers the same protection in browsers. This may change in the future, so it is
recommended to enable the CSRF filter.
In OpenAM 12.0.0 and later, REST API features are assigned version numbers.
Providing version numbers in the REST API helps ensure compatibility between releases. The version number of a feature increases when AM introduces a non-backwards-compatible change that affects clients making use of the feature.
AM provides versions for the following aspects of the REST API.
- resource
Any changes to the structure or syntax of a returned response will incur a resource version change. For example changing
errorMessagetomessagein a JSON response.- protocol
Any changes to the methods used to make REST API calls will incur a protocol version change. For example changing
_actionto$actionin the required parameters of an API feature.
To ensure your clients are always compatible with a newer version of AM, you should always include resource versions in your REST calls.
The REST API version numbers supported in AM 6 are as follows:
- Supported protocol versions
The protocol versions supported in AM 6 are:
1.0- Supported resource versions
The resource versions supported in AM 6 are shown in the following table.
Base End Point Supported Versions /json /authenticate 1.1, 2.0 /users 1.1, 1.2, 2.0, 2.1, 3.0 /groups 1.1, 2.0, 2.1, 3.0 /agents 1.1, 2.0, 2.1, 3.0 /realms 1.0 /dashboard 1.0 /sessions 1.2, 2.1, 3.1 /serverinfo/* 1.1 /users/{user}/devices/trusted 1.0 /users/{user}/uma/policies 1.0 /applications 1.0, 2.0 /resourcetypes 1.0 /policies 1.0, 2.0 /applicationtypes 1.0 /conditiontypes 1.0 /subjecttypes 1.0 /subjectattributes 1.0 /decisioncombiners 1.0 /subjectattributes 1.0 /xacml /policies 1.0 /frrest /token 1.0 /client 1.0
For information about the supported protocol and resource versions available in AM 6, see the API Explorer in the Development Guide available in the AM console.
The AM Release Notes section, "Changes and Deprecated Functionality" in the Release Notes describes the differences between API versions.
You can specify which version of the REST API to use by adding an
Accept-API-Version header to the request. The
following example requests resource version
2.0 and protocol version 1.0:
$ curl \
--request POST \
--header "Content-Type: application/json" \
--header "X-OpenAM-Username: demo" \
--header "X-OpenAM-Password: changeit" \
--header "Accept-API-Version: resource=2.0, protocol=1.0" \
--data "{}" \
https://openam.example.com:8443/openam/json/realms/root/authenticate
You can configure the default behavior AM will take when a REST call does not specify explicit version information. For more information, see "Configuring the Default REST API Version for a Deployment".
You can configure the default behavior AM will take when a REST call does not specify explicit version information using either of the following procedures:
The available options for default behavior are as follows:
- Latest
The latest available supported version of the API is used.
This is the preset default for new installations of AM.
- Oldest
The oldest available supported version of the API is used.
This is the preset default for upgraded AM instances.
Note
The oldest supported version may not be the first that was released, as APIs versions become deprecated or unsupported. See "Deprecated Functionality" in the Release Notes.
- None
No version will be used. When a REST client application calls a REST API without specifying the version, AM returns an error and the request fails.
Log in as AM administrator,
amadmin.Click Configure > Global Services, and then click REST APIs.
In Default Version, select the required response to a REST API request that does not specify an explicit version:
Latest,Oldest, orNone.(Optional) Optionally, enable
Warning Headerto include warning messages in the headers of responses to requests.Save your work.
Use the ssoadm set-attr-defs command with the
openam-rest-apis-default-versionattribute set to eitherLatest,OldestorNone, as in the following example:$ ssh openam.example.com $ cd /path/to/openam-tools/admin/openam/bin $ ./ssoadm \ set-attr-defs \ --adminid amadmin \ --password-file /tmp/pwd.txt \ --servicename RestApisService \ --schematype Global \ --attributevalues openam-rest-apis-default-version=None Schema attribute defaults were set.
AM provides REST API version messages in the JSON response to a REST API call. You can also configure AM to return version messages in the response headers.
Messages include:
Details of the REST API versions used to service a REST API call.
Warning messages if REST API version information is not specified or is incorrect in a REST API call.
The resource and protocol version
used to service a REST API call are returned in the
Content-API-Version header, as shown below:
$ curl \
-i \
--request POST \
--header "Content-Type: application/json" \
--header "X-OpenAM-Username: demo" \
--header "X-OpenAM-Password: changeit" \
--header "Accept-API-Version: resource=2.0, protocol=1.0" \
--data "{}" \
https://openam.example.com:8443/openam/json/realms/root/authenticate
HTTP/1.1 200 OK
Content-API-Version: protocol=1.0,resource=2.0
Server: Restlet-Framework/2.1.7
Content-Type: application/json;charset=UTF-8

{
    "tokenId":"AQIC5wM...TU3OQ*",
    "successUrl":"/openam/console"
}
If the default REST API version behavior is set to None,
and a REST API call does not include the Accept-API-Version
header, or does not specify a resource version, then a
400 Bad Request status code is returned,
as shown below:
$ curl \
--header "Content-Type: application/json" \
--header "Accept-API-Version: protocol=1.0" \
https://openam.example.com:8443/openam/json/realms/root/serverinfo/*
{
    "code":400,
    "reason":"Bad Request",
    "message":"No requested version specified and behavior set to NONE."
}
If a REST API call does include the Accept-API-Version
header, but the specified resource or
protocol version does not exist in AM, then a
404 Not Found status code is returned,
as shown below:
$ curl \
--header "Content-Type: application/json" \
--header "Accept-API-Version: protocol=1.0, resource=999.0" \
https://openam.example.com:8443/openam/json/realms/root/serverinfo/*
{
    "code":404,
    "reason":"Not Found",
    "message":"Accept-API-Version: Requested version \"999.0\" does not match any routes."
}
Tip
For more information on setting the default REST API version behavior, see "Specifying an Explicit REST API Version".
This section describes how to work with realms when making REST API calls to AM.
Realms can be specified in the following ways when making a REST API call to AM:
- DNS Alias
When making a REST API call, the DNS alias of a realm can be specified in the subdomain and domain name components of the REST endpoint.
To list all users in the top-level realm use the DNS alias of the AM instance, for example the REST endpoint would be:
https://openam.example.com:8443/openam/json/users?_queryId=*
To list all users in a realm with DNS alias
suppliers.example.comthe REST endpoint would be:https://suppliers.example.com:8443/openam/json/users?_queryId=*
- Path
When making a REST API call, specify the realm in the path component of the endpoint. You must specify the entire hierarchy of the realm, starting at the top-level realm. Prefix each realm in the hierarchy with the
realms/keyword. For example/realms/root/realms/customers/realms/europe.To authenticate a user in the top-level realm, use the
rootkeyword. For example:https://openam.example.com:8443/openam/json/realms/root/authenticate
To authenticate a user in a subrealm named
customerswithin the top-level realm, the REST endpoint would be:https://openam.example.com:8443/openam/json/realms/root/realms/customers/authenticate
If realms are specified using both the DNS alias and path methods, the path is used to determine the realm.
For example, the following REST endpoint returns users in a
subrealm of the top-level realm named europe, not
the realm with DNS alias suppliers.example.com:
https://suppliers.example.com:8443/openam/json/realms/root/realms/europe/users?_queryId=*
You can use REST-like APIs under /json/authenticate and
/json/sessions for authentication and for logout.
The /json/authenticate endpoint does not support the
CRUDPAQ verbs and therefore does not technically satisfy REST architectural
requirements. The term REST-like describes this
endpoint better than REST.
The simplest user name/password authentication returns a
tokenId that applications can present as a cookie
value for other operations that require authentication. The type of
tokenId returned varies depending on whether client-based
sessions are enabled in the realm to which the user authenticates:
If client-based sessions are not enabled, the
tokenIdis an AM SSO token.If client-based sessions are enabled, the
tokenIdis an AM SSO token that includes an encoded AM session.
Developers should be aware that the size of the tokenId
for client-based sessions—2000 bytes or greater—is
considerably longer than for CTS-based sessions—approximately 100 bytes.
For more information about session tokens,
see "Session Cookies".
When authenticating with a user name and password, use
HTTP POST to prevent the web container from logging the credentials.
Pass the user name in an X-OpenAM-Username header, and
the password in an X-OpenAM-Password header:
$ curl \
--request POST \
--header "Content-Type: application/json" \
--header "X-OpenAM-Username: demo" \
--header "X-OpenAM-Password: changeit" \
--header "Accept-API-Version: resource=2.0, protocol=1.0" \
--data "{}" \
https://openam.example.com:8443/openam/json/realms/root/authenticate
{
    "tokenId": "AQIC5w...NTcy*",
    "successUrl": "/openam/console",
    "realm":"/"
}
To use UTF-8 user names and passwords in calls to the /json/authenticate
endpoint, base64-encode the string, and then wrap the string as described in
RFC 2047:
encoded-word = "=?" charset "?" encoding "?" encoded-text "?="
For example, to authenticate using a UTF-8 username, such as ɗëɱø, perform
the following steps:
Encode the string in base64 format:
yZfDq8mxw7g=.Wrap the base64-encoded string as per RFC 2047:
=?UTF-8?B?yZfDq8mxw7g=?=.Use the result in the
X-OpenAM-Usernameheader passed to the authentication endpoint as follows:$ curl \ --request POST \ --header "Content-Type: application/json" \ --header "X-OpenAM-Username: =?UTF-8?B?yZfDq8mxw7g=?=" \ --header "X-OpenAM-Password: changeit" \ --header "Accept-API-Version: resource=2.0, protocol=1.0" \ --data "{}" \ https://openam.example.com:8443/openam/json/realms/root/authenticate { "tokenId": "AQIC5w...NTcy*", "successUrl": "/openam/console", "realm":"/" }
This zero page login mechanism works only for name/password authentication. If you include a POST body with the request, it must be an empty JSON string as shown in the example. Alternatively, you can leave the POST body empty. Otherwise, AM interprets the body as a continuation of an existing authentication attempt, one that uses a supported callback mechanism.
The authentication service at /json/authenticate
supports callback mechanisms that make it possible to perform other types of
authentication in addition to simple user name/password login.
Callbacks that are not completed based on the content of the client HTTP request are returned in JSON as a response to the request. Each callback has an array of output suitable for displaying to the end user, and input which is what the client must complete and send back to AM. The default is still user name/password authentication:
$ curl \
--request POST \
--header "Content-Type: application/json" \
--header "Accept-API-Version: resource=2.0, protocol=1.0" \
https://openam.example.com:8443/openam/json/realms/root/authenticate
{
    "authId": "...jwt-value...",
    "template": "",
    "stage": "DataStore1",
    "callbacks": [
        {
            "type": "NameCallback",
            "output": [
                {
                    "name": "prompt",
                    "value": " User Name: "
                }
            ],
            "input": [
                {
                    "name": "IDToken1",
                    "value": ""
                }
            ]
        },
        {
            "type": "PasswordCallback",
            "output": [
                {
                    "name": "prompt",
                    "value": " Password: "
                }
            ],
            "input": [
                {
                    "name": "IDToken2",
                    "value": ""
                }
            ]
        }
    ]
}
The authID value is a JSON Web Token (JWT) that
uniquely identifies
the authentication context to AM, and so must also be sent back with the
requests.
To respond to the callback, send back the JSON object with the missing
values filled, as in this case where the user name is demo
and the password is changeit:
$ curl \
--request POST \
--header "Content-Type: application/json" \
--header "Accept-API-Version: resource=2.0, protocol=1.0" \
--data '{ "authId": "...jwt-value...", "template": "", "stage": "DataStore1",
        "callbacks": [ { "type": "NameCallback", "output": [ { "name": "prompt",
        "value": " User Name: " } ], "input": [ { "name": "IDToken1", "value": "demo" } ] },
        { "type": "PasswordCallback", "output": [ { "name": "prompt", "value": " Password: " } ],
        "input": [ { "name": "IDToken2", "value": "changeit" } ] } ] }' \
https://openam.example.com:8443/openam/json/realms/root/authenticate
{
    "tokenId":"AQIC5wM2...U3MTE4NA..*",
    "successUrl": "/openam/console",
    "realm":"/"
}
The response is a token ID holding the SSO token value.
Alternatively, you can authenticate without requesting a session
using the noSession query string parameter:
$ curl \
--request POST \
--header "Content-Type: application/json" \
--header "Accept-API-Version: resource=2.0, protocol=1.0" \
--data '{ "authId": "...jwt-value...", "template": "", "stage": "DataStore1",
        "callbacks": [ { "type": "NameCallback", "output": [ { "name": "prompt",
        "value": " User Name: " } ], "input": [ { "name": "IDToken1", "value": "demo" } ] },
        { "type": "PasswordCallback", "output": [ { "name": "prompt", "value": " Password: " } ],
        "input": [ { "name": "IDToken2", "value": "changeit" } ] } ] }' \
https://openam.example.com:8443/openam/json/realms/root/authenticate?noSession=true
{
    "message":"Authentication Successful",
    "successUrl":"/openam/console",
    "realm":"/"
}
AM can be configured to return a failure URL value when
authentication fails. No failure URL is configured by default. The Default
Failure Login URL can be set per realm; see
"Post Authentication Processing"
for details. Alternatively, failure URLs can be configured per authentication
chain, which your client can specify using the service
parameter described below. On failure AM then returns HTTP status
code 401 Unauthorized, and the JSON in the reply indicates the failure
URL:
$ curl \
--request POST \
--header "Content-Type: application/json" \
--header "Accept-API-Version: resource=2.0, protocol=1.0" \
--header "X-OpenAM-Username: demo" \
--header "X-OpenAM-Password: badpassword" \
https://openam.example.com:8443/openam/json/realms/root/authenticate
{
    "code":401,
    "reason":"Unauthorized",
    "message":"Invalid Password!!",
    "failureUrl": "http://www.example.com/401.html"
}
When making a REST API call, specify the realm in the path component of the
endpoint. You must specify the entire hierarchy of the realm, starting at the top-level realm.
Prefix each realm in the hierarchy with the realms/ keyword. For example
/realms/root/realms/customers/realms/europe.
For example, to authenticate to a subrealm customers within the
top-level realm, then the authentication endpoint URL is as follows:
https://openam.example.com:8443/openam/json/realms/root/realms/customers/authenticate
The following additional parameters are supported:
You can use the authIndexType and
authIndexValue query string parameters as a pair
to provide additional information about how you are authenticating.
The authIndexType can be one of the following
types:
- composite
Set the value to a composite advice string.
- level
Set the value to the authentication level.
- module
Set the value to the name of an authentication module.
- resource
Set the value to a URL protected by an AM policy.
- role
Set the value to an AM role.
- service
Set the value to the name of an authentication tree or authentication chain.
- user
Set the value to an AM user ID.
For example, to log into AM using the built-in ldapService authentication
chain, you could use the following:
$ curl \
--request POST \
--header 'Accept-API-Version: resource=2.0, protocol=1.0' \
--header 'X-OpenAM-Username: demo' \
--header 'X-OpenAM-Password: changeit' \
'http://openam.example.com:8080/openam/json/realms/root/authenticate?authIndexType=service&authIndexValue=ldapService'
You can use the query string parameter,
sessionUpgradeSSOTokenId=tokenId,
to request session upgrade.
Before the tokenId is searched for in the
query string for session upgrade, the token is grabbed from the cookie.
For an explanation of session upgrade,
see "Session Upgrade".
AM uses the following callback types depending on the authentication module in use:
ChoiceCallback: Used to display a list of choices and retrieve the selected choice.ConfirmationCallback: Used to ask for a confirmation such as Yes, No, or Cancel and retrieve the selection.HiddenValueCallback: Used to return form values that are not visually rendered to the end user.HttpCallback: Used for HTTP handshake negotiations.LanguageCallback: Used to retrieve the locale for localizing text presented to the end user.NameCallback: Used to retrieve a name string.PasswordCallback: Used to retrieve a password value.PollingWaitCallback: Used to restrict polling requests by specifying an amount of time to wait before responding.RedirectCallback: Used to redirect the client user-agent.ScriptTextOutputCallback: Used to insert a script into the page presented to the end user. The script can, for example, collect data about the user's environment.TextInputCallback: Used to retrieve text input from the end user.TextOutputCallback: Used to display a message to the end user.X509CertificateCallback: Used to retrieve the content of an x.509 certificate.
Authenticated users can log out with the token cookie value and an HTTP
POST to /json/sessions/?_action=logout:
$ curl \
--request POST \
--header "Content-Type: application/json" \
--header "Cache-Control: no-cache" \
--header "iplanetDirectoryPro: AQIC5wM2...U3MTE4NA..*" \
--header "Accept-API-Version: resource=3.1, protocol=1.0" \
https://openam.example.com:8443/openam/json/realms/root/sessions/?_action=logout
{
    "result":"Successfully logged out"
}
To log out a session using a session handle, first perform an HTTP GET to the
resource URL, /json/sessions/, using the
queryFilter action to get the session handle:
$ curl \
--request GET \
--header "Content-Type: application/json" \
--header "Cache-Control: no-cache" \
--header "iPlanetDirectoryPro: AQICS...NzEz*" \
--header "Accept-API-Version: resource=3.1, protocol=1.0" \
https://openam.example.com:8443/openam/json/realms/root/sessions?_queryFilter=username%20eq%20%22demo%22%20and%20realm%20eq%20%22%2F%22
{
    "result": [
        {
            "username": "demo",
            "universalId": "id=demo,ou=user,dc=openam,dc=forgerock,dc=org",
            "realm":"/",
            "sessionHandle":"shandle:SJ80.*AA....JT.*",
            "latestAccessTime":"2018-10-23T09:37:54.387Z",
            "maxIdleExpirationTime":"2018-10-23T10:07:54Z",
            "maxSessionExpirationTime":"2018-10-23T11:37:54Z"
        },
         {
            "username": "demo",
            "universalId": "id=demo,ou=user,dc=openam,dc=forgerock,dc=org",
            "realm":"/",
            "sessionHandle":"shandle:H4CV.*DV....FM.*",
            "latestAccessTime":"2018-10-23T09:37:43.780Z",
            "maxIdleExpirationTime":"2018-10-23T10:07:43Z",
            "maxSessionExpirationTime":"2018-10-23T11:37:43Z"
        }
    ],
    "resultCount": 2,
    "pagedResultsCookie": null,
    "totalPagedResultsPolicy": "NONE",
    "totalPagedResults": -1,
    "remainingPagedResults": -1
}
To log out a session using a session handle, perform an HTTP POST to the
resource URL, /json/sessions/, using the
logoutByHandle action.
$ curl \
--request POST \
--header "Content-Type: application/json" \
--header "Cache-Control: no-cache" \
--header "iplanetDirectoryPro: AQIC5w...NTcy*" \
--header "Accept-API-Version: resource=3.1, protocol=1.0" \
--data '{
    "sessionHandles": [
        "shandle:SJ80.*AA....JT.*",
        "shandle:H4CV.*DV....FM.*"
    ]
}' \
https://openam.example.com:8443/openam/json/realms/root/sessions/?_action=logoutByHandle
{
    "result": {
        "shandle:SJ80.*AA....JT.*": true,
        "shandle:H4CV.*DV....FM.*": true
    }
}
When authentication depends on the client IP address and AM lies behind
a load balancer or proxy layer, configure the load balancer or proxy to send
the address by using the X-Forwarded-For header, and
configure AM to consume and forward the header as necessary. For
details, see
"Handling HTTP Request Headers" in the Installation Guide.
When authenticating with Windows Desktop SSO, add an
Authorization header containing the string
Basic , followed by a base64-encoded string of the
username, a colon character, and the password. In the following example, the
credentials demo:changeit are base64-encoded into the
string ZGVtbzpjaGFuZ2VpdA==:
$ curl \
--request POST \
--header "Content-Type: application/json" \
--header "Accept-API-Version: resource=2.0, protocol=1.0" \
--header "X-OpenAM-Username: demo" \
--header "X-OpenAM-Password: changeit" \
--header "Authorization: Basic ZGVtbzpjaGFuZ2VpdA==" \
--data "{}" \
https://openam.example.com:8443/openam/json/realms/root/authenticate
{
    "tokenId":"AQIC5w...NTcy*",
    "successUrl":"/openam/console",
    "realm":"/"
}The following is a common scenario when accessing AM by using REST API calls:
First, call the
/json/authenticateendpoint to log a user in to AM. This REST API call returns atokenIDvalue, which is used in subsequent REST API calls to identify the user:$ curl \ --request POST \ --header "Content-Type: application/json" \ --header "X-OpenAM-Username: demo" \ --header "X-OpenAM-Password: changeit" \ --header "Accept-API-Version: resource=2.0, protocol=1.0" \ --data "{}" \ https://openam.example.com:8443/openam/json/realms/root/authenticate { "tokenId":"AQIC5wM...TU3OQ*", "successUrl":"/openam/console", "realm":"/" }The returned
tokenIDis known as a session token (also referred to as an SSO token). REST API calls made after successful authentication to AM must present the session token in the HTTP header as proof of authentication.Next, call one or more additional REST APIs on behalf of the logged-in user. Each REST API call passes the user's
tokenIDback to AM in the HTTP header as proof of previous authentication.The following is a partial example of a curl command that inserts the token ID returned from a prior successful AM authentication attempt into the HTTP header:
$ curl \
--request POST \
--header "Content-Type: application/json" \
--header "iPlanetDirectoryPro: AQIC5w...NTcy*" \
--header "Accept-API-Version: resource=2.0, protocol=1.0" \
--data '{
  ...
Observe that the session token is inserted into a header field named
iPlanetDirectoryPro. This header field name must correspond to the name of the AM session cookie—by default,iPlanetDirectoryPro. You can find the cookie name in the AM console by navigating to Deployment > Servers > Server Name > Security > Cookie, in the Cookie Name field of the AM console.Once a user has authenticated, it is not necessary to insert login credentials in the HTTP header in subsequent REST API calls. Note the absence of
X-OpenAM-UsernameandX-OpenAM-Passwordheaders in the preceding example.Users are required to have appropriate privileges in order to access AM functionality using the REST API. For example, users who lack administrative privileges cannot create AM realms. For more information on the AM privilege model, see "Delegating Realm Administration Privileges" in the Setup and Maintenance Guide.
Finally, call the REST API to log the user out of AM as described in "Authentication and Logout". As with other REST API calls made after a user has authenticated, the REST API call to log out of AM requires the user's
tokenIDin the HTTP header.
You can retrieve AM server information by using HTTP GET on
/json/serverinfo/* as follows:
$ curl \
--request GET \
--header "Content-Type: application/json" \
--header "Accept-API-Version: resource=1.1, protocol=1.0" \
https://openam.example.com:8443/openam/json/serverinfo/*
{
    "domains": [
        ".example.com"
    ],
    "protectedUserAttributes": [],
    "cookieName": "iPlanetDirectoryPro",
    "secureCookie": false,
    "forgotPassword": "false",
    "forgotUsername": "false",
    "kbaEnabled": "false",
    "selfRegistration": "false",
    "lang": "en-US",
    "successfulUserRegistrationDestination": "default",
    "socialImplementations": [
        {
            "iconPath": "XUI/images/logos/facebook.png",
            "authnChain": "FacebookSocialAuthenticationService",
            "displayName": "Facebook",
            "valid": true
        }
    ],
    "referralsEnabled": "false",
    "zeroPageLogin": {
        "enabled": false,
        "refererWhitelist": [
            ""
        ],
        "allowedWithoutReferer": true
    },
    "realm": "/",
    "xuiUserSessionValidationEnabled": true,
    "FQDN": "openam.example.com"
}Valid tokens in AM requires configuration either in percent encoding or in C66Encode format. C66Encode format is encouraged. It is the default token format for AM, and is used in this section. The following is an example token that has not been encoded:
AQIC5wM2LY4SfczntBbXvEAOuECbqMY3J4NW3byH6xwgkGE=@AAJTSQACMDE=#
This token includes reserved characters such as +, /,
and = (The @, #, and * are not
reserved characters per se, but substitutions are still required). To c66encode this token,
you would substitute certain characters for others, as follows:
| + is replaced with - |
| / is replaced with _ |
| = is replaced with . |
| @ is replaced with * |
| # is replaced with * |
| * (first instance) is replaced with @ |
| * (subsequent instances) is replaced with # |
In this case, the translated token would appear as shown here:
AQIC5wM2LY4SfczntBbXvEAOuECbqMY3J4NW3byH6xwgkGE.*AAJTSQACMDE.*
AM 6 supports two Audit Logging Services: a new common REST-based Audit Logging Service, and the legacy Logging Service, which is based on a Java SDK and is available in AM versions prior to OpenAM 13. The legacy Logging Service is deprecated.
Both audit facilities log AM REST API calls.
AM logs information about all REST API calls to the
access topic. For more information about AM audit
topics, see "Audit Log Topics" in the Setup and Maintenance Guide.
Locate specific REST endpoints in the http.path log file
property.
AM logs information about REST API calls to two files:
amRest.access. Records accesses to a CREST endpoint, regardless of whether the request successfully reached the endpoint through policy authorization.
An
amRest.accessexample is as follows:$ cat openam/openam/log/amRest.access #Version: 1.0 #Fields: time Data LoginID ContextID IPAddr LogLevel Domain LoggedBy MessageID ModuleName NameID HostName "2011-09-14 16:38:17" /home/user/openam/openam/log/ "cn=dsameuser,ou=DSAME Users,o=openam" aa307b2dcb721d4201 "Not Available" INFO o=openam "cn=dsameuser,ou=DSAME Users,o=openam" LOG-1 amRest.access "Not Available" 192.168.56.2 "2011-09-14 16:38:17" "Hello World" id=bjensen,ou=user,o=openam 8a4025a2b3af291d01 "Not Available" INFO o=openam id=amadmin,ou=user,o=openam "Not Available" amRest.access "Not Available" 192.168.56.2
amRest.authz. Records all CREST authorization results regardless of success. If a request has an entry in the
amRest.accesslog, but no corresponding entry inamRest.authz, then that endpoint was not protected by an authorization filter and therefore the request was granted access to the resource.The
amRest.authzfile contains theDatafield, which specifies the authorization decision, resource, and type of action performed on that resource. TheDatafield has the following syntax:("GRANT"||"DENY") > "RESOURCE | ACTION" where "GRANT > " is prepended to the entry if the request was allowed "DENY > " is prepended to the entry if the request was not allowed "RESOURCE" is "ResourceLocation | ResourceParameter" where "ResourceLocation" is the endpoint location (e.g., subrealm/applicationtypes) "ResourceParameter" is the ID of the resource being touched (e.g., myApplicationType) if applicable. Otherwise, this field is empty if touching the resource itself, such as in a query. "ACTION" is "ActionType | ActionParameter" where "ActionType" is "CREATE||READ||UPDATE||DELETE||PATCH||ACTION||QUERY" "ActionParameter" is one of the following depending on the ActionType: For CREATE: the new resource ID For READ: empty For UPDATE: the revision of the resource to update For DELETE: the revision of the resource to delete For PATCH: the revision of the resource to patch For ACTION: the actual action performed (e.g., "forgotPassword") For QUERY: the query ID if any$ cat openam/openam/log/amRest.authz #Version: 1.0 #Fields: time Data ContextID LoginID IPAddr LogLevel Domain MessageID LoggedBy NameID ModuleName HostName "2014-09-16 14:17:28" /var/root/openam/openam/log/ 7d3af9e799b6393301 "cn=dsameuser,ou=DSAME Users,dc=openam,dc=forgerock,dc=org" "Not Available" INFO dc=openam,dc=forgerock,dc=org LOG-1 "cn=dsameuser,ou=DSAME Users,dc=openam,dc=forgerock,dc=org" "Not Available" amRest.authz 10.0.1.5 "2014-09-16 15:56:12" "GRANT > sessions|ACTION|logout|AdminOnlyFilter" d3977a55a2ee18c201 id=amadmin,ou=user,dc=openam,dc=forgerock,dc=org "Not Available" INFO dc=openam,dc=forgerock,dc=org OAuth2Provider-2 "cn=dsameuser,ou=DSAME Users,dc=openam,dc=forgerock,dc=org" "Not Available" amRest.authz 127.0.0.1 "2014-09-16 15:56:40" "GRANT > sessions|ACTION|logout|AdminOnlyFilter" eedbc205bf51780001 id=amadmin,ou=user,dc=openam,dc=forgerock,dc=org "Not Available" INFO dc=openam,dc=forgerock,dc=org OAuth2Provider-2 "cn=dsameuser,ou=DSAME Users,dc=openam,dc=forgerock,dc=org" "Not Available" amRest.authz 127.0.0.1
AM also provides additional information in its debug notifications for accesses to any endpoint, depending on the message type (error, warning or message) including realm, user, and result of the operation.
This reference section covers return codes and system settings relating to REST API support in AM.
amster service name: rest
The following settings are available in this service:
- Default Resource Version
The API resource version to use when the REST request does not specify an explicit version. Choose from:
Latest. If an explicit version is not specified, the latest resource version of an API is used.Oldest. If an explicit version is not specified, the oldest supported resource version of an API is used. Note that since APIs may be deprecated and fall out of support, the oldest supported version may not be the first version.None. If an explicit version is not specified, the request will not be handled and an error status is returned.
The possible values for this property are:
LatestOldestNone
Default value:
Latestamster attribute:
defaultVersion- Warning Header
Whether to include a warning header in the response to a request which fails to include the
Accept-API-Versionheader.Default value:
falseamster attribute:
warningHeader- API Descriptions
Whether API Explorer and API Docs are enabled in OpenAM and how the documentation for them is generated. Dynamic generation includes descriptions from any custom services and authentication modules you may have added. Static generation only includes services and authentication modules that were present when OpenAM was built. Note that dynamic documentation generation may not work in some application containers.
The possible values for this property are:
DYNAMIC. Enabled with Dynamic DocumentationSTATIC. Enabled with Static DocumentationDISABLED
Default value:
STATICamster attribute:
descriptionsState- Default Protocol Version
The API protocol version to use when a REST request does not specify an explicit version. Choose from:
Oldest. If an explicit version is not specified, the oldest protocol version is used.Latest. If an explicit version is not specified, the latest protocol version is used.None. If an explicit version is not specified, the request will not be handled and an error status is returned.
The possible values for this property are:
OldestLatestNone
Default value:
Latestamster attribute:
defaultProtocolVersion- Enable CSRF Protection
If enabled, all non-read/query requests will require the X-Requested-With header to be present.
Requiring a non-standard header ensures requests can only be made via methods (XHR) that have stricter same-origin policy protections in Web browsers, preventing Cross-Site Request Forgery (CSRF) attacks. Without this filter, cross-origin requests are prevented by the use of the application/json Content-Type header, which is less robust.
Default value:
trueamster attribute:
csrfFilterEnabled
You can use scripts for client-side and server-side authentication, policy conditions, and handling OpenID Connect claims.
This section introduces how AM executes scripts, and covers thread pools and security configuration.
You can use scripts to modify default AM behavior in the following situations, also known as contexts:
- Client-side Authentication
Scripts that are executed on the client during authentication. Client-side scripts must be in JavaScript.
- Server-side Authentication
Scripts are included in an authentication module and are executed on the server during authentication.
- Policy Condition
Scripts used as conditions within policies.
- OIDC Claims
Scripts that gather and populate the claims in a request when issuing an ID token or making a request to the
userinfoendpoint.
AM implements a configurable scripting engine for each of the context types that are executed on the server.
The scripting engines in AM have two main components: security settings, and the thread pool.
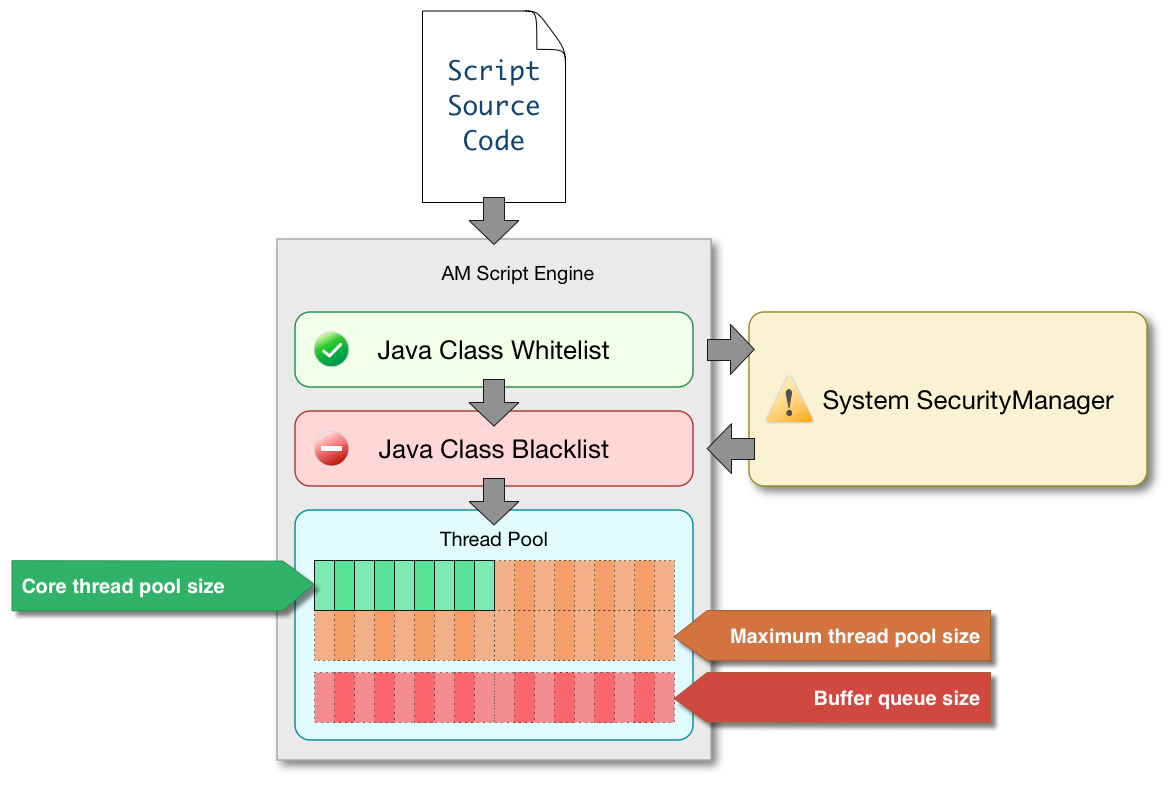
AM scripting engines provide security features for ensuring that malicious Java classes are not directly called. The engines validate scripts by checking all directly-called Java classes against a configurable blacklist and whitelist, and, optionally, against the JVM SecurityManager, if it is configured.
Whitelists and blacklists contain class names that are allowed or denied execution respectively. Specify classes in whitelists and blacklists by name or by using regular expressions.
Classes called by the script are checked against the whitelist first, and must match at least one pattern in the list. The blacklist is applied after the whitelist, and classes matching any pattern are disallowed.
You can also configure the scripting engine to make an additional call to the JVM security manager for each class that is accessed. The security manager throws an exception if a class being called is not allowed to execute.
For more information on configuring script engine security, see "Scripting".
The following points should be considered when configuring the security settings within each script engine:
- The scripting engine only validates directly accessible classes.
The security settings only apply to classes that the script directly accesses. If the script calls
Foo.a()and then that method callsBar.b(), the scripting engine will be unable to prevent it. You must consider the whole chain of accessible classes.Note
Access includes actions such as:
Importing or loading a class.
Accessing any instance of that class. For example, passed as a parameter to the script.
Calling a static method on that class.
Calling a method on an instance of that class.
Accessing a method or field that returns an instance of that class.
- Potentially dangerous Java classes are blacklisted by default.
All Java reflection classes (
java.lang.Class,java.lang.reflect.*) are blacklisted by default to avoid bypassing the security settings.The
java.security.AccessControllerclass is also blacklisted by default to prevent access to thedoPrivileged()methods.Caution
You should not remove potentially dangerous Java classes from the blacklist.
- The whitelists and blacklists match class or package names only.
The whitelist and blacklist patterns apply only to the exact class or package names involved. The script engine does not know anything about inheritance, so it is best to whitelist known, specific classes.
Each script is executed in an individual thread. Each scripting engine starts with an initial number of threads available for executing scripts. If no threads are available for execution, AM creates a new thread to execute the script, until the configured maximum number of threads is reached.
If the maximum number of threads is reached, pending script executions are queued in a number of buffer threads, until a thread becomes available for execution. If a created thread has completed script execution and has remained idle for a configured amount of time, AM terminates the thread, shrinking the pool.
For more information on configuring script engine thread pools, see "Scripting".
This section covers functionality available to each of the server-side script types.
Global API functionality includes:
AM passes an HTTP client object, httpClient,
to server-side scripts.
Server-side scripts can call HTTP services
with the httpClient.send method.
The method returns an HttpClientResponse object.
Configure the parameters for the HTTP client object by using the
org.forgerock.http.protocol package. This package contains the
Request class, which has methods for setting the URI and type of request.
The following example, taken from the default server-side Scripted authentication module script, uses these methods to call an online API to determine the longitude and latitude of a user based on their postal address:
function getLongitudeLatitudeFromUserPostalAddress() {

    var request = new org.forgerock.http.protocol.Request();

    request.setUri("http://maps.googleapis.com/maps/api/geocode/json?address=" + encodeURIComponent(userPostalAddress));
    request.setMethod("GET");

    var response = httpClient.send(request).get();
    logResponse(response);

    var geocode = JSON.parse(response.getEntity());
    var i;

    for (i = 0; i < geocode.results.length; i++) {
        var result = geocode.results[i];
        latitude = result.geometry.location.lat;
        longitude = result.geometry.location.lng;

        logger.message("latitude:" + latitude + " longitude:" + longitude);
    }
}
HTTP client requests are synchronous and blocking until they return. You can, however, set a global timeout for server-side scripts. For details, see "Scripted Authentication Module Properties".
Server-side scripts can access response data by using the methods listed in the table below.
| Method | Parameters | Return Type | Description |
|---|---|---|---|
|
|
|
|
Get the cookies for the returned response, if any exist. |
|
|
|
|
Get the entity of the returned response. |
|
|
|
|
Get the headers for the returned response, if any exist. |
|
|
|
|
Get the reason phrase of the returned response. |
|
|
|
|
Get the status code of the returned response. |
|
|
|
|
Indicate whether the returned response had any cookies. |
|
|
|
|
Indicate whether the returned response had any headers. |
Server-side scripts can write messages to AM debug logs
by using the logger object.
AM does not log debug messages from scripts by default.
You can configure AM to log such messages
by setting the debug log level for the amScript service.
For details, see
"Debug Logging By Service" in the Setup and Maintenance Guide.
The following table lists the logger methods.
| Method | Parameters | Return Type | Description |
|---|---|---|---|
|
|
|
|
Write Error Message to AM debug logs if ERROR level logging is enabled. |
|
|
|
|
Return |
|
|
|
|
Write Message to AM debug logs if MESSAGE level logging is enabled. |
|
|
|
|
Return |
|
|
|
|
Write Warning Message to AM debug logs if WARNING level logging is enabled. |
|
|
|
|
Return |
This section shows you how to manage scripts used for client-side and server-side scripted authentication, custom policy conditions, and handling OpenID Connect claims using the AM console, the ssoadm command, and the REST API.
The following procedures describe how to create, modify, and delete scripts using the AM console:
Log in to the AM console as an AM administrator, for example,
amadmin.Navigate to Realms > Realm Name > Scripts.
Click New Script.
The New Script page appears:

Specify a name for the script.
Select the type of script from the Script Type drop-down list.
Click Create.
The Script Name page appears:
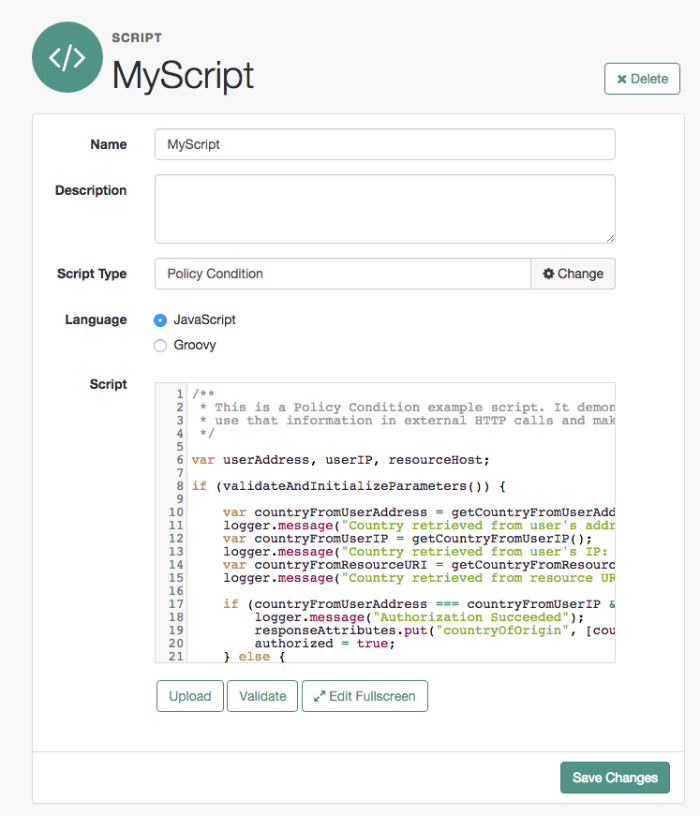
Enter values on the Script Name page as follows:
Enter a description of the script.
Choose the script language, either JavaScript or Groovy. Note that not every script type supports both languages.
Enter the source code in the Script field.
On supported browsers, you can click Upload, navigate to the script file, and then click Open to upload the contents to the Script field.
Click Validate to check for compilation errors in the script.
Correct any compilation errors, and revalidate the script until all errors have been fixed.
Save your changes.

Log in to the AM console as an AM administrator, for example,
amadmin.Navigate to Realms > Realm Name > Scripts.
Select the script you want to modify from the list of scripts.
The Script Name page appears.
Modify values on the Script Name page as needed. Note that if you change the Script Type, existing code in the script is replaced.
If you modified the code in the script, click Validate to check for compilation errors.
Correct any compilation errors, and revalidate the script until all errors have been fixed.
Save your changes.
Log in to the AM console as an AM administrator, for example,
amadmin.Navigate to Realms > Realm Name > Scripts.
Choose one or more scripts to delete by activating the checkboxes in the relevant rows. Note that you can only delete user-created scripts—you cannot delete the global sample scripts provided with AM.
Click Delete.
This section shows you how to manage scripts used for client-side and server-side scripted authentication, custom policy conditions, and handling OpenID Connect claims by using the REST API.
AM provides the scripts REST endpoint
for the following:
User-created scripts are realm-specific, hence the URI for the scripts' API
can contain a realm component, such as
/json{/realm}/scripts.
If the realm is not specified in the URI, the top level realm is
used.
Tip
AM includes some global example scripts that can be used in any realm.
Scripts are represented in JSON and take the following form.
Scripts are built from standard JSON objects and values
(strings, numbers, objects, sets, arrays, true,
false, and null). Each script
has a system-generated universally unique
identifier (UUID), which must be used when modifying
existing scripts. Renaming a script will not affect the UUID:
{
  "_id": "7e3d7067-d50f-4674-8c76-a3e13a810c33",
  "name": "Scripted Module - Server Side",
  "description": "Default global script for server side Scripted Authentication Module",
  "script": "dmFyIFNUQVJUX1RJ...",
  "language": "JAVASCRIPT",
  "context": "AUTHENTICATION_SERVER_SIDE",
  "createdBy": "id=dsameuser,ou=user,dc=openam,dc=forgerock,dc=org",
  "creationDate": 1433147666269,
  "lastModifiedBy": "id=dsameuser,ou=user,dc=openam,dc=forgerock,dc=org",
  "lastModifiedDate": 1433147666269
}
The values for the fields shown in the example above are explained below:
_idThe UUID that AM generates for the script.
nameThe name provided for the script.
descriptionAn optional text string to help identify the script.
scriptThe source code of the script. The source code is in UTF-8 format and encoded into Base64.
For example, a script such as the following:
var a = 123;
var b = 456;
When encoded into Base64 becomes:
dmFyIGEgPSAxMjM7IA0KdmFyIGIgPSA0NTY7
languageThe language the script is written in -
JAVASCRIPTorGROOVY.Script Context Supported Languages POLICY_CONDITIONJAVASCRIPT,GROOVYAUTHENTICATION_SERVER_SIDEJAVASCRIPT,GROOVYAUTHENTICATION_CLIENT_SIDEJAVASCRIPTOIDC_CLAIMSJAVASCRIPT,GROOVYAUTHENTICATION_TREE_DECISION_NODEJAVASCRIPT,GROOVYcontextThe context type of the script.
Supported values are:
POLICY_CONDITIONPolicy Condition
AUTHENTICATION_SERVER_SIDEServer-side Authentication
AUTHENTICATION_CLIENT_SIDEClient-side Authentication
Note
Client-side scripts must be written in JavaScript.
OIDC_CLAIMSOIDC Claims
AUTHENTICATION_TREE_DECISION_NODEAuthentication scripts used by Scripted Tree Decision authentication nodes.
createdByA string containing the universal identifier DN of the subject that created the script.
creationDateAn integer containing the creation date and time, in ISO 8601 format.
lastModifiedByA string containing the universal identifier DN of the subject that most recently updated the resource type.
If the script has not been modified since it was created, this property will have the same value as
createdBy.lastModifiedDateA string containing the last modified date and time, in ISO 8601 format.
If the script has not been modified since it was created, this property will have the same value as
creationDate.
To list all the scripts in a realm, as well as any global scripts, perform
an HTTP GET to the /json{/realm}/scripts
endpoint with a _queryFilter parameter
set to true.
Note
If the realm is not specified in the URL, AM returns scripts in the top level realm, as well as any global scripts.
The iPlanetDirectoryPro header is required and should
contain the SSO token of an administrative user, such as amAdmin, who
has access to perform the operation.
$ curl \
--header "iPlanetDirectoryPro: AQIC5..." \
--header "Accept-API-Version: resource=1.1" \
https://openam.example.com:8443/openam/json/realms/root/realms/myrealm/scripts?_queryFilter=true
{
    "result": [
        {
            "_id": "9de3eb62-f131-4fac-a294-7bd170fd4acb",
            "name": "Scripted Policy Condition",
            "description": "Default global script for Scripted Policy Conditions",
            "script": "LyoqCiAqIFRoaXMg...",
            "language": "JAVASCRIPT",
            "context": "POLICY_CONDITION",
            "createdBy": "id=dsameuser,ou=user,dc=openam,dc=forgerock,dc=org",
            "creationDate": 1433147666269,
            "lastModifiedBy": "id=dsameuser,ou=user,dc=openam,dc=forgerock,dc=org",
            "lastModifiedDate": 1433147666269
        },
        {
            "_id": "7e3d7067-d50f-4674-8c76-a3e13a810c33",
            "name": "Scripted Module - Server Side",
            "description": "Default global script for server side Scripted Authentication Module",
            "script": "dmFyIFNUQVJUX1RJ...",
            "language": "JAVASCRIPT",
            "context": "AUTHENTICATION_SERVER_SIDE",
            "createdBy": "id=dsameuser,ou=user,dc=openam,dc=forgerock,dc=org",
            "creationDate": 1433147666269,
            "lastModifiedBy": "id=dsameuser,ou=user,dc=openam,dc=forgerock,dc=org",
            "lastModifiedDate": 1433147666269
        }
    ],
    "resultCount": 2,
    "pagedResultsCookie": null,
    "remainingPagedResults": -1
}| Field | Supported Operators |
|---|---|
_id |
Equals (eq),
Contains (co),
Starts with (sw)
|
name |
Equals (eq),
Contains (co),
Starts with (sw)
|
description |
Equals (eq),
Contains (co),
Starts with (sw)
|
script |
Equals (eq),
Contains (co),
Starts with (sw)
|
language |
Equals (eq),
Contains (co),
Starts with (sw)
|
context |
Equals (eq),
Contains (co),
Starts with (sw)
|
To read an individual script in a realm, perform an HTTP
GET using the /json{/realm}/scripts
endpoint, specifying the UUID in the URL.
Tip
To read a script in the top-level realm, or to read a built-in global script, do not specify a realm in the URL.
The iPlanetDirectoryPro header is required and should
contain the SSO token of an administrative user, such as amAdmin, who
has access to perform the operation.
$ curl \
--header "iPlanetDirectoryPro: AQIC5..." \
--header "Accept-API-Version: resource=1.1" \
https://openam.example.com:8443/openam/json/realms/root/realms/myrealm/scripts/9de3eb62-f131-4fac-a294-7bd170fd4acb
{
    "_id": "9de3eb62-f131-4fac-a294-7bd170fd4acb",
    "name": "Scripted Policy Condition",
    "description": "Default global script for Scripted Policy Conditions",
    "script": "LyoqCiAqIFRoaXMg...",
    "language": "JAVASCRIPT",
    "context": "POLICY_CONDITION",
    "createdBy": "id=dsameuser,ou=user,dc=openam,dc=forgerock,dc=org",
    "creationDate": 1433147666269,
    "lastModifiedBy": "id=dsameuser,ou=user,dc=openam,dc=forgerock,dc=org",
    "lastModifiedDate": 1433147666269
}
To validate a script, perform an HTTP POST using the
/json{/realm}/scripts
endpoint, with an _action parameter
set to validate. Include a JSON representation of the
script and the script language, JAVASCRIPT or
GROOVY, in the POST data.
The value for script must be in UTF-8 format and
then encoded into Base64.
The iPlanetDirectoryPro header is required and should
contain the SSO token of an administrative user, such as amAdmin, who
has access to perform the operation.
$ curl \
--request POST \
--header "Content-Type: application/json" \
--header "iPlanetDirectoryPro: AQIC5..." \
--header "Accept-API-Version: resource=1.1" \
--data '{
    "script": "dmFyIGEgPSAxMjM7dmFyIGIgPSA0NTY7Cg==",
    "language": "JAVASCRIPT"
}' \
https://openam.example.com:8443/openam/json/realms/root/realms/myrealm/scripts/?_action=validate
{
    "success": true
}
If the script is valid the JSON response contains a
success key with a value of
true.
If the script is invalid the JSON response contains a
success key with a value of
false, and an indication of the problem and where it
occurs, as shown below:
$ curl \
--request POST \
--header "Content-Type: application/json" \
--header "iPlanetDirectoryPro: AQIC5..." \
--header "Accept-API-Version: resource=1.1" \
--data '{
    "script": "dmFyIGEgPSAxMjM7dmFyIGIgPSA0NTY7ID1WQUxJREFUSU9OIFNIT1VMRCBGQUlMPQo=",
    "language": "JAVASCRIPT"
}' \
https://openam.example.com:8443/openam/json/realms/root/realms/myrealm/scripts/?_action=validate
{
    "success": false,
    "errors": [
        {
            "line": 1,
            "column": 27,
            "message": "syntax error"
        }
    ]
}
To create a script in a realm, perform an HTTP POST using the
/json{/realm}/scripts
endpoint, with an _action parameter
set to create. Include a JSON representation of the
script in the POST data.
The value for script must be in UTF-8 format and
then encoded into Base64.
Note
If the realm is not specified in the URL, AM creates the script in the top level realm.
The iPlanetDirectoryPro header is required and should
contain the SSO token of an administrative user, such as amAdmin, who
has access to perform the operation.
$ curl \
--request POST \
--header "Content-Type: application/json" \
--header "iPlanetDirectoryPro: AQIC5..." \
--header "Accept-API-Version: resource=1.1" \
--data '{
    "name": "MyJavaScript",
    "script": "dmFyIGEgPSAxMjM7CnZhciBiID0gNDU2Ow==",
    "language": "JAVASCRIPT",
    "context": "POLICY_CONDITION",
    "description": "An example script"
}' \
https://openam.example.com:8443/openam/json/realms/root/realms/myrealm/scripts/?_action=create
{
    "_id": "0168d494-015a-420f-ae5a-6a2a5c1126af",
    "name": "MyJavaScript",
    "description": "An example script",
    "script": "dmFyIGEgPSAxMjM7CnZhciBiID0gNDU2Ow==",
    "language": "JAVASCRIPT",
    "context": "POLICY_CONDITION",
    "createdBy": "id=amadmin,ou=user,dc=openam,dc=forgerock,dc=org",
    "creationDate": 1436807766258,
    "lastModifiedBy": "id=amadmin,ou=user,dc=openam,dc=forgerock,dc=org",
    "lastModifiedDate": 1436807766258
}
To update an individual script in a realm, perform an HTTP
PUT using the /json{/realm}/scripts
endpoint, specifying the UUID in both the URL and the PUT body.
Include a JSON representation of the updated script in the PUT
data, alongside the UUID.
Note
If the realm is not specified in the URL, AM uses the top level realm.
The iPlanetDirectoryPro header is required and should
contain the SSO token of an administrative user, such as amAdmin, who
has access to perform the operation.
$ curl \
--header "iPlanetDirectoryPro: AQIC5..." \
--header "Content-Type: application/json" \
--header "Accept-API-Version: resource=1.1" \
--request PUT \
--data '{
    "name": "MyUpdatedJavaScript",
    "script": "dmFyIGEgPSAxMjM7CnZhciBiID0gNDU2Ow==",
    "language": "JAVASCRIPT",
    "context": "POLICY_CONDITION",
    "description": "An updated example script configuration"
}' \
https://openam.example.com:8443/openam/json/realms/root/realms/myrealm/scripts/0168d494-015a-420f-ae5a-6a2a5c1126af
{
    "_id": "0168d494-015a-420f-ae5a-6a2a5c1126af",
    "name": "MyUpdatedJavaScript",
    "description": "An updated example script configuration",
    "script": "dmFyIGEgPSAxMjM7CnZhciBiID0gNDU2Ow==",
    "language": "JAVASCRIPT",
    "context": "POLICY_CONDITION",
    "createdBy": "id=amadmin,ou=user,dc=openam,dc=forgerock,dc=org",
    "creationDate": 1436807766258,
    "lastModifiedBy": "id=amadmin,ou=user,dc=openam,dc=forgerock,dc=org",
    "lastModifiedDate": 1436808364681
}
To delete an individual script in a realm, perform an HTTP
DELETE using the /json{/realm}/scripts
endpoint, specifying the UUID in the URL.
Note
If the realm is not specified in the URL, AM uses the top level realm.
The iPlanetDirectoryPro header is required and should
contain the SSO token of an administrative user, such as amAdmin, who
has access to perform the operation.
$ curl \
--request DELETE \
--header "iPlanetDirectoryPro: AQIC5..." \
--header "Accept-API-Version: resource=1.1" \
https://openam.example.com:8443/openam/json/realms/root/realms/myrealm/scripts/0168d494-015a-420f-ae5a-6a2a5c1126af
{}Use the ssoadm command's create-sub-cfg, get-sub-cfg, and delete-sub-cfg subcommands to manage AM scripts.
Create an AM script as follows:
Create a script configuration file, for example
/path/to/myScriptConfigurationFile.txt, containing the following:script-file=/path/to/myScriptFile.js language=JAVASCRIPT
name=My New Script
context=AUTHENTICATION_SERVER_SIDE Possible values for the
languageproperty are:JAVASCRIPTGROOVY
Possible values for the
contextproperty are:POLICY_CONDITIONAUTHENTICATION_SERVER_SIDEAUTHENTICATION_CLIENT_SIDEOIDC_CLAIMSAUTHENTICATION_TREE_DECISION_NODE
Run the ssoadm create-sub-cfg command. The
--datafileargument references the script configuration file you created in the previous step:$ ssoadm \ create-sub-cfg \ --realm /myRealm \ --adminid amadmin \ --password-file /tmp/pwd.txt \ --servicename ScriptingService \ --subconfigname scriptConfigurations/scriptConfiguration \ --subconfigid myScriptID \ --datafile /path/to/myScriptConfigurationFile.txt Sub Configuration scriptConfigurations/scriptConfiguration was added to realm /myRealm
To list the properties of a script, run the ssoadm get-sub-cfg command:
$ ssoadm \
  get-sub-cfg \
  --realm /myRealm \
  --adminid amadmin \
  --password-file /tmp/pwd.txt \
  --servicename ScriptingService \
  --subconfigname scriptConfigurations/myScriptID
createdBy=
lastModifiedDate=
lastModifiedBy=
name=My New Script
context=AUTHENTICATION_SERVER_SIDE
description=
language=JAVASCRIPT
creationDate=
script=...Script output follows...
To delete a script, run the ssoadm delete-sub-cfg command:
$ ssoadm \
  delete-sub-cfg \
  --realm /myRealm \
  --adminid amadmin \
  --password-file /tmp/pwd.txt \
  --servicename ScriptingService \
  --subconfigname scriptConfigurations/myScriptID
Sub Configuration scriptConfigurations/myScriptID was deleted from realm /myRealm
amster service name: scripting
The following settings appear on the Configuration tab:
- Default Script Type
The default script context type when creating a new script.
The possible values for this property are:
POLICY_CONDITION. Policy ConditionAUTHENTICATION_SERVER_SIDE. Server-side AuthenticationAUTHENTICATION_CLIENT_SIDE. Client-side AuthenticationOIDC_CLAIMS. OIDC ClaimsAUTHENTICATION_TREE_DECISION_NODE. Decision node script for authentication trees
Default value:
POLICY_CONDITIONamster attribute:
defaultContext
This service has the following Secondary Configurations.
The following properties are available for Scripting Service secondary configuration instances:
- Engine Configuration
Configure script engine parameters for running a particular script type in OpenAM.
ssoadm attribute:
engineConfigurationTo access a secondary configuration instance using the ssoadm command, use:
--subconfigname [primary configuration]/[secondary configuration]For example:$ ssoadm set-sub-cfg \ --adminid amAdmin \ --password-file admin_pwd_file \ --servicename ScriptingService \ --subconfigname OIDC_CLAIMS/engineConfiguration \ --operation set \ --attributevalues maxThreads=300 queueSize=-1
Note
Supports server-side scripts only. OpenAM cannot configure engine settings for client-side scripts.
The configurable engine settings are as follows:
- Server-side Script Timeout
The maximum execution time any individual script should take on the server (in seconds). OpenAM terminates scripts which take longer to run than this value.
ssoadm attribute:
serverTimeout- Core thread pool size
The initial number of threads in the thread pool from which scripts operate. OpenAM will ensure the pool contains at least this many threads.
ssoadm attribute:
coreThreads- Maximum thread pool size
The maximum number of threads in the thread pool from which scripts operate. If no free thread is available in the pool, OpenAM creates new threads in the pool for script execution up to the configured maximum.
ssoadm attribute:
maxThreads- Thread pool queue size
The number of threads to use for buffering script execution requests when the maximum thread pool size is reached.
ssoadm attribute:
queueSize- Thread idle timeout (seconds)
Length of time (in seconds) for a thread to be idle before OpenAM terminates created threads. If the current pool size contains the number of threads set in
Core thread pool sizeidle threads will not be terminated, to maintain the initial pool size.ssoadm attribute:
idleTimeout- Java class whitelist
Specifies the list of class-name patterns allowed to be invoked by the script. Every class accessed by the script must match at least one of these patterns.
You can specify the class name as-is or use a regular expression.
ssoadm attribute:
whiteList- Java class blacklist
Specifies the list of class-name patterns that are NOT allowed to be invoked by the script. The blacklist is applied AFTER the whitelist to exclude those classes - access to a class specified in both the whitelist and the blacklist will be denied.
You can specify the class name to exclude as-is or use a regular expression.
ssoadm attribute:
blackList- Use system SecurityManager
If enabled, OpenAM will make a call to
System.getSecurityManager().checkPackageAccess(...)for each class that is accessed. The method throwsSecurityExceptionif the calling thread is not allowed to access the package.Note
This feature only takes effect if the security manager is enabled for the JVM.
ssoadm attribute:
useSecurityManager
- Scripting languages
Select the languages available for scripts on the chosen type. Either
GROOVYorJAVASCRIPT.ssoadm attribute:
languages- Default Script
The source code that is presented as the default when creating a new script of this type.
ssoadm attribute:
defaultScript
For more information or resources about AM and ForgeRock Support, see the following sections:
ForgeRock publishes comprehensive documentation online:
The ForgeRock Knowledge Base offers a large and increasing number of up-to-date, practical articles that help you deploy and manage ForgeRock software.
While many articles are visible to community members, ForgeRock customers have access to much more, including advanced information for customers using ForgeRock software in a mission-critical capacity.
ForgeRock product documentation, such as this document, aims to be technically accurate and complete with respect to the software documented. It is visible to everyone and covers all product features and examples of how to use them.
The ForgeRock.org site has links to source code for ForgeRock open source software, as well as links to the ForgeRock forums and technical blogs.
If you are a ForgeRock customer, raise a support ticket instead of using the forums. ForgeRock support professionals will get in touch to help you.
ForgeRock provides support services, professional services, training through ForgeRock University, and partner services to assist you in setting up and maintaining your deployments. For a general overview of these services, see https://www.forgerock.com.
ForgeRock has staff members around the globe who support our international customers and partners. For details, visit https://www.forgerock.com, or send an email to ForgeRock at info@forgerock.com.
- Access control
Control to grant or to deny access to a resource.
- Account lockout
The act of making an account temporarily or permanently inactive after successive authentication failures.
- Actions
Defined as part of policies, these verbs indicate what authorized identities can do to resources.
- Advice
In the context of a policy decision denying access, a hint to the policy enforcement point about remedial action to take that could result in a decision allowing access.
- Agent administrator
User having privileges only to read and write agent profile configuration information, typically created to delegate agent profile creation to the user installing a web or Java agent.
- Agent authenticator
Entity with read-only access to multiple agent profiles defined in the same realm; allows an agent to read web service profiles.
- Application
In general terms, a service exposing protected resources.
In the context of AM policies, the application is a template that constrains the policies that govern access to protected resources. An application can have zero or more policies.
- Application type
Application types act as templates for creating policy applications.
Application types define a preset list of actions and functional logic, such as policy lookup and resource comparator logic.
Application types also define the internal normalization, indexing logic, and comparator logic for applications.
- Attribute-based access control (ABAC)
Access control that is based on attributes of a user, such as how old a user is or whether the user is a paying customer.
- Authentication
The act of confirming the identity of a principal.
- Authentication chaining
A series of authentication modules configured together which a principal must negotiate as configured in order to authenticate successfully.
- Authentication level
Positive integer associated with an authentication module, usually used to require success with more stringent authentication measures when requesting resources requiring special protection.
- Authentication module
AM authentication unit that handles one way of obtaining and verifying credentials.
- Authorization
The act of determining whether to grant or to deny a principal access to a resource.
- Authorization Server
In OAuth 2.0, issues access tokens to the client after authenticating a resource owner and confirming that the owner authorizes the client to access the protected resource. AM can play this role in the OAuth 2.0 authorization framework.
- Auto-federation
Arrangement to federate a principal's identity automatically based on a common attribute value shared across the principal's profiles at different providers.
- Bulk federation
Batch job permanently federating user profiles between a service provider and an identity provider based on a list of matched user identifiers that exist on both providers.
- Circle of trust
Group of providers, including at least one identity provider, who have agreed to trust each other to participate in a SAML v2.0 provider federation.
- Client
In OAuth 2.0, requests protected web resources on behalf of the resource owner given the owner's authorization. AM can play this role in the OAuth 2.0 authorization framework.
- Client-based sessions
AM sessions for which AM returns session state to the client after each request, and require it to be passed in with the subsequent request. For browser-based clients, AM sets a cookie in the browser that contains the session information.
For browser-based clients, AM sets a cookie in the browser that contains the session state. When the browser transmits the cookie back to AM, AM decodes the session state from the cookie.
- Conditions
Defined as part of policies, these determine the circumstances under which which a policy applies.
Environmental conditions reflect circumstances like the client IP address, time of day, how the subject authenticated, or the authentication level achieved.
Subject conditions reflect characteristics of the subject like whether the subject authenticated, the identity of the subject, or claims in the subject's JWT.
- Configuration datastore
LDAP directory service holding AM configuration data.
- Cross-domain single sign-on (CDSSO)
AM capability allowing single sign-on across different DNS domains.
- CTS-based sessions
AM sessions that reside in the Core Token Service's token store. CTS-based sessions might also be cached in memory on one or more AM servers. AM tracks these sessions in order to handle events like logout and timeout, to permit session constraints, and to notify applications involved in SSO when a session ends.
- Delegation
Granting users administrative privileges with AM.
- Entitlement
Decision that defines which resource names can and cannot be accessed for a given identity in the context of a particular application, which actions are allowed and which are denied, and any related advice and attributes.
- Extended metadata
Federation configuration information specific to AM.
- Extensible Access Control Markup Language (XACML)
Standard, XML-based access control policy language, including a processing model for making authorization decisions based on policies.
- Federation
Standardized means for aggregating identities, sharing authentication and authorization data information between trusted providers, and allowing principals to access services across different providers without authenticating repeatedly.
- Fedlet
Service provider application capable of participating in a circle of trust and allowing federation without installing all of AM on the service provider side; AM lets you create Java Fedlets.
- Hot swappable
Refers to configuration properties for which changes can take effect without restarting the container where AM runs.
- Identity
Set of data that uniquely describes a person or a thing such as a device or an application.
- Identity federation
Linking of a principal's identity across multiple providers.
- Identity provider (IdP)
Entity that produces assertions about a principal (such as how and when a principal authenticated, or that the principal's profile has a specified attribute value).
- Identity repository
Data store holding user profiles and group information; different identity repositories can be defined for different realms.
- Java agent
Java web application installed in a web container that acts as a policy enforcement point, filtering requests to other applications in the container with policies based on application resource URLs.
- Metadata
Federation configuration information for a provider.
- Policy
Set of rules that define who is granted access to a protected resource when, how, and under what conditions.
- Policy agent
Java, web, or custom agent that intercepts requests for resources, directs principals to AM for authentication, and enforces policy decisions from AM.
- Policy Administration Point (PAP)
Entity that manages and stores policy definitions.
- Policy Decision Point (PDP)
Entity that evaluates access rights and then issues authorization decisions.
- Policy Enforcement Point (PEP)
Entity that intercepts a request for a resource and then enforces policy decisions from a PDP.
- Policy Information Point (PIP)
Entity that provides extra information, such as user profile attributes that a PDP needs in order to make a decision.
- Principal
Represents an entity that has been authenticated (such as a user, a device, or an application), and thus is distinguished from other entities.
When a Subject successfully authenticates, AM associates the Subject with the Principal.
- Privilege
In the context of delegated administration, a set of administrative tasks that can be performed by specified identities in a given realm.
- Provider federation
Agreement among providers to participate in a circle of trust.
- Realm
AM unit for organizing configuration and identity information.
Realms can be used for example when different parts of an organization have different applications and user data stores, and when different organizations use the same AM deployment.
Administrators can delegate realm administration. The administrator assigns administrative privileges to users, allowing them to perform administrative tasks within the realm.
- Resource
Something a user can access over the network such as a web page.
Defined as part of policies, these can include wildcards in order to match multiple actual resources.
- Resource owner
In OAuth 2.0, entity who can authorize access to protected web resources, such as an end user.
- Resource server
In OAuth 2.0, server hosting protected web resources, capable of handling access tokens to respond to requests for such resources.
- Response attributes
Defined as part of policies, these allow AM to return additional information in the form of "attributes" with the response to a policy decision.
- Role based access control (RBAC)
Access control that is based on whether a user has been granted a set of permissions (a role).
- Security Assertion Markup Language (SAML)
Standard, XML-based language for exchanging authentication and authorization data between identity providers and service providers.
- Service provider (SP)
Entity that consumes assertions about a principal (and provides a service that the principal is trying to access).
- Authentication Session
The interval while the user or entity is authenticating to AM.
- Session
The interval that starts after the user has authenticated and ends when the user logs out, or when their session is terminated. For browser-based clients, AM manages user sessions across one or more applications by setting a session cookie. See also CTS-based sessions and Client-based sessions.
- Session high availability
Capability that lets any AM server in a clustered deployment access shared, persistent information about users' sessions from the CTS token store. The user does not need to log in again unless the entire deployment goes down.
- Session token
Unique identifier issued by AM after successful authentication. For a CTS-based sessions, the session token is used to track a principal's session.
- Single log out (SLO)
Capability allowing a principal to end a session once, thereby ending her session across multiple applications.
- Single sign-on (SSO)
Capability allowing a principal to authenticate once and gain access to multiple applications without authenticating again.
- Site
Group of AM servers configured the same way, accessed through a load balancer layer. The load balancer handles failover to provide service-level availability.
The load balancer can also be used to protect AM services.
- Standard metadata
Standard federation configuration information that you can share with other access management software.
- Stateless Service
Stateless services do not store any data locally to the service. When the service requires data to perform any action, it requests it from a data store. For example, a stateless authentication service stores session state for logged-in users in a database. This way, any server in the deployment can recover the session from the database and service requests for any user.
All AM services are stateless unless otherwise specified. See also Client-based sessions and CTS-based sessions.
- Subject
Entity that requests access to a resource
When an identity successfully authenticates, AM associates the identity with the Principal that distinguishes it from other identities. An identity can be associated with multiple principals.
- User data store
Data storage service holding principals' profiles; underlying storage can be an LDAP directory service or a custom
IdRepoimplementation.- Web Agent
Native library installed in a web server that acts as a policy enforcement point with policies based on web page URLs.
2.3.1.26. Social Authentication Modules
The social authentication modules let AM authenticate clients of OAuth 2.0 or OpenID Connect 1.0 resource servers. References in this section are to RFC 6749, The OAuth 2.0 Authorization Framework.
AM provides pre-configured authentication modules for the following social identity providers:
Instagram
VKontakte
WeChat
AM provides two authentication modules for the WeChat social identity provider. The Social Auth WeChat authentication module implements a login flow that requires the user to scan an on-screen QR code with the WeChat app. The Social Auth WeChat Mobile authentication module implements an alternative login flow for users authenticating on their mobile device, who would not be able to scan a QR code displayed on the mobile device's screen.
AM provides two generic authentication modules, one for OAuth 2.0, and another for OpenID Connect 1.0, for authenticating users of standards-compliant social identity providers, for example Facebook and Google.
Tip
A wizard for configuring common social authentication providers, such as Facebook, Google, and VKontakte, is available by navigating to Realms > Realm Name > Dashboard > Configure Social Authentication. For more information, see "Configuring Pre-Populated Social Authentication Providers".
If the social authentication module is configured to create an account when none exists, then you must provide valid SMTP settings in the Email tab. The social identity provider must also provide the user's email address. As part of account creation, the social authentication module sends the resource owner an email with an account activation code. To send email, AM uses the SMTP settings from the Email tab of the configuration of the social authentication module.
For detailed information about the social authentication module's configuration properties, see the following sections:
"Social Authentication Module Properties - OAuth 2.0"
"Social Authentication Module Properties - OpenID Connect 1.0"
"Social Authentication Module Properties - Instagram"
"Social Authentication Module Properties - VKontakte"
"Social Authentication Module Properties - WeChat"
"Social Authentication Module Properties - WeChat Mobile"