Guide to working with SAML v2.0. ForgeRock® Access Management provides authentication, authorization, entitlement and federation software.
This guide covers concepts, configuration, and usage procedures for working with the Security Assertion Markup Language (SAML) v2.0 features provided by ForgeRock Access Management.
This guide is written for anyone using Access Management for SAML v2.0 identity and service providers, and for anyone using the Fedlet as a SAML v2.0 service provider.
ForgeRock Identity Platform™ serves as the basis for our simple and comprehensive Identity and Access Management solution. We help our customers deepen their relationships with their customers, and improve the productivity and connectivity of their employees and partners. For more information about ForgeRock and about the platform, see https://www.forgerock.com.
Security Assertion Markup Language (SAML) v2.0 is a standard that enables users to access multiple services using only a single set of credentials. The services may be provided by different organizations, using multiple domains. In summary, SAML v2.0 provides cross-domain single sign-on (CDSSO).
SAML v2.0 helps organizations share, or federate identities and services, without having to manage the identities or credentials themselves. The credentials are managed by a single entity, known as the identity provider. The services are provided by service providers. Both providers are configured to trust one another.

Some of the SAML v2.0 terminology is described below:
| Term | Description |
|---|---|
|
End User |
The person who is attempting to access the resource or application. In SAML v2.0, the end user is often referred to as the subject. The end user uses a user-agent, usually a web-browser, when performing SAML single sign-on. |
|
Assertions |
An assertion is a set of statements about an authenticated user that let services make authorization decisions, that is; whether to allow that user to access the service, and what functionality they can use. SAML assertions are XML-formatted tokens. Assertions issues by AM may contain the following pieces of information about an end user:
|
|
Identity Provider (IDP) |
The identity provider is responsible for authenticating end users, managing their account, and issuing SAML assertions about them. |
|
Service Provider (SP) |
The provider of the service or application that the end user is trying to access. The service provider has a trust relationship with the identity provider, which enables the SP to rely on the assertions it receives from the IDP. |
|
Circle of Trust (CoT) |
A circle of trust is an AM concept that groups at least one identity provider and at least one service provider who agree to share authentication information. |
|
Metadata |
Providers in SAML v2.0 share metadata, which represents the configuration of the provider, as well as the mechanisms it can use to communicate with other providers. For example, the metadata may contain neccessary certificates for signing verification, as well as which of the SAML v2.0 bindings are supported. Sharing metadata greatly simplifies the creation of SAML v2.0 providers in a circle of trust. AM can import the XML-formatted metadata provided by other providers, which are referred to as remote providers. You can also export the metadata from providers created in an AM instance, referred to as hosted providers. For more information about metadata, see Metadata for the OASIS Security Assertion Markup Language (SAML) V2.0 in the SAML V2.0 Standard. |
When configuring AM to provide single sign-on using SAML v2.0, you can map accounts at the identity provider to accounts at the service provider, including mapping to an anonymous user.
The identity provider can then make assertions to the service provider, for example, to attest that the end user has authenticated with the identity provider.
The service provider then consumes assertions from the identity provider to make authorization decisions, for example to let an authenticated user complete a purchase that gets charged to the user's account at the identity provider.
The following sequence diagram demonstrates a typical SAML v2.0 flow:

The steps in the diagram are described below:
An unauthenticated user attempts to access a SAML v2.0 service provider.
The service provider determines the identity provider associated with the end user, and redirects the user's browser to the IDP, using an HTTP 302 Redirect message. A SAML v2.0 authentication request is included in the query string.
This is an example of HTTP-Redirect binding, and is the default when requesting SAML authentication by AM. AM also supports the HTTP-POST binding for processing SAML v2.0 authentication requests.
AM provides two deployment models to support single sign-on (SSO) when contacting the SP initially. For details, see "Implementing Single Sign-On and Single Logout".
The identity provider validates the request, determines the authentication method that should be used, and authenticates the user.
The SP may include certain requirements for the authentication it requires the user to perform in the authentication request, for example a requirement to use multiple factors.
The IDP creates a SAML Artifact, which contains a unique artifact ID for the SAML v2.0 response.
The IDP redirects the end user's browser to the SP, and includes the SAML Artifact in the query parameters. Note that the browser only has access to the artifact ID rather than the SAML response itself, reducing risk of malicious interference.
The SP communicates directly with the IDP, using the SOAP protocol, to retrieve the SAML response relating to the artifact ID.
The IDP returns the SAML response, including the assertion, using the SOAP protocol, directly to the SP.
The information in the SAML response is not shared with the user agent. This is an example of HTTP-Artifact binding, and is the default when AM is returning SAML assertions. AM also supports the HTTP-POST binding for transmitting SAML v2.0 assertions.
The SP validates the SAML response, and that the signature matches the public key it holds for the IDP.
Optionally, the SP can choose to create a new account locally for the user, or associate an identifier in the assertion with a user account it already has locally. Linked accounts are often referred to as a federated identity. See "Federating Identities".
Note
In order to link to an existing account, the SP may require the end user to also authenticate to the SP to determine the matching local account. Once linked, the user will only need to authenticate at the IDP when attempting access.
The SP can now use the information provided in the assertion, and any details in the local federated identity, to authorize the user, and decide whether to provide its services to the end user.
SAML v2.0 requires interoperability, and depends on standards for describing how the providers interact and exchange information. The SAML v2.0 standards describe the messages sent between providers, how they are relayed, how they are exchanged, and common use cases.
For more information, see Security Assertion Markup Language (SAML) v2.0.
In federation deployments where not all providers support SAML v2.0, AM can act as a multi-protocol hub; translating for providers who rely on other and older standards, such as WS-Federation (for integration with Active Directory Federation Services, for example).
When your organization acts as the identity provider and you want to enable service providers to federate their services with yours, you can generate configuration files for a fedlet.
An AM fedlet is a small Java web application that can act as a service provider for a specific identity provider without requiring that you install all of AM. For more information on fedlets, see "Implementing SAML v2.0 Service Providers by Using Fedlets".
A common use case for SAML v2.0 is to allow your internal staff to access and use the applications provided by Google G suite, such as Google Docs and Google Sheets. This section highlights how AM provides the solution.
In this scenario, Google acts as the service provider, and AM acts as the identity provider for a hypothetical organization; Example.com.
The high-level steps required to allow staff to access G Suite applications using SAML v2.0 federation in AM are as follows:
In AM, an administrative user configures an AM instance as the IDP.
The administrative user then runs the Configure Google Apps wizard, which configures Google G Suite as the SP, and provides the values that Google requires to use AM as its IDP. For example, the log in and log out URL, profile management URLs, and validation certificate.
The G Suite administrator enters the provided URLs and certificate into the G Suite Admin console for the domain being configured.
After configuration is complete, users attempting to access a G Suite service will be asked for their corporate email address:
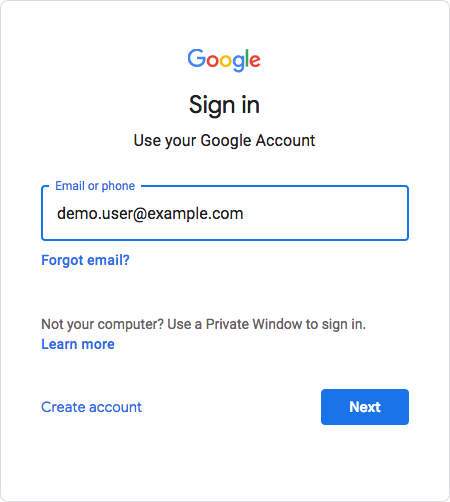
Based on the domain of the email address, Google redirects the user to sign in to AM, acting as the IDP:

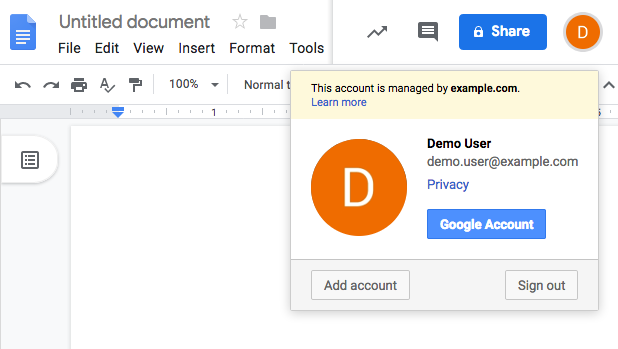
After successfully authenticating with AM the user is redirected back to the G Suite application, for example Google Docs.
Google, acting as the SP, creates a federated identity in its systems to manage local account options, such as privacy settings. The user can now access any of the G Suite apps, by authenticating to the IDP using their corporate Example.com account:


For details of how to configure AM as the IDP for Google G Suite, see "Configuring Google G Suite as a Remote Service Provider".
This chapter covers configuring AM for SAML v2.0 federation, including identity providers, service providers, and circles of trust.
AM provides wizards that let you configure SAML v2.0 identity providers, service providers, and circles of trust, which define the relationships among providers. You can also configure providers and circles of trust using the AM console and the ssoadm command.
Before you set up SAML v2.0 in AM, you should:
Know which providers will participate in circles of trust.
Know how AM installations act as identity providers or service providers.
Define how to map shared user attributes in identity information exchanged with other participants in a circle of trust. Local user profile attribute names should map to user profile attribute names at other providers.
For example, if you exchange user identifiers with your partners, and you call it
uid, whereas another partner calls ituserid, then you map youruidto your partner'suserid.Import the keys used to sign assertions into the keystore in your AM configuration directory. You can use the Java keytool command.
For more information about AM keystores, including location and different types of keystores available and how to change the default keys, see "Configuring Key Aliases and Keystores" in the Setup and Maintenance Guide.
Determine whether your session state configuration limits your usage of certain SAML v2.0 profiles. For more information, see "AM Deployment Requirements for SAML v2.0".
Agree with other providers on a synchronized time service.
The SAML v2.0 features that you can use will depend on how you choose to deploy your AM instances, and whether you use CTS-based or client-based sessions. For example, all SAML v2.0 features are supported when using CTS-based sessions.
However, when setting up SAML v2.0 on realms configured for client-based sessions; or you are deploying AM in containers behind an ingress controller, you must consider the following points:
AM instances cache information about SAML v2.0 progress in memory. After the initial request, you must send each subsequent request in a SAML v2.0 flow to the same instance; for example, by enabling sticky load-balancing.
For more information, see "Configuring Load Balancing for a Site" in the Installation Guide.
You can request that AM writes SAML v2.0 cache information to the CTS store to reduce the chances that a flow halts when directed to a different server, by enabling SAML v2.0 Failover.
For more information, see "Configuring SAML v2.0 Providers for Failover".
Use the HTTP-POST or HTTP-Artifact bindings for SAML v2.0 single sign-on (SSO). The HTTP-Redirect binding is not supported when AM is configured in a site or in a container.
Use the HTTP-POST or HTTP-Redirect bindings for SAML v2.0 single logout (SLO). The SOAP binding is not supported when AM is configured in a site or in a container.
Browsers allow cookie sizes between 4,000 and 5,200 bytes, depending on the browser. If you are using client-based sessions, some SAML v2.0 features may cause the cookie to surpass the browser's supported cookie size; such as:
In standalone mode, when performing single sign-on the IDP adds the full login URL (
FullLoginURLproperty) to the session cookie, which may include the entire base64-encoded SAML v2.0 assertion.In integrated mode, AM adds to the session those SAML v2.0 attributes mapped to AM attributes.
If a client-based session cookie exceeds the supported size in any of these cases, you can configure a custom post-authentication plugin that removes unwanted properties or attributes, at the realm level. Note that removing properties or attributes in a custom SAML v2.0 service provider adapter is not supported.
For more information, see "Creating Post-Authentication Plugins for Chains" in the Authentication and Single Sign-On Guide.
This section covers configuration tasks you perform before you can implement SAML v2.0 in AM.
During setup, you share metadata for providers that you host with other providers in the circle of trust. You must also configure remote providers, connecting to other providers by importing their metadata.
In AM terms, a hosted provider is one served by the current AM server; a remote provider is one hosted elsewhere.
This section provides procedures for performing the following tasks:
| Task | See Section(s) |
|---|---|
|
(Required) Creating identity and service providers. |
"Creating a Hosted Identity Provider" "Creating a Hosted Service Provider" |
|
(Optional) Modifying identity provider, service provider, and circle of trust configurations. You might need to modify these configurations after you have created them using the wizards. | |
|
(Optional) Deploying an identity provider discovery service. When your circle of trust includes multiple identity providers, then service providers must discover which identity provider corresponds to a request. You can deploy the identity provider discovery service for this purpose as a separate web application. | "Deploying the Identity Provider Discovery Service" |
| (Optional) Configuring providers for failover. | "Configuring SAML v2.0 Providers for Failover" |
| (Optional) Configuring Google Apps and Salesforce CRM as service providers. | |
|
(Optional) Creating a Fedlet for an AM service provider. A Fedlet is an example web application that acts as a lightweight SAML v2.0 service provider. | "Implementing SAML v2.0 Service Providers by Using Fedlets" |
The following procedure provides steps for creating a hosted identity provider by using the Create Hosted Identity Provider wizard:
Under Realms > Realm Name > Dashboard > Configure SAMLv2 Providers, select Create Hosted Identity Provider.
Unless you already have metadata for the provider, accept the Name for this identity provider in the field provided, or provide your own unique identifier.
The default name is the URL to the current server which hosts the identity provider, and the default MetaAlias is
idp.Note
Ensure the MetaAlias is unique for each provider in a CoT and in the realm. If you need to create an identity provider with a different MetaAlias, navigate to Realms > Realm Name > Applications > Federation > Entity Providers, and select New in the Entity Providers table.
Select the Signing Key alias you imported into the AM keystore as part of your preparation for SAML v2.0 configuration.
Either add the provider to the circle of trust you already created, or select the Add to new option and provide a New Circle of Trust name.
For the attributes you share, map service provider attribute names (Name in Assertion), to user profile names from your identity repository (Local Attribute Name).
Use this approach to set up a mapping with all SPs in the circle of trust that do not have their own specific mappings configured.
The default mapping implementation has additional features beyond simply retrieving string attributes from the user profile.
Add an attribute that takes a static value by enclosing the profile attribute name in double quotes (
").For example, you can add a static SAML attribute called
partnerIDwith a value ofstaticPartnerIDValueby addingpartnerIDas the Name in Assertion with"staticPartnerIDValue"as the Local Attribute Name.Base64 encode binary attributes when adding them to the SAML attributes by adding
;binaryto the end of the attribute name, as in the following example:objectGUID=objectGUID;binary
This maps the local binary attribute
objectGUIDto a SAML attribute calledobjectGUIDthat is Base64 encoded.Use
NameFormatURIformat as shown in the following example:urn:oasis:names:tc:SAML:2.0:attrname-format:uri|objectGUID=objectGUID;binary
Select Configure to save your configuration.
Export the XML-based metadata from your provider to share with other providers in your circle of trust.
$ curl \
--output metadata.xml \
"http://www.idp.example:8080/openam/saml2/jsp/exportmetadata.jsp?entityid=\
http://www.idp.example:8080/openam&realm=/mysubrealm"
When you have configured your provider in the Top Level Realm, you can omit the query string from the URL.
Alternatively, provide the URL to other providers so they can load the metadata.
The following procedure provides steps for creating a hosted service provider by using the Create Hosted Service Provider wizard:
Under Realms > Realm Name > Dashboard > Configure SAMLv2 Providers, select Create Hosted Service Provider.
Unless you already have metadata for the provider, accept the Name for this service provider in the field provided, or provide your own unique identifier.
The default name is the URL to the current server which hosts the service provider, and the default MetaAlias is
sp.Note
Ensure the MetaAlias is unique for each provider in a CoT and in the realm. If you need to create a service provider with a different MetaAlias, navigate to Realms > Realm Name > Applications > Federation > Entity Providers, and select New in the Entity Providers table.
Either add the provider to the circle of trust you already created, or select the Add to new option and provide a New Circle of Trust name.
(Optional) If this SP requires more a different attribute mapping configuration than the default IDP attribute mapping, set the mapping in the Attribute Mapping section. Map identity provider attribute names in the Name in Assertion column to user profile names from your identity repository in the Local Attribute Name column.
Select Configure to save your configuration.
Export the XML-based metadata from your provider to share with other providers in your circle of trust:
$ curl \
--output metadata.xml \
"http://www.sp.example:8080/openam/saml2/jsp/exportmetadata.jsp?entityid=\
http://www.sp.example:8080/openam&realm=/mysubrealm"
When you have configured your provider in the Top Level Realm, you can omit the query string from the URL.
Alternatively, provide the URL to other providers so they can load the metadata.
The following procedure provides steps for configuring a remote identity provider by using the Register Remote Identity Provider wizard:
Obtain the identity provider metadata or the URL where you can obtain it.
Under Realms > Realm Name > Dashboard > Configure SAMLv2 Providers, select Configure Remote Identity Provider.
Provide the identity provider metadata or link to obtain metadata.
The remote identity provider's metadata might contain more than one
KeyDescriptorelements. If it does, the hosted AM service provider will validate assertions from the identity provider against certificates with key descriptors with an appropriateuseattribute. Incoming assertions that cannot be validated against any of the certificates will be rejected by the hosted service provider.Note
Ensure the MetaAlias is unique for each provider configured in a CoT and in the realm.
Either add the provider to the circle of trust you already created, or select Add to new and provide a New Circle of Trust name.
Select Configure to save your configuration.
The following procedure provides steps for configuring a remote service provider by using the Register Remote Service Provider wizard:
Obtain the service provider metadata, or the URL where you can obtain it.
Under Realms > Realm Name > Dashboard > Configure SAMLv2 Providers, select Configure Remote Service Provider.
Provide the service provider metadata or link to obtain metadata.
The remote service provider's metadata might contain more than one
KeyDescriptorelement. In this case, the hosted identity provider should consider any incoming SAML requests from the service provider to be valid as long as it can be validated with any of the certificates.Note
Ensure the MetaAlias is unique for each provider configured in a CoT and in the realm.
(Optional) If the identity provider has not already mapped the attributes you share, map identity provider attribute names (Name in Assertion) to user profile names from your identity repository (Local Attribute Name).
Use this approach to set up a mapping that is specific to this SP. Note that a remote SP-specific attribute mapping overrides the attribute mapping configuration specified in the hosted IDP configuration.
The default mapping implementation has additional features beyond simply retrieving string attributes from the user profile.
Add an attribute that takes a static value by enclosing the profile attribute name in double quotes (
").For example, you can add a static SAML attribute called
partnerIDwith a value ofstaticPartnerIDValueby addingpartnerIDas the Name in Assertion with"staticPartnerIDValue"as the Local Attribute Name.Base64 encode binary attributes when adding them to the SAML attributes by adding
;binaryto the end of the attribute name, as in the following example:objectGUID=objectGUID;binary
This maps the local binary attribute
objectGUIDto a SAML attribute calledobjectGUIDthat is Base64 encoded.Use
NameFormatURIformat as shown in the following example:urn:oasis:names:tc:SAML:2.0:attrname-format:uri|objectGUID=objectGUID;binary
Either add the provider to the circle of trust you already created, or select Add to new and provide a New Circle of Trust name.
Select Configure to save your configuration.
AM can serve as the identity provider when you use Google G Suite as a service provider, allowing users to have single sign-on to Google G Suite Apps using their AM-managed credentials.
In order to use this service, you must have a Google G Suite account for
at least one of your domains, such as example.com.
If you have not yet done so, set up AM as described in "To Create a Hosted Identity Provider". As part of the IDP configuration, you specify a signing key alias. In a subsequent step, you will provision Google G Suite with this certificate's public key.
For details about changing the signing certificate, see "Changing Default Key Aliases" in the Setup and Maintenance Guide.
Under Realms > Realm Name > Dashboard, select Configure Google Apps.
On the first Configure Google Apps for Single Sign-On page, add your domain name(s), such as
example.comto the list, and then select Create.On the second Configure Google Apps for Single Sign-On page, save the AM verification certificate to a text file, such as
AM.pem.Follow the instructions under To Enable Access to the Google Apps API before selecting Finish.
Access the Google G Suite administration page for the first of your domains in a new browser tab or window.
Log in as a Google G Suite administrator.
Select Enable Single Sign-On.
Copy the URLs from the AM page into the Google G Suite setup screen.
Upload the certificate file you saved, such as
AM.pemas the Google G Suite Verification Certificate.Select Use a domain specific issuer.
Save changes in Google G Suite setup.
Repeat the steps above for each domain you have configured.
Select Finish to complete the process.
For more information about setting up Google G Suite as an SP, see Set up single sign-on for managed Google Accounts using third-party Identity providers in the G Suite Admin Help.
AM can serve as the identity provider when you use Salesforce CRM as a service provider, allowing users to have single sign-on with their Salesforce CRM account.
In order to use this service, you must have Salesforce CRM accounts for your organization or enable Salesforce just-in-time provisioning, which uses content from the SAML assertion created by AM to create regular and portal users in Salesforce the first time they attempt to log in. To enable Salesforce just-in-time provisioning, see "To Enable Salesforce CRM Just-in-Time Provisioning".
If you have not yet done so, set up AM as described in "To Create a Hosted Identity Provider", using a signing certificate that is needed by Salesforce CRM.
For details about changing the signing certificate, see "Changing Default Key Aliases" in the Setup and Maintenance Guide.
If you do not have an account with administrator credentials on Salesforce CRM, create one. See the Salesforce documentation for information about how to create an account with administrator credentials.
In a new browser tab or window, log in to Salesforce CRM with your administrator credentials.
If your users go directly to Salesforce to access services, then their single sign-on is SP-initiated from the Salesforce side. Salesforce provides a My Domain feature to facilitate SP-initiated single sign-on for desktop and device users.
Configure SP-initiated single sign-on in Salesforce as follows:
Select Setup Home > Settings > Company Settings > My Domain.
Select the domain name, and then register the domain.
Wait until the domain is ready for testing to proceed.
After the domain has been created, log out of Salesforce.
Log back in to Salesforce using the domain alias.
Select Setup Home > Settings > Company Settings > My Domain.
Select Deploy to Users.
In the AM console, under Realms > Realm Name > Dashboard, select Configure Salesforce CRM.
Select Configure Salesforce CRM a second time to start the Configure Salesforce CRM wizard.
The Configure Salesforce CRM for Single Sign-On page appears.
Specify values in the Configure Salesforce CRM for Single Sign-On page as follows:
Specify the Salesforce service provider entity in the "Salesforce Service Provider entityID" field. For example,
https://openam.my.salesforce.com.The entity ID is used as the persistent
EntityDescriptormetadata element so that users can have multiple service provider instances. It also appears in the Entity Providers list in the Circle of Trust Configuration.Configure an attribute mapping to associate a Salesforce CRM attribute with the corresponding AM user profile attribute. For example, you might map the Salesforce CRM
IDPEmailattribute to the AMmailattribute.The Configure Salesforce CRM wizard requires you to enter at least one attribute mapping.
Select Add to insert the
IDPEmailtomailmapping to the Remote to Local Attribute Mapping Table.If desired, configure additional attribute mappings.
Select Create.
The following message appears:
Metadata now configured successfully.
Select OK to retrieve the parameters for configuring the Service Provider.
Select OK.
A second Salesforce CRM Single Sign-On Configuration page appears.
Follow the instructions on the second Salesforce CRM Single Sign-On Configuration page:
Specify single sign-on settings for Salesforce as follows:
In Salesforce CRM, navigate to Setup Home > Settings > Identity > Single Sign-On Settings.
Select Edit.
Select the SAML Enabled option.
Create a new SAML single sign-on configuration as follows:
For Issuer, copy the issuer name from the Salesforce CRM Single Sign-On Configuration page in the AM Configure Salesforce CRM wizard.
Set the Name and API Name fields to values of your choosing.
Copy or download the AM verification certificate from the Salesforce CRM Single Sign-On Configuration page in the AM Configure Salesforce CRM wizard. Save the verification certificate to a plain text file.
For Identity Provider Certificate, use the Browse button to locate and upload the file containing the AM verification certificate.
For SAML Identity Type, select the "Assertion contains the Federation ID from the User object" option.
For SAML Identity Location, select the "Identity is in an Attribute" option.
Specify the Identity Provider Login URL as the URL for the AM IDP. For example,
https://openam.example.com:8443/openam/SSOPOST/metaalias/idp.If you require a specific logout page, enter it in the Identity Provider Logout URL field.
If you have a page to which you would like users redirected when encountering errors, enter the URL of your error page in the Custom Error URL field.
Copy the attribute name, such as
IDPEmail, from the Salesforce CRM Single Sign-On Configuration page in the AM Configure Salesforce CRM wizard to the Attribute Name field.Select the Entity ID corresponding to the "My Domain" that you set up.
Select Save.
The Salesforce Login URL appears.
Perform the final steps required by the AM Configure Salesforce CRM wizard:
Copy and paste the Salesforce Login URL to the Salesforce CRM Single Sign-On Configuration page in the AM Configure Salesforce CRM wizard.
Select Finish to conclude operation of the AM Configure Salesforce CRM wizard.
Return to the Single Sign-On Settings page in Salesforce.
Select Download Metadata to download the Salesforce CRM SP metadata. You will import the metadata into AM in a subsequent step.
Configure attribute mapping and name ID format for the AM identity provider:
In the AM console, navigate to Realms > Realm Name > Applications > SAML > Entity Providers > Identity Provider Name > Assertion Processing.
Review the values in the Attribute Map field, which should be the same values that you configured when you ran the Configure Salesforce CRM wizard. In this example, the values should be
IDPEmail=mail.If required, modify the values in the Attribute Map field, and then select Save.
In the AM console, navigate to Realms > Realm Name > Applications > SAML > Entity Providers > Identity Provider Name > Assertion Content > NameID Format.
Salesforce requires SAML assertions that specify an
unspecifiedname ID format. In this step, configure the AM-hosted IDP to support this requirement.If a value for an
unspecifiedname ID format is already present in the NameID Value Map List, remove it from the list.Add the value
urn:oasis:names:tc:SAML:1.1:nameid-format:unspecified=attributeto the NameID Value Map List. Forattribute, specify the attribute that you copied in Step 9.b.x. For example,urn:oasis:names:tc:SAML:1.1:nameid-format:unspecified=mail.Select Save.
Add users to Salesforce CRM:
In Salesforce CRM, navigate to Setup Home > Administration > Users > Users.
Select Users.
Add users as necessary, making sure the attribute chosen as the Federation ID matches the local attribute you mapped to the remote attribute in AM.
Select Finish.
Configure AM as the authentication provider for your Salesforce domain:
In Salesforce CRM, navigate to Setup Home > Settings > Company Settings > My Domain.
Select Edit in the Authentication Configuration section.
The Authentication Configuration page appears, listing the available identity providers.
Select the new Authentication Service.
Select Save.
Reconfigure the remote service provider definition for Salesforce in AM by deleting the service provider definition created by the Configure Salesforce CRM wizard and then importing service provider metadata that you previously exported from Salesforce CRM:
In the AM console, navigate to Realms > Realm Name > Applications > SAML > Entity Providers.
Select the checkbox next to the entity provider definition for the Salesforce CRM service provider, which should be listed as an SP provider with a Remote location.
Select Delete to remove the entity provider configuration.
Select Import Entity.
The Import Entity Provider page appears.
Specify options on the Import Entity Provider page as follows:
Update the Realm Name if desired.
Select File as the location of the metadata file.
Use the Upload button to navigate to the location of the metadata file that you obtained from Salesforce in a previous step.
Add the new remote service provider definition for Salesforce CRM to the federation circle of trust in AM:
In the AM console, navigate to Realms > Realm Name > Applications > Federation > Circle of Trust > Circle of Trust Name.
Move the Salesforce CRM remote service provider from the Available column to the Selected column.
Select Save.
Configuring Salesforce CRM as a remote service provider is now complete. Users navigating to the Salesforce domain should be redirected to AM for authentication. Upon successful authentication, they should be logged in to Salesforce.
With just-in-time provisioning enabled, Salesforce CRM automatically creates regular and portal users when new users access Salesforce by authenticating to AM.
Add mappings to the AM identity provider configuration required by Salesforce just-in-time provisioning:
In the AM console, navigate to Realms > Realm Name > Applications > Federation > Entity Providers > Identity Provider Name > Assertion Processing.
Add the following entries to the Attribute Map property:
User.Email=mailUser.ProfileID="Standard User"User.LastName=snUser.Username=mail
Select Save.
Enable user provisioning in Salesforce CRM:
Log in to your Salesforce domain.
In Salesforce CRM, navigate to Setup Home > Settings > Identity > Single Sign-On Settings.
Select Edit.
Set options in the Just-in-time User Provisioning section as follows:
Select the User Provisioning Enabled check box.
For User Provisioning Type, select Standard.
Select Save.
Configuring just-in-time provisioning in Salesforce CRM is now complete. When new users access Salesforce by authenticating to AM, Salesforce automatically creates regular and portal users.
After you have set up federation components, you can configure them through the Federation menu in the AM console as follows:
To configure hosted identity providers, navigate to Realms > Realm Name > Applications > SAML > Entity Providers > Provider Name. For information about configurable hosted identity provider properties, see "Hosted Identity Provider Configuration Properties".
To configure hosted service providers, navigate to Realms > Realm Name > Applications > Federation > Entity Providers > Provider Name. For information about configurable hosted service provider properties, see "Hosted Service Provider Configuration Properties".
To configure circles of trust, navigate to Realms > Realm Name > Applications > Federation > Circle of Trust > Circle of Trust Name. For information about circle of trust properties, see "Circle of Trust Configuration Properties".
When your circle of trust includes multiple identity providers, then service providers must discover which identity provider corresponds to a request. You can deploy the identity provider discovery service for this purpose as a separate web application.
Browsers only send cookies for the originating domain. Therefore,
when a browser accesses the service provider in the www.sp.example
domain, the service provider has no way of knowing whether the user has
perhaps already authenticated at www.this-idp.example or at
www.that-idp.example. The providers therefore host an identity
provider discovery service in a common domain, such as
www.disco.example, and use that service to discover where
the user logged in. The identity provider discovery service essentially
writes and reads cookies from the common domain. The providers configure
their circle of trust to use the identity provider discovery service
as part of SAML v2.0 federation.
Deploying the identity provider discovery service involves the following stages:
Deploy the
.warinto your web application container.Configure the discovery service.
Add the identity provider discovery service endpoints for writing cookies to and reading cookies from the common domain to the circle of trust configurations for the providers.
Share metadata between identity providers and the service provider.
How you deploy the discovery service .war file depends
on your web application container. The procedure in this section shows how
to deploy on Apache Tomcat.
Copy the
IDPDiscovery-6.0.0.7.warfile to thewebapps/directory.$ cp ~/Downloads/openam/IDPDiscovery-6.0.0.7.war \ /path/to/tomcat/webapps/disco.war
Access the configuration screen through your browser.
In this example, Apache Tomcat listens for HTTP requests on
www.disco.example:8080, and Tomcat has unpacked the application under/disco, so the URL ishttp://www.disco.example:8080/disco, which redirects toConfigurator.jsp.
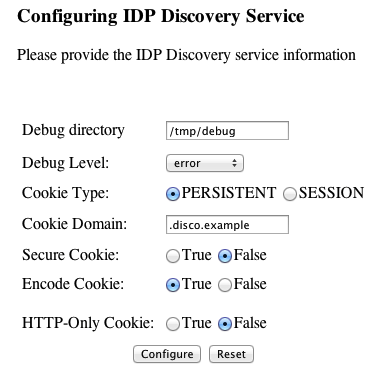
Configure the identity provider discovery service.
Hints for discovery service configuration parameters follow.
- Debug Directory
The discovery service logs to flat files in this directory.
- Debug Level
Default is
error. Other options includeerror,warning,message, andoff.Set this to
messagein order to see the service working when you run your initial tests.- Cookie Type
Set to PERSISTENT if you have configured AM to use persistent cookies, meaning single sign-on cookies that can continue to be valid after the browser is closed.
- Cookie Domain
The cookie domain is the common cookie domain used in your circle of trust for identity provider discovery, in this case
.disco.example.- Secure Cookie
Set this to true if clients should only return cookies when a secure connection is used.
- Encode Cookie
Leave this true unless your AM installation requires that you do not encode cookies. Normally, cookies are encoded such that cookies remain valid in HTTP.
- HTTP-Only Cookie
Set to true to use HTTPOnly cookies if needed to help prevent third-party programs and scripts from accessing the cookies.
Restrict permissions to the discovery service configuration file in
$HOME/libIDPDiscoveryConfig.properties, where $HOME corresponds to the user who runs the web container where you deployed the service.
Each provider has a circle of trust including itself. You configure each of these circles of trust to use the identity provider discovery service as described in the following steps:
On the service provider console, login as AM Administrator.
On the service provider console, under Realms > Realm Name > Applications > Federation > Circle of Trust > Circle of Trust Name, add SAML2 Writer and Reader Service URLs for the identity provider discovery service endpoints, and save your work.
In this example, the writer URL is
http://www.disco.example:8080/disco/saml2writer, and the reader URL ishttp://www.disco.example:8080/disco/saml2reader.On each identity provider console, login as AM Administrator.
On the identity provider console, under Realms > Realm Name > Applications > Federation > Entity Providers > Circle of Trust > Circle of Trust Name, also add SAML2 Writer and Reader Service URLs for the identity provider discovery service endpoints, and save your work.
AM servers can function in a site configuration behind a load balancer. Each server in the site is able to fulfil requests that originated at a different server in the site, either by using the Core Token Service (CTS) shared store, or utilizing client-based data.
A SAML v2.0 deployment in an AM site can also make use of the failover features, by using the CTS and client-based data to ensure any instance in the site can process and continue SAML v2.0 flows.
To setup AM for SAML v2.0 failover, perform the steps below:
Ensure that your AM deployment is configured in a site configuration. See "Installing Multiple Servers" in the Installation Guide.
You must be able to access the AM site by using the URL assigned to the load balancer; for example,
lb.example.com.Using the URL assigned to the load balancer, log in to the console of the AM site as an administrative user, for example
amAdmin.Create the new hosted IDP or SP provider. See "Configuring Identity Providers, Service Providers, and Circles of Trust".
AM will create the provider by using the base URL that you use to access the administration console. Other providers in the circle of trust use these values and are able to direct requests to the site correctly.
Navigate to Configure > Global Services > SAML v2.0 Service Configuration > Global Attributes, and then select the Enable SAML v2.0 failover option and save your changes.
AM will write SAML v2.0 cache information to CTS to minimize the risk that a different server instance in the site could not complete the SAML v2.0 flows.
AM provides two options for implementing single sign-on (SSO) and single logout (SLO) with SAML v2.0:
- Integrated mode
Integrated mode single sign-on and single logout uses the SAML2 authentication module in an AM authentication chain on a service provider (SP), thereby integrating SAML v2.0 authentication into the AM authentication process. The authentication module handles the SAML v2.0 protocol details for you.
Note that integrated mode supports SP-initiated single sign-on only, because the authentication chain that includes the SAML2 authentication module resides on the SP. You cannot trigger IDP-initiated single sign-on in an integrated mode implementation.
Integrated mode supports both IDP-initiated and SP-initiated SLO.
- Standalone mode
Standalone mode requires that you invoke JSPs pages to initiate single sign-on and SLO. When implementing standalone mode, you do not require an AM authentication chain.
The following table provides information to help you decide whether to implement integrated mode or standalone mode for your AM SAML v2.0 deployment:
| Deployment Task or Requirement | Implementation Mode |
|---|---|
| You want to deploy SAML v2.0 single sign-on and single logout using the easiest technique. | Use integrated mode. |
| You want to integrate SAML v2.0 authentication into an authentication chain, letting you configure an added layer of login security by using additional authentication modules. | Use integrated mode. |
| You want to trigger SAML v2.0 IDP-initiated SSO. | Use standalone mode. |
| You want to use the SAML v2.0 Enhanced Client or Proxy (ECP) single sign-on profile. | Use standalone mode. |
Your IDP and SP instances are using the same domain name; for example,
mydomain.net. [a]
| Use standalone mode. |
[a] Due to the way integrated mode tracks authentication status by using a cookie, it cannot be used when both the IDP and SP share a domain name. | |
This section describes how to implement single sign-on and single logout by using the SAML2 authentication module in an AM authentication chain on the service provider. The authentication module handles the SAML v2.0 authentication flow.
The following sequence diagram outlines the flow of SAML v2.0 authentication and persistent federation in an integrated mode implementation:

The following describes the sequence of actions in the diagram:
An unauthenticated user initiates authentication to an AM SAML v2.0 service provider. The login URL references an authentication chain that includes a SAML2 authentication module. For example,
https://openam.example.com:8443/openam/XUI/?service=mySAMLChain#login/.If there are any authentication modules that precede the SAML2 module in the authentication chain, AM executes them.
SAML2 authentication module processing begins.
The authentication module requests an assertion from the identity provider. The SAML2 module's configuration determines the details of the request.
If the user is currently unauthenticated on the identity provider, the following three steps occur:
The identity provider requests credentials from the user.
The user provides their credentials.
Authentication succeeds (assuming the user provided valid credentials).
Processing continues as follows:
The identity provider responds to the service provider with a SAML assertion.
If the SAML assertion contains a non-transient name ID, AM searches the user datastore, attempting to locate a user with the same name ID.
The flow varies here.
The following event occurs if the following are true:
The name ID for the user is not found in the datastore
Dynamic profile creation is configured in the Core Authentication Service
Auto-federation is enabled on the service provider
AM adds an entry for the user to the user datastore. Even if a linking authentication chain has been configured, it is not invoked. The user is not prompted to authenticate to the service provider.
The following two events occur if the following are true:
The name ID for the user is not found in the datastore
A linking authentication chain has been configured in the SAML2 authentication module
Dynamic profile creation is not configured in the Core Authentication Service
Auto-federation is not enabled on the service provider
The SAML2 authentication module invokes the linking authentication chain, requiring the user to authenticate to the service provider.
After successfully completing the linking authentication chain, AM writes the persistent name ID obtained in the SAML assertion sent by the identity provider into the user's profile.
At this point, SAML2 authentication module processing ends. The remaining events comprise completion of the primary authentication chain:
If there are any authentication modules remaining in the chain, AM executes them.
Authentication is complete.
The following list is an overview of the activities you perform when implementing SAML v2.0 single sign-on in integrated mode:
Preparing entity providers and a circle of trust.
Changing several endpoints in the service provider configuration.
Configuring a SAML2 authentication module and including it in an authentication chain.
Deciding if and how you want to federate identities during authentication. In integrated mode, you can either create user entries dynamically, or you can configure a linking authentication chain that authenticates users at the service provider after successful authentication at the identity provider, and then federates the identity.
The following procedure provides step-by-step instructions for performing these activities.
If you have not already done so, configure SAML v2.0 by performing the tasks listed in "Configuring AM for SAML v2.0".
Log in to the AM console on the SP as a top-level administrative user, such as
amAdmin.Create a hosted service provider by following the steps in "To Create a Hosted Service Provider".
Configure a remote identity provider by following the steps in "To Configure a Remote Identity Provider". When you specify the circle of trust for the IDP, use the Add to Existing option and specify the circle of trust that you created when you created the hosted service provider.
Change the Assertion Consumer Service locations in the service provider configuration. The default locations support standalone mode. Therefore, you must change the locations when implementing integrated mode.
Change the locations as follows:
In the AM console, navigate to Realms > Realm Name > Applications > Federation > Entity Providers > Service Provider Name > Services > Assertion Consumer Service.
Change the location of the HTTP-Artifact consumer service to use
AuthConsumer, rather thanConsumer. For example, if the location ishttps://www.sp.com:8443/openam/Consumer/metaAlias/sp, change it tohttps://www.sp.com:8443/openam/AuthConsumer/metaAlias/sp.Similarly, change the location for the HTTP-POST consumer service to use
AuthConsumerrather thanConsumer.Note that you do not need to change the location for the PAOS service because integrated mode does not support the PAOS binding.
Save your changes.
If the AM server configured as the service provider runs as part of an AM site, enable SAML v2.0 failover. In the AM console, navigate to Configure > Global Services, select SAML v2 Service Configuration, select the Enable SAMLv2 failover checkbox, and then save your changes.
Create a SAML2 authentication module:
In the AM console, navigate to Realms > Realm Name > Authentication > Modules, and then select Add Module.
Specify a name for the module, specify the module type as SAML2, and then select Create.
Configure the SAML2 authentication module options. See "SAML2 Authentication Module" in the Authentication and Single Sign-On Guide for detailed information about the configuration options.
Save your changes.
Create an authentication chain that includes the SAML2 authentication module that you created in the previous step.
Test your configuration. First, clear your browser's cache and cookies. Then, attempt to log in to AM using a login URL that references the authentication chain that includes the SAML2 module. For example,
https://www.sp.com:8443/openam/XUI/#login/&service=mySAMLChain.AM will redirect you to the identity provider for authentication.
If required, you can now configure AM to link identities in the IDP with those in the SP, generate new accounts on the SP, or link to a shared account; for example
anonymous. For more information and instructions, see "Federating Identities".
Use the following two options to control single logout in integrated mode:
The post-authentication processing class for the authentication chain that includes the SAML2 authentication module. You configure post-authentication processing classes by navigating to Realms > Realm Name > Authentication > Chains > Chain Name > Settings.
The Single Logout Enabled option in the SAML2 authentication module configuration.
Configure these options as follows:
| Requirement | Configuration |
|---|---|
| Single logout occurs when a user initiates logout at the identity provider or at the service provider. |
Set the post-authentication processing class for the authentication chain that contains the SAML2
authentication module to
Set the Single Logout Enabled option to
|
| Single logout occurs only when the user initiates logout at the identity provider. |
Set the post-authentication processing class for the authentication chain that contains the SAML2
authentication module to
Set the Single Logout Enabled option to
|
| Single logout occurs only when the user initiates logout at the service provider. | Not available. |
| Single logout never occurs. |
Do not set the post-authentication processing class for the authentication chain that contains the SAML2
authentication module to
|
SSO lets users sign in once and remain authenticated as they access services in the circle of trust.
SLO attempts to log out all session participants:
For hosted IDPs, single logout attempts to log out of all SPs with which the session established SAML federation.
For hosted SPs, single logout attempts to log out of the IDP that was source of the assertion for the user's session.
Standalone mode requires that a Federation authentication module instance is present in the realm in which you define your circle of trust, identity providers, and service providers.
The module must be of type Federation, and also have the name as
Federation.
AM creates a Federation authentication module when you create a new realm, so the required module is already
available unless you explicitly deleted it. If you deleted the Federation authentication module and need to restore
it to a realm, create a new authentication module named Federation of module type
Federation. No additional configuration is needed.
Do not add the Federation authentication module to an authentication chain. The module is used for internal purposes.
With standalone mode, AM SAML v2.0 Federation provides JSP files that direct users to do single sign-on (SSO) and single logout (SLO) across providers in a circle of trust. AM has two JSPs for single sign-on and two JSPs for SLO, allowing you to initiate both processes either from the identity provider side, or from the service provider side.
The JSP pages are found under the context root where you deployed AM, in saml2/jsp/.
When you perform HTTP GET requests to these JSPs, there are several query parameters to specify. Which query parameters you can use depends on the JSP. When setting parameters in the JSPs, make sure the parameter values are correctly URL-encoded.
Note
The JSP pages only support query parameters sent by using HTTP GET requests. Do not attempt to use HTTP POST or PUT requests to the pages.
idpSSOInit.jspUsed to initiate single sign-on from the identity provider side, so call this on the identity provider not the service provider.
Also mapped to the endpoint
idpssoinitunder the context root.URLs:https://www.idp.com:8443/openam/saml2/jsp/idpSSOInit.jsphttps://www.idp.com:8443/openam/idpssoinit
Example:The following URL initiates single sign-on from the identity provider side, leaving the user at
http://forgerock.com:https://www.idp.com:8443/openam/saml2/jsp/idpSSOInit.jsp ?metaAlias=/idp &spEntityID=https%3A%2F%2Fwww.sp.com%3A8443%2Fopenam &RelayState=http%3A%2F%2Fforgerock.com
-
metaAlias (Required) Use this parameter to specify the local alias for the provider, such as,
metaAlias=/myRealm/idp.This parameter takes the format
/realm-name/provider-name, as described in MetaAlias. Do not repeat the slash for the top-level realm; for example,metaAlias=/idp.-
spEntityID (Required) Use this parameter to indicate the remote service provider.
Make sure you URL-encode the value. For example, specify
spEntityID=https://www.sp.com:8443/openamasspEntityID=https%3A%2F%2Fwww.sp.com%3A8443%2Fopenam.-
affiliationID (Optional) Use this parameter to specify a SAML affiliation identifier.
-
binding (Optional) Use this parameter to indicate which binding to use for the operation.
For example, specify
binding=HTTP-POSTto use HTTP POST binding with a self-submitting form. You can also specifybinding=HTTP-Artifact.-
NameIDFormat (Optional) Use this parameter to specify a SAML Name Identifier format identifier.
For example,
urn:oasis:names:tc:SAML:2.0:nameid-format:persistent, orurn:oasis:names:tc:SAML:2.0:nameid-format:transient.-
RelayState (Optional) Use this parameter to specify where to redirect the user when the process is complete. Make sure you URL-encode the value.
For example,
RelayState=http%3A%2F%2Fforgerock.comtakes the user tohttp://forgerock.com.-
RelayStateAlias (Optional) Use this parameter to specify the parameter to use as
RelayState.For example, if the query string
target=http%3A%2F%2Fforgerock.com&RelayStateAlias=target, is equivalent toRelayState=http%3A%2F%2Fforgerock.com.
idpSingleLogoutInit.jspUsed to initiate single logout from the IDP.
Also mapped to the endpoint
IDPSloInitunder the context root.URLs:https://www.idp.com:8443/openam/saml2/jsp/idpSingleLogoutInit.jsphttps://www.idp.com:8443/openam/IDPSloInit
Example:The following URL performs single logout from the identity provider side, using a self-submitting form rather than a redirect, and leaving the user at
https://forgerock.com:https://www.idp.com:8443/openam/saml2/jsp/idpSSOInit.jsp ?binding=urn:oasis:names:tc:SAML:2.0:bindings:HTTP-POST &RelayState=https%3A%2F%2Fforgerock.com
-
binding (Required) Use this parameter to indicate which binding to use for the operation. The full, long name format is required for this parameter to work.
The value must be one of the following:
urn:oasis:names:tc:SAML:2.0:bindings:HTTP-Redirecturn:oasis:names:tc:SAML:2.0:bindings:HTTP-POSTurn:oasis:names:tc:SAML:2.0:bindings:SOAP
-
Consent (Optional) Use this parameter to specify a URI that is a SAML Consent Identifier.
-
Destination (Optional) Use this parameter to specify a URI Reference indicating the address to which the request is sent.
-
Extension (Optional) Use this parameter to specify a list of Extensions as string objects.
-
goto (Optional) Use this parameter to specify where to redirect the user when the process is complete.
RelayStatetakes precedence over this parameter.-
logoutAll (Optional) Use this parameter to specify that the identity provider should send single logout requests to service providers without indicating a session index.
-
RelayState (Optional) Use this parameter to specify where to redirect the user when the process is complete. Make sure you URL-encode the value.
For example,
RelayState=http%3A%2F%2Fforgerock.comtakes the user tohttp://forgerock.com.
spSSOInit.jspUse this page to initiate single sign-on from the service provider side.
Also mapped to the endpoint
spssoinitunder the context root.URLs:https://www.sp.com:8443/openam/saml2/jsp/spSSOInit.jsphttps://www.sp.com:8443/openam/spssoinit
Example:The following URL takes the user from the service provider side to authenticate at the identity provider, and then comes back to the end user profile page at the service provider after successful SSO. Lines are folded to show you the query string parameters:
https://www.sp.com:8443/openam/saml2/jsp/spSSOInit.jsp
?metaAlias=/sp
&idpEntityID=https%3A%2F%2Fwww.idp.com%3A8443%2Fopenam
&RelayState=https%3A%2F%2Fwww.sp.com%3A8443%2Fopenam%2FXUI%2F%23profile%2Fdetails
-
idpEntityID (Required) Use this parameter to indicate the remote identity provider. Make sure you URL-encode the value.
For example, encode
idpEntityID=https://www.idp.com:8443/openamas:idpEntityID=https%3A%2F%2Fwww.idp.com%3A8443%2Fopenam.-
metaAlias (Required) Use this parameter to specify the local alias for the provider, such as
metaAlias=/myRealm/sp.This parameter takes the format
/realm-name/provider-nameas described in MetaAlias. Do not repeat the slash for the top-level realm, for examplemetaAlias=/sp.-
affiliationID (Optional) Use this parameter to specify a SAML affiliation identifier.
-
AllowCreate (Optional) When set to
true, the identity provider can create a new identifier for the principal if none exists.-
AssertionConsumerServiceIndex (Optional) Use this parameter to specify an integer that indicates the location to which the Response message should be returned to the requester.
-
AuthComparison (Optional) Use this parameter to specify a comparison method to evaluate the requested context classes or statements.
AM accepts the following values:
better. Specifies that the authentication context statement in the assertion must be better (stronger) than one of the provided authentication contexts.
exact. Specifies that the authentication context statement in the assertion must exactly match at least one of the provided authentication contexts.
maximum. Specifies that the authentication context statement in the assertion must not be stronger than any of the other provided authentication contexts.
minimum. Specifies that the authentication context statement in the assertion must be at least as strong as one of the provided authentication contexts.
-
AuthnContextClassRef (Optional) Use this parameter to specify authentication context class references. Separate multiple values with pipe (|) characters.
When hosted IDP and SP entities are saved in the AM console, any custom authentication contexts are also saved, as long as they are included in the extended metadata. You can load custom authentication contexts in the extended metadata using the ssoadm command.
-
AuthnContextDeclRef (Optional) Use this parameter to specify authentication context declaration references. Separate multiple values with pipe (|) characters.
-
AuthLevel (Optional) Use this parameter to specify the authentication level of the authentication context that AM should use to authenticate the user.
-
binding (Optional) Use this parameter to indicate which binding to use for the operation.
For example, specify
binding=HTTP-POSTto use HTTP POST binding with a self-submitting form. You can also specifybinding=HTTP-Artifact.-
Destination (Optional) Use this parameter to specify a URI Reference indicating the address to which the request is sent.
-
ForceAuthn (Optional) When set to
truethe identity provider should force authentication. Otherwise, it will reuse existing security contexts.-
isPassive (Optional) When set to
truethe identity provider authenticates passively.-
NameIDFormat (Optional) Use this parameter to specify a SAML Name Identifier format identifier.
For example,
urn:oasis:names:tc:SAML:2.0:nameid-format:persistent, orurn:oasis:names:tc:SAML:2.0:nameid-format:transient.-
RelayState (Optional) Use this parameter to specify where to redirect the user when the process is complete. Make sure you URL-encode the value.
For example,
RelayState=http%3A%2F%2Fforgerock.comtakes the user tohttp://forgerock.com.-
RelayStateAlias (Optional) Use this parameter to specify the parameter to use as the
RelayState.For example, the query string
target=http%3A%2F%2Fforgerock.com&RelayStateAlias=target, is the same asRelayState=http%3A%2F%2Fforgerock.com.-
reqBinding (Optional) Use this parameter to indicate the binding to use for the authentication request.
Valid values in include
urn:oasis:names:tc:SAML:2.0:bindings:HTTP-Redirect(default) andurn:oasis:names:tc:SAML:2.0:bindings:HTTP-POST.-
sunamcompositeadvice (Optional) Use this parameter to specify a URL-encoded XML blob that specifies the authentication level advice.
For example, the following XML indicates a requested authentication level of 1. Notice the required : before the
1:<Advice> <AttributeValuePair> <Attribute name="AuthLevelConditionAdvice"/> <Value>/:1</Value> </AttributeValuePair> </Advice>
spSingleLogoutInit.jspUsed to initiate single logout from the SP.
Also mapped to the endpoint
SPSloInitunder the context root.URLs:https://www.sp.com:8443/openam/saml2/jsp/spSingleLogoutInit.jsphttps://www.sp.com:8443/openam/SPSloInit
Example:The following URL initiates single logout from the service provider side, using the HTTP redirect method, leaving the user at
http://forgerock.com:https://www.sp.com:8443/openam/saml2/jsp/spSingleLogoutInit.jsp ?binding=urn:oasis:names:tc:SAML:2.0:bindings:HTTP-Redirect &RelayState=http%3A%2F%2Fforgerock.com
-
binding (Required) Use this parameter to indicate which binding to use for the operation. The full, long name format is required for this parameter to work.
For example, specify
binding=urn:oasis:names:tc:SAML:2.0:bindings:HTTP-POSTto use HTTP POST binding with a self-submitting form, rather than the default HTTP redirect binding. You can also specifybinding=urn:oasis:names:tc:SAML:2.0:bindings:HTTP-Artifact.-
idpEntityID (Required for Fedlets) Use this parameter to indicate the remote identity provider. If the
bindingproperty is not set, then AM uses this parameter to find the default binding. Make sure you URL-encode the value.For example, specify
idpEntityID=https://www.idp.com:8443/openamasidpEntityID=https%3A%2F%2Fwww.idp.com%3A8443%2Fopenam.-
NameIDValue (Required for Fedlets) Use this parameter to indicate the SAML Name Identifier for the user.
-
SessionIndex (Required for Fedlets) Use this parameter to indicate the
sessionIndexof the user session to terminate.-
Consent (Optional) Use this parameter to specify a URI that is a SAML Consent Identifier.
-
Destination (Optional) Use this parameter to specify a URI Reference indicating the address to which the request is sent.
-
Extension (Optional) Use this parameter to specify a list of extensions as string objects.
-
goto (Optional) Use this parameter to specify where to redirect the user when the process is complete.
The
RelayStateparameter takes precedence over this parameter.-
RelayState (Optional) Use this parameter to specify where to redirect the user when the process is complete. Make sure you URL-encode the value.
For example,
RelayState=http%3A%2F%2Fforgerock.comtakes the user tohttp://forgerock.com.-
spEntityID (Optional, for Fedlets) Use this parameter to indicate the Fedlet entity ID.
When missing, AM uses the first entity ID in the metadata.
During single sign-on login in standalone mode, AM presents users with a self-submitting form when access has been validated. This page is otherwise blank.
Perform the steps in the following procedure if you want to present users with something to indicate that the operation is in progress:
To modify the templates to add feedback that single sign-on is in progress, such as an image, edit the source of the AM Java Server Page,
saml2/jsp/autosubmitaccessrights.jsp, under the file system directory where the AM .war has been unpacked.When you add an image or other presentation element, make sure that you retain the form and Java code as-is.
Unpack the AM-6.0.0.7.war file.
Overwrite the modified
saml2/jsp/autosubmitaccessrights.jspfile, where you unpacked the.warfile. Also, include any images referenced in your files.Pack up your custom version of AM, and then deploy it in your web container.
The SAML v2.0 Enhanced Client or Proxy (ECP) profile is intended for use when accessing services over devices like simple phones, medical devices, and set-top boxes that lack the capabilities needed to use the more widely used SAML v2.0 Web Browser single sign-on profile.
The ECP knows which identity provider to contact for the user, and is able to use the reverse SOAP (PAOS) SAML v2.0 binding for the authentication request and response. The PAOS binding uses HTTP and SOAP headers to pass information about processing SOAP requests and responses, starting with a PAOS HTTP header that the ECP sends in its initial request to the server. The PAOS messages continue with a SOAP authentication request in the server's HTTP response to the ECP's request for a resource, followed by a SOAP response in an HTTP request from the ECP.
An enhanced client, such as a browser with a plugin or an extension, can handle these communications on its own. An enhanced proxy is an HTTP server, such as a WAP gateway, that can support the ECP profile on behalf of client applications.
AM supports the SAML v2.0 ECP profile on the server side for identity providers and service providers. You must build the ECP.
By default, an AM identity provider uses the
com.sun.identity.saml2.plugins.DefaultIDPECPSessionMapper
class to find a user session for requests to the IDP from the ECP. The default session mapper uses AM
cookies as it would for any other client application. If, for some reason, you must change the mapping after writing
and installing your own session mapper, you can change the class under Realms >
Realm Name > Applications > Federation > Entity Providers >
IDP Name > IDP > Advanced > ECP Configuration.
By default, an AM service provider uses the
com.sun.identity.saml2.plugins.ECPIDPFinder class to return identity providers from the list
under Realms > Realm Name > Applications > Federation > Entity Providers >
SP Name > SP > Advanced > ECP Configuration > Request IDP List.
You must populate the list with identity provider entity IDs.
The endpoint for the ECP to contact on the AM service provider is /SPECP
as in https://www.sp.com:8443/openam/SPECP.
The ECP provides two query string parameters to identify the service provider and to specify the URL of the resource to access.
-
metaAlias This specifies the service provider, by default,
metaAlias=/realm-name/sp, as described in MetaAlias.-
RelayState This specifies the resource the client aims to access, such as
RelayState=http%3A%2F%2Fforgerock.org%2Findex.html. Make sure this parameter is URL-encoded.
For example, to access the service provider followed by the resource at
http://forgerock.org/index.html, use
https://www.sp.com:8443/openam/SPECP?metaAlias=/sp&RelayState=http%3A%2F%2Fforgerock.org%2Findex.html.
You can use Web Agents and Java Agents in a SAML v2.0 Federation deployment.
Configuring agents to work alongside AM when performing SAML v2.0 single sign-on and single logout involves altering the URLs the agents use for logging in unauthenticated users, and logging users out.
This procedure applies when AM is configured as an IDP in one domain, and a Web or Java agent protects resources on behalf of a second AM server, configured as an SP, on a second domain.
Install the web or Java agent, as described in the relevant user documentation.
When using Web agents:
In the AM console of the SP, navigate to Realms > Realm Name > Applications > Agents > Web > Agent Name.
On the AM Services tab:
When using integrated mode SSO: set the AM Login URL property (
com.sun.identity.agents.config.login.url) to the authentication chain that contains the SAML2 module.For example:
https://www.sp.com:8443/openam/XUI/#login/&service=mySAMLChain
When using standalone mode SSO:
Set the AM Login URL property (
com.sun.identity.agents.config.login.url) to the URL of the SP-initiated SSO JSP file, including the parameters neccessary for initiating SSO.For example:
https://www.sp.com:8443/openam/saml2/jsp/spSSOInit.jsp
?metaAlias=/sp
&idpEntityID=https%3A%2F%2Fwww.idp.com%3A8443%2Fopenam
Add the URL of the SP-initiated SLO JSP file to the AM Logout URL property (
com.sun.identity.agents.config.logout.url).For example:
https://www.sp.com:8443/openam/saml2/jsp/spSingleLogoutInit.jsp
?binding=urn:oasis:names:tc:SAML:2.0:bindings:HTTP-Redirect
&RelayState=http%3A%2F%2Fwww.sp.com
On the Advanced tab, add the following settings in the Custom Properties field:
org.forgerock.openam.agents.config.allow.custom.login=true
com.forgerock.agents.accept.ipdp.cookie=2
org.forgerock.openam.agents.config.allow.custom.login=true
org.forgerock.agents.config.logout.session.invalidate=false
Save your changes.
Note
If you are not using centralized mode for agent configuration, make the changes to the noted properties in the
OpenSSOAgentConfiguration.propertiesconfiguration file rather than in the AM administration console.When using Java agents:
In the AM console of the SP, navigate to Realms > Realm Name > Applications > Agents > Java > Agent Name.
On the AM Services tab:
When using integrated mode SSO: set the AM Login URL property (
com.sun.identity.agents.config.login.url) to the authentication chain that contains the SAML2 module.For example:
https://www.sp.com:8443/openam/XUI/#login/&service=mySAMLChain
When using standalone mode SSO:
Set the AM Login URL property (
com.sun.identity.agents.config.login.url) to the URL of the SP-initiated SSO JSP file, including the parameters neccessary for initiating SSO.For example:
https://www.sp.com:8443/openam/saml2/jsp/spSSOInit.jsp
?metaAlias=/sp
&idpEntityID=https%3A%2F%2Fwww.idp.com%3A8443%2Fopenam
Add the URL of the SP-initiated SLO JSP file to the AM Logout URL property (
com.sun.identity.agents.config.logout.url).For example:
https://www.sp.com:8443/openam/saml2/jsp/spSingleLogoutInit.jsp
?binding=urn:oasis:names:tc:SAML:2.0:bindings:HTTP-Redirect
&RelayState=http%3A%2F%2Fwww.sp.com
On the Advanced tab, add the following settings in the Custom Properties field:
org.forgerock.openam.agents.config.allow.custom.login=true
com.forgerock.agents.accept.ipdp.cookie=2
org.forgerock.openam.agents.config.allow.custom.login=true
Save your changes.
Note
If you are not using centralized mode for agent configuration, make the changes to the noted properties in the
OpenSSOAgentConfiguration.propertiesconfiguration file rather than in the AM administration console.
AM supports linking, or federating, identities between the IDP and the SP.
For information on how to configure AM to federate identities, see the following sections:
AM lets you configure the service provider to automatically link identities based on an attribute value in the assertion returned from the identity provider, known as auto-federation.
When you know the user accounts on both the identity provider and the service provider share a common attribute value, such as an email address or other unique user identifier, you can configure AM to map the attributes to each other, and link identities, without the user having to authenticate to the SP.
This procedure demonstrates how to automatically link identities based on an attribute value that is the same in both accounts.
Before attempting to configure auto-federation, ensure that you have configured AM for SAML v2.0, created the identity and service providers, and configured a circle of trust. You must also have configured AM to support single sign-on. For information on performing those tasks, see "Configuring AM for SAML v2.0" and "Implementing Single Sign-On and Single Logout".
Perform the following steps on the hosted identity provider(s), and again on the hosted service provider(s):
On the hosted identity provider:
Log in to the AM console as an administrator, such as
amAdmin.Navigate to Realms > Realm Name > Applications > Federation > Entity Providers > Hosted Provider Name > Assertion Processing.
On the Assertion Processing tab, if the attribute to use for linking accounts is not yet included in the Attribute Map property, add the attribute mapping.
Enter attribute map values using the following format:
SAML Attribute Name=Profile Attribute Name.Save your work.
On the hosted service provider:
Log in to the AM console as an administrator, such as
amAdmin.Navigate to Realms > Realm Name > Applications > Federation > Entity Providers > Hosted Service Provider Name.
On the Assertion Processing tab, if the attribute to use for linking accounts is not yet included in the Attribute Map property, add the attribute mapping.
Enter attribute map values using the following format:
SAML Attribute Name=Profile Attribute Name.Enable Auto Federation, and in the Attribute property, enter the SAML attribute name that is used to link accounts.
Save your work.
To test your work, initiate single sign-on; for example, as described in "IDP-Initiated Single Sign-on JSP".
Authenticate to the IDP as the
demouser. Attempt to access the SP, and you will notice that the user has a session, and can access their profile page on the SP without having to authenticate again.
On occasion, there may not yet be an identity to link with on the SP. For example, if it is the first time a user is attempting to access the service, and they do not have an account in the SP identity store.
You can configure AM to dynamically create an account for the user in the SP identity store, using the values in the assertion as profile properties, as defined in the attribute mappings.
Before attempting to configure auto-federation to create identities based on attribute values, ensure that you have configured AM for SAML v2.0, created the identity and service providers, and configured a circle of trust. You must also have configured AM to support single sign-on. For information on performing those tasks, see "Configuring AM for SAML v2.0" and "Implementing Single Sign-On and Single Logout".
The following steps demonstrate how to dynamically create missing accounts on the service provider side:
On the hosted identity provider:
Log in to the AM console as an administrator, such as
amAdmin.Navigate to Realms > Realm Name > Applications > Federation > Entity Providers > Hosted Provider Name > Assertion Processing.
On the Assertion Processing tab, if the attributes you want to populate when creating the new user are not yet included in the Attribute Map property, add the attribute mappings.
Enter attribute map values using the following format:
SAML Attribute Name=Profile Attribute Name.Save your work.
On the hosted service provider:
Log in to the AM console as an administrator, such as
amAdmin.Navigate to Realms > Realm Name > Applications > Federation > Entity Providers > Hosted Provider Name > Assertion Processing.
On the Assertion Processing tab, duplicate the attribute mappings you created in the hosted identity provider in the Attribute Map property.
Enter attribute map values using the following format:
SAML Attribute Name=Profile Attribute Name.Tip
In a hosted SP, you can use a special wildcard mapping of
*=*, which maps each attribute in the assertion to an identically named attribute on the SP, using the relevant value.Enable Auto Federation, and in the Attribute property, enter the SAML attribute name that is used to link accounts.
Tip
The value of the named attribute is used as the username of the created user when auto-federation is enabled.
Save your work.
Navigate to Realms > Realm Name > Authentication > Settings.
On the User Profile tab, in the User Profile field, select Dynamic or Dynamic with User Alias.
For more information the user profile property, see "User Profile" in the Authentication and Single Sign-On Guide.
Save your work.
To test your work:
Create a new user on the identity provider, including values for any attributes you mapped in the providers.
Log out of the AM console, and initiate SSO; for example, as described in "IDP-Initiated Single Sign-on JSP".
Authenticate as the new user you created in the IDP.
On success, check
https://www.sp.com:8443/openam/XUI/#profile/detailsto see the new user account created on the SP, and the attributes that were copied from the assertion.
Identity providers and service providers must be able to communicate about users. Yet, in some cases, the identity
provider chooses to communicate a minimum of information about an authenticated user; for example, a generated,
opaque NameID that cannot directly be used to locate to an identity in the SP identity store.
AM can use these pseudonym identifiers for establishing links between otherwise unrelated accounts, by requiring that the user authenticates to the SP using a linking authentication tree or chain.
The following list describes the sequence of events that occurs the first time a user attempts to authenticate to the AM service provider, when a linking authentication tree or chain is configured:
Accessing the service provider.
A user attempts to access a service and is redirected to the AM server acting as the service provider, specifying an authentication chain containing the SAML2 authentication module, in the login URL.
For example,
https://www.sp.com:8443/openam/XUI/#login/&service=spSAMLChain.Authentication at the identity provider.
AM redirects the user to the identity provider. The user authenticates successfully at the identity provider. The identity provider returns a SAML assertion to the SP.
Service provider attempts to access a federated identity.
AM attempts to locate the identity in its own user store. No link between the IDP identity and a local one is found.
Invocation of the linking chain.
As no link is found, AM invokes a linking authentication tree, to determine which local user account to use.
Identity federation.
In this example, after successful authentication at the SP, AM then writes the name ID from the assertion into the local user's profile, creating a permanent link between the two identities.
For more information on creating permanent links between identities, see "Persistent or Transient Federation".
The following list describes the sequence of events that occurs during subsequent authentication attempts, after the user's identities on the identity and service providers have been federated:
Accessing the service provider.
A returning user attempts to access their service and is redirected to the AM server acting as the service provider, specifying an authentication chain containing the SAML2 authentication module, in the login URL.
For example,
https://www.sp.com:8443/openam/XUI/#login/&service=spSAMLChain.Authentication at the identity provider.
AM redirects the user to the identity provider, and the user authenticates successfully at the identity provider. The identity provider returns a SAML assertion to the SP.
Service provider attempts to access a federated identity.
AM attempts to locate the name ID in its user store. The search for the name ID succeeds. Therefore, AM does not invoke the linking authentication chain.
As there is a match, the user does not need to log in to the SP, and is given access to the service.
This procedure demonstrates how to link identities by using a linking authentication tree or chain on the SP to identify the local user.
Before attempting to configure a linking authentication tree or chain, ensure that you have configured AM for SAML v2.0, created the identity and service providers, and configured a circle of trust. You must also have configured AM to support single sign-on. For information on performing those tasks, see "Configuring AM for SAML v2.0" and "Implementing Single Sign-On and Single Logout".
On the hosted service provider, log in to the AM console as an administrator, such as
amAdmin.Create an authentication tree or chain; for example, named
myLinkingTree. This tree or chain is used to identify the user account in the SP to link to the account in the IDP. The tree or chain can use any of the available methods for authentication as required; for example, multi-factor authentication.For more information on creating authentication trees or chains, see "Implementing Authentication" in the Authentication and Single Sign-On Guide.
If you are using integrated mode SSO:
Navigate to Realms > Realm Name > Authentication > Modules, and then select the module name of your SAML2 authentication module.
In the Linking Authentication Chain field, enter the name of the authentication tree or chain you created earlier; for example,
myLinkingTree.Save your work.
If you are using standalone mode SSO:
Navigate to Realms > Realm Name > Authentication > Settings > Core.
In the Organization Authentication Configuration property, select the authentication tree or chain you created earlier; for example,
myLinkingTree.Save your work.
For more information on setting the default tree or chain for a realm, see "Configuring the Default Authentication Tree or Chain" in the Authentication and Single Sign-On Guide.
To test your work, initiate single sign-on; for example, as described in "SP-Initiated Single Sign-on JSP".
Authenticate to the IDP as the
demouser. You will then be redirected to the SP and asked to authenticate using the linking authentication tree or chain specified. If persistent linking is enabled (the default), then initiating single sign-on a second time will require authentication only to the IDP.
AM lets you map identities on the identity provider temporarily to a single account on the service provider;
for example, the anonymous account, in order to exchange attributes about the user without a
user-specific account on the service provider.
This approach can be useful when the service provider either needs no user-specific account to provide a service, or when you do not want to create or retain identity data on the service provider, but instead you make authorization decisions based on attribute values from the identity provider.
The following steps demonstrate how to auto-federate using a single user account on the service provider.
Before attempting these steps, ensure that you have configured AM for SAML v2.0, created the identity and service providers, and configured a circle of trust. You must also have configured AM to support single sign-on. For information on performing those tasks, see "Configuring AM for SAML v2.0" and "Implementing Single Sign-On and Single Logout".
On the hosted identity provider:
Log in to the AM console as an administrator, such as
amAdmin.Navigate to Realms > Realm Name > Applications > Federation > Entity Providers > Hosted Identity Provider Name.
On the Assertion Processing tab, if the attributes you want to access from the SP are not yet included in the Attribute Map property, add the attribute mappings.
Enter attribute map values using the following format:
SAML Attribute Name=Profile Attribute Name.Save your work.
On the hosted service provider:
Log in to the AM console as an administrator, such as
amAdmin.Navigate to Realms > Realm Name > Applications > Federation > Entity Providers > Hosted Service Provider Name.
On the Assertion Processing tab, if the attributes you want to access from the IDP are not yet included in the Attribute Map property, add the attribute mappings.
Enter attribute map values using the following format:
SAML Attribute Name=Profile Attribute Name.Tip
You can use a special wildcard mapping of
*=*, which maps each attribute in the assertion to an identically named attribute on the SP, using the relevant value.Ensure that the Auto Federation property is not selected.
In the Transient User property, add the account name AM will use to link all identities from the IDP, for example;
anonymous.Save your work.
To test your work:
Create a new user on the identity provider, including values for any attributes you mapped in the providers.
Log out of the AM console, and initiate SSO using transient federation; for example, as described in "To Enable Transient Federation".
Authenticate to the IDP as the new user you created.
After successfully authenticating to the IDP, check that the identity is linked to a transient account by performing the following steps:
In a separate browser or private window, log in to the SP console as an administrator, such as
amAdmin.Navigate to Realms > Realm Name > Sessions.
Enter the transient user name you configured earlier; for example,
anonymous.You will see one or more sessions of users who have initiated single sign-on and been temporarily linked to the transient user account.
If you manage both the identity provider and service provider, you can link accounts in bulk by using the ssoadm bulk federation commands.
Before you can run the bulk federation commands, first establish the relationship between accounts, set up the providers as described in "Configuring Identity Providers, Service Providers, and Circles of Trust", and install the ssoadm tool. See "Setting Up Administration Tools" in the Installation Guide.
To understand the relationships between accounts, consider an example where the identity provider is at
www.idp.com and the service provider is at www.sp.com.
A demo user account has the Universal ID id=demo,ou=user,dc=idp,dc=com
on the identity provider. That maps to the Universal ID id=demo,ou=user,dc=sp,dc=com on
the service provider.
The ssoadm command requires a file that maps local user IDs to remote user IDs, one per line, separated by the vertical bar (|) character. Each line of the file appears as follows:
local-user-ID|remote-user-ID
In the example, starting on the service provider side, the line for the demo user reads as follows:
id=demo,ou=user,dc=sp,dc=com|id=demo,ou=user,dc=idp,dc=com
All the user accounts mapped in your file must exist at the identity provider and the service provider when you run the commands to link them.
Link the accounts using the ssoadm bulk federation commands:
Prepare the data with the ssoadm do-bulk-federation command.
The following example starts on the service provider side:
$ cat /tmp/user-map.txt

id=demo,ou=user,dc=sp,dc=com|id=demo,ou=user,dc=idp,dc=com

$ ssoadm do-bulk-federation \
  --metaalias /sp \
  --remoteentityid https://www.idp.com:8443/openam \
  --useridmapping /tmp/user-map.txt \
  --nameidmapping /tmp/name-map.txt \
  --adminid amadmin \
  --password-file /tmp/pwd.txt \
  --spec saml2

Bulk Federation for this host was completed.
To complete the federation, name Id mapping file should be loaded to remote provider.
Copy the name ID mapping output file to the other provider:
$ scp /tmp/name-map.txt openam@www.idp.com:/tmp/name-map.txt

openam@www.idp.com's password: ********
name-map.txt 100% 177 0.2KB/s 00:00
Import the name ID mapping file with the ssoadm import-bulk-fed-data command.
The following example is performed on the identity provider side:
$ ssoadm import-bulk-fed-data \
  --adminid amadmin \
  --password-file /tmp/pwd.txt \
  --metaalias /idp \
  --bulk-data-file /tmp/name-map.txt

Bulk Federation for this host was completed.
At this point the accounts are linked.
You can choose to permanently link identities, known as persistent federation. AM lets you configure the service provider to persistently link identities, based on an attribute value from the identity provider. When you know the user accounts on both the identity provider and the service provider share a common attribute value, such as an email address or another unique user identifier, you can use this method to link accounts without user interaction. See "To Link Identities Automatically Based on an Attribute Value".
In some cases, the identity provider can choose to communicate a minimum of information about an authenticated user, with no user account maintained on the service provider side. This is known as transient federation.
Transient federation can be useful when the service provider either needs no user-specific account to provide a service, or when you do not want to retain a user profile on the service provider, but instead, you make authorization decisions based on attribute values from the identity provider.
In a SAML v2.0 federation where accounts have been persistently linked, authentication is required only on the identity provider side.
Authentication is required on the service provider side, however, when the service provider is unable to map the identity in the assertion from the identity provider to a local user account.
This can happen the first time accounts are linked, for example. After which, the persistent identifier establishes the mapping.
Authenticating to the SP may also be required when transient federation is used when linking identities. The service provider must authenticate the user for every SAML assertion received. This is because the identifier used to link the identities is transient; it does not provide a repeatable, durable means to link the identities.
Note
You can prevent the ability to persistently link accounts on the SP side by setting the
spDoNotWriteFederationInfo property to true, and on the IDP side by setting
the idpDisableNameIDPersistence to true.
Both integrated and standalone SAML v2.0 implementations allow you to persistently link accounts.
Before attempting to configure persistent federation, ensure that you have configured AM for SAML v2.0 single sign-on, created the identity and service providers, and configured a circle of trust. For information on performing those tasks, see "Configuring AM for SAML v2.0" and "Implementing Single Sign-On and Single Logout".
If you are using integrated mode SSO:
Navigate to Realms > Realm Name > Authentication > Modules, and then select the module name of your SAML2 authentication module.
In the NameID Format field, specify the value
urn:oasis:names:tc:SAML:2.0:nameid-format:persistent.Note
You can also link accounts together using different nameid formats. For example, you could use the
urn:oasis:names:tc:SAML:1.1:nameid-format:unspecifiedvalue, and receive the IDP user's e-mail address in the NameID value. The SP would display the login page to identify the local user account and persistently link them.Save your work.
Initiate single sign-on by accessing a URL that calls an authentication chain that includes the SAML2 module.
For example,
https://www.sp.com:8443/openam/XUI/#login/&service=mySAMLChain.
If you are using standalone mode single sign-on:
Initiate single sign-on with either the
spSSOInit.jsporidpSSOInit.jspJSP page, includingNameIDFormat=urn:oasis:names:tc:SAML:2.0:nameid-format:persistentas a query parameter.For example, to initiate single sign-on from the service provider, access a URL similar to the following:
https://www.sp.com:8443/openam/saml2/jsp/spSSOInit.jsp
?idpEntityID=https%3A%2F%2Fwww.idp.com%3A8443%2Fopenam
&metaAlias=/sp
&NameIDFormat=urn:oasis:names:tc:SAML:2.0:nameid-format:persistent
To initiate single sign-on from AM acting as the identity provider, access a URL similar to the following:
https://www.idp.com:8443/openam/saml2/jsp/idpSSOInit.jsp
?spEntityID=https%3A%2F%2Fwww.sp.com%3A8443%2Fopenam
&metaAlias=/idp
&NameIDFormat=urn:oasis:names:tc:SAML:2.0:nameid-format:persistent
To test your work:
Authenticate to the IDP as the user you want to persistently link.
On success, you will be redirected to the SP.
Tip
If there was no login page displayed at the SP, you might have enabled auto-federation, or AM was able to find a link between the two identities without requiring authentication at the SP.
To ensure there are no existing links, create a new identity in the IDP, and initiate single sign-on again, authenticating to the IDP as the new user.
Authenticate to the SP as the local user to link with.
The accounts are persistently linked, with persistent identifiers stored in the user's profile on both the IDP and the SP.
Subsequent attempts to access the SP will only require that the user authenticates to the IDP, as the identities are now permanently linked.
Note
You can prevent the ability to persistently link accounts on the SP side by setting the
spDoNotWriteFederationInfoproperty totrue, and on the IDP side by setting theidpDisableNameIDPersistencetotrue.
Both integrated and standalone SAML v2.0 implementations allow you to temporarily link accounts.
Before attempting to configure transient federation, ensure that you have configured AM for SAML v2.0, created the identity and service providers, and configured a circle of trust. You must also have configured AM to support single sign-on. For information on performing those tasks, see "Configuring AM for SAML v2.0" and "Implementing Single Sign-On and Single Logout".
If you are using integrated mode SSO:
Navigate to Realms > Realm Name > Authentication > Modules, and then select the module name of your SAML2 authentication module.
In the NameID Format field, specify the value
urn:oasis:names:tc:SAML:2.0:nameid-format:transient.Save your work.
Initiate single sign-on by accessing a URL that calls an authentication chain that includes the SAML2 module.
For example,
https://www.sp.com:8443/openam/XUI/#login/&service=mySAMLChain.
If you are using standalone mode SSO:
Initiate single sign-on with either the
spSSOInit.jsporidpSSOInit.jspJSP page, includingNameIDFormat=urn:oasis:names:tc:SAML:2.0:nameid-format:transientas a query parameter.For example, to initiate single sign-on from the service provider, access a URL similar to the following:
https://www.sp.com:8443/openam/saml2/jsp/spSSOInit.jsp
?idpEntityID=https%3A%2F%2Fwww.idp.com%3A8443%2Fopenam
&metaAlias=/sp
&NameIDFormat=urn:oasis:names:tc:SAML:2.0:nameid-format:transient
To initiate single sign-on from the identity provider, access a URL similar to the following:
https://www.idp.com:8443/openam/saml2/jsp/idpSSOInit.jsp
?spEntityID=https%3A%2F%2Fwww.sp.com%3A8443%2Fopenam
&metaAlias=/idp
&NameIDFormat=urn:oasis:names:tc:SAML:2.0:nameid-format:transient
To test your work:
Authenticate to the IDP as the user you want to temporarily link.
On success, you will be redirected to the SP.
Authenticate to the SP as the local user.
The accounts are only linked temporarily, for the duration of the session. Once the user logs out, the accounts are no longer linked.
Nothing is written in the user's profile on either the identity provider and the service provider.
Subsequent attempts to access the SP will require that the user authenticates to the IDP AND the SP (assuming no existing session exists), as the identities are not linked.
AM implements the SAML v2.0 Name Identifier Management profile, allowing you to change a persistent identifier that has been set to federate accounts, and also to terminate federation for an account.
When user accounts are stored in an LDAP directory server, name identifier information is stored on the
sun-fm-saml2-nameid-info and sun-fm-saml2-nameid-infokey attributes of a
user's entry.
[1]
AM provides a pair of JSP files for managing persistently linked accounts;
idpMNIRequestInit.jsp for initiating changes from the IDP side, and
spMNIRequestInit.jsp for initiating changes from the SP side.
The JSP parameters are listed below. When setting parameters in the JSPs, make sure the parameter values are correctly URL-encoded.
-
spEntityID (Required) Use this parameter to indicate the remote service provider. Make sure you URL-encode the value. For example, specify
spEntityID=https://www.sp.com:8443/openamasspEntityID=https%3A%2F%2Fwww.sp.com%3A8443%2Fopenam.-
metaAlias (Required) Use this parameter to specify the local alias for the provider; such as,
metaAlias=/myRealm/idp. This parameter takes the format/realm-name/provider-nameas described in MetaAlias. You do not repeat the slash for the top-level realm; for example,metaAlias=/idp.-
requestType (Required) Type of manage name ID request, either
NewIDto change the ID, orTerminateto remove the information that links the accounts on the identity provider and service provider.-
SPProvidedID (Required if
requestType=NewID) Name identifier in use as described above.-
affiliationID (Optional) Use this parameter to specify a SAML affiliation identifier.
-
binding (Optional) Use this parameter to indicate which binding to use for the operation. The full, long name format is required for this parameter to work.
The value must be one of the following:
urn:oasis:names:tc:SAML:2.0:bindings:HTTP-POSTurn:oasis:names:tc:SAML:2.0:bindings:HTTP-Redirecturn:oasis:names:tc:SAML:2.0:bindings:SOAP
-
relayState (Optional) Use this parameter to specify where to redirect the user when the process is complete. Make sure you URL-encode the value. For example,
relayState=http%3A%2F%2Fforgerock.comtakes the user tohttp://forgerock.com.
-
idpEntityID (Required) Use this parameter to indicate the remote identity provider. Make sure you URL-encode the value. For example, specify
idpEntityID=https://www.idp.com:8443/openamasidpEntityID=https%3A%2F%2Fwww.idp.com%3A8443%2Fopenam.-
metaAlias (Required) Use this parameter to specify the local alias for the provider; such as,
metaAlias=/myRealm/sp. This parameter takes the format/realm-name/provider-nameas described in MetaAlias. You do not repeat the slash for the top-level realm,metaAlias=/sp.-
requestType (Required) Type of manage name ID request, either
NewIDto change the ID, orTerminateto remove the information that links the accounts on the identity provider and service provider.-
IDPProvidedID (Required if
requestType=NewID) Name identifier in use as described above.-
affiliationID (Optional) Use this parameter to specify a SAML affiliation identifier.
-
binding (Optional) Use this parameter to indicate which binding to use for the operation. The full, long name format is required for this parameter to work.
The value must be one of the following:
urn:oasis:names:tc:SAML:2.0:bindings:HTTP-POSTurn:oasis:names:tc:SAML:2.0:bindings:HTTP-Redirecturn:oasis:names:tc:SAML:2.0:bindings:SOAP
-
relayState (Optional) Use this parameter to specify where to redirect the user when the process is complete. Make sure you URL-encode the value. For example,
relayState=http%3A%2F%2Fforgerock.comtakes the user tohttp://forgerock.com.
Retrieve the name identifier value, used to manage the federation in the second step.
You can retrieve the name identifier value on the IDP side by checking the value of the
sun-fm-saml2-nameid-infokeyproperty.For example, if the user's entry in the directory shows:
sun-fm-saml2-nameid-infokey:
https://www.idp.com:8443/openam|
https://www.sp.com:8443/openam|
XyfFEsr6Vixbnt0BSqIglLFMGjR2Then, the name identifier on the IDP side is
XyfFEsr6Vixbnt0BSqIglLFMGjR2.You can retrieve the name identifier value on the SP side by checking the value of
sun-fm-saml2-nameid-info. For example, if the user's entry in the directory shows the following:sun-fm-saml2-nameid-info: https://www.sp.com:8443/openam|
https://www.idp.com:8443/openam|
ATo9TSA9Y2Ln7DDrAdO3HFfH5jKD|
https://www.idp.com:8443/openam|
urn:oasis:names:tc:SAML:2.0:nameid-format:persistent|
9B1OPy3m0ejv3fZYhlqxXmiGD24c|
https://www.sp.com:8443/openam|
SPRole|
falseThen, the name identifier on the SP side is
9B1OPy3m0ejv3fZYhlqxXmiGD24c.
Use the identifier to initiate a change request, as in the following examples:
To initiate a change request from the service provider, use a URL similar to the following example:
https://www.sp.com:8443/openam/saml2/jsp/spMNIRequestInit.jsp
?idpEntityID=https%3A%2F%2Fwww.idp.com%3A8443%2Fopenam
&metaAlias=/sp
&requestType=NewID
&IDPProvidedID=XyfFEsr6Vixbnt0BSqIglLFMGjR2
You can substitute
openam/SPMniInitforopenam/saml2/jsp/spMNIRequestInit.jsp.To initiate a change request from the identity provider, use a URL similar to the following example:
https://www.idp.com:8443/openam/saml2/jsp/idpMNIRequestInit.jsp
?spEntityID=https%3A%2F%2Fwww.sp.com%3A8443%2Fopenam
&metaAlias=/idp
&requestType=NewID
&SPProvidedID =9B1OPy3m0ejv3fZYhlqxXmiGD24c
You can substitute
openam/IDPMniInitforopenam/saml2/jsp/idpMNIRequestInit.jsp
AM lets you terminate account federation, where the accounts have been linked with a persistent identifier, as described in "To Enable Persistent Federation".
The examples below work in an environment where the identity provider is www.idp.example and the
service provider is www.sp.example. Both providers have deployed AM on port 8443 under
deployment URI /openam.
To initiate the process of terminating account federation from the service provider, access the following URL with at least the query parameters shown:
https://www.sp.com:8443/openam/saml2/jsp/spMNIRequestInit.jsp
?idpEntityID=https%3A%2F%2Fwww.idp.com%3A8443%2Fopenam
&metaAlias=/sp
&requestType=Terminate
To initiate the process of terminating account federation from the identity provider, access the following URL with at least the query parameters shown:
https://www.idp.com:8443/openam/saml2/jsp/idpMNIRequestInit.jsp
?spEntityID=https%3A%2F%2Fwww.sp.com%3A8443%2Fopenam
&metaAlias=/idp
&requestType=Terminate
[1] To configure these attribute types, in the AM console, navigate to Configure > Global Services, and then select SAMLv2 Service Configuration.
Most deployments can rely on AM to handle authentication and provide identity assertions. AM supports a wide variety of authentication scenarios out of the box, but AM also makes it possible to add custom authentication modules. Furthermore, IG lets you integrate legacy systems into your access management deployment.
In a deployment where you need AM to act as a SAML v2.0 gateway to a legacy application that serves as an identity provider, you can use AM Secure Attribute Exchange (SAE). On the identity provider side, SAE lets AM retrieve the information needed to create assertions from an external authentication service, bypassing AM authentication and trusting the external service as the authoritative source of authentication. On the service provider side, SAE lets AM securely provide attributes to an application that makes its own policy decision based on the attributes rather than rely on AM for the policy decision.
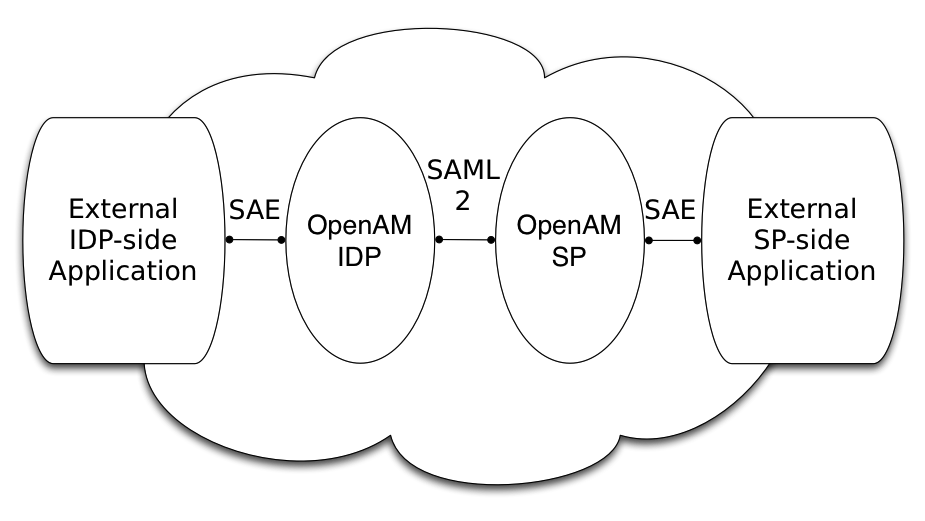
When you use SAE on the identity provider side, an external application
acts as the authoritative source of authentication. After a user authenticates
successfully, the application tells AM to create a session by sending
a secure HTTP GET or POST to AM that asserts the identity of the user.
AM processes the assertion to create a session for the user. If the user
is already authenticated and comes back to access the application, the
application sends a secure HTTP POST to AM to assert both the user's
identity and also any necessary attributes related to the user. AM
processes the assertion to create the session for the user and populate the
attributes in the user's session. When the user logs out, the external
authentication application can initiate single logout from the identity
provider AM server by sending the sun.cmd=logout
attribute to AM using SAE.
On the service provider side, AM communicates using SAML v2.0 with AM on the identity provider side. AM can use SAE to transmit attributes to an application through a secure HTTP POST.
SAE relies either on shared keys and symmetric encryption, or on public and private keys and asymmetric encryption to protect attributes communicated between AM and external applications.
AM ships with sample JSPs that demonstrate secure attribute exchange. To try the sample, you must set up an AM Circle of Trust to include an identity provider and a service provider, install the SDK sample web application on each provider, and then configure the providers appropriately as described in this chapter to secure communications with the sample SAE applications on both the identity provider and service provider sides.
Set up an AM server as an identity provider, and another as a
service provider, connecting the two in a circle of trust called
samplesaml2cot. Configure both the hosted providers and
also the remote providers as described in "Configuring Identity Providers, Service Providers, and Circles of Trust".
This chapter assumes you set up the hosted
identity provider at https://www.idp.com:8443/openam and
the hosted service provider at
https://www.sp.com:8443/openam.
Make sure federation is working before you add secure attribute exchange applications that rely on
functioning SAML v2.0 communications between the providers.
For access to the SAE samples, contact
info@forgerock.com.
The SAE samples are found under
/saml2/sae where you install the samples.
saeIDPApp.jsp is the identity provider side external
application. saeSPApp.jsp is the service provider side
external application.
In order for SAE to be secure, you must both set up a trust relationship between the application on the identity provider side and the AM server acting as identity provider, and sets up a trust relationship between the application on the service provider side and the AM server acting as the service provider. These trust relationships can be based on a shared secret and symmetric encryption, or on public and private key pairs and asymmetric encryption. The trust relationships on either side are independent. For example, you can use a shared secret on the identity provider side and certificates on the service provider side if you chose.
When using symmetric encryption, you must define a shared secret
string used both for the application and the provider. The sample uses
secret12 as the shared secret. To simplify
configuration, the sample uses the same shared secret, and thus
symmetric encryption, for both trust relationships.
When using symmetric encryption, you must also use the encoded
version of your shared secret. To get the encoded version of a shared
secret string, use the encode.jsp page on the
provider, as in
https://www.idp.com:8443/openam/encode.jsp and
https://www.sp.com:8443/openam/encode.jsp. An
encoded version of secret12 looks something like
AQICEcFhDWmb6sVmMuCJuVh43306HVacDte9.
When using asymmetric encryption, you must obtain a public-private key pair for the application, and store the keys in a keystore on the application side. Also store the public key from AM which is acting as the provider in the application's keystore. Make note of the certificate aliases for your application's private key, and for AM's public key. Also note the path to the keystore for your application, the keystore password, and the private key password.
This configuration uses the default sample settings with a shared
secret of secret12, without encryption of the
attributes:
Log in as
amAdminto the AM server console where you set up the hosted identity provider (IDP).The sample includes a
branchattribute not found in user profiles by default. Therefore, under Realms > Realm Name > Authentication > Settings > User Profile, set User Profile to Ignored, and then save your work.Under Realms > Realm Name > Applications > Federation > Entity Providers, select the name of the hosted IDP to access the IDP configuration:
Under Assertion Processing > Attribute Mapper, add both
mail=mailandbranch=branchto the attribute map, and then save your work.Under Advanced > SAE Configuration, make sure the IDP URL reflects an endpoint on the IDP such as
https://www.idp.com:8443/openam/idpsaehandler/metaAlias/idp, and then save your work.Also under Advanced > SAE Configuration > Application Security Configuration, add the URL value for the kind of encryption you are using, and then save your work.
When using the defaults, the value is something like
url=https://www.idp.com:8443/samples/saml2/sae/saeIDPApp.jsp|type=symmetric|secret=encoded-secret, where the AM SDK sample web application is deployed on the IDP side with context root/samplesand the encoded-secret is something likeAQICEcFhDWmb6sVmMuCJuVh43306HVacDte9.If you use a different mechanism to secure the communications between the SAE application and the provider, read the online help in the console to see how to construct your URL value.
Under Realms > Realm Name > Applications > SAML > Entity Providers, select the name of the remote SP to access the SP configuration on the IDP side:
Under Assertion Processing > Attribute Mapper, add both
mail=mailandbranch=branchto the attribute map, and then save your work.Under Advanced > SAE Configuration, make sure the SP URL reflects an endpoint on the SP, such as
https://www.sp.com:8443/openam/spsaehandler/metaAlias/sp, and then save your work.Also under Advanced > SAE Configuration, add the URL to the sample SAE application as the SP Logout URL, such as
https://www.sp.com:8443/samples/saml2/sae/saeSPApp.jsp, and then save your work.
This configuration uses the default sample setting of symmetric
encryption, with a shared secret of secret12.
Login as amAdmin to the AM server console where
you set up the hosted service provider (SP):
The sample includes a
branchattribute not found in user profiles by default. Therefore, under Realms > Realm Name > Authentication > Settings > User Profile, set User Profile to Ignored, and then save your work.Under Realms > Realm Name > Applications > SAML > Entity Providers, select the name of the hosted SP to access the SP configuration:
Under Assertion Processing > Attribute Mapper, add both
mail=mailandbranch=branchto the attribute map, and then save your work.Also under Assertion Processing > Attribute Mapper > Auto Federation, select Enabled, set the Attribute to
mail, and then save your work.Under Advanced > SAE Configuration, make sure the SP URL reflects an endpoint on the SP such as
https://www.sp.com:8443/openam/spsaehandler/metaAlias/sp, and then save your work.Furthermore, under Advanced > SAE Configuration, add the URL to the sample SAE application as the SP Logout URL such as
https://www.sp.com:8443/samples/saml2/sae/saeSPApp.jsp, and then save your work.Also under Advanced > SAE Configuration > Application Security Configuration, add the URL value for the kind of encryption you are using, and then save your work.
When using the defaults, the value is something like
url=https://www.sp.com:8443/samples/saml2/sae/saeSPApp.jsp|type=symmetric|secret=encoded-secret, where the AM SDK sample web application is deployed on the IDP side with context root/samplesand the encoded-secret is something likeAQICkX24RbZboAVgr2FG1kWoqRv1zM2a6KEH.If you use a different mechanism to secure the communications between the SAE application and the provider, read the online help in the console to see how to construct your URL value.
After completing the setup described above, navigate to the IDP side
SAE application, for example at
https://www.idp.com:8443/samples/saml2/sae/saeIDPApp.jsp.
Make sure you set at least the "SP App URL" and "SAE URL on IDP end" to fit your configuration. For example if you used the settings above then use the following values:
- SP App URL
https://www.sp.com:8443/samples/saml2/sae/saeSPApp.jsp- SAE URL on IDP end
https://www.idp.com:8443/openam/idpsaehandler/metaAlias/idp
Check the settings, and then select Generate URL to open the Secure Attributes Exchange IDP APP SAMPLE page.
Select the ssourl link in the page to start the
exchange.
The resulting web page shows the attributes exchanged, including the mail and branch values used. The text of that page is something like the following:
SAE SP APP SAMPLE

Secure Attrs :
mail            testuser@foo.com
sun.idpentityid https://www.idp.com:8443/openam
sun.spentityid  https://www.sp.com:8443/openam
branch          mainbranch
sun.authlevel 0This chapter introduces AM Fedlets, and shows how to use them as part of your Java application.
An AM Fedlet is a small Java web application that can act as a service provider for a specific identity provider without requiring that you install all of AM.
When your organization acts as the identity provider and you want to enable service providers to federate their services with yours, you can generate configuration files for a Fedlet.
Fedlets are easy to integrate into Java web applications. The Fedlet does not require an entire AM installation alongside your application, but instead can redirect to AM for single sign-on, and to retrieve SAML assertions.
After receiving the configuration files for the Fedlet, the service provider administrator installs them, and then obtains the Fedlet web application from the AM distribution and installs it in the application web container.
Fedlets support SAML v2.0 features, as shown in the following table:
| SAML v2.0 Feature | Java Fedlet |
|---|---|
| IDP and SP-initiated Single Sign-On (HTTP Artifact) | Supported |
| IDP and SP-initiated Single Sign-On (HTTP POST) | Supported |
| IDP and SP-initiated Single Logout (HTTP POST) | Supported |
| IDP and SP-initiated Single Logout (HTTP Redirect) | Supported |
| Sign Requests and Responses | Supported |
| Encrypt Assertion, Attribute, and NameID Elements | Supported |
| Export SP Metadata | Supported |
| Attribute Queries | Supported |
| XACML Requests | Supported |
| Multiple IDPs | Supported |
| External IDP Discovery Service | Supported |
| Bundled IDP Reader Service for Discovery | Supported |
This section introduces AM Fedlets and shows how to use the Fedlet as part of your Java web application.
The following sections provide procedures for creating, installing, configuring, and testing a Java Fedlet to perform single sign-on and single logout with an identity provider:
You can also use the Fedlet to query attributes of users on identity
providers configured with the Attribute Authority
(AttrAuth) and the XACML Policy Decision Point
(XACML PDP) types. See the following sections for
additional configuration requirements:
Perform the following steps on the identity provider to create a
Fedlet.zip file containing the configuration files for
the Java fedlet:
If you have not already done so, create a hosted identity provider, using the test certificate for the signing key.
For information about how to create a hosted identity provider, see "Creating a Hosted Identity Provider".
Under Realms > Realm Name > Dashboard, select Create Fedlet Configuration, and then select Create Fedlet Configuration a second time.
Note that the circle of trust includes your hosted identity provider.
Name the Fedlet, and set the Destination URL.
You can use the deployment URL, such as
http://openam.example.com:8080/fedletas both the name and the destination URL.Select Create to generate the
Fedlet.zipfile.A message appears indicating Fedlet creation was successful. Note the location of the generated output file in the message. For example,
${amConfigBase}/myfedlets/httpsopenamexamplecom8443fedlet/Fedlet.zip.Select OK to close the message informing you that the Fedlet was created.
Transfer the
Fedlet.zipfile to the service provider administrator.
Having obtained the Fedlet.zip file from the identity
provider administrator, the service provider adminsitrator unzips and
installs the file, and then installs the fedlet.war
file from the AM distribution:
Create the
fedletdirectory in the home directory of the user that runs the AM web container:$ cd $HOME $ mkdir fedlet
Copy the
Fedlet.zipfile obtained from the identity provider administrator to the$HOME/fedletdirectory.Unzip the
Fedlet.zipfile.Move all the files under the
$HOME/fedlet/confdirectory to the$HOME/fedletdirectory.Obtain the
Fedlet-6.0.0.7.zipfile from the full AM distribution file,AM-6.0.0.7.zip.Unzip the
Fedlet-6.0.0.7.zipfile:$ cd /path/to/openam-distribution/openam $ unzip Fedlet-6.0.0.7.zip
Deploy the Fedlet in your web container:
$ cp /path/to/openam-distribution/openam/fedlet.war /path/to/tomcat/webapps
To test single sign-on and single logout from the Fedlet, browse to the
Fedlet URL. For example,
http://openam.example.com:8080/fedlet.
Try one or more examples from the Fedlet home page:

You can log in to the identity provider with username
demo and password changeit.
You can use the Fedlet to query attributes on an identity provider. The
identity provider must be configured with the Attribute Authority
(AttrAuth) type and should sign responses. The Fedlet
must be configured to deal with signed responses. Furthermore, map the
attributes to request in both the identity provider and the Fedlet
configurations.
Perform the following steps:
Add the Attribute Authority type to the hosted identity provider.
On AM where the identity provider is hosted, log in to the AM console as an administrator, such as
amAdmin.Under Realms > Realm Name > Applications > Federation > Entity Providers, select the New button even though you plan to change the configuration rather than create a new provider.
Select the protocol of the provider:
SAMLv2.In the Create SAMLv2 Entity Provider page, do the following.
Set the Realm.
Set the Entity Identifier to the same entity identifier you selected in the previous screen.
In the Attribute Authority section, set the Meta Alias for example to
/attra, and set the Signing certificate alias and Encryption certificate alias values totest(to use the test certificate).Select Create to save your changes.
Disregard any error messages stating that the entity already exists.
AttrAuthnow appears in the list of Types for your identity provider.
Under Realms > Realm Name > Applications > Federation > Entity Providers, select the identity provider's name to open the provider's configuration.
Make sure attributes for the query are mapped on the Identity Provider.
Under IDP > Attribute Mapper, add the following values to the Attribute Map if they are not yet present.
cn=cnsn=snuid=uid
Note
Make sure to use thread-safe code if you implement the AttributeAuthorityMapper. You can use the attributes on the HttpRequest instead of synchronizing them. The default AttributeAuthorityMapper uses an attribute on the HttpServletRequest to pass information to the AttributeQueryUtil.
Select Save to save your changes.
Generate the Fedlet configuration files as described in "To Create Configuration Files for a Fedlet", making sure you map the attributes.
cn=cnsn=snuid=uid
This step creates a Fedlet configuration with updated identity provider metadata. If you already created a Fedlet, either use a different name, or delete the existing Fedlet.
Deploy the new Fedlet as described in "To Install and Configure the Fedlet as a Demo Application".
Edit the new Fedlet configuration to request signing and encryption, and replace the existing configuration in AM with the edited configuration.
Copy the test keystore from AM, and prepare password files.
$ scp user@openam:/home/user/openam/security/keystores/keystore.jceks ~/fedlet/
The Fedlet uses password files when accessing the keystore. These password files contain encoded passwords, where the encoding is specific to the Fedlet.
To encode the password, use
fedletEncode.jsp.fedletEncode.jspis in the deployed Fedlet, for examplehttp://openam.example.com:8080/fedlet/fedletEncode.jsp.If you are evaluating the Fedlet using the server's keystore and passwords, the strings to encode are in the
${amSecretsBase}/default/.storepassand${amSecretsBase}/default/.keypassfiles. Encode each and store it in the Fedlet password file of the same name:$ echo encoded-storepass > ~/fedlet/.storepass $ echo encoded-keypass > ~/fedlet/.keypass
Edit the following properties in the
~/fedlet/FederationConfig.propertiesfile:com.sun.identity.saml.xmlsig.keystore=@FEDLET_HOME@/keystore.jceks # Matches keystore filename. com.sun.identity.saml.xmlsig.storepass=@FEDLET_HOME@/.storepass # Matches keystore password. com.sun.identity.saml.xmlsig.keypass=@FEDLET_HOME@/.keypass # Matches private key password. com.sun.identity.saml.xmlsig.certalias=test # Matches key alias. com.sun.identity.saml.xmlsig.storetype=JCEKS # Matches keystore type.
Edit the
~/fedlet/sp.xmlfile.To use the test certificate for the attribute query feature, add a
RoleDescriptorto theEntityDescriptorafter theSSODescriptor. TheRoleDescriptordescribes the certificates that are used for signing and encryption. The attribute authority encrypts the response with the Fedlet's public key, and the Fedlet decrypts the response with its private key.Change the following:
<RoleDescriptor xmlns:xsi="http://www.w3.org/2001/XMLSchema-instance"
    xmlns:query="urn:oasis:names:tc:SAML:metadata:ext:query"
    xsi:type="query:AttributeQueryDescriptorType"
    protocolSupportEnumeration="urn:oasis:names:tc:SAML:2.0:protocol">
</RoleDescriptor>
To include information about the certificate of the signing and encryption key in PEM format. The following example uses the
testcertificate:<RoleDescriptor xmlns:xsi="http://www.w3.org/2001/XMLSchema-instance" xmlns:query="urn:oasis:names:tc:SAML:metadata:ext:query" xsi:type="query:AttributeQueryDescriptorType" protocolSupportEnumeration="urn:oasis:names:tc:SAML:2.0:protocol"> <KeyDescriptor use="signing"> <ds:KeyInfo xmlns:ds="http://www.w3.org/2000/09/xmldsig#"> <ds:X509Data> <ds:X509Certificate> MIIDaDCCAlCgAwIBAgIDcB/YMA0GCSqGSIb3DQEBCwUAMGUxCzAJBgNVBAYTAlVL MRAwDgYDVQQIEwdCcmlzdG9sMRAwDgYDVQQHEwdCcmlzdG9sMRIwEAYDVQQKEwlG b3JnZVJvY2sxDzANBgNVBAsTBk9wZW5BTTENMAsGA1UEAxMEdGVzdDAeFw0xNjAz MTgxMTU2MjhaFw0yNjAzMTYxMTU2MjhaMGUxCzAJBgNVBAYTAlVLMRAwDgYDVQQI EwdCcmlzdG9sMRAwDgYDVQQHEwdCcmlzdG9sMRIwEAYDVQQKEwlGb3JnZVJvY2sx DzANBgNVBAsTBk9wZW5BTTENMAsGA1UEAxMEdGVzdDCCASIwDQYJKoZIhvcNAQEB BQADggEPADCCAQoCggEBAKNbl89eP6B8kZATNSPe3+OZ3esLx31hjX+dakHtPwXC AaCKqJFwjwKdxyRuPdsVG+8Dbk3PGhk26aJrSE93EpxeqmQqxNPMeD+N0/8pjkuV YWwPIQ/ts2iTiWOVn7wzlE4ASfvupqOR5pjuYMWNo/pd4L7QNjUCKoAt9H11HMyi P+6roo/EYgX4AH7OAhfUMncYsopWhkW/ze9z8wTXc8BAEgDmt8zFCez1CtqJB/Ml SBUGDgk8oHYDsHKmx05baBaOBQ8LRGP5SULSbRtu34eLFootBIn0FvUZSnwTiSpb aHHRgWrMOVm07oSLWBuO3h/bj38zBuuqqVsAK8YuyoECAwEAAaMhMB8wHQYDVR0O BBYEFHxfAbr6PQ5Xgc+jVx+AGTPnnpWZMA0GCSqGSIb3DQEBCwUAA4IBAQAZBMJ2 9/2idv1ztC6ArHtB4kw/nHHwthXFwtWAN7sRPB8tLW7fD8aJ43RQr5107Bg1Lgkm t+FZxpafqUC/mukjIzGzbW0COMSOTcWUGss+HxK6M6Fl9aOzKJMct1uOSpPFgjIt cGqydGZXR2FH93vXWoAotUwtZ119IixIdxpOJwYJg0HFn+GEfpU1PmiLfq2/uwqJ 0hGCNfNcm9puagzhQrcDFOnolxjnYPSfSkU5wxlGo99yE5eJwoHXXU7csaZVttmx 7sPj1lUENogXUM6JMqzSyEIm1XCOCL8rZJkZ781W5CwZhuJTNzV31sBREs8FaaCe ksu7Y48BmkUqw6E9 </ds:X509Certificate> </ds:X509Data> </ds:KeyInfo> </KeyDescriptor> <KeyDescriptor use="encryption"> <ds:KeyInfo xmlns:ds="http://www.w3.org/2000/09/xmldsig#"> <ds:X509Data> <ds:X509Certificate> MIIDaDCCAlCgAwIBAgIDcB/YMA0GCSqGSIb3DQEBCwUAMGUxCzAJBgNVBAYTAlVL MRAwDgYDVQQIEwdCcmlzdG9sMRAwDgYDVQQHEwdCcmlzdG9sMRIwEAYDVQQKEwlG b3JnZVJvY2sxDzANBgNVBAsTBk9wZW5BTTENMAsGA1UEAxMEdGVzdDAeFw0xNjAz MTgxMTU2MjhaFw0yNjAzMTYxMTU2MjhaMGUxCzAJBgNVBAYTAlVLMRAwDgYDVQQI EwdCcmlzdG9sMRAwDgYDVQQHEwdCcmlzdG9sMRIwEAYDVQQKEwlGb3JnZVJvY2sx DzANBgNVBAsTBk9wZW5BTTENMAsGA1UEAxMEdGVzdDCCASIwDQYJKoZIhvcNAQEB BQADggEPADCCAQoCggEBAKNbl89eP6B8kZATNSPe3+OZ3esLx31hjX+dakHtPwXC AaCKqJFwjwKdxyRuPdsVG+8Dbk3PGhk26aJrSE93EpxeqmQqxNPMeD+N0/8pjkuV YWwPIQ/ts2iTiWOVn7wzlE4ASfvupqOR5pjuYMWNo/pd4L7QNjUCKoAt9H11HMyi P+6roo/EYgX4AH7OAhfUMncYsopWhkW/ze9z8wTXc8BAEgDmt8zFCez1CtqJB/Ml SBUGDgk8oHYDsHKmx05baBaOBQ8LRGP5SULSbRtu34eLFootBIn0FvUZSnwTiSpb aHHRgWrMOVm07oSLWBuO3h/bj38zBuuqqVsAK8YuyoECAwEAAaMhMB8wHQYDVR0O BBYEFHxfAbr6PQ5Xgc+jVx+AGTPnnpWZMA0GCSqGSIb3DQEBCwUAA4IBAQAZBMJ2 9/2idv1ztC6ArHtB4kw/nHHwthXFwtWAN7sRPB8tLW7fD8aJ43RQr5107Bg1Lgkm t+FZxpafqUC/mukjIzGzbW0COMSOTcWUGss+HxK6M6Fl9aOzKJMct1uOSpPFgjIt cGqydGZXR2FH93vXWoAotUwtZ119IixIdxpOJwYJg0HFn+GEfpU1PmiLfq2/uwqJ 0hGCNfNcm9puagzhQrcDFOnolxjnYPSfSkU5wxlGo99yE5eJwoHXXU7csaZVttmx 7sPj1lUENogXUM6JMqzSyEIm1XCOCL8rZJkZ781W5CwZhuJTNzV31sBREs8FaaCe ksu7Y48BmkUqw6E9 </ds:X509Certificate> </ds:X509Data> </ds:KeyInfo> <EncryptionMethod Algorithm="http://www.w3.org/2001/04/xmlenc#aes128-cbc"> <xenc:KeySize xmlns:xenc="http://www.w3.org/2001/04/xmlenc#" >128</xenc:KeySize> </EncryptionMethod> </KeyDescriptor> </RoleDescriptor>If you use a different key, adapt the
EncryptionMethodelement as necessary and include your own certificate. Note that you can view a certificate in PEM format using the Java keytool command:$ keytool -exportcert -alias test -rfc -keystore keystore.jceks -storepass password -----BEGIN CERTIFICATE----- MIIDaDCCAlCgAwIBAgIDcB/YMA0GCSqGSIb3DQEBCwUAMGUxCzAJBgNVBAYTAlVL MRAwDgYDVQQIEwdCcmlzdG9sMRAwDgYDVQQHEwdCcmlzdG9sMRIwEAYDVQQKEwlG b3JnZVJvY2sxDzANBgNVBAsTBk9wZW5BTTENMAsGA1UEAxMEdGVzdDAeFw0xNjAz MTgxMTU2MjhaFw0yNjAzMTYxMTU2MjhaMGUxCzAJBgNVBAYTAlVLMRAwDgYDVQQI EwdCcmlzdG9sMRAwDgYDVQQHEwdCcmlzdG9sMRIwEAYDVQQKEwlGb3JnZVJvY2sx DzANBgNVBAsTBk9wZW5BTTENMAsGA1UEAxMEdGVzdDCCASIwDQYJKoZIhvcNAQEB BQADggEPADCCAQoCggEBAKNbl89eP6B8kZATNSPe3+OZ3esLx31hjX+dakHtPwXC AaCKqJFwjwKdxyRuPdsVG+8Dbk3PGhk26aJrSE93EpxeqmQqxNPMeD+N0/8pjkuV YWwPIQ/ts2iTiWOVn7wzlE4ASfvupqOR5pjuYMWNo/pd4L7QNjUCKoAt9H11HMyi P+6roo/EYgX4AH7OAhfUMncYsopWhkW/ze9z8wTXc8BAEgDmt8zFCez1CtqJB/Ml SBUGDgk8oHYDsHKmx05baBaOBQ8LRGP5SULSbRtu34eLFootBIn0FvUZSnwTiSpb aHHRgWrMOVm07oSLWBuO3h/bj38zBuuqqVsAK8YuyoECAwEAAaMhMB8wHQYDVR0O BBYEFHxfAbr6PQ5Xgc+jVx+AGTPnnpWZMA0GCSqGSIb3DQEBCwUAA4IBAQAZBMJ2 9/2idv1ztC6ArHtB4kw/nHHwthXFwtWAN7sRPB8tLW7fD8aJ43RQr5107Bg1Lgkm t+FZxpafqUC/mukjIzGzbW0COMSOTcWUGss+HxK6M6Fl9aOzKJMct1uOSpPFgjIt cGqydGZXR2FH93vXWoAotUwtZ119IixIdxpOJwYJg0HFn+GEfpU1PmiLfq2/uwqJ 0hGCNfNcm9puagzhQrcDFOnolxjnYPSfSkU5wxlGo99yE5eJwoHXXU7csaZVttmx 7sPj1lUENogXUM6JMqzSyEIm1XCOCL8rZJkZ781W5CwZhuJTNzV31sBREs8FaaCe ksu7Y48BmkUqw6E9 -----END CERTIFICATE-----
Edit the
~/fedlet/sp-extended.xmlfile to use the test certificate for the attribute query.Change the following, assuming your circle of trust is called
cot:<AttributeQueryConfig metaAlias="/attrQuery"> <Attribute name="signingCertAlias"> <Value></Value> </Attribute> <Attribute name="encryptionCertAlias"> <Value></Value> </Attribute> <Attribute name="wantNameIDEncrypted"> <Value></Value> </Attribute> <Attribute name="cotlist"> <Value>cot</Value> </Attribute> </AttributeQueryConfig>To:
<AttributeQueryConfig metaAlias="/attrQuery">
    <Attribute name="signingCertAlias">
        <Value>test</Value>
    </Attribute>
    <Attribute name="encryptionCertAlias">
        <Value>test</Value>
    </Attribute>
    <Attribute name="wantNameIDEncrypted">
        <Value>true</Value>
    </Attribute>
    <Attribute name="cotlist">
        <Value>cot</Value>
    </Attribute>
</AttributeQueryConfig>
In the AM console, under Realms > Realm Name > Applications > Federation > Entity Providers, delete the configuration for your new Fedlet.
Make a copy of the
sp-extended.xmlfile calledsp-extended-copy.xml, and sethosted="0"in the root element of the copy.Use the copied file,
sp-extended-copy.xml, when importing the Fedlet configuration into AM. AM must register the Fedlet as a remote service provider.Under Realms > Realm Name > Applications > Federation > Entity Providers, select the Import Entity button and import your updated Fedlet configuration.
This ensures AM has the correct service provider configuration for your new Fedlet.
Restart the Fedlet or the container where it is deployed.
Try the Attribute Query test.
Access the Fedlet.

Try single sign-on with username
demo, passwordchangeit.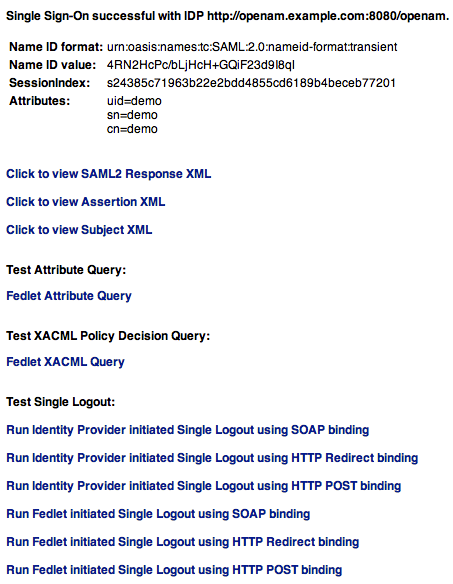
Select Fedlet Attribute Query, set the attributes in the Attribute Query page to match the mapped attributes, and then select Submit.

Check that you see the attribute values in the response.
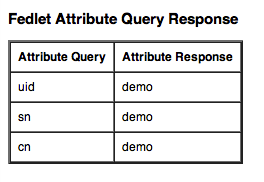
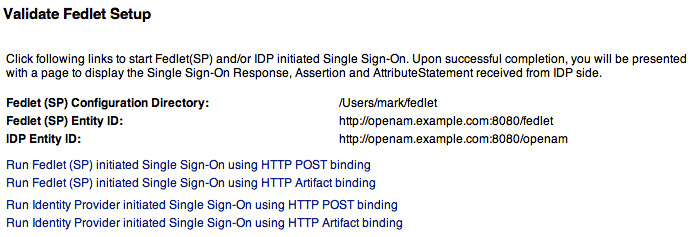

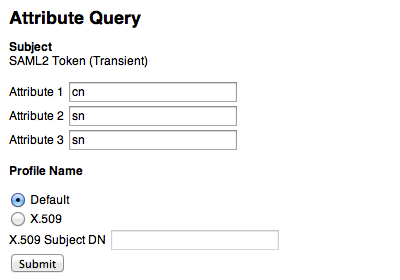

You can use the Fedlet to query an XACML policy decision point on an
identity provider. The identity provider must have a policy configured, must
be configured with the Policy Decision Point (XACML PDP)
type, and must have a SAML v2.0 SOAP Binding PDP handler configured.
Perform the following steps:
Configure a policy on the hosted identity provider.
AM uses the policy to make the decision whether to permit or deny access to a resource. For the purpose of the demonstration, configure a simple policy that allows all authenticated users HTTP GET access on
http://www.example.com/.Log in to the AM console as an administrator, such as
amAdmin.Access the policy editor under Realms > Realm Name > Authorization.
Choose an application that allows the resource pattern
http://www.example.com/*, and HTTP GET as an action.If no application exists in the realm, add a new application for the resource pattern
http://www.example.com/*.Add a new policy with the following characteristics.
Resource pattern:
http://www.example.com/*Actions: allow
GETSubject conditions:
Authenticated Users
Add the Policy Decision Point type to the identity provider.
Under Realms > Realm Name > Applications > Federation > Entity Providers, select the New button even though you plan to change the configuration rather than create a new provider.
Select the protocol of the provider:
SAMLv2.In the Create SAMLv2 Entity Provider page, do the following.
Set the Realm.
Set the Entity Identifier to the entity identifier for the hosted identity provider.
In the XACML Policy Decision Point section, set the Meta Alias for example to
/pdp.Select Create to save your changes.
Disregard any error messages stating that the entity already exists.
XACML PDPnow appears in the list of Types for your identity provider.
Add the PDP handler for the SAML v2.0 SOAP Binding.
Navigate to Configure > Global Services, select SAMLv2 SOAP Binding, and then select New.
Set the new key to match the meta alias you used when adding the XACML PDP type to the identity provider configuration, for example
/pdp.Key:
/pdpClass:
com.sun.identity.xacml.plugins.XACMLAuthzDecisionQueryHandler
Select OK. (Your changes are not saved yet.)
Select Save to actually save the new Key:Class pair.
Create the Fedlet's configuration files as described in "To Create Configuration Files for a Fedlet".
This step creates Fedlet configuration files with updated identity provider metadata. If you already created a Fedlet, either use a different name, or delete the existing Fedlet.
Deploy the new Fedlet as described in "To Install and Configure the Fedlet as a Demo Application".
Try the XACML Query test.
Access the Fedlet.
Try single sign-on with username
demo, passwordchangeit.Select XACML Attribute Query, set the Resource URL in the XACML Query page to
http://www.example.com/, and then select Submit.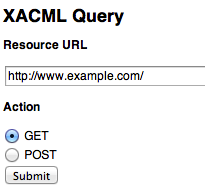
Check that you see the permit decision in the response.


By default when you create the Java Fedlet, signing and encryption are not configured. You can however set up AM and the Fedlet to sign and to verify XML signatures and to encrypt and to decrypt data such as SAML assertions. If you have tried the Attribute Query demonstration, then you have already configured the Fedlet to request signing and encryption using the test keys from the identity provider.
Enabling signing and encryption for the Java Fedlet involves the following high level stages:
Before you create the Fedlet, configure the IDP to sign and encrypt data. See Realms > Realm Name > Applications > Federation > Entity Providers > IDP Name > Signing and Encryption in the AM console.
For evaluation, you can use the
testcertificate delivered with AM.Initially deploy and configure the Fedlet, but do not use the Fedlet until you finish.
On the Fedlet side set up a JCEKS keystore used for signing and encryption. For evaluation, you can use copy the
keystore.jceksfile delivered with AM. You can find the file in the$HOME/openam/security/keystores/directory for a server instance with base URIopenam. The built-in keystore includes thetestcertificate.You must also set up the
.storepassand.keypassfiles using thefedletEncode.jsppage, such ashttp://openam.example.com:8080/fedlet/fedletEncode.jsp, to encode passwords on the Fedlet side.The passwords for the test keystore and private key are recorded in the AM
.storepassand.keypassfiles. These files are located in the${amSecretsBase}/defaults/directory.Configure the Fedlet to perform signing and encryption by ensuring the Fedlet has access to the keystore, and by updating the SP metadata for the Fedlet.
Import the updated SP metadata into the IDP to replace the default Fedlet configuration.
Restart the Fedlet or container in which the Fedlet runs for the changes you made on the Fedlet side to take effect.
The FederationConfig.properties file specifies
the paths to the keystore holding the signing or encryption keys for
the Fedlet, the keystore password file, and the private key password
file.
After setting up your keystore and password files as described above, edit the properties file in the configuration directory, such as
$HOME/fedlet/FederationConfig.properties, to point to the keystore and password files.Export the certificate to use for signing and encryption purposes.
$ keytool -export -rfc -keystore keystore.jceks -alias test
Enter keystore password:
-----BEGIN CERTIFICATE-----
MIIDaDCCAlCgAwIBAgIDcB/YMA0GCSqGSIb3DQEBCwUAMGUxCzAJBgNVBAYTAlVL
MRAwDgYDVQQIEwdCcmlzdG9sMRAwDgYDVQQHEwdCcmlzdG9sMRIwEAYDVQQKEwlG
b3JnZVJvY2sxDzANBgNVBAsTBk9wZW5BTTENMAsGA1UEAxMEdGVzdDAeFw0xNjAz
MTgxMTU2MjhaFw0yNjAzMTYxMTU2MjhaMGUxCzAJBgNVBAYTAlVLMRAwDgYDVQQI
EwdCcmlzdG9sMRAwDgYDVQQHEwdCcmlzdG9sMRIwEAYDVQQKEwlGb3JnZVJvY2sx
DzANBgNVBAsTBk9wZW5BTTENMAsGA1UEAxMEdGVzdDCCASIwDQYJKoZIhvcNAQEB
BQADggEPADCCAQoCggEBAKNbl89eP6B8kZATNSPe3+OZ3esLx31hjX+dakHtPwXC
AaCKqJFwjwKdxyRuPdsVG+8Dbk3PGhk26aJrSE93EpxeqmQqxNPMeD+N0/8pjkuV
YWwPIQ/ts2iTiWOVn7wzlE4ASfvupqOR5pjuYMWNo/pd4L7QNjUCKoAt9H11HMyi
P+6roo/EYgX4AH7OAhfUMncYsopWhkW/ze9z8wTXc8BAEgDmt8zFCez1CtqJB/Ml
SBUGDgk8oHYDsHKmx05baBaOBQ8LRGP5SULSbRtu34eLFootBIn0FvUZSnwTiSpb
aHHRgWrMOVm07oSLWBuO3h/bj38zBuuqqVsAK8YuyoECAwEAAaMhMB8wHQYDVR0O
BBYEFHxfAbr6PQ5Xgc+jVx+AGTPnnpWZMA0GCSqGSIb3DQEBCwUAA4IBAQAZBMJ2
9/2idv1ztC6ArHtB4kw/nHHwthXFwtWAN7sRPB8tLW7fD8aJ43RQr5107Bg1Lgkm
t+FZxpafqUC/mukjIzGzbW0COMSOTcWUGss+HxK6M6Fl9aOzKJMct1uOSpPFgjIt
cGqydGZXR2FH93vXWoAotUwtZ119IixIdxpOJwYJg0HFn+GEfpU1PmiLfq2/uwqJ
0hGCNfNcm9puagzhQrcDFOnolxjnYPSfSkU5wxlGo99yE5eJwoHXXU7csaZVttmx
7sPj1lUENogXUM6JMqzSyEIm1XCOCL8rZJkZ781W5CwZhuJTNzV31sBREs8FaaCe
ksu7Y48BmkUqw6E9
-----END CERTIFICATE-----
Edit the standard metadata file for the Fedlet, such as
$HOME/fedlet/sp.xml, to include the certificate in KeyDescriptor elements, that are children of the SPSSODescriptor element.<EntityDescriptor xmlns="urn:oasis:names:tc:SAML:2.0:metadata" entityID="http://www.example.com:8080/fedlet"> <SPSSODescriptor AuthnRequestsSigned="true" WantAssertionsSigned="true" protocolSupportEnumeration="urn:oasis:names:tc:SAML:2.0:protocol"> <KeyDescriptor use="signing"> <ds:KeyInfo xmlns:ds="http://www.w3.org/2000/09/xmldsig#"> <ds:X509Data> <ds:X509Certificate> MIIDaDCCAlCgAwIBAgIDcB/YMA0GCSqGSIb3DQEBCwUAMGUxCzAJBgNVBAYTAlVL MRAwDgYDVQQIEwdCcmlzdG9sMRAwDgYDVQQHEwdCcmlzdG9sMRIwEAYDVQQKEwlG b3JnZVJvY2sxDzANBgNVBAsTBk9wZW5BTTENMAsGA1UEAxMEdGVzdDAeFw0xNjAz MTgxMTU2MjhaFw0yNjAzMTYxMTU2MjhaMGUxCzAJBgNVBAYTAlVLMRAwDgYDVQQI EwdCcmlzdG9sMRAwDgYDVQQHEwdCcmlzdG9sMRIwEAYDVQQKEwlGb3JnZVJvY2sx DzANBgNVBAsTBk9wZW5BTTENMAsGA1UEAxMEdGVzdDCCASIwDQYJKoZIhvcNAQEB BQADggEPADCCAQoCggEBAKNbl89eP6B8kZATNSPe3+OZ3esLx31hjX+dakHtPwXC AaCKqJFwjwKdxyRuPdsVG+8Dbk3PGhk26aJrSE93EpxeqmQqxNPMeD+N0/8pjkuV YWwPIQ/ts2iTiWOVn7wzlE4ASfvupqOR5pjuYMWNo/pd4L7QNjUCKoAt9H11HMyi P+6roo/EYgX4AH7OAhfUMncYsopWhkW/ze9z8wTXc8BAEgDmt8zFCez1CtqJB/Ml SBUGDgk8oHYDsHKmx05baBaOBQ8LRGP5SULSbRtu34eLFootBIn0FvUZSnwTiSpb aHHRgWrMOVm07oSLWBuO3h/bj38zBuuqqVsAK8YuyoECAwEAAaMhMB8wHQYDVR0O BBYEFHxfAbr6PQ5Xgc+jVx+AGTPnnpWZMA0GCSqGSIb3DQEBCwUAA4IBAQAZBMJ2 9/2idv1ztC6ArHtB4kw/nHHwthXFwtWAN7sRPB8tLW7fD8aJ43RQr5107Bg1Lgkm t+FZxpafqUC/mukjIzGzbW0COMSOTcWUGss+HxK6M6Fl9aOzKJMct1uOSpPFgjIt cGqydGZXR2FH93vXWoAotUwtZ119IixIdxpOJwYJg0HFn+GEfpU1PmiLfq2/uwqJ 0hGCNfNcm9puagzhQrcDFOnolxjnYPSfSkU5wxlGo99yE5eJwoHXXU7csaZVttmx 7sPj1lUENogXUM6JMqzSyEIm1XCOCL8rZJkZ781W5CwZhuJTNzV31sBREs8FaaCe ksu7Y48BmkUqw6E9 </ds:X509Certificate> </ds:X509Data> </ds:KeyInfo> </KeyDescriptor> <KeyDescriptor use="encryption"> <ds:KeyInfo xmlns:ds="http://www.w3.org/2000/09/xmldsig#"> <ds:X509Data> <ds:X509Certificate> MIIDaDCCAlCgAwIBAgIDcB/YMA0GCSqGSIb3DQEBCwUAMGUxCzAJBgNVBAYTAlVL MRAwDgYDVQQIEwdCcmlzdG9sMRAwDgYDVQQHEwdCcmlzdG9sMRIwEAYDVQQKEwlG b3JnZVJvY2sxDzANBgNVBAsTBk9wZW5BTTENMAsGA1UEAxMEdGVzdDAeFw0xNjAz MTgxMTU2MjhaFw0yNjAzMTYxMTU2MjhaMGUxCzAJBgNVBAYTAlVLMRAwDgYDVQQI EwdCcmlzdG9sMRAwDgYDVQQHEwdCcmlzdG9sMRIwEAYDVQQKEwlGb3JnZVJvY2sx DzANBgNVBAsTBk9wZW5BTTENMAsGA1UEAxMEdGVzdDCCASIwDQYJKoZIhvcNAQEB BQADggEPADCCAQoCggEBAKNbl89eP6B8kZATNSPe3+OZ3esLx31hjX+dakHtPwXC AaCKqJFwjwKdxyRuPdsVG+8Dbk3PGhk26aJrSE93EpxeqmQqxNPMeD+N0/8pjkuV YWwPIQ/ts2iTiWOVn7wzlE4ASfvupqOR5pjuYMWNo/pd4L7QNjUCKoAt9H11HMyi P+6roo/EYgX4AH7OAhfUMncYsopWhkW/ze9z8wTXc8BAEgDmt8zFCez1CtqJB/Ml SBUGDgk8oHYDsHKmx05baBaOBQ8LRGP5SULSbRtu34eLFootBIn0FvUZSnwTiSpb aHHRgWrMOVm07oSLWBuO3h/bj38zBuuqqVsAK8YuyoECAwEAAaMhMB8wHQYDVR0O BBYEFHxfAbr6PQ5Xgc+jVx+AGTPnnpWZMA0GCSqGSIb3DQEBCwUAA4IBAQAZBMJ2 9/2idv1ztC6ArHtB4kw/nHHwthXFwtWAN7sRPB8tLW7fD8aJ43RQr5107Bg1Lgkm t+FZxpafqUC/mukjIzGzbW0COMSOTcWUGss+HxK6M6Fl9aOzKJMct1uOSpPFgjIt cGqydGZXR2FH93vXWoAotUwtZ119IixIdxpOJwYJg0HFn+GEfpU1PmiLfq2/uwqJ 0hGCNfNcm9puagzhQrcDFOnolxjnYPSfSkU5wxlGo99yE5eJwoHXXU7csaZVttmx 7sPj1lUENogXUM6JMqzSyEIm1XCOCL8rZJkZ781W5CwZhuJTNzV31sBREs8FaaCe ksu7Y48BmkUqw6E9 </ds:X509Certificate> </ds:X509Data> </ds:KeyInfo> <EncryptionMethod Algorithm="http://www.w3.org/2001/04/xmlenc#aes128-cbc"> <xenc:KeySize xmlns:xenc="http://www.w3.org/2001/04/xmlenc#"> 128 </xenc:KeySize> </EncryptionMethod> </KeyDescriptor> <SingleLogoutService Binding="urn:oasis:names:tc:SAML:2.0:bindings:HTTP-Redirect" Location="http://www.example.com:8080/fedlet/fedletSloRedirect" ResponseLocation="http://www.example.com:8080/fedlet/fedletSloRedirect" /> <SingleLogoutService Binding="urn:oasis:names:tc:SAML:2.0:bindings:HTTP-POST" Location="http://www.example.com:8080/fedlet/fedletSloPOST" ResponseLocation="http://www.example.com:8080/fedlet/fedletSloPOST" /> <SingleLogoutService Binding="urn:oasis:names:tc:SAML:2.0:bindings:SOAP" Location="http://www.example.com:8080/fedlet/fedletSloSoap" /> <NameIDFormat> urn:oasis:names:tc:SAML:2.0:nameid-format:transient </NameIDFormat> <AssertionConsumerService index="0" isDefault="true" Binding="urn:oasis:names:tc:SAML:2.0:bindings:HTTP-POST" Location="http://www.example.com:8080/fedlet/fedletapplication" /> <AssertionConsumerService index="1" Binding="urn:oasis:names:tc:SAML:2.0:bindings:HTTP-Artifact" Location="http://www.example.com:8080/fedlet/fedletapplication" /> </SPSSODescriptor> <RoleDescriptor xmlns:xsi="http://www.w3.org/2001/XMLSchema-instance" xmlns:query="urn:oasis:names:tc:SAML:metadata:ext:query" xsi:type="query:AttributeQueryDescriptorType" protocolSupportEnumeration="urn:oasis:names:tc:SAML:2.0:protocol"> </RoleDescriptor> <XACMLAuthzDecisionQueryDescriptor WantAssertionsSigned="false" protocolSupportEnumeration="urn:oasis:names:tc:SAML:2.0:protocol" /> </EntityDescriptor>Edit the extended metadata file for the Fedlet, such as
$HOME/fedlet/sp-extended.xml, to set the certificate alias names to the alias for the Fedlet certificate, and thewant*Signedandwant*Encryptedvalues totrue.If you reformat the file, take care not to add white space around string values in elements.
<EntityConfig xmlns="urn:sun:fm:SAML:2.0:entityconfig"
 xmlns:fm="urn:sun:fm:SAML:2.0:entityconfig" hosted="1"
 entityID="http://www.example.com:8080/fedlet">
 <SPSSOConfig metaAlias="/sp">
  <Attribute name="description">
   <Value></Value>
  </Attribute>
  <Attribute name="signingCertAlias">
   <Value>test</Value>
  </Attribute>
  <Attribute name="encryptionCertAlias">
   <Value>test</Value>
  </Attribute>
  <Attribute name="basicAuthOn">
   <Value>false</Value>
  </Attribute>
  <Attribute name="basicAuthUser">
   <Value></Value>
  </Attribute>
  <Attribute name="basicAuthPassword">
   <Value></Value>
  </Attribute>
  <Attribute name="autofedEnabled">
   <Value>false</Value>
  </Attribute>
  <Attribute name="autofedAttribute">
   <Value></Value>
  </Attribute>
  <Attribute name="transientUser">
   <Value>anonymous</Value>
  </Attribute>
  <Attribute name="spAdapter">
   <Value></Value>
  </Attribute>
  <Attribute name="spAdapterEnv">
   <Value></Value>
  </Attribute>
  <Attribute name="fedletAdapter">
   <Value>com.sun.identity.saml2.plugins.DefaultFedletAdapter</Value>
  </Attribute>
  <Attribute name="fedletAdapterEnv">
   <Value></Value>
  </Attribute>
  <Attribute name="spAccountMapper">
   <Value>com.sun.identity.saml2.plugins.DefaultLibrarySPAccountMapper</Value>
  </Attribute>
  <Attribute name="useNameIDAsSPUserID">
   <Value>false</Value>
  </Attribute>
  <Attribute name="spAttributeMapper">
   <Value>com.sun.identity.saml2.plugins.DefaultSPAttributeMapper</Value>
  </Attribute>
  <Attribute name="spAuthncontextMapper">
   <Value>com.sun.identity.saml2.plugins.DefaultSPAuthnContextMapper</Value>
  </Attribute>
  <Attribute name="spAuthncontextClassrefMapping">
   <Value
   >urn:oasis:names:tc:SAML:2.0:ac:classes:PasswordProtectedTransport|0|default</Value>
  </Attribute>
  <Attribute name="spAuthncontextComparisonType">
   <Value>exact</Value>
  </Attribute>
  <Attribute name="attributeMap">
   <Value>*=*</Value>
  </Attribute>
  <Attribute name="saml2AuthModuleName">
   <Value></Value>
  </Attribute>
  <Attribute name="localAuthURL">
   <Value></Value>
  </Attribute>
  <Attribute name="intermediateUrl">
   <Value></Value>
  </Attribute>
  <Attribute name="defaultRelayState">
   <Value></Value>
  </Attribute>
  <Attribute name="appLogoutUrl">
   <Value>http://www.example.com:8080/fedlet/logout</Value>
  </Attribute>
  <Attribute name="assertionTimeSkew">
   <Value>300</Value>
  </Attribute>
  <Attribute name="wantAttributeEncrypted">
   <Value>true</Value>
  </Attribute>
  <Attribute name="wantAssertionEncrypted">
   <Value>true</Value>
  </Attribute>
  <Attribute name="wantNameIDEncrypted">
   <Value>true</Value>
  </Attribute>
  <Attribute name="wantPOSTResponseSigned">
   <Value></Value>
  </Attribute>
  <Attribute name="wantArtifactResponseSigned">
   <Value></Value>
  </Attribute>
  <Attribute name="wantLogoutRequestSigned">
   <Value></Value>
  </Attribute>
  <Attribute name="wantLogoutResponseSigned">
   <Value></Value>
  </Attribute>
  <Attribute name="wantMNIRequestSigned">
   <Value></Value>
  </Attribute>
  <Attribute name="wantMNIResponseSigned">
   <Value></Value>
  </Attribute>
  <Attribute name="responseArtifactMessageEncoding">
   <Value>URI</Value>
  </Attribute>
  <Attribute name="cotlist">
   <Value>fedlet-cot</Value>
  </Attribute>
  <Attribute name="saeAppSecretList">
  </Attribute>
  <Attribute name="saeSPUrl">
   <Value></Value>
  </Attribute>
  <Attribute name="saeSPLogoutUrl">
  </Attribute>
  <Attribute name="ECPRequestIDPListFinderImpl">
   <Value>com.sun.identity.saml2.plugins.ECPIDPFinder</Value>
  </Attribute>
  <Attribute name="ECPRequestIDPList">
   <Value></Value>
  </Attribute>
  <Attribute name="ECPRequestIDPListGetComplete">
   <Value></Value>
  </Attribute>
  <Attribute name="enableIDPProxy">
   <Value>false</Value>
  </Attribute>
  <Attribute name="idpProxyList">
   <Value></Value>
  </Attribute>
  <Attribute name="idpProxyCount">
   <Value>0</Value>
  </Attribute>
  <Attribute name="useIntroductionForIDPProxy">
   <Value>false</Value>
  </Attribute>
  <Attribute name="spSessionSyncEnabled">
   <Value>false</Value>
  </Attribute>
  <Attribute name="relayStateUrlList">
  </Attribute>
 </SPSSOConfig>
 <AttributeQueryConfig metaAlias="/attrQuery">
  <Attribute name="signingCertAlias">
   <Value>test</Value>
  </Attribute>
  <Attribute name="encryptionCertAlias">
   <Value>test</Value>
  </Attribute>
  <Attribute name="wantNameIDEncrypted">
   <Value>true</Value>
  </Attribute>
  <Attribute name="cotlist">
   <Value>fedlet-cot</Value>
  </Attribute>
 </AttributeQueryConfig>
 <XACMLAuthzDecisionQueryConfig metaAlias="/pep">
  <Attribute name="signingCertAlias">
   <Value>test</Value>
  </Attribute>
  <Attribute name="encryptionCertAlias">
   <Value>test</Value>
  </Attribute>
  <Attribute name="basicAuthOn">
   <Value>false</Value>
  </Attribute>
  <Attribute name="basicAuthUser">
   <Value></Value>
  </Attribute>
  <Attribute name="basicAuthPassword">
   <Value></Value>
  </Attribute>
  <Attribute name="wantXACMLAuthzDecisionResponseSigned">
   <Value>false</Value>
  </Attribute>
  <Attribute name="wantAssertionEncrypted">
   <Value>true</Value>
  </Attribute>
  <Attribute name="cotlist">
   <Value>fedlet-cot</Value>
  </Attribute>
 </XACMLAuthzDecisionQueryConfig>
</EntityConfig>
Make a copy of the
sp-extended.xmlfile, calledsp-extended-copy.xml, and sethosted="0"in the root element of the copy.Use the copied file,
sp-extended-copy.xml, when importing the Fedlet configuration into AM. AM must register the Fedlet as a remote service provider.In the AM console delete the original SP entity configuration for the Fedlet, and then import the updated metadata for the new configuration into AM on the IDP side.
Restart the Fedlet or the container in which it runs in order for the Fedlet to pick up the changes to the configuration properties and the metadata.
You can customize the Java Fedlet to perform many of the SAML v2.0 service provider operations. The Java Fedlet has the SAML v2.0 capabilities identified in "Fedlet Support for SAML v2.0 Features".
The Fedlet includes the following files that you use when building your own service provider application based on the demo web application, including a set of JavaServer Pages (JSP) examples.
conf/Configuration files copied to the
$HOME/fedletdirectory when you first deploy and configure the Fedlet. When deploying your application, you can move these to an alternate location passed to the Java virtual machine for the web application container at startup. For example, if you store the configuration under the/export/fedlet/directory, then you could pass the following property to the JVM.-Dcom.sun.identity.fedlet.home=/export/fedlet/conf
You do not need to include these files in your application.
fedletAttrQuery.jsp,fedletAttrResp.jspSample SAML attribute query and response handlers.
fedletEncode.jspUtility JSP to encode a password, such as the password used to protect a Java keystore.
fedletSampleApp.jsp,index.jspDemo application. You can remove these before deployment to replace them with your application.
fedletXACMLQuery.jsp,fedletXACMLResp.jspSample SAML XACML query and response handlers.
logout.jspUtility page to perform single log out.
saml2/jsp/JSPs to initiate single sign-on and single logout, and to handle errors, and also a JSP for obtaining Fedlet metadata,
saml2/jsp/exportmetadata.jsp.WEB-INF/classes/Localized Java properties files for strings used in the Fedlet user interface.
WEB-INF/lib/Fedlet libraries required by your application.
WEB-INF/web.xmlFedlet web application configuration, showing how JSPs map to URLs used in the Fedlet. Add mappings for your application before deployment.
In the
web.xmlmappings, your application must be mapped to/fedletapplication, as this is the assertion consumer URL set in the Fedlet metadata.<servlet> <servlet-name>yourApp</servlet-name> <jsp-file>/fedletSampleApp.jsp</jsp-file> </servlet> <servlet-mapping> <servlet-name>yourApp</servlet-name> <url-pattern>/fedletapplication</url-pattern> </servlet-mapping>
Follow these steps for a very simple demonstration of how to customize the Fedlet:
Backup the
fedletSampleApp.jspfile.$ cd /path/to/tomcat/webapps/fedlet/ $ cp fedletSampleApp.jsp fedletSampleApp.jsp.orig
Edit the
fedletSampleApp.jspfile to reduce it to a single redirection to themyapp.jsppage. An implementation of the <html> element of the file follows below.<html> <head> <title>Fedlet Sample Application</title> <meta http-equiv="Content-Type" content="text/html; charset=iso-8859-1" /> </head> <body> <% // BEGIN : following code is a must for Fedlet (SP) side application Map map; try { // invoke the Fedlet processing logic. this will do all the // necessary processing conforming to SAML v2.0 specifications, // such as XML signature validation, Audience and Recipient // validation etc. map = SPACSUtils.processResponseForFedlet(request, response, new PrintWriter(out, true)); response.sendRedirect("myapp.jsp"); } catch (SAML2Exception sme) { SAMLUtils.sendError(request, response, response.SC_INTERNAL_SERVER_ERROR, "failedToProcessSSOResponse", sme.getMessage()); return; } catch (IOException ioe) { SAMLUtils.sendError(request, response, response.SC_INTERNAL_SERVER_ERROR, "failedToProcessSSOResponse", ioe.getMessage()); return; } catch (SessionException se) { SAMLUtils.sendError(request, response, response.SC_INTERNAL_SERVER_ERROR, "failedToProcessSSOResponse", se.getMessage()); return; } catch (ServletException se) { SAMLUtils.sendError(request, response, response.SC_BAD_REQUEST, "failedToProcessSSOResponse", se.getMessage()); return; } // END : code is a must for Fedlet (SP) side application %> </body> </html>Add a
myapp.jsppage to the Fedlet, such as the following:<html> <head> <title>My Application</title> <meta http-equiv="Content-Type" content="text/html" /> </head> <body> <h1>My Application</h1> <p>After you change the <code>fedletSampleApp.jsp</code>, all it does is redirect to this home page after successful login.</p> </body> </html>Browse to the Fedlet URL, such as
http://openam.example.com:8080/fedlet/, and try one of the login methods.After login you are redirected to the
myapp.jsppage.
The Java Fedlet includes a JSP file,
saml2/jsp/fedletSSOInit.jsp, that you can call to
initiate single sign-on from the Fedlet (SP) side. The Fedlet home page,
index.jsp, calls this page when the user does
Fedlet-initiated single sign-on.
When calling this JSP, the parameters to use are those also used by the
saml2/jsp/spSSOInit.jsp page in AM. Those parameters are
described in spSSOInit.jsp Query Parameters.
For IDP-initiated single sign-on, call the appropriate page on the identity provider. AM's page is described in idpSSOInit.jsp Query Parameters.
After single sign-on, the user-agent is directed by default to the
assertion consumer URI set in the Fedlet metadata, which by default is
/fedletapplication. Also by default that URI points to
the JSP, fedletSampleApp.jsp
The Java Fedlet includes a JSP file,
saml2/jsp/spSingleLogoutInit.jsp, that you can call to
initiate single logout from the Fedlet (SP) side. The Fedlet assertion
consumer page, fedletSampleApp.jsp, calls this when
the user does Fedlet-initiated single logout.
When calling this JSP, the parameters to use are those also used by the
saml2/jsp/spSingleLogoutInit.jsp page in AM. Those
parameters are described in spSingleLogoutInit.jsp Query Parameters.
For IDP-initiated single logout, call the appropriate page on the identity provider. AM's page is described in idpSingleLogoutInit.jsp Query Parameters.
Set the RelayState parameter when initiating logout
to redirect the user-agent appropriately when the process is complete.
As seen in "To Use the Fedlet to Query an Attribute Authority", an attribute query allows the Fedlet to get profile information about a subject from the attribute authority. The Fedlet must be configured to deal with responses from the attribute authority, including configuration for signing and encryption. Also, an identity provider and attribute authority is likely to share only those attributes that the Fedlet absolutely requires to provide service, such as, for example, a name to customize a page. The attributes must then be mapped in the attribute authority and Fedlet metadata.
The Java Fedlet includes a JSP file,
fedletAttrQuery.jsp, which is used in the procedure
described above to prepare an attribute query using the transient subject
identifier obtained during single sign-on. The
fedletAttrQuery.jsp page also supports using the Subject
name from an X.509 identity certificate.
Another JSP file, fedletAttrResp.jsp, sends the
query to the attribute authority using
com.sun.identity.saml2.profile.AttributeQueryUtil.html.getAttributesForFedlet(),
and if successful processes the result, which is a
java.util.Map of the attribute types and their
values.
As seen in "To Use the Fedlet to Query an XACML Policy Decision Point", a XACML query allows the Fedlet to request a policy decision from a XACML PDP. You can configure AM to respond to such queries as described in that procedure.
The Java Fedlet includes a JSP file,
fedletXACMLQuery.jsp, which is used in the procedure
described above to prepare a XACML query, identifying a resource URL and a
type of HTTP operation to perform, and specifying the subject identifier
obtained during single sign-on.
Another JSP file, fedletXACMLResp.jsp, sends the
query to the XACML PDP using
com.sun.identity.saml2.profile.XACMLQueryUtil.getPolicyDecisionForFedlet(),
and if successful processes the result, which is a
java.lang.String representing the decision, such as
Permit if the decision is to allow access, or
Deny if the decision is to deny access.
An AM Fedlet is a small web application that makes it easy to add SAML v2.0 service provider (SP) capabilities to your Java web application. The AM console offers a wizard for configuring a Java Fedlet as a SAML v2.0 service provider with AM as the identity provider (IDP). If that fits your purposes, then read the chapter "Using Fedlets in Java Web Applications" instead.
The full distribution file, AM-6.0.0.7.zip,
also includes a Java Fedlet file, Fedlet-6.0.0.7.zip,
that you can configure by hand.
This chapter covers how to configure a Java Fedlet using that distribution,
by manually editing the circle of trust, Java properties,
and IDP and SP XML configuration templates.
Seen from a high level, what you must do is this:
Determine the roles that the IDP(s) and Fedlet play in SAML v2.0 Circles of Trust.
Unpack the unconfigured Fedlet from the full AM distribution to access the Fedlet war and template configuration files.
Begin preparing the Fedlet configuration, including setting up a configuration directory and keystore if needed.
Obtain SAML v2.0 metadata configuration files from the IDP(s), and add them to the Fedlet configuration.
The IDP must provide at least the standard SAML v2.0 metadata.
Finish preparing the Fedlet configuration by editing the remaining Fedlet template configuration files.
Share the Fedlet SAML v2.0 configuration files at least for the standard SAML v2.0 metadata with the IDP(s).
An IDP relies on the standard SAML v2.0 metadata to communicate with the Fedlet.
Deploy and test the Fedlet with each IDP.
Unpack the Java Fedlet distribution into a working directory.
$ mkdir fedlet && cd fedlet
$ unzip ../Fedlet-6.0.0.7.zip
When you unpack the Fedlet-6.0.0.7.zip file,
you find the following files.
fedlet.warThis file contains a Java Fedlet web application that serves as an example, and that you can embed in your applications.
READMEThis file succinctly describes how to configure some Fedlet features.
conf/This folder contains the Fedlet configuration templates that you edit as appropriate for your deployment.
When editing the templates, place copies of the files in the Fedlet home directory on the system where you deploy the Fedlet. By default the Fedlet home directory is
user.home/uri, where user.home is the value of the Java system propertyuser.homefor the user running the web container where you deploy the Fedlet, and uri is the path of the URI where you deploy the Fedlet, such as/fedlet.For example, if user.home is the
/home/userfolder, that user could have a/home/user/fedletfolder for Fedlet configuration files.$ mkdir ~/fedlet
To change the location, set the system property
com.sun.identity.fedlet.homewhen starting the container where the Fedlet runs.$ java -Dcom.sun.identity.fedlet.home=/path/to/fedlet/conf ...
conf/FederationConfig.propertiesThis file defines settings for the Fedlet as a web application. It does not address the SAML v2.0 configuration.
For more about this file, see "Configuring Java Fedlet Properties".
conf/fedlet.cot-templateThis template defines settings for a SAML v2.0 circle of trust to which the Fedlet belongs.
For more about this file, see "Configuring Circles of Trust".
conf/idp.xml(not provided)The
idp.xmlfile is standard SAML v2.0 metadata that describes the IDP configuration.Templates for other SAML v2.0 configuration files are provided, but no
idp.xmltemplate file is provided.Instead you must obtain the SAML v2.0 metadata from the IDP, and add it as an
idp.xmlfile here, alongside the other SAML v2.0 configuration files. How you obtain this file from the IDP depends on the IDP implementation.conf/idp-extended.xml-templateThis template holds extended SAML v2.0 IDP settings that AM uses.
For more about this file, see "Configuring the Identity Providers".
conf/sp.xml-templateThis template describes standard SAML v2.0 SP settings.
For more about this file, see "Configuring the Service Providers".
conf/sp-extended.xml-templateThis template describes extended SAML v2.0 SP settings that the Fedlet uses.
For more about this file, see "Configuring the Service Providers".
The Java Fedlet to configure by hand includes
a FederationConfig.properties file
that defines settings for the Fedlet as a web application.
The configuration for a single Java Fedlet includes
only one FederationConfig.properties file,
regardless of how many IDP and SP configurations are involved.
This file does not address the SAML v2.0 configuration.
When configured this file contains sensitive properties
such as the value of am.encryption.pwd.
Make sure it is readable only by the user running the Fedlet application.
This section categorizes the settings as follows:
The following settings define the Fedlet deployment URL.
com.iplanet.am.server.protocolSet this to the protocol portion of the URL, such as HTTP or HTTPS.
com.iplanet.am.server.hostSet this to the host portion of the URL, such as
www.sp.com.com.iplanet.am.server.portSet this to the port portion of the URL, such as 80, 443, 8080, or 8443.
com.iplanet.am.services.deploymentDescriptorSet this to path portion of the URL, starting with a
/, such as/fedlet.
The following settings define the Fedlet configuration for logging and monitoring statistics.
com.iplanet.am.logstatusThis sets whether the Fedlet actively writes debug log files.
Default:
ACTIVEcom.iplanet.services.debug.levelThis sets the debug log level.
The following settings are available, in order of increasing verbosity:
offerrorwarningmessageDefault:
messagecom.iplanet.services.debug.directoryThis sets the location of the debug log folder.
Trailing spaces in the file names are significant. Even on Windows systems, use slashes to separate directories.
Examples:
/home/user/fedlet/debug,C:/fedlet/debugcom.iplanet.am.stats.intervalThis sets the interval at which statistics are written, in seconds.
The shortest interval supported is 5 seconds. Settings less than 5 (seconds) are taken as 5 seconds.
Default: 60
com.iplanet.services.stats.stateThis sets how the Fedlet writes monitoring statistics.
The following settings are available:
offconsole(write to the container logs)file(write to Fedlet stats logs)Default:
filecom.iplanet.services.stats.directoryThis sets the location of the stats file folder.
Trailing spaces in the file names are significant. Even on Windows systems, use slashes to separate directories.
Examples:
/home/user/fedlet/stats,C:/fedlet/stats
The following settings define settings for access to certificates and private keys used in signing and encryption.
Other sections in this guide explain how to configure a Fedlet for signing and encryption including how to work with the keystores that these settings reference, and how to specify public key certificates in standard SAML v2.0 metadata. When working with a Java Fedlet, see the section on "Enabling Signing and Encryption in a Fedlet".
com.sun.identity.saml.xmlsig.keystoreThis sets the path to the keystore file that holds public key certificates of IDPs and key pairs for the Fedlet.
For hints on generating a keystore file with a key pair, see "Changing Default Key Aliases" in the Setup and Maintenance Guide.
Example:
@FEDLET_HOME@/keystore.jcekscom.sun.identity.saml.xmlsig.storepassThis sets the path to the file that contains the keystore password encoded by using the symmetric key set as the value of
am.encryption.pwd.When creating the file, encode the cleartext password by using your own test copy (not a production version) of AM.
Log in to the AM console as an administrator, such as
amAdmin.Under Deployment > Servers > Server Name > Security > Encryption, set the Password Encryption Key to your symmetric key, and save your work.
Do not do this in a production system where the existing symmetric key is already in use!
Switch to the
encode.jsppage, such ashttp://openam.example.com:8080/openam/encode.jsp, enter the cleartext password to encode with your symmetric key, and select Encode.Copy the encoded password to your file.
Example:
@FEDLET_HOME@/.storepasscom.sun.identity.saml.xmlsig.keypassThis sets the path to the file that contains the private key password encoded by using the symmetric key set as the value of
am.encryption.pwd.To encode the cleartext password, follow the same steps for the password used when setting
com.sun.identity.saml.xmlsig.storepass.Example:
@FEDLET_HOME@/.keypasscom.sun.identity.saml.xmlsig.certaliasThis sets the alias of the Fedlet's public key certificate.
Example:
fedlet-certcom.sun.identity.saml.xmlsig.storetypeThe sets the type of keystore.
Default:
JKS(JCEKSis recommended.)am.encryption.pwdThis sets the symmetric key that used to encrypt and decrypt passwords.
Example:
uu4dHvBkJJpIjPQWM74pxH3brZJ5gJje
The Java Fedlet properties file includes settings that let you plug in alternative implementations of Fedlet capabilities. You can safely use the default settings, as specified in the following list. The list uses the same order for the keys you find in the file.
com.sun.identity.plugin.configuration.classDefault:
com.sun.identity.plugin.configuration.impl.FedletConfigurationImplcom.sun.identity.plugin.datastore.class.defaultDefault:
com.sun.identity.plugin.datastore.impl.FedletDataStoreProvidercom.sun.identity.plugin.log.classDefault:
com.sun.identity.plugin.log.impl.FedletLoggercom.sun.identity.plugin.session.classDefault:
com.sun.identity.plugin.session.impl.FedletSessionProvidercom.sun.identity.plugin.monitoring.agent.classDefault:
com.sun.identity.plugin.monitoring.impl.FedletAgentProvidercom.sun.identity.plugin.monitoring.saml2.classDefault:
com.sun.identity.plugin.monitoring.impl.FedletMonSAML2SvcProvidercom.sun.identity.plugin.monitoring.idff.classDefault:
com.sun.identity.plugin.monitoring.impl.FedletMonIDFFSvcProvidercom.sun.identity.saml.xmlsig.keyprovider.classDefault:
com.sun.identity.saml.xmlsig.JKSKeyProviderDespite the name, this provider supports JCEKS keystores.
com.sun.identity.saml.xmlsig.signatureprovider.classDefault:
com.sun.identity.saml.xmlsig.AMSignatureProvidercom.sun.identity.common.serverModeDefault:
falsecom.sun.identity.webcontainerDefault:
WEB_CONTAINERcom.sun.identity.saml.xmlsig.passwordDecoderDefault:
com.sun.identity.fedlet.FedletEncodeDecodecom.iplanet.services.comm.server.pllrequest.maxContentLengthDefault: 16384
com.iplanet.security.SecureRandomFactoryImplDefault:
com.iplanet.am.util.SecureRandomFactoryImplcom.iplanet.security.SSLSocketFactoryImplDefault:
com.sun.identity.shared.ldap.factory.JSSESocketFactorycom.iplanet.security.encryptorDefault:
com.iplanet.services.util.JCEEncryptioncom.sun.identity.jss.donotInstallAtHighestPriorityDefault:
truecom.iplanet.services.configpathDefault:
@BASE_DIR@
As described in "Java Fedlet Layout", this template defines settings for a SAML v2.0 circle of trust. The Fedlet belongs to at least one circle of trust.
This section includes the following procedures:
When the Fedlet is involved in only a single circle of trust
with one IDP and the Fedlet as an SP,
the only settings to change are
cot-name and sun-fm-trusted-providers.
Save a copy of the template as a
fedlet.cotfile in the configuration folder, as in the following example.$ cp ~/Downloads/fedlet/conf/fedlet.cot-template ~/fedlet/fedlet.cot
Set
cot-nameto the name of the circle of trust.Set
sun-fm-trusted-providersto a comma-separated list of the entity names for the IDP and SP.For example, if the IDP is AM with entity ID
https://openam.example.com:8443/openamand the SP is the Fedlet with entity IDhttps://sp.example.net:8443/fedlet, then set the property as follows.sun-fm-trusted-providers=https://openam.example.com:8443/openam,\ https://sp.example.net:8443/fedlet
This procedure concerns deployments where the Fedlet participates as SP in multiple Circles of Trust, each involving their own IDP.
For each circle of trust, save a copy of the template in the configuration folder.
The following example involves two Circles of Trust.
$ cp ~/Downloads/fedlet/conf/fedlet.cot-template ~/fedlet/fedlet.cot
$ cp ~/Downloads/fedlet/conf/fedlet.cot-template ~/fedlet/fedlet2.cot
Set up IDP XML files for each IDP as described in "Configuring the Identity Providers".
For each circle of trust, set up the cot file as described in "To Configure a circle of trust With a Single IDP".
In the extended SP XML file described in "Configuring the Identity Providers", set the Attribute element with name
cotlistto include values for all Circles of Trust. The values are taken from thecot-namesettings in the cot files.The following example works with two Circles of Trust,
cotandcot2.<Attribute name="cotlist"> <Value>cot</Value> <Value>cot2</Value> </Attribute>The same Attribute element is also available in extended IDP XML files for cases where an IDP belongs to multiple Circles of Trust.
When the circle of trust involves multiple IDPs, use the Fedlet in combination with the AM IDP Discovery service.
Note
For this to work, the IDPs must be configured to use IDP discovery, and users must have preferred IDPs.
Set up the AM IDP Discovery service.
For details see "Deploying the Identity Provider Discovery Service".
Configure the circle of trust as described in "To Configure a circle of trust With a Single IDP", but specifying multiple IDPs, including the IDP that provides the IDP Discovery service.
Set the
sun-fm-saml2-readerservice-urland thesun-fm-saml2-writerservice-urlproperties as defined for the IDP Discovery service.
As described in "Java Fedlet Layout",
the IDP provides its standard SAML v2.0 metadata as XML,
which you save in the configuration folder as a idp.xml file.
If the IDP uses AM,
the IDP can also provide extended SAML v2.0 metadata as XML,
which you save in the configuration folder as a idp-extended.xml file,
rather than using the template for extended information.
If you have multiple identity providers, then number the configuration files,
as in idp.xml, idp2.xml,
idp3.xml,
and also idp-extended.xml,
idp2-extended.xml,
idp3-extended.xml and so on.
This section covers the configuration in the idp.xml file.
The idp.xml file contains standard SAML v2.0 metadata
for an IDP in a circle of trust that includes the Fedlet as SP.
The IDP provides you the content of this file.
If the IDP uses AM then the administrator can export the metadata
by using either the ssoadm create-metadata-templ command
or the /saml2/jsp/exportmetadata.jsp endpoint
under the AM deployment URL.
If the IDP uses an implementation different from AM,
see the documentation for details on obtaining the standard metadata.
The standard, product-independent metadata are covered in
Metadata for the OASIS
Security Assertion Markup Language (SAML) V2.0.
The standard XML namespace describing the XML document has identifier
urn:oasis:names:tc:SAML:2.0:metadata.
An XML schema description for this namespace is found online at
http://docs.oasis-open.org/security/saml/v2.0/saml-schema-metadata-2.0.xsd.
This section covers the configuration in the idp-extended.xml file.
Most extended metadata are specific to the AM implementation of SAML v2.0.
If the IDP runs AM, have the IDP provide the extended metadata
exported by using the ssoadm create-metadata-templ command.
This section covers only the basic settings relative to all IDPs.
The extended metadata file describes an EntityConfig element,
defined by the namespace with the identifier
urn:sun:fm:SAML:2.0:entityconfig.
The XML schema definition is described in the
entity-config-schema.xsd file,
available as part of the AM source code,
though not included in the AM war file.
The unconfigured Fedlet includes a template file,
conf/idp-extended.xml-template.
This extended metadata template for the IDP requires that you edit
at least the IDP_ENTITY_ID
and fedletcot values
to reflect the IDP entity ID used in the standard metadata
and the circle of trust name defined in the fedlet.cot file,
respectively.
The hosted attribute on the EntityConfig element
must remain set to hosted="0",
meaning that the IDP is remote.
The IDP is likely to play at least the role of single sign-on identity provider,
though the namespace defines elements
for the attribute authority and policy decision point roles
shown in the template, as well as the others
defined in the standard governing SAML v2.0 metadata.
The extended metadata file is essentially a series of
XML maps of key-value pairs specifying IDP configuration for each role.
All role-level elements can take a metaAlias attribute
that the Fedlet uses when communicating with the IDP.
Each child element of a role element defines an Attribute
whose name is the key.
Each Attribute element can contain multiple Value elements.
The Value elements' contents comprise the values for the key.
All values are strings, sometimes with a format that is meaningful to AM.
The basic example in the IDP template shows the minimal configuration
for the single sign-on IDP role.
In the following example, the description is empty
and the name of the circle of trust is fedletcot.
<IDPSSOConfig>
   <Attribute name="description">
     <Value/>
   </Attribute>
   <Attribute name="cotlist">
     <Value>fedletcot</Value>
   </Attribute>
</IDPSSOConfig>
<AttributeAuthorityConfig>
   <Attribute name="cotlist">
     <Value>fedletcot</Value>
   </Attribute>
</AttributeAuthorityConfig>
<XACMLPDPConfig>
   <Attribute name="wantXACMLAuthzDecisionQuerySigned">
     <Value></Value>
   </Attribute>
   <Attribute name="cotlist">
     <Value>fedletcot</Value>
   </Attribute>
</XACMLPDPConfig>
When functioning as IDP, AM can take many other Attribute values.
These are implementation dependent.
You can obtain the extended metadata from AM
either as part of the pre-packaged Java Fedlet that you create
by using the AM console wizard as described in
"To Create Configuration Files for a Fedlet",
or by using the ssoadm create-metadata-templ subcommand.
Note
Custom authentication contexts can be loaded and saved when they are loaded via ssoadm as part of the hosted IDP/SP extended metadata and the saves are made in the AM console. Any custom contexts loaded via ssoadm are also visible in the AM console.
For example, you can specify custom entries in the
idpAuthncontextClassrefMapping element of the
extended metadata for a hosted IDP as follows:
<Attribute name="idpAuthncontextClassrefMapping">
 <Value>urn:oasis:names:tc:SAML:2.0:ac:classes:PasswordProtectedTransport
  |1||default</Value>
 <Value>http://idmanagement.gov/ns/assurance/loa/4|4||</Value>
 <Value>http://idmanagement.gov/ns/assurance/loa/3|3||</Value>
 <Value>http://idmanagement.gov/ns/assurance/loa/2|2||</Value>
 <Value>http://idmanagement.gov/ns/assurance/loa/1|1||</Value>
</Attribute>
This section covers elements for the IDP single sign-on role, arranged in the order they appear in the template.
descriptionDescription of the file.
cotlistSpecifies the circle of trust(s) to which the provider belongs.
Default:
fedletcot
This section covers the element for the AttributeAuthorityConfig role, arranged in the order they appear in the template.
cotlistSpecifies the circle of trust(s) to which the provider belongs.
Default:
fedletcot
This section covers the elements for the XACMLPDPConfig role, arranged in the order they appear in the template.
wantXACMLAuthzDecisionQuerySignedIf the IDP requires signed XACML AuthzDecision queries, then set this attribute to
true.cotlistSpecifies the circle of trust(s) to which the provider belongs.
Default:
fedletcot
As mentioned in "Java Fedlet Layout",
the Fedlet SAML v2.0 configuration is defined in two XML files,
the standard metadata in a sp.xml file
and the extended metadata in a sp-extended.xml file.
If the Fedlet has multiple service provider personalities,
then number the configuration files,
as in sp.xml, sp2.xml,
sp3.xml,
and also sp-extended.xml,
sp2-extended.xml,
sp3-extended.xml and so on.
This section covers the configuration in the sp.xml file.
The sp.xml file contains standard SAML v2.0 metadata
for the Fedlet as SP.
If you edit the standard metadata,
make sure that you provide the new version to your IDP,
as the IDP software relies on the metadata to get the Fedlet's configuration.
The standard metadata are covered in
Metadata for the OASIS
Security Assertion Markup Language (SAML) V2.0.
The standard XML namespace describing the XML document has identifier
urn:oasis:names:tc:SAML:2.0:metadata.
An XML schema description for this namespace is found online at
http://docs.oasis-open.org/security/saml/v2.0/saml-schema-metadata-2.0.xsd.
A standard metadata file describes the SAML v2.0 roles that the Fedlet plays.
The default base element of the file is an EntityDescriptor,
which is a container for role descriptor elements.
The EntityDescriptor element can therefore
contain multiple role descriptor elements.
The namespace for the standard metadata document is
urn:oasis:names:tc:SAML:2.0:metadata.
You can get the corresponding XML schema description online at
http://docs.oasis-open.org/security/saml/v2.0/saml-schema-metadata-2.0.xsd.
In general, you can find standard SAML v2.0-related XML schema definitions at
http://docs.oasis-open.org/security/saml/v2.0/.
Fedlets do not support all arbitrary SP configurations. As lightweight service provider components, Fedlets are built to play the SP role in web single sign-on and single logout, to perform attribute queries and XACML policy decision requests, and to work with multiple IDPs including Circles of Trust with an IDP discovery service. For a list of what Fedlets support, see the table "Fedlet Support for SAML v2.0 Features".
When preparing a standard SP metadata file, follow these suggestions.
Start either with an existing example or with the template file,
conf/sp.xml-template.When using the template, replace the following placeholders.
FEDLET_ENTITY_IDThe Fedlet entity ID used when communicating with the IDP.
AM often uses the deployment URL as the entity ID, though that is a convention rather than a requirement.
FEDLET_PROTOCOLThe Fedlet deployment protocol (
http,https)FEDLET_HOSTThe Fedlet deployment host name
FEDLET_PORTThe Fedlet deployment port number
FEDLET_DEPLOY_URIThe Fedlet application deployment path
Add and edit role elements as children depending on the roles the Fedlet plays as described in the following sections.
Add an SPSSODescriptor element to play the SP role
in web single sign-on and logout.
An SPSSODescriptor element has attributes specifying
whether requests and assertion responses should be digitally signed.
The
AuthnRequestsSignedattribute indicates whether the Fedlet signs authentication requests.If you set the
AuthnRequestsSignedattribute to true, then you must also configure theSPSSODescriptorelement to allow the Fedlet to sign requests. For details see the section on "Enabling Signing and Encryption in a Fedlet".The
WantAssertionsSignedattribute indicates whether the Fedlet requests signed assertion responses from the IDP.
An SPSSODescriptor element's children indicate
what name ID formats the Fedlet supports,
and where the IDP can call the following services on the Fedlet.
The
AssertionConsumerServiceelements specify endpoints that support the SAML Authentication Request protocols.You must specify at least one of these. The template specifies two, with the endpoint supporting the HTTP POST binding as the default.
The optional
SingleLogoutServiceelements specify endpoints that support the SAML Single Logout protocols.
Add a RoleDescriptor element with
type="query:AttributeQueryDescriptorType"
to perform attribute queries.
Attribute queries require the IDP to act as Attribute Authority
and call for signing and encryption to be configured for the Fedlet.
For details see the example in the procedure
"To Use the Fedlet to Query an Attribute Authority".
For example, you can set the attribute mapping on the Fedlet
by editing the extended metadata attribute attributeMap
in the SPSSOConfig element
as described in "Service Provider Extended XML: SPSSOConfig Settings".
Add an XACMLAuthzDecisionQueryDescriptor element
to perform XACML policy decision queries.
Attribute queries require the IDP to act as XACML PDP. For details see the example in the procedure "To Use the Fedlet to Query an XACML Policy Decision Point".
This section covers the configuration
in the sp-extended.xml file.
The extended metadata are specific to the AM implementation of SAML v2.0.
The extended metadata file describes an EntityConfig element,
defined by the namespace with the identifier
urn:sun:fm:SAML:2.0:entityconfig.
The XML schema definition is described in the
entity-config-schema.xsd file,
available as part of the AM source code,
though not included with the unconfigured Fedlet.
The unconfigured Fedlet does include a template file,
conf/sp-extended.xml-template.
This extended metadata template for the IDP requires that you edit
at least the FEDLET_ENTITY_ID placeholder value,
the appLogoutUrl attribute value
in the SPSSOConfig element,
and the fedletcot values.
The FEDLET_ENTITY_ID value must reflect the SP entity ID
used in the standard metadata.
For the single logout profile,
the appLogoutUrl attribute value must match
the Fedlet URL based on the values used in the
FederationConfig.properties file.
The fedletcot values must correspond to
the circle of trust name defined in the fedlet.cot file.
The hosted attribute on the EntityConfig element
must remain set to hosted="1",
meaning that the SP is hosted (local to the Fedlet).
If you provide a copy of the file to your IDP running AM, however,
then set hosted="0" for the IDP,
as the Fedlet is remote to the IDP.
The extended metadata file is essentially a series of
XML maps of key-value pairs specifying IDP configuration for each role.
All role-level elements can take a metaAlias attribute
that the Fedlet uses when communicating with the IDP.
Each child element of a role element defines an Attribute
whose name is the key.
Each Attribute element can contain multiple Value elements.
The Value elements' contents comprise the values for the key.
All values are strings, sometimes with a format that is meaningful to the Fedlet.
The basic example in the SP template shows the configuration options,
documented in the following lists.
This section covers elements for the SP single sign-on role, arranged in the order they appear in the template.
descriptionHuman-readable description of the Fedlet in the SP single sign-on role
signingCertAliasAlias of the public key certificate for the key pair used when signing messages to the IDP
The key pair is found in the Fedlet's keystore, and the certificate is included in the standard metadata. See Public and Private Key Settings for details on how to specify access to the keystore, and "Service Provider Standard XML" for details on how to set up standard metadata.
encryptionCertAliasAlias of the public key certificate for the key pair used when encrypting messages to the IDP
The key pair is found in the Fedlet's keystore, and the certificate is included in the standard metadata. See Public and Private Key Settings for details on how to specify access to the keystore, and "Service Provider Standard XML" for details on how to set up standard metadata.
basicAuthOnSet this to true to use HTTP Basic authorization with the IDP.
Default: false
basicAuthUserWhen using HTTP Basic authorization with the IDP, this value is the user name.
basicAuthPasswordWhen using HTTP Basic authorization with the IDP, this value is the password.
Encrypt the password using the
encode.jsppage of your test copy of AM that you might also have used to encode keystore passwords as described in Public and Private Key Settings.autofedEnabledSet this to true to enable automatic federation with AM based on the value of a profile attribute that is common to user profiles both in AM and in the Fedlet's context.
Default: false
autofedAttributeWhen automatic federation is enabled, set this to the name of the user profile attribute used for automatic federation.
transientUserUse this effective identity for users with transient identifiers.
Default: anonymous
spAdapterClass name for a plugin service provider adapter
This class must extend
com.sun.identity.saml2.plugins.SAML2ServiceProviderAdapter.spAdapterEnvWhen using a plugin service provider adapter, this attribute's values optionally take a map of settings
key=valueused to initialize the plugin.fedletAdapterClass name for an alternate fedlet adapter. Default is an empty value.
fedletAdapterEnvWhen using an alternate fedlet adapter, this attribute's values optionally take a map of settings
key=valueused to initialize the plugin.spAccountMapperClass name for an implementation mapping SAML protocol objects to local user profiles
Default:
com.sun.identity.saml2.plugins.DefaultLibrarySPAccountMapperspAttributeMapperClass name for an implementation mapping SAML assertion attributes to local user profile attributes
Default:
com.sun.identity.saml2.plugins.DefaultSPAttributeMapperspAuthncontextMapperClass name for an implementation determining the authentication context to set in an authentication request, and mapping the authentication context to an authentication level
Default:
com.sun.identity.saml2.plugins.DefaultSPAuthnContextMapperspAuthncontextClassrefMappingString defining how the SAML authentication context classes map to authentication levels and indicate the default context class
Format:
authnContextClass|authLevel[|default]Default:
urn:oasis:names:tc:SAML:2.0:ac:classes:PasswordProtectedTransport|0|defaultspAuthncontextComparisonTypeHow to evaluate authentication context class identifiers.
exactAssertion context must exactly match a context in the list
minimumAssertion context must be at least as strong as a context in the list
maximumAssertion context must be no stronger than a context in the list
betterAssertion context must be stronger than all contexts in the list
Default:
exactattributeMapMap of SAML assertion attributes to local user profile attributes
Default:
*=*saml2AuthModuleNameName of an alternative SAML v2.0 authentication module
localAuthURLURL to a login page on the Fedlet side
Use this to override the Assertion Consumer Service URL from the standard metadata when consuming assertions.
intermediateUrlURL to an intermediate page returned before the user accesses the final protected resource
defaultRelayStateIf no RelayState is specified in a SAML request, redirect to this URL after successful single sign-on.
URL-encode the
defaultRelayStatevalue.appLogoutUrlOne or more Fedlet URLs that initiate single logout
Replace the placeholders in the default with the values for your Fedlet.
Default:
FEDLET_PROTOCOL://FEDLET_HOST:FEDLET_PORT/FEDLET_DEPLOY_URI/logoutassertionTimeSkewTolerate clock skew between the Fedlet and the IDP of at most this number of seconds
Default: 300
wantAttributeEncryptedSet to true to request that the IDP encrypt attributes in the response
wantAssertionEncryptedSet to true to request that the IDP encrypt the SAML assertion in the response
wantNameIDEncryptedSet to true to request that the IDP encrypt the name ID in the response
wantPOSTResponseSignedSet to true to request that the IDP sign the response when using HTTP POST
wantArtifactResponseSignedSet to true to request that the IDP sign the response when using HTTP Artifact
wantLogoutRequestSignedSet to true to request that the IDP sign single logout requests
wantLogoutResponseSignedSet to true to request that the IDP sign single logout responses
wantMNIRequestSignedSet to true to request that the IDP manage name ID requests
wantMNIResponseSignedSet to true to request that the IDP manage name ID responses
cotlistSet this to the circle of trust name used in "Configuring Circles of Trust".
Default:
fedletcotsaeAppSecretListWhen using Secure Attribute Exchange with AM this represents the Application Security Configuration settings.
Values take the format
url=FedletURL|type=symmetric|secret=EncodedSharedSecret[|encryptionalgorithm=EncAlg|encryptionkeystrength=EncStrength]orurl=FedletURL|type=asymmetric|privatekeyalias=FedletSigningCertAlias[|encryptionalgorithm=EncAlg|encryptionkeystrength=EncStrength|pubkeyalias=FedletPublicKeyAlias]You can omit the
privatekeyaliassetting if the signing certifcate is specified in the standard metadata.saeSPUrlWhen using Secure Attribute Exchange (SAE) with AM this is the Fedlet URL that handles SAE requests. If this is omitted, then SAE is not enabled.
saeSPLogoutUrlWhen using Secure Attribute Exchange with AM this is the Fedlet URL that handles SAE global logout requests.
ECPRequestIDPListFinderImplWhen using the Enhanced Client and Proxy profile this is the class name for the implementation that returns a list of preferred IDPs trusted by the ECP.
Default:
com.sun.identity.saml2.plugins.ECPIDPFinderECPRequestIDPListWhen using the Enhanced Client and Proxy profile this is the list of IDPs for the ECP to contact.
When not specified the list finder implementation is used.
enableIDPProxySet this to true to enable IDP proxy functionality.
Default: false
idpProxyListA list of preferred IDPs that the Fedlet can proxy to
idpProxyCountNumber of IDP proxies that the Fedlet can have
Default: 0
useIntroductionForIDPProxySet this to true to pick a preferred IDP based on a SAML v2.0 introduction cookie.
Default: false
This section covers elements for the Attribute Requester role, arranged in the order they appear in the template.
signingCertAliasAlias of the public key certificate for the key pair used when signing messages to the IDP
The key pair is found in the Fedlet's keystore, and the certificate is included in the standard metadata. See Public and Private Key Settings for details on how to specify access to the keystore, and "Service Provider Standard XML" for details on how to set up standard metadata.
encryptionCertAliasAlias of the public key certificate for the key pair used when encrypting messages to the IDP
The key pair is found in the Fedlet's keystore, and the certificate is included in the standard metadata. See Public and Private Key Settings for details on how to specify access to the keystore, and "Service Provider Standard XML" for details on how to set up standard metadata.
wantNameIDEncryptedSet to true to request that the IDP encrypt the name ID
cotlistSet this to the circle of trust name used in "Configuring Circles of Trust".
Default:
fedletcot
This section covers elements for the XACML decision requester role, enabling the Fedlet to act as a Policy Enforcement Point, arranged in the order they appear in the template.
signingCertAliasAlias of the public key certificate for the key pair used when signing messages to the IDP
The key pair is found in the Fedlet's keystore, and the certificate is included in the standard metadata. See Public and Private Key Settings for details on how to specify access to the keystore, and "Service Provider Standard XML" for details on how to set up standard metadata.
encryptionCertAliasAlias of the public key certificate for the key pair used when encrypting messages to the IDP
The key pair is found in the Fedlet's keystore, and the certificate is included in the standard metadata. See Public and Private Key Settings for details on how to specify access to the keystore, and "Service Provider Standard XML" for details on how to set up standard metadata.
basicAuthOnSet to true to use HTTP Basic authorization when contacting the Policy Decision Provider
Default: false
basicAuthUserWhen using Basic authorization to contact the Policy Decision Provider, use this value as the user name
basicAuthPasswordWhen using Basic authorization to contact the Policy Decision Provider, use this value as the password
Encrypt the password using the
encode.jsppage of your test copy of AM that you might also have used to encode keystore passwords as described in Public and Private Key Settings.wantXACMLAuthzDecisionResponseSignedSet this to true to request that the Policy Decision Provider sign the XACML response
wantAssertionEncryptedSet this to true to request that the Policy Decision Provider encrypt the SAML assertion response
cotlistSet this to the circle of trust name used in "Configuring Circles of Trust".
Default:
fedletcot
The Fedlet war file, fedlet.war,
serves both as an example and also to provide the code needed
to embed the Fedlet in your web application.
The basic steps for using the Fedlet in your application are as follows.
Unpack the Fedlet war file to a working directory, remove any files you do not want to keep such as
index.jsporfedletEncode.jsp, and overlay the Fedlet files with those of your web application.To integrate single sign-on into your application, modify the functionality in the
fedletSampleApp.jsppage or add it to your application's logic.If you add it to your application's logic, then you must also edit your application's deployment descriptor file,
web.xml, to set the assertion consumer URI, which by default is/fedletapplicationin the basic SP XML for the Fedlet. Addservletandservlet-mappingelements as shown in the following example.<servlet> <servlet-name>yourapplication</servlet-name> <jsp-file>/your-application.jsp</jsp-file> </servlet> <servlet-mapping> <servlet-name>yourapplication</servlet-name> <url-pattern>/fedletapplication</url-pattern> </servlet-mapping>Build a war file from your web application with embedded Fedlet files.
This is the version of the application to deploy.
When you deploy your war file, also provide the Fedlet configuration as described in this section.
This reference section covers configuration settings for AM's SAML v2.0 support. For the global services reference, see Reference.
AM implements the following RFCs, Internet-Drafts, and standards relating to SAML v2.0:
- Security Assertion Markup Language (SAML)
Standard, XML-based framework for creating and exchanging security information between online partners. AM supports multiple versions of SAML including 2.0, 1.1, and 1.0.
Specifications are available from the OASIS standards page.
This section covers service provider, identity provider, and circle of trust configuration properties.
Once you have set up a hosted identity provider, you can configure it through the AM console under Realms > Realm Name > Applications > Federation > Entity Providers > Provider Name.
The following properties appear under the Assertion Content tab:
- Request/Response Signing
Specifies which parts of messages the identity provider requires the service provider to sign digitally.
- Encryption
When selected, the service provider must encrypt NameID elements.
- Certificate Aliases
Specifies aliases for certificates in the AM keystore that are used to handle digital signatures, and to handle encrypted messages.
Specify a Key Pass if the private key password is different from the keystore password, which is stored encrypted in the
.keypassfile for the server. For instructions on working with key pairs, also see "Configuring Key Aliases and Keystores" in the Setup and Maintenance Guide.You can specify lists of aliases for signing and encryption:
If you specify multiple aliases in the Signing property, AM uses the first key alias from the list to sign SAML assertions.
If you specify multiple aliases in the Encryption property, AM will attempt to decrypt incoming protocol messages with all matching certificates in the list until decryption is successful.
When a certificate is about to expire, add a new alias to either field to enable AM to maintain the trust relationship between entities for a longer period of time. Make sure that the remote providers also update their copy of the AM provider's metadata to ensure the key rollover process is seamless.
- NameID Format List
Specifies the supported name identifiers for users that are shared between providers for single sign-on.
The following diagram shows how the hosted IDP decides which of the supported NameID formats is used:

- NameID Value Map
Maps name identifier formats to user profile attributes. The
persistentandtransientname identifiers need not be mapped.NameID mapping supports Base64-encoded binary values by adding a
;binaryflag to the mapping. With this flag set, AM Base64-encodes the profile attribute when adding it to the assertion. The mapping may resemble the following:urn:oasis:names:tc:SAML:2.0:nameid-format:persistent=objectGUID;binary- Disable NameID Persistence
Disables the storage of the NameID values in the user data store for all NameIDs issued by the IDP instance as long as the NameID format is anything but the persistent NameID format:
urn:oasis:names:tc:SAML:2.0:nameid-format:persistent. That is, you can disable the storage of NameID values with persistent NameID-Format if and only if there is a NameID value mapping set up for the NameID-Format.Note
By preventing the storage of the NameID values, the
ManageNameIDand theNameIDMappingSAML profiles will no longer work when using any persistent NameID formats. Existing account links that have been established and stored are not removed when disabling NameID persistence.Default value:
false
- Mapper
Specifies a class that implements the
IDPAuthnContextMapperinterface and sets up the authentication context.Default value:
com.sun.identity.saml2.plugins.DefaultIDPAuthnContextMapper- Default Authentication Context
Specifies which of the supported authentication context classes will be used as the default; for example, if the SP does not include an authentication context in its authentication request.
Default value:
urn:oasis:names:tc:SAML:2.0:ac:classes:PasswordProtectedTransport- Authentication Context
Specifies the authentication context classes the IDP supports, and any AM authentication mechanisms that are used when an SP specifies the respective class in a SAML v2.0 authentication request, or if the class was not specified and the class specified in the Default Authentication Context property is being used, which defaults to the PasswordProtectedTransport class.
AM marks the
PasswordProtectedTransportauthentication context class as supported by default.To enable additional authentication context classes, mark them as Supported in the Authentication Context table.
To specify the authentication mechanism AM uses when an SP specifies an authentication context class in a SAML v2.0 authentication request, select the option from the Key drop-down menu, and enter the details in the Value field.
The available authentication mechanisms are as follows:
- Service
AM will use the specified authentication chain or tree to authenticate the user.
For example, in the Value field, enter HmacOneTimePassword to use the built-in one-time password example authentication tree, or ldapService to use the built-in chain that authenticates against the default identity store.
- Module
AM will use the specified authentication module to authenticate the user.
- Authentication Level
AM will authenticate the user with a method that has an associated authentication level equal to or higher than the specified value.
If there is more than one suitable method, AM presents the available options by using a
ChoiceCallback.For more information on using and returning callbacks during authentication, see "Authentication and Logout" in the Authentication and Single Sign-On Guide.
Important
The
Role,User, andResource URLoptions are deprecated and should not be used.To specify the precedence of the supported context reference classes, enter numeric values in the Level field. Classes with higher numbers are considered stronger than lower numbered classes. The values determine which authentication classes can be used when the SP makes an authentication request that uses a comparison attribute, for example,
minimumorbetter.Note that the value in the Level field should match the auth level of the specified chain or module. For example, if the specified authentication chain sets an auth level of 10, set the same value in the Level field in the Authentication Context table. As AM compares the current auth level against the level specified in Authentication Context table, if the two values do not match, AM may require a logged in user to re-authenticate unnecessarily.
The following image shows an example of configuring the authentication mechanisms AM uses when receiving authentication requests that specify an authentication context class:

For more information on authentication context classes, see Authentication Context for the OASIS Security Assertion Markup Language (SAML) V2.0 in the SAML V2.0 Standard.

- Not-Before Time Skew
Grace period in seconds for the
NotBeforetime in assertions.- Effective Time
Validity in seconds of an assertion.
- Enabled, User Name, Password
When enabled, authenticate with the specified user name and password at SOAP endpoints.
- Enabled
When enabled, cache assertions.
The following properties appear under the Assertion Processing tab:
- Attribute Mapper
Specifies a class that implements the attribute mapping.
The default implementation attempts to retrieve the mapped attribute values from the user profile first. If the attribute values are not present in the user's profile, then it attempts to retrieve them from the user's session.
Default:
com.sun.identity.saml2.plugins.DefaultIDPAttributeMapper- Attribute Map
Maps SAML attributes to user profile attributes.
The user profile attributes used here must both be allowed in user profiles, and also be specified for the identity repository. See "Adding User Profile Attributes" in the Setup and Maintenance Guide, for instructions on allowing additional attributes in user profiles.
To specify the list of profile attributes for an LDAP identity repository, login to the AM console as administrator and browse to Realms > Realm Name > Data Stores, and click the data store name to open the configuration page. Scroll down to User Configuration, and edit the LDAP User Attributes list, and then click Save to keep your work.
The default IDP mapping implementation allows you to add static values in addition to values taken from the user profile. You add a static value by enclosing the profile attribute name in double quotes (
"), as in the following examples.To add a static SAML attribute called
nameIDwith a value ofstaticNameIDValuewith a name format ofurn:oasis:names:tc:SAML:2.0:attrname-format:uri, add the following mapping.urn:oasis:names:tc:SAML:2.0:attrname-format:uri|nameID="staticNameIDValue"
- Account Mapper
Specifies a class that implements
AccountMapperto map remote users to local user profiles.
- Auth URL
If present, overrides the default XUI login URL used to authenticate users during federation.
Use this property to specify an alternative URL for authenticating users, for example, if you have created a custom user interface other than the XUI.
The specified authentication URL is responsible for authenticating the federated user and must establish a session in AM, and return the SSO token value in the configured cookie name, usually
iPlanetDirectoryPro.The domain of the authentication URL must be configured in AM so that the cookie is accepted, and if host cookies are configured in AM, then the fully-qualified domain name of the authentication URL must be identical to that of the AM instance.
For more information on configuring the domains AM accepts in the SSO cookies, see "Changing the Cookie Domain" in the Setup and Maintenance Guide.
Important
AM redirects users to the URL specified, and appends a
gotoparameter. The parameter contains the URL the user must be redirected to after authentication. The specified authentication URL must not override thegotoparameter, as that would redirect the user elsewhere and federation will fail.For more information, see "Redirection URL Precedence" in the Authentication and Single Sign-On Guide.
- Reverse Proxy URL
When a reverse proxy is used for SAML endpoints, it is specified here.
- External Application Logout URL
URL to which to send an HTTP POST including all cookies when receiving a logout request. To add a user session property as a POST parameter, include it in the URL query string as a
appsessionpropertyparameter.
The following properties appear under the Services tab:
- MetaAlias
Used to locate the provider's entity identifier, specified as
[/realm-name]*/provider-name, where provider-name cannot contain slash characters (/). For example:/myRealm/mySubrealm/idp.Ensure the MetaAlias is unique for each provider configured in a CoT and in the realm.
- Artifact Resolution Service
Specifies the endpoint to manage artifact resolution. The Index is a unique number identifier for the endpoint.
- Single Logout Service
Specifies the endpoints to manage single logout, depending on the SAML binding selected.
- Manage NameID Service
Specifies the endpoints to manage name identifiers, depending on the SAML binding selected.
- Single SignOn Service
Specifies the endpoints to manage single sign-on.
- URL
Specifies the endpoint to manage name identifier mapping.
The following properties appear under the Advanced tab:
- IDP URL
Specifies the endpoint to manage Secure Attribute Exchange requests.
- Application Security Configuration
Specifies how to handle encryption for Secure Attribute Exchange operations.
- IDP Session Mapper
Specifies the class that finds a valid session from an HTTP servlet request to an identity provider with a SAML Enhanced Client or Proxy profile.
- Enabled
When enabled, the identity provider sends a SOAP logout request over the back channel to all service providers when a session times out. A session may time out when the maximum idle time or maximum session time is reached, for example.
- IDP Finder Implementation Class
Specifies a class that finds the preferred identity provider to handle a proxied authentication request.
- IDP Finder JSP
Specifies a JSP that presents the list of identity providers to the user.
- Enable Proxy IDP Finder For All SPs
When enabled, apply the finder for all remote service providers.
- Relay State URL List
List of URLs permitted for the
RelayStateparameter. AM validates the redirection URL in theRelayStateparameter against this list. If theRelayStateparameter's value is in the list, AM allows redirection to theRelayStateURL. If it is not in the list, a browser error occurs.Use the pattern matching rules described in "Constraining Post-Login Redirects" in the Authentication and Single Sign-On Guide to specify URLs in the list.
If you do not specify any URLs in this property, AM does not validate the
RelayStateparameter.
- IDP Adapter Class
Specifies a class to invoke immediately before sending a SAML v2.0 response.
Once you have set up a remote identity provider, you can configure it through the AM console under Realms > Realm Name > Applications > Federation > Entity Providers > Provider Name.
The following properties appear under the Assertion Content tab:
- Request/Response Signing
Specifies which parts of messages the identity provider requires the service provider to sign digitally.
- Encryption
When selected, the service provider must encrypt NameID elements.
- Certificate Aliases
These settings are not applicable to remote IDP providers.
- NameID Format List
Specifies the supported name identifiers for users that are shared between providers for single sign-on.
The information on how a hosted SP determines the NameID format to use, see NameID Format.
- Enabled, User Name, Password
When enabled, authenticate with the specified user name and password at SOAP endpoints.
You cannot configure how a remote IDP processes assertions, therefore there are no properties on this tab.
For information about configuring assertion processing settings for a hosted IDP, see "Assertion Processing".
The following properties appear under the Services tab:
- MetaAlias
The MetaAlias attribute is specific to providers using AM therefore, a null value for a remote provider configuration is possible.
- Artifact Resolution Service
Specifies the endpoint to manage artifact resolution. The Index is a unique identifier for the endpoint.
- Single Logout Service
Specifies the endpoints to manage single logout, depending on the SAML binding selected.
- Manage NameID Service
Specifies the endpoints to manage name identifiers, depending on the SAML binding selected.
- Single SignOn Service
Specifies the endpoints to manage single sign-on.
- URL
Specifies the endpoint to manage name identifier mapping.
You cannot configure advanced settings for a remote IDP, therefore there are no properties on this tab.
For information about configuring advanced settings for a hosted IDP, see "Advanced Settings".
Once you have set up a hosted service provider, you can configure it through the AM console by navigating to > Realm Name > Applications > Federation > Entity Providers > Provider Name.
The following properties appear under the Assertion Content tab:
- Request/Response Signing
Specifies what parts of messages the service provider requires the identity provider to sign digitally.
- Encryption
The identity provider must encrypt selected elements.
- Certificate Aliases
Specifies aliases for certificates in the AM keystore that are used to handle digital signatures, and to handle encrypted messages.
You can specify lists of aliases for signing and encryption:
If you specify multiple aliases in the Signing property, AM uses the first key alias from the list to sign SAML assertions.
If you configure multiple aliases in the Encryption property, AM will use all private keys associated with the aliases until decryption is successful.
When a certificate is about to expire, add a new alias to either field to enable AM to maintain the trust relationship between entities for a longer period of time. Make sure that the remote providers also update their copy of the AM provider's metadata to ensure the key rollover process is seamless.
- NameID Format List
Specifies the supported name identifiers for users that are shared between providers for single sign-on.
The following diagram shows how the hosted SP decides which of the supported NameID formats is used:

- Disable Federation Persistence
Disables the storage of NameIDs in the user data store, even if the
NameIDformat isurn:oasis:names:tc:SAML:2.0:nameid-format:persistentin the received assertion and the account mapper has identified the local user.You may want to disable storage of NameID values if you are using a read-only data store, or an external identity store that does not have the AM identity schemas applied.
Note
When local authentication is utilized for account linking purposes, disabling federation persistence requires end users to authenticate locally for each SAML-based login.
Default value:
false
- Mapper
Specifies a class that implements the
SPAuthnContextMapperinterface and sets up the authentication context.Default:
com.sun.identity.saml2.plugins.DefaultSPAuthnContextMapper- Default Authentication Context
Specifies the authentication context class to use when making the authentication request to the IDP. Can be used with the Comparison Type property to allow the IDP to choose a suitable authentication mechanism.
Default:
PasswordProtectedTransport- Authentication Context
Specifies the supported authentication context classes. Only authentication context classes that are enabled will be accepted when verifying an assertion.
After verifying the assertion, AM creates a session. The Level field specifies the authentication level AM assigns to that session, based on the authentication context class within the assertion.
- Comparison Type
Used in conjunction with the Default Authentication Context to specify the possible range of authentication mechanisms the IDP can choose from.
For example, if the Comparison Type field is set to
better, and thePasswordProtectedTransportauthentication context class is selected in the Default Authentication Context field, the IDP must select an authentication mechanism with a higher level assigned.For information on how AM maps the authentication mechanism to authentication context classes, and how to set the precedence, see Authentication Context.
Default:
exact- Include Request Authentication Context
Specifies whether to include an authentication context class as the Requested Authentication Context in the SAML v2.0 Authentication Request.
Default: Enabled
- Assertion Time Skew
Grace period in seconds for the
NotBeforetime in assertions.
- Enabled, User Name, Password
When enabled, authenticate with the specified user name and password at SOAP endpoints.
The following properties appear under the Assertion Processing tab:
- Attribute Mapper
Specifies a class that implements the attribute mapping.
- Attribute Map
Maps SAML attributes to user profile attributes.
- Enabled
When enabled, automatically federate user's accounts at different providers based on the specified SAML attribute.
- Attribute
Specifies the SAML attribute to match accounts at different providers.
- Account Mapper
Specifies a class that implements
AccountMapperto map remote users to local user profiles.- Use Name ID as User ID
When selected, fall back to using the name identifier from the assertion to find the user.
- Encoding
Specifies the message encoding format for artifacts.
- Transient User
Specifies the user profile to map all identity provider users when sending transient name identifiers.
- Local Authentication URL
Specifies the local login URL.
- Intermediate URL
Specifies a URL to which the user is redirected after authentication but before the original URL requested.
- External Application Logout URL
Specifies the URL to which to send an HTTP POST including all cookies when receiving a logout request. To add a user session property as a POST parameter, include it in the URL query string as a
appsessionpropertyparameter.
- Default Relay State URL
Specifies the URL to which to redirect users after the request has been handled. Used if not specified in the response.
- Adapter
Specifies a class that implements the
FederationSPAdapterinterface and performs application specific processing during the federation process.- Adapter Environment
Specifies environment variables passed to the adapter class.
The following properties appear under the Services tab:
- MetaAlias
Used to locate the hosted provider's entity identifier, specified as
[/realm-name]*/provider-name, where provider-name can not contain slash characters (/). For example:/myRealm/mySubrealm/sp.Ensure the MetaAlias is unique for each provider configured in a CoT and in the realm.
- Single Logout Service
Specifies the endpoints to manage single logout, depending on the SAML binding selected.
- Manage NameID Service
Specifies the endpoints to manage name identifiers, depending on the SAML binding selected.
- Assertion Consumer Service
Specifies the endpoints to consume assertions, with Index corresponding to the index of the URL in the standard metadata.
The following properties appear under the Advanced tab:
- SP URL
Specifies the endpoint to manage Secure Attribute Exchange requests.
- SP Logout URL
Specifies the endpoint of the service provider that can handle global logout requests.
- Application Security Configuration
Specifies how to handle encryption for Secure Attribute Exchange operations.
- Request IDP List Finder Implementation
Specifies a class that returns a list of preferred identity providers trusted by the SAML Enhanced Client or Proxy profile.
- Request IDP List Get Complete
Specifies a URI reference used to retrieve the complete identity provider list if the
IDPListelement is not complete.- Request IDP List
Specifies a list of identity providers for the SAML Enhanced Client or Proxy to contact, used by the default implementation of the IDP Finder.
- IDP Proxy
When enabled, AM includes a
Scopingelement in the authentication request to enable the request to be proxied.- Introduction
When enabled, use introductions to find the proxy identity provider.
- Proxy Count
Specifies the maximum number of proxy identity providers.
- IDP Proxy List
Specifies a list of URIs identifying preferred proxy identity providers.
- Enabled
When enabled, the service provider sends a SOAP logout request over the back channel to all identity providers when a session times out. A session may time out when the maximum idle time or maximum session time is reached, for example.
- Relay State URL List
List of URLs permitted for the
RelayStateparameter. AM validates the redirection URL in theRelayStateparameter against this list. If theRelayStateparameter's value is in the list, AM allows redirection to theRelayStateURL. If it is not in the list, a browser error occurs.Use the pattern matching rules described in "Constraining Post-Login Redirects" in the Authentication and Single Sign-On Guide to specify URLs in the list.
If you do not specify any URLs in this property, AM does not validate the
RelayStateparameter.
Once you have set up a remote service provider, you can configure it through the AM console by navigating to Realms > Realm Name > Applications > Federation > Entity Providers > Provider Name.
The following properties appear under the Assertion Content tab:
- Request/Response Signing
Specifies what parts of messages the service provider requires the identity provider to sign digitally.
- Encryption
The identity provider must encrypt selected elements.
- Certificate Aliases
These settings are not applicable to remote SP entities.
- NameID Format List
Specifies the supported name identifiers for users that are shared between providers for single sign-on.
The information on how a hosted SP determines the NameID format to use, see NameID Format.
- Disable NameID Persistence
Disables the storage of NameID values at the IDP when generating an assertion for this remote SP.
Default value:
false
- Enabled, User Name, Password
When enabled, require authentication with the specified user name and password at SOAP endpoints.
The following properties appear under the Assertion Processing tab:
- Attribute Map
Override any mappings of attributes to user profile attributes at the IDP.
Mappings should be defined as
SAML attribute name=Profile attribute name.Examples:
EmailAddress=mailAddress=postaladdress
- Encoding
Specifies the message encoding format for artifacts.
The following properties appear under the Services tab:
- MetaAlias
The MetaAlias attribute is specific to remote service providers that are using AM. Therefore, a null value for a remote provider configuration is possible.
- Single Logout Service
Specifies the endpoints to manage single logout, depending on the SAML binding selected.
- Manage NameID Service
Specifies the endpoints to manage name identifiers, depending on the SAML binding selected.
- Assertion Consumer Service
Specifies the endpoints to consume assertions, with Index corresponding to the index of the URL in the standard metadata.
The following properties appear under the Advanced tab:
- Skip Endpoint Validation For Signed Requests
When enabled, AM does not verify Assertion Consumer Service URL values provided in SAML authentication requests. This allows the Assertion Consumer Service URL to contain dynamic query parameters, for example.
As assertion consumer service URL verification is part of the SAML v2.0 spec, you can only skip validation if the authentication request is digitally signed by the SP. To digitally sign authentication requests, in the remote SP configuration navigate to Assertion Content > Signing and Encryption > Request/Response Signing, and select Authentication Requests Signed.
Important
You must configure the remote SP to sign the authentication request.
AM returns an error if it receives an unsigned authentication request and this option is enabled.
- SP URL
Specifies the endpoint to manage Secure Attribute Exchange requests.
- SP Logout URL
Specifies the endpoint of the service provider that can handle global logout requests.
- IDP Proxy
When enabled, the authentication requests from this service provider can be proxied.
- Proxy all requests
When enabled, AM proxies every authentication request from the SP, whether it contains a
Scopingelement or not.The IDP Proxy option must be enabled for this option to take effect.
- Introduction
When enabled, use introduction cookies to find the proxy identity provider.
Note
This property only works with a non-default SAML2IDPProxyFRImpl implementation, and will be deprecated in a future release.
- Use IDP Finder
When enabled, use the IDP finder service to determine the IDP to which to proxy authentication requests.
- Proxy Count
Specifies the maximum number of proxy identity providers. AM sets the specified value in the
Scopingelement of authentication request it proxies for this SP.The Proxy all requests option must be enabled for this option to take effect.
- IDP Proxy List
Specifies a list of URIs identifying preferred proxy identity providers.
Once you have set up a circle of trust, you can configure it through the AM console under Realms > Realm Name > Applications > Federation > Circle of Trust > Circle of Trust Name.
- Name
String to refer to the circle of trust.
Once you have set up a circle of trust, the Name cannot be configured.
- Description
Short description of the circle of trust.
- Status
Whether this circle of trust is operational.
- Entity Providers
Known hosted and remote identity and service providers participating in this circle of trust.
- SAML2 Writer Service URL
SAML v2.0 service that writes identity provider entity identifiers to Common Domain cookies after successful authentication, used in identity provider discovery. Example:
http://www.disco.example:8080/openam/saml2writer.- SAML2 Reader Service URL
SAML v2.0 service that reads identity provider entity identifiers from Common Domain cookies, used in identity provider discovery. Example:
http://www.disco.example:8080/openam/saml2reader.
- Access control
Control to grant or to deny access to a resource.
- Account lockout
The act of making an account temporarily or permanently inactive after successive authentication failures.
- Actions
Defined as part of policies, these verbs indicate what authorized identities can do to resources.
- Advice
In the context of a policy decision denying access, a hint to the policy enforcement point about remedial action to take that could result in a decision allowing access.
- Agent administrator
User having privileges only to read and write agent profile configuration information, typically created to delegate agent profile creation to the user installing a web or Java agent.
- Agent authenticator
Entity with read-only access to multiple agent profiles defined in the same realm; allows an agent to read web service profiles.
- Application
In general terms, a service exposing protected resources.
In the context of AM policies, the application is a template that constrains the policies that govern access to protected resources. An application can have zero or more policies.
- Application type
Application types act as templates for creating policy applications.
Application types define a preset list of actions and functional logic, such as policy lookup and resource comparator logic.
Application types also define the internal normalization, indexing logic, and comparator logic for applications.
- Attribute-based access control (ABAC)
Access control that is based on attributes of a user, such as how old a user is or whether the user is a paying customer.
- Authentication
The act of confirming the identity of a principal.
- Authentication chaining
A series of authentication modules configured together which a principal must negotiate as configured in order to authenticate successfully.
- Authentication level
Positive integer associated with an authentication module, usually used to require success with more stringent authentication measures when requesting resources requiring special protection.
- Authentication module
AM authentication unit that handles one way of obtaining and verifying credentials.
- Authorization
The act of determining whether to grant or to deny a principal access to a resource.
- Authorization Server
In OAuth 2.0, issues access tokens to the client after authenticating a resource owner and confirming that the owner authorizes the client to access the protected resource. AM can play this role in the OAuth 2.0 authorization framework.
- Auto-federation
Arrangement to federate a principal's identity automatically based on a common attribute value shared across the principal's profiles at different providers.
- Bulk federation
Batch job permanently federating user profiles between a service provider and an identity provider based on a list of matched user identifiers that exist on both providers.
- Circle of trust
Group of providers, including at least one identity provider, who have agreed to trust each other to participate in a SAML v2.0 provider federation.
- Client
In OAuth 2.0, requests protected web resources on behalf of the resource owner given the owner's authorization. AM can play this role in the OAuth 2.0 authorization framework.
- Client-based sessions
AM sessions for which AM returns session state to the client after each request, and require it to be passed in with the subsequent request. For browser-based clients, AM sets a cookie in the browser that contains the session information.
For browser-based clients, AM sets a cookie in the browser that contains the session state. When the browser transmits the cookie back to AM, AM decodes the session state from the cookie.
- Conditions
Defined as part of policies, these determine the circumstances under which which a policy applies.
Environmental conditions reflect circumstances like the client IP address, time of day, how the subject authenticated, or the authentication level achieved.
Subject conditions reflect characteristics of the subject like whether the subject authenticated, the identity of the subject, or claims in the subject's JWT.
- Configuration datastore
LDAP directory service holding AM configuration data.
- Cross-domain single sign-on (CDSSO)
AM capability allowing single sign-on across different DNS domains.
- CTS-based sessions
AM sessions that reside in the Core Token Service's token store. CTS-based sessions might also be cached in memory on one or more AM servers. AM tracks these sessions in order to handle events like logout and timeout, to permit session constraints, and to notify applications involved in SSO when a session ends.
- Delegation
Granting users administrative privileges with AM.
- Entitlement
Decision that defines which resource names can and cannot be accessed for a given identity in the context of a particular application, which actions are allowed and which are denied, and any related advice and attributes.
- Extended metadata
Federation configuration information specific to AM.
- Extensible Access Control Markup Language (XACML)
Standard, XML-based access control policy language, including a processing model for making authorization decisions based on policies.
- Federation
Standardized means for aggregating identities, sharing authentication and authorization data information between trusted providers, and allowing principals to access services across different providers without authenticating repeatedly.
- Fedlet
Service provider application capable of participating in a circle of trust and allowing federation without installing all of AM on the service provider side; AM lets you create Java Fedlets.
- Hot swappable
Refers to configuration properties for which changes can take effect without restarting the container where AM runs.
- Identity
Set of data that uniquely describes a person or a thing such as a device or an application.
- Identity federation
Linking of a principal's identity across multiple providers.
- Identity provider (IdP)
Entity that produces assertions about a principal (such as how and when a principal authenticated, or that the principal's profile has a specified attribute value).
- Identity repository
Data store holding user profiles and group information; different identity repositories can be defined for different realms.
- Java agent
Java web application installed in a web container that acts as a policy enforcement point, filtering requests to other applications in the container with policies based on application resource URLs.
- Metadata
Federation configuration information for a provider.
- Policy
Set of rules that define who is granted access to a protected resource when, how, and under what conditions.
- Policy agent
Java, web, or custom agent that intercepts requests for resources, directs principals to AM for authentication, and enforces policy decisions from AM.
- Policy Administration Point (PAP)
Entity that manages and stores policy definitions.
- Policy Decision Point (PDP)
Entity that evaluates access rights and then issues authorization decisions.
- Policy Enforcement Point (PEP)
Entity that intercepts a request for a resource and then enforces policy decisions from a PDP.
- Policy Information Point (PIP)
Entity that provides extra information, such as user profile attributes that a PDP needs in order to make a decision.
- Principal
Represents an entity that has been authenticated (such as a user, a device, or an application), and thus is distinguished from other entities.
When a Subject successfully authenticates, AM associates the Subject with the Principal.
- Privilege
In the context of delegated administration, a set of administrative tasks that can be performed by specified identities in a given realm.
- Provider federation
Agreement among providers to participate in a circle of trust.
- Realm
AM unit for organizing configuration and identity information.
Realms can be used for example when different parts of an organization have different applications and user data stores, and when different organizations use the same AM deployment.
Administrators can delegate realm administration. The administrator assigns administrative privileges to users, allowing them to perform administrative tasks within the realm.
- Resource
Something a user can access over the network such as a web page.
Defined as part of policies, these can include wildcards in order to match multiple actual resources.
- Resource owner
In OAuth 2.0, entity who can authorize access to protected web resources, such as an end user.
- Resource server
In OAuth 2.0, server hosting protected web resources, capable of handling access tokens to respond to requests for such resources.
- Response attributes
Defined as part of policies, these allow AM to return additional information in the form of "attributes" with the response to a policy decision.
- Role based access control (RBAC)
Access control that is based on whether a user has been granted a set of permissions (a role).
- Security Assertion Markup Language (SAML)
Standard, XML-based language for exchanging authentication and authorization data between identity providers and service providers.
- Service provider (SP)
Entity that consumes assertions about a principal (and provides a service that the principal is trying to access).
- Authentication Session
The interval while the user or entity is authenticating to AM.
- Session
The interval that starts after the user has authenticated and ends when the user logs out, or when their session is terminated. For browser-based clients, AM manages user sessions across one or more applications by setting a session cookie. See also CTS-based sessions and Client-based sessions.
- Session high availability
Capability that lets any AM server in a clustered deployment access shared, persistent information about users' sessions from the CTS token store. The user does not need to log in again unless the entire deployment goes down.
- Session token
Unique identifier issued by AM after successful authentication. For a CTS-based sessions, the session token is used to track a principal's session.
- Single log out (SLO)
Capability allowing a principal to end a session once, thereby ending her session across multiple applications.
- Single sign-on (SSO)
Capability allowing a principal to authenticate once and gain access to multiple applications without authenticating again.
- Site
Group of AM servers configured the same way, accessed through a load balancer layer. The load balancer handles failover to provide service-level availability.
The load balancer can also be used to protect AM services.
- Standard metadata
Standard federation configuration information that you can share with other access management software.
- Stateless Service
Stateless services do not store any data locally to the service. When the service requires data to perform any action, it requests it from a data store. For example, a stateless authentication service stores session state for logged-in users in a database. This way, any server in the deployment can recover the session from the database and service requests for any user.
All AM services are stateless unless otherwise specified. See also Client-based sessions and CTS-based sessions.
- Subject
Entity that requests access to a resource
When an identity successfully authenticates, AM associates the identity with the Principal that distinguishes it from other identities. An identity can be associated with multiple principals.
- User data store
Data storage service holding principals' profiles; underlying storage can be an LDAP directory service or a custom
IdRepoimplementation.- Web Agent
Native library installed in a web server that acts as a policy enforcement point with policies based on web page URLs.