Guide showing you how to customize the ForgeRock® Access Management user interface.
This guide covers concepts, configuration, and usage procedures for customizing the ForgeRock Access Management user interface.
This guide is written for anyone wanting to apply their own look and feel to the end-user facing pages provided by Access Management.
ForgeRock Identity Platform™ serves as the basis for our simple and comprehensive Identity and Access Management solution. We help our customers deepen their relationships with their customers, and improve the productivity and connectivity of their employees and partners. For more information about ForgeRock and about the platform, see https://www.forgerock.com.
When you deploy AM to protect your web-based applications, users can be redirected to AM pages for login and logout.
The end user pages have ForgeRock styling and branding by default. You likely want to change at least the images to reflect your organization. You might want different customizations for different realms. This chapter addresses how to get started customizing AM end user pages for your organizations and supported locales.
You may want to change the default styling and branding as well as customize different realms.
While customizing the UI, you can set the advanced server property,
org.forgerock.openam.core.resource.lookup.cache.enabled,
to false to allow AM immediately to pick up changes
to the files as you customize them. [1]
This includes the XML callback files for authentication modules
used by the XUI.
ForgeRock provides the source code of the XUI so you can customize it to fit your organization requirements. Some customization, such as localizing or theming the XUI, does not require rebuilding the XUI, as demonstrated in the following chapter.
[1]
You can set advanced server properties in the AM console under
Deployment > Servers > Server Name >
Advanced.
Before using AM in production, set
org.forgerock.openam.core.resource.lookup.cache.enabled
back to the default setting, true.
The user-facing XUI pages are fully customizable. You can theme them, localize them, and change their layout. The administrator pages cannot be themed or localized, but changes in in the common components of the XUI, such as the footer, affect them as well.
Customization of the layout of the pages or the JavaScript resources require
a complete rebuild of the XUI. Other changes, such as theming or localizing the
user-facing pages, can be performed in the .war file instead.
The recommended approach to customize the XUI is to download the
source code, modify it to suit your environment, and then either deploy
it in your AM instances as part of your environment pipelines
or pack it in your custom AM .war files, then
deploy them.
To customize the layout and functionality of the XUI, you must download, rebuild, and deploy the XUI project. The build process for XUI uses the Webpack resource bundler to manage dependencies, optimize deliverables, and package the output.
ForgeRock provides the source code for the XUI as a Maven project located in the am-external
repository, accessible to ForgeRock BackStage accounts that are added to a
subscription.
If you do not already have a ForgeRock BackStage account, get one from https://backstage.forgerock.com. For more information about adding your account to a subscription, see Getting access to product support in the ForgeRock Knowledge Base.
Perform the following steps to get the source of the XUI:
Clone the
am-externalrepository:$ git clone https://myBackStageID@stash.forgerock.org/scm/openam/am-external.git
URL encode your BackStage ID if it contains special characters. For example : becomes
%3Aand @ becomes%40.Enter your BackStage password when prompted to do so.
Check out the
release/6.0.0branch:$ cd am-external $ git checkout releases/6.0.0
The XUI project is located in the
am-external/openam-ui/openam-ui-ria/folder.If you do not already have them, install the following prerequisites:
Tip
For information on building the XUI as part of a Maven workflow for deployment inside a WAR file, see How do I customize the XUI using source code in AM (All versions) and OpenAM 12.x, 13.x? in the ForgeRock Knowledge Base.
Use the yarn command to download the dependencies to the project:
$ yarn
yarn install v1.5.1
[1/4] 🔍 Resolving packages...
[2/4] 🚚 Fetching packages...
[3/4] 🔗 Linking dependencies...
[4/4] 📃 Building fresh packages...
✨ Done in 9.08s.
The XUI contains the following types of resources:
| Resources | Location |
|---|---|
| Javascript source and configuration files | src/main/js |
| HTML pages | src/main/resources/templates |
| CSS collections | src/main/resources/css |
| Fonts | src/main/resources/fonts |
| Images | src/main/resources/images |
| Themes | src/main/resources/themes |
| Partials | src/main/resources/partials |
| Localization files | src/main/resources/locales |
Some of the resources, such as the CSS collections, are subdivided in directories depending on if they apply to the administrator pages, user pages, or to both.
Review the following sections for examples on customizing the XUI:
Important
All the files in the XUI source are indented with four spaces. Failure to indent the files properly will cause the XUI not to build.
This section explains how to use themes to alter the appearance of user-facing XUI pages.
The XUI is built with the Bootstrap framework, and supports Bootstrap themes to customize the look and feel of the user interface.
Only user-facing XUI pages support themes. The AM administration console cannot be themed, although customizing the footer would alter the appearance for both user-facing and administration pages.
You can apply themes to specific realms, and also to specific authentication chains within those realms. AM includes a default theme, and an inverted dark theme.
You can perform the steps of this procedure and edit the XUI source code,
or you can find the files as deployed inside the .war file.
The examples in the procedure use the source code paths, but you can find
the referenced files in the /path/to/tomcat/webapps/openam/XUI
directory of a deployed AM .war file.
Perform the following steps to apply a theme to the XUI:
Copy your custom Bootstrap theme to a directory in
src/main/resources/themes. A custom Bootstrap theme should consist of one or more CSS files, and optionally, media and font files.As an example, the dark theme is available in the
src/main/resources/themes/darkdirectory.Edit the
src/main/js/config/ThemeConfiguration.jsfile[2]:Locate the
themeselement, and under it create a new element with the name of your theme. The following example adds a theme calledmyTheme:return { themes: { // There must be a theme named "default". "default": { ... }, "fr-dark-theme": { ... }, "myTheme": {} }, mappings: [...] };In the new theme element, create a
stylesheetsarray containing the theme's two CSS files, followed by the requiredcss/structure.cssfile.return { themes: { // There must be a theme named "default". "default": { ... }, "fr-dark-theme": { ... }, "myTheme": { stylesheets: [ "themes/myTheme/css/bootstrap.min.css", "themes/myTheme/css/myTheme.css", "css/structure.css" ] } }, mappings: [...] };Note that you must specify paths relative to the
src/main/resourcesdirectory.If required, specify additional settings specific to the new theme, such as the logos to use or the footer information. For information on the available settings, see "XUI Configuration Parameters".
Locate the
mappingsarray, and create a new element under it to map your new theme to realms and authentication chains.Elements in the
mappingsarray are evaluated in order from top to bottom. The first theme that matches the current realm and/or authentication chain is applied. Any subsequent mappings, even if true, are ignored once a match is found.If no match is found, the
defaulttheme is applied.Create a
themeelement, and set the value to the name of your new theme:return { themes: { ... }, mappings: [{ theme: "myTheme" }] };(Optional) Create a
realmsarray, and include the realms the theme will apply to:return { themes: { ... }, mappings: [{ theme: "myTheme", realms: ["/", "/test-realm", /^\/a/] }] };You can use a regular expression to specify the realms the theme should apply to. For example
/^\/a/will apply the theme to all realms that start with/a, including/aband/a/c.If you do not include a realms array, the theme is applied to all realms.
(Optional) Create an
authenticationChainsarray, and include any authentication service (chains or trees) the theme applies to when used:return { themes: { ... }, mappings: [{ theme: "myTheme", realms: ["/", "/test-realm", /^\/a/], authenticationChains: ["auth-chain-one", "Example-Tree"] }] };If you specify both realms and authentication services, the theme is only applied when both criteria are true.
(Optional) Compile the XUI project using the yarn build command.
(Optional) Start the developent XUI server to test the changes by following the steps detailed in "To Test XUI Pages in a Development Server".
Log in as a user to see the new theme applied:
(Optional) Once you are satisfied with the changes, deploy the output in the
builddirectory to the/path/to/tomcat/webapps/openam/XUIdirectory of your AM instances.There is no need to restart the AM instance. Subsequent visits to the XUI pages will use the rebuilt files.
Both user-facing and the administration pages are provided only in English, but you can customize and localize the user-facing text as required.
Localizing the XUI does not require a rebuild of the XUI project. However, it is
recommended to make the changes in the source code and deploy the XUI in
your AM instances or pack it in your custom AM .war
file.
The English text is provided in .json files located in
the following directories:
src/main/resources/locales/en, if you are modifying the XUI source code./path/to/tomcat/webapps/openam/XUI/locales/en, if you are modifying the deployed AM.warfile.
To localize the files to a new locale:
Copy the English locale directory
locales/ento a new directory, for example,locales/fr.The name of the directory should be specified as per rfc5646 - Tags for Identifying Languages. For example,
en-GB.Edit the files and change the values of the elements for the required locale taking care not to change the JSON structure or to render it invalid.
Rebuild and deploy the XUI, if required. For more information, see "To Rebuild and Deploy the XUI".
To perform basic customizations, edit the
openam-ui-ria/src/js/config/ThemeConfiguration.js as if you were
applying a theme for the XUI. For more information,
see "Theming the XUI" and "XUI Configuration Parameters".
To customize the layout of XUI pages, you need to download the XUI source code, edit it, and rebuild the XUI.
This procedure demonstrates how to customize the layout of XUI pages by copying the relevant files into a theme, editing the source, and making changes to the CSS.
Download the XUI source code as explained in "Downloading the XUI".
Modify the XUI source as follows:
Copy the
src/resources/themes/darkdirectory to a new directory with a suitable name for the theme that contains your customizations, for example,myTheme.Tip
You can modify the original files, but it is recommended to create a new theme containing your changes.
Edit the
openam-ui-ria/src/js/config/ThemeConfiguration.jsfile, which contains the configuration the XUI uses when applying a theme, and make a copy of the"fr-dark-theme"section, named after the directory you created in the previous step ("myTheme").In this example, in the
footerelement, change the email address toFeedback@example.com, and add a new element callediconthat points to an icon to display in the footer.Alter the
pathproperty to point to the name of the directory you created in thethemesdirectory earlier, including a trailing slash. For examplemyTheme/.The new section will resemble the following:
"myTheme": {
    // An ordered list of URLs to stylesheets that will be applied to every page.
    stylesheets: [
        "themes/myTheme/css/bootstrap.min.css",
        StructureStyle,
        "themes/myTheme/css/theme-dark.css"
    ],
    // A path that is prepended to every relative URL when fetching resources (including images, stylesheets and
    // HTML template files). Must include a trailing forward slash.
    path: "myTheme/",
    settings: {
        loginLogo: {
            src: "themes/myTheme/images/login-logo-white.png",
            title: "ForgeRock",
            alt: "ForgeRock",
            height: "228px",
            width: "220px"
        },
        footer: {
            // A contact email address.
            mailto: "Feedback@example.com",
            // The footer icon.
            icon : "images/logo-horizontal.png"
        }
    }
}
Important
Specify resource paths within the theme configuration as relative to the
openam-ui-ria/src/resources/directory.Edit the
mappingssection of theThemeConfiguration.jsfile to apply the new theme to the required contexts.For example, to apply the theme to the top-level realm, use:
mappings: [
    { theme: "myTheme", realms: ["/"] }
]
For more information about the format of the
ThemeConfiguration.jsfile, see "XUI Configuration Parameters".Copy the
openam-ui-ria/src/resources/templates/common/FooterTemplate.htmlfile into the same path but within themyThemedirectory, for example:$ cp openam-ui-ria/src/resources/templates/common/FooterTemplate.html openam-ui-ria/src/resources/themes/myTheme/templates/common/FooterTemplate.html
This template contains the HTML code for the footer. This example creates a table in the footer that holds an image, the altered email address, and some text.
Edit the new
FooterTemplate.htmlfile as follows:<div class="container"> <p> <table align="center"> <td> <img src="{{theme.settings.footer.icon}}" alt="Horizontal ForgeRock Logo" align="middle" class="footer_image"> </td> <td> <b>ForgeRock XUI at Example.com</b> <br/> <a href="mailto: {{theme.settings.footer.mailto}}">Send us Feedback!</a> </td> </table> </p> </div>The file contains variables expressed in double curly brackets ({{}}); they are the paths defined in the
ThemeConfiguration.jsfile.Also, the image has the
footer_imageclass applied to simplify applying a CSS style to it in the next step.Copy and edit any additional files that require customization from the
templatesandpartialsdirectories to the equivalent path in yourthemesdirectory.Edit the
/am-external/openam-ui/openam-ui-ria/src/resources/themes/myTheme/css/theme-dark.cssfile to specify the height of the image, add padding to thefooter_imageclass.For example:
.footer_image {
    height: 3em;
    padding-right: 1em;
}
Rebuild the XUI by running the yarn build command.
Tip
If you receive errors during the build, you may be missing the required components locally. Try running yarn install, and then try again.
(Optional) Test the XUI pages by following the steps detailed in "To Test XUI Pages in a Development Server".
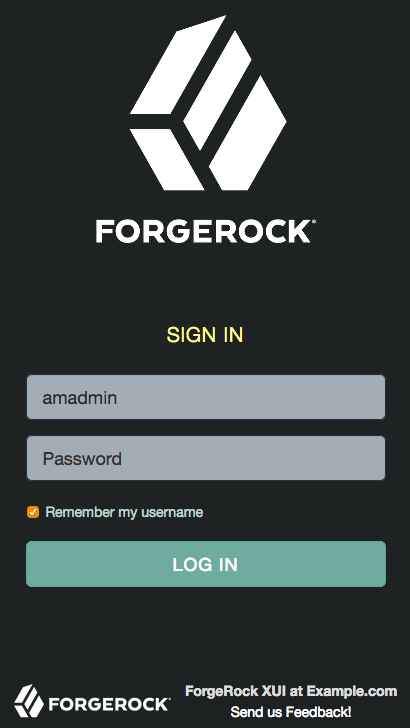
You can now see the customized template in the login page:
Once you are satisfied with the changes, deploy the output in the
builddirectory to the/path/to/tomcat/webapps/openam/XUI/directory of your AM instances.There is no need to restart the AM instance. Subsequent visits to the XUI pages will use the rebuilt files.
You can extend user profiles by adding custom attributes. This section demonstrates how to add a custom attribute to a user profile when storing user profiles in the LDAP directory.
Adding a custom attribute involves both updating the identity repository schema to hold the new attribute and updating the XUI. Furthermore, to give users write permissions to the custom attribute, you must also update the AM configuration store.
This section uses DS 5 or later in the examples and includes the following procedures:
Perform the following steps to update the identity repository schema for the custom attribute, and then update AM to use the custom attribute and object class.
If you intend to use an existing attribute that is already allowed on user profile entries, you can skip this procedure.
Prepare the attribute type object class definitions in LDIF format. For example:
$ cat custom-attr.ldif
dn: cn=schema
changetype: modify
add: attributeTypes
attributeTypes: ( temp-custom-attr-oid NAME 'customAttribute' EQUALITY case
 IgnoreMatch ORDERING caseIgnoreOrderingMatch SUBSTR caseIgnoreSubstrings
 Match SYNTAX 1.3.6.1.4.1.1466.115.121.1.15 USAGE userApplications )
-
add: objectClasses
objectClasses: ( temp-custom-oc-oid NAME 'customObjectclass' SUP top AUXILIARY
  MAY customAttribute )
In the example, the attribute type is called
customAttributeand the object class is calledcustomObjectclass.Add the schema definitions to the directory.
$ /path/to/opendj/bin/ldapmodify \
 --port 1389 \
 --hostname openam.example.com \
 --bindDN "cn=Directory Manager" \
 --bindPassword password \
 custom-attr.ldif
Processing MODIFY request for cn=schema
MODIFY operation successful for DN cn=schema
In the AM console, browse to Realms > Realm Name > Data Stores > Data Store Name > User Configuration.
Add the object class, for example
customObjectclass, to the LDAP User Object Class list.Add the attribute type, for example
customAttribute, to the LDAP User Attributes list.Save your work.
Perform the following steps to update AM configuration store to give users write permission to the custom attribute.
This procedure assumes you use an LDAP browser, for example Apache Directory Studio. Alternatively, you can follow "To Allow Users to Update the New Attribute Using the Command Line" if you use the command line.
Connect to the AM configuration store. You can see the configuration store details by navigating to Deployment > Servers > Directory Configuration > Server.
Search for
ou=SelfWriteAttributes. You should find DNs similar to the following:dn:ou=SelfWriteAttributes,ou=Policies,ou=default,ou=OrganizationConfig,ou=1.0,ou=iPlanetAMPolicyService,ou=services,o=sunamhiddenrealmdelegationservicepermissions,ou=services,dc=openam,dc=forgerock,dc=orgdn:ou=SelfWriteAttributes,ou=default,ou=default,ou=OrganizationConfig,ou=1.0,ou=sunEntitlementIndexes,ou=services,o=sunamhiddenrealmdelegationservicepermissions,ou=services,dc=openam,dc=forgerock,dc=org
In the entry under
iPlanetAMPolicyService, edit thesunKeyValueattribute to add the custom attribute to the list of self-writable attributes. For example,<Value>customAttribute</Value>.In the entry under
sunEntitlementIndexes, edit thesunKeyValueattribute to add the custom attribute to the list of self-writable attributes. The following is an example of the custom attribute as the first element of the list:\"attributes\": [\n \"customAttribute\",\n ....Restart AM or the web container where it runs.
Perform the following steps to update the AM configuration store to give users write permission to the custom attribute.
This procedure assumes you use the command line. Alternatively, you can follow "To Allow Users To Update the New Attribute Using an LDAP Browser" if you use an LDAP browser.
Search for the value of
sunKeyValueinou=SelfWriteAttributesby running the following command:$ /path/to/opendj/bin/ldapsearch --hostname openam.example.com --port 1389 \ --bindDn "cn=Directory Manager" --bindPassword forgerock \ --baseDn "dc=openam,dc=forgerock,dc=org" "(ou=SelfWriteAttributes)" sunKeyValue dn: ou=SelfWriteAttributes,ou=Policies,ou=default,ou=OrganizationConfig,ou=1.0,ou=iPlanetAMPolicyService,ou=services,o=sunamhiddenrealmdelegationservicepermissions,ou=services,dc=openam,dc=forgerock,dc=org sunKeyValue:: eG1scG9saWN5PTw........ dn: ou=SelfWriteAttributes,ou=default,ou=default,ou=OrganizationConfig,ou=1.0,ou=sunEntitlementIndexes,ou=services,o=sunamhiddenrealmdelegationservicepermissions,ou=services,dc=openam,dc=forgerock,dc=org sunKeyValue: serializable={"eCondition":{"className":"com.sun.....Note that the command returns two DNs, and the value of
sunKeyValuein the first one is base64-encoded.Decode the base64 string of the
iPlanetAMPolicyServiceDN. For example:$ ./base64 decode --encodedData eG1scG9saWN5PTw........ xmlpolicy=<?xml version="1.0" encoding="UTF-8"?> <Policy name="SelfWriteAttributes" createdby="cn=dsameuser,ou=DSAME Users,dc=openam,dc=forgerock,dc=org" lastmodifiedby="cn=dsameuser,ou=DSAME Users,dc=openam,dc=forgerock,dc=org" creationdate="1528296269883" lastmodifieddate="1528296269883" referralPolicy="false" active="true" > <Rule name="user-read-rule"> <ServiceName name="sunAMDelegationService" /> <ResourceName name="sms://*dc=openam,dc=forgerock,dc=org/sunIdentityRepositoryService/1.0/application/*" /> <AttributeValuePair> <Attribute name="MODIFY" /> <Value>allow</Value> </AttributeValuePair> </Rule> <Subjects name="Subjects" description=""> <Subject name="delegation-subject" type="AuthenticatedUsers" includeType="inclusive"> </Subject> </Subjects> <Conditions name="AttrCondition" description=""> <Condition name="condition" type="UserSelfCheckCondition"> <AttributeValuePair><Attribute name="attributes"/><Value>givenname</Value><Value>sn</Value><Value>cn</Value><Value>userpassword</Value><Value>mail</Value><Value>telephonenumber</Value><Value>postaladdress</Value><Value>preferredlocale</Value><Value>iplanet-am-user-password-reset-options</Value><Value>iplanet-am-user-password-reset-question-answer</Value><Value>description</Value><Value>oath2faEnabled</Value><Value>sunIdentityServerDeviceKeyValue</Value><Value>sunIdentityServerDeviceStatus</Value> </AttributeValuePair> </Condition> </Conditions> </Policy>
Create a file with the decoded string. Then, add the custom attribute to the
<AttributeValuePair>list. For example:$ vi to-encode.xml .... <Attribute name="attributes"/><Value>customAttribute</Value><Value>givenname</Value>...</AttributeValuePair> ....
Base64-encode the content of the file. For example:
$ ./base64 encode -f to-encode.xml
EG1scG9saWN5PTw22.....
Create an LDIF file, for example,
change.ldif, containing the following:The LDIF properties and rules required to modify the value of the
sunKeyValueattribute for both DNs.The newly base64-encoded string as the value of the
sunKeyValueattribute of theiPlanetAMPolicyServiceDN. The string already contains the custom attribute.The value of the
sunKeyValueattribute of thesunEntitlementIndexesDN. You must add the custom attribute inside theattributeslist.
The following excerpt is an example of LDIF file:
dn: ou=SelfWriteAttributes,ou=Policies,ou=default,ou=OrganizationConfig,ou=1.0,ou=iPlanetAMPolicyService,ou=services,o=sunamhiddenrealmdelegationservicepermissions,ou=services,dc=openam,dc=forgerock,dc=org
changetype: modify
replace: sunKeyValue
sunKeyValue: EG1scG9saWN5PTw22.....

dn: ou=SelfWriteAttributes,ou=default,ou=default,ou=OrganizationConfig,ou=1.0,ou=sunEntitlementIndexes,ou=services,o=sunamhiddenrealmdelegationservicepermissions,ou=services,dc=openam,dc=forgerock,dc=org
changetype: modify
replace: sunKeyValue
sunKeyValue: serializable={"eCondition":{"className": ...  \"properties\": {\"attributes\": [\n    \"customAttribute\",\n    \"givenname\",\n    \"sn\",\n  ... \"values\": []\n}"}}
Apply the changes in the LDIF file to the LDAP configuration store, as follows:
$ /path/to/opendj/bin/ldapmodify --hostname openam.example.com --port 50389 --bindDn "cn=Directory Manager" --bindPassword forgerock --filename change.ldif
# MODIFY operation successful for DN ou=SelfWriteAttributes,ou=Policies,ou=default,ou=OrganizationConfig,ou=1.0,ou=iPlanetAMPolicyService,ou=services,o=sunamhiddenrealmdelegationservicepermissions,ou=services,dc=openam,dc=forgerock,dc=org
# MODIFY operation successful for DN ou=SelfWriteAttributes,ou=default,ou=default,ou=OrganizationConfig,ou=1.0,ou=sunEntitlementIndexes,ou=services,o=sunamhiddenrealmdelegationservicepermissions,ou=services,dc=openam,dc=forgerock,dc=org
Restart AM or the web container where it runs.
To allow the XUI to show the new attribute in the user profile, you need to download the XUI source, edit it, and then rebuild the XUI.
Perform the following steps to configure the XUI to show the new attribute:
Download the XUI source as explained in "Downloading the XUI".
Modify the XUI as follows:
Edit the
src/main/resources/locales/en/translation.jsonfile and add a new line with the description for the custom attribute. This description will show in the XUI user's profile page. For example:... "profile": "Profile", "username" : "Username", "emailAddress" : "Email address", "givenName" : "First Name", "customAttribute" : "My Custom Attribute", "sn" : "Last Name", "changePassword" : "Change password", ...Note that the example adds the custom attribute under the
common.userJSON path.Tip
If you have translated the XUI pages, remember to edit all the
translation.jsonfiles in your installation.Edit the
src/main/resources/templates/user/UserProfileTemplate.htmlfile and add a new line for the custom attribute. Consider the following points:propertymust contain the name of the custom attribute created in the LDAP. For example,customAttribute.labelmust contain the path to the label created in thetranslation.jsonfile. In this case,common.user.customAttribute.
For example:
{{#user}}
  {{> form/_basicInput property="username" label="common.user.username" readonly=true}}
  {{> form/_basicInput property="givenName" label="common.user.givenName"}}
  {{> form/_basicInput property="sn" label="common.user.sn" required="true"}}
  {{> form/_basicInput type="email" property="mail" label="common.user.emailAddress"
  extraAttributes='data-validator="validEmailAddressFormat" data-validator-event="keyup"' }}
  {{> form/_basicInput type="tel" property="telephoneNumber" label="common.user.phoneNumber"
  extraAttributes='data-validator="validPhoneFormat" data-validator-event="keyup"'}}
  {{> form/_basicInput property="customAttribute" label="common.user.customAttribute"}}
{{/user}}
Edit the
src/main/js/org/forgerock/openam/ui/user/UserModel.jsfile and add the custom attribute on theServiceInvoker.restCallfunction.Consider the following constraints when modifying this file:
The file does not support tab indentation. You must use space indentation.
The file does not support lines longer than 120 characters. If the line you are modifying exceeds this limit, break it in multiple lines.
For example:
return ServiceInvoker.restCall(_.extend(
                            {
                                type: "PUT",
                                data: JSON.stringify(
                                    _.chain(this.toJSON())
                                        .pick(["givenName", "sn", "mail", "postalAddress", "telephoneNumber",
                                            "customAttribute"])
                                        .mapValues((val) => {
                                        ...
}
Rebuild the XUI by running the yarn build command.
Test the XUI pages by following the steps detailed in "To Test XUI Pages in a Development Server".
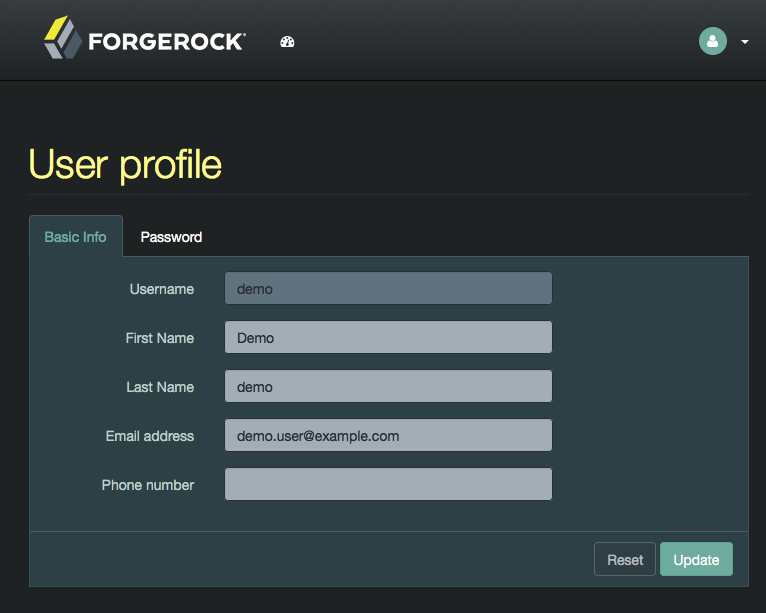
The XUI user profile page now shows the custom attribute, and users are able to read and write its values:
Once you are satisfied with the changes, deploy the output in the
builddirectory to the/path/to/tomcat/webapps/openam/XUI/directory of your AM instances.There is no need to restart the AM instance. Subsequent visits to the XUI pages will use the rebuilt files.

The Maven project for the XUI contains a package.json configuration file, which
specifies the available commands for building and testing the XUI. The following commands are available:
- yarn build
Performs a one-time production-ready build of the XUI. Outputs to the
builddirectory.- yarn test
Compiles and executes XUI unit tests in the
src/testdirectory, and continuously watches for source changes to trigger re-testing.Run this command in a separate terminal window when developing to continuously run unit tests against the code.
- yarn profile
Performs a one-time build of the XUI, in production mode, with profiling enabled.
Generates a report in the
builddirectory namedreport.htmldetailing the structure of the bundles and chunks that are created as part of a production build.- yarn start
Starts the XUI in development mode, with automatic rebuilds and reloads enabled.
The
startscript launches a dedicated Webpack development server to serve the XUI during development. For more information, see "To Test XUI Pages in a Development Server".
The package.json file also lists the dependencies the XUI uses, and the required versions.
Dependencies are locked to specific versions, for example, "lodash": "4.1.0" specifies an
explicit version without using ^ or ~ characters.
You can run the XUI project on a dedicated development server for testing customizations. The XUI
in the development server connects to a separate instance of AM running on a different port, but using the
same base domain. Any HTTP requests the XUI makes out to AM are proxied to port 8080,
by default.
Tip
You can override the default setting for the the port AM is running on by using an
OPENAM_PORT environment variable.
By separating the XUI from the core AM server, the XUI behaves as it would in production, except with the addition of development tooling, such as automatic browser refreshes when XUI code is changed.
To run the XUI on a development server:
Configure and start an AM instance. For example,
http://openam.example.com:8080/openam.Start an XUI development server by using the yarn start command.
The development server starts on this first available port counting up from port
8080, which is usually port8081. Ensure you can access the development server using the same domain as the AM instance, for example,http://xui.example.com:8081.In a web browser, navigate to the full URL of your AM instance, but use the port number of the XUI development server.
For example, navigate to
http://openam.example.com:8081/openam/XUI/#login.Changes made to the XUI project are rebuilt and redeployed to the development server automatically, and the browser refreshed to show the changes, or any errors that have occurred.
Note
The XUI development server assumes the AM instaces has a deployment URI of
/openam. The deployment URI and port numbers can be edited in theconfig/webpack/development.jsfile in the XUI project.
After making changes to the XUI, such as editing the JavaScript or HTML templates, perform the following steps:
Rebuild the project using the yarn build.
(Optional) Test the XUI pages before deploying them to an instance. For more information, see "To Test XUI Pages in a Development Server".
Deploy the output in the
builddirectory to the/path/to /tomcat/webapps/openam/XUI/directory in your Access Management instances.There is no need to restart the AM instance. Subsequent visits to the XUI pages will use the rebuilt files.
[2] /XUI/config/ThemeConfiguration.[hash].js if
you are modifying it in the .war file. [hash]
is an alphanumeric value generated each time the XUI is rebuilt, to
reference the CSS files in the theme, and to map the theme to realms and authentication services.
This reference chapter covers the languages and locales supported by AM, as well as configuration parameters for AM's user interface, named the XUI.
This section lists languages and locales supported by AM.
The XUI interface pages are localized for the following languages:
English
You can localize the XUI for other languages as you require. For more information, see "Localizing the XUI".
The configuration of the XUI is based on settings in the
ThemeConfiguration.[hash].js file, where
[hash] is an alphanumeric value generated each time the XUI is rebuilt,
to help resolve caching issues.
This file is found in the /path/to/webapps/openam/XUI/config/
directory. The file contains a full configuration for the mandatory
default theme. Additional themes should use a
duplicate of the default theme's configuration. Any parameters that
are not configured will inherit values from the mandatory
default theme.
The available parameters for each theme in the file are as follows:
themes: Title; also represents an array of theme objects.name: Theme title.
stylesheets: An ordered array of URLs to CSS stylesheet files that are applied to every page. It is highly recommended to include the variableStructureStyleas one of the entries to provide default styles for layout and structure.For example:
["themes/dark/css/bootstrap.min.css", StructureStyle, "themes/dark/css/theme-dark.css"]path: A relative path to a directory containingtemplatesorpartialsdirectories, used for customizing the default layout of XUI pages.For more information, see "Customizing the XUI".
icon: URL to a resource to use as a favicon.settings: Configuration settings for the theme. Missing parameters inherit their value from the mandatorydefaulttheme.logo: Parameters for the logo displayed on user profile pages.src: Filename of the logo.title: HTMLtitleattribute of the logo.alt: HTMLaltattribute of the logo.height: Logo height in CSS notation. For example:75pxor10%.width: Logo width in CSS notation. For example:150pxor25%.
loginLogo: Parameters for the logo displayed on login pages.src: Filename of the logo.title: HTMLtitleattribute of the logo.alt: HTMLaltattribute of the logo.height: Logo height in CSS notation. For example:75pxor10%.width: Logo width in CSS notation. For example:150pxor25%.
footer: Parameters to display in the footer of each XUI page.mailto: Email address.phone: Telephone number.
For more information, see "Theming the XUI".
For more information or resources about AM and ForgeRock Support, see the following sections:
ForgeRock publishes comprehensive documentation online:
The ForgeRock Knowledge Base offers a large and increasing number of up-to-date, practical articles that help you deploy and manage ForgeRock software.
While many articles are visible to community members, ForgeRock customers have access to much more, including advanced information for customers using ForgeRock software in a mission-critical capacity.
ForgeRock product documentation, such as this document, aims to be technically accurate and complete with respect to the software documented. It is visible to everyone and covers all product features and examples of how to use them.
The ForgeRock.org site has links to source code for ForgeRock open source software, as well as links to the ForgeRock forums and technical blogs.
If you are a ForgeRock customer, raise a support ticket instead of using the forums. ForgeRock support professionals will get in touch to help you.
ForgeRock provides support services, professional services, training through ForgeRock University, and partner services to assist you in setting up and maintaining your deployments. For a general overview of these services, see https://www.forgerock.com.
ForgeRock has staff members around the globe who support our international customers and partners. For details, visit https://www.forgerock.com, or send an email to ForgeRock at info@forgerock.com.
- Access control
Control to grant or to deny access to a resource.
- Account lockout
The act of making an account temporarily or permanently inactive after successive authentication failures.
- Actions
Defined as part of policies, these verbs indicate what authorized identities can do to resources.
- Advice
In the context of a policy decision denying access, a hint to the policy enforcement point about remedial action to take that could result in a decision allowing access.
- Agent administrator
User having privileges only to read and write agent profile configuration information, typically created to delegate agent profile creation to the user installing a web or Java agent.
- Agent authenticator
Entity with read-only access to multiple agent profiles defined in the same realm; allows an agent to read web service profiles.
- Application
In general terms, a service exposing protected resources.
In the context of AM policies, the application is a template that constrains the policies that govern access to protected resources. An application can have zero or more policies.
- Application type
Application types act as templates for creating policy applications.
Application types define a preset list of actions and functional logic, such as policy lookup and resource comparator logic.
Application types also define the internal normalization, indexing logic, and comparator logic for applications.
- Attribute-based access control (ABAC)
Access control that is based on attributes of a user, such as how old a user is or whether the user is a paying customer.
- Authentication
The act of confirming the identity of a principal.
- Authentication chaining
A series of authentication modules configured together which a principal must negotiate as configured in order to authenticate successfully.
- Authentication level
Positive integer associated with an authentication module, usually used to require success with more stringent authentication measures when requesting resources requiring special protection.
- Authentication module
AM authentication unit that handles one way of obtaining and verifying credentials.
- Authorization
The act of determining whether to grant or to deny a principal access to a resource.
- Authorization Server
In OAuth 2.0, issues access tokens to the client after authenticating a resource owner and confirming that the owner authorizes the client to access the protected resource. AM can play this role in the OAuth 2.0 authorization framework.
- Auto-federation
Arrangement to federate a principal's identity automatically based on a common attribute value shared across the principal's profiles at different providers.
- Bulk federation
Batch job permanently federating user profiles between a service provider and an identity provider based on a list of matched user identifiers that exist on both providers.
- Circle of trust
Group of providers, including at least one identity provider, who have agreed to trust each other to participate in a SAML v2.0 provider federation.
- Client
In OAuth 2.0, requests protected web resources on behalf of the resource owner given the owner's authorization. AM can play this role in the OAuth 2.0 authorization framework.
- Client-based sessions
AM sessions for which AM returns session state to the client after each request, and require it to be passed in with the subsequent request. For browser-based clients, AM sets a cookie in the browser that contains the session information.
For browser-based clients, AM sets a cookie in the browser that contains the session state. When the browser transmits the cookie back to AM, AM decodes the session state from the cookie.
- Conditions
Defined as part of policies, these determine the circumstances under which which a policy applies.
Environmental conditions reflect circumstances like the client IP address, time of day, how the subject authenticated, or the authentication level achieved.
Subject conditions reflect characteristics of the subject like whether the subject authenticated, the identity of the subject, or claims in the subject's JWT.
- Configuration datastore
LDAP directory service holding AM configuration data.
- Cross-domain single sign-on (CDSSO)
AM capability allowing single sign-on across different DNS domains.
- CTS-based sessions
AM sessions that reside in the Core Token Service's token store. CTS-based sessions might also be cached in memory on one or more AM servers. AM tracks these sessions in order to handle events like logout and timeout, to permit session constraints, and to notify applications involved in SSO when a session ends.
- Delegation
Granting users administrative privileges with AM.
- Entitlement
Decision that defines which resource names can and cannot be accessed for a given identity in the context of a particular application, which actions are allowed and which are denied, and any related advice and attributes.
- Extended metadata
Federation configuration information specific to AM.
- Extensible Access Control Markup Language (XACML)
Standard, XML-based access control policy language, including a processing model for making authorization decisions based on policies.
- Federation
Standardized means for aggregating identities, sharing authentication and authorization data information between trusted providers, and allowing principals to access services across different providers without authenticating repeatedly.
- Fedlet
Service provider application capable of participating in a circle of trust and allowing federation without installing all of AM on the service provider side; AM lets you create Java Fedlets.
- Hot swappable
Refers to configuration properties for which changes can take effect without restarting the container where AM runs.
- Identity
Set of data that uniquely describes a person or a thing such as a device or an application.
- Identity federation
Linking of a principal's identity across multiple providers.
- Identity provider (IdP)
Entity that produces assertions about a principal (such as how and when a principal authenticated, or that the principal's profile has a specified attribute value).
- Identity repository
Data store holding user profiles and group information; different identity repositories can be defined for different realms.
- Java agent
Java web application installed in a web container that acts as a policy enforcement point, filtering requests to other applications in the container with policies based on application resource URLs.
- Metadata
Federation configuration information for a provider.
- Policy
Set of rules that define who is granted access to a protected resource when, how, and under what conditions.
- Policy agent
Java, web, or custom agent that intercepts requests for resources, directs principals to AM for authentication, and enforces policy decisions from AM.
- Policy Administration Point (PAP)
Entity that manages and stores policy definitions.
- Policy Decision Point (PDP)
Entity that evaluates access rights and then issues authorization decisions.
- Policy Enforcement Point (PEP)
Entity that intercepts a request for a resource and then enforces policy decisions from a PDP.
- Policy Information Point (PIP)
Entity that provides extra information, such as user profile attributes that a PDP needs in order to make a decision.
- Principal
Represents an entity that has been authenticated (such as a user, a device, or an application), and thus is distinguished from other entities.
When a Subject successfully authenticates, AM associates the Subject with the Principal.
- Privilege
In the context of delegated administration, a set of administrative tasks that can be performed by specified identities in a given realm.
- Provider federation
Agreement among providers to participate in a circle of trust.
- Realm
AM unit for organizing configuration and identity information.
Realms can be used for example when different parts of an organization have different applications and user data stores, and when different organizations use the same AM deployment.
Administrators can delegate realm administration. The administrator assigns administrative privileges to users, allowing them to perform administrative tasks within the realm.
- Resource
Something a user can access over the network such as a web page.
Defined as part of policies, these can include wildcards in order to match multiple actual resources.
- Resource owner
In OAuth 2.0, entity who can authorize access to protected web resources, such as an end user.
- Resource server
In OAuth 2.0, server hosting protected web resources, capable of handling access tokens to respond to requests for such resources.
- Response attributes
Defined as part of policies, these allow AM to return additional information in the form of "attributes" with the response to a policy decision.
- Role based access control (RBAC)
Access control that is based on whether a user has been granted a set of permissions (a role).
- Security Assertion Markup Language (SAML)
Standard, XML-based language for exchanging authentication and authorization data between identity providers and service providers.
- Service provider (SP)
Entity that consumes assertions about a principal (and provides a service that the principal is trying to access).
- Authentication Session
The interval while the user or entity is authenticating to AM.
- Session
The interval that starts after the user has authenticated and ends when the user logs out, or when their session is terminated. For browser-based clients, AM manages user sessions across one or more applications by setting a session cookie. See also CTS-based sessions and Client-based sessions.
- Session high availability
Capability that lets any AM server in a clustered deployment access shared, persistent information about users' sessions from the CTS token store. The user does not need to log in again unless the entire deployment goes down.
- Session token
Unique identifier issued by AM after successful authentication. For a CTS-based sessions, the session token is used to track a principal's session.
- Single log out (SLO)
Capability allowing a principal to end a session once, thereby ending her session across multiple applications.
- Single sign-on (SSO)
Capability allowing a principal to authenticate once and gain access to multiple applications without authenticating again.
- Site
Group of AM servers configured the same way, accessed through a load balancer layer. The load balancer handles failover to provide service-level availability.
The load balancer can also be used to protect AM services.
- Standard metadata
Standard federation configuration information that you can share with other access management software.
- Stateless Service
Stateless services do not store any data locally to the service. When the service requires data to perform any action, it requests it from a data store. For example, a stateless authentication service stores session state for logged-in users in a database. This way, any server in the deployment can recover the session from the database and service requests for any user.
All AM services are stateless unless otherwise specified. See also Client-based sessions and CTS-based sessions.
- Subject
Entity that requests access to a resource
When an identity successfully authenticates, AM associates the identity with the Principal that distinguishes it from other identities. An identity can be associated with multiple principals.
- User data store
Data storage service holding principals' profiles; underlying storage can be an LDAP directory service or a custom
IdRepoimplementation.- Web Agent
Native library installed in a web server that acts as a policy enforcement point with policies based on web page URLs.