Deployment Tasks
Autonomous Identity administrators and deployers must set up additional tasks during installment.
The following are some deployments tasks that may occur:
Customize the Domain and Namespace
By default, the Autonomous Identity URL and domain for the UI console is set to autoid-ui.forgerock.com, and the URL and domain for the self-service feature is autoid-selfservice.forgerock.com.
-
Customize the domain name and target environment by editing the
/autoid-config/vars.xmlfile. By default, the domain name is set toforgerock.comand the target environment is set toautoid. The default Autonomous Identity URL will be:https://autoid-ui.forgerock.com. For example, we set the domain name toabc.comand the target environment tomyid:domain_name: forgerock.com target_environment: autoid
-
If you set up your domain name and target environment in the previous step, you need to change the certificates to reflect the changes. Autonomous Identity generates self-signed certificates for its default configuration. You must generate new certificates as follows:
-
Generate the private key (that is,
privatekey.pem).$ openssl genrsa 2048 > privatekey.pem
-
Generate the certificate signing request.
$ openssl req -new -key privatekey.pem -out csr.pem
-
Generate the Diffie-Hellman (DH) parameters file (dhparam4096.pem).
$ openssl dhparam -out dhparam4096.pem 4096
-
Create a self-signing certificate.
$ openssl x509 -req -days 365 -in csr.pem -signkey privatekey.pem -out server.crt
-
Use your Certificate Authority (CA) to sign the certificate. The certificate must be
server.crt. -
Copy the files to the
/autoid-config/certsdirectory. -
Make the domain changes on your DNS server or update your
/etc/hosts(Linux/Unix) file orC:\Windows\System32\drivers\etc\hosts(Windows) locally on your machine.
-
Configuring Your Filters
The filters on the Applications pages let you focus your searches based on entitlement and user attributes. In most cases, the default filters should suffice for most environments. However, if you need to customize the filters, you can do so by accessing the configuration service API endpoint as show below.
The default filters for an entitlement are the following:
-
Risk Level
-
Criticality
The default filters for an user attributes are the following:
-
User Department Name
-
Line of Business Subgroup
-
City
-
Jobcode Name
-
User Employee Type
-
Chief Yes No
-
Manager Name
-
Line of Business
-
Cost Center
-
From the deployer node, SSH to the target node.
-
Run the
curlcommand to retrieve the current filters configuration.$ curl -i -k -u configadmin:<configadmin-password> --header "Content-Type: application/json" --request GET https://autoid-configuration-service.forgerock.com/api/configuration/AllowedAttributesForFiltering { "entitlement": [ "risk_level", "criticality", "owner" ], "user": [ "usr_department_name", "line_of_business_subgroup", "city", "jobcode_name", "usr_emp_type", "chief_yes_no", "manager_name", "line_of_business", "cost_center" ] }
-
Update the filters configuration. The syntax is as follows:
$ curl -i -k -u configadmin:<configadmin-password> \
      --request PUT \
      --header "Content-Type: application/json" \
      --data '{<UPDATED_FILTERING_JSON_DATA>}' \
    https://autoid-configuration-service.forgerock.com/api/configuration/AllowedAttributesForFiltering
For example, update the filters list with fewer attributes:
$ curl -i -k -u configadmin:<configadmin-password> \
      --request PUT \
      --header "Content-Type: application/json"
      --data '{ "entitlement":["risk_level","criticality","owner"], \
        "user":["usr_department_name","line_of_business_subgroup","city","jobcode_name"]}' \
    https://autoid-configuration-service.forgerock.com/api/configuration/AllowedAttributesForFiltering

configuration item updated
Change the Vault Passwords
Autonomous Identity uses the ansible vault to store passwords in encrypted files, rather than in plaintext. Autonomous Identity stores the vault file at /autoid-config/vault.yml
saves the encrypted passwords to /config/.autoid_vault_password
. The /config/
mount is internal to the deployer container. The default encryption algorithm used is AES256.
By default, the /autoid-config/vault.yml
file uses the following parameters:
configuration_service_vault:
  basic_auth_password: Welcome123

openldap_vault:
  openldap_password: Welcome123

cassandra_vault:
  cassandra_password: Welcome123
  cassandra_admin_password: Welcome123

mongo_vault:
  mongo_admin_password: Welcome123
  mongo_root_password: Welcome123

elastic_vault:
  elastic_admin_password: Welcome123
  elasticsearch_password: Welcome123
Assume that the vault file is encrypted during the installation. To edit the file:
-
Change to the
/autoid-config/directory.$ cd ~/autoid-config/
-
First, decrypt the vault file.
$ ./deployer.sh decrypt-vault
-
Open a text editor and edit the
vault.ymlfile. -
Encrypt the file again.
$ ./deployer.sh encrypt-vault
Set Up Single Sign-On (SSO)
Autonomous Identity supports single sign-on (SSO) using OpenID Connect (OIDC) JWT tokens. SSO lets you log in once and access multiple applications without the need to re-authenticate yourself. You can use any third-party identity provider (IdP) to connect to Autonomous Identity.
There are two scenarios for SSO configuration:
-
Set up SSO for initial deployments. In this example, we use ForgeRock Access Management (AM) as an OpenID Connect (OIDC) IdP for Autonomous Identity during the original installation of Autonomous Identity. See Set up SSO in initial deployments.
-
Set up SSO for existing deployments. For procedures to set up SSO in an existing Autonomous Identity deployment, see Set up SSO in existing deployments.
|
If you set up SSO-only, be aware that the following services are not deployed with this setting:
If you want to use these services and SSO, set up the authentication as |
Set up SSO in initial deployments
The following procedure requires a running instance of ForgeRock AM. For more information, see ForgeRock Access Management Authentication and Single Sign-On Guide.
-
First, set up your hostnames locally in
/etc/hosts(Linux/Unix) file orC:\Windows\System32\drivers\etc\hosts(Windows):35.189.75.99 autoid-ui.forgerock.com autoid-selfservice.forgerock.com 35.246.65.234 openam.example.com
-
Open a browser and point to
http://openam.example.com:8080/openam. Log in with username:amadmin, password:cangetinam. -
In AM, select Realm > Identities > Groups tab, and add the following groups:
-
AutoIdAdmin
-
AutoIdEntitlementOwner
-
AutoIdExecutive
-
AutoIdSupervisor
-
AutoIdUser
-
-
Add the
demouser to each group. -
Go back to the main AM Admin UI page. Click Configure OAuth Provider.
-
Click Configure OpenID Connect, and then Create.
-
Go to Applications > OAuth 2.0, and then click Add Client. Enter the following properties, specific to your deployment:
Client ID:         <autoid>
Client secret:     <password>
Redirection URIs:  https://<autoid-ui>.<domain>/api/sso/finish
Scope(s):          openid profile
For example:
Client ID:         autoid
Client secret:     Welcome123
Redirection URIs:  https://autoid-ui.forgerock.com/api/sso/finish
Scope(s):          openid profile
-
On the New Client page, go to to the Advanced tab, and enable
Implied Consent. Next, change theToken Endpoint Authentication Methodtoclient_secret_post. -
Edit the OIDC claims script to return
roles (groups), so that AM can match the Autonomous Identity groups. Additionally, add the groups as a claim in the script:"groups": { claim, identity -> [ "groups" : identity.getMemberships(IdType.GROUP).collect { group -> group.name }]}In the
utils.setScopeClaimsMapblock, add:groups: ['groups']
For more information about the OIDC claims script, see the ForgeRock Knowledge Base. The
id_tokenreturns the content that includes the group names.{ "at_hash": "QJRGiQgr1c1sOE4Q8BNyyg", "sub": "demo", "auditTrackingId": "59b6524d-8971-46da-9102-704694cae9bc-48738", "iss": "http://openam.example.com:8080/openam/oauth2", "tokenName": "id_token", "groups": [ "AutoIdAdmin", "AutoIdSupervisor", "AutoIdUser", "AutoIdExecutive", "AutoIdEntitlementOwner", "AutoIdAppOwner", "AutoIdRoleOwner", "AutoIdRoleEngineer" ], "given_name": "demo", "aud": "autoid", "c_hash": "SoLsfc3zjGq9xF5mJG_C9w", "acr": "0", "org.forgerock.openidconnect.ops": "B15A_wXm581fO8INtYHHcwSQtJI", "s_hash": "bOhtX8F73IMjSPeVAqxyTQ", "azp": "autoid", "auth_time": 1592390726, "name": "demo", "realm": "/", "exp": 1592394729, "tokenType": "JWTToken", "family_name": "demo", "iat": 1592391129, "email": "demo@example.com" }For more information on how to retrieve the id_tokenfor observation, see OpenID Connect 1.0 Endpoints.You have successfully configured AM as an OIDC provider.
-
Next, we set up Autonomous Identity. Change to the Autonomous Identity install directory on the deployer machine.
cd ~/autoid-config/
-
Open a text editor, and set the SSO parameters in the
/autoid-config/vars.ymlfile. Make sure to changeLDAPtoSSO.authentication_option: "SSO" oidc_issuer: "http://openam.example.com:8080/openam/oauth2" oidc_auth_url: "http://openam.example.com:8080/openam/oauth2/authorize" oidc_token_url: "http://openam.example.com:8080/openam/oauth2/access_token" oidc_user_info_url: "http://openam.example.com:8080/openam/oauth2/userinfo" oidc_jwks_url: "http://openam.example.com:8080/openam/oauth2/connect/jwk_uri" oidc_callback_url: "https://autoid-ui.forgerock.com/api/sso/finish" oidc_client_scope: 'openid profile' oidc_groups_attribute: groups oidc_uid_attribute: sub oidc_client_id: autoid oidc_client_secret: Welcome1 admin_object_id: AutoIdAdmin entitlement_owner_object_id: AutoIdEntitlementOwner executive_object_id: AutoIdExecutive supervisor_object_id: AutoIdSupervisor user_object_id: AutoIdUser application_owner_object_id: AutoIDAppOwner role_owner_object_id: AutoIDRoleOwner role_engineer_object_id: AutoIDRoleEngineer oidc_end_session_endpoint: "http://openam.example.com:8080/openam/oauth2/logout" oidc_logout_redirect_url: "http://openam.example.com:8088/openman/logout"
-
On the target machine, edit the
/etc/hostsfile or your DNS server, and add an entry foropenam.example.com.35.134.60.234 openam.example.com
-
On the deployer machine, run
deployer.shto push the new configuration.$ deployer.sh run
-
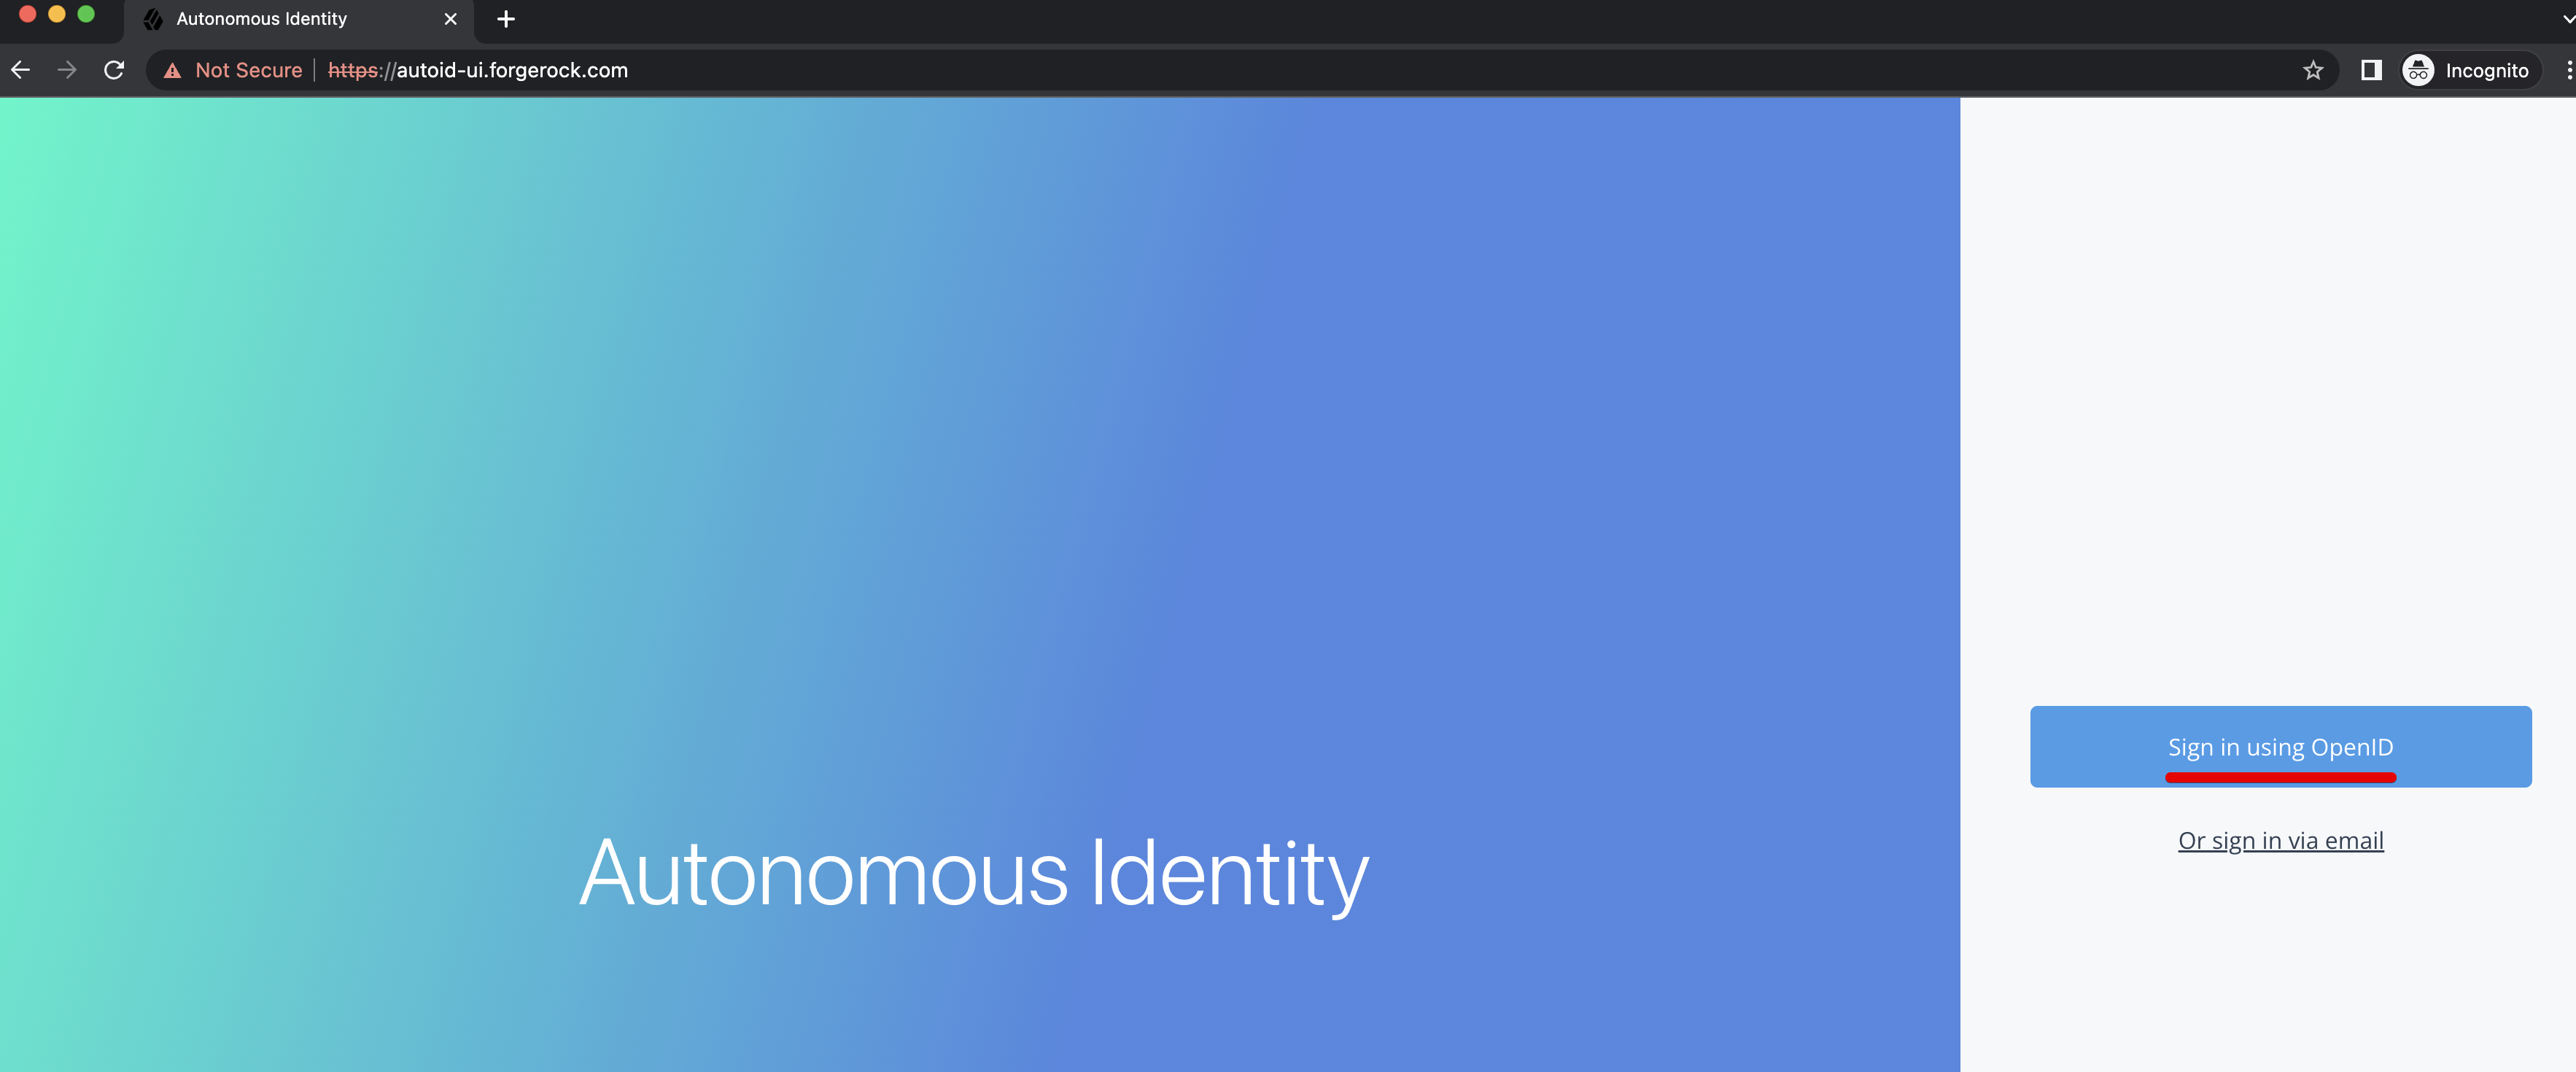
Test the connection now. Access
https://autoid-ui/forgerock.com. The redirect should occur with the following:
Set up SSO in existing deployments
-
First, retrieve and update your
configuration-servicepermissions:-
On the instance where the
configuration-serviceDocker container is running, run the following command to obtain theconfiguration-servicebasic authentication credentials:docker inspect configuration-service_configuration-service
You can find these properties in the output under
Spec > TaskTemplate > Envobject asBASIC_AUTH_PASSWDandBASIC_AUTH_USER: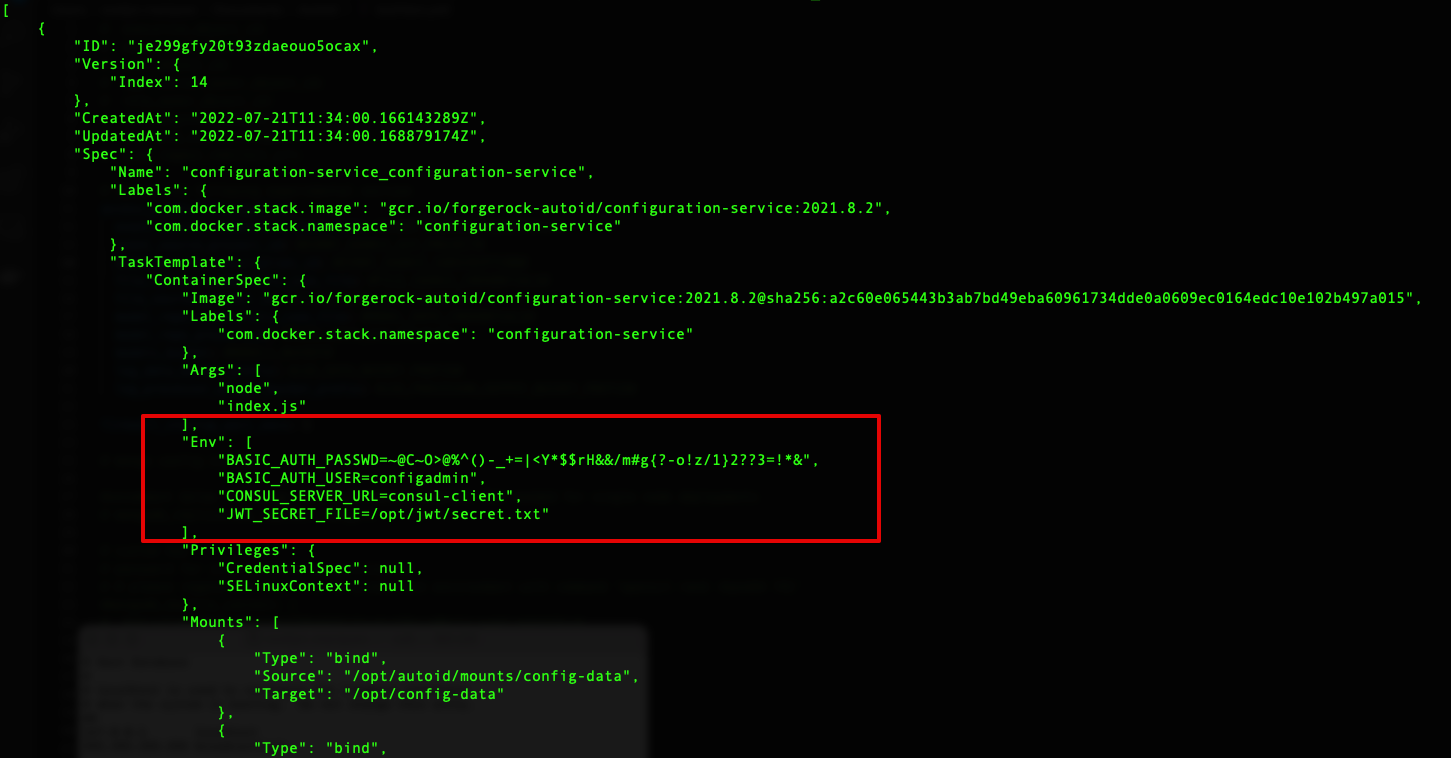
You can also get the password using basic_auth_passwordand opening the~/autoid-config/vault.ymlfile. -
Depending on how you want to configure SSO, use one of the following templates:
localAndSSO template (
LocalAndSSO.json){ "permissions": { "Zoran Admin": { "title": "Admin", "can": "*" }, "###Zoran_Admin_Token###": { "title": "Admin", "can": "*" }, "Zoran Role Engineer": { "title": "Role Engineer", "can": [ "SHOW__ROLE_PAGE", "SEARCH__ALL_ROLES", "CREATE__ROLE", "UPDATE__ROLE", "DELETE__ROLE", "SHOW__ENTITLEMENT", "SHOW__USER", "SHOW__CERTIFICATIONS" ] }, "###Zoran_Role_Engineer_Token###": { "title": "Role Engineer", "can": [ "SHOW__ROLE_PAGE", "SEARCH__ALL_ROLES", "CREATE__ROLE", "UPDATE__ROLE", "DELETE__ROLE", "SHOW__ENTITLEMENT", "SHOW__USER", "SHOW__CERTIFICATIONS" ] }, "Zoran Role Owner": { "title": "Role Owner", "can": [ "SHOW__ROLE_PAGE", "SEARCH__ROLES", "CREATE__ROLE", "UPDATE__ROLE", "DELETE__ROLE", "SHOW__ENTITLEMENT", "SHOW__USER", "SHOW__CERTIFICATIONS" ] }, "###Zoran_Role_Owner_Token###": { "title": "Role Owner", "can": [ "SHOW__ROLE_PAGE", "SEARCH__ROLES", "CREATE__ROLE", "UPDATE__ROLE", "DELETE__ROLE", "SHOW__ENTITLEMENT", "SHOW__USER", "SHOW__CERTIFICATIONS" ] }, "Zoran Application Owner": { "title": "Application Owner", "can": [ "SHOW__APPLICATION_PAGE", "SEARCH__USER", "SEARCH__ENTITLEMENTS_BY_APP_OWNER", "SHOW_OVERVIEW_PAGE", "SHOW__ENTITLEMENT", "SHOW__ENTITLEMENT_USERS", "SHOW__APP_OWNER_FILTER_OPTIONS", "SHOW__ENTT_OWNER_UNSCORED_ENTITLEMENTS", "SHOW__ENTT_OWNER_PAGE", "SHOW__ENTT_OWNER_USER_PAGE", "SHOW__ENTT_OWNER_ENT_PAGE", "SHOW__USER_ENTITLEMENTS", "SHOW__RULES_BY_APP_OWNER", "REVOKE__CERTIFY_ACCESS", "SHOW__USER", "SHOW__CERTIFICATIONS" ] }, "###Zoran_Application_Owner_Token###": { "title": "Application Owner", "can": [ "SHOW__APPLICATION_PAGE", "SEARCH__USER", "SEARCH__ENTITLEMENTS_BY_APP_OWNER", "SHOW_OVERVIEW_PAGE", "SHOW__ENTITLEMENT", "SHOW__ENTITLEMENT_USERS", "SHOW__APP_OWNER_FILTER_OPTIONS", "SHOW__ENTT_OWNER_UNSCORED_ENTITLEMENTS", "SHOW__ENTT_OWNER_PAGE", "SHOW__ENTT_OWNER_USER_PAGE", "SHOW__ENTT_OWNER_ENT_PAGE", "SHOW__USER_ENTITLEMENTS", "SHOW__RULES_BY_APP_OWNER", "REVOKE__CERTIFY_ACCESS", "SHOW__USER", "SHOW__CERTIFICATIONS" ] }, "Zoran Entitlement Owner": { "title": "Entitlement Owner", "can": [ "SEARCH__ENTITLEMENTS_BY_ENTT_OWNER", "SHOW_OVERVIEW_PAGE", "SHOW__ENTITLEMENT", "SHOW__ENTITLEMENT_USERS", "SHOW__ENTT_OWNER_FILTER_OPTIONS", "SHOW__ENTT_OWNER_UNSCORED_ENTITLEMENTS", "SHOW__ENTT_OWNER_PAGE", "SHOW__ENTT_OWNER_USER_PAGE", "SHOW__ENTT_OWNER_ENT_PAGE", "SHOW__USER_ENTITLEMENTS", "SHOW__RULES_BY_ENTT_OWNER", "REVOKE__CERTIFY_ACCESS", "SHOW__USER", "SHOW__CERTIFICATIONS" ] }, "###Zoran_Entitlement_Owner_Token###": { "title": "Entitlement Owner", "can": [ "SEARCH__ENTITLEMENTS_BY_ENTT_OWNER", "SHOW_OVERVIEW_PAGE", "SHOW__ENTITLEMENT", "SHOW__ENTITLEMENT_USERS", "SHOW__ENTT_OWNER_FILTER_OPTIONS", "SHOW__ENTT_OWNER_UNSCORED_ENTITLEMENTS", "SHOW__ENTT_OWNER_PAGE", "SHOW__ENTT_OWNER_USER_PAGE", "SHOW__ENTT_OWNER_ENT_PAGE", "SHOW__USER_ENTITLEMENTS", "SHOW__RULES_BY_ENTT_OWNER", "REVOKE__CERTIFY_ACCESS", "SHOW__USER", "SHOW__CERTIFICATIONS" ] }, "Zoran Executive": { "title": "Executive", "can": [ "SEARCH__USER", "SHOW__ASSIGNMENTS_STATS", "SHOW__COMPANY_PAGE", "SHOW__COMPANY_ENTITLEMENTS_DATA", "SHOW__CRITICAL_ENTITLEMENTS", "SHOW__ENTITLEMENT_AVG_GROUPS", "SHOW__USER_ENTITLEMENTS" ] }, "###Zoran_Executive_Token###": { "title": "Executive", "can": [ "SEARCH__USER", "SHOW__ASSIGNMENTS_STATS", "SHOW__COMPANY_PAGE", "SHOW__COMPANY_ENTITLEMENTS_DATA", "SHOW__CRITICAL_ENTITLEMENTS", "SHOW__ENTITLEMENT_AVG_GROUPS", "SHOW__USER_ENTITLEMENTS" ] }, "Zoran Supervisor": { "title": "Supervisor", "can": [ "SEARCH__USER", "SHOW_OVERVIEW_PAGE", "SHOW__SUPERVISOR_FILTER_OPTIONS", "SHOW__SUPERVISOR_PAGE", "SHOW__SUPERVISOR_ENTITLEMENT_USERS", "SHOW__SUPERVISOR_USER_ENTITLEMENTS", "SHOW__SUPERVISOR_UNSCORED_ENTITLEMENTS", "SEARCH__SUPERVISOR_USER_ENTITLEMENTS", "REVOKE__CERTIFY_ACCESS", "SHOW__ENTITLEMENT", "SHOW__USER", "SHOW__CERTIFICATIONS" ] }, "###Zoran_Supervisor_Token###": { "title": "Supervisor", "can": [ "SEARCH__USER", "SHOW_OVERVIEW_PAGE", "SHOW__SUPERVISOR_FILTER_OPTIONS", "SHOW__SUPERVISOR_PAGE", "SHOW__SUPERVISOR_ENTITLEMENT_USERS", "SHOW__SUPERVISOR_USER_ENTITLEMENTS", "SHOW__SUPERVISOR_UNSCORED_ENTITLEMENTS", "SEARCH__SUPERVISOR_USER_ENTITLEMENTS", "REVOKE__CERTIFY_ACCESS", "SHOW__ENTITLEMENT", "SHOW__USER", "SHOW__CERTIFICATIONS" ] }, "Zoran User": { "title": "User", "can": [ "SHOW__ENTITLEMENT", "SHOW__USER", "SHOW__CERTIFICATIONS" ] }, "###Zoran_User_Token###": { "title": "User", "can": [ "SHOW__ENTITLEMENT", "SHOW__USER", "SHOW__CERTIFICATIONS" ] }, "Zoran Service Connector": { "title": "Service Connector", "can": [ "SERVICE_CONNECTOR", "SHOW__API_KEY_MGMT_PAGE", "SHOW__ENTITLEMENT", "SHOW__USER", "SHOW__CERTIFICATIONS", "SHOW__RULES" ] }, "###Zoran_Service_Connector###": { "title": "Service Connector", "can": [ "SERVICE_CONNECTOR", "SHOW__API_KEY_MGMT_PAGE", "SHOW__ENTITLEMENT", "SHOW__USER", "SHOW__CERTIFICATIONS", "SHOW__RULES" ] } } }SSO template (
SSO.json){ "permissions": { "###Zoran_Admin_Token###": { "title": "Admin", "can": "*" }, "###Zoran_Role_Engineer_Token###": { "title": "Role Engineer", "can": [ "SHOW__ROLE_PAGE", "SEARCH__ALL_ROLES", "CREATE__ROLE", "UPDATE__ROLE", "DELETE__ROLE", "SHOW__ENTITLEMENT", "SHOW__USER", "SHOW__CERTIFICATIONS" ] }, "###Zoran_Role_Owner_Token###": { "title": "Role Owner", "can": [ "SHOW__ROLE_PAGE", "SEARCH__ROLES", "CREATE__ROLE", "UPDATE__ROLE", "DELETE__ROLE", "SHOW__ENTITLEMENT", "SHOW__USER", "SHOW__CERTIFICATIONS" ] }, "###Zoran_Application_Owner_Token###": { "title": "Application Owner", "can": [ "SHOW__APPLICATION_PAGE", "SEARCH__USER", "SEARCH__ENTITLEMENTS_BY_APP_OWNER", "SHOW_OVERVIEW_PAGE", "SHOW__ENTITLEMENT", "SHOW__ENTITLEMENT_USERS", "SHOW__APP_OWNER_FILTER_OPTIONS", "SHOW__ENTT_OWNER_UNSCORED_ENTITLEMENTS", "SHOW__ENTT_OWNER_PAGE", "SHOW__ENTT_OWNER_USER_PAGE", "SHOW__ENTT_OWNER_ENT_PAGE", "SHOW__USER_ENTITLEMENTS", "SHOW__RULES_BY_APP_OWNER", "REVOKE__CERTIFY_ACCESS", "SHOW__USER", "SHOW__CERTIFICATIONS" ] }, "###Zoran_Entitlement_Owner_Token###": { "title": "Entitlement Owner", "can": [ "SEARCH__ENTITLEMENTS_BY_ENTT_OWNER", "SHOW_OVERVIEW_PAGE", "SHOW__ENTITLEMENT", "SHOW__ENTITLEMENT_USERS", "SHOW__ENTT_OWNER_FILTER_OPTIONS", "SHOW__ENTT_OWNER_UNSCORED_ENTITLEMENTS", "SHOW__ENTT_OWNER_PAGE", "SHOW__ENTT_OWNER_USER_PAGE", "SHOW__ENTT_OWNER_ENT_PAGE", "SHOW__USER_ENTITLEMENTS", "SHOW__RULES_BY_ENTT_OWNER", "REVOKE__CERTIFY_ACCESS", "SHOW__USER", "SHOW__CERTIFICATIONS" ] }, "###Zoran_Executive_Token###": { "title": "Executive", "can": [ "SEARCH__USER", "SHOW__ASSIGNMENTS_STATS", "SHOW__COMPANY_PAGE", "SHOW__COMPANY_ENTITLEMENTS_DATA", "SHOW__CRITICAL_ENTITLEMENTS", "SHOW__ENTITLEMENT_AVG_GROUPS", "SHOW__USER_ENTITLEMENTS" ] }, "###Zoran_Supervisor_Token###": { "title": "Supervisor", "can": [ "SEARCH__USER", "SHOW_OVERVIEW_PAGE", "SHOW__SUPERVISOR_FILTER_OPTIONS", "SHOW__SUPERVISOR_PAGE", "SHOW__SUPERVISOR_ENTITLEMENT_USERS", "SHOW__SUPERVISOR_USER_ENTITLEMENTS", "SHOW__SUPERVISOR_UNSCORED_ENTITLEMENTS", "SEARCH__SUPERVISOR_USER_ENTITLEMENTS", "REVOKE__CERTIFY_ACCESS", "SHOW__ENTITLEMENT", "SHOW__USER", "SHOW__CERTIFICATIONS" ] }, "###Zoran_User_Token###": { "title": "User", "can": [ "SHOW__ENTITLEMENT", "SHOW__USER", "SHOW__CERTIFICATIONS" ] }, "###Zoran_Service_Connector###": { "title": "Service Connector", "can": [ "SERVICE_CONNECTOR", "SHOW__API_KEY_MGMT_PAGE", "SHOW__ENTITLEMENT", "SHOW__USER", "SHOW__CERTIFICATIONS", "SHOW__RULES" ] } } } -
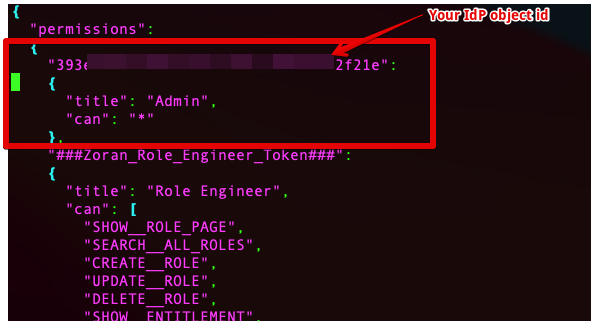
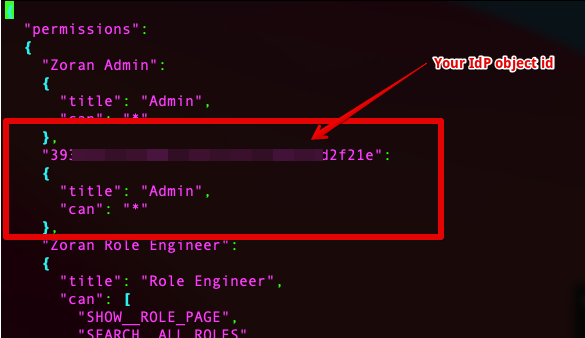
Edit the Permissions object in the templates by replacing the
Zoran_…_Tokenfields with the actual SSO group IDs (object_ids):
Next, we set up Autonomous Identity.
For SSO only:
For LocalAndSSO:
-
Add an entry to your local system’s
/etc/hostsfile or DNS entry for theconfiguration-servicedomain:127.0.0.1 autoid-configuration-service.forgerock.com autoid-ui.forgerock.com
-
Use
curlto update the current permissions configuration object. For example, replace the "<>" placeholders with actual values using the json file and password:curl -k -u configadmin -X PUT -H "Content-Type: application/json" \ -d @LocalAndSSO.json https://autoid-configuration-service.forgerock.com/api/configuration/PermissionsConf
If everything is okay, you should see the following:

-
Use curl to verify the new permissions. You should see a response that includes the configuration changes you made in json:
curl -k -u configadmin -X GET -H "Content-Type: application/json" \
-d @LocalAndSSO.json https://autoid-configuration-service.forgerock.com/api/configuration/PermissionsConf
-
-
Next, update the JAS container environment variables:
-
On the instance where Docker is running, create a backup of the
/opt/autoid/res/jas/docker-compose.ymlfile, and edit the variables in the environment section. For example, change the following variables:From:
- OIDC_ENABLED=False
- GROUPS_ATTRIBUTE=_groups
- OIDC_JWKS_URL=na
To:
- OIDC_ENABLED=True
- GROUPS_ATTRIBUTE=groups
- OIDC_JWKS_URL= <Same value as in the zoran-api. See step 3 below>
The GROUPS_ATTRIBUTEvariable must match theOIDC_GROUPS_ATTRIBUTEvariable used in thedocker-compose.ymlfile. -
Remove the running JAS container and re-deploy:
docker stack rm jas

docker stack deploy --with-registry-auth --compose-file /opt/autoid/res/jas/docker-compose.yml jas
-
-
Next, update the
zoran-apicontainer environment variables:-
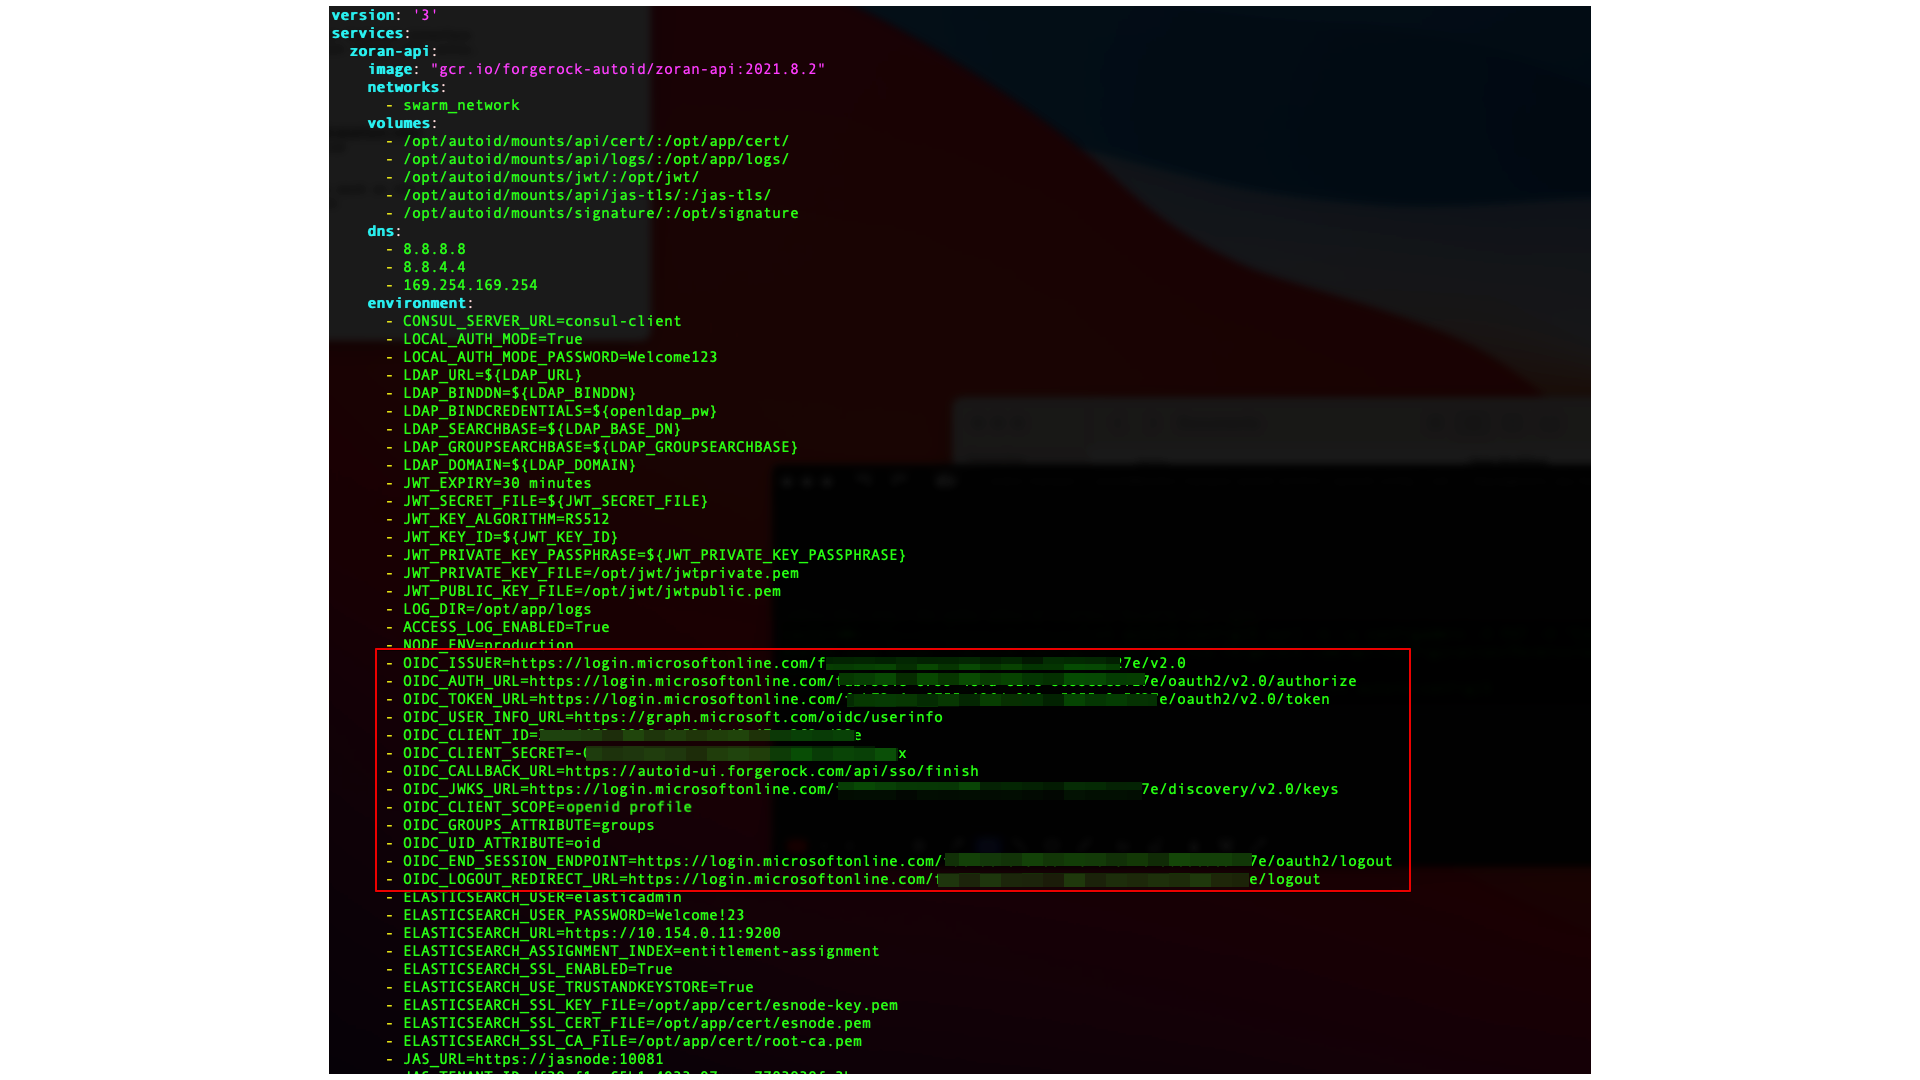
On the instance where Docker is running, create a backup of the
/opt/autoid/res/api/docker-compose.ymlfile, and edit the following variables in the file replacing the\$\{…\}placeholders:- OIDC_ISSUER=${OIDC_ISSUER} - OIDC_AUTH_URL=${OIDC_AUTH_URL} - OIDC_TOKEN_URL=${OIDC_TOKEN_URL} - OIDC_USER_INFO_URL=${OIDC_USER_INFO_URL} - OIDC_CLIENT_ID=${OIDC_CLIENT_ID} - OIDC_CLIENT_SECRET=${OIDC_CLIENT_SECRET} - OIDC_CALLBACK_URL=${OIDC_CALLBACK_URL} - OIDC_JWKS_URL=${OIDC_JWKS_URL} - OIDC_CLIENT_SCOPE=${OIDC_CLIENT_SCOPE} - OIDC_GROUPS_ATTRIBUTE=${OIDC_GROUPS_ATTRIBUTE} - OIDC_UID_ATTRIBUTE=${OIDC_UID_ATTRIBUTE} - OIDC_END_SESSION_ENDPOINT=${OIDC_END_SESSION_ENDPOINT} - OIDC_LOGOUT_REDIRECT_URL=${OIDC_LOGOUT_REDIRECT_URL}For example, you should see something similar below (the example uses Asure links and object IDs):
-
Remove the running zoran-api Docker container and re-deploy:
docker stack rm api

docker stack deploy --with-registry-auth --compose-file /opt/autoid/res/api/docker-compose.yml api
-
Restart the UI and Nginx Docker containers:
docker service update --force ui_zoran-ui

docker service update --force nginx_nginx
-
-
Open the Autonomous Identity UI to verify the SSO login.
Setting the Session Duration
By default, the session duration is set to 30 minutes. You can change this value at installation by setting the JWT_EXPIRY property in the /autoid-config/vars.yml
file.
If you did not set the value at installation, you can make the change after installation by setting the JWT_EXPIRY property using the API service.
-
Log in to the Docker manager node.
-
Verify the
JWT_EXPIRYproperty.$ docker inspect api_zoran-api
-
Go to the API folder.
$ cd /opt/autoid/res/api
-
Edit the
docker-compose.ymlfile and update theJWT_EXPIRYproperty. TheJWT_EXPIRYproperty is set to minutes. -
Redeploy the Docker stack API.
$ docker stack deploy --with-registry-auth --compose-file docker-compose.yml api
If the command returns any errors, such as "image could not be accessed by the registry," then try the following command:
$ docker stack deploy --with-registry-auth --resolve-image changed \ --compose-file /opt/autoid/res/api/docker-compose.yml api -
Verify the new
JWT_EXPIRYproperty.$ docker inspect api_zoran-api
-
Log in to the Docker worker node.
-
Stop the worker node.
$ docker stop [container ID]
The Docker manager node re-initiates the worker node. Repeat this step on any other worker node.