JMX-Based Monitoring
A number of tools support Java Management Extensions (JMX),
including the jconsole command bundled with the Java platform, and VisualVM.
JMX is not configured by default.
Configure JMX
-
Set server Java arguments appropriately to avoid regular full garbage collection (GC) events.
JMX is based on Java Remote Method Invocation (RMI), which uses references to objects. By default, the JMX client and server perform a full GC periodically to clean up stale references. As a result, the default settings cause JMX to cause a full GC every hour.
To prevent hourly full GCs when using JMX, add the
-XX:+DisableExplicitGCoption to the list ofstart-ds.java-argsarguments. You can do this by editing theconfig/java.propertiesfile and restarting the server.Avoid using this argument when importing LDIF online using the
import-ldifcommand. The import process uses GC to work around memory management issues. -
Configure the server to activate JMX access.
The following example uses the reserved port number,
1689:$ dsconfig \ create-connection-handler \ --handler-name JMX \ --type jmx \ --set enabled:true \ --set listen-port:1689 \ --hostname localhost \ --port 4444 \ --bindDN uid=admin \ --bindPassword password \ --usePkcs12TrustStore /path/to/opendj/config/keystore \ --trustStorePassword:file /path/to/opendj/config/keystore.pin \ --no-promptbashThe change takes effect immediately.
Connect Over JMX
-
Add appropriate privileges to access JMX monitoring information.
By default, no users have privileges to access the JMX connection. The following commands create a user with JMX privileges, who can authenticate over an insecure connection:
Show commands
# Create a password policy to allow the user to authenticate insecurely:
$ dsconfig \
 create-password-policy \
 --policy-name "Allow insecure authentication" \
 --type password-policy \
 --set default-password-storage-scheme:PBKDF2-HMAC-SHA256 \
 --set password-attribute:userPassword \
 --hostname localhost \
 --port 4444 \
 --bindDN uid=admin \
 --bindPassword password \
 --usePkcs12TrustStore /path/to/opendj/config/keystore \
 --trustStorePassword:file /path/to/opendj/config/keystore.pin \
 --no-prompt

# Create a backend for the JMX monitor user entry:
$ dsconfig \
create-backend \
 --backend-name jmxMonitorUser \
 --type ldif \
 --set enabled:true \
 --set base-dn:"uid=JMX Monitor" \
 --set ldif-file:db/jmxMonitorUser/jmxMonitorUser.ldif \
 --set is-private-backend:true \
 --hostname localhost \
 --port 4444 \
 --bindDN uid=admin \
 --bindPassword password \
 --usePkcs12TrustStore /path/to/opendj/config/keystore \
 --trustStorePassword:file /path/to/opendj/config/keystore.pin \
 --no-prompt

# Prepare the JMX monitor user entry.
# Notice the privileges and password policy settings:
$ cat > /tmp/jmxMonitorUser.ldif << EOF
dn: uid=JMX Monitor
objectClass: top
objectClass: person
objectClass: organizationalPerson
objectClass: inetOrgPerson
cn: JMX Monitor
sn: User
uid: JMX Monitor
userPassword: password
ds-privilege-name: monitor-read
ds-privilege-name: jmx-notify
ds-privilege-name: jmx-read
ds-privilege-name: jmx-write
ds-pwp-password-policy-dn: cn=Allow insecure authentication,cn=Password Policies,cn=config
EOF

# Import the JMX monitor user:
$ import-ldif \
 --backendID jmxMonitorUser \
 --includeBranch "uid=JMX Monitor" \
 --ldifFile /tmp/jmxMonitorUser.ldif \
 --hostname localhost \
 --port 4444 \
 --bindDN uid=admin \
 --bindPassword password \
 --usePkcs12TrustStore /path/to/opendj/config/keystore \
 --trustStorePassword:file /path/to/opendj/config/keystore.pin
bash -
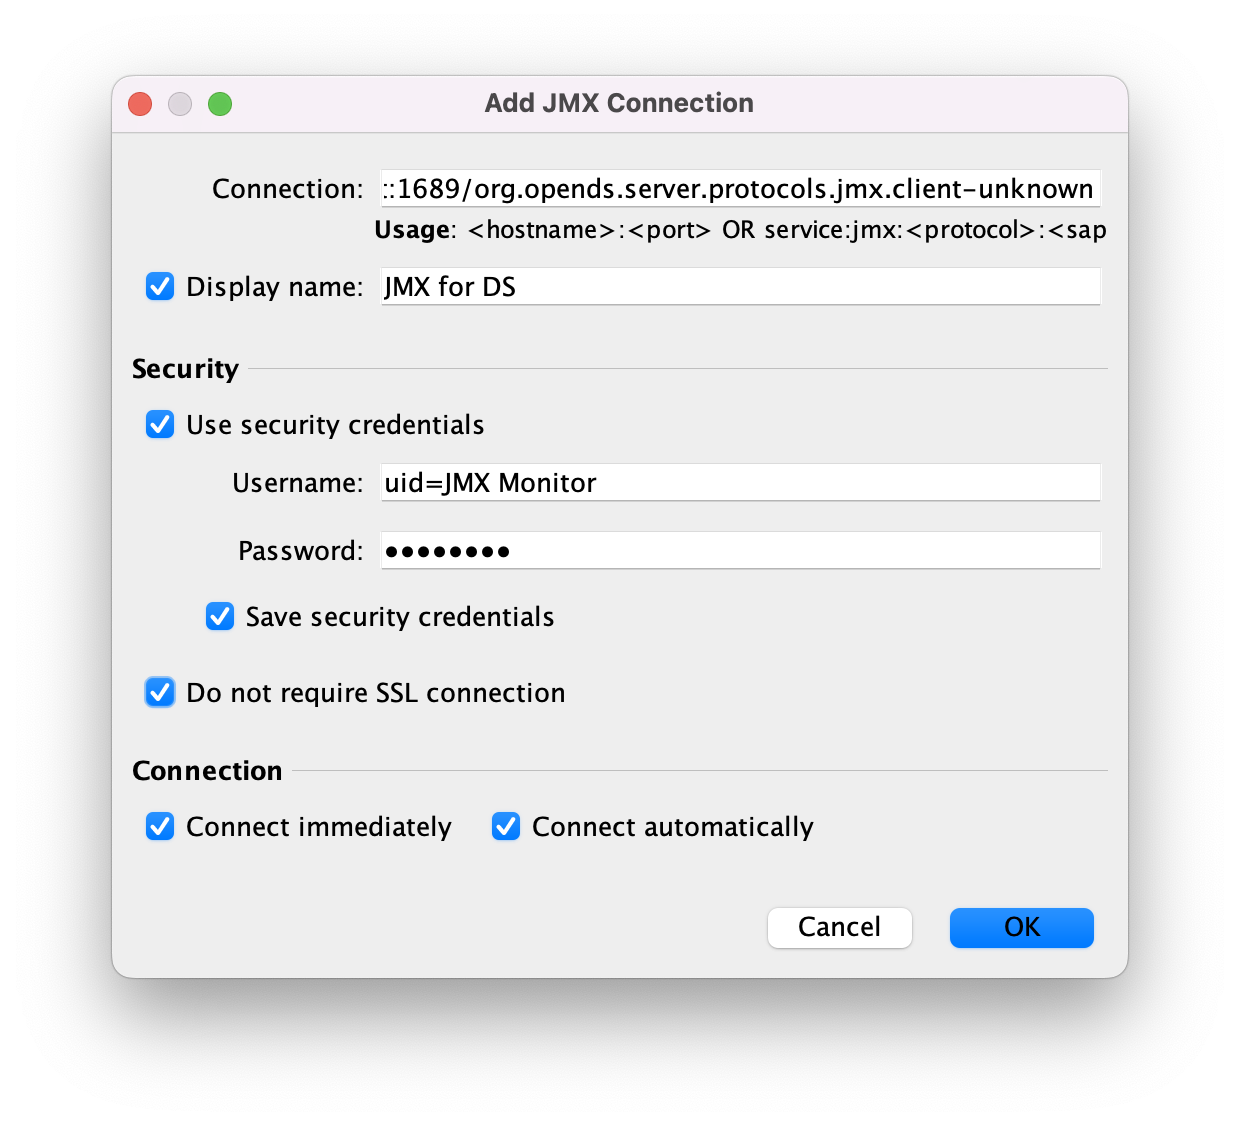
Connect using the service URI, username, and password:
- Service URI
-
Full URI to the service including the hostname or IP address and port number for JMX where the DS server listens for connections.
For example, if the server hostname is
localhost, and the DS server listens for JMX connections on port1689, then the service URI is:service:jmx:rmi:///jndi/rmi://localhost:1689/org.opends.server.protocols.jmx.client-unknown
- Username
-
The full DN of the user with privileges to connect over JMX, such as
uid=JMX Monitor. - Password
-
The bind password for the user.
-
Connect remotely.
The following steps show how you connect using VisualVM:
-
Start VisualVM.
-
Select File > Add JMX Connection… to configure the connection:
-
Select the connection in the left menu to view JMX monitoring information.
For additional details, see Monitoring and Management Using JMX Technology.
-