Access request
View all requests
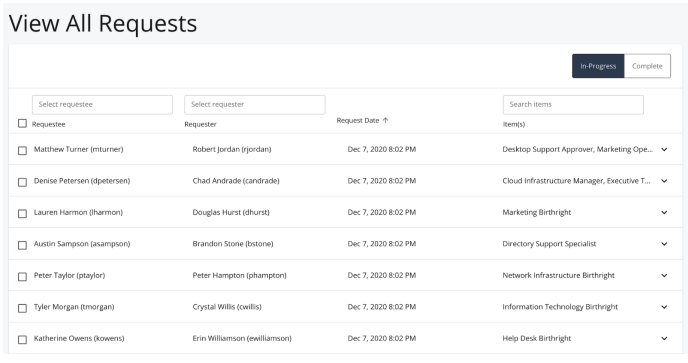
The View All Requests page allows administrators to view all requests across the entire application, either in progress or completed.
Requests table
The table includes the following columns:
-
Requestee - user for whom the access is requested
-
Requester - user who submitted the request
-
Request Date - date the request was submitted
-
Item(s) - items that are included as part of the request
Table filters
The requests table can be filtered using any of the following options:
-
Status:
-
In Progress - Shows all in-flight request that are still waiting on one or more user approvals to be processed
-
Complete - All previously completed requests that have either been completed by all necessary approvers or cancelled by the requester or an administrator.
-
-
Requester: Select a user using the typeahead input box above the column label to display only requests where they are the requester.
-
Requestee: Select a user using the typeahead input box above the column label to display only requests where they are the requestee.
-
Item: Select a requestable item using the typeahead input box above the column label to display only requests targeting a specific item.
-
Request Date: Not specifically a filter, however the current list of results within the table can be sorted by request date, either ascending or descending, by clicking on the column label “Request Date.”
-
Table Pagination: The requests table allows the user to choose the amount of rows they would like to see within the page of results (10, 20, or 30.) The user has the ability to scroll through subsequent pages of request results by clicking the navigation arrows to move forward or backward.

Request information
Clicking on an individual request will open an extended panel showing the entire request process, grouped by each individual approval task.
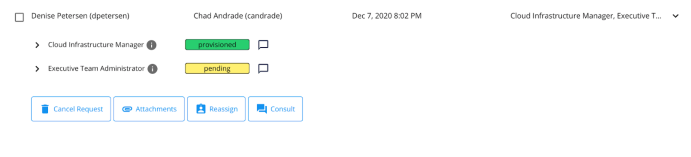
The expanded view of a request shows a list of all of the items that are included as part of a request. Each line includes the following information:
-
Item - The display name of the item

-
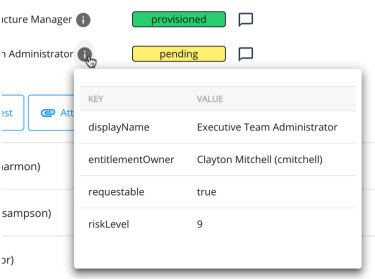
Info Icon - Get more information on the requested item. Hovering over this icon will expand a page containing all displayable metadata for the item.
-
Remove Icon - Any requested item that was requested to be removed will have a small, red minus icon next to its info icon.
-
Status - The current approval outcome of each item
-
Pending - Item request is in-progress and still awaiting action by one or more approvers.
-
Denied - Item has been rejected during one of its approval tasks.
-
Provisioned - Item has completed its approval chain, and has been successfully provisioned to the user.
-
Not Provisioned - Item has completed its approval chain, but has not been provisioned to the user. This means one of the following has occurred:
-
An error during provisioning
-
The user already had the specific access requested
-
The item has a manual provisioning task, which the provisioner completed as “Not Provisioned”
-
-
Cancelled - Request has been cancelled before this item has completed its approval process.
-
-
Comment Icon - Clicking this icon allows the user to add a comment to the given item’s history.
Request item history
In addition to the information presented initially, each individual line item can be clicked and expanded to reveal a chronological history of the actions taken as part of that item’s approval process. This includes comments made, approval task information, reassign or consult actions, file uploads, and more.
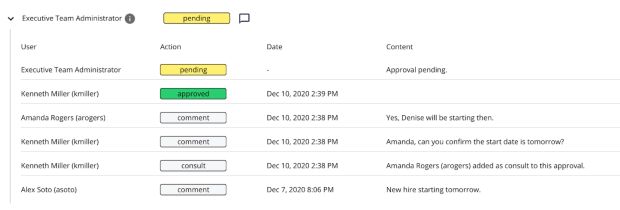
The history view is organized as a table that includes the following columns:
-
User - The user who took the specified action on the item. In the event that the system acts directly on the request, for example during a task expiration, this column will read “SYSTEM.”
-
Action - The action taken on the request. Possible values are listed below
-
Pending - An in progress approval task awaiting action
-
Approved - A completed approval task that was manually approved
-
Rejected - A completed approval task that was manually rejected
-
Auto-approved - A completed approval task that was auto-approved
-
Auto-provisioned - Indicator that item required no approval
-
Cancelled - A completed approval task that was cancelled in-progress
-
Comment - A generic comment referencing the item
-
Consult - Indicator that a consult was added to an approval task
-
Upload - Information on an uploaded file
-
Reassign - Information on a reassigned task
-
-
Date - The date and time the action took place
-
Content - The content of the action, which will vary depending on the specific action, but will always provide additional details as to what took place. Note that entries into this table for approval task completion may or may not have additional content to display.
| Any approval task that is currently pending/in-progress for the given item will always appear at the top of the item’s history and will be listed as pending. |
Action buttons
Administrators also have access to take certain actions on individual requests via the row of action buttons found at the bottom of the expanded view. Each action is detailed below:

-
Cancel Request - Cancel the request, including all currently in-progress tasks. The administrator will be asked to confirm the action before it is completed. Note that any item in a given request that already has a finalized outcome (Provisioned, Not Provisioned, Denied, etc.) will not be affected by a cancellation. Once an item is complete, the provisioning action can not be reversed.
-
Attachments - Allows the user to view the current list of attachments assigned to this request, download any of those files, or upload a new file.
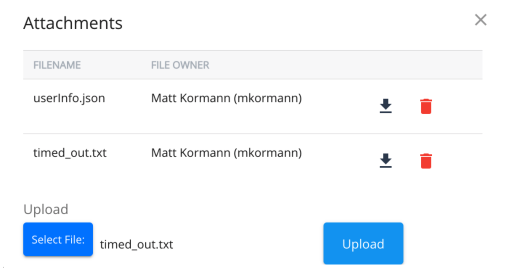
If there are any files attached to the request, the files table will appear at the top of the page. This table consists of three columns:
-
Filename - Name of the uploaded file
-
File Owner - User who uploaded the file to the request
-
Action Buttons
-
Download Icon - Click to download the file to your local machine
-
Delete Icon - Click to remove the file from the request
-
At the bottom of the page will be the upload file form for adding files to the request. To choose the file you want to upload, click on the Select File button to open up a file picker screen. Once you’ve selected the file, the name of the file chosen will appear next to the Select File button in the form. Finally, clicking on the Upload button to the right will complete the action and save the file to the request.
| For requests with multiple items, it is possible to “attach” a file to only certain items within the request, so that the file is only visible to those approvers who need to see its contents, and not available to approvers who may not be responsible for that specific item. In these cases there will be an extra input as part of the upload form, that allows the uploader to select the items that the file is relevant to. |
-
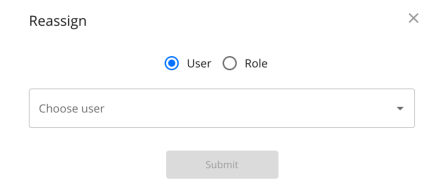
Reassign - Administrators have the ability to reassign any task that is currently awaiting approval as part of a request. Clicking on the reassign button will pop up a page form for reassigning tasks. Users can choose between reassigning a task to a user or a role/group. Once chosen, the typeahead box below will allow for searching the system for the desired assignee. When the option has been selected, clicking Submit will start the reassignment process.
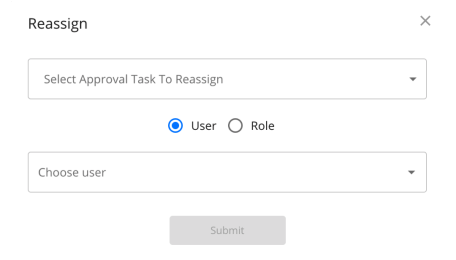
Some requests may have more than one active approval task that is eligible to be reassigned. In this case, there will be an additional selection to be made at the top of the request form for determining which approver’s task should be reassigned with this action.
-
Consult - Administrators have the ability to add a consult to any task that is currently awaiting approval as part of a request. The interface for adding a consult mirrors the reassign functionality shown above.
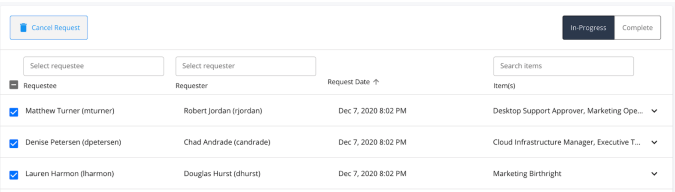
Bulk cancelling requests
When viewing in-progress requests, you have the ability to select one (or more) requests and cancel them in bulk. To do so, simply click the checkbox next to the request(s) you wish to cancel and click the ‘Cancel Request’ button at the top left of the requests page. You will be asked to confirm your decision and then will receive a confirmation message when the request cancellation process is complete.
| As mentioned above, if you cancel a request in which one or more of the items have already been provisioned, those items will remain provisioned. Items are provisioned as their individual approval chains are completed, and at that point are considered final. Any items that were still awaiting any further approvals will not be provisioned. |
Bundle editor
Administrators are granted the ability to create a requestable bundle of individual items, that can be submitted as part of a new request as a single package. Each individual item that is contained within a bundle still retains all of its original requirements for approval, notably its individual approval chain, however it allows for the end user to submit multiple related items simultaneously, without the need for locating and adding each individually.
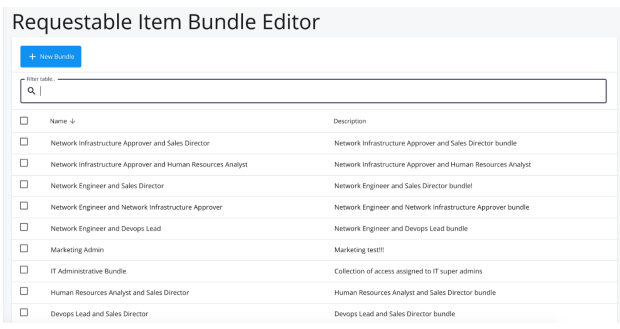
Requestable bundle table
After navigating to the Bundle Editor interface, the administrator will be presented with a table that displays all of the existing bundles within the system. The table includes two columns for each bundle:
-
Name: The name given to the bundle of items
-
Description: The description and/or purpose of the bundle
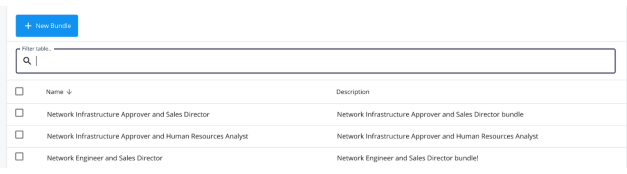
Bundle search
The table also allows the user to search the list of bundles by using the table’s filter box. This search feature works against both the Name and Description fields of the requestable bundle and returns all matches.
| The bundle table is not currently searchable based off of the items that are included within the bundle, therefore when creating a new bundle it is highly recommended that you leverage the description to provide sufficient information on which to search for the bundle. |
Deleting bundles
The Bundle table allows the administrator to select one or more bundles at a time and delete them from the system. Simply check off any of the bundles that you wish to remove, and select the delete button on the top right of the table. Bundle deletion is permanent, and the only way to recover a deleted bundle is to recreate it manually.
| Deleting a bundle will not affect any current in-progress requests that were created using that bundle. Those requests will maintain their state, and will continue without any issue. |
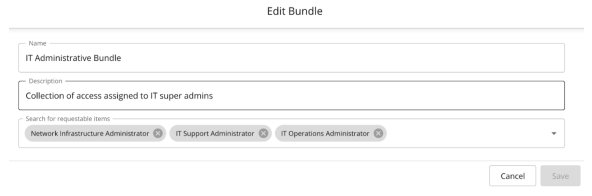
Create bundle
By clicking on the new button on the bundle editor page, the administrator will be able to enter information into the Edit Bundle form on the right side of the page to create a new bundle. There are three fields available:
-
Name: The name given to the bundle of items
-
Description: The description and/or purpose of the bundle
-
Items: The requestable items that will be included in any request that contains this bundle
Both the name and description fields are simple text boxes. To search for items to add to the bundle, begin by typing the desired item’s name within the items input box. As you type, you will see a dropdown menu appear with selectable options that match the input that you’ve entered. Click on any of the available requestable items to add them to the current bundle form. Once added, clicking on the item display name in the input box will display further information about the item in a pop-up page.
Once all of the desired information is set within the form, clicking Save at the bottom of the form will save the bundle to the database and will make it available for viewing within the bundle table on the left.
Editing a bundle
To edit an existing bundle, search and find the desired bundle within the bundle table. Once found, clicking the bundle’s row within the table will populate the Edit Bundle form page. The information can then be edited as needed, including the addition or removal of individual items.
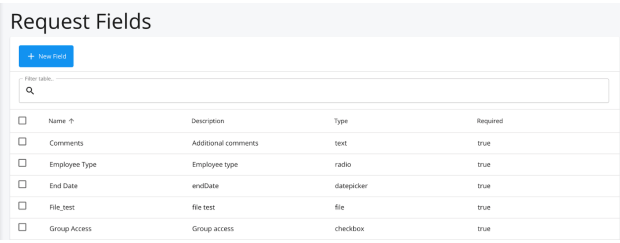
Request fields
Request fields are the building blocks that allow administrators to define custom request forms for individual requestable items. This screen allows administrators to create, manage, and delete fields from the application.
Request fields table
The table allows the admin to search the list of request fields by using the table’s filter box. This search feature works against both the Name and Description fields of the request field items and returns all matches, paginated.
Deleting request fields
The Request Field table allows the administrator to select one or more fields at a time and delete them from the system. Simply check off any of the fields that you wish to remove, and select the delete button on the top right of the table. Request field deletion is permanent, and the only way to recover a deleted field is to recreate it manually.
| Deleting a request field will not affect any current in-progress requests that were created using that field. Those requests will maintain their state, and will continue without any issue. Furthermore, any item that is leveraging a request field that has been deleted will simply ignore that field for any new requests, and will automatically reference that field again if it is recreated with the same name. |
Create request field form
By clicking on the new button on the editor page, the administrator will be able to enter information into the Request Field form on the right side of the page to create a new entry.
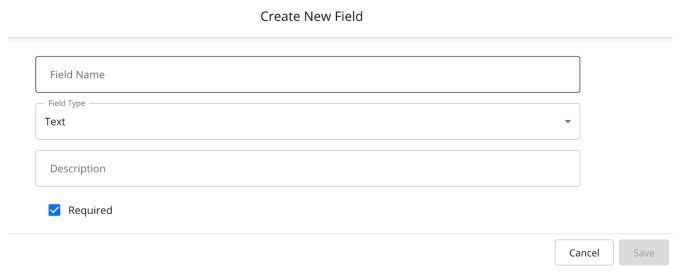
The following fields are available:
-
Field Name: The name given to the request field (this is the key referenced on each requestable item’s requestFields key.)
-
Field Type: The type of input used for this field. Choose from the following options:
-
Text
-
Select
-
Typeahead
-
Radio
-
Checkbox
-
Datepicker
-
File
-
-
Description: The description and/or purpose of the request field.
-
Required: Whether or not this field is required for any requestable item that includes it. For those fields that may be required for some forms and not for others, it is recommended to create two distinct fields.
-
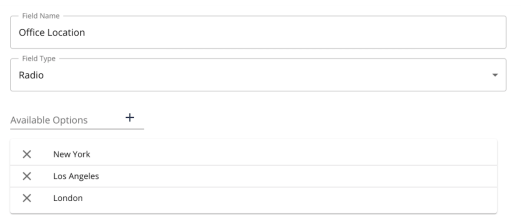
Available Options (for Field Types of radio, select, and checkbox): Used to define the items to choose from for those input types with distinct options. Enter in the value of the option in the underlined text field, and click the ‘+’ icon to add the option to the list. To remove an entry, click the ‘x’ icon next the the field value within the list.
Once all of the desired information is set within the form, clicking Save at the bottom of the form will save the Request Field to the database and will appear within the main table.
Assigning request fields to items
To assign Request Fields to a requestable item, the requestFields key must be added to the glossary entry for that item. This is a reserved key on any entry, and will always be of type array. Once created, the requestFields uses a custom interface to assign the available fields to that item.

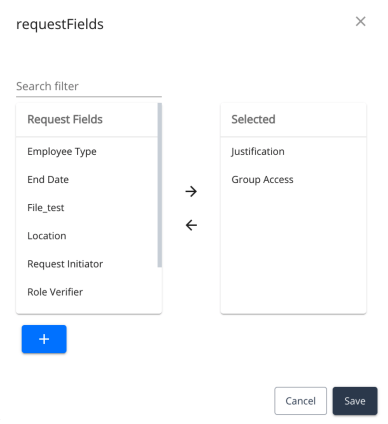
To assign existing Request Fields to the open entry, simply select (or optionally filter the options first) an entry on the left side of the form, which will move it to the selected section on the right. Once all the desired fields are attached to the requestable item, click Save to close the page and keep your changes. Note: The order of the fields added to this array key will be respected in the Create New Request interface.
Defining requestable items
The Identity Glossary is where glossary administrators are responsible for creating and defining what items are eligible to be requested within the application, what approval process they follow, and any additional data that may or may not affect the request. To make an object requestable within the IDM environment, it must have a glossary entry that meets ALL of the following requirements:
For entries of type:
-
Object
-
Must be an existing managed object within IDM
-
The managed user schema must include a relationship property between itself and the managed object type of the item (default property used is roles)
-
If using a managed user property other than the defined default (roles), the glossary item must specify the desired user property name with the userProvisionProperty key.
-
-
Identity-Value
-
The key attributeName must be an existing non-relationship property on the managed user schema.
-
-
System-Value
-
Must have either a provisioner key or a provisionScript key on the item. As these entries do not reference a direct IDM user property, they must have a manual provisioning step. The provisioner user/group runs as a manual provisioning task, while a provision script runs automatically on approval completion.
-
A boolean key of requestable set to true
-
A string key of displayName
-
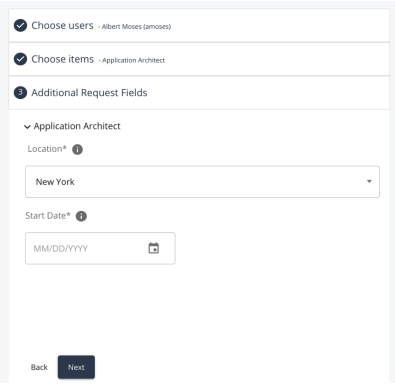
If all the above criteria is met, the item will appear within the Create Request form in the Access Request application and be available for use within request.
Access request glossary keys
There are several reserved keys for glossary items that are leveraged by the Access Request application. Any key marked with an asterisk (*) is for use within the default approval flow and will not be enforced when using a custom approval flow.
Glossary keys are case_sensitive. For example, make sure to put requestable and not Requestable.
|
The following is a list ofo the reserved glossary keys for Access Request:
-
requestable(boolean). Is the item available to be requested. -
approvers* (array). The approval chain for granting access to the requested item. The entries within this approver list will be evaluated against both the managed/user object of the requestee, as well as the keys of the glossary item itself. In order for an approver key to be evaluated correctly it must refer to a managed object of either type user or role. For managed/user properties, the specified property must be a single relationship to the user/role.Some examples:
-
An entry of ‘manager’ in the approvers array will evaluate to the requestee user’s manager, as the property manager exists on the user schema and is a single relationship to a managed/user.
-
An entry of ‘entitlementOwner’ in the approvers array of an item with an entitlementOwner key of type managed object id that is set to a role, will use that role as the approver.
-
If the approvers list contains a key that is not able to resolve to a single user or role ID, the Access Request workflow will default to the group defined in the Access Request settings as the Default Approver Group to handle that task
The value of ‘self’ is also reserved as an approver option for any approval chain that wants to use the requestee themselves as an approver. This can be useful when defining a separate approver chain for removal of access. If an item is intended to be auto-provisioned, i.e. requires no approval steps, an approvers key should be created and left as a blank list. If an item is defined as requestable but has no approvers key, it will leverage the Access Request setting for Default Approvers. -
removalApprovers(array). The approval chain for the item when the request type is ‘remove.’ If this key is not used, the approvers key will be used in its place. All the same functionality for defining approvers applies here as well. -
parallelApproval(boolean). If true, all approval tasks will be created concurrently. If false, or not set, approval flow will be executed sequentially. Note that provisioning tasks will always be created after all approval tasks are completed, not in parallel. -
userProvisionProperty(string). The managed user property for which the requestable item will be assigned to upon approval when using the default approval flow or the provision endpoint. This is used for requested items with a glossary class of object only, and has a default value of roles. -
preRequestScript(string). Script hook that is run immediately after creation of the request object for any pre-processing of the request, notifications, etc. This will be called before any approval task creation or custom workflows are kicked off. The value should be set to the relative path of the javascript file to be run from the openidm script directory. -
provisionScript(string). Script hook for handling the provisioning of an approved item. Supersedes the default provisioning of items within IDM and is called once the item’s approval chain is fully approved. -
provisionScript (string). Script hook for handling the provisioning of an approved item. Supersedes the default provisioning of items within IDM and is called once the item’s approval chain is fully approved.
-
provisioner* (managed object id). If defined on an item and referencing a managed/user or managed/role, a manual provisioning task will be created when the item’s approval chain is completed, and be assigned to that provisioner. Note this should only be used in instances when manual intervention is required, as it supersedes the automated provisioning that normally occurs when a request is approved. -
requestWorkflow(string). Identifies the custom workflow to use for the requestable item. Defining a custom request workflow on a requestable item will supersede the default approval process and control the entire approval flow. See section Standard Request Workflow for details.-
For BPMN workflows, it is the name of the workflow definition in IDM.
-
For custom scripts, it is the relative path to the script file within the scripts directory (e.g. access-request/roleApproval.js)
-
-
requestWorkflowType(string). Identifies the type of workflow defined by the requestWorkflow key, either ‘workflow’ or ‘script.’ Any item with a requestWorkflow defined but without a requestWorkflowType will default to ‘workflow.’
-
Standard request workflow
ForgeRock Access Request uses an internal workflow in order to control and manage the approval process for all requestable items that do not explicitly specify their own process. All customizations and controls for the request process are available within the Access Request user interface.
The following section describes in detail the process of the out of the box workflow so that admins can better understand what actions are being taken at what stage.
Approval process
An item that is submitted within the Create Request form will follow the approval process that is explicitly defined within that item’s glossary entry. Each item has a list of approvers that the Access Request system will use to determine which users are assigned a given task and how many levels of approval are needed to provision an item. At each level of approval, the user who is assigned the task will have the ability to either approve or reject each item that belongs to their task and submit their decision. Based on those decisions, items can either be provisioned, rejected outright, or continue down the chain of approval.
Request flow
Approval flow
-
When a request is submitted, the following steps are taken, in order, to determine the flow of a request.
-
If a request contains multiple requestees, each requestee is split into their own individual request, so that each requestee’s access can be provisioned independently of the other users.
-
If the request contains a requestable bundle as one of the requested items, that bundle is unpacked and each item within the request is then treated as an individual item within the request. This allows each item in the bundle to maintain its defined approval process independently of the items bundled with it.
-
If there are items within the request that have a preRequestScript key in their definition, it will be executed at this point for any pre-request logic that needs to occur.
-
If an item has an explicitly defined approvers list that is empty (i.e. an approvers key within their glossary entry that is a list with no entries), then that item will be auto-provisioned at this point. This is for any items that do not require any level of approval to be granted.
-
The items within the request will then be grouped, if possible, by the assigned approver. An approval task will then be created for each individual user and group that is calculated as an approver for those items. As an example:
A request that contains: - “Role 1”, with approver “A” - “Role 2”, with approver “A” - “Role 3”, with approver “B”
+ will result in two separate approval tasks:
-
Approver A will receive a task with “Role 1” and “Role 2”
-
Approver B will receive a task with “Role 3”
-
-
Depending on the system settings, auto approval may be enabled for certain approval tasks. There is an option for tasks where the requester is the direct approver and also an option for tasks where the requester belongs to the group assigned as the approver. Any items that meet the criteria of the enabled settings will be immediately sent to their next level of approval, or if none exists, will be provisioned. This feature allows end users to avoid duplication of effort, for example when a manager is requesting access for his/her reports and the initial approver for the items is defined as manager.
-
Once each approval task is created, the tasks can be completed independently of any other task that is part of the same request. This potentially allows for a single item to continue along its entire approval process and be completed without depending on a separate approval task to be decided on. Important to note here is that any item that completes its approval process will have that item provisioned to the user as soon as that final decision is made. Further, any item that has already been completed and provisioned as part of a request that is cancelled at a later date will remain provisioned. Any item that is rejected during a given approval task will be immediately removed from any further approvals, and a notification will be sent to inform users that that item was not successfully approved.
-
Approval task deadlines are calculated using the global setting defined in the access request configuration. When an approval task hits its defined deadline it does not expire or get cancelled. Instead, the task at that point is reassigned to the group defined as the Default Approver for further review. The group can decide to reassign the task elsewhere for another user to complete, if enabled.
-
After an item included in the request has either been approved by all listed approvers, its definition will be checked for a provisionScript or provisioner key. Any item with a provision script will have that script executed in lieu of the default IDM provisioning and then will be marked as complete. Any item with a provisioner listed will have a manual provisioning task created on the request and assigned to that provisioner to be completed. Once that user takes the manual steps to provision the item, they can complete the task as either ‘provisioned’ or ‘not provisioned.’
-
After an item in the request has been approved by all listed approvers, its definition is checked for a provision script or provisioner key. Any item with a provision script will have that script executed in lieu of the default IDM provisioning and then will be marked as complete. Any item with a provisioner listed will have a manual provisioning task created on the request and assigned to that provisioner to be completed. Once that user takes the manual steps to provision the item, they can complete the task as either ‘provisioned’ or ‘not provisioned.’
Any disconnected application item that is being requested must include one of the above keys for provisioning, as it is not a direct IDM managed resource and cannot be automatically assigned to the user. NOTE: Any disconnected application item that is being requested must include one of the above keys for provisioning, as it is not a direct IDM managed resource and cannot be automatically assigned to the user. -
If no further provisioning or approval tasks are required for any items within the request,, the request will be complete. All approved access will have already been provisioned and the request will move to the completed table for reference.
Custom workflows
For any item with an approval process that requires additional steps that are not covered by the out-of-the-box functionality, a custom workflow may be used to define the steps necessary for approval. There are two different options available for a custom workflow: a BPMN workflow (activiti in IDM 6.5, flowable in 7.0) or a javascript script.
Either choice will use the Access Request API to interact with the request, create approval tasks, provision access, and complete the request. The process for doing so for each method is outlined below.
When a requestable item uses a custom workflow, every step of the approval process will be controlled by that flow, immediately following the creation of the request object. Once a call is made to the create request API, the request object is saved to the repository with all of the necessary submitted request information, but no other steps are taken to advance the approval of the given item. Other items in the request will follow their own processes, if defined, and will not expect another item’s custom workflow to interact with their approval. However those other items, as part of the request object, will be available within the workflows if they need to be leveraged for any custom logic.
Defining a custom workflow on a glossary entry
There are two keys on a glossary entry that determine what custom workflow will be used to drive the request lifecycle:
-
requestWorkflow- This defines the specific workflow definition or script that will be used to drive the request.-
For workflows it is the name of the workflow definition within IDM. Refer to the IDM documentation for any questions on adding workflows to your environment.
-
For scripts it is the path to the javascript file, starting from within the openidm/script directory, (e.g., “basicRequest.js” for a file located directly in that directory).
-
-
requestWorkflowType- Value can be either ‘workflow’ or ‘script’. Entries that have a requestWorkflow key but not a requestWorkflowType key will be assumed to be of type workflow. However, it is recommended best practice to store the proper type with this key. -
requestWorkflow - This defines the specific workflow definition or script that will be used to drive the request.
-
For workflows, it is the name of the workflow definition within IDM. Refer to the IDM documentation for any questions on adding workflows to your environment.
-
For scripts it is the path to the javascript file, starting from within the openidm/script directory, (e.g., “basicRequest.js” for a file located directly in that directory).
-
-
requestWorkflowType - Value can be either ‘workflow’ or ‘script’. Entries that have a requestWorkflow key but not a requestWorkflowType key will be assumed to be of type workflow. However, it is recommended best practice to store the proper type with this key.
| There are some key differences between the two different types of custom workflow definitions because of the way each method operates. The details of each are described in the following two sections. |
Creating a custom approval process with BPMN workflow
A request including an item that has a custom approval process via BPMN workflow (activiti/flowable) will have a process instance of that request created upon creation of the request. As mentioned above, a request with multiple items that each have their own custom flow defined will create a workflow instance for each individual item, rather than one process for the entire request contents.
The following information is passed into the workflow process and can be used to drive the approval process:
-
requestId- ID of the request object this item belongs to. -
requesterId- ID of the user who submitted the request. -
requesteeId- ID of the user who is targeted by this request. -
item- ID of the requestable item glossary entry. -
requestType- Type of request submitted for this item, either add or remove.
A custom BPMN workflow must be responsible for the following functionality in the request process:
-
Creating necessary approval tasks. To create an approval task via the API within a workflow, first create a user task node within the BPMN definition. Within that node’s ‘create’ listener, make a call to ‘openidm/access-request/approval’ and send the following body.
-
requestId- ID of the request. -
itemIds- List of item IDs to include in approval task (normally just the single item). -
approverId- ID of approver user or group. -
workflowTaskId- The user task ID that corresponds to this approval. This is used within BPMN workflows to complete the task upon approval submission and continue the workflow process.
-
-
Sending request notifications. To send an Access Request notification via API, use the ‘openidm/notification/[NOTIFICATION_ID]’ endpoint with the notification template of your choosing. Templates can be found with the accessRequestNotificationTemplates.json file in the conf directory, and any POST body to the endpoint must include any of the variables described in the template definition.
-
Provisioning approved access. Access Request provides a provisioning endpoint, openidm/access-request/provision, for IDM attribute/role assignment during simple request provisioning. Alternatively, you can create a provisioning task for any required manual operation.
-
Setting the final outcome of the item on the request object. When an item’s approval process is complete, the workflow must set the request item’s outcome via a POST call to openidm/access-request/request?_action=update). When an item’s outcome is set to a final outcome (e.g. provisioned, denied, etc.), no other action is required on the request, and it will be closed if and when any other items on the request have been completed.
Creating a custom approval process via script
A request including an item that has a custom approval process via script will execute that script upon creation of the request, and following the completion of every approval task containing that item.
The following information is passed into the script as variables to be used to drive the approval process:
-
request- The request object. -
approval- The approval task object that triggered the script; this will be null when the script is run on creation -
glossaryItem- The glossary entry for the requested item.
A custom script must be responsible for the following functionality in the request process:
-
Creating necessary approval tasks. To create an approval task via the API within a workflow, first create a user task node within the BPMN definition. Within that node’s ‘create’ listener, make a call to ‘openidm/access-request/approval’ and send the following body.
-
requestId- ID of request. -
itemIds- List of item IDs to include in approval task (normally just the single item). -
approverId- ID of approver user or group.
-
-
Sending request notifications. To send an Access Request notification via API, use the ‘openidm/notification/[NOTIFICATION_ID]’ endpoint with the notification template of your choosing. Templates can be found with the accessRequestNotificationTemplates.json file in the conf directory, and any POST body to the endpoint must include any of the variables described in the template definition. For a more detailed example, refer to the Access Request Postman collection.
-
Provisioning approved access. Access Request provides a provisioning endpoint (openidm/access-request/provision) for basic IDM attribute/role assignment which can be used for simple request provisioning, or a workflow can provision in another way if more appropriate. Alternatively, a provisioning approval task can be created for any required manual task.
-
Sending request notifications. To send an Access Request notification via API, use the ‘openidm/notification/[NOTIFICATION_ID]’ endpoint with the notification template of your choosing. Templates can be found with the accessRequestNotificationTemplates.json file in the conf directory, and any POST body to the endpoint must include any of the variables described in the template definition. For a more detailed example, please see the Access Request Postman collection.
-
Provisioning approved access. Access Request provides a provisioning endpoint, openidm/access-request/provision, for IDM attribute/role assignment during simple request provisioning. Alternatively, you can create a provisioning task for any required manual operation.
-
Setting the final outcome of the item on the request object. A request object is returned and saved with every iteration of the script, and so can be used to make any adjustments to the item’s outcome within the request when a final outcome has been reached.
Every iteration of the script that is executed expects an object to be returned with two keys:
-
success- A boolean value determining whether or not the script execution was successfully completed -
request- The request object, including any updates made during the script execution, which will be saved to the request.
When an item’s outcome is set to a final outcome (e.g. provisioned, denied, etc.), no other action is required on the request, and it will be closed if and when any other items on the request have been completed.
Access request notifications
User notifications are sent for certain events that take place within the application.
Modifying notification templates
Notifications sent by the Access Request application are stored within the openidm/conf/accessRequestNotificationTemplates.json file.
This file can be modified to display whatever custom message is desired for each individual notification.
Modifying these templates directly will require someone with administrative privileges to edit the file within the IDM directory itself.
Templates
The following templates are used within the application:
| Field | Description |
|---|---|
OUTCOME_UPDATE |
Sent when an item or items have reached a final request decision. |
APPROVAL_TASK_CREATED |
Sent to approver(s) when an approval task is assigned to them. |
APPROVAL_TASK_EXPIRED |
Sent to the default approver group when an approval task expires and is assigned to them for review. |
CONSULT_TASK_CREATED |
Sent to consult(s) when added to an approval task for additional information. |
CONSULT_TASK_CANCELLED |
Sent to consult(s) when a consult task is cancelled. |
PROVISIONING_TASK_CREATED |
Sent to provisioner(s) when a manual provisioning task is assigned to them |
CREATE_REQUEST_FAILED |
Sent to the requester when creation of a request fails for an unknown reason. |
REQUEST_CANCELLED |
Sent to requester/requestee when a request has been cancelled. |
APPROVAL_TASK_CANCELLED |
Sent to approver(s) when an approval task has been cancelled. |