Identity glossary
Users who are assigned to the glossary-admin internal authorization role will see the Glossary subsection available on the side taskbar. Navigating to this screen will allow the user to directly edit, create, or delete glossary objects within the system. This role is imperative in defining the properties on items with the IDM system that will be used as a part of Access Request. = Identity glossary
Users who are assigned to the glossary-admin internal authorization role will see the Glossary subsection available on the side taskbar. Navigating to this screen will allow the user to directly edit, create, or delete glossary objects within the system. This role is imperative in defining the properties on items with the IDM system that will be used as a part of Access Request. Items within the glossary are known as keys.
Glossary keys are case_sensitive. For example, make sure to put requestable and not Requestable.
|
Glossary Introduction
The glossary is an extensive collection of metadata that refers to any and all the identity information that is compiled and tracked by IDM. It allows administrators to store as much information as desired about any of the components described below. The data stored can directly affect some of the product functionality, or it can be as simple as arbitrary information that allows for easier maintainability and categorization of the system on a whole.

Glossary Object Classes

-
Identity: The user properties that exist on a managed user within IDM.
-
Examples: jobCode, department, location
-
Required Keys:
-
attributeName (string): the attribute property on the user
-
-
-
Identity-Value: Specific values that are assigned to any of properties that exist on a managed user within IDM.
-
Examples: a jobCode of AT152, a status of T
-
Required Keys:
-
attributeName (string): the attribute property on the user
-
attributeValue (string): the value assigned to that property
-
-
-
Object: A specific instance of a managed object within IDM. Can refer to a managed object of any type, as long as it currently exists within the system.
-
Examples: Database Administrator Role, LDAP Group Assignment
-
Required Keys:
-
objectId (managed object id): the _id of the object in IDM
-
displayName (string): the readable name of the object
-
order (array): the displayable order of the object’s properties
-
-
-
System: A connected external system managed by IDM
-
Examples: Active Directory, PeopleSoft
-
Required Keys:
-
name (string): the name of the connected system
-
-
-
System-Attribute: A user property within the external connected system.
-
Examples: ldapGroups, cn
-
Required Keys:
-
system (string): the name of the connected system that tracks this attribute
-
objectType (string): the object type of the attribute (e.g. account or group)
-
attributeName (string): the name of the attribute
-
order (integer): numeric ranking used to determine display order
-
-
-
System-Value: Specific values that are assigned to any of properties that exist on an external connected system.
-
Examples: a jobCode of AT152, a status of T
-
Required Keys:
-
system (string): the name of the connected system that tracks this attribute
-
objectType (string): the object type of the attribute (e.g. account or group)
-
attributeName (string): the name of the attribute
-
attributeValue (string): the value assigned to that attribute
-
-
Selecting a Glossary Object Class
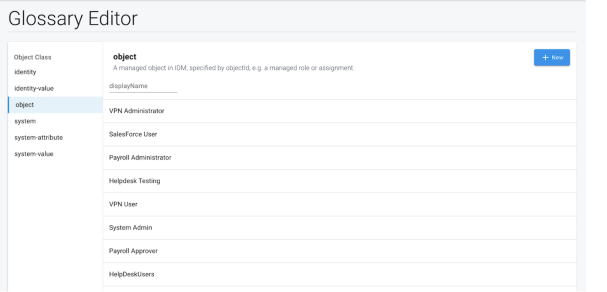
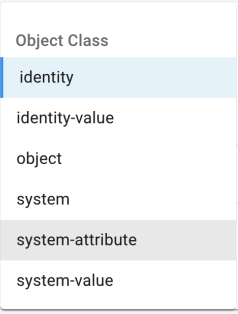
Using the available select list, administrators will be able to view a single glossary object class at a time within the glossary editor interface. Once a class is chosen, the table will display existing glossary entries that pertain to that class in a searchable and paginated fashion. The table includes text inputs that allow you to further filter the results by properties such as name, attributeValue, system, and more. There are also pagination controls available near the bottom of the table, that allow admins to control how many entries they see at a given time.
Creating a New Glossary Entry
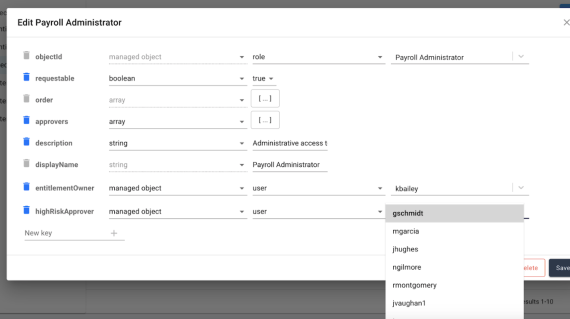
Once a glossary object class is selected, clicking the “New” button will display a blank form to the administrator, with all of the required keys pre-populated and awaiting entry. Note that next to each required key, the type of metadata is also pre-populated, and is locked to the required type for that entry. These fields must all be completed before a glossary entry will be allowed to be saved.
In order to add a new metadata key to the glossary object, simply add the key name to the empty input box below the existing keys marked ‘New key’ and then click on the ‘+’ icon. Doing so will add the new key to the list of entries, which will then make it editable. Each entry row has multiple inputs, the number of which may vary depending on the type selected. Firstly, the delete icon next to non-required keys will allow admins to remove the corresponding key from the object. Next to that icon is the key itself, which is followed by the entry type selector, which allows the admin to define the type of data being entered. The choices for this selector are as follows:
-
String
-
Boolean
-
Integer
-
Managed Object
-
Object
-
Array
-
Date
| Entries of type Managed Object will allow the admin to further choose the type of object being entered, and once the type is selected will actually query the IDM system for objects of that type. The fields for which this input box queries against per managed object is defined in the commons.json file located in the openidm/conf directory. The initial configuration of commons.json contains the IDM OOTB attributes for user, role, and assignment only. In order to add entries for different custom managed objects, each object must be added to commons.json in order for it to be an available choice for a new glossary entry. |
Once all entries have been added and the entry is complete, clicking on the Save button will save the entry to the glossary.
Editing an Existing Glossary Entry
In order to edit an existing entry, simply locate the entry desired within the search table of the editor, and click on its row. Doing so will display the editor form, much like when creating a new entry, but with the current metadata populated within the form.

Deleting a Glossary Entry
In order to delete an existing glossary entry, click on the entry in question in order to display the edit glossary entry form for the object. Once populated, clicking delete will allow the entry to be removed.
Reserved Keys
While the glossary editor will allow the user to enter in nearly any value as a key within the glossary object, the admin should take note that there are certain keys that are leveraged across different products to provide different levels of functionality. Examples of these include the key approvers for Access Request and riskLevel for Access Review. Glossary admins should be aware of any keys used throughout other applications before creating new key entries to avoid potential conflicts. The full list of reserved keys used by Identity Governance can be found within the respective Access Review and Access Request sections.