Policies in the UI
A policy can only be created as part of a policy set.
-
To add a policy using the AM admin UI, go to Realms > Realm Name > Authorization > Policy Sets, and select the name of the policy set in which to configure the policy.
-
To create a new policy, select Add a Policy.
-
In the Name field, enter a descriptive name for the policy.
Do not use special characters in resource type, policy, or policy set names (for example,
"my+resource+type"). If you include special characters, AM returns a 400 Bad Request error. This includes the following special characters: double quotes ("), plus sign (+), comma (,), less than (<), equals (=), greater than (>), backslash (\), forward slash (/), semicolon (;), and null (\u0000). -
To set the resources to which the policy applies, follow these steps:
-
Select a resource type from the Resource Type drop-down list.
The set of resource patterns within the selected resource type will populate the Resources drop-down list.
-
Select a resource pattern from the Resources drop-down list.
-
Replace the asterisks with values to define the resources that the policy applies to.
For details on specifying patterns for matching resources, refer to Specify resource patterns with wildcards.
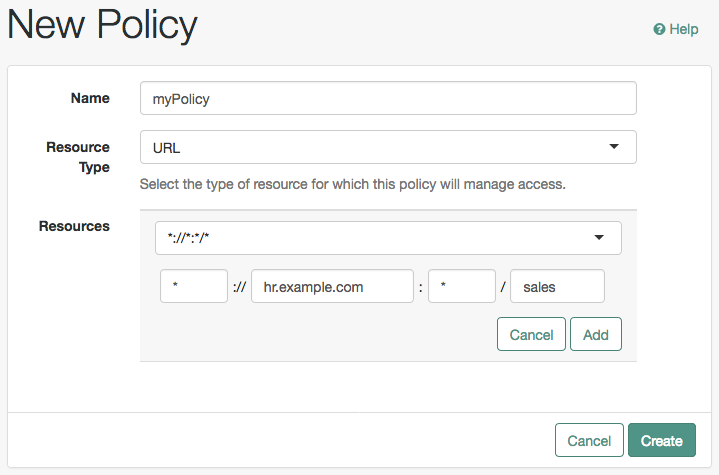 Figure 1. Editing Resource Patterns
The
OAuth2 Scoperesource type has the same resource patterns as theURLresource type, and also the*pattern. Use the resource patterns that are most relevant for the scopes in your environment.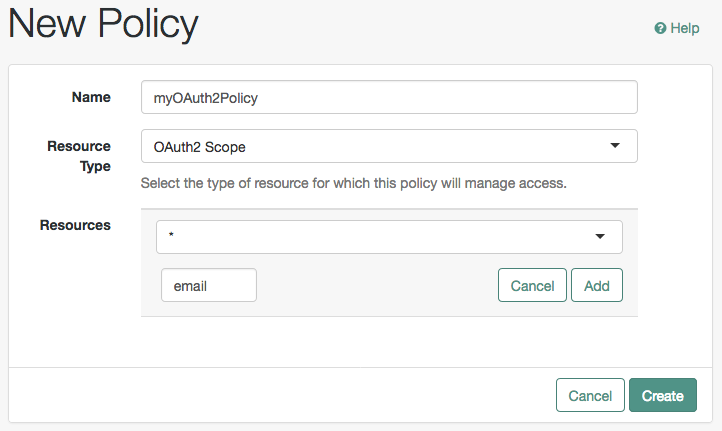 Figure 2. Editing OAuth2 Scope Resource Type Resource Patterns
Before testing your OAuth 2.0 policies, ensure your OAuth 2.0 service is configured to interact with AM’s authorization service. Perform the following steps:
-
Go to Realms > Realm Name > Services > OAuth2 Provider.
-
Ensure that Use Policy Engine for Scope decisions is enabled.
For more information about testing OAuth 2.0 policies, see Dynamic OAuth 2.0 authorization.
-
-
Select Add to save the resource.
The AM admin UI displays a page for your new policy. The Tab pages let you modify the policy’s properties.
To remove a resource, click Delete.
-
-
Repeat these steps to add all the resources to which your policy applies, and click Create.
-
To configure the policy’s actions, select the Actions tab and perform the following:
-
From the Add an Action drop-down list, select each action that you want to control with this policy.
-
Select whether to allow or deny the action on the resources specified earlier.
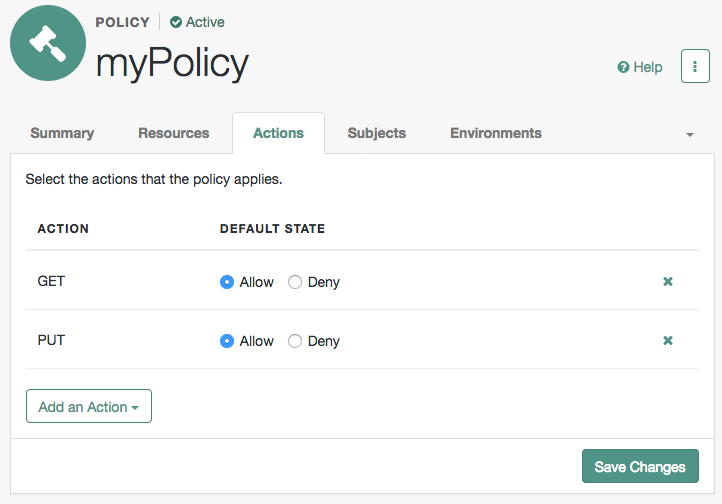 Figure 3. Allowing or Denying the Action for the Resource
 -
When you have added all required actions, save your work.
-
-
On the Subjects and Environments tabs, define conditions by combining logical operators with blocks of configured parameters. Conditions create a set of rules that the policy uses to filter requests for resources.
Use drag and drop to nest logical operators at multiple levels to create complex rule sets.
Valid drop points in which to drop a block are displayed with a grey horizontal bar.
 Figure 4. Valid Drop Point
-
To define the subjects that the policy applies to, select the Subjects tab::
-
Select Add a Subject Condition, choose the type from the drop-down menu, specify any required subject values, select the checkmark to the right when done, and then drag the block into a valid drop point in the rule set above.
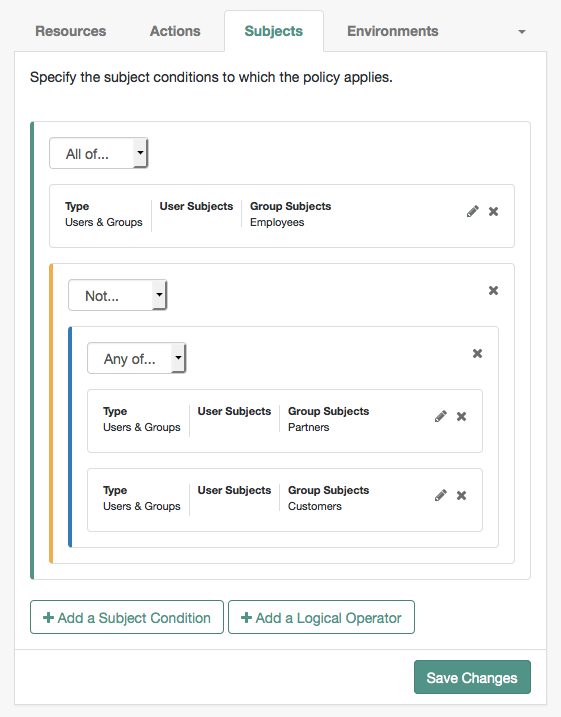 Figure 5. Nesting subject conditions
Subject conditions
- Authenticated Users
-
Any user that has successfully authenticated with AM.
- Users & Groups
-
A user or group as defined in the realm containing the policy. To manage the identities and groups in a realm, go to Realms > Realm Name > Identities.
Select one or more users or groups from the Identities or Groups tabs, which display the identities and groups available within the realm.
To remove an entry, select the value, and then press Delete (Windows/GNU/Linux) or Backspace (Mac OS X).
- OpenID Connect/Jwt Claim
-
Validate a claim within a JSON Web Token (JWT).
Type the name of the claim to validate in the Claim Name field, for example,
sub, and the required value in the Claim Value field, and then select the checkmark.Repeat the step to enter additional claims.
The claim(s) will be part of the JWT payload together with the JWT header and signature. The JWT is sent in the authorization header of the bearer token.
This condition type only supports string equality comparisons, and is case-sensitive.
- Never Match
-
Never match any subject. Has the effect of disabling the policy, as it will never match a subject.
If you do not set a subject condition, "Never Match" is the default. In other words, you must set a subject condition for the policy to apply.
To match regardless of the subject, configure a subject condition that is "Never Match" inside a logical
Notblock.
-
To add a logical operator, select the Add a Logical Operator button, choose between
All Of,Not, andAny Offrom the drop-down list, and then drag the block into a valid drop point in the rule set above. -
Continue combining logical operators and subject conditions. To edit an item, click Edit. To remove an item, click Delete. When complete, click Save Changes.
-
-
To configure environment conditions in the policy, select the Environments tab:
-
To add an environment condition, click Environment Condition, choose the type from the drop-down list, specify any required parameters, and drag the block into a drop point in a logical block above.
Scriptis the only environmental condition available for OAuth 2.0 policies.Environment conditions
- Active Session Time
-
Make the policy test how long the user’s session has been active, as specified in Max Session Time. To terminate the session if it has been active for longer than the specified time, set Terminate Sessions to
True. The user will need to reauthenticate. - Authentication Level (greater than or equal to)
-
Make the policy test the minimum acceptable authentication level specified in Authentication Level.
- Authentication Level (less than or equal to)
-
Make the policy test the maximum acceptable authentication level specified in Authentication Level.
- Authentication by Module Instance
-
Make the policy test the authentication module used to authenticate, specified in Authentication Scheme. Specify a timeout for application authentication in Application Idle Timeout Scheme, and the name of the application in Application Name.
- Authentication by Service
-
Make the policy test the service that was used to authenticate the user.
- Authentication to a Realm
-
Make the policy test the realm to which the user authenticated.
A session can only belong to one realm, and session upgrade between realms is not allowed.
- Current Session Properties
-
Make the policy test property values set in the user’s session.
Set Ignore Value Case to
Trueto make the test case-insensitive.Specify one or more pairs of session properties and values using the format
property:value. For example, specifyclientType:genericHTMLto test whether the value of theclientTypeproperty is equal togenericHTML. - IPv4 Address/DNS Name
-
Make the policy test the IP version 4 address that the request originated from.
The IP address is taken from the
requestIpvalue of policy decision requests. If this is not provided, the IP address stored in the SSO token is used instead.Specify a range of addresses to test against by entering four sets of up to three digits, separated by periods (.) in both Start IP and End IP.
If only one of these values is provided, it is used as a single IP address to match.
Optionally, specify a DNS name in DNS Name to filter requests to that domain.
- IPv6 Address/DNS Name
-
Make the policy test the IP version 6 address that the request originated from.
The IP address is taken from the
requestIpvalue of policy decision requests. If this is not provided, the IP address stored in the SSO token is used instead.Specify a range of addresses to test against by entering eight sets of four hexadecimal characters, separated by a colon (:) in both Start IP and End IP.
If only one of these values is provided, it is used as a single IP address to match.
Optionally, specify a DNS name in DNS Name to filter requests to those coming from the specified domain.
Use an asterisk (*) in the DNS name to match multiple subdomains. For example,
*.example.comapplies to requests coming fromwww.example.com,secure.example.com, or any other subdomain ofexample.com. - Identity Membership
-
Make the policy apply if the UUID of the invocator is a member of at least one of the AMIdentity objects specified in AM Identity Name.
Often used to filter requests on the identity of a Web Service Client (WSC).
Java agents and web agents do not support the
Identity Membershipenvironment condition. Instead, use the equivalentUsers & Groupssubject condition. - LDAP Filter Condition
-
Make the policy test whether the user’s entry can be found using the LDAP search filter you specify in the directory configured for the policy service. By default, this is the identity repository defined during setup.
If you define a filter condition that uses LDAP accounts or groups in a different identity repository, you must configure the LDAP settings:
-
For global settings, go to Configure > Global Services, or, for realm-based settings, go to Realms > Realm Name > Services.
-
Select Policy Configuration to view and edit the LDAP configuration.
-
- OAuth2 Scope
-
Make the policy test whether an authorization request includes all the specified OAuth 2.0 scopes.
Scope names must follow OAuth 2.0 scope syntax described in RFC 6749, Access Token Scope. As described in that section, separate multiple scope strings with spaces, such as
openid profile.The scope strings match regardless of order in which they occur, so
openid profileis equivalent toprofile openid.The condition is also met when additional scope strings are provided beyond those required to match the specified list. For example, if the condition specifies
openid profile, thenopenid profile emailalso matches. - Resource/Environment/IP Address
-
Make the policy apply to a complex condition, such as whether the user is making a request from the localhost, and has also authenticated in a particular way.
Entries must take the form of an
IF…ELSEstatement. TheIFstatement can specify eitherIPto match the user’s IP address, ordnsNameto match their DNS name.If the
IFstatement is true, theTHENstatement must also be true for the condition to be fulfilled. If not, relevant advice is returned in the policy evaluation request.The available parameters for the
THENstatement are as follows:moduleThe module used to authenticate the user. For example,
DataStore.serviceThe service that was used to authenticate the user.
authlevelThe minimum required authentication level.
roleThe role of the authenticated user.
userThe name of the authenticated user.
redirectURLThe URL the user was redirected from.
realmThe realm that was used to authenticate the user.
The IP address can be IPv4, IPv6, or a hybrid of the two. Example:
IF IP=[127.0.0.1] THEN role=admins. - Script
-
Make the policy depend on the outcome of a JavaScript or Groovy script executed at the time of the policy evaluation.
For information on scripting policy conditions, see Scripted policy conditions.
Scriptis the only environmental condition available for OAuth 2.0 policies. Use scripts to capture theClientIdenvironmental attribute. - Time (day, date, time, and timezone)
-
Make the policy test when the policy is evaluated.
The values for day, date and time must be set in pairs that comprise a start and an end.
 Figure 6. Create conditions that apply between a start and end date andtime.
 - Transaction
-
Make the policy depend on the successful completion of a transaction performed by the user.
Configure a transaction with an authentication strategy that asks the user to reauthenticate before being allowed access to the resource.
Transactions support the following authentication strategies:
-
Authenticate to Chain: Specify the name of an authentication chain the user must successfully complete to access the protected resource. -
Authenticate to Realm: Specify the full path of a realm in which the user must successfully authenticate to access the protected resource.For example,
/sales/internal. -
Authenticate to Tree: Specify the name of an authentication tree the user must successfully traverse to access the protected resource. -
Authenticate to Module: Specify the name of an authentication module the user must successfully authenticate against to access the protected resource. -
Auth Level: Specify the minimum authentication level the user must achieve to access the protected resource.If you specify a minimum authentication level, ensure there are methods available to users to reach that level. If none are found, the policy will return a
400 Bad requesterror when attempting to complete the transaction.
-
For more information on transactional authorization, see Transactional authorization.
-
To add a logical operator, click Logical, choose between
All Of,Not, andAny Offrom the drop-down list, and drag the block into a valid drop point in the rule set above. -
Continue combining logical operators and environment conditions, and when finished, select Save Changes.
-
-
-
You can add response attributes, retrieved from the user entry in the identity repository, into the headers of the request at policy decision time (not available for the
OAuth2 Scoperesource type). The web or Java agent for the protected resources/applications or the protected resources/applications themselves retrieve the policy response attributes to customize or personalize the application. Policy response attributes come in two formats: subject attributes and static attributes.To configure response attributes in the policy, complete the following steps on the Response attributes tab:
-
To add subject attributes, select them from the Subject attributes drop-down list.
To remove an entry, select the value, and then press Delete (Windows/GNU/Linux) or Backspace (Mac OS X).
-
To add a static attribute, specify the key-value pair for each static attribute. Enter the Property Name and its corresponding Property Value in the fields, and click Add (+) icon.
To edit an entry, select the Edit icon in the row containing the attribute, or select the row itself. To remove an entry, select the Delete icon in the row containing the attribute.
-
Continue adding subject and static attributes, and when finished, click Save Changes.
-