Provision users with workflow
This sample demonstrates a typical workflow use case, provisioning new users.
The sample uses the admin UI to set up the initial users and roles, then shows how users can complete their registration process in the End User UI.
The sample simulates the following scenario:
-
An existing employee requests that an outside contractor be granted access to an organization’s system.
-
The system in this case, is the IDM managed user repository and a remote HR data source, represented by a CSV file (
hr.csv). -
User roles are stored separately, in a second CSV file (
roles.csv).
The sample has three mappings—two for the bidirectional synchronization of the managed user repository and the HR data store, and one for the synchronization of the roles data to the managed repository.
Prepare the sample
In this section, you start IDM, configure the outbound email service, and reconcile user and role data. The reconciliation operations create two managed users, user1 and manager1, and two managed roles, employee (assigned to user1) and manager (assigned to manager1).
|
Workflows are not supported with a DS repository. Before you test this sample, install a JDBC repository. |
-
Edit the
/path/to/openidm/samples/provisioning-with-workflow/conf/datasource.jdbc-default.jsonfile with the details of your JDBC repository. For more information, refer to Select a repository. -
Start IDM with the configuration for the provisioning sample:
cd /path/to/openidm/
./startup.sh -p samples/provisioning-with-workflow
-
Log in to the admin UI.
-
Configure the outbound email service:
-
From the navigation bar, click Configure > Email Settings.
-
On the Email Settings page, enable the outbound mail service, enter the connection information, and click Save.
-
-
Enable Password Reset:
-
From the navigation bar, click Configure > Password Reset.
-
On the Password Reset page, enable password reset, enter the applicable information, and click Save.
For additional password reset information, refer to Email for password reset.
-
-
Reconcile the role and user data:
-
From the navigation bar, click Configure > Mappings.
-
Select the first mapping (systemRolesFileRole_internalRole), and click Reconcile.
-
To verify the reconciliation:
-
From the navigation bar, click Manage > Role.
-
On the Roles page, click the Internal tab.
IDM displays the two roles created in the previous step:
-
employee -
manager
-
-
-
From the navigation bar, click Configure > Mappings.
-
Select the second mapping (systemCsvfileAccounts_managedUser), and click Reconcile.
The reconciliation operation creates the top-level managers (users who do not have their own
managerproperty) in the managed user repository. In this sample, there is only one top-level manager (manager1). -
Select the second mapping again (systemCsvfileAccounts_managedUser), and click Reconcile.
This reconciliation operation creates the employees of the managers that were created by the previous reconciliation. In this sample, there is only one employee (
employee1). -
From the navigation bar, click Manage > User, and verify the users
manager1anduser1exist.
-
-
Verify the relationships between the new user and role objects:
-
Click user1.
The Manager field displays
manager1for this user. -
Click the Authorization Roles tab.
user1has two roles,openidm-authorizedandemployee. -
From the breadcrumb link at the top of the page, click User, and select
manager1.The Manager field is empty for this user.
-
Click the Authorization Roles tab.
manager1has three roles:manager,openidm-authorized, andopenidm-tasks-manager.
-
-
Verify the available workflows:
-
From the navigation bar, click Manage > Processes.
-
On the Workflow Processes page, select the Definitions tab.
-
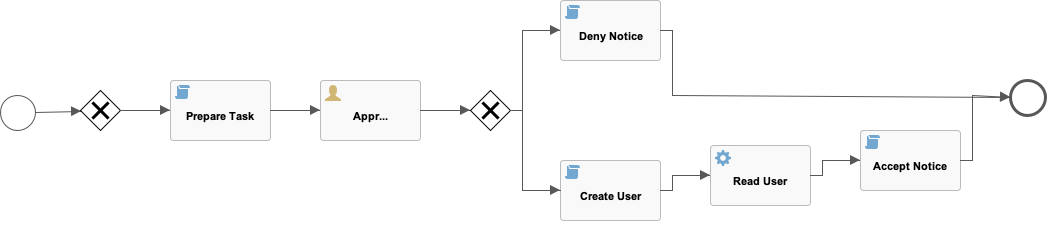
From the Definitions list, click Contractor onboarding process.
IDM displays a diagram similar to the following:
-
-
Log out of the admin UI.
Run the sample
During this part of the sample, an existing employee initiates a Contractor Onboarding process. This process is a request to add a contractor to the managed user repository, with an option to include the contractor in the original HR data source (hr.csv).
When the employee has completed the required form, the request is sent to the manager for approval. Any user with the role manager can claim the approval task. If the request is approved, an email is sent to the address provided in the initial form, with a request for the contractor to reset their password. When the password reset has been completed, the contractor is created in the managed user repository. If a request was made to add the contractor to the original HR data source, this is done when the manager approves the request.
-
Log in to the End User UI (
https://localhost:8443/) as the user you created in the previous section (user1) with passwordWelcome1. -
Navigate to the dashboard, with the Dashboard icon (). Alternatively, select the Menu icon (), and select Dashboard.
-
Initiate the provisioning workflow as
user1:-
Scroll down to the Start a Process menu, and click Edit adjacent to Contractor onboarding process.
-
Complete the form for the sample user you will be creating. Use an accessible email address, as you’ll need the email message to complete this workflow.
-
Enable Create in CSV File. This option enables implicit synchronization from the managed user repository to the
hr.csvfile.user1does not provide a password for this user. A password reset request is sent to the email address provided on this form to ensure that only the actual contractor can log in with this account. -
Select Submit to initiate the process.
-
Log out of the End User UI.
-
-
Approve the workflow task as
manager1:-
Log in to the End User UI as
manager1with passwordWelcome1. -
Navigate to the dashboard, with the Dashboard icon (). Alternatively, select the Menu icon (), and select Dashboard.
-
Under Unassigned Tasks, locate the Approve Contractor task, select Assign, and click Assign to Me.
Approve Contractor is now listed under My Tasks.
-
Click Edit adjacent to the task name.
-
Review the form content, and click Accept.
This is the same content you provided as user1. -
Log out of the End User UI.
-
-
Verify that the contractor has been created in the HR data source (
/path/to/openidm/samples/provisioning-with-workflow/data/hr.csv):"username","firstname","lastname","manager", "department","jobTitle", ... "user1", "Ordinary", "Employee","manager1","dep1", "job1", ... "manager1","Big", "Manager", "", "dep1", "Manager", ... "bjensen", "Barbara", "Jensen", "user1", "Payroll", "Payroll clerk",...Note the addition of the new contractor entry,
bjensen. -
Complete the password reset process:
-
Check the email account you provided on the initial form for a message with the subject line "Reset your password".
-
Open the password reset email, and click Password reset link.
The link takes you to the End User UI.
-
Click Reset Your Password.
-
Enter a new password, and click Change Password.
The password that you enter here must comply with the password policy that is configured for managed users. For more information, refer to Enforcing Password Policy.
-
Click Sign In, and enter the username and new password.
-
Click the notifications icon (), and you should see a welcome message.
-
|
If you declined the approval request, the user is not created in either the managed user repository, or in the HR CSV file. |