Subscribe to JMS messages
IDM can subscribe to Java Messaging Service (JMS) messages using the Messaging Service’s JMS Subscriber. In an event-driven architecture, also known as a message-driven architecture, there are publishers and subscribers. When a publisher sends a message over JMS, that message is broadcast. All active and subscribed clients receive that message. This sample shows how IDM can act as a JMS message subscriber, using the ActiveMQ Artemis JMS message broker.
|
For more information on how IDM can publish JMS messages using the JMS Audit Event Handler, refer to Direct audit information to a JMS broker |
Sample overview
With the scripted message handler shown in this sample, you can configure scripts to parse the contents of JMS messages, and act on that content.
The script in this sample, crudpaqTextMessageHandler.js, shows how JMS can handle ForgeRock REST operations. If you customize a script to manage JMS messages, you must also modify the conf/messaging.json
file.
This sample uses ActiveMQ Artemis, a JMS message broker. With the ActiveMQ Artemis UI, you can act as the JMS message provider. This sample demonstrates how you can input REST payloads using the Artemis UI.
Dependencies for JMS messaging
The JMS audit event handler requires Apache ActiveMQ Artemis and additional dependencies bundled with the ActiveMQ Artemis delivery. This section lists the dependencies, and where they must be installed in the IDM instance. If you use a different ActiveMQ version, you may need to download the corresponding dependencies separately.
-
Download the following files:
-
This sample was tested with version 2.20.0. -
The most recent
bndJAR file from https://repo1.maven.org/maven2/biz/aQute/bnd/biz.aQute.bnd/.The bnd utility lets you create OSGi bundles for libraries that do not support OSGi.
-
-
Unpack the ActiveMQ Artemis archive. For example:
tar -zxvf ~/Downloads/apache-artemis-2.20.0-bin.tar.gz
-
Create a temporary directory, and then change to that directory:
mkdir ~/Downloads/tmp
cd ~/Downloads/tmp/
-
Move the ActiveMQ Artemis Client and
bndJAR files to the temporary directory.mv ~/Downloads/apache-artemis-2.20.0/lib/client/artemis-jms-client-all-2.20.0.jar ~/Downloads/tmp/ mv ~/Downloads/biz.aQute.bnd-version.jar ~/Downloads/tmp/ -
Create an OSGi bundle:
-
In a text editor, create a BND file named
activemq.bndwith the following contents, and save it to the current directory:version=2.20.0 Export-Package: *;version=${version} Import-Package: !org.apache.log4j.*,!org.apache.log.*,!org.apache.avalon.framework.logger.*,!org.apache.avalon.framework.logger.*,!org.glassfish.json.*,!org.conscrypt.*,!org.apache.logging.*,!org.bouncycastle.jsse.*,!org.eclipse.*,!sun.security.*,!reactor.*,!org.apache.activemq.artemis.shaded.*,!com.aayushatharva.*,!com.github.luben.zstd,!com.jcraft.jzlib,!com.ning.compress,!com.ning.compress.lzf,!com.ning.compress.lzf.util,!com.oracle.svm.core.annotate,!lzma.*,!net.jpountz.*,* Bundle-Name: ActiveMQArtemis :: Client Bundle-SymbolicName: org.apache.activemq Bundle-Version: ${version}Your
tmp/directory should now contain the following files:ls -1 ~/Downloads/tmp/ activemq.bnd artemis-jms-client-all-2.20.0.jar biz.aQute.bnd-version.jar -
In the same directory, create the OSGi bundle archive file. For example:
java -jar biz.aQute.bnd-version.jar wrap \
--properties activemq.bnd \
--output artemis-jms-client-all-2.20.0-osgi.jar \
artemis-jms-client-all-2.20.0.jar
-
-
Copy the resulting
artemis-jms-client-all-2.20.0-osgi.jarfile to theopenidm/bundledirectory:cp artemis-jms-client-all-2.20.0-osgi.jar /path/to/openidm/bundle/
Configure SSL for Apache ActiveMQ Artemis
For information on configuring Apache ActiveMQ Artemis security features, including SSL, refer to the ActiveMQ Artemis Documentation:
Start the ActiveMQ Artemis broker and IDM
With the appropriate bundles in the /path/to/openidm/bundles directory, you’re ready to start the ActiveMQ Artemis message broker, as well as IDM with the JMS Audit Sample.
| For a full list of ActiveMQ Artemis setup options, refer to Using the Server in the Artemis Documentation. |
-
Navigate to the directory where you unpacked the ActiveMQ Artemis binary and run the following command to create the Artemis broker:
cd ~/Downloads/apache-artemis-2.20.0/bin
./artemis create fr-scripted-jms
Creating ActiveMQ Artemis instance at: /path/to/Downloads/apache-artemis-2.20.0/bin/fr-scripted-jms
...
-
Start the newly created ActiveMQ Artemis broker:
./fr-scripted-jms/bin/artemis run
-
Start IDM, with the configuration for this sample:
cd /path/to/openidm/
./startup.sh -p samples/scripted-jms-subscriber
-
Verify you can access the Artemis management console at
http://localhost:8161/console.
Use the ActiveMQ Artemis UI to access the REST interface
In this section, you will use the ActiveMQ Artemis UI to send REST requests.
-
Log in to the Artemis management console (
http://localhost:8161/console). -
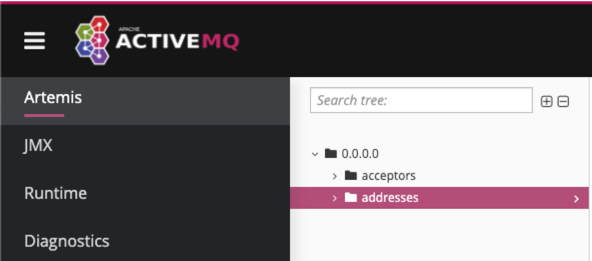
From the navigation menu, click Artemis.
-
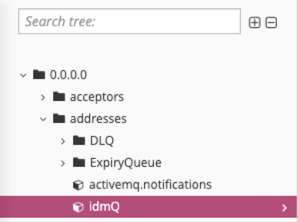
From the tree view, select the addresses node.
-
On the addresses page, click the Create address tab.
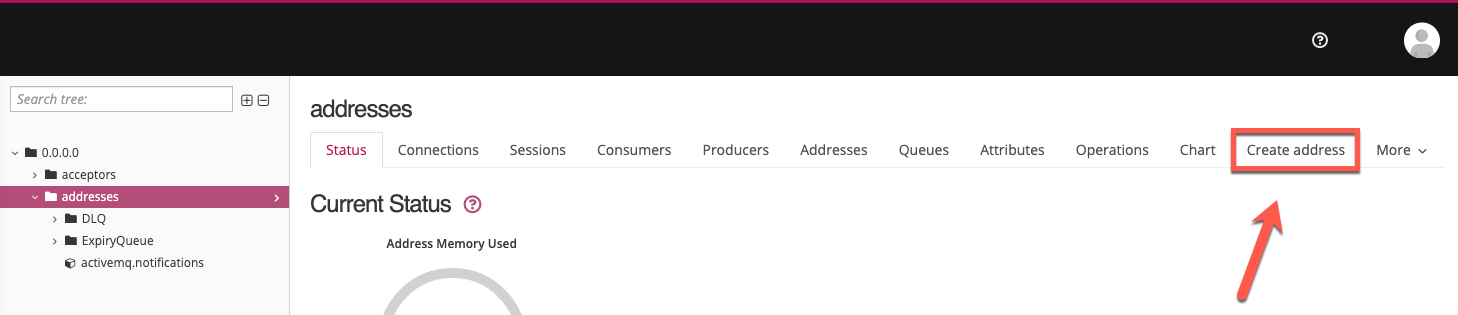
Depending on your window size, the Create address tab may be located under the More menu. -
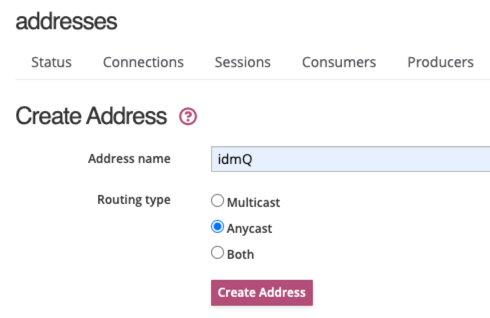
Fill out the Create Address form, and then click Create Address:
-
Address name:
idmQ -
Routing type:
Anycast
-
-
From the tree view, expand the addresses node, and click idmQ.
-
On the idmQ page, click the Send message tab.
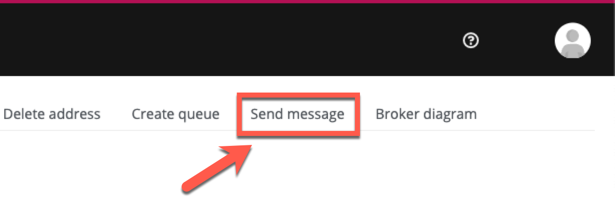
Depending on your window size, the Send message tab may be located under the More menu. -
On the Send Message page, paste the following text into the Body field. This request creates a new user with a user ID of
mgr1:{ "operation" : "CREATE", "resourceName" : "/managed/user", "newResourceId" : "mgr1", "content" : { "mail" : "mgr1@example.com", "sn" : "Sanchez", "givenName" : "Jane", "password" : "Password1", "employeenumber" : 100, "accountStatus" : "active", "roles" : [ ], "userName" : "mgr1" }, "params" : {}, "fields" : [ ] }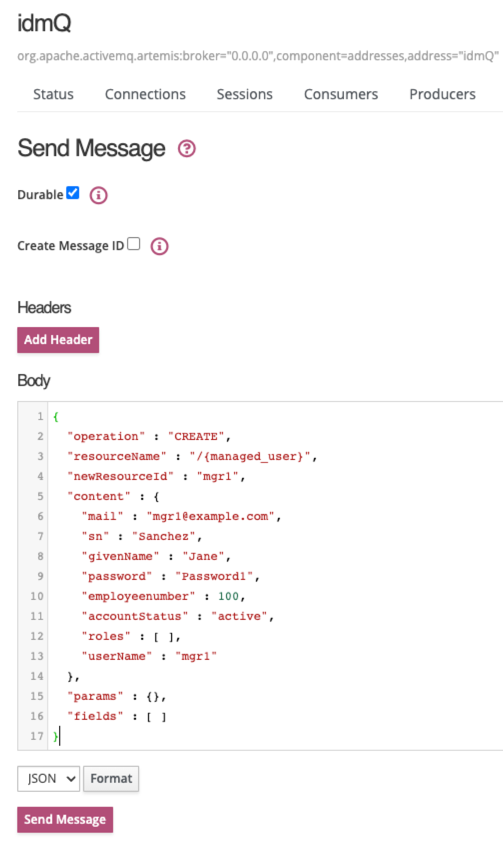
For comparison, the following equivalent REST call would create the same user:
curl \ --header "X-OpenIDM-Username: openidm-admin" \ --header "X-OpenIDM-Password: openidm-admin" \ --header "Accept-API-Version: resource=1.0" \ --header "Content-Type: application/json" \ --request POST \ --data '{ "mail" : "mgr1@example.com", "sn" : "Sanchez", "givenName" : "Jane", "password" : "Password1", "employeenumber" : 100, "accountStatus" : "active", "roles" : [ ], "userName" : "mgr1", "params" : {}, "fields" : [ ] }' \ "http://localhost:8080/openidm/managed/user?_action=create" -
Click Send Message.
The OSGi console displays the message request and response:
**************request received************* Parsed JMS JSON = { "operation": "CREATE", "resourceName": "/managed/user", "newResourceId": "mgr1", "content": { "mail": "mgr1@example.com", "sn": "Sanchez", "givenName": "Jane", "password": "Password1", "employeenumber": 100, "accountStatus": "active", "roles": [], "userName": "mgr1" }, "params": {}, "fields": [] } Message response is... { "accountStatus": "active", "password": { "$crypto": { "type": "x-simple-encryption", "value": { <encryptedValue> } } }, "mail": "mgr1@example.com", "employeenumber": 100, "givenName": "Jane", "sn": "Sanchez", "userName": "mgr1", "effectiveRoles": [], "memberOfOrgIDs": [], "effectiveAssignments": [], "_rev": "17273eca-d14b-4647-b850-1e3733ba1830-116", "_id": "mgr1" } **************END MESSAGE************* -
Confirm the user details:
curl \ --header "X-OpenIDM-Username: openidm-admin" \ --header "X-OpenIDM-Password: openidm-admin" \ --header "Accept-API-Version: resource=1.0" \ --request GET \ "http://localhost:8080/openidm/managed/user/mgr1" { "_id": "mgr1", "_rev": "17273eca-d14b-4647-b850-1e3733ba1830-116", "accountStatus": "active", "mail": "mgr1@example.com", "employeenumber": 100, "givenName": "Jane", "sn": "Sanchez", "userName": "mgr1", "effectiveRoles": [], "memberOfOrgIDs": [], "effectiveAssignments": [] } -
You can repeat the process using different REST operations in the Artemis UI. For example, enter the following payload on the Send Message page to change the first name (
givenName) of themgr1user toDonna:{ "operation": "PATCH", "resourceName": "/managed/user/mgr1", "value": [ { "operation": "replace", "field": "/givenName", "value": "Donna" } ] } -
Confirm the updated
givenNameformgr1:curl \ --header "X-OpenIDM-Username: openidm-admin" \ --header "X-OpenIDM-Password: openidm-admin" \ --header "Accept-API-Version: resource=1.0" \ --request GET \ "http://localhost:8080/openidm/managed/user/mgr1" { "_id": "mgr1", "_rev": "17273eca-d14b-4647-b850-1e3733ba1830-315", "accountStatus": "active", "mail": "mgr1@example.com", "employeenumber": 100, "givenName": "Donna", "sn": "Sanchez", "userName": "mgr1", "effectiveRoles": [], "memberOfOrgIDs": [], "effectiveAssignments": [] }
Customize the scripted JMS sample
If you set up a custom script to parse and process JMS messages, store that script in the script/ subdirectory. Assume the script is named myCustomScript.js.
Edit the messaging.json file in the conf/ subdirectory, and point it to the custom file:
{
  "subscribers" : [
    {
      "name" : "IDM CREST Queue Subscriber",
      "instanceCount": 3,
      "enabled" : true,
      "type" : "JMS",
      "handler" : {
        "type" : "SCRIPTED",
        "properties" : {
          "script" : {
            "type" : "text/javascript",
            "file" : "myCustomScript.js"
          }
        }
      },
      "properties" : {
        "sessionMode" : "CLIENT",
        "jndi" : {
          "contextProperties" : {
            "java.naming.factory.initial" : "org.apache.activemq.artemis.jndi.ActiveMQInitialContextFactory",
            "java.naming.provider.url" : "tcp://127.0.0.1:61616?daemon=true",
            "queue.idmQ" : "idmQ"
          },
          "destinationName" : "idmQ",
          "connectionFactoryName" : "ConnectionFactory"
        }
      }
    }
  ]
}
You’ll find some of these properties in JMS audit event handler properties. Despite the name of the table and the different configuration file, the properties are the same.
Other messaging.json notable properties:
messaging.json Property |
Description |
|---|---|
|
Needed to subscribe to incoming JMS message requests. |
|
Arbitrary name for the subscriber. |
|
Each |
|
Parses the JMS message, then processes it, possibly through a script. |
|
One of the JNDI context properties. Name of the JMS queue in the Artemis UI. |
|
JNDI lookup name for message delivery. |