Configure the MSI Updater client
The MSI Updater client can launch automatically (if the option is selected at the last installation screen) after you exit the installer and updates the Windows Workstation Authentication MSI with relevant ForgeRock environment details. You can then configure various settings related to authentication and the Windows login experience.
Before you begin working with the MSI Updater, verify the following information is available:
-
Server URL: Environment URL for the ForgeRock environment.
-
Realm: The realm in ForgeRock that corresponds to where the journeys reside.
-
Push journey name: Name of the journey for push notifications. For more information on the journey, refer to Example of push journey.
-
OTP journey Name: Name of the journey for TOTPs (OATH). For more information on the journey, refer to Example of OTP journey.
-
SMS/email/voice journey name: Name of the journey for SMS/email/voice. For more information on the journey, refer to Example of SMS/email journey.
-
SSO URL (optional): ForgeRock SSO URL. If enabled and supplied, on successful login to the Windows machine, the default browser opens a logged-in session into the specified ForgeRock environment.
-
With this URL, an additional journey can be referenced. For example, to check for an existing session. For more information, refer to Example of SSO journey.
-
| Tab name | Description |
|---|---|
Select the base MSI file to update, as well as which MFA methods to allow on Windows login. |
|
Configure various settings, such as caching the last used username to pre-populate on next login or enabling trace logs by default. |
|
Enable MFA settings, such as allowing a Windows group to bypass MFA login or enabling Offline OTP (TOTP/OATH). |
|
Change the UI text of the MFA method(s) that users select on Windows login. |
|
Select scenarios in which you can bypass MFA on Windows login. |
|
ForgeRock specific settings, such as the ForgeRock URL or the names of the journeys that correspond to each MFA method. |
To begin the configurations, launch the MSI Updater client as an administrator.
In the Parameters tab, configure the relevant settings:
-
With the MSI Updater client launched, at the top of the Parameters tab, click Browse and upload the workstation authentication MSI file to be updated. This is the base MSI file that came with the downloads.
-
If preferred, enter an uninstall password in the Uninstall field.
Entering an uninstall password ensures end users cannot uninstall the MSI package without the administrator password. -
Select one or more of the following authentication options:
Authenticator Description ForgeRock Push
Select this checkbox to enable login to Windows using ForgeRock’s push notification authentication.
This is used in conjunction with the ForgeRock Authenticator application.
OTP
Select this checkbox to enable authentication with TOTP (OATH). This corresponds to the journey used for TOTP (OATH).
This is also referred to as Offline OTP. This is used in conjunction with the ForgeRock Authenticator application.
SMS
Select this checkbox to enable authentication with OTP via SMS. This corresponds to the journey used for OTP over SMS.
Email
Select this checkbox to enable authentication with OTP via email. This corresponds to the journey used for OTP via email.
Voice Call
Select this checkbox to enable a two-factor authentication voice call. This corresponds to the journey used for OTP via a voice call.
SMS, email, and voice call all utilize the same journey configuration. -
Click Next to open the Settings tab.
-
In the Settings tab, configure the relevant settings:
The MSI Updater version appears at the top of the tab.
Setting Description Show Default Credential Providers
Determines whether Windows default credential providers (Windows and Active Directory) are displayed when logging into Windows.
Select this option for testing or debugging. Do not use this in production (the MSI deployed on your end user’s workstation).
Use Last Username
When selected, the username of the user who logged in most recently is saved and automatically presented for the next login.
TPM Support
If TPM 2.0 is enabled, selecting this option allows TPM to store the private key for BLE password encryption.
Local User Support
When selected, workstation authentication for Windows will be enabled for local users and will verify that the local user matches with the corresponding user in ForgeRock.
This setting is relevant for non-domain users only.
POC Mode
When selected, workstation authentication for Windows will not check the certificate with the server. This setting is used mainly for POC.
Azure AD Joined Machine
Select this checkbox when the workstations are configured to connect with the Azure AD domain. When the setting is selected, users will be prompted to log in with UPN and not their username.
Enable Trace
Select this checkbox to enable the logs by default immediately after installation. For more information on Windows Workstation Authentication logging, refer to Log files with Windows Workstation Authentication.
-
Click Next.
-
In the MFA tab, configure the relevant settings:
Setting Description MFA Change Password Support
When selected, users are able to change the password on the Windows workstation without the Workstation Authentication credential provider (CP) intercepting the process. When the checkbox is cleared, the workstation authentication CP controls the password change process.
Bypass Local User Login
When selected, administrators with a local user account can bypass workstation authentication and log in with their username and password.
Use Offline OTP
When selected, users are able to log into Windows using a one time password that is stored locally. When Offline OTP is activated, a list of OTPs is securely stored on the Windows workstation to allow users to authenticate to the workstation when not connected to the network. The OTPs are timed-based and use the standard TOTP mechanism. For more information, refer to Offline OTP enrollment.
Force Offline OTP After Installation
When selected, users are unable to perform offline authentication until they complete at least one online login successfully.
Bypass MFA on Unlock when Connected to AD
When selected, users connected to the organization network who have already authenticated with MFA are not required to authenticate with 2nd factor again when unlocking the workstation. This will work as long as you are inside the network (no time limit).
When selecting this option, verify that the Bypass MFA Groups checkbox is NOT selected.
Force Lock After Offline OTP
When selected, workstations that were unlocked using an Offline OTP and then connected back to the organization network (online) are automatically locked, and the user is asked to authenticate. This setting prevents users from using weak authentication to log into the organization network (online).
Bypass MFA from NLA Login
When selected, users who are members of the Bypass MFA Group will not require MFA authentication when using a Network Level Authentication (NLA) login.
Bypass MFA Groups
When selected, you can specify ONE group in the AD that will not require MFA authentication. Enter <Domain>\>Group Name> in the field to the right.
When selecting this option, verify that the Bypass MFA on Unlock when Connected to AD checkbox is NOT selected.
Offline OTP Buffer Period
If Use Offline OTP is selected, enter the maximum period of time (in days) that users will be able to continue authenticating offline without performing an online login. Once expired, users will be forced to authenticate online before being able to use the Offline OTP option again.
-
Click Next.
-
In the Advanced tab, configure the relevant settings:
Setting Description Change OTP Name
Allows you to change the default name of the TOTP (OATH or Offline OTP) displayed in the Windows credential provider’s login authentication method selection list. After selecting the checkbox, enter the desired name in the field (for example, ForgeRock OTP).
This setting is available only when the OTP checkbox in the Parameters tab is selected.Change ForgeRock Push Name
Allows you to change the default name of the authenticator displayed in the Windows credential provider’s login authentication method selection list. After selecting the checkbox, enter the desired name in the field.
This setting is available only when the ForgeRock Push checkbox in the Parameters tab is selected.Change SMS Name
Allows you to change the default name of the SMS option displayed in the Windows credential provider’s login authentication method selection list. After selecting the checkbox, enter the desired name in the field.
Change Email Name
Allows you to change the default name of the Email option displayed in the Windows credential provider’s login authentication method selection list. After selecting the checkbox, enter the desired name in the field.
Change Voice Call Name
Allows you to change the default name of the Voice Call option displayed in the Windows credential provider’s login authentication method selection list. After selecting the checkbox, enter the desired name in the field.
Enable CP Bypass List
Allows you to specify credential providers (in addition to ForgeRock) that will be available for Windows login. After selecting the checkbox, paste the registry key(s) representing the relevant credential provider(s) in the field to the right. The specified providers will be displayed as login options on the Windows Login screen.
-
If desired, customize the Windows login experience by replacing the default organization logo with your own image.
The images must be 448x448 in 24-bit BMP (bitmap image file) format. For Windows Servers, the images must be 448x448 in 16-bit BMP format.
-
Click Next.
-
In the CredUI tab, select the scenarios in which an additional MFA credential, for example, push or OTP, will not be required. When a Bypass is selected, the default Windows login screen is presented and end users authenticate by entering their username and password.
Selecting Bypass All activates MFA bypass for all the scenarios listed below in the tab.
-
Click Next.
-
In the ForgeRock tab, configure the relevant settings:
Setting Description Use credentials
When selected, user credentials are sent to ForgeRock for validation. You must configure the journey to support the validation of the user credentials.
Use failureUrl for error message
When selected, error descriptions are displayed on the Windows Login screen (in the event of error/authentication failure). This means that your journey, in the event of a failure, must reference the Failure URL node.
Server URL
Enter the URL of your ForgeRock authentication server. For example,
http://<tenant-env-fqdn>/openam.Ensure to include the path to AM in the URL.
Realms
Enter the name of the ForgeRock realm to authenticate to.
For example,
alpha.There is no leading
/when defining the realm for Windows Workstation Authentication.Push Tree Name
Enter the name of the push journey.
For example,
windows-push.OTP Tree Name
Enter the name of the OTP journey.
For example,
windows-otp.SMS/Email Tree Name
Enter the name of the SMS/email/voice call journey.
For example,
windows-sms-email-voice.Enable SSO
When selected, the SSO Portal opens automatically upon successful login to Windows. This will open, in the default browser on the Windows machine, a logged in instance to the specified ForgeRock environment. Enter the SSO URL in the field to the right. If this box is selected, the URL box becomes available for editing. This is also known as a transfer of trust.
An example SSO URL to enter in this box is
http://<tenant-env-fqdn>/am/XUI/?realm=alpha&authIndexType=service&authIndexValue=sso-journey&ForceAuth=true.The authIndexValuereferences the journey to use for SSO. Ensure to addForceAuth=trueto the end of your SSO URL.For examples of the pre-configured journeys to have in your environment, refer to Create authentication journey(s).
-
At the bottom of the ForgeRock tab, click Apply.
A confirmation screen will appear.
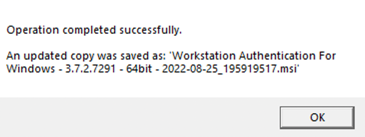
A new modified MSI file is created in the same location as the original MSI file. The name of the new file will include Workstation Authentication for Windows 64-bit and the timestamp of file creation.
|
The base (original) MSI file will not be updated and can be reused. Do not use the base MSI file for deployment. Use the deployment specific MSI file generated as the output of the MSI Updater configurations. |
-
Download and install the binaries from Backstage (you must be logged in). This includes the base MSI file as well as the MSI Updater client.
-
Pre-configure the relevant journey(s).
-
Install the MSI Updater client on an administrative Windows machine.
-
Configure the MSI Updater client specific to your organization’s needs.
-
(Optional) Consider additional configurations.
-
Deploy the generated MSI file through your desired mechanism.
-
Verify and test your deployment.