Social authentication
You can configure user self-registration to include social identity providers as an option for users. This lets users register and log in to PingOne Advanced Identity Cloud using an account they have through another trusted service.
These topics describe the high-level steps to configure social authentication.
Configure social identity providers
PingOne Advanced Identity Cloud supports social identity providers that are OAuth 2.0 or OpenID Connect (OIDC) 1.0-compliant.
Default social identity provider configurations
A number of social identity providers are configured by default:
| Identity provider | Specification | Configuration ID |
|---|---|---|
Amazon |
OAuth 2.0 |
|
Apple |
OIDC |
|
OAuth 2.0 |
|
|
OIDC |
|
|
OAuth 2.0 |
|
|
LINE (Browser) |
OIDC |
|
LINE (Native) |
OIDC |
|
LinkedIn (Legacy) (2) |
OAuth 2.0 |
|
OIDC |
|
|
Microsoft |
OAuth 2.0 |
|
Salesforce |
OAuth 2.0 |
|
OAuth 2.0 |
|
|
VK (Vkontakte) |
OAuth 2.0 |
|
OAuth 2.0 |
|
|
WordPress |
OAuth 2.0 |
|
Yahoo |
OIDC |
|
itsme(1) |
OIDC |
|
(1) To integrate with itsme, you must obtain an Organization Validation (OV) certificate.
(2) The OAuth 2.0 version of the profile is deprecated by LinkedIn.
Custom social identity provider configurations
You can add providers that aren’t configured by default, as long as these providers use OAuth 2.0 or OpenID Connect:
| Identity provider | Specification | Configuration ID |
|---|---|---|
Any social identity provider that implements the OAuth 2.0 specification. |
OAuth 2.0 |
|
Any social identity provider that implements the OIDC specification. |
OIDC |
|
Add identity providers
-
Register a service in the identity provider, and keep the provider’s documentation within reach. You will use it during this procedure.
At minimum, you must have a client ID and a redirect URL.
A redirect URL is a path in PingOne Advanced Identity Cloud (AM) where the identity provider redirects the user on successful authentication; for example,
https://<tenant-env-fqdn>/am.Depending on the social identity provider and on your environment, you change the redirect URL later.
The redirect URL in the identity provider service and in the PingOne Advanced Identity Cloud client configuration must match.
Some providers require you to enable a specific setting or API in their service:
-
Enable the
Gmail APIin the Google Cloud Platform. - Apple
-
You must have access to the Apple Development Program (Enterprise program isn’t eligible), and you must enable
Sign In With Applein the Apple Developer site. - LINE
-
You must apply for permission for your LINE channel to access a user’s email address using OIDC:
-
In the LINE Developers console, enable Email address permission.
-
Agree to the terms and conditions, and follow the steps to complete the application.
-
The console displays
Appliedwhen your application is accepted.
If you don’t have email permission, the registration will fail with an
Invalid Attribute Syntaxerror. -
-
In the AM admin UI, go to Realms > Realm Name > Services.
-
Click Social Identity Provider Service.
-
Go to the Secondary Configurations tab.
PingOne Advanced Identity Cloud includes scripts and configurations for several common identity providers.
-
In the Add a Secondary Configuration drop-down list, select the required identity provider.
If the required provider doesn’t appear, select one of the following to add a custom identity provider client:
-
Client Configuration for providers that implement the OAuth2 specification
-
Client Configuration for providers that implement the OpenID Connect specification
-
-
Provide the client’s required configuration details, such as the Client ID, Client Secret (for confidential clients), the Scope Delimiter (usually an empty space), and the Redirect URL.
For OAuth 2.0 social identity providers, store the client secret in a secret store for greater security.
Use the Client Secret Label Identifier to create a dynamic secret label to map to an alias for the secret.
Learn more about secrets in Use ESVs for signing and encryption keys.
Don’t worry if some details are missing. You can edit the configuration later after saving the client profile for the first time.
Save your changes to access all the configuration fields for the client.
-
Provide the client’s advanced configuration details, and edit any required configuration details if needed.
To find the required identity provider information:
-
Refer to the provider’s documentation.
Providers must specify their integration needs in their documentation, as well as their API endpoints.
For example, providers usually have different scopes that you can configure depending on your service’s needs.
Financial-grade providers usually also require additional security-related configuration, such as
acrvalues, PKCE-related settings, and more.Keep their documentation close while configuring the client profile.
-
Visit the provider’s
.well-knownendpoint.OAuth 2.0/OpenID Connect-compliant providers will display much of the information you need to configure the identity provider client in their
.well-knownendpoint. For example, the endpoint should expose their endpoint URLs, and the signing and encryption algorithms they support.PingOne Advanced Identity Cloud is preconfigured, but you must make sure the settings for the provider haven’t changed. Key preconfigured fields include:
-
The provider’s URLs.
For example, Authentication Endpoint URL, Access Token Endpoint URL, and User Profile Service URL.
-
The OAuth Scopes field.
-
The Well Known Endpoint for retrieving information about the provider.
Leave this field empty for the LINE (Browser)configuration. -
The configuration in the UI Config Properties section.
-
The script selected in the Transform Script drop-down list.
This script is responsible for mapping attributes provided by the identity providers to a profile format compatible with PingOne Advanced Identity Cloud.
For details, refer to Transform Script.
Some features require choosing algorithms from those supported by the provider, as well as creating secrets. Consider the following points before configuring the client:
-
Several capabilities in the identity provider client share the same secret IDs. For example, signing request objects and signing client authentication JWTs.
-
Every identity provider client in a realm shares the same secrets.
Therefore, ensure that you configure features requiring secrets in a way that they are compatible across clients in the same realm.
For more information, refer to the page about the /oauth2/connect/rp/jwk_uri endpoint.
For details about client configuration settings, refer to Client configuration reference.
-
-
-
Save your changes.
Proceed to Configure basic social registration journeys.
Configure basic social registration journeys
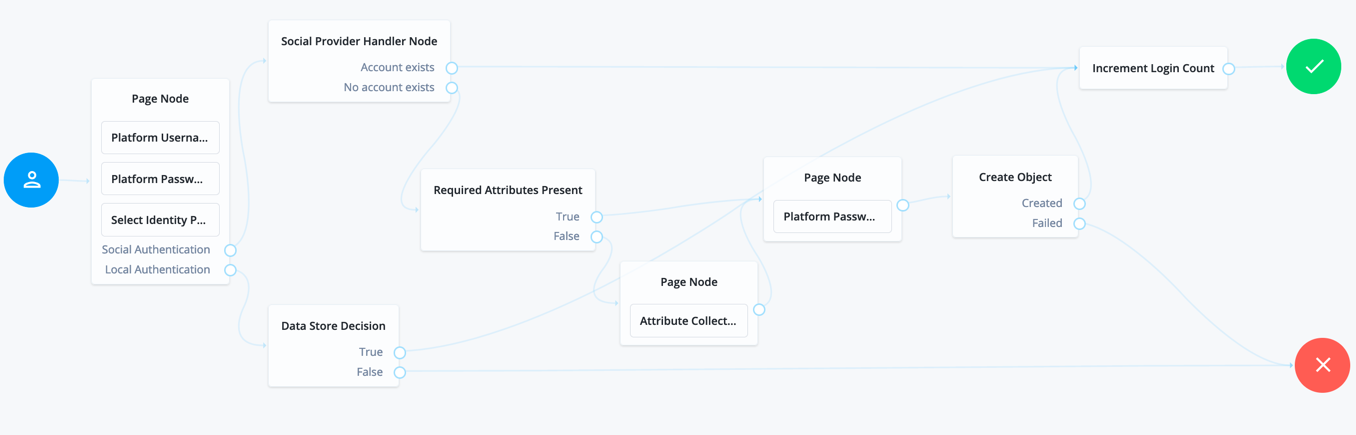
There are two nodes associated with identity providers:
- Select Identity Provider node
-
The Select Identity Provider node prompts the user to select a social identity provider for registration or sign in, or (optionally) to continue with local registration or sign in.
When the user selects a provider, the journey continues to the Social Provider Handler node.
- Social Provider Handler node
-
The Social Provider Handler node communicates with the selected provider and collects the information provided after the user has authorized the service. It runs the provider’s configured normalization script to map the information into a format that PingOne Advanced Identity Cloud can consume.
Next, the node uses a transformation script provided by PingOne Advanced Identity Cloud called
Normalized Profile to Managed Userto transform the profile information into a managed object.The node then queries the identity store available for the realm to check whether the user already exists. If the user exists, they are logged in. If the user does not exist, the user will need to be created.
Set up a basic social registration journey
-
In your realm, go to Journeys.
You can create a new journey, modify an existing journey, or duplicate an existing journey.
-
Decide whether users can log in with their local credentials, and add the relevant nodes to the journey:
-
Social authentication journeys allowing local authentication might look like the following:
-
Social authentication journeys enforcing social authentication login might look like the following:
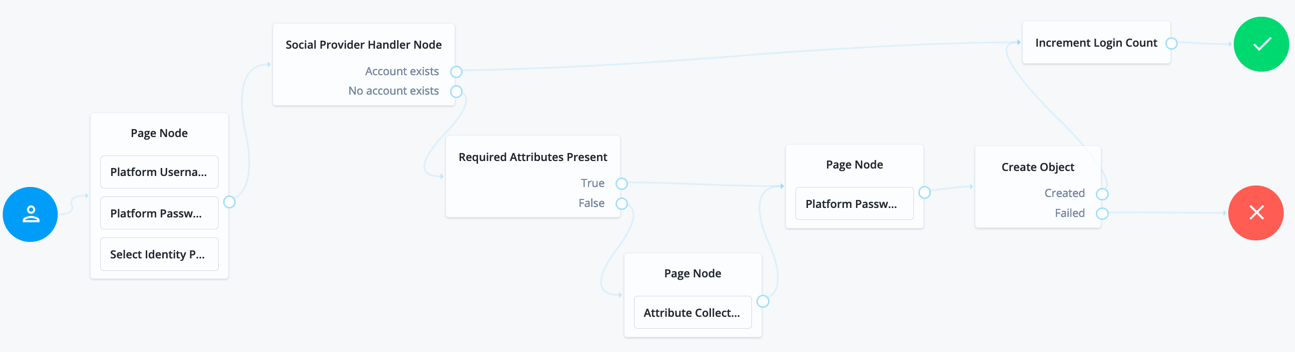
To configure either option, set Include local authentication in the Select Identity Provider node. To support both local and social authentication in the same page, use the Page node as shown in the example.
-
-
Configure the Social Provider Handler node:
-
In the Transformation Script field, select
Normalized Profile to Managed User. This script transforms the normalized identity provider’s profile object into a format that PingOne Advanced Identity Cloud can use.To view the script and the available bindings, refer to normalized-profile-to-managed-user.js.
-
In Client Type, select
BROWSERwhen using the PingOne Advanced Identity Cloud UI or ForgeRock SDK for JavaScript, orNATIVEwhen using the ForgeRock SDKs for Android or iOS.
-
-
Configure the Required Attributes Present node and the Create Object node:
In the Identity Resource fields of each, configure the relevant managed identity resource type, such as
managed/alpha_user.To check for the available managed identity resource types, go to the IDM admin UI, and open the Manage drop-down list.
Identity managed object types are preceded by the icon.
-
Configure the Attribute Collector node adding at least the
mail,givenName, andsnattributes.
Configure social registration with account claiming
If your users have one or more social identity provider accounts, they can link them to the same PingOne Advanced Identity Cloud account.
The following example builds on the basic social registration journey shown in Set up a basic social registration journey:
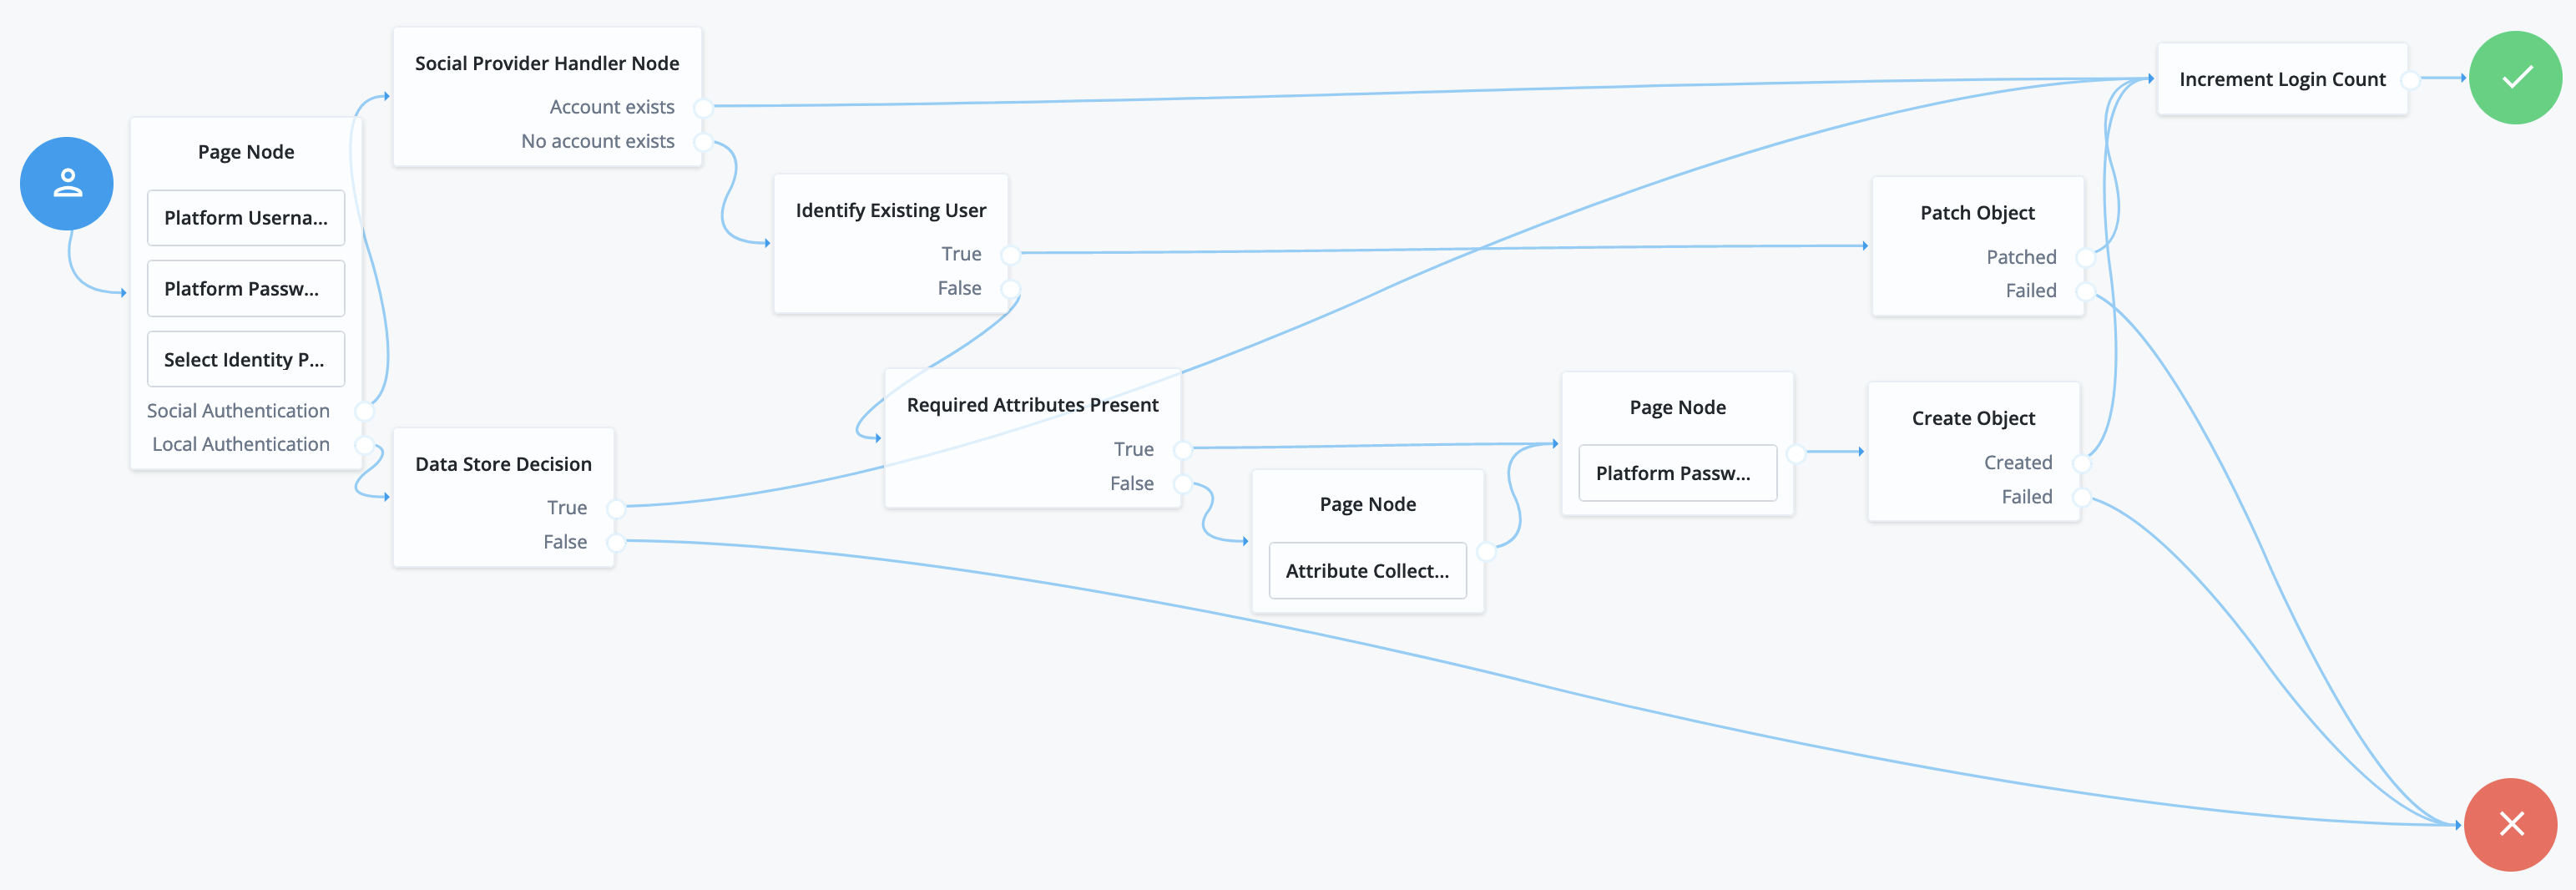
The journey uses the Identify Existing User node to determine if the user is already registered in PingOne Advanced Identity Cloud. By default, the node checks that the email address associated with the account is already registered in PingOne Advanced Identity Cloud.
Ensure that you configure the Transformation Script in the Social Provider Handler node, and the Identity Resource field in the Patch Object node.
Refer to Set up a basic social registration journey for tips.
Let users connect through their profile page
To let users connect to social identity providers through the End User UI profile page, add a mapping for your social authentication journey:
-
From the left navigation pane, click Services.
-
Select Self Service Trees.
-
Set a new key and value and click + Add:
- Key
-
connectSocial - Value
-
The name of the journey
-
Click Save Changes.