Protect the deployment
After you set up a sample deployment according to Separate identity stores or Shared identity store, you have a functionally complete ForgeRock Identity Platform installation.
Notice, however, that your deployment is lacking security. Except when connecting to the directory service, connections use HTTP, not HTTPS. Users send their login credentials in unprotected cleartext.
The instructions that follow show how to add ForgeRock Identity Gateway (IG) to your deployment, providing a single point of entry to ForgeRock Identity Platform, and securing communications from outside with HTTPS.
|
The instructions that follow are sufficient to add IG to your sample deployment. For in-depth documentation on using IG, see the IG product documentation.
Prepare keys
HTTPS requires a server key pair for IG.
In a public deployment where IG is the entry point, get the IG server certificate signed by a well-known CA. A server certificate signed by a well-known CA will be trusted by other systems and browsers, because the CA certificate is distributed with the system or the browser.
|
The examples that follow do not use a well-known CA. Instead, they use an IG server certificate generated with one of the DS deployment ID and password combinations that you used to set up the deployment. You will generate an IG server key pair using the DS |
Generate the keys on a system where you installed DS:
-
Save a password file for the keystore:
mkdir -p /path/to/security/ touch /path/to/security/keystore.pin chmod 600 /path/to/security/keystore.pin echo -n password > /path/to/security/keystore.pinbashBe sure to use
echo -n, as IG cannot use the secret if the file has a newline character at the end. -
Set the deployment ID in an environment variable that you will use in
dskeymgrcommands:export DEPLOYMENT_ID=deployment-idbash -
Generate a server key pair for IG to use for HTTPS:
/path/to/opendj/bin/dskeymgr \
 create-tls-key-pair \
 --deploymentId $DEPLOYMENT_ID \
 --deploymentIdPassword password \
 --keyStoreFile /path/to/security/keystore \
 --keyStorePassword:file /path/to/security/keystore.pin \
 --hostname localhost \
 --hostname platform.example.com \
 --subjectDn CN=platform.example.com,O=ForgeRock
bash -
Inspect the contents of the keystore you just created to find the key alias is
ssl-key-pair:keytool -list -keystore /path/to/security/keystore -storepass:file /path/to/security/keystore.pin Keystore type: PKCS12 Keystore provider: SUN Your keystore contains 1 entry ssl-key-pair, <date>, PrivateKeyEntry, Certificate fingerprint (SHA-256): <fingerprint>bash -
Copy the keystore and password to the system where IG runs.
-
Export the deployment ID CA certificate to trust:
/path/to/opendj/bin/dskeymgr export-ca-cert \ --deploymentId $DEPLOYMENT_ID \ --deploymentIdPassword password \ --outputFile ca-cert.pembashUse this
ca-cert.pemfile when you need to trust the IG server certificate. You can import it into your browser to trust the platform URLs in this example.
Install IG
This example uses IG in standalone mode. In standalone mode, IG runs in the web container provided in the .zip file.
-
Download IG-2023.4.0.zip.
-
Unpack the files.
This example shows the files unpacked in the
/path/to/identity-gateway/directory. -
Create a configuration directory for IG:
mkdir -p $HOME/.openig/config/bashThe default IG configuration directory is
$HOME/.openig/configon Linux and UNIX, and%appdata%\OpenIG\configon Windows. -
Add an admin.json configuration file for HTTPS support at the root of the IG configuration directory.
Sample admin.json
This example expects the keystore and
keystore.pinfile in the/path/to/security/directory:{ "heap": [ { "name": "TlsConf", "type": "ServerTlsOptions", "config": { "keyManager": { "type": "SecretsKeyManager", "config": { "signingSecretId": "key.manager.secret.id", "secretsProvider": "ServerIdentityStore" } } } }, { "name": "SecretsPasswords", "type": "FileSystemSecretStore", "config": { "directory": "/path/to/security/", "format": "PLAIN" } }, { "name": "ServerIdentityStore", "type": "KeyStoreSecretStore", "config": { "file": "/path/to/security/keystore", "storePasswordSecretId": "keystore.pin", "secretsProvider": "SecretsPasswords", "mappings": [ { "secretId": "key.manager.secret.id", "aliases": [ "ssl-key-pair" ] } ] } } ], "connectors": [ { "port": 9080 }, { "port": 9443, "tls": "TlsConf" } ] }json -
Start IG:
/path/to/identity-gateway/bin/start.sh
...
[main] INFO ... started in XXXXms on ports : [9080, 9443]
bash -
Test that you can use the IG "ping" endpoint over HTTP:
curl -v http://platform.example.com:9080/openig/pingbashThe output should include an HTTP
200status code indicating success, and an empty reply from IG. -
When you can successfully ping IG over HTTP, try HTTPS using your CA certificate file:
curl -v --cacert ca-cert.pem https://platform.example.com:9443/openig/pingbashThe
ca-cert.pemfile is the one you exported with thedskeymgrcommand. If it is not in the current directory, include the path to the file.As before, you should receive an empty success response. This demonstrates that you successfully connected to IG over HTTPS.
Now that you are sure the HTTPS connection works, you can edit
admin.jsonto stop using port 9080 for HTTPS.
Trust the deployment ID certificate
|
You generated a deployment ID CA certificate used in this example with the Make sure this certificate is trusted when negotiating SSL and HTTPS connections. |
As long as no one else knows your deployment ID and password combination, this is safe, because only you have the secrets to generate this CA certificate, or to generate signed keys:
-
Trust the deployment ID CA certificate by importing the
ca-cert.pemfile as a certificate authority trusted for SSL and HTTPS connections.Some browsers refer to "Authorities" in the browser settings. See the browser help for details.
Configure IG
IG terminates HTTPS for your deployment. All access to your deployment goes through IG.
You must therefore configure IG to route traffic through to the components of the deployment, and then back to clients of the platform:
-
Add a config.json configuration file at the root of the IG configuration directory.
Sample config.json
This example configures the capture decorator, a router, and a default route:
{ "heap": [ { "name": "capture", "type": "CaptureDecorator" }, { "type": "Router", "name": "_router" }, { "name": "DefaultRoute", "type": "StaticResponseHandler", "config": { "status": 200, "headers": { "Content-Type": [ "text/html" ] }, "entity": "<html><p><a href='/enduser-login/?realm=/alpha#/service/PlatformLogin'>End user access</a></p><p><a href='/platform-login/?realm=/#/'>Admin access</a></p></html>" } } ], "handler": "_router", "audit": "global" }jsonThe default route in the sample file defines a simple static HTML page to present when a user accesses the platform before logging in, or after logging out.
In this example, the page includes a link for each of the two user flows:
-
An end user logs in to access their applications and profile page through the End User UI.
-
An admin logs in to configure the platform through the Platform Admin UI, AM admin UI, or IDM admin UI.
You can configure IG to redirect users to your site if desired. IG can also serve static pages, so you can add an entry point that matches your site.
-
-
Create a
routesdirectory under the IG configuration file directory:mkdir $HOME/.openig/config/routesbash -
Add a zz-default.json route file in the
routesdirectory.The file name ensures this will be the last route:
Sample zz-default.json
{
    "handler": "DefaultRoute"
}
json -
Add a login.json route file in the
routesdirectory.This route consumes the paths specified in the links on the default, static page to route users to the correct URL on the Login UI:
Sample login.json
{
    "name": "login",
    "condition": "${find(request.uri.path, '^/enduser-login|^/platform-login')}",
    "baseURI": "http://login.example.com:8083",
    "handler": {
        "type": "Chain",
        "config": {
            "filters": [
                {
                    "type": "UriPathRewriteFilter",
                    "config": {
                        "mappings": {
                            "/enduser-login": "/",
                            "/platform-login": "/"
                        },
                        "failureHandler": "DefaultRoute"
                    }
                }
            ],
            "handler": "ReverseProxyHandler"
        }
    }
}
json -
Add an
enduser-ui.jsonroute file in theroutesdirectory.This route sends end users to the End User UI:
Sample for End User UI from a Docker image
{ "name": "enduser-ui", "condition": "${find(request.uri.path, '^/enduser-ui')}", "baseURI": "http://enduser.example.com:8888", "handler": { "type": "Chain", "config": { "filters": [ { "type": "UriPathRewriteFilter", "config": { "mappings": { "/enduser-ui": "/" }, "failureHandler": "DefaultRoute" } } ], "handler": "ReverseProxyHandler" } } }jsonSample for End User UI from a .zip file
{
    "name": "enduser-ui",
    "condition": "${find(request.uri.path, '^/enduser-ui')}",
    "baseURI": "http://am.example.com:8081",
    "handler": {
        "type": "Chain",
        "config": {
            "filters": [
                {
                    "type": "UriPathRewriteFilter",
                    "config": {
                        "mappings": {
                            "/enduser-ui": "/enduser"
                        },
                        "failureHandler": "DefaultRoute"
                    }
                }
            ],
            "handler": "ReverseProxyHandler"
        }
    }
}
json -
Add a
platform-ui.jsonroute file in theroutesdirectory.This route sends administrators to the Admin UI:
Sample for Admin UI from Docker images
{ "name": "platform-ui", "condition": "${find(request.uri.path, '^/platform-ui')}", "baseURI": "http://admin.example.com:8082", "handler": { "type": "Chain", "config": { "filters": [ { "type": "UriPathRewriteFilter", "config": { "mappings": { "/platform-ui": "/" }, "failureHandler": "DefaultRoute" } } ], "handler": "ReverseProxyHandler" } } }jsonSample for Admin UI from a .zip file
{
    "name": "platform-ui",
    "condition": "${find(request.uri.path, '^/platform-ui')}",
    "baseURI": "http://am.example.com:8081",
    "handler": {
        "type": "Chain",
        "config": {
            "filters": [
                {
                    "type": "UriPathRewriteFilter",
                    "config": {
                        "mappings": {
                            "/platform-ui": "/platform"
                        },
                        "failureHandler": "DefaultRoute"
                    }
                }
            ],
            "handler": "ReverseProxyHandler"
        }
    }
}
json -
Add an am.json route file in the
routesdirectory.This route handles requests to AM, ensuring that the browser gets redirected through IG:
Sample am.json
{
    "name": "am",
    "baseURI": "http://am.example.com:8081",
    "condition": "${find(request.uri.path, '(?:^/am(?!/XUI))')}",
    "handler": {
        "type": "Chain",
        "config": {
            "filters": [
                {
                    "comment": "Always redirect to IG rather than AM",
                    "type": "LocationHeaderFilter",
                    "config": {
                        "baseURI": "https://platform.example.com:9443/"
                    }
                }
            ],
            "handler": "ReverseProxyHandler"
        }
    }
}
json -
Add an idm.json route file in the
routesdirectory.This route handles requests to IDM, ensuring that the browser gets redirected through IG:
Sample idm.json
{
    "name": "idm",
    "baseURI": "http://openidm.example.com:8080",
    "condition": "${find(request.uri.path, '(?:^/openidm)|(?:^/admin)|(?:^/upload)|(?:^/export)')}",
    "handler": {
        "type": "Chain",
        "config": {
            "filters": [
                {
                    "comment": "Always redirect to IG rather than IDM",
                    "type": "LocationHeaderFilter",
                    "config": {
                        "baseURI": "https://platform.example.com:9443/"
                    }
                }
            ],
            "handler": "ReverseProxyHandler"
        }
    }
}
json -
Restart IG to take all your changes into account.
Verify in the server output that all your routes load successfully.
When troubleshooting and developing routes, you can change an IG route configuration while IG is running, and IG will reload changed routes every 10 seconds by default.
The IG capture decorator is particularly useful when troubleshooting routes.
To use it quickly, add "capture": "all" to an object in a route, and let IG reload the route before you try it.
It logs messages in the server output about incoming requests at any point until IG sends the request,
and outgoing responses at any point until IG delivers the response.
For more information, see the IG product documentation.
Adapt the AM configuration
A sample deployment configured according to Separate identity stores or Shared identity store does not route the traffic through IG. Adapt the AM and OAuth 2.0 client configurations to use IG.
The following minimal changes are sufficient to use the sample deployment. Add any additional changes necessary for your deployment:
-
If you’re not currently logged in to the AM admin UI as the
amAdminuser, log in.The password used in the documentation to set up the platform is
Passw0rd. -
In the Top Level Realm and the
alpharealm, add redirect URIs for theend-user-uiOAuth 2.0 client:https://platform.example.com:9443/enduser-ui/appAuthHelperRedirect.html
https://platform.example.com:9443/enduser-ui/sessionCheck.html -
In the Top Level Realm and the
alpharealm, add redirect URIs for theidm-admin-uiOAuth 2.0 client:https://platform.example.com:9443/platform/appAuthHelperRedirect.html
https://platform.example.com:9443/platform/sessionCheck.html
https://platform.example.com:9443/admin/appAuthHelperRedirect.html
https://platform.example.com:9443/admin/sessionCheck.html
https://platform.example.com:9443/platform-ui/appAuthHelperRedirect.html
https://platform.example.com:9443/platform-ui/sessionCheck.html -
In the
alpharealm, edit Success URLs for the following AM trees:- PlatformLogin
-
Success URL:
https://platform.example.com:9443/enduser-ui/?realm=/alpha - PlatformRegistration
-
Success URL:
https://platform.example.com:9443/enduser-ui/?realm=/alpha - PlatformResetPassword
-
Success URL:
https://platform.example.com:9443/enduser-ui/?realm=/alpha
-
Update these settings:
- Top Level Realm > Authentication > Settings > General
-
External Login Page URL:
https://platform.example.com:9443/platform-login - Top Level Realm > Services
-
-
+ Add a Service > Validation Service.
-
In Valid goto URL Resources, set:
https://platform.example.com:9443/*
https://platform.example.com:9443/*?*
-
- Top Level Realm > Services
-
-
+ Add a Service > Base URL Source.
-
In Base URL Source, choose
Fixed value. -
In Fixed value base URL, set
https://platform.example.com:9443.
-
alphaRealm > Authentication > Settings > General-
External Login Page URL:
https://platform.example.com:9443/enduser-login alphaRealm > Services > Validation Service-
To Valid goto URL Resources, add:
https://platform.example.com:9443/*
https://platform.example.com:9443/*?* alphaRealm > Services-
-
+ Add a Service > Base URL Source.
-
In Base URL Source, choose
Fixed value. -
In Fixed value base URL, set
https://platform.example.com:9443.
-
- Configure > Global Services > CORS Service > Secondary Configurations > Cors Configuration
-
To Accepted Origins, add:
https://platform.example.com:9443.
Adapt the IDM configuration
In the /path/to/openidm/conf/ui-configuration.json file, change configuration > platformSettings > amUrl
to access the IDM UI through IG:
{
    "configuration" : {
        "platformSettings" : {
            "adminOauthClient" : "idm-admin-ui",
            "adminOauthClientScopes" : "fr:idm:*",
            "amUrl" : "https://platform.example.com:9443/am",
            "loginUrl" : ""
        }
    }
}Adapt the Platform UI configuration
Adapt the platform UI configuration to use IG.
|
These steps show the configuration for the platform UI Docker containers.
If you install from |
-
Keep a copy of the current configuration for testing:
cp /path/to/platform_env /path/to/platform_env.bakbash -
Replace the
/path/to/platform_envcontent with settings that direct traffic through IG:AM_URL=https://platform.example.com:9443/am AM_ADMIN_URL=https://platform.example.com:9443/am/ui-admin IDM_REST_URL=https://platform.example.com:9443/openidm IDM_ADMIN_URL=https://platform.example.com:9443/admin IDM_UPLOAD_URL=https://platform.example.com:9443/upload IDM_EXPORT_URL=https://platform.example.com:9443/export ENDUSER_UI_URL=https://platform.example.com:9443/enduser-ui PLATFORM_ADMIN_URL=https://platform.example.com:9443/platform-ui/ ENDUSER_CLIENT_ID=end-user-ui ADMIN_CLIENT_ID=idm-admin-ui THEME=default PLATFORM_UI_LOCALE=enproperties -
Restart the platform UI Docker containers to take the changes into account.
Test the deployment
Once you have finished changing the configuration to use IG, test your work:
-
Log out of any open platform applications.
-
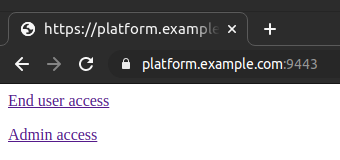
Browse https://platform.example.com:9443/.
You should see the default route page:
If you see a page suggesting that your connection is not private, a warning about a security risk, or any other indication that your browser does not trust the IG server certificate, read Trust the deployment ID certificate again.
-
Test the flow for an end user:
-
Click the End user access link.
-
Sign in as an end user.
If you have not yet created an end user account, follow the Create an account link, and register an end user with the platform.
In the end, your browser should be directed to the end user page:
https://platform.example.com:9443/enduser-ui/?realm=alpha#/dashboard
-
Sign out.
Your browser should be directed to the platform default page.
-
-
Test the flow for an administrator:
-
Click the Admin access link.
-
Sign in as
amAdmin.The password used in the documentation to set up the platform is
Passw0rd.Your browser should be directed to the admin UI page:
https://platform.example.com:9443/platform-ui/?realm=root#/dashboard
-
Browse around the platform admin UI, and open the AM admin UI and IDM admin UI.
The browser address should show a secure connection through
https://platform.example.com:9443/for all pages. -
Sign out.
Your browser should be directed to the platform default page.
-
You can now route traffic through IG to your platform deployment. If you get the IG server certificate signed by a well-known CA, instead of the private CA, other browsers and systems can connect through IG without additional configuration.