Remote connectors
|
Connectors continue to be released outside the IDM release. For the latest documentation, refer to the ICF documentation. |
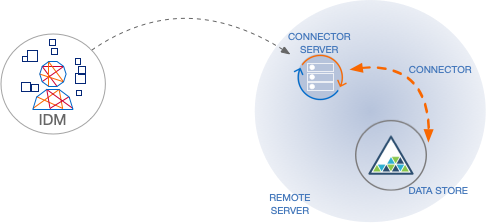
In most cases, IDM bundles the connectors required to connect to remote resources, and assumes that the connector will run on the same host as IDM. Sometimes, a connector cannot run on the same host as IDM. This might be for security or network reasons, or because IDM runs in the cloud while the resource is "on-prem". Connectors that do not run on the same host as IDM are called remote connectors. To run remotely, a connector needs a remote connector server (RCS), that runs on the same host as the connector. IDM accesses the connector through the RCS.
Running connectors remotely requires the following high-level steps:
-
Install an RCS (either .NET or Java) on your on-prem server.
-
Many connectors are bundled with the RCS itself. If the connector you want to use is not bundled with the RCS, download it from the ForgeRock BackStage download site, and put the .jar file or .dll file on your remote server, in the
/path/to/openicf/connectors/directory.
For a list of supported RCS versions, and compatibility between versions, see IDM / ICF Compatibility Matrix.
Install a Remote Connector Server (RCS)
There are two types of RCS:
-
Java: Use the Java RCS if your Java connector needs to run in a different JVM to IDM. Unless the remote resource you are connecting to needs the .NET Powershell connector, this is the recommended RCS to use.
The system on which you install the Java RCS must run JRE version 11, or later. Disk space and memory requirements will depend on the number of connectors you are using, and the volume of traffic through the RCS.
Set Up a Java RCS
Install a Java RCS on Unix/Linux-
Download and extract the Java RCS from the ForgeRock BackStage download site.
-
Change to the
openicfdirectory:cd /path/to/openicf
-
Review the
ConnectorServer.propertiesfile in the/path/to/openicf/confdirectory, and adjust it to suit your deployment. For a complete list of properties in that file, see RCS Properties.-
In server mode, the RCS uses a
connectorserver.keyproperty to authenticate the connection. The default value of the key is a hashed value of the stringchangeit. You cannot set this property directly in the configuration file. To change its value, use the commandConnectorServer.sh /setKey. This example sets the key value toPassw0rd:/path/to/openicf/bin/ConnectorServer.sh /setKey Passw0rd Key has been successfully updated.
In client mode, this is not necessary, and may be skipped. For more information about the differences between client mode and server mode, see Configure a Remote Connector Server (RCS).
-
-
Start the Java RCS:
/path/to/openicf/bin/ConnectorServer.sh /run
The RCS is now running, and listening on port
8759, by default.Log files are available in the
/path/to/openicf/logsdirectory.ls logs/ Connector.log ConnectorServer.log ConnectorServerTrace.log
-
To stop the Java RCS, press CTRL + C, or
qin the terminal where you started the server.
Install a Java RCS on Windows-
Download and extract the Java RCS from the ForgeRock BackStage download site.
-
In a Command Prompt window, change to the
openicfdirectory:C:\> cd C:\path\to\openicf
-
Review the
ConnectorServer.propertiesfile in the\path\to\openicf\confdirectory, and adjust it to suit your deployment. For a complete list of properties in that file, see RCS Propterties.-
In server mode, the RCS uses a
connectorserver.keyproperty to authenticate the connection. The default value of the key is a hashed value of the stringchangeit. You cannot set this property directly in the configuration file. To change its value, use theConnectorServer.bat /setKeycommand. This example sets the key value toPassw0rd:c:\path\to\openicf> bin\ConnectorServer.bat /setKey Passw0rd Key has been successfully updated.
In client mode, this is not necessary, and may be skipped. For more information about the differences between client mode and server mode, see Configure a Remote Connector Server (RCS).
-
-
You can either run the Java RCS as a Windows service, or start and stop it from the command line:
-
To install the Java RCS as a Windows service, run the following command:
c:\path\to\openicf> bin\ConnectorServer.bat /install
If you install the RCS as a Windows service, you can use the Microsoft Services Console to start, stop, and restart the service. The Java Connector Service is named
OpenICFConnectorServerJava.To uninstall the Java RCS as a Windows service, run the following command:
c:\path\to\openicf> bin\ConnectorServer.bat /uninstall
-
To start the Java RCS from the command line, enter the following command:
c:\path\to\openicf> bin\ConnectorServer.bat /run
-
-
The RCS is now running, and listening on port
8759, by default.Log files are available in the
\path\to\openicf\logsdirectory. -
To stop the Java RCS, press
^ + C.
-
-
.NET: Use the .NET RCS if you are using the PowerShell connector to connect to an identity store. IDM communicates with the .NET RCS over the network, and the RCS runs the Powershell connector.
Set Up a .NET RCS
Set Up a .NET RCSThe .NET RCS is distributed in two file formats:
-
openicf-version-dotnet.msiis a wizard that installs the RCS as a Windows service. -
openicf-version-dotnet.zipis just a bundle of files required to run the RCS.-
Depending on how you want to install the RCS, download the corresponding file from the ForgeRock BackStage download site.
-
Follow one of these procedures to install the RCS:
Install the RCS as a Service
-
Double-click the
openicf-version-dotnet.msiinstallation file and complete the wizard.You must run the wizard as a user who has permission to start and stop a Windows service; otherwise, the service will not start.
Select Typical as the Setup Type.
When the wizard has completed, the RCS is installed as a Windows service.
-
Open the Microsoft Services Console and make sure that the RCS is listed there.
The name of the service is
OpenICF Connector Server, by default.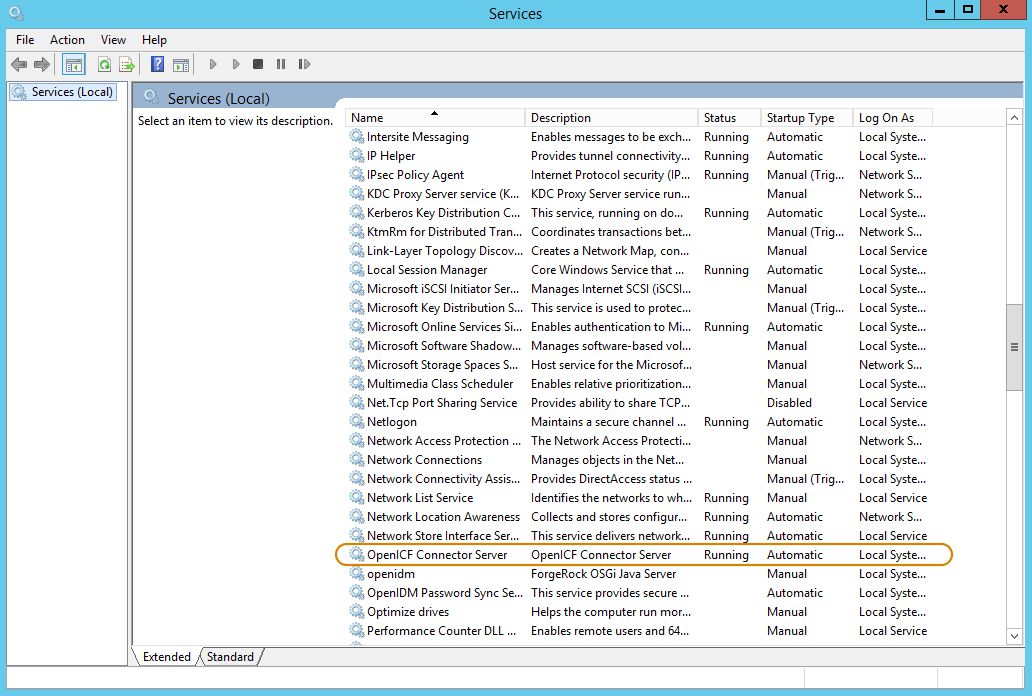
-
Make sure that the RCS is not currently running. If it is running, use the Microsoft Services Console to stop it.
Unpack the RCS Zip
-
If you do not want to run the RCS as a Windows service, download and extract the
openicf-version-dotnet.zipfile. -
If you have already extracted the .zip file and then decide to run the RCS as a service, install the service manually with the following command:
.\ConnectorServerService.exe /install /serviceName service-name
-
-
At the command prompt, change to the directory where the RCS was installed, for example:
cd "c:\Program Files (x86)\ForgeRock\OpenICF"
-
By default, the RCS outputs log messages to a file named
connectorserver.log, in the\path\to\openicfdirectory. To change the location of the log file, set theinitializeDataparameter in the configuration file. The following example sets the log directory toC:\openicf\logs\connectorserver.log:<add name="file" type="System.Diagnostics.TextWriterTraceListener" initializeData="C:\openicf\logs\connectorserver.log" traceOutputOptions="DateTime"> <filter type="System.Diagnostics.EventTypeFilter" initializeData="Information"/> </add> -
Run the
ConnectorServerService /setKeycommand to set a secret key for the RCS. The key can be any string value. This example sets the secret key toPassw0rd:ConnectorServerService /setKey Passw0rd Key has been successfully updated.
This key is used by clients connecting to the RCS. The key that you set here must also be set in the IDM RCS configuration.
-
Edit the RCS configuration.
The RCS configuration is saved in a file named
ConnectorServerService.exe.Config(in the directory where the RCS is installed).Check and edit this file, as necessary, to reflect your installation. Specifically, verify that the
baseAddressreflects the host and port on which the RCS is installed:<system.serviceModel> <services> <service name="Org.ForgeRock.OpenICF.Framework.Service.WcfServiceLibrary.WcfWebsocket"> <host> <baseAddresses> <add baseAddress="http://0.0.0.0:8759/openicf" /> </baseAddresses> </host> </service> </services> </system.serviceModel>The baseAddressspecifies the host and port on which the RCS listens, and is set tohttp://0.0.0.0:8759/openicfby default. If you set a host value other than the default0.0.0.0, connections from all IP addresses other than the one specified are denied.If Windows Firewall is enabled, you must create an inbound port rule to open the TCP port for the RCS (8759 by default). If you do not open the TCP port, IDM won’t be able to contact the RCS. For more information, see the corresponding Microsoft documentation. -
Configure the RCS to use SSL:
-
Open a Powershell terminal as a user with administrator privileges, then change to the ICF installation directory:
cd 'C:\Program Files (x86)\ForgeRock\OpenICF'
-
Use an existing CA certificate, or use the
New-SelfSignedCertificatecmdlet to create a self-signed certificate:New-SelfSignedCertificate -DnsName "dotnet", "dotnet.example.com" -CertStoreLocation "cert:\LocalMachine\My" PSParentPath: Microsoft.PowerShell.Security\Certificate::LocalMachine\My Thumbprint Subject ---------- ------- 770F531F14AF435E963E14AD82B70A47A4BFFBF2 CN=dotnet
-
Assign the certificate to the RCS:
.\ConnectorServerService.exe /setCertificate
Select certificate you want to use:
Index  Issued To                Thumbprint
-----  ---------                -------------------------

0)  dotnet                    770F531F14AF435E963E14AD82B70A47A4BFFBF2 0
Certificate Thumbprint has been successfully updated to 770F531F14AF435E963E14AD82B70A47A4BFFBF2.
-
Bind the certificate to the RCS port (
8759by default). To bind the certificate: -
Use the
New-Guidcmdlet to generate a new UUID:New-Guid Guid ---- 0352cf0f-2e7a-4aee-801d-7f27f8344c77
-
Enter the
netsh httpconsole and add the certificate thumbprint generated in the previous step, and the UUID that you have just generated:netsh netsh> http netsh http> add sslcert ipport=0.0.0.0:8759 certhash=770F5…FFBF2 appid={0352c…4c77} SSL Certificate successfully added
-
-
Change the RCS configuration (in the
ConnectorServerService.exe.Configfile) to use HTTPS and not HTTP.Change
baseAddress="http…"tobaseAddress="https…":<host> <baseAddresses> ... <add baseAddress="https://0.0.0.0:8759/openicf"/> </baseAddresses> </host>Change
httpTransporttohttpsTransport:<httpsTransport authenticationScheme="Basic" realm="OpenICF"> <webSocketSettings transportUsage="Always" createNotificationOnConnection="true" .../> </httpsTransport> -
Export the certificate:
-
Launch the certificate management MMC (
certlm.msc). -
Right-click the
dotnetcertificate, and select All Tasks > Export to launch the Certificate Export Wizard. -
Select Next > No, do not export the private key > DER encoded binary X.509 (.CER) > Next.
-
Save the file in an accessible location (for example,
C:\Users\Administrator\Desktop\dotnet.cer), and click Finish.
-
-
Import the certificate into the IDM truststore:
-
Transfer the certificate from the Windows machine to the machine that’s running IDM.
-
Change to the
openidm/securitydirectory and use the Javakeytoolcommand to import the certificate:cd /path/to/openidm/security keytool -import -alias dotnet -file ~/Downloads/dotnet.cer -keystore ./truststore Enter keystore password: changeit Owner: CN=dotnet Issuer: CN=dotnet Serial number: 1e3af7baed05ce834da5cd1bf1241835 Valid from: Tue Aug 08 15:58:32 SAST 2017 until: Wed Aug 08 16:18:32 SAST 2018 Certificate fingerprints: MD5: D1:B7:B7:46:C2:59:1A:3C:94:AA:65:99:B4:43:3B:E8 SHA1: 77:0F:53:1F:14:AF:43:5E:96:3E:14:AD:82:B7:0A:47:A4:BF:FB:F2 SHA256: C0:52:E2:E5:E5:72:9D:69:F8:11:4C:B8:4C:E4:E3:1C:19:95:86:19:70:E5:31:FA:D8:81:4B:F2:AC:30:9C:73 Signature algorithm name: SHA256withRSA Version: 3 … Trust this certificate? [no]: yes Certificate was added to keystore
-
-
When you configure the RCS, remember to set
"useSSL": true.
-
-
Check the trace settings under
system.diagnosticsin the RCS configuration file:<system.diagnostics> <trace autoflush="true" indentsize="4"> <listeners> <remove name="Default" /> <add name="console" /> <add name="file" /> </listeners> </trace> <sources> <source name="ConnectorServer" switchName="switch1"> <listeners> <remove name="Default" /> <add name="file" /> </listeners> </source> </sources> <switches> <add name="switch1" value="Information" /> </switches> <sharedListeners> <add name="console" type="System.Diagnostics.ConsoleTraceListener" /> <add name="file" type="System.Diagnostics.TextWriterTraceListener" initializeData="logs\ConnectorServerService.log" traceOutputOptions="DateTime"> <filter type="System.Diagnostics.EventTypeFilter" initializeData="Information" /> </add> </sharedListeners> </system.diagnostics>The RCS uses the standard .NET trace mechanism. For more information about tracing options, see Microsoft’s .NET documentation for
System.Diagnostics.The default trace settings are a good starting point. For less tracing, set the EventTypeFilter’s
initializeDatatoWarningorError. For very verbose logging, set the value toVerboseorAll. The logging level has a direct effect on the RCS performance, so take care when setting this level. -
Start the .NET RCS in one of the following ways:
-
Start the server as a Windows service, by using the Microsoft Services Console.
Locate the RCS service (
OpenICF connector server), and click Start the service or Restart the service.The service runs with the credentials of the "run as" user (
System, by default). -
Start the server as a Windows service, by using the command line.
In the Windows Command Prompt, run the following command:
net start ConnectorServerService
To stop the service, run the following command:
net stop ConnectorServerService
-
Start the server without using Windows services.
In the Windows Command Prompt, change to the RCS installation directory. The default location is
c:\> cd "c:\Program Files (x86)\ForgeRock\OpenICF".Start the server with the following command:
ConnectorServerService.exe /run
This command starts the RCS with the credentials of the current user. It does not start the server as a Windows service.
-
-
-
Both RCS types use the following configuration properties:
RCS Properties
This table shows the complete list of RCS configuration properties. Note that all properties are prefixed with connectorserver. in the configuration file. The prefixes are not shown here so that the table is easier to read:
| Property | RCS Mode (Server or Client) | Description | Example | ||
|---|---|---|---|---|---|
|
Client |
Name of the remote connector client. This name is used to identify the remote connector server in the list of connector reference objects. The name must be lower case alphanumeric characters ( |
rcs1 |
||
|
Client |
URL of the server on which IDM runs. |
|||
|
Client |
Unique identifier for the RCS. |
MY_UNIQUE_RCS_HOST_ID |
||
|
Client |
Proxy server host. |
|||
|
Client |
Proxy server port number. |
|||
|
Client |
Proxy server principal. |
|||
|
Client |
Proxy server password. |
|||
|
Client |
WebSocket connections housekeeping interval, in seconds. |
9 |
||
|
Client |
WebSocket groups check interval, in seconds. |
900 |
||
|
Client |
Number of WebSocket connections to open. |
3 |
||
|
Client |
Time to live of a WebSocket connection, in seconds. |
88 |
||
|
Client |
Time (in seconds) before a new connection can be established. |
26 |
||
|
Client |
Token endpoint from which to retrieve the access token, if you are using OAuth2 to authenticate against AM. |
|
||
|
Client |
OAuth2 token scope, if you are using OAuth2 to authenticate against AM. |
fr:idm:* |
||
|
Client |
OAuth2 Client ID for which to request an access token. |
connectorServer |
||
|
|||||
|
Client |
OAuth2 Client Secret. |
openidm |
||
|
Both |
WebSocket Ping/Pong interval, in seconds. The purpose of the ping is to keep connections alive (for firewalls or load balancers that honor connections in use). If your firewall or load balancer does not honor connections in use (that is, connections are timed out, regardless of their usage), the ping has no effect and you should disable it. Set this property to |
300 |
||
|
Both |
The IDM truststore file. You do not need to set this property if the IDM certificate is a CA-signed certificate. |
|
||
|
Both |
The IDM truststore type. You do not need to set this property if the IDM certificate is a CA-signed certificate. |
|
||
|
Both |
The IDM truststore password. You do not need to set this property if the IDM certificate is a CA-signed certificate. |
changeit |
||
|
Both |
The IDM keystore file. You do not need to set this property if the IDM certificate is a CA-signed certificate. |
|
||
|
Both |
The IDM keystore type. You do not need to set this property if the IDM certificate is a CA-signed certificate. |
|
||
|
Both |
The IDM keystore password. You do not need to set this property if the IDM certificate is a CA-signed certificate. |
changeit |
||
|
Both |
The IDM certificate password. You do not need to set this property if the IDM certificate is a CA-signed certificate. |
changeit |
||
|
Both |
Directory on the RCS host in which connector library file dependencies are located (relative to |
|
||
|
Both |
Directory on the RCS host in which connector .jar files are located (relative to |
|
||
|
Both |
The RCS logger class. |
|
||
|
Both |
Principal to authenticate to the RCS. This property is not used if the RCS obtains its access token through ForgeRock® Access Management (AM) (which is the case when IDM is running in ForgeRock Identity Cloud). |
anonymous |
||
|
Both |
Password to authenticate to the RCS. This property is not used if the RCS obtains its access token through AM (which is the case when IDM is running in ForgeRock Identity Cloud). |
changeit |
||
|
Server |
Whether the connection between IDM and the RCS should be over SSL. |
false/true |
||
|
Server |
Port on which the RCS listens for the connection from IDM. |
8759 |
||
|
Certain configuration properties are dependent on the RCS mode. For more information, see Configure a Remote Connector Server (RCS). Sample connectorserver.properties file for client modeSample connectorserver.properties file for server mode |
Install Connector Dependencies
In most cases, ICF connectors come bundled with all third party libraries needed to run. In some cases, however, you’ll need to download certain libraries (for example, the Database Table connector needs the appropriate JDBC driver for the database you are targeting). For local connectors, place these libraries in the /path/to/openidm/lib/
directory. For remote connectors, place them in the /path/to/openicf/lib/
directory on the RCS.
The following table lists the connector dependencies and indicates which ones must be downloaded:
| Dependencies for bundled connectors | |
|---|---|
Database Table Connector |
No external dependencies. However, you must include the JDBC driver for the database that you are targeting in the |
DocuSign Connector |
|
PeopleSoft Connector |
|
Configure a Remote Connector Server (RCS)
RCS runs in one of two modes:
- Client mode
-
In client mode, RCS initiates the connection with a server. Run the RCS in client mode if your data store is protected by a firewall or DMZ.
The following diagram shows an RCS in client mode:

- Server mode
-
In server mode, RCS acts as the server, with IDM acting as a client. IDM initiates the connection to the RCS. Run the RCS in server mode if IDM can initiate the connection and has access through any firewalls.
The following diagram shows an RCS in server mode:
This example shows how to retrieve the RCS types over REST:
List the RCS Types
curl \
--header "X-OpenIDM-Username: openidm-admin" \
--header "X-OpenIDM-Password: openidm-admin" \
--header "Accept-API-Version: resource=1.0" \
--request POST \
"http://localhost:8080/openidm/system?_action=availableConnectorServers"
{
  "connectorServers": [
    {
      "displayName": "Remote Connector Server",
      "systemType": "provisioner.openicf",
      "type": "remoteConnectorServer"
    },
    {
      "displayName": "Remote Connector Servers Group",
      "systemType": "provisioner.openicf",
      "type": "remoteConnectorServersGroup"
    },
    {
      "displayName": "Remote Connector Server in Client mode",
      "systemType": "provisioner.openicf",
      "type": "remoteConnectorClient"
    },
    {
      "displayName": "Remote Connector Servers Group in Client mode",
      "systemType": "provisioner.openicf",
      "type": "remoteConnectorClientsGroup"
    }
  ]
}
Configure RCS in Client Mode
The RCS configuration will differ between server mode and client mode. See RCS Properties for a list of properties and the mode to which they apply.
To generate the core configuration, use the createConnectorServerCoreConfig action on the system endpoint. Include at least the RCS type (remoteConnectorClient) and the systemType in the JSON payload. The systemType is always provisioner.openicf, regardless of the RCS type:
Create a Core RCS Configuration (Client Mode)
curl \
--header "X-OpenIDM-Username: openidm-admin" \
--header "X-OpenIDM-Password: openidm-admin" \
--header "Accept-API-Version: resource=1.0" \
--header "Content-Type: application/json" \
--request POST \
--data '{
  "type": "remoteConnectorClient",
  "systemType": "provisioner.openicf"
}' \
"http://localhost:8080/openidm/system?_action=createConnectorServerCoreConfig"
{
  "displayName": "",
  "name": "",
  "enabled": true,
  "useSSL": false
}
IDM returns the basic configuration properties for an RCS in client mode. The configuration that is returned is not functional. It does not contain the required configuration property values, such as the name of the RCS.
Use the output returned in the previous example to create your complete RCS configuration. Specify at least the name of the RCS, and use a PUT request on the config endpoint. Note that this step creates an RCS configuration on IDM. The values of these properties must match the RCS configuration, specified in the ConnectorServer.properties
file on the RCS:
Create a New RCS Configuration (Client Mode)
curl \
--header "X-OpenIDM-Username: openidm-admin" \
--header "X-OpenIDM-Password: openidm-admin" \
--header "Accept-API-Version: resource=1.0" \
--header "Content-Type: application/json" \
--request PUT \
--data '{
  "_id": "provisioner.openicf.connectorinfoprovider",
  "connectorsLocation": "connectors",
  "enabled": true,
  "remoteConnectorClients": [
    {
      "displayName": "On premise 1",
      "name": "onprem",
      "enabled": true
    }
  ]
}' \
"http://localhost:8080/openidm/config/provisioner.openicf.connectorinfoprovider"
{
  "_id": "provisioner.openicf.connectorinfoprovider",
  "connectorsLocation": "connectors",
  "enabled": true,
  "remoteConnectorClients": [
    {
      "displayName": "On premise 1",
      "name": "onprem",
      "enabled": true
    }
  ]
}
Configure RCS in Server Mode
The RCS configuration will differ between server mode and client mode. See RCS Properties for a list of properties and the mode to which they apply.
To generate the core configuration, use the createConnectorServerCoreConfig action on the system endpoint. Include at least the RCS type (remoteConnectorServer) and the systemType in the JSON payload. The systemType is always provisioner.openicf, regardless of the RCS type:
Create a Core RCS Configuration (Server Mode)
curl \
--header "X-OpenIDM-Username: openidm-admin" \
--header "X-OpenIDM-Password: openidm-admin" \
--header "Accept-API-Version: resource=1.0" \
--header "Content-Type: application/json" \
--request POST \
--data '{
  "type": "remoteConnectorServer",
  "systemType": "provisioner.openicf"
}' \
"http://localhost:8080/openidm/system?_action=createConnectorServerCoreConfig"
{
  "displayName": "",
  "proxyPassword": null,
  "proxyHost": null,
  "enabled": true,
  "useSSL": false,
  "proxyPort": 8080,
  "port": "",
  "name": "",
  "host": "",
  "proxyUser": null,
  "housekeepingInterval": 600,
  "connectionGroupCheckInterval": 900,
  "pingPongInterval": 300,
  "key": "password",
  "webSocketConnections": 2
}
IDM returns the required configuration properties for an RCS in server mode. The configuration that is returned is not functional. It does not contain the specific property values, such as the host name and port of the RCS.
Use the output returned in the previous example to create your complete RCS configuration. Specify at least the host and port of the RCS, and use a PUT request on the config endpoint. Note that this step creates an RCS configuration on IDM. The values of these properties must match the RCS configuration, specified in the ConnectorServer.properties file on the RCS:
Create a New RCS Configuration (Server Mode)
curl \
--header "X-OpenIDM-Username: openidm-admin" \
--header "X-OpenIDM-Password: openidm-admin" \
--header "Accept-API-Version: resource=1.0" \
--header "Content-Type: application/json" \
--request PUT \
--data '{
  "_id": "provisioner.openicf.connectorinfoprovider",
  "connectorsLocation": "connectors",
  "enabled": true,
  "remoteConnectorServers": [
    {
      "type": "remoteConnectorServer",
      "displayName": "Remote Connector Server 1",
      "proxyPassword": null,
      "proxyHost": null,
      "enabled": true,
      "useSSL": false,
      "proxyPort": 8080,
      "port": 8759,
      "name": "rcs1",
      "host": "rcs.example.com",
      "proxyUser": null,
      "housekeepingInterval": 600,
      "connectionGroupCheckInterval": 900,
      "pingPongInterval": 300,
      "key": "Passw0rd",
      "webSocketConnections": 2
    }
  ]
}' \
"http://localhost:8080/openidm/config/provisioner.openicf.connectorinfoprovider"
{
  "_id": "provisioner.openicf.connectorinfoprovider",
  "connectorsLocation": "connectors",
  "enabled": true,
  "remoteConnectorServers": [
    {
      "type": "remoteConnectorServer",
      "displayName": "Remote Connector Server 1",
      "proxyPassword": null,
      "proxyHost": null,
      "enabled": true,
      "useSSL": false,
      "proxyPort": 8080,
      "port": 8759,
      "name": "rcs1",
      "host": "rcs.example.com",
      "proxyUser": null,
      "housekeepingInterval": 600,
      "connectionGroupCheckInterval": 900,
      "pingPongInterval": 300,
      "key": {
        "$crypto": {
          "type": "x-simple-encryption",
          "value": {
            "cipher": "AES/CBC/PKCS5Padding",
            "stableId": "openidm-sym-default",
            "salt": "3Mq1UJuZXqANx2AzUtbFbg==",
            "data": "4WHBEI3nSVWJ2DfIs2dPZg==",
            "keySize": 16,
            "purpose": "idm.config.encryption",
            "iv": "BvFAQ4sjwJCNY2e7WZPkGw==",
            "mac": "ximBz/BlqC8SEsBTuYQX5Q=="
          }
        }
      },
      "webSocketConnections": 2
    }
  ]
}
Configure Failover Between RCS Servers
For failover purposes, you can configure a group of RCSs, in either server or client mode. Failover is particularly important when you configure an RCS in client mode because IDM has no way of knowing whether the RCS is available.
To prevent the RCS from being a single point of failure, you can specify a list of RCS servers that the connector can target. To set up a failover configuration, you create either a remoteConnectorServersGroup or a remoteConnectorClientsGroup and list the RCS servers. The connector attempts to contact the first RCS in the list. If that RCS is down, it proceeds to the next RCS.
Configure Failover For RCS Servers in Server Mode
This example configures a remoteConnectorServersGroup that lists two remote RCS servers, on hosts remote-host-1 and remote-host-2. The RCS servers are listed by their name property. You can configure multiple groups and multiple servers per group.
First, generate the core configuration to obtain the required properties:
curl \
--header "X-OpenIDM-Username: openidm-admin" \
--header "X-OpenIDM-Password: openidm-admin" \
--header "Accept-API-Version: resource=1.0" \
--header "Content-Type: application/json" \
--request POST \
--data '{
  "type" : "remoteConnectorServersGroup",
  "systemType" : "provisioner.openicf"
}' \
"http://localhost:8080/openidm/system?_action=createConnectorServerCoreConfig"
{
   "displayName": "",
   "name": "",
   "serversList": [],
   "algorithm": "failover"
 }
Use the output returned in the previous example to create your RCS group configuration. Use a PUT request on the config endpoint:
curl \
--header "X-OpenIDM-Username: openidm-admin" \
--header "X-OpenIDM-Password: openidm-admin" \
--header "Accept-API-Version: resource=1.0" \
--header "Content-Type: application/json" \
--request PUT \
--data '{
  "_id": "provisioner.openicf.connectorinfoprovider",
  "connectorsLocation": "connectors",
  "enabled": true,
  "remoteConnectorServers": [
    {
      "type": "remoteConnectorServersGroup",
      "displayName": ".NET Failover Group",
      "name" : "dotnet-ha",
      "algorithm" : "failover",
      "serversList" : [
        {"name": "remote-host-1"},
        {"name": "remote-host-2"}
      ]
    }
  ]
}' \
"http://localhost:8080/openidm/config/provisioner.openicf.connectorinfoprovider"
{
  "_id": "provisioner.openicf.connectorinfoprovider",
  "connectorsLocation": "connectors",
  "enabled": true,
  "remoteConnectorServers": [
    {
      "type": "remoteConnectorServersGroup",
      "displayName": ".NET Failover Group",
      "name": "dotnet-ha",
      "algorithm": "failover",
      "serversList": [
        {
          "name": "remote-host-1"
        },
        {
          "name": "remote-host-2"
        }
      ]
    }
  ]
}
The algorithm can be either failover or roundrobin. If the algorithm is failover, requests are always sent to the first RCS in the list, unless it is unavailable; in which case, requests are sent to the next RCS in the list. If the algorithm is roundrobin, requests are distributed equally between the RCS servers in the list, in the order in which they are received.
Your connector configuration (provisioner.openicf-connector-name.json) references the RCS group, rather than a single RCS. For example, the following excerpt of a PowerShell connector configuration file references the dotnet-ha RCS group created in the previous example:
{
   "connectorRef" : {
     "bundleName" : "MsPowerShell.Connector",
     "connectorName" : "Org.ForgeRock.OpenICF.Connectors.MsPowerShell.MsPowerShellConnector",
     "connectorHostRef" : "dotnet-ha",
     "bundleVersion" : "[1.4.3.0,1.5.0.0)"
   },
   ...
 }
Configure Failover For RCS Servers in Client Mode
This example configures a remoteConnectorClientsGroup that lists two remote RCS servers, on hosts remote-host-1 and remote-host-2. The RCS servers are listed by their name property. You can configure multiple groups and multiple servers per group.
First, generate the core configuration to obtain the required properties:
curl \
--header "X-OpenIDM-Username: openidm-admin" \
--header "X-OpenIDM-Password: openidm-admin" \
--header "Accept-API-Version: resource=1.0" \
--header "Content-Type: application/json" \
--request POST \
--data '{
  "type" : "remoteConnectorClientsGroup",
  "systemType" : "provisioner.openicf"
}' \
"http://localhost:8080/openidm/system?_action=createConnectorServerCoreConfig"
{
   "displayName": "",
   "name": "",
   "serversList": [],
   "algorithm": "failover"
 }
Use the output returned in the previous example to create your RCS group configuration. Use a PUT request on the config endpoint:
curl \
--header "X-OpenIDM-Username: openidm-admin" \
--header "X-OpenIDM-Password: openidm-admin" \
--header "Accept-API-Version: resource=1.0" \
--header "Content-Type: application/json" \
--request PUT \
--data '{
  "_id": "provisioner.openicf.connectorinfoprovider",
  "connectorsLocation": "connectors",
  "enabled": true,
  "remoteConnectorClients": [
    {
      "type": "remoteConnectorClientsGroup",
      "displayName": ".NET Failover Group",
      "name" : "dotnet-ha",
      "algorithm" : "failover",
      "serversList" : [
        {"name": "remote-host-1"},
        {"name": "remote-host-2"}
      ]
    }
  ]
}' \
"http://localhost:8080/openidm/config/provisioner.openicf.connectorinfoprovider"
{
  "_id": "provisioner.openicf.connectorinfoprovider",
  "connectorsLocation": "connectors",
  "enabled": true,
  "remoteConnectorClients": [
    {
      "type": "remoteConnectorClientsGroup",
      "displayName": ".NET Failover Group",
      "name": "dotnet-ha",
      "algorithm": "failover",
      "serversList": [
        {
          "name": "remote-host-1"
        },
        {
          "name": "remote-host-2"
        }
      ]
    }
  ]
}
The algorithm can be either failover or roundrobin. If the algorithm is failover, requests are always sent to the first RCS in the list, unless it is unavailable; in which case, requests are sent to the next RCS in the list. If the algorithm is roundrobin, requests are distributed equally between the RCS servers in the list, in the order in which they are received.
Your connector configuration (provisioner.openicf-connector-name.json) references the RCS group, rather than a single RCS. For example, the following excerpt of a PowerShell connector configuration file references the dotnet-ha RCS group created in the previous example:
{
   "connectorRef" : {
     "bundleName" : "MsPowerShell.Connector",
     "connectorName" : "Org.ForgeRock.OpenICF.Connectors.MsPowerShell.MsPowerShellConnector",
     "connectorHostRef" : "dotnet-ha",
     "bundleVersion" : "[1.4.3.0,1.5.0.0)"
   },
   ...
 }
Secure the Connection to the RCS With SSL
The SSL configuration for an RCS depends on whether you are running the RCS in server mode or in client mode:
-
In server mode, IDM initiates the connection to the RCS.
The RCS needs a public/private key pair and a certificate (either self-signed or CA-signed). The RCS sends its certificate to the client (IDM) during the SSL handshake.
If you are using a CA-signed certificate, IDM will trace the certificate back to the root certificate. If you are using a self-signed certificate (or a certificate that depends on an unreachable issuer in the chain from the root certificate), you must import the certificate into the IDM truststore.
-
In client mode, the RCS initiates the connection to IDM. IDM sends its certificate during the SSL handshake. If you are using the IDM self-signed certificate, you must import the certificate into the RCS truststore.
If you are using TLS Mutual Authentication, the RCS needs a public/private key pair and a certificate. IDM requests the certificate from the RCS during the SSL handshake.
Configure the RCS For SSL
On the RCS, edit the conf/ConnectorServer.properties
file to specify a secure connection between IDM and the RCS:
- RCS in server mode
-
-
Set
connectorserver.useSSL=true. -
Specify the RCS keystore and truststore. For example:
connectorserver.trustStoreFile=security/truststore.pkcs12
connectorserver.trustStoreType=PKCS12
connectorserver.trustStorePass=changeit
connectorserver.keyStoreFile=security/keyStore.pkcs12
connectorserver.keyStoreType=PKCS12
connectorserver.keyStorePass=changeit
connectorserver.keyPass=changeit
-
- RCS in client mode
-
-
Connection security is determined by the value of the
connectorserver.urlproperty. Use thewssprotocol to establish a WebSocket over an encrypted TLS connection; for example,wss://my-tenant.forgeblocks.com/openicf.The
connectorserver.useSSLproperty is not used in client mode. -
Specify the RCS keystore and truststore. For example:
connectorserver.trustStoreFile=security/truststore.pkcs12
connectorserver.trustStoreType=PKCS12
connectorserver.trustStorePass=changeit
connectorserver.keyStoreFile=security/keyStore.pkcs12
connectorserver.keyStoreType=PKCS12
connectorserver.keyStorePass=changeit
connectorserver.keyPass=changeit
-
Configure IDM For SSL
In your conf/provisioner.openicf.connectorinfoprovider.json
file, set "useSSL" : true.
Generate Keys for an RCS in Server Mode
-
Generate the RCS private/public key pair and create a new PKCS12 keystore:
keytool \
-genkeypair \
-keyalg EC \
-alias icf-rcs \
-dname "CN=icf.example.com,O=Example Corp,C=FR" \
-keystore rcsKeystore \
-storetype PKCS12 \
-storepass changeit \
-
Verify the contents of the new keystore:
keytool \
-list \
-v \
-keystore rcsKeystore
Enter keystore password:  changeit
Keystore type: PKCS12
Keystore provider: SUN

Your keystore contains 1 entry

Alias name: icf-rcs
Creation date: Jul 13, 2020
Entry type: PrivateKeyEntry
Certificate chain length: 1
Certificate[1]:
Owner: CN=icf.example.com, O=Example Corp, C=FR
Issuer: CN=icf.example.com, O=Example Corp, C=FR
Serial number: 611e093d
Valid from: Mon Jul 13 23:58:49 SAST 2020 until: Sun Oct 11 23:58:49 SAST 2020
Certificate fingerprints:
SHA1: Fingerprint
SHA256: Fingerprint
Signature algorithm name: SHA256withECDSA
Subject Public Key Algorithm: 256-bit EC key
...
-
Export the RCS certificate:
keytool \
-export \
-alias icf-rcs \
-file rcs.cert \
-keystore rcsKeystore.pkcs12
Enter keystore password: changeit
Certificate stored in file <rcs.cert>
-
If you are not using a self-signed certificate, have the certificate signed by a Certificate Authority (CA):
-
Create a Certificate Signing Request (CSR):
keytool \
-keystore rcsKeystore.pkcs12 \
-certreq \
-alias icf-rcs \
-file rcs.csr
more rcs.csr -----BEGIN NEW CERTIFICATE REQUEST----- MIIEKTCCA9QCAQAwVzELMAkGA1UEBhMCRlIxCzAJBgNVBAgTAkZSMQswCQYDVQQH xZ47rzcY6OrElh8+/TYG50NRqcQYMzm4CefCrhxTm6dHW4XQEa24tHmHdUmEaVys A1UdDgQWBBSivxV9AzgbrIo3gG6vCBlNaXf3wjANBglghkgBZQMEAwIFAANAADA9 … AhxL791/ikf1hqxOD3uttV7qumg+TNednsgtk6uOAh0AlINk+1LBeyUkQA7iUHy/ 3KLYWog/Npu5USdCeA== -----END NEW CERTIFICATE REQUEST-----
-
Submit the CSR to your CA for signature.
-
-
Import the signed certificate into the RCS keystore:
keytool \
-importcert \
-trustcacerts \
-file rcs.cert \
-keystore rcsKeystore.pkcs12 \
-storetype pkcs12 \
-alias icf-rcs
Enter keystore password: changeit
Certificate reply was installed in keystore
If your CA certificate is not trusted, you might need to import the CA certificate into the keystore too. -
Import the RCS certificate into the IDM truststore:
keytool \
-import \
-alias icf-rcs \
-keystore /path/to/openidm/truststore \
-file rcs.cert
Enter keystore password: changeit
Owner: CN=icf.example.com, O=Example Corp, C=FR
Issuer: CN=icf.example.com, O=Example Corp, C=FR
Serial number: 611e093d
Valid from: Fri Apr 05 16:04:04 CEST 2019 until: Mon Aug 17 16:04:04 CEST 2020
Certificate fingerprints:
MD5:  Fingerprint
SHA1: Fingerprint
SHA256: Fingerprint
Signature algorithm name: SHA256withRSA
Subject Public Key Algorithm: 2048-bit DSA key
Version: 1
Trust this certificate? [no]:  yes
Certificate was added to keystore
Generate Keys for an RCS in Client Mode
-
Generate the RCS private/public key pair and create a new PKCS12 keystore:
keytool \
-genkeypair \
-keyalg EC \
-alias icf-rcs \
-dname "CN=icf.example.com,O=Example Corp,C=FR" \
-keystore rcsKeystore \
-storetype PKCS12 \
-storepass changeit \
-
Verify the contents of the new keystore:
keytool \
-list \
-v \
-keystore rcsKeystore
Enter keystore password:  changeit
Keystore type: PKCS12
Keystore provider: SUN

Your keystore contains 1 entry

Alias name: icf-rcs
Creation date: Jul 13, 2020
Entry type: PrivateKeyEntry
Certificate chain length: 1
Certificate[1]:
Owner: CN=icf.example.com, O=Example Corp, C=FR
Issuer: CN=icf.example.com, O=Example Corp, C=FR
Serial number: 611e093d
Valid from: Mon Jul 13 23:58:49 SAST 2020 until: Sun Oct 11 23:58:49 SAST 2020
Certificate fingerprints:
SHA1: Fingerprint
SHA256: Fingerprint
Signature algorithm name: SHA256withECDSA
Subject Public Key Algorithm: 256-bit EC key
...
-
Export the RCS certificate:
keytool \
-export \
-alias icf-rcs \
-file rcs.cert \
-keystore rcsKeystore.pkcs12
Enter keystore password: changeit
Certificate stored in file <rcs.cert>
-
If you are not using a self-signed certificate, have the certificate signed by a Certificate Authority (CA):
-
Create a Certificate Signing Request (CSR):
keytool \
-keystore rcsKeystore.pkcs12 \
-certreq \
-alias icf-rcs \
-file rcs.csr
more rcs.csr -----BEGIN NEW CERTIFICATE REQUEST----- MIIEKTCCA9QCAQAwVzELMAkGA1UEBhMCRlIxCzAJBgNVBAgTAkZSMQswCQYDVQQH xZ47rzcY6OrElh8+/TYG50NRqcQYMzm4CefCrhxTm6dHW4XQEa24tHmHdUmEaVys A1UdDgQWBBSivxV9AzgbrIo3gG6vCBlNaXf3wjANBglghkgBZQMEAwIFAANAADA9 … AhxL791/ikf1hqxOD3uttV7qumg+TNednsgtk6uOAh0AlINk+1LBeyUkQA7iUHy/ 3KLYWog/Npu5USdCeA== -----END NEW CERTIFICATE REQUEST-----
-
Submit the CSR to your CA for signature.
-
-
Import the signed certificate into the RCS keystore:
keytool \
-importcert \
-trustcacerts \
-file rcs.cert \
-keystore rcsKeystore.pkcs12 \
-storetype pkcs12 \
-alias icf-rcs
Enter keystore password: changeit
Certificate reply was installed in keystore
If your CA certificate is not trusted, you might need to import the CA certificate into the keystore too. -
Import the RCS certificate into the IDM truststore:
keytool \
-import \
-alias icf-rcs \
-keystore /path/to/openidm/truststore \
-file rcs.cert
Enter keystore password: changeit
Owner: CN=icf.example.com, O=Example Corp, C=FR
Issuer: CN=icf.example.com, O=Example Corp, C=FR
Serial number: 611e093d
Valid from: Fri Apr 05 16:04:04 CEST 2019 until: Mon Aug 17 16:04:04 CEST 2020
Certificate fingerprints:
MD5:  Fingerprint
SHA1: Fingerprint
SHA256: Fingerprint
Signature algorithm name: SHA256withRSA
Subject Public Key Algorithm: 2048-bit DSA key
Version: 1
Trust this certificate? [no]:  yes
Certificate was added to keystore
-
Export the IDM self-signed certificate:
keytool \
-export \
-alias openidm-localhost \
-keystore keystore.jceks \
-storetype jceks \
-file idm.cert \
Enter keystore password: changeit
Certificate stored in file <idm.cert>
-
Import the IDM self-signed certificate into the RCS truststore:
keytool \
-import \
-alias openidm-localhost \
-keystore /path/to/rcs/security/truststore.pkcs12 \
-storetype pkcs12 \
-file idm.cert
Enter keystore password: changeit

Owner: CN=openidm-localhost, O=OpenIDM Self-Signed Certificate, OU=None, L=None, ST=None, C=None
Issuer: CN=openidm-localhost, O=OpenIDM Self-Signed Certificate, OU=None, L=None, ST=None, C=None
Serial number: 16981c79d8d
Valid from: Wed Feb 13 15:35:36 CET 2019 until: Thu Mar 15 15:35:36 CET 2029
Certificate fingerprints:
MD5:  fingerprint
SHA1: fingerprint
SHA256: fingerprint
Signature algorithm name: SHA512withRSA
Subject Public Key Algorithm: 2048-bit RSA key
Version: 3
Trust this certificate? [no]:  yes

Certificate was added to keystore
Example: Use the CSV Connector to Reconcile Users in a Remote CSV Data Store
This example shows reconciliation of users stored in a CSV file on a remote machine. The remote Java RCS lets IDM synchronize its repository with the remote CSV file.
The example assumes that a remote Java RCS is installed and running on a host named remote-host.
The example uses the small CSV data set provided with the Getting Started sample (hr.csv). The CSV connector runs as a remote connector, on the host where the Java RCS is running. Before you start, copy the CSV data file from the Getting Started sample (/path/to/openidm/samples/getting-started/data/hr.csv) to an accessible location on the machine that hosts the remote Java RCS. For example:
cd /path/to/openidm/samples/getting-started/data/
scp hr.csv testuser@remote-host:/home/testuser/csv-sample/data/
Password:**
hr.csv     100%  651     0.6KB/s   00:00
Configure IDM for the Remote CSV Connector Example
-
Copy the following files to your
/path/to/openidm/confdirectory:- sync.json
-
A customized mapping file for this example.
/openidm/samples/example-configurations/provisioners/provisioner.openicf.connectorinfoprovider.json-
A sample RCS configuration.
/openidm/samples/example-configurations/provisioners/provisioner.openicf-csvfile.json-
A sample connector configuration file.
-
Edit the RCS configuration file (
provisioner.openicf.connectorinfoprovider.json) to match your network setup.The following example indicates that the Java RCS is running on the host
remote-host, listening on the default port, and configured with a secret key ofPassw0rd:{ "remoteConnectorServers" : [ { "name" : "csv", "host" : "remote-host", "port" : 8759, "useSSL" : false, "key" : "Passw0rd" } ] }The
namethat you set in this file will be referenced in theconnectorHostRefproperty of the connector configuration, in the next step.The
keythat you specify here must match the password that you set when you installed the Java RCS. -
Edit the CSV connector configuration file (
provisioner.openicf-csvfile.json) as follows:{ "connectorRef" : { "connectorHostRef" : "csv", "bundleName" : "org.forgerock.openicf.connectors.csvfile-connector", "bundleVersion" : "[1.5.19.0,1.6.0.0)", "connectorName" : "org.forgerock.openicf.csvfile.CSVFileConnector" }, ... "configurationProperties" : { "csvFile" : "/home/testuser/csv-sample/data/hr.csv" } }-
The
connectorHostRefproperty sets the RCS to use, and refers to thenameproperty you specified in theprovisioner.openicf.connectorinfoprovider.jsonfile. -
The
bundleVersion : "[1.5.1.4,1.6.0.0)",must either be exactly the same as the version of the CSV connector that you are using or, if you specify a range, the CSV connector version must be included in this range. -
The
csvFileproperty must specify the absolute path to the CSV data file that you copied to the remote host on which the Java RCS is running.
-
-
Start IDM:
/path/to/openidm/startup.sh
-
Verify that IDM can reach the RCS, and that the CSV connector has been configured correctly:
curl \
--header "X-OpenIDM-Username: openidm-admin" \
--header "X-OpenIDM-Password: openidm-admin" \
--header "Accept-API-Version: resource=1.0" \
--request POST \
"http://localhost:8080/openidm/system?_action=test"
[
  {
    "name": "csv",
    "enabled": true,
    "config": "config/provisioner.openicf/csv",
    "objectTypes": [
      "__ALL__",
      "account"
    ],
    "connectorRef": {
      "bundleName": "org.forgerock.openicf.connectors.csvfile-connector",
      "connectorName": "org.forgerock.openicf.csvfile.CSVFileConnector",
      "bundleVersion": "[1.5.0.0,1.6.0.0)"
    },
    "displayName": "CSV File Connector",
    "ok": true
  }
]
The connector must return
"ok": true.Alternatively, use the admin UI to verify that IDM can reach the RCS and that the CSV connector is active. Log in to the admin UI (
https://localhost:8443/openidm/admin), and select Configure > Connectors. The CSV connector should be listed on the Connectors page, and its status should be Active.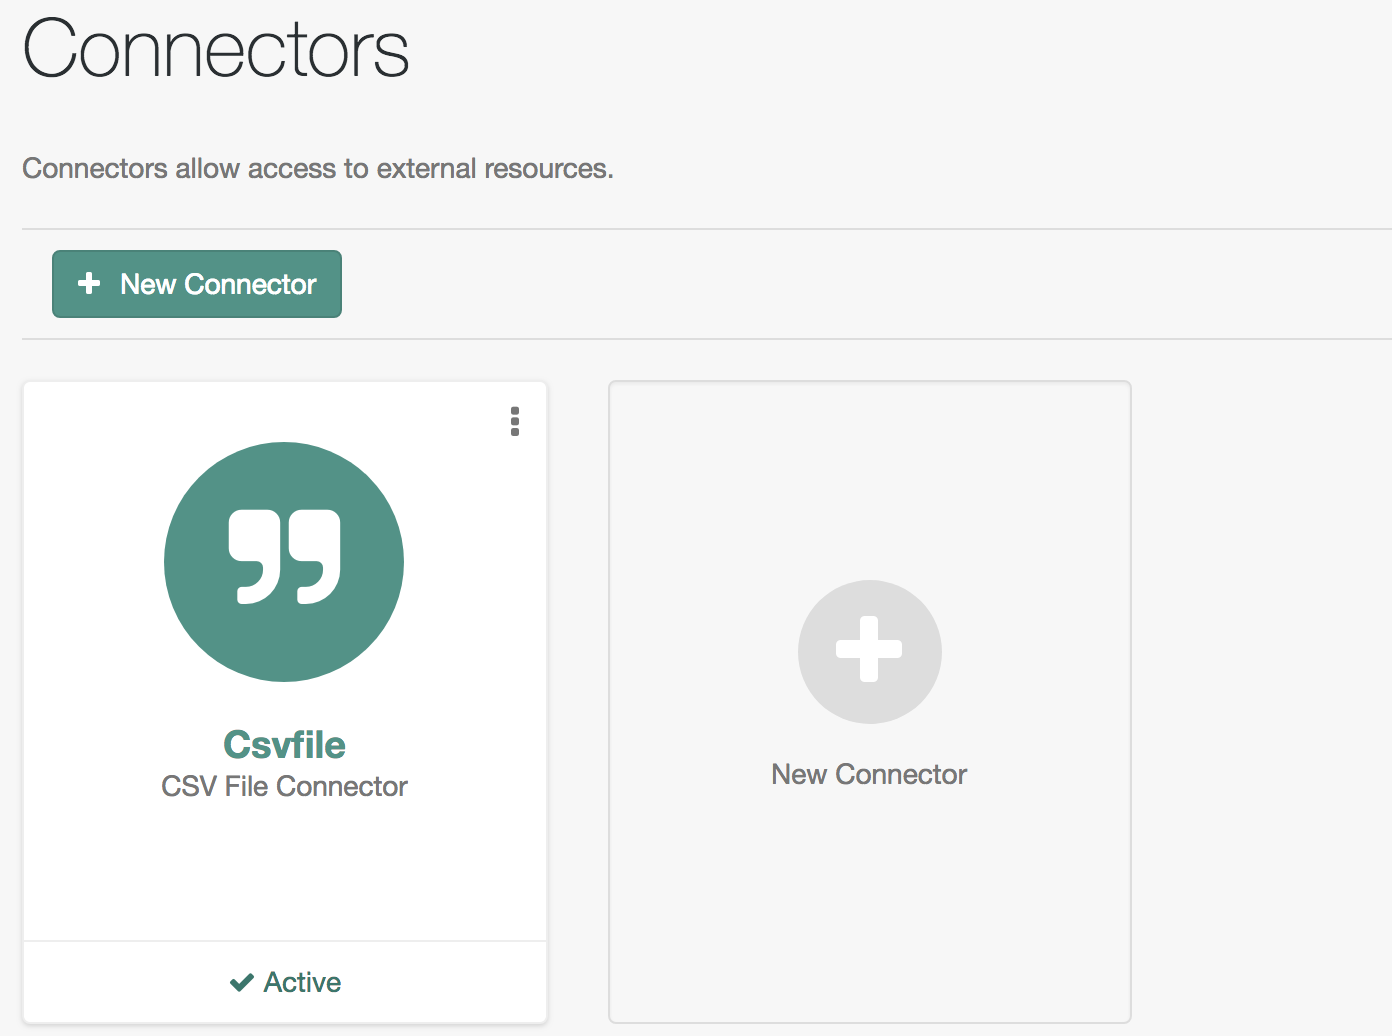 Figure 1. Connectors Tab Showing an Active CSV Connector
 -
To test that the connector has been configured correctly, run a reconciliation operation as follows:
-
Select Configure > Mappings, and click the systemCsvAccounts_managedUser mapping.
-
Click Reconcile.
If the reconciliation is successful, the three users from the remote CSV file should have been added to the managed user repository.
To check this, click Manage > User.
-