Register a user
The AM UI includes pages for users to register to AM. You can, however, create a RESTful application to leverage the user self-service features.
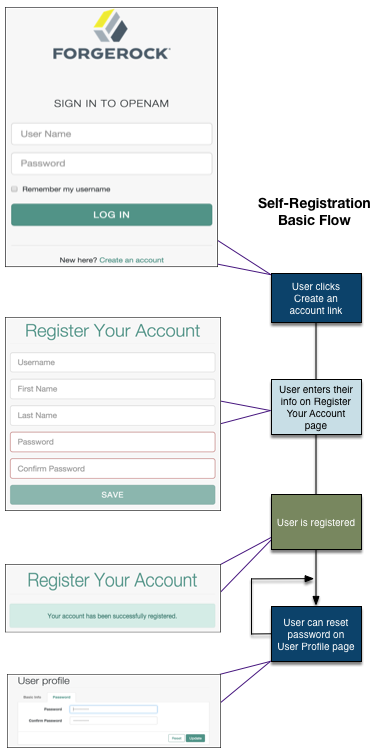
User self-registration flow with options (UI)
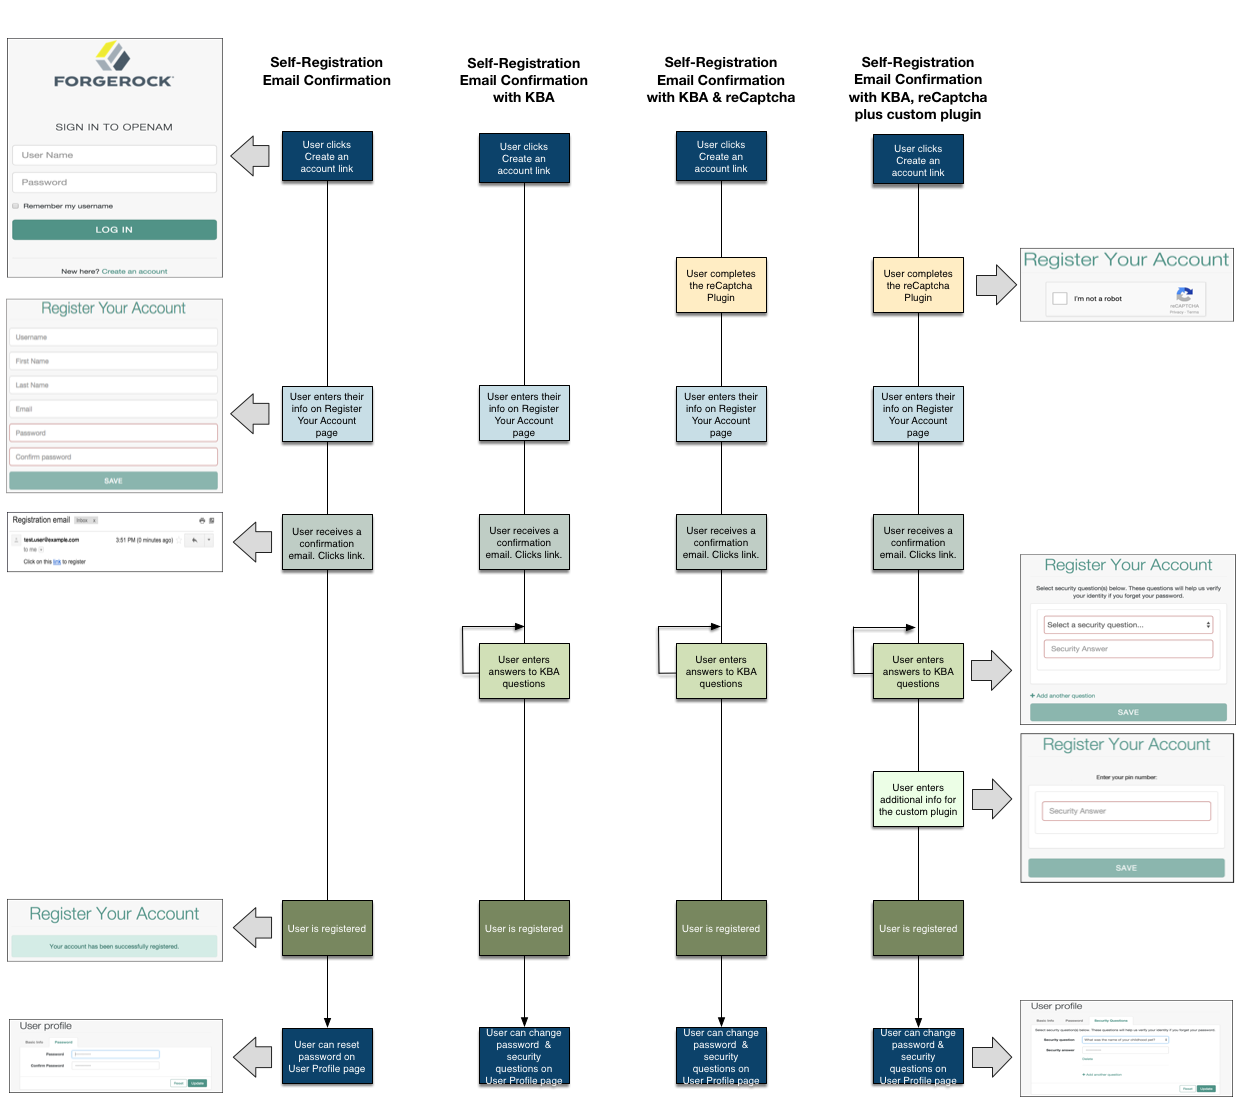
When performing user self-service functions, you can enable one or more security methods, such as email validation, Google reCAPTCHA, knowledge-based authentication, or custom plugins. Each configured security method requires requests to be sent from AM to the client, and completed responses returned to AM to verify.
A unique token is provided in the second request to the client that must be used in any subsequent responses, so that AM can maintain the state of the user self-service process.
By default, the user self-registration flow validates the email address after the user has provided their details. AM also provides a backwards-compatible mode for user self-registration flows configured in OpenAM 13 and 13.5 that lets AM validate the email address before the user has provided their details.
Register a user over REST
Before performing the steps in this procedure, ensure that Verify Email before User Detail (Realms > Realm Name > Services > User Self-Service > User Registration) is disabled.
-
Create a GET request to the
/selfservice/userRegistrationendpoint.Notice that the request does not require any form of authentication:
$ curl \ --header "Accept-API-Version: resource=1.0, protocol=1.0" \ https://openam.example.com:8443/openam/json/realms/root/selfservice/userRegistration { "requirements": { "$schema": "http://json-schema.org/draft-04/schema#", "description": "New user details", "properties": { "user": { "description": "User details", "type": "object" } }, "required": [ "user" ], "type": "object" }, "tag": "initial", "type": "userDetails" }bashAM sends a request to complete the user details. The
requiredarray defines the data that must be returned to AM to progress past this step of the registration. In the example, the required type is auserobject that contains the user details. -
Create a POST response back to the
/selfservice/userRegistrationendpoint with a query string containing_action=submitRequirements. In the POST data, include aninputelement in the JSON structure, which should contain values for each element in therequiredarray of the request.In this example, AM requests an object named
user. Ths object should contain values for theusername,givenName,sn,mail,userPassword, andinetUserStatusproperties:$ curl \ --header "Accept-API-Version: resource=1.0, protocol=1.0" \ --request POST \ --header "Content-Type: application/json" \ --data \ '{ "input": { "user": { "username": "DEMO", "givenName": "Demo User", "sn": "User", "mail":"demo@example.com", "userPassword": "forgerock", "inetUserStatus": "Active" } } }' \ https://openam.example.com:8443/openam/json/realms/root/selfservice/userRegistration?_action=submitRequirements { "requirements": { "$schema": "http://json-schema.org/draft-04/schema#", "description": "Verify emailed code", "properties": { "code": { "description": "Enter code emailed", "type": "string" } }, "required": [ "code" ], "type": "object" }, "tag": "validateCode", "token": "eyJ0eXAiOiJKV.....QiLCJjmqrlqUfQ", "type": "emailValidation" }bashIf the response is accepted, AM continues with the registration process and sends the next request for information.
The value of the
tokenelement should be included in this and any subsequent responses to AM for this registration; AM uses this information to track which stage of the registration process is being completed.Note that the request for information is of the type
emailValidation. Other possible types include:-
captcha, if the Google reCAPTCHA plugin is enabled -
kbaSecurityAnswerDefinitionStage, if knowledge-based security questions are required
For an example of Google reCAPTCHA validation, see Retrieve forgotten usernames.
-
-
Return the information required by the next step of the registration, along with the
tokenelement.In this example, the user information was accepted and a code was emailed to the email address. AM requires this code in the response in an element named
codebefore continuing:$ curl \ --request POST \ --header "Content-Type: application/json" \ --header "Accept-API-Version: resource=1.0, protocol=1.0" \ --data \ '{ "input": { "code": "cf53fcb6-3bf2-44eb-a437-885296899699" }, "token": "eyJ0eXAiOiJKV.....QiLCJjmqrlqUfQ" }' \ https://openam.example.com:8443/openam/json/realms/root/selfservice/userRegistration?_action=submitRequirements { "type": "selfRegistration", "tag": "end", "status": { "success": true }, "additions": {} }bashWhen the process is complete, the response from AM has a
tagproperty with value ofend. If thesuccessproperty in thestatusobject has a value oftrue, then self-registration is complete and the user account was created.In the example, AM only required email verification to register a new user. In flows containing Google reCAPTCHA validation or knowledge-based security questions, you would continue returning POST data to AM containing the requested information until the process is complete.
Register a user over REST (backwards-compatible mode)
Before performing the steps in this procedure, ensure that Verify Email before User Detail (Realms > Realm Name > Services > User Self-Service > User Registration) is enabled.
-
Create a GET request to the
/selfservice/userRegistrationendpoint.Notice that the request does not require any form of authentication:
$ curl \ --header "Accept-API-Version: resource=1.0, protocol=1.0" \ https://openam.example.com:8443/openam/json/realms/root/selfservice/userRegistration { "type":"emailValidation", "tag":"initial", "requirements":{ "$schema":"http://json-schema.org/draft-04/schema#", "description":"Verify your email address", "type":"object", "required":[ "mail" ], "properties":{ "mail":{ "description":"Email address", "type":"string" } } } }bashAM sends the first request for security information. In this example, the first request is of type
emailValidation, but other types includecaptcha, if the Google reCAPTCHA plugin is enabled, andkbaSecurityAnswerDefinitionStage, if knowledge-based authentication is required.The
requiredarray defines the data that must be returned to AM to progress past this step of the registration.The
propertieselement contains additional information about the required response, such as a description of the required field, or the site key required to generate a reCAPTCHA challenge. -
Create a POST response back to the
/selfservice/userRegistrationendpoint with a query string containing_action=submitRequirements. In the POST data, include aninputelement in the JSON structure, which should contain values for each element in therequiredarray of the request.In this example, a
mailvalue was requested:$ curl \ --request POST \ --header "Content-Type: application/json" \ --header "Accept-API-Version: resource=1.0, protocol=1.0" \ --data \ '{ "input": { "mail": "demo.user@example.com" } }' \ https://openam.example.com:8443/openam/json/selfservice/userRegistration\ ?_action=submitRequirements { "type":"emailValidation", "tag":"validateCode", "requirements":{ "$schema":"http://json-schema.org/draft-04/schema#", "description":"Verify emailed code", "type":"object", "required":[ "code" ], "properties":{ "code":{ "description":"Enter code emailed", "type":"string" } } }, "token":"eyAicHis...PIF-lN4s" }bashIf the response was accepted, AM continues with the registration process and sends the next request for information. In this example, the email address was accepted and a code was emailed to the address, which AM requires in the response in an element named
codebefore continuing.The value of the
tokenelement should be included in this and any subsequent responses to AM for this registration. -
Continue returning POST data to AM containing the requested information, in the format specified in the request. Also return the
tokenvalue in the POST data, so that AM can track which stage of the registration process is being completed:$ curl \ --request POST \ --header "Content-Type: application/json" \ --header "Accept-API-Version: resource=1.0, protocol=1.0" \ --data \ '{ "input": { "code": "cf53fcb6-3bf2-44eb-a437-885296899699" }, "token": "eyAicHis...PIF-lN4s" }' \ https://openam.example.com:8443/openam/json/selfservice/userRegistration\ ?_action=submitRequirements { "type":"userDetails", "tag":"initial", "requirements":{ "$schema":"http://json-schema.org/draft-04/schema#", "description":"New user details", "type":"object", "required":[ "user" ], "properties":{ "user":{ "description":"User details", "type":"object" } } }, "token":"eyAicHis...PIF-lN4s" }bash -
When requested—when the
typevalue in the request isuserDetails—supply the details of the new user as an object in the POST data:$ curl \ --request POST \ --header "Content-Type: application/json" \ --header "Accept-API-Version: resource=1.0, protocol=1.0" \ --data \ '{ "input": { "user": { "username": "demo", "givenName": "Demo User", "sn": "User", "userPassword": "d3m0", "inetUserStatus": "Active" } }, "token": "eyAicHis...PIF-lN4s" }' \ https://openam.example.com:8443/openam/json/selfservice/userRegistration\ ?_action=submitRequirements { "type": "selfRegistration", "tag": "end", "status": { "success": true }, "additions": {} }bashWhen the process is complete, the
tagelement has a value ofend. If thesuccesselement in thestatuselement has a value oftrue, then self-registration is complete and the user account was created.
The user self-service feature provides options to set the user’s destination after a successful self-registration.
These options include redirecting the user to a 'successful registration' page, to the login page,
or automaticatically logging the user into the system.
Use the Destination After Successful Self-Registration property to set the option
(on the console: Realm Name > Services > User Self-Service > User Registration).
When you select User sent to 'successful registration' page or User sent to login page,
the JSON response after a successful registration is as follows:
{
   "type": "selfRegistration",
   "tag": "end",
   "status": {
       "success": true
   },
   "additions": {}
}If you select User is automatically logged in, the JSON response is:
{
"type": "autoLoginStage",
"tag": "end",
"status": {
"success": true
},
"additions": {
"tokenId": "AQIC5…MQAA*",
"successUrl": "/openam/console"
}
}