UMA use case
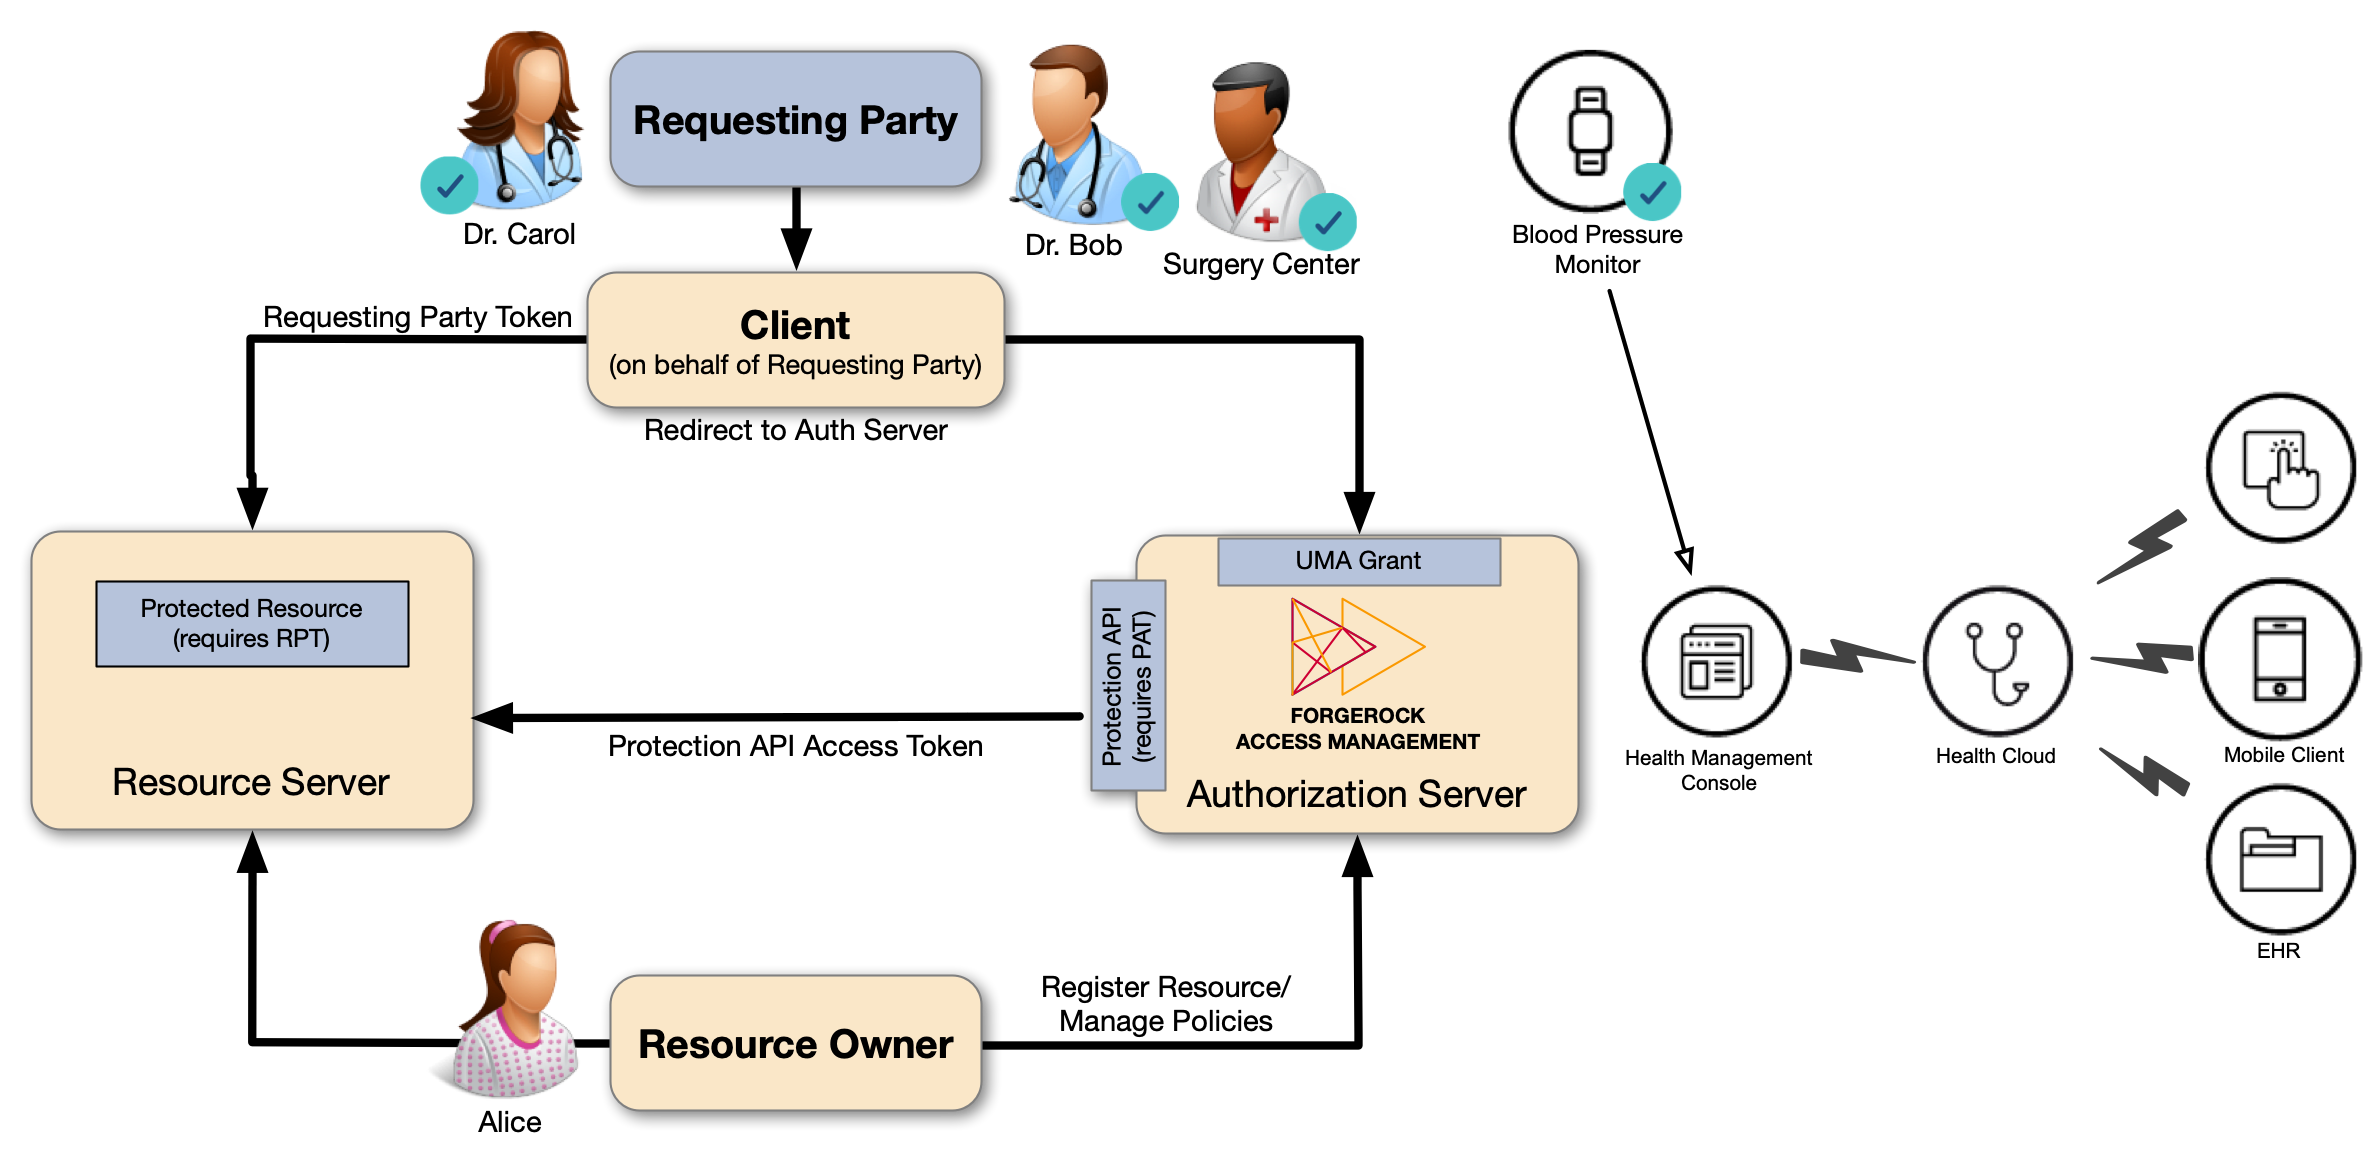
A resource owner, Alice, is a patient who plans to undergo a medical procedure at a surgery center.
Dr. Bob is a specialist surgeon who needs read access (for example, view scope) to Alice’s electronic health records
in order to operate, and write access (for example, comment scope) in order to add new entries related to the surgery.
Alice’s records are a resource whose contents have built up over time and to which Alice’s regular physician,
Dr. Carol, already has access.
Alice, or some party representing Alice, registers her health records and sets up permissions using authorization policies, giving Dr. Bob and Dr. Carol access to her health data. On an online healthcare application, Alice can easily grant access to her data by clicking a Share button, or decline access by clicking a Deny button.
UMA can also solve managed consent for IoT deployments. For example, Alice needs to be monitored after her operation. Dr. Bob prescribes a smart medical device for Alice, such as a clinical-grade blood pressure monitor, which must be registered by the resource server to place it under the authorization server’s protection. The blood pressure monitor sends data to a server that aggregates and transmits the data to external devices, allowing Dr. Bob and Dr. Carol access to Alice’s data on their tablets or mobile apps.
AM supports a one-to-many policy that can be shared with many entities, rather than a single requesting party. Thus, Alice is able to share her data with Dr. Bob, Dr. Carol, and the clinical and operational employees at the surgery center.
In this example, you will learn how to:
-
Create an example configuration in AM.
-
Register and protect a resource as the resource owner.
-
Request access to the resource as the requesting party, through the UMA grant flow.
|
This example demonstrates UMA concepts and the grant flow. It does not give insight into the more technical aspects of UMA. Read the rest of these topics to learn how to configure UMA in production environments, and for in-depth explanations about the REST APIs. |
You can run this example in two ways:
-
Use the UMA Postman collection.
-
Configure UMA manually by following the steps in a series of procedures, and then run the flow examples using your preferred REST client.
UMA Postman collection
ForgeRock provides an UMA Postman collection to configure AM for the example, and to run each of these procedures. The Postman collection also contains REST calls to the supporting UMA endpoints, that you can run as part of the example.
-
Download and install Postman.
-
Download the ForgeRock UMA Postman collection.
-
Import the collection in Postman:
-
Go to File > Import … > Upload Files.
-
Select the collection you downloaded, and click Open, then click Import.
-
-
Change the collection variables to suit your environment:
-
On the Collections tab, select the
ForgeRock UMA Collection. -
On the Variables tab, change the values of at least the following variables to match your AM deployment:
-
URL_base -
admin_password
-
-
Save your changes.
You are ready to start running the collection.
The collection is divided into the following folders:
-
Prerequisitescontains REST calls equivalent to the configuration tasks in Configure AM for UMA.If you run the calls in this folder, do not perform the equivalent manual steps, to avoid object conflicts.
-
UMA Resource Registration Flowcontains the REST calls in Register and protect an UMA resource. -
UMA Grant Flowcontains the REST calls in Request access to a resource. -
Managing UMA Resourcescontains REST calls related to the /uma/resource_set endpoint. -
Managing UMA User Labelscontains REST calls to manage UMA user and favorite labels. -
Managing UMA Policiescontains REST calls related to the /json/users/{user}/uma/policies endpoint.
-
Manual steps
The high-level steps to run the example manually are as follows:
Configure AM for UMA
Configure the example UMA deployment to test the procedures in this documentation:
Create a basic OAuth 2.0 provider service
These steps configure a basic OAuth 2.0 provider suitable for the example.
-
In the AM admin UI, go to Realms > Realm Name > Services.
-
Create an OAuth 2.0 provider, or configure it if one is already created.
-
If an OAuth 2.0 provider is already created, click on it.
-
If there is no OAuth 2.0 provider, add one:
-
Click Add a Service.
-
On the drop-down menu, select the OAuth2 Provider service, and click Create (leave the default field values).
-
-
-
On the OAuth 2.0 provider page, select the Advanced tab, and check that the following fields are configured:
-
Grant Types: At least,
UMAandResource Owner Password Credentials. -
Response Type Plugins: At least,
id_token|org.forgerock.openidconnect.IdTokenResponseTypeHandlerandtoken|org.forgerock.oauth2.core.TokenResponseTypeHandlermust be configured.
-
Create a basic UMA provider service
-
In the AM admin UI, go to Realms > Realm Name > Services, and add an UMA Provider service.
The default configuration is suitable for the example.
For production environments, see UMA actors.
Create an UMA client
Create a profile for the example UMA client in AM. Because this client will use the UMA grant flow, which requires an ID token, you must also configure OpenID Connect properties on it:
-
In the AM admin UI, go to Realms > Realm Name > Applications > OAuth 2.0 > Clients.
-
Click Add Client, and enter the following values:
-
Client ID:
UmaClient -
Client secret:
password -
Redirection URIs: (For this example, leave this field empty.)
-
Scope(s):
viewopenidcommentdownloadType
view, press Enter, then typeopenid, press Enter, and so on. -
Default Scope(s): (For this example, leave this field empty.)
-
-
Click Create.
-
On the UmaClient page, select the Advanced tab, and enter the following values:
-
Grant Types:
UMA,Resource Owner Password CredentialsYou will need to enter
UMA, press Enter, and then enterResource Owner Password Credentials.This example uses the Resource Owner Password Credentials grant, but you can use any grant type except the Client Credentials grant. This is because this client acts on behalf of the requesting party, which needs to authenticate with their identities as part of the flow.
-
Token Endpoint Authentication Method:
client_secret_postConfidential OpenID Connect clients can use several methods to authenticate, but this example uses
client_secret_postfor clarity. For more information, see OIDC client authentication.
-
-
Save your changes.
Create an UMA resource server client
Create a profile for the example resource server client. Because this client only needs to obtain PATs, it does not require any OpenID Connect-related configuration.
-
In the AM admin UI, go to Realms > Realm Name > Applications > OAuth 2.0 > Clients.
-
Click Add Client, and enter the following values:
-
Client ID:
Uma-Resource-Server -
Client secret:
password -
Redirection URIs: (For this example, leave this field empty.)
-
Scope(s):
uma_protection -
Default Scope(s): (For this example, leave this field empty.)
-
-
Click Create.
-
On the UmaCUma-Resource-Server page, select the Advanced tab, and enter the following values:
-
Grant Types:
Resource Owner Password CredentialsThis example uses the Resource Owner Password Credentials grant, but you can use any grant type except the Client Credentials grant. This is because the resource owner must authenticate to the resource server.
-
-
Save your changes.
Create an UMA resource owner
-
In the AM admin UI, go to Realms > Realm Name > Identities.
-
Click New, and create a new resource owner.
This example uses the following values:
-
ID:
alice -
First Name:
Alice -
Last Name:
Resource-Owner -
Full Name:
Alice Resource-Owner -
Password:
Ch4ng31t
-
-
Click Create.
Create a requesting party
-
In the AM admin UI, go to Realms > Realm Name > Identities.
-
Click New, and create a new requesting party.
This example uses the following values:
-
ID:
bob -
First Name:
Bob -
Last Name:
Requesting-Party -
Full Name:
Bob Requesting-Party -
Password:
Ch4ng31t
-
-
Click Create.
Register and protect an UMA resource
Alice, the resource owner, has been given the latest results of her medical procedure. To share the results with her doctors, Alice registers the results online in her surgery’s resource server, and lets Dr. Bob view them and comment on them:

Flow explained
-
A resource owner wants to make a resource sharable and sends a request to the resource server (labeled 1 in the diagram).
-
The resource server requires the resource owner to acquire a PAT on the authorization server (2).
-
The authorization server returns a PAT, which lets the resource owner register resources and manage policies (3).
-
The resource server registers the resource on the authorization server at the resource registration endpoint (4).
-
The resource owner creates a policy after registering the resource (5).
Perform the steps in the following procedure to register an example resource and protect it, as Alice:
-
Alice’s client application requests a PAT on her behalf.
The client application will use the PAT as an authorization token to register Alice’s medical records in AM. The records are already stored in the surgery’s resource server.
The following example uses the
Resource Owner Password Credentialsgrant:$ curl \ --request POST \ --data 'grant_type=password' \ --data 'scope=uma_protection' \ --data 'username=alice' \ --data 'password=Ch4ng31t' \ --data 'client_id=UMA-Resource-Server' \ --data 'client_secret=password' \ "https://openam.example.com:8443/openam/oauth2/realms/root/realms/alpha/access_token" { "access_token": "oMsRVDXHYsWAC0KClr6dmX2_cIc", "scope": "uma_protection", "token_type": "Bearer", "expires_in": 3599 }The value returned in the
access_tokenobject is the PAT. -
Alice registers her medical records in AM as an UMA resource. The client application uses the PAT, obtained previously, as authorization:
$ curl \
--request POST \
--header 'authorization: Bearer oMsRVDXHYsWAC0KClr6dmX2_cIc' \ (1)
--header 'cache-control: no-cache' \
--header 'content-type: application/json' \
--data '{
    "resource_scopes": [
        "view", "comment", "download" (2)
    ],
    "name": "my resource 106",
    "type": "type"
}' \
"https://openam.example.com:8443/openam/uma/realms/root/realms/alpha/resource_set"
{
    "_id": "0d7790de-9066-4bb6-8e81-25b6f9d0b8853", (3)
    "user_access_policy_uri": "https://openam.example.com:8443/openam/XUI/?realm=/#uma/share/0d7790de-9066-4bb6-8e81-25b6f9d0b8853"
}
1 Use the PAT previously acquired on behalf of Alice. 2 A set of actions or permissions that the resource supports. Because UMA is an OAuth 2.0/OpenID Connect extension, the permissions are in the form of scopes. 3 The value returned in the _idfield is the ID of the new UMA resource.The resource is ready. Alice must now create a policy to share the resource with Dr. Bob, specifying the actions that Dr. Bob can perform on the resource.
-
Alice logs in to AM, the UMA authorization sever:
$ curl \ --request POST \ --header "Content-Type: application/json" \ --header "X-OpenAM-Username: alice" \ --header "X-OpenAM-Password: Ch4ng31t" \ --header "Accept-API-Version: resource=2.0, protocol=1.0" \ 'https://openam.example.com:8443/openam/json/realms/root/realms/alpha/authenticate' { "tokenId":"AQIC5wM2LY4S…Q4MTE4NTA2*", "successUrl":"/openam/console", "realm":"/alpha" }The value returned in the
tokenIdfield is Alice’s session token. -
Using the client application, Alice creates a policy to share the newly created resource with Dr. Bob:
$ curl \ --request PUT \ --header 'Accept-API-Version: resource=1.0' \ --header 'cache-control: no-cache' \ --header 'content-type: application/json' \ --header "iPlanetDirectoryPro: AQIC5wM2LY4S…Q4MTE4NTA2*" \ (1) --header "If-None-Match: *" \ --data '{ "policyId": "0d7790de-9066-4bb6-8e81-25b6f9d0b8853", (2) "permissions": [ { "subject": "bob", "scopes": [ (3) "view", "comment" ] } ] }' \ "https://openam.example.com:8443/openam/json/realms/root/realms/alpha/users/alice/uma/policies/0d7790de-9066-4bb6-8e81-25b6f9d0b8853" (4) { "_id": "0d7790de-9066-4bb6-8e81-25b6f9d0b8853", "_rev": "-1985914901" }1 Use Alice’s session token. Administrative users such as amAdmincannot create UMA resource policies on behalf of a resource owner.2 Use the ID of the UMA resource. 3 A subset of the permissions or scopes available for this resource. The requesting party, "subject": "bob", can only view or comment on the resource, but not download it.4 Use the ID of the UMA resource, appended at the end of the URL. The resource is now shared with Dr. Bob, who has permission to
viewandcommenton Alice’s records.
Request access to a resource
When the requesting party, Dr. Bob, needs to access Alice’s records, he uses an application on his computer. The application makes a call to AM to request permission to see Alice’s records. Once granted, the application shows the permission token to the server that stores Alice’s records.
This, in a nutshell, is the UMA grant flow.
Follow these steps to request access to Alice’s records, as Dr. Bob’s client application:
-
Acquire a PAT on behalf of Alice.
You will use the PAT later, to authorize a permission ticket for Dr. Bob.
The following example uses the
Resource Owner Password Credentialsgrant:$ curl \ --request POST \ --data 'grant_type=password' \ --data 'scope=uma_protection' \ --data 'username=alice' \ --data 'password=Ch4ng31t' \ --data 'client_id=UMA-Resource-Server' \ --data 'client_secret=password' \ "https://openam.example.com:8443/openam/oauth2/realms/root/realms/alpha/access_token" { "access_token": "oMsRVDXHYsWAC0KClr6dmX2_cIc", "scope": "uma_protection", "token_type": "Bearer", "expires_in": 3599 }The value returned in the
access_tokenfield is the PAT. -
Gather information about the requesting party.
To request access to Alice’s records, Dr. Bob, and his client application, must prove their identity to the authorization server (AM). AM will issue them an ID token with their identity’s details.
$ curl \ --request POST \ --data 'client_id=UmaClient' \ --data 'client_secret=password' \ --data 'grant_type=password' \ --data 'scope=openid' \ --data 'username=bob' \ --data 'password=Ch4ng31t' \ "https://openam.example.com:8443/openam/oauth2/realms/root/realms/alpha/access_token" { "access_token": "f09f55e5-5e9c-48fe-aeaa-d377de88e8e6", "scope": "openid", "id_token": "eyJ0eXA…FBznEB5A", "token_type": "Bearer", "expires_in": 4999 }The value of the
id_tokenfield (an OpenID Connect ID token), is the UMA claim token that provides information about Dr. Bob. -
Obtain a permission ticket for Dr. Bob’s client application.
Permission tickets let requesting parties request access to a particular resource. In this case, Dr. Bob’s client application needs a permission ticket to access Alice’s medical records.
$ curl \ --request POST \ --header 'authorization: Bearer 057ad16f-7dba-4049-9f34-e609d230d43a' \ (1) --header 'cache-control: no-cache' \ --header 'content-type: application/json' \ --data '[ { "resource_id" : "ef4d750e-3831-483b-b395-c6f059b5e15d0", (2) "resource_scopes" : ["view"] } ]' \ "https://openam.example.com:8443/openam/uma/realms/root/realms/alpha/permission_request" { "ticket": "eyJ0eXAiOiJ…XPeJi3E" (3) }1 Use the PAT previously acquired on behalf of Alice. 2 The ID of the protected resource. This is the ID of the resource created in Register an UMA resource (REST). 3 The permission ticket, which links Alice’s identity to a resource, and to the action Dr. Bob is requesting. -
Obtain an RPT for Dr. Bob so that he has access to Alice’s records.
$ curl \ --request POST \ --data 'client_id=UmaClient' \ --data 'client_secret=password' \ --data 'grant_type=urn:ietf:params:oauth:grant-type:uma-ticket' \ --data 'ticket=eyJ0eXAiOiJ…XPeJi3E' \ (1) --data 'claim_token=eyJ0eXA…FBznEB5A' \ (2) --data 'claim_token_format=http://openid.net/specs/openid-connect-core-1_0.html#IDToken' \ "https://openam.example.com:8443/openam/oauth2/realms/root/realms/alpha/access_token" { "access_token": "Aw4a92ZoKsjadWKw2d4Rmcjv7DM", "token_type": "Bearer", "expires_in": 3599 }1 Use the permission ticket obtained previously. 2 Use the claim token obtained previously. The value of the
access_tokenobject is the RPT.Presenting the RPT, Dr. Bob’s client application can now access Alice’s records in the surgery’s resource server.
Permission tickets have a lifetime of 180 seconds by default. AM will return a message similar to the following if the ticket has expired:
{
  "error_description": "The provided access grant is invalid, expired, or revoked.",
  "error": "invalid_grant"
}
Obtain a new permission ticket and try requesting the RPT again.
What’s next?
Use the knowledge you gained by running through the example to develop and configure your own UMA environment.
The following table shows the tasks you need to perform to do so, and the associated documentation:
| Task | Resources |
|---|---|
Learn about AM as the authorization service, and configure the UMA actors. |
|
Learn more about resources, resource labels, and authorization policies, and their specific REST endpoints. |
|
Discover how to extend the default UMA implementation to suit your environment’s needs. |