Set up policy and application stores
Setting up a policy and/or application store in AM requires two procedures:
-
Configuring the connection between AM and the directory server.
-
Enabling a realm to use the newly configured directory server.
Connect AM to a policy or application store
-
In the AM admin UI, go to Configure > Global Services > External Data Stores.
-
On the Secondary Configurations tab, click Add a Secondary Configuration.
-
Complete the form as follows:
-
In the Name field, provide a name for the data store; for example,
myPolicyStore -
In the Host Urls field, enter one or more connection strings. The format for each connection string is
HOST:PORT; for examplepolicies1.example.com:636.AM will use the first connection string in the list, unless the server is unreachable. In this case, it will try the subsequent connection strings in the order in which they are defined.
-
Enter the Bind DN and Bind Password of the service account AM uses to authenticate to the data store. The account needs sufficient privileges to read and write to the root suffix of the data store.
-
Specify whether to use SSL and/or Start TLS connectivity to the data store by enabling the relevant option.
-
Specify whether to access the data stores by using multiple directory instances in an affinity deployment, rather than a single master directory instance using an active/passive deployment.
If you enable this option, specify each of the directory server instances that form the affinity deployment in the Host Urls field.
-
-
To save your changes, click Create.
AM will attempt to contact the data store using the specified settings. If successful, AM will attempt to make the required schema and structure changes in the data store. If the service account specified in the Bind DN property does not have permissions to alter schema and structure, you will need to manually apply the required settings.
If AM can contact the data store using the specified settings, the connection is saved and made available for use as a policy or application store.
-
To edit the connection settings to a store, perform the following steps:
-
On the Secondary Configuration tab, click the name of the data store.
-
Edit the configuration as required, and click Save Changes.
-
-
Repeat these steps for additional policy or application stores.
You can now configure AM to use the new store. See Configure a realm to use a policy or application store.
Configure a realm to use a policy or application store
| Changing the policy or application store will cause any existing policies or applications to become unavailable to the realm. |
Either recreate the policies or applications manually, or use Amster to export the existing instances, then import them back after changing the stores.
-
In the AM admin UI, go to Realms > Realm name Services.
-
Configure the External Data Stores service in the realm:
-
If the External Data Stores service has not yet been added to the realm, click Add a Service, and select External Data Stores.
-
If the External Data Stores service has already been added to the realm, click External Data Stores to edit the configuration.
-
-
On the External Data Stores page, select the name of the store to use as the Policy Data Store and/or Application Data Store, and click Save Changes.
If you choose the Default Datastoreoption for either property, AM will use the configuration data store that was specified during installation.Changes take effect immediately. New policies or applications are created in the configured data store.
Remove a policy or application store
Follow these steps to remove a policy or application store from a realm, and to delete the store from the AM configuration.
| You cannot remove a policy or application store that is being used by a realm. |
-
For each realm that is using the store, in the AM admin UI, go to Realms > Realm Name > Services > External Data Stores, and change each of the drop-down menus to either
Default Datastore, or an alternative data store.Save your changes.
-
Go to Configure > Global Services > External Data Stores > Secondary Configurations. Click the name of the store to remove, and click the delete icon.
If the data store is still in use, you will see an error message as follows:
Unable to modify data store instance because it is referenced by the data store service of realm /Realm Name
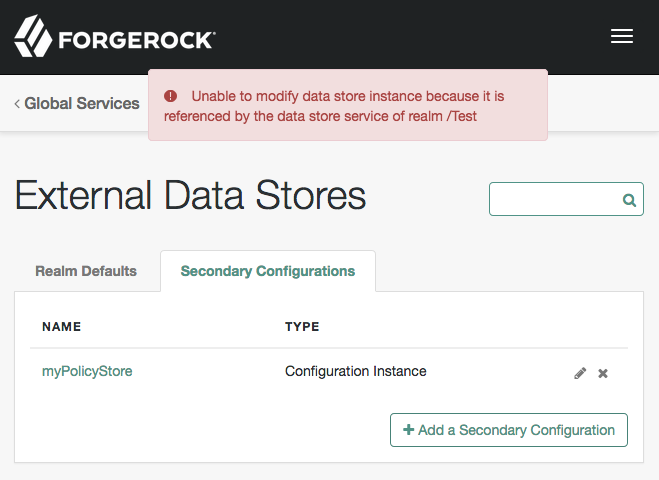
If you see this error, repeat the first step to remove the unwanted store from the listed realm, then repeat this step.