Client configuration reference
- Enabled
-
Specifies whether the provider is enabled.
Required: Yes.
- Auth ID Key
-
Specifies the attribute the social identity provider uses to identify an authenticated individual. For example,
id,sub, anduser_id.Required: Yes.
- Client ID
-
Specifies the
client_idparameter as described in section 2.2 of The OAuth 2.0 Authorization Framework specification.Required: Yes.
- Client Secret
-
Specifies the
client_secretparameter as described in section 2.3 of The OAuth 2.0 Authorization Framework specification.Required: No.
- Authentication Endpoint URL
-
Specifies the URL to the social provider’s endpoint handling authentication as described in section 3.1 of The OAuth 2.0 Authorization Framework. For example,
https://accounts.google.com/oauth2/v2/auth.Required: Yes.
- Access Token Endpoint URL
-
Specifies the URL to the endpoint handling access tokens as described in section 3.2 of The OAuth 2.0 Authorization Framework specification. For example,
https://www.googleapis.com/oauth2/v4/token.Required: Yes.
- User Profile Service URL
-
Specifies the user profile URL that returns profile information. For example,
https://www.googleapis.com/oauth2/v3/userinfo.This URL should return JSON objects in its response.
Required: No.
- Token Introspection Endpoint URL
-
Specifies the URL to the endpoint handling access token validation, as described in the OAuth 2.0 Token Introspection specification. For example,
https://oauth2.googleapis.com/tokeninfo.Required: No.
- Redirect URL
-
Specifies the URL the identity provider will redirect the user to after authenticating, as described in Section 3.1.2 of The OAuth 2.0 Authorization Framework specification.
This URL is usually a page or path in AM; for example,
https://platform.example.com:8443/am, and it is also registered in the identity provider’s service.You can also use a custom URI scheme as the redirect, if you are using an app built with the ForgeRock SDKs for Android or iOS. For example,
com.example.sdkapp:redirect_uri_pathorfrauth://com.forgerock.ios.sdkapp.When using the
FORM_POSTResponse Mode, you must specify theform_postendpoint in the redirection URL. Refer to Response Mode for more information.Required: Yes.
- Redirect after form post URL
-
Specifies the URL of a custom login page or application. AM will send processed form post data related to social login authentication to that URL as the value of the
form_post_entryquery parameter.To continue the authentication journey, the custom login page is responsible for making a call to the AM
/json/authenticateendpoint with the authentication ID (authID) and the processed form data (form_post_entry).Configure this property when the following is true:
-
The
FORM_POSTResponse Mode is configured. -
Your users log in to AM using custom login pages, such as apps using the ForgeRock SDKs, instead of the AM UI.
Required: No.
-
- Scope Delimiter
-
Specifies the delimiter used to separate scope values. For example, a blank space (), or a comma character (,).
Most providers use a blank space.
Required: Yes.
- OAuth Scopes
-
Specifies the list of scopes to request from the provider.
The scopes that the provider returns depends on the permissions that the resource owner, such as the end user, grants to the client application.
For example, Google exposes its supported scopes in their OAuth 2.0 Scopes for Google APIs documentation.
Required: Yes.
- Client Authentication Method
-
Specifies how the client should authenticate to the provider. Possible values are:
CLIENT_SECRET_POST-
The client sends the client ID and the secret in the
client_IDand theclient_secretparameters in the body of the request. CLIENT_SECRET_BASIC-
The client sends the client ID and the secret in a basic authorization header with the base64-encoded value of client-id:client-secret.
PRIVATE_KEY_JWT-
The client sends its credentials to the provider in a signed JWT as specified in the JSON Web Token (JWT) Profile for OAuth 2.0 Client Authentication and Authorization Grants.
ENCRYPTED_PRIVATE_KEY_JWT-
The client sends its credentials to the provider in a signed, then encrypted JWT as specified in the JSON Web Token (JWT) Profile for OAuth 2.0 Client Authentication and Authorization Grants.
TLS_CLIENT_AUTH-
The client presents a X.509 certificate that uses public key infrastructure (PKI), as specified in the OAuth 2.0 Mutual TLS (mTLS) Client Authentication and Certificate Bound Access Tokens.
SELF_SIGNED_TLS_CLIENT_AUTH-
The client presents a X.509 self-signed certificate, as specified in the OAuth 2.0 Mutual TLS (mTLS) Client Authentication and Certificate Bound Access Tokens.
Some of the authentication methods require additional configuration:
How do I configure JWT authentication with signed JWTs?
-
Obtain a list of supported signing algorithms from the provider’s
.well-knownendpoint, and decide which one you will use. -
In the Private Key JWT Signing Algorithm field, enter the signing algorithm that AM will use to sign the JWT. For example,
RSA256.This field may already be configured if the client is sending request objects.
-
Create a signing secret, and map it to the
am.services.oauth2.oidc.rp.jwt.authenticity.signingsecret ID in an AM secret store.The secret ID may already have secrets mapped to it if the client is sending signed request objects to the provider, or if another client in the realm is already using it.
For more information, refer to Secret stores, and /oauth2/connect/rp/jwk_uri.
-
Provide a JWK with the public key to the identity provider. Refer to their documentation for more information.
For example, you could copy the contents of the public JWK in a field in the provider’s service configuration, or you could configure the realm’s
/oauth2/connect/rp/jwk_uriendpoint, which exposes the client’s public keys.Configure the realm’s
/oauth2/connect/rp/jwk_uriendpoint in the provider, which exposes the client’s public keys. Refer to the provider’s documentation for more information. -
Change the value in the Private Key JWT Expiration Time (seconds) field, if needed. It has a sensible value preconfigured, but you may need to tune it for your provider.
How do I configure JWT authentication with signed and encrypted JWTs?
-
Follow the steps in How do I configure JWT authentication with signed JWTs? to configure AM to sign authentication JWTs.
Now you are ready to configure AM to encrypted authentication JWTs.
-
Obtain a list of supported encryption algorithms and methods from the provider’s
.well-knownendpoint, and decide which one you will use. -
In the JWT Encryption Algorithm field, select the encryption algorithm.
If the required encryption algorithm does not appear in the drop-down, check the reference entry for the JWT Encryption Algorithm field for information on how to add it.
This field may already be configured if the client is encrypting request objects.
-
In the JWT Encryption Method field, select the encryption method.
This field may already be configured if the client is encrypting request objects.
-
In the JWKS URI Endpoint field, configure the URI containing the provider’s public JWK set.
Obtain the URI from the provider’s
.well-knownendpoint, or their documentation.AM will use the JWK URI to fetch the provider’s public encryption key.
-
Perform one of the following steps depending on the encryption method you configured:
-
If you chose Direct AES Encryption method, select
NONEin the JWT Signing Algorithm field. Signing is redundant with this encryption method. -
If you chose an encryption method different from the Direct AES Encryption method, configure signing. For more information, refer to How do I configure JWT authentication with signed JWTs?.
-
How do I configure mTLS authentication with PKI?
-
Obtain a certificate for AM to use as a client. This certificate must be signed by a certificate authority (CA).
You can use the same certificate for different social identity provider client configurations, and you can only have one mTLS certificate by realm (either PKI-related, or self-signed).
-
Make the certificate available to AM configuring it in an AM secret store, and map its alias to the
am.services.oauth2.mtls.client.authenticationsecret ID.For example, you can create a
PKCS12keystore secret store.For more information, refer to Secret stores.
Even though the identity provider should trust the CA certificate automatically, the client certificate will appear in the /oauth2/connect/rp/jwk_uri endpoint.
How do I configure mTLS authentication with self-signed certificates?
-
Obtain a self-signed certificate that AM will use as a client.
You can use the same certificate for different social identity provider client configurations, and you can only have one mTLS certificate by realm (either PKI-related, or self-signed).
-
Make the certificate available to AM configuring it in an AM secret store, and map its alias to the
am.services.oauth2.mtls.client.authenticationsecret ID.For example, you can create a
PKCS12keystore secret store.For more information, refer to Secret stores.
To trust the self-signed certificate, the social identity provider must be able to access its public key and certificate. Social identity providers may have different ways of accessing public keys; for example, you may be able to configure the public JWK directly in the provider, or you may be able to provide AM’s /oauth2/connect/rp/jwk_uri endpoint, which exposes it.
Refer to your social identity provider documentation for more information.
Required: Yes.
-
- PKCE Method
-
Specifies the PKCE transformation method AM uses when making requests to the provider’s authorization endpoint, as specified in Section 4.2 of the Proof Key for Code Exchange by OAuth Public Clients specification.
Select
NONEto disable PKCE transformations.Required: No.
- Request Parameter JWT Option
-
(OpenID Connect providers only) Specifies whether AM should provide a request object JWT to the provider. Possible values are:
NONE-
AM does not send a request object to the provider.
REFERENCE-
The request object JWT is stored in AM’s CTS token store, and AM exposes a unique identifier for it using the
oauth2/request_uriendpoint for the realm. The URL to the endpoint and the JWT’s unique identifier are passed to the provider in therequest_uriparameter of the request.Ensure that the provider can reach the endpoint.
An example of the URL is
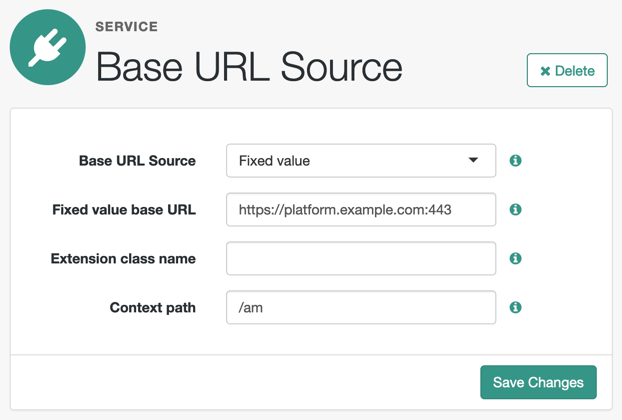
https://platform.example.com:8443/am/realms/root/realms/myRealm/oauth2/request_uri/requestobjectIDWhen integrating with itsme, ensure that the base URL of AM contains the
443port. For example,https://platform.example.com:443/am.To do this, configure the reverse proxy or load balancer to expose the port, or the Base URL Source Service:
-
In the AM admin UI, go to Realms > Realm Name > Services.
-
Add a Base URL Source service if one is not already configured, or select it to change its properties:
-
VALUE-
AM appends the JWT as the value of the
requestparameter of the request.How do I configure the client to send signed request objects?
-
In the Request Parameter JWT Option field, select either
VALUEorREFERENCE.Refer to your identity provider’s documentation for more information.
-
Obtain a list of supported signing algorithms from the provider’s
.well-knownendpoint, and decide which one you will use. -
In the JWT Signing Algorithm field, select the signing algorithm that AM will use to sign the request object. For example,
RS256.This field may already be configured if the client is using JWT client authentication.
-
Create a signing secret that uses the algorithm you selected previously, and map it to the`am.services.oauth2.oidc.rp.jwt.authenticity.signing` secret ID in an AM secret store.
The secret ID may already have secrets mapped to it if the client is using JWT client authentication, or if another client in the realm is already using it.
For more information, refer to Secret stores, and /oauth2/connect/rp/jwk_uri.
-
Provide a JWK with the public key to the identity provider. Refer to their documentation for more information.
For example, you could copy the contents of the public JWK in a field in the provider’s service configuration, or you could configure the realm’s
/oauth2/connect/rp/jwk_uriendpoint, which exposes the client’s public keys.Configure the realm’s
/oauth2/connect/rp/jwk_uriendpoint in the provider, which exposes the client’s public keys. Refer to the provider’s documentation for more information.
How do I configure the client to send signed and encrypted request objects?
-
Follow the steps in How do I configure the client to send signed request objects? to configure AM to send signed request objects.
Now you are ready to configure AM to send encrypted request objects.
-
Enable Encrypt Request Parameter JWT.
-
Obtain a list of supported encryption algorithms and methods from the provider’s
.well-knownendpoint, and decide which one you will use. -
In the JWT Encryption Algorithm field, select the encryption algorithm.
If the required encryption algorithm does not appear in the drop-down, check the reference entry for the JWT Encryption Algorithm field for information on how to add it.
This field may already be configured if the client is encrypting authentication JWTs.
-
In the JWT Encryption Method field, select the encryption method.
This field may already be configured if the client is encrypting authentication JWTs.
-
In the JWKS URI Endpoint field, configure the URI containing the provider’s public JWK set.
Obtain the URI from the provider’s
.well-knownendpoint.AM will use the JWK URI to fetch the provider’s public encryption key.
-
Perform one of the following steps depending on the encryption method you configured:
-
If you chose Direct AES Encryption method, select
NONEin the JWT Signing Algorithm field. Signing is redundant with this encryption method. -
If you chose an encryption method different from the Direct AES Encryption method, configure signing. For more information, refer to How do I configure the client to send signed request objects?.
-
-
- Encrypt Request Parameter JWT
-
Specifies whether the request parameter must be encrypted when Request Parameter JWT Option is set to
REFERENCEorVALUE. - ACR Values
-
(OpenID Connect providers only) Specifies a space-separated list, in order of preference, of the client’s
acrvalues.Required: No.
- Well Known Endpoint
-
(OpenID Connect providers only) Specifies the URL for retrieving information about the provider, such as endpoints, and public keys. For example,
https://accounts.google.com/.well-known/openid-configuration.Required: Yes.
- Request Object Audience
-
(OpenID Connect providers only) Specifies the intended audience (
aud) of the request object when the Request Parameter JWT Option field is set toVALUEorREFERENCE.When not configured, the value of the Issuer field will be used as the audience of the request object.
- OP Encrypts ID Tokens
-
(OpenID Connect providers only) Specifies whether the provider encrypts ID Tokens.
How do I configure the AM to receive encrypted tokens?
-
Obtain a list of supported ID token encryption algorithms from the provider’s
.well-knownendpoint, and decide which one the client will use. -
Create a suitable secret for the algorithm that you chose, and map it to the
am.services.oauth2.oidc.rp.idtoken.encryptionsecret ID in an AM secret store.The secret ID may already have secrets mapped if another client in the realm is already using it.
For more information, refer to Secret stores and /oauth2/connect/rp/jwk_uri.
-
Provide a JWK with the public key to the identity provider. Refer to their documentation for more information.
For example, you could copy the contents of the public JWK in a field in the provider’s service configuration, or you could configure the realm’s
/oauth2/connect/rp/jwk_uriendpoint, which exposes the client’s public keys.Configure the realm’s
/oauth2/connect/rp/jwk_uriendpoint in the provider, which exposes the client’s public keys. Refer to the provider’s documentation for more information.
Required: No.
-
- Issuer
-
(OpenID Connect providers only) Specifies the issuer of ID Tokens.
Either specify a regular expression or a string value that must exactly match the value returned in the ID token, depending on the configuration of the Issuer comparison check setting.
Obtain the
issuervalue from the provider’s.well-knownendpoint.Required: Yes.
- Enable Native Nonce
-
(OpenID Connect providers only) When enabled, the provider native SDK must include a
nonceclaim in the ID token. The value of the claim must be the value of thenonceclaim sent in the Authentication Request.Required: No.
- User Info Response Format
-
(OpenID Connect providers only) Specifies the format in which the provider’s
userinfoendpoint returns data.Some of the options require additional configuration:
How do I configure the client to receive signed userinfo JWTs?
-
In the JWKS URI Endpoint field, configure the URL containing the provider’s public JWK set. Obtain it from the provider’s
.well-knownendpoint, or their documentation.AM will use this URL to fetch the provider’s public signing key.
How do I configure the client to receive signed, then encrypted userinfo JWTs?
-
Follow the steps in How do I configure the client to receive signed userinfo JWTs? to configure AM to receive signed JWTs.
Now you are ready to configure AM to receive encrypted JWTs.
-
Obtain a list of supported ID token encryption algorithms from the provider’s
.well-knownendpoint, and decide which one the client will use. -
Create a suitable secret for the algorithm that you chose, and map it to the
am.services.oauth2.oidc.rp.idtoken.encryptionsecret ID in an AM secret store.The secret ID may already have secrets mapped if another client in the realm is already using it, or if the provider encrypts ID tokens.
For more information, refer to Secret stores and /oauth2/connect/rp/jwk_uri.
-
Provide a JWK with the public key to the identity provider. Refer to the identity provider’s documentation for more information.
For example, you could copy the contents of the public JWK in a field in the provider’s service configuration, or you could configure the realm’s
/oauth2/connect/rp/jwk_uriendpoint, which exposes the client’s public keys.Configure the realm’s
/oauth2/connect/rp/jwk_uriendpoint in the provider, which exposes the client’s public keys. Refer to the provider’s documentation for more information.
Possible values are:
JSON-
The provider’s
userinfoendpoint returns a JSON object. SIGNED_JWT-
The provider’s
userinfoendpoint returns a signed JWT. SIGNED_THEN_ENCRYPTED_JWT-
The provider’s
userinfoendpoint returns a signed, then encrypted JWT.
-
- JWKS URI Endpoint
-
Specifies the URI that contains the public keys of the identity provider. AM will use these keys to verify signatures, or to encrypt objects.
Configure this field when:
-
Client Authentication Method is set to
ENCRYPTED_PRIVATE_KEY_JWT. -
Encrypt Request Parameter JWT is enabled.
-
User Info Response Format is set to
SIGNED_JWTorSIGNED_THEN_ENCRYPTED_JWT.
Required: No.
-
- Claims
-
Any claims on the request object, in JSON format. These claims must conform to the claims request parameter, as defined in the OpenID Connect specification.
- JWT Signing Algorithm
-
Specifies the signing algorithm supported by the provider that AM use to sign the following:
-
Client authentication JWTs when Client Authentication Method is set to
PRIVATE_KEY_JWT. -
(OpenID Connect providers only) Request JWTs when Request Parameter JWT Option is set to
VALUEorREFERENCE.
Obtain a list of the supported algorithms from the provider’s
.well-knownendpoint. SelectNONEif the client will encrypt the JWT with the Direct AES Encryption method, because the signature will be redundant.
Required: No. -
- JWT Encryption Algorithm
-
Specifies the encryption algorithm supported by the provider that AM should use to encrypt client authentication JWTs when Client Authentication Method is set to
PRIVATE_KEY_JWT, and (OpenID Connect providers only) request JWTs when Request Parameter JWT Option is set toVALUEorREFERENCE.If set to
NONE, AM will not encrypt the JWTs. Obtain a list of the supported algorithms from the provider’s.well-knownendpoint. Configure the algorithms exposed in this field using the AM advanced server property, openam.private.key.jwt.encryption.algorithm.whitelist.How do I configure advanced server properties?
-
To configure advanced server properties for all instances in the AM environment, go to Configure > Server Defaults > Advanced in the AM admin UI.
-
To configure advanced server properties for a specific instance, go to Deployment > Servers > Server Name > Advanced.
If the property you want to add or edit is already configured, click on the pencil () button to edit it. When you are finished, click on the tick () button.
Save your changes.
Required: No.
-
- JWT Encryption Method
-
Specifies the encryption algorithm supported by the provider that AM should use to encrypt the following:
-
Client authentication JWTs when Client Authentication Method is set to
PRIVATE_KEY_JWT. -
(OpenID Connect providers only) Request JWTs when Request Parameter JWT Option is set to
VALUEorREFERENCE.
Use in conjunction with
JWT Encryption Algorithm. Obtain a list of the supported methods from the provider’s.well-knownendpoint.Required: No.
-
- Private Key JWT Expiration Time (seconds)
-
Specifies the amount of time, in seconds, that AM will cache the client authentication JWT before creating a new one.
Caching the JWT avoids creating a new one for every client authentication. However, it may also become invalid if the provider changes it configuration.
Required: No.
- Response Mode
-
(OpenID Connect providers only) Specify the way the provider will return ID tokens to AM. Possible values are:
-
DEFAULT. The provider returns the ID token as query parameters, as explained in the OpenID Connect Core 1.0 incorporating errata set 1 specification.Most preconfigured providers use the
DEFAULTresponse mode. -
FORM_POST. The provider returns the ID token by submitting an HTML form using the HTTP POST method, as explained in the OAuth 2.0 Form Post Response Mode specification.When using this response mode, add the
/oauth2/client/form_post/ClientConfigNameURI to the Redirect URL, where ClientConfigName is the name of the social identity provider client that you are configuring. For example,https://platform.example.com:8443/am/oauth2/client/form_post/myAppleClient.By default, the
form_postendpoint processes the post data, encrypts it, and redirects with it back to the authentication tree to resume authentication.However, environments using custom login pages need to configure the Redirect after form post URL property to redirect back to the custom login pages.
The
/oauth2/client/form_postdoes not require authentication. Protect it from denial of service (DoS) attacks by limiting the rate at which it can take connections in your load balancer or proxy.If you configured AM with AES Key Wrap encryption, you must configure the
org.forgerock.openam.encryption.useextractandexpandproperty.For more information, refer to Use stronger encryption algorithms.
Required: Yes.
-
- Certificate Revocation Checking Options
-
Specify one or more options to be used by the TLS certificate revocation checking mechanism.
The possible values are:
-
ONLY_END_ENTITY: Only check the revocation status of end-entity certificates. -
PREFER_CRLS: Prefer certificate revocation lists (CRLs) to Online Certificate Status Protocol (OCSP). -
NO_FALLBACK: Disable the fallback mechanism. -
SOFT_FAIL: Allow revocation check to succeed if the revocation status cannot be determined due to a network error. -
DISABLE_REVOCATION_CHECKING: Disable all revocation checking.
Including
DISABLE_REVOCATION_CHECKINGas one of the options will prevent any revocation checking. For further details of the other options, refer to: PKIXRevocationChecker.Option.If no options are selected, the default behavior is to enable revocation checking with
SOFT_FAIL.If the certificate does not specify any OCSP or CRL endpoints, the revocation checking will hard fail even if the
SOFT_FAILoption is enabled. In this case, an administrator could disable revocation checking. -
- Use custom trust store
-
Specifies whether a custom truststore is used to verify the server certificate of the
.well-knownendpoint or JWKs URI of an OpenID provider (OP) in a TLS handshake.If enabled, a secret ID is dynamically generated using the alphanumeric characters of the client configuration name. For example, a client configuration called
sampleOidcConfigresults in a secret ID namedam.services.oidc.reliant.party.sampleOidcConfig.truststore.Note that the generated secret ID must then be mapped to an alias that exists in the realm secret store.
If this setting is not enabled, the default truststore is used to verify the server certificate.
- Request Native App for UserInfo
-
(Apple SSO) When enabled, this flag indicates that the native app can send the user’s
userinfoin JSON format.Apple returns the
userinfoonly once, when the user first consents to send their details, and not on subsequent authentication attempts. In addition, the user has the option not to consent to Apple sending theiruserinfo.If you are progressively profiling the
userinfowith data from other social providers—usually, using a Patch Object node--there is a risk of overwriting the user’s details with blank values when the user authenticates through Apple SSO.To mitigate this risk, you can add a Scripted Decision node to your authentication journey that assesses whether the
userinfois provided and patches the object accordingly.How do I use a Scripted Decision node to patch an object, based on the returned
userinfo?The normalized-profile-to-managed-user.groovy script and normalized-profile-to-managed-user.js scripts set a boolean flag (
nameEmptyOrNull) that indicates whether the user’sfirstNameandlastNamehave been returned.Create a custom script that uses this flag, then add a Scripted Decision node that calls your script. An example of a custom script that achieves this functionality follows:
-
JavaScript
-
Groovy
if (sharedState.get('nameEmptyOrNull')) {
  outcome = 'true'
} else {
outcome = 'false'
}
if (sharedState.get("nameEmptyOrNull").asBoolean()) { outcome = "true" } else { outcome = "false" }The outcome of the Scripted Decision node will be either to patch the
userinfoobject or not to patch theuserinfoobject.If you need to progressively profile the user information on every authentication, regardless of whether the user’s first name and last name are returned by the OIDC provider, you can use another Scripted Decision node that does the following:
-
If the user details are not present, route the
userinfopatch through a Patch Object node, configured to ignore thefirstNameandlastName. (In the Ignored Fields list, addgivenNameto ignore thefirstNameandsnto ignore thelastName.) -
If the user details are present, route the
userinfopatch through a Patch Object node that patches the full object.
If necessary, also refer to First name and last name are missing when signing in to Identity Cloud or AM 7.x using Apple social sign-on in the ForgeRock Knowledge Base.
Required: No.
-
- UI Config Properties
-
Specifies a map of properties defined and consumed in the UI. The map affects how the identity provider’s logo will show on the login page.
AM common end user UI properties
-
buttonImage: A relative path to an image in the End User UI. -
buttonCustomStyle: Any custom CSS you wish to apply to the button outside of normal End User UI styling. -
buttonClass: Adds the specified class to the identity provider button, for any additional styling you want to apply. -
buttonCustomStyleHover: Adds custom styling when the cursor is hovering over the button. -
buttonDisplayName: The name of the identity provider, which will be included either on the button or in the button’saltattribute, depending on styling. -
iconFontColor: Specifies the color of the icon. You can use methods supported in CSS (such aswhite, or#ffffff). -
iconClass: Adds the specified class to the identity provider icon, for any additional styling you want to apply. -
iconBackground: The color for the background of the icon. You can use methods supported in CSS (such aswhite, or#ffffff).
Required: Yes.
-
- Transform Script
-
A script to convert the provider’s raw profile object into a normalized object.
Each social identity provider returns different user profile information using their own attribute names.
For example, Google’s OIDC
/userinfoendpoint returns claims, which AM stores in arawProfileobject. The followinggoogle-profile-normalization.groovyscript maps the attributes of this object to AM profile attributes:import static org.forgerock.json.JsonValue.field import static org.forgerock.json.JsonValue.json import static org.forgerock.json.JsonValue.object return json(object( field("id", rawProfile.sub), field("displayName", rawProfile.name), field("givenName", rawProfile.given_name), field("familyName", rawProfile.family_name), field("photoUrl", rawProfile.picture), field("email", rawProfile.email), field("username", rawProfile.email), field("locale", rawProfile.locale)))The script returns a JSON object containing normalized attributes in the following format:
("<platformAttributeName>", rawProfile.<providerAttributeName>)For example,
idis the platform attribute name, whilerawProfile.subis the field received from the provider.Even if field names are the same, such as
emailandrawProfile.email, they must still be mapped for them to be included in the returned JSON object.AM provides default scripts for other preconfigured identity providers. To view the bindings and expected return values, find the
<identity provider>-profile-normalization.*scripts in Sample scripts.To write your own script in Groovy or Javascript for an identity provider, go to Realms > Realm Name > Scripts, and use the provided scripts as a reference.
When a user authenticates, the social authentication journey calls another transformation script set in the Social Provider Handler node to convert the attributes again; this time into an identity object that AM can process.
Social authentication nodes expect every attribute to have a value. In other words, the attributes returned by the identity provider cannot be empty or
null, or the journey will end with an error.For example, if a user tries to log in using Google as the identity provider, but they did not configure a surname in their account, Google returns
nullas the value of thefamilyNamefor the identity, and social authentication fails.Ensure all users have their social profiles configured correctly, or modify the transformation scripts so that they don’t collect null or empty attributes.
Required: Yes
- Issuer comparison check
-
(OpenID Connect providers only) Determines how the expected issuer value should match the actual value of the
issclaim:-
EXACT: AM performs a string comparison between the expected and actual issuer values, which must result in an exact match. -
REGEX: AM evaluates the expected issuer value as a regular expression, against which the actual value must match.This lets social identity providers use a common issuer value for multiple tenants, which is replaced with a unique value during the OpenID Connection authentication flow. For example,
^https://login.microsoftonline.com/(.*)/v2.0$is successfully matched againsthttps://login.microsoftonline.com/tenant-d5c6a592-eec6-47f0/v2.0.Consider the performance impact when constructing regular expressions as the comparison is performed for each social identity provider interaction.
Also, ensure the regular expression is as specific as possible to avoid matching against incorrect issuer values.
-