Link identities for authentication
Identity providers and service providers must be able to communicate about users.
Yet, in some cases, the identity provider chooses to communicate a minimum of information about an authenticated user;
for example, a generated, opaque NameID that cannot directly be used
to locate to an identity in the SP identity store.
AM can use these pseudonym identifiers for establishing links between otherwise unrelated accounts, by requiring that the user authenticates to the SP using a linking authentication mechanism.
The following list describes the sequence of events that occurs the first time a user attempts to authenticate to the AM service provider:
-
Accessing the service provider.
A user attempts to access a service and is redirected to the AM server acting as the service provider, specifying the SAML v2.0 service in the login URL. For example:
-
An authentication chain containing the SAML2 Authentication Module.
For example,
https://www.sp.com:8443/openam/XUI/#login/&service=spSAMLChain. -
An authentication tree containing the SAML2 Authentication node.
For example,
https://www.sp.com:8443/openam/XUI/#login/&service=spSAMLTree.
-
-
Authentication at the identity provider.
AM redirects the user to the identity provider. The user authenticates successfully at the identity provider. The identity provider returns a SAML assertion to the SP.
-
Service provider attempts to access a federated identity.
AM attempts to locate the identity in its own user store. No link between the IDP identity and a local one is found.
-
Invocation of the linking chain, or equivalent authentication node(s).
As no link is found, AM does one of the following:
-
(Authentication chains) Invokes a linking authentication chain to determine which local user account to use.
-
(Authentication trees) Goes through a path in the authentication tree that lets the user authenticate on the SP.
-
-
Identity federation.
After successful authentication at the SP, AM then writes the name ID from the assertion into the local user’s profile, creating a permanent link between the two identities.
For more information on creating permanent links between identities, see Persistent or transient federation
For an example of an authentication tree that links identities, see SSO and SLO in Integrated Mode.
The following list describes the sequence of events that occurs during subsequent authentication attempts, after the user’s identities on the identity and service providers have been federated:
-
Accessing the service provider.
A returning user attempts to access their service and is redirected to the AM server acting as the service provider. Their login URL specifies the SAML v2.0 login service. For example:
-
An authentication chain containing the SAML2 Authentication Module.
For example,
https://www.sp.com:8443/openam/XUI/#login/&service=spSAMLChain. -
An authentication tree containing the SAML2 Authentication node and the Write Federation Information node.
For example,
https://www.sp.com:8443/openam/XUI/#login/&service=spSAMLTree.
-
-
Authentication at the identity provider.
AM redirects the user to the identity provider, and the user authenticates successfully at the identity provider. The identity provider returns a SAML assertion to the SP.
-
Service provider attempts to access a federated identity.
AM attempts to locate the name ID in its user store. The search for the name ID succeeds.
As there is a match, the user does not need to log in to the SP, and is given access to the service.
Configure authentication mechanisms to link accounts
To configure AM to link accounts, see the following options:
Link identities by using a linking authentication chain
This procedure demonstrates how to link identities by using a linking authentication chain on the SP to identify the local user.
Before attempting to configure a linking authentication chain, ensure that you have configured AM for SAML v2.0, created the identity and service providers, and configured a circle of trust. You must also have configured AM to support single sign-on. For information on performing those tasks, see Deployment considerations and Implement SSO and SLO.
-
On the hosted service provider, log in to the AM admin UI.
-
Create an authentication chain; for example, named
myLinkingChain.This chain is used to identify the user account in the SP to link to the account in the IDP. The chain can use any of the available methods for authentication as required; for example, multi-factor authentication.
For more information on creating authentication chains, see Configure AM for authentication.
-
If you are using integrated mode SSO:
-
Go to Realms > Realm Name > Authentication > Modules, and then select the module name of your SAML2 authentication module.
-
In the Linking Authentication Chain field, enter the name of the authentication chain you created earlier; for example,
myLinkingChain. -
Save your work.
-
-
If you are using standalone mode SSO:
-
Go to Realms > Realm Name > Authentication > Settings > Core.
-
In the Organization Authentication Configuration property, select the authentication chain you created earlier; for example,
myLinkingChain. -
Save your work.
For more information on setting the default chain for a realm, see Configure sensible default authentication services.
-
-
To test your work, initiate single sign-on; for example, as described in SP-initiated SSO JSP.
Authenticate to the IDP as the
demouser. You will then be redirected to the SP and asked to authenticate using the linking authentication chain specified. If persistent linking is enabled (the default), then initiating single sign-on a second time will require authentication only to the IDP.
Link accounts using authentication trees (standalone AM)
If you are not using auto-federation, perform the steps in this procedure to configure a tree similar to the following to link accounts persistently:
-
Add a SAML2 Authentication node.
Integrated mode is SP SSO-initiated only, and SLO is not supported.
Ensure that the NameID Format specified is
persistent.The node processes the assertion, makes its contents available to the authentication tree’s state in the
userInfoobject, and tries to map the assertion’s nameID using theuidmapping in the SP’s assertion map.If the node finds a match, the tree continues through the
Account Existsoutput. Otherwise, the tree continues through theNo Account Existsoutput. -
On the
No Account Existsoutcome, configure nodes to authenticate the user to the SP.
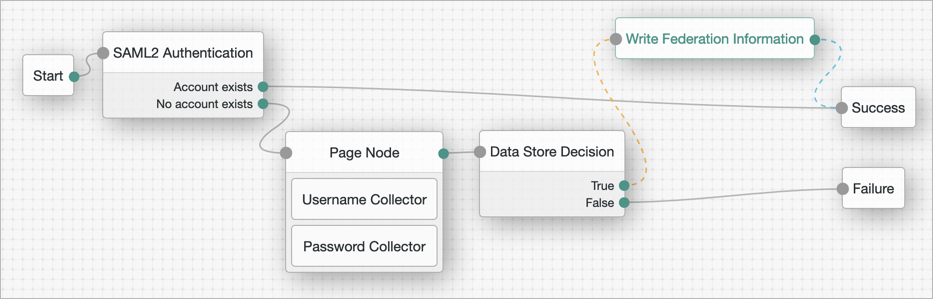
Link accounts persistently
If you are not using auto-federation, perform the steps in this procedure to configure a tree similar to the following to link accounts persistently:
-
Add a SAML2 Authentication node.
Integrated mode is SP SSO-initiated only, and SLO is not supported.
Ensure that the NameID Format specified is
persistent.The node processes the assertion, makes its contents available to the authentication tree’s state in the
userInfoobject, and tries to map the assertion’s nameID using theuidmapping in the SP’s assertion map.If the node finds a match, the tree continues through the
Account Existsoutput. Otherwise, the tree continues through theNo Account Existsoutput.Note that the attribute the node uses to map the nameID is not configurable, and this example adds nodes to process the
userInfoobject and match its contents to the managed user’s schema instead. -
Add a Scripted Decision node to copy the information from the assertion to the authentication tree’s shared state.
Example script
outcome = "true";
if (sharedState.get("userInfo")) {
if (sharedState.get("objectAttributes")) {
sharedState.remove("objectAttributes");
}
var userName=null,sn=null,mail=null;

    try { userName=sharedState.get("userInfo").get("attributes").get("uid").get(0).toString(); } catch (e) {}
    try { sn=sharedState.get("userInfo").get("attributes").get("sn").get(0).toString(); } catch (e) {}
    try { mail=sharedState.get("userInfo").get("attributes").get("mail").get(0).toString(); } catch (e) {}

  sharedState.put("objectAttributes", {"userName":userName,"sn":sn,"mail":mail});
}
For more information, see Scripted decision node API.
-
Add an Identify Existing User node to search the user with the appropriate attribute.
For example,
userName. -
Authenticate the user to the SP.
-
Add the Write Federation Information node to the successful outcome of the authentication process to create the link between the accounts.
If a transient link exists, it will be converted into a persistent one.