Push authentication journeys
Configure authentication journeys for passwordless authentication and to receive push notifications.
When configured for passwordless authentication, the authentication flow requires the user to enter their user ID, but not their password. A push notification is then sent to their registered device to complete authentication with the ForgeRock Authenticator app.
Before implementing passwordless push authentication, consider the Limitations of passwordless push authentication.
Configure the ForgeRock Authenticator (Push) service
Configure the ForgeRock Authenticator (Push) service for the realm where you create the journey.
This service specifies the user profile attribute that stores registered device metadata.
-
Under Native Consoles > Access Management > Realms > Realm Name, click Services > Add a Service.
-
Select ForgeRock Authenticator (Push) Service in the service type drop-down list, and create the new service configuration.
-
Accept the default configuration unless you must encrypt the device metadata in user profiles:
- Profile Storage Attribute
-
pushDeviceProfiles(default) - Device Profile Encryption Scheme
-
If you choose an encryption scheme, also edit the settings to access the keys.
For details, read Use ESVs for signing and encryption keys.
Default:
No encryption of device settings. - ForgeRock Authenticator (Push) Device Skippable Attribute Name
-
push2faEnabled(default)For details, read the reference documentation, ForgeRock Authenticator (Push) Service.
Configure the Push Notification service
Under Native Consoles > Access Management, configure the Push Notification service for the realm.
|
PingOne Advanced Identity Cloud uses an external AWS service to send push notifications. Its configuration requires access keys and other metadata. As a Ping Identity customer, you have streamlined access to the required metadata: Before you start, log in to Backstage, then follow the instructions in How To Configure Service Credentials (Push Auth, Docker) in Backstage. Download the AWS credential data in JSON format and refer to that as you configure the service. |
-
Under Native Consoles > Access Management > Realms > Realm Name, click Services > Add a Service.
-
Select Push Notification Service in the service type drop-down list.
-
Update the following fields with the data you generated on Backstage, then create the new service configuration:
- SNS Access Key ID
-
The generated Key ID; the
"accessKeyId"in the JSON - SNS Access Key Secret
-
The generated Secret; the
"accessKeySecret"in the JSON - SNS Endpoint for APNS
-
The generated APNS; the
"APNS"in the JSON - SNS Endpoint for GCM
-
The generated GCM; the
"GCM"in the JSON
You can also store the Access Key Secret in a secret store. For additional details, refer to the reference documentation, Push Notification Service.
Create a push authentication journey
The procedure assumes the following:
-
Users provide user IDs and passwords as the first step of multi-factor authentication (MFA).
-
PingOne Advanced Identity Cloud sends the push notification to the device as an additional factor to complete authentication.
-
You have prepared the prerequisite services, described in Configure the ForgeRock Authenticator (Push) service and Configure the Push Notification service.
-
In the Advanced Identity Cloud admin UI, create a custom journey for push notification.
Learn more in Custom journeys.
-
Add the following nodes to your journey:
-
Connect the nodes as demonstrated in the following figure:
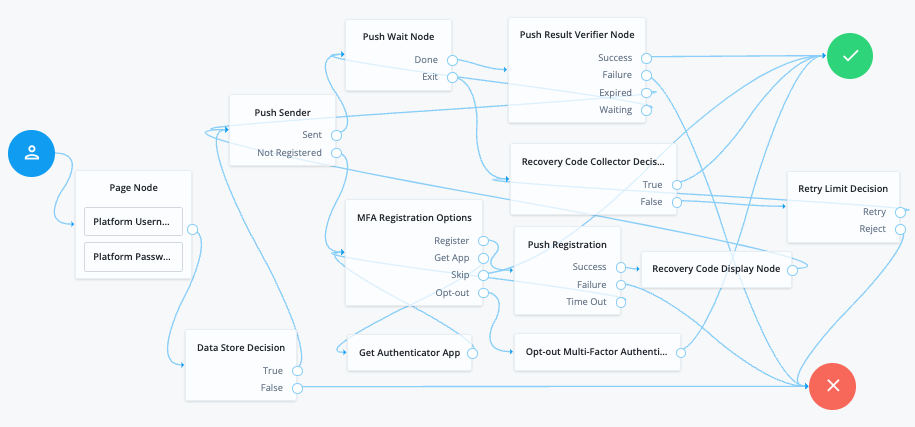 Figure 1. Example Push Authentication Journey
Node connections
Table 1. List of node connections Source node Outcome path Target node Page Node containing:
-
Platform Username
-
Platform Password
→
Data Store Decision
Data Store Decision
True
Push Sender
False
Failure
Push Sender
Sent
Push Wait
Not Registered
MFA Registration Options
Push Wait
Done
Push Result Verifier
Exit
Recovery Code Collector Decision
Push Result Verifier
Success
Success
Failure
Failure
Expired
Push Sender
Waiting
Push Wait
MFA Registration Options
Register
Push Registration
Get App
Get Authenticator App
Skip
Success
Opt-out
Opt-out Multi-Factor Authentication
Recovery Code Collector Decision
True
Success
False
Retry Limit Decision
Push Registration
Success
Recovery Code Display Node
Failure
Failure
Time Out
MFA Registration Options
Get Authenticator App
→
MFA Registration Options
Opt-out Multi-Factor Authentication
→
Success
Retry Limit Decision
Retry
Recovery Code Collector Decision
Reject
Failure
Recovery Code Display Node
→
Push Sender
-
-
Save your changes.
-
Test your authentication journey as follows:
-
Copy and paste the Preview URL into a browser in incognito mode. The URL will look something like:
https://<tenant-env-fqdn>/am/XUI/?realm=alpha&authIndexType=service&authIndexValue=myPushAuthJourneyA login screen prompting you to enter your user ID and password appears.
-
Verify that you can use the ForgeRock Authenticator app to perform MFA.
If the authentication journey is correctly configured, authentication is successful and PingOne Advanced Identity Cloud displays the user profile page. For details, refer to Test push authentication.
-
-
Create a passwordless authentication journey
The procedure assumes the following:
-
Users provide only their user IDs as the first step of MFA.
-
Users have pre-registered a device for push authentication.
-
PingOne Advanced Identity Cloud sends the push notification to the device as an additional factor to complete authentication, without needing the user’s password.
-
You have prepared the prerequisite services, described in Configure the ForgeRock Authenticator (Push) service and Configure the Push Notification service.
-
In the Advanced Identity Cloud admin UI, create a custom journey for push notification.
For details, refer to Custom journeys.
-
Add the following nodes to your journey:
-
Connect the nodes as demonstrated in the following figure:
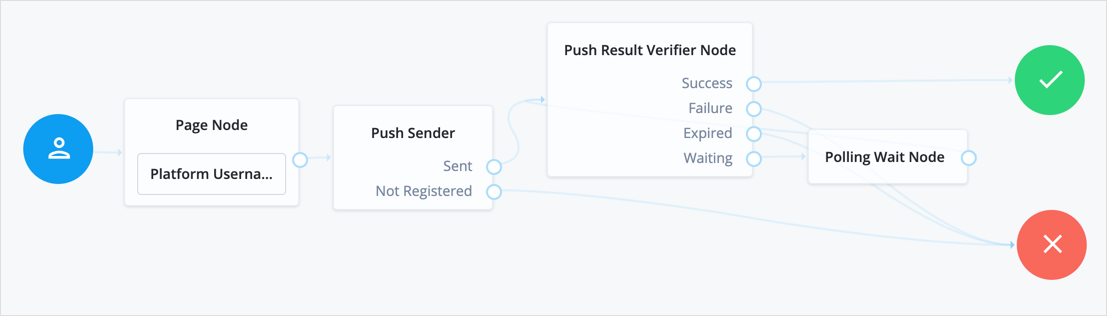 Figure 2. Passwordless Push Authentication Example
 -
Save your changes.
-
Test your authentication journey as follows:
-
Copy and paste the Preview URL into a browser in incognito mode. The URL will look something like:
https://<tenant-env-fqdn>/am/XUI/?realm=alpha&authIndexType=service&authIndexValue=myPasswordlessAuthJourneyA login screen appears, prompting you to enter your user ID.
-
Verify that you can use the ForgeRock Authenticator app to perform MFA.
If the authentication journey is correctly configured, authentication is successful and PingOne Advanced Identity Cloud displays the user profile page without the user entering their password.
For details, refer to Test push authentication.
-
-