IdentityX Check Enrollment Status node
Verifies that a user is enrolled with the Daon IdentityX platform.
|
This node configures integration with the IdentityX platform. Journeys that integrate with the IdentityX platform must include this node. |
Prerequisites
Before you start, configure the IdentityX platform and a ForgeRock service application client.
Daon IdentityX configuration
The nodes require a connection to an IdentityX server. Contact your Daon representative for connection details.
Follow these high-level steps:
-
In the Daon Admin Console, go to Administration > System Configuration > REST Authentication.
The URL to the REST Authentication screen has the form
https://api.identityx-cloud.com/your-Daon-instance/AdminConsole/#configurations/restauthentication. -
Update JWT Signature Validation Keys URLs to use your ForgeRock JWK URI.
Make sure the algorithm is
RS256.{ "endpoints": [{ "url": "https://<tenant-env-fqdn>:443/am/oauth2/alpha/connect/jwk_uri", "alg": "RS256" }] } -
For REST Authentication Mode, enable JSON Web Token (JWT).
-
Set a name for the JWT Roles Claim Name.
Record the name for use when setting up the ForgeRock service application client.
-
Set the JWT Read Timeout to
500(milliseconds). -
Create a new role.
Go to Administration > Roles and click Create Role.
Use the following settings and save the new role:
- Role Name
-
Anything (example:
forgerockjwt) - Description
-
Anything (example:
forgerockjwt) - External ID
-
Anything (example:
forgerockjwt) - Entity
-
All (*) - Permission Selector
-
Select your Daon tenant.
- Enable these flags
-
CREATE
READ
UPDATE
DELETE
BLOCK
UNBLOCK
ALL(*)
Record your choice for external ID for use when setting up the ForgeRock service application client.
Ping Identity Platform configuration
-
Create an OAuth2 Access Token Modification script to use the IdentityX role you configured.
In the Advanced Identity Cloud admin UI, go to Scripts > Auth Scripts, click + New Script, and create an OAuth2 Access Token Modification script.
Save a new script such as the following, where the field value is the Daon role ID:
(function () {
  // Always includes this field in the token.
  accessToken.setField('roles', 'forgerockjwt');
}());
Record the name of your script for use when setting up the ForgeRock service application client.
-
Create a service application to access the IdentityX platform.
Go to Applications and click + Add Application.
Select Service as the application type.
Create a client ID and secret for your application.
Record the client ID and secret for use when setting up journeys that use the IdentityX platform.
-
Use the following settings for your new service application:
- Grant Types
-
Client Credentials - Scopes
-
fr:idm:*
-
Use the following advanced settings for your new service application:
- Default Scopes
-
fr:idm:* - Response Types
-
Token
-
Configure signing and override OAuth 2.0 provider settings for your application.
In the AM admin UI, go to Realms > Realm Name > Applications > OAuth 2.0 > Clients > client-ID.
Switch to the Signing and Encryption tab, verify the following settings and save your changes:
- Token Endpoint Authentication Signing Algorithm
-
RS256 - ID Token Signing Algorithm
-
RS256 - Authorization Response JWT Signing Algorithm
-
RS256 - Token introspection response signing algorithm
-
RS256
Switch to the OAuth2 Provider Overrides tab, update the following settings and save your changes:
- Enable OAuth2 Provider Overrides
-
Enabled
- Access Token Modification Plugin Type
-
SCRIPTED - Access Token Modification Script
-
Your OAuth2 Access Token Modification script
-
Update the OAuth2 token signing algorithm in the OAuth 2.0 provider service for the realm.
In the AM admin UI, go to Realms > Realm Name > Services > OAuth2 Provider.
Switch to the Advanced tab, update the following setting and save your changes:
- OAuth2 Token Signing Algorithm
-
RS256
This setting must match the configuration completed on the IdentityX administrative console.
Outcomes
User Enrolled-
Successfully verified enrollment.
User Not Enrolled-
Failed to verify enrollment.
Error-
An error occurred.
Properties
| Property | Usage |
|---|---|
ForgeRock Client ID |
The client ID of your ForgeRock service application for communications with the IdentityX platform. |
ForgeRock Client Secret |
The client secret of your ForgeRock service application for communications with the IdentityX platform. |
IdentityX Base URL |
The IdentityX URL has the following form
|
User Id Attribute |
The shared state attribute that holds the Daon identifier for the end user. Leave this blank to collect the Daon User ID with a Platform Username node instead. |
Daon IdentityX examples
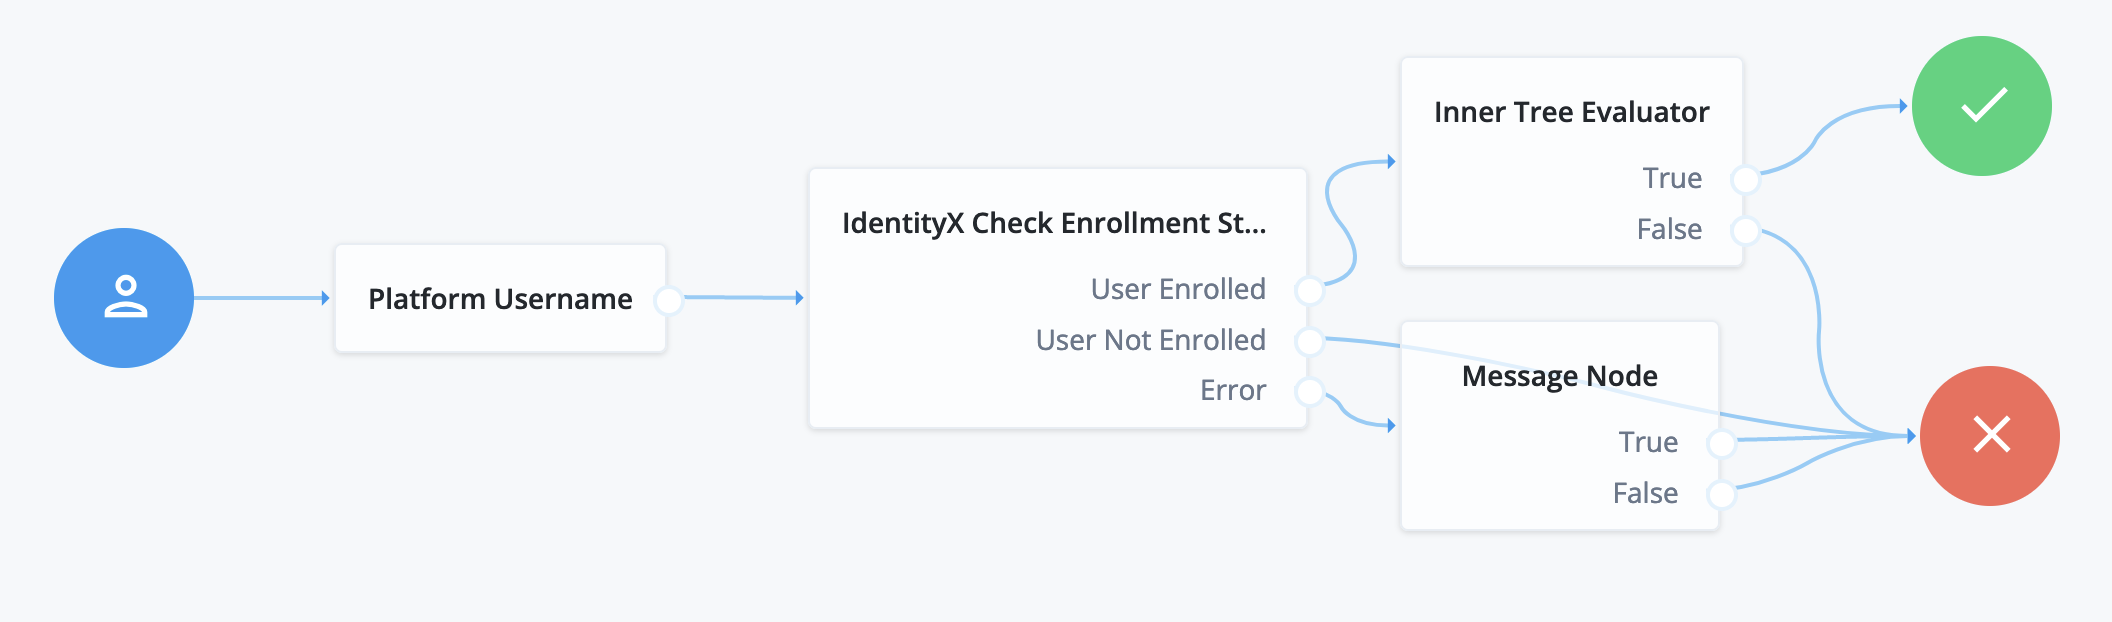
Check enrollment before continuing
The following example demonstrates the use of this node before an inner tree with additional IdentityX nodes:
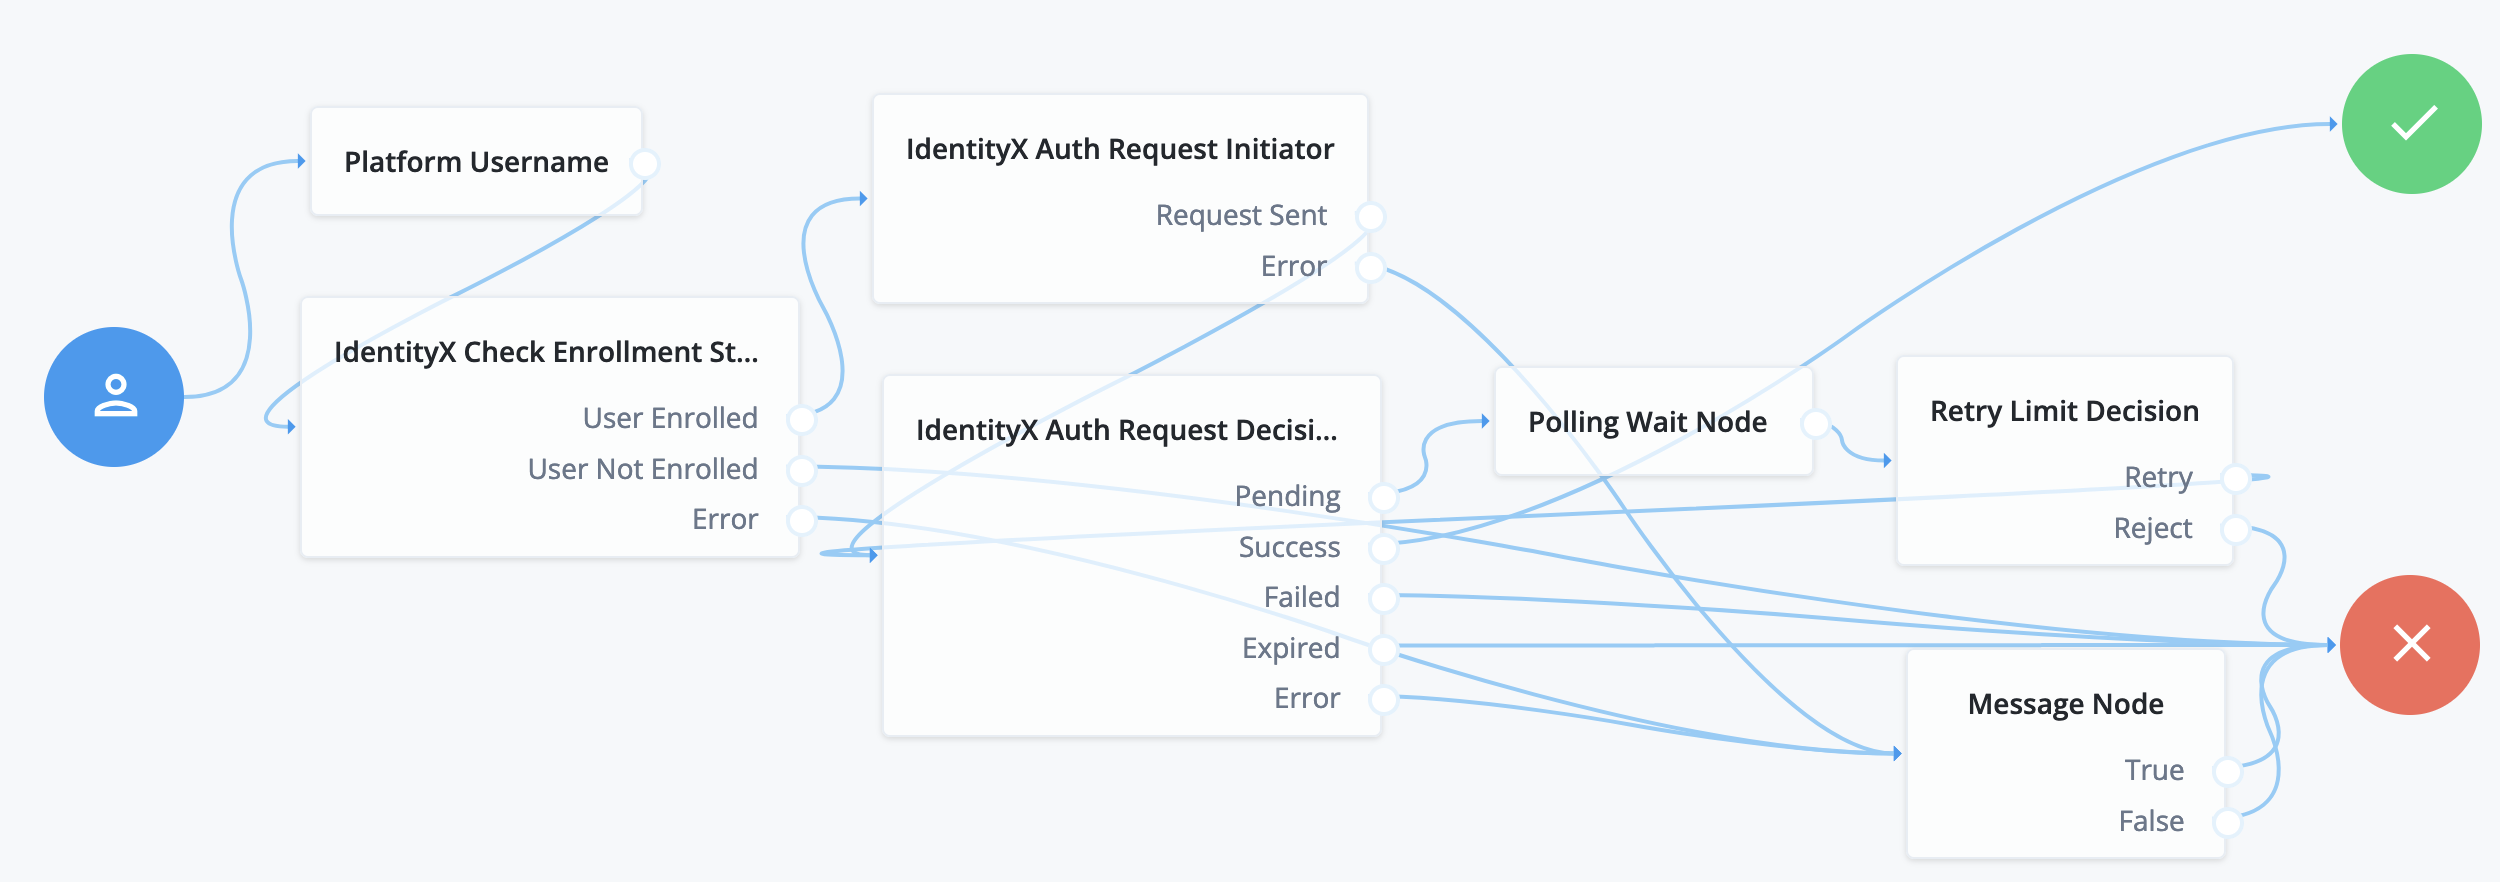
Out-of-band authentication
The following example uses the IdentityX platform in an out-of-band flow over a separate, secure channel: