Sync identities
Before you can sync identities with a remote server or use load balancing and failover in PingOne Advanced Identity Cloud, you must register a remote server with your tenant.
Connectors can read data in your tenant and in external resources (an app or service that runs on a server outside your tenant). Use connectors to convert your identity profiles, as well as user accounts in a resource server, into a format that both data stores can use.
| Advanced Identity Cloud provides built-in connectors for synchronization with data stores in other cloud services. |
Process overview
Before you can make a connection, you must register a remote connector server with your tenant. You also need to have a connector service up and running.
To configure connectors that aren’t built in to Advanced Identity Cloud, complete this list of tasks in order:
-
Change the client secret by resetting it.
-
Download a remote server from Backstage.
-
Install and configure a connector, if needed.
You can also create a connector configuration over REST. -
Configure the remote server to connect to Advanced Identity Cloud (optional).
-
Create a mapping between identities in Advanced Identity Cloud and identities in your identity resource server.
-
If you plan to set up load balancing or failover, then register a remote server cluster (optional).
For troubleshooting advice, learn more in the knowledge base article How do I troubleshoot the Java Remote Connector Service (RCS)?.
Tasks
Task 1: Register a remote server
-
To create a connector server in your development or sandbox[1] environments:
-
In the Advanced Identity Cloud admin console, go to Identities > Connect > Connector Servers.
-
Click + New Connector Server.
-
In the New Connector Server dialog box, provide the remote server details:
-
Name: This name is displayed in the Connector Servers list.
Use only lowercase letters and numerals. No special characters or spaces are allowed.
-
-
Click Save.
-
-
To create a connector server in your UAT[2], staging, or production environments:
-
Follow the instructions in step 1 to create a connector server in your development environment.
-
Run a series of promotions to promote the connector server configuration from your development environment to your upper environments.
-
Task 2: Reset the client secret
| RCSClient is a built-in OAuth 2.0 client shared by all connector servers in Advanced Identity Cloud. If you reset its client secret, you must update the configuration of all remote connectors configured to connect to the tenant environment. |
-
If you already know the client secret of the RCSClient, skip to Task 3: Download a remote server.
-
In the Advanced Identity Cloud admin console, go to OAuth2 Clients.
-
Click RCSClient.
-
Click Reset to change the client secret
-
In the Reset Client Secret dialog box, enter a strong password.
-
Read the warning, and then click Save.
Task 3: Download a remote server
You’re directed to the
IDM Cloud Connectors download page. You must sign in to Backstage to view this page and download the connectors.
-
Download the Remote Connector Server to the host that will run the connector server.
Ping Identity recommends using the Java version of the Remote Connector Server. Only download the .NET version if you need to use a PowerShell connector. Learn about the differences between the RCS types in Install a Remote Connector Server (RCS).
You can run the connector server on the same host as the identity resource server or you can run it on a different host. For example, you could run the connector server on a host that’s dedicated to only connectors.
Task 4: Install and configure a connector
If the connector you want to use is not bundled with the remote server you downloaded in Task 2, you’ll need these instructions. Follow the instructions in the ICF documentation to download and install the remote connector you need.
After you complete the Next Steps, click Done in the Next Steps window.
Task 5: Configure a remote server
-
Unpack the OpenICF package you downloaded from the IDM Connectors download page.
-
Edit the
ConnectorServer.propertiesfile.ConnectorServer.propertiesdetails:-
Add the OAuth2 Client credentials used to obtain an OAuth2 token. The client uses the Client Credentials grant type.
-
connectorserver.clientId=RCSClient
Advanced Identity Cloud created this OAuth 2 client for you. -
connectorserver.clientSecret=<client-secret>
Use the OAuth 2 client secret you entered for RCSClient.
-
-
Uncomment these settings and edit them for your tenant:
-
connectorserver.url
This is the Advanced Identity Cloud OpenICF endpoint.
Usewssover HTTPS so the client can obtain a bearer token through OpenID.-
In staging and production environments, use three URLs in a space-delimited list. Example:
connectorserver.url=wss://<tenant-env-fqdn>/openicf/0 wss://<tenant-env-fqdn>/openicf/1 wss://<tenant-env-fqdn>/openicf/2 -
In a development environment, use only one URL. Example:
connectorserver.url=wss://<tenant-env-fqdn>/openicf/0
-
-
connectorserver.connectorServerName=<remote-server-name>
This is the remote server name you set through the Advanced Identity Cloud admin console. Be sure the name includes only lowercase letters and numerals. No special characters or spaces are allowed. -
connectorserver.pingPongInterval=60
The WebSocket Ping/Pong interval (seconds). -
connectorserver.housekeepingInterval=20
The WebSocket connections housekeeping interval (seconds). -
connectorserver.groupCheckInterval=60
WebSocket groups check interval, in seconds. -
connectorserver.webSocketConnections=3
Specifies the number of sockets the connector server establishes and maintains to each Advanced Identity Cloud (IDM) backend instance. -
connectorserver.connectionTtl=300
WebSocket connection’s time to live (seconds). -
connectorserver.newConnectionsInterval=10
Time between new connections (seconds). -
connectorserver.tokenEndpoint=https://<tenant-env-fqdn>/am/oauth2/realms/root/realms/alpha/access_token
Token endpoint to retrieve access token. -
connectorserver.scope=fr:idm:*
OAuth2 token scope. -
connectorserver.loggerClass=org.forgerock.openicf.common.logging.slf4j.SLF4JLog
You don’t need to set the
connectorserver.usesslproperty; the remote server determines connection security from the value of theconnectorserver.urlproperty. -
-
-
When you’re satisfied with your changes, save the file.
-
Start the remote server on the OAuth 2.0 client:
-
Windows
-
Linux
bin\ConnectorServer.bat /rundosbin/ConnectorServer.sh /runbash -
-
To verify the connection is working, view the remote server status in the Remote Servers list.
Task 6: Create a mapping
Create a mapping between identities in Advanced Identity Cloud and identities in your identity resource server.
-
In the Advanced Identity Cloud admin console, go to Native Consoles > Identity Management.
-
In the IDM admin console, click Create Mapping.
For detailed information and instructions, learn more in Configure a resource mapping.
After you’ve tested your mapping configuration per the instructions, you can make connections for synchronizing and provisioning user profiles.
Task 7: Register a server cluster
This is optional. Use a cluster of remote servers when you want to set up load balancing or failover among multiple resource servers.
-
In the Advanced Identity Cloud admin console, go to Identities > Connect > Server Clusters.
-
Click + New Server Cluster.
-
Provide Server Cluster Details:
-
Name: Identifier to display in the Server Clusters list.
-
Algorithm:
-
Choose Failover if you want requests to be redirected to a designated server only when the primary server fails.
-
Choose Round Robin if you want to continuously load-balance among two or more servers regardless of service status.
-
-
-
Click Next.
-
In the Choose Servers dialog box, enable the connectors you want to include in the server cluster.
Every connector associated with a server cluster must have an identical set of JAR files and scripts in its /path/to/openicf/lib directory. All JAR files must be at the same version. If you make any changes to the JAR files and scripts in this directory, you must propagate the changes to all the other connectors in the server cluster.
-
Click Create Cluster.
Synchronize passwords
You can synchronize hashed user passwords from your PingDS deployment into Advanced Identity Cloud.
Password synchronization relies on an LDAP connector configured to synchronize accounts from your DS servers. Advanced Identity Cloud password synchronization does not use a password synchronization plugin. Instead, it synchronizes hashed passwords as strings in the same way it synchronizes other LDAP attributes.
This feature depends on having compatible one-way hash password storage schemes in Advanced Identity Cloud and in your DS password policies. DS servers in Advanced Identity Cloud verify user-provided plaintext passwords against the password hash, just as the DS servers in your deployment.
-
Verify that your DS service stores the passwords you want to synchronize only with DS password storage schemes that are also enabled in Advanced Identity Cloud.
The following DS password storage schemes are enabled in Advanced Identity Cloud:
-
Bcrypt
-
PBKDF2
-
PBKDF2-HMAC-SHA256
-
PBKDF2-HMAC-SHA512
-
PBKDF2-HMAC-SHA512T256 (for interoperability only)
-
Salted SHA-256
-
Salted SHA-512
-
SCRAM-SHA-256
-
SCRAM-SHA-512
-
-
Verify that account synchronization works properly from your DS service to Advanced Identity Cloud.
For example, modify a test user’s entry in your DS server and check that the corresponding account in Advanced Identity Cloud is updated correctly after reconciliation runs.
-
In the native IDM admin console, configure the LDAP connector to synchronize
userPasswordattributes as strings:-
Delete
__PASSWORD__from the list of LDAP connector properties. -
Add
userPasswordwith Native type:stringand Run as User enabled.
-
-
In the native IDM admin console, configure the mapping from your remote DS system resource to Advanced Identity Cloud managed users:
-
Map
userPasswordin your remote DS system resource topasswordin managed users. -
Set the transformation script for the synchronization to the following inline script:
// Set the text of DS userPassword as the value of the password:
if (source != null) {
  var base64 = Packages.org.forgerock.util.encode.Base64url;
  decodedTarget = new Packages.java.lang.String(base64.decode(source));
  target = decodedTarget;
}
javascript
-
-
Verify that password synchronization is working correctly.
For example, modify a test user’s password in your DS server, and check that the user can authenticate in Advanced Identity Cloud after reconciliation runs.
About Advanced Identity Cloud connectors
Apps and services that run and store data outside your tenant exist as external resources relative to Advanced Identity Cloud.
Advanced Identity Cloud provides connectors to synchronize your identity profiles with data stored in your resource servers.
Connectors work differently based on the capabilities of the connected resource server. For a summary of supported connectors and their capabilities, learn more in ICF documentation.
Syncing and provisioning
Here’s how Advanced Identity Cloud synchronizes user data. In this diagram, an identity resource server hosts an app and a data store containing user accounts. The resource server also hosts a connector server. The connector server runs a connector.
When you edit a user’s account on the resource server, the connector makes the change in the user’s profile in your tenant.
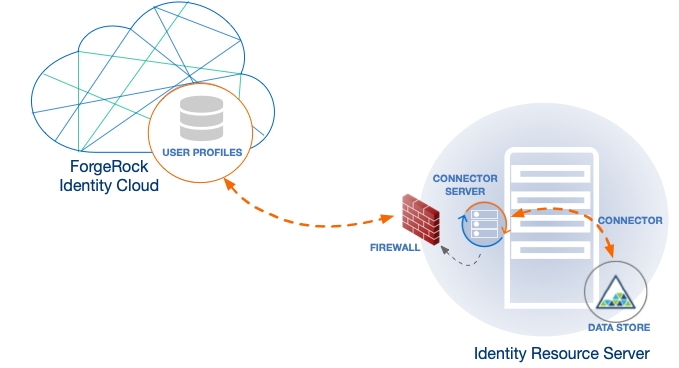
The opposite also happens. When you edit a user’s profile in your tenant, the connector makes the change in the user’s account in your resource server. For a quick take on Advanced Identity Cloud syncing and provisioning, refer to a related example in "Assignments".
Data reconciliation
Advanced Identity Cloud reconciles data when changes occur in your identity profiles or in user accounts stored in resource servers.
An Advanced Identity Cloud connector first compares an identity profile to its corresponding user account in the resource server. If conflicting information exists, Advanced Identity Cloud resolves the conflicts based on your preferences. Then Advanced Identity Cloud updates both the identity profile and the user account.
Load balancing and failover
Use a connector server cluster (a cluster of connector servers) when you want to set up load balancing or failover. A connector server cluster connects to multiple resource servers.
When you configure the connector server cluster for load balancing, Advanced Identity Cloud distributes incoming authentication or authorization requests among the clustered servers. The connector service determines where a request is directed. Request traffic flows evenly, and no single connector works faster or more slowly than others in the server cluster. This ensures requests are handled with the greatest efficiency.
When you configure connector servers for failover, if one resource server stops, then your Advanced Identity Cloud redirects requests to a standby resource server. This ensures your end users don’t experience a loss of service. When the stopped resource server restarts, Advanced Identity Cloud directs requests to the restarted server.
Deactivate the RCS OAuth 2.0 client
The RCS OAuth 2.0 client is activated by default. If you do not need to synchronize your tenant data using a connector, you can deactivate the client:
-
In the Advanced Identity Cloud admin console, go to OAuth2 Clients.
-
Click RCSClient.
-
Click Active, then select Inactive.
-
The client is immediately deactivated.
If you deactivate the RCS OAuth 2.0 client, you can reactivate it at any time.