Advanced Identity Cloud Postman collection
Advanced Identity Cloud provides REST APIs to help you manage identities, authenticate to the system, monitor Advanced Identity Cloud, and more.
You can also use the AM and IDM APIs with Advanced Identity Cloud.
To help you quickly use and understand these REST APIs, Advanced Identity Cloud provides a Postman collection, containing example requests grouped into features.
Features include:
・Intelligent Access
・User Self-Service
・Session Management
・Identity Profiles
・Managed Identities
・Auditing/Monitoring
・OAuth 2.0 Flows
Download Postman and import the Advanced Identity Cloud collection
-
Download and install the Postman application.
-
Download the Advanced Identity Cloud Postman collection.
-
In Postman:
-
Go to File > Import... > Upload Files.
-
Browse to the collection JSON file you downloaded in the previous step, and then click Open.
-
Click Import to bring the collection into your workspace.
-
Create a service account and download its private key
To use the Advanced Identity Cloud Postman collection, you must create a service account that the requests in the collection can use to connect to your Advanced Identity Cloud instance.
Follow the steps in Create a new service account.
-
In step 9, save the private key as a local file called
key.jwk. -
Make a note of the ID for the service account you created.
An example of an ID is
449d7e27-7889-47af-a736-83b6bbf97ec5.
Proceed to the next section to learn how to enter these values into the collection, plus other settings necessary to use Postman with Advanced Identity Cloud.
Configure collection variables
The Advanced Identity Cloud Postman collection uses a number of configurable variables to populate the requests.
These variables are stored at the collection level. To view them, click on the top level of the collection menu labeled PingOne Advanced Identity Cloud Collection, and then select the Variables tab.
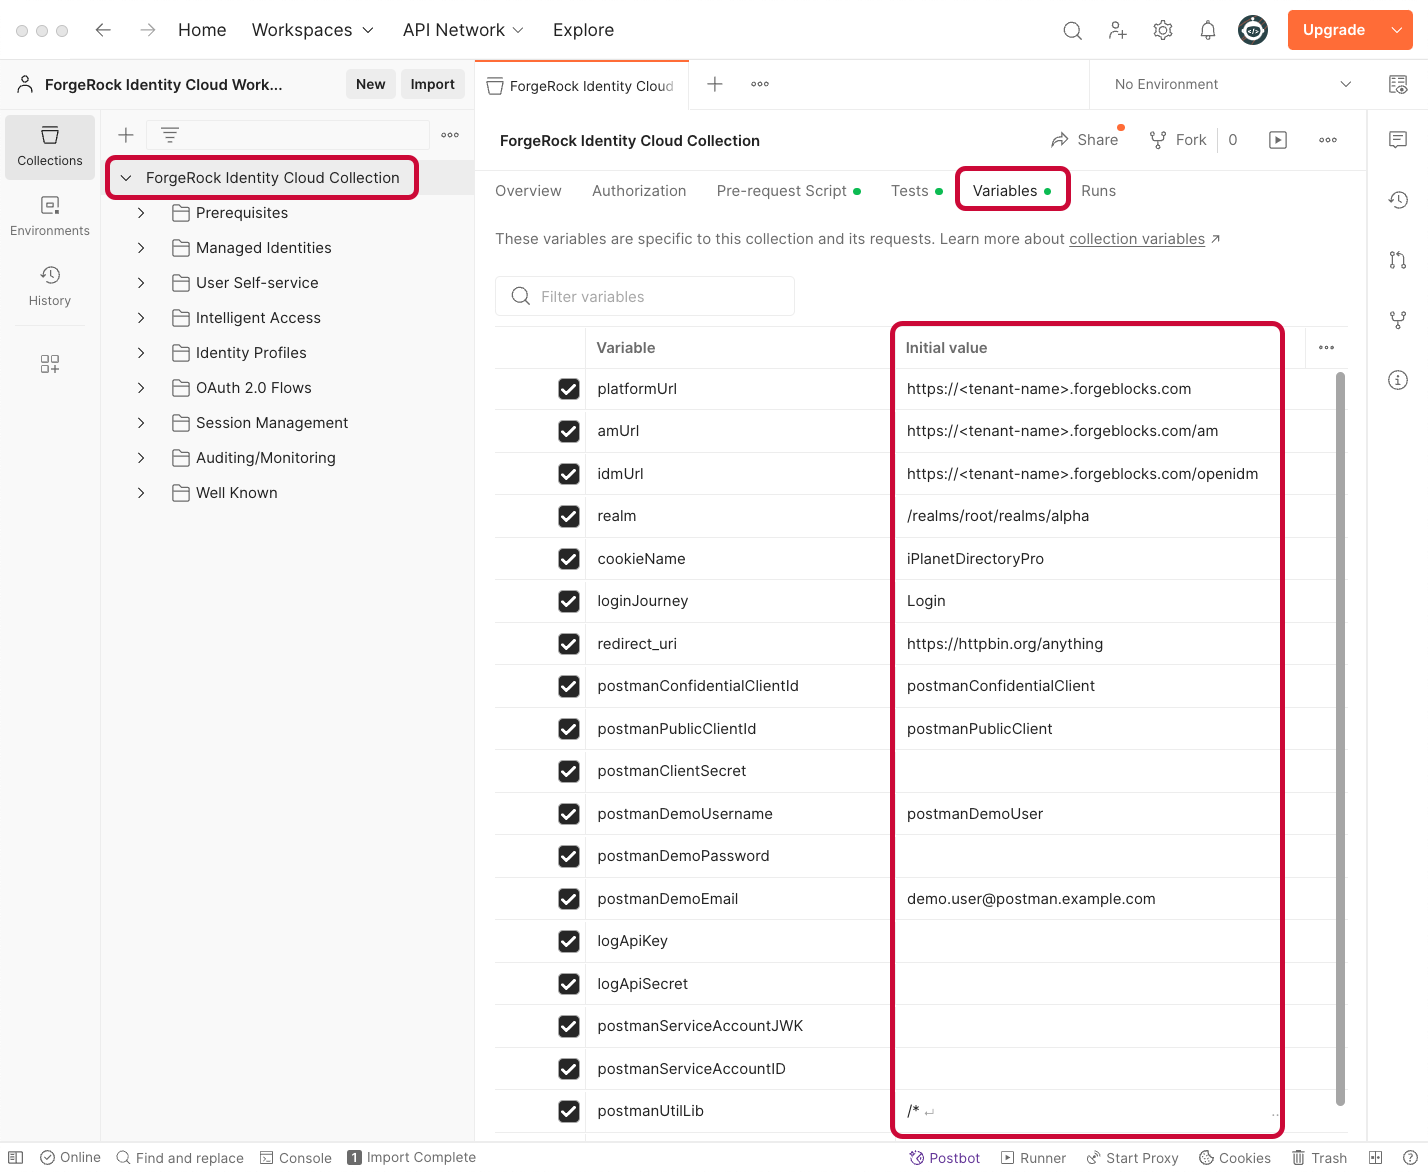
The variables are initially set with placeholder values that you must modify or replace. For example, the collection needs to know the Advanced Identity Cloud URL, as well as your admin access credentials.
To edit the variables, enter new values in the INITIAL VALUE column. Then click Save to make the edits permanent.
To understand which variables you need to edit before you can use the collection, learn more in Required variable values. To understand which variables you can optionally edit to customize the collection to suit your environment, learn more in Optional variable values.
You can then start using the collection.
|
You can also override the default collection-level variables by creating a Postman Environment. Use the same variable names as the Required variable values. This is useful if you have more than one Advanced Identity Cloud tenant, as you can configure the connection and username values as separate environments in Postman. You can also enter potentially sensitive values in an environment to keep them separate from the collection. This means you can share the collection without sharing your credentials. For information on creating a Postman Environment, learn more in Managing environments in the "Postman Learning Center". |
Required variable values
Before using the collection, you must provide the correct values for the following variables. You can provide the value at the collection level or add them at the environment level.
|
Ensure you use strong passwords for access credentials. |
Server URLs
platformUrl-
- Default
-
https://<tenant-env-fqdn> - Description
-
Specifies the root URL of your Advanced Identity Cloud.
amUrl-
- Default
-
https://<tenant-env-fqdn>/am - Description
-
Specifies the URL of the Access Management (AM) component of your Advanced Identity Cloud.
idmUrl-
- Default
-
https://<tenant-env-fqdn>/openidm - Description
-
Specifies the URL of the Identity Management (IDM) component of your Advanced Identity Cloud.
User credentials
postmanServiceAccountID-
- Default
-
Not set
- Description
-
Specifies the ID of the service account you created to allow the Postman collection access to your tenant.
The collection uses this ID when creating a JWT to sign, which it then uses to obtain an access token.
The JWT is generated when you run the Prerequisite requests.
- Example
-
c41515a8e-9c7d-4c37-4b2a-58c0fdea2080
postmanServiceAccountJWK-
- Default
-
Not set
- Description
-
Specifies the private key you downloaded as
key.jwkwhen you created the service account.Open the downloaded
key.jwkin a text editor, and then enter the entire JSON web key into the field in Postman, including the curly braces.The collection uses this key to sign a JWT token, which it then uses to obtain an access token.
The JWK is used to sign the JWT when you run the Prerequisite requests.
- Example
-
{
  "d": "MsVF...dmvw",
  "dp": "0iic...jdrw",
  "dq": "BXja...4epQ",
  "e": "AQAB",
  "kty": "RSA",
  "n": "stO0...qNyU",
  "p": "3VoI-ZPcw",
  "q": "ztGg...EJBw",
  "qi": "NHkA...NV_Gw"
}
json
postmanClientSecret-
- Default
-
Not set
- Description
-
Specifies the secret used by the OAuth 2.0 clients the collection creates.
You create these clients when you run the Prerequisite requests.
postmanDemoPassword-
- Default
-
Not set
- Description
-
Specifies the password used by the managed realm user the collection creates for demonstration purposes.
You create the realm user when you run the Prerequisite requests.
Logging API
logApiKey-
- Default
-
Not set
- Description
-
Specifies the API key used to access the monitoring endpoints.
Add this key to run the auditing and monitoring requests.
Learn more in Obtaining API Credentials.
- Example
-
0405de08ea73f1d84f
logApiSecret-
- Default
-
Not set
- Description
-
Specifies the API secret used to access the monitoring endpoints.
Add this key to run the auditing and monitoring requests.
Learn more in Obtaining API Credentials.
- Example
-
58932ad661ccf7ea5eda0b...a8d310e1676c9cac7f
Optional variable values
The collection uses the following additional variables that work using their default values; however, you can modify them.
List of optional variable values
postmanDemoUsername-
- Default
-
postmanDemoUser - Description
-
Specifies the username of the managed realm user the collection creates for demonstration purposes.
postmanDemoEmail-
- Default
-
demo.user@postman.example.com - Description
-
Specifies the email of the managed realm user the collection creates for demonstration purposes.
Enter an email address you have access to if you want to test the forgotten username or password flows in the user self-service section of the collection.
realm-
- Default
-
/realms/root/realms/alpha - Description
-
Specifies the realm that the majority of the requests in the collection use.
You must specify the entire hierarchy of the realm, starting at the root realm.
Prefix each realm in the hierarchy with the
realmskeyword. - Example
-
/realms/root/realms/customers/realms/europe.
cookieName-
- Default
-
Not set
- Description
-
Specifies the name of the session cookie the tenant uses to store session tokens.
The collection sets this value automatically when you run the first request in the Prerequisites folder.
loginJourney-
- Default
-
Login - Description
-
Specifies the authorization journey name to use.
For information on the default journeys that Advanced Identity Cloud provides, learn more in Login.
redirect_uri-
- Default
-
https://httpbin.org/anything - Description
-
Specifies the URI to which the OAuth 2.0 client will redirect the user upon a successful authentication request.
postmanConfidentialClientId-
- Default
-
postmanConfidentialClient - Description
-
Specifies the ID of the OAuth 2.0 private client.
postmanPublicClientId-
- Default
-
postmanPublicClient - Description
-
Specifies the ID of the OAuth 2.0 public client.
Hard-coded variable values
The collection uses the following additional variables that must not be modified.
List of hard-coded variable values
postmanUtilLib-
- Description
-
Contains the
postman-util-libutility library that the collection uses to sign requests and generate certain keys.Learn more in postman-util-lib on GitHub.
Use the collection
Before using the Advanced Identity Cloud Postman collection, you should run the Prerequisite requests. The requests configure your Advanced Identity Cloud with the necessary elements, such as OAuth 2.0 clients and managed users
Running the prerequisite requests
| Ensure you have configured the required collection variables as described in Configure collection variables before running the prerequisite requests. |
-
In Postman, with the Advanced Identity Cloud collection loaded, open the Prerequisites section.
-
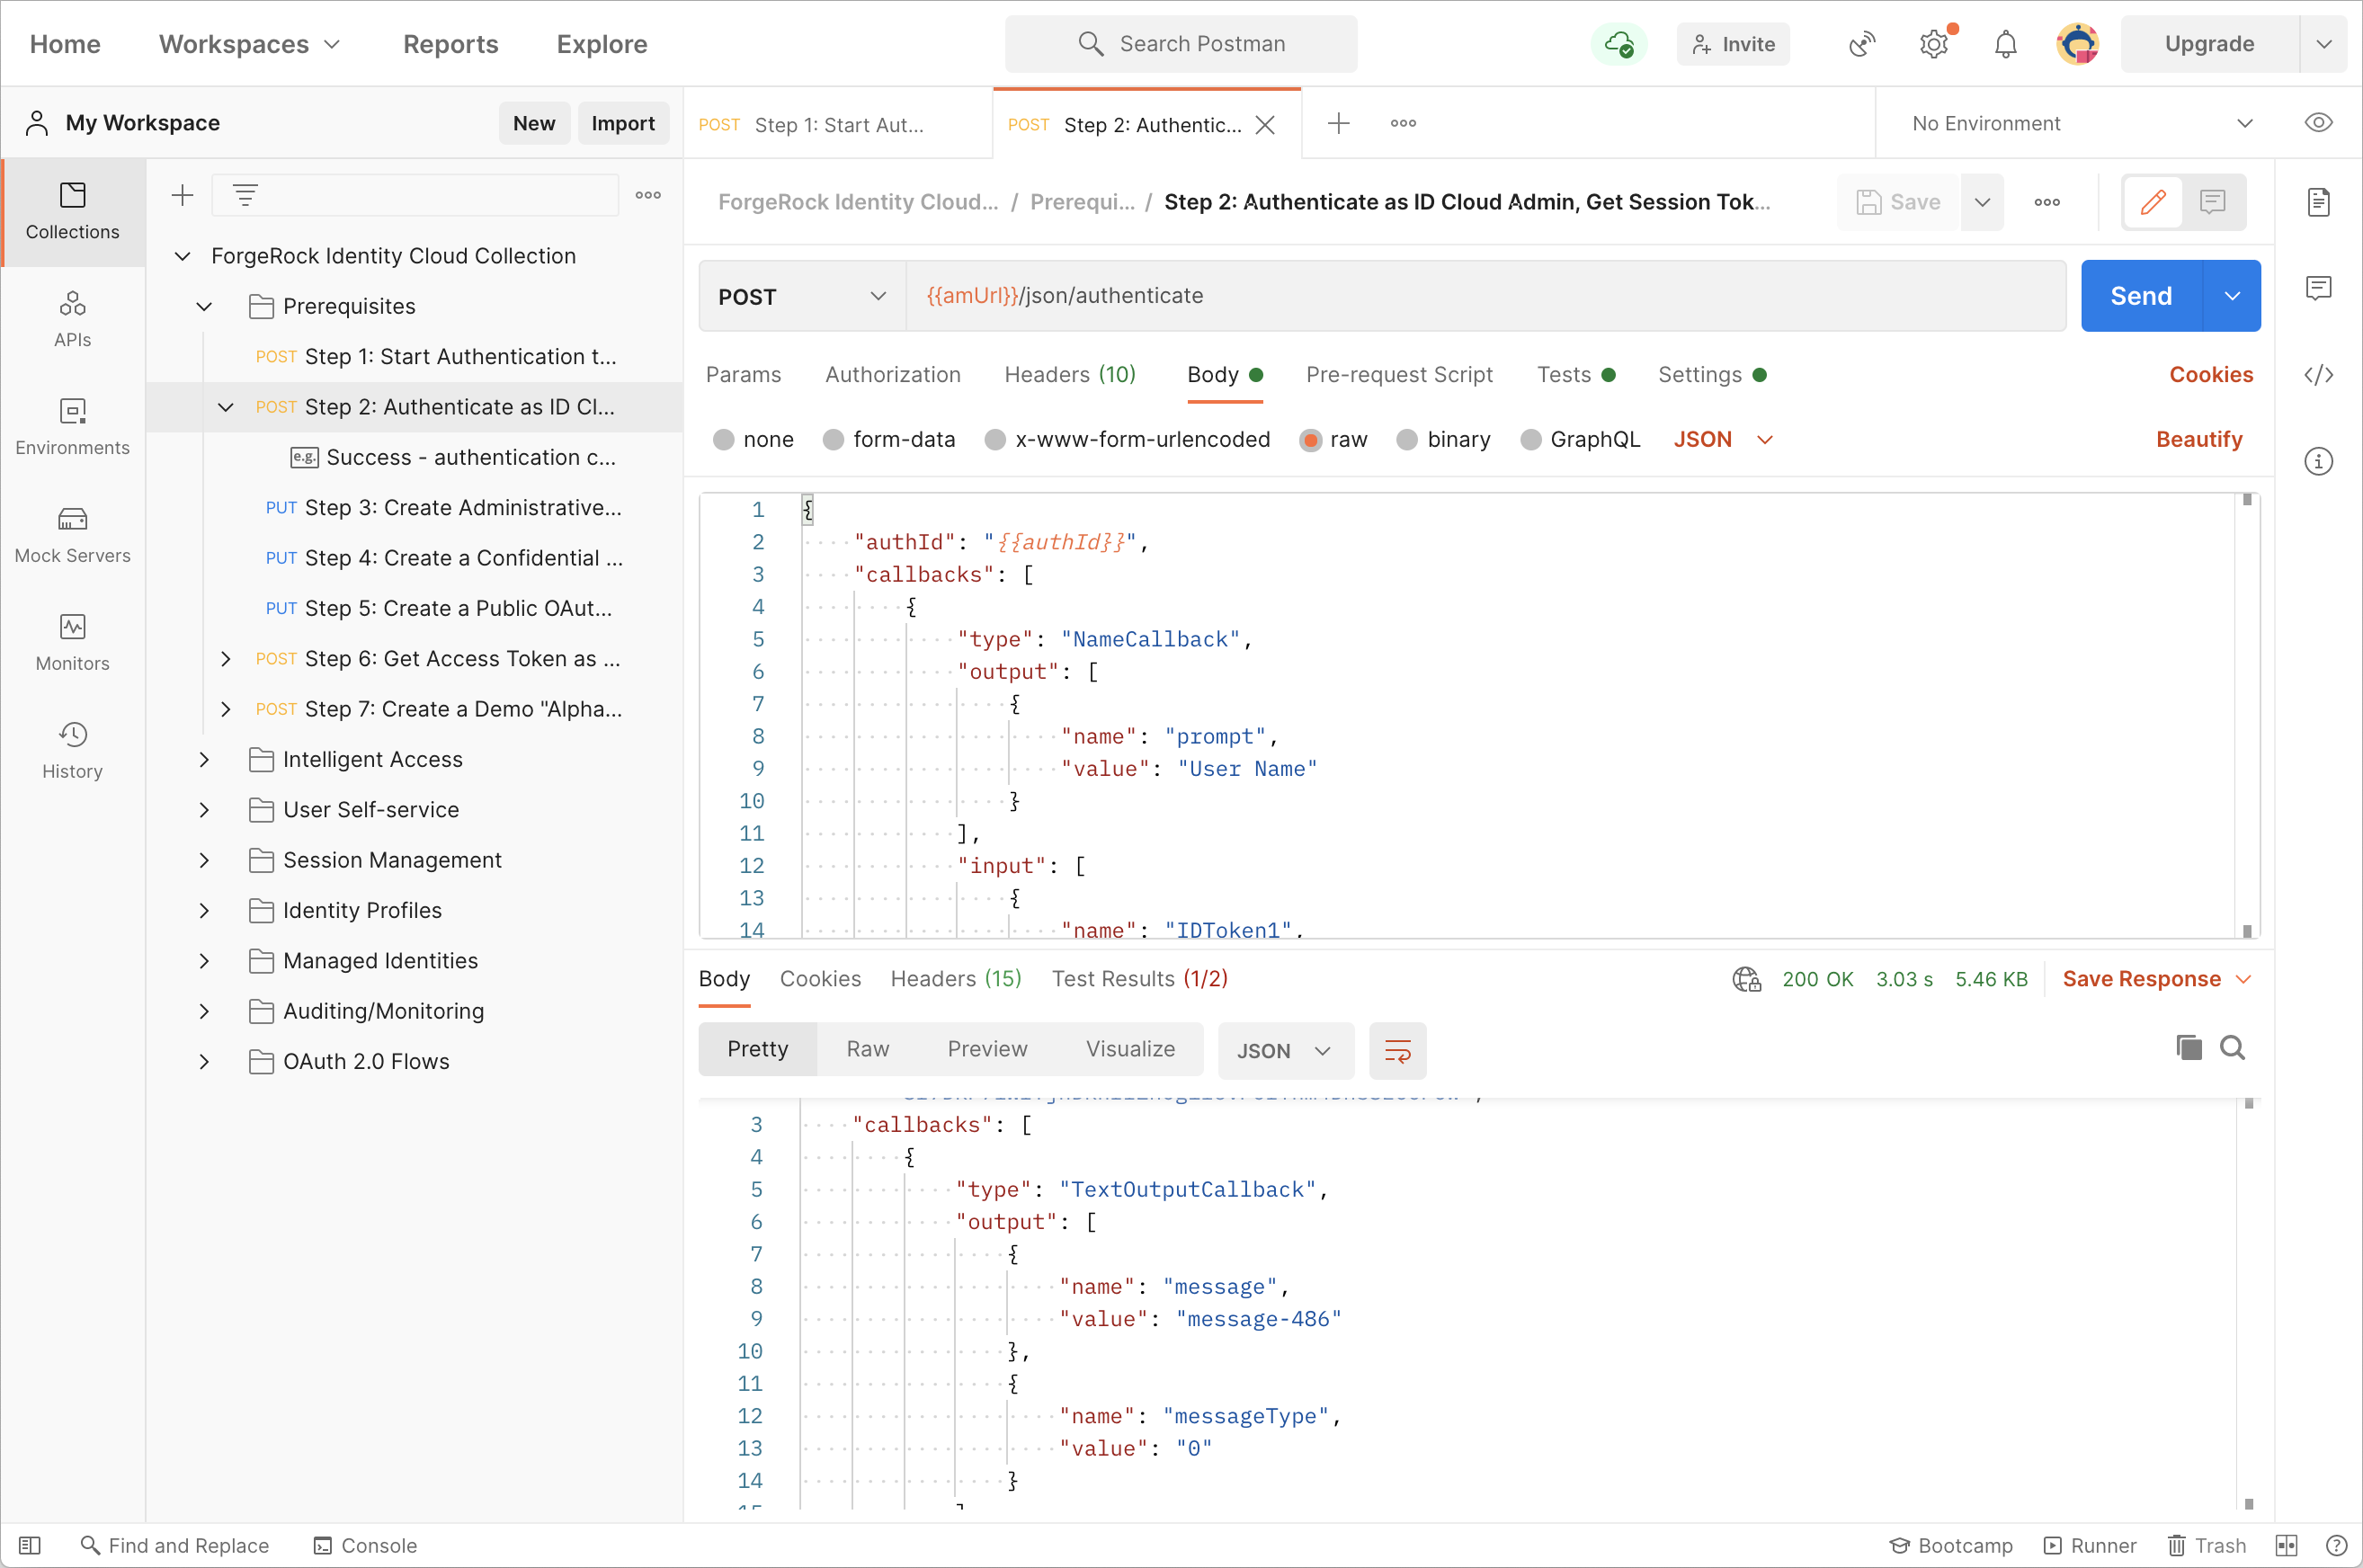
Select the first request in the list, examine the details, and when you’re satisfied the request is properly formed, click Send.
Many of the requests have associated tests; for example, that the response code was
200. Postman displays the test results alongside the response to the request.Many of the requests set a global variable containing a value returned in the response for use in subsequent requests.
View the details of these in the Tests tab of a request. You can also view the values of these global variables by clicking Environment Quick Look ().
-
Repeat the previous step for each request in the Prerequisites folder.
When completed, Advanced Identity Cloud contains the following:
-
An alpha_user identity, named
postmanDemoUserby default, which demonstrates a number of user-related endpoints, such as identity profiles, and user self-service. -
Two OAuth 2.0 clients:
-
A client named
postmanConfidentialClient, which is used by the OAuth 2.0 requests to demonstrate a number of grant flows. -
A client named
postmanPublicClient, which is used by the OAuth 2.0 requests to demonstrate a number of grant flows.
-
If you need to recreate any of the above, or decide to alter the default values, run each of the steps in the Prerequisite folder again.
Running the requests
The requests in the collection are split into different features. To run the calls for a feature, open the relevant folder, and run each request in sequence.
The value in square brackets in the name shows what type of authentication the request requires:
[User]-
The request acts on a user’s data or profile.
These requests often authenticate as
postmanDemoUserin the collection. [fr:am:*]-
The request requires an access token that has the
fr:am:*scope so that it can perform access management related actions.These requests authenticate as the service account you created earlier.
[fr:idm:*]-
The request requires an access token that has the
fr:am:*scope so that it can perform identity management related actions.These requests authenticate as the service account you created earlier.
Note that intelligent access and identity profiles have additional functionality. Refer to each section for details.
Intelligent access
There are scripts in the Intelligent Access requests that attempt to detect the callbacks that the first step returns, and sets the next request to handle it.
To view the details of this script:
-
Click on the top level of the collection menu (labelled PingOne Advanced Identity Cloud Collection), then select the Pre-request Scripts tab.
-
Within the tab, examine the
detectCallbacksscript.
When manually running through the steps, examine the response returned in the first call, and run the relevant next step. The collection is able to handle the following ready-to-use callbacks:
| Step | Callback |
|---|---|
Step 2a |
Username and password callbacks, together in a page node. |
Step 2b |
Validated create username and password callbacks, together in a page node. |
Step 2c |
Choice callbacks. |
Step 2d |
Text input callbacks. |
Step 2e |
Device profile callbacks. Learn more in Configure Device Profiling. |
Step 2f |
Progressive profile callbacks. |
Identity profiles
Some endpoints require the ID of an identity, rather than the username.
An example of this is when getting the OAuth 2.0 profiles a user has provided consent to.
When running the Identity Profiles requests, ensure you have also executed the request named Step 3: [User] Read session info and store ID in the Authenticate as "Postman Demo User" folder.
The result is stored in the demoUserId global variable.