Configure device profiling authentication
The Ping SDKs support authentication journeys that use device context. Device context is data that informs PingOne Advanced Identity Cloud about how and where a device authenticates.
Ping Identity AM provides authentication nodes for capturing and storing device profiles, and for comparing them.
The Ping SDKs have built-in support for these device-profiling authentication nodes. Use the SDKs to seamlessly integrate device context into high-security, low-friction authentication journeys.
|
It is up to you what information you collect from users and devices. You should always use data responsibly and provide your users appropriate control over data they share with you. You are responsible for complying with any regulations or data protection laws. |
Device profiling authentication nodes
Authentication journeys that use device context generally require three basic components:
-
Capture: Obtain information about the device being used to authenticate.
-
Store: Persist the captured data to a user’s profile for retrieval in future authentication journeys.
-
Compare: Determine if the device being used to authenticate:
-
Matches a device that has previously been used
-
Is being used from a trusted location
-
Is being used from a previously-used location
-
Capture
- Device Profile Collector node
-
Gathers metadata about the device the user is authenticating with.
Store
- Device Profile Save node
-
Persists collected device data to a user’s profile in the identity store.
Compare
- Device Match node
-
Compares any collected device metadata with that stored in the user’s profile.
- Device Location Match node
-
Compares any collected device location metadata with that stored in the user’s profile.
- Device Geofencing node
-
Compares any collected device location metadata with the trusted locations configured in the authentication node.
- Device Tampering Verification node
-
Inspects the captured metadata of an authenticating device and assigns a numeric score based on whether it has been tampered with. For example, the device may have been rooted or jailbroken.
Creating device profile journeys
The flexibility of authentication journeys means you can alter the different paths, and build upon examples provided here to suit your requirements.
Basic device profile matching
-
In the AM console, go to Realms > Realm Name > Authentication > Trees, and then click Create Tree.
-
Enter a name for the tree (for example
device-profile), and then click Create. -
Use a Data Store Decision node to determine the authenticating identity.
This example tree uses device context as an additional factor. Start by dragging the following nodes into the tree designer.The page node is optional: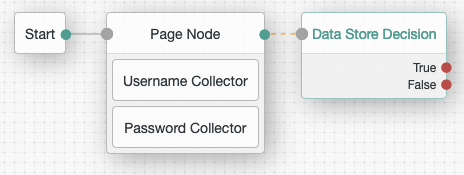
Now you can associate a user profile with the authenticating user.
-
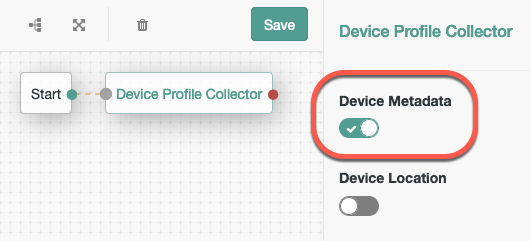
To add device context to the journey, connect a Device Profile Collector to the True outcome of the Data Store Decision node.
For this example, connect the False outcome to the Failure node:
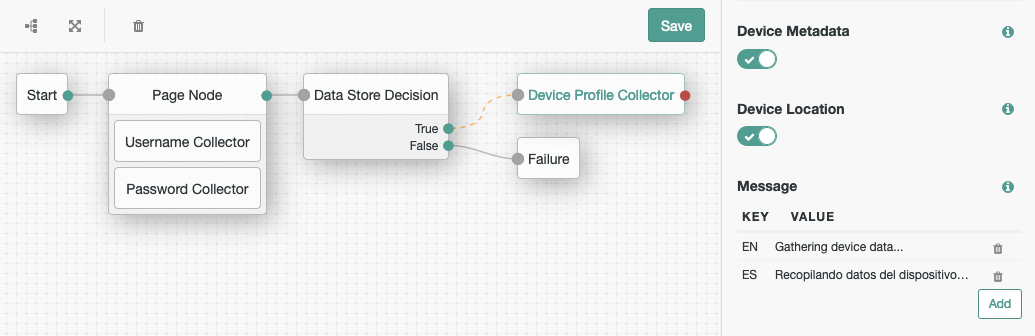
Ensure that you are capturing Device Metadata in the node’s configuration.
Optionally, provide a message to display while the node is capturing data. Now that you have the information about the authenticating device, you can compare it to any persisted device profiles the user may have. -
Connect a Device Match authentication node to the previous node, and connect the Success node, as follows:
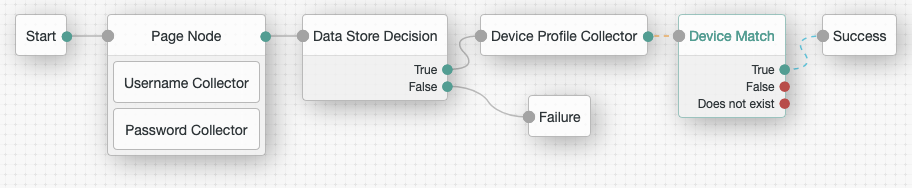 With this configuration, if the authenticating device matches one that has been previously used,
and persisted, then you can successfully authenticate the user.
With this configuration, if the authenticating device matches one that has been previously used,
and persisted, then you can successfully authenticate the user.There’s no need to persist the captured device profile, as it already matches a saved profile.
-
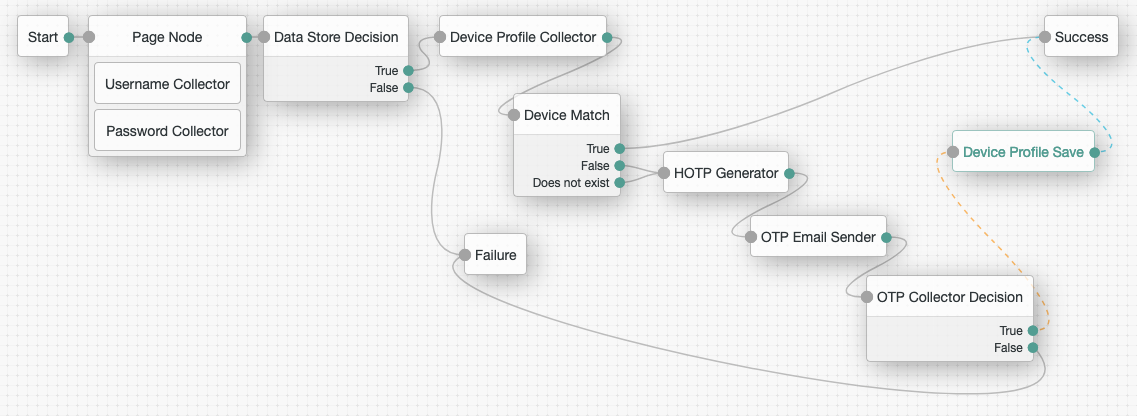
Decide the paths for when the device does not match, or the user has not yet saved a device profile.
This example, requires a one-time password (OTP) before persisting the user’s device profile.
-
Complete the authentication tree. In this example:
-
Save your work.
-
Validate the authentication journey:
-
User enters their username and password.
-
If the credentials are correct, metadata about their device is collected.
If the node has an optional message, it is displayed to the user. -
If the collected metadata matches an existing profile, authentication is successful.
If the collected metadata does not match, or there is no existing profile, the user performs OTP verification. -
If OTP verification was successful, the collected metadata is saved to the user’s profile, and authentication is successful.
-
On subsequent authentications with the same device, the user will not need to perform OTP verification.
Basic location matching
-
In the AM console, navigate to Realms > Realm Name > Authentication > Trees, and then click Create Tree.
-
Enter a name for the tree (for example
device-location-match), and then click Create. -
Determine the authenticating identity by using a Data Store Decision node.
Start by dragging the following nodes into the tree designer. The page node is optional:Now that you can associate a user profile with the authenticating user, you can start to add device context to the journey.
-
Connect a Device Profile Collector to the True outcome of the Data Store Decision node. For this example, connect the False outcome to the Failure node:
Ensure that you are capturing Device Location in the node’s configuration.Optionally, provide a message to display while the node is capturing the location data.
Now that you have the location information about the authenticating device, you can compare it to any persisted device profiles the user may have.
-
Connect a Device Location Match authentication node to the previous node, and connect the Success node:
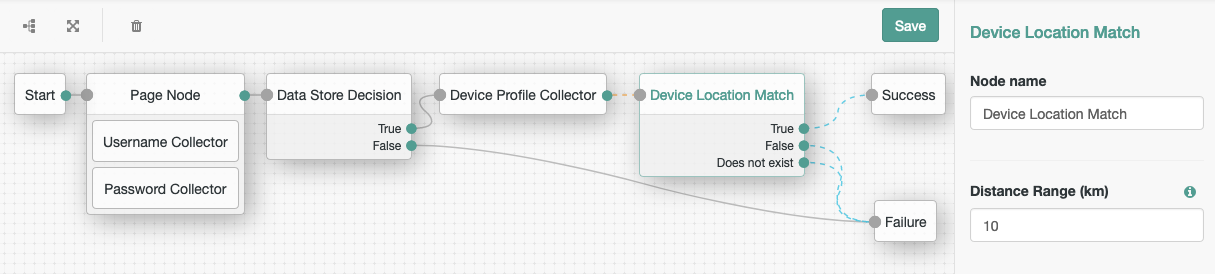
With this configuration, if the authenticating device is located within 10 kilometers of a location that has been previously used and persisted, then you can successfully authenticate the user. You can decide the paths for when the device does not match a previous location, or the user has not yet saved a device profile.
For example, you could send the user through additional authentication checks, and then save the new location data. For this simple demonstration, we proceed directly to failure.
-
Save your work.
-
Validate the authentication journey:
-
User enters their username and password.
-
If the credentials are correct, location metadata from their device is collected.
If the node has an optional message, it is displayed to the user.
-
If the collected location is within 10 kilometers of a location in an existing profile, authentication is successful.
If the collected metadata does not match, or there is no existing profile, authentication fails.
A more complete sample might ask for another factor if the location does not match, as well as verify that the device has been used previously through basic profile matching.
-
Once trust has been established, the tree would persist the new location, by using the Device Profile Save authentication node.
Trusted locations (geofencing) inner journey
-
In the AM console, navigate to Realms > Realm Name > Authentication > Trees, and then click Create Tree.
-
Enter a name for the tree; for example
geofence-innertree, and then click Create. -
Connect a Device Profile Collector to the Start node.
You can use geofencing as a prerequisite check in authentication trees. Without knowing the identity of the user, you can reject requests that are made from outside the range of a trusted location: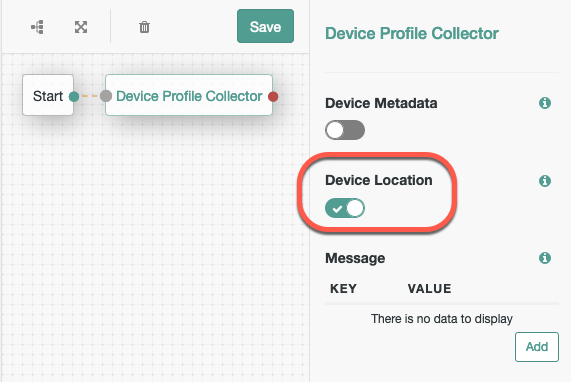
Ensure that you are capturing Device Location in the node’s configuration.
Optionally, provide a message to display while the node is capturing the location data.
Now that you have the location information about the authenticating device, you can ensure it is within range of a trusted location.
-
Connect a Device Geofencing authentication node to the collector node, and connect the
Insideoutcome to the Success node. -
Connect the
Outsideoutcome to the Failure node.This tree is not suitable to be used in isolation but, should be used within regular authentication tree, inside an Inner Tree Evaluator authentication node.
-
In the configuration of the Device Geofencing authentication node, add one or more trusted locations. For example, you could enter the locations of your offices around the world:
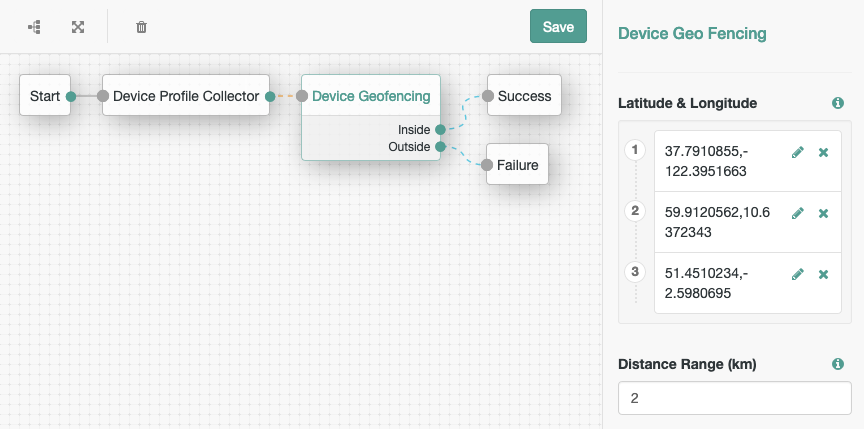
With this configuration, if the authenticating device is located within 2 kilometers of a trusted location then we can continue the authentication journey.
-
Save your work.
-
Insert the new tree into your existing authentication journeys, by using the Inner Tree Evaluator node:
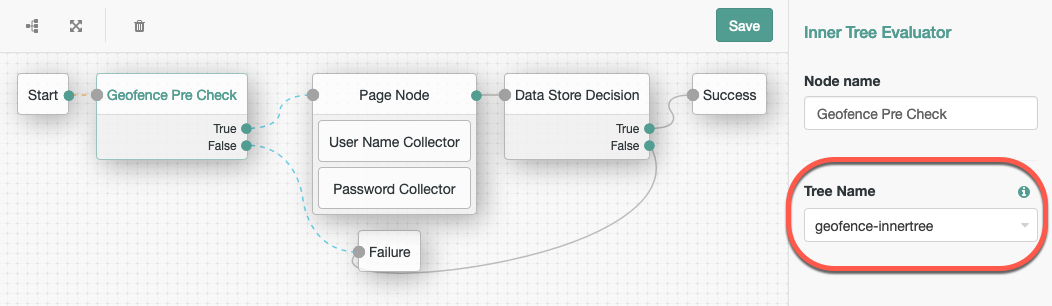
The
Trueoutcome should continue the journey.You can choose how to handle authentications that are not within range of a trusted location. In this example, they result in a failed authentication.
Tampered device inner journey
-
In the AM console, navigate to Realms > Realm Name > Authentication > Trees, and then click Create Tree.
-
Enter a name for the tree; for example
tamper-check-innertree, and then click Create. -
Connect a Device Profile Collector to the Start node.
You can use checking for tampered devices as a prerequisite in authentication trees. Without knowing the identity of the user, you can reject requests that are made from devices that may have been tampered with:
Ensure that you are capturing Device Metadata in the node’s configuration.
Optionally, provide a message to display while the node is capturing the location data.Now you have the metadata information about the authenticating device. You can check the likelihood that it has been tampered with and therefore, its trust level.
-
Connect a Device Tampering Verification authentication node to the collector node, and connect the
Not Tamperedoutcome to the Success node. -
Connect the
Tamperedoutcome to the Failure node.This tree is not suitable to be used in isolation but, should be used within regular authentication tree, inside an Inner Tree Evaluator authentication node.
-
In the configuration of the Device Tampering Verification authentication node, set the threshold for determining if the device is jailbroken, or rooted.
The higher the score (nearer to the maximum of
1), the more likely it is that the device may not be trustworthy.For this example, set a threshold of
0.8:
With this configuration, if the authenticating device scores less than 0.8, the authentication journey can continue.
-
Save your work.
-
Insert the new tree into your existing authentication journeys, by using the Inner Tree Evaluator node:
TheTrueoutcome should continue the journey.You can choose how to handle authentications coming from a device that may have been tampered with. In this example, they result in a failed authentication.