Configure compliance policies
Identity Governance enables centralized management of end-user access to resources throughout your company ensuring corporate and regulatory compliance.
Identity Governance implements an internal control process, also known as segregation of duties (SoD), to prevent the granting of privileges to a single individual in situations where conflict of interest could arise. For example, end users responsible for authorizing financial transactions should be different from those users responsible for reconciling, recording, or reviewing these transactions.
To implement SoD, Identity Governance uses policies consisting of policy rules, which outline the conditions for conflicting entitlements during end user access requests. You can also schedule policy scans on a regular basis to catch any policy violations.
Identity Governance also provides workflow nodes to handle SoD violations, letting you grant an exception for the violation, reject the violation, or remediate any conflicting entitlements. When Identity Governance detects non-compliant access requests, whether due to error or fraudulent activity, it marks them as violations and displays them on the Violations page. Identity Governance also displays all allowed violations on the Exceptions page.
View policies
-
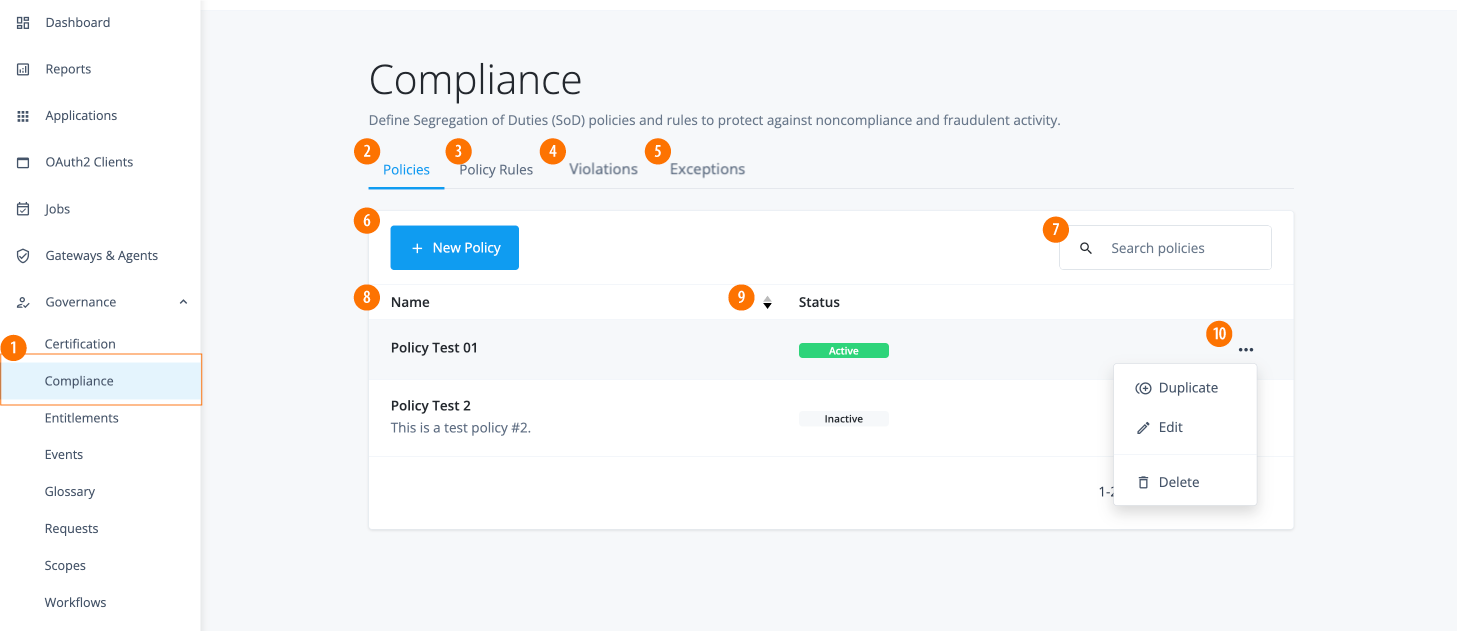
In the Advanced Identity Cloud admin UI, click Governance > Compliance. The Policies page appears with a list of policies. If no policies are present, the page displays a New Policy button.
-
1 Click the Compliance link in the left navigation bar.
-
2 Click the Policies tab to view the list of all policies.
-
3 Click the Policies Rules tab to view the list of all policy rules.
-
4 Click the Violations tab to view the list of all policy violations.
-
5 Click the Exceptions tab to view the list of all policy exceptions.
-
6 Click the New Policy button to add a new policy.
-
7 Search policies. Search by policy name, status, or description, case insensitive.
-
8 Name: Name of the policy. This is a required field.
-
9 Status: Current status of the policy, either
InactiveandActive. You can sort the list in ascending or descending order by clicking the up or down triangles. -
10 Ellipsis (). Click to duplicate, edit, or delete the policy.
-
View policy details
Identity Governance provides a policy details page, where you can add or edit the policy rules, schedule policy scans, review or forward policy violations, and review any policy exceptions.
-
In the Advanced Identity Cloud admin UI, click Governance > Compliance.
-
On the Policies page, click the ellipsis () for a policy, and then click Edit. The policy details page appears.

-
1 Click Details to view or edit a policy’s configuration.
-
2 Click Rules to view or edit the policy rules assigned to the policy.
-
3 Click Scans to schedule a scan for the policy.
-
4 Click Violations to view or forward any violations found in the scans.
-
5 Status: Current status of the policy, either
InactiveandActive. Click Activate to make the policy active, or click Deactivate to make the policy inactive. -
6 Name: Name of the policy.
-
7 Description: Optional. Enter a description for the policy.
-
8 Policy Owner. Select the policy owner(s) for the policy.
-
Add policies rules
Policy rules set the criteria for violation conditions, specify who the criteria applies to, outline decision options, determine scan types, and manage the lifecycles of violations.
-
In the Advanced Identity Cloud admin UI, click Governance > Compliance.
-
Click the Policy Rules tab, and then click New Rule.
-
On the New Policy Rule page, enter the policy rule details, and then click Next:
Field Description Name
Enter a name for your policy rule. Follow any naming convention established by your company.
Description
Optional. Enter a general description for the new policy.
Owner
Select a policy owner for this new policy rule.
Risk Score
Assign a risk score for this rule. Range is 0–100. For example, a high risk score could be 80–100 for a rule.
Mitigating Control
Optional. Enter instructions on what to do if a violation is unavoidable.
Control URL
Optional. Enter a URL link to a reference site, such as an internal corporate policy page.
#Correction Advice
Optional. Enter instructions on how to correct the violation(s).
-
On the Violation Condition page, do the following:
-
Use the filter to set your initial violation conditions. When done, click , and then click Add Rule or Add Group.
Field Description Select entitlements if
AnyorAllconditions are met.Select either Any or All.
Select a property
Values could include the following, depending on your glossary items:
-
Description
-
Display Name
-
Entitlement Owner
-
Requestable
Connector
Values include:
-
contains
-
is
-
starts with
-
ends with
Attribute Value
Enter an attribute.
-
-
Next, enter a condition that
cannot conflict withthe previous condition. When done, click , and then click Add Rule or Add Group. Click Next:Field Description Select entitlements if
AnyorAllconditions are met.Select either Any or All.
Select a property
Values include:
-
Description
-
Display Name
-
Entitlement Owner
-
Requestable
Connector
Values include:
-
contains
-
is
-
starts with
-
ends with
Attribute Value
Enter an attribute.
-
-
-
On the Applies To page, select the end users for whom this policies applies. When done, click Next. Values include:
Field Description Applies to
Options are:
-
All users -
A single user -
Users matching a filter. Create a filtered condition to match users.
-
-
On the Settings page, select the policy rule settings:
Field Description Violation Owner
Confirm the violation owner of the policy rule. Select an alternate owner if necessary.
Decision Options
Select option to allow or grant a temporary exception to retain access:
-
Enable Allow: Click to allow an end user to retain their violating access permanently.
-
Enable Exception: Click to allow a user to be granted temporary exception to retain access. If you select this option, additional properties are displayed:
-
Exception Duration: Enter a number (in days) for the maximum duration for the exception.
-
Require a justification when allowing exceptions. Click to this option to always require a justification for the exception.
-
Scan Types
At least one value must be checked. Values include:
-
Preventative: Click to enforce rule during access request and provisioning. When this property is enabled, the end user sees a warning message when trying to request for a non-compliant entitlement.
Granting access to these entitlement(s) will result in a Segregation of Duties (SoD) violation.
-
Detective: Click to enforce rule during compliance scans.
Violation Lifecycle
Select the settings for the violation life cycle:
-
When a violation is found: Select a setting if a violation is found. Options are:
-
Do nothing. Click to leave the violation as-is with no corrective action. A violations owner must decide what to do with the violation and take corrective action.
-
Launch Violation Workflow. Select the workflow to launch when a rule violation is triggered.
-
-
Violations Expire: Select what happens when a violation expires. Options are:
-
Never. Never expire the violation automatically.
-
After a specified time. Enter the number of day(s) after which the violations expire.
-
-
When violation expires: Determines what happens when a violation expires. Options are:
-
Close violation. Closes the expired violation.
The conflicting entitlements still remain with the user. -
Create a new violation. Create a new violation.
-
Do nothing. Violation expires and no action is taken.
The conflicting entitlements still remain with the user.
-
-
-
Click Save.
Edit policy rules
-
In the Advanced Identity Cloud admin UI, click Governance > Compliance.
-
On the Policies page, click Policy Rules.
-
Click a policy rule. Change any aspect of a policy rule. Click Save to keep your changes.
Add policies
-
In the Advanced Identity Cloud admin UI, click Governance > Compliance.
-
On the Policies page, click New Policy.
-
On the New Policy modal, enter the following, and when completed, click Next.
Field Description Name
Enter a name for your policy. Follow any naming convention established by your company.
Description
Optional. Enter a general description for the new policy.
Policy Owner
Select a policy owner for this new policy.
-
On the New Policy modal, select the one or more rules to add to this policy.
-
Click Save. The new policy appears on the Policies page in an
Activestatus.
Edit policies
The Policies tab provides options to duplicate, edit, or delete a policy.
-
In the Advanced Identity Cloud admin UI, click Governance > Compliance.
-
On the Policies page, click the ellipsis () for a policy, and then click Edit.
-
Make any changes, and then click Save.
Field Description Status
Options are:
-
If the status is
Active, click Deactivate to disable the policy if needed. -
If the status is
Inctive, click Activate to enable the policy.
Name
Change the policy name.
Description
Optional. Add or change the description for the policy.
Policy Owner
Change the policy owner if necessary.
-
Schedule policy scans
You can schedule policy scans to search for any compliance violations.
-
In the Advanced Identity Cloud admin UI, click Governance > Compliance.
-
On the Policies page, click the ellipsis () for a policy, and then click Edit.
-
Click the Scans tab. Set the scan schedule, and then click Save. The options are:
Field Description Edit Schedule
Options are:
-
Enter a number and time values:
hour(s),day(s),week(s), ormonth(s). -
Click Set a Start Tie, and click the date and time to start a scan.
Repeat
Options are:
-
Enter the number of times to run a scan.
-
Click Until specific date, and click the end date and time for the scans.
-
Click Indefinitely.
-
-
Click Simulate Scan to run a simulation. This feature helps to check if your policy rules are correctly configured but does not create any violation objects used in the system.
-
Click Run Scan to run a scan. The scan generates violation objects and reports any violations to the policy.
View violations
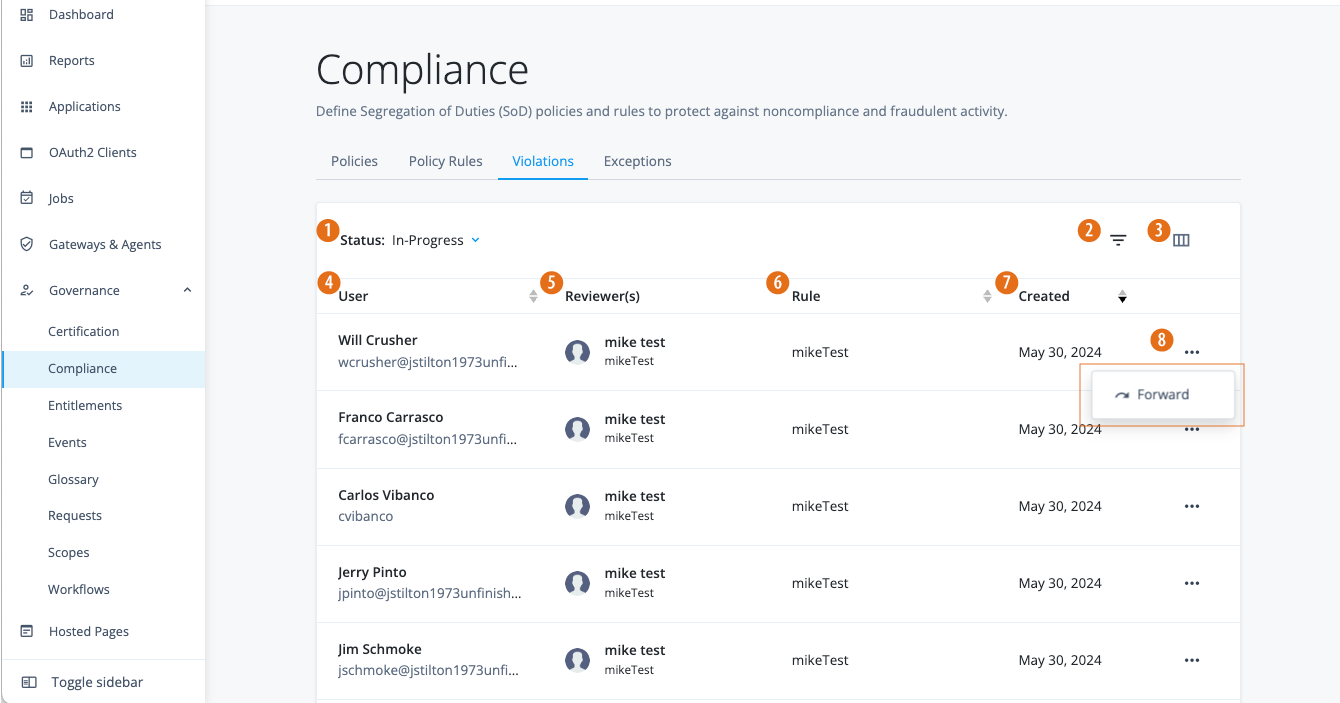
Identity Governance Violations page displays the compliance violations found during the policy scans. You (administrators) can only view violations, forward a violation to another authorized end user (i.e., violation owners), view the violation’s activity history, or add a comment.
-
In the Advanced Identity Cloud admin UI, click Governance > Compliance > Violations to view all violations found during the scans.
-
1 Click to filter violations by status: In-progress or Completed.
-
2 Click the filter icon () to display violations by owner, rule, or date range.
-
3 Click the column icon () to customize the columns displayed on the page.
-
4 Displays the violations by user.
-
5 Displays the rule violation.
-
6 Displays the creation date of the violation.
-
7 Click the ellipsis () to forward the violation to another user.
Filter violations page
Identity Governance’s Violations page provides a filtering option for its page.
-
In the Advanced Identity Cloud admin UI, click Governance > Compliance > Violations.
-
Click the filter list icon (), do any of the following:
-
Rule: Select the rule on the drop-down list.
-
User: Select All Users, or select a specific user.
-
From: Enter a starting date in a date range, or click the calendar icon () for the start date.
-
To: Enter an end date in a date range, or click the calendar icon () for the end date.
-
Customize columns on the Violations page
Identity Governance’s Violations page provides a column customization option to display the properties based on your settings.
-
In the Advanced Identity Cloud admin UI, click Governance > Compliance > Violations.
-
Click the view column icon (), the columns are ordered from top to bottom and displayed from left to right on the page. Do any of the following:
-
In Active Columns, click and drag the column down or up to reorder the columns on the page.
-
In Available Columns, click any property to display in Active Columns.
-
Click the trash can icon () to remove the column from the page. In Available Columns, clear the selected column to remove the property from the Active Columns.
-
Click Apply to save your changes. Your settings appear immediately.
-
View violations details
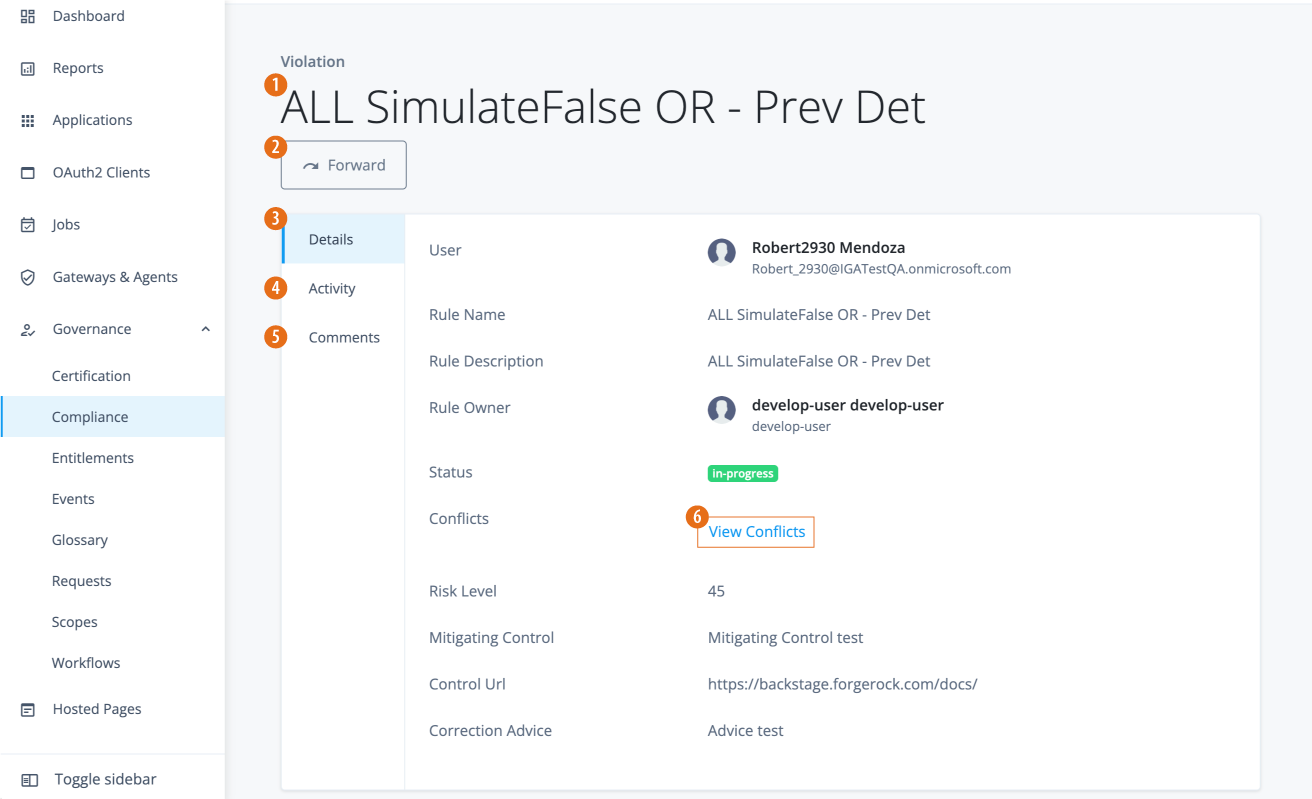
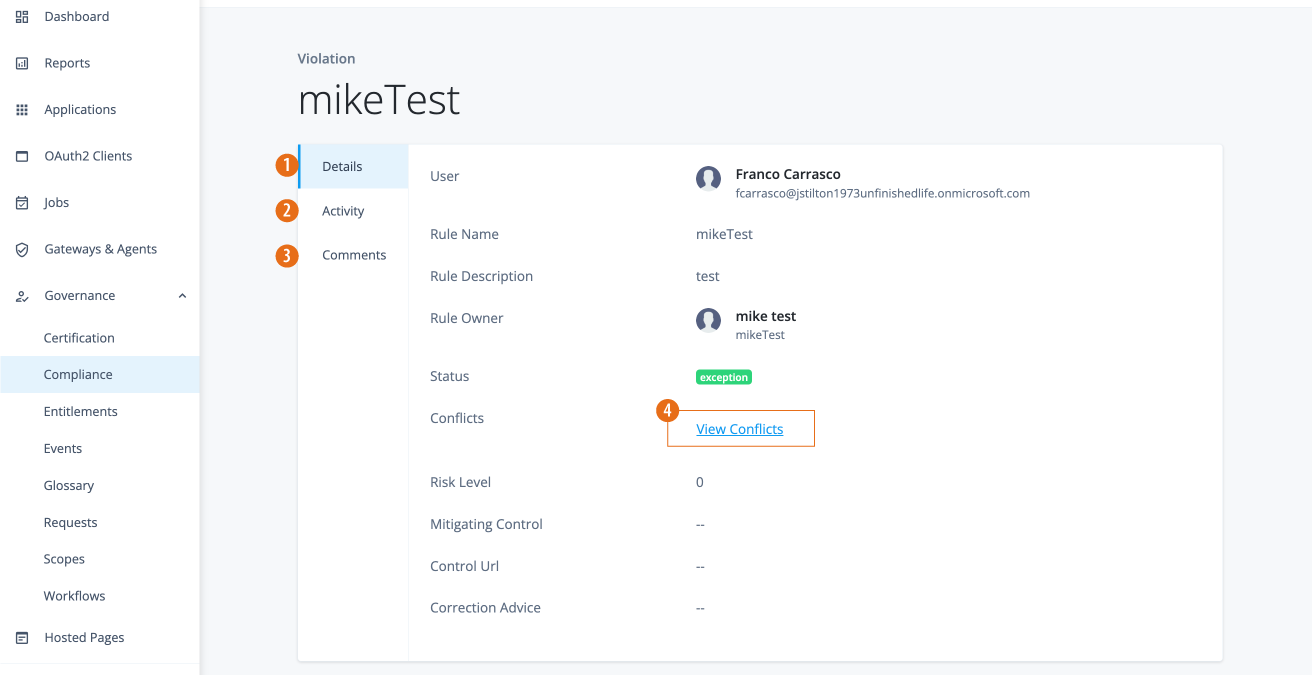
Administrators can only view the violation details, forward to a violations owner, view the activity history on the violation, or add a comment.
-
1 Violation name is based on the policy rule.
-
2 Click Forward to send to a violations owner to process.
-
3 Click Details to view the violation detailed information.
-
4 Click Activity to view a history of actions on the violation.
-
5 Click Comments to view any comments made by authorized end users or to enter a new comment.
-
6 Click View Conflicts to view the conflicting entitlements causing the violation.
-
In the Advanced Identity Cloud admin UI, click Governance > Compliance.
-
Click Violations.
-
On the Violations page, click a violation to view its details.
-
On the specific violations page, review the Details page:
Field Description User
Displays the user associated with the violation.
Rule Name
Displays the rule name associated with the violation.
Rule Description
Displays the description for the rule.
Rule Owner
Displays the rule owner.
Status
Displays the status of the violation:
in-progressorcompleted.Conflicts
Click View Conflicts to view the conflicting entitlements causing the violation.
Risk Level
Displays the associated risk level of the violation.
Mitigating Control
Review instructions for mitigating the conflict.
Control Url
Displays the URL for corporate compliance policies.
Correction Advice
Displays any advice to correct the conflicts.
-
Click Activity to view a history of all actions related to the violation.
-
Click Comments to view any comments related to the violation or to add a comment.
-
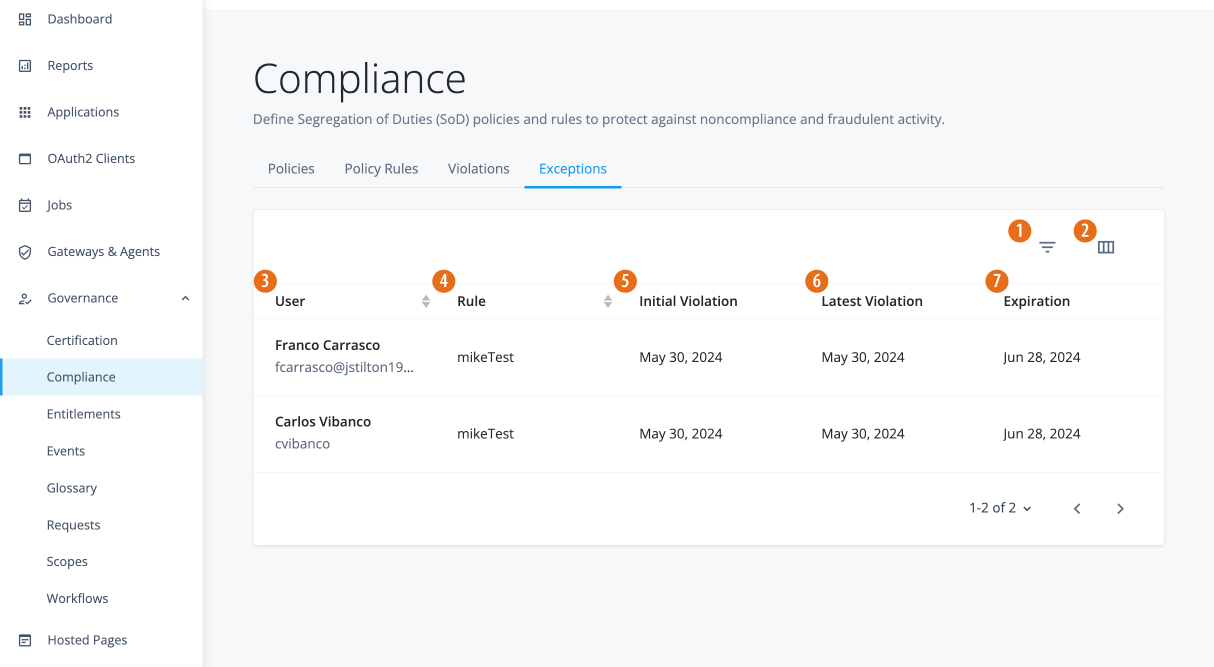
View exceptions
Identity Governance Exceptions page displasy the compliance exceptions granted to any violation. You can filter the search by user and rule.
-
In the Advanced Identity Cloud admin UI, click Governance > Compliance > Exceptions to view all "active" violation exceptions.
Once an exception has expired or has been closed, the exception no longer appears on the page.
-
1 Click the filter icon () to display violations by owner, rule, or date range.
-
2 Click the column icon () to customize the columns displayed on the page.
-
3 Displays the exception by user.
-
4 Displays the rule violation.
-
5 Displays the date of the initial violation.
-
6 Displays the date of the latest violation.
-
7 Displays the expiration date of the violation.
Filter exceptions page
Identity Governance’s Exceptions page provides a filtering option.
-
In the Advanced Identity Cloud admin UI, click Governance > Compliance > Exceptions.
-
Click the filter list icon (), do any of the following:
-
Rule: Select the rule on the drop-down list.
-
User: Select All Users, or select a specific user.
-
From: Enter a starting date in a date range, or click the calendar icon () for the start date.
-
To: Enter an end date in a date range, or click the calendar icon () for the end date.
-
Customize columns on the Exceptions page
Identity Governance’s Exceptions page provides a column customization option to display the properties based on your settings.
-
In the Advanced Identity Cloud admin UI, click Governance > Compliance > Exceptions.
-
Click the view column icon (), the columns are ordered from top to bottom and displayed from left to right on the page. Do any of the following:
-
In Active Columns, click and drag the column down or up to reorder the columns on the page.
-
In Available Columns, click any property to display in Active Columns.
-
Click the trash can icon () to remove the column from the page. In Available Columns, clear the selected column to remove the property from the Active Columns.
-
Click Apply to save your changes. Your settings appear immediately.
-
View exceptions detail
-
1 Click Details to view the violation detailed information.
-
2 Click Activity to view a history of actions on the violation.
-
3 Click Comments to view any comments made by authorized end users or to enter a new comment.
-
4 Click View Conflicts to view the conflicting entitlements causing the violation.
-
In the Advanced Identity Cloud admin UI, click Governance > Compliance > Exceptions.
-
On the Exceptions page, click an exception to view its details.
-
On the specific exceptions page, review the Details page:
Field Description User
Displays the user associated with the violation.
Rule Name
Displays the rule name associated with the violation.
Rule Description
Displays the description for the rule.
Rule Owner
Displays the rule owner.
Status
Displays the status of the violation:
in-progressorcompleted.Conflicts
Click View Conflicts to view the conflicting entitlements causing the violation.
Risk Level
Displays the associated risk level of the violation.
Mitigating Control
Review instructions for mitigating the conflict.
Control Url
Displays the URL for corporate compliance policies.
Correction Advice
Displays any advice to correct the conflicts.
-
Click Activity to view a history of the exception.
-
Click Comments to view or add any comments related to the exception.
-