Set up Microsoft AD FS as a federation identity provider
To use AD FS as a federation identity provider for PingOne Advanced Identity Cloud, you need to create a relying party trust. The trust is a set of identifiers, names, and rules that identify the partner or web-application to the federation Service.
Afterward, you need to create an application group that uses single sign-on (SSO) to access applications that are outside the corporate firewall.
Step 1: Complete AD FS prerequisites
Before setting up AD FS as a federation identity provider, you must set up a self-hosted instance of AD FS version 4.0, running on Windows Server 2016 or higher.
Step 2: Create a relying party trust
After you complete the prerequisites of setting up AD FS, you need to create a relying part trust that identifies the partner or web-application to the federation service.
Perform the following steps to add a relying party trust by using AD FS Management.
-
Open the Server Manager console by clicking Server Manager on the Start screen or clicking Server Manager in the taskbar on the desktop.
-
In AD FS Management, select Tools > AD FS.
-
On the AD FS dialog, in the left panel, click Relying Party Trusts.
-
In the Actions pane, select Add Relying Party Trust.
-
On the Welcome page of the Add Relying Party Trust wizard, select Claims aware.
-
On the Select Data Source page, select Enter data about the relying party manually.
-
On the Specify Display Name page, enter a display name.
-
Complete the steps in the wizard until you reach the Configure Identifiers page.
-
On the Configure Identifiers page, add a relying party trust identifier for each of your tenant environments using the following URL format:
https://<tenant-env-fqdn>/am
For example, if one of your tenant environment FQDNs is "openam-mycompany-ew2.id.forgerock.io", use "https://openam-mycompany-ew2.id.forgerock.io/am" as the URL for that environment.
-
On the Choose Access Control Policy page, select the appropriate settings according to your corporate policy.
-
Complete the steps in the wizard until you reach the Finish page.
Step 3: Create an application group
To use AD FS as a federation identity provider, you need to create a Relying Party Trust. The trust is a set of identifiers, names, and rules that identify the partner or web-application to the federation Service.
Afterward, you need to create an application group that uses single sign-on (SSO) to access applications.
Perform the following steps to set up an application group that connects with Advanced Identity Cloud.
-
In the AD FS editor, select Application Groups.
-
In the Actions pane, select Add Application Group.
-
Complete the Add Application Groups wizard as follows:
-
On the Welcome page of the Add Application Groups wizard, provide a name and a description and select the Server application accessing a web API template.
-
On the Server application page:
-
Accept the proposed
Name. -
Note the
Client Identifier. -
Add tenant Redirect URIs for each of your tenant environments using the following URL format:
https://<tenant-env-fqdn>/login/admin
For example, if one of your tenant environment FQDNs is "openam-mycompany-ew2.id.forgerock.io", use "https://openam-mycompany-ew2.id.forgerock.io/login/admin" as the URL for that environment.
-
-
On the Configure Application Credentials page:
-
Select Generate a shared secret. The secret acts as a password for the application.
-
Use the Copy to clipboard button to copy the secret.
-
-
Click Next.
-
On the Configure Web API page, add the
client identifieryou noted earlier. -
Click Next.
-
On the Choose Access Control Policy page, select the appropriate settings according to your corporate policy.
-
Click Next.
-
On the Configure Application Permissions page, check the following permitted scopes:
-
allatclaims: Lets the application request the claims in the access token that is added to the ID token.
-
email: Lets the application request an email claim for the signed-in user.
-
openid: Lets the application request use of the OpenID Connect authentication protocol.
-
profile: Lets the application request profile-related claims for the signed-in user.
-
-
Click Next.
-
On the Summary page, review your selections.
-
Click Next.
-
On the Complete page, click Close.
-
Step 4: Include additional identity claims in tokens
Since AD FS does not support the /userinfo endpoint, we must extract all the user information or claims from the identity token. We use rules to configure AD FS to include these additional claims in the tokens required by Advanced Identity Cloud.
The Send LDAP Attribute as Claims rule allows you to include the active directory attributes of the users that access Advanced Identity Cloud.
Perform the following steps to instruct AD FS to include additional claims in the tokens that Advanced Identity Cloud requires.
-
In the AD FS editor, select Application Groups.
-
In the Actions pane, select Add Application Group.
-
Double-click your application group.
-
In the Applications section, in the Web API area, select your application, and click Edit.
-
Click the Issuance Transform Rules tab, and click Add Rule.
-
To include active directory attributes of the users that are accessing Advanced Identity Cloud, in the Claim rule template drop-down field, select Send LDAP Attributes as Claims.
-
In the Claim rule name field, enter a name for the claim rule. For example, Profile Attributes.
-
In the Attribute store drop-down field, select Active Directory.
-
To map LDAP attributes to name spaces in Advanced Identity Cloud, complete the Mapping of LDAP attributes to outgoing claim types table:
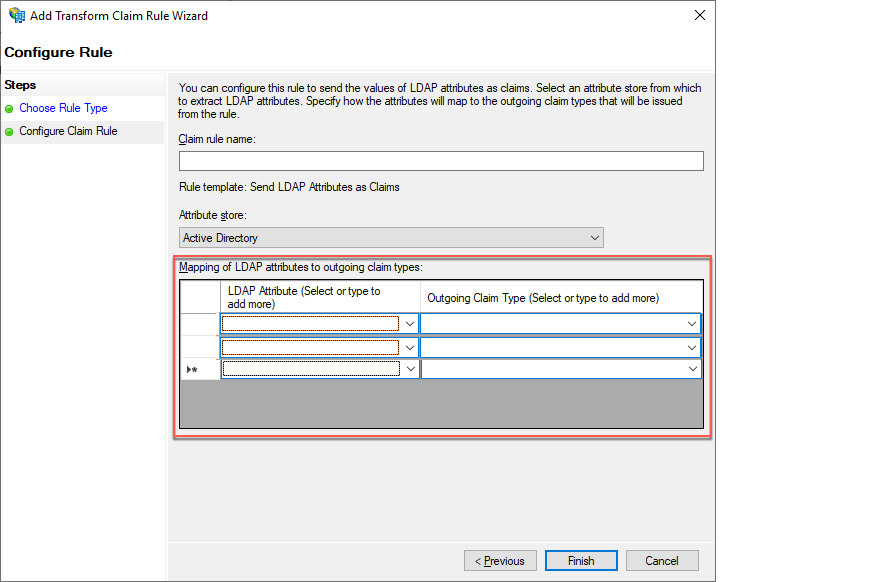
LDAP Attribute (Select or type to add more) Outgoing Claim Type (Select or type to add more) E-Mail Addresses
mail
Given-Name
givenName
Surname
sn
-
Click Finish.
-
On the Issuance Transform Rules tab, click Apply.
-
Click OK twice.
Step 5: Obtain the well-known endpoint for the AD FS OpenID Connect service
After you include any additional identity claims in tokens, you need to identify the well-known URI that the AD FS OpenID Connect service uses.
-
In the AD FS editor, select Service > Endpoints.
-
In the middle pane, scroll down to the OpenID Connect section.
-
In the OpenID Connect section, note the URL path. The well-known end point URL is the concatenation of the host name of the machine running AD FS and the URL path you just noted.
Step 6: Enable federation in AD FS using group membership
Groups let you add and remove sets of administrators based on their group membership in your identity provider (Microsoft Azure, AD FS, or OIDC). You can also specify the administrator access for an entire group of users: super administrators or tenant administrator.
Create groups containing Advanced Identity Cloud tenant administrators
You need to create two groups of administrators in AD FS for each of your Advanced Identity Cloud environments:
For each tenant:
-
The first group should consist of the users that will be super administrators in your Advanced Identity Cloud tenant.
-
The second group should consist of the users that will be tenant administrators in your Advanced Identity Cloud tenant.
When naming each group, use a prefix that identifies the group as relevant for Advanced Identity Cloud; this allows the AD FS claim scripts to only include relevant groups. Make sure to include the tenant name as part of the group name to help you identify the tenant the group is for.
Example: group name template
<prefix>-<tenant identifier>-<admin type>.
Example: group name
aic-dev-superadmin
In this example:
-
aicrepresents the prefix. -
devrepresents the tenant identifier. -
superadminrepresents the admin type.
Example: All group names for a standard promotion group of tenants and a sandbox tenant.
-
aic-dev-superadmin -
aic-dev-tenantadmin -
aic-staging-superadmin -
aic-staging-tenantadmin -
aic-prod-superadmin -
aic-prod-tenantadmin -
aic-sandbox-superadmin -
aic-sandbox-tenantadmin
Include additional claims in the tokens for Advanced Identity Cloud
To use group membership to enable federation, you must add issuance transform rules to enable AD FS to add additional group claims.
You must add the following two rules in AD FS:
-
Store Groups rule: A rule that collects all the user groups and stores them in a claim with the indicated name. The script produces a potentially large claim.
-
Issue Groups rule: A rule that takes the long list of groups that the Store Groups script creates and only selects the groups with the Group Name Prefix that is relevant for the claim.
-
In the AD FS editor, select Application Groups.
-
In the Actions pane, select the group you previously created.
-
Right-click the group and select Properties.
-
In the Applications section, in the Web API area, select your application, and click Edit.
-
Click the Issuance Transform Rules tab.
-
Click Add Rule.
-
To include active directory attributes of the users that are accessing Advanced Identity Cloud, in the Claim rule template drop-down field, select Send Claims Using a Custom Rule.
-
In the Custom rule field, enter the rule definition for the Store Groups rule.
-
Store Groups rule template:
c:[Type == "http://schemas.microsoft.com/ws/2008/06/identity/claims/windowsaccountname", Issuer == "AD AUTHORITY"] ⇒ add(store = "Active Directory", types = ("<Groups Claim Name>"), query = ";tokenGroups;{0}", param = c.Value); -
Store Groups rule example:
c:[Type == "http://schemas.microsoft.com/ws/2008/06/identity/claims/windowsaccountname", Issuer == "AD AUTHORITY"] ⇒ add(store = "Active Directory", types = ("groups"), query = ";tokenGroups;{0}", param = c.Value);-
"groups" is the name of the resulting claim that you enter into the Groups Claim Name field on the Identity Provider Details page in the Advanced Identity Cloud.
-
-
-
Click Finish.
-
Click Add Rule.
-
To include active directory attributes of the users that are accessing Advanced Identity Cloud, in the Claim rule template drop-down field, select Send Claims Using a Custom Rule.
-
In the Custom rule field, enter the rule definition for the Issue Groups rule.
-
Issue Groups rule template:
c:[Type == "<Groups Claim Name>", Value =~ "^<Group Name Prefix>-.+"] ⇒ issue(claim = c); -
Issue Groups rule example:
c:[Type == "groups", Value =~ "^aic-.+"] ⇒ issue(claim = c);-
"groups" is the name of the resulting claim that you enter into the Groups Claim Name field on the Identity Provider Details page in the Advanced Identity Cloud.
-
"aic" is the prefix you chose for the group names.
-
-
-
Click Finish.
-