Microsoft Entra ID (Azure AD) as OpenID provider
| While this PingOne Advanced Identity Cloud use case was validated for accuracy, it can always be improved. To provide feedback, click or in the top right of this page (you must be logged into Backstage). |
Description
Estimated time to complete: 45 minutes
In this use case, you configure Advanced Identity Cloud to be a relying party (RP), or client, with Microsoft Entra ID (formerly known as Azure AD) as the OpenID provider (IDP).
You also create a journey that lets end users log in to Advanced Identity Cloud optionally using Microsoft Entra ID.
Goals
After completing this use case, you will know how to do the following:
-
Configure Microsoft Entra ID to be an identity provider (IDP).
-
Configure Advanced Identity Cloud to be a relying party (RP) by delegating authentication to a third party.
-
Create a journey that lets end users log in to Advanced Identity Cloud using either their Microsoft Entra ID credentials or their Advanced Identity Cloud credentials. If no identity exists in Advanced Identity Cloud after a user authenticates with Microsoft Entra ID, complete just in time (JIT) registration based on information returned to Advanced Identity Cloud from Microsoft Entra ID.
Prerequisites
Before you start work on this use case, ensure you have these prerequisites:
-
A basic understanding of:
-
Realms
-
The UI under Native Consoles > Access Management
-
Journeys
-
Nodes
-
The Advanced Identity Cloud end-user UI
-
The
managed/alpha_userobject schema
-
-
Access to your development environment as an administrator
-
Proficiency in Microsoft Entra ID
-
A Microsoft Entra ID environment with administrator privileges
-
A test identity in Microsoft Entra ID
Tasks
| This use case requires the use of third-party services. Use your environment specific details where necessary. |
Task 1: Create application in Microsoft Entra ID
| Some steps require you to copy information. Paste the information into a text editor to keep track. |
-
Log in to your Microsoft Entra ID environment.
-
Under Azure services, select App registrations.
If the resource isn’t present, use the search bar to search for it.
-
Click + New Registration.
-
Specify the following values on the Register an application page:
-
Name —
Advanced Identity Cloud (OIDC) -
Supported account types — Select
Accounts in any organizational directory (Any Azure AD directory - Multitenant). -
Redirect URI — Where to redirect an end user after they authenticate with Microsoft Entra ID.
Select
Weband enter the fully qualified domain name (FQDN) of your Advanced Identity Cloud tenant:https://<tenant-env-fqdn>/am
-
-
Click Register.
Copy the value of Application (client) ID and paste it into a text editor. You’ll need it in a later step.
-
From the left navigation menu, click Certificates & secrets.
-
Click + New client secret and enter the following values:
-
Description —
Client Secret for Advanced Identity Cloud (OIDC). -
Expires — Select
180 days (6 months). For the purposes of this use case, six months is sufficient. Ensure you have a change management process in place to update the secrets in Microsoft Entra ID and in Advanced Identity Cloud.
-
-
Click Add.
Copy the secret value from the Value column and paste it into a text editor. You’ll need it in a later step.
Learn more about registering an application in Microsoft’s documentation.
Task 2: Configure Advanced Identity Cloud’s social identity provider service
Because this use case explores the use of Microsoft Entra ID as an additional login option for end users, you must configure the Microsoft social identity provider as follows:
-
In a new tab, log in to the Advanced Identity Cloud admin UI as an administrator.
-
In the left navigation pane, select Native Consoles > Access Management.
The realm overview for the Alpha realm displays.
-
In the left navigation pane, click Services.
In the enabled services, check if Social Identity Provider Service is present. If it is, skip to step 7.
-
Click + Add a Service.
-
In the Service Types drop-down list, select Social Identity Provider Service.
-
Click Create.
-
Ensure the Enabled box is checked.
-
Click Save Changes to accept the default settings.
-
Click the Secondary Configurations tab > + Add a Secondary Configuration > Client configuration for Microsoft.
-
Complete the following fields:
Fields
Field Value Description Name
Enter
Microsoft Social Login.The name of the service.
Client ID
Enter the client ID you copied in Task 1.
For example,
9b6b20d4-36e0-4d13-af17-412f51a6567f.Specifies the
client_idparameter as described in section 2.2 of The OAuth 2.0 Authorization Framework specification.Token Introspection Endpoint URL
Leave blank.
The URL to the endpoint handling access token validation, as described in the OAuth 2.0 Token Introspection specification.
For example,
https://oauth2.googleapis.com/tokeninfo.Redirect URL
The redirect URL you entered when creating the application in Microsoft Entra ID. The Redirect URL in Advanced Identity Cloud and the Redirect URI in Microsoft Entra ID must match.
For example,
https://<tenant-env-fqdn>/am.The URL to which the identity provider will redirect the user after authenticating, as described in Section 3.1.2 of The OAuth 2.0 Authorization Framework specification.
Redirect after form post URL
Leave blank.
The URL of a custom login page or application. Advanced Identity Cloud sends the processed form post data related to social login authentication to that URL as the value of the
form_post_entryquery parameter.Scope Delimiter
Enter a blank space in this field by placing your cursor in the field and pressing the Spacebar.
Specifies the delimiter used to separate scope values. For example, a blank space or a comma character.
Most providers use a blank space.
JWKS URI Endpoint
Leave blank.
The URI that contains the public keys of the identity provider. Advanced Identity Cloud uses these keys to verify signatures or to encrypt objects.
JWT Encryption Algorithm
If not already selected, select
NONE.The encryption algorithm supported by the provider that PingOne Advanced Identity Cloud should use to encrypt client authentication JWTs when Client Authentication Method is set to
PRIVATE_KEY_JWT, and (OpenID Connect providers only) request JWTs when Request Parameter JWT Option is set toVALUEorREFERENCE.If set to
NONE, PingOne Advanced Identity Cloud doesn’t encrypt the JWTs. Obtain a list of the supported algorithms from the provider’s.well-knownendpoint.JWT Encryption Method
If not already selected, select
NONE.The encryption algorithm supported by the provider that PingOne Advanced Identity Cloud should use to encrypt the following:
-
Client authentication JWTs when Client Authentication Method is set to
PRIVATE_KEY_JWT. -
(OpenID Connect providers only) Request JWTs when Request Parameter JWT Option is set to
VALUEorREFERENCE.Used in conjunction with
JWT Encryption Algorithm. Obtain a list of supported methods from the provider’s.well-knownendpoint.
Certificate Revocation Checking Options
Leave blank.
Specify one or more options to be used by the TLS certificate revocation checking mechanism.
If you select no options, the default behavior is to enable revocation checking with
SOFT_FAIL. -
-
Click Create.
-
In the Client Secret field, enter the client secret you copied in Task 1.
-
At the bottom of the page, click Save Changes.
The properties under the UI Config Properties section set the Microsoft logo and branding that displays to the end user when they select to authenticate with Microsoft.
The default settings use the Microsoft logo and branding. Change them if necessary.
|
The Transform Script field with the value of This use case doesn’t require you to update this script; however, if needed, you can update the script:
|
Task 3: Create a social authentication journey
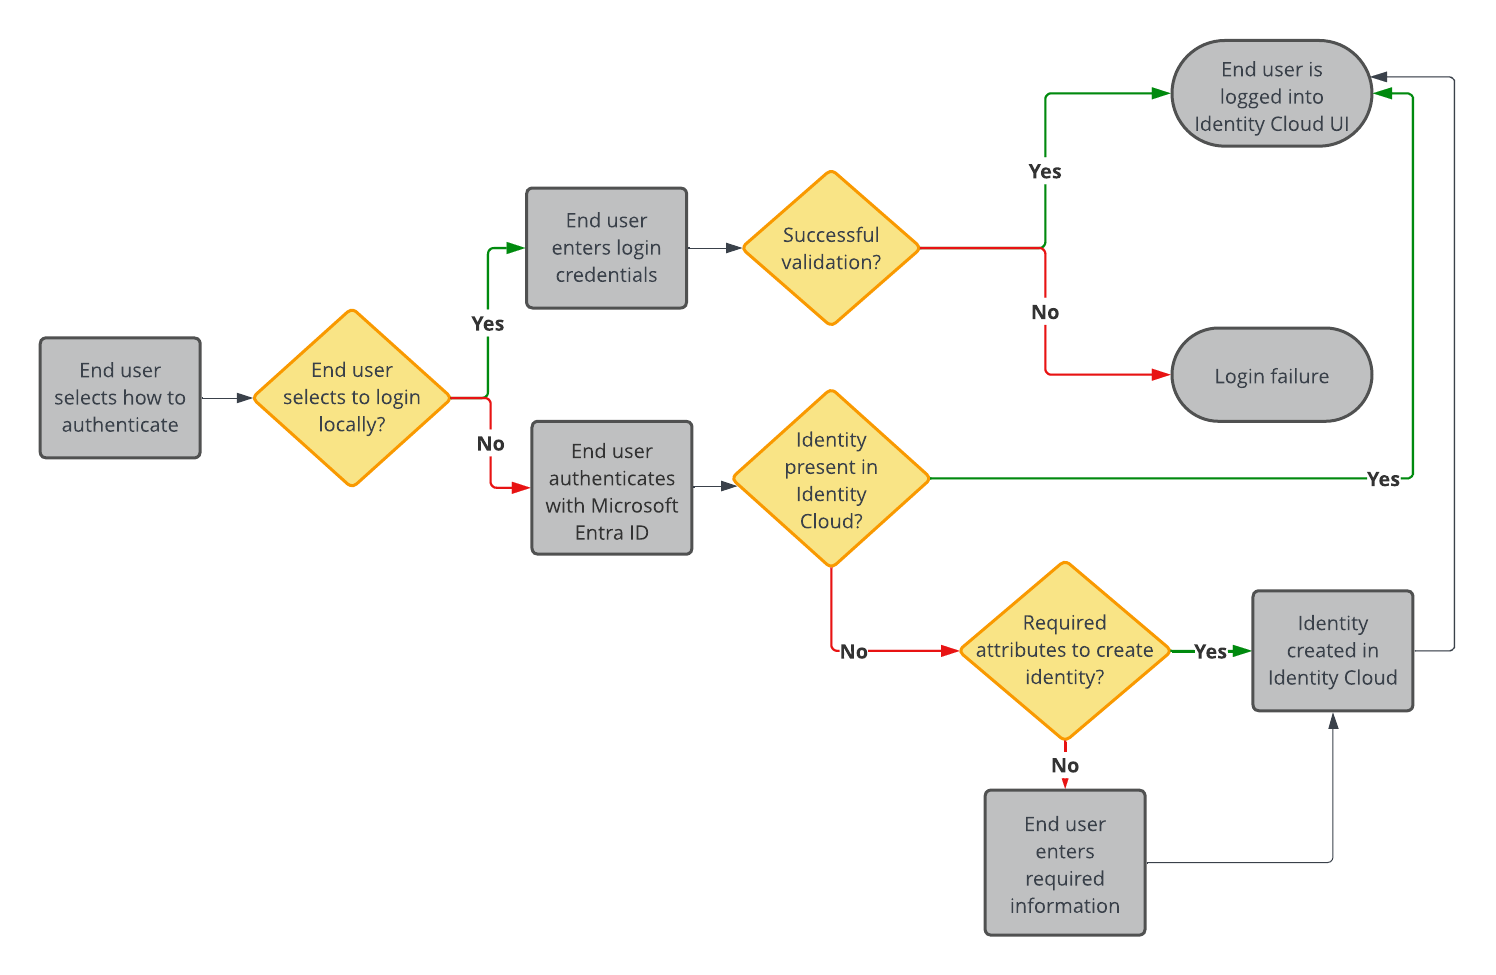
In this task you create a journey that allows the end user to log in locally (using their Advanced Identity Cloud credentials) or log in socially using SSO (through Microsoft Entra ID).
After you set up the journey, it includes the following capabilities:
Configure journey options
-
In the Advanced Identity Cloud admin UI, click Journeys.
All existing Advanced Identity Cloud journeys display.
-
Click + New Journey.
-
Configure options for the new journey:
Field Value Description Name
Enter
Social authentication with Microsoft.A name to display in the journeys list.
Identity Object
Select
Alpha Realm - Users.The type of object that this journey authenticates.
Description
Enter
A login journey that allows end users to log into the end user UI locally or with Microsoft. This is for the implementation guide..Description of the journey.
Override theme
Don’t enable.
Lets you provide a unique UI for this journey.
Default journey for end users
Don’t enable.
Lets you designate this journey as the default journey for your Advanced Identity Cloud environment.
Tags
Enter
Implementation Guide.Keywords for organizing the journeys list.
-
Click Save. The journey editor displays.
To save your progress, periodically click Save in the top right of the journey editor. Failure to do this results in losing your work if the page reloads or if you lose your network connection. 
Collect and validate user credentials locally
-
In the top left search bar, enter
Page Node.A Page node combines multiple nodes that request input into a single page for display to the user. In this case, Advanced Identity Cloud displays the username and password boxes on the same page.
-
Drag the Page Node box from the left side of the journey editor to the right side (the canvas).
-
Connect the Start (person) icon to the Page Node by selecting the icon and dragging it into the left side (input) of the Page Node. An arrow shows the flow of the journey from the person icon into the Page Node.
-
Search for the
Platform Usernamenode and drag it into the Page Node.The Platform Username node prompts the end user to enter their username and stores it in a configurable state attribute.
-
Search for the
Platform Passwordnode and drag it into the Page Node.The Platform Password node prompts the end user to enter their password and stores it in a configurable state attribute.
-
Search for the
Data Store Decisionnode and drag it to the right of the Page Node.The Data Store Decision node verifies that the username and password values match those in the data store configured for the realm.
-
Connect the right side of the Page Node (the outcome) into the left side of the Data Store Decision node (input).
-
Connect the
Trueoutcome of the Data Store Decision node into the Success node (green circle). -
Connect the
Falseoutcome of the Data Store Decision node into the Failure node (red X circle). -
In the top right of the journey editor, click Save.
|
When connecting the outcome of a node to another node, make sure there is a hand icon present on the node you’re connecting to. Click to display an example
|

At this point, the journey is configured to:
-
a Collect the username and password from the same page.
-
b Validate the username and password.
Add Microsoft as identity provider
The next step in the journey is to:
-
Update the page node description to provide more information to the end user on login.
-
Add Microsoft as an option for the end user to choose when authenticating.
-
Upon successful redirect back to Advanced Identity Cloud, verify if the account (identity) exists in Advanced Identity Cloud.
To add Microsoft as an authentication provider:
-
Click the Page Node.
-
In the Page Node configurations under Page Description, click +.
-
Click + Add and enter the following:
Field Value Description Key
Enter
en.The locale of the text to display. You can add multiple locales. The locale set in the end user’s browser determines the locale presented in the journey.
Description
Enter
Enter your login credentials or log in with Microsoft..Custom text that displays to the end user when the journey goes through the Page node.
-
Click Done and then Save.
-
Search for the
Select Identity Providernode and drag it into the Page Node.The Select Identity Providers node presents the user with a list of configured, enabled, social identity providers to use for authentication.
-
Click the Select Identity Provider node, and in the Filter Enabled Providers field on the right side of the screen, enter
Microsoft Social Login.By default, the node displays all identity providers marked as
Enabledin the Social Identity Provider Service as a selectable option. Specify the name of one of more providers to filter the list.View the names of your configured social identity providers under Native Consoles > Access Management > Realms > Realm name > Services > Social Identity Provider Service > Secondary Configurations. Don’t change the default properties.
-
Connect the
Local Authenticationoutcome of the Page Node as input to the Data Store Decision node. -
Search for the
Social Provider Handler Nodeand drag it to the right of the Page Node.The Social Provider Handler node takes the identity provider the end user selects, in this case Microsoft, from the Select Identity Provider node and attempts to authenticate the user. This node collects relevant profile information from the provider and returns the user to the flow, transforming the profile information into the appropriate attributes.
-
Configure the properties for the Social Provider Handler node:
Properties
Field Value Description Name
Don’t modify.
Name of the node. The name entered displays in the journey canvas.
Transformation Script
Select Normalized Profile to Managed User.
This script transforms the IdP’s user identity into a normalized user identity that Advanced Identity Cloud can use.
You can view the script in normalized-profile-to-managed-user.js.
Username Attribute
Don’t modify the default value (userName).
The user identity attribute in Advanced Identity Cloud that contains a user name.
Client Type
Don’t modify the default value (BROWSER).
The client type authenticating to the provider.
-
Connect the
Social Authenticationoutcome of the Page Node as input to the Social Provider Handler Node. -
Connect the
Account Existsoutcome of the Social Provider Handler Node to the Success node. -
Click Save.
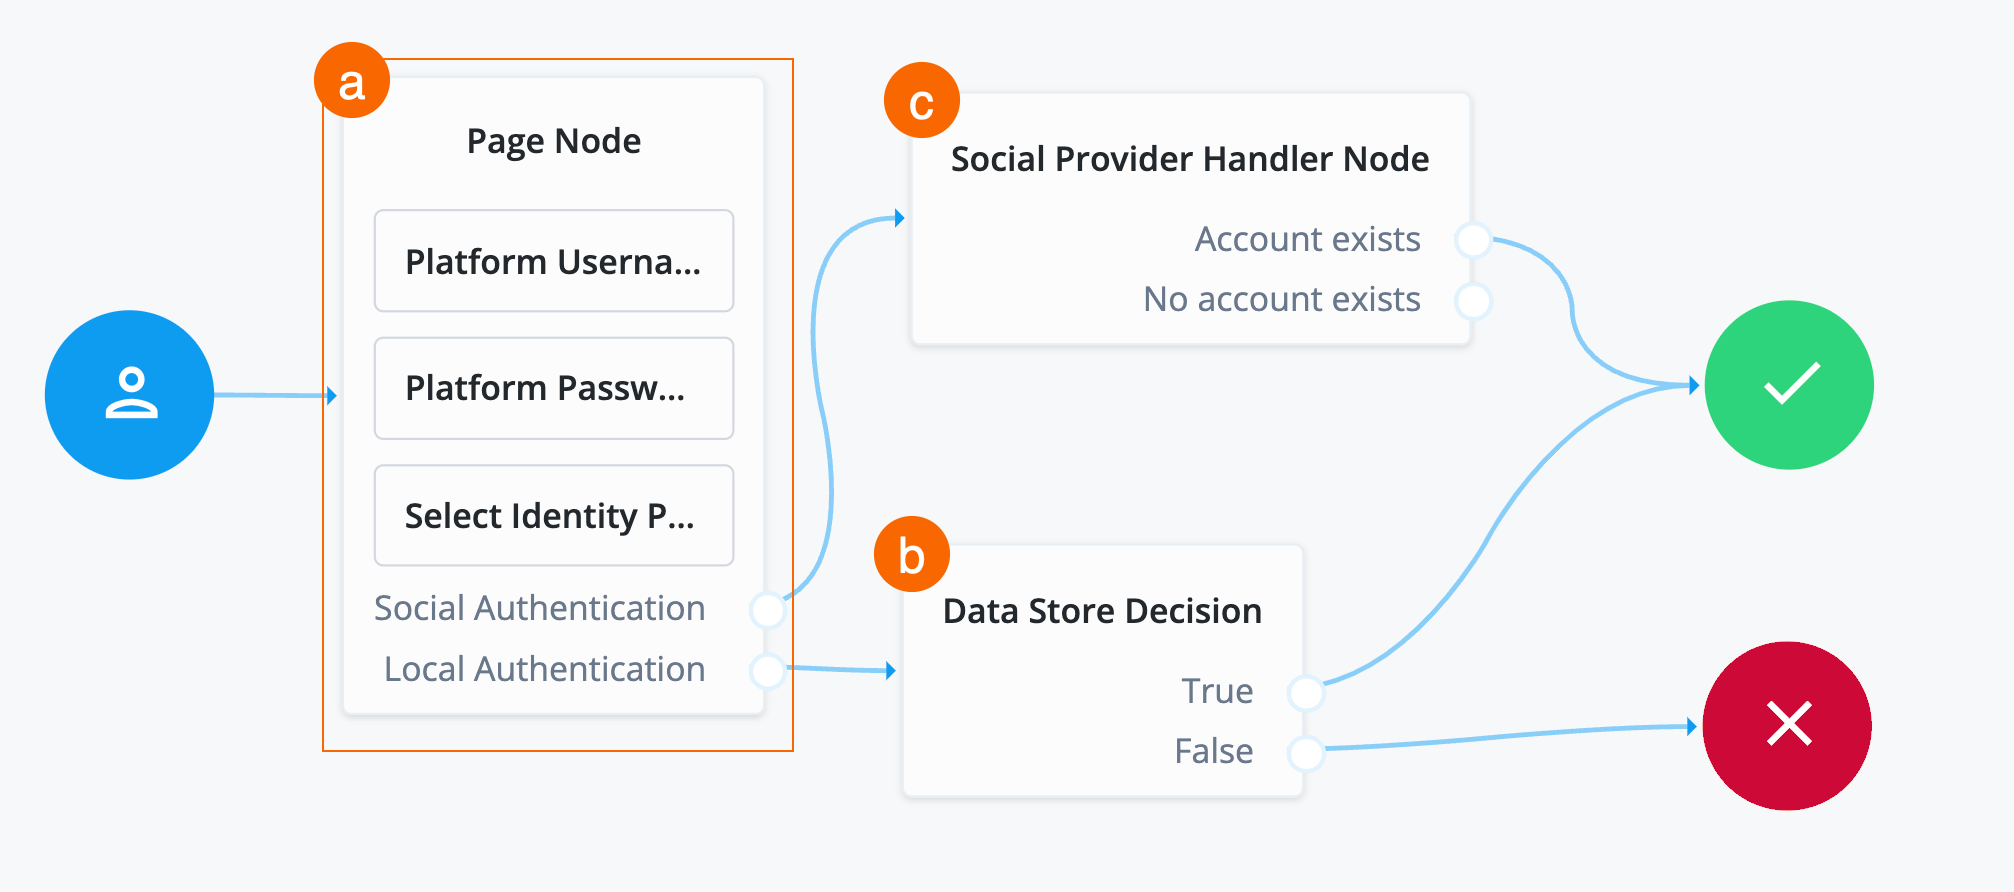
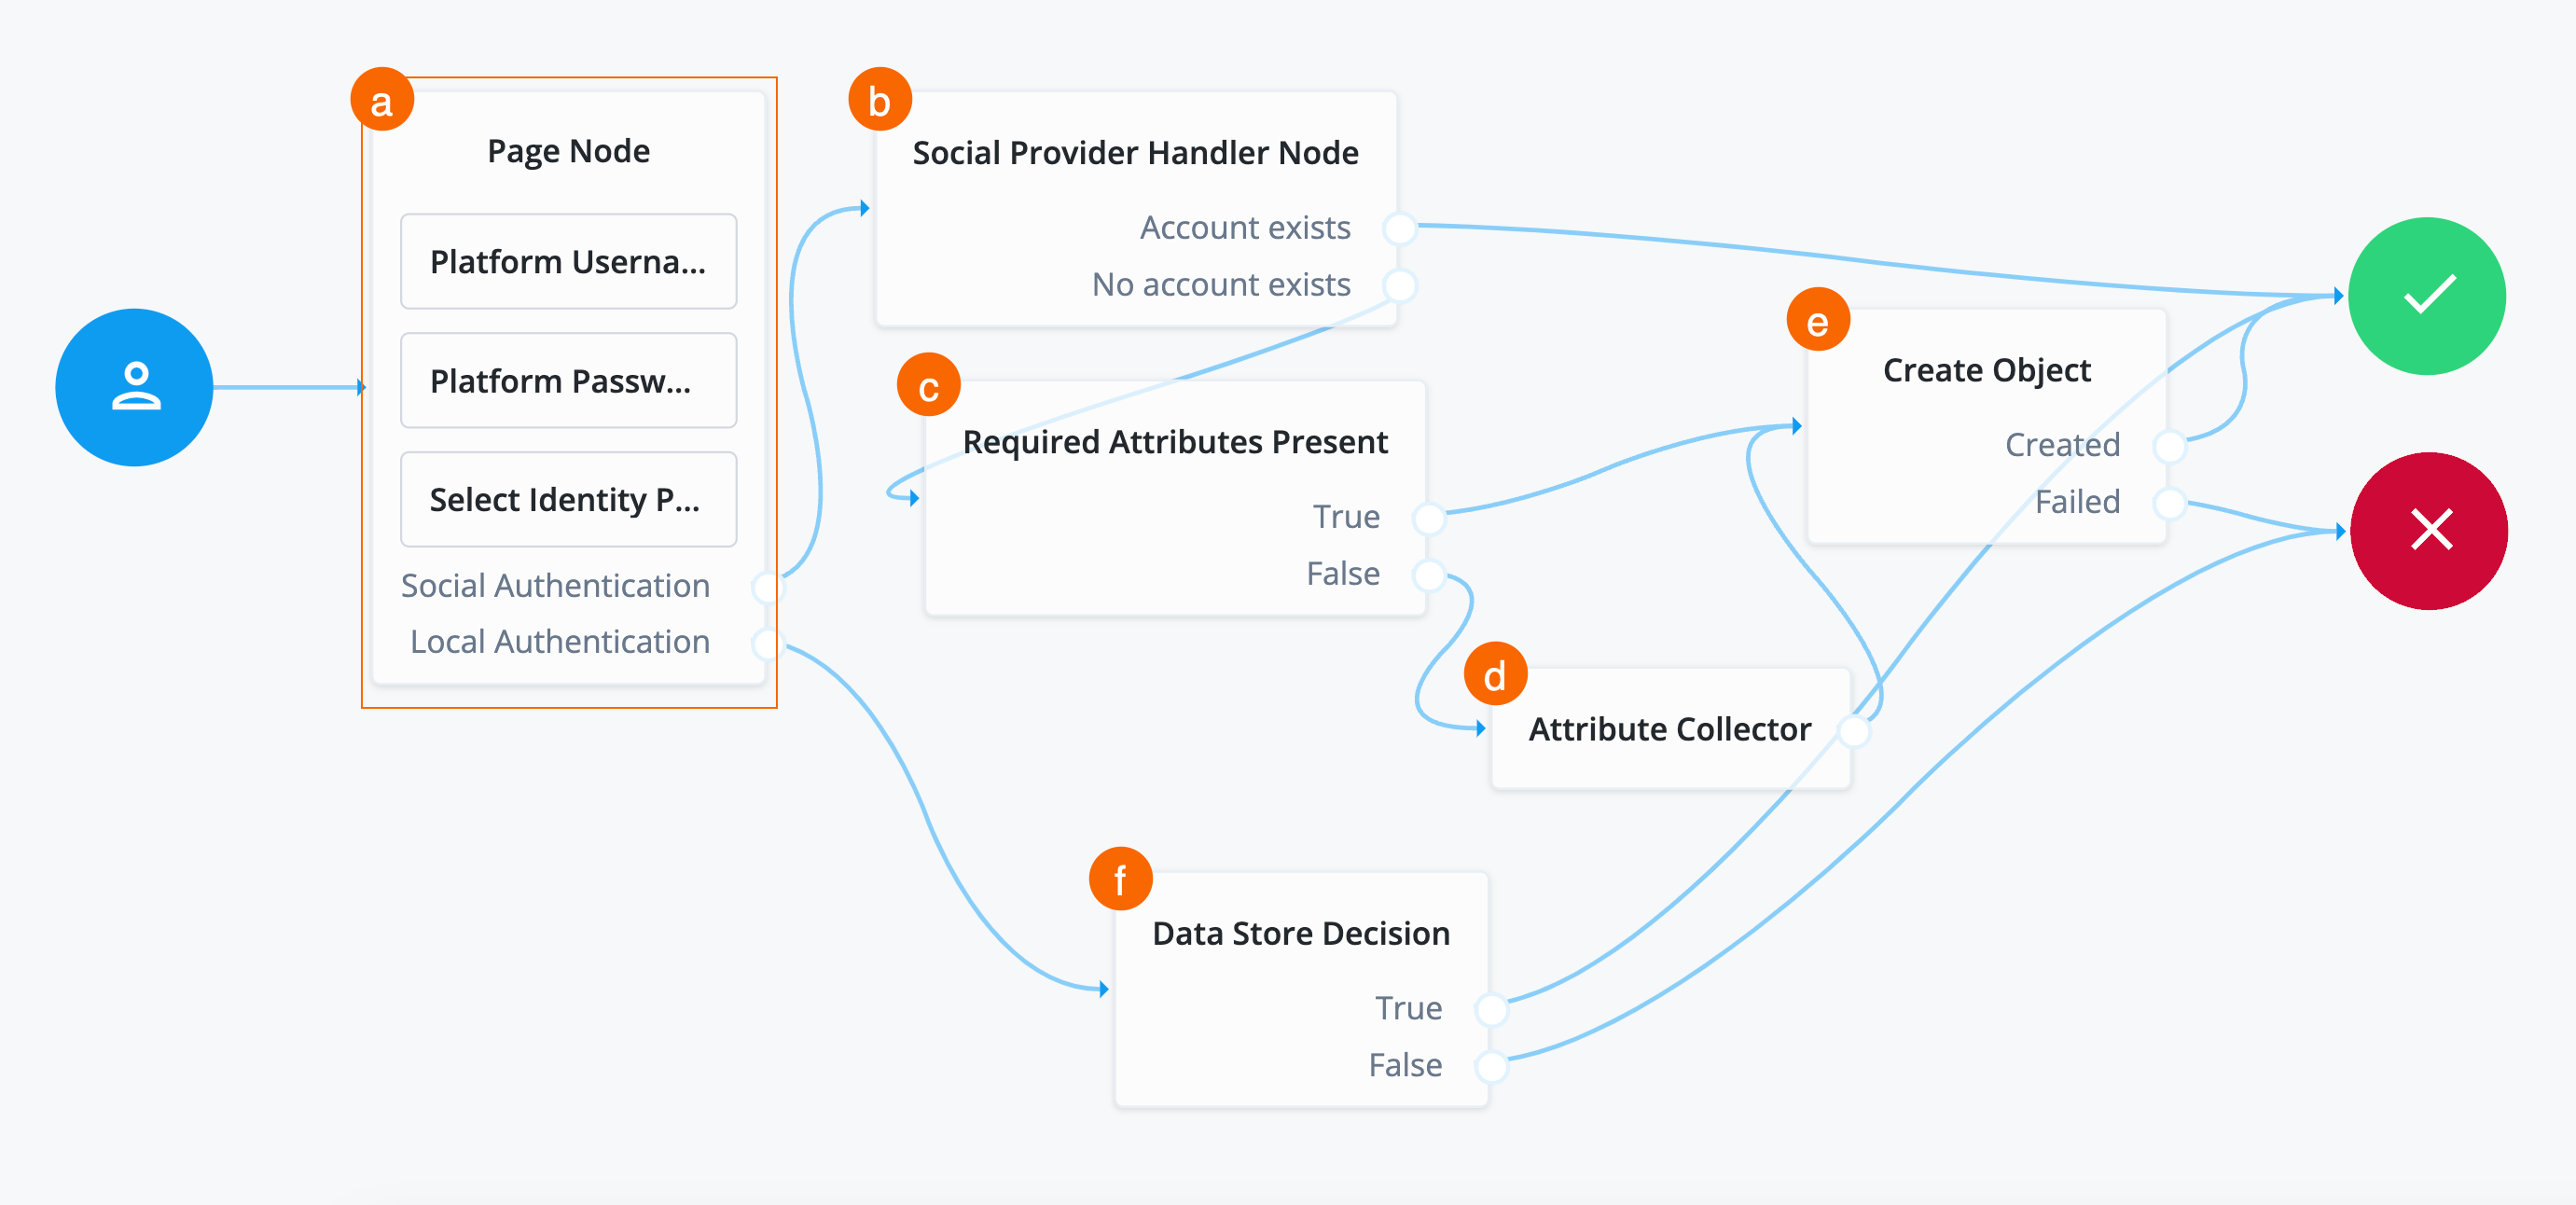
At this point, the journey is configured to:
-
a Display description text on the Page Node screen to inform the end user on the actions they can take, and allow the end user to select between local authentication and social authentication on the Page Node.
-
If the end user selects Microsoft as the social authentication provider, redirect the user to Microsoft to enter their credentials.
-
If the end user decides to authenticate locally, the username and password fields are already displayed.
-
-
b If the end user selects local authentication, validate the username and password.
-
c If the end user selects social authentication, after they enter their credentials successfully in Microsoft, on redirect back, verify if the identity already exists in Advanced Identity Cloud.
Create identity if not present in Advanced Identity Cloud
If the identity returned from Microsoft Entra ID isn’t present in Advanced Identity Cloud, then Advanced Identity Cloud must create the identity with JIT registration.
This requires that the journey:
-
Check if the attributes in the returned access token from Microsoft Entra ID are enough to create the identity in Advanced Identity Cloud.
The required attributes to create an identity in Advanced Identity Cloud are set by enabling the requiredfield on properties in a managed object. Learn more about therequiredproperty description in Create and modify object types.If the required attributes are present, create the identity in Advanced Identity Cloud, create a session for the end user, and log them into the Advanced Identity Cloud admin UI.
-
If the access token from Microsoft Entra ID doesn’t contain enough required information to create the identity, prompt the end user to enter the necessary information. After doing this, create the identity in Advanced Identity Cloud, create a session for the end user, and log them into the Advanced Identity Cloud admin UI.
To create an identity if not present:
-
Search for the
Required Attributes Presentnode and drag it under thr Social Provider Handler Node.The Required Attributes Present node checks the specified identity resource in Advanced Identity Cloud, and determines if all attributes required to create the specified object exist within the shared node state. In this case, these are the attributes that Microsoft sent back to Advanced Identity Cloud.
-
Connect the
No Account Existsoutcome of the Social Provider Handler Node as input to the Required Attributes Present node. -
In the properties of the Required Attributes Present node, set the value of Identity Resource to
managed/alpha_user. -
Search for the
Create Objectnode and drag it to the right of the Required Attributes Present node.The Create Object node creates a new object in Advanced Identity Cloud based on information collected during authentication, such as user registration.
Any managed object attributes that are marked as required must be collected during authentication to create the new object. The is why the Required Attributes Present node precedes the Create Object node.
-
Connect the
Trueoutcome of the Required Attributes Present node to the input of the Create Object node. -
In the properties of the Create Object node, set the value of Identity Resource to
managed/alpha_user. -
Connect the
Createdoutcome of the Create Object node to the Success node and theFailedoutcome to the Failure node. -
Search for the
Attribute Collectornode and drag it under the Required Attributes Present node.The Attribute Collector node collects the values of attributes for use later in the flow; for example, to populate a new account during registration. To reference the attributes, they must exist in the managed object schema.
-
Connect the
Falseoutcome of the Required Attribiutes Present node to the input of the Attribute Collector node. -
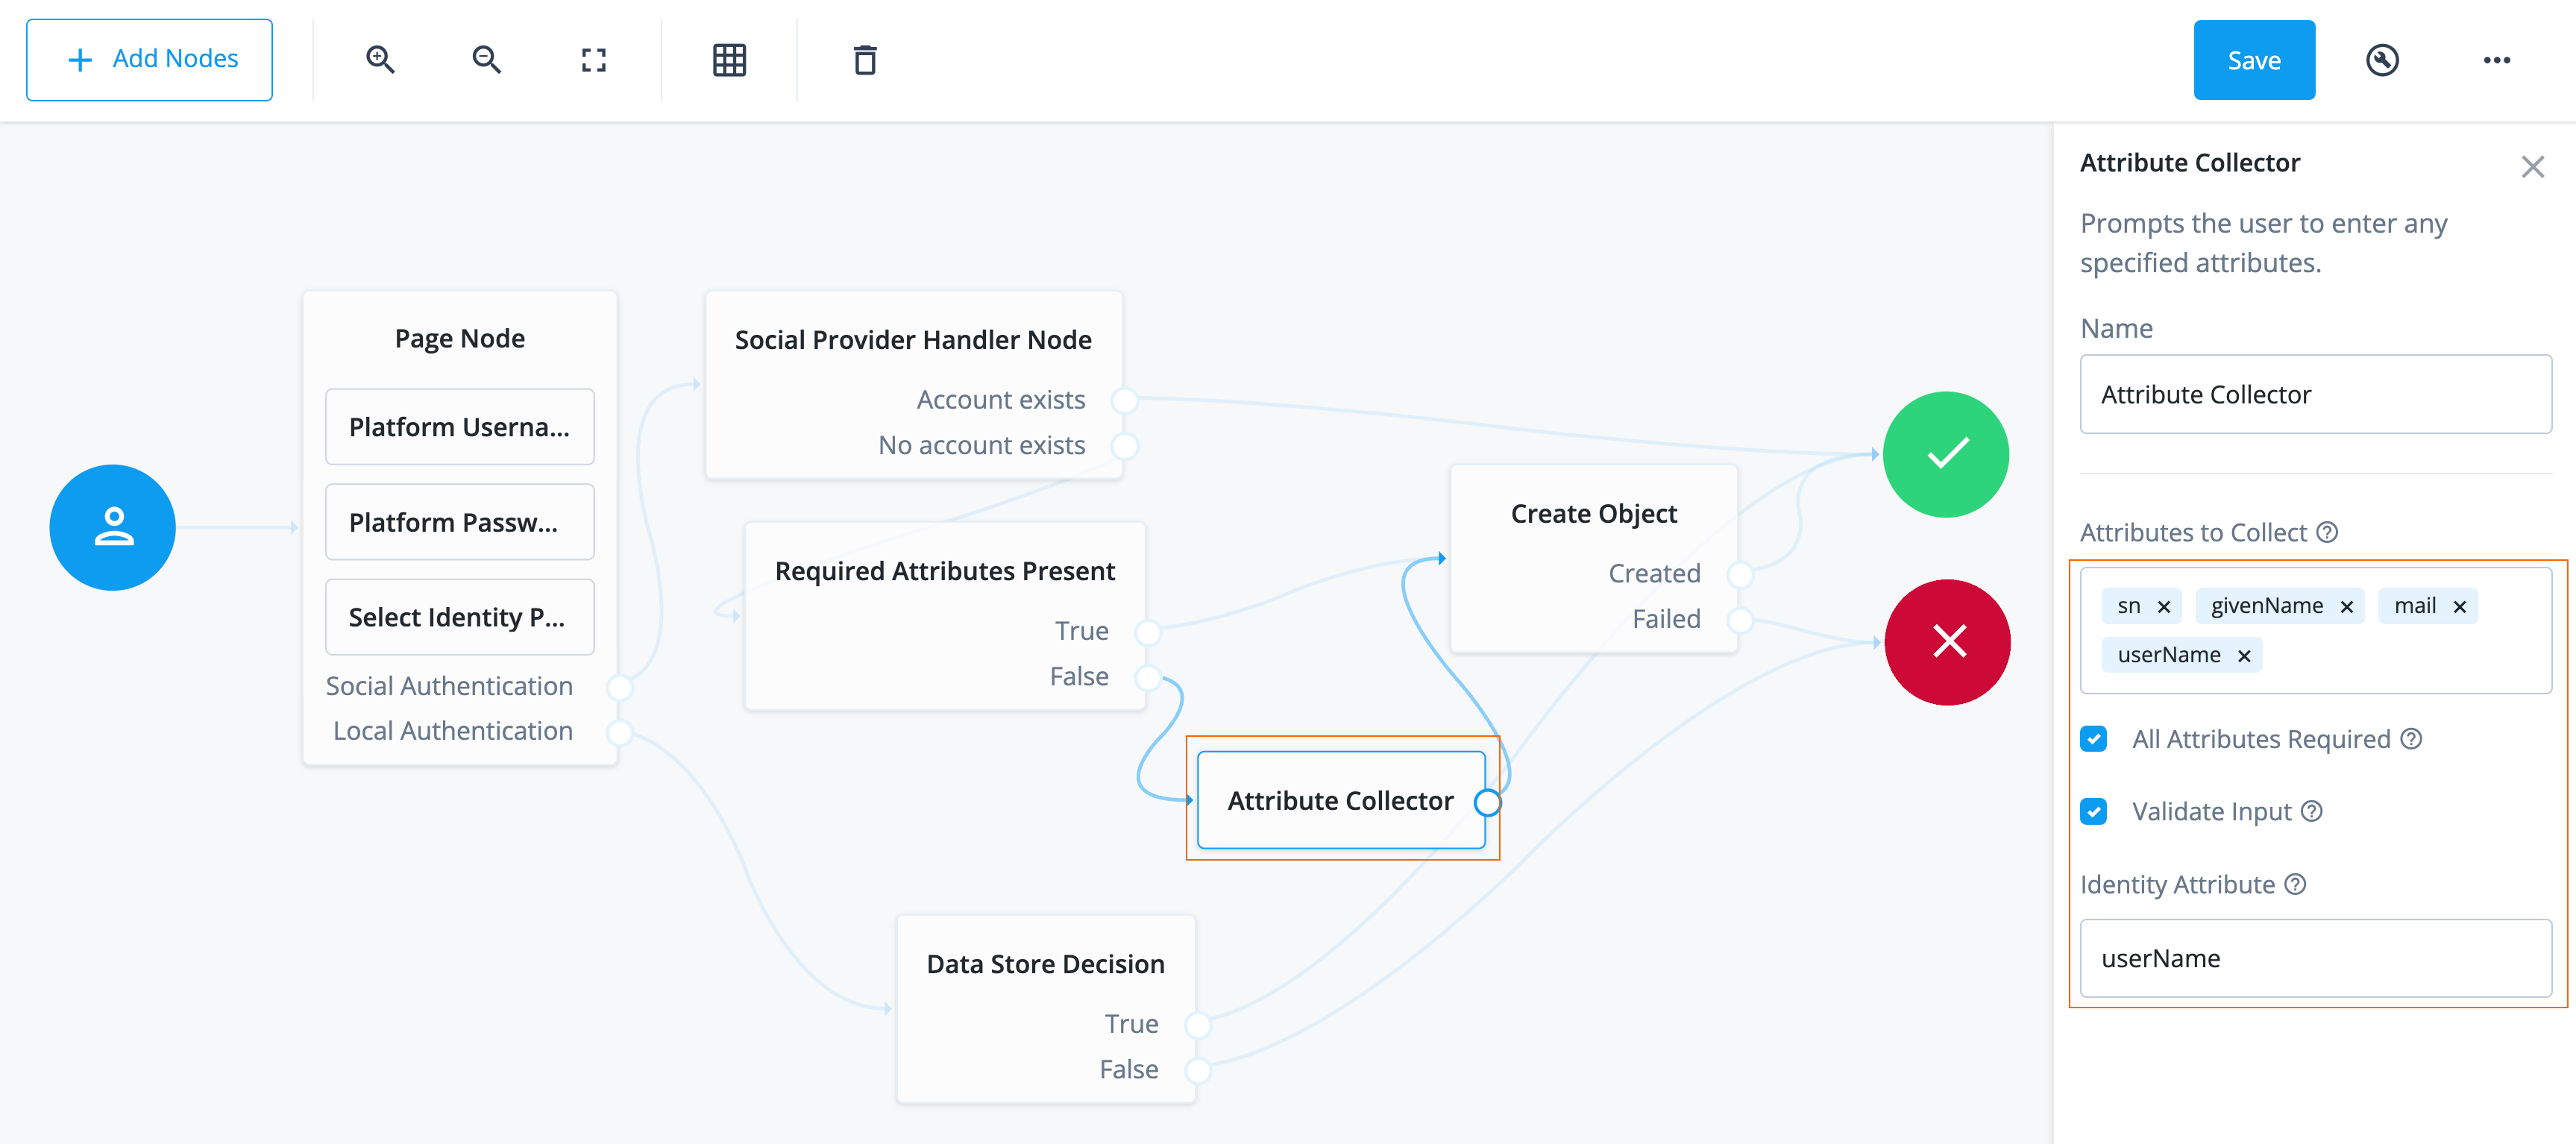
Configure the properties for the Attribute Collector node:
Properties
Field Value Description Name
Don’t modify.
Name of the node. The name entered displays in the journey canvas.
Attributes to Collect
Enter the following attributes:
-
userName -
mail -
givenName -
sn
You must press Enter after each entry. A list of the attributes to collect, based on those in the Advanced Identity Cloud schema for the current identity object.
For example, to view the properties of
alpha_user, from the IDM admin UI, go to Configure > Managed Objects > alpha_user and enter values into this field as they display in the Property Name column.All Attributes Required
Enable.
When enabled, all attributes collected in this node are required to continue. In this case, all attributes are required because they correspond to the attributes needed by the managed object schema.
Validate Input
Don’t enable.
When enabled, validate the content against any policies specified in the managed object schema for each collected attribute. For example, if you set a policy that the
`userNamemust be in an email format, then the node validates that this policy is met before preceding.Identity Attribute
If not already entered, enter
userName.The attribute used to identify the object in Advanced Identity Cloud. In this case, the attribute used to reference the identity in the backend.
-
-
Connect the outcome of the Attribute Collector node to the input of the Create Object node.
-
Click Save. You have now configured the journey successfully.
The completed journey has the following capabilities:
-
a Display description text on the Page Node screen to inform the end user on the actions they can take, and allow the end user to select between local authentication and social authentication on the Page Node.
-
b If the end user selects Microsoft as the social authentication provider, redirect the user to Microsoft to enter their credentials. After the end user enters their credentials in Microsoft successfully, on redirect back, verify if the identity already exists in Advanced Identity Cloud. If the identity does exist in Advanced Identity Cloud, create a session for the user and log them into the Advanced Identity Cloud end-user UI.
-
c If the user doesn’t exist in Advanced Identity Cloud, check if the required attributes are present to create the identity.
-
d If the required attributes aren’t present, present a screen for the end user to enter the required attributes.
-
e Once the required attributes are present, regardless of if the required attributes were given by Microsoft or entered by the end user, create the identity in Advanced Identity Cloud.
-
f If the end user decides to authenticate locally, the username and password fields are already displayed. If the end user selects local authentication, validate the username and password. Advanced Identity Cloud creates a session for the end user and logs them into the Advanced Identity Cloud end-user UI.
Task 4: Check journey path connections
The Social authentication with Microsoft journey uses many nodes.
Use the following table to compare each node’s outcomes and validate
that you wired the journey correctly.
Many nodes can have more than one outcome. "→" denotes that a node only has one outcome path.
| Source node | Outcome path | Target node |
|---|---|---|
Start (person icon) |
→ |
Page Node |
Page node containing:
|
Social Authentication |
Social Provider Handler Node |
Local Authentication |
Data Store Decision |
|
Social Provider Handler Node |
Account exists |
Success |
No account exists |
Required Attributes Present |
|
Required Attributes Present |
True |
Create Object |
False |
Attribute Collector |
|
Attribute Collector |
→ |
Create Object |
Create Object |
Created |
Success |
Failed |
Failure |
|
Data Store Decision |
True |
Success |
False |
Failure |
Validation
Now that you have created an application in Microsoft Entra ID, configured Advanced Identity Cloud, and created your journey, you are ready to validate the use case.
Before validating, make sure you have a test user in Microsoft Entra ID that has all the necessary attributes Advanced Identity Cloud requires in its identity:
When you create an identity in Advanced Identity Cloud, you set the required attributes by enabling the
required field on properties in a managed object.
Learn more about the required property description in
Create and modify object types.
|
-
User Principal Name(UPN)Advanced Identity Cloud uses the UPN to create the
mail(email) anduserNameattributes of the identity in Advanced Identity Cloud. -
Display Name -
Given Name -
Surname
The steps in this validation follow a typical flow where Microsoft Entra ID provides the necessary attributes that Advanced Identity Cloud requires to create an identity.
Steps
-
Get a URL you can use to test the journey:
-
Log in to the Advanced Identity Cloud admin UI as an administrator.
-
Select Journeys.
-
Select the journey you created, Social authentication with Microsoft.
A preview screen of the journey displays.
-
Click the copy icon next to Preview URL, a URL you can use to test a journey as an end user.
-
-
Authenticate using Microsoft:
-
Paste the URL into an incognito window.
Use incognito mode for testing to avoid caching issues so that any current sessions you have don’t interfere with your test.
The login end-user UI displays.
-
Click Sign in with Microsoft. The journey redirects you to a Microsoft sign-in page.
-
Enter the email/UPN of the test user in Microsoft Entra ID.
-
Click Next.
-
Enter the password of the test user.
Microsoft may prompt you to configure MFA or other settings. This depends on the configurations you have set in Microsoft Entra ID. -
On the Permissions Requested screen, click Accept. Microsoft is requesting your permission to share the user’s information with Advanced Identity Cloud using the application you created.
Microsoft redirects you back to Advanced Identity Cloud logged into the Advanced Identity Cloud end-user UI.
If you receive an error similar to
AADSTS500113: no reply address is registered for the application, make sure the Reply URL you configured in Advanced Identity Cloud and in Microsoft Entra ID are the same.If you receive the error
Session has timed outon redirect to Advanced Identity Cloud, restart the flow. To configure the timeout, go to Native Consoles > Access Management > Authentication > Settings > Trees and set the Max duration (minutes) field.
-
-
View created user and logout:
-
From the left navigation menu, click Profile. View the username of the user in Advanced Identity Cloud. This username correlates to the email/UPN in Microsoft Entra ID.
Under Social Sign In, view that Microsoft is now a connected application.
-
Click the test user’s name in the top right corner of the Advanced Identity Cloud end-user UI.
-
Select Sign Out.
You are redirected to a sign-in page. This page differs from the journey you created, Social authentication with Microsoft. The page you are directed to when you sign out is the default journey in the realm. Learn how to set the default journey in "Default end-user journey" in Journeys.
-
Close the incognito window.
-
|
For further validation, test the journey with
a test user from Microsoft Entra ID
that has the |
Explore further
Reference material
| Reference | Description |
|---|---|
Realms are administrative units that group configurations and identities together. Realms let you manage different sets of identities and applications within the same Advanced Identity Cloud tenant. Each realm is fully self-contained and operates independently of other realms within a tenant. |
|
Get to know the admin interfaces; Advanced Identity Cloud admin UI, AM admin UI, and IDM admin UI. |
|
Conceptual information on journeys and their purpose in Advanced Identity Cloud. |
|
Description of fields that relate to authentication settings that apply to the entire realm. |
|
A guided video of journeys in Advanced Identity Cloud and how to use them. |
|
Learn about the configurable nodes Advanced Identity Cloud offers for use in journeys. |
|
Customize the look and feel of login and end-user UI pages. This is used when you are using the ForgeRock hosted pages as your UI option. |
|
Reference of the social identity provider service configurations. |
|
Learn more about localization (support for languages) with Advanced Identity Cloud hosted (login and end-user UI) pages. |
|
Configure policies on properties in a managed object. For example, create a policy on the
|