Device authorization grant
The device authorization grant, formerly known as the device flow, is designed for client devices that have limited user interfaces, such as a set-top box, streaming radio, or a server process running on a headless operating system.
Instead of logging in with the client device, you can authorize the client to access protected resources on your behalf. You log in with a different user agent, such as a phone or Internet browser, and authenticate using a code that the client device displays.
The device authorization grant flow

-
The client device requests a device code from PingOne Advanced Identity Cloud.
-
PingOne Advanced Identity Cloud returns a device code, a user code, a URL for entering the user code, and an interval, in seconds.
-
The client device provides instructions to the user to enter the user code. The client can choose an appropriate method to convey the instructions, for example, text instructions on screen, or a QR code.
-
The client device continuously polls PingOne Advanced Identity Cloud to check if authorization has completed.
-
If the user hasn’t completed the authorization, PingOne Advanced Identity Cloud returns an HTTP 403 status code with an
authorization_pendingmessage. -
The user follows the instructions from the client device to enter the user code by using a separate device.
-
If the user code is valid, PingOne Advanced Identity Cloud redirects the resource owner for authentication.
-
On authentication, PingOne Advanced Identity Cloud prompts the user to confirm the user code and pre-populates the page with the code entered previously.
-
The user can authorize the client device. The PingOne Advanced Identity Cloud consent page also displays the requested scopes and their values.
If the user had a valid session when they entered the code and the client is configured to skip consent, PingOne Advanced Identity Cloud doesn’t display the confirmation or the consent pages.
This is also true if you perform the call using REST and pass the
decision=allowparameter. -
On authorization, PingOne Advanced Identity Cloud responds to the client device’s polling with an HTTP 200 status and an access token, giving the client device access to the requested resources.
Demonstrate the device authorization grant flow
Follow these steps to demonstrate the OAuth 2.0 device grant flow:
Prepare the demonstration
Complete these steps to prepare the device authorization grant demonstration:
-
Create an application owner profile and record the username and password.
-
Register a client application.
-
In the Advanced Identity Cloud admin UI, go to Applications and select + Custom Application.
-
Select the sign-in method as OIDC - OpenId Connect and application type as Native / SPA.
-
Create the application, providing the following details:
- Name
-
myClient - Owners
-
<application-owner> - Client ID
-
myClient
-
Switch to the Sign On tab and under General Settings, set these fields to have the following values:
- Sign-in URLs
-
https://www.example.com:443/callback - Scopes
-
write - Grant Types
-
Device Code
-
Save your changes.
-
-
Create a resource owner profile and record the username and password.
Get a user code for the device
Devices can display a user code and instructions for a user. You can use these instructions on a separate client to provide consent, allowing the device to access resources.
User codes consist of a random selection of characters. You can configure the character set.
By default, PingOne Advanced Identity Cloud generates the user code from eight of the following characters:
234567ABCDEFGHIJKLMNOPQRSTVWXYZabcdefghijkmnopqrstvwxyz
|
You can configure the list of possible characters to improve usability. For example,
remove similar characters such as The length of the user code is also configurable. For more information, refer to the device flow configuration. |
Perform the following steps to request a user code in the OAuth 2.0 device flow:
-
As the client, call the /oauth2/device/code endpoint, specifying at least the client ID,
myClient.For information about client authentication methods, refer to Client application authentication.
For example:
$ curl \
--request POST \
--data "client_id=myClient" \
--data "scope=write" \
"https://<tenant-env-fqdn>/am/oauth2/realms/root/realms/alpha/device/code"
{
    "interval": 5,
    "device_code": "7a95a0a4-6f13-42e3-ac3e-d3d159c94c55...",
    "verification_uri": "https://<tenant-env-fqdn>/am/oauth2/realms/root/realms/alpha/device/user",
    "verification_url": "https://<tenant-env-fqdn>/am/oauth2/realms/root/realms/alpha/device/user",
    "verification_uri_complete": "https://<tenant-env-fqdn>/am/oauth2/realms/root/realms/alpha/device/user?user_code=VAL12e0v",
    "user_code": "VAL12e0v",
    "expires_in": 300
}
On success, PingOne Advanced Identity Cloud returns a user code, a
verification_uri, and averification_uri_completevalue that comprises the user code appended to the URI. You can use theverification_uri_completevalue to create QR codes.The output includes the
verification_urlto support earlier versions of the specification.PingOne Advanced Identity Cloud also returns an interval, in seconds, that the client device must wait before it can request an access token again.
Under Native Consoles > Access Management, go to Realms > Realm Name > Services > OAuth2 Provider > Device Flow to configure the returned values.
-
The client device must now instruct the user to enter the user code and grant access to the OAuth 2.0 device.
The client can choose an appropriate method to convey the instructions, for example, text instructions on screen or a QR code. Perform the steps in one of the following procedures:
-
To grant access to the client without using a browser, refer to Grant consent using REST.
-
To grant access to the client using a browser, refer to Grant consent using a browser.
-
-
The client device must start polling the authorization server for the access token using the interval and device code information obtained in the previous step.
For more information, refer to Poll for authorization.
Grant consent using REST
The OAuth 2.0 device authorization grant requires the user to grant consent to let a client device access a resource. The authorization server provides the client with an access token.
To grant consent with a user code without using a browser, perform the following steps:
-
The resource owner logs in to the authorization server.
For example:
$ curl \ --include \ --request POST \ --header "Content-Type: application/json" \ --header "X-OpenAM-Username: <resource-owner-username>" \ --header "X-OpenAM-Password: <resource-owner-password>" \ --header "Accept-API-Version: resource=2.0, protocol=1.0" \ 'https://<tenant-env-fqdn>/am/json/realms/root/realms/alpha/authenticate' { "tokenId":"<tokenId>", "successUrl":"/enduser/?realm=/alpha", "realm":"/alpha "} -
As the client, call the /oauth2/device/user endpoint. Provide the resource owner’s SSO token in a cookie, and at least the following parameters:
-
user_code=<resource-owner-user-code> -
decision=allow -
csrf=<tokenId>
The
scopeand theclient_idparameters aren’t required because the user code already contains that information.$ curl \ --request POST \ --header "Cookie: <session-cookie-name>=<tokenId>" \ --data "user_code=VAL12e0v" \ --data "decision=allow" \ --data "csrf=<tokenId>" \ "https://<tenant-env-fqdn>/am/oauth2/realms/root/realms/alpha/device/user"PingOne Advanced Identity Cloud returns HTML containing a JavaScript fragment named
pageData, with details of the result. The following example shows the default HTML response:<!DOCTYPE html> <!-- Copyright … -→ <html lang="en"> <head> <meta charset="utf-8"> <meta http-equiv="X-UA-Compatible" content="IE=edge"> <meta name="viewport" content="width=device-width, initial-scale=1"> <meta name="description" content="OAuth2 Authorization"> <title>OAuth2 Authorization Server</title> </head> <body style="display:none"> <div id="wrapper">Loading…</div> <footer id="footer" class="footer"></footer> <script type="text/javascript"> pageData = { locale: "en_US", baseUrl : "https://<tenant-env-fqdn>/am", realm : "\/alpha", done: true }; </script> <script src="https://<tenant-env-fqdn>/am/main-device.js"></script> </body> </html>The
done: trueline in thepageDatafragment means the flow can continue.To return the output in JSON format instead of HTML, include the
Accept: application/jsonheader in the request. The following example returns the output in JSON:$ curl \ --request POST \ --header "Cookie: iPlanetDirectoryPro=ne1QUOjPzY0r…" \ --header "Accept: application/json" \ --data "user_code=Gp4qkX4G" \ --data "decision=allow" \ --data "csrf=ne1QUOjPzY0r…" \ "https://<tenant-env-fqdn>/am/oauth2/realms/root/realms/alpha/device/user" { "baseUrl": "https://<tenant-env-fqdn>/am", "errorCode": null, "realm": "/alpha", "csrf": "1hQSplblZgaErLQ0/1rvcEvw5lj/cJQx3lrC3dV/3ac=", "locale": "en_US", "userCode": "Gp4qkX4G" }In this case, the
"errorCode": nullmeans the request is successful and the flow can continue.If the supplied user code is wrong or has been used, the output includes the following
pageDatafragment:pageData = { locale: "en_US", errorCode: "not_found", realm : "/alpha", baseUrl : "https://<tenant-env-fqdn>/am" oauth2Data: { csrf: "ErFIk8pMraJ1rvKbloTgpp6b7GZ57kyk9HaIiKMVK3g=", userCode: "VAL12e0v" } } -
|
In accordance with Section 4.1.1 of the OAuth 2.0 authorization framework, the authorization server must obtain an authorization decision from the resource owner. Clients using the endpoints to register consent must ensure this requirement is met. PingOne Advanced Identity Cloud can’t assert that consent was given in these cases. |
Grant consent using a browser
The OAuth 2.0 device flow requires that the user grants consent to allow the client device to access the resources.
The authorization server would then provide the client with an access token.
To grant consent with a user code using a browser, perform the following steps:
-
The resource owner navigates to the verification URL acquired with the user code. For example:
https://<tenant-env-fqdn>/am/oauth2/realms/root/realms/alpha/device/user -
The resource owner logs in to the authorization server.
-
The resource owner enters their user code:
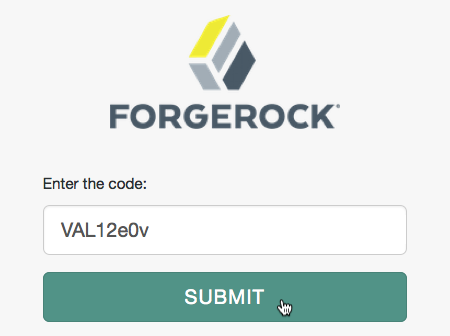 Figure 2. OAuth 2.0 User Code
The
verification_uri_completeproperty in the response appends the user code as a query parameter.PingOne Advanced Identity Cloud prefills the form with the user code value if provided in the
user_codequery parameter. -
The resource owner authorizes the device flow client by allowing the requested scopes:
 Figure 3. OAuth 2.0 Consent Page
By default, client applications use implied consent. PingOne Advanced Identity Cloud does not display the screen to the user.
-
PingOne Advanced Identity Cloud adds the OAuth 2.0 client to the user’s profile page in the Authorized Apps section and displays that the user is done with the flow:
 Figure 4. OAuth 2.0 Done Page
The device that polls the authorization server (PingOne Advanced Identity Cloud) can now obtain an access token.
Poll for authorization
The client device must poll the authorization server for an access token, since it cannot know whether the resource owner has already given consent or not.
Perform the following steps to poll for an access token:
-
On the client device, create a POST request to poll the
/oauth2/access_tokenendpoint to request an access token specifying, at least, the following parameters:-
client_id=<your-client-id> -
grant_type=urn:ietf:params:oauth:grant-type:device_code -
device_code=<your-device-code>
For information about the parameters supported by the
/oauth2/access_tokenendpoint, refer to /oauth2/access_token.The client device must wait for the number of seconds previously provided as the value of
intervalbetween polling PingOne Advanced Identity Cloud for an access token. For example:$ curl \ --request POST \ --data "client_id=myClient" \ --data "grant_type=urn:ietf:params:oauth:grant-type:device_code" \ --data "device_code=<your-device-code>" \ "https://<tenant-env-fqdn>/am/oauth2/realms/root/realms/alpha/access_token"If the user has authorized the client device, PingOne Advanced Identity Cloud returns an HTTP 200 status code with an access token that can be used to request resources:
{
    "access_token": "<access-token>",
    "refresh_token": "<refresh-token>",
    "scope": "write",
    "token_type": "Bearer",
    "expires_in": 3599
}
If the user hasn’t authorized the client device, PingOne Advanced Identity Cloud returns an HTTP 403 status code with the following error message:
{
    "error": "authorization_pending",
    "error_description": "The user has not yet completed authorization"
}
If the client device polls faster than the specified interval, PingOne Advanced Identity Cloud returns an HTTP 400 status code with the following error message:
{ "error": "slow_down", "error_description": "The polling interval has not elapsed since the last request" } -