Manage violations
Any end user authorized as a violation owner can view and take action on violations. Actions include viewing the violating entitlements, revoke the violation, allow an exception, extend or revoke the exception.
View violations
-
In the Advanced Identity Cloud end-user UI, click Inbox > Violations. All violations found during the scans or forwarded to the end user are displayed.
-
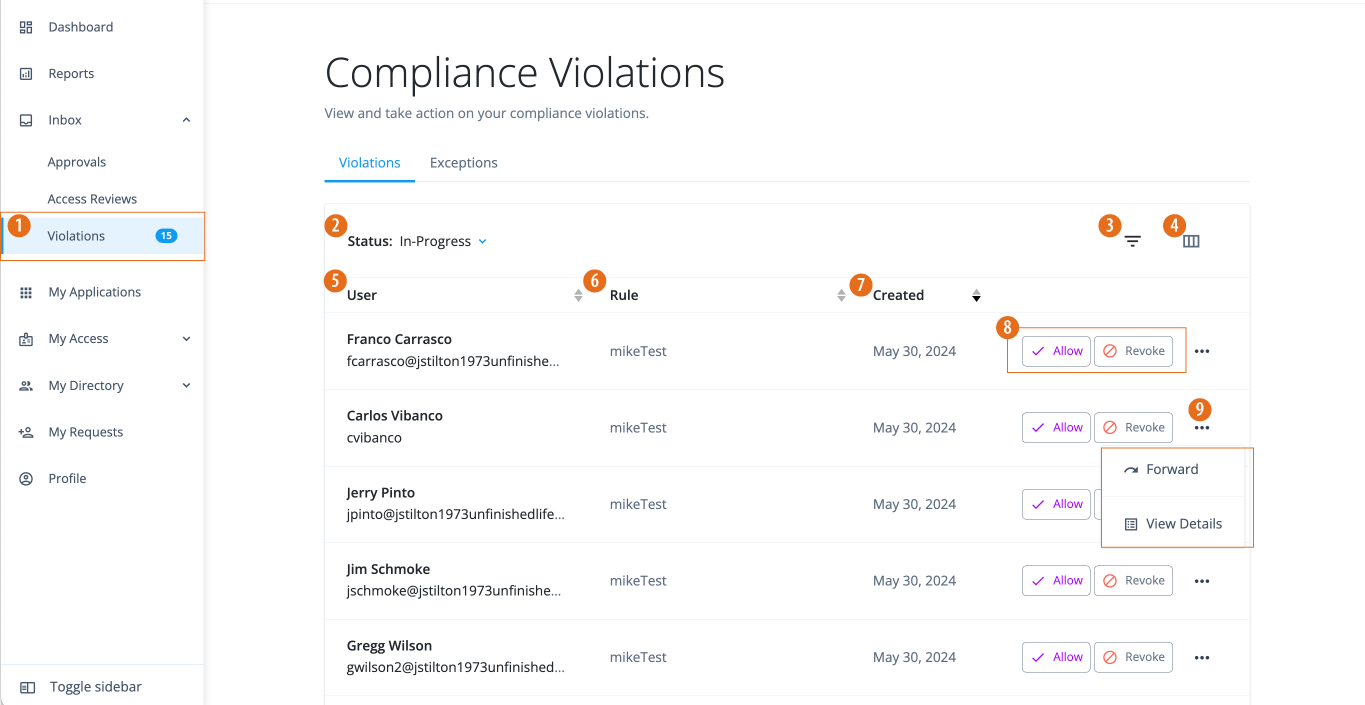
1 Click Inbox > Violations on the Advanced Identity Cloud end-user UI.
-
2 Click to filter violations by status: In-progress or Completed.
-
3 Click the filter icon () to display violations by owner, rule, or date range.
-
4 Click the column icon () to customize the columns displayed on the page.
-
5 Displays the violations by user.
-
6 Displays the rule violation.
-
7 Displays the creation date of the violation.
-
8 Click Allow or Revoke.
-
9 Click ellipsis () to forward the violation to another user or to view its details.
Allow violations
When a violations owner allows a violation, they create an exception. The Exceptions page displays all active exceptions.
-
In the Advanced Identity Cloud end-user UI, click Inbox > Violations.
-
Select a violation, and then click Allow.
-
On the Allow an exception modal, enter the following, and click Allow when complete:
Field Description Rule Violated
Displays the rule and description associated with the violation.
View Details
Click to display the violation details.
Allow an exception
Select an options:
-
Forever. Allow the exception to exist without an expiration date.
-
Until Specified Date. Click to set an expiration date for the exception. Click Date and select a date on the calendar.
-
Justification. Enter a justification for the exception. If you clicked the Require a justification when allowing exceptions on the policy rule settings, end users are required to enter an exception reason.
-
Revoke violations
When a violations owner opens their violations, they have the option to revoke the violation. Identity Governance displays two sets of entitlements: one set of entitlements existing for the end user; the other set, the conflicting entitlements. You can click one set of entitlements to revoke, which moves them to the cart on the right.
-
In the Advanced Identity Cloud end-user UI, click Inbox > Violations.
-
Select a violation, and then click Allow.
-
On the Allow an exception modal, enter the following, and click Revoke Entitlements when complete:
Field Description User
Displays the user and user’s email address.
Rule Violated
Displays the rule and description associated with the violation.
View Details
Click to display the violation details.
How to Fix
Displays any instructions entered when configuring the policy rule.
Entitlements (Number)
Displays the existing entitlement(s) on the left.
-
Click Revoke all to revoke the entitlement(s). The entitlements appear in the right pane.
Conflicting Entitlements (Number)
Displays the conflicting entitlement(s) on the right.
-
Click Revoke all to revoke the entitlements. The entitlements appear in the right page.
Justification
Enter a justification for revoking the entitlement(s).
Entitlements to Revoke (right pane)
Displays the selected entitlement(s) to revoke.
-
Forward violations
-
In the Advanced Identity Cloud end-user UI, click Inbox > Violations.
-
Click ellipsis () and click Forward.
-
On the Forward Violation modal. Select or enter the following:
Field Description Forward this violation to
Select one of the following:
-
Another user. Forward to another end user, and select in the Forward to menu.
-
Users with assigned role. Forward to another end user with the selected role in the Forward to menu.
Comment
Enter a comment as to why the violation is being forwarded.
OK
Click to forward the violation. The end user receives an email notification for the forwarded violation.
-
View exceptions
The Exceptions page displayed all allowed violations, or exceptions.
-
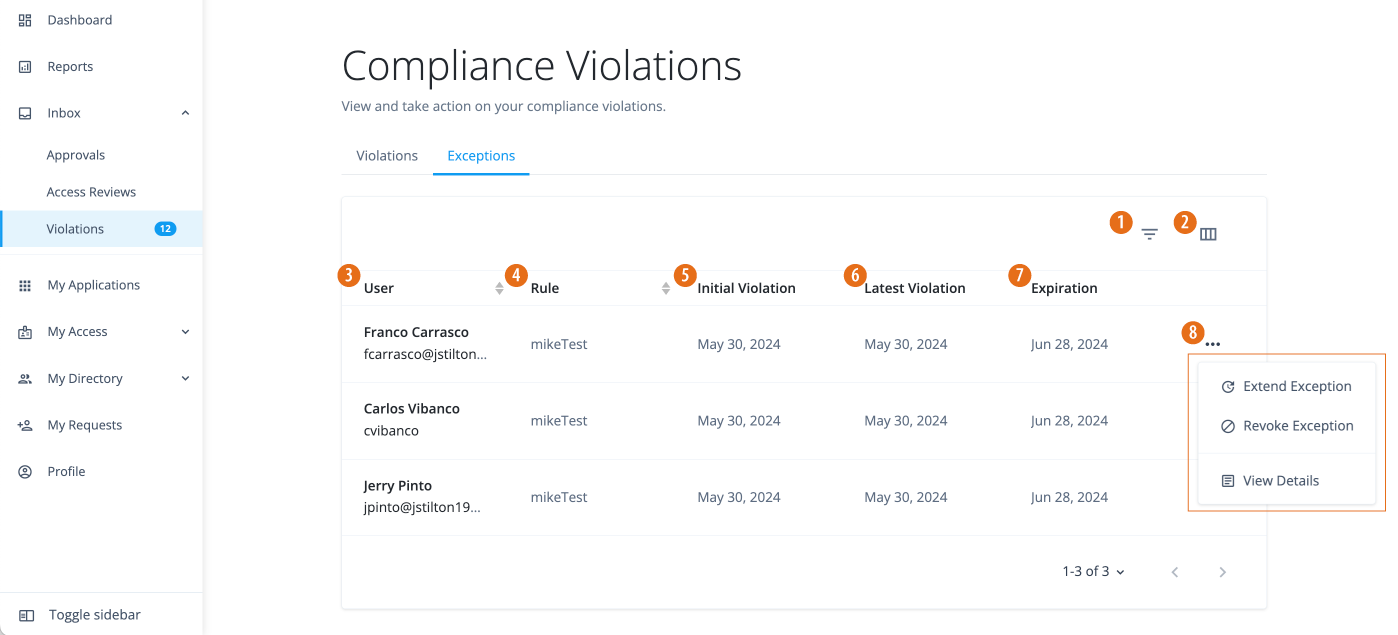
In the Advanced Identity Cloud end-user UI, click Inbox > Violations > Exceptions.
-
1 Click the filter icon () to display the exceptions.
-
2 Click the column icon () to customize the columns displayed on the page.
-
3 Displays the violations by user.
-
4 Displays the rule violation.
-
5 Displays the creation date of the violation.
-
6 Displays the latest violation date.
-
7 Displays the expiration date of the exception.
-
8 Click ellipsis () to extend the violation, revoke the exception, or to view its details.
Extend exceptions
Violation owners can extend an exception on the Exceptions page.
-
In the Advanced Identity Cloud end-user UI, click Inbox > Violations > Exceptions.
-
On the Extend Exception modal, select or enter the following:
Field Description Rule Violated
Displays the policy rule, description, and the date of the exception associated with the violation.
View Details
Click to display the violation details.
Extend Exception
Select an options:
-
Forever. Allow the exception to exist without an expiration date.
-
Until Specified Date. Click to set an expiration date for the exception. Click Date and select a date on the calendar.
-
Justification. Enter a justification for the exception.
-
-
Click Extend. The Exception page displays the updated expiration date.