Workflow nodes
When you define a workflow, you specify each task through a node.
Identity Governance provides several nodes that allow you to customize your workflow.
For information on how to place nodes in a workflow, refer to workflow editor canvas.To use an If/else node or Switch node, you must set outcomes in the script.
| For a comprehensive example of using the following nodes, refer to Workflow use cases. |
Approval node
Requires a user’s input in the workflow. Define:
-
User(s) to approve the access request
-
What to do when the request expires. The end user defines the expiration when they create the access request.
-
Notifications to send.
Outcomes
-
Approved -
Reject
Evaluation continues along the Approved outcome path
if any of the defined approvers approve the request.
Evaluation continues along the Reject outcome path if any of the defined
approvers reject the request.
Properties
| Property | Usage | ||
|---|---|---|---|
Approvers |
Select user(s) that must approve the access request.
|
||
Form |
Select dynamic forms or choose a specific form to present to the reviewer.
|
||
Expiration Settings |
The end user defines the expiration when they create the access request. Select one of the following:
|
||
Notification Settings |
Select which email notifications to send. By default all notifications are enabled. Select any of the following:
|
Fulfillment node
The Fulfillment node assigns a fulfillment task to users, requiring them to
manually complete of a governance task. In this case, an authorized user reviews
the task details and marks it as complete. Workflows using the fulfillment node
should also include flows to suspend the process while waiting for a response.
Administrators can use the Fulfillment node in chain tasks or used in conjunction with the Switch node to implement serial or parallel flows.
The Fulfillment node enables the complete orchestration of end-to-end lifecycles and event-driven flows.
Properties
| Property | Usage | ||
|---|---|---|---|
Reviewers |
Select user(s) that must approve the access request.
|
||
Form |
Allow dynamic form selection or choose a specific form to present to the reviewer.
|
||
Expiration Settings |
The end user defines the expiration when they create the access request. Select one of the following:
|
||
Notification Settings |
Select which email notifications to send. By default all notifications are enabled. Select any of the following:
|
If/else node
| To use this node, there must be a preceding Script node that sets at least one outcome. |
Also referred to as an exclusive gateway, this node has the
outcomes validationSuccess and ValidationFailure.
Once a condition evaluates to true, the node stops evaluating and takes that
outcome.
Outcomes
-
validationSuccess -
validationFailure
Evaluation continues along the validationSuccess outcome path when
the defined condition is met.
Evaluation continues along the validationFailure outcome path when
the defined condition is met.
Properties
| Property | Usage |
|---|---|
Outcomes |
Specify which outcome (defined in a preceding Script node) meets the condition. Set the following properties:
|
Script node
Write custom logic in a workflow with the Script node.
The logic you write depends on the task you are trying to achieve.
For example, you can write a script to set parameters to deny an access request, or you can write a script that sets outcomes you can use in conjunction with an If/else node or Switch node.
Outcomes
Single outcome path; however, you will often set outcomes in the script that you will use with the If/else node or Switch node.
Properties
| Property | Usage |
|---|---|
Script |
Define your custom logic by writing a JavaScript script.
|
Accessing access request-related data in scripts
When an access request is created, the relevant data is stored in a request object. The data accessible through the script node varies depending on the type of access request. For example, an application grant workflow contains information about the application whereas a role grant workflow contains information about the role.
Potential scenarios
|
The following scenarios reference the request object. To view all properties available in the request object, use the REST API endpoint Identity Governance attributes can be referenced using PingIDM functions,
such as reading a resource using |
For an application grant request, grab the application ID and name submitted in the request:
var content = execution.getVariables();                                                     1
var requestId = content.get('id');
var app = null;
var applicationName = null;

var requestObj = openidm.action('iga/governance/requests/' + requestId, 'GET', {}, {});     2
applicationId = requestObj.application.id;
app = openidm.read("managed/alpha_application/" + applicationId);                           3
applicationName = app.name; 4-
1 To leverage the workflow process variables from when the request was created, grab the variables and put them into the
contentvariable. For an access request, the only variable passed is theid. -
2 Obtain information about the access request using a
/governanceendpoint. -
3 Using the
openidm.readfunction, grab all data associated to the application and store it in a local variable,app. -
4 Grab the application name.
For an application grant request, grab the value of the custom created glossary attribute, riskLevel:
var content = execution.getVariables();                                                             1
var requestId = content.get('id');
var appId = null;
var appGlossary = null;
var riskLevel = null;

var requestObj = openidm.action('iga/governance/requests/' + requestId, 'GET', {}, {});             2
appId = requestObj.application.id;
appGlossary = openidm.action('iga/governance/application/' + appId + '/glossary', 'GET', {}, {});   3
riskLevel = appGlossary.riskLevel; 4-
1 To leverage the workflow process variables from when the request was created, grab the variables and put them into the
contentvariable. For an access request, the only variable passed is theid. -
2 Obtain information about the access request using a
/governance/requestsendpoint. -
3 Using the application
idgrabbed from theiga/governance/requestsendpoint, obtain information about the glossasry attributes for the application using theiga/governance/applicationendpoint. -
4 Grab the glossary attribute,
riskLevel, and store it in a local variable,riskLevel. The glossary nameriskLevelcomes from the name that you define when you create a glossary attribute.
For an application grant, access the requester user properties. In this scenario, access the frIndexedString1 property which correlates to a user’s line of business (LOB):
var content = execution.getVariables();                                                     1
var requestId = content.get('id');
var user = null;
var lineOfBusiness = null;

var requestObj = openidm.action('iga/governance/requests/' + requestId, 'GET', {}, {});     2

user = openidm.read("managed/alpha_user/" + requestObj.user.id);                            3

lineOfBusiness = user.frIndexedString1; 4-
1 To leverage the workflow process variables from when the request was created, grab the variables and put them into the
contentvariable. For an access request, the only variable passed is theid. -
2 Obtain information about the access request using a
iga/governance/requestsendpoint. -
3 Using the
openidm.readfunction, put the user;s data into therequestervariable. -
4 Grab line of business the user is in, which is stored in the property
frIndexedString1.
For an entitlement grant request, grab the entitlement ID and name submitted in the request:
var content = execution.getVariables();                                                     1
var requestId = content.get('id');
var requestObj = null;
var entitlementName = null;
var entitlementId = null;

requestObj = openidm.action('iga/governance/requests/' + requestId, 'GET', {}, {});         2
entitlementName = requestObj.descriptor.idx./entitlement.displayName;                       3
entitlementId = requestObj.assignment.id; 4-
1 To leverage the workflow process variables from when the request was created, grab the variables and put them into the
contentvariable. For an access request, the only variable passed is theid. -
2 Obtain information about the access request using a
iga/governance/requestsendpoint. -
3 Grab the entitlement name from
requestObj. Theentitlement.displayNameis derived from the display name attribute on the application’s entitlement object. For more information, refer to populate entitlement object display name. -
4 Grab the entitlement
idfrom therequestObj.The assignment.idis unique whereas theentitlement.idisn’t. The entitlement object is raw data from the application. Applications with the sameentitlement.idcan cause collisions if you referenceentitlement.idin your scripts. Therefore, make sure to reference theassignment.idwhen you want to reference an entitlement.
For a role grant request, grab the role ID and name submitted in the request:
var content = execution.getVariables();                                                 1
var requestId = content.get('id');
var requestObj = null;
var roleId = null;
var role = null;
var roleName = null;

requestObj = openidm.action('iga/governance/requests/' + requestId, 'GET', {}, {});     2
roleId = requestObj.role.id;
role = openidm.read("managed/alpha_role/" + roleId);                                    3
roleName = role.name; 4-
1 To leverage the workflow process variables from when the request was created, grab the variables and put them into the
contentvariable. For an access request, the only variable passed is theid. -
2 Obtain information about the access request using a
iga/governance/requestsendpoint. -
3 Using the
openidm.readfunction, grab all data associated to the role and store it in a local variable,role. -
4 Grab the role name.
Switch node
| To use this node, there must be a preceding Script node that sets multiple outcomes. |
Also referred to as an inclusive gateway, this node allows many outcomes based on different conditions. Any condition or all conditions can be true.
The Switch node and If/else node both evaluate conditions; however, the Switch node continues evaluating conditions after one condition is met.
Properties
| Property | Usage | ||
|---|---|---|---|
Name |
The name of the node. Set the name to update the outcome name in the node.
|
||
Outcomes |
Specify the outcomes (defined in a preceding Script node) based on meeting multiple conditions.
|
Require multiple approvals in parallel
You can use a Switch node to evaluate multiple paths instead of nesting multiple If/else nodes. However, you can also use a Switch node to send multiple approval paths in parallel. For example, you can send an approval to the role owner of a role and to an end user’s manager at the same time. Only when both approvals are approved, the workflow proceeds.
To achieve this:
-
There must be a proceeding Script node before the Swtich node.
-
A switch node must set two or more outcomes with the script set to
true. -
Each outcome of the Switch node routes to an Approval node.
-
The
Approveoutcome of each Approval node must route to an additional Switch node. -
The additional Switch node must only have one outcome with the script set to
true.
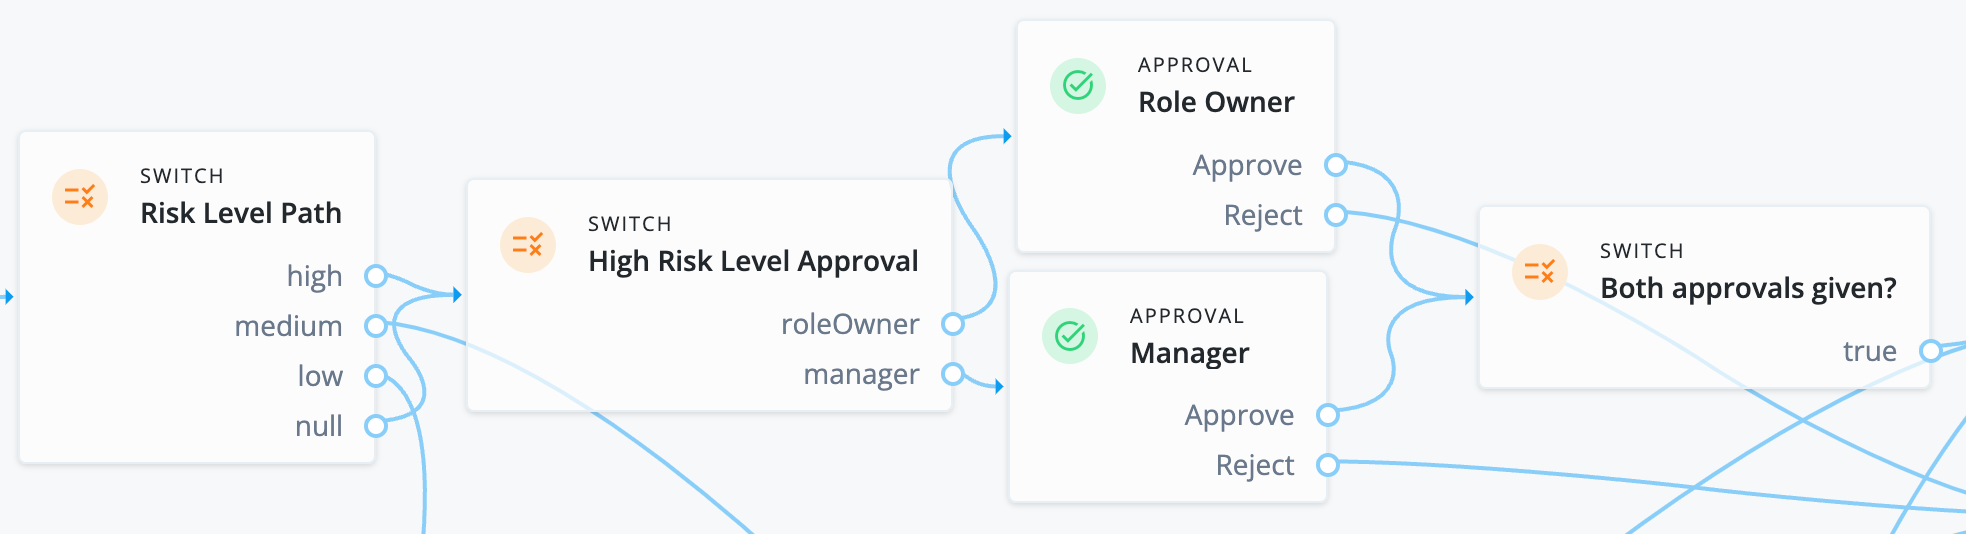
For a detailed example of using a Switch node for parallel paths, refer to Role grant workflow example.
Violation node
Assigns a compliance violation task to users. Workflows using the Violation node can better route violation handling in your company.
You can use the node in chain tasks or used in conjunction with the Switch node to implement serial or parallel flows.
Properties
| Property | Usage |
|---|---|
Name |
Violation Task |
Actors |
Select user(s) who acts on the violation.
|
Expiration Settings |
Define what to do when the violation expires. Options are:
|
Notification Settings |
Select which email notifications to send. By default all notifications are enabled. Select any of the following:
|