Configure scheduled jobs
PingOne Advanced Identity Cloud lets you view, schedule, and manage scheduled jobs and scanning tasks using the Jobs page. You can use jobs to run scripts or reconciliation. You can use scanning tasks to query objects and run a script on the results. Learn more about scripts in Scripting.
Although application reconciliation jobs display in the list, you must create and edit them from the application provisioning settings.
Schedule a job
-
In the Advanced Identity Cloud admin UI, click Jobs.
-
Click Schedule a Job.
-
In the Schedule a Job window, select Script, and click Next.
-
On the Script Job Details page, enter a name for the job in the Job Name field.
-
To configure the job frequency, do one of the following:
-
To use
cron, enable Use cron, and enter a validcronstring in the Frequency field.To validate a
cronschedule expression, learn more in Validate cron trigger expressions. -
In the Frequency area, set the applicable fields and options:
Field, drop-down, option Description Run Every
The schedule run frequency.
value
The time period for the adjacent Run every field:
-
day(s)
-
hour(s)
-
week(s)
-
month(s)
Set a Start Time
A start time for the first job run. Selecting this option displays the following additional fields:
-
Date picker
-
Time picker
-
Timezone
Repeat
How the job repeats:
-
X Times
-
Until specific date
If you do not set either value, Advanced Identity Cloud saves the schedule with a Times value of -1(infinite repeat). -
-
-
To configure variables, in the Script area, click Variables, and do one of the following:
-
For each variable, enter a Name and Value, and click .
-
To specify the variables in JSON format, enable JSON, and enter your JSON data in the PASSED VARIABLES field.
-
-
In the Script field, enter your script. For example:
java.lang.System.out.println('Job executing on ' + identityServer.getProperty('openidm.node.id') + ' at: ' + java.lang.System.currentTimeMillis());Learn more about scripts in Scripting.
-
Click Save.
Schedule a scanning task
Perform the following steps to scan a set of properties with a query filter at a scheduled interval, and execute a script on the objects returned by the query.
-
In the Advanced Identity Cloud admin UI, click Jobs.
-
Click Schedule a Job.
-
In the Schedule a Job window, select Task Scanner, and click Next.
-
In the Choose Entity to Scan window, from the Entity to Scan drop-down list, select an entity to scan at a scheduled interval. The default options are:
-
realm-name - User
-
realm-name - Role
-
realm-name - Group
-
realm-name - Organization
-
realm-name - Application
-
-
Click Next.
-
On the Task Scanner Job Details page, enter a name for the job in the Job Name field.
-
To configure the job frequency, do one of the following:
-
To use
cron, enable Use cron, and enter a validcronstring in the Frequency field.To validate a
cronschedule expression, learn more in Validate cron trigger expressions. -
In the Frequency area, set the applicable fields and options:
Field, drop-down, option Description Run Every
The schedule run frequency.
value
The time period for the adjacent Run every field:
-
day(s)
-
hour(s)
-
week(s)
-
month(s)
Set a Start Time
A start time for the first job run. Selecting this option displays the following additional fields:
-
Date picker
-
Time picker
-
Timezone
Repeat
How the job repeats:
-
X Times
-
Until specific date
If you do not set either value, Advanced Identity Cloud saves the schedule with a Times value of -1(infinite repeat). -
-
-
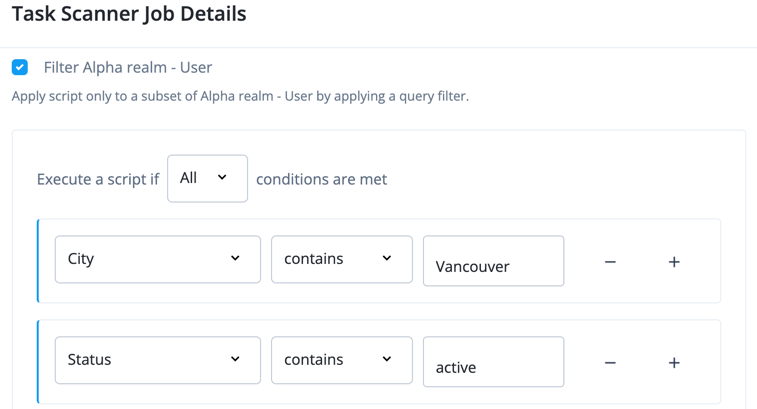
To limit the task to a subset of entities, select Filter realm-name - Entity, and do one of the following:
-
Use the basic editor to create the query conditions.
Show Me
-
Click Advanced Editor to enter the query code. For example:
(/city co "Vancouver" and /accountStatus co "active")
-
-
Complete the fields in the Task State area:
- Started
-
Specifies the field that stores the timestamp for when the task begins.
- Completed
-
Specifies the field that stores the timestamp for when the task completes its operation. The
completedfield is present as soon as the task has started, but its value isnulluntil the task has completed.
The Task State indicates the names of the fields in which the start message and completed message are stored. These fields are used to track the status of the task.
-
To configure variables, in the Script area, click Variables, and do one of the following:
-
For each variable, enter a Name and Value, and click +.
-
To specify the variables in JSON format, enable JSON, and enter your JSON data in the PASSED VARIABLES field.
-
-
In the Script field, enter your script. For example:
java.lang.System.out.println('Job executing on ' + identityServer.getProperty('openidm.node.id') + ' at: ' + java.lang.System.currentTimeMillis());Learn more about scripts in Scripting.
-
Click Save.
Manage jobs
-
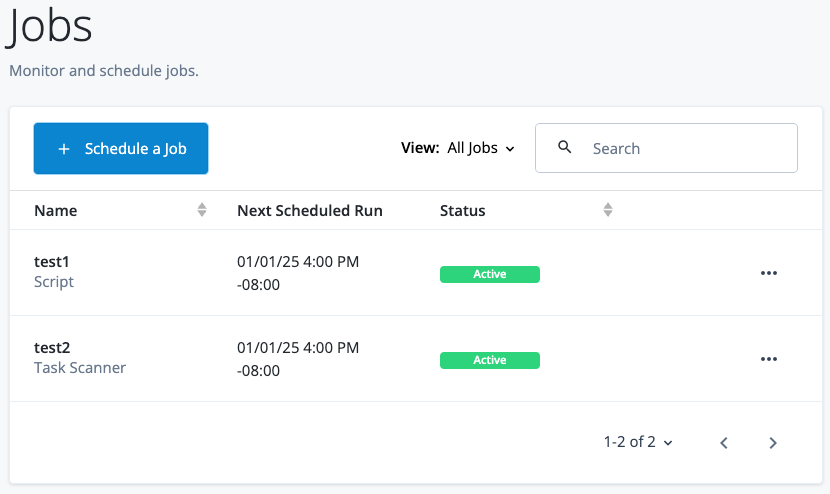
In the Advanced Identity Cloud admin UI, click Jobs.
The Jobs page displays a list of jobs, the next scheduled run, and the status.
Show Me
-
To filter job types, click the View drop-down list and select a job type. For example, Task Scanner.
-
To search for jobs by name, enter text in the Search field, and press Enter.
-
To view details about a job, click the More () menu adjacent to a job, and click View Details.
-
To edit a job, click it from the jobs list.
-
To manually trigger a job, click the More () menu adjacent to a job, and click Run Now.
-
In the Run Scheduled Job window, click Run Job.
-
-
To deactivate a job, click the More () menu adjacent to a job, and click Deactivate.
-
To activate a job, click the More () menu adjacent to a job, and click Activate.
-
To delete a job, click the More () menu adjacent to a job, and click Delete.
-
In the Delete Scheduled Job? window, click Delete.
-