Create a script in a journey to record last login time
| While this PingOne Advanced Identity Cloud use case was validated for accuracy, it can always be improved. To provide feedback, click or in the top right of this page (you must be logged into Backstage). |
Description
Estimated time to complete: 20 minutes
In this use case, you duplicate an existing journey and modify it to record the time the user logs in to the Advanced Identity Cloud end-user UI. You use a script in your journey to record the login time.
Prerequisites
Before you start work on this use case, make sure you have:
-
A basic understanding of:
-
JavaScript.
-
Journeys and nodes.
-
Realms.
-
The Advanced Identity Cloud admin UI.
-
The Advanced Identity Cloud end-user UI.
-
The
managed/alpha_userobject schema.
-
-
Access to your Advanced Identity Cloud development environment as an administrator.
-
A test identity in Advanced Identity Cloud.
Tasks
Task 1: Create a journey decision script
A journey decision script runs in Advanced Identity Cloud during an authentication journey. It’s called a decision script because it’s programmed to decide how the journey continues.
When the script runs, it can also read and change the shared state of the journey. In this example, the script adds a timestamp to record when it runs in the shared state.
Later, nodes can use the shared state data to take action. You can configure nodes to use shared state data and script the actions Advanced Identity Cloud takes. In this example, a later node writes the timestamp in the authenticating user’s profile.
-
Log in to the Advanced Identity Cloud admin UI as an administrator.
Select the
alpharealm if it is not selected by default. -
In the left menu pane, select Scripts > Auth scripts and click + New script.
-
Select Journey Decision Node and click Next to open the script editor.
-
Set the fields as follows and click Save and Close:
Field Value Name
last-login-timeDescription
Set last login time. Use this after successful authentication.JavaScript
function tag(message) {
    return '*** last-login-time: '.concat(message)
}

var lastLoginAttribute = 'frUnindexedDate1'
var lastLoginTime = new Date().toISOString()
sharedState.get('objectAttributes').put(lastLoginAttribute, lastLoginTime)
logger.message(tag('Setting ' + lastLoginAttribute + ' to ' + lastLoginTime))
outcome = 'Success'
The script sets the shared state
objectAttributes.frUnindexedDate1to the current time as an ISO date string. Managed users have many optional fields. ThefrUnindexedDate1field is one of them. The script sets this field inobjectAttributes, the attributes of the managed user object, so a later node can write the updatedfrUnindexedDate1value from shared state to the user’s profile.The
frUnindexedDate1field is an unindexed field, meaning Advanced Identity Cloud does not maintain a search index for the field. If applications look up profiles based on the last login time, use one of thefrIndexedDate*fields instead.Notice the following objects from Advanced Identity Cloud bound to the journey decision script execution context; the script uses them directly without having to define them first:
-
sharedState: Use this to access the shared journey state. -
logger: Use this to log debug messages. -
outcome: Set the outcome to a string as the last processing step.
There is no authentication decision to make, so the script’s only outcome is
Success. You include each outcome in the Scripted Decision node Outcomes setting when using the script in a journey. -
Task 2: Update the target managed user field
By default, the label in the Advanced Identity Cloud end-user UI for the frUnindexedDate1 field is Generic Unindexed Date 1.
The journey uses this field for last login times; therefore, you change the label to Last Login Time for readability.
-
In the left menu pane of Advanced Identity Cloud admin UI, select Native Consoles > Identity Management.
The IDM admin UI dashboard displays.
-
In the top menu of the IDM admin UI, select Configure > Managed Objects and click the card for Alpha_user to edit the managed object properties.
-
Scroll to the
frUnindexedDate1row and click it to edit the property. -
Set the fields as follows and click Save:
Field Value Readable Title
Last Login TimeThis changes the label in the Advanced Identity Cloud end-user UI.
Show advanced options > Searchable
Enable this.
Show advanced options > User Editable
Disable this.
Task 3: Create a last login journey
You base the last login journey on the default Login journey. To reference the script, you add a Scripted Decision node. To write the last login time to the user’s profile, you add a Patch Object node.
Duplicate the default login journey
-
In the left menu pane of Advanced Identity Cloud admin UI, select Journeys
-
Select the More () menu for the default Login journey and select Duplicate to display the Duplicate Journey modal.
-
Set the fields as follows and click Save:
Field Value Name
Log in and set last login timeIdentity Object
Alpha realm - Users
managed/alpha_userDescription
Duplicate of default Login journey that also sets last login timeThe Advanced Identity Cloud admin UI displays the journey editor.
Configure your last login time journey
-
In the journey editor, find these nodes to drag and drop them onto the journey canvas:
-
Scripted Decision node
-
Patch Object node
-
-
Select the Scripted Decision node and set the fields as follows:
Field Value Name
Last login timeScript
last-login-timeOutcomes
SuccessLeave the default settings for other fields.
When the journey reaches this node, your journey decision script runs.
-
Select the Patch Object node and set the fields as follows:
Field Value Identity Resource
managed/alpha_userLeave the default settings for other fields.
When the journey reaches this node, it updates the
managed/alpha_userobject properties with the shared stateobjectAttributesfields including thefrUnindexedDate1field set by your script. This update stores the last login time in the end user’s profile. -
Reconnect the Scripted Decision node
Trueoutcome to theLast login timenode input. -
Connect the
Last login timenode outcome to the Patch Object node input. -
Connect the Patch Object node
Patchedoutcome to the Increment Login Count node input. -
Connect the Patch Object node
Failedoutcome to the Failure node.
At this point, the authentication journey is complete. The following shows a rectangle around the nodes you added after duplicating the default journey:

-
a Collects the username and password.
-
b Validates the username and password.
-
c Records the time in the shared state object attributes on
frUnindexedDate1. -
d Writes the time to the user’s profile.
-
e Increments the number of authentications.
-
f Triggers an inner journey; in this case, a journey for progressive profiling.
Task 4: Check journey path connections
Use the following table to check the connections for each node in the Log in and set last login time journey.
Some nodes have more than one outcome. The → symbol means the node only has one outcome path.
| Source node | Outcome path | Target node |
|---|---|---|
Start (person icon) |
→ |
Page node |
Page node containing:
|
→ |
Data Store Decision node |
Data Store Decision node |
|
Scripted Decision node ( |
|
Failure node |
|
Scripted Decision node ( |
→ |
Patch Object node |
Patch Object node |
|
Increment Login Count node |
|
Failure node |
|
Increment Login Count node |
→ |
Inner Tree Evaluator node |
Inner Tree Evaluator node |
|
Success node |
|
Failure node |
Validation
Now that you have created your script, updated a label in the Advanced Identity Cloud end-user UI, duplicated the default Login journey, and updated the copy to record the last login time in the user’s profile, you are ready to validate the journey.
Before validating, make sure you have a test user in the alpha realm.
Steps
-
Get a URL you can use to test the journey:
-
Log in to the Advanced Identity Cloud admin UI as an administrator.
-
Select Journeys.
-
Select the journey you created, Log in and set last login time.
A preview screen of the journey displays.
-
Click the copy icon next to Preview URL, a URL you can use to test the journey as an end user:
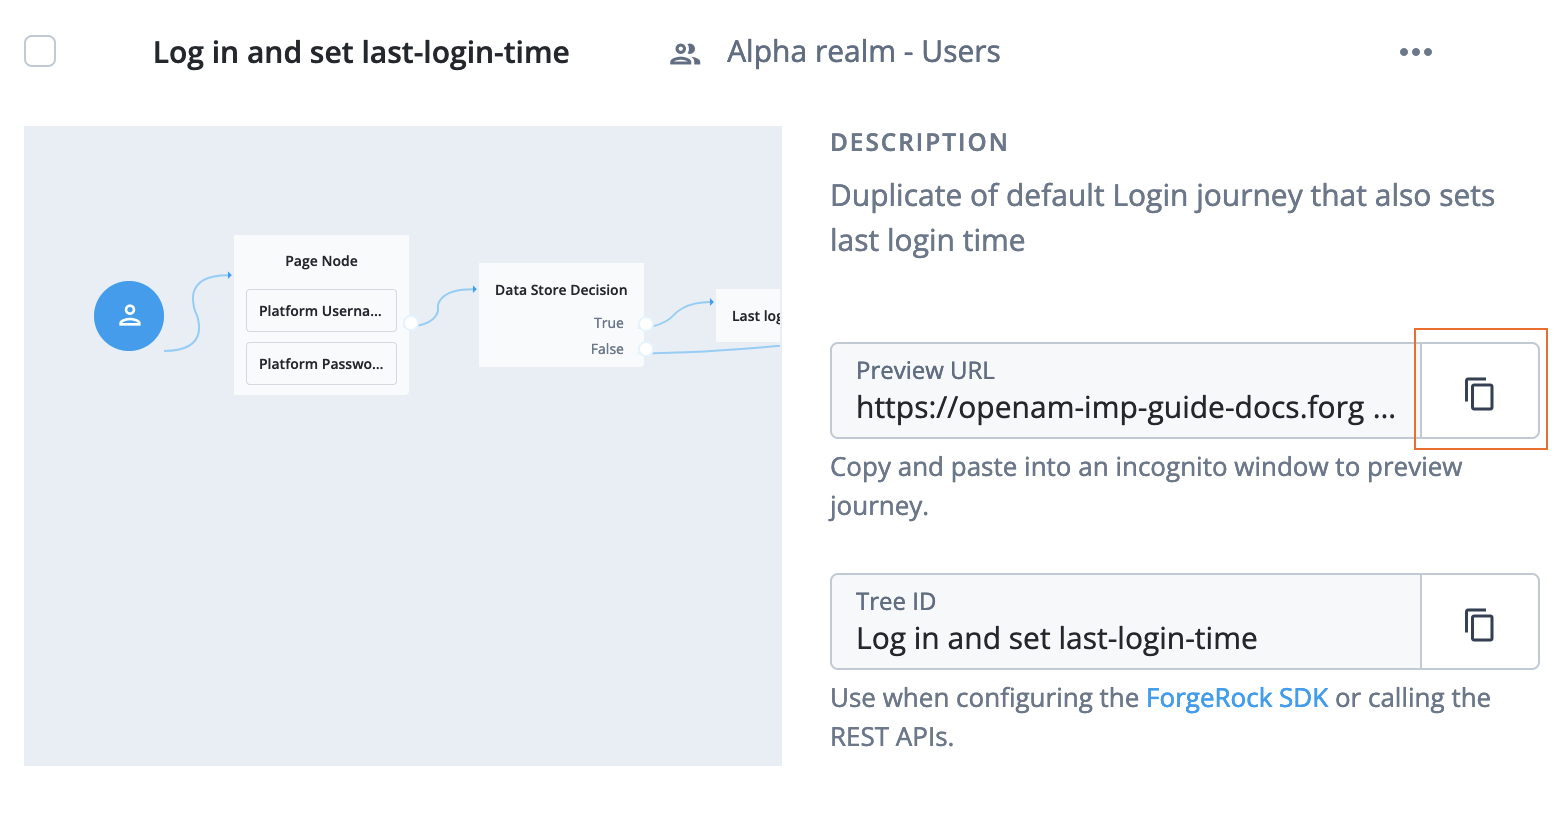
-
-
Log in to the Advanced Identity Cloud end-user UI:
-
Paste the URL into an incognito window.
Use incognito mode for testing to avoid caching issues and interference with any current sessions.
The Advanced Identity Cloud end-user UI displays the login screen.
-
Enter the test user’s username and password.
-
Click Next.
The Advanced Identity Cloud end-user UI displays the test user’s profile.
-
-
Click Edit Your Profile to display the profile screen then Edit Personal Info to display the profile fields.
-
Scroll to the Last Login Time field.
The field contains the timestamp written when the test user logged in:

The Advanced Identity Cloud end-user UI appends
(optional)to the field name for managed object properties without Required enabled.
Explore further
Reference material
| Reference | Description |
|---|---|
Get to know the admin interfaces; Advanced Identity Cloud admin UI, AM admin UI, and IDM admin UI. |
|
Conceptual information on journeys and their purpose in Advanced Identity Cloud. |
|
A guided video of journeys in Advanced Identity Cloud and how to use them. |
|
Learn about the configurable nodes Advanced Identity Cloud offers for use in journeys. |
|
Reference information for end user profile properties. |
|
Reference information for journey decision node scripts. |