Manage Proxy Connect using the API
For background on Proxy Connect in PingOne Advanced Identity Cloud, learn more in Configure a proxy service with Proxy Connect.
Proxy Connect API endpoints
Proxy Connect provides these Advanced Identity Cloud API endpoints:
-
Header rules API endpoint (
/environment/proxy-connect/header-rules)-
Use
GETto view the header ruleset and determine if the ruleset is active. -
Use
PUTto update the header ruleset and activate or deactivate the ruleset.
-
-
IP Address rules API endpoint (
/environment/proxy-connect/ip-rules)-
Use
GETto view the IP ruleset and determine if the ruleset is active. -
Use
PUTto update the IP ruleset and activate or deactivate the ruleset.
-
Authenticate to Proxy Connect API endpoints
To authenticate to Proxy Connect API endpoints, use an access token created with one of the following scopes:
| Scope | Description |
|---|---|
|
Full access to Proxy Connect API endpoints. Use this scope to view, create, activate, deactivate, or delete rules. |
|
Read-only access to Proxy Connect API endpoints. Use this scope if you only need to View default rulesets or View configured rulesets. |
|
Write access to Proxy Connect API endpoints. Use this scope to create, activate, deactivate, or delete rules. |
View default rulesets
By default, the header and IP rulesets in each of your tenant environments are inactive. You can view the default ruleset configurations using the API without adding a security header or using a particular IP address.
In any tenant environment (where the header and IP rulesets are inactive):
-
Get an access token created with the
fr:idc:proxy-connect:readscope. -
Get the header ruleset configuration from the
/environment/proxy-connect/header-rulesendpoint:$ curl \ --request GET 'https://<tenant-env-fqdn>/environment/proxy-connect/header-rules' \(1) --header 'Authorization: Bearer <access-token>' \(2) --header 'Content-Type: application/json'1 Replace <tenant-env-fqdn> with the FQDN of your tenant environment. 2 Replace <access-token> with the access token. The response shows the default header ruleset configuration:
Show response
[
    {
        "enabled": false, (1)
        "headers": null, (2)
        "requestStatus": "SUCCESS" (3)
    }
]
1 The header ruleset is not active. 2 The header ruleset contains no rules. 3 The header ruleset is synchronized with the environment’s load balancer. -
Get the IP ruleset configuration from the
/environment/proxy-connect/ip-rulesendpoint:$ curl \ --request GET 'https://<tenant-env-fqdn>/environment/proxy-connect/ip-rules' \(1) --header 'Authorization: Bearer <access-token>' \(2) --header 'Content-Type: application/json'1 Replace <tenant-env-fqdn> with the FQDN of your tenant environment. 2 Replace <access-token> with the access token. The response shows the default IP ruleset configuration:
Show response
[
    {
        "enabled": false, (1)
        "ipRanges": null, (2)
        "requestStatus": "SUCCESS" (3)
    }
]
1 The IP ruleset is not active. 2 The IP ruleset contains no rules. 3 The IP ruleset is synchronized with the environment’s load balancer.
View configured rulesets
If the header or IP rulesets in a tenant environment have been activated, API requests return a 404 response unless you use a particular IP address and/or add a security header to your API requests.
In any tenant environment (where the header or IP rulesets are active):
-
Complete the Prerequisite actions for accessing a tenant when rulesets are configured.
-
Get an access token created with the
fr:idc:proxy-connect:readscope. -
Get the header ruleset configuration from the
/environment/proxy-connect/header-rulesendpoint:$ curl \ --request GET 'https://<tenant-env-fqdn>/environment/proxy-connect/header-rules' \(1) --header 'Authorization: Bearer <access-token>' \(2) --header 'Content-Type: application/json' \ --header '<security-header-name>: <security-header-value>' (3)1 Replace <tenant-env-fqdn> with the FQDN of your tenant environment. 2 Replace <access-token> with the access token. 3 (Optional) Review the prerequisite actions. If necessary, add an existing security header to your request; for example: --header 'X-Security-Header: f1drybngmzqj5loposddd5p98z886jp9'The response shows your custom configuration, which will be similar to this:
Show response
[
    {
        "enabled": true, (1)
        "headers": [
            {"header": "X-Security-Header", "value": "f1drybngmzqj5loposddd5p98z886jp9"} (2)
        ],
        "requestId": "ag-6WQQCYKH", (3)
        "requestStatus": "SUCCESS" (4)
    }
]
1 The header ruleset is active. 2 The header ruleset contains one rule. Requests from a third-party service must include a X-Security-HeaderHTTP security header (set with the specified value) to be classed as a valid request.3 The last update to the header ruleset was assigned a requestIdof "ag-6WQQCYKH".4 The header ruleset is synchronized with the environment’s load balancer. -
Get the IP ruleset configuration from the
/environment/proxy-connect/ip-rulesendpoint:$ curl \ --request GET 'https://<tenant-env-fqdn>/environment/proxy-connect/ip-rules' \(1) --header 'Authorization: Bearer <access-token>' \(2) --header 'Content-Type: application/json' --header '<security-header-name>: <security-header-value>' (3)1 Replace <tenant-env-fqdn> with the FQDN of your tenant environment. 2 Replace <access-token> with the access token. 3 (Optional) Review the prerequisite actions. If necessary, add an existing security header to your request; for example: --header 'X-Security-Header: f1drybngmzqj5loposddd5p98z886jp9'Show response
[
    {
        "enabled": true, (1)
        "ipRanges": [
            "1.2.3.4/32" (2)
        ],
        "requestId": "ag-eZKnKPqS", (3)
        "requestStatus": "SUCCESS" (4)
    }
]
1 The IP ruleset is active. 2 The IP ruleset contains one rule. Requests from a third-party service must originate from an IP address in the specified CIDR range to be classed as a valid request. 3 The last update to the IP ruleset was assigned a requestIdof "ag-eZKnKPqS".4 The IP ruleset is synchronized with the environment’s load balancer.
Create or update rulesets
Create or update the header and/or IP rulesets in a tenant environment to configure Proxy Connect.
Test ruleset configuration updates on a lower environment before you update your production environment and ensure that any automated scripts are not affected by your changes.
In any tenant environment:
-
Complete the Prerequisite actions for accessing a tenant when rulesets are configured.
-
Get an access token created with the
fr:idc:proxy-connect:writescope. -
(Optional) Update the header ruleset:
-
Review the existing header ruleset configuration. Learn more in:
-
Step 2 in View default rulesets.
-
Step 3 in View configured rulesets.
-
-
Replace the existing header ruleset configuration with your own header ruleset configuration:
$ curl \
--request PUT 'https://<tenant-env-fqdn>/environment/proxy-connect/header-rules' \(1)
--header 'Authorization: Bearer <access-token>' \(2)
--header 'Content-Type: application/json'
--header '<security-header-name>: <security-header-value>' \ (3)
--data '{"enabled": true, "headers": <headers>}' (4)
1 Replace <tenant-env-fqdn> with the FQDN of your tenant environment. 2 Replace <access-token> with the access token. 3 (Optional) Review the prerequisite actions. If necessary, add an existing security header to your request; for example: --header 'X-Security-Header: f1drybngmzqj5loposddd5p98z886jp9'4 Replace <headers> with a JSON array of security header objects; for example: [ {"header": "X-Security-Header", "value": "f1drybngmzqj5loposddd5p98z886jp9"}, {"header": "X-Security-Header2", "value": "2ey9ant69h3021b49vvdl8qnww6rmj3y"} ]Show response
[
    {
        "enabled": true, (1)
        "headers": [
            {"header": "X-Security-Header", "value": "f1drybngmzqj5loposddd5p98z886jp9"}, (2)
            {"header": "X-Security-Header2", "value": "2ey9ant69h3021b49vvdl8qnww6rmj3y"} (2)
        ],
        "requestId": "ag-vnYPhgaC", (3)
        "requestStatus": "PENDING" (4)
    }
]
1 The header ruleset is active. 2 The header ruleset contains two rules. Requests from a third-party service must include a X-Security-HeaderorX-Security-Header2HTTP security header (set with the specified value) to be classed as a valid request.3 The update to the header ruleset was assigned a requestIdof "ag-vnYPhgaC".4 The update to the header ruleset is not yet synchronized with the environment’s load balancer. -
An asynchronous process updates the header ruleset in the environment’s load balancer. This process can take up to 10 minutes to complete.
To check when the asynchronous process has completed, poll the
/environment/proxy-connect/header-rulesendpoint until therequestStatuskey in the response changes fromPENDINGtoSUCCESS.$ curl \ --request GET 'https://<tenant-env-fqdn>/environment/proxy-connect/header-rules' \(1) --header 'Authorization: Bearer <access-token>' \(2) --header 'Content-Type: application/json' \ --header '<security-header-name>: <security-header-value>' (3)1 Replace <tenant-env-fqdn> with the FQDN of your tenant environment. 2 Replace <access-token> with the access token. 3 (Optional) Review the prerequisite actions. If necessary, add an existing security header to your request. Otherwise, if you are setting header rules for the first time, add one of the new security headers to your request; for example: --header 'X-Security-Header: f1drybngmzqj5loposddd5p98z886jp9'When the asynchronous process has completed and updated the header ruleset in the environment’s load balancer, the response should look like this:
Show response
[
    {
        "enabled": true,
        "headers": [
            {"header": "X-Security-Header", "value": "f1drybngmzqj5loposddd5p98z886jp9"},
            {"header": "X-Security-Header2", "value": "2ey9ant69h3021b49vvdl8qnww6rmj3y"}
        ],
        "requestId": "ag-vnYPhgaC",
        "requestStatus": "SUCCESS"
    }
]
-
-
(Optional) Update the IP ruleset:
-
Review the existing IP ruleset configuration. Learn more in:
-
Step 3 in View default rulesets.
-
Step 4 in View configured rulesets.
-
-
Replace the existing IP ruleset configuration with your own IP ruleset configuration:
$ curl \
--request PUT 'https://<tenant-env-fqdn>/environment/proxy-connect/ip-rules' \(1)
--header 'Authorization: Bearer <access-token>' \(2)
--header 'Content-Type: application/json'
--header '<security-header-name>: <security-header-value>' (3)
--data '{"enabled": true, "ipRanges": <ip-ranges>}' (4)
1 Replace <tenant-env-fqdn> with the FQDN of your tenant environment. 2 Replace <access-token> with the access token. 3 (Optional) Review the prerequisite actions. If necessary, add an existing security header to your request; for example: --header 'X-Security-Header: f1drybngmzqj5loposddd5p98z886jp9'4 Replace <ip-ranges> with a JSON array of CIDR ranges; for example: ["1.2.3.4/32", "2.3.2.1/32"]Show response
[
    {
        "enabled": true, (1)
        "ipRanges": [
            "1.2.3.4/32", (2)
            "2.3.2.1/32" (2)
        ],
        "requestId": "ag-gdyuPUKD", (3)
        "requestStatus": "PENDING" (4)
    }
]
1 The IP ruleset is active. 2 The IP ruleset contains two rules. Requests from a third-party service must originate from an IP address in one of the specified CIDR ranges to be classed as a valid request. 3 The update to the IP ruleset was assigned a requestIdof "ag-gdyuPUKD".4 The update to the IP ruleset is not yet synchronized with the environment’s load balancer. -
An asynchronous process will automatically update the IP ruleset in the environment’s load balancer.
To check when the asynchronous process has completed, follow the instructions in step 2c using the
/environment/proxy-connect/ip-rulesendpoint instead of the/environment/proxy-connect/header-rulesendpoint.
-
Deactivate rulesets
To deactivate rulesets, follow the instructions in Create or update rulesets with the following changes:
-
In step 2b, use the payload
--data '{"enabled": false, "headers": []}'to deactivate the header ruleset. -
In step 3b, use the payload
--data '{"enabled": false, "ipRanges": []}'to deactivate the IP ruleset.
Prerequisite actions for accessing a tenant when rulesets are configured
| The prerequisite actions are not required if you configured a proxy service to access your tenant or if you configured Secure Connect and can access your tenant from a private network. |
-
Consult with your team to find out what header rules are configured for the environment:
-
If header rules are configured, you need the name and value of a configured security header.
-
Add the security header to all cURL requests using the format:
--header '<security-header-name>: <security-header-value>'For example:
--header 'X-Security-Header: f1drybngmzqj5loposddd5p98z886jp9' -
Add the security header to all browser requests using a browser extension; for example, the SimpleModifyHeaders extension lets you modify headers for Chrome and Firefox:
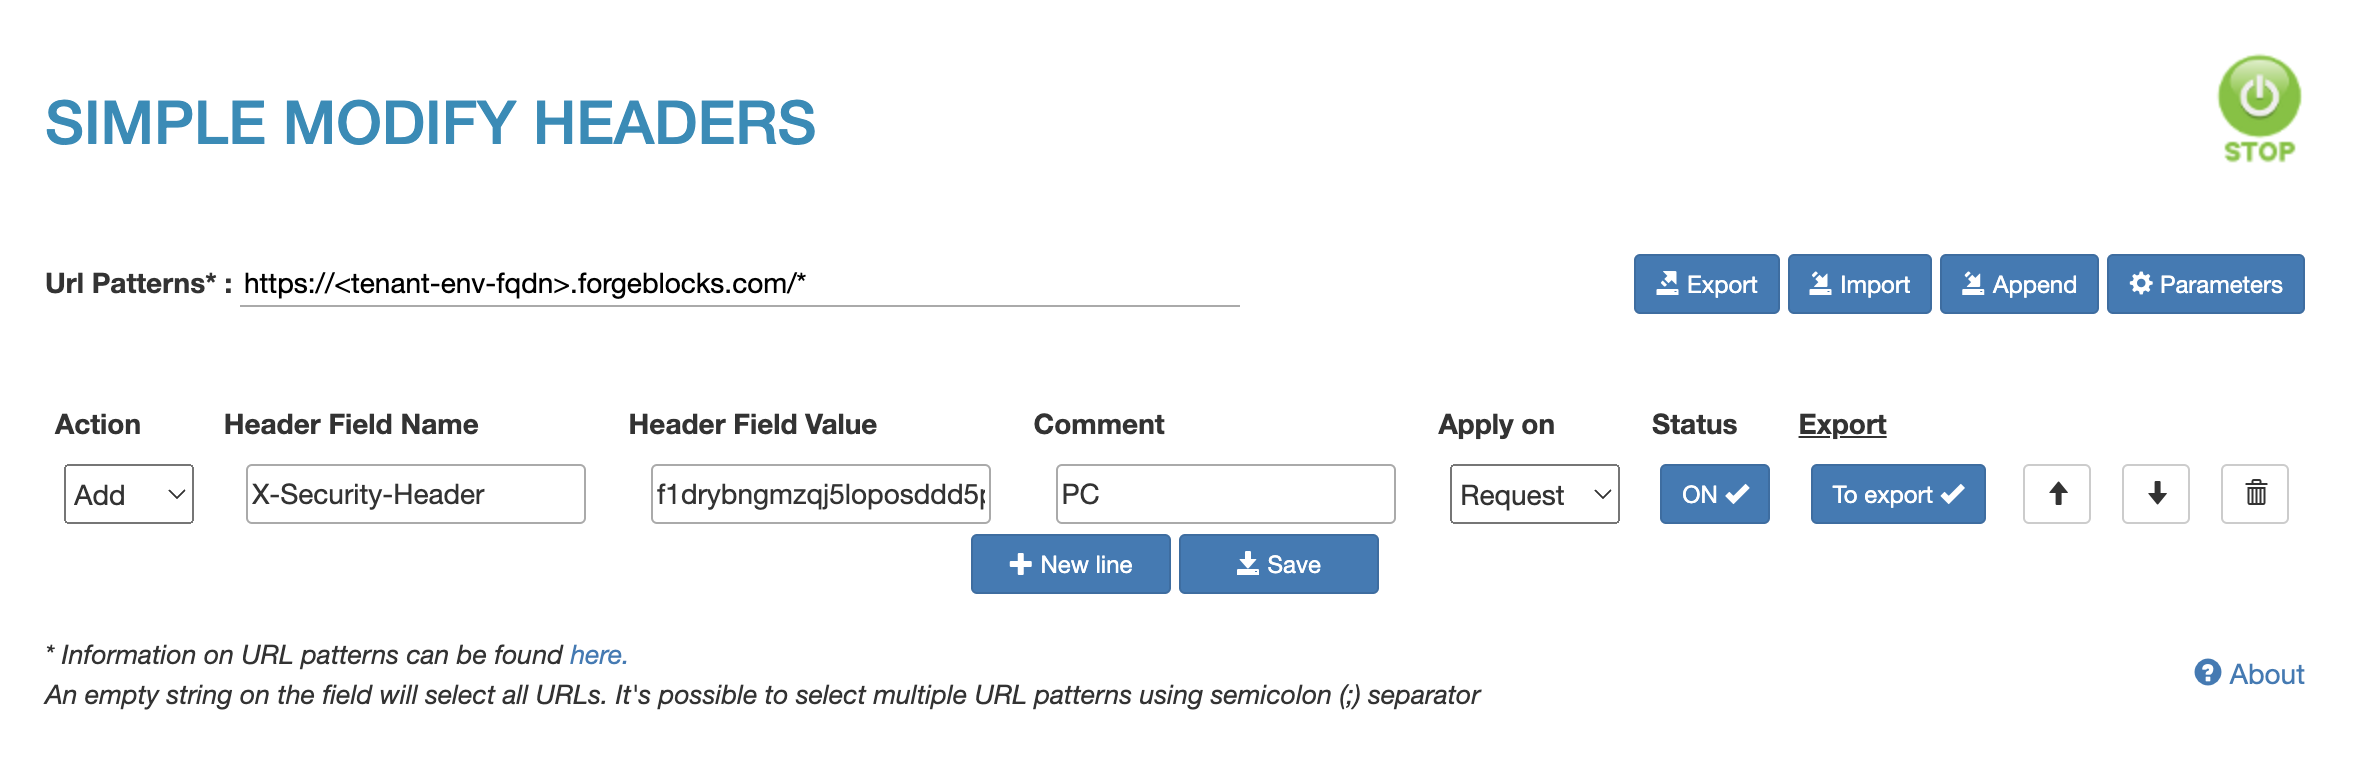
-
-
Consult with your team to find out what IP rules are configured for the environment:
-
If IP rules are configured, your IP address needs to be in one of the configured CIDR ranges. You may need to join your company’s VPN to change your IP address, or you may need your team to add your IP address to the IP rules configuration.
-
Run all cURL and browser requests from a configured IP address.
-