Login with MFA using push notifications
Description
Estimated time to complete: 30 minutes
In this use case, you authenticate a user with MFA by setting up the ForgeRock Authenticator application for push notification on a smartphone.
Goals
After completing this use case, you will know how to do the following:
-
Set configurations in the AM admin UI, such as configuring a service in Advanced Identity Cloud for push notifications.
-
Capture and validate a username and password.
-
Configure and register an end user’s device with their user profile in Advanced Identity Cloud.
-
Create a journey to enforce MFA at log in.
-
Provide recovery codes to end users if they lose their device.
Prerequisites
Before you start work on this use case, ensure you have these prerequisites:
-
A basic understanding of these Advanced Identity Cloud concepts:
-
Realms
-
The AM admin UI
-
Journeys
-
Nodes
-
The Advanced Identity Cloud end-user UI
-
-
Access to your development environment as an administrator
-
An identity in Advanced Identity Cloud to test the journey (you may need to create this)
-
An Android or iOS smartphone with access to the internet
-
A Backstage account
Tasks
Task 1: Log in and configure the ForgeRock Authenticator Push service
-
Log in to the Advanced Identity Cloud admin UI as an administrator.
-
In the left menu pane, select Native Consoles > Access Management.
The realm overview for the Alpha realm displays.
-
Select Services.
-
Click + Add a Service.
-
Create the push service configuration:
-
Select ForgeRock Authenticator (Push) Service in the service type drop-down list.
-
Click Create.
-
Click Save Changes to accept the default settings.
The default settings don’t encrypt the device metadata stored in user profiles. This use case accepts the default settings for simplicity. Learn more in Configure the ForgeRock Authenticator (Push) service.
-
Task 2: Create Push service credentials in Backstage
Advanced Identity Cloud uses an external AWS service to send push notifications. Its configuration requires access keys and other metadata. As a Ping Identity customer, you have streamlined access to the required metadata:
-
In a new tab, log in to Backstage.
-
In the top right corner, click your profile icon > Profile.
-
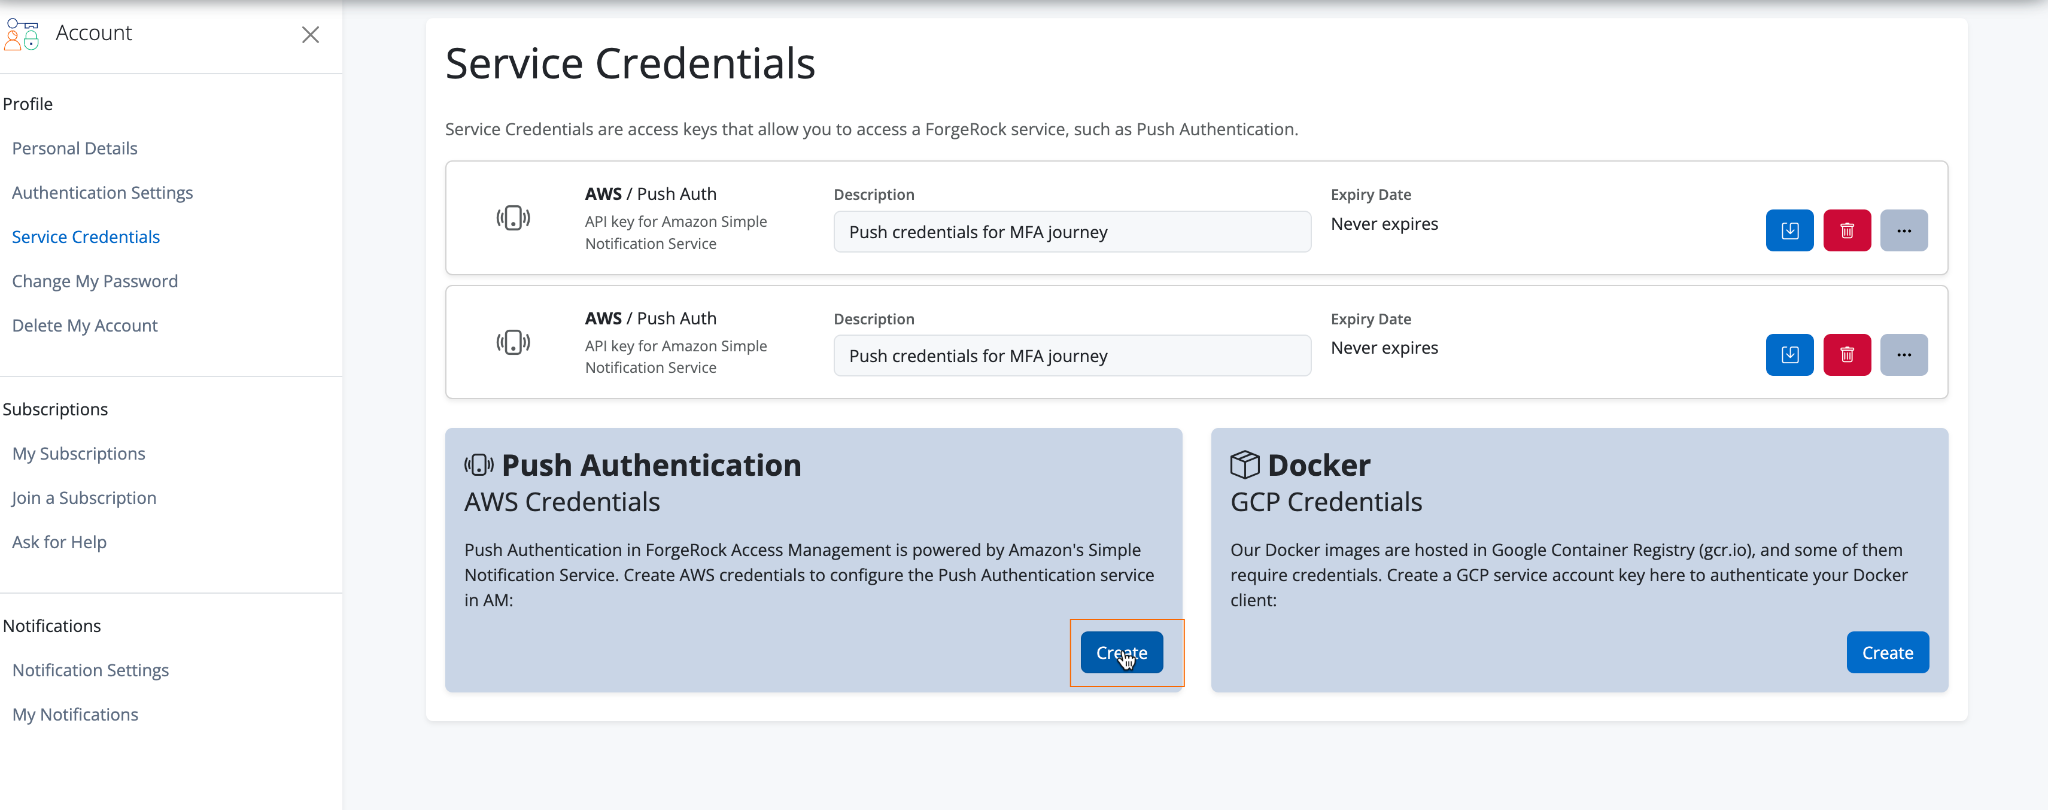
From the left mxenu pane, select Service Credentials.
-
Under Push Notifications AWS Credentials, click Create.
-
In the Description field, enter
Push credentials for MFA journey. -
Click Create.
-
Click Download as JSON.
-
Click Close.
-
Close the Backstage tab.
Task 3: Configure the Push Notification service in the AM admin UI
-
Click back to the tab that displays the AM admin UI.
-
Select Services.
-
Click + Add a Service.
-
To configure the Push Notification service, select Push Notification Service in the service type drop-down list.
-
Open the JSON file you downloaded in step 7.
-
Enter the fields from the JSON file into the fields that display:
Don’t enter the quotes that surround the JSON value. Field in AM admin UI Field in JSON file Description SNS Access Key ID
accessKeyId
The generated Key ID; the
"accessKeyId"in the JSON.SNS Access Key Secret
accessKeySecret
The generated Secret; the
"accessKeySecret"in the JSON.SNS Endpoint for APNS
APNS
The generated APNS; the
"APNS"in the JSON. Used to send push notifications to the Apple Push Notification Service (APNS).SNS Endpoint for GCM
GCM
The generated GCM; the
"GCM"in the JSON. Used to send push notifications to Android devices using Google Cloud Messaging (GCM). -
Click Create.
-
Click Save Changes.
-
Close the AM admin UI tab.
-
Click back to the Advanced Identity Cloud admin UI tab.
Task 4: Create the MFA using push notifications journey
Configure journey options
-
In the Advanced Identity Cloud admin UI, click Journeys. All existing Advanced Identity Cloud journeys display.
-
Click + New Journey.
-
Configure options for the new journey:
Field Value Description Name
Enter
Login with Push MFAA name to display in the journeys list.
Identity Object
Select
Alpha Realm - UsersThe type of object that this journey authenticates.
Description
Enter
A login journey with MFA using push notifications. This is for the
implementation guide.
Description of the journey.
Override theme
Do not enable
Lets you provide a unique UI for this journey.
Default journey for end users
Do not enable
Lets you designate this journey as the default journey for your Advanced Identity Cloud environment.
Tags
Enter
Implementation GuideKeywords for organizing the journeys list.
-
Click Save. The journey editor displays.
To save your progress, periodically click Save in the top right of the journey editor. Failure to do this results in losing your work if the page reloads or if you lose your network connection. 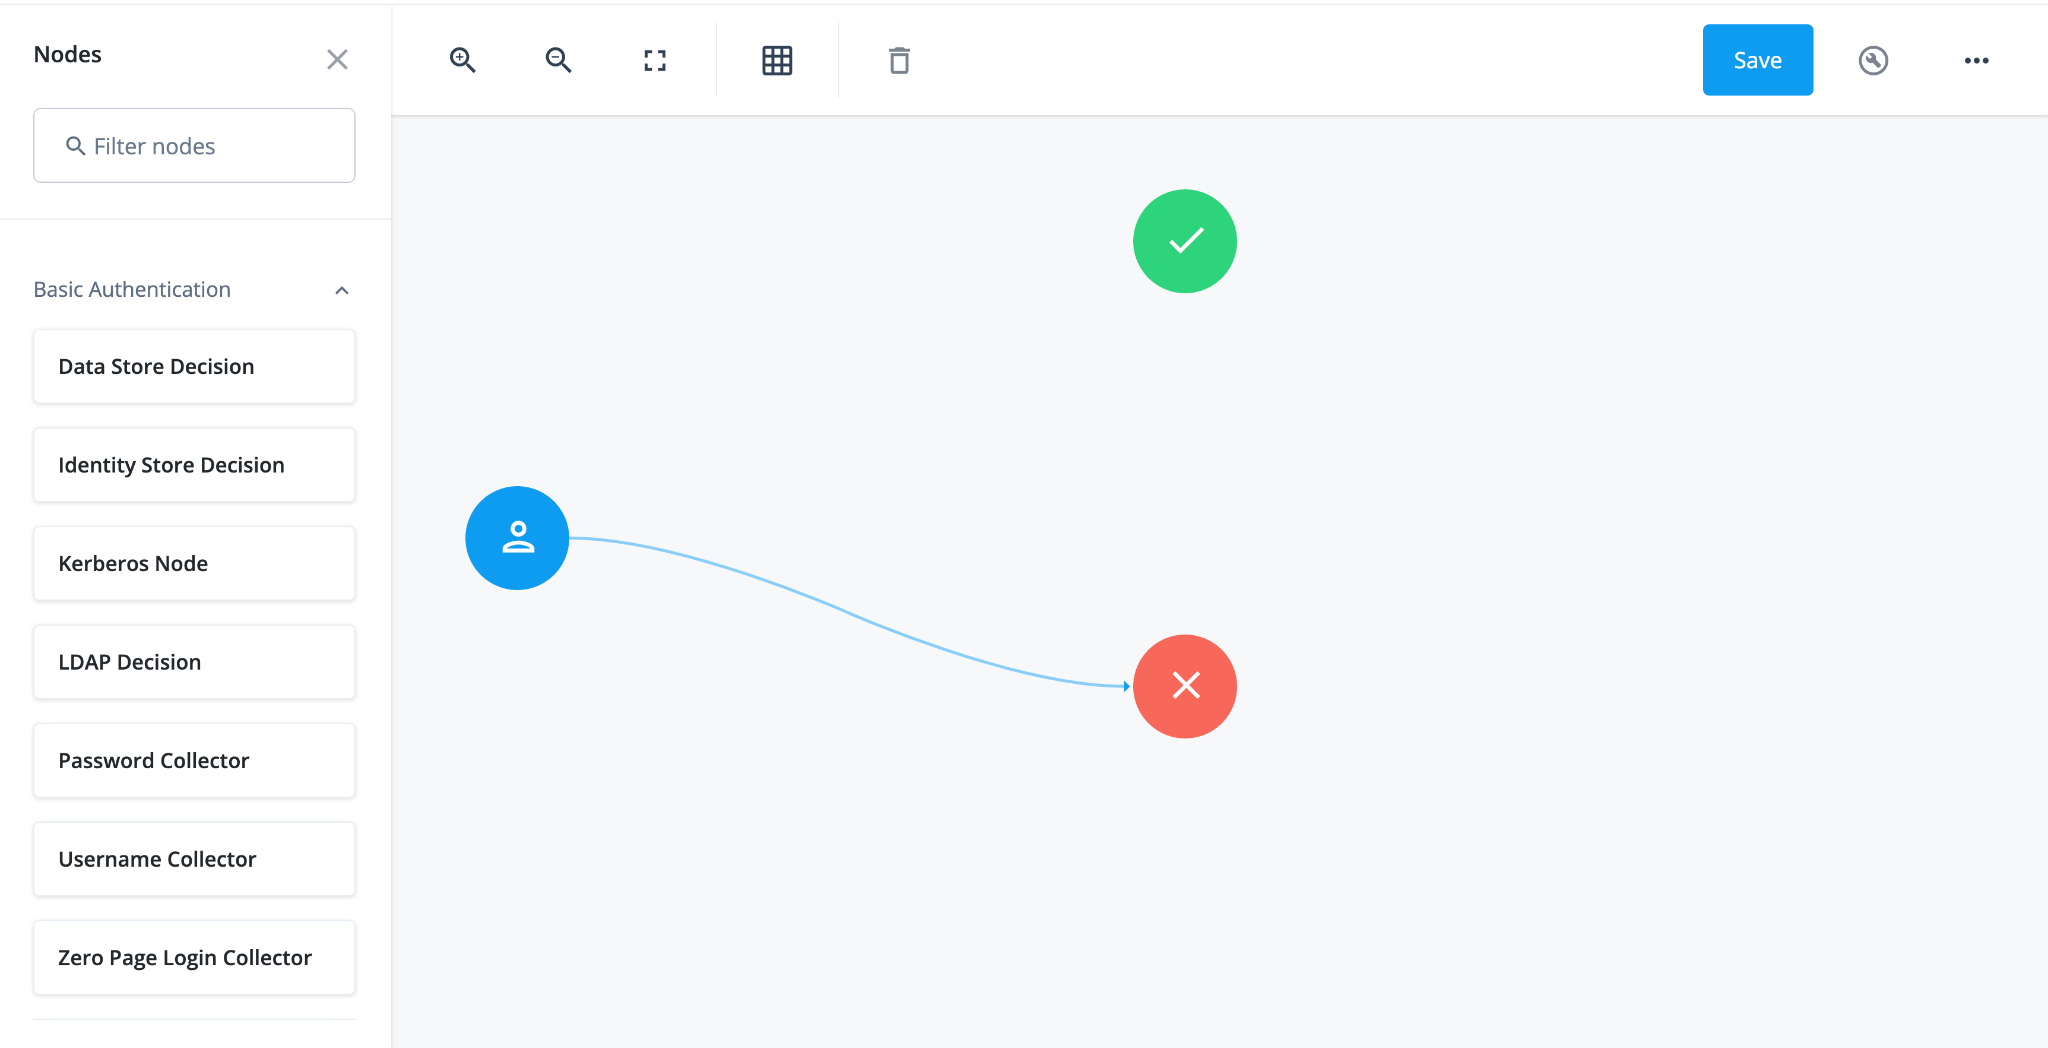
Collect username, password, and validate login on one page
-
In the top left search bar, enter
Page Node.A Page node combines multiple nodes that request input into a single page for display to the user. In this case, it allows the username and password boxes to display to the end user on the same page.
-
Drag the Page Node box from the left side of the journey editor to the right side (the canvas).
-
Connect the start (person) icon to the Page Node by selecting the icon and dragging it into the left side (input) of the Page Node. An arrow shows the flow of the journey from the person icon into the Page Node.
When you connect nodes together, the arrows show the flow of the journey from node to node.
-
Search for the
Platform Usernamenode and drag it into the Page Node.The Platform Username node prompts the end user to enter their username and stores it in a configurable state attribute.
-
Search for the
Platform Passwordnode and drag it into the Page Node.The Platform Password node prompts the end user to enter their password and stores it in a configurable state attribute.
-
Search for the
Data Store Decisionnode and drag it to the right of the Page Node.The Data Store Decision node verifies that the username and password values match those in the data store configured for the realm.
-
Connect the right side of the Page Node (the outcome) into the left side of the Data Store Decision node (input).
-
Connect the
Falseoutcome of the Data Store Decision node into the Failure node (red X circle). -
In the top right of the journey editor, click Save.
|
When connecting the outcome of a node to another node, make sure there is a hand icon present on the node you’re connecting to. Click to display an example
|
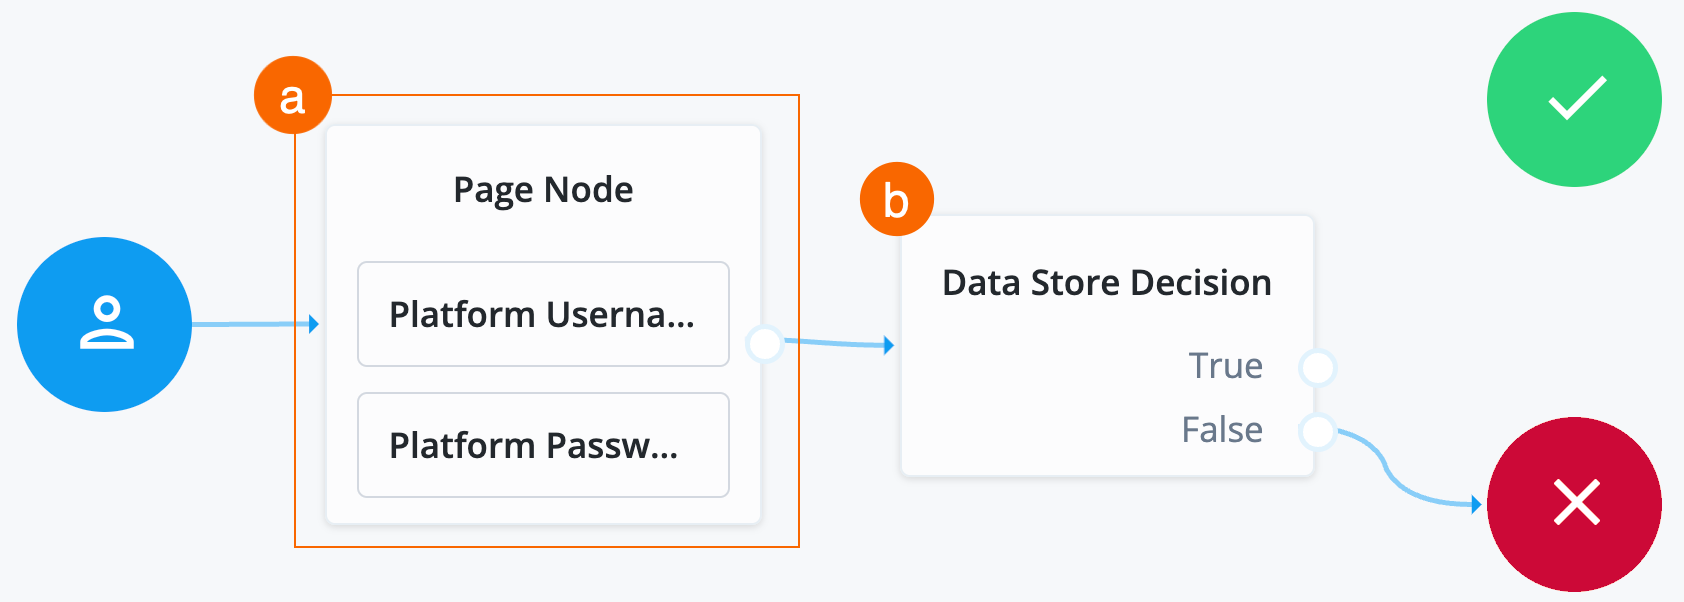
At this point, the journey is configured to:
-
a Collect the username and password from the same page
-
b Validate the username and password
The following video demonstrates the steps up to this point in the procedure:
Send and verify push notifications
The journey goes down this path when the end user has a device registered with their Advanced Identity Cloud profile.
-
Search for the
Push Sendernode and drag it to the right of the Data Store Decision node on the canvas. -
Connect the
Trueoutcome of the Data Store Decision node to the input of the Push Sender node. -
Click the Push Sender node and configure its options:
Field Value Description Message Timeout
Do not modify.
Specifies the number of milliseconds the push notification message remains valid.
User Message
Do not modify.
Specifies an optional message to send to the end user on their device.
Remove ‘skip’ option
Enable this property.
Enable this option in the node to make the push authentication mandatory.
When disabled, the user can skip the push authentication requested by the node and evaluation continues along the
Skippedoutcome path.Share Context Info
Enable this property.
Enable this option to include context data, such as remoteIp, userAgent, and location, in the notification payload.
Custom Payload Attributes
Do not modify.
Include shared state objects in the message payload sent to the client. The size of the payload must not exceed 3 Kb or a NodeProcessException is thrown.
Push Type
Select Display Challenge Code.
The type of push authentication the user must perform on their device to continue the journey. Select one of the following types:
-
Tap to accept— Requires the user to tap to accept. -
Display Challenge Code— Requires the user to select one of three numbers displayed on their device. This selected number must match the code displayed in the browser for the request to be verified. -
Use Biometrics to Accept— Requires the user’s biometric authentication to process the notification.
Research shows users might accept a push authentication without fully checking if it’s legitimate. To reduce the chances of a user accepting a malicious push authentication attempt, select Display Challenge CodeorUse Biometrics to Accept.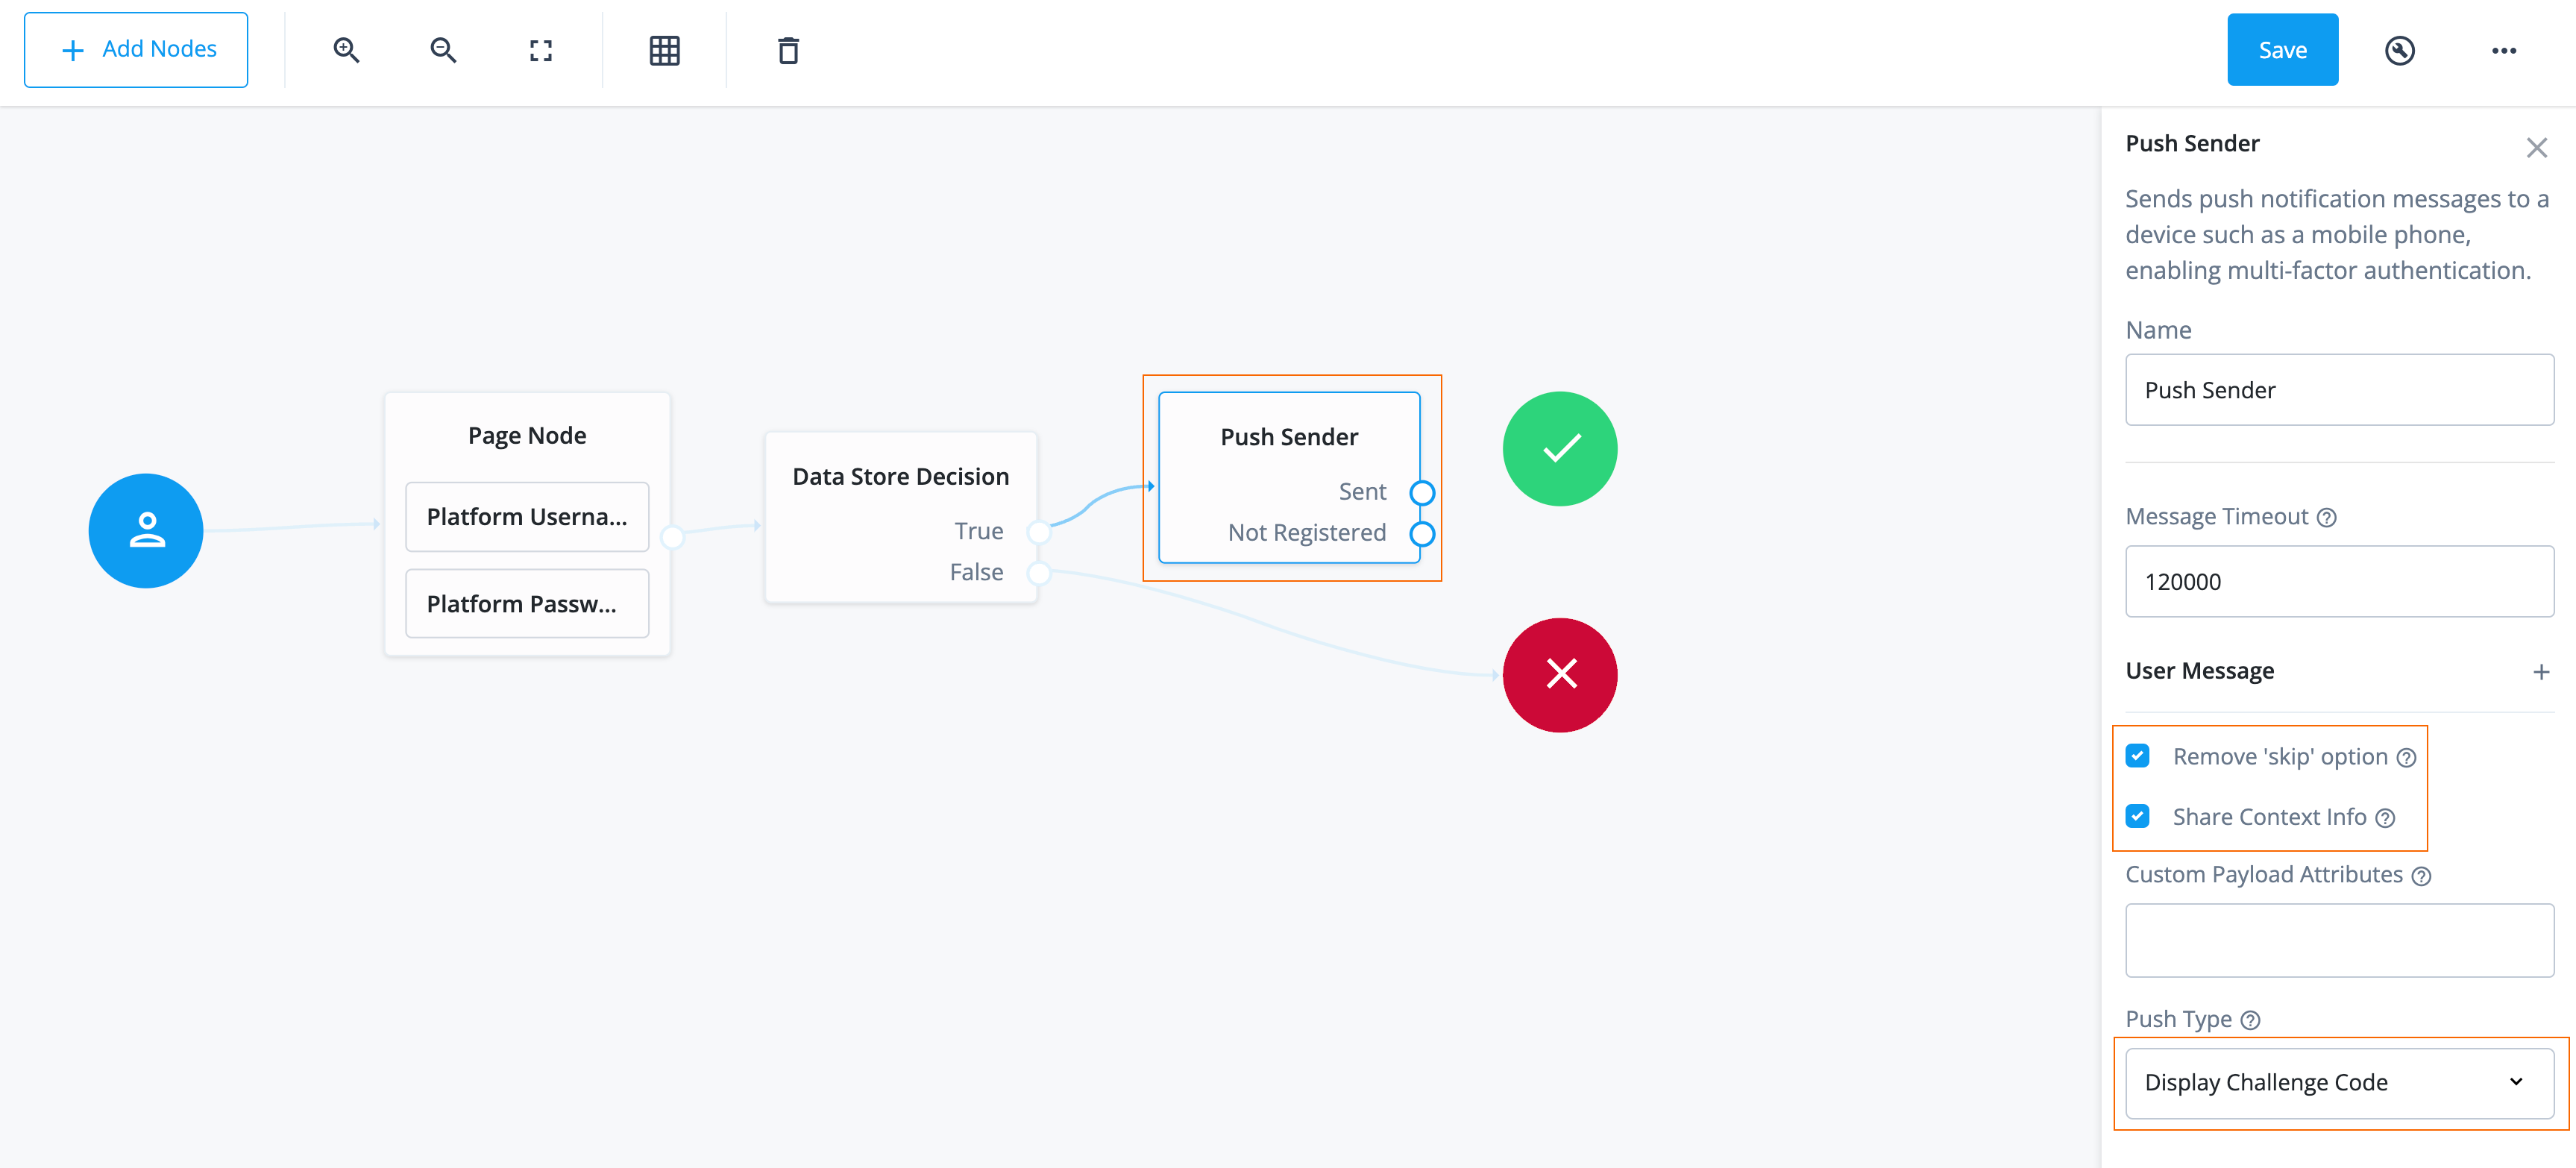
-
-
Search for the Push Wait Node and drag it to the right of the Push Sender node in the canvas.
To let the end user respond to the push notification, the Push Wait node pauses authentication for the specified number of seconds while processing a push authentication request.
-
Connect the Sent outcome of the Push Sender node to the input of the Push Wait Node.
-
Search for the Push Result Verifier Node and drag it to the right of the Push Wait Node.
The Push Result Verifier node works with the Push Sender node to validate the user’s response to a previously sent push notification message.
-
Connect the Done outcome of the Push Wait Node to the input of the Push Result Verifier Node.
-
Connect the outcomes of the Push Result Verifier Node to various nodes:
Outcome path Target node SuccessSuccess node (green check mark)
FailureFailure node (red X)
ExpiredPush sender node
WaitingPush Wait Node
-
Click Save.
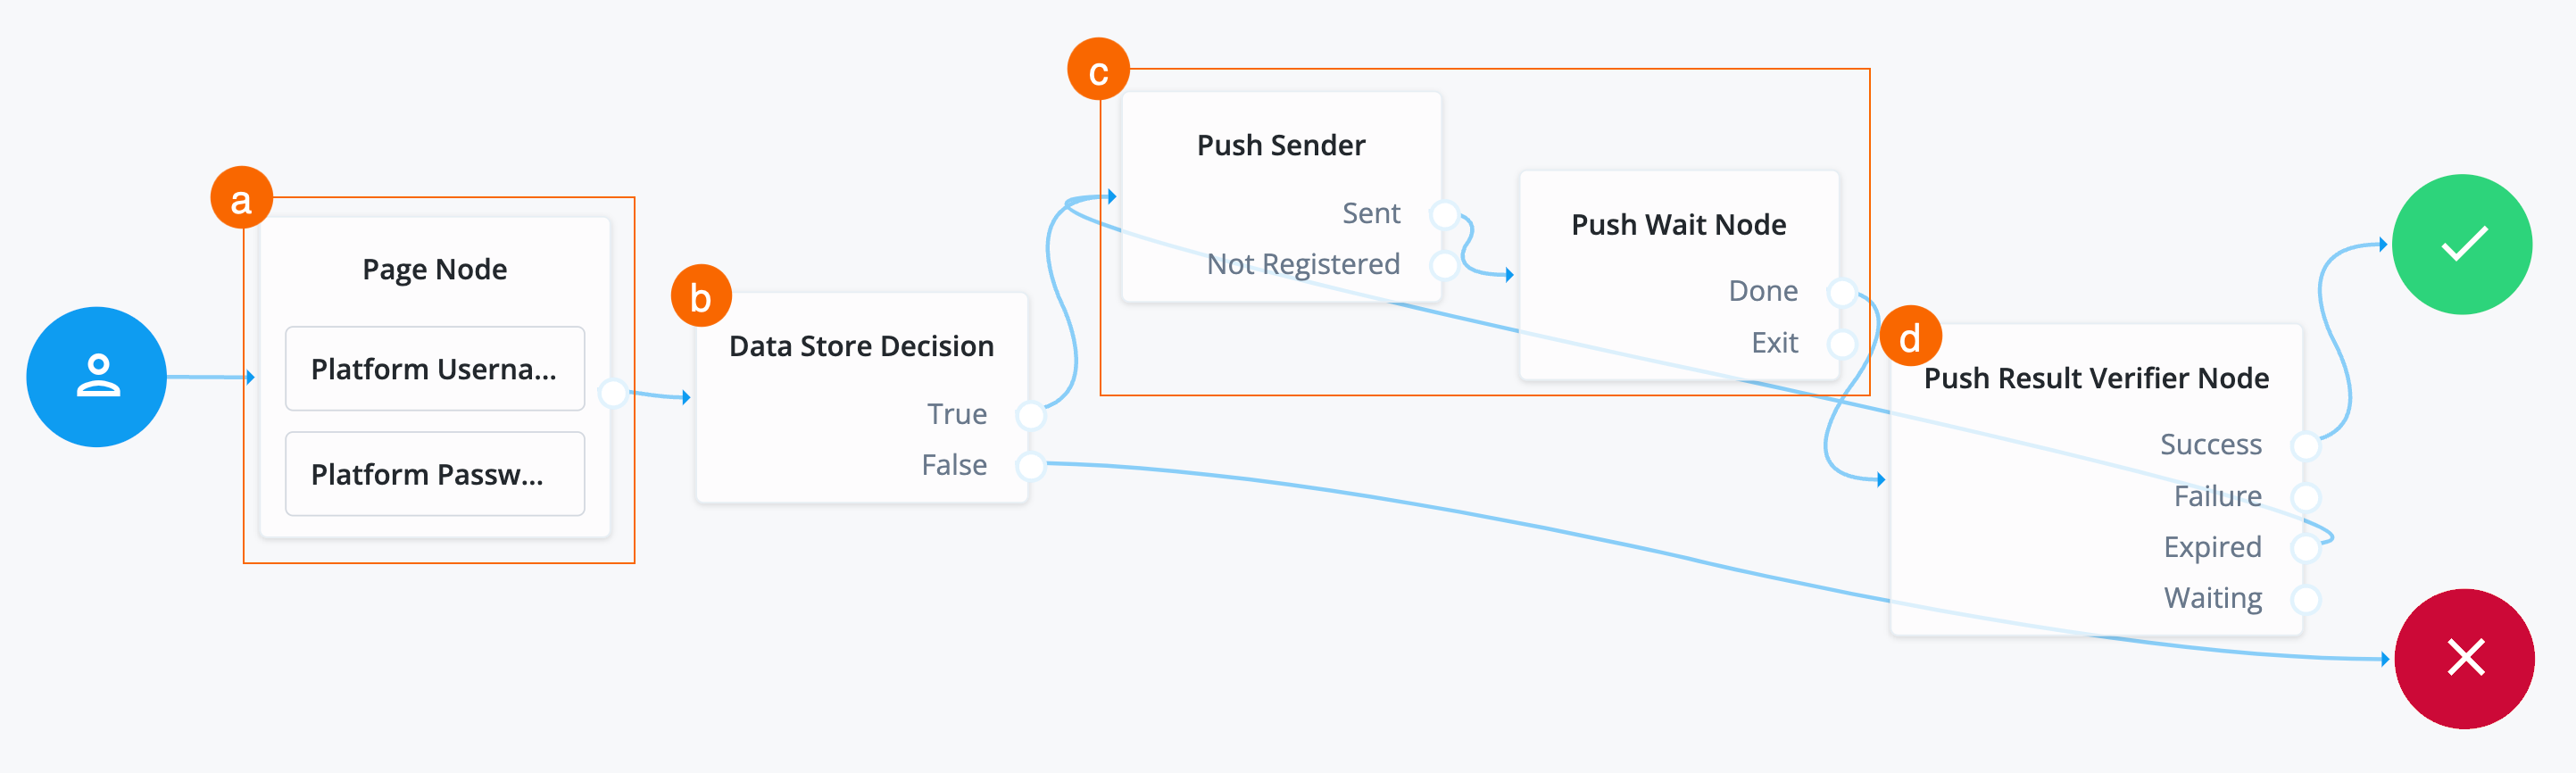
At this point, the journey is configured to:
-
a Collect the username and password and present it on the same page.
-
b Validate the username and password.
-
c Send a push notification to the end user’s device.
-
d Validate the push notification.
Register device (smartphone) with Advanced Identity Cloud profile
The journey goes down this path when the Push Sender node goes to the Not Registered outcome, signaling that the end user doesn’t have a device registered with their Advanced Identity Cloud profile.
-
Search for the
Get Authenticator Appnode and drag it under the Push Sender node.The Get Authenticator App node displays information to obtain the ForgeRock Authenticator application from the Apple App Store or the Google Play Store.
-
Connect the
Not Registeredoutcome of the Push Sender node to the input of the Get Authenticator App node. -
Search for the
Push Registrationnode and drag it to the right of the Get Authenticator App node. -
Connect the outcome of the Get Authenticator App node to the input of the Push Registration node.
-
Connect the
Failureoutcome of the Push Registration node to the Failure node. -
Connect the
Time Outoutcome of the Push Registration node to the Get Authenticator App node. -
Click Save.
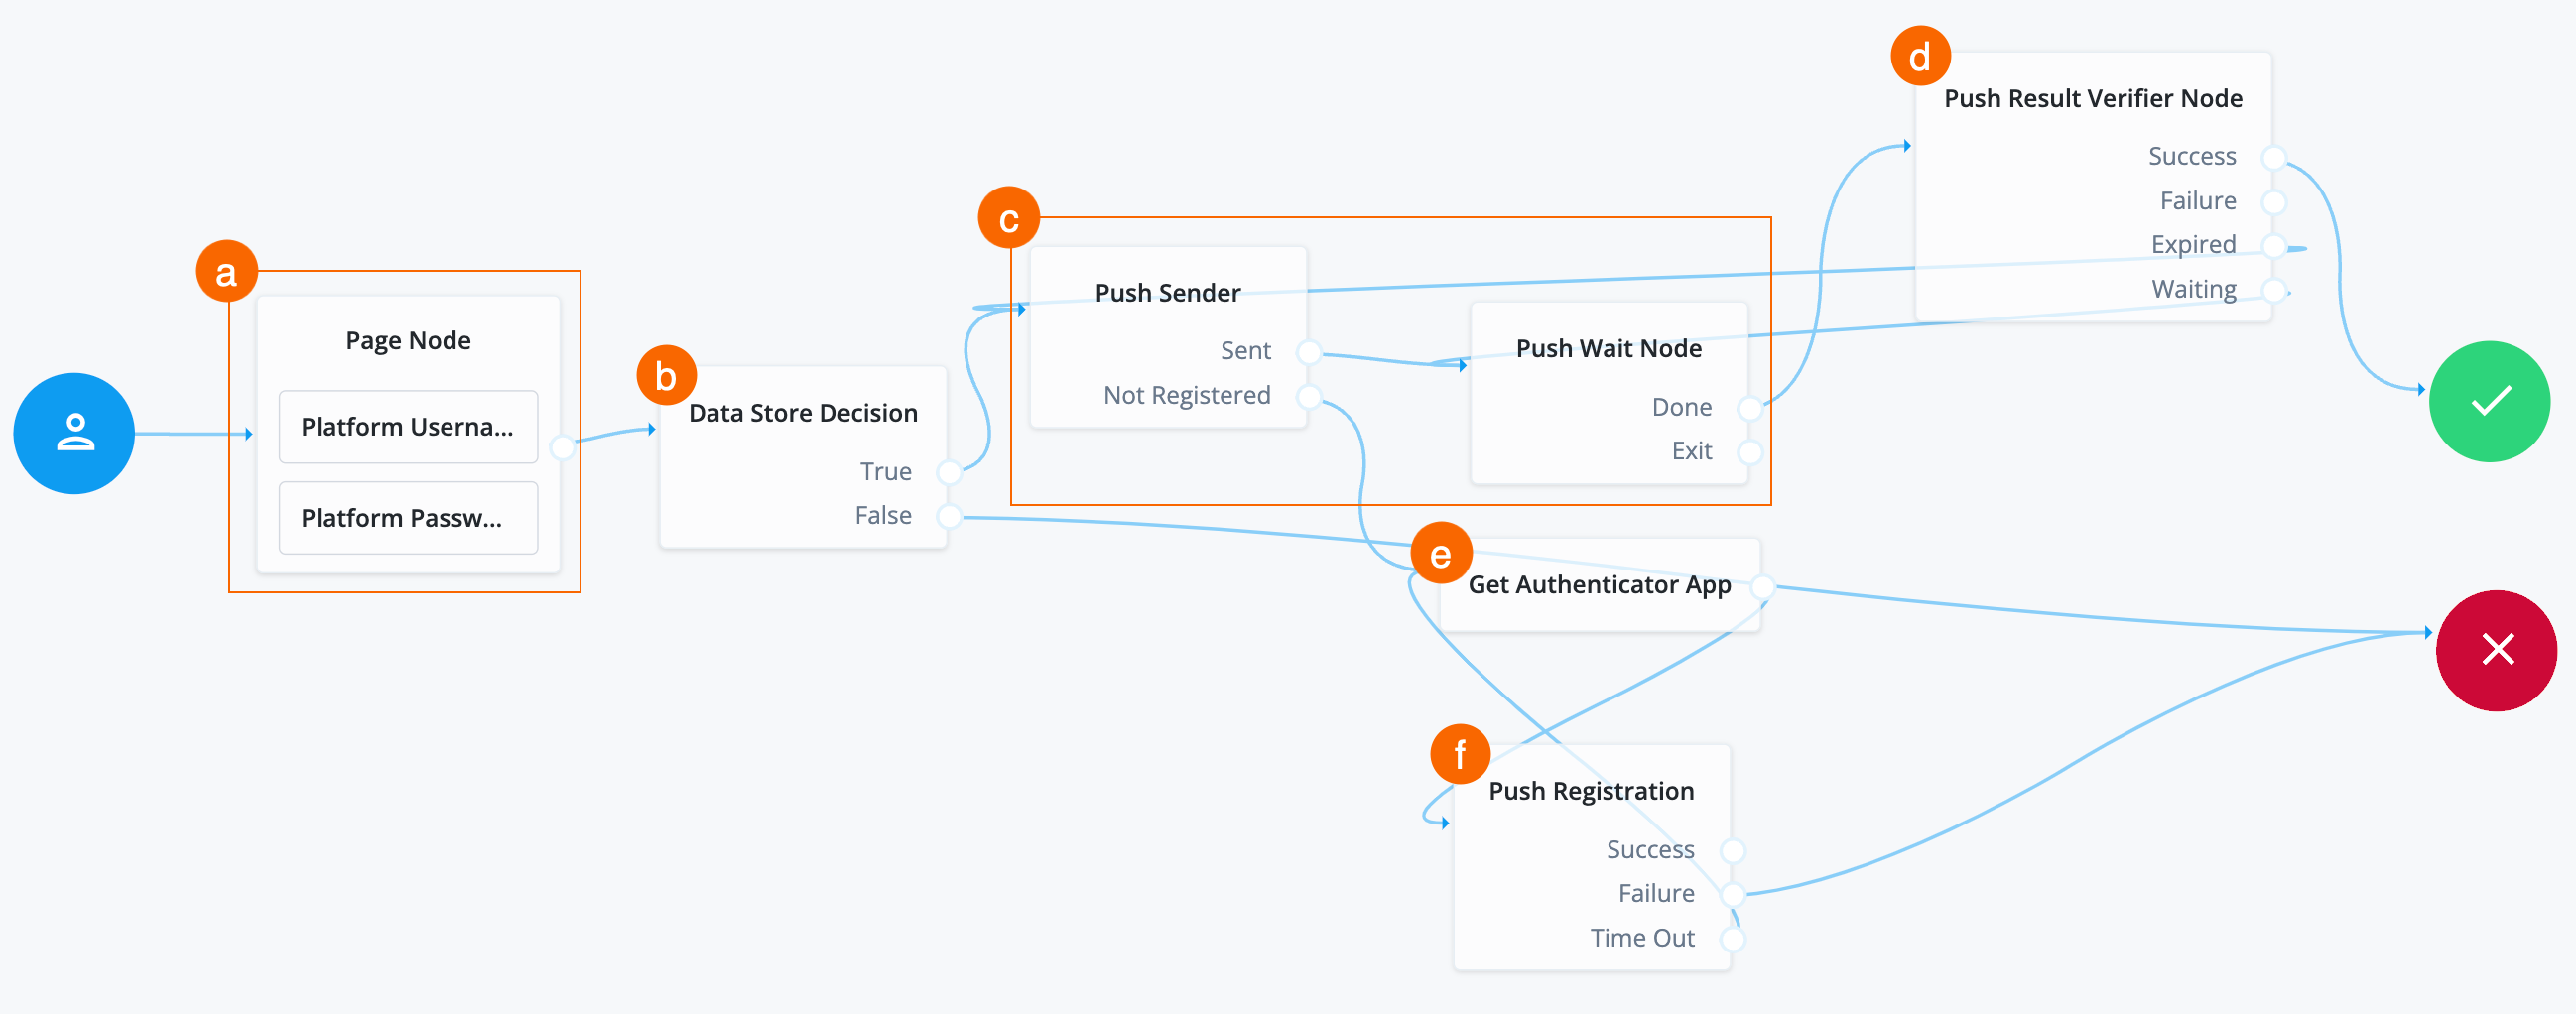
At this point, the journey is configured to:
-
a Collect the username and password and present it on the same page.
-
b Validate the username and password.
-
c Send a push notification to the end user’s device.
-
d Validate the push notification sent.
-
e Prompt the user to download the application and register their device if Advanced Identity Cloud doesn’t find a device in the user’s profile.
-
f Validate the push registration.
Add recovery codes and send push notification to the new device
-
Search for the
Recovery Code Display Nodeand drag it to the right of the Push Registration node.If the user’s device is lost, the Recovery Code Display node retrieves generated recovery codes from the transient state and presents them to the user for safekeeping. The codes can be used to authenticate if a registered device is lost or stolen.
-
Connect the
Successoutcome of the Push Registration node as input to the Recovery Code Display Node. -
Connect the outcome of the Recovery Code Display Node as input to the Push Sender node.
-
Search for the
Recovery Code Collector Decisionnode and drag it to the right of the Push Wait Node.In the event the end user doesn’t have access to or has lost their device, the Recovery Code Collector Decision node lets the end user authenticate with the recovery code provided in the Recovery Code Display node.
-
Connect the
Exitoutcome of the Push Wait Node as input to the Recovery Code Collector Decision node. -
Connect the
Trueoutcome of the Recovery Code Collector Decision node to the Success node. -
Search for the
Retry Limit Decisionnode and drag it to the right of the Recovery Code Collector Decision node.The Retry Limit Decision node permits the specified number of passes through to the Retry outcome path before continuing evaluation along the Reject outcome path. In this case, it lets the end user reenter their recovery codes up to three times before the journey goes to the Failure node.
-
Connect the
Falseoutcome of the Recovery Code Collector Decision node as input to the Retry Limit Decision node. -
Connect the
Retryoutcome of the Retry Limit Decision node as input to the Recovery Code Collector Decision node. -
Connect the
Rejectoutcome of the Retry Limit Decision node to the Failure node. -
Click Save. You have now configured the journey successfully.
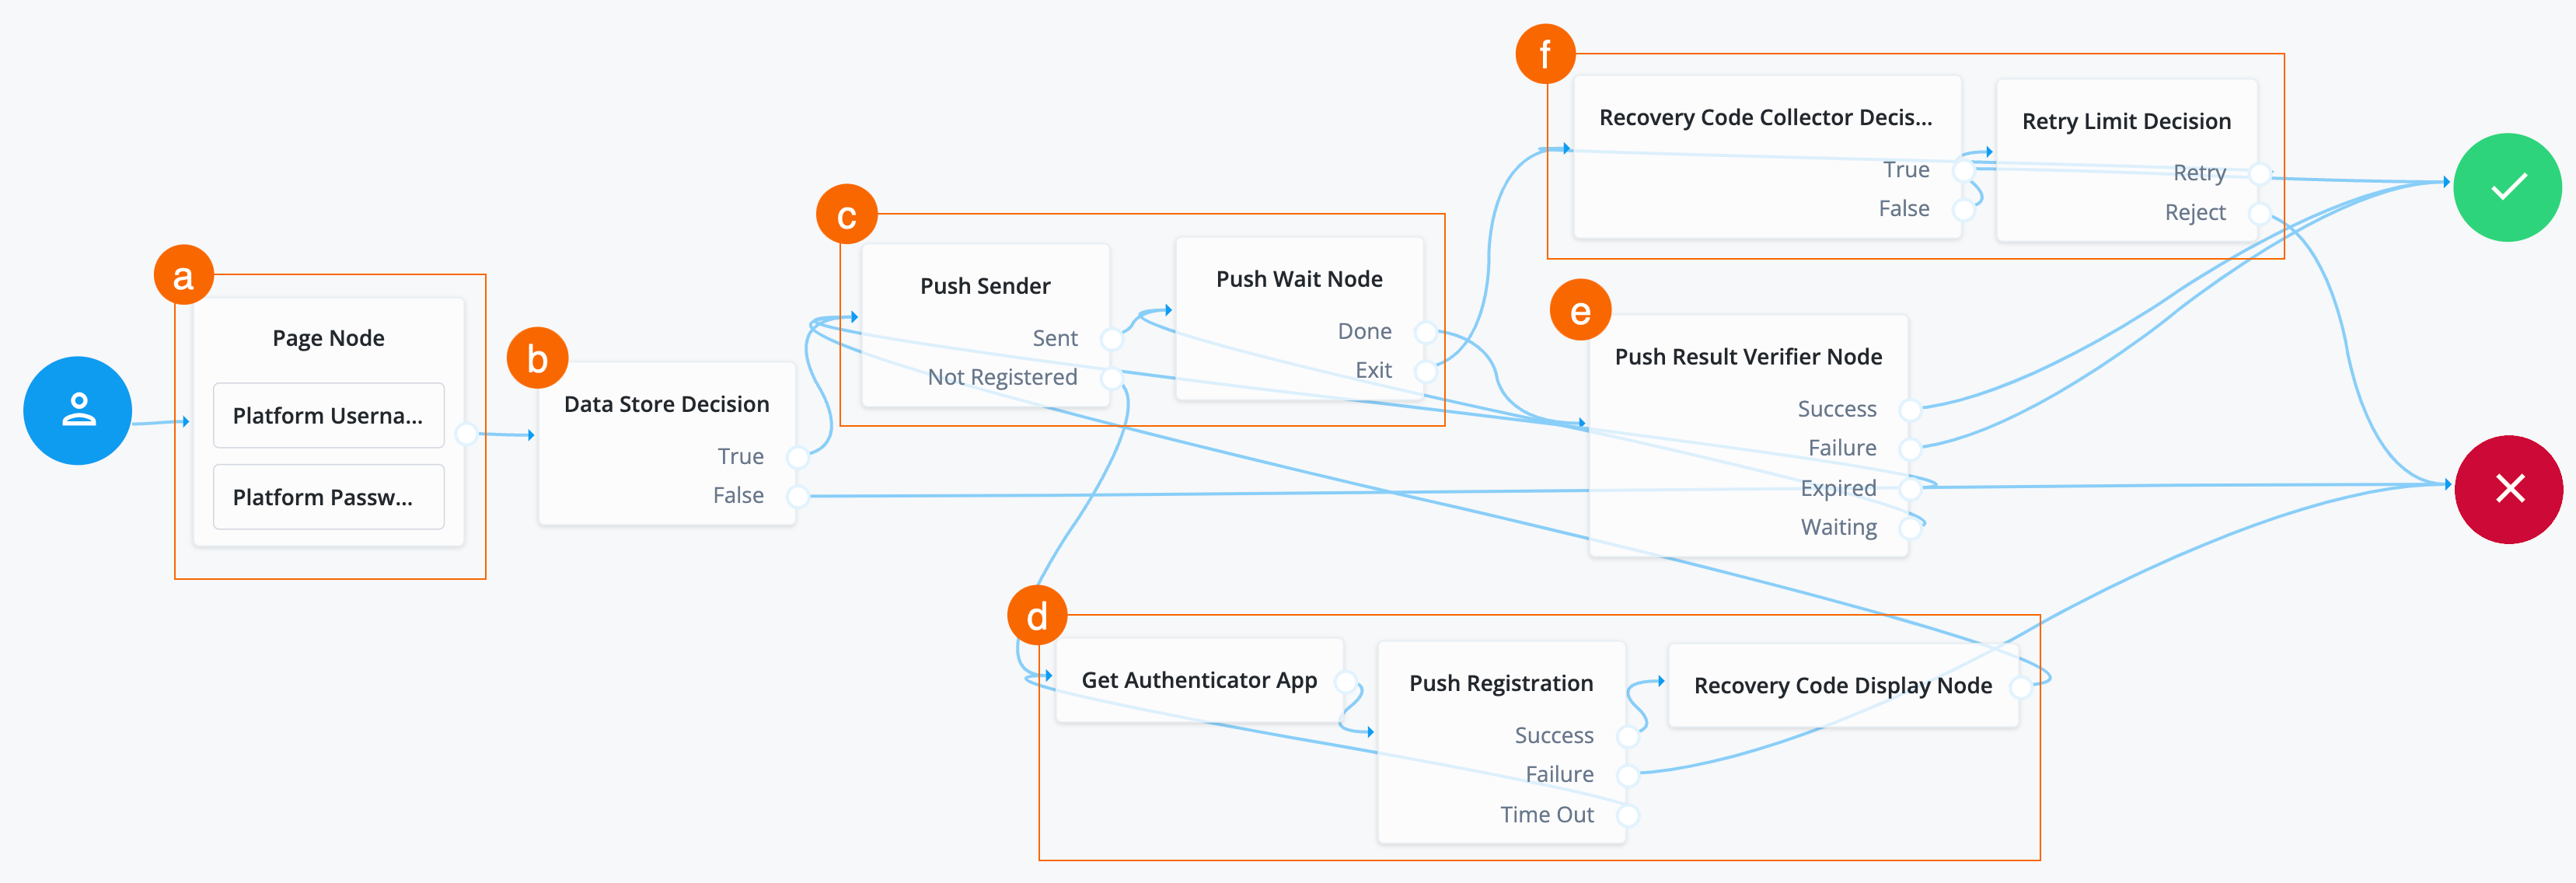
The completed journey has the following capabilities:
-
a Collect the username and password and present it on the same page.
-
b Validate the username and password.
-
c Send a push notification to the end user’s device.
-
d Prompt the end user to download the application and register their device if Advanced Identity Cloud doesn’t find a device on the user’s profile. After registering their device, present the end user with recovery codes in the event they don’t have access to or lose their device. Send the user a push notification.
-
e Validate the push notification.
-
f Prompt the end user to enter their recovery codes if a timeout occurs during push notification validation. Allow the end user up to three incorrect entries.
Task 5: Check journey path connections
The MFA using push notifications journey uses many nodes. Use the following
table to compare the outcomes of each node and to validate that you wired the
journey correctly.
Many nodes can have more than one outcome. "→" denotes that a node only has one outcome path.
| Source node | Outcome path | Target node |
|---|---|---|
Start (person icon) |
→ |
Page Node |
Page Node containing:
|
→ |
Data Store Decision |
Data Store Decision |
True |
Push Sender |
False |
Failure |
|
Push Sender |
Sent |
Push Wait Node |
Not Registered |
Get Authenticator App |
|
Push Wait Node |
Done |
Push Result Verifier Node |
Exit |
Recovery Code Collector Decision |
|
Push Result Verifier Node |
Success |
Success |
Failure |
Failure |
|
Expired |
Push Sender |
|
Waiting |
Push Wait Node |
|
Recovery Code Collector Decision |
True |
Success |
False |
Retry Limit Decision |
|
Retry Limit Decision |
Retry |
Recovery Code Collector Decision |
Reject |
Failure |
|
Get Authenticator App |
→ |
Push Registration |
Push Registration |
Success |
Recovery Code Display Node |
Failure |
Failure |
|
Timeout |
Get Authenticator App |
|
Recovery Code Display Node |
→ |
Push Sender |
Validation
Now that you have configured the ForgeRock Authenticator push service, the push notifications for Advanced Identity Cloud, and created your journey, you are ready to validate your journey.
Before validating, make sure you have created a test user and have access to an Android or iOS smartphone.
Steps
In the journey you created, there are various paths the end user may go down, depending on their actions and the information in their user profile. For example, if the end user has a device (smartphone) registered with their profile, the journey does not display the page to download the ForgeRock Authenticator application or to register a device. On the other hand, if the end user does not approve the push notification in the specified time (defined in the Push Wait node in the journey), the journey prompts the user to enter a recovery code.
To demonstrate the device registration process and push notification approval, this validation explores the path of an end user who does not have the ForgeRock Authenticator application on their smartphone and does not have a smartphone registered with their user profile in Advanced Identity Cloud.
-
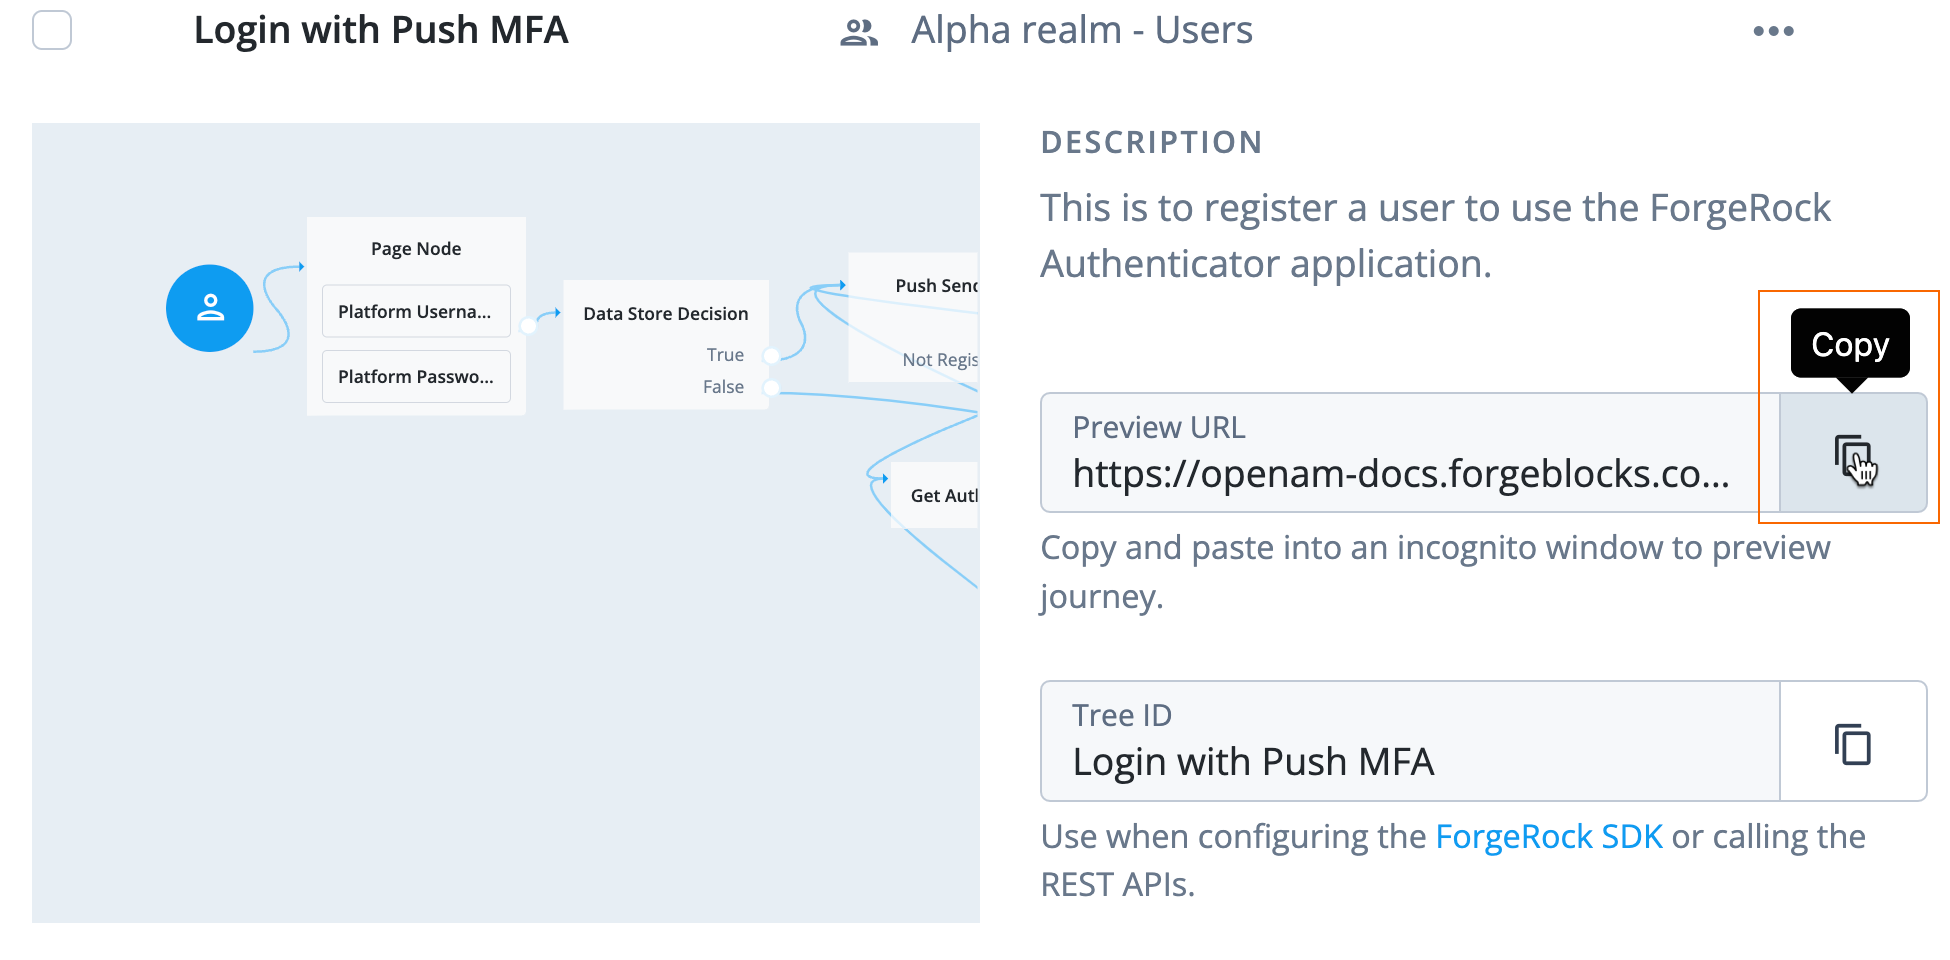
Get a URL you can use to test the journey:
-
Log in to the Advanced Identity Cloud admin UI as an administrator.
-
Select Journeys.
-
Select the journey you created, Login with Push MFA. A preview screen of the journey displays.
-
Click the copy icon next to Preview URL, a URL you can use to test a journey as an end user:
-
-
Log in to Advanced Identity Cloud:
-
Paste the URL into an incognito window.
Use incognito mode for testing to avoid caching issues, and so that any current sessions you have don’t interfere with your test.
The login end-user UI displays.
-
Enter the test user’s username and password.
-
Click Next.
A screen displays prompting you to download the ForgeRock Authenticator application.
-
-
Download the ForgeRock Authenticator application:
-
Click the Apple App Store or Google Play Store link, depending on which smartphone you have.
-
Download the ForgeRock Authenticator application.
-
After you have downloaded the ForgeRock Authenticator application, click Continue. A screen displays prompting you to scan a QR code.
-
-
Register your user profile with your smartphone and copy recovery codes:
-
Open the ForgeRock Authenticator application on your smartphone.
-
Tap the blue + icon in the bottom right corner.
-
Tap Scan QR Code.
-
Scan the QR code that displays in your browser window with your smartphone’s. camera.
A profile displays in the ForgeRock Authenticator application. Verify the test user’s username displays in the account created in the ForgeRock Authenticator application and that recovery codes display in the browser window.
-
Copy the recovery codes.
An end user can use recovery codes when they lose their device and need to log in.
-
Click Done. A push notification is sent to your smartphone.
-
-
Approve push notification and finish logging in:
-
Tap Accept on your smartphone.
-
Verify the acceptance by using your fingerprint or facial recognition.
You should now be logged into the Advanced Identity Cloud end-user UI.
-
-
Log out of Advanced Identity Cloud end-user UI:
-
Click the test user’s name in the top right corner of the Advanced Identity Cloud end-user UI.
-
Select Sign Out.
You are redirected to a sign-in page. This page differs from the journey you created, Login with MFA Push. The page you are directed to when you sign out is the default journey in the realm. Learn how to set the default journey in "Default end-user journey" in Journeys.
-
Explore further
Reference material
| Reference | Description |
|---|---|
Realms are administrative units that group configurations and identities together. Realms let you manage different sets of identities and applications within the same Advanced Identity Cloud tenant. Each realm is fully self-contained and operates independently of other realms within a tenant. |
|
Get to know the admin interfaces; Advanced Identity Cloud admin UI, AM admin UI, and IDM admin UI. |
|
Conceptual information on journeys and their purpose in Advanced Identity Cloud. |
|
A guided video of journeys in Advanced Identity Cloud and how to use them. |
|
Learn about the configurable nodes Advanced Identity Cloud offers for use in journeys. |
|
Integrate third-party services into your applications or journeys with marketplace nodes. |
|
Manage, group, and assign privileges to identities. |
|
Customize the look and feel of login and end-user UI pages. This is used when you are using the ForgeRock hosted pages as your UI option. |
|
A more in-depth reference on the configuration properties and the steps to create a journey with push notifications. |