Provision data from Active Directory (AD) using RCS
| While this PingOne Advanced Identity Cloud use case was validated for accuracy, it can always be improved. To provide feedback, click or in the top right of this page (you must be logged into Backstage). |
Description
Estimated time to complete: 1 hour
In this use case, you provision accounts from an on-premise AD server into Advanced Identity Cloud.
Goals
After completing this use case, you will know how to do the following:
-
Let Advanced Identity Cloud communicate with an on-premise external data store, Active Directory (AD), by installing a remote connector server (RCS), also referred to as a remote server, and using an AD LDAP connector.
-
Map attributes from AD to Advanced Identity Cloud.
-
Determine the actions Advanced Identity Cloud takes with synchronization situations.
-
Provision users from an on-prem external data source into Advanced Identity Cloud.
Prerequisites
Before you start work on this use case, ensure you have these prerequisites:
-
A basic understanding of:
-
The
managed/alpha_userobject schema -
Application templates
-
Advanced Identity Cloud remote connector servers (RCS)
-
PingOne Open Connector Framework (ICF)
-
Mappings
-
Reconciliation
-
Synchronization
-
Synchronization situations and actions
-
-
Access to your development environment as an administrator.
-
Access to an on-premise AD server (it can be a test server) that contains user test data with the following minimum properties on the user(s):
-
userPrincipalName(UPN) — Unique identifier for the user in AD. Typically, it’s in an email format. -
mail— Email address -
givenName— First name -
sn— Last name
-
-
A test user in Advanced Identity Cloud that serves as the application owner for the Active Directory application.
-
A server to install the remote server on. The server must be able to connect to the on-premise AD server.
-
A Backstage account.
Tasks
|
The following tasks assume you have access to an AD server. Substitute your own environment and AD details as necessary. |
Task 1: Download remote server
Advanced Identity Cloud uses a remote server to connect to on-premise external data stores. The remote server contains bundled connectors.
Register a remote server
-
Log in to the Advanced Identity Cloud admin UI as an administrator.
-
In the left menu pane, go to Identities > Connect and click + New Connector Server.
-
In the New Connector Server dialog box, provide the following:
Name — This name displays in the Connector Servers list.
Use only lowercase letters and numerals. Underscores and hyphens are the only special characters allowed. In this case, enterad-imp-guide. -
Click Save. This creates an OAuth2 client.
|
When the remote server is successfully registered, links display the next steps. Be sure to open each link in a different window or tab, so you always have access to the Next Steps dialog box. These steps are listed in the following sections. 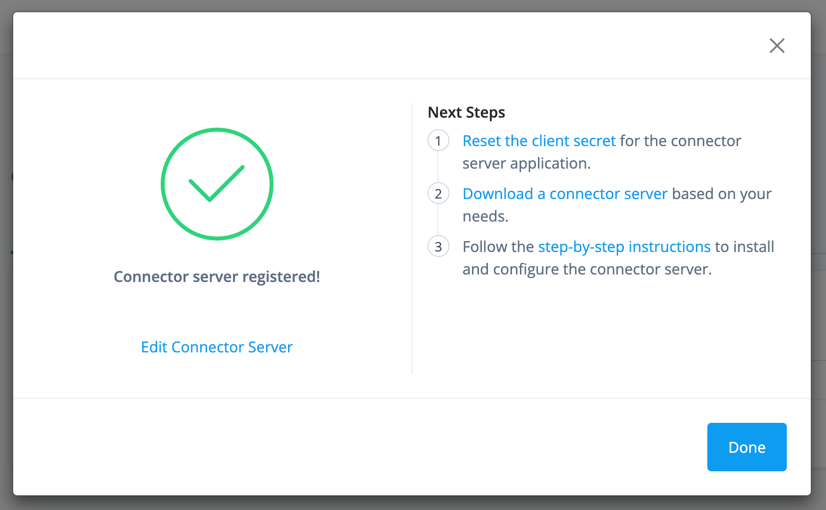
|
Reset the client secret and download remote server
-
Under the Client Credentials box, next to the Client Secret field, click Reset.
-
In the Reset Client Secret dialog box, enter any string to serve as a password.
-
Read the warning, and then click Save.
-
Go to Identities > Connect, and click ad-imp-guide.
-
Under the Quick Start box, click the Download a connector server link. You’re redirected to the IDM Cloud Connectors download page.
-
Log in to Backstage.
-
Download the remote server to the host that runs the connector server.
We recommend you use the Java version of RCS. Only download the .NET version if you need to use a PowerShell connector. For more information about the differences between the RCS types, learn more in Install a Remote Connector Server (RCS).
You can run the connector server on the same host as the external data source or you can run it on a different host. For example, you could download the remote server to a different server that has connectivity to the external data source
-
Task 2: Configure the remote server
-
On the server you downloaded RCS, unpack the remote server you downloaded in task 1.
-
On the remote server, open
ConnectorServer.properties. This file includes the configurations to connect to your Advanced Identity Cloud tenant.The path to this file may differ depending on the version and type of remote server you download.
-
The remote server (OAuth2 client) uses the Client Credentials grant type. To add the OAuth2 client credentials, operational, and security settings, specify the following values in
ConnectorServer.properties:The default values in ConnectorServer.properties serve as starting configurations for your remote server. Adjust the properties to the needs of your organization. ConnectorServer.properties
Field Value Description connectorserver.urlUncomment and update to
connectorserver.url=wss://<tenant-env-fqdn>/openicf/0.This is the Advanced Identity Cloud OpenICF endpoint.
-
In sandbox or development environments, use only one URL. Example:
connectorserver.url=wss://<tenant-env-fqdn>/openicf/0 -
In staging and production environments, use three URLs in a space-delimited list. For example:
connectorserver.url=wss://<tenant-env-fqdn>/openicf/0 wss://<tenant-env-fqdn>/openicf/1 wss://<tenant-env-fqdn>/openicf/2
connectorserver.connectorServerNameThe name of the remote server in Advanced Identity Cloud to connect to. Uncomment and enter the name of the remote server (OAuth2 client) you created in task 1.
For example,
connectorserver.connectorServerName=ad-imp-guide.The name of the remote server (OAuth2 client) in Advanced Identity Cloud to connect to.
connectorserver.pingPongIntervalUncomment and don’t modify.
The WebSocket Ping/Pong interval, in seconds. The default is
60seconds.connectorserver.housekeepingIntervalUncomment and don’t modify.
The WebSocket connections housekeeping interval, in seconds. The default is
20seconds.connectorserver.groupCheckIntervalUncomment and don’t modify
The WebSocket groups check interval, in seconds. The default is
60seconds.connectorserver.webSocketConnectionsUncomment and don’t modify.
Specifies the number of sockets the connector server establishes and maintains to each Advanced Identity Cloud (IDM) backend instance. The default is
3.connectorserver.connectionTtlUncomment and don’t modify.
The WebSocket connection’s time to live (ttl), in seconds. The default is
300seconds.connectorserver.newConnectionsIntervalUncomment and don’t modify.
The time between new connections, in seconds. The default is
10seconds.connectorserver.tokenEndpointUncomment and update to
connectorserver.tokenEndpoint=https://<tenant-env-fqdn>/am/oauth2/realms/root/realms/alpha/access_token.The token endpoint to retrieve the access token.
connectorserver.clientIdUpdate to
connectorserver.clientId=RCSClient.When you create a remote server in Advanced Identity Cloud, Advanced Identity Cloud sets the
clientIdtoRCSClient.connectorserver.clientSecretUpdate to
connectorserver.clientSecret=client-secret.Enter the client secret you reset.
The client secret for the OAuth2 client.
connectorserver.scopeUncomment and update to
connectorserver.scope=fr:idm:*.The OAuth2 token scope. The scope
fr:idm:*gives access to/openidm/*(identity-related) API endpoints.connectorserver.loggerClassDon’t modify. Ensure the key/value pair is
connectorserver.loggerClass=org.forgerock.openicf.common.logging.slf4j.SLF4JLog.The logging class the remote server uses.
You don’t need to set the
connectorserver.usesslproperty; the remote server determines connection security from the value of theconnectorserver.urlproperty. -
-
Save the file.
-
Start the remote server from the openicf-zip-<version>\openicf directory by running one of the following commands:
-
Windows
-
Linux
bin\ConnectorServer.bat /runIf the server starts successfully, the following (or similar) displays:
RCS <version> started.bin/ConnectorServer.sh /runIf the server starts successfully, the following (or similar) displays:
RCS 1.5.20.15 started.This starts the remote server for the terminal session only. Consider creating a job to start or stop your remote server(s). -
-
To verify that the connection between Advanced Identity Cloud and the remote server is successful, in the Advanced Identity Cloud admin UI, navigate to Identites > Connect.
The Status column of the remote server, in this case,
ad-imp-guide, displays Connected.If the status is Waiting to connect…, make sure the server where the remote server resides is connected to Advanced Identity Cloud. Verify the properties you set inConnectorServer.propertiesare correct.To view the bundled connectors with RCS, select the connected remote serve in Advanced Identity Cloud and click the Connectors tab. Learn more about each connector in the Connector reference. 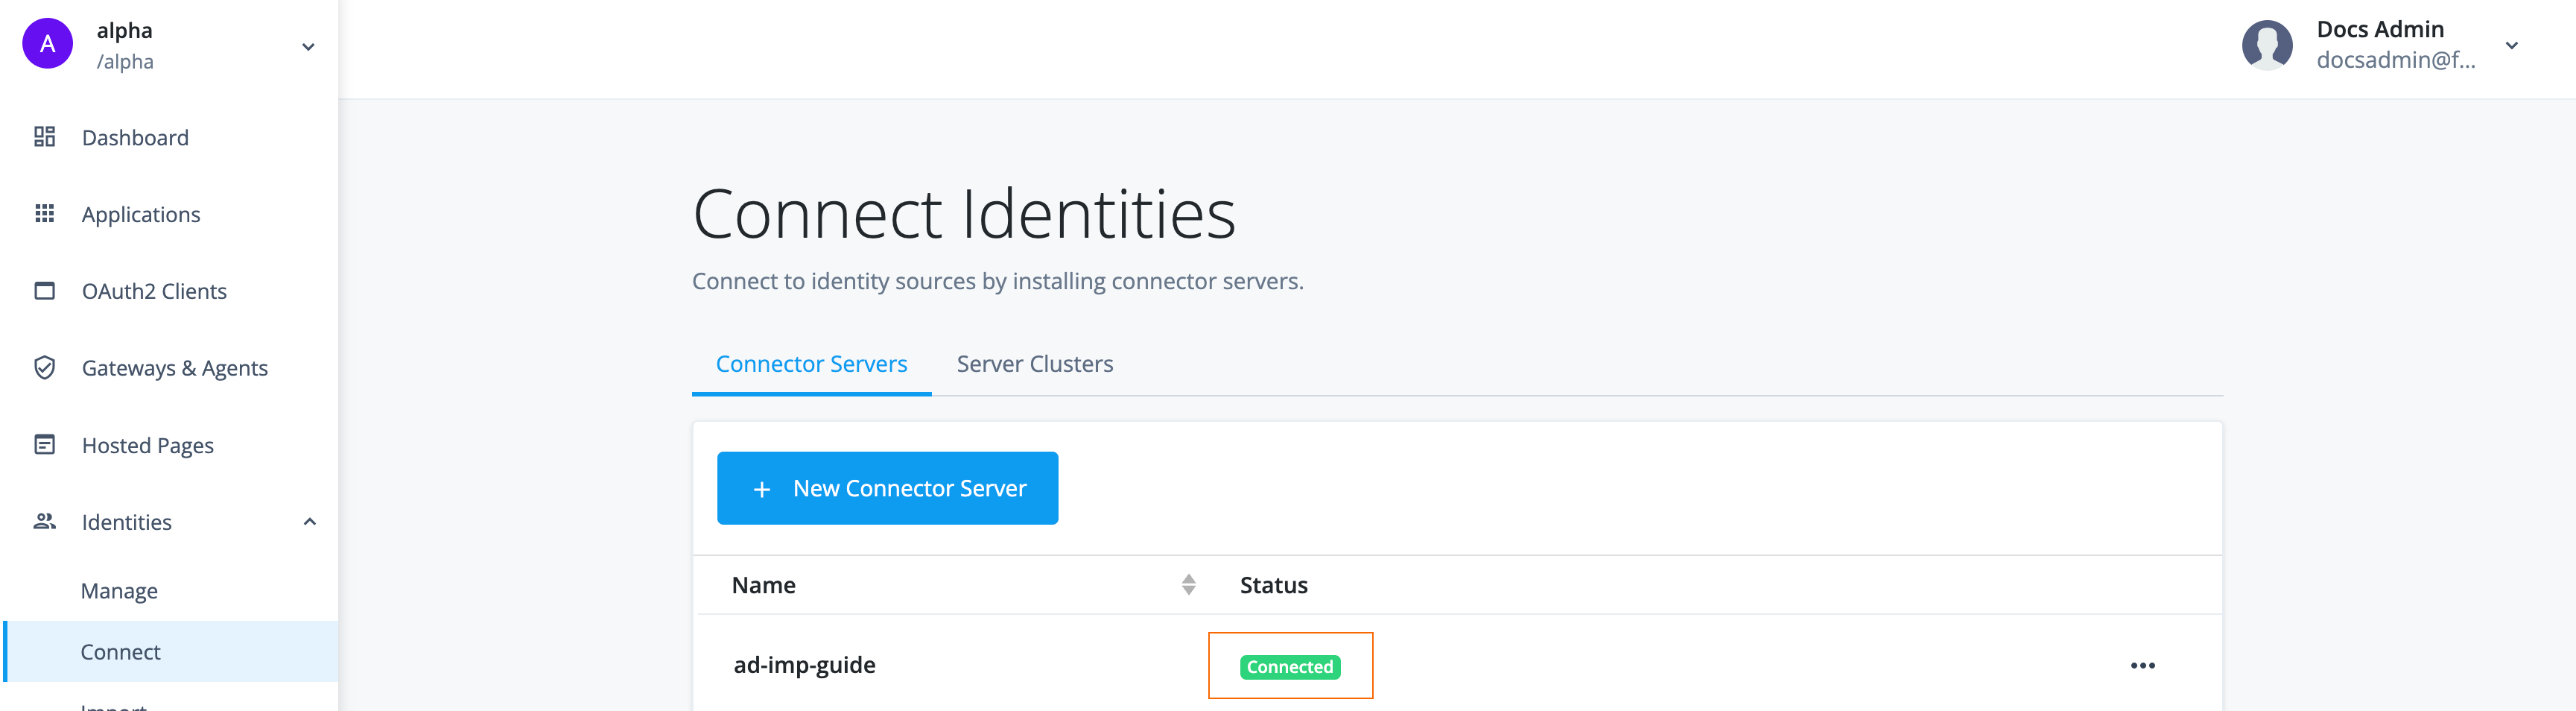
Task 3: Connect AD to Advanced Identity Cloud using AD LDAP connector app template
Now that Advanced Identity Cloud is connected to the intranet where AD resides via an installed remote server, Advanced Identity Cloud can now connect to AD.
-
From the Advanced Identity Cloud admin UI, go to Applications and click Browse App Catalog.
-
In the Filter apps search box, enter and select
Active Directory.Select the latest application version.
-
Click Next.
-
Click Next again.
-
Enter the following details:
Field Value Description Name
Enter
AD Implementation Guide.N/A
Description
Enter
Application used to connect to an on-premise AD server using a remote server.Optional. The purpose of the application.
Owners
Select the test user you created in Advanced Identity Cloud to be the test owner.
Every application has an owner. The owner is responsible for the application, including the details and the users and roles who have access to the application.
App Logo URI
Don’t modify.
The location of the application logo.
Authoritative
Enable.
If you want the application to be authoritative, enable this field. When enabled, synchronization can only happen from the application to Advanced Identity Cloud and Advanced Identity Cloud can’t push changes to the application. If you don’t enable this field, Advanced Identity Cloud can provision data to the application.
-
Click Create Application. Advanced Identity Cloud redirects you to the newly created application.
-
Enter the connection details for the application by going to the Provisioning tab and clicking Set up Provisioning.
-
Enter the following details:
Field Value Description Host Name or IP
Enter the host name or IP of the server where you installed the remote server. If entering the IP address leads to a connection failure, try the host name.
N/A
Port
Enter the port to connect to your AD server. For example,
389. In a production scenario, use a common secure port, such as1636.The AD server must be actively waiting for inbound requests on this port and firewall policies must be in place to allow Advanced Identity Cloud to connect to the AD server via this port.
Use SSL
Disable
Enabled by default. In a production scenario, enable.
Login Account DN
Enter the name of the administrator service account to connect to the AD server.
N/A
Password
Enter the password of the administrator service account to connect to the AD server.
N/A
Base DNs
Enter base DNs that include your users and groups.
For example,
DC=example,DC=com. -
Click Connect. Advanced Identity Cloud uses the remote server that has connectivity to AD to connect to AD. On the Provisioning tab, the status Connected displays.
Task 4: Map attributes from AD to Advanced Identity Cloud
Now that you have registered the application and connected Advanced Identity Cloud to the AD server, you are ready to map the attributes from AD to Advanced Identity Cloud.
Review inbound mapping attributes
Inbound attributes are the attributes going from the external data store (AD) to Advanced Identity Cloud for provisioning operations.
All application templates are configured to auto-map attributes.
|
When you create a mapping, you must specify the attributes required by the Advanced Identity Cloud managed object, which is the In a default Advanced Identity Cloud tenant, the required properties are Learn more in property definition fields. |
-
From the left menu pane, go to Applications and select an application. In this case, click AD Implementation Guide.
-
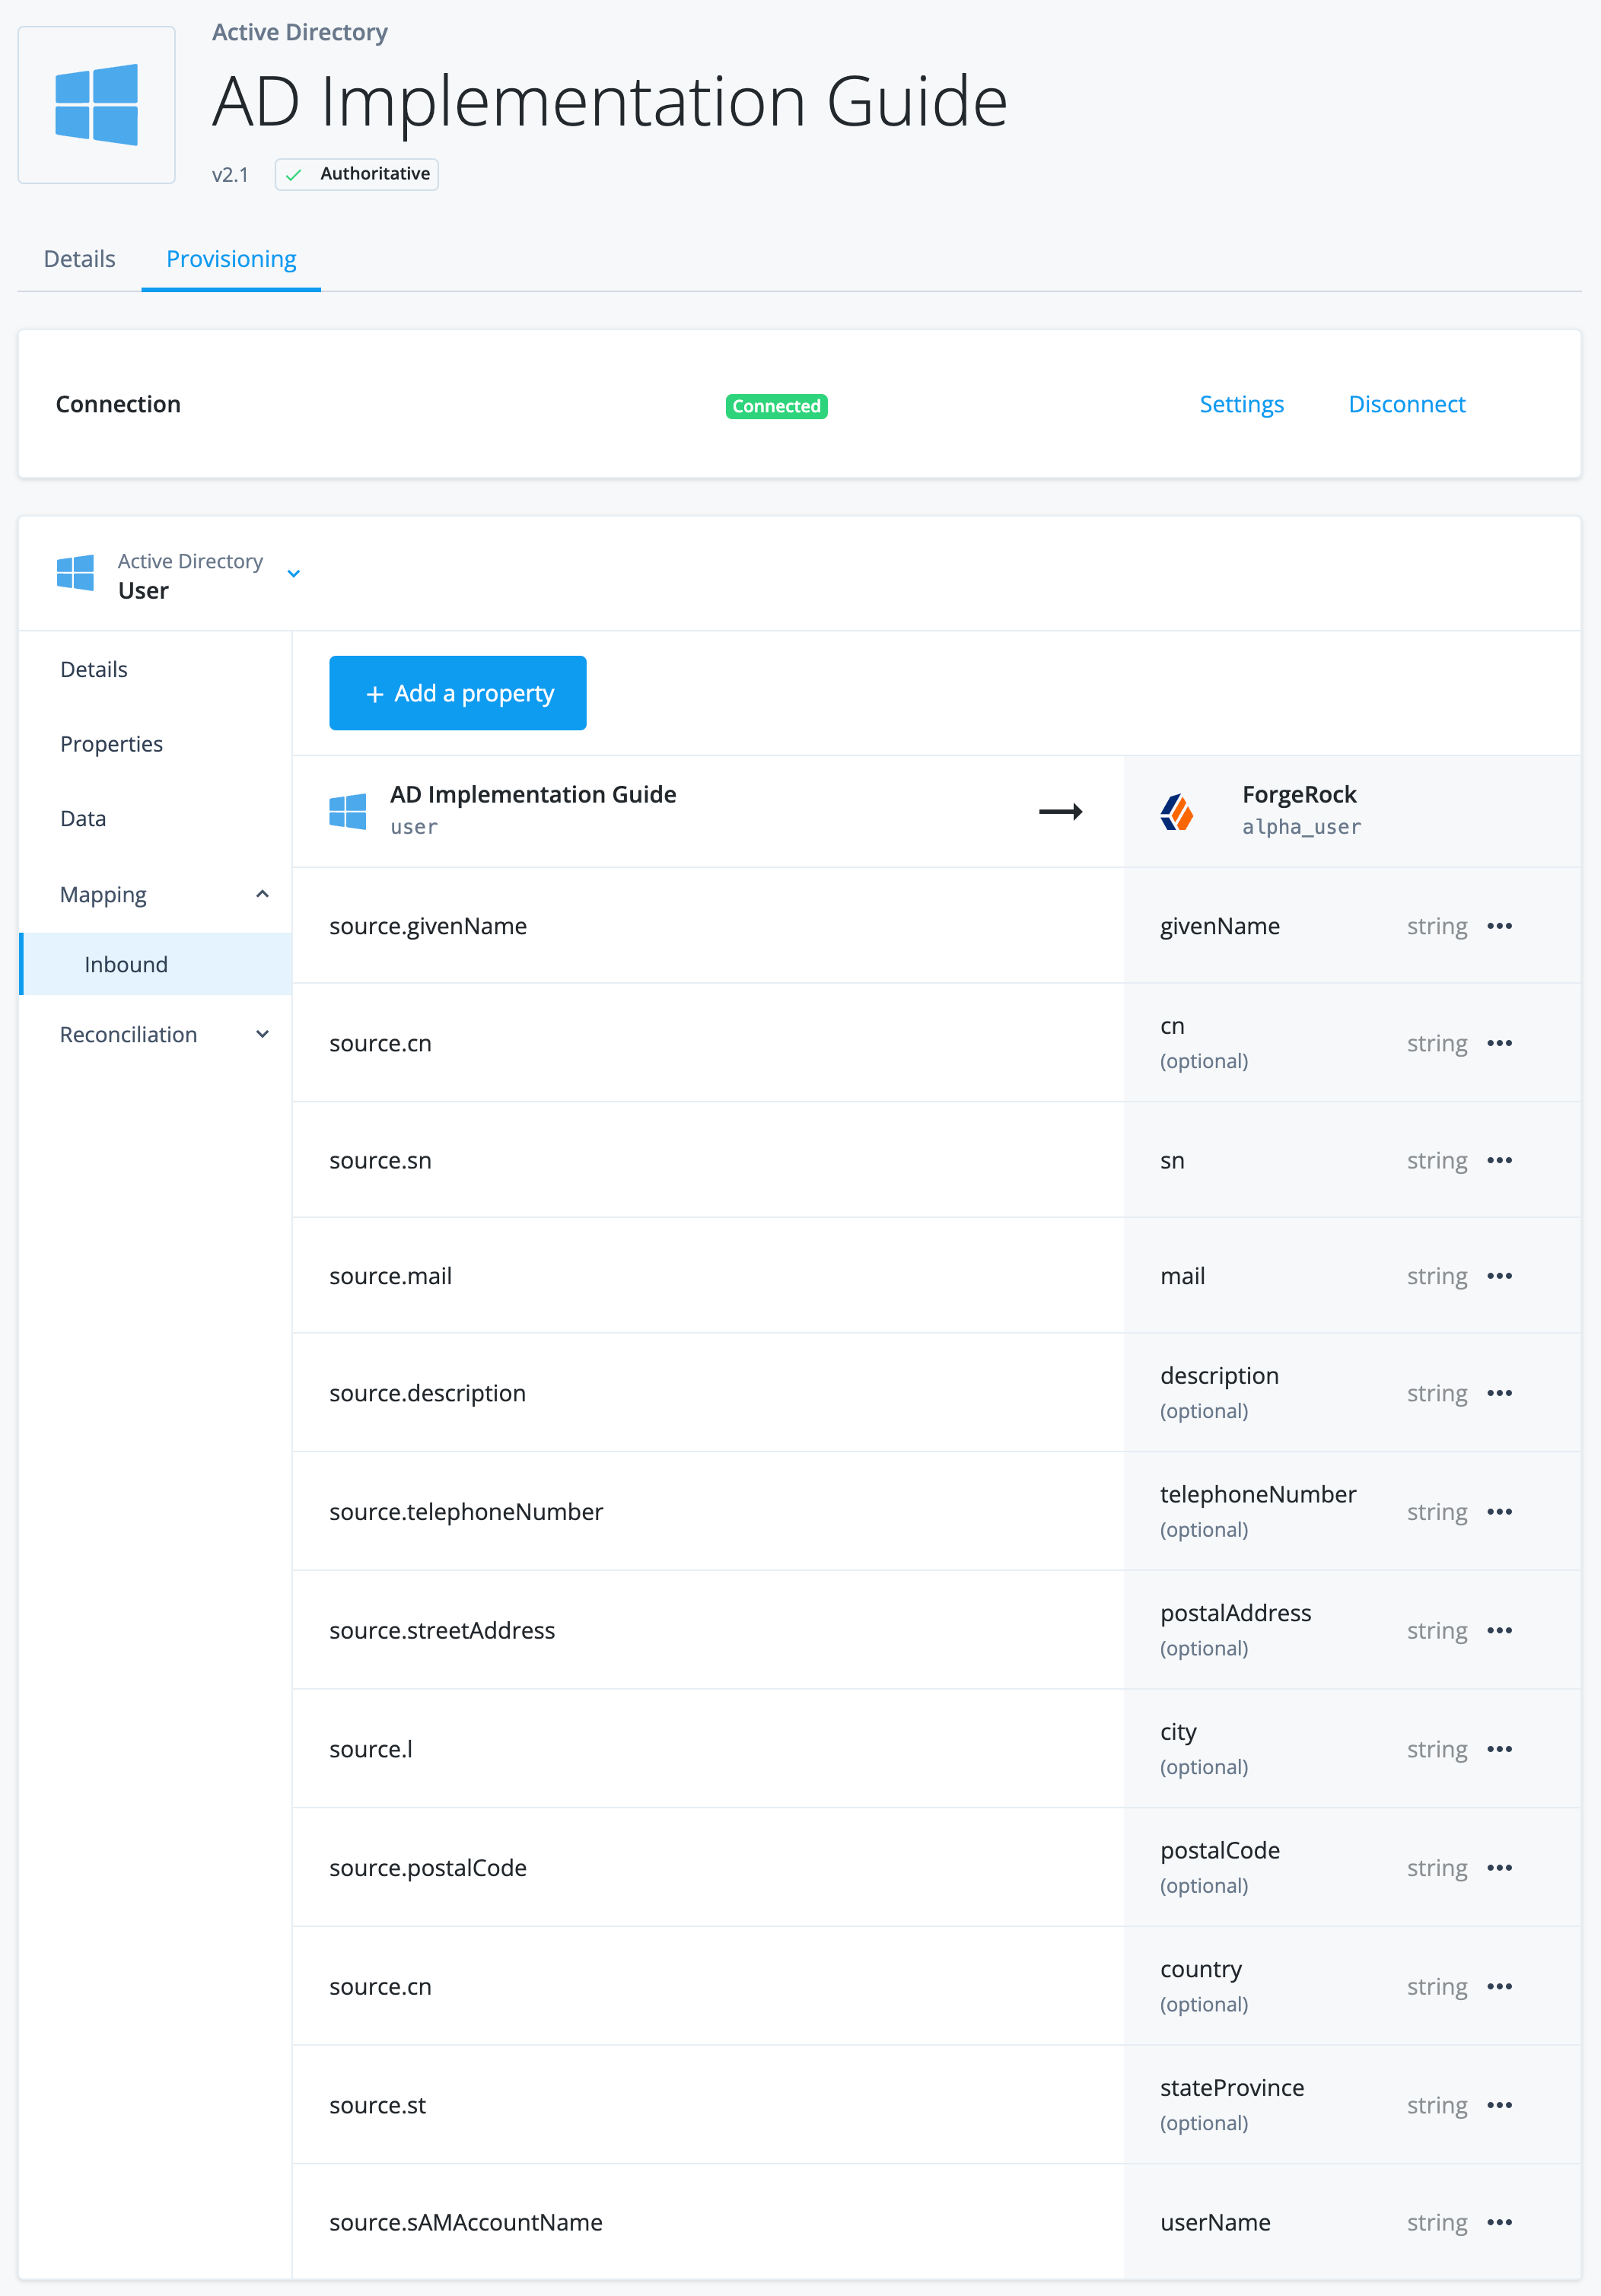
Click the Provisioning tab and make sure you select
User. -
Click Mapping > Inbound. Observe the default mapping. The following image displays a sample of the auto-mapped attributes:
Configure sync situations and actions
Advanced Identity Cloud evaluates each record during the reconciliation process. When reconciling, Advanced Identity Cloud determines the state of the record, referred to as the situation. Based off the situation, Advanced Identity Cloud takes an action that you configure.
You define what action Advanced Identity Cloud takes in each situation.
For example, if reconciliation detects a record exists in the source but not in the target (the situation), in this case Advanced Identity Cloud, create the record in Advanced Identity Cloud (the action).
-
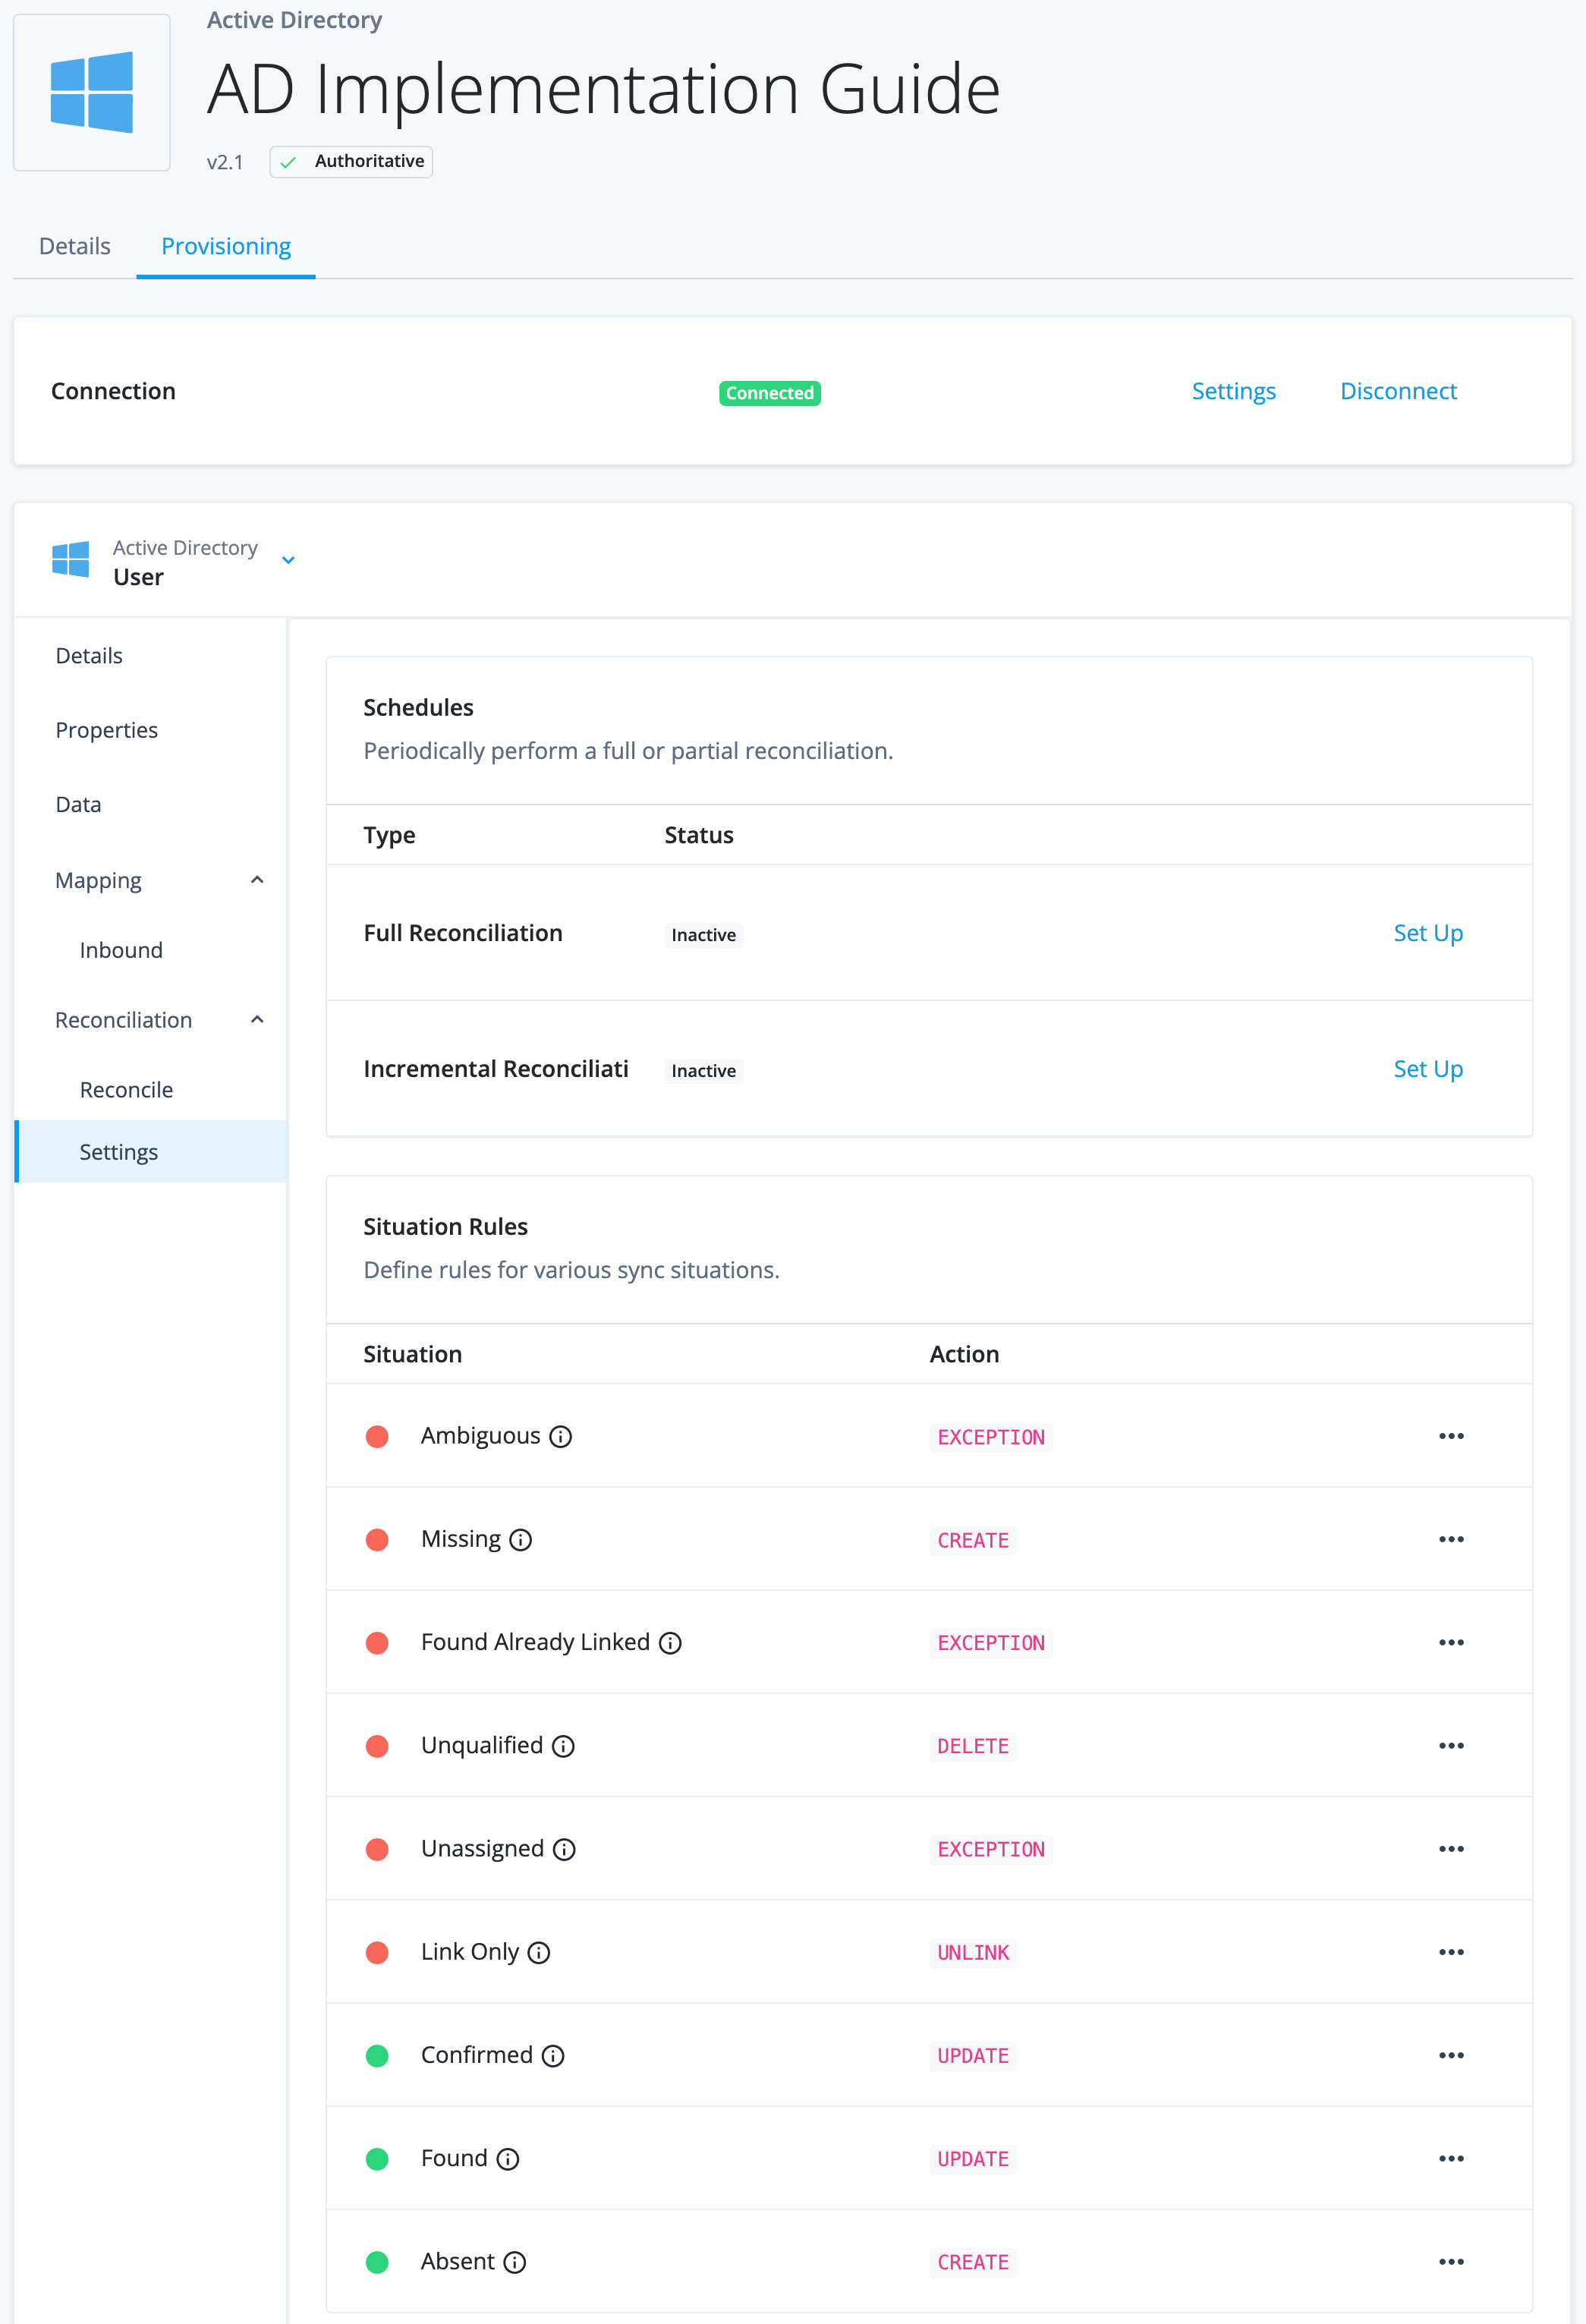
From the Provisioning tab, click Reconciliation > Settings.
-
Under the Situation Rules section, set the following actions for each situation:
Situation Action Ambiguous
Select
Exception.Source Missing
Select
Exception.Missing
Select
Create.Found Already Linked
Select
Exception.Unqualified
Select
Delete.Unassigned
Select
Exception.Link Only
Select
Unlink.Confirmed
Select
Update.Found
Select
Update.Absent
Select
Create.For descriptions of the situations and actions, learn more in Manage reconciliation rules.
Advanced Identity Cloud is now ready for provisioning. Normally, you would complete more tasks to reconcile users and set up schedules, however; for the purposes of this use case, those tasks are left for the following Validation section.
Validation
To test provisioning between AD and Advanced Identity Cloud, reconcile one user account and update the same user account in AD to observe the change in Advanced Identity Cloud.
These validations use the test user, Sam Carter. Substitute
your test user as necessary.
|
Reconcile data from AD to Advanced Identity Cloud
Usually, you would want to reconcile an entire set of users from an external data source into Advanced Identity Cloud, however; for the purposes of this use case, only one account is reconciled. To reconcile one account, you must add a filter so that Advanced Identity Cloud only reconciles based on the filter.
-
From the Provisioning tab, click Reconciliation > Settings.
-
Scroll down and click Show advanced settings.
-
Enable the Filter Source checkbox (AD is the source) and fill out the following details:
Field Value Assign to ADImplementationGuide if Any conditions are met
Select
Any.ADimplementationguide properties
Select
mail.contains
Select
is.Blank
Enter the email of the user you want to pull in from AD. The
mailattribute must be populated in AD, and the email you enter must be an exact match. For example, entersamcarter@example.com.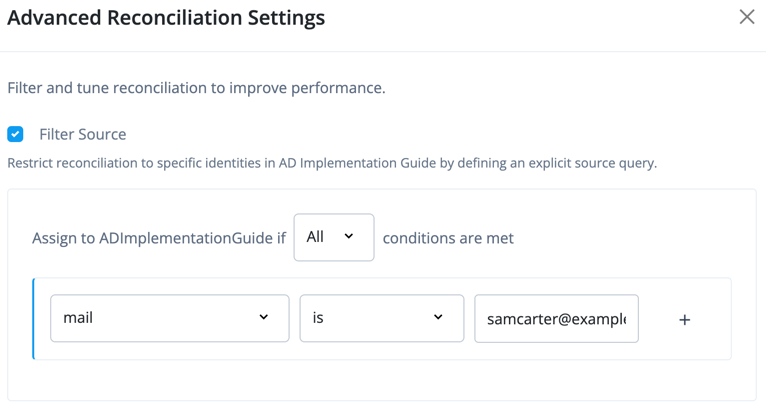
-
Scroll down and click Save.
-
In the left tabs, click Reconciliation > Reconcile.
-
Click Reconcile Now. Monitor the progress of the reconciliation in the metrics that display. Since you are filtering to reconcile only one user, failures on the reconciled data is expected.
-
In the left menu pane, Identities > Manage > Alpha realm - Users and search for the user. The user successfully displays in Advanced Identity Cloud.
If the user doesn’t display, check the following:
-
The fields Advanced Identity Cloud requires to create an identity are present in the inbound mapping.
-
The source filtering to reconcile only one record is correct.
-
-
Go into your AD server, and update the
sn(last name) of your test user. In this example, update the sn toChanged. -
From the left menu pane, go to Applications and select
AD Implementation Guide. In the Reconcile tab, click Reconcile Now again. -
Similar to step 7, locate the test user in Advanced Identity Cloud. The last name is updated.
| You can set a schedule to perform a full or incremental reconciliation by going to Reconciliation > Settings. Learn more in reconciliation schedules. |
Explore further
Reference material
| In this use case, you configured only one remote server, however; in a production scenario, register a server cluster and install remote servers on multiple servers for high-availability. |
| Reference | Description |
|---|---|
Register and connect a remote server with Advanced Identity Cloud. |
|
Gain an in-depth understanding of registering an application using app templates. |
|
Learn how to connect AD to Advanced Identity Cloud. |
|
Learn how to add or edit mappings with application templates. |
|
Learn the various actions you can take on reconciliation situations. For example,
if the situation is |
|
Understand managed object fields you can modify, such as setting a property as required or whether an end user can update the property in the Advanced Identity Cloud end-user UI. |
|
Understand the various synchronization types Advanced Identity Cloud uses to keep data consistent: reconciliation, liveSync, and implicit synchronization. |
|
Learn more about connectors. This includes connectors bundled with RCS and connectors you can download and add to the remote server. |