Provision users from Microsoft Entra ID (Azure AD)
| While this PingOne Advanced Identity Cloud use case was validated for accuracy, it can always be improved. To provide feedback, click or in the top right of this page (you must be logged into Backstage). |
Description
Estimated time to complete: 30 minutes
In this use case, you provision accounts from Microsoft Entra ID (formerly Azure AD) into Advanced Identity Cloud.
Goals
In completing this use case, you will learn how to do the following:
-
Use the Advanced Identity Cloud admin UI
-
Set up a Microsoft Entra ID application as an authoritative identity data source
-
Provision identity data from the application to Advanced Identity Cloud
-
Enable incremental reconciliation
Prerequisites
Before you start work on this use case, make sure you have:
-
A basic understanding of:
-
The Advanced Identity Cloud admin UI
-
The
managed/alpha_userobject schema -
Application templates
-
Reconciliation
-
-
Access to your Microsoft Entra ID tenant environment as an administrator
-
Access to your Advanced Identity Cloud development environment as an administrator
-
A test user in Advanced Identity Cloud to serve as the application owner for the Microsoft Entra ID application
Tasks
Task 1: Create a Microsoft Entra ID application
| Some steps require you to copy information. Paste the information into a text editor to keep track. |
Advanced Identity Cloud uses a Microsoft Entra ID application account to connect to Microsoft Entra ID through the Microsoft Graph API. To register the application in Advanced Identity Cloud, make sure you record:
-
The tenant ID
-
The client ID
-
The client secret—the value of the secret, not the secret ID
You register the application and set the Graph API permissions Advanced Identity Cloud requires.
-
Sign in to the Microsoft Entra ID tenant as administrator.
-
Select Home > + Add > App registration.
-
Set a Name and click Register.
-
On the profile page for the application you registered, record the values for:
-
Application (client) ID
-
Directory (tenant) ID
-
-
On the profile page for the application you registered, select Client credentials > Client secrets > + New client secret and add a client secret.
Record the client secret for use when configuring the connection from Advanced Identity Cloud. You cannot retrieve the secret after leaving the page where you created it.
-
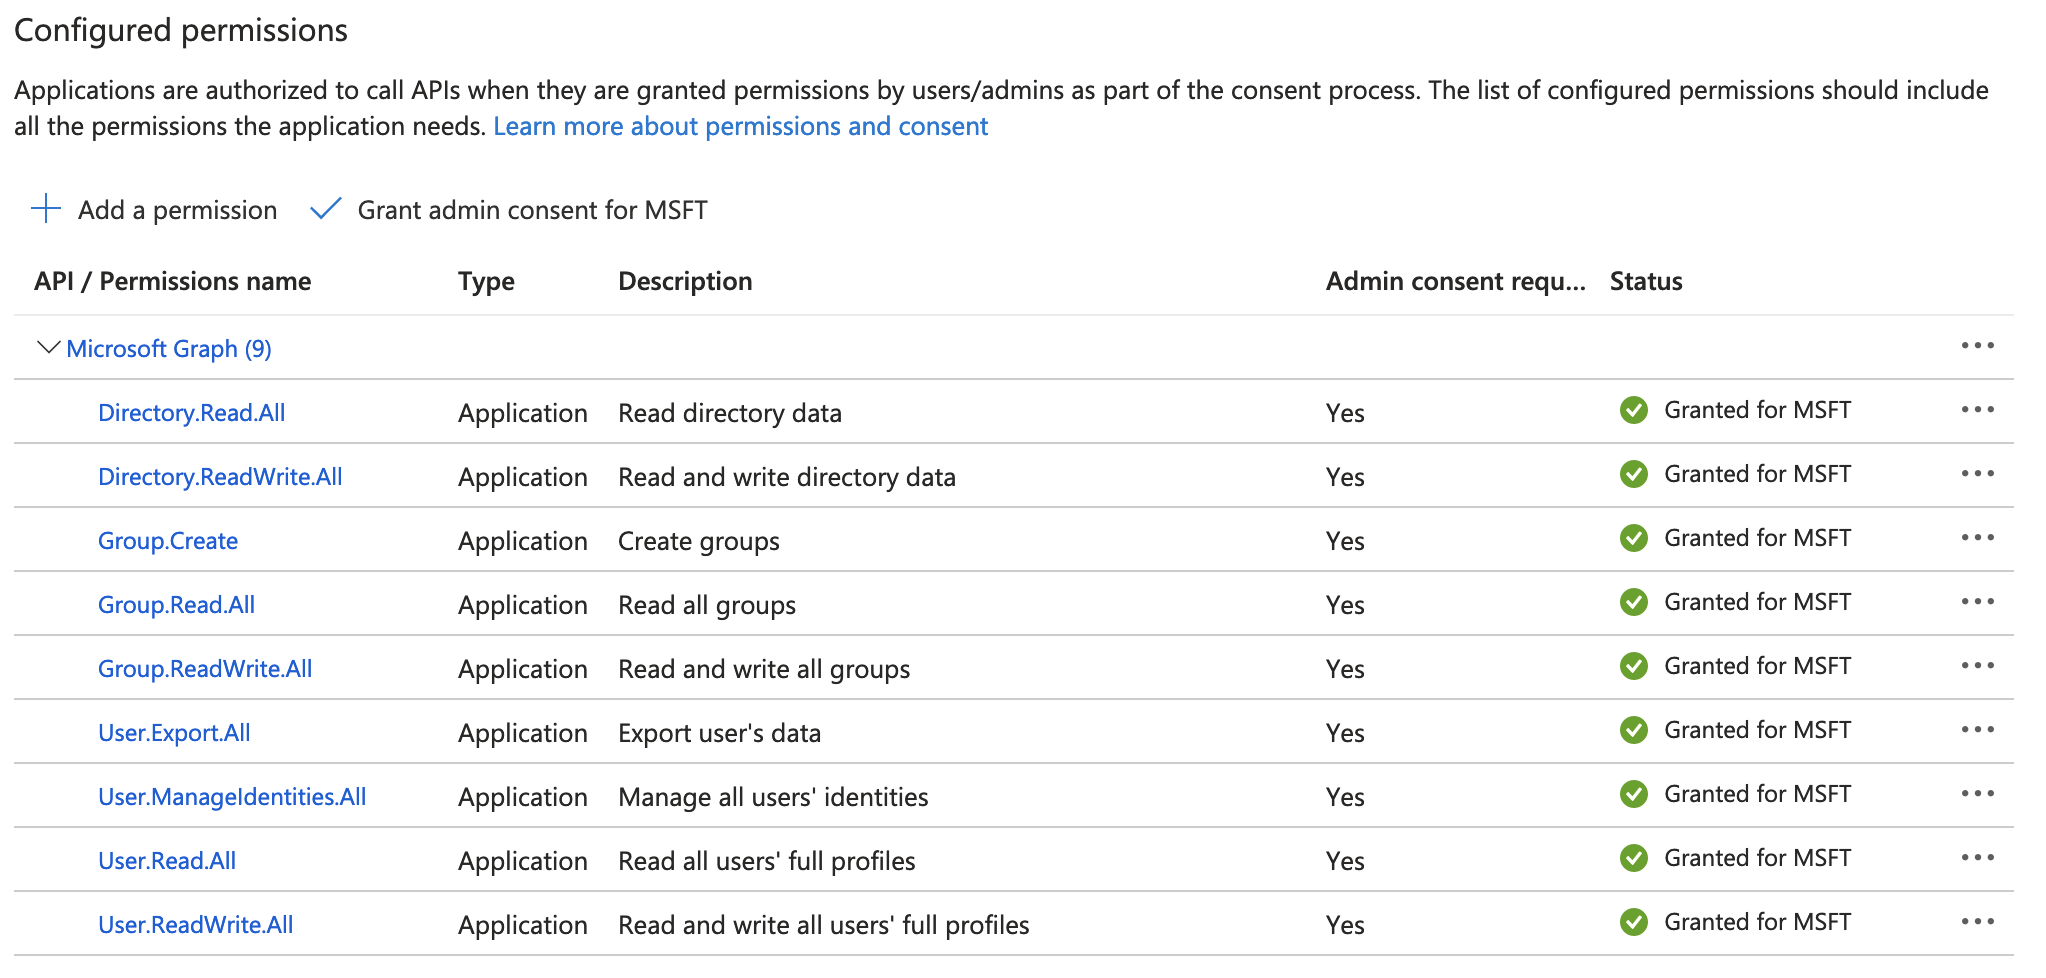
On the profile page for the application you registered, select API permissions > + Add a permission and add the following Microsoft Graph API permissions:
-
User.Export.All -
User.ManageIdentities.All -
User.Read.All -
User.ReadWrite.All -
Group.Create -
Group.Read.All -
Group.ReadWrite.All -
Directory.Read.All -
Directory.ReadWrite.All
-
-
On the API permissions page, select Grant admin consent for tenant.
Each permission must have Granted for tenant status before you connect Advanced Identity Cloud to the Microsoft Entra ID tenant:
If you cannot grant the permissions yourself, ask the primary tenant administrator to grant the permissions.
Task 2: Create a Microsoft Entra ID test user account
To validate reconciliation, Advanced Identity Cloud requires at least one user with the required Advanced Identity Cloud properties:
-
An email address
-
A display name
-
A first name
-
A last name
Create the test account in Microsoft Entra ID:
-
Sign in to the Microsoft Entra ID tenant as administrator.
-
Select Home > + Add > User > Create new user.
-
Prepare to create the user with the following settings:
Field Value User principal name
scarter@domain, where domain is the Microsoft Entra ID tenant domainMail nickname
Select Derive from user principal name.
Display name
Sam CarterPassword
Select Auto-generate password.
This use case doesn’t use the password, but record the password so you can sign on to Microsoft Entra ID later.
Account enabled
Leave this selected.
First name
SamLast name
CarterEmail
scarter@example.com -
Review and create the test user account.
Task 3: Configure Microsoft Entra ID as an authoritative identity data source
-
Log in to the Advanced Identity Cloud admin UI as an administrator.
-
Select Application > Browse App Catalog > Azure AD Provisioning and click Next.
Select the latest application version.
-
Click Next again and create an application with the following settings:
Field Value Name
Microsoft Entra IDOwners
The Advanced Identity Cloud test user to act as the owner of this application.
Authoritative
Enable.
-
In the application profile screen, select Provisioning > Set up Provisioning, enter the information you collected when registering the Microsoft Entra ID application, and click Connect:
Field Value Tenant
The Directory (tenant) ID from Microsoft Entra ID; for example,
f7ff6108-c26f-48dd-ae9e-9743eefbd11f.Client ID
The Application (client) ID from Microsoft Entra ID; for example,
b5ee41de-4a06-40ec-b170-1edbeb7c7764.Client Secret (optional)
The value of the client secret from Microsoft Entra ID.
The client secret is not optional for this use case.
-
Make sure the Advanced Identity Cloud admin UI displays the application as Connected:

-
Select Data to display a table of details from accounts in Microsoft Entra ID.
This confirms Advanced Identity Cloud can access the account properties.
Task 4: Configure reconciliation
Advanced Identity Cloud uses reconciliation to keep its accounts in sync with accounts in other systems. You configure:
-
How account properties in the other systems map to Advanced Identity Cloud account properties.
-
What Advanced Identity Cloud does in each reconciliation situation.
Inbound mapping
For this use case, configure at least a minimal inbound mapping:
-
Log in to the Advanced Identity Cloud admin UI as an administrator.
-
Select Application > Microsoft Entra ID > Provisioning > Mapping > Inbound.
-
Review how an Microsoft Entra ID user account maps to the corresponding Advanced Identity Cloud
alpha_useraccount: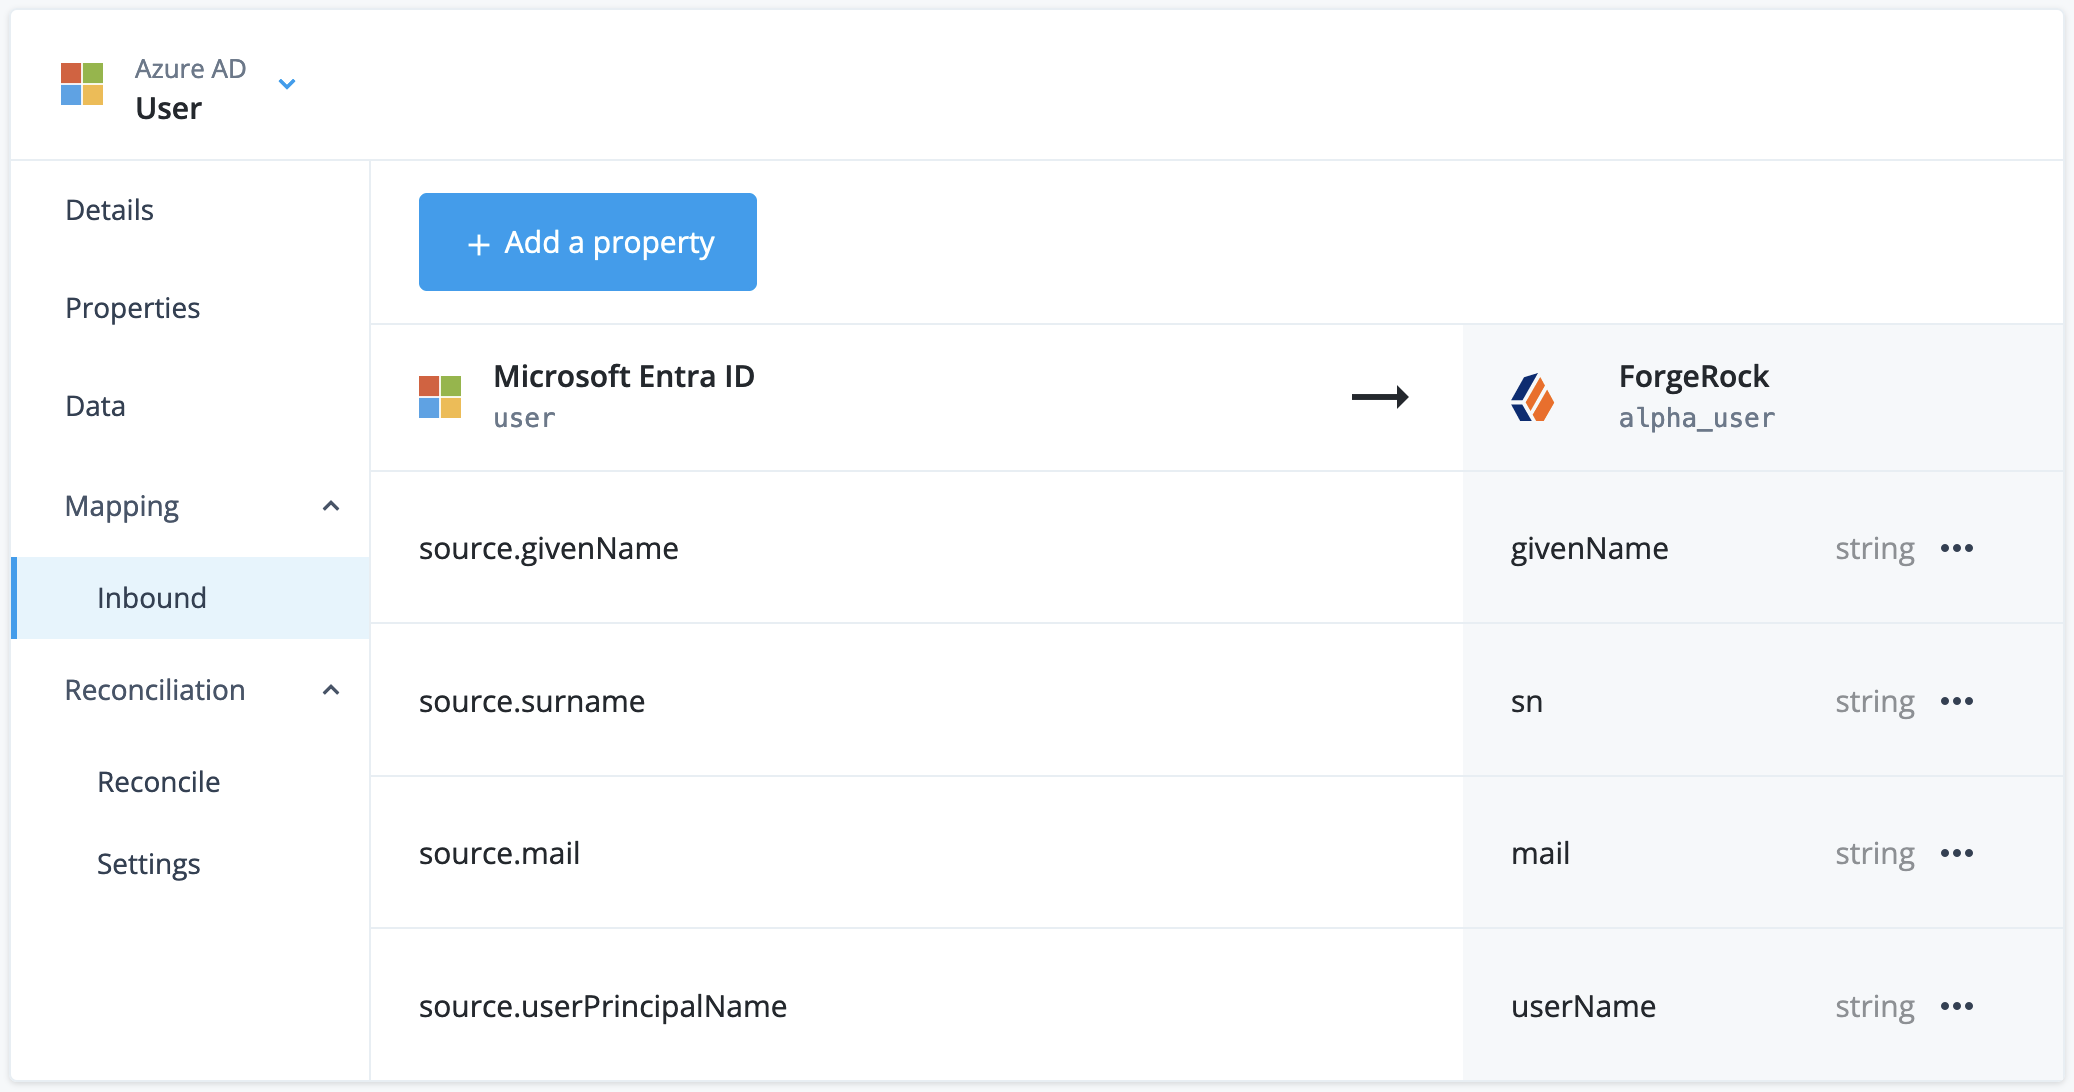
-
Adjust the inbound mapping to the following settings:
Microsoft Entra ID user property Advanced Identity Cloud alpha_userpropertysource.givenNamegivenNamesource.mailmailsource.surnamesnsource.userPrincipalNameuserNameReconciliation only synchronizes mapped properties. If required, add additional mappings.
Reconciliation situations
-
Log in to the Advanced Identity Cloud admin UI as an administrator.
-
Select Application > Microsoft Entra ID > Reconciliation > Settings.
-
Edit the default Situation Rules to set Link Only to
UNLINK: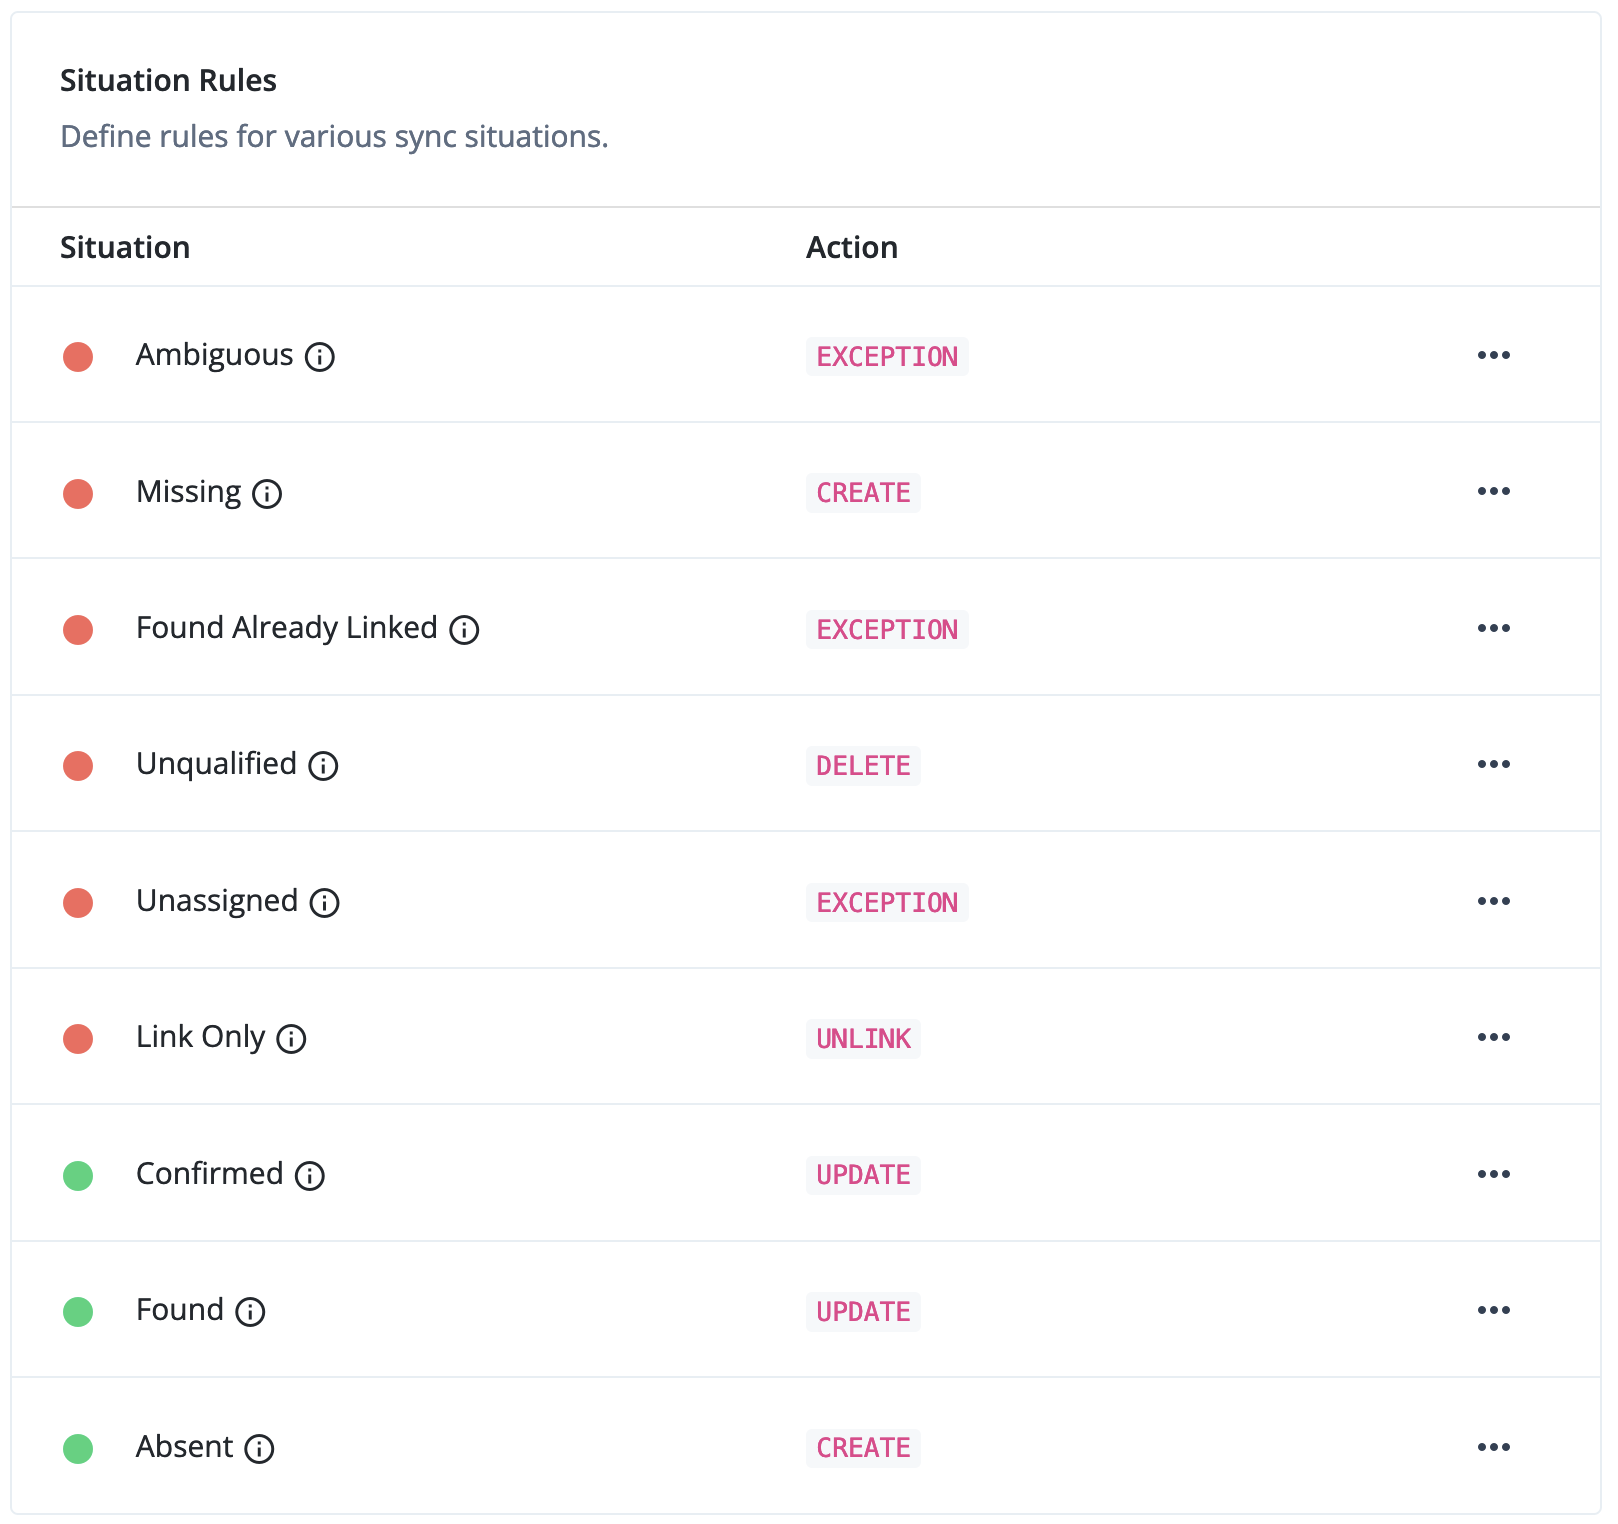
Advanced Identity Cloud is now ready to provision user accounts from the Microsoft Entra ID tenant.
Task 5: Prepare reconciliation for validation
Although you can run reconciliation manually for initial synchronization and testing, you can also enable incremental reconciliation as a recurring task. Incremental reconciliation runs periodically, synchronizing new changes automatically.
For testing, you can restrict which accounts reconciliation synchronizes with a filter. After validating your work, you can disable the filter and reconcile all accounts.
-
Log in to the Advanced Identity Cloud admin UI as an administrator.
-
Select Application > Microsoft Entra ID > Reconciliation > Settings.
-
Select Schedules > Incremental Reconciliation > Set Up and configure the task.
For example, to run reconciliation every 15 minutes, select Use cron and set the Frequency to
*/15 * * * * ?: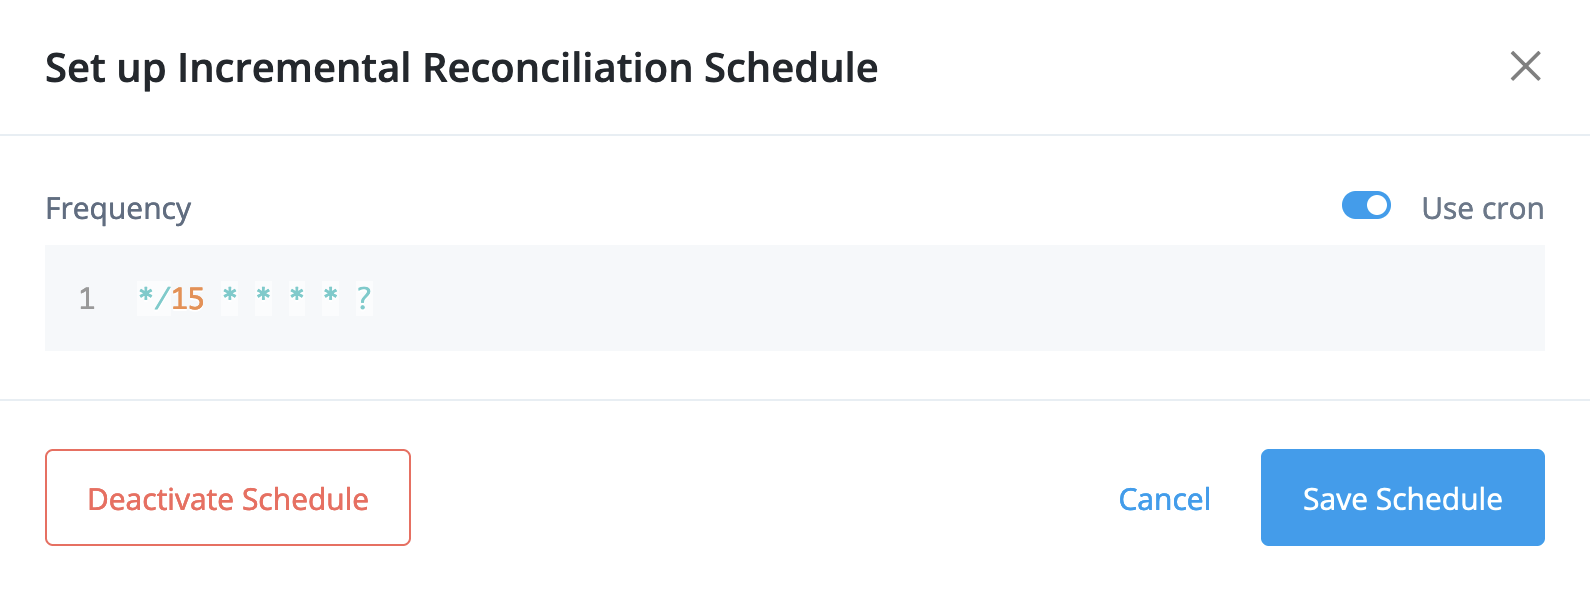
-
Select Show advanced settings and filter reconciliation to target only the Microsoft Entra ID test account.
For example, select Filter Source and set the filter to match when the user
mailis the test account email address: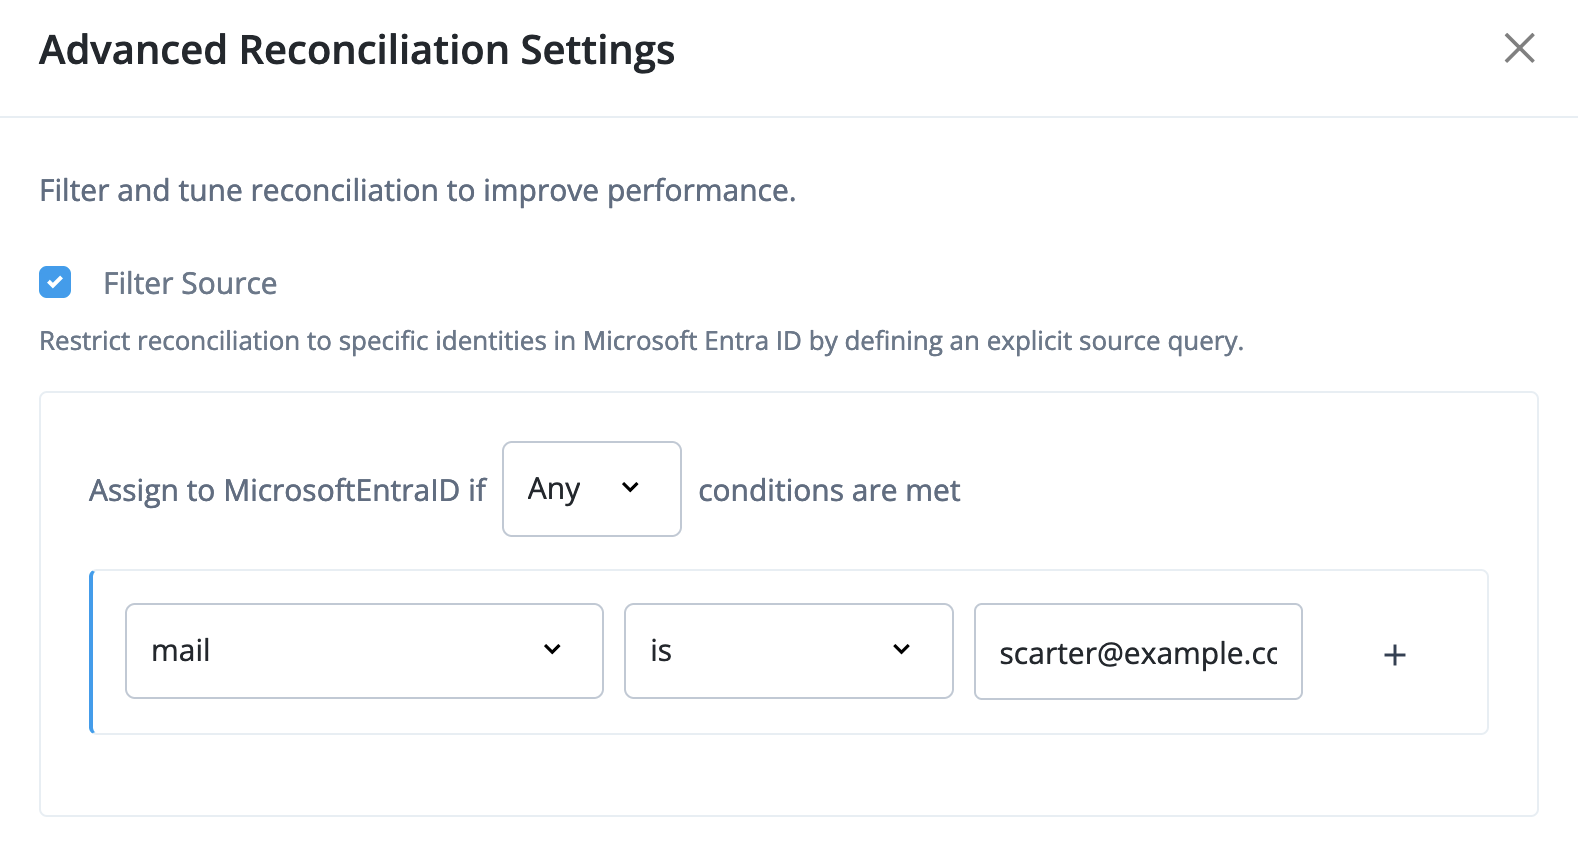
-
Click Save.
Validation
With Advanced Identity Cloud connected to Microsoft Entra ID as an authoritative identity data source, validate the configuration by provisioning an account from Microsoft Entra ID to Advanced Identity Cloud and receiving updates to the newly created Advanced Identity Cloud user.
Steps
Initial reconciliation
-
Log in to the Advanced Identity Cloud admin UI as an administrator.
-
Select Application > Microsoft Entra ID > Provisioning > Reconciliation > Reconcile > Reconcile Now.
Reconciliation creates the test user account from Microsoft Entra ID in Advanced Identity Cloud.
On the reconciliation status page, Unresolved Microsoft Entra ID users is greater than zero. Advanced Identity Cloud found an Microsoft Entra ID user account and created an identity in Advanced Identity Cloud.
-
Select Identities > Manage and search for the test user account.
The Advanced Identity Cloud admin UI displays the new account reconciliation created based on the Microsoft Entra ID test user account.
Incremental reconciliation
-
Sign in to the Microsoft Entra ID tenant as administrator.
-
Select Home > Users > Select test user > Edit properties, change one of the mapped properties such as First name, and Save your change.
-
Log in to the Advanced Identity Cloud admin UI as an administrator.
-
Wait for reconciliation to run as scheduled or select Reconcile Now again in Advanced Identity Cloud admin UI.
Reconciliation applies the changes you made in Microsoft Entra ID to the account in Advanced Identity Cloud.
On the reconciliation status page, 1-to-1 match is greater than 0. Advanced Identity Cloud found an Microsoft Entra ID account with a matching Advanced Identity Cloud account and reconciled the two.
-
Select Identities > Manage, search for the account, and select it to display the details.
The Advanced Identity Cloud admin UI displays the change from the Microsoft Entra ID test user account.
Explore further
Reference material
| Reference | Description |
|---|---|
Get to know the Advanced Identity Cloud admin UI. |
|
Learn about connecting Advanced Identity Cloud to Microsoft Entra ID. |
|
Learn about reconciliation of user accounts. |
|
Find out more about application templates. |
|
Learn how Advanced Identity Cloud keeps data consistent across multiple systems. |
|
Refer to this Microsoft Entra ID documentation for details. |