Configure access requests
Before end users can request access to resources in Advanced Identity Cloud, you must:
Configure scoping rules to resources
Identity Governance allows you to centrally manage end-user access to resources across your company using scopes. Scoping refers to the rules defining who can access which resource. Once a resource has been granted, a delegated administrator or user is expected to control who can do what. The main goals of scoping are:
-
Controlling resources that are available to a user.
-
Controlling which end users a user can see.
-
Controlling the actions a user can take either on the resource or the user.
Administrators can create and manage filtering rules to ensure users have access to only the resource required.
Enable scopes
By default, scopes are disabled in Identity Governance. You can enable scopes globally across the Identity Governance configuration settings using the config API.
Use PUT iga/commons/config/iga_global with a payload of enableScoping:true:
curl \
--request PUT \
--header "Content-Type: application/json" \
--header "Accept-API-Version: resource=1.0" \
--data '{
  "enableScoping": true
}'
"https://<tenant-env-fqdn>/iga/commons/config/iga_global"
View scopes
-
On the Advanced Identity Cloud admin UI, click Governance > Scopes. The page appears with a list of scopes. If no scopes are present, the page displays a New Scopes button.
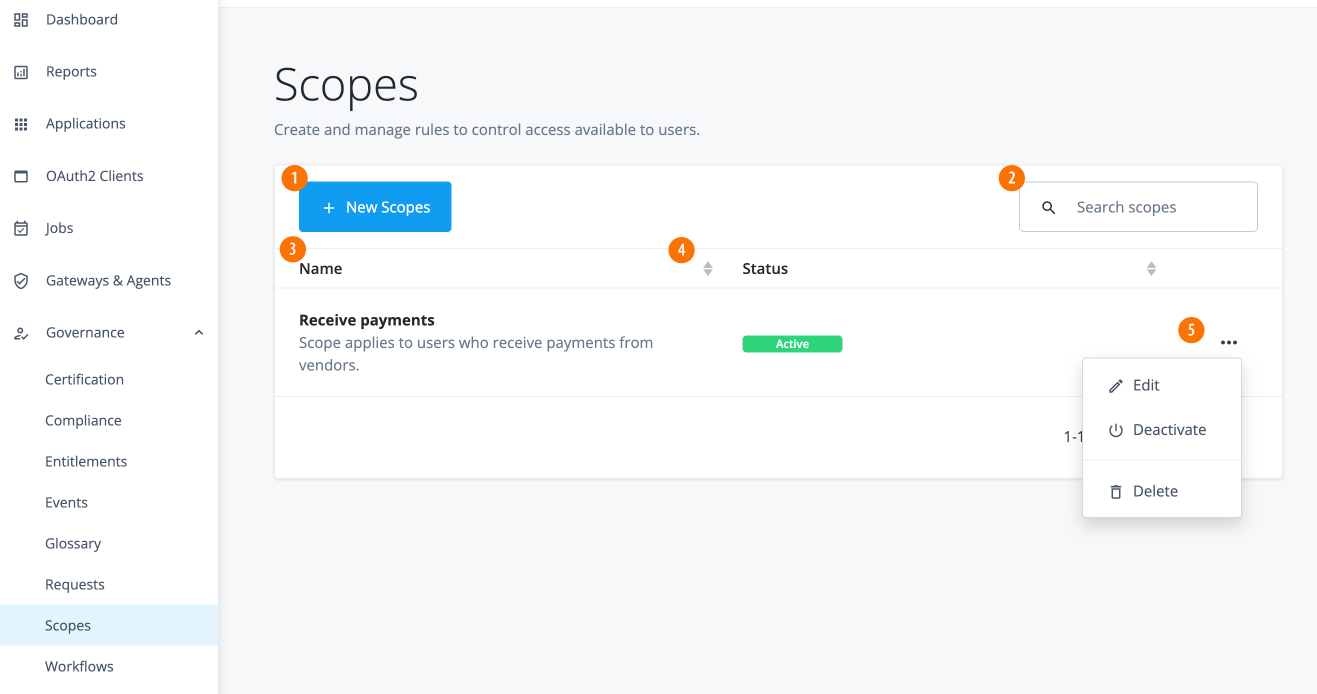
-
1 Click Governance > Scopes on the Advanced Identity Cloud end-user UI.
-
2 Click the New Scope button to add a new scope.
-
3 Search scopes. Search by scope name, status, or description, case insensitive.
-
4 Name: Name of the scope. This is a required field.
-
5 Status: Current status of the scope, either
InactiveandActive. You can sort the list in ascending or descending order by clicking the up or down triangles. -
6 Ellipsis (). Click to edit, deactivate (if active) or activate (if inactive), or delete the scope.
-
Add scopes
-
On the Advanced Identity Cloud admin UI, click Governance > Scopes.
-
Click the New Scopes.
-
On the New Scope Details page, enter the scope details, and then click Next:
Field Description Name
Enter a name for your scope. Follow any naming convention established by your company.
Description (Optional)
Enter a general description for the new scope.
-
On the New Scope Applies to page, do the following:
-
Use the filter to define which users should have this scope. Select or enter the properties, and then click to add the filter.
Field Description Select entitlements if
AnyorAllconditions are met.Select either Any or All.
Select a property
Values include:
-
_id
-
accountStatus
-
city
-
cn
-
country
-
descriptions
-
frIndexedDate[1-5]
-
frIndexedString[1-5]
-
frUnindexedDate[1-5]
-
frUnindexedString[1-5]
-
givenName
-
mail
-
password
-
passwordExpirationTime
-
passwordLastChangedTie
-
postalAddress
-
postalCode
-
profileImage
-
sn
-
stateProvince
-
telephoneNumber
-
userName
Connector
Values include:
-
contains
-
does not contain
-
is
-
is not
-
starts with
-
ends with
Attribute Value
Enter an attribute.
-
-
Click Next to continue.
-
-
On the New Scope Access page, select the applications, entitlements and/or roles resources which users are allowed to access:
Field Description Applications
Select one of the following:
-
All Applications
-
Applications matching a filter. The page displays a filter to match the applications.
Entitlements
Select one of the following:
-
All Entitlements
-
Entitlements matching a filter. The page displays a filter to match the entitlements.
Roles
Select one of the following:
-
All Roles
-
Roles matching a filter. The page displays a filter to match the roles.
-
Click Save. The Scopes page displays the new scope.
-
Edit scopes
-
On the Advanced Identity Cloud admin UI, click Governance > Scopes.
-
On the Scopes page, click the ellipsis () for a policy, and then click Edit to change any aspect of a scope.
-
Click Save to keep your changes.
-
Click Deactivate to disable the scope, or click Activate to enable the scope for use.
-
Click Remove to remove the rule from the policy.
-
Define resources that can be requested
By default, end users in Advanced Identity Cloud can only request
access to a resource
marked as Requestable in the access catalog.
You can make applications, entitlements, and roles requestable in Identity Governance.
| Authoritative applications are not requestable and are limited to read-only access. These apps onboard new identities, modify existing identities, or remove identities when needed. When there is a requirement to both read from and write to an application like a directory service, customers can define two apps: one authoritative and the other targeted for non-authoritative purposes. |
Applications
To make applications requestable:
-
From the Advanced Identity Cloud admin UI, go to Applications.
-
Select an application. The application must be a target application.
-
In the Details tab, toggle the Requestable box.
-
For every target application you desire to be requestable, repeat steps 2-3.
Add owners to resources
Before an end user can request access to a resource, you must associate it to an owner. Owners are the individual(s) responsible for monitoring who has access to the resource.
When an end user requests access to a resource, Identity Governance sends the request to the owner(s) for approval.
In access requests, the owner is referred to as the approver. When the owner approves the access request, Identity Governance provisions the resource to the end user.
Application owners
To assign owners to applications in Advanced Identity Cloud:
-
From the Advanced Identity Cloud admin UI, go to Applications.
-
Select an application. The application must be a target application.
-
In the Details tab, click the Owners field, and add as many owners as you desire.
-
Repeat steps 2-3 for every target application.
Entitlement owners
After you load entitlements into Advanced Identity Cloud, they display in the Entitlements section.
To assign owners to entitlements in Advanced Identity Cloud:
-
From the Advanced Identity Cloud admin UI, go to Entitlements.
-
Select an entitlement.
-
In the Details tab, click the Entitlement Owner field, and select an owner.
-
Repeat steps 2-3 for every entitlement.
Optionally, create and configure glossary attributes
Governance glossary attributes enable you to attach custom attributes to applications, entitlements, or roles.
When configuring resources that your end users can request access to, consider creating searchable governance glossary attributes. These attributes enable end users to filter and select a resource when requesting access.
Example of using glossary attributes with access requests
An example of using a governance glossary attribute would be to assign a risk level to each role, indicating the level of sensitivity associated with the resources granted to end users. This risk level attribute lets end users efficiently filter and search for roles based on their desired risk level when requesting access.
-
From the Advanced Identity Cloud admin UI, click Glossary.
-
Click Role > + Role Glossary Item.
-
Enter the following values:
Field Value Name
riskLevelDisplay Name
Risk LevelDescription
The level of risk associated with granting this resource to a user.
The higher the risk, the more sensitive the resource.
Type
StringEnumerated Values
Enable and create the following in the text and value fields:
-
Low -
Medium -
High
Show advanced settings > Searchable
Enable. This enables the end user to search and filter on the attribute when requesting access to the role. -
-
Click Save.
-
Populate each role in Advanced Identity Cloud with either
Low,Medium, orHigh.To do this, navigate to Manage > Alpha realm - Roles and populate newly created role attribute
Risk Level.
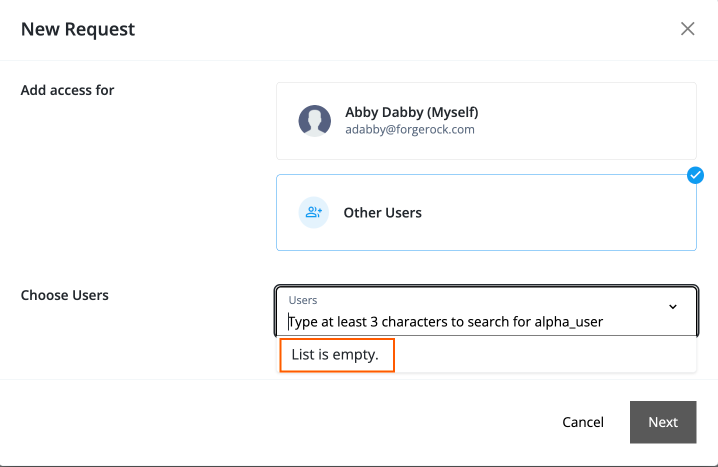
Configure access requests for other end users
Identity Governance provides the ability for end users to enter requests for other end users. Administrators can configure if all end users can see all other end users, all users can see only a subset of other end users, or only managers can see their direct reports.
To accomplish the ability to enter access requests for other end users,
administrators must give end users an internal role with view privileges and
configure read access to attributes (userName, givenName, sn, and mail) to other end users.
While organization owners and administrators get these privileges from the
PingIDM configuration targeted to only their organization’s members, other end users
outside of the organization do not have access to these privileges. As a result,
end users only see List is empty when clicking Other Users and
not be able to select any end users.
There are three use cases available to set up other end users:
Use case 1: Configure all end users to see all other end users
To configure Identity Governance so that end users can see all other end users, you can add
an internal role with view privileges and set the userName, givenName, sn, and mail
attributes to read access.
-
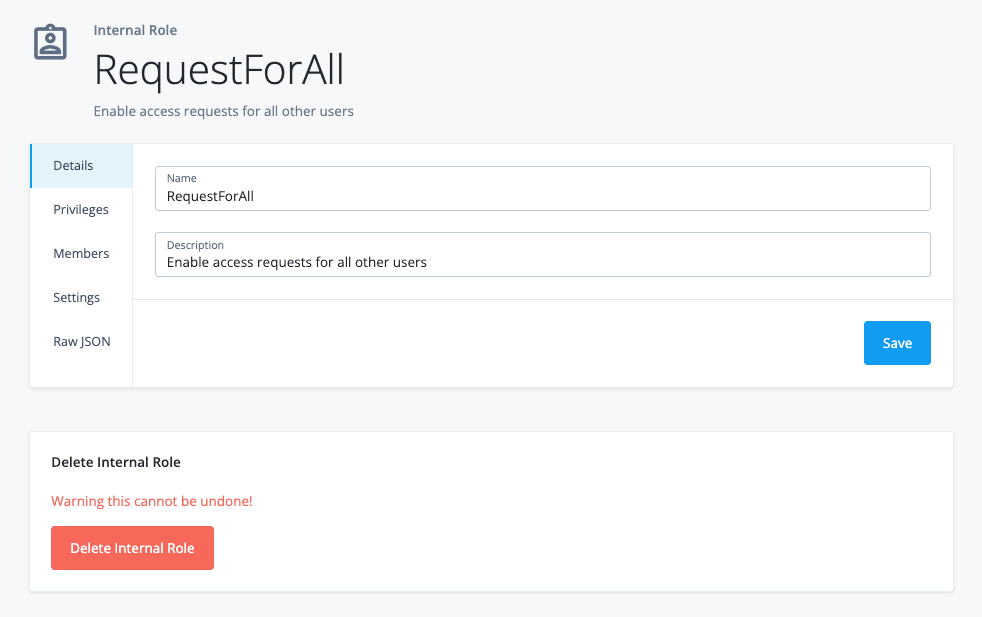
Create a new internal role:
-
On the Advanced Identity Cloud admin UI, log in to Advanced Identity Cloud as a tenant administrator.
-
Click Identities > Manage > Internal Roles > New Internal Role.
-
On the New Internal role modal, enter the following:
-
Name. Enter a descriptive name for the internal role.
-
Description. Optional. Enter a description for the internal role.
-
-
Click Next.
-
-
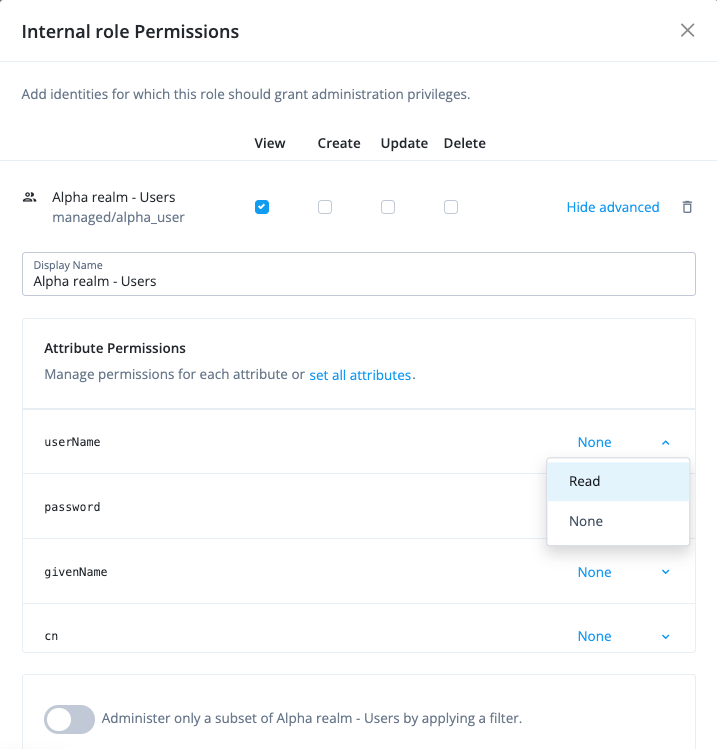
Set the internal role permissions:
-
On the Internal role permissions modal, select Alpha realm - Users.
-
Click Add. The permissions for View, Create, Update, and Delete are displayed.
-
Keep View selected.
-
For attribute permissions, click Show advanced.
-
Click set all attributes, and select None.
-
For the following attributes, set the permission to
Read:-
userName -
givenName -
sn -
mail
-
-
Click Next.
Details
-
-
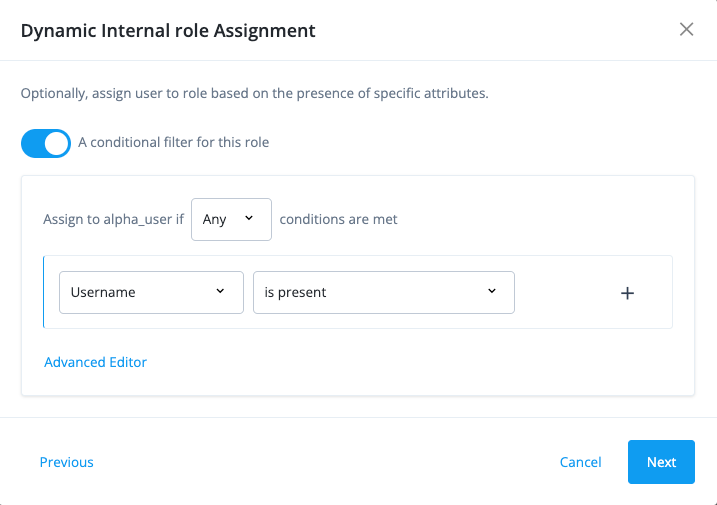
Configure a filter for the role:
-
On the Dynamic internal role Assignment modal, click A conditional filter for this role.
-
On the filter, select the following properties:
-
Select Any. Specifies when to apply the rule if the conditions are met.
-
Select an attribute like Username.
-
Select is present. Specifies the existence of the property or not.
-
-
Click Next.
Details
-
-
Set an time constraint on the internal role:
-
On the Time Constraint modal, leave the default as-is.
-
Click Save. The new internal role is created. All users will now have the ability to see all other end users.
Details
The one side effect to this procedure is that the end user’s UI displays
Alpha Realm - useron the left navigation bar, which can be useful as a company-wide address book or when you want to add attributes, such astelephoneNumber.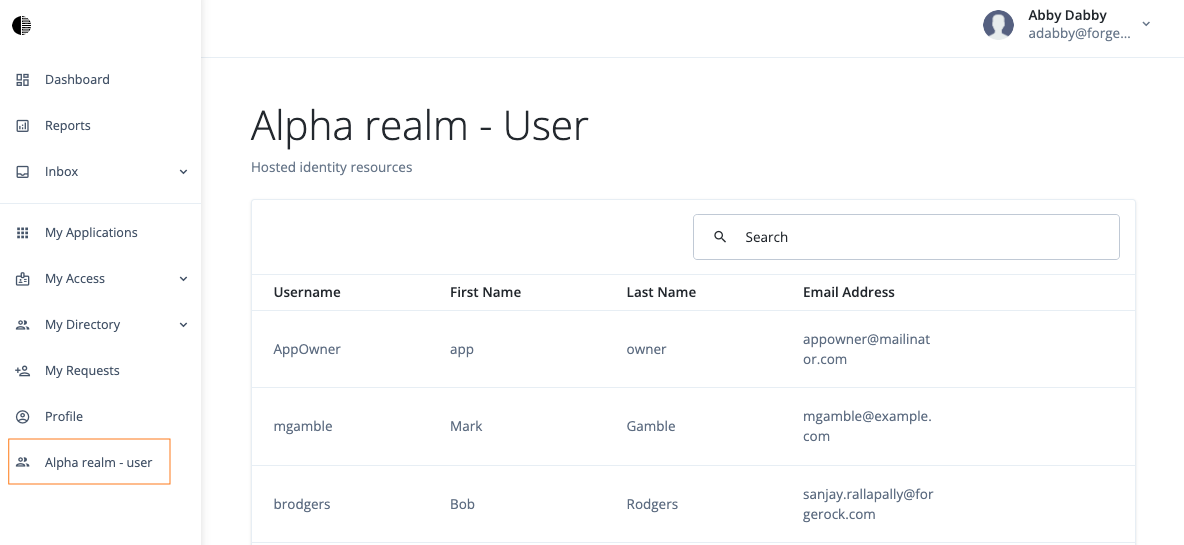
-
Use case 2: Configure all end users to see a subset of other end users
This case is when you want the end users to see a subset of end users that match
an attribute, such as department or city.
-
Repeat the steps 1–2 in Use case 1: Configure all end users to see all other end users.
-
Configure a filter for the role:
-
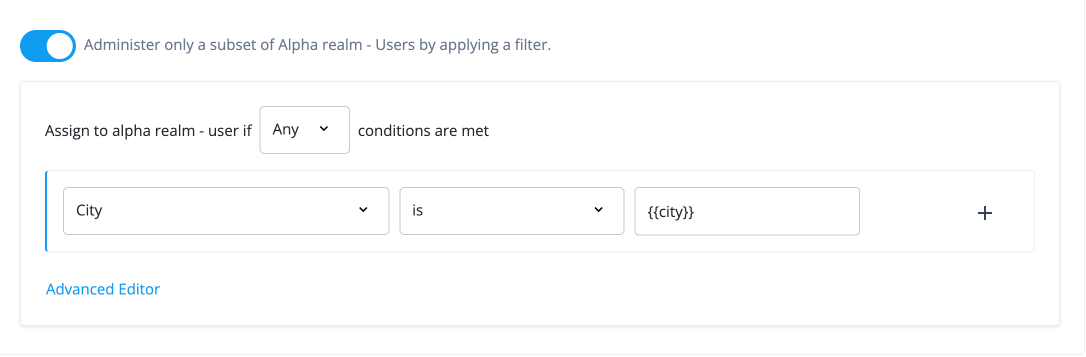
On the Dynamic internal role Assignment modal, click A conditional filter for this role.
-
On the filter, select the following properties:
-
Select Any. Specifies when to apply the rule if the conditions are met.
-
Select City. An attribute name.
-
Select is. Specifies the relationship between the attribute and its value.
-
Enter {{attribute}}. Curly braces indicates that the end user’s current property. For example, you can use
{{city}}indicating the end user’scityof work be included in the decision. This filter rule enables the manager to make requests for any other end users whosecitymatches the manager’scityproperty. If you want to specify end users in a different city from the manager’s city, you can use, for example,{{Denver}}to indicate the manager can see direct reports located inDenver.
-
-
Click , and then click Add Rule.
-
Click Next.
Details
-
Use case 3: Configure only managers to request for their directs
The third use case is to configure the system so that only managers can request for their direct reports. One solution is to use a multivalued attribute to hold the value of the manager ID for each user.
-
On the Advanced Identity Cloud admin UI, log in to Advanced Identity Cloud as a tenant administrator.
-
Create a managed object. A managed object is an identity-related data object managed in the IDM admin UI:
-
Click Native Console > Identity Management.
-
On the Quick Start page, click Configure on the top navigation bar, and then select Managed Objects.
-
On the Managed Objects page, click Alpha_user.
-
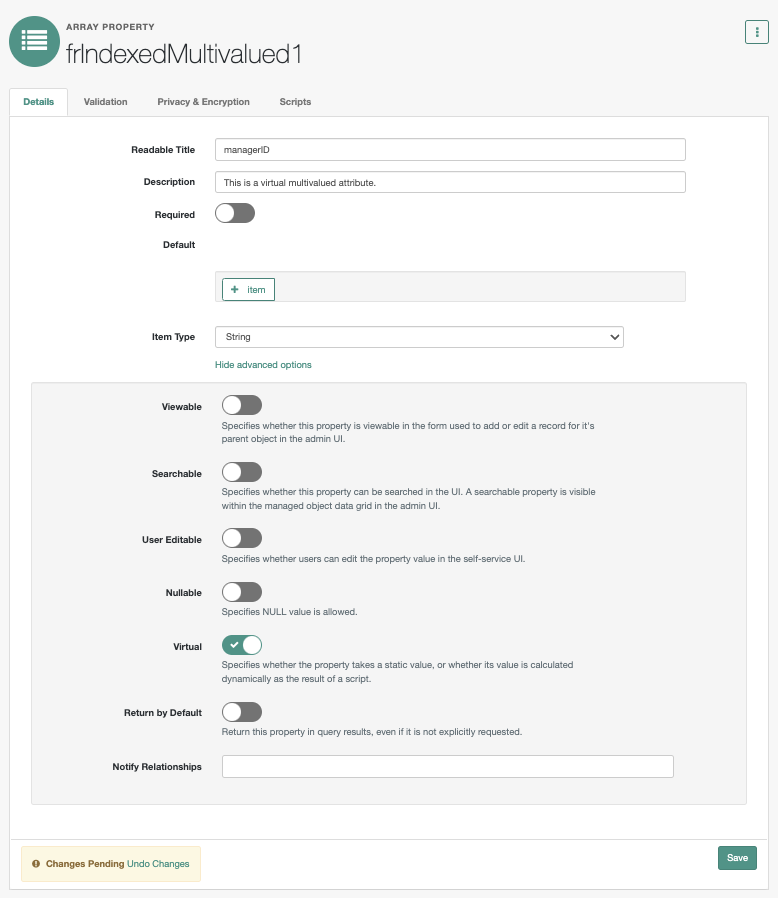
Scroll down, and click the pencil icon () next to frindexedMultivalued1 to edit it.
-
On the frindexedMultivalued1 page, enter the following values:
Field Value Readable Titles
Enter
managerID.Description
Enter a description of the managed object.
Show advanced options.
Click the link to display more options.
Viewable
Click to disable it.
User Editable
Click to disable it.
Virtual
Click to enable it.
-
Click Save.
Details
-
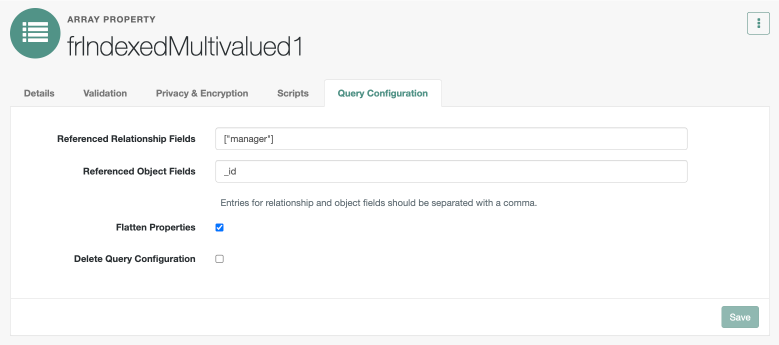
Click the Query Configuration tab, enter the following, and then click Save.
Field Value Referenced Relationship Fields
Enter
["manager"].Referenced Object Fields
Enter the referenced object,
_id.Flatten Properties
Click to enable it.
Details
-
-
Now, set up a manager on each end user using a relationship-derived virtual property (RDVP). RDVPs are calculated based on relationships and relationship notifications. Here we create an RDVP to query end users ("reports") who have a manager expressed in the
_idproperty. For additional information, learn about it at Relationship-derived virtual properties.Create a new internal role called
RequestDirects:-
On the Advanced Identity Cloud admin UI, log in to Advanced Identity Cloud as a tenant administrator.
-
Click Identities > Manage > Internal Roles > New Internal Role.
-
On the New Internal role modal, enter the following, and then click Next.
-
Name. Enter a descriptive name for the internal role. Enter
RequestDirects. -
Description. Optional. Enter a description for the internal role.
-
-
-
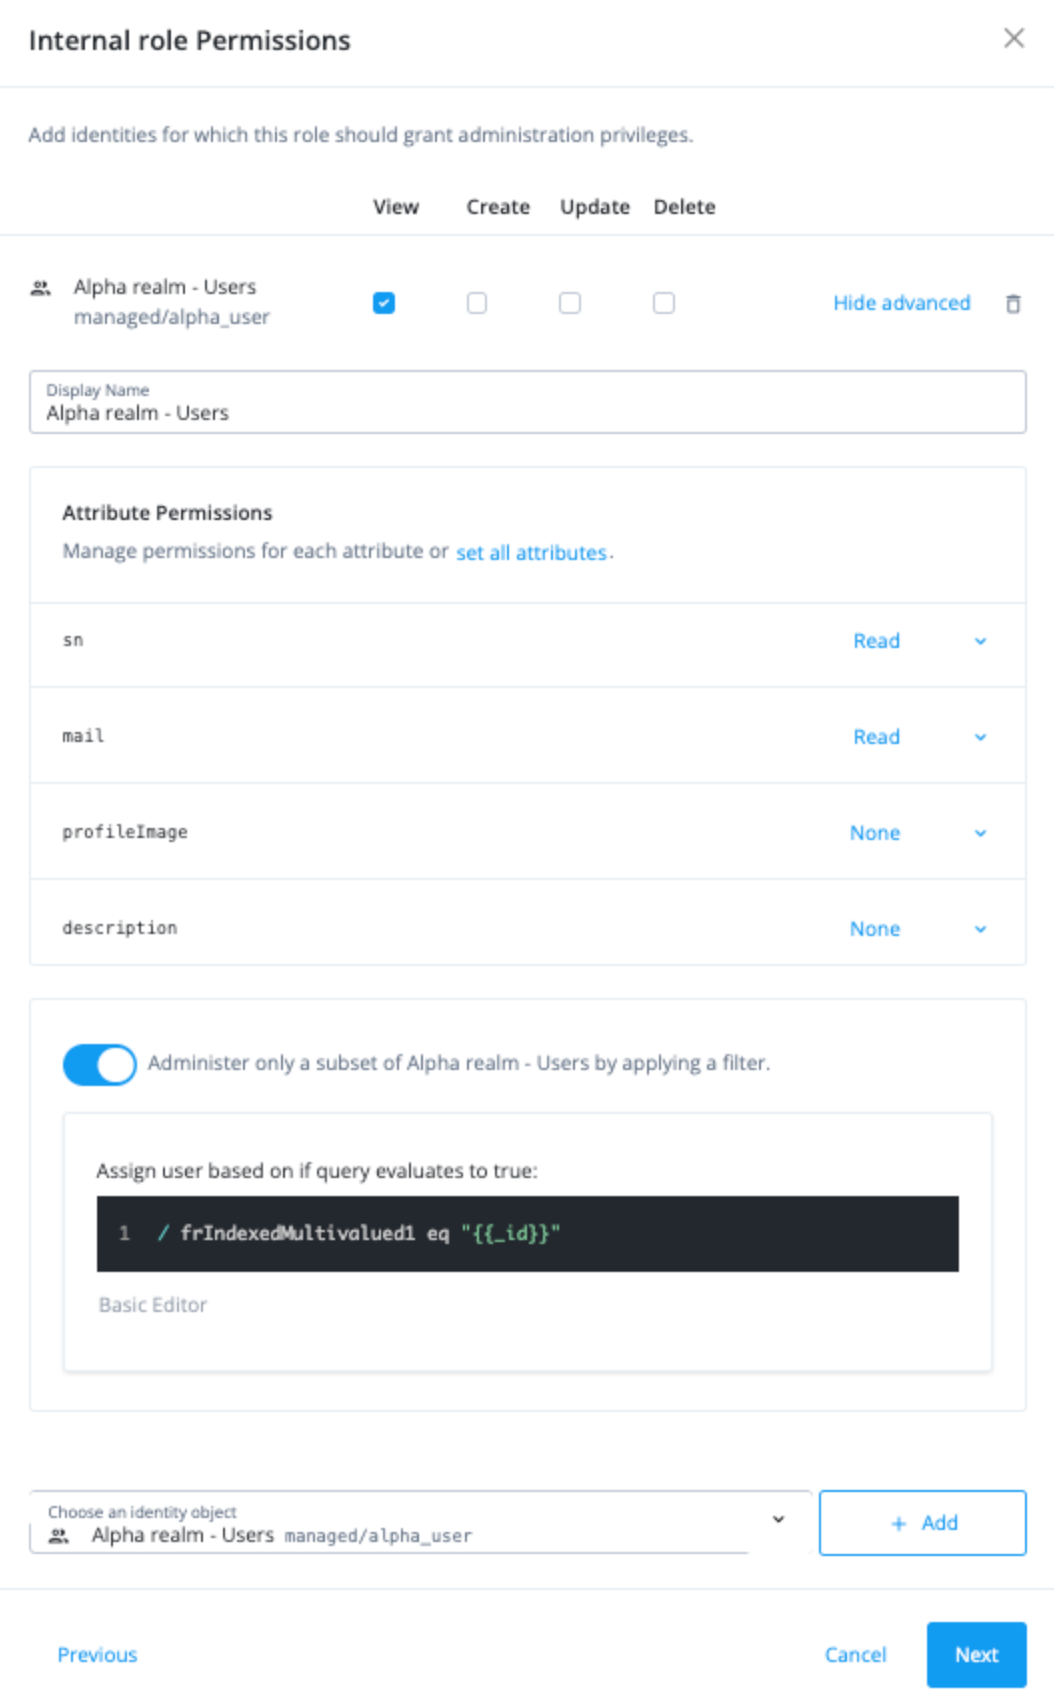
Set the internal role permissions:
-
On the Internal role permissions modal, select Alpha realm - Users.
-
Click Add. The permissions for View, Create, Update, and Delete are displayed.
-
Keep View selected.
-
For attribute permissions, click Show advanced.
-
Click set all attributes, and select None.
-
For the following attributes, set the permission to
Read:-
userName -
givenName -
sn -
mail
-
-
Click Administer only a subset of Alpha realm - Users by applying a filter.
-
Click Advanced Editor, and enter
/frIndexedMultivalued3 eq "{{_id}}".-
Click Next.
Details
-
-
On the Dynamic Internal role Assignment modal, click Next.
-
On the Time Constraint modal, click Save.
-
-
Create an RDVP and make it queryable:
-
Click Native Console > Identity Management.
-
On the Quick Start page, click Configure on the top navigation bar, and then select Managed Objects.
-
On the Managed Objects page, click Alpha_user.
-
Scroll down, and pencil icon () next to frindexedMultivalued2 to edit it..
-
-
On the frindexedMultivalued2, enter the following values:
-
Readable Titles:
reportsIDs -
Description: Enter a description of the managed object.
-
-
Click Show advanced options.
-
Click Viewable to disable it.
-
Click User Editable to disable it.
-
Click Virtual to enable it. We are using
frIndexedMultivalued2as a virtual RDVP.Details
-
-
Click Query Configuration.
-
In the Referenced Relationship Fields, enter
["reports"]. This relationship property is used to calculate the RDVP. -
In the Referenced Object Fields, enter
_id. This property is used to hold the returned value when the RDVP is calculated. In this example, this would be_id. -
Click Flatten Properties to enable it.
-
Click Save. The Managed Object created message appears.
-
-
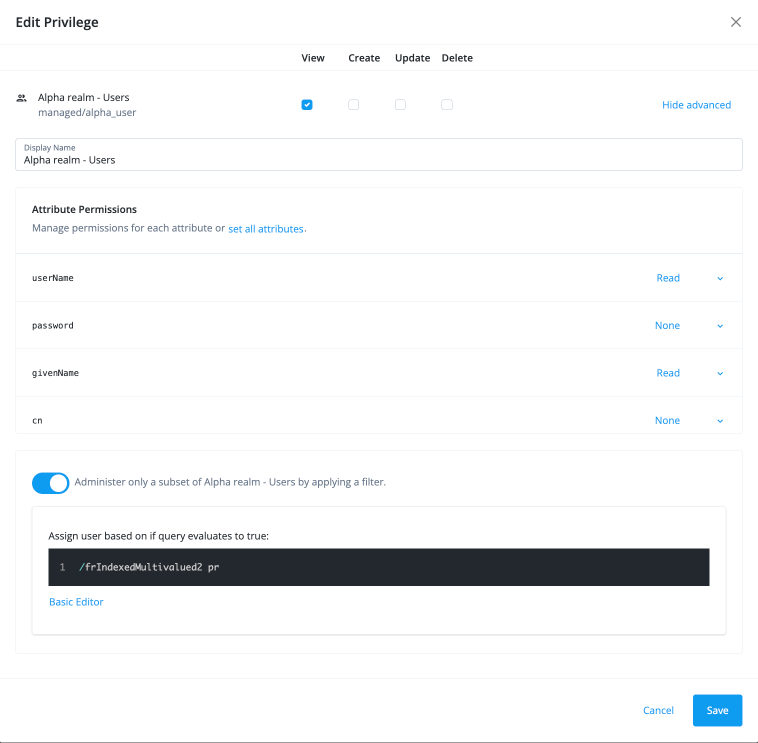
Reset the
RequestDirectsinternal role:-
Click Manage Identities > Internal Roles > RequestDirects.
-
On the RequestDirects modal, click Privileges.
-
Click the ellipsis icon () next to the [.label]#View privilege.
-
On the Edit Privilege modal, click Show advanced, and then click Advanced Editor.
-
In the Assign user based on if query evaluates to true: field, enter the condition
/frIndexedMultivalued2 pr. -
Click Save. The new RDVP allows an end-user’s direct reports to be updated virtually whenever the RDVP is recalculated due to a change.
Details
-