User registration
| While this PingOne Advanced Identity Cloud use case was validated for accuracy, it can always be improved. To provide feedback, click or in the top right of this page (you must be logged into Backstage). |
Description
Estimated time to complete: 20 minutes
In this use case, you test the default registration journey to observe how it works. Then, you duplicate it and make changes to meet your organization’s needs. Finally, you register as a new end user using the updated registration journey.
| To quickly test this user registration journey without building it from scratch, you can download it from the Ping Identity Integration Directory. Learn more in User Registration Journey. |
Prerequisites
Before you start work on this use case, ensure you have these prerequisites:
-
Access to your Advanced Identity Cloud development environment as an administrator.
-
A basic understanding of journeys and nodes.
Tasks
Task 1: Test the default registration journey
-
In the Advanced Identity Cloud admin UI, go to Journeys and click on the Registration journey.
-
In the Preview URL field, click and paste the URL into an Incognito window.
The Sign Up page for the tenant displays.
-
In the Sign Up page, enter the following details:
Field Value Username
asmithFirst Name
AmyLast Name
SmithEmail Address
asmith@example.comPassword
Ch4ng3it!Select a security question
Select
What’s your favorite color?Answer
Red -
Click Next.
You are logged into the Advanced Identity Cloud end-user UI as Amy Smith.
-
Close the Incognito window and go back to the Advanced Identity Cloud admin UI.
-
Go to Identities > Manage.
-
Enter
asmithin the Search field and press Enter.The user
asmithdisplays with the details you entered above: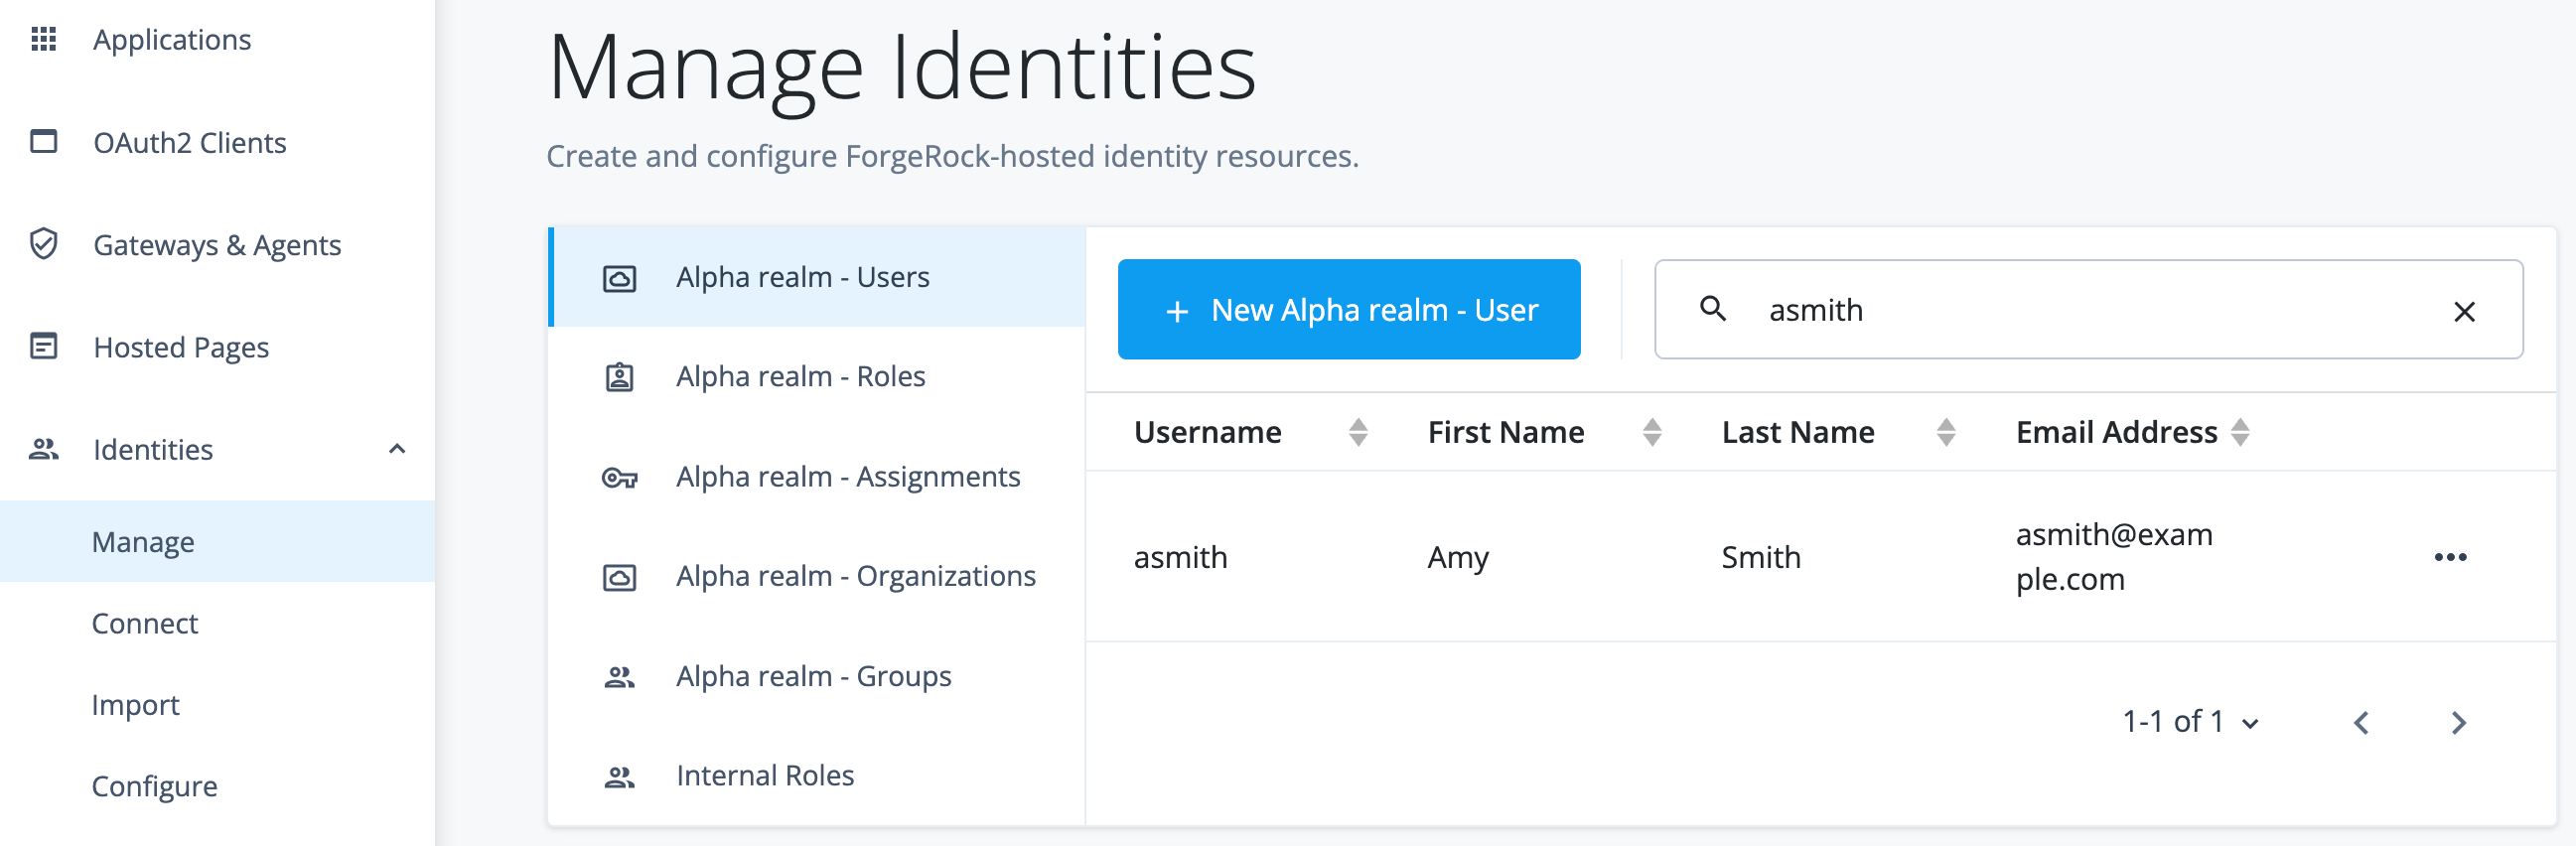
Task 2: Modify the default registration journey
-
In the Advanced Identity Cloud admin UI, go to Journeys.
-
On the Journeys page, click the ellipsis icon () for the
Registrationjourney and select Duplicate. -
In the Duplicate Journey window, enter the following details:
Field Value Name
User RegistrationIdentity Object
Alpha realm - Users
managed/alpha_userDescription
Updated user registration journey. -
Click Save.
The journey editor displays.
-
In the journey editor, select the KBA Definition node in the Page Node and click to delete this node.
This removes the security questions from the registration process.
-
Search for the
Email Suspend Nodeand drag it on to the journey canvas.The Email Suspend Node sends an email to the end user and only resumes the journey once they click a link in the email. In this case, they confirm their email address.
-
Select the Platform Password node in the Page Node and drag it out of the node on to the journey canvas.
-
Connect the Page Node outcome to the Email Suspend Node input.
-
Connect the Email Suspend Node outcome to the Platform Password node input.
-
Click the Email Suspend Node and review the default settings. You do not need to modify them.
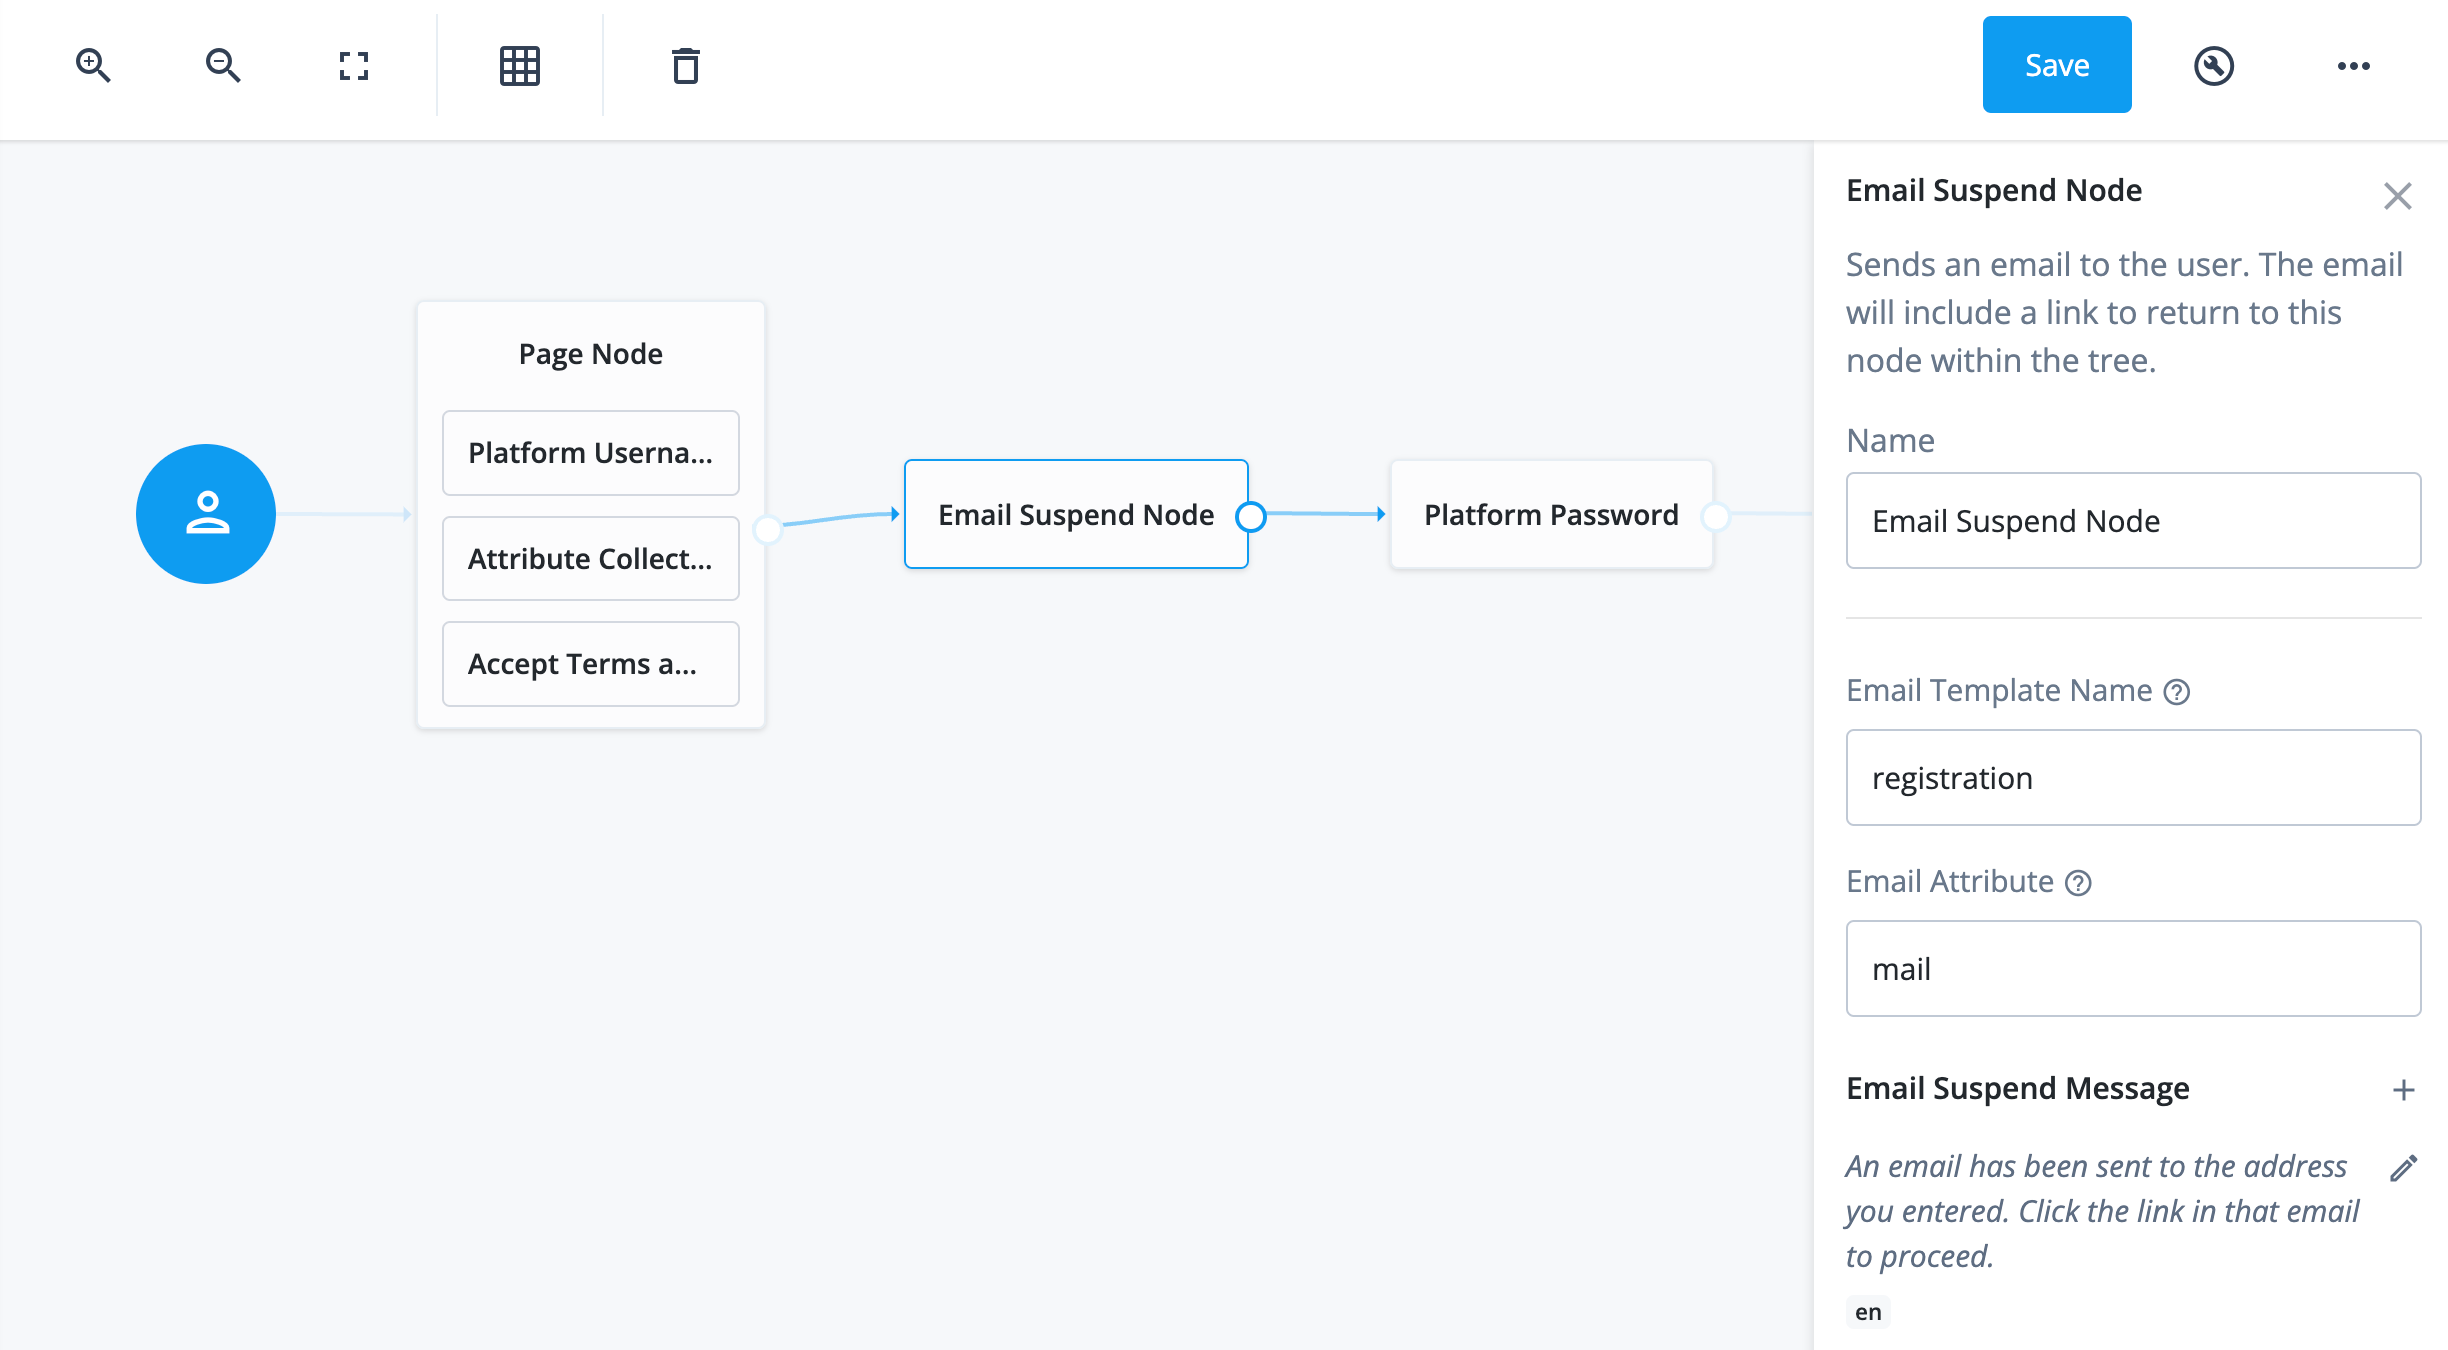
The Email Template Name field shows which email template is used in the journey.
-
Connect the Platform Password node outcome to the Create Object node input.
-
Click Save.
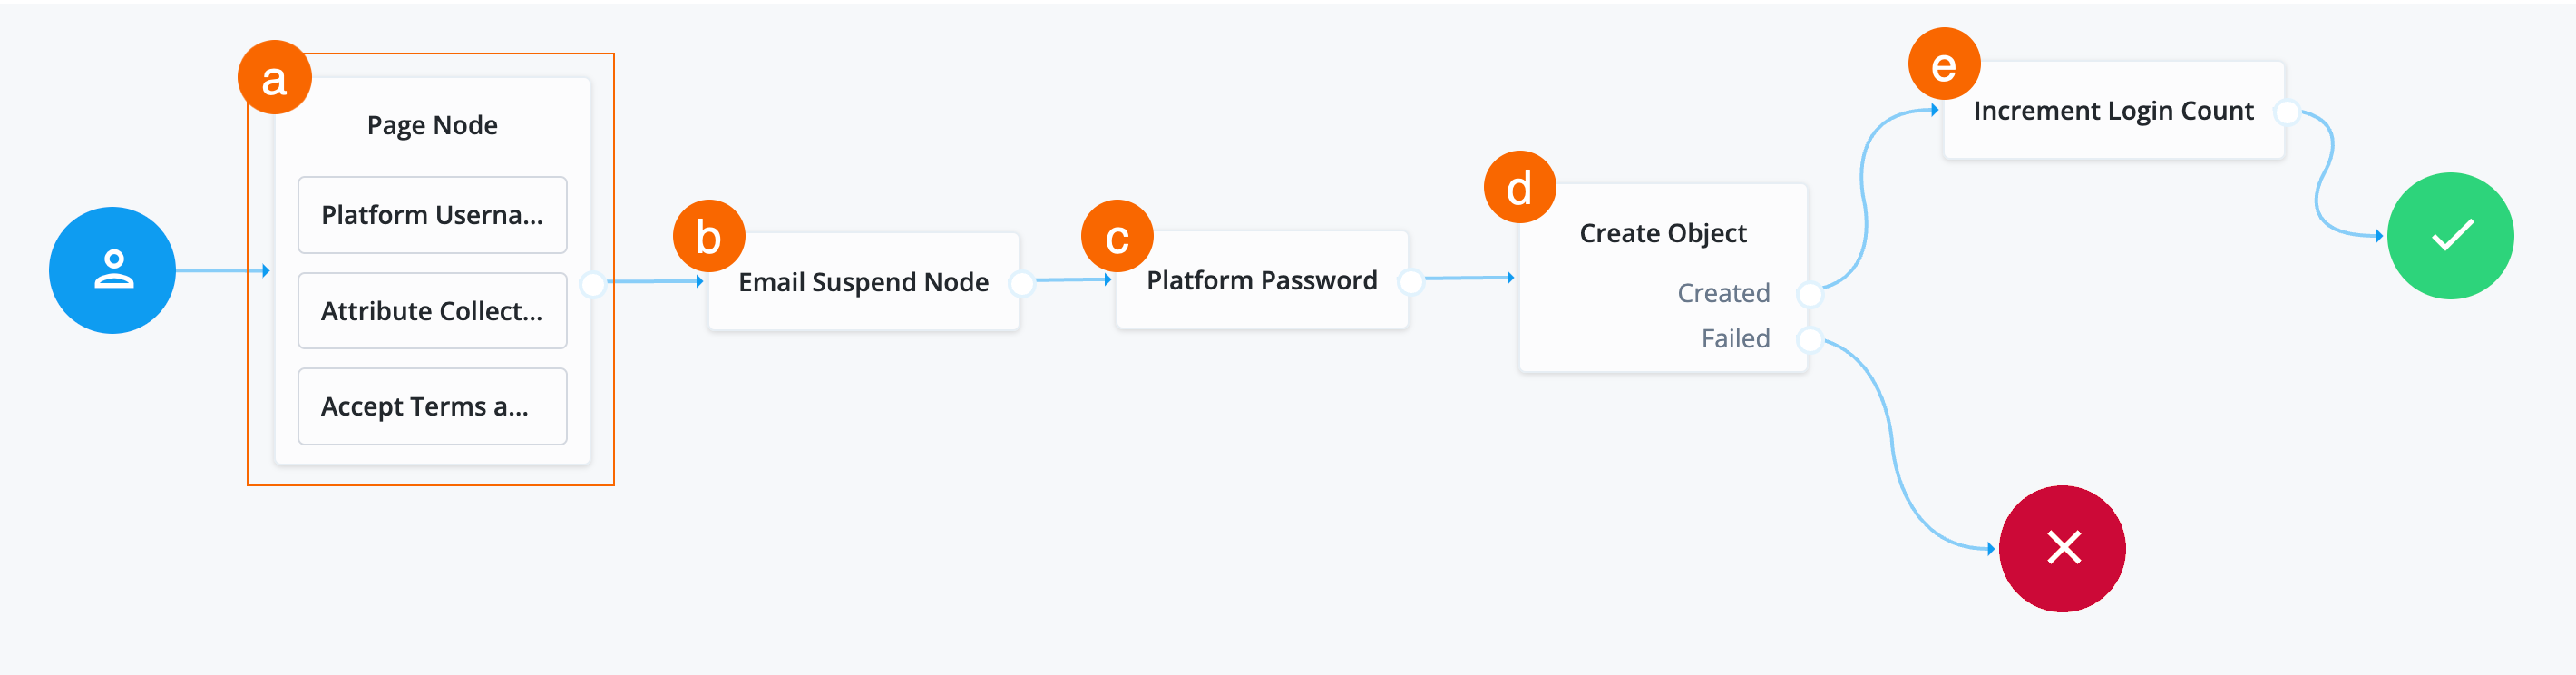
At this point, the journey is configured to:
-
a Collect the username, user details, terms and conditions, and present it on the same page.
-
b Email the end user so they can confirm their email address.
-
c Once confirmed, collect the end user’s password.
-
d Create the new identity in Advanced Identity Cloud.
-
e Increment the successful login count property for the end user.
Task 3: Check journey path connections
Use the following table to check the outcomes for each node in the User Registration journey.
Many nodes can have more than one outcome. "→" denotes that a node only has one outcome path.
| Source node | Outcome path | Target node |
|---|---|---|
Start (person icon) |
→ |
Page Node |
Page Node containing:
|
→ |
Email Suspend Node |
Email Suspend Node |
→ |
Platform Password |
Platform Password |
→ |
Create Object |
Create Object |
Created |
Increment Login Count |
Failed |
Failure |
|
Increment Login Count |
→ |
Success |
Validation
Now that you have created a new user registration journey, you are ready to validate your journey.
The steps in this validation register a new end user in Advanced Identity Cloud so you can verify the new User Registration journey.
| When you register the new end user, ensure you use an email address that you can access. |
Steps
-
In the Advanced Identity Cloud admin UI, go to Journeys and click on the
User Registrationjourney you just updated. -
In the Preview URL field, click and paste the URL into an Incognito window.
The Sign Up page for the tenant displays.
-
In the Sign Up page, enter the following details:
Field Value Username
agarciaFirst Name
AlexLast Name
GarciaEmail Address
Enter an email address for this new end user. You must have access to this email account.
-
Click Next. A message displays informing you an email has been sent.
-
Click the link in the Registration email to confirm your email address and continue registration.
-
Enter
Ch4ng3it!in the Password field. -
Click Next.
You are logged into the Advanced Identity Cloud end-user UI as Alex Garcia.
-
Close the Incognito window and go back to the Advanced Identity Cloud admin UI.
-
Go to Identities > Manage.
-
Enter
agarciain the Search field and press Enter.The user
agarciadisplays with the details you entered above.
Explore further
Reference material
| Reference | Description |
|---|---|
Information about the default registration journey. |
|
Conceptual information on journeys and their purpose in Advanced Identity Cloud. |
|
Learn about the configurable nodes Advanced Identity Cloud offers for use in journeys. |
|
Manage, group, and assign privileges to identities. |