Authentication nodes and journeys
Authentication journeys provide fine-grained authentication by allowing multiple paths and decision points throughout the authentication flow. Use them to build complex authorization scenarios, while offering a streamlined login experience to users.
Authentication journeys are made up of authentication nodes, which define actions taken during authentication. Each node performs a single task during authentication; for example, collecting a username or making a simple decision based on a cookie.
Nodes can have multiple outcomes rather than just success or failure. These outcomes let you create complex yet user-friendly authentication experiences by linking nodes together, creating loops and sections for different authentication scenarios, and nesting nodes within a journey.

For greater control of the authentication process, you can assign authentication levels to sections of a journey, with higher levels typically allowing access to more restricted resources.
Authentication levels
When a user authenticates successfully, PingOne Advanced Identity Cloud creates a session which allows PingOne Advanced Identity Cloud to manage the user’s access to resources. The session is assigned an authentication level. The authentication level is often used as a measure of the strength of the authentication performed. For example, a simple username and password might be assigned a low authentication level, while multi-factor authentication with push and WebAuthn might be assigned a high level.
Authorization policies might require a particular authentication level to access protected resources. When an authenticated user tries to access a protected resource without satisfying the authentication level requirement, PingOne Advanced Identity Cloud denies access to the resource and returns an advice indicating that the user must reauthenticate at the required level to access the resource.
The policy enforcement point, such as an agent, sends the user back to PingOne Advanced Identity Cloud for a session upgrade.
PingOne Advanced Identity Cloud provides the following nodes to manage authentication levels:
-
The Auth Level Decision node checks that the current authentication level is equal to or greater than the level specified in the node.
-
The Modify Auth Level node can raise or lower the authentication level.
Position these nodes to alter the authentication level, depending on the route taken through the authentication flow.
Account lockout
Use account lockout to limit the number of times an end-user can attempt to authenticate with invalid credentials before rendering their account inactive. Limiting the number of attempts helps to prevent password-guessing and brute-force attacks.
Authentication journeys have built-in support for account lockout. They also provide nodes for checking and changing the status of a user.
For more information refer to Account lockout.
Configure authentication journeys
The following table summarizes the high-level tasks required to configure authentication journeys:
| Task | Resources |
|---|---|
Design your user authentication journey Authentication journeys are flexible. For example, the same journey can branch for different use cases, or users can be forced to loop though branches until they’re able to present the required credentials. It’s easy to create a massive journey that’s difficult to understand, read, and maintain in the UI. To avoid this, PingOne Advanced Identity Cloud lets you nest journeys within journeys. The best way to tackle the design decision is to write down a list of required steps users would need to take to log in to your environment, and then check the list of nodes available in PingOne Advanced Identity Cloud. |
|
Configure your authentication journeys Use the journey editor to put together your journeys quickly. |
|
Configure webhooks, if required If you have configured the |
Specify the identity object type for a journey
Each authentication journey assumes a specific identity object type. The nodes in the journey use this object type to
verify the identity, for example, users, roles, or organizations. The default journeys provided with Advanced Identity Cloud assume
the identity object using the journey to authenticate is a realm-name user, for example Alpha realm - Users or
Bravo realm - Users.
When you create a new journey, you select the object type in the Identity Object list.
To change the object type of an existing journey:
-
In the Advanced Identity Cloud admin UI select Journeys > Journey name > Edit.
-
On the journey page, click the ellipses () at the top right of the page, then click Edit details.
-
Select a new object type in the Identity Object list.
Enable and disable an authentication journey
Custom authentication journeys are enabled by default, when they are saved. For security purposes, you can disable custom authentication journeys during development and testing, to prevent accidentally allowing access through these journeys. Rather than having unused authentication journeys enabled, you should disable the default authentication journeys until you need them.
When a user attempts to authenticate through a disabled journey, PingOne Advanced Identity Cloud returns a Tree does not exist error.
To enable or disable an authentication journey, set the enabled flag in the journey configuration:
To enable or disable an authentication journey, send a PUT request to update the journey’s configuration.
Specify the journey ID, the nodes in the journey, and set the enabled flag:
Example
$ curl \
--header "Content-Type: application/json" \
--header "<session-cookie-name>: AQIC5..." \
--header 'accept-api-version: protocol=2.1,resource=1.0' \
--header "If-Match: *" \
--request PUT \
--data '
  {
  "entryNodeId": "c11e9cf8-ef48-4740-876f-6300e2f46aef",
  "nodes": {
    "c11e9cf8-ef48-4740-876f-6300e2f46aef": {
      "displayName": "Page Node",
      "nodeType": "PageNode",
      "x": 147,
      "y": 25,
      "connections": {
        "outcome": "15839e1c-5085-4f58-bc94-c4cc848a0ae8"
      }
    },
    "15839e1c-5085-4f58-bc94-c4cc848a0ae8": {
      "displayName": "Data Store Decision",
      "nodeType": "DataStoreDecisionNode",
      "x": 349,
      "y": 25,
      "connections": {
        "true": "70e691a5-1e33-4ac3-a356-e7b6d60d92e0",
        "false": "e301438c-0bd0-429c-ab0c-66126501069a"
      }
    }
  },
  "enabled": false
}' \
'https://https://<tenant-env-fqdn>/am/json/realms/root/realms/alpha/realm-config/authentication/authenticationtrees/trees/myAuthTree'
{
  "_id": "myAuthTree",
  "_rev": "2070284866",
  "uiConfig": {},
  "entryNodeId": "c11e9cf8-ef48-4740-876f-6300e2f46aef",
  "nodes": {
    "c11e9cf8-ef48-4740-876f-6300e2f46aef": {
      "displayName": "Page Node",
      "nodeType": "PageNode",
      "x": 147,
      "y": 25,
      "connections": {
        "outcome": "15839e1c-5085-4f58-bc94-c4cc848a0ae8"
      }
    },
    "15839e1c-5085-4f58-bc94-c4cc848a0ae8": {
      "displayName": "Data Store Decision",
      "nodeType": "DataStoreDecisionNode",
      "x": 349,
      "y": 25,
      "connections": {
        "true": "70e691a5-1e33-4ac3-a356-e7b6d60d92e0",
        "false": "e301438c-0bd0-429c-ab0c-66126501069a"
      }
    }
  },
  "staticNodes": {
    "startNode": {
      "x": 50,
      "y": 25
    },
    "70e691a5-1e33-4ac3-a356-e7b6d60d92e0": {
      "x": 570,
      "y": 30
    },
    "e301438c-0bd0-429c-ab0c-66126501069a": {
      "x": 573,
      "y": 107
    }
  },
  "enabled": false
}
Disable direct access through a child journey
A child journey lets you nest authentication logic. There is no limit to the depth of nesting.
You configure a child journey like any other journey and call it from a parent journey using an Inner Tree Evaluator node.
You may want to hide child journeys as complete services. In other words, you may want to prevent users from authenticating directly through a child journey, either for security reasons or simply because the child journey is insufficient as a complete authentication service.
To prevent a journey from being used outside of its parent journey, send a PUT request to update the journey configuration,
including the journey ID and all the nodes in the journey and set the innerTreeOnly property to true:
Example
$ curl \
--header "Content-Type: application/json" \
--header "<session-cookie-name>: AQIC5..." \
--header 'accept-api-version: protocol=2.1,resource=1.0' \
--header "If-Match: *" \
--request PUT \
--data '
  {
  "entryNodeId": "c11e9cf8-ef48-4740-876f-6300e2f46aef",
  "nodes": {
    "c11e9cf8-ef48-4740-876f-6300e2f46aef": {
      "displayName": "Page Node",
      "nodeType": "PageNode",
      "x": 147,
      "y": 25,
      "connections": {
        "outcome": "15839e1c-5085-4f58-bc94-c4cc848a0ae8"
      }
    },
    "15839e1c-5085-4f58-bc94-c4cc848a0ae8": {
      "displayName": "Data Store Decision",
      "nodeType": "DataStoreDecisionNode",
      "x": 349,
      "y": 25,
      "connections": {
        "true": "70e691a5-1e33-4ac3-a356-e7b6d60d92e0",
        "false": "e301438c-0bd0-429c-ab0c-66126501069a"
      }
    }
  },
  "innerTreeOnly": true
}' \
'https://https://<tenant-env-fqdn>/am/json/realms/root/realms/alpha/realm-config/authentication/authenticationtrees/trees/myAuthTree"
{
  "_id": "myAuthTree",
  "_rev": "1081620278",
  "uiConfig": {},
  "entryNodeId": "c11e9cf8-ef48-4740-876f-6300e2f46aef",
  "innerTreeOnly": true,
  "nodes": {
    "c11e9cf8-ef48-4740-876f-6300e2f46aef": {
      "displayName": "Page Node",
      "nodeType": "PageNode",
      "x": 147,
      "y": 25,
      "connections": {
        "outcome": "15839e1c-5085-4f58-bc94-c4cc848a0ae8"
      }
    },
    "15839e1c-5085-4f58-bc94-c4cc848a0ae8": {
      "displayName": "Data Store Decision",
      "nodeType": "DataStoreDecisionNode",
      "x": 349,
      "y": 25,
      "connections": {
        "true": "70e691a5-1e33-4ac3-a356-e7b6d60d92e0",
        "false": "e301438c-0bd0-429c-ab0c-66126501069a"
      }
    }
  },
  "staticNodes": {
    "startNode": {
      "x": 50,
      "y": 25
    },
    "70e691a5-1e33-4ac3-a356-e7b6d60d92e0": {
      "x": 570,
      "y": 30
    },
    "e301438c-0bd0-429c-ab0c-66126501069a": {
      "x": 573,
      "y": 107
    }
  },
  "enabled": true
}
Configure authentication webhooks
Webhooks are used to send HTTP POST calls to a server with contextual information about an authentication session when a predefined event occurs, for example, logging out.
Webhooks are used from within authentication journeys, by the Register Logout Webhook node.
-
Under Native Consoles > Access Management, go to Realms > Realm Name > Authentication > Webhooks.
-
Select Create Webhook, specify a Webhook Name, and select Create.
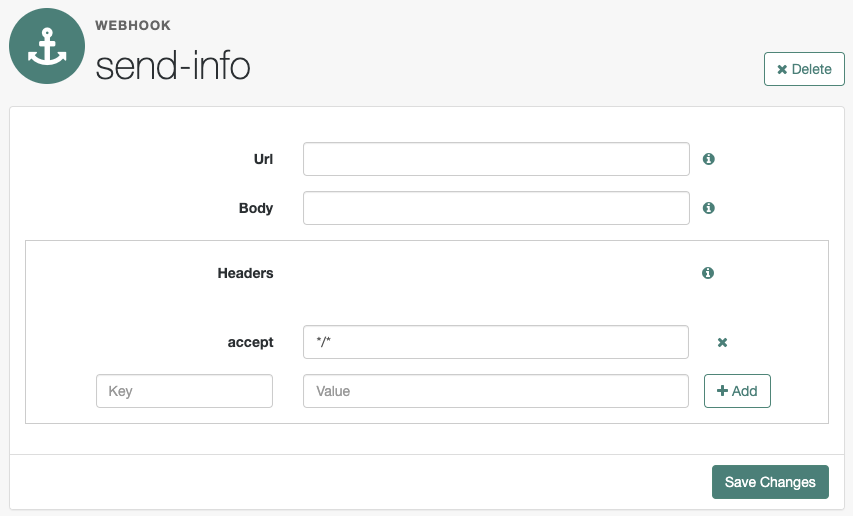
The webhook configuration screen is displayed:
-
Complete the fields as required:
- Url
-
The URL to which the HTTP POST is sent when the event occurs.
- Body
-
The body of the HTTP POST. To send different data formats, set the correct Content-Type header in the
Headerproperty, for example:-
Form Data. Enter the body value in the format
parameter=value¶meter2=value2, and set aContent-Typeheader ofapplication/x-www-form-urlencoded. -
JSON Data. Enter the body value in the format
{"parameter":"value","parameter2":"value2"}, and set aContent-Typeheader ofapplication/json.
-
- Headers
-
Any HTTP headers to add to the POST.
To add a header, enter the name of the header in the
Keyfield, and the value, and then click Add (➕).To remove a header, click Delete (✖).
The fields in a webhook support variables for retrieving values from the user’s session after successfully authenticating. Specify a variable in the following format:
${variable_name}.To access the type of webhook event, use the
WebhookEventTypeparameter key to return one of the following possible values:-
LOGOUT -
UPGRADE -
DESTROY -
MAX_TIMEOUT -
IDLE_TIMEOUT
For example, to retrieve the event type as a query parameter:
&event=${WebhookEventType}You can use a variable to access custom properties added to the session with the Set Session Properties node as well as the following default session properties:
Default session properties
Property Example value Description AMCtxId22e73c81-708e-4849-b064-db29b68ef943-105372
The audit ID for the session. This is logged as the
trackingIdsfield in PingOne Advanced Identity Cloud access audit logs.authInstant2022-02-28T14:06:31Z
The exact time that authentication completed.
AuthLevel5
The authentication level of the session, determined by the login mechanism used to create the session. For example, a journey can have an authentication level of 10.
Step-up authentication is triggered if an authentication level specified by an agent or policy that is designed to protect a resource, is greater than or equal to the value of the
AuthLevelsession property.For more information, refer to Session upgrade with MFA.
CharSetUTF-8
The character set for the session, set to
UTF-8.clientTypegenericHTML
The type of client, set to
genericHTML.FullLoginURLhttps://example.forgeblocks.com/platform/?realm=alpha
The full login URL, including query parameters.
Host192.0.2.1
The originating IP address of the authentication request.
HostName192.0.2.1
The host name that was used when the session was authenticated.
IndexTypeservice
Based on the value of the
authIndexValuequery parameter during authentication. Typically, this is set toservice.Localeen_US
The session locale.
loginURL/openam/UI/Login
The base login URL. A subset of
FullLoginURL.OidcSidg0wmSpoAIwH6HAwCnurvRcfYqh4
Unique session ID used by PingOne Advanced Identity Cloud to determine whether OIDC ID tokens granted for the same client relate to the same session. This appears when
Enable Session Management(storeOpsToken) is set to true in the OAuth 2.0 provider settings.Organizationo=alpha,ou=services,dc=openam,dc=forgerock,dc=org
The DN of the realm where authentication took place.
Principalid=demo,ou=user,o=alpha,ou=services,dc=openam,dc=forgerock,dc=org
The value of
sun.am.UniversalIdentifier.Principalsdemo
The username for the session.
ServiceExample
The name of the journey that was used to authenticate this session.
successURL/openam/console
The URL that was redirected to, upon a successful login request.
sun.am.UniversalIdentifierid=demo,ou=user,o=alpha,ou=services,dc=openam,dc=forgerock,dc=org
The DN of the user (username is lowercase).
UserIddemo
The
idvalue from thePrincipalproperty.UserProfileRequired
Can be one of:
Required,Create,Ignore, orCreateWithAlias. Based on the value of thedynamicProfileCreationauthentication configuration. Values other thanIgnoreindicates that user profile attributes were mapped based on theUser Attribute Mapping to Session Attributesetting. Refer to authentication configuration for details.Default:
Required.UserTokendemo
The username, as defined in the
Principalproperty.The following figure shows an example webhook, using variable substitutions:
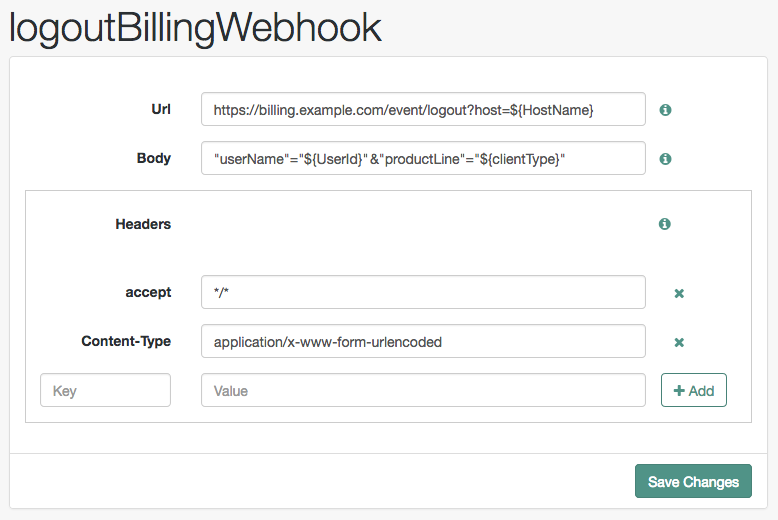
Specifying a variable that is not present in the user’s session places the literal variable text in the HTTP POST, for example
user=${UserId}, rather thanuser=demo.