MFA: Authenticate using a device with WebAuthn
WebAuthn lets users authenticate by using an authenticator device, for example, the fingerprint scanner on their laptop or phone.
The user’s browser communicates with the authenticator device. PingOne Advanced Identity Cloud can request that the browser activates authenticator devices with specified criteria. Example criteria are that the authenticator device must be built-in, not a USB device that the user can eject, or that the device must verify the user’s identity, not just the user’s presence.
To use WebAuthn with PingOne Advanced Identity Cloud, users must first register their authenticators. If recovery codes are enabled, users should copy their codes on successful registration.
Registration involves the selected authenticator creating, or minting, a key pair. The public key of the pair is returned to PingOne Advanced Identity Cloud and stored in the user’s profile. The private key is stored securely in the authenticator itself or in the platform managing the authenticators. The private key does not leave the client at any time.
When authenticating with WebAuthn, the authenticator device locks data with its stored private key and sends it to PingOne Advanced Identity Cloud. PingOne Advanced Identity Cloud verifies the data using the public key stored in the user’s profile. If the data verification succeeds and passes any attestation checks, PingOne Advanced Identity Cloud considers the authentication successful.
|
PingOne Advanced Identity Cloud supports WebAuthn for the following user agents on the specified platforms:
| Browser(1) | Platform |
|---|---|
Google Chrome |
Desktop |
Android |
|
Safari |
Desktop |
iOS |
|
Microsoft Edge |
Desktop |
Mozilla Firefox |
Desktop |
(1) Latest stable versions are supported.
Journeys for WebAuthn
The example journey that follows registers the user’s device if necessary, and authenticates the user with the device. If the user has already registered their device, they only need to enter their username, and then perform the authorization gesture with their registered device to complete authentication.
If the user doesn’t have a registered device, they must provide both their username and their password. The Data Store Decision node confirms their identity before allowing them to register their device. The user then authenticates with the new device to complete authentication.
|
This sample journey doesn’t include user-friendly features, such as letting the user retry their password if they mistype it. |
Create the WebAuthn journey
-
In the Advanced Identity Cloud admin console, start a custom journey for WebAuthn.
Learn more in Custom journeys.
-
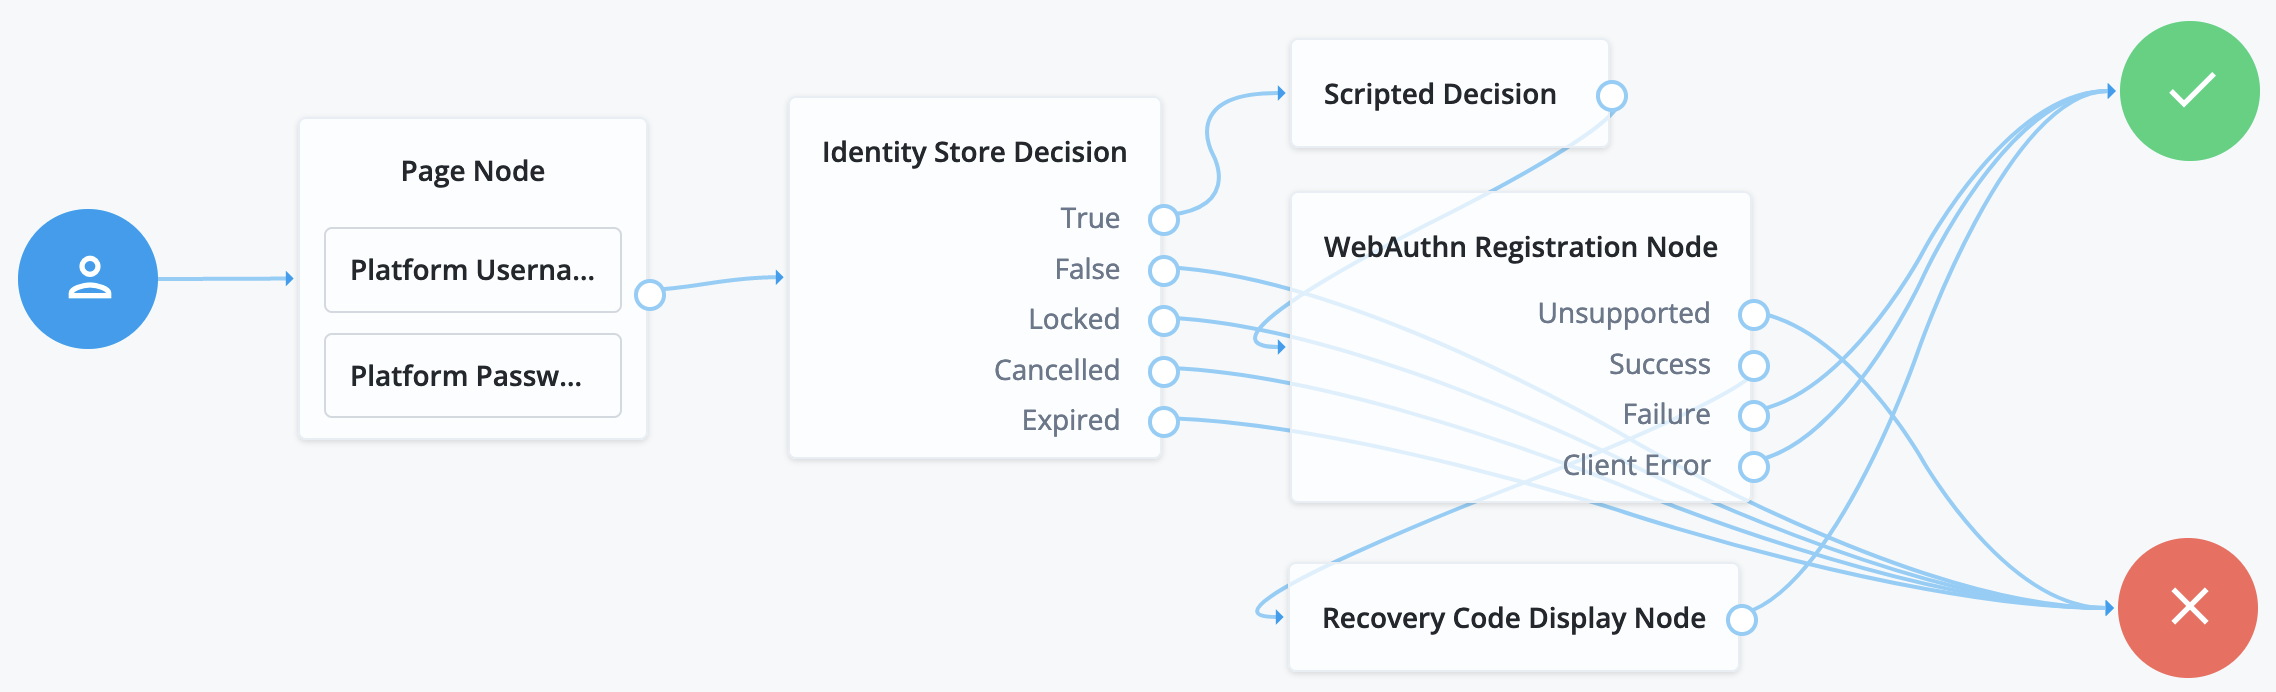
Add the following nodes to your journey:
-
Connect the nodes as demonstrated in the following figure:

-
On the WebAuthn Authentication node, select Allow recovery codes.
-
On the WebAuthn Registration node, select Generate recovery codes.
-
Save your changes.
Test the WebAuthn journey
-
Register a test user account unless you have already done so.
-
In an incognito browser window, browse to the WebAuthn journey. The URL looks something like:
https://<tenant-env-fqdn>/am/XUI/?realm=alpha&authIndexType=service&authIndexValue=myWebAuthnJourneyA login screen prompts for the username.
-
Enter the username for the test user account.
-
If the user does not have a registered device:
-
Enter the test user’s password when prompted.
-
Register a WebAuthn authenticator by performing an authorization gesture.
For example, press the button on a connected YubiKey or scan your fingerprint.
The browser may present a consent pop-up to allow access to the available authenticators.
When you grant consent, the browser activates the relevant authenticators, ready for registration.
If the device registration is successful, the journey returns to the WebAuthn Authentication node.
-
-
When prompted, authenticate by performing an authorization gesture with a registered device.
The UI displays the user profile page.
-
Browse to Edit Your Profile > 2-Step Verification > Change.
The UI displays a list of the registered devices that you can rename or delete.
The default name for a new WebAuthn device is
New Security Key.
Configure usernameless authentication with ForgeRock Go
With ForgeRock Go, you can create a secure and seamless login experience by authenticating with any credential on the user’s device that supports FIDO2 WebAuthn.
You can also extend passwordless authentication to include usernameless authentication with popular authenticators that support resident keys; for example, Windows Hello (biometric authenticators).
To use usernameless authentication, you must register an authenticator that supports resident keys to the user’s profile, and enable the option to associate a certificate on the device with the user’s username.
Once registered, that device can be used to authenticate the user without them having to provide their credentials; they need to select the appropriate entry to use from the list their device provides.
To configure usernameless authentication with ForgeRock Go, create a web authentication registration journey to associate a device that supports resident keys with a user. The registration journey is similar to that described in Journeys for WebAuthn.
Create a second journey that lets users authenticate to PingOne Advanced Identity Cloud without entering their username or password, by using ForgeRock Go.
|
The journeys created here do not include user-friendly features, such as allowing retries or redirecting for further help on failures. |
Create the ForgeRock Go registration journey
-
[mfa-webauthn-profile-encryption] for the realm if you have not already done so.
-
In the Advanced Identity Cloud admin console, start a custom journey for ForgeRock Go registration.
Learn more in Custom journeys.
-
In the Advanced Identity Cloud admin console, add the following nodes to your journey:
-
(Optional) Scripted Decision node
When configured for ForgeRock Go, by default the WebAuthn Registration node stores the journey’s shared state variable
usernameon the device. During authentication, this value later identifies the user.Use a Scripted Decision node to customize the display name or string to be saved in the shared state.
Script to set the display name-
Next-generation
-
Legacy
var user = nodeState.get('username'); var identity = idRepository.getIdentity(user); var displayName = ''; var givenName = identity.getAttributeValues('givenName')[0]; var surname = identity.getAttributeValues('sn')[0]; var email = identity.getAttributeValues('mail')[0]; if (givenName) { displayName += givenName; } if (surname) { displayName += ' ' + surname; } if (email) { displayName += ' (' + email + ')'; } if (displayName) { nodeState.putShared('displayName', displayName); } else { nodeState.putShared('displayName', user); } action.goTo("true");javascriptvar fr = JavaImporter(org.forgerock.openam.auth.node.api.Action); var user = nodeState.get('username').asString(); var displayName = ''; var givenName = idRepository.getAttribute(user, 'givenName'); var surname = idRepository.getAttribute(user, 'sn'); var email = idRepository.getAttribute(user, 'mail'); if (givenName) { displayName += givenName.toArray()[0]; } if (surname) { displayName += ' ' + surname.toArray()[0]; } if (email) { displayName += ' (' + email.toArray()[0] + ')'; } if (displayName) { nodeState.putShared('displayName', displayName.toString()); } else { nodeState.putShared('displayName', user.toString()); } outcome = 'true'; action = fr.Action.goTo("true").build();javascript -
-
Connect the nodes as demonstrated in the following figure:
If you do not use the Scripted Decision node, connect the Identity Store Decision node
Trueoutput directly to the WebAuthn Registration node. -
On the Identity Store Decision node, select Username as Universal Identifier.
-
If you use the Scripted Decision node:
-
Select your script in the Script list.
-
Add the outcome of your script,
truein this example, in the Outcomes field.
-
-
On the WebAuthn Registration node:
-
Select Username to device.
-
If you do not use the Scripted Decision node, add
userNamein the Shared state attribute for display name field. -
If you use the Scripted Decision node, add the shared state variable name, such as
displayName, in the Shared state attribute for display name field.
-
-
Save your changes.
Create the ForgeRock Go authentication journey
-
[mfa-webauthn-profile-encryption] for the realm if you have not already done so.
-
In the Advanced Identity Cloud admin console, start a custom journey for ForgeRock Go authentication.
Learn more in Custom journeys.
-
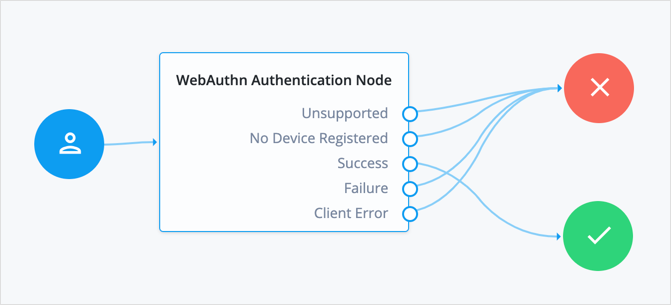
In the Advanced Identity Cloud admin console, add a WebAuthn Authentication node to your journey.
-
Connect the nodes as demonstrated in the following figure:
-
On the WebAuthn Authentication node, ensure Username from device is enabled.
-
Save your changes.
Register with ForgeRock Go
Follow these steps to register a device for usernameless authentication, and then authenticate with no username or password, only an authorization gesture.
-
Register a test user account unless you have already done so.
-
In an incognito browser window, browse to the ForgeRock Go registration journey. The URL looks something like:
https://<tenant-env-fqdn>/am/XUI/?realm=alpha&authIndexType=service&authIndexValue=myForgeRockGoRegistrationJourneyA login screen prompts for your credentials.
-
Sign in with the username and password of the test user.
-
If you are authenticating from a FIDO2-enabled device, it prompts you for the method to verify your identity.
For example, you might use a USB security key or a built-in biometric sensor.
Select the option to associate with the user.
-
Perform the authorization gesture of the chosen option when asked to do so.
For example, press the button on your USB security key or scan your fingerprint.
The UI displays the user profile page.
-
Browse to Edit Your Profile > 2-Step Verification > Change.
The UI displays a list of the registered devices that you can rename or delete.
The default name for the WebAuthn device is
New Security Key. -
(Optional) Click the ellipsis icon, , select Edit Name, and give a suitable name to the new WebAuthn device, such as
MacBook Touch ID.
Authenticate with ForgeRock Go
After registering, authenticate with ForgeRock Go without your username or password:
-
Sign out.
-
In the same browser window, browse to the ForgeRock Go authentication journey. The URL looks something like:
https://<tenant-env-fqdn>/am/XUI/?realm=alpha&authIndexType=service&authIndexValue=myForgeRockGoAuthenticationJourney -
Perform the authorization gesture of the chosen option when prompted.
A list of the accounts associated with the authentication device displays:
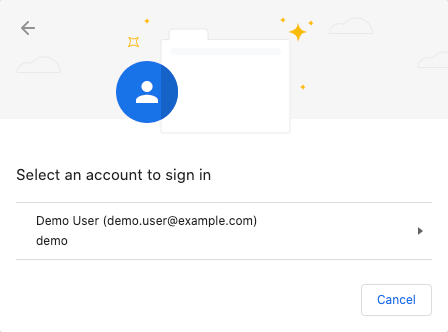
In this example, the user’s full name and email address appear. The Scripted Decision node gathered them during registration.
-
Select the account to sign in.
The UI displays the user profile page without you having to enter your username or password.
| To design simple user journeys that invoke biometric sensors on FIDO2-enabled devices to add biometrics to your authentication journeys, refer to the Community blog Use case: Configure biometric authentication in PingOne Advanced Identity Cloud. |