Tenant administrator settings
Tenant administrator groups
There are two groups of users that can access a tenant admin console:
-
Tenant administrator: Users in this group can manage realm settings and most tenant settings except for those related to managing other tenant administrators. All tenant administrator identities get the same realm permissions, and these are not configurable.
-
Super administrator: Users in this group are tenant administrators with the following elevated permissions:
-
Invite tenant administrators.
-
Grant super administrator privileges to tenant administrators.
-
Revoke super administrator privileges from tenant administrators.
-
Enable federated access for a tenant.
-
Enforce federated access for some or all administrators in a tenant.
-
The tenant provisioning process initially creates a single super administrator.
Register to access a tenant admin console
| Tenant administrators | Super administrators[1] | |
|---|---|---|
Action allowed? |
Yes |
Yes |
If you are added as a tenant administrator to an Advanced Identity Cloud tenant, you receive an email that prompts you to complete the registration process.
-
When you receive the Complete your Ping Identity Advanced Identity Cloud registration email, click Complete Registration.
-
Perform one of the following sets of steps:
-
To use your email and password to register with Advanced Identity Cloud, on the Complete Registration page:
-
Enter your email address, first name, last name, and your password.
-
Click Next.
-
Choose a country of residency, accept Ping Identity’s privacy policy, and click Next.
-
Choose to set up 2-step verification or skip this option. The Advanced Identity Cloud dashboard should now display.
-
-
To use Microsoft Azure or AD FS to register with Advanced Identity Cloud, on the Complete Registration page:
-
Choose to continue with Microsoft Azure or AD FS.
-
Enter your credentials and log in.
-
Choose a country of residency, accept Ping Identity’s privacy policy, and click Next. The Advanced Identity Cloud dashboard should now display.
-
-
Sign on to a tenant admin console
| Tenant administrators | Super administrators[1] | |
|---|---|---|
Action allowed? |
Yes |
Yes |
You can access the sign-on page of a tenant admin console using the following URL:
https://<tenant-env-fqdn>/login/admin
For example, if your tenant environment FQDN is "openam-mycompany-ew2.id.forgerock.io", use the URL "https://openam-mycompany-ew2.id.forgerock.io/login/admin".
Upon successful authentication, you are automatically switched to the Alpha realm.
Multiple failed authentication attempts cause Advanced Identity Cloud to lock a tenant administrator’s account. Learn more about unlocking an account in Unlock a tenant administrator’s account.
Edit your own tenant administrator profile
| Tenant administrators | Super administrators[1] | |
|---|---|---|
Action allowed? |
Yes |
Yes |
-
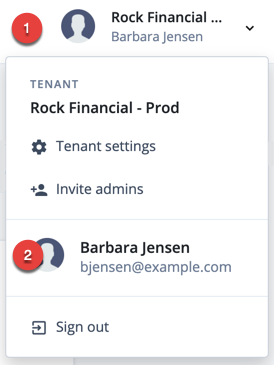
In the Advanced Identity Cloud admin console, open the TENANT menu (upper right), and click your username.
-
On your tenant administrator profile page:
-
To edit your name or email address, click Edit Personal Info.
Provide the information, then click Save. -
In the Sign-in & Security card:
-
To change your username, click Update.
-
Enter your current password, then click Next.
-
Enter your new username, then click Next.
You’ll receive an email confirming your username has been changed.
-
-
To change your password, click Reset.
-
Enter your current password, then click Next.
-
Enter your new password, then click Next.
You’ll receive an email confirming your password has been changed.
-
-
By default, 2-Step Verification is enabled.
Learn more in Manage tenant administrator 2-step verification.
-
-
To view the social identity providers you can use to log into your account, view the Social Sign-in card.
-
To view the devices that have accessed your account, view the Trusted Devices card.
-
To view the applications you have granted access to your account, view the Authorized Applications card.
-
To download your account data, in the Account Controls card, beside Download your data, click the downward pointing arrow, and click Download.
-
To delete your account data, in the Account Controls card, beside Delete account, click the downward pointing arrow, and click Delete Account.
-
Invite tenant administrators
| Tenant administrators | Super administrators[1] | |
|---|---|---|
Action allowed? |
No |
Yes |
Send invitations to people when you want to authorize them to view or manage settings for your tenant.
-
In the Advanced Identity Cloud admin console, open the TENANT menu (upper right).

-
Click Invite admins.
-
In the Invite Admins dialog box, enter a comma-separated list of email addresses for the people you want to authorize.
-
Grant people specific administrator access by selecting either Super Admin or Tenant Admin.
-
Click Send Invitations.
Advanced Identity Cloud sends an email to each address, containing instructions to set up an administrator account.
After each invitee completes the instructions in the invitation email, they become a super administrator or tenant administrator (depending on your choice in step 4).
View the tenant administrators list
| Tenant administrators | Super administrators[1] | |
|---|---|---|
Action allowed? |
No |
Yes |
From the tenant administrators list, you can invite, deactivate, or delete other tenant administrators.
-
In the Advanced Identity Cloud admin console, click the tenant name to expand the settings menu.
-
Click Tenant Settings > Admins.
-
To invite a new tenant administrator:
-
Click + Invite Admins.
-
Follow steps 3–4 in the invite tenant administrators instructions above.
-
-
To deactivate a tenant tenant administrator:
-
Find a tenant administrator with the label Active.
-
Click More (), and select Deactivate.
-
-
To delete a tenant administrator, click More (), and select Delete.
When you deactivate a tenant administrator, their status changes, but they remain on the list of tenant administrators.
When you delete a tenant administrator, their username is removed from the list of tenant administrators, and permissions are removed from their user profile. This operation cannot be undone!
-
Unlock a tenant administrator’s account
| Tenant administrators | Super administrators[1] | |
|---|---|---|
Action allowed? |
No |
Yes |
If Advanced Identity Cloud locks out one of your company’s tenant administrators due to multiple failed login attempts, the account can be unlocked by a super administrator.
-
In the Advanced Identity Cloud admin console, open the TENANT menu (upper right), and click your username.
-
Click Tenant Settings > Admins.
-
Find the entry for the tenant administrator who was locked out.
-
In the same row, click More () and choose Activate.
If you are the only super administrator in your organization and your account is locked, create a support case in the Ping Identity Support Portal.
Modify a tenant administrator’s group
| Tenant administrators | Super administrators[1] | |
|---|---|---|
Action allowed? |
No |
Yes |
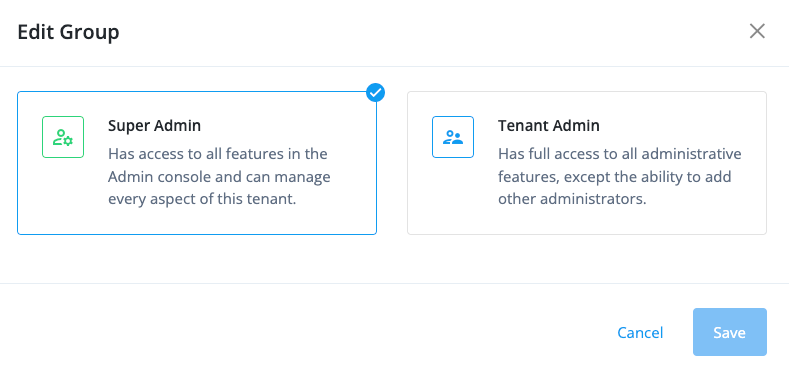
To modify a tenant administrator’s group
-
Go to Tenant Settings > Admins.
-
Click a tenant administrator.
-
In the Group section, click Edit.
-
On the Edit Group page:
-
To grant super administrator access, select Super Admin.
-
To grant tenant administrator access, select Tenant Admin.
-
-
Click Save.
Manage tenant administrator 2-step verification
| Tenant administrators | Super administrators[1] | |
|---|---|---|
Action allowed? |
Yes |
Yes |
2-step verification, also known as multifactor authentication (MFA), prevents unauthorized actors from signing on as a tenant administrator by asking for a second factor of authentication.
Advanced Identity Cloud provides tenant administrators with the following second factor options:
-
ForgeRock Authenticator
Lets you register the following authenticator applications:-
Any third-party authenticator application that supports the Time-Based One-Time Password (TOTP) open standard. For example, Google Authenticator or Salesforce Authenticator.
-
Security Key or Touch ID
Lets you register an authenticator device such as the fingerprint scanner on your laptop or phone. Learn more in MFA: Authenticate using a device with WebAuthn.
Register for 2-step verification
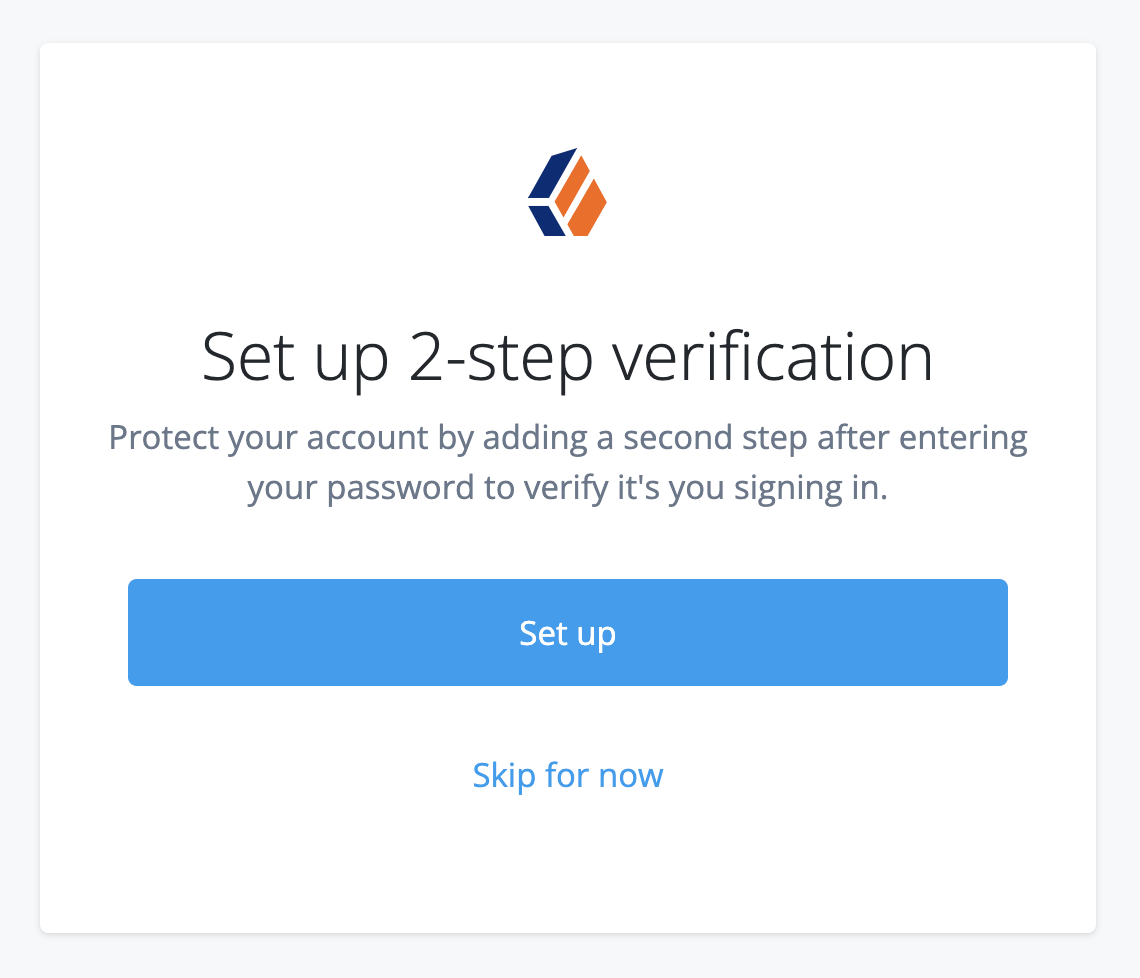
You can register for 2-step verification when you sign on to the Advanced Identity Cloud admin console for the first time:
-
Click Set up to let Advanced Identity Cloud guide you through the device registration process.
The ForgeRock Authenticator option also lets you register any TOTP compliant third-party authenticator application. -
Alternatively, click Skip for now to temporarily skip registration for 2-step verification. You’ll be asked to register again the next time you sign on.
The option to skip registration for 2-step verification is a deprecated feature, and soon 2-step verification will be mandatory in all tenants. To understand if this affects you, read the Tenant administrator mandatory 2-step verification FAQ.
Manage verification codes
During registration for 2-step verification, Identity Cloud displays 10 verification codes.
| Be sure to copy the codes and store them in a secure location. |
-
You’ll use the verfication codes as recovery codes if you cannot use your registered device to sign in.
-
You can use each verification code only once. Then, the code expires.
-
If, for some reason, you need to re-register a device, first delete your previously registered device.
Change 2-step verification options
-
In the Advanced Identity Cloud admin console, open the TENANT menu (upper right) and choose your tenant administrator username.
-
On your tenant administrator profile page, find 2-Step Verification and click Change.
The 2-Step/Push Authentication page lists devices you’ve registered for MFA.
To delete a device, click its More () menu, and choose Delete.
-
When you delete a device from the list, 2-step or push authentication is disabled. You cannot undo the delete operation.
-
Once you sign off and attempt to sign back on again, you will be asked if you want to set up a second factor.
-