PingOne Advanced Identity Cloud documentation
Single-page edition
All PingOne Advanced Identity Cloud docs on a single HTML page. Use this for text searches, or to make a PDF.
PingOne Advanced Identity Cloud
PingOne Advanced Identity Cloud (formerly ForgeRock Identity Cloud) is a comprehensive IAM service. Our service lets you deploy applications anywhere: on-premises, in your own private cloud, or in your choice of public cloud.
With PingOne Advanced Identity Cloud, you can manage the complete lifecycle of identities including:
-
Flexible and extensible user journeys
-
Real-time identity synchronization between cloud and on premises
-
Policy enforcement using PingGateway
-
Device-profiling authentication in user journeys using our SDKs
And much more...
Support and customer success
Ping Identity is here to help you with your identity journey. You’ll have a dedicated team to help you achieve your goals. Find all the resources you need Backstage.
Our dedicated cloud engineering team monitors and manages your environment. We’ll help you with moving configuration, and with secrets management, between environments. Learn about moving configuration between environments.
Getting started with PingOne Advanced Identity Cloud
Step 1: Register your Advanced Identity Cloud tenant
After your organization purchases PingOne Advanced Identity Cloud and requests a tenant, Ping Identity prepares the tenant for initial use. Afterward, Ping Identity sends a registration email to the person from your organization that is designated as the tenant administrator.
If you are the designated tenant administrator and received the registration email, click on the registration link and perform the sign up steps in the next section.
Step 2: Sign in to Advanced Identity Cloud
If you haven’t received a confirmation email, contact your Ping Identity representative.
| You receive an email for each environment. |
-
In a supported web browser, enter your first name, last name, and password.
-
Accept the privacy policy.
-
Set up Multi-factor authentication (MFA).
Step 3: Know your tenant
-
Take 5 minutes to read about Advanced Identity Cloud and its capabilities.
-
Take 5 minutes to read about your tenant.
Step 4: Take a test drive
Here are some things you can try in your development environment:
-
Create an external role for your user.
-
Add an application to your identity platform.
-
Sign out of your tenant administrator session, then be the end-user:
-
Using a browser, go to your tenant URL.
-
Sign in as the test user you created.
-
Step 5: Get going
Once you’re ready to stage real users and applications in your tenant, start with these steps:
-
Take some time to read up on how your engineering environments work.
-
To provision your tenant, import identity profiles to your tenant.
-
Add an application to your tenant.
-
Sync your application users with users in your tenant.
-
Use the ForgeRock SDKs to set up authentication.
Admin UIs
PingOne Advanced Identity Cloud provides three user interfaces (UIs) to help you manage your tenant:
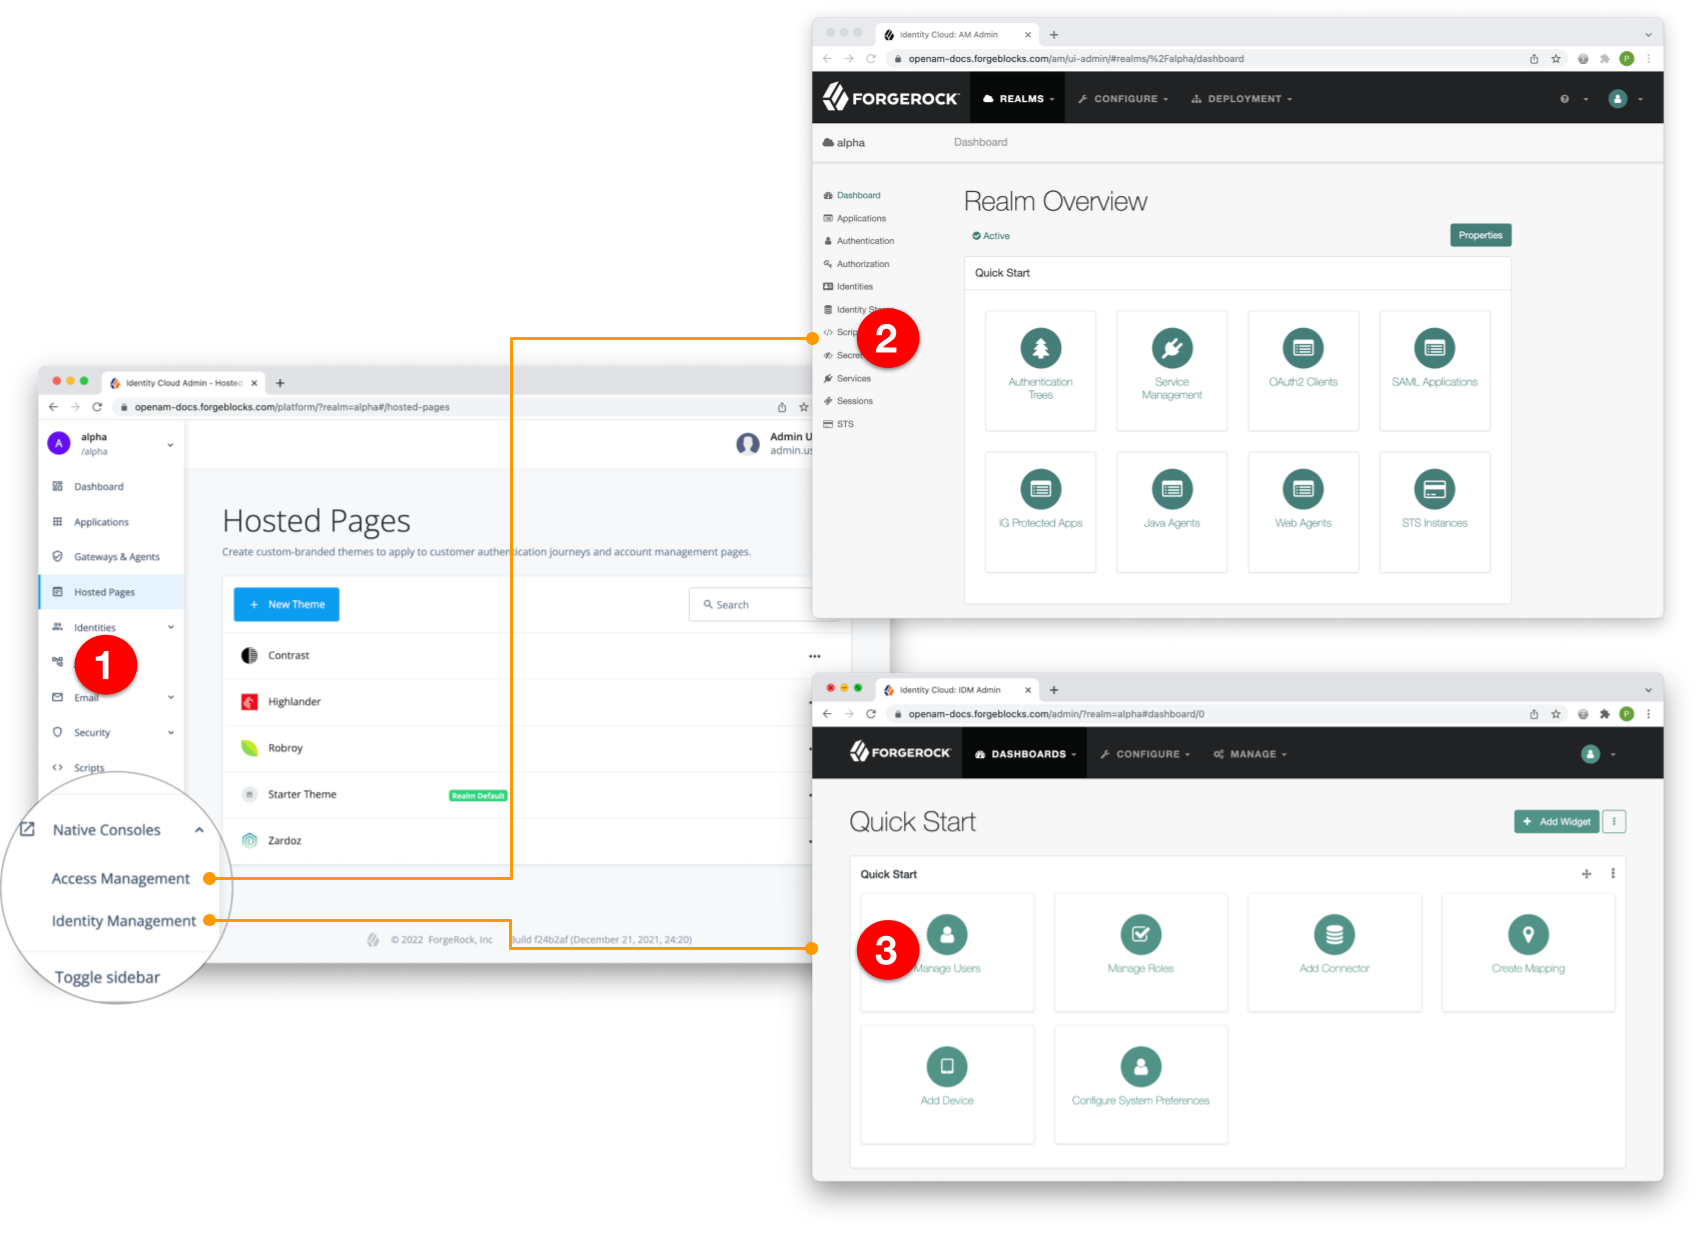
① Advanced Identity Cloud admin UI
② AM admin UI (native console)
③ IDM admin UI (native console)
Advanced Identity Cloud admin UI
This is the primary UI, designed to handle most of the day-to-day tasks associated with managing your tenant. To get started, take a test drive.
AM admin UI and IDM admin UI (native consoles)
These are secondary UIs, intended for specialist tasks when configuring AM and IDM in Advanced Identity Cloud. They let you access functionality not yet available in the Advanced Identity Cloud admin UI.
You don’t need separate credentials to access these UIs. If you are signed into the Advanced Identity Cloud admin UI, you can seamlessly switch from one UI to another.
- AM admin UI
-
Use to register SAML 2.0 applications, for example.
To open, in the Advanced Identity Cloud admin UI, click Native Consoles > Access Management.
- IDM admin UI
-
Use to set up a built-in connector, for example, or map your identities to identities stored in an external resource.
In the Advanced Identity Cloud admin UI, click Native Consoles > Identity Management.
Advanced Identity Cloud analytics dashboard
PingOne Advanced Identity Cloud analytics dashboard provides a comprehensive snapshot of your Advanced Identity Cloud system usage. You can use the dashboard to gain valuable insights on your tenants:
Monitor the number of users and engagements
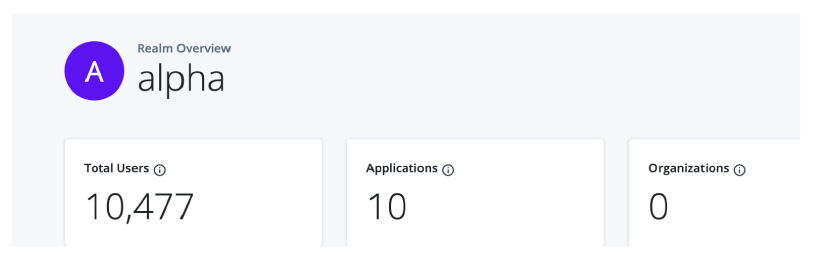
At the top of the Identity Cloud analytics dashboard, there is a summary of total number of users, applications, and organizations in your realm. These realm usage totals are summarized as follows:
-
Total Users. Displays the total count of active and inactive users in this realm.
-
Applications. Displays the total number of current applications in this realm.
-
Organizations. Displays the total number of organizations in this realm.
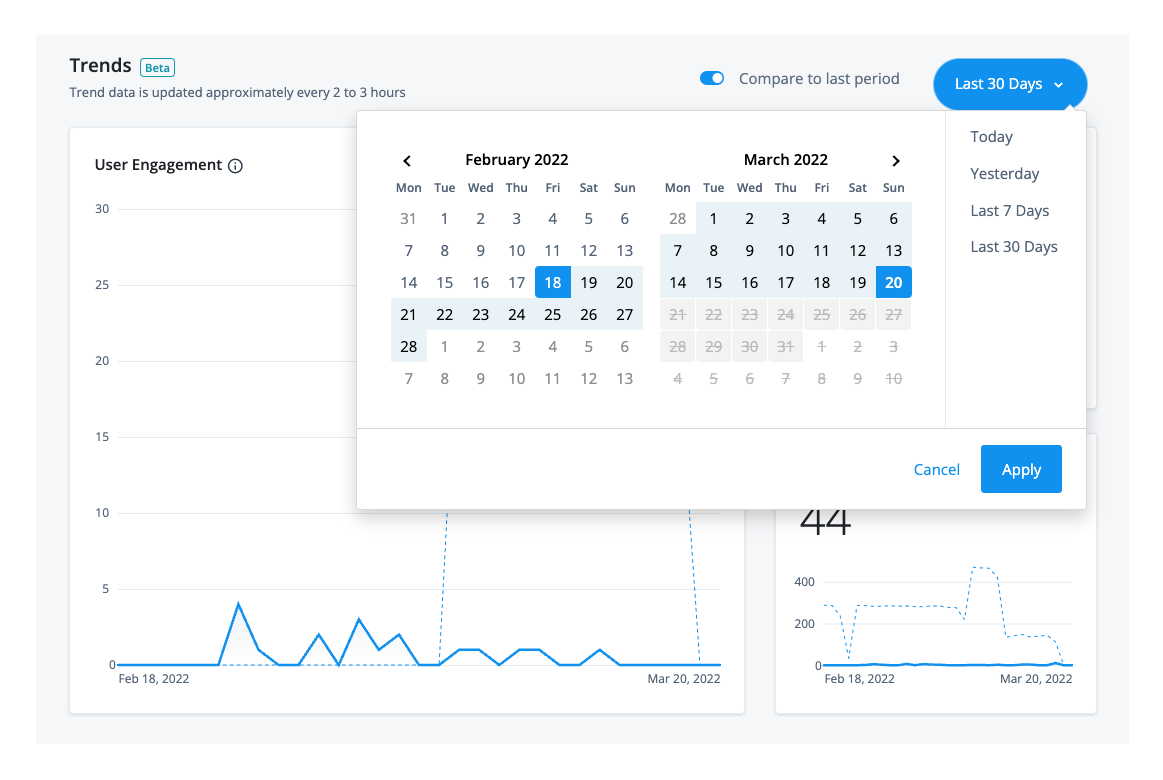
Below the realm usage totals, Identity Cloud analytics dashboard displays three trendline charts: user engagements, total users, and new users. These trendline charts are updated every two to three hours and are summarized as follows:
-
User Engagement. Displays the trendline of the number of user engagements within a given time period; by default, the last 30 days. A user engagement is counted when a user is involved in an identity operation within the given time period. An identity operation can be any of the following:
-
Sign-in/authentication
-
Token refresh (for example, token issuance, validation, and refresh)
-
Password creation or change
A user who has multiple user engagements within a given time period is counted once.
-
-
Total Users Trend. Displays the trendline for total users (active and inactive) during the time period in this realm.
The total users trend number may differ from the Total Usersnumber at the top of the page as the data depends on the selected time period and the update frequency. For example, new users who have been added to the system within the last hour may not appear yet on the page. -
Sign Ups. Displays the trendline for new user sign-ups during the time period in this realm.
Filter timelines
Each chart displays the usage numbers for the current time period, expressed as solid lines; the dotted lines display
the numbers for the previous time period. For example, if the time period is Last 30 days, the solid line displays
the numbers over the last 30 days from today’s date; the dotted line displays the previous 30-day numbers.
To compare the numbers for a specific date, hover over a point on either line to display the numbers for the current and the previous time periods.
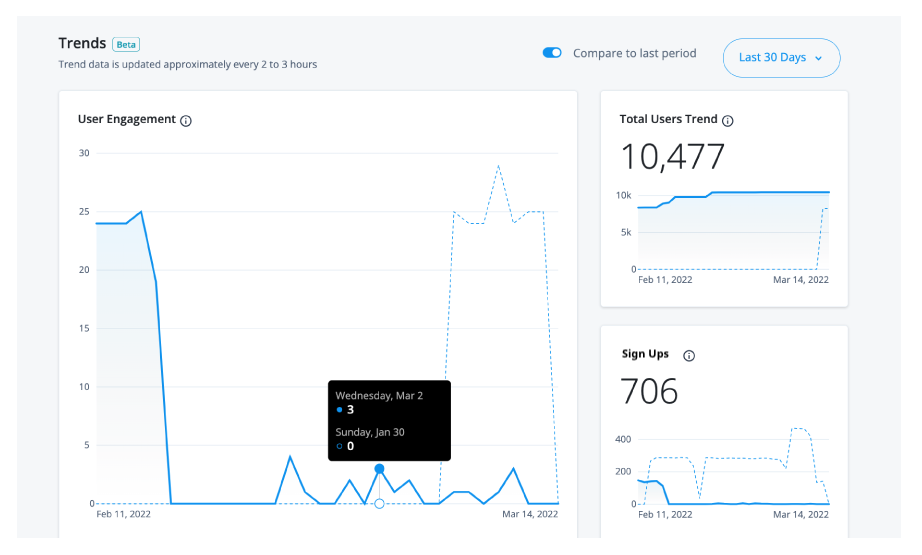
By default, the Identity Cloud analytics dashboard displays the number of engagements, total users, and new user sign-ups for a 30-day period, you can filter the output by changing the time period.
Change the time period for the trendline charts
-
Click Last 30 days, and select one of the following time periods:
-
Today. Displays the numbers for
today,12:00 a.m. to the current time. -
Yesterday. Displays the numbers for
yesterday,12:00 a.m. to 12:00 p.m. on the previous day. -
Last 7 Days. Displays the numbers for the last seven days from today’s date.
-
Last 30 Days. Displays the last 30 days from today’s date. This is the default time period.
All dates and time periods are based on UTC time.
-
-
Click Apply to save your changes.
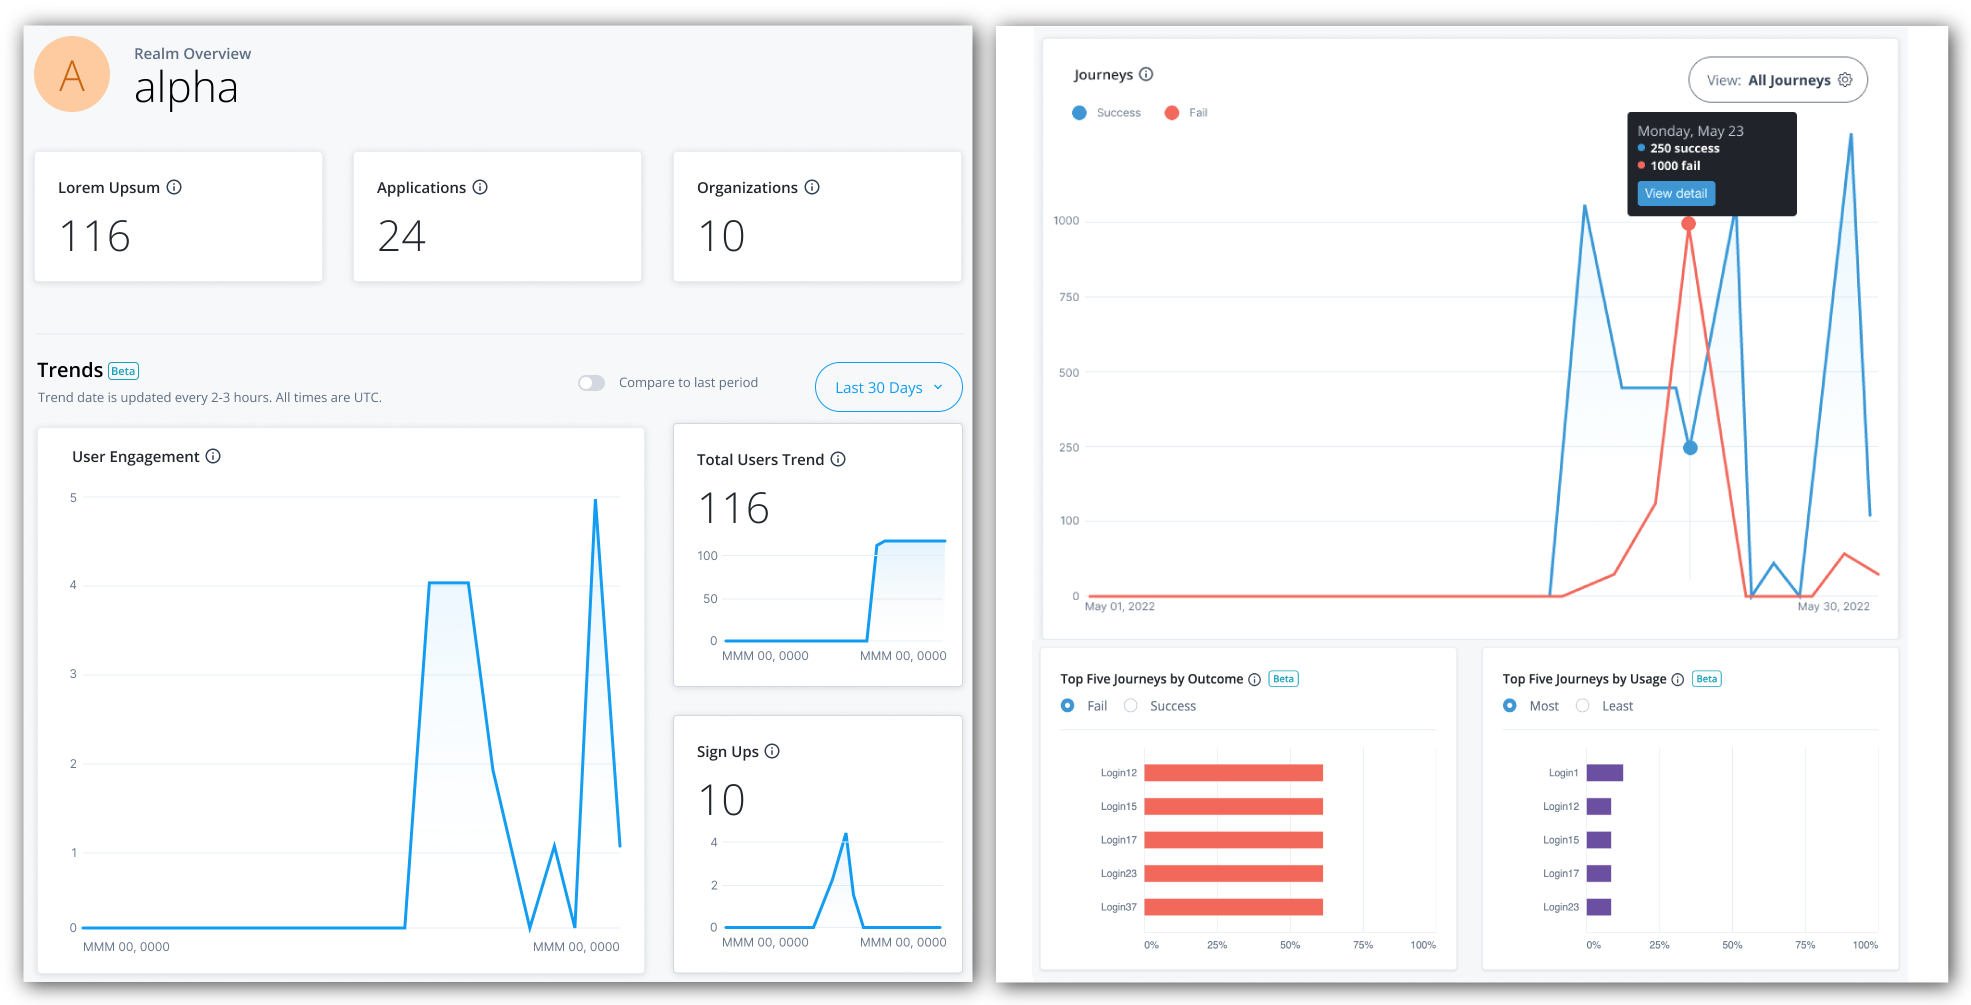
Monitor journeys
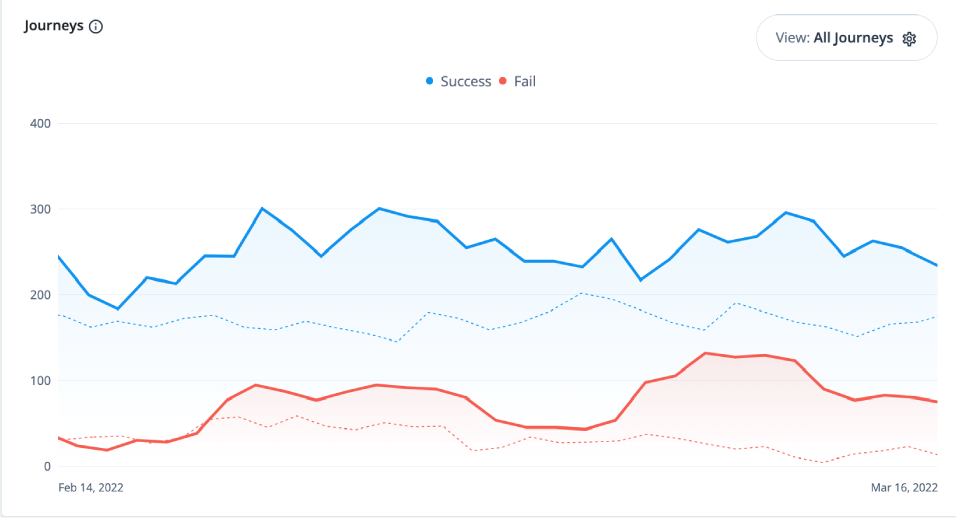
You can refer to a chart on the number of successful and failed journey outcomes within your realm on the Identity Cloud analytics dashboard. Scroll down the Identity Cloud analytics dashboard page to refer to the Journeys graph.
By default, the Identity Cloud analytics dashboard displays the aggregation of all successful and failed journeys on the Advanced Identity Cloud. These aggregations express four different types of information:
-
Blue lines indicate successful journey outcomes.
-
Red lines indicate failed journey outcomes.
-
Solid lines indicate the journey outcomes that occurred within the current selected time period.
-
Dotted lines indicate the journey outcomes in the previous time period.
| The journey usage is not counted if the journey is used as a node in another journey. |
The Identity Cloud analytics dashboard also lets you filter the chart by journey type. The available journeys are listed on the Advanced Identity Cloud Journeys page and includes any custom journeys that you may have configured. For example:
-
EvaluateRisk
-
ForgottenUsername
-
Login (default)
-
PasswordGrant
-
ProgressiveProfile
-
Registration
-
ResetPassword
-
Sample Tree
-
UpdatePassword
The categories are:
-
Authentication
-
Password Reset
-
Progressive Profile
-
Registration
-
Username Reset
| The journeys and categories options come from any tag that you have selected. |
Access journey pass/fail details
The Journeys chart also lets you drill down at specific points on a trendline to access its details, or metric breakdown. Red lines indicate failed journeys. Blue lines indicate successful journeys.
For example, you can use the Metric Breakdown page to review the journeys for the selected date, sorted by a ranking of percentage failures (default). The percentage is calculated for each journey as the total outcomes passed or failed, and then sorted in descending order from the highest failed journey by percentage to the lowest failed journey by percentage.
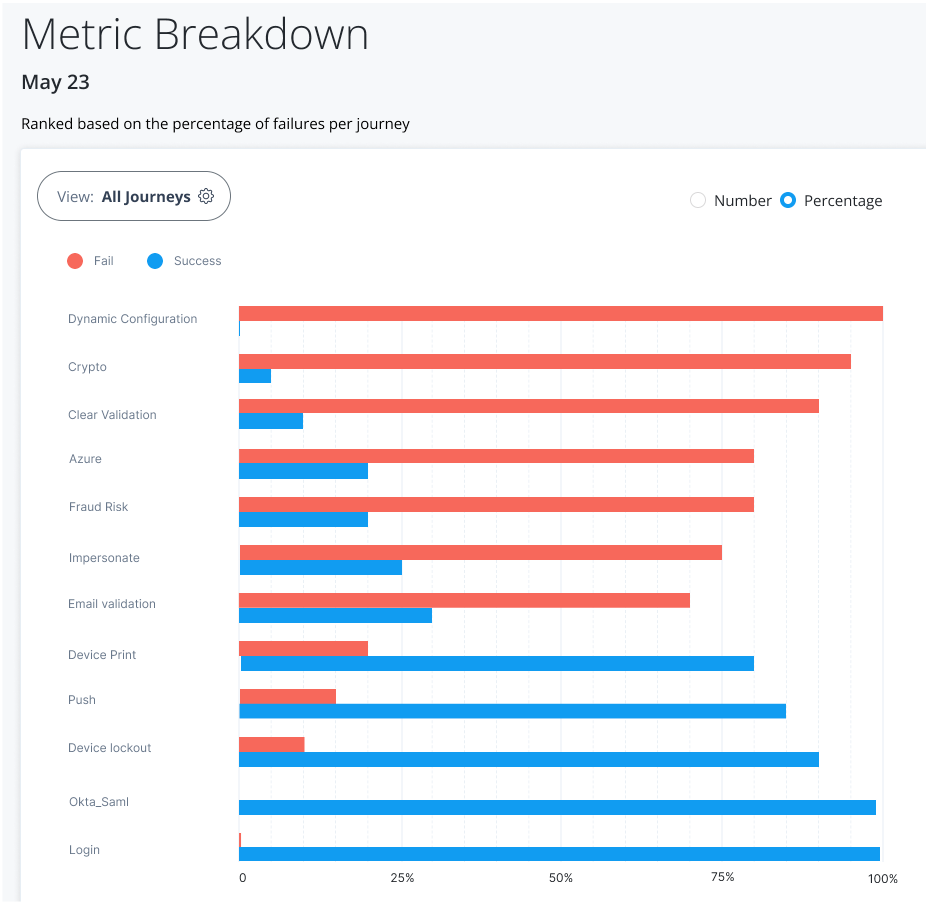
The Metric Breakdown page also lets you sort the journeys by number ranking. Number indicates the actual number of successful or failed outcomes for each journey.
The following table provides an example of how the analytics dashboard ranks by percentage and by number:
| Journey | Total Outcomes | Passed | Failed | Percentage Rank | Number Rank |
|---|---|---|---|---|---|
A |
900 |
630 |
270 (30%) |
2 |
1 |
B |
100 |
50 |
50 (50%) |
1 |
2 |
C |
100 |
80 |
20 (20%) |
3 |
3 |
| Timeouts are not displayed in the Journey outcomes. |
Access the metric breakdown page
-
On the Journeys chart, hover anywhere over a trendline to view the successful or failed outcomes for that date, and then click View detail. The Metric Breakdown page appears with more insights on the individual journeys. By default, All Journeys and Percentage are selected.
-
On the Metric Breakdown page, click Number to display the number of failed and successful journeys sorted by rank.
Click to show how to access the metric breakdown page
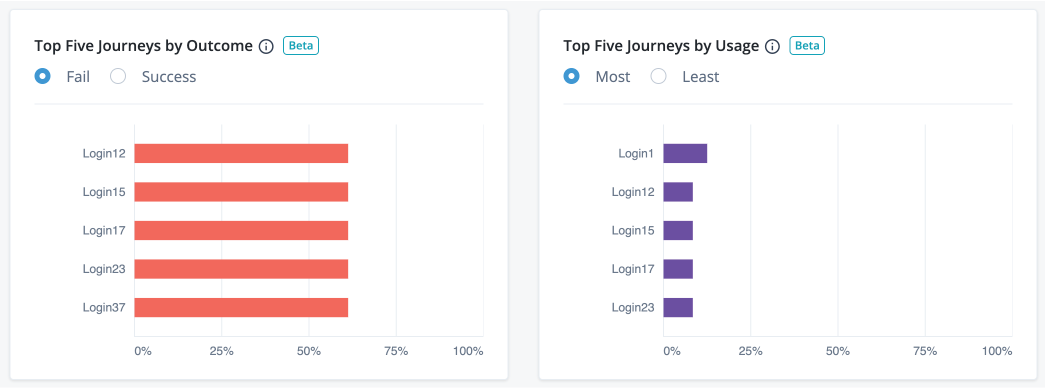
Top Five Journeys by Outcome and Top Five Journeys by Usage widgets
The Identity Cloud analytics dashboard displays two additional widgets providing trendlines into your journeys: Top Five Journeys by Outcome and Top Five Journeys by Usage. The Top Five Journeys by Outcome widget displays the top five journeys ranked by percentage failed or successful. The default selection is Fail. You can change the selection to Success to display top five successful journeys.
The Top Five Journeys by Usage widget displays the top five most or least used journeys. By default, the most used journeys are selected. Each bar chart provides the percentage usage of the journey in the given time period based on the outcomes only. For each journey, the calculation is based on the total number of outcomes for the journey divided by the total number of all journey outcomes in the time period.
| The widgets only display the journey outcomes for the selected time period. The x-axis denotes the percentage outcomes in the journey. |
Access top five journeys by outcome and top five journeys by usage
-
On the Top Five Journeys by Outcome widget, the widget displays the top five failed journeys by default. Click Success to display the top five successful journeys.
-
On the Top Five Journeys by Usage widget, the widget displays the most used journeys by default. Click Least to display the least used journeys.
Notice
The analytics dashboard service provides key insights and trends with respect to successful or failed journey outcomes, number of users, user engagement, number of new users (sign-ons), applications, and organizations. By leveraging this functionality, Ping Identity customers can better understand their usage of the Advanced Identity Cloud. This functionality also allows Ping Identity to maintain accurate billing information with respect to such use.
All data Ping Identity collects for the purposes of providing the analytics dashboard service is anonymized using industry standard practices. The purpose is to ensure that the data does not contain any personally identifiable information, and further, so it cannot be re-identified. This includes, but is not limited to, a one-way SHA-256 hashing function that returns a hexadecimal representation of a UUID. This ensures that no personally identifiable information is used by Ping Identity, or any other third-party or system.
Data residency
When you sign up for PingOne Advanced Identity Cloud, you specify the region where you want your data to reside. This is key in helping you meet data residency compliance requirements while letting you place data as close to your users as possible.
Advanced Identity Cloud uses pre-configured ranges of IP addresses in Google Cloud Platform (GCP) regions. The IP addresses are not exclusive to Ping Identity.
Regions
The tables in this section show all the region abbreviations for the data regions that Advanced Identity Cloud uses. The region abbreviations are used in the naming convention of your tenant environment FQDNs.
The tables also indicate secondary backup regions when available.
United States
| Region | Abbreviation | Secondary backup region[1] |
|---|---|---|
Oregon (us-west1) |
usw1 |
A different region within the United States |
Los Angeles (us-west2) |
usw2 |
A different region within the United States |
Iowa (us-central1) |
usc1 |
A different region within the United States |
South Carolina (us-east1) |
use1 |
A different region within the United States |
North Virginia (us-east4) |
use4 |
A different region within the United States |
Canada
| Region | Abbreviation | Secondary backup region[1] |
|---|---|---|
Montréal (northamerica-northeast1) |
nane1 |
A different region within Canada |
Brazil
| Region | Abbreviation | Secondary backup region[1] |
|---|---|---|
São Paulo (southamerica-east1) |
sae1 |
Regional selection is available. For more information, please contact your Ping Identity representative. |
Europe
| Region | Abbreviation | Secondary backup region[1] |
|---|---|---|
London (europe-west2) |
ew2 |
A different region within Europe |
Belgium (europe-west1) |
ew1 |
A different region within Europe |
Netherlands (europe-west4) |
ew4 |
A different region within Europe |
Zurich (europe-west6) |
ew6 |
A different region within Europe |
Frankfurt (europe-west3) |
ew3 |
A different region within Europe |
Finland (europe-north1) |
en1 |
A different region within Europe |
Paris (europe-west9) |
ew9 |
A different region within Europe |
Asia
| Region | Abbreviation | Secondary backup region[1] |
|---|---|---|
Singapore (asia-southeast1) |
ase1 |
Regional selection is available. For more information, please contact your Ping Identity representative. |
Jakarta (asia-southeast2) |
ase2 |
Regional selection is available. For more information, please contact your Ping Identity representative. |
Hong Kong (asia-east2) |
ae2 |
Regional selection is available. For more information, please contact your Ping Identity representative. |
Australia
| Region | Abbreviation | Secondary backup region[1] |
|---|---|---|
Sydney (australia-southeast1) |
ausse1 |
A different region within Australia |
Development, staging, and production tenant environments
Each PingOne Advanced Identity Cloud account includes a development, a staging, and a production tenant environment. These three environments let you build, test, and deploy your IAM applications:
| Tenant Environment | Description | ||
|---|---|---|---|
Development |
Used for building and adding new features.
|
||
Staging |
Used for testing development changes, including stress tests and scalability tests with realistic deployment settings. |
||
Production |
Used for deploying applications into operation for end users. |
Manage configuration
Advanced Identity Cloud has two types of configuration, dynamic and static. Learn more about the difference between them in What kind of configuration changes can my company make?.
You can change dynamic configuration in any environment, but you can only change static configuration in your development environment. Advanced Identity Cloud therefore uses a promotion model to move static configuration changes through the three environments.
Promote static configuration
The development environment is mutable. This means that you can make static configuration changes to the environment through one of the admin UIs or through the REST API.
The staging and production environments are not mutable. This means that you cannot make static configuration changes to these environments directly. Instead, you must move the changes from the development environment to the staging environment by running a promotion, then move the changes from the staging environment to the production environment by running a further promotion.
In situations where you want a static configuration value (such as an authentication token) to be distinct in each environment, you can set the value as an ESV in each environment, then insert the ESV placeholder into your configuration, then move the configuration to your staging and production environments by running sequential promotions. Learn more in Configure placeholders to use with ESVs.
| Tenant environment | Mutable | Make static configuration changes |
|---|---|---|
Development |
Yes |
|
Staging |
No |
|
Production |
No |
Sandbox tenant environment
|
Advanced Identity Cloud add-on capability
Contact your Ping Identity representative if you want to add a sandbox environment to your PingOne Advanced Identity Cloud subscription. Learn more in Add-on capabilities. |
A sandbox tenant environment is a standalone environment separate from your group of development, staging, and production tenant environments. It tracks the rapid release channel, which lets you test the newest features and fixes from Ping Identity before they reach your other environments. It’s mutable like your development environment, but because changes can’t be promoted, you have more freedom to test various use cases. You can run experiments without worrying about accidentally promoting your changes to your upper environments.
For example, you can create user journeys and test them before deciding which one you’d like to use in your development environment. You can safely do this in a sandbox environment because nothing in that environment is part of the promotion process. This means you don’t need to worry about cleaning up unused user journeys. You can extract any configuration from your sandbox environment using the REST APIs, then post it to your development environment.

Sandbox usage guidelines
There are some important guidelines to note when using a sandbox environment. In particular, the environment should not be used for load testing, and it should not contain personally identifiable information (PII):
| Feature | Description | ||
|---|---|---|---|
Production use |
No |
||
Static & dynamic configuration |
Mutable via the UI and REST APIs |
||
Configuration promotion |
No |
||
Max number of identity objects |
10,000 identity objects
|
||
Log retention |
1 day |
||
Monitored via Statuspage.io |
No |
||
SLA |
N/A (support provided at lowest priority level, see below) |
||
Personally identifiable information (PII) |
No |
||
Load testing |
No |
||
Level of support |
Business hours Monday–Friday (excluding public holidays in Australia, Singapore, France, United Kingdom, United States, and Canada) |
UAT tenant environment
|
Advanced Identity Cloud add-on capability
Contact your Ping Identity representative if you want to add a UAT environment to your PingOne Advanced Identity Cloud subscription. Learn more in Add-on capabilities. |
A UAT (user acceptance testing) tenant environment is an additional environment that you can add into your standard promotion group of development, staging, and production tenant environments. It has the same capabilities as your staging environment, allowing you to test your development changes in a production-like environment.
Having a UAT environment in addition to your staging environment lets you perform different kinds of testing in parallel; for example, you could perform user acceptance testing in your UAT environment alongside load testing in your staging environment (or the other way around if you prefer).
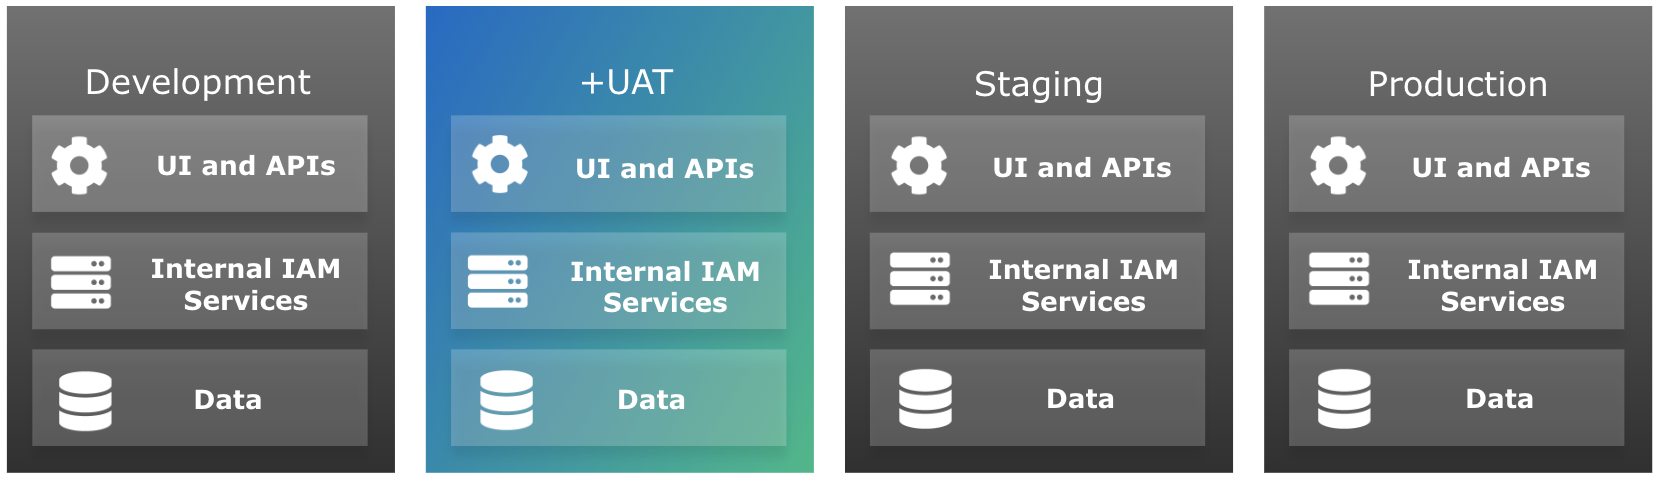
A UAT environment is inserted into the self-service promotion process between the development and staging environments:
-
If you have one UAT environment, the revised promotion order is development → UAT → staging → production:
-
If you have two UAT environments, the revised promotion order is development → UAT → UAT2 → staging → production:
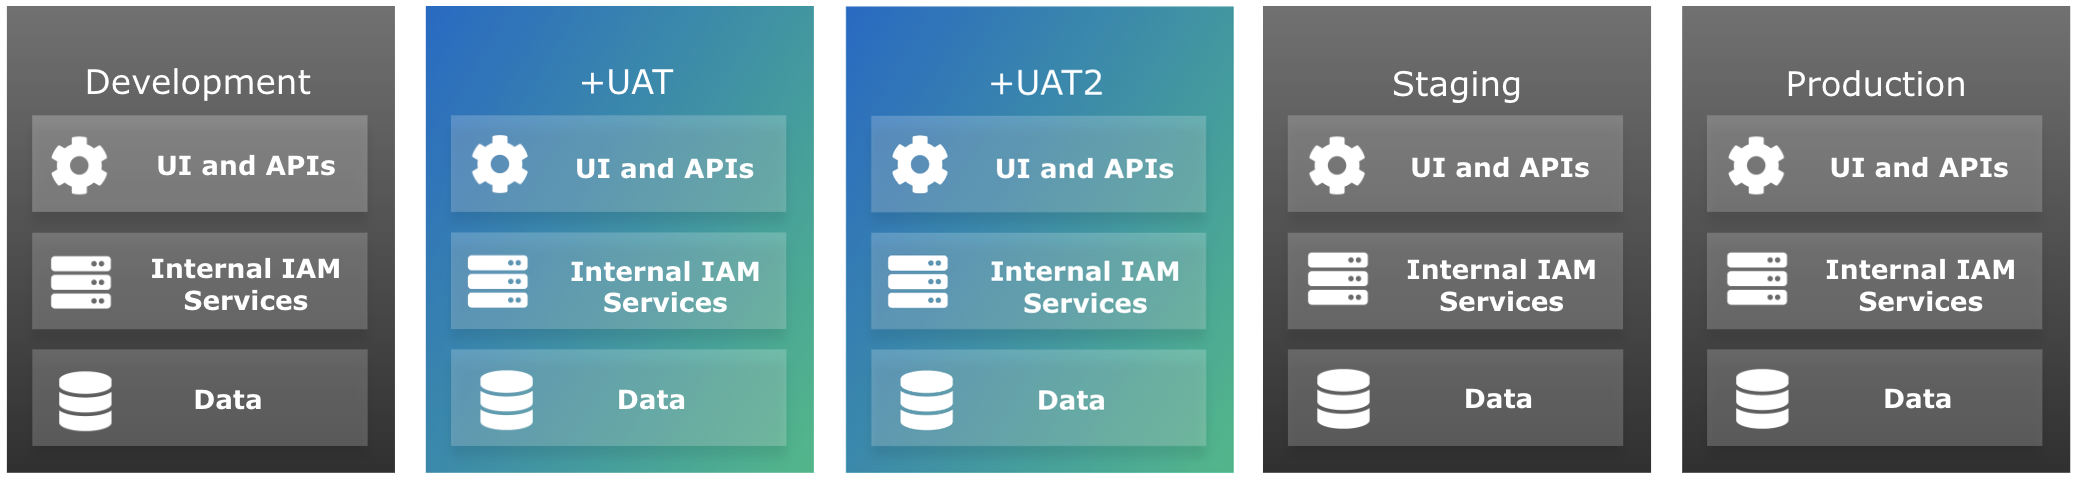
| You can only add up to two UAT environments to your promotion group of environments. |
Set up tenant administrators
A new UAT environment is set up with an initial tenant administrator (as specified to your Ping Identity representative when requesting the environment).
You can set up additional tenant administrators in the same way as you did for your development, staging, and production environments. Learn more in Invite tenant administrators.
Set up configuration
Existing customers
A new UAT environment contains no configuration; Ping Identity does not copy any configuration from your existing environments.
You need to promote your configuration from your development environment to your UAT environment. Observe the following warnings:
-
Make sure you promote from your development environment to your UAT environment before you promote from your UAT environment to your staging environment; otherwise, you will overwrite the configuration in your staging environment.
-
Make sure the configuration in your development environment matches the configuration in your staging environment, as this configuration eventually gets promoted through your UAT environment to your production environment.
-
Make sure all required ESVs are created in your UAT environment.
New customers
A new UAT environment contains no configuration, but neither does a new development, staging, or production environment. Therefore, your only additional consideration is that there is an extra environment inserted into the promotion process between your development environment and your staging environment.
You need to configure your development environment before you can promote to your UAT environment. Learn more about managing environments and promoting configuration between them in Introduction to self-service promotions.
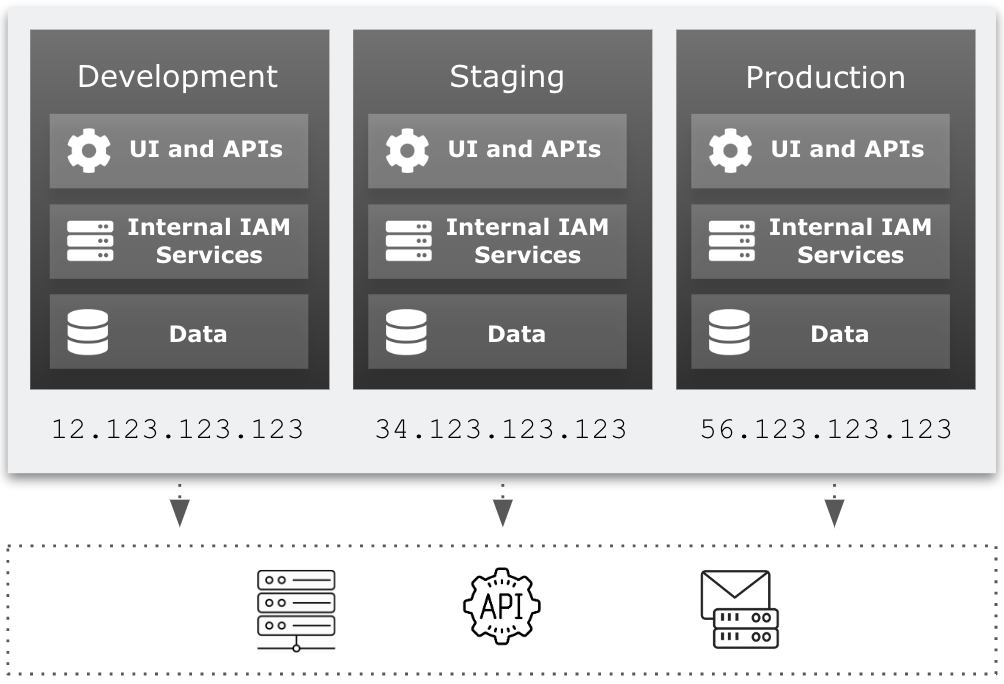
Outbound static IP addresses
Ping Identity allocates outbound static IP addresses to each of your development, staging, and production tenant environments (and to any sandbox[2] and UAT[3] tenant environments). This lets you identify network traffic originating from PingOne Advanced Identity Cloud and from individual environments within Advanced Identity Cloud.
Having static IP addresses for outbound requests lets you implement IP allowlisting in your enterprise network. Some examples of IP allowlisting are:
-
Adding IP addresses to your firewall settings to restrict access to your internal APIs
-
Adding IP addresses to your email server settings so emails sent from Advanced Identity Cloud are not marked as spam
FAQ
Why would I need to know my outbound static IP addresses?
You can add them to an allowlist that restricts access to your network infrastructure, adding an extra layer of access security. For example, you may want to allow only Advanced Identity Cloud to make API calls to an SMTP server inside your network.
How are outbound static IP addresses being introduced?
-
Outbound static IP address functionality is available and enabled by default if your tenant environments were created on or after the following dates:
For these tenant environments, learn more in How can I find out what my outbound static IP addresses are?
-
Outbound static IP address functionality is available but not enabled if your tenant environments were created between the following dates:
For these tenant environments, learn more in How do I enable outbound static IP addresses for my tenants?.
-
Outbound static IP address functionality is not available if your tenant environments were created before May 10, 2022.
For these tenant environments, the functionality will become available in 2024. For more information, please contact your Ping Identity representative.
How can I find out what my outbound static IP addresses are?
Outbound static IP address functionality is available and enabled by default if your tenant environments were created on or after the following dates:
You can view your outbound static IP addresses in your tenant global settings.
How do I enable outbound static IP addresses for my tenants?
Outbound static IP address functionality is available but not enabled if your tenant environments were created between the following dates:
To enable outbound static IP addresses and get your IP addresses:
-
Open an Advanced Identity Cloud: Config request with Backstage Support.
-
On the Advanced Identity Cloud: Config Request page, provide values for the following fields:
Field Value Hostname(s)
Enter a comma-separated list of FQDNs for your sandbox[2], development, UAT[3], staging, and production tenant environments.
What would you like to do?
Select Enable outbound static IP addresses.
Do you give permission for ForgeRock to access and make changes to your environment?
Select Yes to allow Backstage Support to access your environments
-
Click Submit to create the support ticket.
-
Backstage Support enables outbound static IP addresses and provides you with the IP addresses.
Tenant settings
PingOne Advanced Identity Cloud provides you with a unified view of your tenant’s customer, workforce, and device profiles. Use the Advanced Identity Cloud admin UI to manage all aspects of your tenant including realms, identities, applications, user journeys, and password policy.
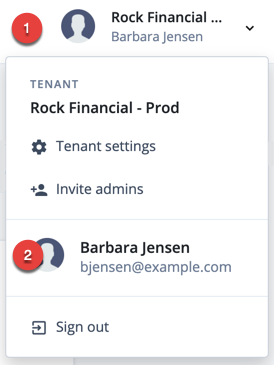
You can review tenant details and access global settings for your tenant by opening the account menu in the top right of the Advanced Identity Cloud admin UI, then clicking the Tenant Settings menu option.
View tenant details
| Tenant administrators | Super administrators[4] | |
|---|---|---|
Action allowed? |
Yes |
Yes |
-
In the Advanced Identity Cloud admin UI, open the TENANT menu (upper right).

-
Click Tenant Settings.
-
Click Details.
-
Tenant Name
The identifier assigned to the tenant during onboarding and registration. This identifier is not configurable. -
Region
The region where your data resides.
-
Invite and view administrators
| Tenant administrators | Super administrators[4] | |
|---|---|---|
Action allowed? |
No |
Yes |
Click the Admins tab on the Tenant Settings page to access options to:
Manage federated access
| Tenant administrators | Super administrators[4] | |
|---|---|---|
Action allowed? |
No |
Yes |
Click the Federation tab on the Tenant Settings page to access options to:
Access global settings
| Tenant administrators | Super administrators[4] | |
|---|---|---|
Action allowed? |
Yes |
Yes |
-
In the Advanced Identity Cloud admin UI, open the TENANT menu (upper right).
-
Click Tenant Settings.
-
Click Global Settings.
-
Content Security Policy
Learn more in Configure Content Security Policy. -
Cookie
The name of your tenant’s session cookie.
Learn more in Session cookie name. -
Cross-Origin Resource Sharing (CORS)
Learn more in Configure cross-origin resource sharing. -
Environment Secrets and Variables
Learn more in Manage ESVs using the UI. -
IP Addresses
View the outbound static IP addresses from your tenant. -
Log API Keys
You’ll need this to extract log data.-
Click On, then click the arrow.
-
In the Log API Keys dialog box, click + New Log API Key.
-
In the New Log API Key dialog box, provide a name, and then click Create key.
-
Identity Cloud generates an
api_key_idand anapi_key_secretfor you to copy and paste. -
Click Done.
-
-
Service Accounts
Learn more in Service accounts. -
End User UI
Learn more in Advanced Identity Cloud hosted pages.
-
Tenant administrator settings
Types of administrators
There are two types of administrator in Advanced Identity Cloud:
-
Tenant administrator: An administrator that can manage realm settings and most tenant settings except for those related to managing other tenant administrators. All tenant administrator identities get the same realm permissions, and these are not configurable.
-
Super administrator: A tenant administrator with the following elevated permissions:
-
Invite tenant administrators.
-
Grant or revoke super administrator privileges to and from tenant administrators.
-
Enable federation for a tenant.
-
Enforce federation for some or all administrators in a tenant.
-
The tenant provisioning process initially creates a single super administrator.
Register as an administrator
| Tenant administrators | Super administrators[4] | |
|---|---|---|
Action allowed? |
Yes |
Yes |
If you are added as an administrator to an Advanced Identity Cloud tenant, you receive an email that prompts you to complete the registration process.
-
When you receive the Complete the ForgeRock Identity Cloud registration email, click Complete Registration.
-
Perform one of the following sets of steps:
-
To use your email and password to register with Advanced Identity Cloud, on the Complete Registration page:
-
Enter your email address, first name, last name, and your password.
-
Click Next.
-
Choose a country of residency, accept ForgeRock’s privacy policy, and click Next.
-
Choose to set up 2-step verification or skip this option. The Advanced Identity Cloud dashboard should now display.
-
-
To use Microsoft Azure or AD FS to register with Advanced Identity Cloud, on the Complete Registration page:
-
Choose to continue with Microsoft Azure or AD FS.
-
Enter your credentials and log in.
-
Choose a country of residency, accept ForgeRock’s privacy policy, and click Next. The Advanced Identity Cloud dashboard should now display.
-
-
Tenant administrator sign-in
| Tenant administrators | Super administrators[4] | |
|---|---|---|
Action allowed? |
Yes |
Yes |
Tenant administrators access their sign-in page using the following URL:
https://<tenant-env-fqdn>/login/admin
For example, if your tenant environment FQDN is "openam-mycompany-ew2.id.forgerock.io", use the URL "https://openam-mycompany-ew2.id.forgerock.io/login/admin".
Upon successful authentication, a tenant administrator is automatically switched to the Alpha realm.
Multiple failed authentication attempts cause Advanced Identity Cloud to lock out a tenant administrator. For information about how to unlock an administrator’s account, learn more in Unlock a tenant administrator’s account.
Edit your own tenant administrator profile
| Tenant administrators | Super administrators[4] | |
|---|---|---|
Action allowed? |
Yes |
Yes |
In the Advanced Identity Cloud admin UI, open the TENANT menu (upper right), and click your username.
On your tenant administrator profile page:
-
To edit your name or email address, click Edit Personal Info.
Provide the information, then click Save. -
In the Account Security card:
-
To change your username, click Update.
-
Enter your current password, then click Next.
-
Enter your new username, then click Next.
You’ll receive an email confirming your username has been changed.
-
-
To change your password, click Reset.
-
Enter your current password, then click Next.
-
Enter your new password, then click Next.
You’ll receive an email confirming your password has been changed.
-
-
By default, 2-Step Verification is enabled.
Learn more in Manage tenant administrator 2-step verification.
-
-
To view the social identity providers you can use to log into your account, view the Social Sign-in card.
-
To view the devices that have accessed your account, view the Trusted Devices card.
-
To view the applications you have granted access to your account, view the Authorized Applications card.
-
To download your account data, in the Account Controls card, beside Download your data, click the downward pointing arrow, and click Download.
-
To delete your account data, in the Account Controls card, beside Delete account, click the downward pointing arrow, and click Delete Account.
Invite tenant administrators
| Tenant administrators | Super administrators[4] | |
|---|---|---|
Action allowed? |
No |
Yes |
Send invitations to people when you want to authorize them to manage settings for your tenant.
-
In the Advanced Identity Cloud admin UI, open the TENANT menu (upper right).
-
Click Invite admins.
-
In the Invite Admins dialog box, enter a comma-separated list of email addresses for the people you want to authorize.
-
Grant people specific administrator access by selecting either Super Admin or Tenant Admin.
-
Click Send Invitations.
Advanced Identity Cloud sends an email to each address, containing instructions to set up an administrator account.
After the invitee completes the instructions in the invitation email, the invitee becomes an administrator.
View the tenant administrators list
| Tenant administrators | Super administrators[4] | |
|---|---|---|
Action allowed? |
No |
Yes |
From the tenant administrators list, you can invite new tenant administrators, deactivate tenant administrators, or delete tenant administrators.
-
In the Advanced Identity Cloud admin UI, click the tenant name to expand the settings menu.
-
Click Tenant Settings > Admins.
-
To invite a new tenant administrator:
-
Click + Invite Admins.
-
Follow steps 3–4 in the invite other tenant administrators instructions above.
-
-
To deactivate a tenant administrator:
-
Find an administrator with the label Active.
-
Click More (), and select Deactivate.
-
-
To delete a tenant administrator, click More (), and select Delete.
When you deactivate a tenant administrator, their status changes, but they remain on the tenant administrators list.
When you delete a tenant administrator, their username is removed from the tenant administrators list, and tenant administrator permissions are removed from their user profile. This operation cannot be undone!
-
Unlock a tenant administrator’s account
| Tenant administrators | Super administrators[4] | |
|---|---|---|
Action allowed? |
No |
Yes |
If Advanced Identity Cloud locks out one of your company’s tenant administrators due to multiple failed login attempts, the account can be unlocked.
If your organization has multiple tenant administrators, another tenant administrator can unlock the account:
-
In the Advanced Identity Cloud admin UI, open the TENANT menu (upper right), and click your username.
-
Click Tenant Settings > Admins.
-
Find the entry for the administrator who was locked out.
-
In the same row, click More () and choose Activate.
If your organization does not have multiple tenant administrators, submit a Backstage Support ticket.
Grant or revoke super administrator access
| Tenant administrators | Super administrators[4] | |
|---|---|---|
Action allowed? |
No |
Yes |
To grant or revoke super administrator privileges:
-
Go to Tenant Settings > Admins.
-
Click an administrator.
-
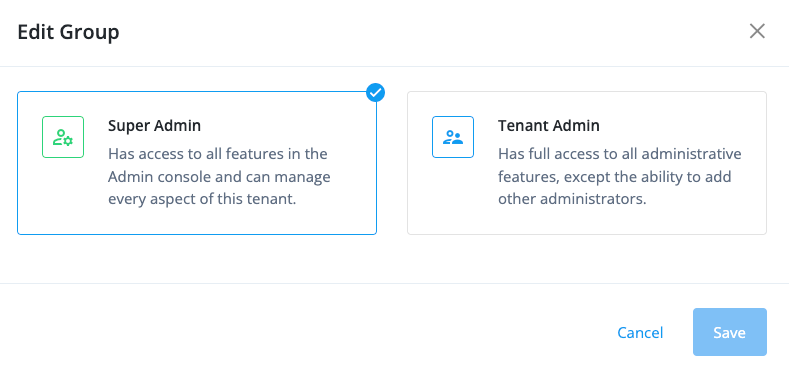
In the Group section, click Edit.
-
On the Edit Group page:
-
To grant super administrator access, select Super Admin.
-
To grant tenant administrator access, select Tenant Admin.
-
-
Click Save.
Manage tenant administrator 2-step verification
| Tenant administrators | Super administrators[4] | |
|---|---|---|
Action allowed? |
Yes |
Yes |
2-step verification, also known as multifactor authentication (MFA), prevents unauthorized actors from signing in as a tenant administrator by asking for a second factor of authentication.
Advanced Identity Cloud provides tenant administrators with the following second factor options:
Register for 2-step verification
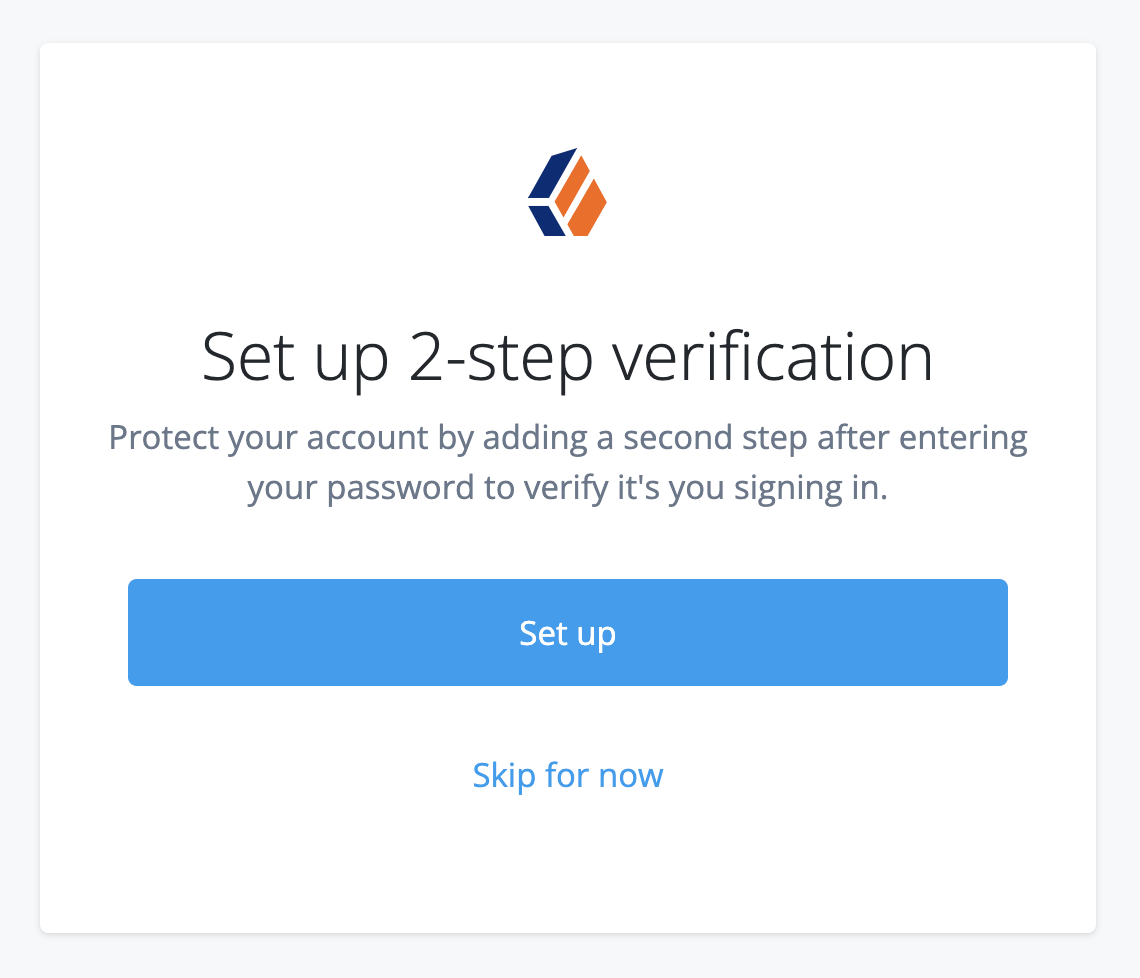
You can register for 2-step verification when you sign in as a tenant administrator for the first time:
-
Click Set up to let Advanced Identity Cloud guide you through the device registration process.
-
Alternatively, click Skip for now to temporarily skip registration for 2-step verification.
The option to skip registration for 2-step verification is a deprecated feature, and soon 2-step verification will be mandatory in all tenants. To understand if this affects you, read the Tenant administrator mandatory 2-step verification FAQ.
Manage verification codes
During registration for 2-step verification, Identity Cloud displays 10 verification codes.
| Be sure to copy the codes and store them in a secure location. |
-
You’ll use the verfication codes as recovery codes if you cannot use your registered device to sign in.
-
You can use each verification code only once. Then, the code expires.
-
If, for some reason, you need to re-register a device, first delete your previously registered device.
Change 2-step verification options
-
Open your tenant administrator user profile.
In the Advanced Identity Cloud admin UI, open the TENANT menu (upper right) and choose your tenant administrator username. -
On your tenant administrator user profile page, find 2-Step Verification and click Change.
The 2-Step/Push Authentication page lists devices you’ve registered for MFA.
To delete a device, click its More () menu, and choose Delete.
-
When you delete a device from the list, 2-step or push authentication is disabled. You cannot undo the delete operation.
-
Once you sign out and attempt to sign back in again, you will be asked if you want to set up a second factor.
-
ESVs
Environment secrets and variables (ESVs) let you individually configure your sandbox[2], development, UAT[3], staging, and production tenant environments in PingOne Advanced Identity Cloud.
Use variables to set values that need to be different for each tenant environment. For example, an authentication node might need one URL in your development environment, but a different URL in your production environment.
Use secrets to set values that need encrypting. The values may or may not need to be different for each tenant environment. For example, an MFA push notification node might need an authorization password to use an external SMS service.
| ESVs are an Advanced Identity Cloud only feature. In particular, ESV secrets should not be confused with secrets in the self-managed AM or IDM products. |
Variables
Use ESV variables to set configuration values that need to be different for each tenant environment.
Variables are simple key/value pairs. Unlike secrets, they are not versioned. They should not contain sensitive values. The value of a variable must not exceed a maximum length of 65535 bytes (just under 64KiB).
You can reference ESV variables from configuration placeholders or scripts after you have:
-
Created or updated the variables using the variables APIs or the Advanced Identity Cloud admin UI
-
Restarted Advanced Identity Cloud services using the restart API or by applying updates in the Advanced Identity Cloud admin UI
The following table shows how to reference an ESV variable with the name esv-my-variable:
| Context | How to reference | Access as soon as set |
|---|---|---|
Configuration placeholders |
|
|
Scripts |
|
|
Variable types
You must use the expressionType parameter to set a type when you create an ESV variable. This
lets Advanced Identity Cloud correctly transform the value of the ESV to match the configuration property type
when substituting it into configuration.
The type is set when the ESV is created, and it cannot be modified.
Before the expressionType parameter was introduced, it was only possible to set types from
within configuration, using expression level syntax; for example, {"$int": "&{esv.journey.ldap.port|1389}"}.
The expressionType parameter supplements this expression level syntax and allows the ESV type
to be identified without inspecting configuration.
Make sure the type that you set in configuration matches the type that you set in the ESV expressionType parameter.
|
| Expression type | Description | Examples | ||||||||||||
|---|---|---|---|---|---|---|---|---|---|---|---|---|---|---|
|
String value (default) |
|
||||||||||||
|
JSON array |
|
||||||||||||
|
JSON object |
|
||||||||||||
|
Boolean value |
|
||||||||||||
|
Integer value |
|
||||||||||||
|
This type can transform any number value (integers, doubles, longs, and floats). |
|||||||||||||
|
Comma-separated list |
|
Existing ESVs will be migrated to use the expressionType parameter. If any existing ESVs contain
combined types, they will be split into separate ESVs by the migration process.
|
ESV variables in Advanced Identity Cloud global configuration
Ping Identity manages Advanced Identity Cloud global configuration on your behalf; however, the global configuration contains a single static ESV placeholder to let you override the default maximum size for SAML requests (20480 bytes). To override the default value of the static placeholder in any environment, create a new ESV variable with a corresponding name and a custom value:
Static placeholder |
|
|---|---|
Default value |
20480 |
ESV name to create |
|
Possible values |
Specify an integer |
Secrets
Use ESV secrets to set configuration values that need encrypting. The values may or may not need to be different for each tenant environment.
You can reference ESV secrets from configuration placeholders or scripts after you have:
-
Created or updated the secrets using the secrets APIs or the Advanced Identity Cloud admin UI
-
Restarted Advanced Identity Cloud services using the restart API or by applying updates in the Advanced Identity Cloud admin UI
You can reference secrets that are signing and encryption keys by mapping them to secret labels. Secrets referenced by secret label mappings can be accessed as soon as the ESV is set; restarting Advanced Identity Cloud services is not required.
The following table shows how to reference an ESV secret with the name esv-my-secret:
| Context | How to reference | Access as soon as set |
|---|---|---|
Configuration placeholders |
|
|
Scripts |
|
|
Signing and encryption keys |
Secret versions
Instead of having a single value, ESV secrets have one or more secret versions, each containing their own value. By design, the value of a secret version cannot be read back after it has been created. The value of a secret version must not exceed a maximum length of 65535 bytes (just under 64KiB). To create a new secret version, its value must be different to the value of the latest secret version.
You can enable or disable secret versions by setting their status field to ENABLED or DISABLED.
The latest version of a secret must be enabled for it to be used in your configuration.
The following rules ensure that a secret always has at least one enabled version:
-
When you create a secret, the first version of the secret is automatically created and is enabled.
-
You cannot disable the latest version of a secret.
-
You cannot delete the latest version of a secret if the previous version is disabled.
| Secret versions are an important feature of key rotation. Learn more in Rotate keys in mapped ESV secrets. |
Encoding format
You can use the encoding parameter to set an encoding format when you create an ESV secret:
| Encoding format | Description |
|---|---|
|
Use this format for secrets that are not keys, such as passwords. |
|
Use this format for asymmetric keys; for example, a public and private RSA key pair. Learn more in Generate an RSA key pair. |
|
Use this format for AES keys; for example, an AES-256 key. Learn more in Generate an AES or HMAC key. |
|
Use this format for HMAC keys; for example, a HMAC-SHA-512 key. Learn more in Generate an AES or HMAC key. |
You can only choose an encoding format using the API. The UI currently creates secrets only
with the generic encoding format.
|
Control access to secrets
There are 3 contexts where you can access an ESV secret:
-
From configuration placeholders; learn more in Configure placeholders to use with ESVs.
-
From scripts; learn more in Use ESVs in scripts.
-
From mapped secret labels (for signing and encryption keys); learn more in Use ESVs for signing and encryption keys.
However, if the secret contains a signing and encryption key, you may want to restrict access from
configuration placeholder and script contexts. To do this, you can use the useInPlaceholders
boolean parameter when you create the secret:
| Context | Unrestricted access | Restricted access |
|---|---|---|
|
|
|
Configuration placeholders |
|
|
Scripts |
|
|
Mapped secret labels |
|
|
| You can only set restricted access using the API. The UI currently creates secrets only with unrestricted access. |

Preconditions to delete an ESV
Before you delete an ESV, you may need to remove references to it from your environment:
-
You cannot delete an ESV if it is referenced in a configuration placeholder. You must first remove the placeholder from configuration. Learn more in Delete an ESV referenced by a configuration placeholder.
-
You cannot delete an ESV if it is referenced in a script. You must first remove any scripts that reference the ESV.
-
You cannot delete an ESV if it is referenced in an orphaned script[5]. You must first remove any orphaned scripts. You can do this by running a self-service promotion (which automatically cleans up orphaned scripts).
ESV naming
ESV API naming convention
The names of secrets and variables need to be prefixed with esv- and can only contain
alphanumeric characters, hyphens, and underscores; for example, esv-mysecret-1 or
esv-myvariable_1. The maximum length, including prefix, is 124 characters.
ESV legacy naming convention and API compatibility
Before the introduction of the ESV API endpoints, if ESVs were defined on your behalf as part of
the promotion process, they were prefixed with byos-. Advanced Identity Cloud uses compatibility behavior to
let you still use these legacy ESVs. The compatibility behavior depends on how far the legacy ESVs
were promoted through your development, staging, and production tenant environments:
- Development, staging, and production environments
-
If you promoted a legacy ESV to all your tenant environments, it will have been duplicated during the ESV migration process, so will be available in the API using the new
esv-prefix.For example,
byos-myvariable123will appear asesv-myvariable123. Scripts that reference the legacy ESV will still work; bothbyos-myvariable123andesv-myvariable123resolve to the same ESV. - Development and staging environments only
-
If you never promoted a legacy ESV to your production environment, it will have been ignored during the ESV migration process. However, you can still use the ESV API to create it in your production environment, as the compatibility behaviour looks for new ESVs that have a naming format like a legacy ESV (
byos-<hash>-<name>). So any ESVs that are created with a naming format ofesv-<hash>-<name>will also automatically create abyos-<hash>-<name>duplicate.For example, creating a new ESV called
esv-7765622105-myvariablewill automatically create another ESV calledbyos-7765622105-myvariable. Scripts that reference the legacy ESV will still work; bothbyos-7765622105-myvariableandesv-7765622105-myvariableresolve to the same ESV.
Manage ESVs using the API
For background on ESVs in PingOne Advanced Identity Cloud, learn more in ESVs.
ESV API endpoints
Advanced Identity Cloud provides these API endpoints for ESVs:
To authenticate to the API, learn more in Authenticate to ESV API endpoints.
| If you plan to delete an ESV using the variables or secrets API endpoints, you may first need to remove references to it from your environment. Learn more in Preconditions to delete an ESV. |
Authenticate to ESV API endpoints
To authenticate to ESV API endpoints, use an access token.
In addition to the default fr:idm:* OAuth scope, there are several additional OAuth scopes that
can be used with the ESV API endpoints when you create an access token:
| Scope | Description |
|---|---|
|
Read, create, update, delete, and restart access to ESV API endpoints. |
|
Read access to ESV API endpoints. |
|
Create, update, and delete access to ESV API endpoints. |
|
Restart access to ESV API endpoints. |
Manage ESVs using the UI
For background on ESVs in PingOne Advanced Identity Cloud, learn more in ESVs.
Create variables
-
In the Advanced Identity Cloud admin UI, go to Tenant Settings > Global Settings > Environment Secrets & Variables.
-
Click the Variables tab.
-
Click + Add Variable.
-
In the Add a Variable modal window, enter the following information:
Name
Enter a variable name. Learn more in ESV naming.
Variable names cannot be modified after the variable has been created. Type
Select a variable type. Learn more in variable types.
Description
(optional) Enter a description of the purpose of the variable.
Value
Enter a variable value.
If the variable value is JSON, you can optionally click the JSON toggle to turn on JSON validation. You can find the toggle above the top right of the field.
-
Click Save to create the variable.
Update variables
-
In the Advanced Identity Cloud admin UI, go to Tenant Settings > Global Settings > Environment Secrets & Variables.
-
Click the Variables tab.
-
Find a variable in the paginated list of variables, then click + Update for that variable.
-
In the Update Variable modal window:
-
At the top, you can optionally click Add a Description to update the variable description:
-
Click the Add a Description link to open a secondary modal.
-
In the Edit Variable Description secondary modal window, enter the following information:
Description
Enter a new or updated description of the purpose of the variable.
-
Click Save Description to update the variable description and close the secondary modal.
-
-
Below that, you will see the read-only Configuration Placeholder field. The placeholder value is derived from the variable name. You can optionally use the clipboard widget to copy the placeholder value.
-
Below that, you can optionally click Edit to update the variable value:
-
Click the Edit link to open a secondary modal.
-
In the Edit Variable Value secondary modal window, enter the following information:
Value
Enter a new variable value.
If the variable value is JSON, you can optionally click the JSON toggle to turn on JSON validation. You can find the toggle above the top right of the field.
-
Click Save Value to update the variable value and close the secondary modal.
-
-
Below that, you will see the read-only Type field. The variable type cannot be modified.
-
-
Click Done to close the modal.
Delete variables
| Before you delete a variable, you may need to remove references to it from your environment. Learn more in Preconditions to delete an ESV. |
-
In the Advanced Identity Cloud admin UI, go to Tenant Settings > Global Settings > Environment Secrets & Variables.
-
Click the Variables tab.
-
Find a variable in the paginated list of variables, then click the Delete Variable icon on the right-hand side.
-
In the Delete Variable? modal window, click Delete.
Create secrets
-
In the Advanced Identity Cloud admin UI, go to Tenant Settings > Global Settings > Environment Secrets & Variables.
-
Click the Secrets tab.
-
Click + Add Secret.
-
In the Add a Secret modal window, enter the following information:
Name
Enter a secret name. Learn more in ESV naming.
Secret names cannot be modified after the secret has been created. Description
(optional) Enter a description of the purpose of the secret.
Value
Enter a secret value.
The field obscures the secret value by default. You can optionally click the visibility toggle () to view the secret value as you enter it.
If the variable value is JSON, you can optionally click the JSON toggle to turn on JSON validation. You can find the toggle above the top right of the field.
The initial secret value is used to create the first secret version for the secret. -
Click Save to create the variable.
Update secrets
-
In the Advanced Identity Cloud admin UI, go to Tenant Settings > Global Settings > Environment Secrets & Variables.
-
Click the Secrets tab.
-
Find a secret in the paginated list of secrets, then click + Update or Updated for that secret.
-
In the Update Secret modal window:
-
At the top, you can optionally click Add a Description to update the secret description:
-
Click the Add a Description link to open a secondary modal.
-
In the Edit Secret Description secondary modal window, enter the following information:
Description
Enter a new or updated description of the purpose of the secret.
-
Click Save Description to update the secret description and close the secondary modal.
-
-
Below that, you will see the read-only Configuration Placeholder field. The placeholder value is derived from the secret name. You can optionally use the clipboard widget to copy the placeholder value.
-
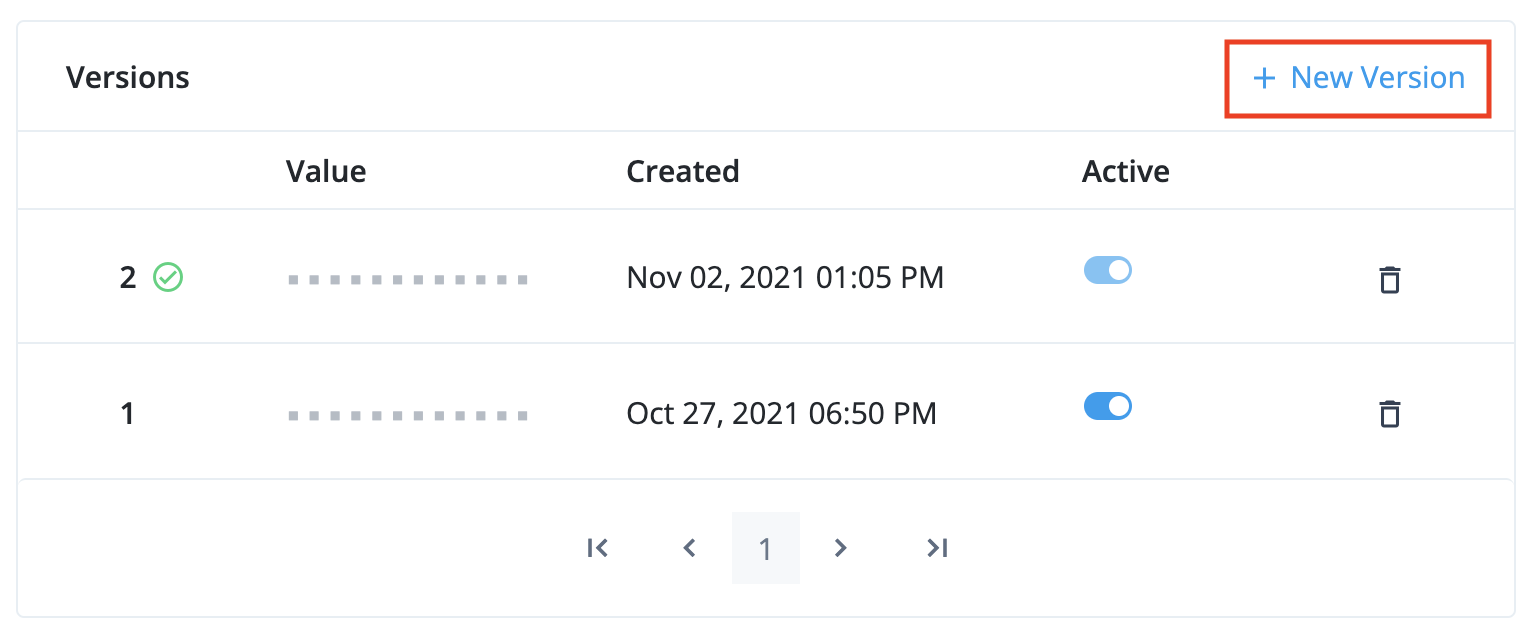
Below that, you will see the secret versions interface, which shows a paginated list of secret versions for the secret:
Learn more about the rules for enabling, disabling, and deleting secret versions in Secret versions. -
To add a new secret version, click + New Version to open a secondary modal.
-
In the Create a New Secret Version secondary modal window:
-
At the top, you will see the readonly Secret field, which contains the secret name.
-
Below that, enter the following information:
Value
Enter a secret value.
The field obscures the secret value by default. You can optionally click the visibility toggle () to view the secret value as you enter it.
If the variable value is JSON, you can optionally click the JSON toggle to turn on JSON validation. You can find the toggle above the top right of the field.
-
Then, click the + Add Version button to create the secret version and close the secondary modal.
-
-
The new secret version should now be visible at the top of the the secret versions interface:
-
Click Done to close the modal.
-
-
Delete secrets
| Before you delete a secret, you may need to remove references to it from your environment. Learn more in Preconditions to delete an ESV. |
-
In the Advanced Identity Cloud admin UI, go to Tenant Settings > Global Settings > Environment Secrets & Variables.
-
Click the Secrets tab.
-
Find a secret in the paginated list of variables, then click the Delete Secret icon on the right-hand side.
-
In the Delete Secret? modal window, click Delete.
Apply updates
When one or more ESVs have been created or updated by any of the tenant administrators, the ESV entry screen will display a blue banner at the top to tell you how many updates are waiting to be applied:

| Before you apply any updates, ensure that you have made all the ESV changes that you need, as applying the updates will disable the ESV UI for the next 10 minutes and prevent further ESV changes. This behavior will apply to all tenant administrators. |
To apply any pending updates:
-
Click View Updates.
-
In the Pending Updates modal, review the list of ESVs that have been updated, then click Apply n Updates.
-
In the Apply n Updates? confirmation modal, click Apply Now.
-
The banner will change color from blue to orange while the updates are applied, and the ESV UI will be disabled. This behavior will apply to all tenant administrators.
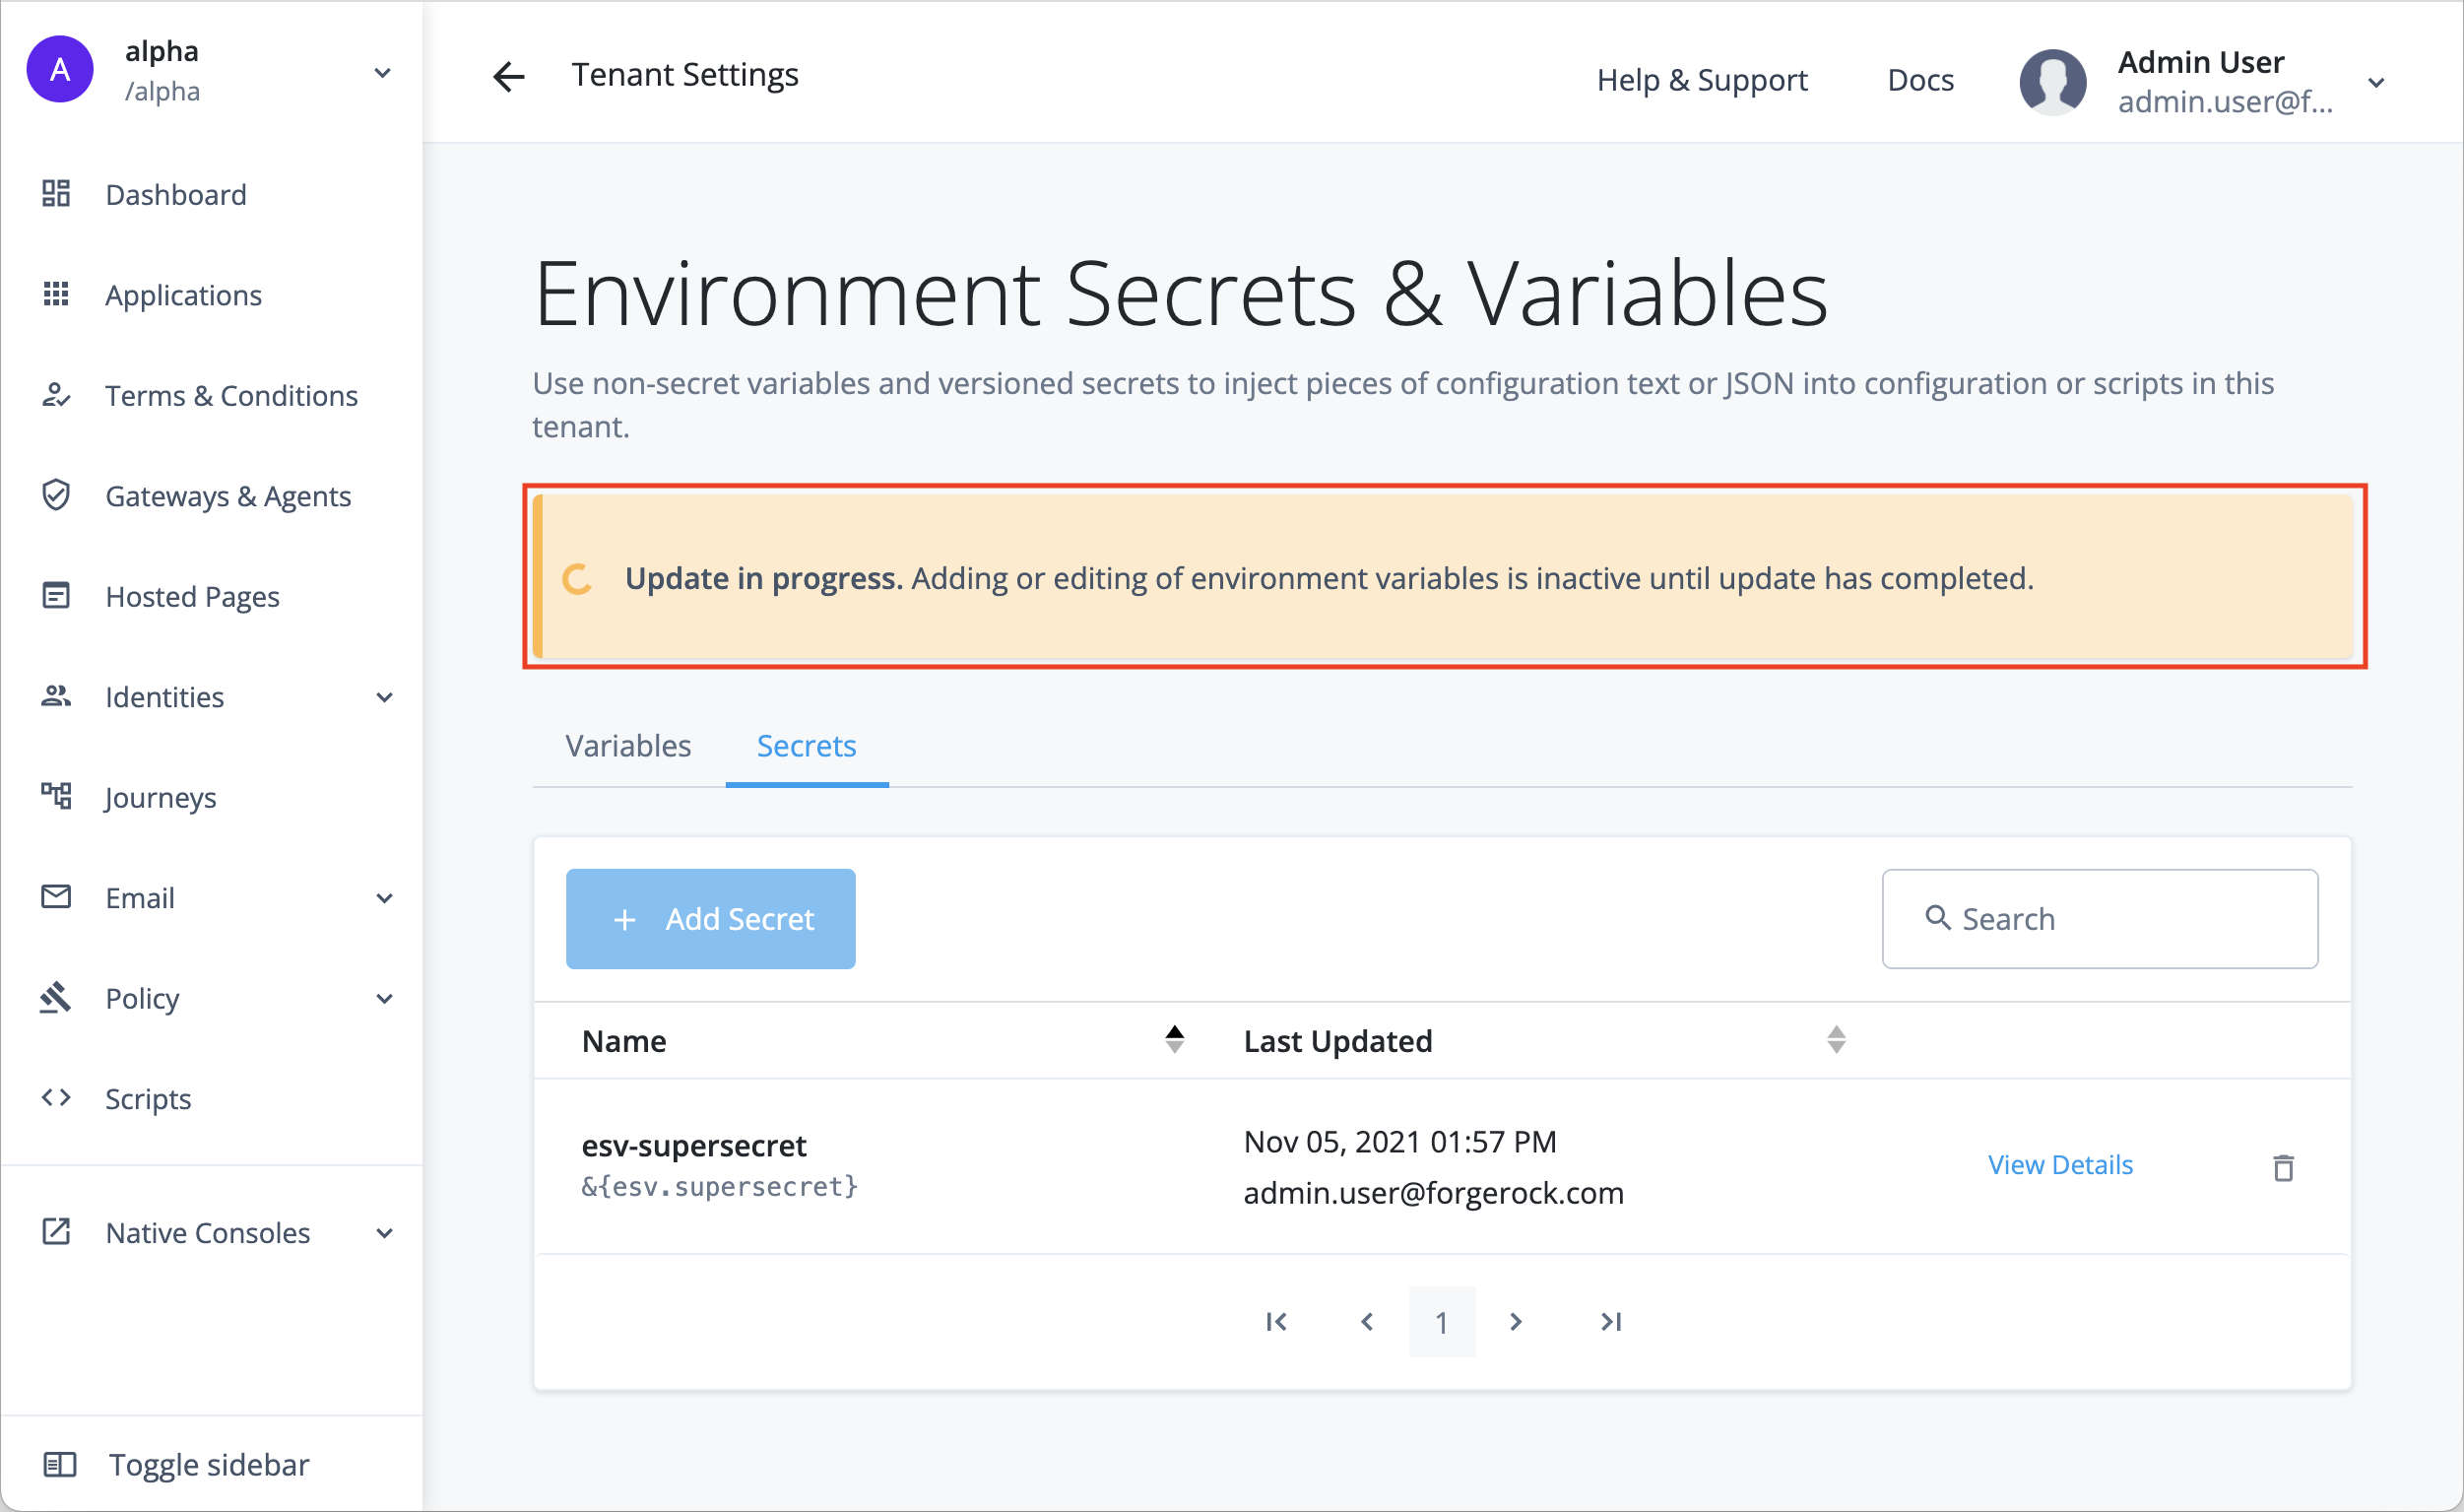
-
When the update is complete, the banner will no longer be visible, and the ESV UI will be enabled again.

Use ESVs in scripts
PingOne Advanced Identity Cloud lets scripts access ESVs directly, without the need for you to restart Advanced Identity Cloud services or request a promotion first.
|
Ensure that your scripts use the full reference for ESVs; for example Ping Identity recommends that you establish a review and testing process for all scripts. |
AM scripts
To access an ESV with the name esv-my-variable in an AM script, use:
systemEnv.getProperty("esv.my.variable")
Learn more about using the systemEnv binding in
ESVs in scripts.
IDM scripts
To access an ESV with the name esv-my-variable in an IDM script, use:
identityServer.getProperty("esv.my.variable")
Learn more about using the identityServer variable in
The identityServer variable.
Use ESVs for signing and encryption keys
PingOne Advanced Identity Cloud lets you store signing and encryption keys in ESV secrets, then map them to secret labels. Each secret label represents an authentication feature in Advanced Identity Cloud, such as signing OAuth 2.0 client access tokens.
Advanced Identity Cloud can directly access keys stored in a mapped ESV secret, there is no need to restart Advanced Identity Cloud services.
You can rotate keys stored in a mapped ESV secret by adding new secret versions to the ESV. The key in the latest secret version is used to sign new access tokens, then subsequently validate them. Keys in older secret versions (that are still enabled) are still used to validate existing access tokens.
You can also rotate SAML 2.0 certificates using ESV secrets. Learn more in Rotate SAML 2.0 certificates using ESVs
Secret labels
Secret labels (also known as secret IDs or purposes) represent authentication features in Advanced Identity Cloud that
need a signing or encryption key. For example, to sign an OAuth 2.0 client access token with an
HMAC key, you would use the secret label am.services.oauth2.stateless.signing.HMAC.
For a full list of secret labels, learn more in Secret labels.
Secret labels with fixed names
Most secret labels represent an authentication feature that requires only a single secret per
realm. These secret labels have fixed names as they require only a single mapping per realm to
override them. An example of a secret label with a fixed name is am.services.oauth2.stateless.token.encryption,
the label for the secret used to encrypt client-side access tokens issued in the realm.
Secret labels with identifiers
Some secret labels represent an authentication feature that could require multiple instances per
realm, such as OAuth 2.0 clients. The names of these secret labels contain a configurable portion,
known as the identifier, to support multiple override mappings per realm. An example of a secret
label with an identifier is am.applications.oauth2.client.<identifier>.secret.
Authentication features that support secret labels with identifiers provide a
Secret Label Identifier field that lets you define the identifier value. The value of
the identifier must be alphanumeric, can also contain periods (but not at the start or end), and
must not contain spaces. When you create an instance of the authentication feature and define a
Secret Label Identifier, Advanced Identity Cloud creates a new secret label; for example, if you
create a new OAuth 2.0 client and define the Secret Label Identifier as "salesforce",
Advanced Identity Cloud creates the secret label am.applications.oauth2.client.salesforce.secret.
You can then map the secret label to an ESV secret. If you don’t create a mapping, the authentication feature falls back to a manually entered password.
|
In the case of OAuth 2.0 clients, Advanced Identity Cloud defines four secret labels for each client. In the example above, Advanced Identity Cloud creates the following secret labels:
Continuing the example, Advanced Identity Cloud tries to find a mapping for any of the four secret labels, before falling back to a manually entered password. Learn more in Authenticate OAuth 2.0 clients. |
Map ESV secrets to secret labels
In each realm, each secret label is mapped to a default secret key. You cannot
access these default secret keys. However, you can override the default key mappings. To do this, map
a secret label to an ESV secret in a realm’s ESV secret store.
To store a key in an ESV secret, then map it to a secret label:
-
Create an ESV secret, containing the value of your new signing or encryption key:
You can only create secrets that contain keys using the API. The UI currently does not support the encodinganduseInPlaceholdersparameters.For examples of how to generate asymmetric and symmetric keys, learn more in:
-
Create an access token for the appropriate realm. Learn more in Get an access token.
-
Create the ESV secret:
Show request
$ curl \
--request PUT 'https://<tenant-env-fqdn>/environment/secrets/<secret-name>' \(1)
--header 'Authorization: Bearer <access-token>' \(2)
--header 'Content-Type: application/json' \
--header 'Accept-API-Version: protocol=1.0;resource=1.0' \
--data-raw '{
    "encoding": "<encoding-format>",(3)
    "useInPlaceholders": false,(4)
    "valueBase64": "<base64-encoded-key>"(5)
}'
1 Replace <secret-name> with an appropriate secret name; for example, esv-oauth2-signing-key. Learn more in ESV naming.2 Replace <access-token> with the access token. 3 Replace <encoding-format> with pemfor asymmetric keys orbase64hmacfor symmetric keys. Learn more in Encoding format.4 Ensure that useInPlaceholdersis set tofalse. Learn more in Control access to secrets.5 Replace <base64-encoded-key> with your new signing or encryption key, encoded as a Base64 string. Show response
{
    "_id": "esv-oauth2-signing-key",
    "activeVersion": "",
    "description": "",
    "encoding": "base64hmac",
    "lastChangeDate": "2022-01-28T13:25:40.515Z",
    "lastChangedBy": "23b299e8-90d4-406e-9431-80faf25bc7c0",
    "loaded": true,
    "loadedVersion": "",
    "useInPlaceholders": false
}
-
-
In the Advanced Identity Cloud admin UI, click Native Consoles > Access Management.
-
In the AM admin UI (native console), go to Realm > Secret Stores.
-
Click the ESV secret store, then click Mappings.
-
Click + Add Mapping, then enter the following information:
Secret Label
Select a secret label; for example
am.services.oauth2.stateless.signing.HMAC.aliases
Enter the name of the ESV secret you created in step 1, including the
esv-prefix; for example,esv-oauth2-signing-key. Then click Add.Only add a single ESV alias. The UI lets you add additional aliases, but this is a legacy mechanism for key rotation. Instead, rotate ESV keys by adding new secret versions to the ESV. Learn more in Rotate keys in mapped ESV secrets. -
Click Create.
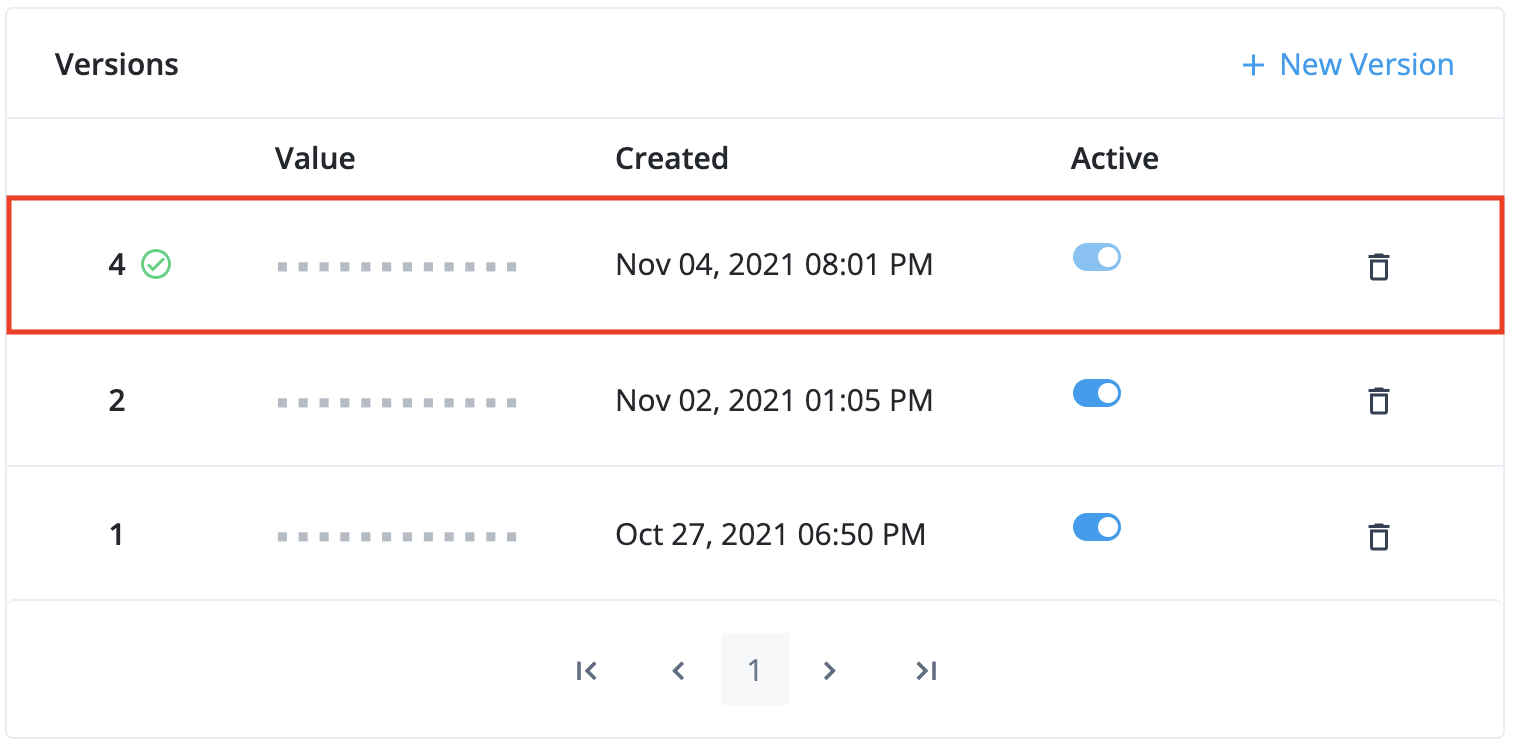
Rotate keys in mapped ESV secrets
You can rotate keys stored in a mapped ESV secret by manipulating the enabled status of its secret versions:
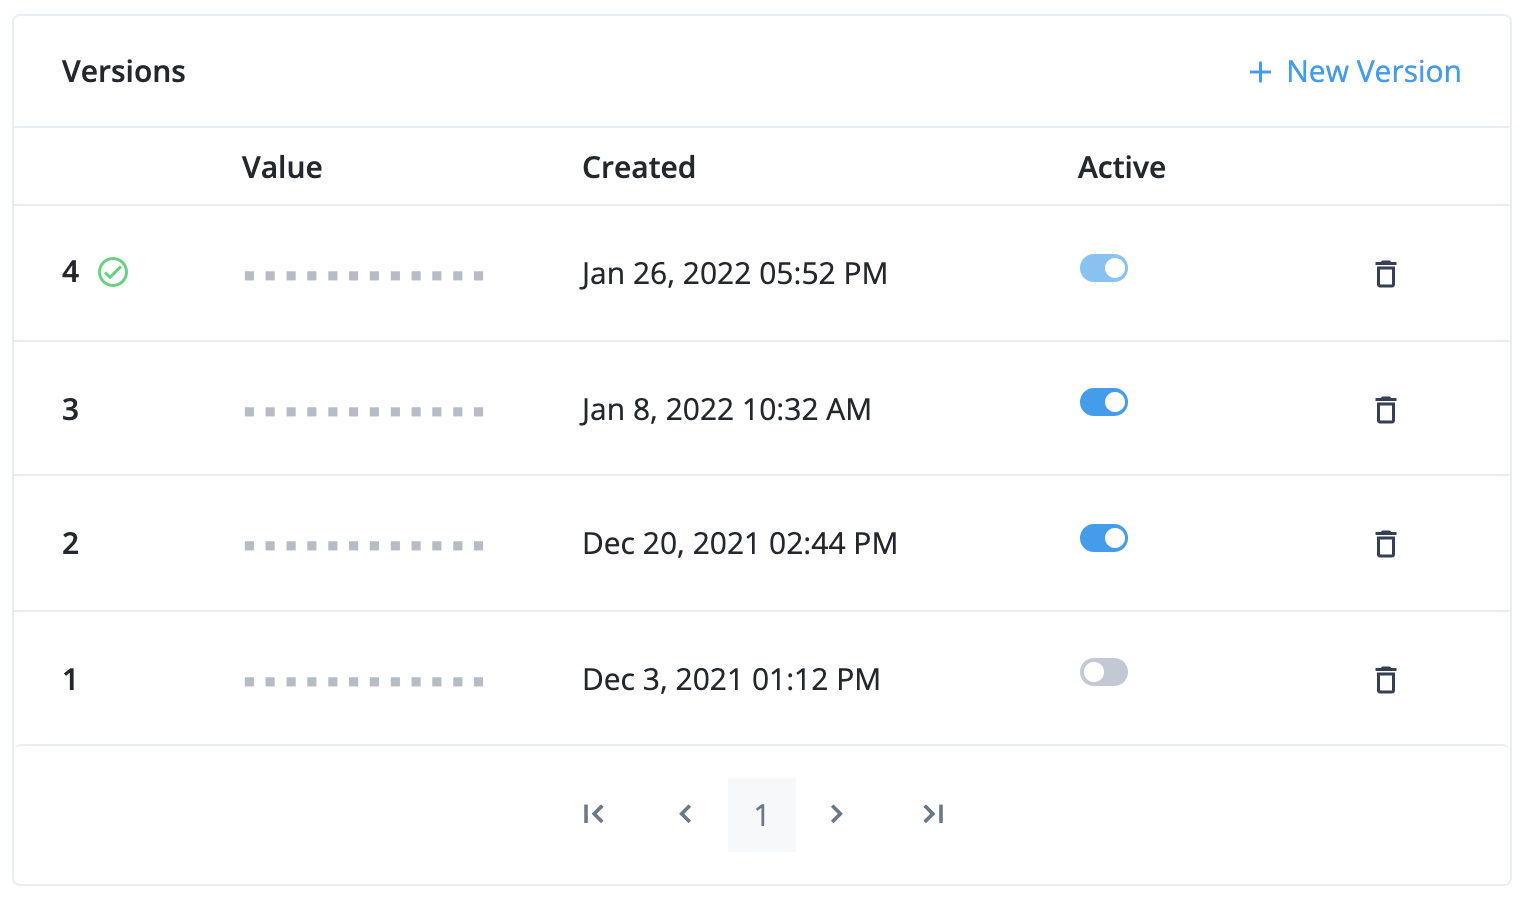
- Version 4
-
This is the latest secret version. It is enabled and cannot be disabled. It is used to sign new tokens. Existing tokens signed by this key are still valid.
- Version 3 and version 2
-
These are older secret versions. They are still enabled. Existing tokens signed by these keys are still valid.
- Version 1
-
This is an older secret version. It is disabled. Existing tokens signed by this key are not valid.
Rotate SAML 2.0 certificates using ESVs
Generate an RSA key pair
To generate an RSA key pair to use in an ESV:
-
Run the following command to generate a private key:
$ openssl genrsa -out private-key.pem -
Then, generate a public key using the private key:
$ openssl req -new -x509 -key private-key.pem -out public-key.pem -days 365 -subj /CN=idcloud -
Combine the private key and public key into a key pair:
$ cat private-key.pem public-key.pem > key-pair.pem -
If you intend to use an API request to create the ESV:
-
Encode the key pair into
base64:$ openssl enc -base64 -A -in key-pair.pem -out key-pair-base64.pemThe file
key-pair-base64.pemnow contains abase64encoded key pair value. -
You can now use this value in the
valueBase64property of the JSON body of the API request. Refer to step 1b in Map ESV secrets to secret labels for an example.
-
Generate an AES or HMAC key
To generate an AES or HMAC key to use in an ESV:
-
Run the following command:
$ head -c<bytes> /dev/urandom | openssl enc -base64 -A -out key.txt(1)1 Replace <bytes> with your required key length; for example, 512. Summary of command:
-
Generates a random number using
/dev/urandom -
Truncates the random number to your required key length using
head -
Encodes the truncated random number into
base64usingopenssl
-
-
If you intend to use an API request to create the ESV:
-
Encode the key into
base64again:$ openssl enc -base64 -A -in key.txt -out key-base64.txtThe file
key-base64.txtnow contains abase64encoded key value. -
You can now use this value in the
valueBase64property of the JSON body of the API request. Refer to step 1b in Map ESV secrets to secret labels for an example.
-
Configure placeholders to use with ESVs
PingOne Advanced Identity Cloud lets you reference ESVs from configuration placeholders. This lets you use different configuration values for the development, staging, and production environments at runtime.
For example, suppose you wanted to set a different email sender for each environment. You would
set the configuration value of the email sender to an ESV with different values in each
environment; for example, dev-mycompany@example.com (development),
staging-mycompany@example.com (staging), and mycompany@example.com (production). Then, you
would insert the ESV configuration placeholder into your configuration instead of a literal value.
| Configuration placeholders that reference an undefined ESV cause promotions to fail. Learn more in Configuration integrity checks. |
Set up configuration placeholders to reference an ESV
-
In your development environment:
-
Create the ESV using one of the following:
-
Create a variable or create a secret using the API (learn more in Manage ESVs using the API).
-
Create a variable or create a secret using the Advanced Identity Cloud admin UI.
-
-
Insert the ESV configuration placeholder into your configuration. Learn more in:
-
-
In your staging environment:
-
Repeat step 1a for your staging environment. Ensure the ESV name is the same as you set up in the development environment.
-
Run a promotion to move the configuration change from your development environment to your staging environment. Learn more in:
-
-
In your production environment:
-
Repeat step 1a for your production environment. Ensure the ESV name is the same as you set up in the development environment.
-
Run a further promotion to move the configuration change from your staging environment to your production environment.
-
If you want to add more ESVs later, repeat the steps above and use a further series of promotions.
| Configuration placeholders can only be inserted into static configuration. You can find more information on what static configuration is and which areas of configuration are classified as static in the promotion FAQs. |
Update an ESV referenced by a configuration placeholder
-
Update the ESV using one of the following:
-
Update a variable or add a new secret version to a secret using the API (learn more in Manage ESVs using the API).
-
Update a variable or add a new secret version to a secret using the Advanced Identity Cloud admin UI.
-
Restart Advanced Identity Cloud services
If you update an ESV referenced by a configuration placeholder, you also need to restart Advanced Identity Cloud services. This substitutes the updated secret or variable into the corresponding configuration placeholder.
-
Restart Advanced Identity Cloud services using one of the following:
-
Restart using the API (learn more in Manage ESVs using the API).
-
Apply updates using the Advanced Identity Cloud admin UI.
-
Delete an ESV referenced by a configuration placeholder
-
Remove the ESV configuration placeholder from your configuration in the development environment. Refer to:
-
Run a promotion to move the configuration change from the development environment to the staging environment. Refer to:
-
Run a further promotion to move the configuration change from the staging environment to the production environment.
-
Delete the ESV in each of the development, staging, and production environments using one of the following:
-
Delete a variable or delete a secret using the Advanced Identity Cloud API (learn more in Manage ESVs using the API).
-
Delete a variable or delete a secret using the Advanced Identity Cloud admin UI.
-
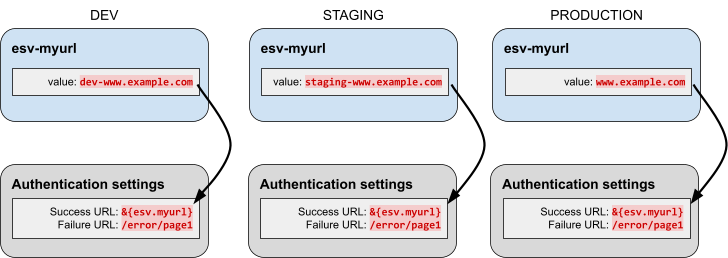
Define and promote an ESV
An example of using a variable would be to define a URL that a user is redirected to after logging
in. In each environment, the URL would need a different value; for example, dev-www.example.com
(development), staging-www.example.com (staging), and www.example.com (production).
To define and promote the variable:
-
Decide on a variable name; for example,
esv-myurl. Learn more in ESV naming. -
Set an ESV variable in each of the development, staging, and production environments. To do this, choose one of the following options:
-
Use the variables API endpoint to create the variable, then use the restart API endpoint to restart Identity Cloud services.
-
Use the Advanced Identity Cloud admin UI to create the variable, then apply the update.
-
-
Insert the ESV configuration placeholder into your configuration in the development environment. For the example variable
esv-myurlfrom step 1, the placeholder would be called&{esv.myurl}. Refer to:Configuration placeholders can only be inserted into static configuration. Learn more in promotion FAQs. -
Run a promotion to move the configuration change from the development environment to the staging environment. Refer to:
-
Run a promotion to move the configuration change from the staging environment to the production environment.
The following illustration demonstrates the process:
Manage configuration placeholders using the API
PingOne Advanced Identity Cloud lets you add placeholders to your configuration so you can reference the value of an ESV variable or an ESV secret instead of defining a static value.
For example, if you created an ESV variable named esv-email-provider-port, you could reference its value by adding a placeholder of {"$int" : "&{esv.email.provider.port}"} to your configuration.
To set a default value in a configuration placeholder, include it after a vertical bar. For example, the following expression sets a default email provider port of 465: {"$int" : "&{esv.email.provider.port|465}"}. If no ESV is set, the default value of 465 is used instead.
If you add a placeholder to your configuration and do not set a corresponding ESV or specify a default value, you will not be able to complete a successful promotion.
A configuration property can include a mix of static values and placeholders. For example, if you set esv-hostname to id, then &{esv.hostname}.example.com evaluates to id.example.com.
Examples
Configure tenant email provider
This example shows how to configure placeholders in your tenant email provider configuration. Learn more in Email provider.
-
Get an access token. Learn more in Get an access token.
-
Get the email provider configuration:
Show request
$ curl \
--request GET 'https://<tenant-env-fqdn>/openidm/config/external.email' \
--header 'Content-Type: application/json' \
--header 'Accept-API-Version: resource=1.0' \
--header 'Authorization: Bearer <access-token>' (1)
1 Replace <access-token> with the access token created in step 1. Show response
{ "_id": "external.email", "auth": { "enable": true, "password": "changeit", "username": "example.user" }, "connectiontimeout": 30000, "debug": false, "from": "\"Example User\" <example.user@example.com>", "host": "localhost", "port": 465, "smtpProperties": [], "ssl": { "enable": true }, "starttls": { "enable": false }, "threadPoolSize": 21, "timeout": 30000, "writetimeout": 30000 } -
Create a local copy of the email provider configuration from step 2, then substitute in ESV placeholders:
{
    "auth": {
        "enable": true,
        "password": "&{esv.email.provider.password}",(1)
        "username": "&{esv.email.provider.username}"(2)
    },
    "connectiontimeout": 30000,
    "debug": false,
    "from": "\"Example User\" <&{esv.email.provider.from.email}>",(3)
    "host": "localhost",
    "port": {
        "$int": "&{esv.email.provider.port}"(4)
    },
    "smtpProperties": [],
    "ssl": {
        "enable": {
            "$bool": "&{esv.email.provider.use.ssl}"(5)
        }
    },
    "starttls": {
        "enable": false
    },
    "threadPoolSize": 21,
    "timeout": 30000,
    "writetimeout": 30000
}
1 Substitution for ESV placeholder &{esv.email.provider.password}.2 Substitution for ESV placeholder &{esv.email.provider.username}.3 Substitution for ESV placeholder &{esv.email.provider.from.email}.4 Substitution for ESV placeholder &{esv.email.provider.port}.5 Substitution for ESV placeholder &{esv.email.provider.use.ssl}.The following table summarizes the ESVs that correspond with the above placeholders:
ESV name ESV type Example value esv-email-provider-passwordSecret
n/a
esv-email-provider-usernameVariable
String
example.user
esv-email-provider-from-emailVariable
String
example.user@example.com
esv-email-provider-portVariable
Integer
465
esv-email-provider-use-sslVariable
Boolean
true
-
Update the email provider configuration:
Show request
$ curl \
--request PUT 'https://<tenant-env-fqdn>/openidm/config/external.email' \
--header 'Content-Type: application/json' \
--header 'Accept-API-Version: resource=1.0' \
--header 'Authorization: Bearer <access-token>' \(1)
--data-raw '<email-provider-configuration>'(2)
1 Replace <access-token> with the access token created in step 1. 2 Replace <email-provider-configuration> with the local copy of the email-provider configuration modified in step 3. Show response
{
    "_id": "external.email",
    "auth": {
        "enable": true,
        "password": "&{esv.email.provider.password}",
        "username": "&{esv.email.provider.username}"
    },
    "connectiontimeout": 30000,
    "debug": false,
    "from": "\"Example User\" <&{esv.email.provider.from.email}>",
    "host": "localhost",
    "port": {
        "$int": "&{esv.email.provider.port}"
    },
    "smtpProperties": [],
    "ssl": {
        "enable": {
            "$bool": "&{esv.email.provider.use.ssl}"
        }
    },
    "starttls": {
        "enable": false
    },
    "threadPoolSize": 20,
    "timeout": 30000,
    "writetimeout": 30000
}
Configure CORS
This example shows how to configure placeholders in your tenant CORS configuration. Learn more in Configure cross-origin resource sharing.
-
Get an access token. Learn more in Get an access token.
-
Get the CORS configuration:
Show request
$ curl \
--request POST 'https://<tenant-env-fqdn>/am/json/global-config/services/CorsService/?_action=nextdescendents' \
--header 'Content-Type: application/json' \
--header 'Accept-API-Version: resource=1.0' \
--header 'Authorization: Bearer <access-token>' (1)
1 Replace <access-token> with the access token created in step 1. Show response
{
    "result": [
        {
            "maxAge": 600,
            "exposedHeaders": [],
            "acceptedHeaders": [
                "accept-api-version",
                "x-requested-with"
            ],
            "allowCredentials": true,
            "acceptedMethods": [
                "GET",
                "POST",
                "PUT",
                "DELETE"
            ],
            "acceptedOrigins": [
                "https://example.org",
                "https://example.com",
                "https://openam-example.forgeblocks.com"
            ],
            "enabled": true,
            "_id": "example-cors-config",(1)
            "_type": {
                "_id": "configuration",
                "name": "Cors Configuration",
                "collection": true
            }
        }
    ]
}
1 The ID of the CORS configuration; in this example it is example-cors-config. -
Create a local copy of the CORS configuration from step 2, then substitute in ESV placeholders:
{
    "maxAge": 600,
    "exposedHeaders": [],
    "acceptedHeaders": [
        "accept-api-version",
        "x-requested-with"
    ],
    "allowCredentials": true,
    "acceptedMethods": [
        "GET",
        "POST",
        "PUT",
        "DELETE"
    ],
    "acceptedOrigins": {
        "$array": "&{esv.cors.accepted.origins}"(1)
    },
    "enabled": true,
    "_id": "example-cors-config",
    "_type": {
        "_id": "configuration",
        "name": "Cors Configuration",
        "collection": true
    }
}
1 Substitution for ESV placeholder &{esv.cors.accepted.origins}.The following table summarizes the ESV that corresponds with the above placeholder:
ESV name ESV type Example value esv-cors-accepted-originsVariable
Array
["https://example.org","https://example.com","https://openam-example.forgeblocks.com"]
-
Update the CORS configuration:
Show request
$ curl \
--request PUT 'https://<tenant-env-fqdn>/am/json/global-config/services/CorsService/configuration/<cors-id>' \(1)
--header 'Content-Type: application/json' \
--header 'Accept-API-Version: resource=1.0' \
--header 'Authorization: Bearer <access-token>' \(2)
--data-raw '<cors-configuration>'(3)
1 Replace <cors-id> with the CORS configuration ID you found in step 2; for example, example-cors-config.2 Replace <access-token> with the access token created in step 1. 3 Replace <cors-configuration> with the local copy of the CORS configuration modified in step 3. Show response
{
    "_id": "example-cors-settings",
    "_rev": "1594160724",
    "maxAge": 600,
    "exposedHeaders": [],
    "acceptedHeaders": [
        "accept-api-version",
        "x-requested-with"
    ],
    "allowCredentials": true,
    "acceptedMethods": [
        "GET",
        "POST",
        "PUT",
        "DELETE"
    ],
    "acceptedOrigins": {
        "$array": "&{esv.cors.accepted.origins}"
    },
    "enabled": true,
    "_type": {
        "_id": "configuration",
        "name": "Cors Configuration",
        "collection": true
    }
}
Configure a journey node
This example shows how to configure placeholders in an LDAP decision node, but the approach can be adapted to configure placeholders in any journey node.
-
Get an access token. Learn more in Get an access token.
-
Get the configuration of the journey that contains the LDAP decision node so you can extract the ID of the node:
Show request
$ curl \
--request GET 'https://<tenant-env-fqdn>/am/json/realms/root/realms/<realm>/realm-config/authentication/authenticationtrees/trees/<journey-name>' \(1) (2)
--header 'Content-Type: application/json' \
--header 'Accept-API-Version: resource=1.0' \
--header 'Authorization: Bearer <access-token>' (3)
1 Replace <realm> with the realm that contains the journey that contains the LDAP decision node; for example, alpha.2 Replace <journey-name> with the name of the journey that contains the LDAP decision node; for example, UpdatePassword.3 Replace <access-token> with the access token created in step 1. Show response
{
    "_id": "ldapJourney",
    "_rev": "1341035508",
    "identityResource": "managed/alpha_user",
    "uiConfig": {
        "categories": "[]"
    },
    "entryNodeId": "76e74888-73e1-46e2-aa33-5e4c8b07ccec",
    "nodes": {
        "76e74888-73e1-46e2-aa33-5e4c8b07ccec": {
            "x": 249,
            "y": 171.015625,
            "connections": {
                "outcome": "c12abfe7-ae71-42e6-a6b3-e8f4d4d05549"
            },
            "nodeType": "PageNode",
            "displayName": "Page Node"
        },
        "2082c1ad-f5ad-4b6d-aada-dd4fff4dc6f3": {(1)
            "x": 510,
            "y": 181.015625,
            "connections": {
                "CANCELLED": "e301438c-0bd0-429c-ab0c-66126501069a",
                "EXPIRED": "e301438c-0bd0-429c-ab0c-66126501069a",
                "FALSE": "e301438c-0bd0-429c-ab0c-66126501069a",
                "LOCKED": "e301438c-0bd0-429c-ab0c-66126501069a",
                "TRUE": "70e691a5-1e33-4ac3-a356-e7b6d60d92e0"
            },
            "nodeType": "LdapDecisionNode",
            "displayName": "LDAP Decision"
        }
    },
    "staticNodes": {
        "startNode": {
            "x": 50,
            "y": 250
        },
        "70e691a5-1e33-4ac3-a356-e7b6d60d92e0": {
            "x": 792,
            "y": 181
        },
        "e301438c-0bd0-429c-ab0c-66126501069a": {
            "x": 795,
            "y": 307
        }
    },
    "enabled": true
}
1 The ID of the LdapDecisionNodenode; in this example, it is2082c1ad-f5ad-4b6d-aada-dd4fff4dc6f3. -
Get the configuration of the LDAP decision node:
Show request
$ curl \
--request GET 'https://<tenant-env-fqdn>/am/json/realms/root/realms/<realm>/realm-config/authentication/authenticationtrees/nodes/LdapDecisionNode/<node-id>' \(1) (2) (3)
--header 'Content-Type: application/json' \
--header 'Accept-API-Version: resource=1.0' \
--header 'Authorization: Bearer <access-token>' (4)
1 Replace <realm> with the realm that contains the journey that contains the LDAP decision node; for example, alpha.2 The node name specified is LdapDecisionNode.3 Replace <node-id> with the node ID you found in step 2; for example, 2082c1ad-f5ad-4b6d-aada-dd4fff4dc6f3.4 Replace <access-token> with the access token created in step 1. Show response
{ "_id": "2082c1ad-f5ad-4b6d-aada-dd4fff4dc6f3", "_rev": "-752122233", "searchFilterAttributes": [ "mail" ], "userProfileAttribute": "uid", "primaryServers": [ "userstore-0.userstore:1389", "userstore-1.userstore:1389", "userstore-2.userstore:1389" ], "ldapConnectionMode": "LDAP", "trustAllServerCertificates": false, "heartbeatInterval": 10, "returnUserDn": true, "searchScope": "SUBTREE", "heartbeatTimeUnit": "SECONDS", "secondaryServers": [], "ldapOperationsTimeout": 0, "userCreationAttrs": [], "minimumPasswordLength": 8, "accountSearchBaseDn": [ "o=example" ], "adminPassword": null, "adminDn": "uid=admin", "beheraEnabled": true, "_type": { "_id": "LdapDecisionNode", "name": "LDAP Decision", "collection": true }, "_outcomes": [ { "id": "TRUE", "displayName": "True" }, { "id": "FALSE", "displayName": "False" }, { "id": "LOCKED", "displayName": "Locked" }, { "id": "CANCELLED", "displayName": "Cancelled" }, { "id": "EXPIRED", "displayName": "Expired" } ] } -
Create a local copy of the node configuration from step 3, then substitute in ESV placeholders:
{
    "searchFilterAttributes": [
        "mail"
    ],
    "userProfileAttribute": "uid",
    "primaryServers" : {
        "$list": "&{esv.journey.ldap.primary.servers}"(1)
    },
    "ldapConnectionMode": "LDAP",
    "trustAllServerCertificates": false,
    "heartbeatInterval": {
        "$int": "&{esv.journey.ldap.heartbeat.interval}"(2)
    },
    "returnUserDn": true,
    "searchScope": "SUBTREE",
    "heartbeatTimeUnit": "&{esv.journey.ldap.heartbeat.unit}",(3)
    "secondaryServers": [],
    "ldapOperationsTimeout": 0,
    "userCreationAttrs": [],
    "minimumPasswordLength": 8,
    "accountSearchBaseDn": [
        "o=example"
    ],
    "adminPassword": {
        "$string": "&{esv.journey.ldap.password}"(4)
    },
    "adminDn": "&{esv.journey.ldap.username}",(5)
    "beheraEnabled": {
        "$bool": "&{esv.journey.ldap.behera.enabled}"(6)
    },
    "_type": {
        "_id": "LdapDecisionNode",
        "name": "LDAP Decision",
        "collection": true
    },
    "_outcomes": [
        {
            "id": "TRUE",
            "displayName": "True"
        },
        {
            "id": "FALSE",
            "displayName": "False"
        },
        {
            "id": "LOCKED",
            "displayName": "Locked"
        },
        {
            "id": "CANCELLED",
            "displayName": "Cancelled"
        },
        {
            "id": "EXPIRED",
            "displayName": "Expired"
        }
    ]
}
1 Substitution for ESV placeholder &{esv.journey.ldap.primary.servers}.2 Substitution for ESV placeholder &{esv.journey.ldap.heartbeat.interval}.3 Substitution for ESV placeholder &{esv.journey.ldap.heartbeat.unit}.4 Substitution for ESV placeholder &{esv.journey.ldap.password}.5 Substitution for ESV placeholder &{esv.journey.ldap.username}.6 Substitution for ESV placeholder &{esv.journey.ldap.behera.enabled}.The following table summarizes the ESVs that correspond with the above placeholders:
ESV name ESV type Example value esv-journey-ldap-primary-serversVariable
List
userstore-0.userstore:1389,userstore-1.userstore:1389,userstore-2.userstore:1389
esv-journey-ldap-heartbeat-intervalVariable
Integer
10
esv-journey-ldap-heartbeat-unitVariable
String
SECONDS
esv-journey-ldap-passwordSecret
n/a
changeit
esv-journey-ldap-usernameVariable
String
uid=myadmin
esv-journey-ldap-behera-enabledVariable
Boolean
false
-
Update the configuration of the LDAP decision node:
Show request
$ curl \
--request PUT 'https://<tenant-env-fqdn>/am/json/realms/root/realms/<realm>/realm-config/authentication/authenticationtrees/nodes/LdapDecisionNode/<node-id>' \(1) (2) (3)
--header 'Content-Type: application/json' \
--header 'Accept-API-Version: resource=1.0' \
--header 'Authorization: Bearer <access-token>' \(4)
--data-raw '<node-configuration>'(5)
1 Replace <realm> with the realm that contains the journey that contains the LDAP decision node; for example, alpha.2 The node name specified is LdapDecisionNode.3 Replace <node-id> with the node ID you found in step 2; for example, 2082c1ad-f5ad-4b6d-aada-dd4fff4dc6f3.4 Replace <access-token> with the access token created in step 1. 5 Replace <node-configuration> with the local copy of the node configuration modified in step 4. Show response
{
    "_id": "2082c1ad-f5ad-4b6d-aada-dd4fff4dc6f3",
    "_rev": "1359037709",
    "searchFilterAttributes": [
        "mail"
    ],
    "userProfileAttribute": "uid",
    "primaryServers": {
        "$list": "&{esv.journey.ldap.servers}"
    },
    "ldapConnectionMode": "LDAP",
    "trustAllServerCertificates": false,
    "heartbeatInterval": {
        "$int": "&{esv.journey.ldap.heartbeat.interval}"
    },
    "returnUserDn": true,
    "searchScope": "SUBTREE",
    "heartbeatTimeUnit": "&{esv.journey.ldap.heartbeat.unit}",
    "secondaryServers": [],
    "ldapOperationsTimeout": 0,
    "userCreationAttrs": [],
    "minimumPasswordLength": 8,
    "accountSearchBaseDn": [
        "o=example"
    ],
    "adminPassword": {
        "$string": "&{esv.journey.ldap.password}"
    },
    "adminDn": "&{esv.journey.ldap.username}",
    "beheraEnabled": {
        "$bool": "&{esv.journey.ldap.behera.enabled}"
    },
    "_type": {
        "_id": "LdapDecisionNode",
        "name": "LDAP Decision",
        "collection": true
    },
    "_outcomes": [
        {
            "id": "TRUE",
            "displayName": "True"
        },
        {
            "id": "FALSE",
            "displayName": "False"
        },
        {
            "id": "LOCKED",
            "displayName": "Locked"
        },
        {
            "id": "CANCELLED",
            "displayName": "Cancelled"
        },
        {
            "id": "EXPIRED",
            "displayName": "Expired"
        }
    ]
}
Configure a federation provider secret
This example shows how to configure a placeholder for a federation provider secret.
-
Get an access token. Learn more in Get an access token.
-
Get the configuration of the federation provider:
Show request
$ curl \
--request GET 'https://<tenant-env-fqdn>/am/json/realms/root/realm-config/services/SocialIdentityProviders/oidcConfig/<provider-id>' \(1)
--header 'Content-Type: application/json' \
--header 'Accept-API-Version: resource=1.0' \
--header 'Authorization: Bearer <access-token>' (2)
1 Replace <provider-id> with the name of your federation provider; for example, ms-azure-provider.2 Replace <access-token> with the access token created in step 1. Show response
{ "clientId": "my-client-id", "pkceMethod": "S256", "wellKnownEndpoint": "https://login.microsoftonline.com/common/v2.0/.well-known/openid-configuration", "authorizationEndpoint": "https://login.microsoftonline.com/common/oauth2/v2.0/authorize", "clientSecret": null, "issuerComparisonCheckType": "EXACT", "encryptJwtRequestParameter": false, "scopeDelimiter": " ", "scopes": [ "User.Read", "openid" ], "issuer": "ForgeRock", "userInfoResponseType": "JSON", "acrValues": [], "encryptedIdTokens": false, "enabled": true, "jwtRequestParameterOption": "NONE", "authenticationIdKey": "id", "uiConfig": { "buttonCustomStyle": "background-color: #fff; border-color: #8b8b8b; color: #8b8b8b;", "buttonCustomStyleHover": "background-color: #fff; border-color: #8b8b8b; color: #8b8b8b;", "buttonDisplayName": "Azure", "buttonImage": "img/azure-logo.6be3c5e8.svg", "iconBackground": "#0078d7", "iconFontColor": "white" }, "privateKeyJwtExpTime": 600, "revocationCheckOptions": [], "enableNativeNonce": true, "userInfoEndpoint": "https://graph.microsoft.com/oidc/userinfo", "jwtSigningAlgorithm": "NONE", "redirectURI": "https://openam-federation-preview.forgeblocks.com/login/admins", "clientAuthenticationMethod": "CLIENT_SECRET_POST", "responseMode": "DEFAULT", "useCustomTrustStore": false, "tokenEndpoint": "https://login.microsoftonline.com/common/oauth2/v2.0/token", "_id": "ms-azure-provider", "_type": { "_id": "oidcConfig", "name": "Client configuration for providers that implement the OpenID Connect specification.", "collection": true } } -
Create a local copy of the federation provider configuration from step 2, then substitute an ESV placeholder for the application secret:
{
    "clientId": "my-client-id",
    "pkceMethod": "S256",
    "wellKnownEndpoint": "https://login.microsoftonline.com/common/v2.0/.well-known/openid-configuration",
    "authorizationEndpoint": "https://login.microsoftonline.com/common/oauth2/v2.0/authorize",
    "clientSecret": {
        "$string":"&{esv.ms.azure.provider}" (1)
    },
    "issuerComparisonCheckType": "EXACT",
    "encryptJwtRequestParameter": false,
    "scopeDelimiter": " ",
    "scopes": [
        "User.Read",
        "openid"
    ],
    "issuer": "ForgeRock",
    "userInfoResponseType": "JSON",
    "acrValues": [],
    "encryptedIdTokens": false,
    "enabled": true,
    "jwtRequestParameterOption": "NONE",
    "authenticationIdKey": "id",
    "uiConfig": {
        "buttonCustomStyle": "background-color: #fff; border-color: #8b8b8b; color: #8b8b8b;",
        "buttonCustomStyleHover": "background-color: #fff; border-color: #8b8b8b; color: #8b8b8b;",
        "buttonDisplayName": "Azure",
        "buttonImage": "img/azure-logo.6be3c5e8.svg",
        "iconBackground": "#0078d7",
        "iconFontColor": "white"
    },
    "privateKeyJwtExpTime": 600,
    "revocationCheckOptions": [],
    "enableNativeNonce": true,
    "userInfoEndpoint": "https://graph.microsoft.com/oidc/userinfo",
    "jwtSigningAlgorithm": "NONE",
    "redirectURI": "https://openam-federation-preview.forgeblocks.com/login/admins",
    "clientAuthenticationMethod": "CLIENT_SECRET_POST",
    "responseMode": "DEFAULT",
    "useCustomTrustStore": false,
    "tokenEndpoint": "https://login.microsoftonline.com/common/oauth2/v2.0/token",
    "_id": "ms-azure-provider",
    "_type": {
        "_id": "oidcConfig",
        "name": "Client configuration for providers that implement the OpenID Connect specification.",
        "collection": true
    }
}
1 Substitution for ESV placeholder &{esv.ms.azure.provider}. -
Update the federation provider configuration:
Show request
curl \
--request PUT 'https://<tenant-env-fqdn>/am/json/realms/root/realm-config/services/SocialIdentityProviders/oidcConfig/<provider-id>' \ (1)
--header 'Content-Type: application/json' \
--header 'Accept-API-Version: resource=1.0' \
--header 'Authorization: Bearer <access-token>' \(2)
--data-raw '<provider-configuration>' (3)
1 Replace <provider-id> with the name of your federation provider; for example, ms-azure-provider.2 Replace <access-token> with the access token created in step 1. 3 Replace <provider-configuration> with the local copy of the provider configuration modified in step 3. Show response
{
    "clientId": "my-client-id",
    "pkceMethod": "S256",
    "wellKnownEndpoint": "https://login.microsoftonline.com/common/v2.0/.well-known/openid-configuration",
    "authorizationEndpoint": "https://login.microsoftonline.com/common/oauth2/v2.0/authorize",
    "clientSecret": {
        "$string":"&{esv.ms.azure.provider}"
    },
    "issuerComparisonCheckType": "EXACT",
    "encryptJwtRequestParameter": false,
    "scopeDelimiter": " ",
    "scopes": [
        "User.Read",
        "openid"
    ],
    "issuer": "ForgeRock",
    "userInfoResponseType": "JSON",
    "acrValues": [],
    "encryptedIdTokens": false,
    "enabled": true,
    "jwtRequestParameterOption": "NONE",
    "authenticationIdKey": "id",
    "uiConfig": {
        "buttonCustomStyle": "background-color: #fff; border-color: #8b8b8b; color: #8b8b8b;",
        "buttonCustomStyleHover": "background-color: #fff; border-color: #8b8b8b; color: #8b8b8b;",
        "buttonDisplayName": "Azure",
        "buttonImage": "img/azure-logo.6be3c5e8.svg",
        "iconBackground": "#0078d7",
        "iconFontColor": "white"
    },
    "privateKeyJwtExpTime": 600,
    "revocationCheckOptions": [],
    "enableNativeNonce": true,
    "userInfoEndpoint": "https://graph.microsoft.com/oidc/userinfo",
    "jwtSigningAlgorithm": "NONE",
    "redirectURI": "https://openam-federation-preview.forgeblocks.com/login/admins",
    "clientAuthenticationMethod": "CLIENT_SECRET_POST",
    "responseMode": "DEFAULT",
    "useCustomTrustStore": false,
    "tokenEndpoint": "https://login.microsoftonline.com/common/oauth2/v2.0/token",
    "_id": "ms-azure-provider",
    "_type": {
        "_id": "oidcConfig",
        "name": "Client configuration for providers that implement the OpenID Connect specification.",
        "collection": true
    }
}
Manage configuration placeholders using the UI
PingOne Advanced Identity Cloud lets you add placeholders to your configuration so you can reference the value of an ESV variable or an ESV secret instead of defining a static value.
For example, if you created an ESV variable named esv-ldap-minimum-password-length, you
could reference its value in a journey by adding the placeholder &{esv.ldap.minimum.password.length}
to the Minimum Password Length field of an LDAP Decision node.
UI support for configuration placeholders
The Advanced Identity Cloud admin UI has full support for viewing and removing placeholders; however, it supports adding placeholders only to journey configuration. To add placeholders to configuration outside the journey editor, use the API. Learn more in Manage configuration placeholders using the API.
The following table summarizes the Advanced Identity Cloud admin UI support for placeholders:
| UI action | Journey configuration | Non-journey configuration |
|---|---|---|
Add placeholder |
Yes |
No (use API) |
View placeholder |
Yes |
Yes |
Remove placeholder |
Yes |
Yes |
| Even if you enter a placeholder in non-journey configuration in the UI and the UI renders it as a read-only field, it is not valid and won’t work as expected. |
Add a configuration placeholder to a field
| If you create a new ESV in a separate tab or window, you may also need to reload the page you are working on to display the new ESV in a field’s variable list. |
-
(Optional) Create a new ESV by following steps 1a and 1b in Set up configuration placeholders to reference an ESV.
-
In the Advanced Identity Cloud admin UI, identify the insertable placeholder field to which you want to add a placeholder.
-
Click on the field’s token icon ().
-
The UI displays a list of ESVs with a compatible variable type for the field; for example, for a field that expects a boolean value, the list contains only ESVs with a
booltype: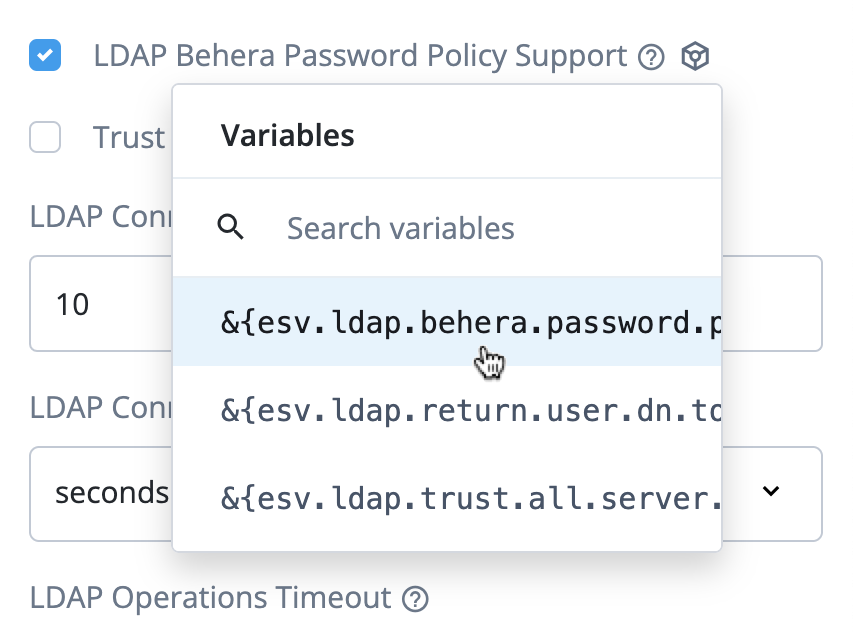
The UI combines secrets and stringtype variables into one list. This combined list displays for password fields and for text fields that expect a string value. -
(Optional) To filter the ESVs displayed in the list, enter a value in the field with a search icon ().
-
Select an ESV from the list.
-
The UI displays the selected placeholder and changes the field to a read-only placeholder field.
-
(Optional) To edit the placeholder:
-
Click on the field’s clear icon ().
-
The UI reverts the field to an insertable placeholder field.
-
Repeat steps 2–7 above.
-
-
Save the page that contains the field. This adds the placeholder to your configuration.
Delete a configuration placeholder for a field
-
In the Advanced Identity Cloud admin UI, identify the read-only placeholder field for which you want to delete a placeholder.
-
Click on the field’s clear icon ().
-
The UI reverts the field to an insertable placeholder field.
-
(Optional) Set a new regular input value for the field.
-
Save the page that contains the field. This removes the placeholder from your configuration and replaces it with a regular input value.
Placeholder field states
Insertable
Fields into which you can add a placeholder are insertable. If a field is insertable, a token icon () displays when you hover your cursor over the field or when you focus on the field:
-
For text, password, select, and tag fields, the icon is displayed inside the field on the right-hand side:
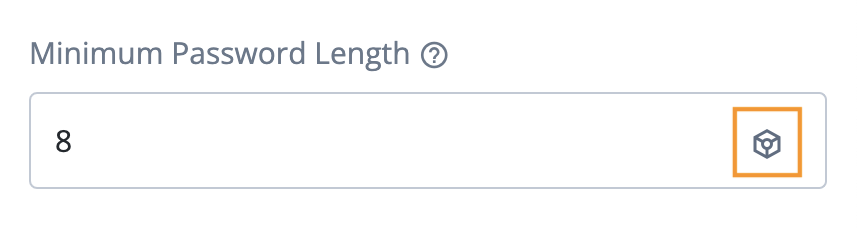
-
For checkboxes, the icon is displayed outside the field to the right-hand side:

-
For key-value fields, the icon is displayed to the right-hand side of the key-value field name:

Until you add a configuration placeholder, insertable placeholder fields behave the same as regular input fields.
Read-only
When you add a configuration placeholder to a placeholder field, it becomes read-only:
-
For text, password, select, and tag fields, the placeholder displays inside the field, the field is grayed out, and the field value cannot be edited. The only part of the field that is interactive is the field’s clear icon () on the right-hand side:
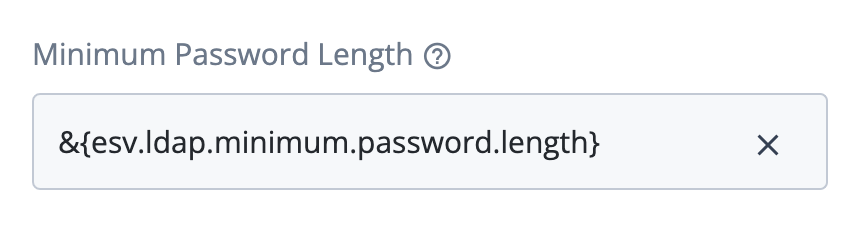
-
For checkboxes, the checkbox is replaced with a read-only text field below the checkbox label:
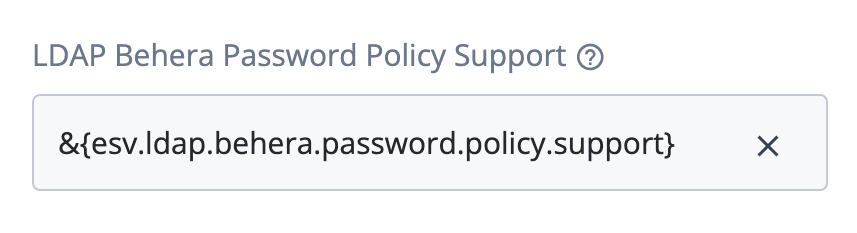
-
For key-value fields, the field name, controls, and summary are replaced entirely with a read-only text field. The read-only text field includes the key-value field name above the placeholder:
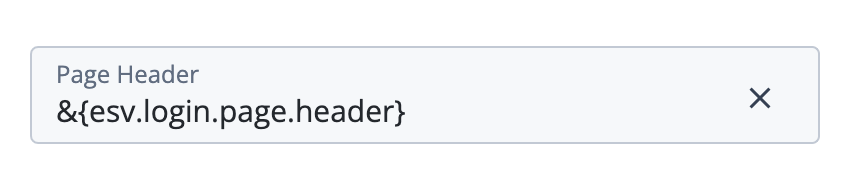
Key-value field conversion example
An example of a key-value field is the Page Header field in the Page Node.
The following screenshot shows the Page Header field populated with en and fr keys containing locale-specific messages:
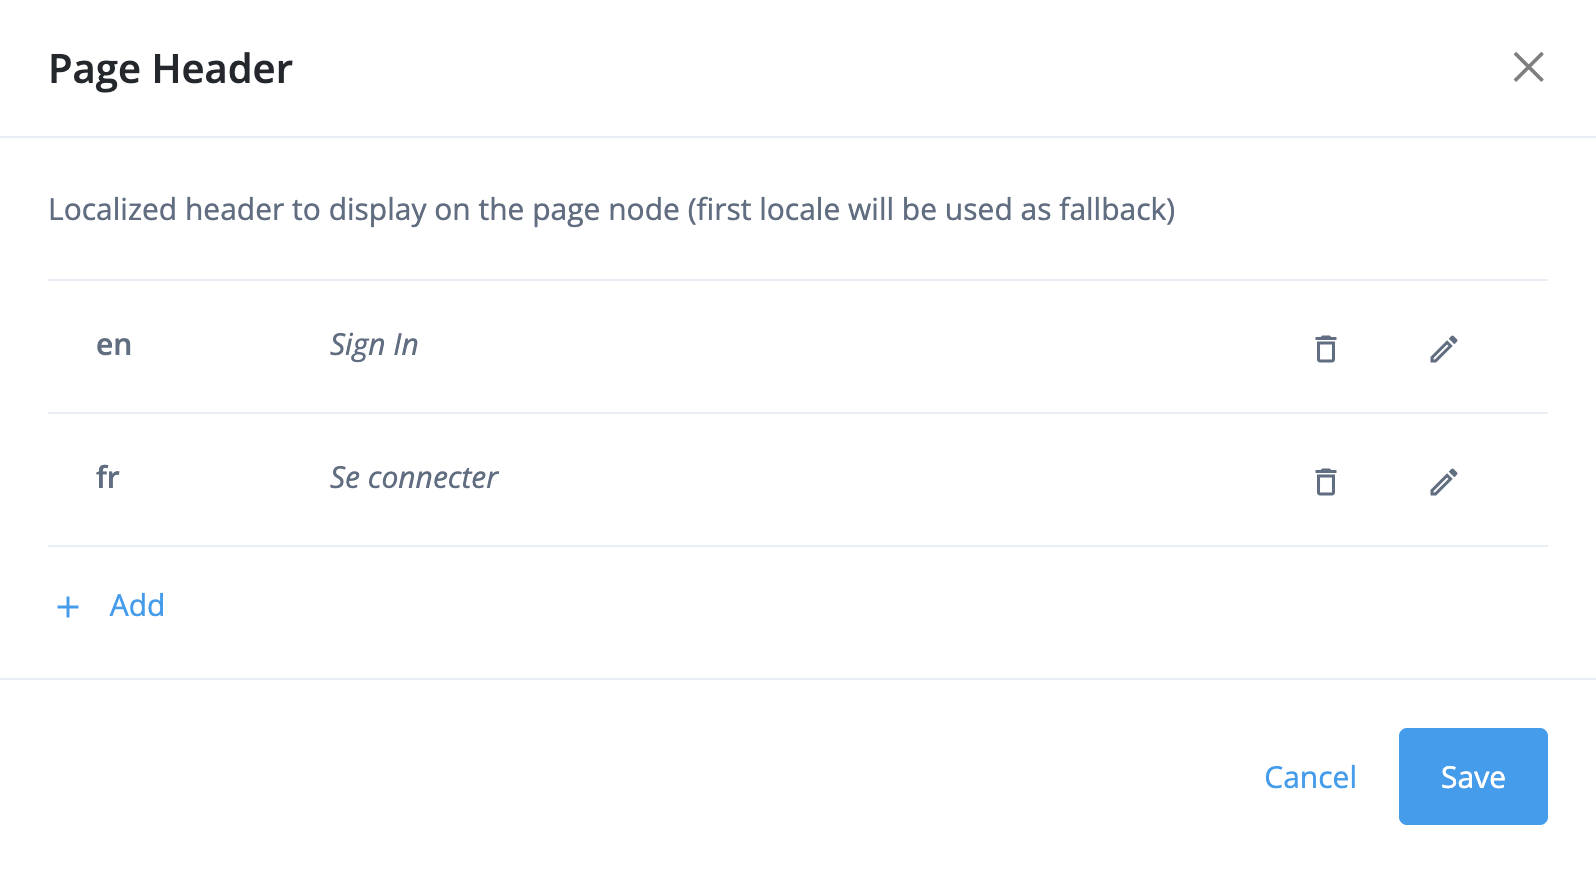
To convert this data to an ESV, use the object type ESV variable and set the value as a JSON object:
{
    "en":"Sign in",
    "fr":"Se connecter"
}
Introduction to self-service promotions
PingOne Advanced Identity Cloud lets you run self-service promotions to move static configuration between a sequential pair of tenant environments, either from the development environment to the staging environment (staging promotion), or from the staging environment to the production environment (production promotion).
| Non-sequential promotions (between the development environment and the production environment) are not supported. |
If you promote configuration that accidentally causes instability or errors, Advanced Identity Cloud lets you run a self-service rollback to restore an upper environment to its previous configuration.
You can run a promotion or a rollback using the following options:
-
Manage self-service promotions using the API (promotion and rollback)
-
Manage self-service promotions using the UI (promotion only)
The Advanced Identity Cloud configuration model
The following video summarizes the concepts of the Advanced Identity Cloud configuration model:
Lower and upper environments
The environments in a sequential pair of environments are referred to as the lower environment (the configuration source), and the upper environment (the configuration destination); the terms lower environment and upper environment therefore refer to different environments, depending on which environment you are promoting to.
Standard promotion group of environments
For a standard promotion group of development, staging, and production tenant environments, the lower and upper environments are:
| Development environment |
Staging environment |
Production environment |
|
|---|---|---|---|
Staging promotion |
lower |
upper |
|
Production promotion |
lower |
upper |
Key:
-
lower = lower environment (configuration source)
-
upper = upper environment (configuration destination)
Additional UAT environments
If you also have a UAT[3] environment in your promotion group of environments, it is inserted into the promotion process between the development and staging environments:
-
If you add one UAT environment, the revised lower and upper environments are:
Development
environmentUAT
environmentStaging
environmentProduction
environmentUAT promotion
lower
upper
Staging promotion
lower
upper
Production promotion
lower
upper
-
If you add two UAT environments, the revised lower and upper environments are:
Development
environmentUAT
environmentUAT2
environmentStaging
environmentProduction
environmentUAT promotion
lower
upper
UAT2 promotion
lower
upper
Staging promotion
lower
upper
Production promotion
lower
upper
Environment locking
|
Locking an environment prevents configuration changes that could disrupt a promotion or a rollback; however, all authentication flows continue to work as normal. |
Before you run a promotion or a rollback, you must lock the lower and upper environments. This prevents anyone else from locking either of those environments, which ensures only one promotion or rollback can be run at the same time in the same set of development, staging, and production environments.
Locking the lower and upper environments also blocks access to the ESV API in those environments. This prevents anyone else from accidentally disrupting a promotion or rollback by manipulating ESV configuration values. If the lower environment is also the development environment, then most Advanced Identity Cloud API endpoints are also restricted.
When a promotion or a rollback is complete, you must unlock the lower and upper environments to return the environments back to full functionality.
Configuration integrity checks
When you run a promotion or a rollback, Advanced Identity Cloud performs integrity checks on your static configuration to protect the stability of the upper environment.
Integrity check for missing ESVs
| Promotion | Rollback | |
|---|---|---|
Checked? |
Yes |
Yes |
This integrity check looks for ESVs referenced in your static configuration, but not set in the upper environment.
Advanced Identity Cloud runs this integrity check on the whole configuration, not just configuration changes.
Integrity check for encrypted secrets
| Promotion | Rollback | |
|---|---|---|
Checked? |
Yes |
No |
This integrity check looks for encrypted secrets embedded directly in your static configuration. It is best practice to store encrypted secrets in an ESV secret and update your configuration to reference the ESV secret instead.
Advanced Identity Cloud runs this integrity check on the whole configuration, not just configuration changes.
Manage self-service promotions using the API
For background on self-service promotions in PingOne Advanced Identity Cloud, learn more in Introduction to self-service promotions.
Lower and upper environments
Before you run any promotions API requests, you must know which tenant environment is the lower environment and which is the upper environment. Learn more in Lower and upper environments.
The API uses a pull model to promote configuration, so most API commands must be run against the upper environment.
Dry-run promotions
When you are ready to run a promotion, perform a dry run first. A dry run lets you identify any problems with missing ESVs or encrypted secrets, before you run a full promotion.
Reports
| Header 1 | Header 2 |
|---|---|
Dry-run promotion report |
A promotion report generated after a dry-run promotion. It provides a full list of configuration changes that will be promoted between a lower and an upper environment. |
Promotion report |
A promotion report generated after a promotion. It provides a full list of configuration changes that were promoted between a lower and an upper environment. |
Provisional rollback report |
A rollback report generated before rollback. It provides a full list of configuration changes that will be reverted from the upper environment. |
Rollback report |
A rollback report generated after a rollback. It provides a full list of configuration changes that were reverted from the upper environment. |
Promotions API endpoints
Advanced Identity Cloud provides these API endpoints for promotions:
To authenticate to promotions API endpoints, use an
access token created with the
fr:idc:promotion:* scope.
The following diagram summarizes how promotions API commands are used to run a promotion. Learn more in Run a promotion.
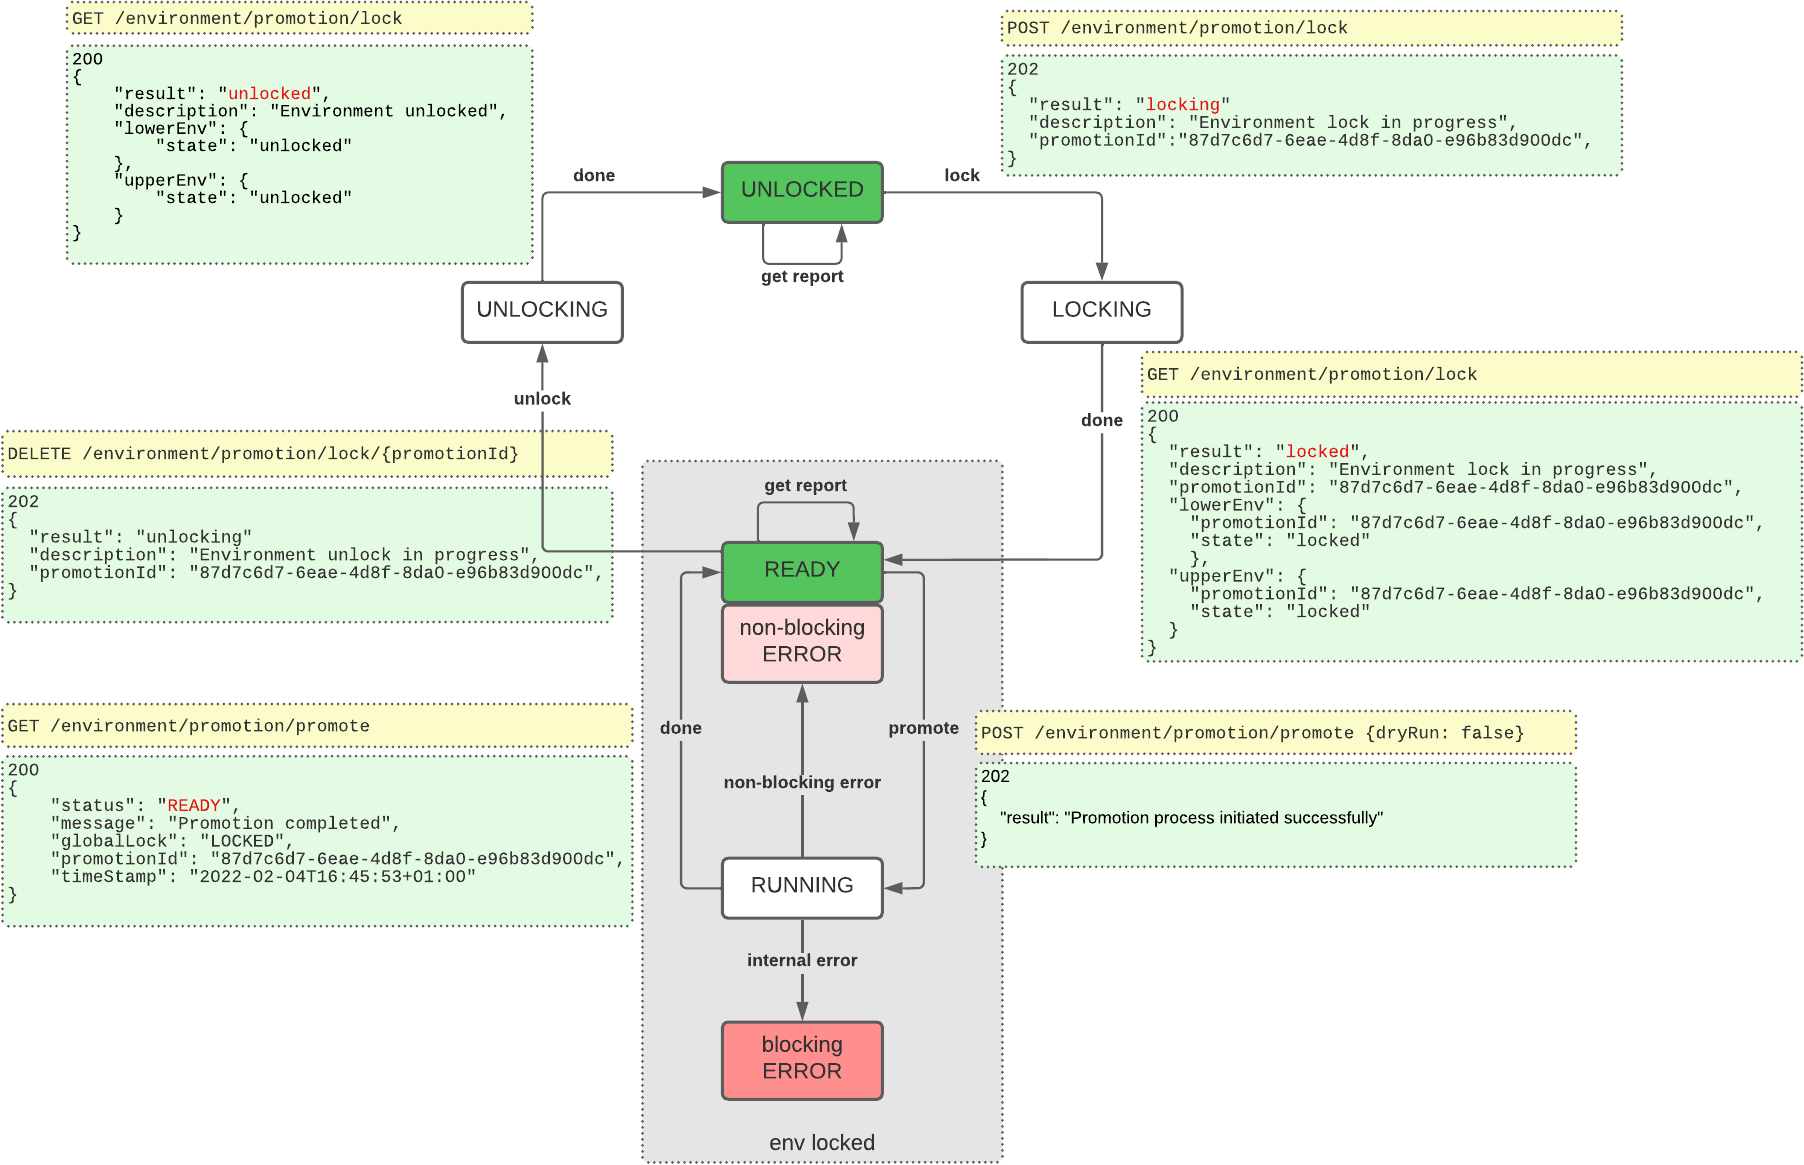
Monitor progress when you lock or unlock environments, start a promotion, or start a rollback
When you use API commands to lock environments, unlock environments, start a promotion, or start a rollback, you trigger asynchronous processes in your environments. You can monitor the progress of these asynchronous processes by checking their state or status until they have completed. You do this by running further API commands and analyzing their responses.
Check the lock state
To check the lock state, use the /environment/promotion/lock/state endpoint:
curl \
--request GET 'https://<tenant-env-upper-fqdn>/environment/promotion/lock/state' \(1)
--header 'Content-Type: application/json' \
--header 'Accept-API-Version: resource=1.0' \
--header 'Authorization: Bearer <access-token>'(2)| 1 | Replace <tenant-env-upper-fqdn> with the FQDN of the upper environment. |
| 2 | Replace <access-token> with an access token for the upper environment (learn more in
Get an access token). |
Learn how to analyze the response from this endpoint in Lock environments.
Check the promotion status
To check the promotion status, use the /environment/promotion/promote endpoint:
curl \
--request GET 'https://<tenant-env-upper-fqdn>/environment/promotion/promote' \(1)
--header 'Content-Type: application/json' \
--header 'Accept-API-Version: resource=1.0' \
--header 'Authorization: Bearer <access-token>'(2)| 1 | Replace <tenant-env-upper-fqdn> with the FQDN of the upper environment. |
| 2 | Replace <access-token> with an access token for the upper environment (learn more in
Get an access token). |
Learn how to analyze the response from this endpoint during a promotion in Run a promotion.
Check the rollback status
To check the rollback status, use the /environment/promotion/promote endpoint, as described in
Check the promotion status.
Learn how to analyze the response from this endpoint during a rollback in Run a rollback.
Lock environments
Before you run a promotion or a rollback, you must lock the upper and lower environments.
Step 1: Check that the environments are unlocked
-
Check the lock state to confirm that both environments are unlocked. This is indicated in the response when
resulthas a value ofunlocked:{ "description": "Environment unlocked", "lowerEnv": { "state": "unlocked" }, "result": "unlocked", "upperEnv": { "state": "unlocked" } }
Step 2: Lock the environments
|
Locking an environment prevents configuration changes that could disrupt a promotion or a rollback; however, all authentication flows continue to work as normal. |
-
To lock the environments, use the
/environment/promotion/lockendpoint to create a lock request:curl \ --request POST 'https://<tenant-env-upper-fqdn>/environment/promotion/lock' \(1) --header 'Content-Type: application/json' \ --header 'Accept-API-Version: resource=1.0' \ --header 'Authorization: Bearer <access-token>'(2)1 Replace <tenant-env-upper-fqdn>with the FQDN of the upper environment.2 Replace <access-token>with an access token for the upper environment (learn more in Get an access token).-
If the lock request is successful, the response
resulthas a value oflocking:{ "description": "Environment lock in progress", "promotionId": "8acd3a87-2272-450f-a3b3-1eb222108740", "result": "locking" } -
If the lock request is rejected, the response
codehas a value of409.-
In the example below the lock request was rejected because a lock already exists:
{
    "code": 409,
    "message": "Environment is already locked for promotion 791eb03a-7ec1-42ae-ae84-ed142cf52688"
}
To resolve this:
-
If another member of your team is already running a promotion:
-
Wait until the team member has completed their promotion and has released the lock.
-
Start the promotion steps again.
-
-
If the lock has accidentally been left in place, and no one else is running a promotion:
-
Unlock the environments using the promotion ID stated in the error message.
-
Start the promotion steps again.
-
-
-
In the example below the lock request was rejected because Ping Identity locked the environment:
{
    "code": 409,
    "message": "Environment is locked by ForgeRock for maintenance. Retry later."
}
Ping Identity typically locks an environment so that Backstage Support engineers can investigate an issue or perform maintenance. To resolve this, wait until Ping Identity releases the lock.
-
-
If the lock request causes an unexpected error, the response
codehas a value of500.{ "code": 500, "message": "<internal-error-message>" }To resolve this, submit a Backstage Support ticket. Learn more in Resolve environment errors that are preventing a promotion or a rollback.
-
-
Check the lock state to confirm that the lock is in progress. This is indicated in the response when
resulthas a value oflocking:{ "description": "Environment lock in progress", "lowerEnv": { "promotionId": "8acd3a87-2272-450f-a3b3-1eb222108740", "state": "locking" }, "promotionId": "8acd3a87-2272-450f-a3b3-1eb222108740", "result": "locking", "upperEnv": { "promotionId": "8acd3a87-2272-450f-a3b3-1eb222108740", "state": "locking" } } -
Check the lock state as many times as you need until both environments are locked. This is indicated in the response when
resulthas a value oflocked:{ "description": "Environment locked", "lowerEnv": { "promotionId": "8acd3a87-2272-450f-a3b3-1eb222108740", "state": "locked" }, "promotionId": "8acd3a87-2272-450f-a3b3-1eb222108740", "result": "locked", "upperEnv": { "promotionId": "8acd3a87-2272-450f-a3b3-1eb222108740", "state": "locked" } }
Run a promotion
Step 1: Lock the environments
Follow the instructions in Lock environments.
Step 2: Check that a promotion is not already running
Check the promotion status to confirm that a promotion is not already running. This is
indicated in the response when status has a value of READY:
{
    "status": "READY",
    "message": "Environment ready for promotion",
    "blockingError": false,
    "globalLock": "LOCKED",
    "promotionId": "8acd3a87-2272-450f-a3b3-1eb222108740",
    "timeStamp": "2024-06-12T17:12:32Z",
    "type": "promotion"
}
Step 3: Run a dry-run promotion
To run a dry-run promotion, follow the steps in Step 4: Run the promotion; however, in
step 4.1, set the dryRun flag to true:
--data-raw '{
    "dryRun": true
}'|
If there are any scripts awaiting promotion, ensure that they do not emit any personally identifiable information (PII) of your end users into Advanced Identity Cloud logs. Ping Identity recommends that you establish a review and testing process for all scripts to prevent PII leaking out of your Advanced Identity Cloud tenant environments. |
Step 4: Run the promotion
-
To run a promotion, use the
/environment/promotion/promoteendpoint:curl \ --request POST 'https://<tenant-env-upper-fqdn>/environment/promotion/promote' \(1) --header 'Content-Type: application/json' \ --header 'Accept-API-Version: resource=1.0' \ --header 'Authorization: Bearer <access-token>' \(2) --data-raw '{ "dryRun": false (3) }'1 Replace <tenant-env-upper-fqdn>with the FQDN of the upper environment.2 Replace <access-token>with an access token for the upper environment (learn more in Get an access token).3 The dryRunflag is set tofalsein the request body.{ "result": "Promotion process initiated successfully" } -
Check the promotion status to confirm that the promotion is in progress. This is indicated in the response when
statushas a value ofRUNNING:{ "status": "RUNNING", "message": "Prepare config", "blockingError": false, "globalLock": "LOCKED", "promotionId": "8acd3a87-2272-450f-a3b3-1eb222108740", "timeStamp": "2024-06-12T17:14:13Z", "type": "promotion" } -
Check the promotion status as many times as you need until the promotion is complete.
-
If the promotion is still running, the response
statushas a value ofRUNNING:{ "status": "RUNNING", "message": "Promote configuration", "blockingError": false, "globalLock": "LOCKED", "promotionId": "8acd3a87-2272-450f-a3b3-1eb222108740", "timeStamp": "2024-06-12T17:15:51Z", "type": "promotion" } -
If the promotion failed but is recoverable, the response
statushas a value ofERROR, and the responseblockingErrorhas a value offalse.-
In the example below, the promotion failed an integrity check for missing ESVs.
{
    "status": "ERROR",
    "message": "Missing ESVs",
    "blockingError": false,
    "missingESVs": [
        "email.from"
    ],
    "globalLock": "LOCKED",
    "promotionId": "8acd3a87-2272-450f-a3b3-1eb222108740",
    "timeStamp": "2024-06-12T17:19:31Z",
    "type": "promotion"
}
To resolve this:
-
For each ESV in
missingESVs, add an ESV into the upper environment. -
Start the promotion steps again.
-
In the example below, the promotion failed an integrity check for encrypted secrets.
{
    "status": "ERROR",
    "message": "Found encrypted values in the AM/IDM configuration",
    "blockingError": false,
    "globalLock": "LOCKED",
    "encryptedSecrets": [
        "* am/services/realm/root-alpha/persistentcookiedecisionnode/1.0/organizationconfig/default/dd35c42f-177e-4633-9107-373214858fa7.json:10"
    ],
    "promotionId": "8acd3a87-2272-450f-a3b3-1eb222108740",
    "timeStamp": "2024-06-12T17:19:31Z",
    "type": "promotion"
}
To resolve this:
-
If the encrypted secret is in your configuration by accident:
-
Create an ESV secret containing the encrypted secret in each of the development, staging, and production environments.
-
Update your configuration to reference the new ESV secret.
-
Start the promotion steps again.
-
If the encrypted secret is in your configuration deliberately, you can bypass this check:
-
Follow the steps in Step 4: Run the promotion; however, in step 4.1, set the
ignoreEncryptedSecretsflag totrue:--data-raw '{ "dryRun": false, "ignoreEncryptedSecrets": true }'
-
-
-
-
If the promotion failed and is not recoverable, the response
statushas a value ofERROR, and the responseblockingErrorhas a value oftrue:{ "status": "ERROR", "message": "Failed to promote config", "blockingError": true, "globalLock": "LOCKED", "promotionId": "8acd3a87-2272-450f-a3b3-1eb222108740", "timeStamp": "2024-06-12T17:19:31Z", "type": "promotion" }If you run the promotion again after a blocking error, the following response displays:
{
    "code": 409,
    "message": "Environment is blocked from a previous failed promotion or rollback"
}
To resolve this, submit a Backstage Support ticket. Learn more in Resolve environment errors that are preventing a promotion or a rollback.
-
If Advanced Identity Cloud services are restarting, the response
statushas a value ofRUNNING, and the responsemessagehas a value ofWaiting for workloads to restart:{ "status": "RUNNING", "message": "Waiting for workloads to restart", "blockingError": false, "globalLock": "LOCKED", "promotionId": "8acd3a87-2272-450f-a3b3-1eb222108740", "timeStamp": "2024-06-12T17:32:06Z", "type": "promotion" }This part of the promotion can take several minutes. It does not apply to dry-run promotions, where Advanced Identity Cloud services do not need to be restarted.
-
If the promotion is complete, the response
statushas a value ofREADY, and the responsemessagehas a value ofPromotion completed:{ "status": "READY", "message": "Promotion completed", "blockingError": false, "globalLock": "LOCKED", "promotionId": "8acd3a87-2272-450f-a3b3-1eb222108740", "timeStamp": "2024-06-12T17:40:29Z", "type": "promotion" }If no changes have been promoted, the
messagehas a value ofPromotion completed (no change).
-
Step 5: View the promotion report
-
To view a report for the most recent promotion, use the
/environment/promotion/reportendpoint.curl \ --request GET 'https://<tenant-env-upper-fqdn>/environment/promotion/report' \(1) --header 'Content-Type: application/json' \ --header 'Accept-API-Version: resource=1.0' \ --header 'Authorization: Bearer <access-token>' \(2)1 Replace <tenant-env-upper-fqdn>with the FQDN of the upper environment.2 Replace <access-token>with an access token for the upper environment (learn more in Get an access token).{ "createdDate": "2024-06-12T17:32:05Z", "promotionId": "8acd3a87-2272-450f-a3b3-1eb222108740", "report": { "IDMConfig": [ { "configChange": { "added": [ "Forgotten Username" ] }, "configItem": "Email > Templates", "fileDestinationPattern": "idm/conf/emailTemplate-*.json", "fileName": "displayName", "type": "single" } ] }, "reportId": "c41286bb-30cd-4109-ba9d-dc4788b6a75c", "reportName": "Report_2024-06-12T17-32+00Z_dryrun=false_8acd3a87-2272-450f-a3b3-1eb222108740", "type": "promotion" }In the example above, the promotion report shows that email template configuration was promoted.
-
To view a report from before the most recent promotion, learn more in View previous promotion or rollback reports.
Step 6: Unlock the environments
Follow the instructions in Unlock environments.
Run a rollback
Step 1: Lock the environments
Follow the instructions in Lock environments.
Step 2: Check that a promotion is not already running
Check the promotion status to confirm that a promotion is not already running. This is
indicated in the response when status has a value of READY:
{
    "status": "READY",
    "message": "Environment ready for promotion",
    "blockingError": false,
    "globalLock": "LOCKED",
    "promotionId": "8acd3a87-2272-450f-a3b3-1eb222108740",
    "timeStamp": "2024-06-12T17:12:32Z",
    "type": "promotion"
}
Step 3: Get a provisional rollback report
To get a provisional rollback report, use the /environment/promotion/report/provisional-rollback endpoint:
curl \
--request GET 'https://<tenant-env-upper-fqdn>/environment/promotion/report/provisional-rollback' \(1)
--header 'Content-Type: application/json' \
--header 'Accept-API-Version: resource=1.0' \
--header 'Authorization: Bearer <access-token>'(2)| 1 | Replace <tenant-env-upper-fqdn> with the FQDN of the upper environment. |
| 2 | Replace <access-token> with an access token for the upper environment (learn more in
Get an access token). |
{
    "createdDate": "2024-06-12T17:32:05Z",
    "promotionId": "8acd3a87-2272-450f-a3b3-1eb222108740",
    "report": {
        "IDMConfig": [
            {
                "configChange": {
                    "added": [
                        "Forgotten Username"
                    ]
                },
                "configItem": "Email > Templates",
                "fileDestinationPattern": "idm/conf/emailTemplate-*.json",
                "fileName": "displayName",
                "type": "single"
            }
        ]
    },
    "reportId": "c41286bb-30cd-4109-ba9d-dc4788b6a75c",
    "reportName": "Report_2024-06-12T17-32+00Z_dryrun=false_8acd3a87-2272-450f-a3b3-1eb222108740",
    "type": "provisional-rollback"
}
Step 4: Run the rollback
-
To run a rollback, use the
/environment/promotion/rollbackendpoint:curl \ --request POST 'https://<tenant-env-upper-fqdn>/environment/promotion/rollback' \(1) --header 'Content-Type: application/json' \ --header 'Accept-API-Version: resource=1.0' \ --header 'Authorization: Bearer <access-token>' \(2) --data-raw '{}'1 Replace <tenant-env-upper-fqdn>with the FQDN of the upper environment.2 Replace <access-token>with an access token for the upper environment (learn more in Get an access token).{ "result": "Rollback process initiated successfully" } -
Check the rollback status to confirm that the rollback is in progress. This is indicated in the response when
statushas a value ofRUNNING:{ "status": "RUNNING", "message": "Prepare config", "blockingError": false, "globalLock": "LOCKED", "promotionId": "8acd3a87-2272-450f-a3b3-1eb222108740", "timeStamp": "2024-06-12T17:14:13Z", "type": "rollback" } -
Check the rollback status as many times as you need until the rollback is complete.
-
If the rollback is still running, the response
statushas a value ofRUNNING:{ "status": "RUNNING", "message": "Rollback configuration", "blockingError": false, "globalLock": "LOCKED", "promotionId": "8acd3a87-2272-450f-a3b3-1eb222108740", "timeStamp": "2024-06-12T17:15:51Z", "type": "rollback" } -
If the rollback failed but is recoverable, the response
statushas a value ofERROR, and the responseblockingErrorhas a value offalse.-
In the example below, the rollback failed an integrity check for missing ESVs.
{
    "status": "ERROR",
    "message": "Missing ESVs",
    "blockingError": false,
    "missingESVs": [
        "email.from"
    ],
    "globalLock": "LOCKED",
    "promotionId": "8acd3a87-2272-450f-a3b3-1eb222108740",
    "timeStamp": "2024-06-12T17:19:31Z",
    "type": "rollback"
}
To resolve this:
-
For each ESV in
missingESVs, re-add the ESV into the upper environment. -
Start the rollback steps again.
-
-
If the rollback failed and is not recoverable, the response
statushas a value ofERROR, and the responseblockingErrorhas a value oftrue:{ "status": "ERROR", "message": "Failed to rollback config", "blockingError": true, "globalLock": "LOCKED", "promotionId": "8acd3a87-2272-450f-a3b3-1eb222108740", "timeStamp": "2024-06-12T17:19:31Z", "type": "rollback" }If you run the rollback again after a blocking error, the following response displays:
{
    "code": 409,
    "message": "Environment is blocked from a previous failed promotion or rollback"
}
To resolve this, submit a Backstage Support ticket. Learn more in Resolve environment errors that are preventing a promotion or a rollback.
-
If Advanced Identity Cloud services are restarting, the response
statushas a value ofRUNNING, and the responsemessagehas a value ofWaiting for workloads to restart:{ "status": "RUNNING", "message": "Waiting for workloads to restart", "blockingError": false, "globalLock": "LOCKED", "promotionId": "8acd3a87-2272-450f-a3b3-1eb222108740", "timeStamp": "2024-06-12T17:32:06Z", "type": "rollback" }This part of the rollback can take several minutes.
-
If the rollback is complete, the response
statushas a value ofREADY, and the responsemessagehas a value ofPromotion completed:{ "status": "READY", "message": "Rollback completed", "blockingError": false, "globalLock": "LOCKED", "promotionId": "8acd3a87-2272-450f-a3b3-1eb222108740", "timeStamp": "2024-06-12T17:40:29Z", "type": "rollback" }
-
Step 5: Unlock the environments
Follow the instructions in Unlock environments.
Unlock environments
After you run a promotion or a rollback, you must unlock the upper and lower environments.
-
To unlock the environments, use the
/environment/promotion/lockendpoint:curl \ --request DELETE 'https://<tenant-env-upper-fqdn>/environment/promotion/lock/<promotion-id>' \(1) (2) --header 'Content-Type: application/json' \ --header 'Accept-API-Version: resource=1.0' \ --header 'Authorization: Bearer <access-token>'(3)1 Replace <tenant-env-upper-fqdn>with the FQDN of the upper environment.2 Replace <promotion-id>with thepromotionIdcreated when you initially locked the environments.3 Replace <access-token>with an access token for the upper environment (learn more in Get an access token).{ "description": "Environment unlock in progress", "promotionId": "8acd3a87-2272-450f-a3b3-1eb222108740", "result": "unlocking" } -
Check the lock state as many times as you need until both environments are unlocked. This is indicated in the response when
resulthas a value ofunlocked:{ "description": "Environment locked", "lowerEnv": { "promotionId": "8acd3a87-2272-450f-a3b3-1eb222108740", "state": "locked" }, "promotionId": "8acd3a87-2272-450f-a3b3-1eb222108740", "result": "locked", "upperEnv": { "promotionId": "8acd3a87-2272-450f-a3b3-1eb222108740", "state": "locked" } }
View previous promotion or rollback reports
-
To view a list of previous promotion or rollback reports, use the
/environment/promotion/reportsendpoint:curl \ --request GET 'https://<tenant-env-upper-fqdn>/environment/promotion/reports' \(1) --header 'Content-Type: application/json' \ --header 'Accept-API-Version: resource=1.0' \ --header 'Authorization: Bearer <access-token>'(2)1 Replace <tenant-env-upper-fqdn>with the FQDN of the upper environment.2 Replace <access-token>with an access token for the upper environment (learn more in Get an access token).[ { "createdDate": "2024-06-12T12:00:29Z", "dryRun": true, "promotionId": "8acd3a87-2272-450f-a3b3-1eb222108740", "reportId": "57aabe7d-4e8c-4fbb-8a13-2fc7d1cb4d52", "type": "promotion" }, { "createdDate": "2024-06-12T17:32:05Z", "dryRun": false, "promotionId": "8acd3a87-2272-450f-a3b3-1eb222108740", "reportId": "c41286bb-30cd-4109-ba9d-dc4788b6a75c", "type": "promotion" }, { "createdDate": "2024-06-12T13:56:10Z", "dryRun": true, "promotionId": "8acd3a87-2272-450f-a3b3-1eb222108740", "reportId": "df893dee-e952-489c-b94d-8c9ebf36e9a5", "type": "promotion" } ] -
To view individual reports, use the
/environment/promotion/reportendpoint and supply areportIdfrom the response in the previous step:curl \ --request GET 'https://<tenant-env-upper-fqdn>/environment/promotion/report/<report-id>' \(1) (2) --header 'Content-Type: application/json' \ --header 'Accept-API-Version: resource=1.0' \ --header 'Authorization: Bearer <access-token>'(3)1 Replace <tenant-env-upper-fqdn>with the FQDN of the upper environment.2 Replace <report-id>with areportId; for example,c41286bb-30cd-4109-ba9d-dc4788b6a75c.3 Replace <access-token>with an access token for the upper environment (learn more in Get an access token).{ "createdDate": "2024-06-12T17:32:05Z", "promotionId": "8acd3a87-2272-450f-a3b3-1eb222108740", "report": { "IDMConfig": [ { "configChange": { "added": [ "Forgotten Username" ] }, "configItem": "Email > Templates", "fileDestinationPattern": "idm/conf/emailTemplate-*.json", "fileName": "displayName", "type": "single" } ] }, "reportId": "c41286bb-30cd-4109-ba9d-dc4788b6a75c", "reportName": "Report_2024-06-12T17-32+00Z_dryrun=false_8acd3a87-2272-450f-a3b3-1eb222108740", "type": "promotion" }
Resolve environment errors that are preventing a promotion or a rollback
To resolve environment errors that are preventing a promotion or a rollback submit a support ticket:
-
Open a How-To ticket with Backstage Support.
-
On the How Do I...? page, provide values for the following fields:
Field Value Product
Select the following from the lists:
-
PingOne Advanced Identity Cloud
-
Tenant Settings
-
Self-Service Promotion
What are you trying to achieve?
Enter one of the following:
-
Resolve environment errors preventing a self-service promotion -
Resolve environment errors preventing a self-service rollback
Please provide a short description
Enter one of the following:
-
An error has occurred during a self-service promotion to the development/staging/production
environment
. -
An error has occurred during a self-service rollback from the staging/production
environment
.
Enter the error code and message (API users only).
-
-
Click Submit.
Revert configuration in your development environment
To revert configuration in your development environment, submit a support ticket:
-
Open an Identity Cloud: Config request with Backstage Support.
-
On the Advanced Identity Cloud: Config Request page, provide values for the following fields:
Field Value Hostname
Enter the FQDN of the upper environment from the promotion you need to revert.
What would you like to do?
Select Restore from backup
-
In the Restore from backup section, provide values for the following fields:
Field Value What is the environment name?
Select Dev.
What is the date of the backup you would like to restore from?
Enter the date when you last had stable configuration, using the format YYYY-MM-DD.
-
Click Submit.
Manage self-service promotions using the UI
For background on self-service promotions in PingOne Advanced Identity Cloud, learn more in Introduction to self-service promotions.
Lower and upper environments
Before you run a promotion using the UI, you must know which tenant environment is the lower environment and which is the upper environment. Learn more in Lower and upper environments.
The UI uses a push model to promote configuration, so you need to run a promotion from the UI in the lower environment. However, you also need to have a tenant administrator account in the upper environment, as the UI in the lower environment needs to authenticate to the upper environment.
When a promotion is complete, you can view a report in the lower environment. You can also view the report in the upper environment.
Promotions UI functionality in the lower environment
In the lower environment, the promotions UI lets you:
-
View changes awaiting promotion to the upper environment
-
Promote changes to the upper environment
-
View history of promotions sent to the upper environment
This lower environment functionality exists in your development and staging environments only. It does not exist in your production environment, as that environment does not send promotions to another environment.
View changes awaiting promotion to the upper environment
-
In the Advanced Identity Cloud admin UI of the lower environment, open the TENANT menu (upper right)
-
Click Promote configuration to open the Promotion tab in the Tenant Settings page.
-
The Promotion tab shows the following information:
-
A summary of the promotion status for the environment:
-
Your development environment shows information about promoting from your development environment to your staging environment:
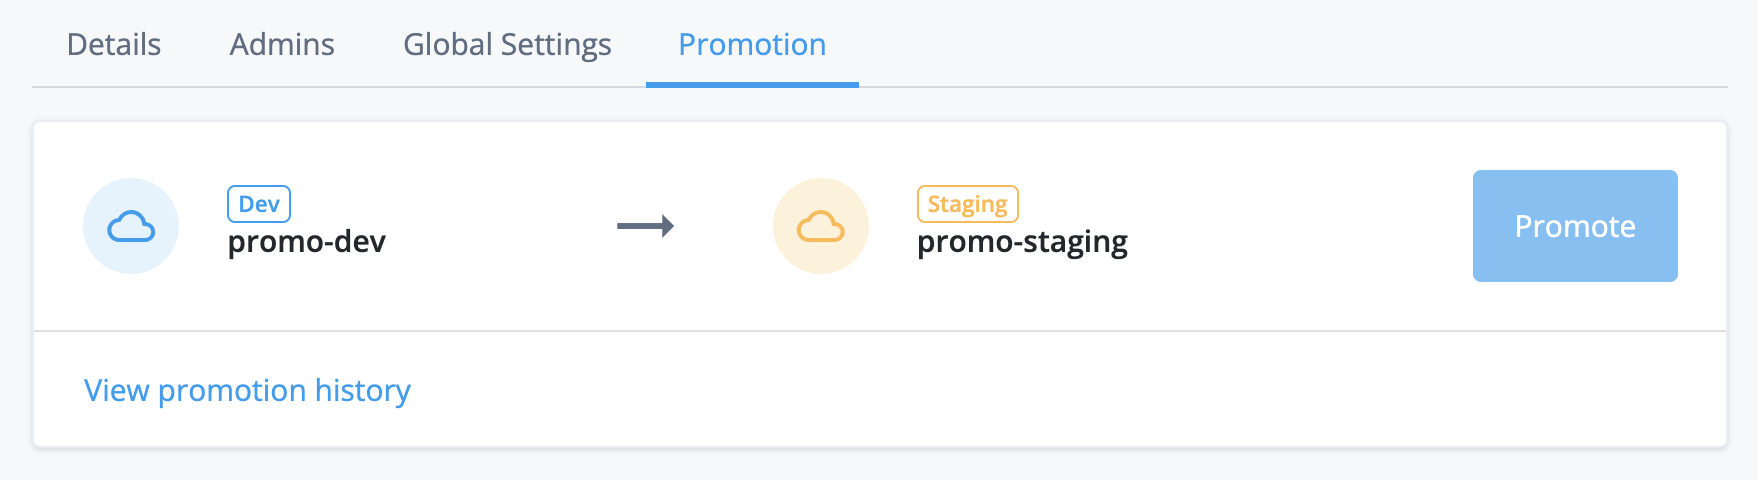
If you have a UAT[3] environment, your development environment promotes to your UAT environment instead. The revised promotion order is development → UAT → staging. If you have a second UAT environment, the revised promotion order is development → UAT → UAT2 → staging.
Learn more in Additional UAT environments.
-
Your staging environment shows information about promoting from your staging environment to your production environment:
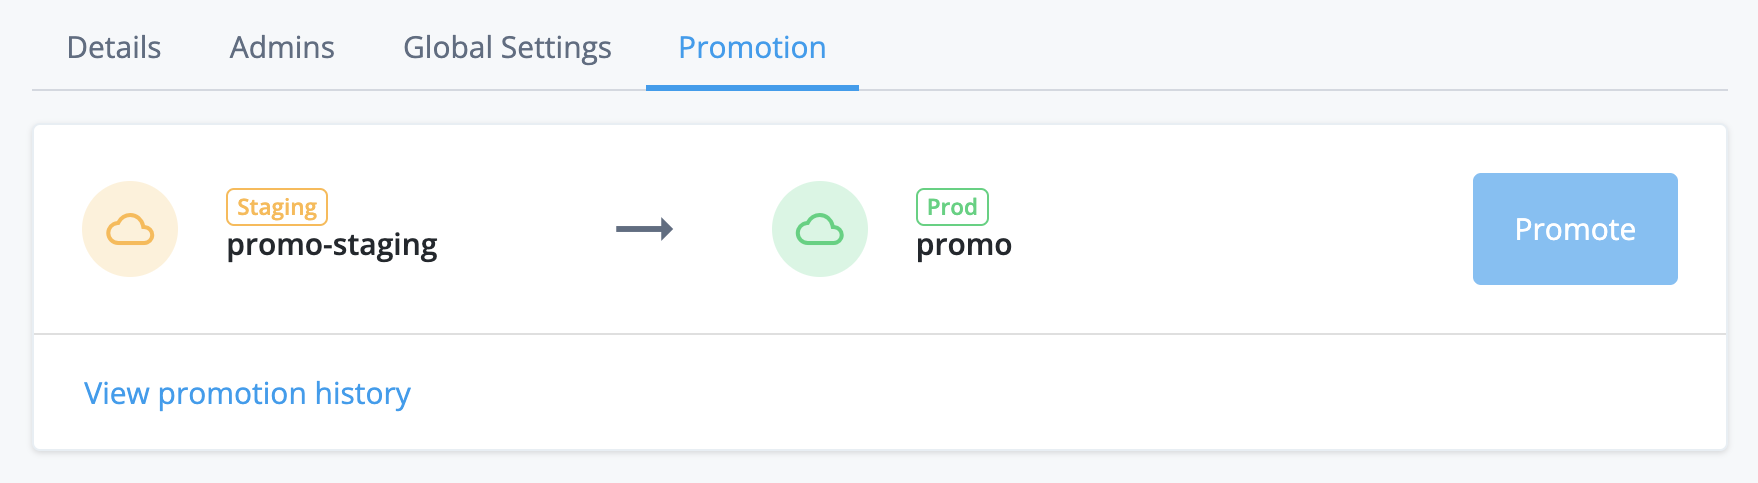
-
-
A summary of any changes to static configuration made by you or other tenant administrators.
For example, in the screenshot below, the UI indicates that two configuration changes have been made—one to a journey and one to an email template:
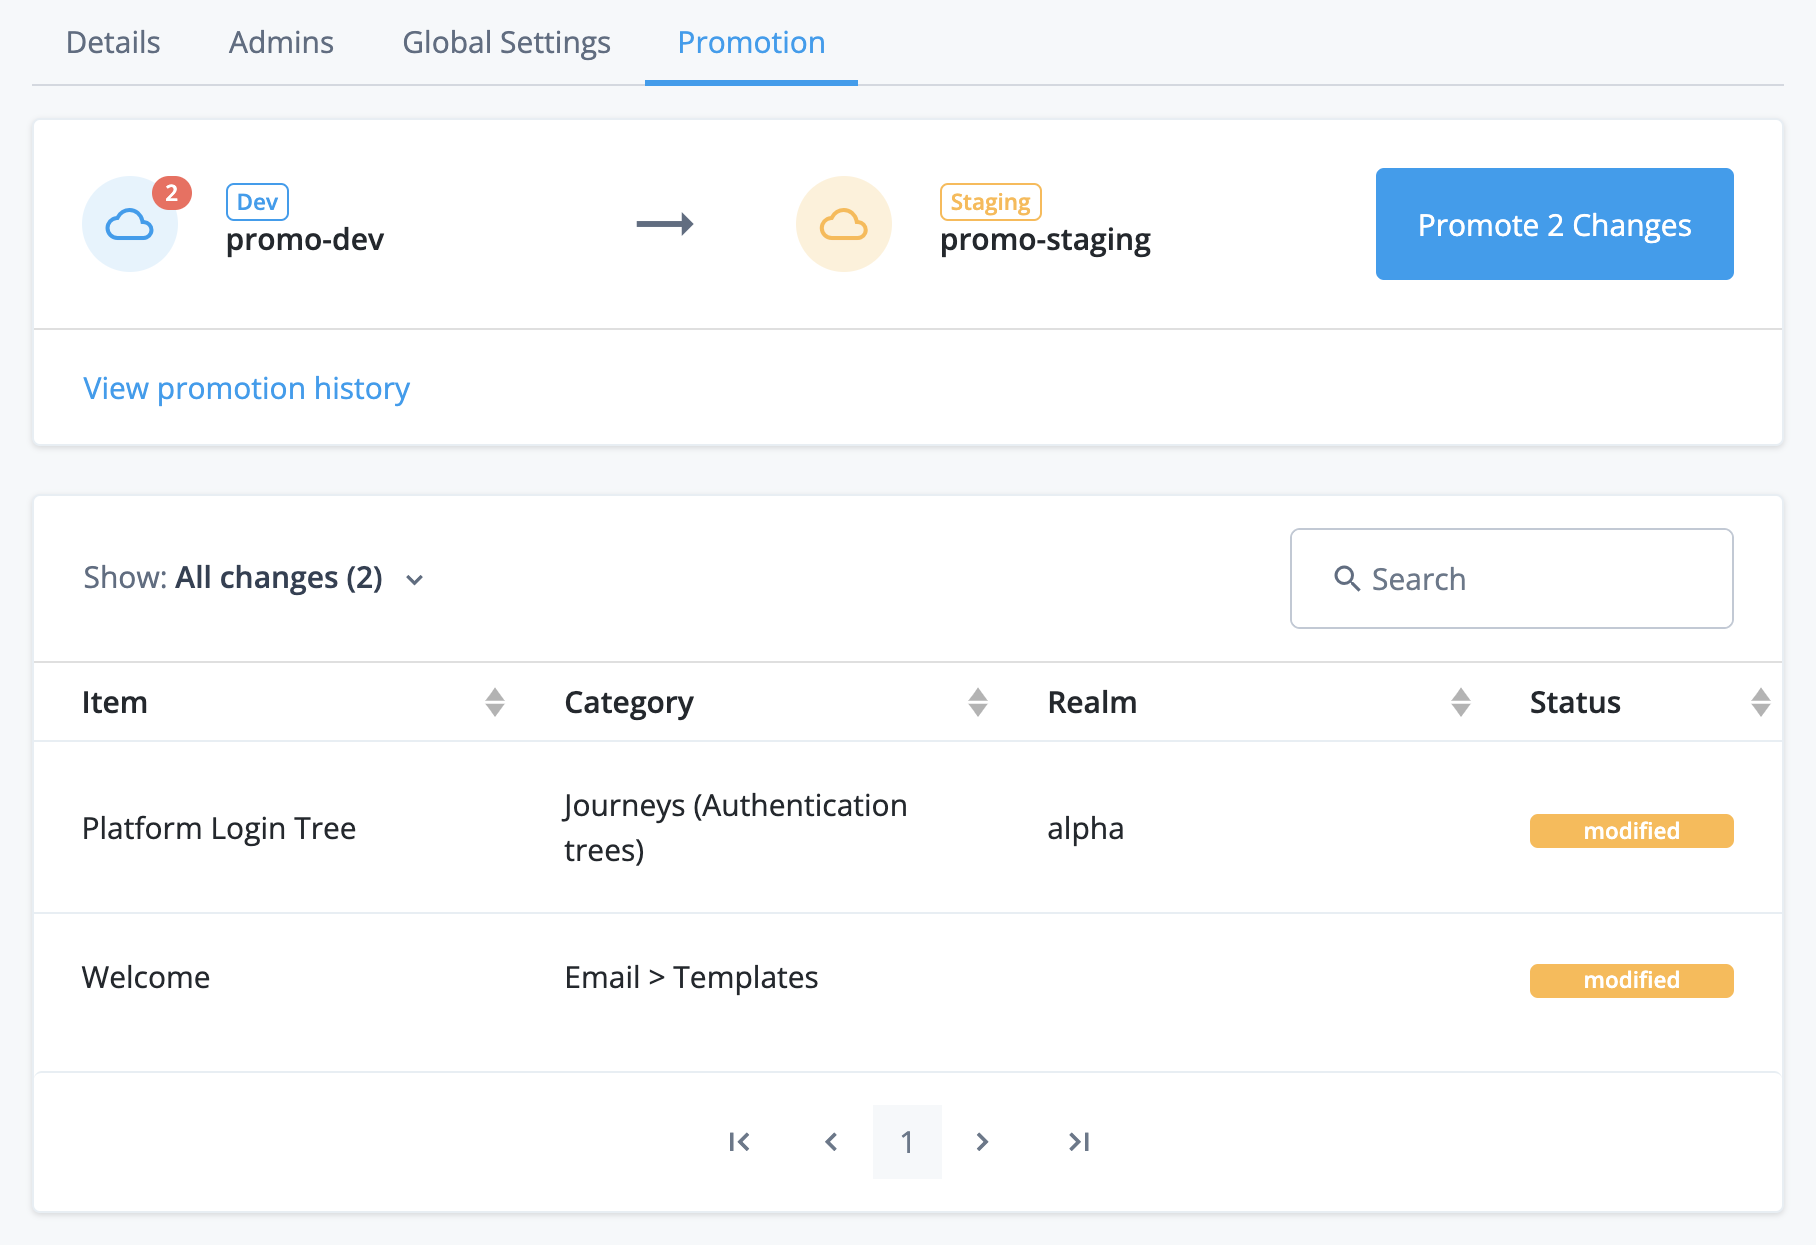
-
Sign in to the upper environment
When you run a promotion or view promotion history, the UI in the lower environment shows a sign-in screen for the upper environment. This lets the UI in the lower environment authenticate to the upper environment using your upper environment tenant administrator account.
In your development environment, the sign-in screen title is Sign in to Staging:

In your staging environment, the sign-in screen title is Sign in to Production:

| If you have a UAT[3] environment, your development environment shows a sign-in screen to your UAT environment instead. Learn more in Additional UAT environments. |
To sign in:
-
Check your browser settings:
-
Ensure your browser has third-party cookies enabled for your tenant domain:
-
For Chrome, follow the instructions under the "Change your cookie settings" section in this support article: https://support.google.com/chrome/answer/95647.
-
For other supported browsers, consult the browser documentation.
-
-
Ensure your browser is not in incognito mode.
If your browser does not have third-party cookies enabled or is in incognito mode, authentication to the upper environment will fail without an error message and redisplay the sign-in screen. -
-
Click Sign in to Staging (from your development environment) or Sign in to Production (from your staging environment) to open a pop-up browser window showing the sign-in screen for the upper environment:
-
Enter the credentials of your tenant administrator account for the upper environment.
-
Click Next.
-
Complete the authentication journey to the upper environment:
-
If 2-step verification is already enabled for your tenant administrator account, follow the UI prompts to provide your second authentication factor.
-
If 2-step verification is not yet enabled for your tenant administrator account:
-
Click Set up.
-
Follow the UI prompts to set up a second authentication factor for your tenant administrator account.
-
Follow the UI prompts to provide your second authentication factor.
-
-
Otherwise, if 2-step verification is not mandatory in the upper environment, you can click Skip for now to defer the setup of 2-step verification.
-
-
After you have successfully authenticated, the pop-up browser window closes automatically.
-
Promote changes to the upper environment
-
In the Advanced Identity Cloud admin UI of the lower environment, open the TENANT menu (upper right)
-
Click Promote configuration.
-
Review the static configuration changes that are awaiting promotion. Learn more in View changes awaiting promotion to the upper environment.
If there are any scripts awaiting promotion, ensure that they do not emit any personally identifiable information (PII) of your end users into Advanced Identity Cloud logs.
Ping Identity recommends that you establish a review and testing process for all scripts to prevent PII leaking out of your Advanced Identity Cloud tenant environments.
-
Click Promote n Changes.
-
If the UI shows a sign-in screen for the upper environment, follow the steps in Sign in to the upper environment.
-
In the Lock Tenants? screen, click Lock and Continue to lock the lower and upper environments.
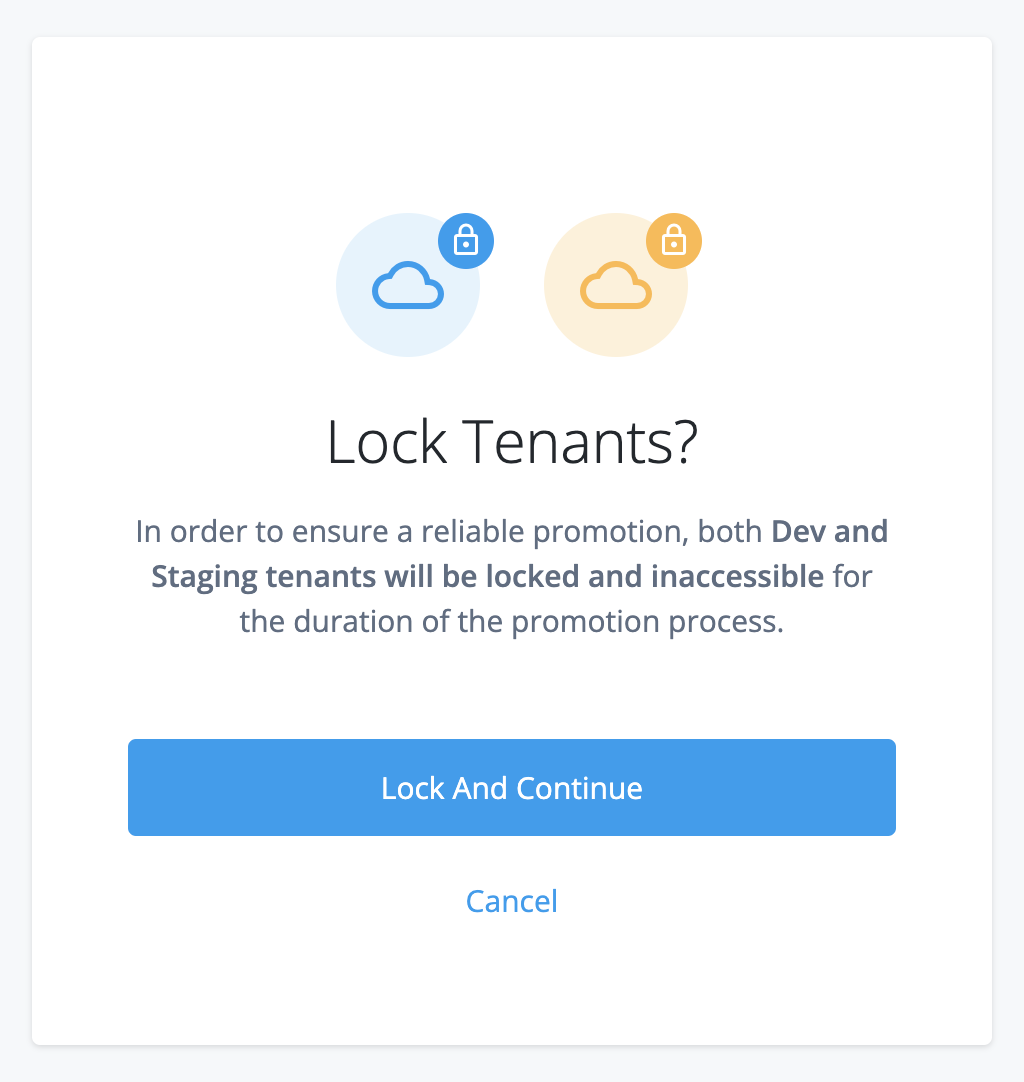
Allow 1–2 minutes for the locking process to complete. When the environments are locked, the UI has restricted functionality.
Locking an environment prevents configuration changes that could disrupt a promotion; however, all authentication flows continue to work as normal.
-
In the Review Promotion screen, check the static configuration changes that are awaiting promotion.
-
If you want to cancel the promotion:
-
Click Cancel Promotion.
This unlocks the lower and upper environments. Allow 1–2 minutes for the unlocking process to complete.
-
-
If you want to proceed with the promotion:
-
Click Start Promotion
-
In the Start Promotion? modal window:
-
If your static configuration contains directly embedded encrypted secrets that you have yet to store in ESVs, check Ignore Encrypted Secrets to bypass the integrity check for encrypted secrets.
-
Click Start Promotion again.
-
This promotes the static configuration changes from the lower environment to the upper environment. At the end of the promotion process, Advanced Identity Cloud services are restarted in the upper environment, and both environments are automatically unlocked. Allow 10–45 minutes for these combined processes to complete.
If the UI shows an error message during the promotion process, learn more in the following: -
-
-
When the promotion completes you have a choice of actions:
-
Click View report to view the promotion immediately in the promotion history.
-
Click Done to return to the Promotion tab.
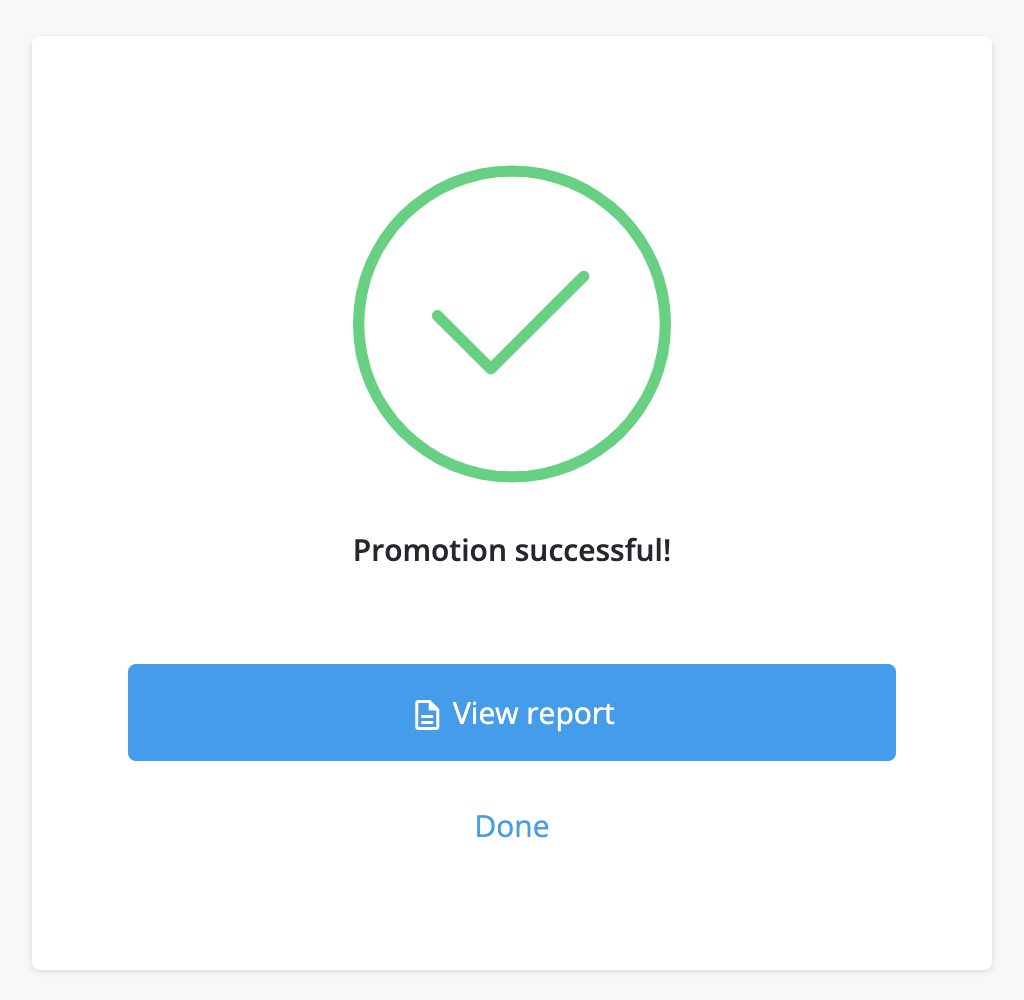
-
View history of promotions sent to the upper environment
-
In the Advanced Identity Cloud admin UI of the lower environment, open the TENANT menu (upper right)
-
Click Promote configuration.
-
Click View promotion history.
-
If the UI shows a sign-in screen for the upper environment, follow the steps in Sign in to the upper environment.
-
In the Promotion History page, click a promotion date in the left menu to review a report:
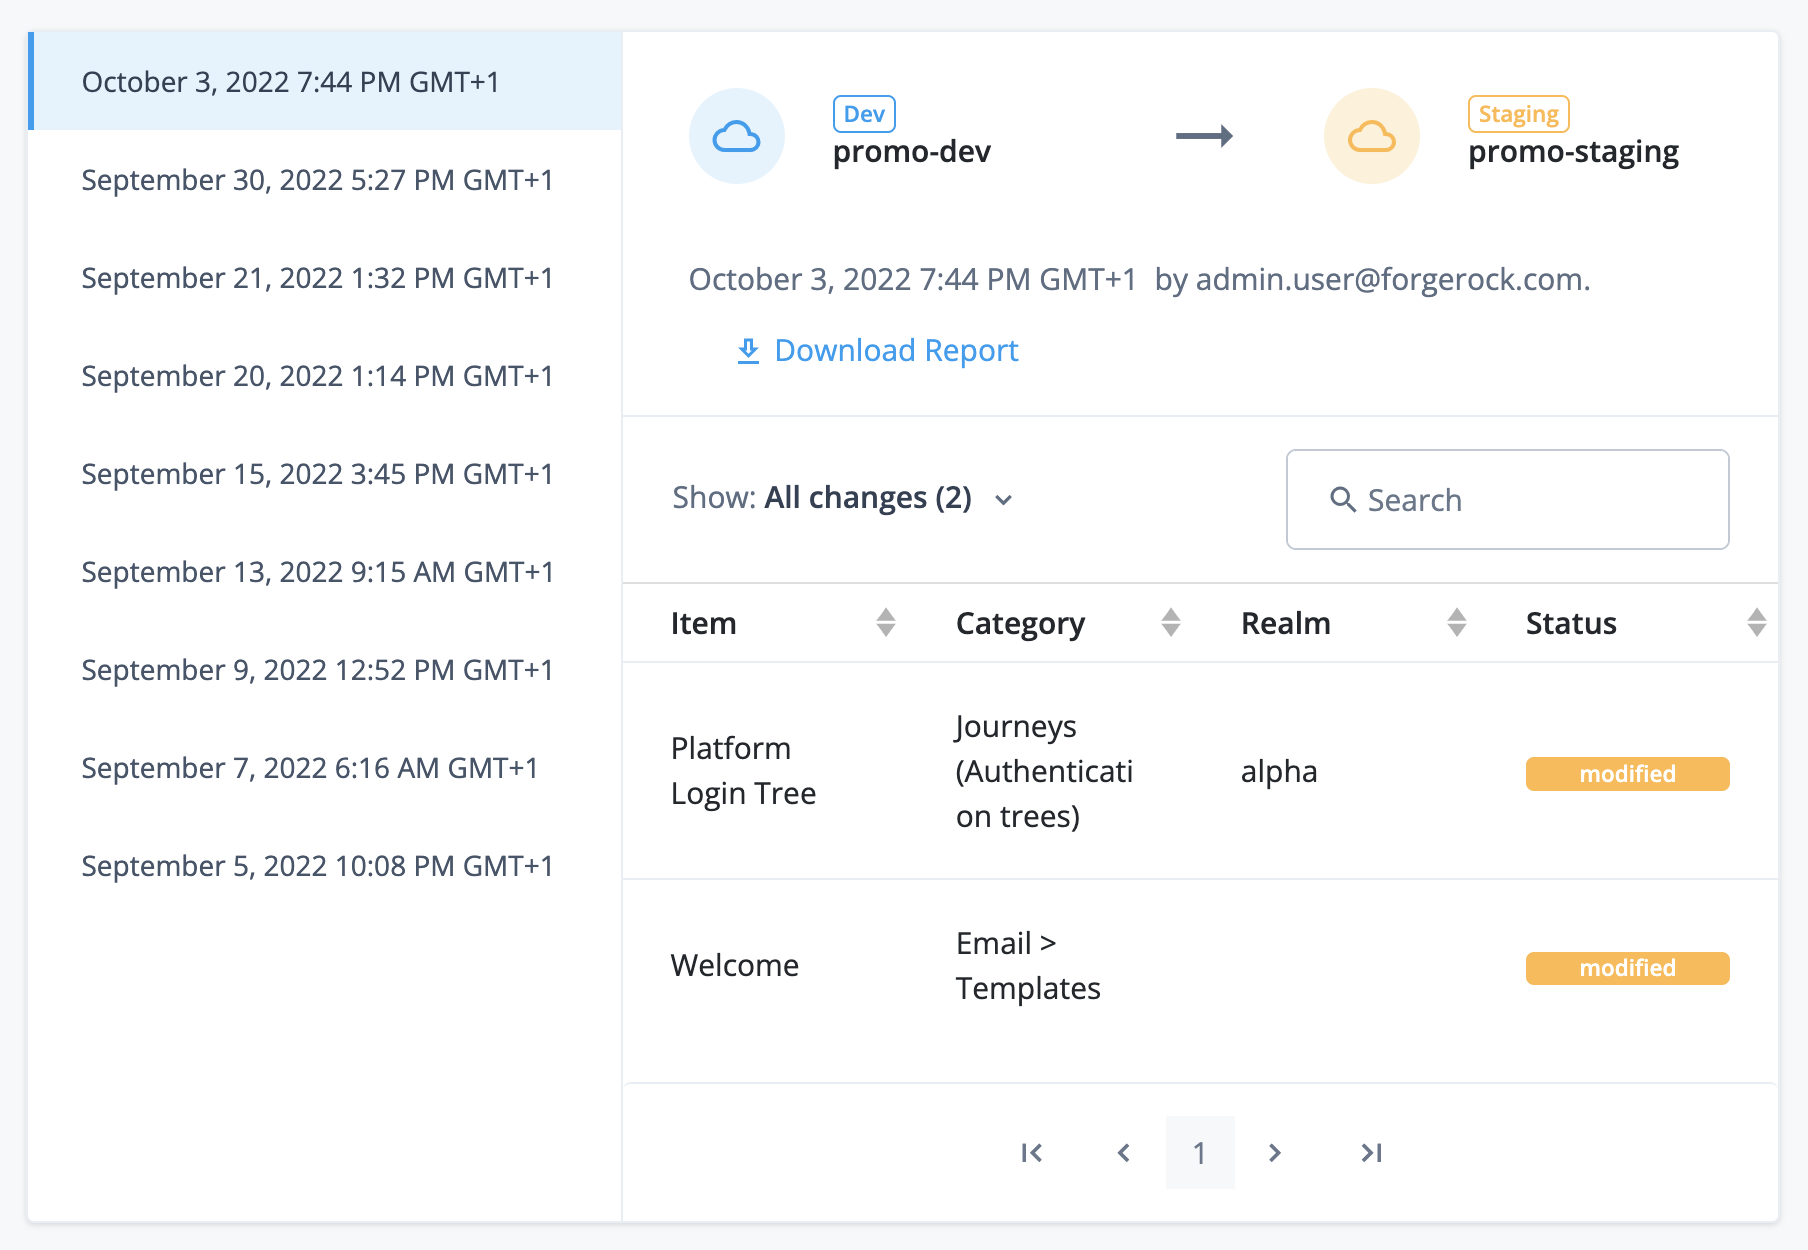
Promotions UI functionality in the upper environment
In the upper environment, the promotions UI lets you:
-
View a history of promotions received from the lower environment
This upper environment functionality exists in your staging and production environments only. It does not exist in your development environment, as that environment does not receive promotions from another environment.
View history of promotions received from the lower environment
-
In the Advanced Identity Cloud admin UI of the upper environment, open the TENANT menu (upper right)
-
Click Tenant settings.
-
Click the Details tab.
-
Click View updates.
-
In the Tenant Updates page, click a promotion date in the left menu to review a report.
Learn more in the screenshot in View history of promotions sent to the upper environment.
Restricted functionality
When you run a promotion and lock the upper and lower environments, the UI restricts some functionality under Tenant Settings > Promotion until the environments are unlocked.
Restricted functionality in the lower environment
In the lower environment, the UI has the following restricted functionality:
-
The left menu is hidden.
-
The page header shows Tenant Locked on the left.
-
The page header shows a restricted dropdown menu on the right.
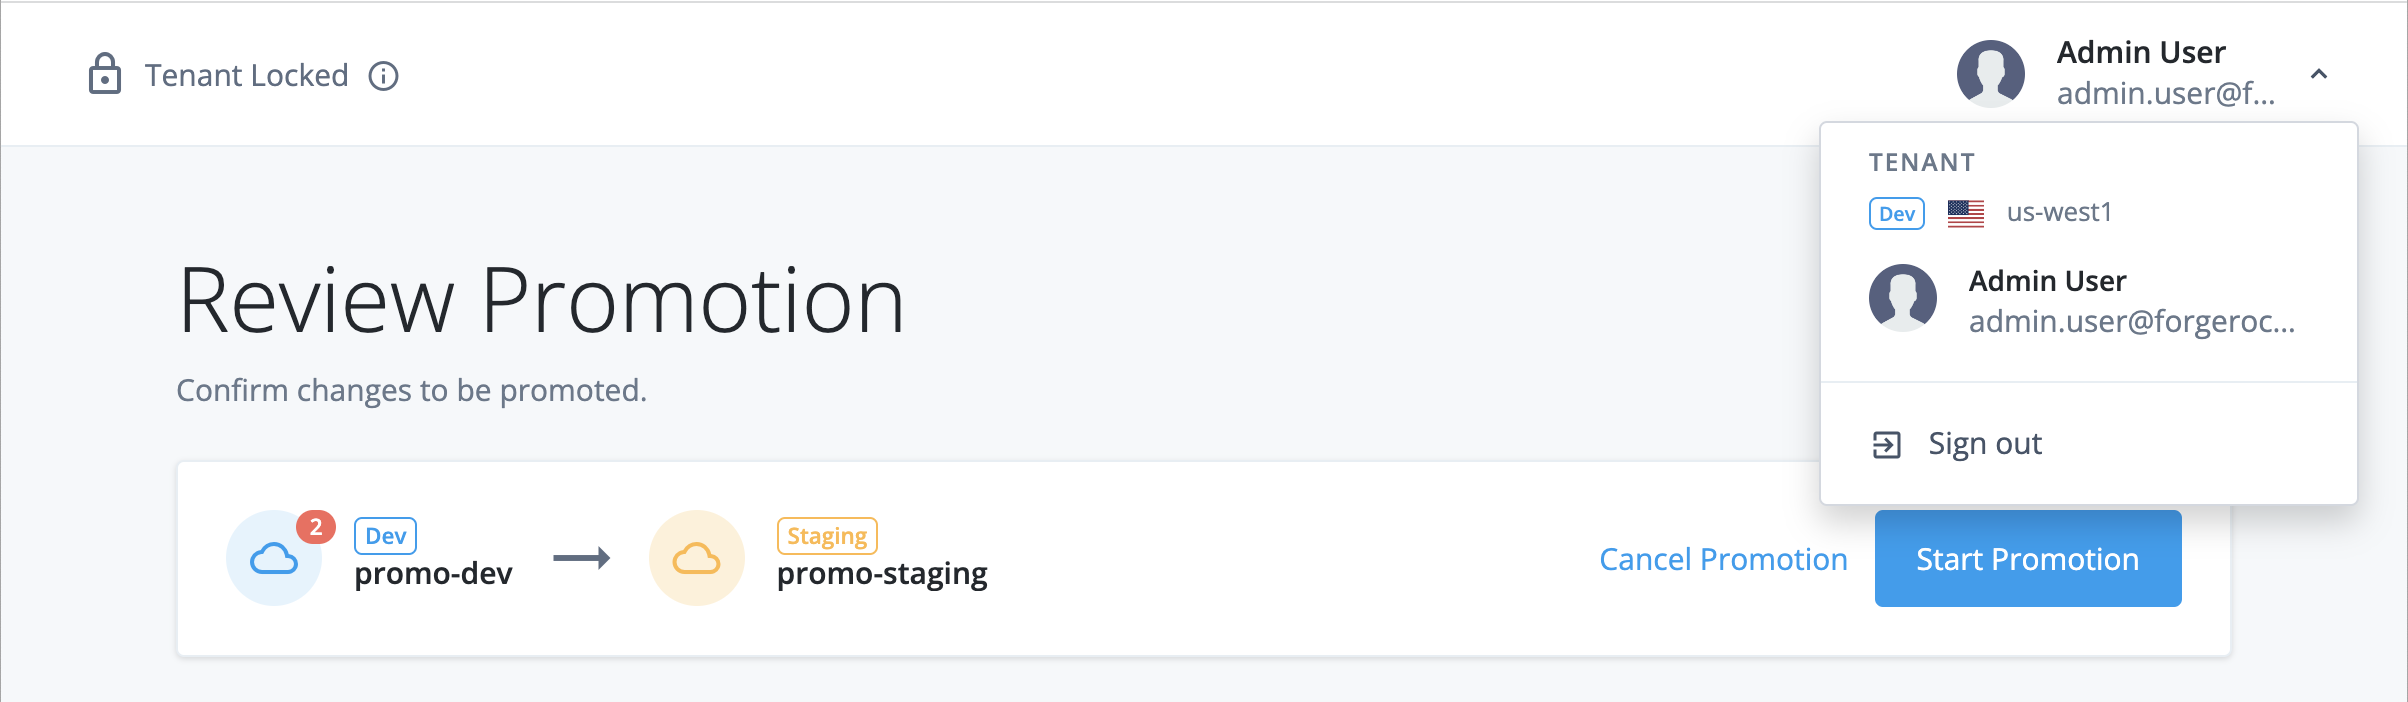
If you sign out and immediately sign back in, you are redirected back to Tenant Settings > Promotion.
Other tenant administrators who are logged in and working in other parts of the UI do not have this restricted functionality. They and are not redirected to Tenant Settings > Promotion unless they sign out and immediately sign back in while the upper and lower environments are locked.
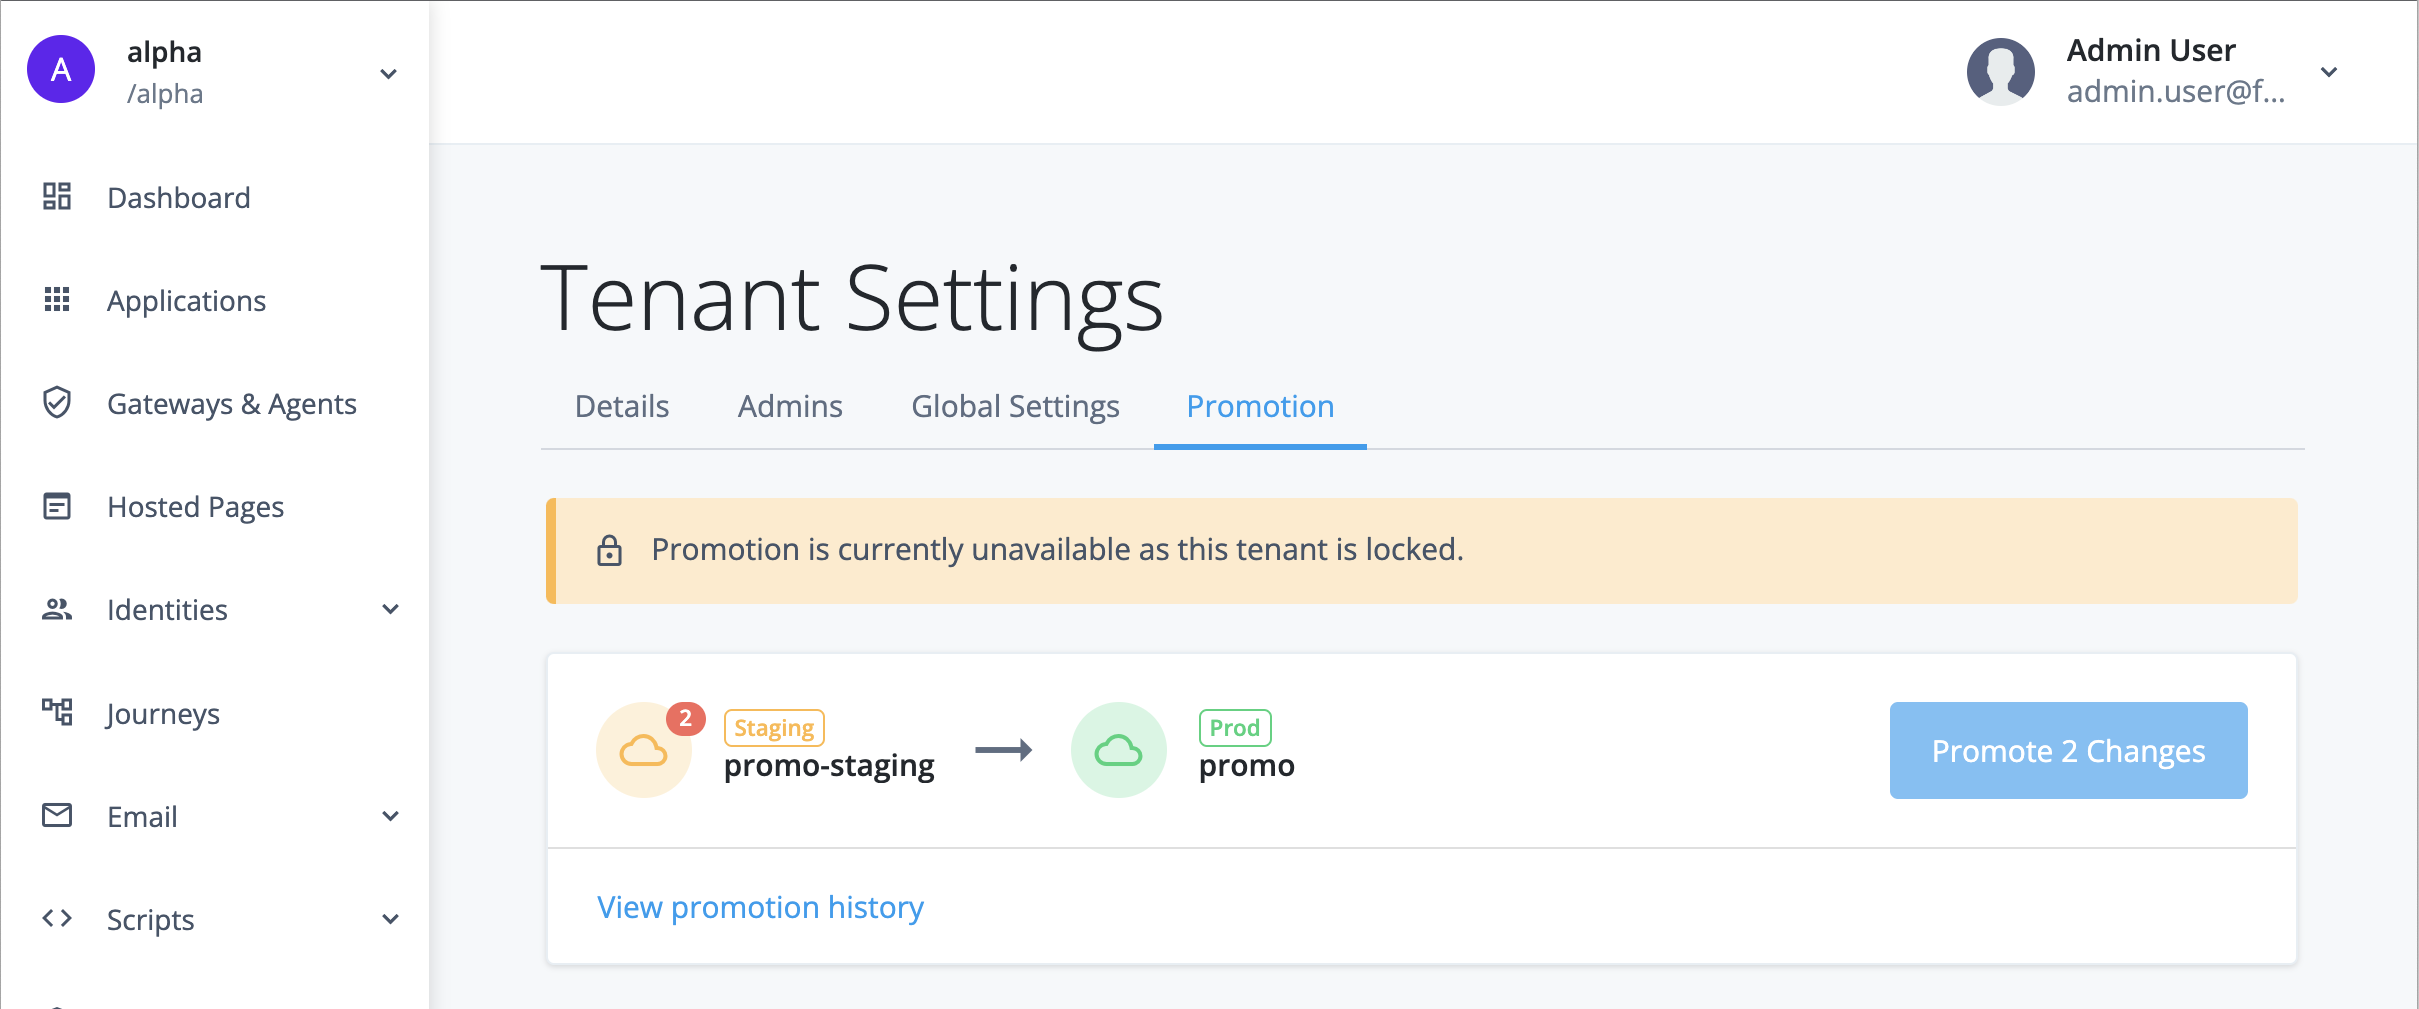
Troubleshooting
Resolve failed integrity check for missing ESVs
When you run a promotion, the UI may show an error message that you have missing ESVs:

This happens when the upper environment failed an integrity check for missing ESVs.
To resolve this:
-
Click Download Report to download a CSV report of the affected configuration.
-
Click Cancel and Unlock Tenants. This unlocks the lower and upper environments. Allow 1–2 minutes for the unlocking process to complete.
-
For each ESV in the report, create an equivalent ESV in the upper environment.
-
Start the promotion steps again.
Resolve failed integrity check for encrypted secrets
When you run a promotion, the UI may show an error message that you have encrypted secrets in your configuration:
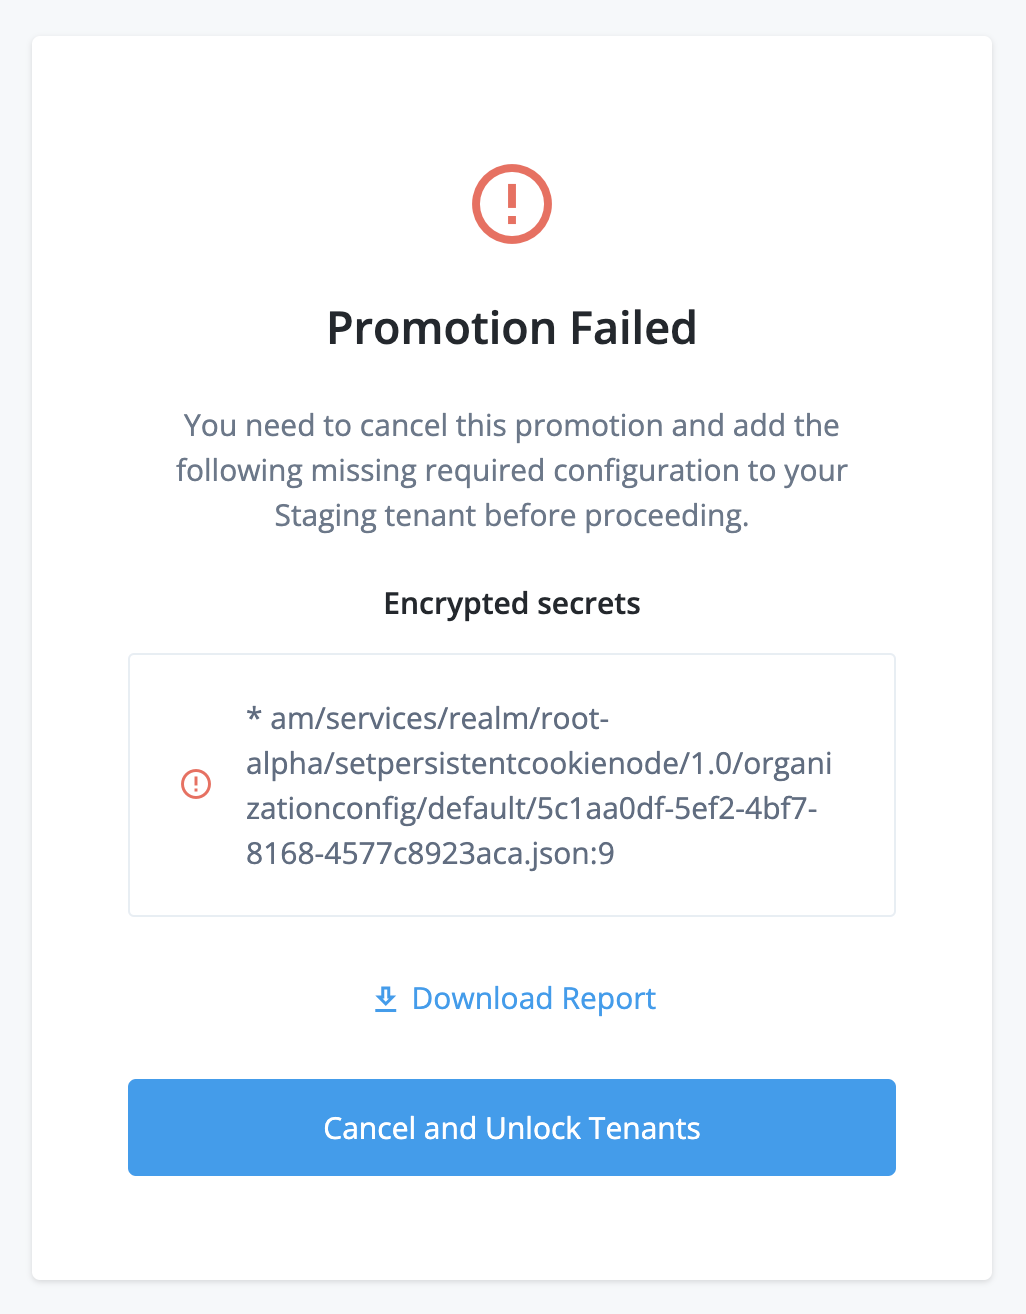
This happens when your lower environment configuration failed an integrity check for encrypted secrets.
To resolve this:
-
Click Download Report to download a CSV summary of the affected configuration.
-
Click Cancel and Unlock Tenants. This unlocks the lower and upper environments. Allow 1–2 minutes for the unlocking process to complete.
-
For each encrypted secret in the report:
-
Create an ESV secret containing the encrypted secret in each of the development, staging, and production environments.
-
Update your configuration to reference the new ESV secret.
-
-
Start the promotion steps again.
Resolve tenant locked errors
When you run a promotion, the UI may show an error message that your tenant is locked:
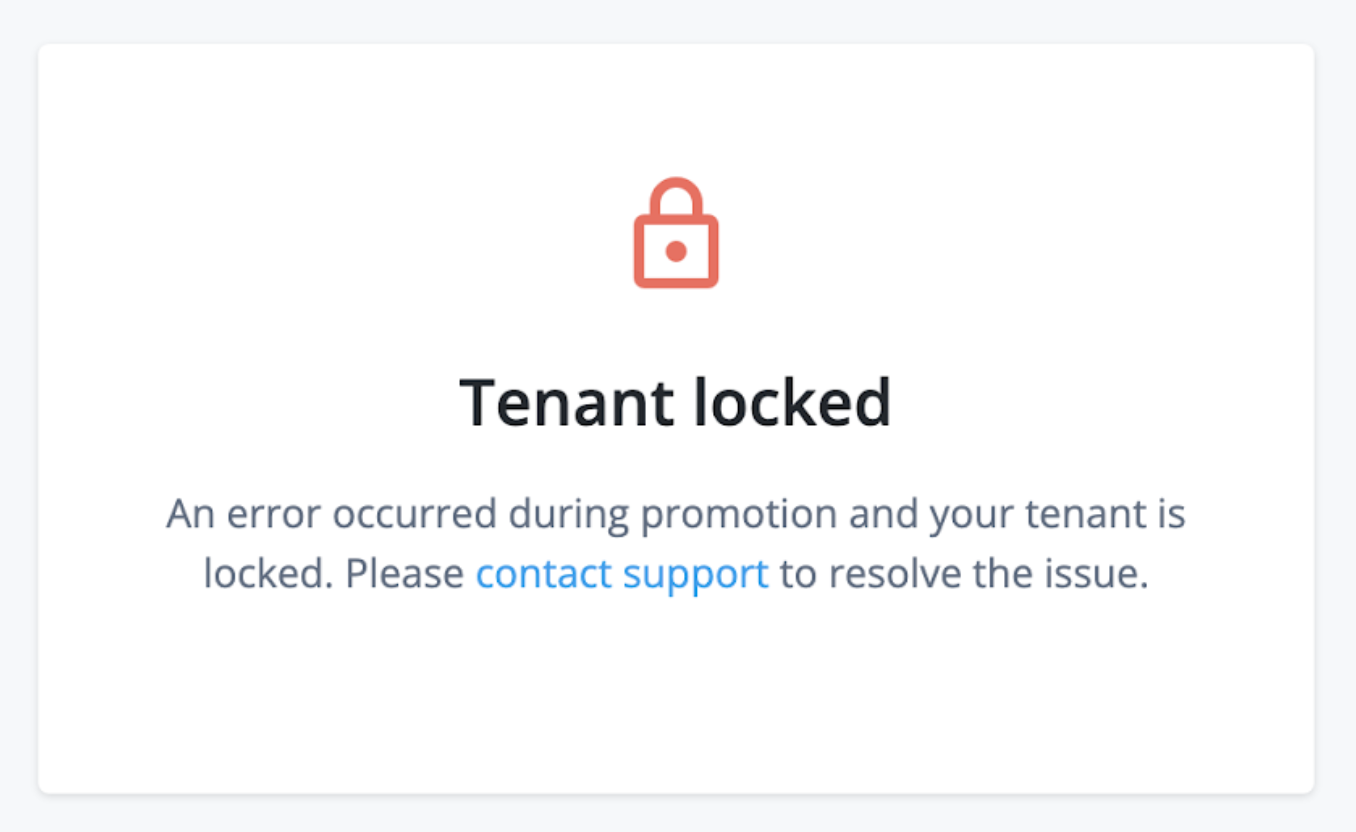
This happens when a previous promotion failed and left the environments in an error state that cannot be automatically resolved.
To resolve environment errors that are preventing a promotion or a rollback submit a support ticket:
-
Open a How-To ticket with Backstage Support.
-
On the How Do I...? page, provide values for the following fields:
Field Value Product
Select the following from the lists:
-
PingOne Advanced Identity Cloud
-
Tenant Settings
-
Self-Service Promotion
What are you trying to achieve?
Enter one of the following:
-
Resolve environment errors preventing a self-service promotion -
Resolve environment errors preventing a self-service rollback
Please provide a short description
Enter one of the following:
-
An error has occurred during a self-service promotion to the development/staging/production
environment
. -
An error has occurred during a self-service rollback from the staging/production
environment
.
Enter the error code and message (API users only).
-
-
Click Submit.
Revert a promotion
You can revert a promotion using the API. Learn more in Run a rollback.
Revert configuration in your development environment
To revert configuration in your development environment, submit a support ticket:
-
Open an Identity Cloud: Config request with Backstage Support.
-
On the Advanced Identity Cloud: Config Request page, provide values for the following fields:
Field Value Hostname
Enter the FQDN of the upper environment from the promotion you need to revert.
What would you like to do?
Select Restore from backup
-
In the Restore from backup section, provide values for the following fields:
Field Value What is the environment name?
Select Dev.
What is the date of the backup you would like to restore from?
Enter the date when you last had stable configuration, using the format YYYY-MM-DD.
-
Click Submit.
Service accounts
PingOne Advanced Identity Cloud provides service accounts to let you request access tokens for most REST API endpoints;
for example, you may need an access token to use the REST API endpoint
/openidm/managed/alpha_user to get a list of identities.
You create a new service account in the Advanced Identity Cloud admin UI, which provides you with credentials
(a service account ID and a private key). You use the credentials to obtain an access token from a
built-in OAuth 2.0 public client using the JWT profile for OAuth 2.0 authorization grant flow. You
can then use the access token as a bearer token in the Authorization HTTP header for each API request.
Manage service accounts
A tenant administrator can manage service accounts in these ways:
-
To use the Advanced Identity Cloud admin UI, learn more in Manage service accounts using the UI.
-
To use the Advanced Identity Cloud REST API with a tenant administrator access token, learn more in the article A scripted approach for creating and using service accounts in PingOne Advanced Identity Cloud.
Only a tenant administrator account has the privileges to create, modify, or delete service accounts.
You create service accounts in each environment; they are not promotable.
Service account scopes
When you create a service account, you choose which scopes it can grant to the access tokens it creates. You should always choose the minimum number of scopes needed.
Scopes for AM and IDM APIs in Advanced Identity Cloud
| Scope | Purpose | Reference |
|---|---|---|
|
Access to |
|
|
Access to |
Service account access tokens granted the fr:idm:* scope also have access to API
endpoints under the fr:idc:esv:* scope.
|
Scopes for Advanced Identity Cloud environment APIs
| Scope | Purpose | Reference |
|---|---|---|
|
Access to certificate API endpoints |
|
|
Read-only access to certificate API endpoints. Use this scope if you only need to list certificates. |
|
|
Access to Content Security Policy API endpoints |
Content Security Policy API endpoint |
|
Full access to cookie domain API endpoints. |
|
|
Access to custom domain endpoints |
Custom domains API endpoint |
|
Access to ESV API endpoints |
|
|
Read-only access to ESV API endpoints. Use this scope if you only need to list ESVs. |
|
|
Create, update, and delete access to ESV API endpoints |
|
|
Access to ESV API endpoint to restart Advanced Identity Cloud services |
|
|
Access to promotions API endpoints |
|
|
Access to release management API endpoints |
Release management API endpoint |
|
Access to SSO cookie API endpoints |
SSO cookie API endpoint |
Scopes for Advanced Identity Cloud APIs under development
The following scopes grant access to API endpoints that are under development and will imminently be released to the rapid channel.
| Scope | Purpose | Reference |
|---|---|---|
|
Access to web application firewall (WAF) API endpoints |
|
|
Read-only access to WAF API endpoints. Use this scope if you only need to list WAFs. |
|
|
Create, update, and delete access to WAF API endpoints |
|
|
Access to analytics API endpoints |
Scopes for add-on capability APIs
The following scopes grant access to API endpoints in Add-on capabilities.
| Scope | Purpose | Reference |
|---|---|---|
|
Access to IGA API endpoints |
Restricted scopes
The following scopes are restricted, so the API endpoints under them are not accessible using a service account access token. Learn how to access API endpoints using a tenant administrator access token in the article A scripted approach for creating and using service accounts in PingOne Advanced Identity Cloud.
| Scope | Purpose | Reference |
|---|---|---|
|
Access to federation API endpoints |
Federation API endpoint |
Get an access token using a service account
To get an access token using a service account, learn more in Authenticate to Advanced Identity Cloud REST API with access token.
| You can also create a script to get a service account access token within your journeys. This approach lets you use the access token in API calls in a Scripted Decision node in Advanced Identity Cloud. Learn more in Get an access token in a journey for an example. |
Manage service accounts using the UI
View service accounts
-
In the Advanced Identity Cloud admin UI, open the TENANT menu (upper right).
-
Click Tenant settings.
-
Click Global Settings.
-
Click Service Accounts. The page displays existing service accounts for your tenant.
Create a new service account
-
In the Advanced Identity Cloud admin UI, open the TENANT menu (upper right).
-
Click Tenant settings.
-
Click Global Settings.
-
Click Service Accounts.
-
Click New Service Account.
-
Enter a Name and optional Description for the service account.
-
In the Scopes section, select the scopes that the service application can grant to an access token. Learn more in Service account scopes.
-
Click Save.
-
When the 'Service account successfully created!' message shows:
-
Make a note of the service account ID, found in the ID field.
-
Click Download Key to download the service account private key.
You must download the private key at this point as it will not be available again.
-
-
Click Done.
| To get an access token using a service account, learn more in Authenticate to Advanced Identity Cloud REST API with access token. |
Modify a service account
-
In the Advanced Identity Cloud admin UI, open the TENANT menu (upper right).
-
Click Tenant settings.
-
Click Global Settings.
-
Click Service Accounts.
-
Click the ellipsis on the right of a service account and select Edit.
-
You can change the Name or optional Description.
-
In the Scopes section, you can change the scopes that the service application can grant to an access token. Learn more in Service account scopes.
Before removing scopes that the service application can grant to an access token, make sure you identify which of your integrations are dependent upon those scopes; otherwise those integrations will fail the next time they request an access token. -
Click Save.
Regenerate a key for a service account
| Before regenerating a key, make sure you identify which of your integrations are dependent upon it to sign JWTs, as all those integrations need to be updated with the new key. |
-
In the Advanced Identity Cloud admin UI, open the TENANT menu (upper right).
-
Click Tenant settings.
-
Click Global Settings.
-
Click Service Accounts.
-
Click the ellipsis on the right of a service account and select Regenerate Key.
-
On the Regenerate Key dialog box, click Regenerate Key.
-
When the 'Key successfully created!' message is shown:
-
Click Download Key to download the new service account private key.
You must download the private key at this point as it will not be available again.
-
-
Click Done.
Delete a service account
| Before deleting a service account, make sure none of your integrations are dependent upon its key to sign JWTs; otherwise those integrations will fail the next time they request an access token. |
-
In the Advanced Identity Cloud admin UI, open the TENANT menu (upper right).
-
Click Tenant settings.
-
Click Global Settings.
-
Click Service Accounts.
-
Click the ellipsis on the right of a service account and select Delete.
-
On the Delete Service Account page, click Delete Service Account.
Monitor your tenant
PingOne Advanced Identity Cloud lets you monitor uptime status and system performance.
|
Advanced Identity Cloud also provides APIs for extracting log data. Learn more in View audit and debug logs. |
Monitor uptime status
Tenant status page
Use your tenant status page to monitor uptime and historical trends for your production and staging tenant environments.
| If you don’t have access to this page, follow the instructions in Get status page access credentials for additional tenant administrators. |
- Production environment
-
For the production environment, the tenant status page shows individual statuses for these services:
-
Access Management
-
Identity Management
-
End User UI
-
Login UI
-
Registration UI
-
Administrator UI
-
Logs
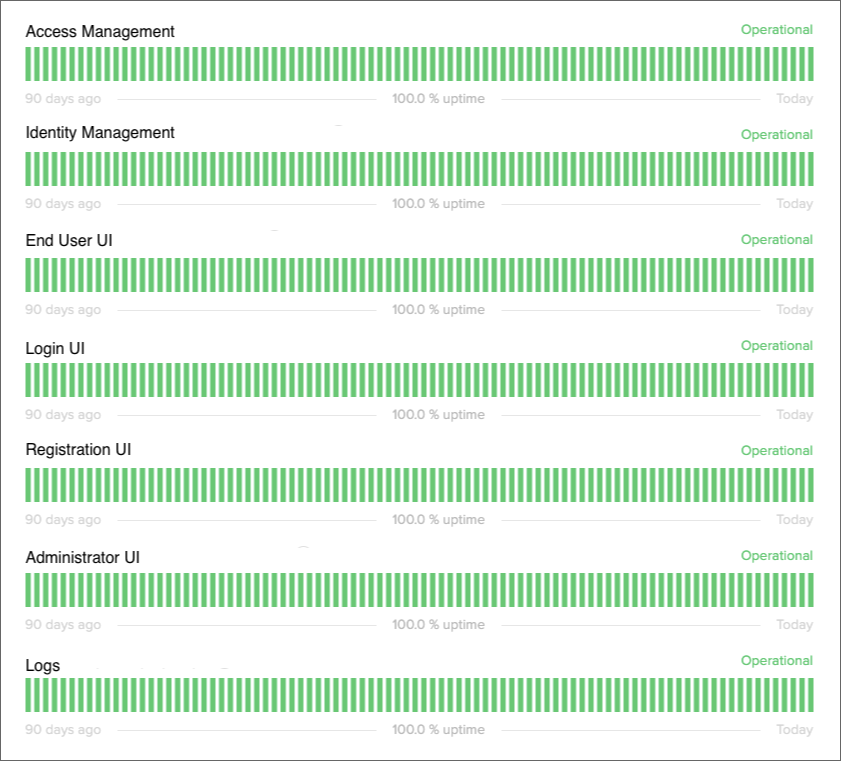
-
- Staging environment
-
For the staging environment, the tenant status page combines the individual service statuses into a single status.
Manage access to your tenant status page
Get status page access credentials for the initial tenant administrator
If you are the initial tenant administrator, you should have received status page credentials when your tenant was set up.
If you have lost or forgotten those credentials, follow the instructions in Get status page access credentials for additional tenant administrators.
Get status page access credentials for additional tenant administrators
If monitoring Advanced Identity Cloud uptime status is part of a tenant administrator’s role, submit a Backstage Support ticket to request that the administrator receive access to the tenant status page.
-
You can request access on behalf of one or more tenant administrators, including yourself.
-
In the request, provide the email address of each tenant administrator you want to have status page access.
Remove status page access for tenant administrators
If you want to remove status page access for one or more tenant administrators, submit a Backstage Support ticket. In the request, provide the email address of each tenant administrator from which you want to remove access.
Access your tenant status page
| If you don’t have access to this page, follow the instructions in Get status page access credentials for additional tenant administrators. |
-
Identify your tenant domain name by removing the protocol and any trailing slash from your tenant FQDN.
Example:
openam-mycompany-mytenant-usw1.id.forgerock.io -
Obtain your tenant status page URL by appending your tenant domain name to the Advanced Identity Cloud status page URL, https://status.id.forgerock.io.
Example: https://status.id.forgerock.io/openam-mycompany-mytenant-usw1.id.forgerock.io
-
Open your tenant status page URL in a browser.
-
On the sign-on page, enter your status page credentials.
-
Click Authenticate.
Your tenant status page displays, showing real-time status information for your staging and production tenant environments:
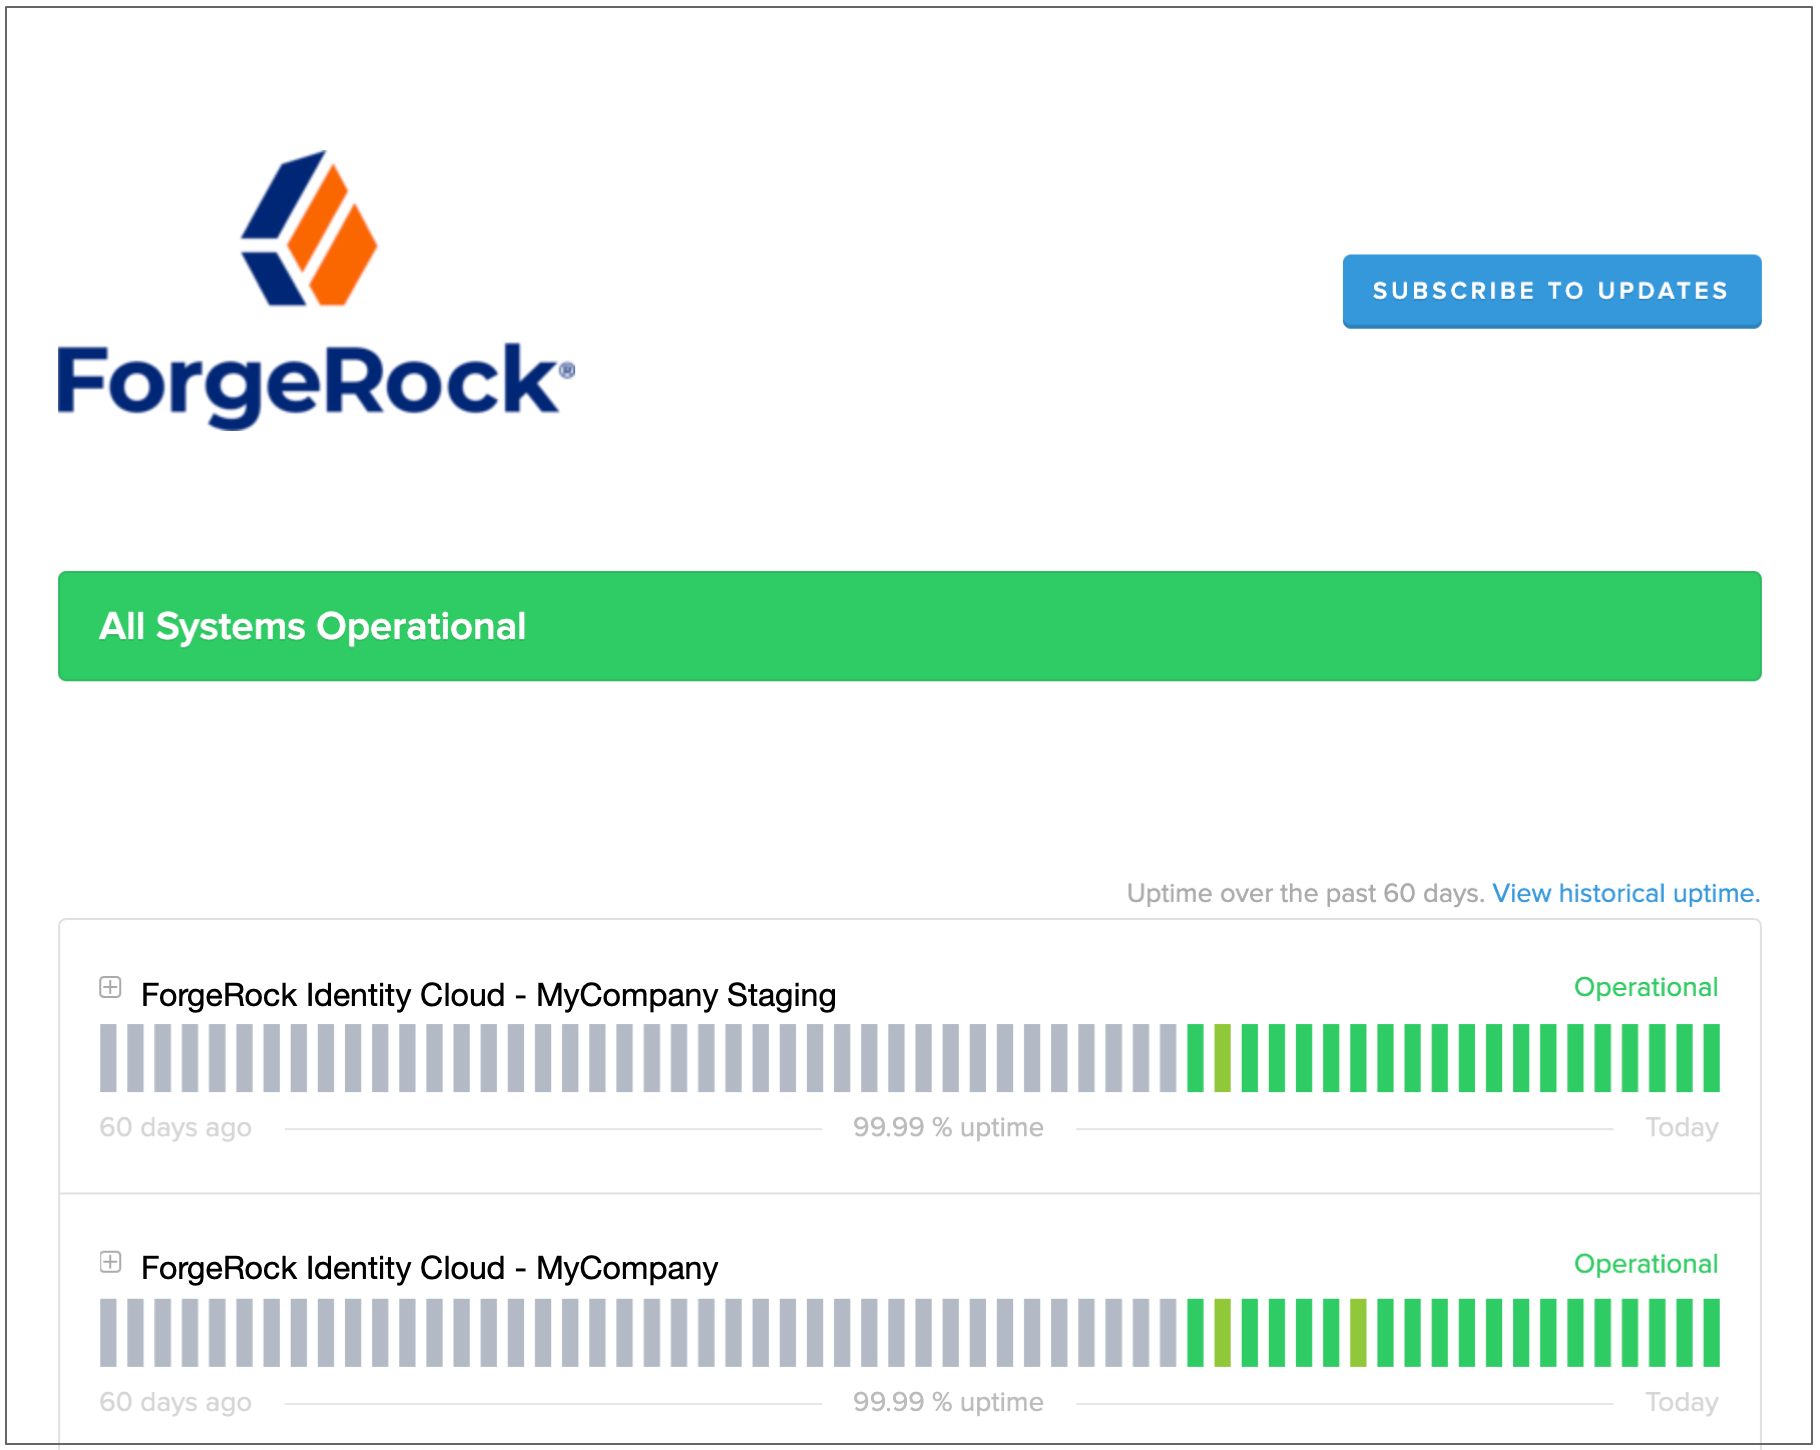
View incident reports in your production tenant environment
Filter your status page to show service incidents in your production tenant environment:
-
Click View historical uptime.
-
Select the Incidents tab.
-
For the production environment, click Filter Components, then select one or more Advanced Identity Cloud services.
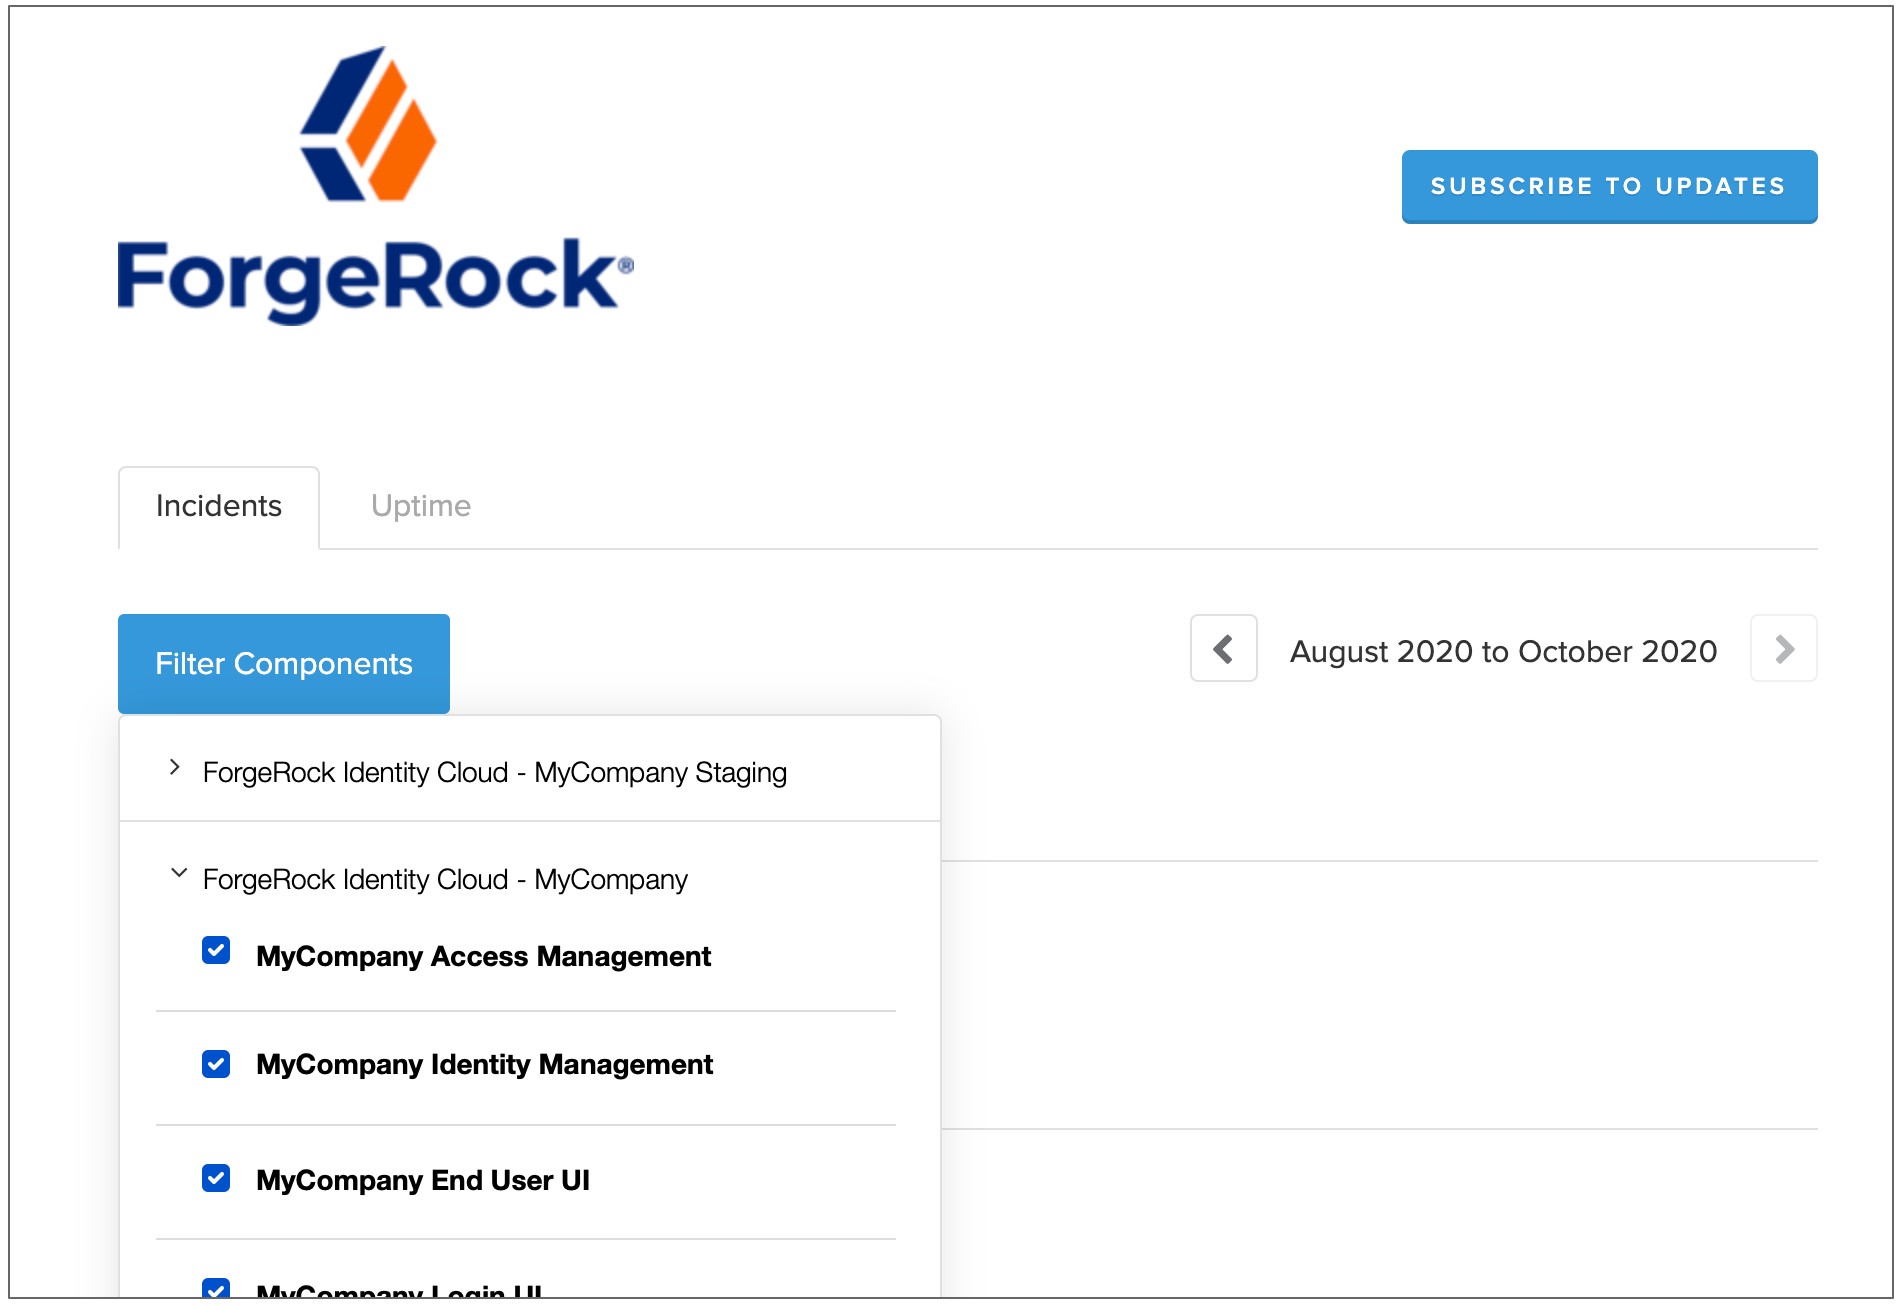
-
Click Filter Components again to view the incident reports.
Monitor system performance
Monitor using health check endpoint
Use the HTTP response codes from the /monitoring/health endpoint to integrate your tenant
environment with external monitoring tools such as Pingdom.
$ curl 'https://<tenant-env-fqdn>/monitoring/health'This endpoint returns the following HTTP response status codes:
- 200
-
Indicates all critical services in an environment are healthy. This status code also shows the informational message
OK. - 503
-
Indicates one or more critical services in an environment are not healthy. This status code also shows the informational message
Service Unavailable.
Monitor using Prometheus endpoints
Advanced Identity Cloud provides monitoring endpoints you can use with Prometheus.
| Endpoint | Description | ||
|---|---|---|---|
|
Produces Prometheus-formatted metrics for Access Management. Learn which AM metrics are available in the self-managed documentation:
|
||
|
Produces Prometheus-formatted metrics for Identity Management Learn which IDM metrics are available in the self-managed documentation: |
|
Advanced Identity Cloud adds a |
You must obtain API credentials to authenticate to the /monitoring/prometheus/am and
/monitoring/prometheus/idm endpoints. Learn more in
Authenticate to Advanced Identity Cloud REST API with API key and secret.
You can download and run a Docker-based example of a Grafana dashboard. The demo requires that you have Docker Desktop installed, and requires macOS.
To try the demo:
-
Download and extract the PingOne Advanced Identity Cloud Monitoring Demo ZIP file.
-
Edit the
setup_monitoring_config.shfile:-
In the
TENANT_DOMAINvariable, enter the domain name of your tenant.Do not include the protocol, and do not add a trailing slash.
For example:
TENANT_DOMAIN="openam-mycompany-mytenant-usw1.id.forgerock.io" -
In the
API_KEY_IDandAPI_KEY_SECRETvariables, enter the API credentials you obtained earlier.For example:
API_KEY_ID="b977d5724ef...562e4c57" API_KEY_SECRET="d3628be865ce152f49...870e5fd3506c4" -
Save your changes.
-
-
Run the
setup_monitoring_config.shscript.The Shell script will set up the following config files:
Config File Description prometheus/prometheus.ymlThe script populates the tenant domain and API credentials.
docker/docker-compose.ymlThe script populates the working directory path.
-
Run the following Docker command:
docker-compose -f docker/docker-compose.yml up
The command downloads a Prometheus Docker image and configures it for your tenant. It also downloads a Grafana Docker image, and configures it to use the Prometheus image as a data source.
-
When the command output for the "grafana_1" container displays a message that contains "HTTP Server Listen", open http://localhost:3000 in a web browser.
-
Log in with username
admin, passwordadmin. -
Enter a new password to use for the administrator, or click Skip.
-
On the Grafana Home page, select Dashboards in the left-side hamburger menu.
The Dashboards page appears.
-
Select AM Overview to view the AM overview dashboard:
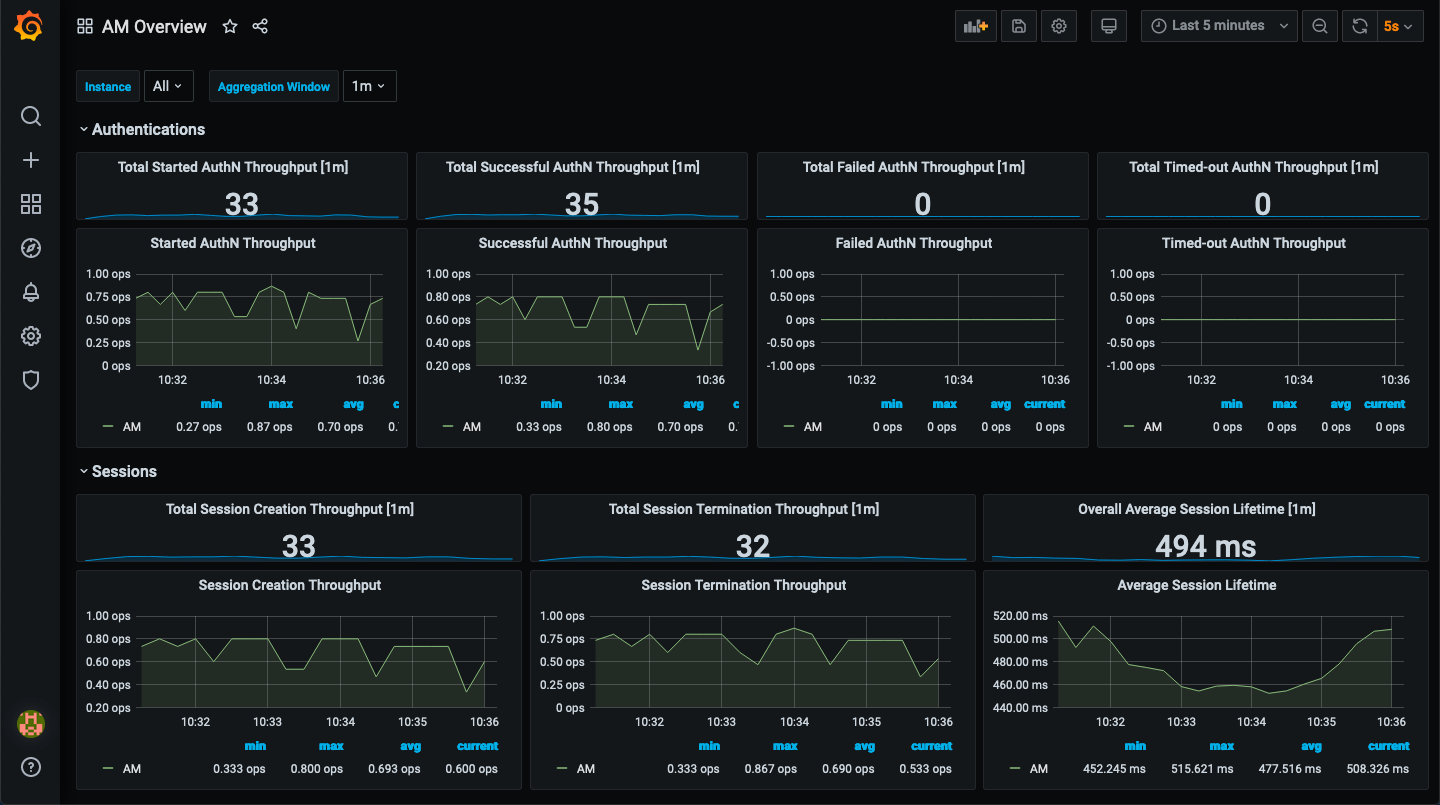
-
Select IDM Sample Dashboard to view the IDM sample dashboard.
-
Go to http://localhost:9090 to view the Prometheus dashboard.
Get audit and debug logs
PingOne Advanced Identity Cloud provides audit and debug logs to help you manage your tenant:
-
Use audit logs to investigate user and system behavior.
-
Use debug logs to investigate any issues that can arise in production.
Advanced Identity Cloud stores logs for 30 days. Use the /monitoring/logs endpoint to access the stored data.
| You need to get an API key and secret before you can authenticate to the endpoints. |
Sources
Advanced Identity Cloud makes browsing the logs easier by storing them in various sources.
View sources
To view a list of the available sources, use the /monitoring/logs/sources endpoint.
Example request:
$ curl \
--request GET 'https://<tenant-env-fqdn>/monitoring/logs/sources' \
--header 'x-api-key: <api-key>' \
--header 'x-api-secret: <api-secret>'
Example response:
{
  "result": [
    "am-access",
    "am-activity",
    "am-authentication",
    "am-config",
    "am-core",
    "am-everything",
    "idm-access",
    "idm-activity",
    "idm-authentication",
    "idm-config",
    "idm-core",
    "idm-everything",
    "idm-recon",
    "idm-sync"
  ],
  "resultCount": 14,
  "pagedResultsCookie": null,
  "totalPagedResultsPolicy": "NONE",
  "totalPagedResults": 1,
  "remainingPagedResults": 0
}
Advanced Identity Cloud returns the available sources in the result array.
Source descriptions
The following table lists the available sources and describes their purpose:
| Source | Type | Description |
|---|---|---|
am-access |
Audit |
Captures all incoming Advanced Identity Cloud access calls as audit events. This includes who, what, when, and the output for every access request. Audit events:
Show exampleAccess log format
|
am-activity |
Audit |
Captures state changes to objects that were created, updated, or deleted by Advanced Identity Cloud end users. This includes session, user profile, and device profile changes. Audit events:
Show exampleActivity log format
|
am-authentication |
Audit |
Captures when and how a user authenticated and related audit events. Advanced Identity Cloud records an authentication audit event for each authentication node and the journey outcome. A node can provide extra data in the standard audit event, which is logged when an authentication node completes. Audit events:
Learn more about Authentication log format
|
am-config |
Audit |
Captures access management configuration changes for Advanced Identity Cloud with a timestamp and by whom. Configuration changes can only be performed in development environments, so these logs are empty in staging and production environments. Audit events:
Show exampleConfig log format
|
am-core |
Debug |
Captures access management debug logs for Advanced Identity Cloud. Use am-core when debugging anything in access management without capturing audit events. am-core also captures logging in authentication scripts. Development and sandbox environments provide DEBUG level logs, with logs in several areas tuned to INFO or WARNING. To reduce log volumes, staging and production environments only provide WARNING level logs and above. To troubleshoot and view the latest entries in the stored logs, you can tail am-core source. Learn more in Tail logs. |
am-everything |
Audit, Debug |
Captures all access management audit and debug logs for Advanced Identity Cloud. This includes all the logs captured in |
idm-access |
Audit |
Captures messages for the identity management REST endpoints and the invocation of scheduled tasks. This is the who, what, and output for every identity management access request in Advanced Identity Cloud. Audit events:
Show exampleLearn more about |
idm-activity |
Audit |
Captures operations on internal (managed) and external (system) objects in Advanced Identity Cloud. idm-activity logs the changes to identity content, such as adding or updating users and changing passwords. Audit events:
Show exampleLearn more about |
idm-authentication |
Audit |
Captures the results when authenticating to an If an authentication session already exists in access management, authentication to identity management is not required. In this instance, the authentication logs would appear for am-authentication, with identity management logs in idm-access and idm-activity. Audit events:
Learn more about |
idm-config |
Audit |
Captures identity management configuration changes for Advanced Identity Cloud with a timestamp and by whom. Configuration changes can only be performed in development environments, so these logs are empty in staging and production environments. Audit events:
Show exampleLearn more about |
idm-core |
Debug |
Captures identity management debug logs for Advanced Identity Cloud. Use idm-core when debugging anything in identity management without capturing audit events. Development and sandbox environments provide FINE level logs, with logs in several areas tuned to INFO, WARNING and SEVERE. To reduce log volumes, staging and production environments only provide INFO and WARNING level logs and above. To troubleshoot and view the latest entries in the stored logs, you can tail idm-core source. Learn more in Tail logs. |
idm-everything |
Audit, Debug |
Captures identity management audit and debug logs for Advanced Identity Cloud. This includes all the logs captured in |
idm-recon |
Audit |
Captures reconciliation events for Advanced Identity Cloud. The corresponding audit topic for idm-recon is disabled by default in Advanced Identity Cloud. For reconciliation events to appear in the audit logs, you must enable the recon event handler. Learn more about |
idm-sync |
Audit |
Captures any changes to an object resulting in automatic sync (live sync and implicit sync) when a repository is mapped to Advanced Identity Cloud. This includes situations and the actions taken on each object, by account. The idm-activity log contains additional details about each action. Learn more about |
Retrieve log entries
To retrieve the stored log entries for a source, use the /monitoring/logs endpoint, specifying the source as a parameter.
Example request:
$ curl -G \
--request GET 'https://<tenant-env-fqdn>/monitoring/logs' \
--header 'x-api-key: <api-key>' \
--header 'x-api-secret: <api-secret>' \
--data 'source=am-authentication'
Example response:
{
  "result": [{
    "payload": "<payload>",
    "timestamp": "<dateTime>",
    "type": "application/json",
    "source": "am-authentication"
  }, {
    "...": "..."
  }],
  "resultCount": "1000",
  "pagedResultsCookie": "<pagedResultsCookie>",
  "totalPagedResultsPolicy": "NONE",
  "totalPagedResults": -1,
  "remainingPagedResults": -1
}
Advanced Identity Cloud returns the available log entries in the result array. Results are in JSON format or
plaintext, depending on the source you request.
To reduce the size of the output, log query results are by default restricted to the last 24 hours, unless you add beginTime and/or endTime query parameters. Learn more in Get log results for a time period.
Get log results for a time period
Use the beginTime and endTime query parameters to return entries created between two ISO 8601 formatted times.
Example request:
$ curl -G \
--request GET 'https://<tenant-env-fqdn>/monitoring/logs' \
--header 'x-api-key: <api-key>' \
--header 'x-api-secret: <api-secret>' \
--data 'source=am-authentication' \
--data 'beginTime=2023-03-01T12:45:00Z' \
--data 'endTime=2023-03-01T12:50:00Z'
The beginTime and endTime query parameters are subject to these rules:
-
If
endTimeis not specified, it defaults to the current time. -
If
beginTimeis not specified, it defaults to 24 hours beforeendTime. -
If
beginTimeis specified, it must be 24 hours or less beforeendTime.
Tail logs
To tail, or get the latest entries in the stored logs for a source, use the
/monitoring/logs/tail endpoint with the source as a parameter.
The first call to the tail endpoint returns log entries from the last 15 seconds. Subsequent calls return log entries in a range that starts from the last returned log entry in the previous result (inclusive) and ends with the latest log entry but one. If calls to the tail endpoint are not frequent enough to match the rate at which the log entries are produced, the result may not include all available log entries.
The format of the log results depends on the source or sources specified in your request. Some
sources return only JSON formatted log entries and some sources return only plaintext log entries.
Some sources, such as am-everything, can return log entries in both formats.
Example request:
$ curl -G \
--request GET 'https://<tenant-env-fqdn>/monitoring/logs/tail' \
--header 'x-api-key: <api-key>' \
--header 'x-api-secret: <api-secret>' \
--data 'source=am-everything'
Example response:
{
  "result": [{
    "payload": "<payload>",
    "timestamp": "<dateTime>",
    "type": "<type>",
    "source": "am-core"
  }, {
    "...": "..."
  }],
  "resultCount": "100",
  "pagedResultsCookie": "<pagedResultsCookie>",
  "totalPagedResultsPolicy": "NONE",
  "totalPagedResults": -1,
  "remainingPagedResults": -1
}
You can specify multiple sources in a single call. Example request:
$ curl -G \
--request GET 'https://<tenant-env-fqdn>/monitoring/logs/tail' \
--header 'x-api-key: <api-key>' \
--header 'x-api-secret: <api-secret>' \
--data 'source=am-access,idm-access,idm-sync,idm-activity'|
To keep tailing, pass the Example request: |
View logs for a specific request
All log events for an external request into Advanced Identity Cloud are assigned the same unique transaction ID.
The x-forgerock-transactionid response header holds the transaction ID:
$ curl \
--request POST 'https://<tenant-env-fqdn>/am/json/realms/root/realms/alpha/authenticate' \
--include \
--header 'Content-Type: application/json' \
--header 'X-OpenAM-Username: bjensen' \
--header 'X-OpenAM-Password: Passw0rd!' \
--header 'Accept-API-Version: resource=2.0, protocol=1.0' \
...
x-forgerock-transactionid: <transaction-id>
...
To filter the logs for a specific transaction ID, add the transactionId parameter to your API request; for example:
$ curl -G \
--request GET 'https://<tenant-env-fqdn>/monitoring/logs' \
--header 'x-api-key: <api-key>' \
--header 'x-api-secret: <api-secret>' \
--data 'source=am-authentication' \
--data 'transactionId=<transaction-id>'
Example response:
{
  "result": [{
    "payload": "<payload>",
    "timestamp": "<dateTime>",
    "type": "application/json",
    "source": "am-authentication"
  }, {
    "...": "..."
  }],
  "resultCount": "8",
  "pagedResultsCookie": null,
  "totalPagedResultsPolicy": "NONE",
  "totalPagedResults": -1,
  "remainingPagedResults": -1
}
Filter log results
Use the _queryFilter parameter to filter log results on any field or combination of
fields in a payload. You can add the parameter to the /monitoring/logs and
/monitoring/logs/tail endpoints.
The benefits of the _queryFilter parameter are:
-
Lets you iteratively refine queries to remove extraneous results and find the specific log entries you are interested in. This is useful when searching logs to debug a production issue.
Use the /monitoring/logsendpoint for iterative searching as the/monitoring/logs/tailendpoint only returns results from the last 15 seconds. -
Lets you tune queries to reduce Advanced Identity Cloud log volume, making integration with external log tools such as Splunk or Elastic Stack more efficient and potentially reducing storage costs.
The _queryFilter parameter takes a URL-encoded filter expression:
$ curl -G \
--request GET 'https://<tenant-env-fqdn>/monitoring/logs' \
--header 'x-api-key: <api-key>' \
--header 'x-api-secret: <api-secret>' \
--data 'source=<source>' \
--data-urlencode '_queryFilter=<filter-expression>'
Learn more about constructing a filter expression in the
filter expression rules for _queryFilter.
Here are some basic examples:
| Example filter expression | Description |
|---|---|
|
Search plaintext results for a particular string. |
|
Search for JSON results containing a particular client IP address |
|
Search for JSON results containing a particular event name |
|
Search for JSON results with a particular timestamp |
|
Search for JSON results with a timestamp that starts with a particular datetime |
|
Search for JSON results containing a particular client IP address and also containing a particular debug level |
|
Search for JSON results where an authentication node type is present |
Filter array items in log results
To filter on array items, do not include an array index in your filter expression.
For example, to search for JSON results where the authentication node type is ScriptedDecisionNode:
-
Wrong:
/payload/entries/0/info/nodeType eq "ScriptedDecisionNode" -
Right:
/payload/entries/info/nodeType eq "ScriptedDecisionNode"
where a log entry for an authentication node looks like this:
    {
      "payload": {
        "_id": "7ae37a4b-f22b-4c5e-8621-2130d5bc603c-9310858",
        "component": "Authentication",
        "entries": [
          {
            "info": {
              "authLevel": "0",
              "displayName": "Using Invite?",
              "nodeId": "15edd2f7-22f1-4f32-bf0a-8ca3f98af850",
              "nodeOutcome": "False",
              "nodeType": "ScriptedDecisionNode",
              "treeName": "Login"
            }
          }
        ],
        "eventName": "AM-NODE-LOGIN-COMPLETED",
        ...
    }
Filter log results between two dates
To filter log results between two dates, use the beginTime and endTime query parameters with
ISO 8601 datetime values:
$ curl -G \
--request GET 'https://<tenant-env-fqdn>/monitoring/logs' \
--header 'x-api-key: <api-key>' \
--header 'x-api-secret: <api-secret>' \
--data 'source=<source>' \
--data 'beginTime=<begin-datetime>' \
--data 'endTime=<end-datetime>' \
--data-urlencode '_queryFilter=<filter-expression>'
For example, to filter log results between two specific dates for a specific user :
$ curl -G \
--request GET 'https://<tenant-env-fqdn>/monitoring/logs' \
--header 'x-api-key: <api-key>' \
--header 'x-api-secret: <api-secret>' \
--data 'source=am-authentication' \
--data 'beginTime=2023-05-24T12:40:00.00Z' \
--data 'endTime=2023-05-24T12:45:00.00Z' \
--data-urlencode '_queryFilter=/payload/principal eq "user.name@example.com"'
Add response fields
Authentication events
You can use a script to add extra information to log entries for authentication events. Learn more in Add information to authentication audit log entries.
Identity object events
You can configure audit log results to include additional identity object events. For example, you may want to log the before and after values of specific activities, such as changes to a user’s last name or email address.
To include additional identity object event fields, add them to the includeIf property in the audit configuration. Make these changes in your development environment and then promote them.
| By default, Advanced Identity Cloud audits identity object event fields that are safe to log. When adding audit event fields, be mindful of the type of information that you intend to expose in the logs. For example, you may need to keep personally identifiable information (PII) out of the logs. |
Add identity object event fields to audit logging
-
Get the current audit configuration.
Example request:
$ curl \
--request GET 'https://<tenant-env-fqdn>/openidm/config/audit' \
--header 'Authorization: Bearer <access-token>' \
--header 'Content-Type: application/json'
Learn more in the IDM REST API reference.
Show response
{ "_id": "audit", "auditServiceConfig": { "availableAuditEventHandlers": [ "org.forgerock.audit.handlers.csv.CsvAuditEventHandler", "org.forgerock.audit.handlers.elasticsearch.ElasticsearchAuditEventHandler", "org.forgerock.audit.handlers.jms.JmsAuditEventHandler", "org.forgerock.audit.handlers.json.JsonAuditEventHandler", "org.forgerock.audit.handlers.json.stdout.JsonStdoutAuditEventHandler", "org.forgerock.openidm.audit.impl.RepositoryAuditEventHandler", "org.forgerock.openidm.audit.impl.RouterAuditEventHandler", "org.forgerock.audit.handlers.splunk.SplunkAuditEventHandler", "org.forgerock.audit.handlers.syslog.SyslogAuditEventHandler" ], "caseInsensitiveFields": [ "/access/http/request/headers", "/access/http/response/headers" ], "filterPolicies": { "value": { "excludeIf": [ "/access/http/request/cookies/&{com.iplanet.am.cookie.name}", "/access/http/request/cookies/session-jwt", "/access/http/request/headers/&{com.sun.identity.auth.cookieName}", "/access/http/request/headers/&{com.iplanet.am.cookie.name}", "/access/http/request/headers/accept-encoding", "/access/http/request/headers/accept-language", "/access/http/request/headers/Authorization", "/access/http/request/headers/cache-control", "/access/http/request/headers/connection", "/access/http/request/headers/content-length", "/access/http/request/headers/content-type", "/access/http/request/headers/proxy-authorization", "/access/http/request/headers/X-OpenAM-Password", "/access/http/request/headers/X-OpenIDM-Password", "/access/http/request/queryParameters/access_token", "/access/http/request/queryParameters/IDToken1", "/access/http/request/queryParameters/id_token_hint", "/access/http/request/queryParameters/Login.Token1", "/access/http/request/queryParameters/redirect_uri", "/access/http/request/queryParameters/requester", "/access/http/request/queryParameters/sessionUpgradeSSOTokenId", "/access/http/request/queryParameters/tokenId", "/access/http/response/headers/Authorization", "/access/http/response/headers/Set-Cookie", "/access/http/response/headers/X-OpenIDM-Password" ], "includeIf": [] } }, "handlerForQueries": "json" }, "eventHandlers": [ { "class": "org.forgerock.audit.handlers.json.JsonAuditEventHandler", "config": { "buffering": { "maxSize": 100000, "writeInterval": "100 millis" }, "logDirectory": "&{idm.data.dir}/audit", "name": "json", "topics": [ "access", "activity", "sync", "authentication", "config" ] } }, { "class": "org.forgerock.openidm.audit.impl.RepositoryAuditEventHandler", "config": { "enabled": false, "name": "repo", "topics": [ "access", "activity", "sync", "authentication", "config" ] } } ], "eventTopics": { "activity": { "filter": { "actions": [ "create", "update", "delete", "patch", "action" ] }, "passwordFields": [ "password" ], "watchedFields": [] }, "config": { "filter": { "actions": [ "create", "update", "delete", "patch", "action" ] } } }, "exceptionFormatter": { "file": "bin/defaults/script/audit/stacktraceFormatter.js", "type": "text/javascript" } } -
Make a backup of the audit configuration.
-
Update the
includeIfproperty (underfilterPolicies) in the audit configuration to include the fields you want to add.The following example updates the audit configuration to include before and after values of a user’s last name and email address:
$ curl \
--request PUT 'https://<tenant-env-fqdn>/openidm/config/audit' \
--header 'Authorization: Bearer <access-token>' \
--header 'Content-Type: application/json' \
--data-raw '
{
  "_id": "audit",
  ...
   "filterPolicies": {
     "value": {
       "excludeIf": [
          "/access/http/request/cookies/&{com.iplanet.am.cookie.name}",
          "/access/http/request/cookies/session-jwt",
        ...
        ],
        "includeIf": [
           "/activity/before/sn", (1)
           "/activity/after/sn", (2)
           "/activity/before/mail", (3)
           "/activity/after/mail" (4)
        ]
      }
   },
  ...
}'
Fields added:
1 Logs the user’s last name before change. 2 Logs the user’s last name after change. 3 Logs the user’s email address before change. 4 Logs user’s email address after change.
Once updated, idm-activity and idm-everything audit logs will include the fields you have added.
For example, the following entry in a sample idm-activity log shows before and after values for changes to a user’s last name and email address from "Brown" to "Granger":
{
    "payload": {
        "message": "",
        "runAs": "bd220328-9762-458b-b05a-982ac3c7fc54",
        "transactionId": "1630683558570-abec9e9304c84ad368ba-28676/0",
        "before": {
            "sn": "Brown",
            "mail": "jbrown@example.com"
        },
        "operation": "PATCH",
        "passwordChanged": false,
        "_id": "52f7cea0-285d-4ef6-bda3-83256dda71c5-1300250",
        "revision": "00000000412cae36",
        "eventName": "activity",
        "userId": "bd220328-9762-458b-b05a-982ac3c7fc54",
        "status": "SUCCESS",
        "objectId": "managed/alpha_user/ce7492dc-8759-47b3-b4ee-eda8d4de4ab1",
        "timestamp": "2023-09-03T15:39:42.862Z",
        "changedFields": [],
        "after": {
            "sn": "Granger",
            "mail": "jgranger@example.com"
        }
    "type": "application/json",
    "timestamp": "<date-time>"
}|
You can also exclude fields from audit logging by adding them to the For example, to prevent audit logs from showing target object attributes for synchronization and reconciliation events, add the following entries to the |
Rate limiting
Logs endpoint
To reduce unwanted stresses on the system, Advanced Identity Cloud limits the number of requests you can make
to the /monitoring/logs endpoint in a certain timeframe:
-
The page-size limit is 1000 logs per request.
Ping Identity recommends you do not override the page-size limit with a greater value as it could increase request throttling and reduce the overall number of logs you can request per minute. -
The request limit is 60 requests per minute.
-
The theoretical upper rate limit is therefore 60,000 logs per minute.
These limits apply per environment, so your development, staging, and production environments each have their own quota.
The following rate limit notification response headers are sent for each request to the
/monitoring/logs endpoint:
- X-RateLimit-Limit
-
The maximum number of requests allowed in the current rate limit window.
- X-RateLimit-Remaining
-
The number of requests remaining in the current rate limit window.
- X-RateLimit-Reset
-
The time in seconds since Jan. 1, 1970, UTC when the rate limit window resets.
Logs tail endpoint
The /monitoring/logs/tail endpoint has the same limits and response headers as the
/monitoring/logs endpoint described above. However, the endpoint also has a limit of 20,000
lines per request, which supersedes the page-size limit of 1000 logs per request.
Because calls to the /monitoring/logs/tail endpoint do not always fetch all logs, use this
endpoint for debugging only. Use the /monitoring/logs endpoint when you need to fetch all logs.
Troubleshooting
Update audit configuration
Sometimes a log source is shown in the available sources in Advanced Identity Cloud but returns no results when you query the Advanced Identity Cloud logging endpoints. In this case, check the underlying IDM audit configuration to ensure that the corresponding audit topic for the source is enabled.
The following example shows how to enable the recon event handler so that reconciliation events
appear in the audit logs:
-
Get the current audit configuration.
Example request:
$ curl \
--request GET 'https://<tenant-env-fqdn>/openidm/config/audit' \
--header 'Authorization: Bearer <access-token>' \
--header 'Content-Type: application/json'
Learn more in IDM REST API reference.
-
Update the audit configuration as needed. The following example enables the reconciliation audit event handler.
Example update:
$ curl \
--request PUT 'https://<tenant-env-fqdn>/openidm/config/audit' \
--header 'Authorization: Bearer <access-token>' \
--header 'Content-Type: application/json' \
--data-raw '
{
  "_id": "audit",
...
  "eventHandlers": [
    {
      "class": "org.forgerock.audit.handlers.json.stdout.JsonStdoutAuditEventHandler",
      "config": {
        "elasticsearchCompatible": false,
        "enabled": true,
        "name": "json",
        "topics": [
          "access",
          "activity",
          "sync",
          "authentication",
          "config",
          "recon"
        ]
      }
    },
    {
      "class": "org.forgerock.openidm.audit.impl.RepositoryAuditEventHandler",
      "config": {
        "enabled": false,
        "name": "repo",
        "topics": [
          "access",
          "activity",
          "sync",
          "authentication",
          "config",
          "recon"
        ]
      }
    }
  ],
...
}'
Include large log entries in filter log results
Some Advanced Identity Cloud log output is too large to be stored as a single log entry, so is stored across two log entries instead. When this happens, any log output in JSON format is stored as two plaintext log entries rather than a single JSON log entry. Consequently, any filter expression that filters on a specific JSON field will not find any of these plaintext log entries.
To work around this, you can combine a specific field filter with a plaintext filter. For example, if you were searching for log results containing a particular transaction ID using the filter expression:
/payload/transactionId co "<transaction-id>"
you could add a plaintext filter as follows:
/payload/transactionId co "<transaction-id>" or /payload co "<transaction-id>"
to include both JSON and plaintext log entries in the log results.
Import cURL commands into Postman
If you use Postman’s import cURL commands feature to convert cURL
commands into Postman requests, you might have problems with the example commands on this page that
use a GET request and include a --data parameter, such as this one:
$ curl -G \
--request GET 'https://<tenant-env-fqdn>/monitoring/logs'
--header 'x-api-key: <api-key>' \
--header 'x-api-secret: <api-secret>' \
--data 'source=am-authentication'
When you import the above command into Postman and run the request, it produces this error:
<html><head>
<meta http-equiv="content-type" content="text/html;charset=utf-8">
<title>400 Bad Request</title>
</head>
<body text=#000000 bgcolor=#ffffff>
<h1>Error: Bad Request</h1>
<h2>Your client has issued a malformed or illegal request.</h2>
<h2></h2>
</body></html>
This occurs because Postman adds the value of --data parameter twice—as a query string but also
incorrectly as a message body. The equivalent incorrect cURL query of the import would be:
curl \
--request GET 'https://<tenant-env-fqdn>/monitoring/logs?source=am-authentication' \
--header 'x-api-key: <api-key>' \
--header 'x-api-secret: <api-secret>' \
--header 'Content-Type: application/x-www-form-urlencoded' \
--data-urlencode 'source=am-authentication'
To resolve, convert any --data parameters into a query string before importing into Postman:
$ curl \
--request 'https://<tenant-env-fqdn>/monitoring/logs?source=am-authentication'
--header 'x-api-key: <api-key>' \
--header 'x-api-secret: <api-secret>'
Email provider
PingOne Advanced Identity Cloud uses email provider configuration to support email-dependent end-user journeys. For example, registration and password reset end-user journeys usually include an email component.
By default, Advanced Identity Cloud configures the email provider with default values to connect to a built-in SMTP server. This lets you quickly create and test email-dependent journeys in your tenant development environment using the ready-to-use email templates. No rate limiting is applied to password reset emails or any emails sent by the built-in SMTP server. This means an attacker can potentially spam a known user account with an infinite number of emails, filling that user’s inbox. In the case of password reset, the spam attack can obscure an actual password reset attempt.
|
In your staging and production tenant environments, you must update the email provider configuration with values to connect to something other than the built-in SMTP server. Additionally, the built-in SMTP server does not support:
|
Setup process
| Email provider configuration changes made in one realm are applied to both realms. |
-
In your tenant development environment, create and test a journey that uses an email node. By default, the email provider uses the built-in SMTP server to test the email node.
-
When you’re satisfied with your test results:
-
Edit the email provider configuration to use your own external email provider.
-
Verify that your email templates work with the external provider.
-
-
Promote your configuration changes to your tenant staging environment.
-
Optionally, you can revert the email provider to use the built-in SMTP server for testing purposes. Be sure to reconfigure the email provider to use your own external service before promoting configuration changes to your tenant staging environment.
|
Do not use the email provider with the built-in SMTP server in a tenant production environment. Advanced Identity Cloud provides this ready-to-use server for testing purposes only. |
Email service configuration types
Advanced Identity Cloud supports two email service configuration types:
-
SMTP - Email service that uses the Simple Mail Transfer Protocol. Can be configured using the UI or API.
-
MS Graph API - Email service that uses the MS Graph API
sendMailendpoint. Can only be configured using the API.
International email addresses
To use international email addresses, you must:
-
Use SMTP as the provider type.
-
The SMTP provider must support international email addresses.
-
Configure
mail.mime.allowutf8=trueusing the REST API or the UI.Learn more in
smtpPropertiessub-properties.
MS Graph API requirements
Use of the MS Graph API email client requires a properly configured Microsoft Azure tenant. The steps for configuring an Azure tenant should be used as an outline, as the specific options, menus, and features may have changed.
Configure Azure for MS Graph API email client
-
Navigate to Azure Active Directory | App registrations.
-
Create the Advanced Identity Cloud client application:
-
From the menu bar, click + New Registration.
-
On the Register an application page, enter the application Name, such as
my-email-client. -
For Supported account types, select the applicable option for your organization.
-
Click Register.
-
On the my-email-client page, from the main Essentials area, record the Application (client) ID.
This is the value for clientIdin theauthsettings of the email configuration. Learn more inoauth2properties.
-
-
Add a client secret:
-
On the my-email-client page, in the main Essentials area, click Add a certificate or secret.
Show Me
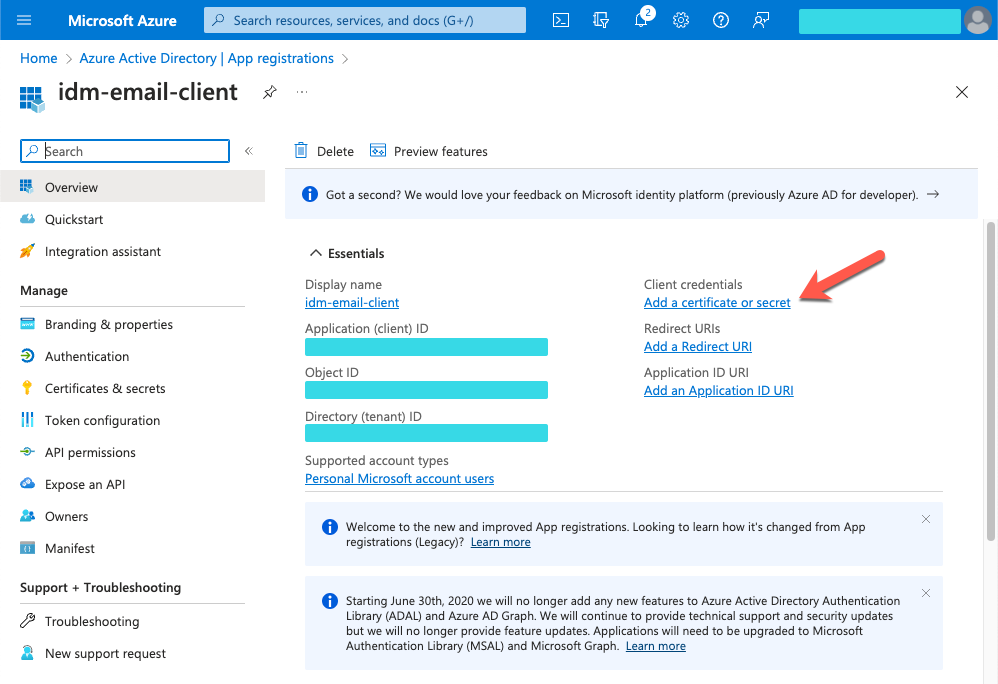
-
On the Certificates & secrets page, select the Client secrets tab, and click + New client secret.
Show Me
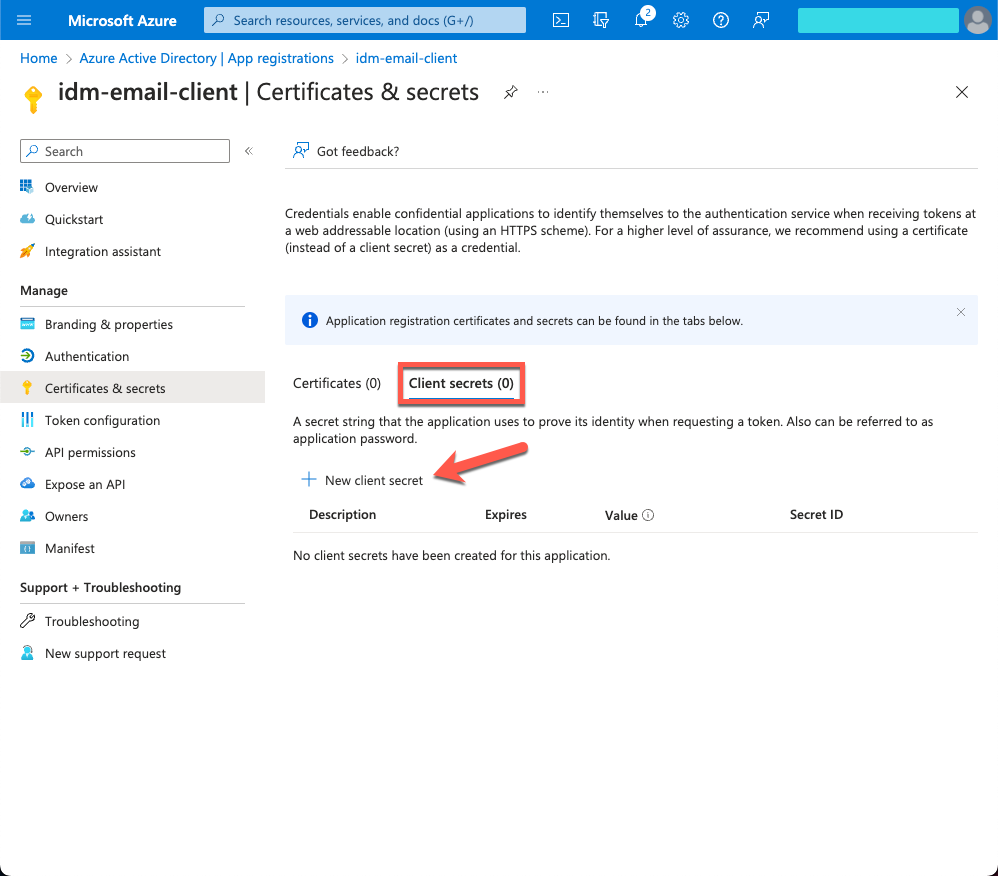
-
In the Add a client secret window, enter the details, and click Add.
-
Copy the Value and Secret ID to a secure place before leaving the Certificates & secrets page.
Use the secret Value for clientSecretin theauthsettings of the email configuration. Learn more inoauth2properties.
-
-
Add API permissions:
-
From the side menu, click API permissions.
-
On the API permissions page, click + Add a permission.
-
In the Request API permissions windows, select the Microsft APIs tab, and click Microsoft Graph.
-
In the What type of permissions… area, click Application permissions.
-
In the Select permissions search bar, type
send. -
Expand the Mail node, and select Mail.Send.
-
Click Add permissions.
Show Me
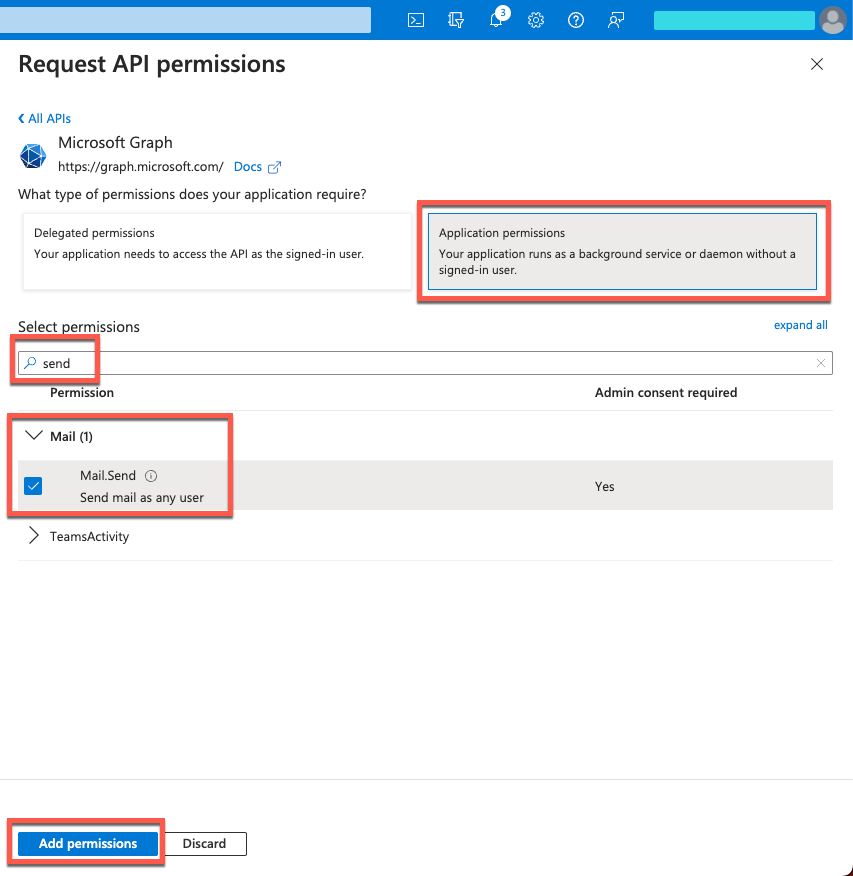
-
Configure the email provider
| Email provider configuration changes made in one realm are applied to both realms. |
In your staging and production tenant environments, configure the email provider to use your own external service:
-
For SMTP, you can use the UI or API.
-
For MS Graph API, you can only use the API.
|
Using the UI
-
In the Advanced Identity Cloud admin UI, go to Email > Provider.
-
On the Email Provider page, enable Use my own email provider.
-
Enter details in the following fields:
From Address
Email address of the organization or individual sending the email.
Example:
mycompany@example.com.Not set by default.
Although
fromis optional in the email configuration, the email service requires this property to send email. If you do not specify afromaddress in the email configuration, you must provide one in another way, for example:-
From an email template.
-
As a parameter in the email service request (
fromor_from).
From Name
Name of sending organization.
Host
Hostname or IP address of your SMTP server.
When no hostname is specified, Advanced Identity Cloud uses the built-in SMTP server.
Port
Port number of your SMTP server.
Many SMTP servers require the use of a secure port such as 465 or 587. Many ISPs flag email from port 25 as spam.
Default value is
587.Username
Username for your SMTP server account.
Password
Password for your SMTP server account.
-
-
Click Show advanced settings, and edit the options and fields:
Socket Connection Timeout (ms)
Elapsed time before Advanced Identity Cloud times out due to unsuccessful socket connection to the SMTP server. A setting of
0disables this timeout.The default is
300000ms (5 minutes).Socket Write Timeout (ms)
Elapsed time before Advanced Identity Cloud times out because client can’t write to the SMTP server. A setting of
0disables this timeout.The default is
300000(5 minutes).Socket Timeout (ms)
Elapsed time before Advanced Identity Cloud times out due to inactivity. A setting of
0disables this timeout.The default is
300000(5 minutes).Use STARTTLS
-
If enabled, and if the SMTP server supports the STARTTLS command, then Advanced Identity Cloud switches to a TLS-protected connection before issuing any login commands.
-
If the SMTP server does not support STARTTLS, the connection continues without the use of TLS.
Enabled by default.
Use SSL
If enabled, Advanced Identity Cloud uses SSL to connect to the SMTP server.
Disabled by default.
Allow UTF-8
If enabled, adds support for UTF-8 (Non-ASCII) characters in the local part of email addresses (everything before the
@character).Disabled by default.
Do not set this property unless your SMTP provider supports UTF-8 characters. Learn more in International email addresses.
-
-
To test your configuration, click Send Test Email.
-
In the Send Test Email dialog box, enter your own email address.
-
Click Send.
If the test is successful, you’ll get a test email in your email inbox.
-
-
To save the email provider configuration, click Save.
Using the API
You can edit the email service over REST at the openidm/config/external.email endpoint. The following example submits an email configuration over REST:
curl \
--header "Authorization: Bearer <token>" \
--header "Accept-API-Version: resource=1.0" \
--header "Content-Type: application/json" \
--request PUT \
--data '{
    "host" : "smtp.gmail.com",
    "port" : 587,
    "debug" : false,
    "auth" : {
        "enable" : true,
        "username" : "admin",
        "password" : "Passw0rd"
    },
    "from" : "admin@example.com",
    "timeout" : 300000,
    "writetimeout" : 300000,
    "connectiontimeout" : 300000,
    "starttls" : {
        "enable" : true
    },
    "ssl" : {
        "enable" : false
    },
    "smtpProperties" : [
        "mail.smtp.ssl.protocols=TLSv1.2",
        "mail.smtps.ssl.protocols=TLSv1.2",
        "mail.mime.allowutf8=true"
    ],
    "threadPoolSize" : 20
}' \
"https://<tenant-env-fqdn>/openidm/config/external.email"
Sample email configuration
This sample email configuration sets up the email provider:
-
SMTP
-
MS Graph API
{
    "host" : "smtp.gmail.com",
    "port" : 587,
    "debug" : false,
    "auth" : {
        "enable" : true,
        "username" : "xxxxxxxx",
        "password" : "xxxxxxxx"
    },
    "timeout" : 300000,
    "writetimeout" : 300000,
    "connectiontimeout" : 300000,
    "starttls" : {
        "enable" : true
    },
    "ssl" : {
        "enable" : false
    },
    "smtpProperties" : [
        "mail.smtp.ssl.protocols=TLSv1.2",
        "mail.smtps.ssl.protocols=TLSv1.2",
        "mail.mime.allowutf8=true"
    ],
    "threadPoolSize" : 20
}
{
"type" : "msgraph",
"mailEndpoint" : "https://graph.microsoft.com/v1.0/users/example@myTenant.onmicrosoft.com/sendMail",
"from" : "example@myTenant.onmicrosoft.com",
"auth" : {
"enable" : true,
"type" : "oauth2",
"clientId" : "clientId",
"clientSecret" : "clientSecret",
"tokenEndpoint" : "https://login.microsoftonline.com/myTenant.onmicrosoft.com/oauth2/v2.0/token",
"scope" : [
"https://graph.microsoft.com/.default"
]
},
"timeout" : 300000,
"writetimeout" : 300000,
"connectiontimeout" : 300000,
"threadPoolSize" : 20
}Email provider configuration properties
The msgraph type also supports the External REST configuration properties.
| Property | Description | Required? / Type Support |
|---|---|---|
|
The email service configuration type, |
No |
|
The URI for the MS Graph API Typical format: |
Yes Only for |
|
The hostname or IP address of the SMTP server. |
Yes Only for |
|
SMTP server port number, such as 25, 465, or 587. Many SMTP servers require the use of a secure port such as 465 or 587. Many ISPs flag email from port 25 as spam. |
Yes Only for |
|
When set to |
No Only for |
|
Specifies a default From: address which displays when users receive emails from Advanced Identity Cloud. Although
|
No |
|
Contains authentication detail sub-properties. Learn more about authentication sub-properties. |
Yes Required sub-properties vary based on |
|
If |
No Only for |
|
Set |
No Only for |
|
SMTP options. Learn more about SMTP sub-properties. |
No Only for |
|
Emails are sent in separate threads managed by a thread pool. This property sets the number of concurrent emails that can be handled at a specific time. The default thread pool size (if none is specified) is |
No |
|
The socket connection timeout, in milliseconds. The default connection timeout (if none is specified) is |
No |
|
The socket read timeout, in milliseconds. The default read timeout (if none is specified) is |
No Only for |
|
The socket write timeout, in milliseconds. The default write timeout (if none is specified) is |
No Only for |
| Property | Description | Required? / Type Support |
|---|---|---|
|
Whether you need login credentials to connect to the server/API. If |
Yes |
|
Account used to connect to the server/API. |
No |
|
Password used to connect to the server/API. |
No |
|
Authentication type used to connect to the server/API:
|
Yes |
| Property | Description | Required? / Type Support |
|---|---|---|
The following properties are only applicable when the |
||
|
clientId used to request an access token from the token endpoint. Obtained during Azure application creation. |
Yes |
|
clientSecret used to request an access token from the token endpoint. Obtained during Azure application creation. |
Yes |
|
OAuth2 token endpoint. Typical format: |
Yes |
|
Requested OAuth2 scopes in a JSON array of strings. |
Yes |
|
Scope delimiter to use. Defaults to space. |
No |
|
The only supported grant type is |
No |
| Property | Description | Required? / Type Support |
||
|---|---|---|---|---|
|
The enabled SMTP SSL connection protocols. Protocols are specified as a whitespace-separated list. The default protocol is TLSv1.2. |
No Only for |
||
|
The enabled SMTPS SSL connection protocols. Protocols are specified as a whitespace-separated list. The default protocol is TLSv1.2. |
No Only for |
||
|
Adds support for UTF-8 (Non-ASCII) characters in the local part of email addresses (everything before the
|
No Only for |
Revert the email provider to use the built-in SMTP server
| Email provider configuration changes made in one realm are applied to both realms. |
If you need to revert the email provider to use the built-in SMTP server:
-
In the Advanced Identity Cloud admin UI, go to Email > Provider.
-
On the Email Provider page, disable Use my own email provider.
-
Click Save.
|
The built-in SMTP server does not support:
|
Email templates
PingOne Advanced Identity Cloud provides preconfigured email templates for common end-user journeys.
You can customize email templates using Markdown language. Advanced Identity Cloud uses a parser to let you preview your markup.
|
Email templates utilize Handlebar expressions to reference
object data dynamically. For example, to reference the |
Create a new email template
-
In the Advanced Identity Cloud admin UI, go to Email > Templates.
-
On the Email Templates page, click + New Template.
-
Provide the following details:
-
Template Name: Display name for the template.
-
From Address: Enter an email address for the group or individual sending the email.
-
From Name: Enter a name for the group or individual sending the email.
-
Description: A brief description of the template.
-
-
Click Save. The new email opens in the email editor.
-
Learn more in Edit an email template.
Edit an email template
-
In the Advanced Identity Cloud admin UI, go to Email > Templates.
-
On the Email Templates page, click a template name to open the email editor.
-
To change the wording in the email template, edit the Markdown text in the left window on the page. You can also:
-
Add, modify, or delete locales to suit your end-user audience. Learn more in Manage email template locales.
-
Repeat step 3 for each template locale.
-
To edit the template styles, click Styles, and edit the CSS style code.
-
To view available variables that you can use in the template, click Variables, and view the content on the Available Properties page. Click Done.
-
To edit the template settings, click the More () icon at the top right of the page, and select Settings.
-
Provide the following details:
-
Template Name: Display name for the template.
-
From Address: Enter an email address for the group or individual sending the email.
-
From Name: Enter a name for the group or individual sending the email.
-
Description: Enter a brief description of the template.
-
-
Click Update.
-
Click Save. This saves content changes in all template locales.
Add an image to an email template
-
Upload your image to a hosted service, such as a content delivery network (CDN), so it is available over HTTPS. Local image paths are not permitted.
-
In the Advanced Identity Cloud admin UI, go to Email > Templates.
-
On the Email Templates page, click a template name to open the email editor.
-
Edit the Markdown text to reference your image:
-
To add an image at full size:
For example, the Markdown would look like this for an image hosted at
https://example.com/image.extwhere the alt text isthis is an example image: -
To add an image and resize it in pixels:
 -
To add an image and resize it as a percentage:

-
-
Click Save.
Use HTML formatting in an email template
Although you can’t see HTML formatting in the editor, you can use inline HTML to format your email. Learn more in Markdown Syntax: Inline HTML.
-
In the Advanced Identity Cloud admin UI, go to Email > Templates.
-
On the Email Templates page, click a template name to open the email editor.
-
Edit the Markdown text:
-
Specify HTML tags to format your content. For example:
<h1>Reset Password</h1> -
To add a table, include both the
<thead>and<tbody>tags; otherwise the table will not convert correctly to Markdown when saved. For example:<table> <thead> <tr> <th>Header 1</th> <th>Header 2</th> <th>Header 3</th> </tr> </thead> <tbody> <tr> <td>Cell Text 1</td> <td>Cell Text 2</td> <td>Cell Text 3</td> </tr> </tbody> </table>
-
-
Click Styles, and add CSS styles for the tag to format it as required. For example:
h1 { font-family: Arial, Helvetica, sans-serif; color: #f96700; background-color: #032b75; font-size: 25px; padding: 10px; } -
Click Save.
After saving your changes, the inline HTML tags are converted to Markdown, but the CSS styles for the tags persist. The CSS styles apply to all locales.
| Alternatively, you can click Advanced Editor and modify the template in HTML; however, if you swap to the Advanced Editor, you cannot change back to Markdown. |
Use ESV variables in an email template
You can use ESV variables in email templates to dynamically present different text, images, or links depending on the specific tenant environment.
For background on ESVs in PingOne Advanced Identity Cloud, learn more in ESVs.
| To add ESV variables to an email template, you must use the Advanced Editor. Once you have swapped to the Advanced Editor, you cannot change back to Markdown. |
Add ESV variables to an email template
-
Create the ESV variables to use in the email template:
-
Create the variables using the Advanced Identity Cloud admin UI or variables APIs.
-
Restart Advanced Identity Cloud services by applying updates in the Advanced Identity Cloud admin UI or using the restart API.
-
-
In the Advanced Identity Cloud admin UI, go to Email > Templates.
-
On the Email Templates page, click a template name to open the email editor.
-
Click Advanced Editor.
-
Add the placeholder for one or more ESV variables. For example:
&{esv.my.variable} -
Click Save.
-
In step 1, add these two ESV variables:
-
esv-test-link, with a value ofhttps://test.example.com -
esv-test-image, with a value ofhttps://example.com/image.ext
-
-
In step 5, add the link and image:
-
Add the link using the ESV placeholder, where the link text is the URL, for example:
<p>For more information, go to our website: &{esv.test.link}</p>You can also add the link using the <a>tag with thehrefattribute; this is useful if you want to display different link text. -
Add the image using the ESV placeholder, for example:
<p>
<img src="&{esv.test.image}">
</p>
The preview in the left window shows the ESV placeholder and an image placeholder rather than the actual link and image as these are only resolved when the email is sent.
-
Manage email template locales
The locale selector in the top left of the email template editor displays the current template
locale in the format Locale: code, where code is a
ISO-639-1 language codes (for example en or de).
-
To switch locale:
-
Click Locale: code.
-
Select a locale.
-
-
To add a locale:
-
Click Locale: code.
-
Click Add Locale to open the Add Locale modal window.
-
Enter a ISO-639-1 language code in the Code field.
-
(Optional) Select Make Default to make the new locale the default for this template.
-
Click Save to close the modal window and add the new locale to the template, populated with a copy of the content from the default locale. The changes apply immediately without saving the main template.
-
-
To modify a locale:
-
Click Locale: code.
-
Click the locale’s edit icon () to open the Edit Locale modal window.
-
To change the locale, enter a ISO-639-1 language code in the Code field.
-
To make the locale the default locale for the template, Select Make Default.
-
Click Save to close the modal window. Any changes apply immediately without saving the main template.
-
-
To delete a locale:
-
Click Locale: code.
-
Click the locale’s edit icon () to open the Edit Locale modal window.
-
Click Delete Locale to delete the locale and its content. The deletion applies immediately without saving the main template.
-
Delete an email template
|
Deleting an email template cannot be undone. |
-
In the Advanced Identity Cloud admin UI, go to Email > Templates.
-
On the Email Templates page, click the More () icon adjacent to any template.
-
Select Delete.
-
In the dialog box, click Delete.
Manage email templates
-
In the Advanced Identity Cloud admin UI, go to Email > Templates.
-
On the Email Templates page, click the More () icon adjacent to any template, and do any of the following:
-
To disable a template, click Deactivate.
-
To enable a template, click Activate.
-
To duplicate a template, click Duplicate.
-
In the Duplicate Template window, enter the following details:
-
Template Name: Display name for the template.
-
From Address: Enter an email address for the group or individual sending the email.
-
From Name: Enter a name for the group or individual sending the email.
-
Description: A brief description of the template.
-
-
Click Save.
-
-
Configure cross-origin resource sharing
Cross-origin resource sharing (CORS) lets user agents make cross-domain server requests. In PingOne Advanced Identity Cloud, you can configure CORS to allow browsers from trusted domains to access Advanced Identity Cloud protected resources. For example, you might want a custom web application running on your own domain to get an end-user’s profile information using the Advanced Identity Cloud REST API.
By default, CORS is configured to let the ForgeRock SDKs access Advanced Identity Cloud. You can add additional CORS configurations that let other APIs or SDKs access Advanced Identity Cloud.
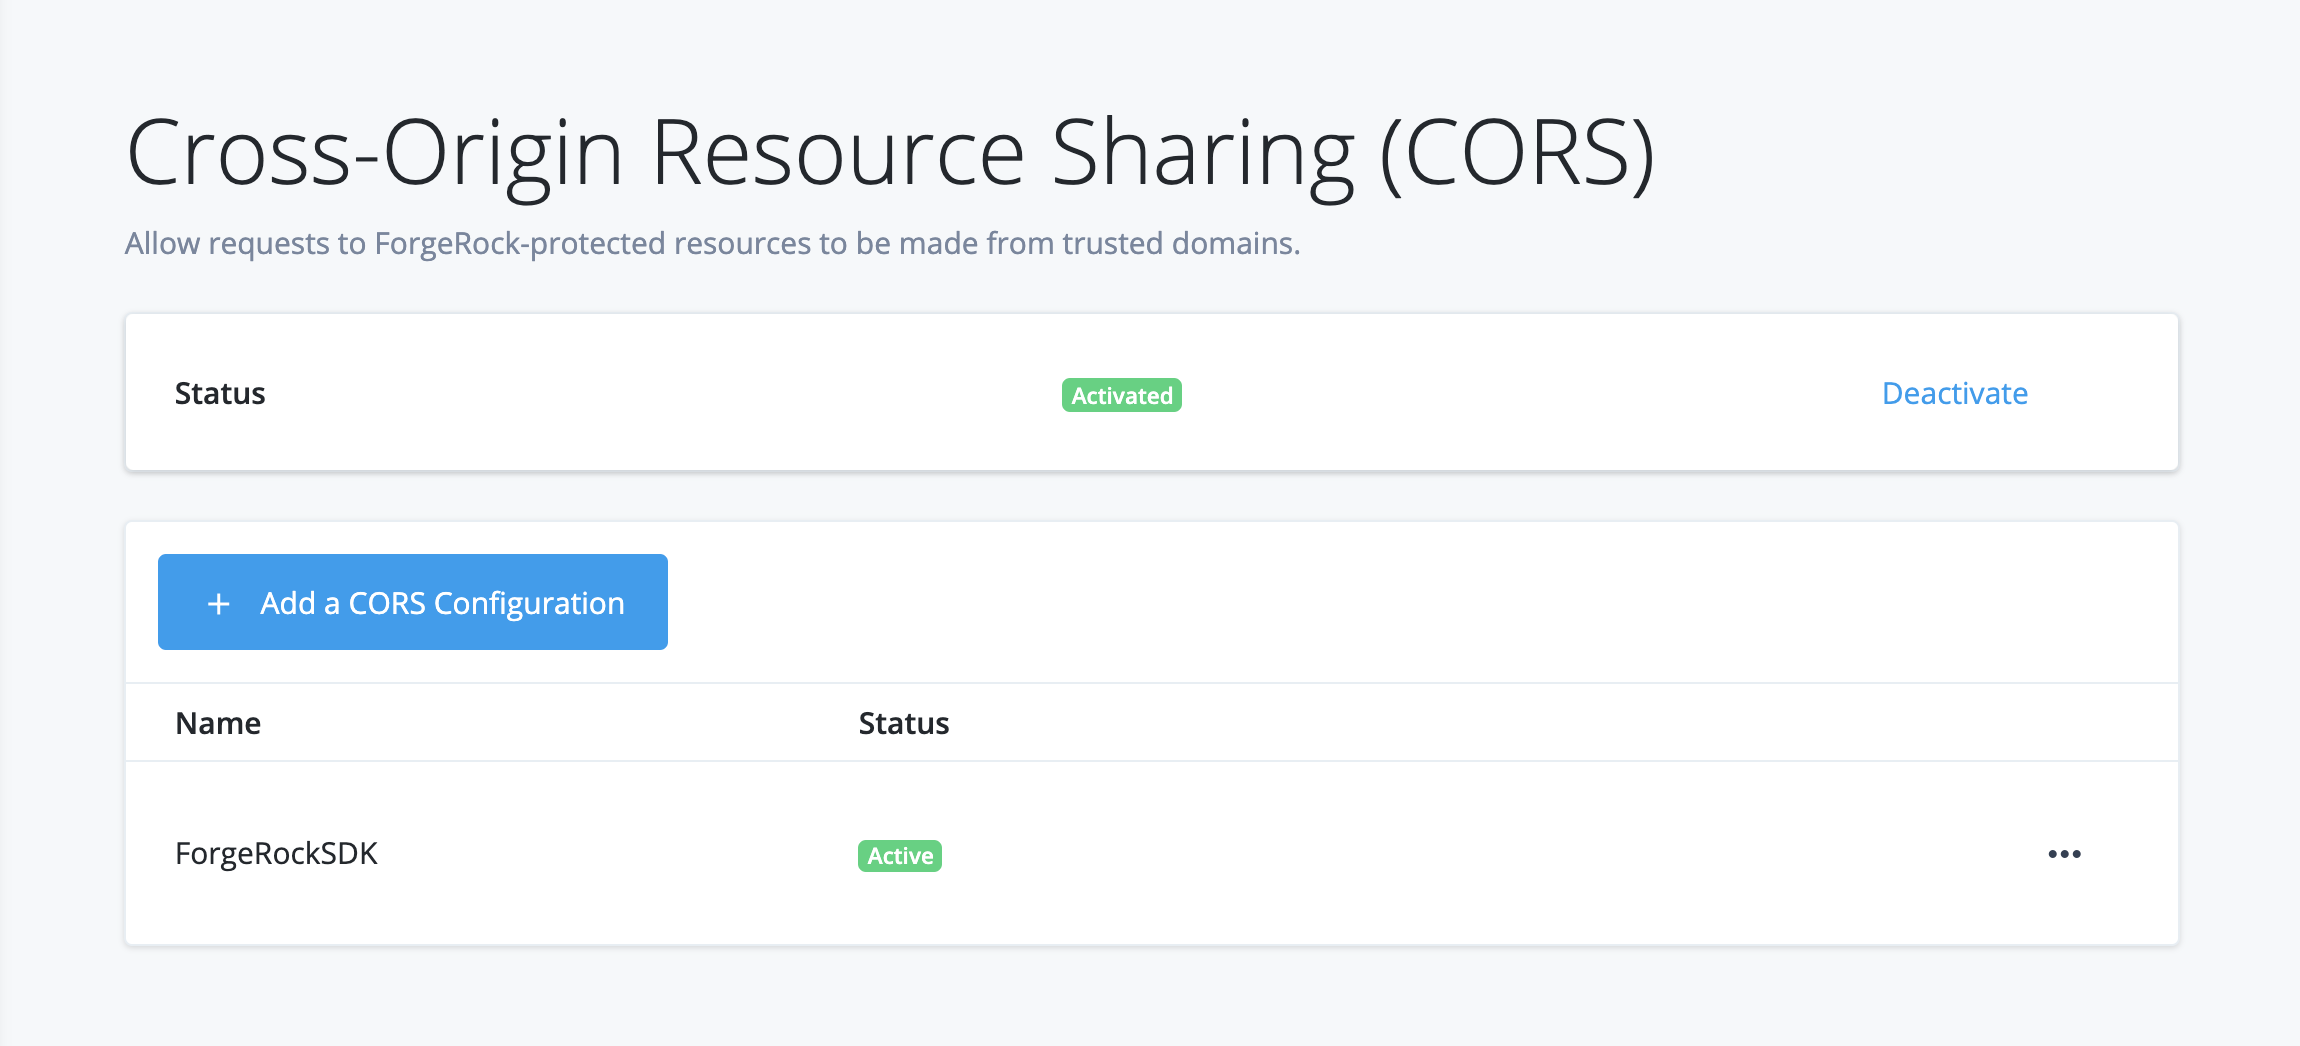
Configure CORS using ESVs
-
In your development environment:
-
Use the Advanced Identity Cloud admin UI to set up one or more CORS configurations for your environment:
You can create as many configurations as you need. The active configurations are combined to form the entire set of rules for resource sharing in your environment.
-
For each CORS configuration:
-
If the
acceptedOriginsfield contains hard-coded configuration, use the Advanced Identity Cloud REST API to replace the value of theacceptedOriginsfield with an ESV array. Learn more in the Configure CORS section of Manage configuration placeholders using the API. -
If the
acceptedOriginsfield already contains an ESV array, no action is needed.
-
-
Check that the CORS configuration is working as expected in your development environment.
-
-
In your staging environment:
-
If you created any new ESV arrays in step 1b, create corresponding ESVs with the same names in your staging environment.
-
Run a promotion to move the configuration change from your development environment to your staging environment. Refer to:
-
Check that the CORS configuration is working as expected in your staging environment.
-
-
In your production environment:
-
If you created any new ESV arrays in step 1b, create corresponding ESVs with the same names in your production environment.
-
Run a promotion to move the configuration change from your staging environment to your production environment.
-
Check that the CORS configuration is working as expected in your production environment.
-
Create a new CORS configuration
-
In your development environment, open the TENANT menu (upper right), and choose Tenant settings.
-
On the Tenant Settings page, click Global Settings > Cross-Origin Resource Sharing (CORS).
-
Click + New CORS Configuration.
-
On the New CORS Configuration dialog box, choose a configuration type.
ForgeRock SDK
Choose this option when you want to work with the ForgeRock SDK.
Identity Cloud pre-configures accepted origins, methods, and headers for you. You can modify the configuration in the next step.Custom
Choose this option when you want to use your own SDK, APIs, or other software components.
-
Click Next.
-
In the New CORS Configuration dialog box, provide CORS details.
Name
Enter a display name. Use only numerals, letters, and hyphens (-).
Accepted Origins
Required. Accepted origins that will be allowed to make requests to ForgeRock from your application in a cross-origin context. Wildcards are not supported. Each value should be identical to the origin of the CORS request.
Example:https://myapp.example.com:443Accepted Methods
Defaults are
POSTandGET. The set of (non-simple) accepted HTTP methods allowed when making CORS requests to ForgeRock. Use only uppercase characters.Accepted Headers (optional)
Accepted header names when making requests from the above specified trusted domains.
Header names are case-insensitive. By default, the following simple headers are explicitly accepted:Cache-Control,Content-Language,ExpiresLast-Modified,Pragma.
If you don’t specify values for this element, then the presence of any header in the CORS request, other than the simple headers listed above, will cause the request to be rejected. -
(Optional) Click Show advanced settings to display further CORS configuration settings:
Exposed Headers (optional)
Add the response header names that ForgeRock returns.
The header names are case-insensitive. User agents can make use of any headers that are listed in this property, as well as these simple response headers:Cache-Control,Content-Language,Expires,Last-Modified,Pragma, andContent-Type. User agents must filter out all other response headers.Enable Caching
Max age is the maximum length of time, in seconds, that the browser is allowed to cache the pre-flight response. The value is included in pre-flight responses, in the Access-Control-Max-Age header.
Allow Credentials
Enable this property if you send Authorization headers as part of the CORS requests, or need to include information in cookies when making requests.
When enabled, AM sets the Access-Control-Allow-Credentials: true header.
-
Click Save CORS Configuration.
Activate or deactivate a CORS configuration
-
To activate or deactivate all CORS configurations:
-
In your development environment, open the TENANT menu (upper right), and choose Tenant settings.
-
On the Tenant Settings page, click Global Settings > Cross-Origin Resource Sharing (CORS).
-
On the CORS Configurations page, in the upper right side, click Activate or Deactivate.
-
-
To deactivate an individual CORS configuration:
-
In your development environment, open the TENANT menu (upper right), and choose Tenant settings.
-
On the Tenant Settings page, click Global Settings > Cross-Origin Resource Sharing (CORS).
-
On the CORS Configurations page, find the name of the configuration you want to deactivate.
-
Click its More () menu, and choose Deactivate.
-
Edit a CORS configuration
-
In your development environment, open the TENANT menu (upper right), and choose Tenant settings.
-
On the Tenant Settings page, click Global Settings > Cross-Origin Resource Sharing (CORS).
-
On the CORS Configurations page, find the name of the configuration you want to edit.
-
Click its More () menu, and choose Edit.
TLS, secrets, signing, trust, and encryption
PingOne Advanced Identity Cloud was built with security in mind:
-
Incoming network traffic is always encrypted over TLS.
-
Secrets — for example, credentials to connect to external services—can be specified in your developer, staging, and production environments.
-
Keys and certificates are used to generate, sign, validate, and encrypt tokens, such as SAML 2.0 assertions and client-based access tokens.
-
Incoming SAML 2.0 assertions require trust relationships with the SAML 2.0 providers.
-
Advanced Identity Cloud data is encrypted at rest.
This page describes the default implementations for each of these security factors. It also describes customization options, if they’re available.
TLS encryption
By default, your Advanced Identity Cloud tenant uses a Google-managed SSL certificate for TLS encryption.
If you prefer, Advanced Identity Cloud lets you use your own, self-managed SSL certificate instead of using the Google-managed SSL certificate.
Learn more about configuring your tenant to use a self-managed certificate in Self-managed SSL certificates.
Secrets
When you configure Advanced Identity Cloud, the secrets you provide in your development environment normally do not change when you promote your environment to staging and production. But, in some situations, you might want the three environments to use different secrets.
For example, you might want Advanced Identity Cloud to log in to an external system, such as an OTP provider. But you need Advanced Identity Cloud to use different credentials depending on whether it’s accessing the OTP provider from the development, staging, or production environment.
Environment secrets and variables (ESVs) let you configure different secrets in your Advanced Identity Cloud development, staging, and production environments. In the preceding example, instead of hard-coding a single set of credentials for the OTP provider in the Advanced Identity Cloud admin UI, you could configure ESVs that hold the credentials. Then, the desired credentials to the OTP provider would be used depending on which Advanced Identity Cloud environment was running.
Learn more in Define and promote ESVs.
Signing keys and certificates
By default, Advanced Identity Cloud generates a set of secret labels in each Advanced Identity Cloud realm. Each secret label corresponds to functionality in Advanced Identity Cloud that requires a signing key or certificate. For a full list of secret labels, learn more in Secret labels.
Advanced Identity Cloud lets you override the generated secret labels. First, create an ESV secret that holds the key or certificate. Then, map the secret in the secret store of the desired realm.
Learn more in Use ESVs for signing and encryption keys.
Trust relationships with SAML 2.0 providers
If your Advanced Identity Cloud tenant has trust relationships with one or more SAML 2.0 providers, the tenant might receive SAML assertions signed by a certificate. The certificate might itself be signed by a certificate authority (CA). For Advanced Identity Cloud to trust this type of SAML assertion, the CA’s public certificate must be installed in Advanced Identity Cloud.
You can add a CA’s public certificate to your Advanced Identity Cloud configuration by submitting a ticket to Backstage Support.
Realm settings
Realms are administrative units that group configurations and identities together so that you can manage different sets of identities and applications within the same PingOne Advanced Identity Cloud tenant.
Each realm is fully self-contained and operates independently of other realms within a tenant; the identities and applications in one realm can’t access those in another realm.
A typical example of realm management is when a company divides its identities into two realms: one for employees and one for customers, each having a distinct set of identities and registered applications.
Manage realm settings
-
In the Advanced Identity Cloud admin UI (upper left), open the Realm menu.
-
Go to Realm Settings > Details.
-
On the Details page:
-
The Status bar indicates whether the realm is Active or Inactive.
-
To take the realm out of service, click Deactivate.
When a realm is deactivated, users and devices contained in the realm will not be able to access its applications. Identity and app information is still registered to your identity platform. -
Name: The realm name is non-configurable.
-
(Optional) DNS Aliases: Alternative display names for the realm’s URL.
-
Use Client-based Sessions: Enable this option to allow signing and encryption of the JWT in the global session service.
-
-
To configure a custom domain name, click Custom Domains. Learn more in Custom domains.
When you’re satisfied with your changes, click Save.
Override realm authentication attributes
It’s useful to override realm authentication attributes when you want to adjust the core authentication properties of a realm. For example, you may want to extend the time limit for responding to an authentication verification email.
Under Native Consoles > Access Management, go to Authentication > Settings.
For detailed property information, learn more in Core authentication attributes.
Alpha and Bravo realms
The Alpha and Bravo realms are the two default realms that are included as part of an PingOne Advanced Identity Cloud tenant. These realms are configurable, unlike the top-level realm that Advanced Identity Cloud configures for tenant administrator identities.
|
Advanced Identity Cloud does not support more than two realms in the same tenant. |
The Alpha and Bravo realms are nearly identical, with the exception of delegated administration.
End-user sign-in
End users access their sign-in page using a URL that specifies the realm they belong to. For example:
-
Alpha realm end users: https://<tenant-env-fqdn>/am/XUI/?realm=alpha&authIndexType=service&authIndexValue=Login
-
Bravo realm end users: https://<tenant-env-fqdn>/am/XUI/?realm=bravo&authIndexType=service&authIndexValue=Login
Tenant administrators cannot authenticate using these realm-specific login URLs, learn more in Tenant administrator sign-in.
Delegated administration
In the Alpha realm, you can set up internal roles for delegated administration using a custom set of privilege attributes.You can then assign those internal roles to users so that Alpha realm users can act as delegated administrators and perform actions on the custom set of attributes specified by the role.
The Bravo realm does not support delegated administration.
Assign internal roles
You can assign the internal roles in two different ways using the Advanced Identity Cloud admin UI:
-
To add an internal role to a user, go to Identities > Manage > Realm - Users. Select a user, then select the Authorization Roles tab, then click + Add Authorization Roles.
-
To add a user to an internal role, go to Identities > Manage > Internal Roles. Select a role, then select the Members tab, then click + Add Members.
In the Bravo realm, while you can set up internal roles for delegated administration, you cannot use them. Also, you cannot add a user to an internal role, and even though it appears possible to add an internal role to a user, this will not correctly link the user to the role. If you attempt this, the user will not be listed in the internal role Members tab.
The following table summarizes these differences:
| Action | Alpha Realm | Bravo Realm |
|---|---|---|
Create internal role for the purposes of delegated administration |
||
Add user to internal role |
||
Add internal role to user |
|
Custom domains
Access PingOne Advanced Identity Cloud through a customer-friendly URL by configuring a custom domain name. For example, replace the default forgerock.io domain with your own company name or brand.
Consider the following points when you customize a domain name:
-
You can set a custom domain name only at the realm level.
-
You can set multiple custom domain names per realm.
-
The Advanced Identity Cloud admin UI continues to display the default tenant environment URL.
-
Don’t use your top-level domain name.
-
Wrong:
mycompany.com -
Right:
id.mycompany.com
-
-
Changing your custom domain name affects your end-user UIs and REST APIs.
Set up a custom domain in Advanced Identity Cloud
Configure a custom domain using the UI
-
Choose one of these options:
-
If your custom domain relies on public DNS:
-
(Optional) Create a self-managed SSL certificate for your custom domain.
-
-
If your custom domain relies on private DNS or you route your HTTP traffic through a WAF service:
-
Submit a Backstage Support ticket to deactivate CNAME record verification. Learn more in Deactivate CNAME record verification for your custom domain.
-
Create a self-managed SSL certificate for your custom domain.
-
-
-
In the Advanced Identity Cloud admin UI, go to Realm > Realm Settings > Custom Domain.
-
Click + Add a Custom Domain.
-
In the Add a Custom Domain dialog box, enter your domain name, then click Next.
The domain name must be unique, and must contain at least one period (dot).
Example:id.mycompany.com. -
Choose one of these options:
-
If your custom domain relies on public DNS:
-
In the Verify Domain Name Ownership dialog box, Advanced Identity Cloud provides the Host and Data information that you’ll use in the next step to prove that you own the domain you’ve named.
-
Create a CNAME record with your domain name registrar.
-
Return to the Verify the Domain Ownership dialog box, and click Verify.
-
-
If your custom domain relies on private DNS or you route your HTTP traffic through a WAF service:
-
In the Verify Domain Name Ownership dialog box, click Verify.
-
-
-
Configure the base URL source for the realm where the custom domain is to be used.
-
The custom domain should now be successfully configured:
-
If your custom domain relies on public DNS and you do not have a self-managed SSL certificate, Advanced Identity Cloud generates a Google-managed SSL certificate.
If your custom domain already has CAA records, you must add additional CAA records to ensure that Advanced Identity Cloud can generate Google-managed SSL certificates. Learn more in Specify the CAs that can issue your Google-managed certificate. -
The custom domain name is added to the realm settings.
-
The FDQN for your custom domain name is mapped to server defaults.
-
The custom domain name is added to the Redirection URIs field of the
end-user-uiOAuth 2.0 client. Learn more in Configure OAuth clients. -
Both tenant domain and custom domain URL paths work; however, this does not apply to the OIDC configuration discovery endpoint.
Examples:
-
For AM endpoint:
https://<tenant-env-fqdn>/am/json/realms/root/realms/alpha/authenticate
you can use:
https://id.mycompany.com/am/json/realms/root/realms/alpha/authenticate -
For IDM endpoint:
https://<tenant-env-fqdn>/openidm/managed/alpha_user/<uuid>
you can use:
https://id.mycompany.com/openidm/managed/alpha_user/<uuid>
-
-
-
Confirm that the custom domain is working as expected. Learn more in Check that a custom domain is working in your browser.
Configure a custom domain using ESVs
|
The option to configure a custom domain using ESVs has been removed from Advanced Identity Cloud. Instead, you can Configure a custom domain using the UI in any environment without needing to configure ESVs and promote configuration. If you previously used ESVs to configure a custom domain, the ESV values have been migrated to normal UI input values and the custom domain still works as normal. |
Add a CNAME record to your custom domain
If your custom domain relies on public DNS, add a CNAME record to it so Advanced Identity Cloud can validate that you are the domain owner.
-
Sign in to the website for your domain name registrar.
-
Find the CNAME record for your domain. If you don’t already have a CNAME record for your domain, then follow the domain name provider’s instructions to create one.
-
In the CNAME record for your domain, enter the following values to create an alias from your custom domain to your Advanced Identity Cloud tenant domain:
-
In the host field, enter your custom domain FQDN; for example,
id.mycompany.com. -
In the data field, enter your Advanced Identity Cloud tenant FQDN; for example,
openam-mycompany.forgerock.io.
-
-
Follow the domain name provider’s instructions to complete the operation.
-
It may take up to 48 hours for domain name changes to propagate. Learn more in Check when CNAME domain name changes propagate.
Check when CNAME domain name changes propagate
If you add a CNAME record to your custom domain, you can use the following ways to check when the changes propagate:
-
Use a DNS checker website; for example https://dnschecker.org/all-dns-records-of-domain.php.
-
Use the
nslookupcommand-line tool:If you do not have nslookupinstalled, refer to https://command-not-found.com/nslookup to find installation instructions for your particular package manager.$ nslookup -q=cname id.mycompany.com(1) Server: fe80::ced4:2eff:fec3:40e%8 Address: fe80::ced4:2eff:fec3:40e%8#53 id.mycompany.com canonical name = openam-mycompany.forgeblocks.com.(2)1 Replace id.mycompany.comwith your custom domain FQDN.2 The output shows that the domain id.mycompany.comis an alias for the canonical nameopenam-mycompany.forgeblocks.com.
Deactivate CNAME record verification for your custom domain
If your custom domain relies on private DNS, or you route your HTTP traffic through a WAF service, raise a ticket to deactivate CNAME record verification.
-
Open a How-To ticket with Backstage Support.
-
On the How Do I...? page, provide values for the following fields:
Field Value Product
Select the following from the lists:
-
PingOne Advanced Identity Cloud
-
Tenant Settings
-
Realms - Custom Domains
What are you trying to achieve?
Enter "Disable CNAME record verification for a custom domain".
Please provide a short description
Enter your custom domain FQDN.
-
-
Click Submit.
Configure the base URL source for a realm to support a custom domain
To support HTTP requests from a custom domain, the base URL source of the associated realm needs to be configured to retrieve the hostname, the server name, and the port number from incoming HTTP requests.
-
Go to Native Consoles > Access Management.
-
From the Realms menu, choose the realm that contains the custom domain name.
-
On the Services page, click Base URL Source to edit its configuration.
-
On the Base URL Source page, change the Base URL Source option to
Host/protocol from incoming request. -
Click Save Changes.
Check that a custom domain is working in your browser
-
To confirm that Advanced Identity Cloud is serving traffic over HTTPS (TLS) for your custom domain name, in a browser, go to your custom domain location. For example, go to
https://id.mycompany.com. -
To test hosted pages, use an incognito or private browser window to access an end-user URL. For example, access
https://id.mycompany.com/login/?authIndexType=service&authIndexValue=mytreename#/. -
If your custom domain relies on public DNS, it may take up to 48 hours for domain name changes to propagate. If you try to use the new domain name to access your website, error messages may display until the changes take effect. If error messages still display after 48 hours, make sure your Advanced Identity Cloud domain name settings are correct and match your CNAME record. Learn more in Check when CNAME domain name changes propagate.
Verify a custom domain in Google
If you use Google as a social login IDP, you must use your domain to configure the redirect URL fields of your OAuth 2.0 apps. This might create prompts from Google to verify your domain with your domain provider. For information about how to verify your domain, learn more in Verify your site ownership on the Google Search Console.
Access OIDC configuration discovery endpoint
When you configure a custom domain, the OIDC configuration discovery endpoint URL changes:
| Domain context | Endpoint URL | ||
|---|---|---|---|
Default domain |
|
||
Custom domain |
|
Configure the cookie domain for a custom domain
Learn more in Cookie domains.
Application management (legacy)
|
The topics in this section are for tenants created before January 12, 2023. Learn more in Application management migration FAQ. |
Your applications act as clients to PingOne Advanced Identity Cloud. Ping Identity uses both OAuth 2.0 and OpenID Connect protocols to protect your applications. When you register a supported application or service, Advanced Identity Cloud sets the OAuth 2.0 grant type based on the type of application you’re registering. Advanced Identity Cloud also sets OpenID Connect default options for you. You can customize configuration in the application’s client profile.
To get started, first register your application or service to your tenant. Then, create a client profile for the application or service.
You can view and manage all your applications on the Applications page of the Advanced Identity Cloud admin UI.
| The Advanced Identity Cloud admin UI supports a maximum of 500 applications. |
Register an application or service
-
In the Advanced Identity Cloud admin UI, go to Applications, and click + Add Application.
-
In the New Consumer App dialog box, choose the application type you want to register:
-
In the Web Application Credentials dialog box, enter a Client ID to be displayed in the Applications list, and if shown, enter a Client Secret.
-
Click Create Application.
Create a client profile
-
In the Advanced Identity Cloud admin UI, click Applications.
-
In the Applications list, find the application name, then click More (), and choose Edit.
-
Review read-only Client Credentials:
Client Credentials
Discovery URI
AM URL base for OpenID Provider Configuration.
Default: http://openam.example.com:8088/openam/oauth2Client ID
Identifier used to register your client with AM’s authorization server, and then used when your client must authenticate to AM.
Client Secret
Password used to register your client with AM’s authorization server, and then used when your client must authenticate to AM.
-
Edit General Settings:
General Settings
Name
Specify a client name to display to the resource owner when the resource owner is asked to authorize client access to protected resources.
App Logo URI
Specify the location of your custom logo image file.
Description
Specify a client description to display to the resource owner when the resource owner is asked to authorize client access to protected resources.
Sign-in URLs
Custom URL for handling login. Overrides the default OpenAM login page.
Sign-out URLs
Custom URL for handling logout. Example: http://client.example.com:8080/openam/XUI/?realm=/#logout.
Grant Types
Specify the set of OAuth 2.0 grant types, also known as grant flows, allowed for this client:
- Authorization Code
-
(default) Instead of requesting authorization directly from the user, your client application or service directs the user to an authorization server (Advanced Identity Cloud).
- Back Channel Request
-
- Implicit
-
The client is issued an access token directly. No intermediate credentials (such as an authorization code) are issued. This grant type can potentially pose a security risk. Learn more in Implicit grant.
- Resource Owner Password Credentials
-
Username and password can be used directly as an authorization grant to obtain an access token. The credentials should only be used when there is a high degree of trust between the user and the client application or service.
- Client Credentials
-
Used when the client acts on its own behalf or requests access to protected resources based on previously-arranged authorization.
- Refresh Token
-
Credentials used to obtain access tokens.
- Device Code
-
Authorizes a client device, such as a smarthome thermostat, to access its service on an end user’s behalf. For example, the end user could log in to the thermostat service using a cell phone to enter a code displayed on the thermostat.
- SAML 2.0
-
Leverages the REST-based services provided by AM’s OAuth 2.0 support. Maintains existing SAML 2.0 federation implementation.
Scopes
Specify scopes that display to the resource owner when they authorize client access to protected resources.
The
openidscope is required. -
Edit Advanced Settings:
Access
Add Default Scopes
Scopes to be set automatically when tokens are issued. The
openidscope is required.Add Response types
Specify the response types that the client uses. The response type value specifies the flow that determines how the ID token and access token are returned to the client. By default, the following response types are available:
-
︎
code. Specifies that the client application requests an authorization code grant. -
token. Specifies that the client application requests an implicit grant type and requests a token from the API. -
id_token. Specifies that the client application requests an ID token. -
code token. Specifies that the client application requests an access token, access token type, and an authorization code. -
token id_token. Specifies that the client application requests an access token, access token type, and an ID token. -
code id_token. Specifies that the client application requests an authorization code and an ID token. -
code token id_token. Specifies that the client application requests an authorization code, access token, access token type, and an ID token.
Add Claims
Claims can be entered as simple strings, such as
name,email,profile, orsub. Or, as a pipe-separated string in the format:scope|locale|localized description. For example,name|en|Full name of user.Allow wildcard ports in redirect URLs
Specify whether AM allows the use of wildcards (* characters) in the redirection URI port to match one or more ports.
The URL configured in the redirection URI must be either localhost, 127.0.01, or ::1. For example, http://localhost:*/, https://127.0.0.1:80*/, or https://[::1]:*443/.
Enable this setting, for example, for desktop applications that start a web server on a random free port during the OAuth 2.0 flow.
Authentication
Token Endpoint
Authentication MethodAuthentication method client uses to authenticate to AM.
Choose one:-
client_secret_basic. Clients authenticate using the HTTP Basic authentication scheme after receiving a client_secret value. -
client_secret_post. Clients authenticate by including the client credentials in the request body after receiving a client_secret value. -
private_key_jwt. Clients sign a JSON web token (JWT) with a registered public key.
Token Endpoint Authentication Method (Client Type)
-
Confidential clients can maintain the confidentiality of their credentials. For example, a web application runs on a server where its credentials are protected.
-
Public clients run the risk of exposing their passwords to a host or user agent. For example, a JavaScript client running in a browser may be accessible to the public.
Implied Consent
When enabled, the resource owner will not be asked for consent during authorization flows. The OAuth2 Provider must also be configured to allow clients to skip consent.
OAuth 2.0 Mix-Up Mitigation active
Enable this setting only if this OAuth 2.0 client supports the OAuth 2.0 Mix-Up Mitigation draft; otherwise AM will fail to validate access token requests received from this client.
Add Default ACR values
Default Authentication Context Class Reference values. Specify strings that will be requested as Voluntary Claims by default in all incoming requests.
Add Request URIs
Specify request_uri values that a dynamic client would pre-register.
Client JWT Bearer
Public KeyA base64-encoded X509 certificate in PEM format used to obtain the client’s JWT bearer public key. The client uses the private key to sign client authentication and access token request JWTs, while AM uses the public key for verification.
Subject Type
Default value is public.
-
Choose pairwise if you want each client to receive a different subject value. This prevents correlation between clients.
-
Choose public if you want each client to receive the same subject value.
Default Max Age
Enable this option to enforce a default maximum age of ten minutes. If the user session is not currently active, and if more than ten minutes have passed since the user last authenticated, then the user must be authenticated again.
Use Certificate-Bound Access Tokens
Enable this option if you want access tokens issued to this client to be bound to an X.509 certificate. When enabled, access tokens will use the X.509 certificate to authenticate to the
access_tokenendpoint.Token Lifetimes
Authorization code lifetime (seconds)
The time an authorization code is valid for.
Default value: 120Access token lifetime (seconds)
The time an access token is valid for, in seconds
If you set the value to 0, the access token will not be valid. A maximum lifetime of 600 seconds is recommended. Default value: 3600Refresh token lifetime (seconds)
The time a refresh token is valid for.
If this field is set to -1, the refresh token will never expire. Default value: 604800JWT token lifetime (seconds)
The amount of time the JWT is valid for. Default value: 3600
Consent Screen
Add Display Name
Custom user-facing title. In this example, MyClient.
Add Display Description
User-facing instruction text. In this example, "This application is requesting the following information:"
Add Privacy Policy URI
URI containing the client’s privacy policy documentation. The URI is displayed as a link in the consent page.
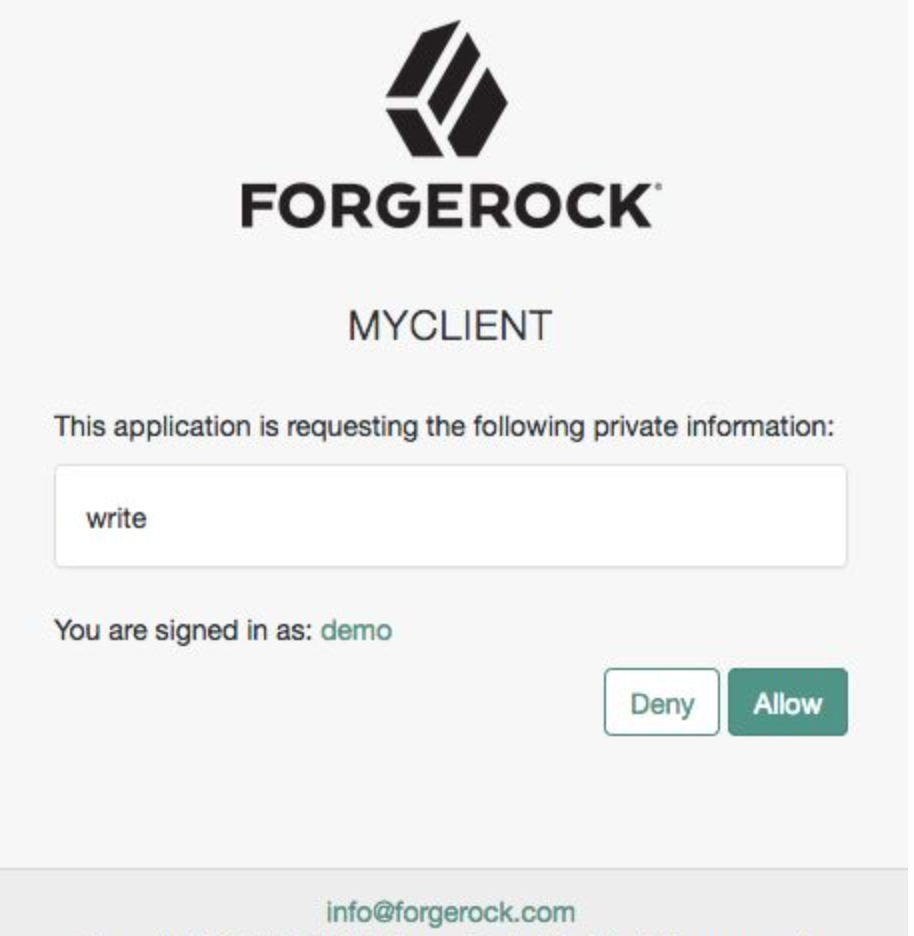
Client Management
Access Token
Specify the
registration_access_tokenvalue that you provide when registering the client, and then subsequently, when reading or updating the client profile.Session Management
Client Session URI
Specify the relying party (client) URI to which the OpenID Connect Provider sends "session changed" notification. Message is sent using the HTML 5 postMessage API.
Endpoint Response Formats
User info response format
Specify the output format from the
userinfoendpoint.
The supported output formats are:-
(default) User info JSON response format.
-
User info encrypted JWT response format.
-
User info signed JWT response format.
-
︎ User info signed then encrypted response format.
Token introspection response format
Specifies the format of the token introspection response. The possible values for this property are:
-
JSON response format
-
Signed JWT response format
-
Signed then encrypted JWT response format
Signing and Encryption
Public key selector
Select the public key for this client, which comes from the JWKs_URI, manual JWKs, or X.509 field.
JSON Web Key URI
The URI that contains the client public keys in JSON web key format.
JSON Web Key
Raw JSON web key value containing the client public keys.
ID Token Encryption Public Key
Base64-encoded public key for encrypting ID tokens.
Enable ID Token Encryption
When enabled, encryption uses the algorithm with which the ID token must be encrypted. Default algorithm value is RSA1_5 (RSAES-PKCS1-V1_5).
-
-
Click Save.
Supported application types
When you register an application or service, Advanced Identity Cloud automatically sets the optimal configuration for you. To change the default settings, edit the client profile.
Native / SPA
Native applications are developed for specific platforms or devices. Examples include the applications on mobile phones and applications dedicated to the macOS platform.
Single-page applications (SPAs) are OAuth 2.0 clients that run in a user’s web browser.
SPAs use PKCE to verify the client because SPAs do not have a way to secure the client_secret value.
PKCE stands for Proof Key Code Exchange; a security standard explained in the IETF specification
Proof Key for Code Exchange by OAuth Public Clients.
For a deep dive on how ForgeRock implements PKCE for native and SPA applications, learn more in Authorization code grant with PKCE.
Web
Web applications are OAuth 2.0 clients that run on a web server. End users (resource owners) access web applications using a web browser. The application makes API calls using a server-side programming language. The end user has no access to the OAuth 2.0 client secret or any access tokens issued by the authorization server.
Service
Machine-to-machine (M2M) applications interact with an API and no user involvement is necessary. The application can ask for an access token without involving a user in the process. A smart meter that tracks your utility usage and wearable devices that gather and communicate health data use services and M2M applications.
OAuth 2.0 and OpenID Connect
Advanced Identity Cloud uses OAuth 2.0 and OpenID Connect to protect your applications.
OAuth 2.0
Advanced Identity Cloud provides an authorization service in the OAuth 2.0 authorization flow. OAuth 2.0 lets you set up access to your resources without sharing end-user account information. For a deep dive, learn more in RFC6749.
|
You may encounter domain validation prompts when using forgeblocks.com and id.forgerock.io domains as redirect URLs in your Google OAuth 2.0 applications. To resolve this, you must use a custom domain, and then set up domain verification with Google. |
|
You could encounter
A custom domain acts as a realm DNS alias, so when it is used as a redirect URL, Advanced Identity Cloud implicitly knows which realm to use. |
OpenID Connect
OpenID Connect (OIDC) provides an identity layer on top of OAuth 2.0. OIDC lets a client make assertions about the user’s identity and their means of authentication. For a deep dive, learn more in OIDC grant flows.
What’s in the client profile
Changing the client profile settings requires a working knowledge of OAuth 2.0, its grant types, and its components. If no one has given you direction on how to configure the client profile, you’ll want to read up on some basic concepts.
Scopes
Scopes limit your client application’s access to end users' resources. For a deep dive on how scopes work, learn more in Scopes.
Grant types
Grant types, also known as grant flows, describe how your application or service access gets an access token. Learn more about grant types in OAuth 2.0 grant flows.
Claims
Claims convey information about the end user to your client application or service. For a deep dive on claims, learn more in the Claims.
Access tokens
Your applications and services use access tokens when making requests on behalf of a user. Tokens provide proof that your application or service is authorized to access the end user’s data. For a deep dive on access tokens, learn more in Advanced Identity Cloud as authorization server.
Keys
Keys protect sensitive information that Advanced Identity Cloud needs to both send and receive. You can store keys in ESV secrets, then use them in OAuth 2.0 authentication flows by mapping the ESVs to secret labels.
Test SAML 2.0 SSO using JSP flows
|
The topics in this section are for tenants created before January 12, 2023. Learn more in Application management migration FAQ. |
SAML 2.0 helps organizations to share(or federate) identities and services without having to manage the identities or credentials themselves.
These instructions describe how to launch an SP-initiated JSP flow to test SAML 2.0 SSO. PingOne Advanced Identity Cloud acts as the authentication service provider (SP) in a circle of trust (CoT). For this test, a self-managed AM instance acts as the identity provider (IDP).
|
Before identities can be federated in a CoT, an AM module named Federation must be present in the SP configuration. In self-managed AM instances, by default the Federation module is ready-to-use. In Advanced Identity Cloud AM instances, you must manually create a module named Federation when you create an SP circle of trust. |
Step 1: Set up an SP and an IDP
-
Set up the Advanced Identity Cloud AM instance as a service provider:
-
In the AM admin UI (native console), go to
Realm Name > Applications > Federation > Entity Providers. -
Click + Add Entity Provider > Hosted, and add a hosted entity provider:
-
Entity ID: Enter a unique identifier. Example: Cloud-SP.
-
Service Provider Meta Alias: Provide an SP alias. Example:
cloud-sp.
-
-
Export the SP metadata to an XML file. Example export metadata URL:
https://<tenant-FQDN>/am/saml2/jsp/exportmetadata.jsp?entityid=<SP-Entity-ID>&realm=/alpha.
-
-
Set up the self-managed AM instance as an identity provider:
-
In the AM admin UI (self managed), go to
Top Level Realm > Applications > Federation > Entity Providers. -
Click + Add Entity Provider > Hosted, and add a hosted entity provider:
-
Entity ID: Enter a unique identifier. Example: AM-IDP.
-
Meta Alias: Provide an IDP alias. Example:
am-idp.
-
-
Export the IDP metadata to an XML file. Example export metadata URL:
https://<IDP-host-FQDN>/openam/saml2/jsp/exportmetadata.jsp?entityid=<IDP-Entity-ID>.
-
-
In the Advanced Identity Cloud AM instance, add a remote entity provider by importing the IDP metadata:
-
In the AM admin UI (native console), go to
Realm Name > Authentication > Federation > Entity Providers. -
Click + Add Entity Provider > Remote.
-
Import the IDP metadata.
-
-
In the self-managed AM instance, add a remote entity provider by importing the SP metadata:
-
In the AM admin UI (self managed), go to:
Top Level Realm > Authentication > Federation > Entity Providers. -
Click + Add Entity Provider > Remote.
-
Import the SP metadata.
-
-
Create a user profile on the SP and IDP:
-
SP: In the AM admin UI (native console), go to Identities and add a user identity.
-
IDP: In the AM admin UI (self managed), go to Identities and add a user identity.
-
Step 2: Create an SP circle of trust
-
In the Advanced Identity Cloud AM instance, create a circle of trust:
-
In the AM admin UI (native console), go to
Realm Name > Applications > Federation > Circles of Trust. -
Click + Add Circle of Trust.
-
On the New Circle of Trust page, provide a name, then click Create.
-
On the CoT page, provide CoT details.
CoT details:
-
Description: Enter a unique identifier.
-
Entity Providers: Choose the entity IDs for the SP and IDP.
Examples:Cloud-SPAM-IDP
-
-
Click Save Changes.
-
-
In the Advanced Identity Cloud AM instance, create a federation module:
-
In the AM admin UI (native console), go to
Realm Name > Authentication > Modules. -
On the Modules page, click Add Module. Enter module details:
-
Name: Must be named
Federation. -
Type: Must be type
Federation.
-
-
Click Save Changes.
-
-
In the Advanced Identity Cloud AM instance, configure the page the browser displays upon successful SSO:
-
In the AM admin UI (native console), go to
Realm Name > Applications > Federation > Entity Providers. -
In the
Cloud-SPentity provider page, select the Advanced tab. -
In the Relay State URL List field, add the target URL for the SP end-user sign-in page.
Example:https://<tenant-FDQN>/enduser/?realm=alpha#/dashboard. -
Click Save Changes.
-
Step 3: Create an IDP circle of trust
-
In the AM admin UI (self managed), go to
Top Level Realm > Applications > Circles of Trust. -
Click + Add Circle of Trust.
-
On the New Circle of Trust page, provide a name, then click Create.
-
On the CoT page, provide CoT details.
CoT details:
-
Description: Enter a unique identifier.
-
Entity Providers: Choose the entity IDs for the SP and IDP.
Examples:Cloud-SPAM-IDP.
-
-
Click Save Changes.
Step 4: Test SAML 2.0 SSO
-
In a browser, go the JSP URL to launch an SP-initiated JSP flow. Example:
https://<tenant-FQDN>/am/saml2/jsp/spSSOInit.jsp?realm=/alpha/&metaAlias=/alpha/cloud-sp&idpEntityID=AM-IDP&binding=urn:oasis:names:tc:SAML:2.0:bindings:HTTP-POST&NameIDformat=urn:oasis:names:tc:SAML:2.0:nameid-format:persistent&RelayState=https://<tenant-FQDN>/enduser/?realm=alpha#/dashboard. -
On the IDP sign-in page, enter the user’s credentials:
Keep this session open. The IDP authenticates the user, then the browser redirects the user back to the SP sign-in page.
-
On the SP sign-in page, enter the user’s credentials:
After this second successful authentication, the user’s SP identity is linked to, or federated with, the user’s IDP identity.
The browser redirects to the SP end-user page.
-
Sign the user out of both the SP and IDP.
-
Go to the IDP end-user sign-in page, and enter the user’s credentials.
When the user is successfully authenticated, the browser redirects to the SP end-user page specified in Relay State URL List.
Gateways & agents
Integrate PingOne Advanced Identity Cloud with PingGateway and policy agents to secure access to your web resources.
PingGateway
PingGateway integrates your web applications, APIs, and microservices with Advanced Identity Cloud. ${ig.abbr} enforces security and access control without modifying your applications or the containers where they run—whether on premises, in a public cloud, or in a private cloud.
Based on reverse proxy architecture, ${ig.abbr} intercepts client requests and server responses. In this process, ${ig.abbr} enforces user or service authentication and authorization to HTTP traffic. Advanced Identity Cloud acts as the authentication and authorization provider.
${ig.abbr} can also conduct deep analysis, then throttle and transform requests and responses when necessary.
Learn more in the PingGateway Guide for Advanced Identity Cloud. In particular, refer to these detailed instructions and examples:
Policy agents
Policy agents are PingAM add-on components. They operate as policy enforcement points (PEPs) for websites and applications.
Policy agents natively plug into web or applications servers. The agents intercept inbound requests to websites, and interact with AM to:
-
Ensure that clients provide appropriate authentication.
-
Enforce AM resource-based policies.
Use Web Agents to protect services and web resources hosted on a web or proxy server. Use Java Agents to protect resources hosted on application or portal servers.
Although both agents enforce authentication and authorization to protected resources, they differ in the way they derive policy decisions and enforce them.
For examples of how to transition from on-premises access management to Advanced Identity Cloud without changing the architecture of the agent-based model, learn more in these guides:
- Web Agent Example
- Java Agent Example
Password policy
Configure a password policy in PingOne Advanced Identity Cloud when you want a customized rule for creating valid sign-in passwords. The password policy applies to end users who sign in to your registered apps within a realm.
|
You can configure only one password policy per realm. |
By default, Advanced Identity Cloud password policy is set to the minimum security requirements established by the National Institute of Standards and Technology (NIST). Any changes you make to the password policy must conform to requirements contained in their guidelines. Learn more in NIST Digital Identity Guidelines.
Configure a password policy
-
In the Advanced Identity Cloud admin UI, go to Security > Password Policy.
-
Choose the realm the password policy will apply to.
-
Edit password policy details.
Password length
When enabled, the policy requires a password with the specified minimum number of characters. No maximum.
Cannot include
Options to restrict the use of any of the following in the policy:
-
More than two consecutive characters (Example: aaaaaa)
-
Commonly-used passwords (Examples: qwerty or 12345678)
-
Values in certain user attributes. From the drop-down list, specify user attributes that cannot be used.
Must contain
When enabled, the policy requires the use of a specified 1–4 of the following:
-
Upper case letter
-
Lower case letter
-
Number
-
Space, pipe, or special character:
( ! " # $ % & ' ( ) * + , - . / : ; < = > ? @ [ \ ] ^ _ ` { } ~ ) .
Cannot reuse
When enabled, the policy restricts the end user from reusing the specified number of previously set passwords.
Force password change
When enabled, the policy forcibly expires each end-user password after the specified number of days, months, or years have elapsed from when the password was set.
To handle expired passwords in an end-user journey, use theExpiredoutcome in the Identity Store Decision node.Refer to the considerations in Force end-user password changes before using this policy setting. -
-
Click Save.
Force end-user password changes
You can combine a password policy and the Identity Store Decision node to expire end-user passwords in a journey; the Force password change policy setting lets you define an expiry time interval, which is measured for each end user from when their password was last set.
If you are introducing such a policy for the first time, you may want to process your end users in batches in order to improve messaging about the changes. The following sections describe two high-level strategies to achieve this.
|
If you are considering forcing your end users to change their passwords, review the NIST Digital Identity Guidelines. In particular, NIST no longer recommends scheduled password changes; learn more in Usability Considerations by Authenticator Type. The NIST guidelines are continually refined, so you should keep them in mind when setting password policy. |
Strategy 1: Target segments of end users
Adapt the end-user login journey to use dynamic groups or user properties to target a segment of end users to reset their password.
Advantage: You can segment users any way you like. For example, you may have a set of end users who could struggle with a password reset. You could add a property to each end user in the set and initially exclude end users with that property from a password reset. Then, at a later time, remove the exclusion when support is available for those end users.
Disadvantage: Creating new dynamic groups with large numbers of end users can incur a significant performance cost.
Strategy 2: Target oldest passwords first
Adapt the end-user login journey to target all end users to reset their password, but initially set a very long expiry time interval to target the oldest passwords first. Then periodically reduce the expiry time interval to eventually target all passwords.
Advantage: This strategy segments end users by the date of their last password reset. Additionally, end users with the oldest passwords are targeted first.
Password timestamps
Password timestamps let you view or query when a user password was last changed and when it is set to expire.
If you have this feature enabled, the following timestamp fields and properties are available:
| Field name on the user page | Property name in the managed object configuration |
|---|---|
Password Last Changed Time |
|
Password Expiration Time |
|
To enable or check the status of the feature, learn more in Feature enablement.
passwordLastChangedTimecurl \
--header "Authorization: Bearer <token>" \
--header "Accept-API-Version: resource=1.0" \
--request GET \
"https://<tenant-env-fqdn>/openidm/managed/realm-name_user?_queryFilter=passwordLastChangedTime%20ge%20%222024-01-01T21:22:06.274Z%22&_fields=_id"
{
"result": [
{
"_id": "453a73a9-3f50-4b04-8115-f3915fd1dd89",
"_rev": "fa876a46-82e6-4a11-a3f4-6b4919815ea4-5851"
}
],
...
}Journeys
PingOne Advanced Identity Cloud comes with pre-configured end-user journeys. A journey is an end-to-end workflow invoked by an end user or device. Advanced Identity Cloud provides templates for common end-user journeys; for example, account registration and sign-in.
You can use the Advanced Identity Cloud hosted pages theme editor to configure or modify the layout and appearance of journeys.
You can use the drag-and-drop journey editor to configure or modify the journey templates:
- Authentication template
-
Use the Login authentication template to configure sign-in journeys.
- User self-service templates
-
Use a self-service template to let end users manage their accounts or resolve simple password issues without having to engage a tenant administrator.
- Custom journey
-
Start with a blank canvas when you want to build a custom journey, and drag and drop nodes from the nodes list.
- Default end-user journey
-
The journey Advanced Identity Cloud displays to end users when they access a default webpage URL. For example, application webpages commonly display a sign-in link. When the end user clicks the link, the Login journey is invoked by default.
Set a default end-user journey as follows:
-
Set a new journey as the default:
-
In the Advanced Identity Cloud admin UI, click Journeys and New Journey.
-
On the New Journey page, enable the option Default journey for end users.
-
-
Set an existing journey as the default:
-
In the Advanced Identity Cloud admin UI, click Journeys to view the list of journeys.
-
Select a journey, and click and Set as default.
-
-
- Device profiling support
-
Use the ForgeRock SDKs to create authentication journeys based on device context. Learn more in Configure device profiling authentication.
- Scripting
-
Add JavaScript to a Scripted Decision node to customize the outcome of an authentication journey.
Use the auth scripting editor to do the following:
-
Manage scripted decision node scripts directly from within a scripted decision node
Authentication templates
Login
Create a basic Login journey for end users to authenticate and sign in to an app or service with a username and password.
-
In the Advanced Identity Cloud admin UI, go to Journeys > Login.
-
Hover over the journey schematic, and click Edit.
-
Enter information for each node in the journey:
-
To test the journey, copy the Preview URL, and paste the URL into a browser using Incognito mode.
-
When you’re satisfied with your journey, click Save.
Learn more about the Login journey in Login with self-service.
|
If you implement account lockout using the Account Lockout node, it creates a persistent lockout on user accounts. User accounts can be unlocked by a tenant administrator. Advanced Identity Cloud also supports configurable persistent and duration account lockout. Learn more in Account lockout. |
Device profiling
Use the ForgeRock SDK to create journeys that let inanimate objects authenticate based on device context. Cell phones and smartwatches are examples of devices that have their own identities. Device context provides Advanced Identity Cloud with information about how or where a device is used to authenticate.
For detailed instructions, learn more in Configure device profiling authentication.
User self-service templates
Registration
Create a registration journey to let end users create their own account for an app or service.
-
In the Advanced Identity Cloud admin UI, go to Journeys > Registration.
-
Hover over the journey schematic, and click Edit.
-
Enter information for each node in the journey:
Learn about all available nodes in Nodes for journeys.
-
To test the journey, copy the Preview URL, and paste the URL into a browser using Incognito mode.
-
When you’re satisfied with your journey, click Save.
Learn more about the Registration journey in User self-registration.
Progressive profile
Create a Progressive Profile journey to trigger a conditional event in the journey.
The default journey triggers a reminder to set preferences for receiving news and special offers. The reminder is displayed only if the end user logs in three times without selecting preferences. If the end user makes no selection, the reminder expires and is not displayed again. If the end user selects one or more options, the preferences get set in the end user’s profile.
-
In the Advanced Identity Cloud admin UI, go to Journeys > Progressive Profile.
-
Hover over the journey schematic, and click Edit.
-
Enter information for each node in the journey:
Learn about all available nodes in Nodes for journeys.
-
To test the journey, copy the Preview URL, and paste the URL into a browser using Incognito mode.
-
When you’re satisfied with your journey, click Save.
Learn more about the Progressive Profile journey in Progressive profile.
Update password
Create an Update Password journey to let end users change their passwords. End users may be required to change passwords at regular intervals or if a password is compromised.
-
In the Advanced Identity Cloud admin UI, go to Journeys > Update Password.
-
Hover over the journey schematic, and click Edit.
-
Enter information for each node in the journey:
Learn about all available nodes in Nodes for journeys.
-
To test the journey, copy the Preview URL, and paste the URL into a browser using Incognito mode.
-
When you’re satisfied with your journey, click Save.
Learn more about the Update Password journey in Password updates.
Reset password
Create a Reset Password journey to let end users change their existing passwords. End users typically reset their passwords when they’ve forgotten the password they set.
-
In the Advanced Identity Cloud admin UI, go to Journeys > Reset Password.
-
Hover over the journey schematic, and click Edit.
-
Enter information for each node in the journey:
Learn about all available nodes in Nodes for journeys.
-
To test the journey, copy the Preview URL, and paste the URL into a browser using Incognito mode.
-
When you’re satisfied with your journey, click Save.
Learn more about the Reset Password journey in Password reset.
Forgotten username
Create a Forgotten Username journey to let end users retrieve their username from their user account data.
-
In the Advanced Identity Cloud admin UI, go to Journeys > Forgotten Username.
-
Hover over the journey schematic, and click Edit.
-
Enter information for each node in the journey:
Learn about all available nodes in Nodes for journeys.
-
To test the journey, copy the Preview URL, and paste the URL into a browser using Incognito mode.
-
When you’re satisfied with your journey, click Save.
Learn more about the Forgotten Username journey in Username recovery.
Custom journeys
Create a custom journey when none of the ready-to-use templates suits your needs.
-
In the Advanced Identity Cloud admin UI, click Journeys.
-
Click + New Journey.
-
Enter journey details:
-
Name: Name to display in the Journeys list.
-
Identity Object: Identifier for the user or device to authenticate.
-
(Optional) Description: Summarize end user interaction.
-
(Optional) Tags: For organizing journeys to make them easier to find.
-
-
Click Create journey.
-
Use the journey editor to create your custom journey.
Drag nodes from the palette and arrange them on the blank canvas. -
Provide information for each node, and connect nodes.
Learn about all available nodes in Nodes for journeys.
-
To test the journey, copy the Preview URL, and paste the URL into a browser using Incognito mode.
-
When you’re satisfied with your journey, click Save.
Deactivate journeys
Deactivate a journey to prevent end users using it to authenticate. If you deactivate it, you can reactivate it at any time.
For example, if you are building a new journey in your development environment and you need to run a promotion, you can deactivate the journey prior to the promotion so that there’s no risk of the journey being discovered and used by end users in your upper environments and potentially allowing insecure access. You can activate the journey in your development environment again after a promotion.
Ping Identity recommends you deactivate any default journeys not in use. Learn more in Deactivate unused or insecure journeys.
-
In the Advanced Identity Cloud admin UI, go to Journeys to view the existing journeys list.
-
Find the journey.
-
Click its More () menu:
-
To deactivate the journey, choose Deactivate, then in the Deactivate Journey dialog, click Deactivate.
-
To activate the journey, choose Activate.
-
You can also deactivate and activate a journey using the More () menu in the journey editor.
Duplicate journeys
Duplicate a journey to preserve a template for future use. For example, if you are testing a journey, start with a duplicate. Give the duplicate journey a unique name.
Create a duplicate journey in the following ways:
-
Click Journeys to view the existing journeys list. Find the template name. Then, click its More () menu, and choose Duplicate.
-
In the Journey editor, click More (), and choose Duplicate.
Export journeys
You can export journeys, including all dependencies like nodes, inner journeys, and scripts of any type apart from library scripts.
Use this feature to export journeys from one environment, such as a development environment, to another.
-
In the Advanced Identity Cloud admin UI, go to Journeys.
-
Check the checkbox beside one more journeys.
-
Click Export.
-
View the information on the Export Journeys page.
-
Click Export.
Import journeys
You can import journeys, including all dependencies such as nodes, inner journeys, and scripts, and scripts of any type apart from library scripts.
Use this feature to import a journey from one environment, such as a development environment, to another.
-
In the Advanced Identity Cloud admin UI, go to Journeys, and click Import.
-
Download or skip back up:
-
Download a backup of your existing journeys so that you can restore them in case of error or unexpected behavior during or after import:
-
To view the backup summary, click Show backup summary.
-
Click Download Backup.
-
-
Skip the download:
-
Click Skip Backup.
-
In the dialog box, click Skip Backup again.
-
-
-
Configure the import:
-
On the Import Journeys page, browse to and select a JSON file that contains the journey’s configurations to import.
-
Select the identity object that the journey authenticates.
-
In the Conflict Resolution section, choose how the system resolves import conflicts:
-
Overwrite all conflicts (default)
-
Manually pick conflict resolution
-
-
Click Next.
-
Review the information on the Import Summary page.
-
Click Start Import.
-
On the Import Complete page, click Done.
-
Debug Advanced Identity Cloud end-user journeys
You can debug end-user journeys in your PingOne Advanced Identity Cloud development environment as you create them. By setting a journey to debug mode, you can view information stored in shared, transient, and secure state, as you navigate the journey. This lets you confirm that information is being passed correctly from node to node in the journey.
Enable debug mode
Enable debug mode to log debug information as you navigate a journey.
-
In the Advanced Identity Cloud admin UI, go to Journeys, and select a journey.
-
Hover over the journey schematic, and click Edit.
-
In the journey editor, click the debug button
 (on the top right of the toolbar). The Debug panel opens.
 -
In the Debug panel, enable Debug mode.
-
Select Enable Debug Popup to display debug logs as you navigate the journey. Learn more in view debug information in a popup window.
-
Click Save to save your journey with debug mode enabled.
|
View debug information in a pop-up window
View debug log output in a separate pop-up window, as you navigate a journey.
-
In the Advanced Identity Cloud admin UI:
-
In the journey editor, copy the end-user journey URL from the Preview URL field (on the right, above the top toolbar).
-
In a new incognito browser window (or a separate browser):
-
Go to the end-user journey URL that you copied in the previous step.
-
The browser window displays an initial debug step.
-
If the browser blocks the pop-up window, unblock it:
-
For Chrome, follow the instructions under the "Allow pop-ups and redirects from a site" section in this support article: https://support.google.com/chrome/answer/95472.
-
For other supported browsers, consult the browser documentation.
-
-
Refresh the browser window. The pop-up window should now appear.
-
Arrange the windows so that they are both clearly visible.
-
Navigate the journey in the browser window, and monitor the debug output for each step in the pop-up window.
-
Shared, transient, and secure state
- Shared state
-
Used by nodes to store non-sensitive information required during the authentication flow.
- Transient state
-
Used by nodes to store sensitive information that Advanced Identity Cloud encrypts on round trips to the client.
- Secure state
-
Used by nodes to store decrypted transient state.
|
When debug mode is enabled, debug nodes are temporarily inserted between each journey node. Because debug nodes can change the state of node information, inserting them between journey nodes can cause a problems if a journey node expects to access node information in a specific state. For example, if a journey node adds a password to secure state, and the following debug node reads that password from secure state, the password is moved to transient state. Then, if the next journey node expects the password to be in secure state, and tries to read it from there, an error occurs. |
Advanced Identity Cloud identity schema
PingOne Advanced Identity Cloud uses a default identity schema to organize users, roles, assignments, groups, organizations, and applications. The following diagram shows the identity schema relationships:

Learn more about the Advanced Identity Cloud identity schema in Summary of the identity schema.
You can customize the default identity schema to your business needs in the following ways:
-
Create custom attributes to store identity information specific to your business.
-
Create indexable custom attributes that let you search your identities and create customized segments.
-
Create organizations to structure your identities in a flexible and performant way.
For examples of customizing the Advanced Identity Cloud identity schema, learn more in Use cases for customizing the identity schema.
Summary of the identity schema
-
Users, roles, assignments, groups, organizations, and applications form the default identity schema. Their relationships are also part of the default schema.
-
Users are hybrid identity objects:
-
Their default attributes are explicitly defined in the schema, with indexes also explicitly defined for certain attributes.
-
You can add custom attributes to them. However, the attributes are stored in an unindexed JSON data structure.
-
If you need a custom attribute for a user to be searchable, use an indexed general purpose extension attribute instead of a custom attribute.
-
-
Roles, assignments, groups, and organizations are generic identity objects:
-
None of their attributes are explicitly defined in the schema, and instead they are entirely stored in an indexed JSON data structure.
-
You can add custom attributes to them, and they will also be indexed.
-
-
You can create custom identity objects. These custom identity objects are also generic. This means that they are entirely stored in an indexed JSON data structure.
-
Applications are also generic identity objects. However, you should not alter these in any way as they are reserved for modification by Ping Identity to support workforce use cases. You should not add custom attributes to them, repurpose their default attributes, or reconcile data into them.
|
The following table summarizes the identity schema:
| Identity object | Type | Indexes on default attributes? | Indexes on custom attributes? |
|---|---|---|---|
Users |
Hybrid |
Yes (where defined) |
No |
Roles |
Generic |
Yes (all) |
Yes (all) |
Applications |
Generic |
Yes (all) |
n/a (customer modifications not supported) |
Custom |
Generic |
n/a |
Yes (all) |
Use cases for customizing the identity schema
The following are examples of how you might customize the default schema to support a media service:
-
Add a custom attribute for membership level to user identities to support subscription-level access or rate limiting. For example, the membership levels might be "gold", "silver", and "bronze".
-
Add a custom attribute for registration level to user identities to support access to premium content or to support progressive profiling in journeys. For example, the registration levels might be "guest", "pending", and "registered".
-
Adapt a general purpose extension attribute to be a searchable user attribute for date of birth to support age-restricted access. Use the attribute to support delegated administration for different age segments, allowing separate users to administrate adults and children.
-
Create organizations to structure user relationships between family members to support parental control.
The following are examples of how you might customize the default schema to support workforce:
-
Add custom attributes for job code, department number, or cost center to user identities to support the automatic provisioning of birthright roles.
-
Add custom attributes for external ID and metadata to user identities to support synchronisation using System for Cross-domain Identity Management (SCIM).
Customize user identities
You can customize user identities by adding your own attributes. This lets you store more useful information about each user such as the user’s department, cost centers, application preferences, device lists, and so on.
Advanced Identity Cloud offers the following strategies to customize user identities:
Customize user identities using custom attributes
You can create new custom attributes directly on user identities. Custom attributes on user identities must be
prefixed with custom_; for example, custom_department.
| Advanced Identity Cloud does not support searching on user identity custom attributes, which can sometimes render an environment unresponsive. Instead, if you need to make a particular user identity attribute searchable, use an indexed extension attribute. Learn more in Customize user identities using general purpose extension attributes. |
To create a user identity custom attribute:
-
In the Advanced Identity Cloud admin UI, click Native Consoles > Identity Management.
-
In the IDM admin UI, go to Configure > Managed Objects.
-
Click Alpha_user or Bravo_user.
-
Click + Add a Property. This scrolls the page to the bottom and automatically focuses on the Name input field.
-
In the Name input field, enter a new attribute name prefixed with
custom_; for example, entercustom_department. -
In the Label input field, optionally enter a display name for the new attribute.
-
Click Save.
Customize user identities using general purpose extension attributes
You can use the general purpose extension attributes that already exist on user identities. These attributes are predefined as part of the default identity schema. The following extension attributes are indexed, so you can use them as searchable attributes:
-
Generic Indexed String 1–5
-
Generic Indexed Multivalue 1–5
-
Generic Indexed Date 1–5
-
Generic Indexed Integer 1–5
To use an extension attribute:
-
In the Advanced Identity Cloud admin UI, click Native Consoles > Identity Management.
-
In the IDM admin UI, go to Configure > Managed Objects.
-
Click Alpha_user or Bravo_user.
-
Find an extension attribute that has one of the following default labels:
-
Generic Indexed String 1–5 or Generic Unindexed String 1–5
-
Generic Indexed Multivalue 1–5 or Generic Multivalue String 1–5
-
Generic Indexed Date 1–5 or Generic Date String 1–5
-
Generic Indexed Integer 1–5 or Generic Integer String 1–5
If you need to make the attribute searchable, make sure you use an indexed extension attribute.
-
-
Click the pen icon () to edit the attribute.
-
In the Readable Title input field, enter a custom label. For example,
Department. -
Click Save.
Roles and assignments
Roles and assignments let you create an entitlements structure that fits the needs of each realm in PingOne Advanced Identity Cloud.
Identity architects usually build the entitlements structure, and may also use the native AM and IDM consoles to put more complex entitlements in place.
Once your entitlements structure is in place, you can use the Advanced Identity Cloud admin UI to:
-
Add new user profiles, device profiles, or roles
-
Add assignments to roles
-
Make changes to existing user profiles, device profiles, roles, or assignments
-
Provision identities with role-based permissions
Roles
Roles define privileges for user and device identities. Roles let you automatically update privileges in numerous identity profiles. All role members receive the same permissions you’ve defined for the role. When you change the privileges for that role, you change the permissions for all role members.
When you add a role to an identity profile, the user or device becomes a member of the role. A user or device can belong to many roles.
A role won’t work until you link it to at least one assignment. During the authorization process, Advanced Identity Cloud evaluates permissions based on:
-
Roles a user or device belongs to
-
Assignments attached to their roles
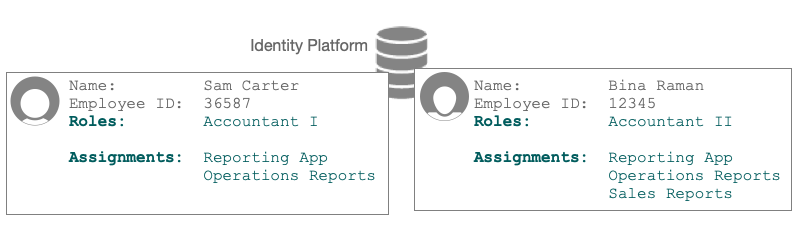
Internal roles
Internal roles, also called authorization roles, control access to your identity platform. You use internal roles to authorize administrators to manage your tenant or identities contained in it.
External roles
External roles, also called provisioning roles, give users and devices the permissions they need to access apps and services. You use external roles to let employees access intranet applications. You can also use external roles to let your customers and their end users access web services and mobile apps in your tenant.
Assignments
You create an assignment when you want to give a user or device permission to access a resource they need to do a job. A resource might be any application or service, data contained in a document or a database, or a device such as a printer or cell phone.
An assignment won’t work without a role. A role-assignment relationship is not fully formed until you do two things:
Assignment linked to role
Link an assignment to a role. Advanced Identity Cloud grants the permissions defined in the assignment to all members of the linked role.
Assignment mapped to attribute
Map your tenant assignment to an attribute stored in an external system. An external system can be, for example, an intranet Reporting App with its own database of user accounts.
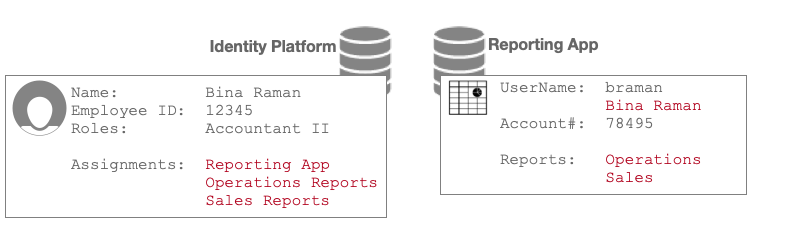
In this illustration, Bina’s Accountant II role links to three assignments. During data store sync, Advanced Identity Cloud provisions her Reporting App user account based on assignment-attribute mappings:
| Mapping From Assignment Attribute | Mapping To Reporting App | Description and Provisioning Outcome |
|---|---|---|
Assignments: Reporting App |
UserName |
The mapping sets the value of Bina’s Name ("Bina Raman") in the UserName attribute in the Reporting App. |
Assignments: Operations Reports |
Reports: Operations |
The mapping adds the value "Operations" to the Reports attribute in the Reporting App. |
Assignments: Sales Reports |
Reports: Sales |
The mapping adds the value "Sales" to the Reports attribute in the Reporting App. |
You can create any number of assignments in your tenant. You can link an assignment to one or more external roles. You cannot link assignments to internal roles.
How provisioning works
When you add a user or device to a role, Advanced Identity Cloud updates the user or device profile with the role information. The update gives, or provisions, the user or device with the permissions that come with the role and its assignments.
Here’s a simple entitlement schema example:
- Roles
-
Accountant-I
Accountant-II - Accountant-I Assignments
-
Reporting App
Operations Reports - Accountant-II Assignments
-
Reporting App
Operations Reports
Sales Reports
Sam and Bina are co-workers. Their identity profiles are provisioned with permissions based on the entitlements schema example.
-
Sam is a member of the Accountant I role.
The Accountant I role assignments give Sam permission to use the Reporting app to access only Operations Reports. -
Bina is a member of the Accountant II role.
The Accountant II role assignments give Bina permission to use the Reporting app to access both Operations Reports and Sales Reports.
|
For a deep dive, learn more in the following documents: |
Organizations
Create organizations in PingOne Advanced Identity Cloud when you want to group identities to suit your business needs.
For example, you can build an organization structure modeled after your brand hierarchy. This lets you control access to business applications with tailored login experiences. You can also use organizations to delegate user administration.
Organization use case
Here’s an example to help explain organization concepts. MightyBank is a conglomeration of independently-operated banks. MightyBank organizes its business units into two locales based on banking regulations associated with each locale. Within a business unit, each bank brand is a self-contained organization.
This diagram depicts MightyBank’s hierarchy of realms and organizations for identity management:

MightyBank organized their Advanced Identity Cloud tenant similarly to their business units. The Alpha realm contains MightyBank identities in the Americas. The Bravo realm contains MightyBank identities in Europe, the Middle East, and Africa (EMEA). Identities represent all employees, contractors, partners, vendors, customers—anyone who conducts business for or with MightyBank.
Each organization in the hierarchy has a designated owner. An owner can create child organizations, or sub-organizations. Owners can also add administrators to their organizations and sub-organizations.
Organization administrators manage user identities within organizations. Administrators also delegate administration to individual users through roles and assignments.
Users who belong to an organization are known as members of the organization.
Top-level organizations
Only Advanced Identity Cloud tenant administrators can create top-level organizations. In this example, Sam Carter is an Advanced Identity Cloud tenant administrator. Sam has created a top-level organization in each realm.
Sam can view and manage all identities within both the Alpha and Bravo realms:

Sam delegates organization administration by setting up organization owners, who in turn set up organization administrators.
Owners
The main job of organization owners is to create organizations and sub-organizations. They also designate users, within the organizations they own, as administrators. Users who are authorized to manage identities within organizations are called organization administrators.
In this example, Sam designated Alma as owner of the top-level organization in the Alpha realm. Alma grouped identities into sub-organizations. One sub-organization contains Acme Bank identities. A second sub-organization contains MexBanco identities.
Alma is authorized to manage the MightyBank Americas organization, and all its sub-organizations.

Organization owners can do the following, but only within the organizations and sub-organizations they own:
-
Add an administrator to an organization or sub-organization.
-
An owner can add an existing user profile to a sub-organization only if the user already belongs to a parent organization.
-
An owner can create a new user profile in a sub-organization if the user doesn’t already belong to a parent organization.
-
In this example, before Alma can add a user profile to the Acme Bank organization, the user must belong to MightyBank Americas, the parent organization. If a user doesn’t belong to the parent organization, then Alma can open the Acme Bank organization, and create a new user profile directly in the organization.
Administrators
The main job of organization administrators is to manage user identities within an organization or sub-organization.
In this example, Alma designated Barbara as the administrator for MightyAmericas. Barbara is authorized to manage all identities in the MightyAmericas organization, and in all of its sub-organizations.
Barbara then delegated administration to two employees in the Acme Bank organization, and two employees in the MexBanco organization. These delegated administrators share responsibility for managing identities.

Organization administrators can do the following, but only within the organizations they are authorized to manage:
-
Delegate user identity administration through roles and assignments.
-
An administrator can add an existing user profile to an organization only if the user already belongs to a parent organization.
-
An administrator can create a new user profile in an organization if the user doesn’t already belong to a parent organization.
-
In this example, before an administrator can add a user profile to the Acme Bank organization, the user profile must already belong to MightyBank Americas, the parent organization. If a user profile does not already belong in MightyBank Americas, then the administrator can open the Acme Bank organization and create a new user profile directly in the organization.
Each organization administrator can manage user profiles, but in only the organization they’re authorized to manage.
More information
-
For steps to create and manage organizations using Advanced Identity Cloud admin UI, learn more in Organizations on the Manage identities page.
-
For a deep dive into organizations, learn more in Organizations.
-
To manage organizations using the REST API, learn more in Manage organizations over REST.
-
To add the organization model to your environment, learn more in How do I get the organization model in my Advanced Identity Cloud environment?.
-
For a deep dive into roles and assignments, learn more in Authorization and roles and Use assignments to provision users.
Manage identities
A PingOne Advanced Identity Cloud tenant can contain data about people (such as employees, customers, or vendors) and devices (such as cell phones or printers), each of which has a unique combination of defining attributes. Advanced Identity Cloud stores these attributes in identity profiles.
In an identity profile, roles and assignments define the type and extent of access permissions given to users and devices. Advanced Identity Cloud uses roles and assignments to provision identity profiles with permissions.
For quick takes, learn more in About roles and assignments and How provisioning works. To view a list of tenant administrators, learn more in View the administrators list. To view realm settings, learn more in Realm settings.
Note that identity resources are grouped by realm. If you can’t find a resource, make sure that you’re looking in the right realm.
Users
A user is a person, such as a customer, employee, or vendor, whose identity profile is stored in a tenant. A user identity profile is also called a user profile.
For a deep dive into Advanced Identity Cloud user identities, learn more in Manage identities.
Create a user profile
-
In the Advanced Identity Cloud admin UI, go to Identities > Manage.
-
On the Manage Identities page, click Alpha realm - Users and New Alpha realm - User.
-
On the New Alpha realm - User page, enter information for the user, and then click Save. For a list of user attributes, learn more in User identity attributes and properties reference.
Edit a user profile
-
In the Advanced Identity Cloud admin UI, go to Identities > Manage.
-
On the Manage Identities page, click Alpha realm - Users, and click on a username.
-
Edit information for the user, and then click Save. For a list of user attributes, learn more in User identity attributes and properties reference.
Reset a user password
-
In the Advanced Identity Cloud admin UI, go to Identities > Manage.
-
On the Manage Identities page, click Alpha realm - Users, and click on a username.
-
Click Reset Password.
-
Enter a new password, and click Reset Password to save the new password.
Delete a user
-
In the Advanced Identity Cloud admin UI, go to Identities > Manage.
-
On the Manage Identities page, click Alpha realm - Users, and click on a username.
-
At the bottom of the page, click Delete Alpha realm - User. The Delete operation cannot be undone.
Add an application to a user
When you add an application to a user, Advanced Identity Cloud automatically provisions an account for them in the target application.
-
In the Advanced Identity Cloud admin UI, go to Identities > Manage.
-
On the Manage Identities page, click Alpha realm - Users, and click a username.
-
Click the Applications tab.
-
Click + Add Application.
-
On the Account Details page, in the Application drop-down field, select an application.
-
Click Assign. Afterward, in the Users & Roles tab, the Assignment column shows the user has a Direct assignment to the application.
Manage trusted devices
| To populate the Trusted Devices tab, add the Device Profile Collector node to your authentication journeys to collect end-user device information. |
You can view and delete the list of trusted devices on a user account.
-
In the Advanced Identity Cloud admin UI, go to Identities > Manage.
-
On the Manage Identities page, click Alpha realm - Users, and click a username.
-
Click the Trusted Devices tab to view a list of devices that the end user has used to log in to their account.
-
Click a device from the list to open its Device Details modal window. The modal displays device information such as operating system and browser. The modal may also display location information for the device if the Device Profile Collector node is configured to collect it and if the end user consented to the information being collected by their browser.
-
Choose one of the following options:
-
To close the modal, click Done.
-
To remove the device from the list of trusted devices:
-
Click Remove device.
-
In the Delete Device? modal window, click Delete.
-
-
Roles
Create an external role
-
In the Advanced Identity Cloud admin UI, go to Identities > Manage.
-
On the Manage Identities page, click Alpha Realm - Roles and New Alpha realm - Role.
-
On the role page, enter the following information for the role, and then click Next:
-
Name: Unique identifier to display in the roles list.
-
Description: String to describe the role, such as Sales.
-
-
(Optional) Assign the role only to identities with specified attributes:
-
On the Dynamic Alpha realm - role Assignment page, use the slider to create a conditional filter for the role.
-
Use the choosers to specify conditions that an identity must meet.
-
(Optional) Click Advanced Editor to create a query-based condition.
-
Click Next.
-
-
(Optional) Assign the role only at specified times:
-
On the Time Constraint page, use the slider to enable a start and end date during which the role is active.
-
Use the calendar, clock choosers, and time zone offset.
-
Click Save.
-
Edit an external role
-
In the Advanced Identity Cloud admin UI, go to Identities > Manage.
-
On the Manage Identities page, click Alpha Realm - Roles, and click on a role name.
-
Add managed assignments to the role:
-
On the role page, click Managed Assignments and Add Managed Assignments.
-
Select a managed assignment from the drop-down list, and click Save.
-
-
Add members to the role:
-
On the role page, click Role Members and Add Role Members.
-
Select an identity from the members list.
-
(Optional) Use the slider to assign the role only at specified times, and then add the dates, times, and timezone offset.
-
-
Change the time constraints or conditions of a role.
-
On the Internal Role page, click Settings.
-
In Time Constraint or Condition, click Set Up to edit the parameters, and then click Save.
-
Add an application to a role
When you add an application to a role and then assign a user to the role, Advanced Identity Cloud automatically provisions the user in the target application.
-
In the Advanced Identity Cloud admin UI, go to Identities > Manage.
-
On the Manage Identities page, click Alpha Realm - Roles, and click on a role name.
-
Click the Applications tab.
-
Click + Add Application.
-
On the Account Details page, in the Application drop-down field, select an application.
-
Click Assign. Afterward, in the Users & Roles tab, the Assignment column shows the user has a Role-based assignment to the application.
Create an internal role
-
In the Advanced Identity Cloud admin UI, go to Identities > Manage.
-
Click Internal Roles.
-
Click + New Internal Role.
-
In the New Internal role screen, enter role details:
-
Name: Unique identifier to display in the Roles list.
-
Description (optional): String that’s meaningful to your organization.
Examples: Employee, Customers, Sales Department, and Europe.
-
-
Click Next.
-
To choose an identity object that the role should grant permissions to, on the Internal role Permissions dialog, choose an identity object.
-
To add the identity, click Add.
-
Set the permission for the identity:
-
View: Grant the identity object view access.
-
Create: Grant the identity object create access.
-
Update: Grant the identity object update access.
-
Delete: Grant the identity object delete access.
-
-
To add another identity, repeat the above three steps.
-
Click Next.
-
To optionally assign a user to a role based on specific attributes, on the Dynamic Internal role Assignment screen:
-
Enable A conditional filter for this role.
-
Use the choosers and drop-down lists to specify conditions for assigning a user to a role.
-
To create a query-based condition, click Advanced Editor, and edit the query code.
-
Click Next.
-
-
To assign a role on a temporary basis, on the Time Constraint screen:
-
Enable Set a start and end date during which this role will be active.
-
Use the calendar and date pickers to define when the role is in effect:
-
Specify the time zone to be used for the start date/time and end/date you specified. Choose a time zone relative to Greenwich Mean Time (GMT). GMT is the same as Universal Time Coordinated (UTC).
-
To view a worldwide list of offset times, click Time zones chart to calculate the offset time.
-
-
-
Click Save.
Edit an internal role
-
In the Advanced Identity Cloud admin UI, go to Identities > Manage.
-
On the Manage Identities page, click Internal Roles, and click on a role name.
-
To edit role details:
-
Click the Details tab.
-
Edit the Name field and possibly the Description field.
-
Click Save.
-
-
To edit a privilege:
-
Click the Privileges tab.
-
Click a privilege.
-
Edit the privilege details.
-
Click Save.
-
-
To add a privilege:
-
Click the Privileges tab.
-
Click + Add Privileges.
-
To choose an identity that this role should grant administration privileges to, use the drop-down list field to choose an identity object.
-
To add the identity, click Add.
-
Set the permission for the identity:
-
View: Grant the identity object view access.
-
Create: Grant the identity object create access.
-
Update: Grant the identity object update access.
-
Delete: Grant the identity object delete access.
-
-
To add another identity, repeat the above three steps.
-
Click Save.
-
-
To edit a member:
-
Click the Members tab.
-
Click a member.
-
Edit the member’s information.
-
Click Save.
-
-
To add a member:
-
Click the Members tab.
-
Click + Add Members.
-
Use the drop-down field to choose a member.
-
Click Save.
-
-
To set a start and end date for when the role is active:
-
On the Internal Role page, click Settings.
-
In the Time Constraint section, click Set Up.
-
Enable Set a start and end date during which this role will be active.
-
Set the time parameter fields.
-
Click Save.
-
-
To set a conditional filter for the role:
-
On the Internal Role page, click Settings.
-
In the Condition section, click Set Up.
-
Enable A conditional filter for this role.
-
Set the condition fields.
-
Click Save.
-
-
To use JSON to configure internal role details, privileges, and other information:
-
On the Internal Role page, click Raw JSON.
-
Edit the JSON sample.
-
-
For a deep dive into roles, learn more in Roles.
Assignments
For a quick take, learn more in Assignments. For a deep dive into roles and assignments, learn more in Use assignments to provision users.
Create a mapping
Before you create an assignment, make sure that you have a mapping, or create a mapping as described in this section.
A mapping specifies a relationship between an object and its attributes, in two data stores. Learn more in Resource mapping.
-
In the Advanced Identity Cloud admin UI, go to Native Consoles > Identity Management. The Identity Management console is displayed.
-
Click Create Mapping, and add a mapping using information from Configure mappings using the admin UI.
Create an assignment
-
In the Advanced Identity Cloud admin UI, go to Identities > Manage.
-
On the Manage Identities page, click Alpha realm - Assignments and New Alpha realm - Assignments.
-
On the assignment page, enter the following information for the assignment, and then click Next:
-
Name: Unique identifier to display in the assignments list.
-
Description: String to describe the assignment, such as Sales reporting.
-
Mapping: Select a mapping to which the assignment applies.
-
-
(Optional) Add an attribute to map to the target system. Learn more in provision an attribute in the target data store.
-
On the Assignment Attributes page, click Add an Attribute.
-
Select an attribute from the drop-down list, and enter a value for the attribute. The attribute-value pair is synchronized with user accounts in the target data store.
-
(Optional) Click , and in the Assignment Operation window specify how Advanced Identity Cloud synchronizes assignment attributes on the target data store:
-
On assignment
-
Merge with target: The attribute value is added to any existing values for that attribute.
-
Replace target: The attribute value overwrites any existing values for that attribute. The value from the assignment becomes the authoritative source for the attribute.
-
-
On unassignment
-
Remove from target: The attribute value is removed from the system object when the user is no longer a member of the role, or when the assignment itself is removed from the role definition.
-
No operation: Removing the assignment from the user’s effectiveAssignments has no effect on the current state of the attribute in the system object.
-
-
-
-
Click to add the assignment, and then click Save.
-
(Optional) Add an event script.
Groovy scripts are not supported. -
One the Alpha realm - Assignment page, click Add an event script.
-
Choose whether to trigger the script on assignment or unassignment.
-
Enter the script in the text box or upload it.
-
(Optional) Define custom variables to pass to your script. To enter variables in JSON format, use the JSON slider.
-
Click Save.
-
-
(Optional) Add managed roles to the assignment
-
On the Alpha realm - Assignment page, click the Manage Roles tab, and click Add Manage Roles.
-
Select a managed role from the drop-down list, and click Save.
-
Organizations
For a quick take, learn more in Organizations.
Organizations can be managed in the following ways:
-
By tenant administrators, using the REST APIs:
Before you can use the IDM REST APIs, you’ll have to get an access token and authenticate to the IDM API server. Learn more in Accessing the IDM REST APIs.
For examples of API calls for organizations, learn more in Manage Organizations Over REST.
-
By tenant administrators, using the Advanced Identity Cloud admin UI as described on this page.
-
By organization owners and organization administrators, using the Advanced Identity Cloud end-user UI as described on this page.
Import identities into an organization
You can build organizations in different ways. For example, you can start with a parent organization that contains all user identities, and then build your organization hierarchy. Alternatively, you can start with a hierarchy of empty organizations, and then add users. Whatever approach you take, at some point you’ll have to import identities into an organization.
| Tenant administrators | Organization owners | Organization administrators |
|---|---|---|
Only tenant administrators can import identities into an organization.
For this example, it is assumed that the following items already exist:
-
A .csv file containing 100 user identities
-
A parent organization with no members
-
In the Advanced Identity Cloud admin UI, go to Identities > Import.
-
On the Bulk Import page, click New Import.
-
On the Upload CSV page, select Alpha realm - Users, and then click Next.
-
In the Upload CSV page, Enter the following information and then click Next:
-
CSV File: Browse to your file
-
Match Using: Add a property name to use for a unique record match
-
-
When the Import Complete dialog box is displayed, and you can confirm that the import was successful, click Done.
You can confirm the import in the following ways:
-
Go to Identities > Manage > Alpha realm - Users, and open any user profile. Click Organizations to which I Belong, and make sure that the organization you created is displayed.
-
Go to Identities > Manage > Alpha realm - Organizations, and make sure that the organization you created is displayed.
-
Click the name of the organization you created, click Members, and then make sure that all the imported user identities are displayed.
-
Create a parent organization
| Tenant administrators | Organization owners | Organization administrators |
|---|---|---|
Only tenant administrators can create a parent organization.
-
In the Advanced Identity Cloud admin UI, go to Identities > Manage.
-
On the Manage Identities page, click Alpha realm - Organizations and New Alpha realm - Organizations.
-
On the New Alpha realm - Organizations page, enter a name for the organization. Uppercase, lowercase, alphanumeric, special characters, and white spaces are allowed.
-
Click Save.
-
In the organization page, change the name, add a description, or assign a parent organization. To designate this organization as the parent, leave the Parent Organization field blank.
-
Click Save.
Create an organization owner
| Tenant administrators | Organization owners | Organization administrators |
|---|---|---|
Only tenant administrators can create an organization owner.
-
In the Advanced Identity Cloud admin UI, go to Identities > Manage.
-
On the Manage Identities page, click Alpha realm - Organizations and click on an organization name.
-
Click Owner and Add Owner.
-
In the Add Owner page, select an identity from the drop-down list.
Make sure that the organization owner is not also an organization member. This can result in giving the organization administrator greater control of the organization than its owner. -
Click Save.
Create an organization administrator
| Tenant administrators | Organization owners | Organization administrators |
|---|---|---|
-
Tenant administrators can create an organization administrator in any organization.
-
Organization owners can create organization administrators only within organizations or sub-organization where they are owner.
-
Organization administrators cannot create other organization administrators.
-
On the Manage Identities page, click Alpha realm - Organizations and click on an organization name.
-
Click Administrators and Add Administrators.
-
In the Add Administrators page, select a user from the drop-down list. The user must already belong to the organization.
-
Click Add Administrators. The username is displayed in the members list.
Create a sub-organization
| Tenant administrators | Organization owners | Organization administrators |
|---|---|---|
-
Tenant administrators can create sub-organizations within any organization.
-
Organization owners can create sub-organizations only within organizations or sub-organizations where they are owner.
-
Organization administrators can create sub-organizations only within organizations or sub-organizations where they are administrator.
Tenant administrators
| Tenant administrators can view all organizations. |
Follow the steps in to create a parent organization, and then set a parent organization that is:
-
An existing organization
-
One level of hierarchy higher than this child organization
Organization owners and organization administrators
| Organization owners and organization administrators can view only the organizations and sub-organizations that they own or administrate. |
-
In the Advanced Identity Cloud end-user UI, go to Alpha realm - Organizations and New Alpha realm - Organizations.
-
On the New Alpha realm - Organizations, page enter a name for the organization. Uppercase, lowercase, alphanumeric, special characters, and white spaces are allowed.
-
Click Save.
-
In the organization page, optionally change the name, and add a description.
-
Assign a parent organization that is One level of hierarchy higher than this child organization.
-
Click Save.
|
While privileges for default attributes are automatically included when setting up a sub-organization, custom attributes need to be manually added to your privileges configuration before creating the sub-organization. Do this by adding the custom attribute to the |
Edit an organization or sub-organization
| Tenant administrators | Organization owners | Organization administrators |
|---|---|---|
-
Tenant administrators can edit any organization or sub-organization.
-
Organization owners can edit only organizations or sub-organization where they are owner.
-
Organization administrators can edit only organizations or sub-organizations where they are administrator.
Tenant administrators
-
In the Advanced Identity Cloud admin UI, go to Identities > Manage.
-
On the Manage Identities page, click Alpha realm - Organizations and click on an organization name.
-
In the organization page, change the name, add a description, or assign a parent organization.
Uppercase, lowercase, alphanumeric, special characters, and white spaces are allowed in the organization name.
To designate this organization as the parent, leave the Parent Organization field blank.
-
Click Save.
Organization owners and organization administrators
-
In the Advanced Identity Cloud end-user UI, go to Alpha realm - Organizations, and click on an organization name.
-
In the organization page, change the name, add a description, or assign a parent organization.
Uppercase, lowercase, alphanumeric, special characters, and white spaces are allowed in the organization name.
To designate this organization as the parent, leave the Parent Organization field blank.
-
Click Save.
Add or create organization members
| Tenant administrators | Organization owners | Organization administrators |
|---|---|---|
-
Tenant administrators can access all members of all organizations.
-
Organization owners can access only members of organizations they own.
-
An organization owner can add a user profile to their organization only if the user profile exists inside their ownership area.
-
An organization owner can create a new user profile as a member of their organization.
-
-
Organization administrators can access only members in their administrative area.
-
An organization administrator can add a user profile to their organization only if the user profile exists inside their administrative area.
-
An organization administrator can create a new user profile as a member of their organization.
-
Add a member to an organization
Tenant administrators
-
In the Advanced Identity Cloud admin UI, go to Identities > Manage.
-
On the Manage Identities page, click Alpha realm - Organizations and click on an organization name.
-
On the organization page, click Members and Add Members.
-
Select an identity from the members list, and then click Save. The username or usernames you added are now displayed in the members list.
Organization owners and organization administrators
-
In the Advanced Identity Cloud end-user UI, go to Alpha realm - Organizations.
-
Follow steps in the tenant administrator instructions.
Create a new user profile in an organization
Tenant administrators
-
Add a user profile, as described in Create a user profile.
-
In the user profile, click Organizations to which I Belong and Add Organizations to which I Belong.
-
In the add organization dialog box, choose one or more organizations from the drop-down list, and click Save.
Organization owners and organization administrators
-
In the Advanced Identity Cloud end-user UI, go to Alpha realm - Users.
-
Follow steps in the tenant administrator instructions.
Delete an organization
| Tenant administrators | Organization owners | Organization administrators |
|---|---|---|
-
Tenant administrators can delete any organization or sub-organization.
-
Organization owners can delete only organizations or sub-organizations where they are owner.
-
Organization administrators can delete only organizations or sub-organization where they are administrator.
Tenant administrators
-
In the Advanced Identity Cloud admin UI, go to Identities > Manage.
-
On the Manage Identities page, click Alpha realm - Organizations and click on an organization name.
-
On the organization page, click Delete Alpha realm - Organization.
This operation cannot be undone.
Organization owners and organization administrators
-
In the Advanced Identity Cloud end-user UI, go to Manage.
-
Follow steps in the tenant administrator instructions.
Sync identities
Before you can sync identities with a remote server or use load balancing and failover in PingOne Advanced Identity Cloud, you must register a remote server with your tenant.
Connectors can read data in your tenant and in external resources (an app or service that runs on a server outside your tenant). Use connectors to convert your identity profiles, as well as user accounts in a resource server, into a format that both data stores can use.
| Advanced Identity Cloud provides built-in connectors for synchronization with data stores in other cloud services. |
Process overview
Before you can make a connection, you must register a remote connector server with your tenant. You also need to have a connector service up and running.
To configure connectors that aren’t built in to Advanced Identity Cloud, complete this list of tasks in order:
-
Change the client secret by resetting it.
-
Download a remote server from Backstage.
-
Install and configure a connector, if needed.
You can also create a connector configuration over REST. -
Configure the remote server to connect to Advanced Identity Cloud (optional).
-
Create a mapping between identities in Advanced Identity Cloud and identities in your identity resource server.
-
If you plan to set up load balancing or failover, then register a remote server cluster (optional).
For troubleshooting advice, learn more in the knowledge base article How do I troubleshoot the Java Remote Connector Service (RCS)?.
Tasks
Task 1: Register a remote server
-
To create a connector server in your development or sandbox[2] environments:
-
In the Advanced Identity Cloud admin UI, go to Identities > Connect > Connector Servers.
-
Click + New Connector Server.
-
In the New Connector Server dialog box, provide the remote server details:
-
Name: This name is displayed in the Connector Servers list.
Use only lowercase letters and numerals. No special characters or spaces are allowed.
-
-
Click Save.
-
-
To create a connector server in your UAT[3], staging, or production environments:
-
Follow the instructions in step 1 to create a connector server in your development environment.
-
Run a series of promotions to promote the connector server configuration from your development environment to your upper environments.
-
Task 2: Reset the client secret
| RCSClient is a built-in OAuth 2.0 client shared by all connector servers in Advanced Identity Cloud. If you reset its client secret, you must update the configuration of all remote connectors configured to connect to the tenant environment. |
-
If you already know the client secret of the RCSClient, skip to Task 3: Download a remote server.
-
In the Advanced Identity Cloud admin UI, go to OAuth2 Clients.
-
Click RCSClient.
-
Click Reset to change the client secret
-
In the Reset Client Secret dialog box, enter a strong password.
-
Read the warning, and then click Save.
Task 3: Download a remote server
You’re directed to the
IDM Cloud Connectors download page. You must sign in to Backstage to view this page and download the connectors.
-
Download the Remote Connector Server to the host that will run the connector server.
Ping Identity recommends using the Java version of the Remote Connector Server. Only download the .NET version if you need to use a PowerShell connector. Learn about the differences between the RCS types in Install a Remote Connector Server (RCS).
You can run the connector server on the same host as the identity resource server or you can run it on a different host. For example, you could run the connector server on a host that’s dedicated to only connectors.
Task 4: Install and configure a connector
If the connector you want to use is not bundled with the remote server you downloaded in Task 2, you’ll need these instructions. Follow the instructions in the ICF documentation to download and install the remote connector you need.
After you complete the Next Steps, click Done in the Next Steps window.
Task 5: Configure a remote server
-
Unpack the OpenICF package you downloaded from the IDM Connectors download page.
-
Edit the
ConnectorServer.propertiesfile.ConnectorServer.propertiesdetails:-
Add the OAuth2 Client credentials used to obtain an OAuth2 token. The client uses the Client Credentials grant type.
-
connectorserver.clientId=RCSClient
Advanced Identity Cloud created this OAuth 2 client for you. -
connectorserver.clientSecret=<client-secret>
Use the OAuth 2 client secret you entered for RCSClient.
-
-
Uncomment these settings and edit them for your tenant:
-
connectorserver.url
This is the Advanced Identity Cloud OpenICF endpoint.
Usewssover HTTPS so the client can obtain a bearer token through OpenID.-
In staging and production environments, use three URLs in a space-delimited list. Example:
connectorserver.url=wss://<tenant-env-fqdn>/openicf/0 wss://<tenant-env-fqdn>/openicf/1 wss://<tenant-env-fqdn>/openicf/2 -
In a development environment, use only one URL. Example:
connectorserver.url=wss://<tenant-env-fqdn>/openicf/0
-
-
connectorserver.connectorServerName=<remote-server-name>
This is the remote server name you set through the Advanced Identity Cloud admin UI. Be sure the name includes only lowercase letters and numerals. No special characters or spaces are allowed. -
connectorserver.pingPongInterval=60
The WebSocket Ping/Pong interval (seconds). -
connectorserver.housekeepingInterval=20
The WebSocket connections housekeeping interval (seconds). -
connectorserver.groupCheckInterval=60
WebSocket groups check interval, in seconds. -
connectorserver.webSocketConnections=3
Specifies the number of sockets the connector server establishes and maintains to each Advanced Identity Cloud (IDM) backend instance. -
connectorserver.connectionTtl=300
WebSocket connection’s time to live (seconds). -
connectorserver.newConnectionsInterval=10
Time between new connections (seconds). -
connectorserver.tokenEndpoint=https://<tenant-env-fqdn>/am/oauth2/realms/root/realms/alpha/access_token
Token endpoint to retrieve access token. -
connectorserver.scope=fr:idm:*
OAuth2 token scope. -
connectorserver.loggerClass=org.forgerock.openicf.common.logging.slf4j.SLF4JLog
You don’t need to set the
connectorserver.usesslproperty; the remote server determines connection security from the value of theconnectorserver.urlproperty. -
-
-
When you’re satisfied with your changes, save the file.
-
Start the remote server on the OAuth 2.0 client:
-
Windows
-
Linux
bin\ConnectorServer.bat /runbin/ConnectorServer.sh /run -
-
To verify the connection is working, view the remote server status in the Remote Servers list.
Task 6: Create a mapping
Create a mapping between identities in Advanced Identity Cloud and identities in your identity resource server.
-
In the Advanced Identity Cloud admin UI, go to Native Consoles > Identity Management.
-
In the IDM admin UI, click Create Mapping.
For detailed information and instructions, learn more in Configure a resource mapping.
After you’ve tested your mapping configuration per the instructions, you can make connections for synchronizing and provisioning user profiles.
Task 7: Register a server cluster
This is optional. Use a cluster of remote servers when you want to set up load balancing or failover among multiple resource servers.
-
In the Advanced Identity Cloud admin UI, go to Identities > Connect > Server Clusters.
-
Click + New Server Cluster.
-
Provide Server Cluster Details:
-
Name: Identifier to display in the Server Clusters list.
-
Algorithm:
-
Choose Failover if you want requests to be redirected to a designated server only when the primary server fails.
-
Choose Round Robin if you want to continuously load-balance among two or more servers regardless of service status.
-
-
-
Click Next.
-
In the Choose Servers dialog box, enable the connectors you want to include in the server cluster.
Every connector associated with a server cluster must have an identical set of JAR files and scripts in its /path/to/openicf/lib directory. All JAR files must be at the same version. If you make any changes to the JAR files and scripts in this directory, you must propagate the changes to all the other connectors in the server cluster.
-
Click Create Cluster.
Synchronize passwords
You can synchronize hashed user passwords from your PingDS deployment into Advanced Identity Cloud.
Password synchronization relies on an LDAP connector configured to synchronize accounts from your DS servers. Advanced Identity Cloud password synchronization does not use a password synchronization plugin. Instead, it synchronizes hashed passwords as strings in the same way it synchronizes other LDAP attributes.
This feature depends on having compatible one-way hash password storage schemes in Advanced Identity Cloud and in your DS password policies. DS servers in Advanced Identity Cloud verify user-provided plaintext passwords against the password hash, just as the DS servers in your deployment.
-
Verify that your DS service stores the passwords you want to synchronize only with DS password storage schemes that are also enabled in Advanced Identity Cloud.
The following DS password storage schemes are enabled in Advanced Identity Cloud:
-
Bcrypt
-
PBKDF2
-
PBKDF2-HMAC-SHA256
-
PBKDF2-HMAC-SHA512
-
Salted SHA-256
-
Salted SHA-512
-
SCRAM-SHA-256
-
SCRAM-SHA-512
-
-
Verify that account synchronization works properly from your DS service to Advanced Identity Cloud.
For example, modify a test user’s entry in your DS server and check that the corresponding account in Advanced Identity Cloud is updated correctly after reconciliation runs.
-
In the native IDM admin UI, configure the LDAP connector to synchronize
userPasswordattributes as strings:-
Delete
__PASSWORD__from the list of LDAP connector properties. -
Add
userPasswordwith Native type:stringand Run as User enabled.
-
-
In the native IDM admin UI, configure the mapping from your remote DS system resource to Advanced Identity Cloud managed users:
-
Map
userPasswordin your remote DS system resource topasswordin managed users. -
Set the transformation script for the synchronization to the following inline script:
// Set the text of DS userPassword as the value of the password:
if (source != null) {
  var base64 = Packages.org.forgerock.util.encode.Base64url;
  decodedTarget = new Packages.java.lang.String(base64.decode(source));
  target = decodedTarget;
}
-
-
Verify that password synchronization is working correctly.
For example, modify a test user’s password in your DS server, and check that the user can authenticate in Advanced Identity Cloud after reconciliation runs.
About Advanced Identity Cloud connectors
Apps and services that run and store data outside your tenant exist as external resources relative to Advanced Identity Cloud.
Advanced Identity Cloud provides connectors to synchronize your identity profiles with data stored in your resource servers.
Connectors work differently based on the capabilities of the connected resource server. For a summary of supported connectors and their capabilities, learn more in ICF documentation.
Syncing and provisioning
Here’s how Advanced Identity Cloud synchronizes user data. In this diagram, an identity resource server hosts an app and a data store containing user accounts. The resource server also hosts a connector server. The connector server runs a connector.
When you edit a user’s account on the resource server, the connector makes the change in the user’s profile in your tenant.
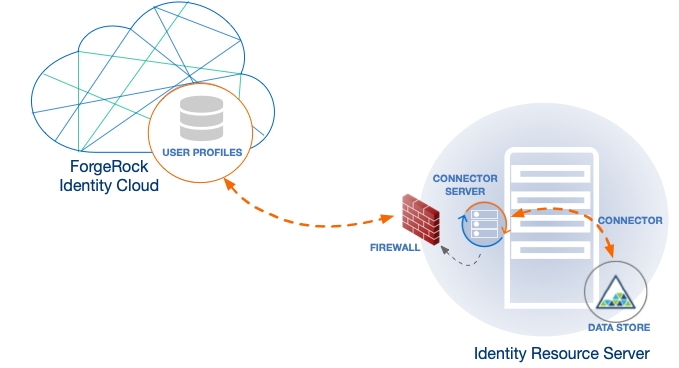
The opposite also happens. When you edit a user’s profile in your tenant, the connector makes the change in the user’s account in your resource server. For a quick take on Advanced Identity Cloud syncing and provisioning, refer to a related example in "Assignments".
Data reconciliation
Advanced Identity Cloud reconciles data when changes occur in your identity profiles or in user accounts stored in resource servers.
An Advanced Identity Cloud connector first compares an identity profile to its corresponding user account in the resource server. If conflicting information exists, Advanced Identity Cloud resolves the conflicts based on your preferences. Then Advanced Identity Cloud updates both the identity profile and the user account.
Load balancing and failover
Use a connector server cluster (a cluster of connector servers) when you want to set up load balancing or failover. A connector server cluster connects to multiple resource servers.
When you configure the connector server cluster for load balancing, Advanced Identity Cloud distributes incoming authentication or authorization requests among the clustered servers. The connector service determines where a request is directed. Request traffic flows evenly, and no single connector works faster or more slowly than others in the server cluster. This ensures requests are handled with the greatest efficiency.
When you configure connector servers for failover, if one resource server stops, then your Advanced Identity Cloud redirects requests to a standby resource server. This ensures your end users don’t experience a loss of service. When the stopped resource server restarts, Advanced Identity Cloud directs requests to the restarted server.
Deactivate the RCS OAuth 2.0 client
The RCS OAuth 2.0 client is activated by default. If you do not need to synchronize your tenant data using a connector, you can deactivate the client:
-
In the Advanced Identity Cloud admin UI, go to OAuth2 Clients.
-
Click RCSClient.
-
Click Active, then select Inactive.
-
The client is immediately deactivated.
If you deactivate the RCS OAuth 2.0 client, you can reactivate it at any time.
Bulk import identities
You can use a CSV file to bulk import identities into PingOne Advanced Identity Cloud. This is useful when you want to add a large number of identities to a role or assignment in a single operation.
Import identities in bulk
Before you begin:
You’ll need a CSV file containing the identity profiles you want
to import. The file must comply with this CSV template example:
CSV template example
{
  "_id": "template",
  "header": "\"userName\",\"givenName\",\"sn\",\"mail\",\"description\",\"accountStatus\",\"telephoneNumber\",
 \"postalAddress\",\"address2\",\"city\",\"postalCode\",\"country\",\"stateProvince\",\"preferences/updates\",
 \"preferences/marketing\""
}
Be sure to use commas as separators. Any other separator may cause errors.
Learn more about generating this file in Import bulk data.
-
In the Advanced Identity Cloud admin UI, go to Identities > Import.
-
On the Import Identities page, click + New Import.
-
On the New Import dialog box, select the realm-target you want to import to.
Tell me more
The target can be any managed object such as a user, role, or assignment defined within a realm. For example, you could import ten user profiles to the Bravo realm - Roles target. The imported roles are added to the
bravo_rolemanaged object in Advanced Identity Cloud. -
Click Next.
-
(Optional) If you haven’t already generated a CSV file, click CSV Template. to download an example file.
If you use this file:
-
Replace the attributes in this file with attributes in your identity resource server.
-
Delete all unused attributes.
-
-
Enter the name of the CSV file to upload.
-
Choose a property Advanced Identity Cloud can use to match an entry in the CSV file to an identity profile in your realm-target.
Tell me more
For example, you could choose the username property. If username
bjensenexists in your CSV file, Advanced Identity Cloud tries to verify that a user profile with the usernamebjensenalso exists in your tenant. If verified, then Advanced Identity Cloud updates the entirebjensenuser profile. If no match is found, then Advanced Identity Cloud creates a user profile forbjensen. -
Click Next.
The Import Complete dialog box indicates real-time import progress. When the import is complete, Advanced Identity Cloud displays the number of new, updated, unchanged, and failed imports.
-
(Optional) To download a CSV file containing a list of identity profiles that failed to import, click Download CSV.
-
Click Done.
Constrain identity queries in the UI
PingOne Advanced Identity Cloud lets you constrain queries in two ways when managing identities with the Advanced Identity Cloud admin UI:
-
By requiring all Advanced Identity Cloud admin UI users to provide a minimum number of characters when searching for identities.
-
By forbidding delegated administrators from sorting and searching resource collections.
Constraining how the Advanced Identity Cloud admin UI can be used can improve overall Advanced Identity Cloud performance because the constraints forbid queries that might inadvertently use a large amount of computing resources.
|
If you encounter slow or failed searches when searching for users in the IDM admin UI, refer to the knowledge base article Searching for users in the UI is very slow in Identity Cloud for troubleshooting ideas. |
Require a minimum length search string
You can require Advanced Identity Cloud administrators to enter a minimum length string when querying identities using the Advanced Identity Cloud admin UI. This setting also disables sorting search results unless a minimum length string has been specified in the search box.
Applying this setting can speed up the time it takes to retrieve records from large identity data sets.
This setting only affects queries performed in the Advanced Identity Cloud admin UI. It does not affect Advanced Identity Cloud REST API queries.
To apply the setting:
-
In the Advanced Identity Cloud admin UI, go to Identities > Configure to access the Configure Identities page.
-
Click on an identity profile. For example, if you want to configure the UI for managing identities in the Alpha realm, click Alpha realm - User.
-
Enter a number greater than zero in the Minimum Characters field.
-
Click Save.
To verify that the setting is in effect:
-
Go to Identities > Manage.
-
Select the identity profile that corresponds to the one you configured when you applied the setting.
-
Click one of the column titles at the top of the search results to attempt to sort the results.
You should not be able to sort the results. Sorting by column should have been disabled.
-
Specify a string in the Search field that has fewer characters than the minimum number of characters you specified in the profile’s configuration. Then, press Enter.
The search operation should not be permitted.
-
Specify a string in the Search field that has the minimum number of characters you specified in the profile’s configuration. Then, press Enter.
The search operation should be permitted.
-
Click one of the column titles at the top of the search results to sort the results.
Sorting the search results should now be permitted.
Forbid sorting or searching resource collections
A resource collection is a set of identities that has a relationship with another identity. For example:
-
All the users with a particular role assignment
-
All the users who are members of an organization
You can forbid Advanced Identity Cloud delegated administrators from sorting resource collections and performing searches within resource collections in the Advanced Identity Cloud admin UI.
This setting only affects delegated administrators using the Advanced Identity Cloud end-user UI. It does not affect tenant administrators using the Advanced Identity Cloud admin UI.
To apply the setting:
-
In the Advanced Identity Cloud admin UI, go to Identities > Configure to access the Configure Identities page.
-
Click on an identity profile. For example, if you want to configure the UI for managing identities in the Alpha realm, click Alpha realm - User.
-
Click the Disable sorting and searching on grids that use this object as a resource collection toggle.
-
Click Save.
To verify that the setting is in effect:
-
Log out of Advanced Identity Cloud.
-
Log in to Advanced Identity Cloud as a delegated administrator.
-
Select an identity profile that has a relationship with the profile you configured when you applied the setting.
For example, if you disabled sorting and search for Alpha realm - User grids, then you could select Alpha realm - organization because organizations have members (which are users).
-
Find the name of an organization for which you’re the delegated administrator.
-
Click its More () menu, and choose Edit.
-
Click Members to bring up the collection of users that are members of your organization.
-
Click First Name to attempt to sort the identities by first name.
Sorting the search results should not be permitted.
User identity attributes and properties reference
You may need to work with user identity attributes in PingOne Advanced Identity Cloud for the following reasons:
-
To customize the identity attribute display names shown in the user profile in the UI
-
To reference the identity attributes in scripts and API calls
|
The attribute and property names are not consistent between the underlying AM and IDM services. To address this, the reference tables depict the equivalent attribute. |
Using the reference tables
-
If you write scripts for AM that access user profiles, then use AM attribute names. User profile script examples: OAuth2 access token modification; OIDC claims; decision node scripts for authentication journeys (trees).
-
If you write scripts for IDM that access managed objects, then use IDM property names. Managed object script examples:
onUpdate,onCreate,onDelete, and so forth. -
If you use APIs to access managed objects or user profiles:
-
Calls to
/amAPIs must use AM attribute names. -
Calls to
/openidmAPIs must use IDM property names.
-
|
If you use the IDM admin UI to change the display name of a property, the change is reflected in both the IDM admin UI and the Advanced Identity Cloud admin UI; however, on the API side and in scripts, the generic names remain unchanged. |
Reference tables
Basic user attributes
| Display Name | IDM Property | AM Attribute |
|---|---|---|
Username |
|
|
Common Name |
|
|
Display Name |
|
|
Password |
|
|
Status |
|
|
First Name |
|
|
Last Name |
|
|
Email Address |
|
|
Description |
|
|
Telephone Number |
|
|
Address 1 |
|
|
City |
|
|
State/Province |
|
|
Postal Code |
|
|
Country |
|
|
Additional user attributes
| Description | IDM Property | AM Attribute |
|---|---|---|
Alias list |
|
|
Applications |
|
|
Applications I Own |
|
|
Assigned dashboard |
|
|
Assignments |
|
|
Consented Mappings |
|
|
Direct Reports |
|
|
Manager |
|
|
Authorization Roles |
|
not available[7] |
Effective Assignments |
|
|
Effective Applications |
|
|
Effective Groups |
|
|
Effective Roles |
|
|
Groups |
|
|
Last Sync timestamp |
|
|
KBA |
|
|
Preferences |
|
|
Profile image |
|
|
Provisioning Roles |
|
|
Organizations I Administer |
|
|
Organizations I Own |
|
|
Organizations to which I Belong |
|
|
Password Last Changed Time |
|
|
Password Expiration Time |
|
|
Task Proxies[8] |
|
n/a |
Task Principals[8] |
|
|
| Description | IDM Property | AM Attribute |
|---|---|---|
Notifications |
|
|
Revision |
|
|
User Metadata |
|
|
UUID |
|
|
General purpose extension attributes
Strings
| Display Name | IDM Property | AM Attribute |
|---|---|---|
Generic Indexed String 1 |
|
|
Generic Indexed String 2 |
|
|
Generic Indexed String 3 |
|
|
Generic Indexed String 4 |
|
|
Generic Indexed String 5 |
|
|
Generic Unindexed String 1 |
|
|
Generic Unindexed String 2 |
|
|
Generic Unindexed String 3 |
|
|
Generic Unindexed String 4 |
|
|
Generic Unindexed String 5 |
|
|
Multivalues
| Display Name | IDM Property | AM Attribute |
|---|---|---|
Generic Indexed Multivalue 1 |
|
|
Generic Indexed Multivalue 2 |
|
|
Generic Indexed Multivalue 3 |
|
|
Generic Indexed Multivalue 4 |
|
|
Generic Indexed Multivalue 5 |
|
|
Generic Unindexed Multivalue 1 |
|
|
Generic Unindexed Multivalue 2 |
|
|
Generic Unindexed Multivalue 3 |
|
|
Generic Unindexed Multivalue 4 |
|
|
Generic Unindexed Multivalue 5 |
|
|
Dates
| Display Name | IDM Property | AM Attribute |
|---|---|---|
Generic Indexed Date 1 |
|
|
Generic Indexed Date 2 |
|
|
Generic Indexed Date 3 |
|
|
Generic Indexed Date 4 |
|
|
Generic Indexed Date 5 |
|
|
Generic Unindexed Date 1 |
|
|
Generic Unindexed Date 2 |
|
|
Generic Unindexed Date 3 |
|
|
Generic Unindexed Date 4 |
|
|
Generic Unindexed Date 5 |
|
|
Integers
| Display Name | IDM Property | AM Attribute |
|---|---|---|
Generic Indexed Integer 1 |
|
|
Generic Indexed Integer 2 |
|
|
Generic Indexed Integer 3 |
|
|
Generic Indexed Integer 4 |
|
|
Generic Indexed Integer 5 |
|
|
Generic Unindexed Integer 1 |
|
|
Generic Unindexed Integer 2 |
|
|
Generic Unindexed Integer 3 |
|
|
Generic Unindexed Integer 4 |
|
|
Generic Unindexed Integer 5 |
|
|
Overview
PingOne Advanced Identity Cloud end users experience and regularly interact with user interfaces (UIs) and user self-service capabilities.
Advanced Identity Cloud provides different UI customization options depending on the needs of your organization.
Advanced Identity Cloud end users can manage their own data, reset their password, retrieve their username, and more. The robust capabilities of Advanced Identity Cloud allows you to customize the end user screens, the applications they have access to, and the data they have access to. Configure user self-service journeys by defining journeys and configuring the information end users can access, manage, and the actions they can take.
End-user UX options for authentication journeys and account management
When you integrate your applications with PingOne Advanced Identity Cloud, you must provide your end users with a UX (user experience) that handles authentication journeys and account management.
Advanced Identity Cloud provides these end-user UX options:
Advanced Identity Cloud hosted pages
Use Advanced Identity Cloud’s built-in and fully-featured UIs with no development work.
ForgeRock Login Widget
Use a widget to integrate authentication journeys easily into your client-side JavaScript web applications.
ForgeRock SDKs
Use SDKs for web, Android, or iOS applications. Integrate the SDK into Advanced Identity Cloud using the REST API.
Advanced Identity Cloud REST API
Build your own custom UIs without any Ping Identity prebuilt components and integrate with Advanced Identity Cloud REST API.
The options are not mutually exclusive, and you may need a combination of them to meet your company’s requirements. For a quick take on which option is most suitable for you, learn more in Compare end-user UX options.
UX options
Advanced Identity Cloud hosted pages
Advanced Identity Cloud hosted pages provide OOTB UIs for the following:
-
End-user authentication journeys, such as login, registration, and password reset
-
End-user account activities, such as managing profile information, viewing application access, and viewing roles and entitlements
This is the most straightforward end-user UX option since all the necessary capabilities are readily available.
The UI layouts are fixed but can be themed per realm. You can add company logos and change button, link, and background colors. The UIs support web applications but not native applications.
Hosted pages are useful if you have limited theming needs or want to quickly try new registration or authentication flows without integrating them into an application.
This UX option only lets you use centralized journey flows in your applications, with embedded journey flows not supported. Specifically, Ping Identity does not support embedding hosted pages in HTML frames.
This is the only UX option that supports SAML journey flows that use Advanced Identity Cloud as the IDP.
Learn more in Advanced Identity Cloud hosted pages.
ForgeRock Login Widget
The ForgeRock Login Widget provides an OOTB UI for end-user authentication journeys, such as login, registration, and password reset. It does not provide a UI for account management.
The Login Widget is low-code and framework-agnostic; it can be initiated with a few lines of code and can be easily integrated into any modern JavaScript application. It does not currently support server-side rendering (SSR), including Node.js.
The Login Widget provides OOTB support for localization, social login, WebAuthn, passkey, device profile, token management, and compliance with WCAG standards. It is highly themeable and customizable with CSS and Javascript.
Learn more in Ping Identity Login Widget.
ForgeRock SDKs
The ForgeRock SDKs let you develop your own custom UI for web, Android, or iOS applications. You then integrate it with your Advanced Identity Cloud tenant using the REST API.
Each SDK provides an OOTB UI module that allows you to prototype your custom UI; however, it is only provided as a starting point, and it is not intended for production use.
This option offers a lot of flexibility if you want to customize the behavior, layout, and theming of the UI, or want to support Android and iOS applications. Using it requires a higher level of technical skill than the previous options.
SDKs can use centralized and embedded journey flows.
Learn more in ForgeRock SDKs.
Advanced Identity Cloud REST API
The most flexible UX option is to build your own custom UIs and integrate with the Advanced Identity Cloud REST API. However, this is also the most complex and time-consuming UX option, as you need to build everything yourself without any Ping Identity prebuilt components.
In addition, you will also need deep identity implementation experience, including an understanding of how to securely store tokens locally.
Learn more in Advanced Identity Cloud REST API.
Ping Identity Platform login and end-user UIs (deprecated)
| Ping Identity no longer recommends or supports this UX option due to the complexity of configuring the distributable packages. For a quick take on alternative options, learn more in Compare end-user UX options. |
Ping Identity also provides the hosted pages UIs as distributable packages, known as the platform login and end-user UIs. You can self-host one or both of the UIs and configure them to use your Advanced Identity Cloud tenant.
This UX option offers flexibility if you want to customize the layout of the UIs or customize the theming beyond what the hosted pages provide. The UIs support web applications but not native applications.
This UX option also lets you use both centralized and embedded journey flows in your applications.
For background information about the platform end-user and login UIs, learn more in Platform UIs.
Compare end-user UX options
For background on UX options in PingOne Advanced Identity Cloud, learn more in End-user UX options for authentication journeys and account management.
Compare development effort against flexibility
The choice of end-user UX option is a balance between development effort and flexibility; the more flexible the option, the more complex and time-consuming it is to develop and implement:
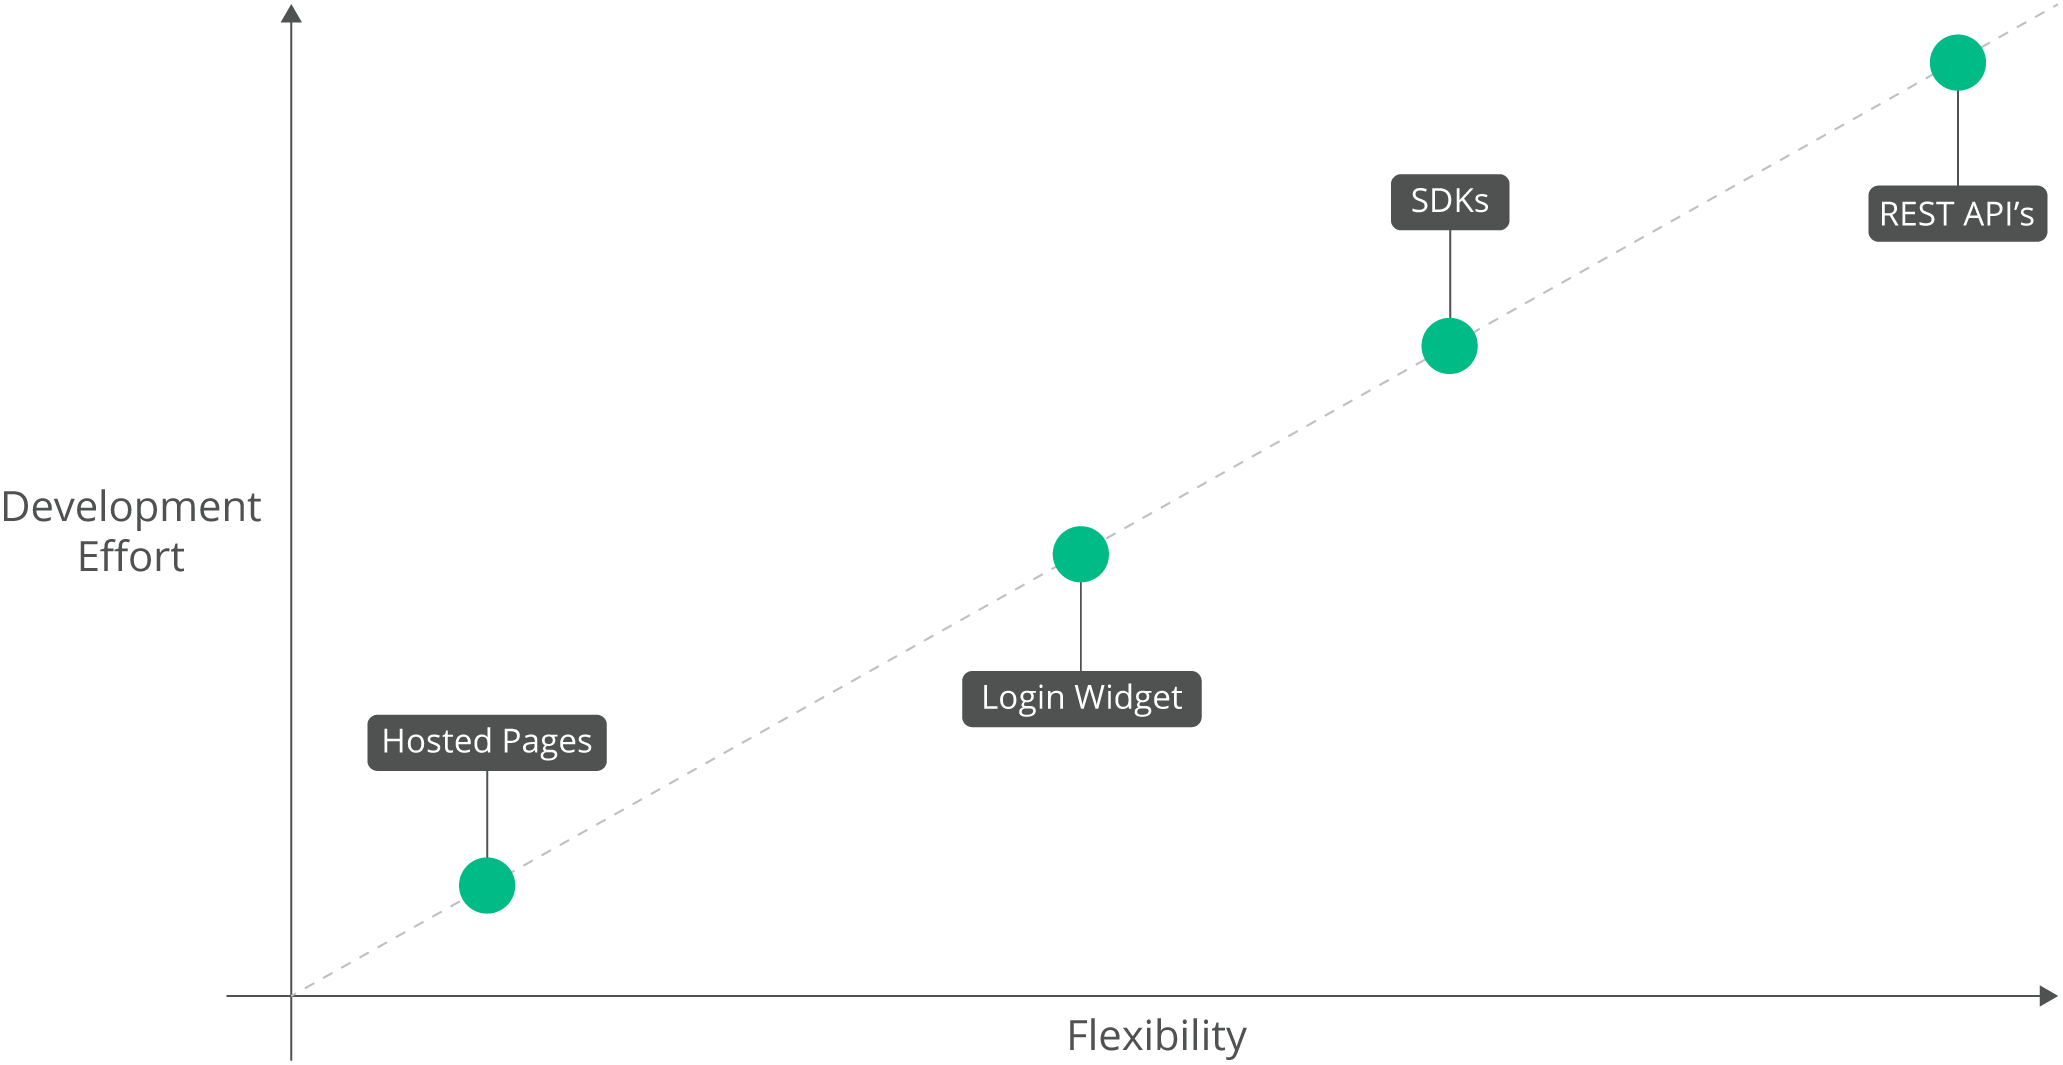
Compare specific features
More specifically, the end-user UX option you choose will be based on a combination of these features:
| Feature | Hosted pages | Login Widget | SDKs | APIs |
|---|---|---|---|---|
OOTB end-user authentication journey UI |
Yes |
Yes |
No |
No |
OOTB end-user authentication journey support |
Yes |
Yes |
Yes |
No |
OOTB end-user account management UI |
Yes |
No |
No |
No |
Hosted by |
Ping Identity |
You |
You |
You |
Theming |
Limited |
No limitation |
No limitation |
No limitation |
Web application (browser) |
Yes |
Yes |
Prototype UI only |
Can be developed |
Native applications (Android, iOS) |
No |
No |
Prototype UI only |
Can be developed |
Localization |
Yes |
Yes |
N/A |
Can be developed |
Yes |
No |
Yes |
Can be developed |
|
No |
Yes |
Yes |
Can be developed |
|
SAML supported |
Yes |
No |
No |
Can be developed |
CAPTCHA supported |
Yes |
Yes |
Yes |
Can be developed |
QR codes supported |
Yes |
Yes |
Yes |
Can be developed |
WebAuthn supported |
Yes |
Yes |
Yes |
Can be developed |
Passkey supported |
Yes |
Yes |
Yes |
Can be developed |
Device profile supported |
N/A |
Yes |
Yes |
Can be developed |
Token management supported |
No |
Yes |
Yes |
Can be developed |
WCAG compliance |
Not always 100% |
Yes |
No |
Can be developed |
Social login |
Yes |
Apple, Facebook, Google only |
Apple, Facebook, Google only |
Can be developed |
Include third-party CSS and JS |
No |
Yes |
Yes |
Can be developed |
End-user UX journey flows
Journey flows define the sign-on experience for end users. The End-user UX options available in PingOne Advanced Identity Cloud offer two journey flows:
Not every end-user UX option supports both centralized and embedded journey flows. Learn more in Compare end-user UX options for more information.
Centralized journey flows
Centralized journey flows redirect end users to an external page to sign in. This is a common experience for most users. This approach is considered the security best practice for Advanced Identity Cloud, ensuring all your applications and websites can share the same, centralized authentication processes.
An example of a centralized journey flow is Google G Suite, where an end user is redirected to the same authentication page no matter which application they’re trying to access.
The following video shows a centralized journey flow with ForgeRock SDKs:
Use the hosted pages and the SDK end-user UX options to implement centralized journey flows.
Embedded journey flows
Embedded journey flows offer a more traditional sign-on experience, as end users are not redirected to an external page.
Embedded journey flows aren’t considered to be a security best practice for the following reasons:
-
Individual applications have access to end user’s credentials.
-
Individual applications have access to the authorization grant.
-
Each application must manually build in security during the sign-on process.
The following video shows an embedded journey flow with ForgeRock SDKs:
Use the Login Widget and the SDK end-user UX options to implement embedded journey flows.
Advanced Identity Cloud hosted pages
PingOne Advanced Identity Cloud hosts its own UI pages, referred to as hosted pages, that you can use in journeys and the Advanced Identity Cloud end-user UI. You can use these pages to quickly create and test common end-user self-service operations.
Advanced Identity Cloud offers two types of hosted pages:
-
Hosted account pages — Pages for end-user account management, shown after a login journey.
-
Hosted journey pages — Pages for end-user login journeys.
In the following example, the sign-in page was created using a hosted journey page. Barbara Jensen’s account page was created using a hosted account page.
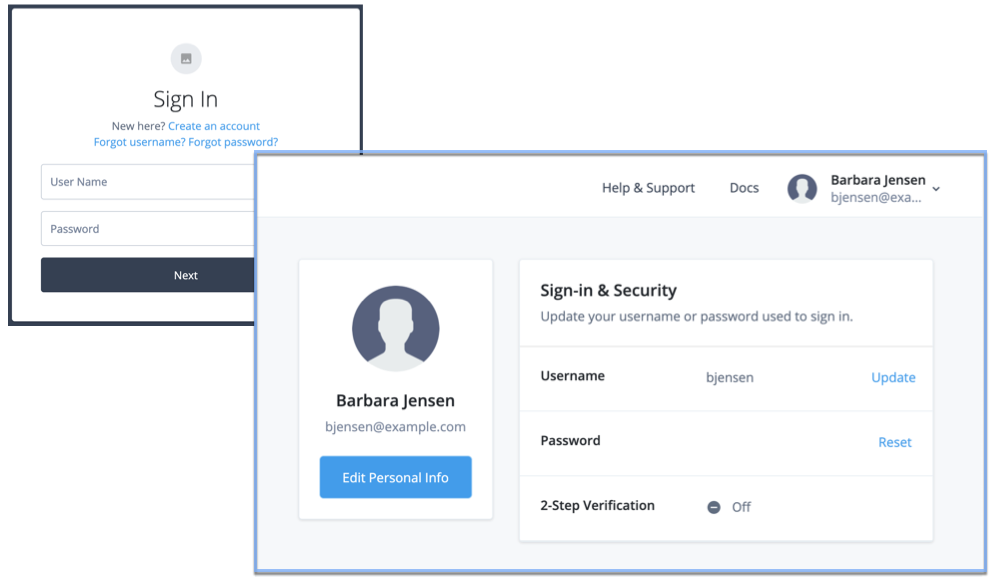
Not only do these hosted pages support localization, but you can use themes to customize their look and feel to meet the branding guidelines of your organization.
Deactivate hosted account pages
Hosted account pages are activated by default. If you deactivate them, you can reactivate them at any time.
You can use the ForgeRock SDKs or APIs to create and host your own custom account pages. If you do this, Ping Identity recommends that you deactivate the hosted account pages to ensure there is no risk of unauthorized access to end-user profile information by a malicious user.
| Hosted account pages can be deactivated independently from hosted journey pages. |
When you deactivate the hosted accout pages, Advanced Identity Cloud displays the following web page to unauthorized end users:
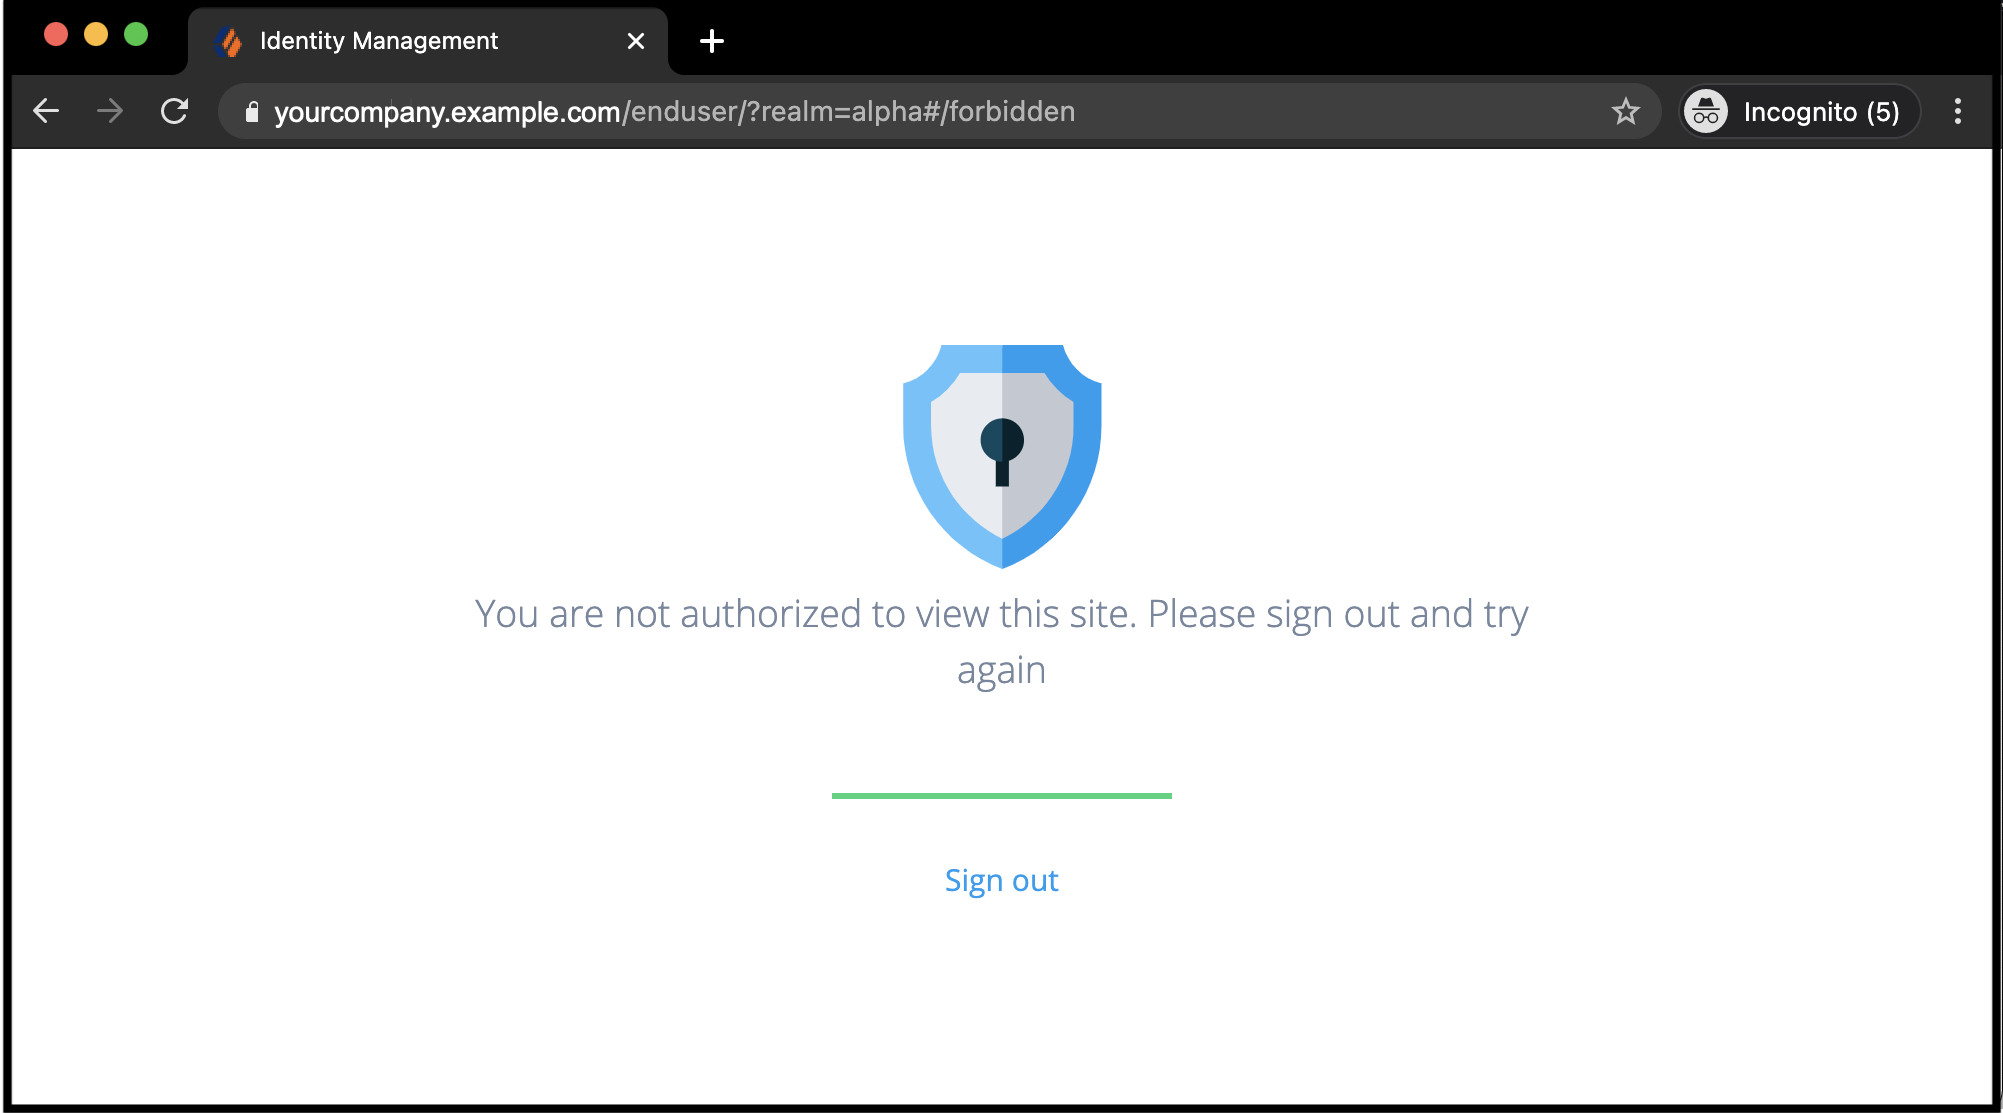
After deactivating the default end-user profile, you can still use the hosted end-user journey UI while denying unauthorized access to end-user profiles. Your customers manage only their own profiles or delegate administration using your application.
Afterward, all hosted pages associated with your tenant are deactivated.
-
In the Advanced Identity Cloud admin UI, open the TENANT menu (upper right), and go to Tenant Settings > Global Settings.
-
Click End User UI.
-
On the End User UI page, do one of the following:
-
To activate hosted pages, beside Hosted Account Pages, click Activate. The Global Settings toggle displays the status as Active.
-
To deactivate hosted pages, beside Hosted Account Pages, click Deactivate. The Global Settings toggle displays the status as Inactive.
-
The change takes effect immediately.
|
When you deactivate hosted pages, all hosted pages associated with your tenant are deactivated. |
Deactivate hosted journey pages
You can use the ForgeRock SDKs or APIs to create and host your own custom journeys. If you do this, Ping Identity recommends that you deactivate the hosted journey pages to ensure there is no risk of unauthorized access to the login, registration, or password reset pages by a malicious user.
| Hosted journey pages can be deactivated independently from hosted account pages. |
When you deactivate the hosted journey pages, Advanced Identity Cloud displays the following web page to unauthorized end users:
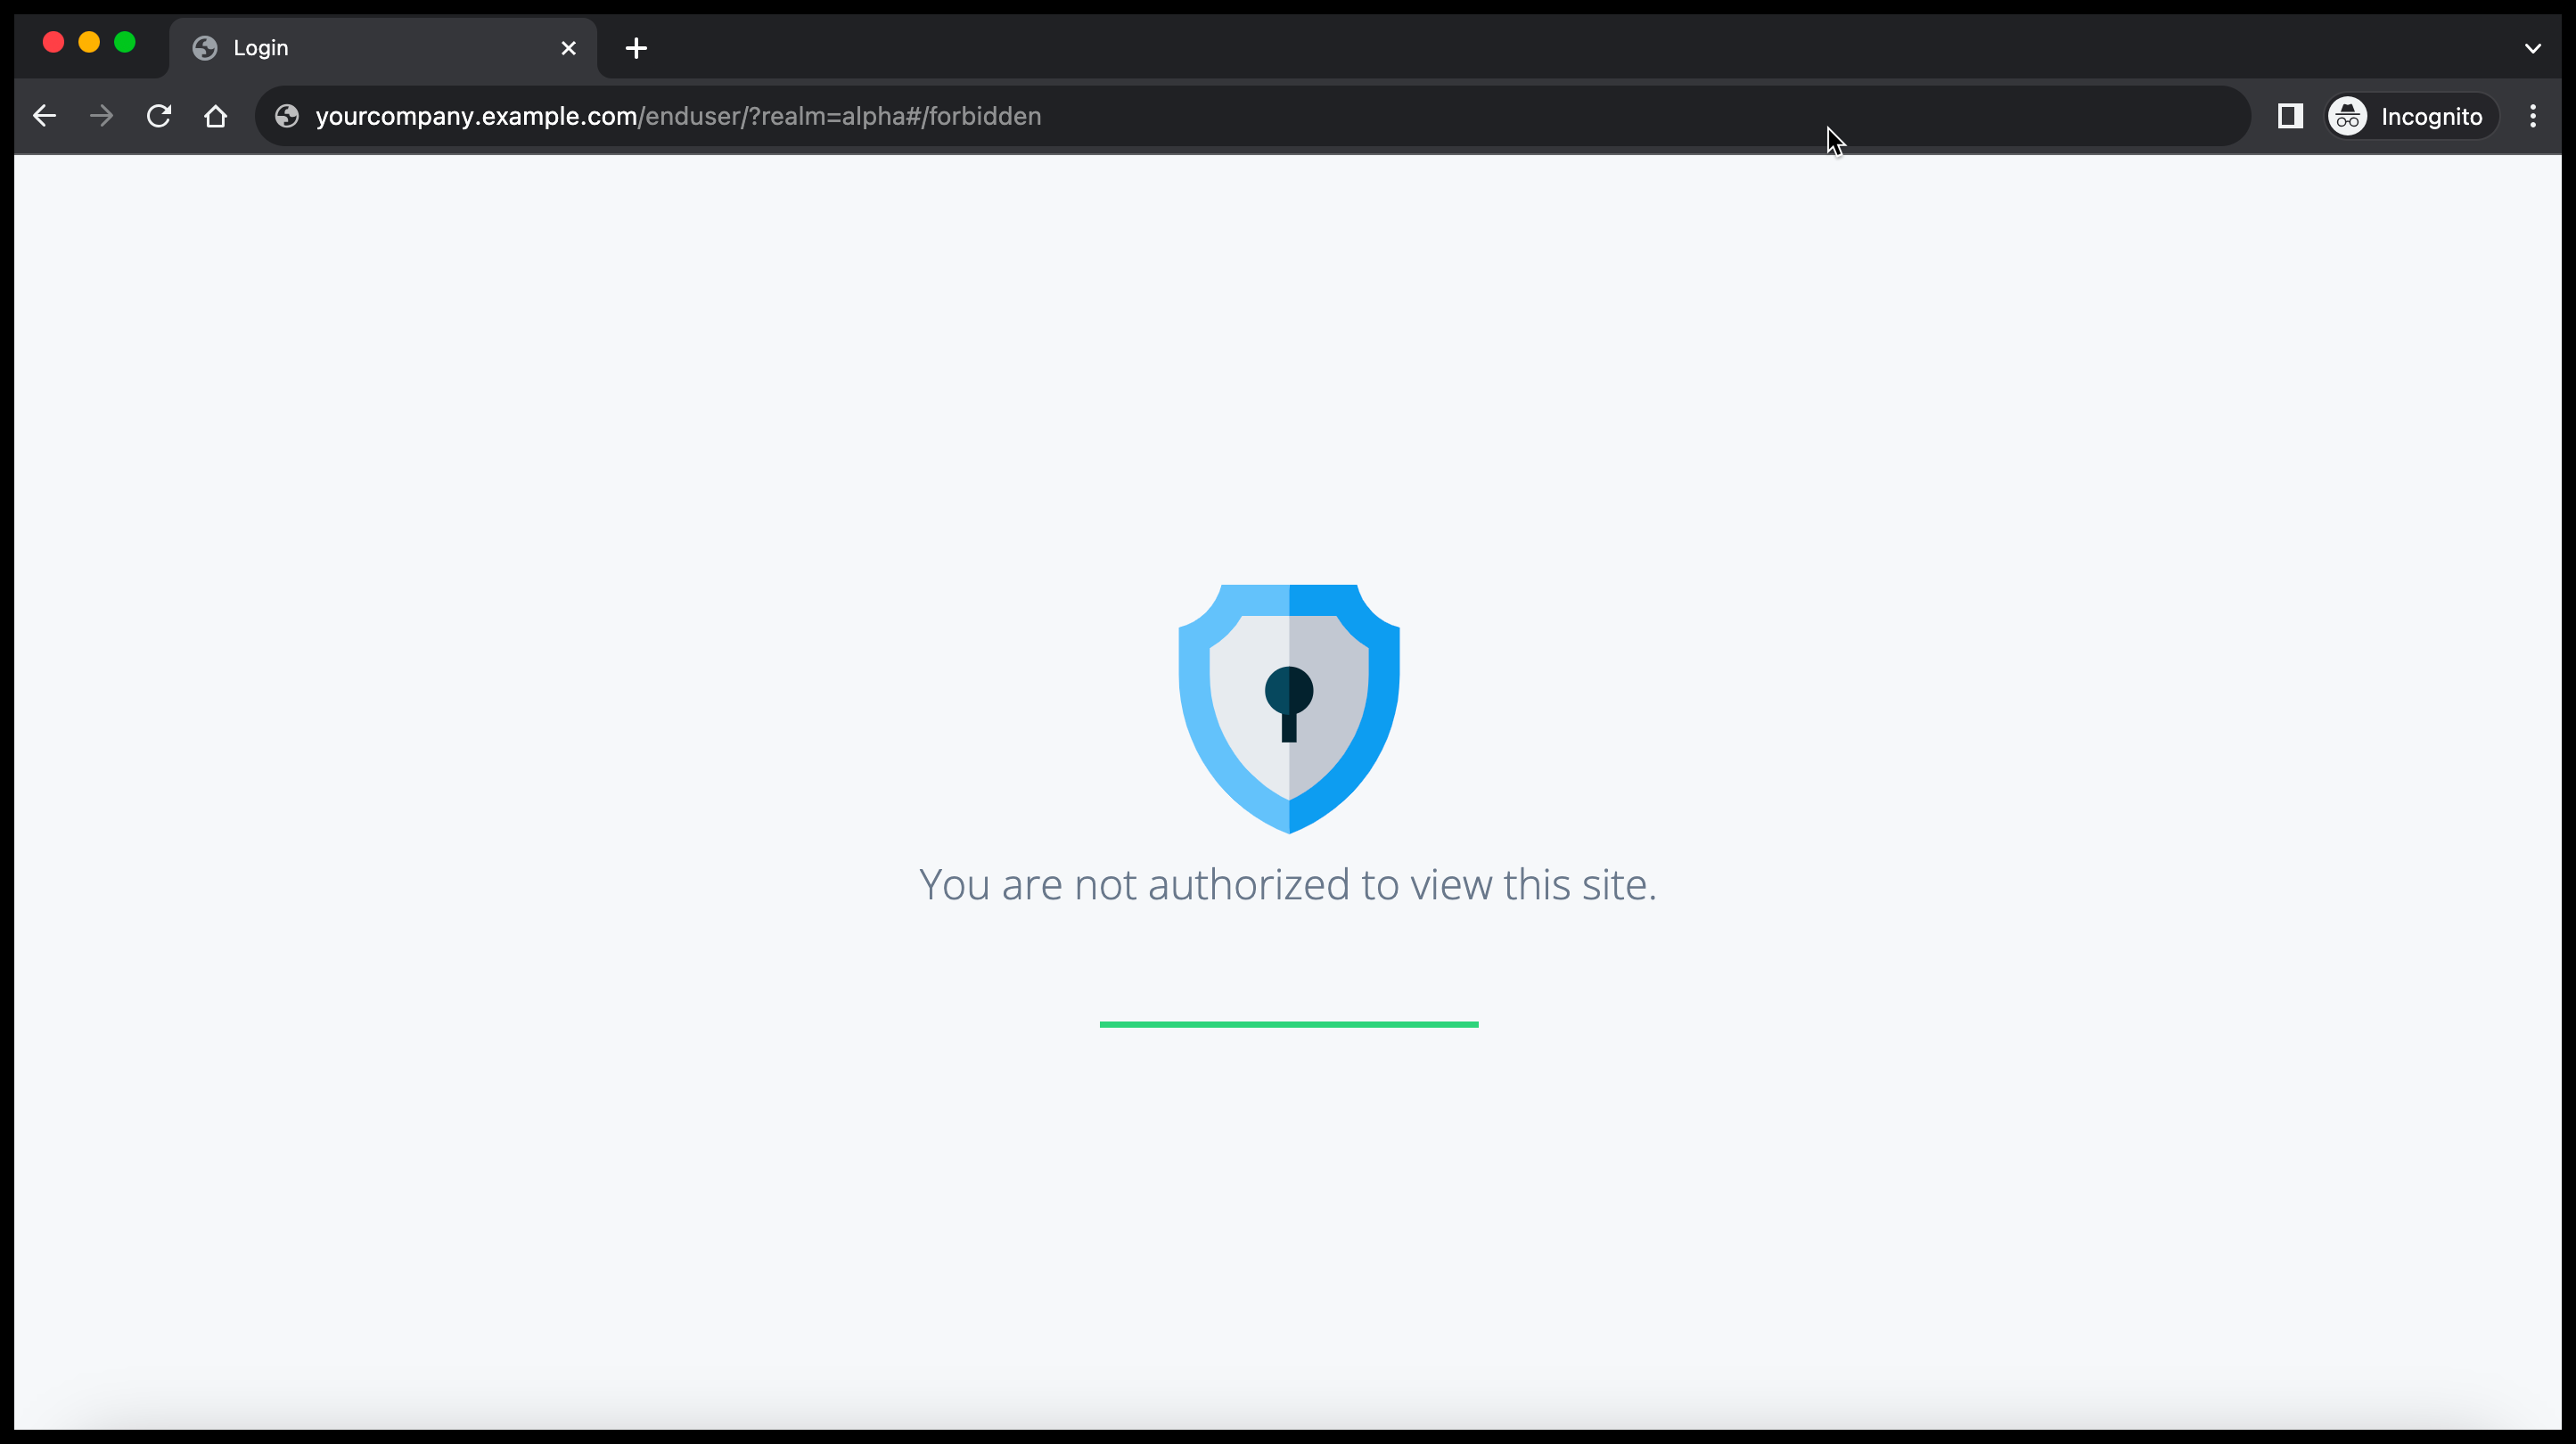
After you deactivate the default hosted journey pages, you can still administer the tenant environment while preventing unauthorized access to default journey information.
For an explanation about how hosted pages integrate with the default journey, learn more in Journeys.
Other resources
Learn how to customize and use hosted pages:
-
Customize login and end user pages - Customize the look and feel of the login (journey) pages. This includes logos, headers, footers, the layout of the overall page, and the actions and information your end users have access to in the Advanced Identity Cloud end-user UI.
-
Localize login and end-user pages - Support different languages in the UI with localization.
-
End-user pages - Explore an example of a journey and the Advanced Identity Cloud end-user UI screens that display to end users (depending on the configuration).
Customize login and end-user pages
If you choose to present pages to end users by selecting the hosted pages UI integration option, customize the PingOne Advanced Identity Cloud provided pages with themes.
Themes let you customize the look and feel of login and Advanced Identity Cloud end-user UI pages, including the information presented to end users and the actions they can take when logged into the Advanced Identity Cloud end-user UI.
Notes on themes:
-
Advanced Identity Cloud realms have a default theme that includes the colors of buttons and links, typefaces, and so on. This default theme applies to the end-user and login UIs. You can add custom themes so that your end users are presented with screens specific to their authentication journey.
-
Custom themes let you create a different look and feel for each brand that you support, including logos, favicon, headers, footers, scripted tags, and the actions and information end users can see in the Advanced Identity Cloud end-user UI.
-
A theme is followed throughout an authentication journey. This means that if a user logs in through the Login UI with a specific theme, the remaining pages in the journey will have that same theme.
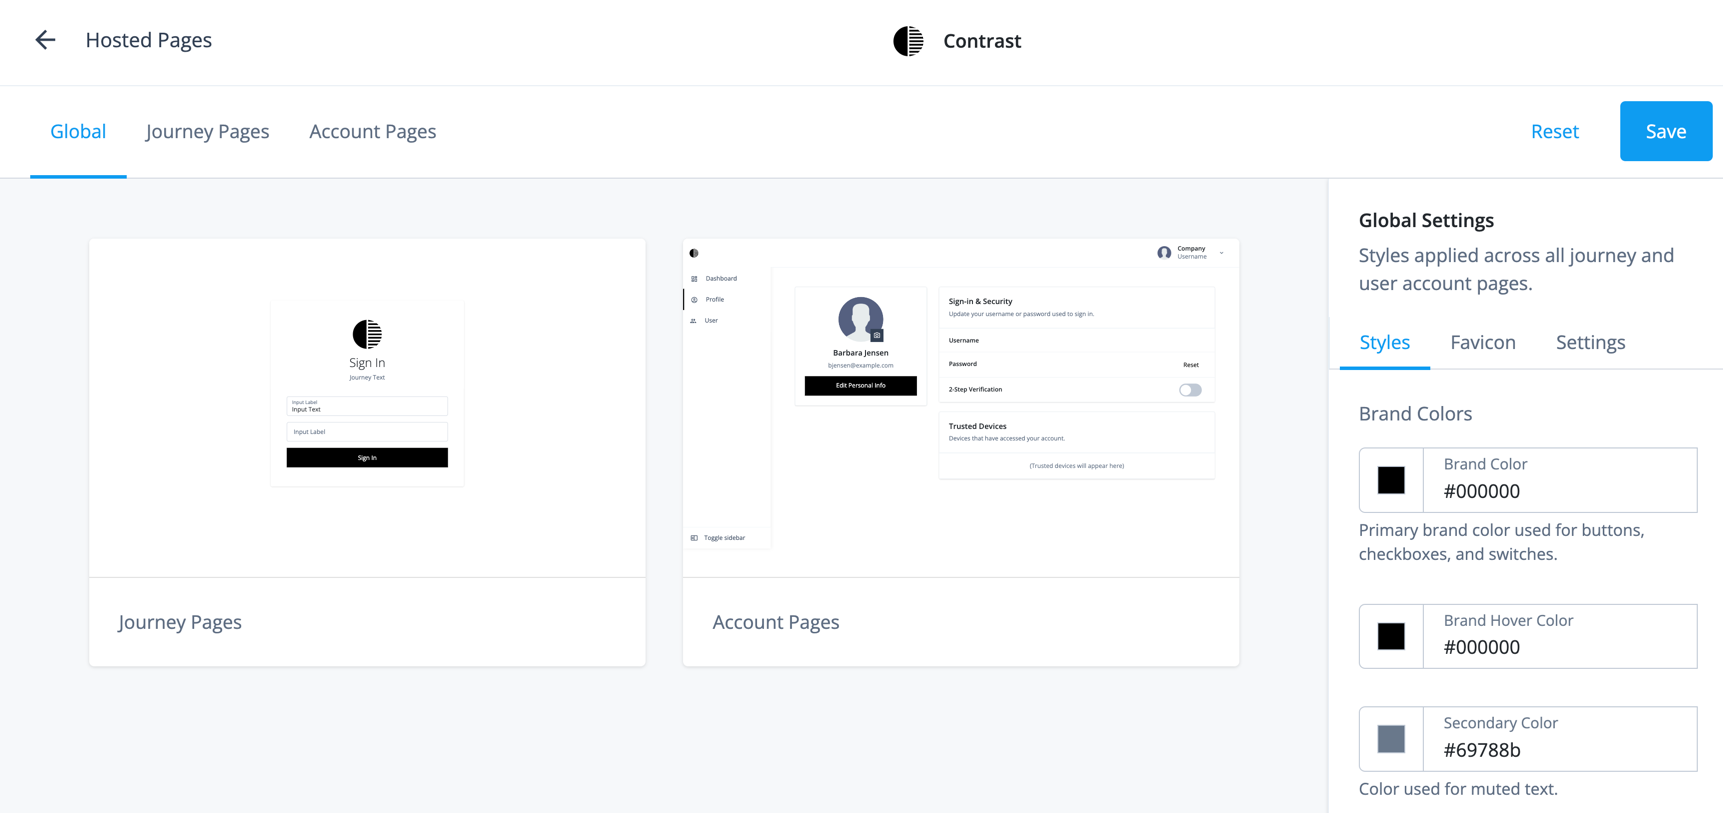
Add a custom theme
In the Advanced Identity Cloud admin UI:
-
Select Hosted Pages > + New Theme.
Duplicate an existing theme by clicking next to the theme you want, then select Duplicate. -
Enter a theme name that describes the theme’s purpose; for example, the brand associated with an authentication journey.
-
Use the tabs and options to customize various aspects of the theme:
Tab Option What you can customize Global
Styles
You can customize:
-
Brand Colors — This includes colors for buttons, checkboxes, switches, high-level alert actions, and success actions.
-
Typography — The font applied to all journeys and customer-facing pages.
-
Buttons — The colors of buttons and their radius.
-
Links — The color of links, including when you hover over them and the option to bold all links.
-
Switches — The background color.
Favicon
Favicon logo displayed for all journey and account pages. You can localize the favicon. Learn more in Localize the favicon and theme logo.
Settings
The theme name and any journey(s) using this theme.
From this screen, you can select journeys to apply to your theme. Journey Pages
Styles
You can customize:
-
Page Background — This includes the color of the journey background as well as a background image (optional).
-
Sign-in Card — The sign-in card is where end users enter their credentials. This includes the card colors, field colors, card shadow, border radius, and if the input text labels should sit above or in the input field.
-
Global Styles — These are the styles you set in the Global tab. Modifying this section from the Journey Pages updates the Global tab styles.
Logo
Logo to display on sign-in and registration pages. The displaying of the logo is optional. You can localize the logo. Learn more in Localize the favicon and theme logo.
Layout
This includes:
-
Layout — The position of the sign-in card on the page.
-
Button Position — The position of the button inside the sign-in card.
-
Header and footer: Place a header above or a footer below the sign-in card.
-
Error Heading Fallback — Turn off the error heading that displays as a fallback if there is no heading in the page content.
-
Remember Me — Add a checkbox to the sign-in card that lets end users choose to have their username remembered and prepopulated. If checked, the UI stores an end-user’s username in local storage after their next sign-in attempt.
The optional Label field lets you specify a custom label to display to the end user to replace the default label of Remember Me.
-
Scripted Tags — Add HTML scripted tags to journey pages.
-
Focus First Form Item — Focus the first form input or button on each journey step.
Account Pages
Styles
This includes customizing the colors of:
-
The left end-user Navigation pane.
-
The Top Bar where the user logs out.
-
The Page Styles that present user information.
-
The Cards that are contained within the page that display various information.
-
Global Settings — These are the styles you set in the Global tab. Modifying this section from the Account Pages updates the Global tab styles.
Logo
Logo to display on customer-facing pages
Layout
This includes:
-
Profile Page — Learn more in Configure visible information and end-user actions.
-
Footer: Place a footer below all acount pages.
-
Scripted Tags — Add HTML scripted tags to account pages.
-
-
Configure the new theme as the default theme for the realm:
The default theme is the theme that’s used when you don’t apply a specific theme to an authentication journey.
-
From the Advanced Identity Cloud admin UI, go to Hosted Pages.
-
From the list of themes, click the ellipsis (…).
-
Click Set as Realm Default.
-
Localize the favicon and theme logo
To localize the favicon or theme logo:
-
On the Global, Journey Pages, or Account Pages tabs, click the Favicon or Logo tabs from the right pane.
-
Click the favicon or logo .
-
Click + Specify a Locale.
-
In the Locale field, enter the ISO 639-1 (2 letter country code) for the language. For example, for French the value would be
fr. -
Click Add.
-
In the Favicon URL field or the Logo URL field, enter the URL for the favicon or logo.
The images must be publicly accessible. -
To set alternative text for the logo, in the Alt Text field, enter alternate text.
-
Click Update.
-
Click Save.
Apply a custom theme to a journey
In the Advanced Identity Cloud admin UI:
-
Select Journeys.
-
Select the journey to apply the custom theme.
-
Click Edit.
-
Click ... > Edit Details.
-
Select Override theme.
-
Select the custom theme that you want to apply to this journey, then click Save.
|
Theme definitions and the mappings between authentication journeys and themes are stored in
Advanced Identity Cloud as configuration objects. They are therefore "static" in terms of Advanced Identity Cloud promotion.
If you add a new theme or logo, your change must go through the promotion process. Theme
selection can be dynamic, however. If you set a theme in a page node during a journey, for
example, by setting |
Custom headers and footers
Each theme lets you configure localized custom headers and footers:
| Header | Footer | |
|---|---|---|
Journey pages |
||
Account pages |
n/a |
Headers and footers can take HTML or inline CSS to insert links, classes, and other elements. Scripting isn’t supported in headers and footers.
The account footer is separate from the journey footer. This lets you set up different buttons, links, and other elements, that display to an end user after they log in.
Enable headers and footers for a theme
-
In the Advanced Identity Cloud admin UI, go to Hosted Pages, then select a theme.
-
Select either Journey Pages or Account Pages.
-
In the panel on the right-hand side, click Layout.
-
Find the Header section (journey pages only), then enable the switch.
-
Find the Footer section, then enable the switch.
-
Edit headers and footers
-
Follow the steps above to find the appropriate Header or Footer section, then click the preview to open the editor.
-
If you do not need localized content, edit the HTML as appropriate, then go to step 4.
-
If you need localized content:
-
Add as many locales as you need. Learn more in Localize headers and footers.
-
Use the locale selector to change locales, and edit the HTML in each locale as appropriate.
-
-
Click Save.
Localize headers and footers
-
Follow the steps above to find the appropriate Header or Footer section, then click the preview to open the editor.
-
To add an initial locale for the existing header or footer content:
-
Click + Specify a Locale to open a secondary modal.
-
In the Add a Locale secondary modal, enter a locale identifier; for example,
fr(French), orfr-ca(French - Canada). -
Click Add to add the locale and close the secondary modal.
-
The + Specify a Locale link will now be replaced by a locale selector, with the new locale preselected.
-
-
To add an additional locale:
-
Click the locale selector, then click + Add Locale to open a secondary modal.
-
In the Add a Locale secondary modal, enter a locale identifier; for example,
es(Spanish), ores-ar(Spanish - Argentina). -
Click Add to add the locale and close the secondary modal.
-
The new locale will now be available in the locale selector, and be preselected. The header or footer content for the new locale will be a copy of the header or footer content from the initial locale.
-
Translate the header or footer content for the new locale.
-
-
Repeat step 3 for as many locales as you need.
-
Click Save.
Configure actions and information for end users
Login UI
You can configure the following self-service features to control the actions and information displayed to end users in the Identity Cloud Login UI:
Configure terms and conditions
Configure the terms and conditions your end users must accept before they can complete a registration journey. Learn more in Terms and conditions.
Configure privacy and consent
Configure the external resources your end users can choose to share their data with. Learn more in Privacy and consent.
Configure security questions
Configure the security questions your end users answer during a registration journey and can later use during a reset journey to verify their identity. Learn more in Security questions.
End User UI
You control the information that is displayed and the actions end users can take from the Advanced Identity Cloud end-user UI.
The information and actions are broken out into the following sections:
Configure visible information and end-user actions
Your end users can only see the information and take actions that you configure.
To configure the information users can see and the actions they can take:
-
From the Advanced Identity Cloud admin UI, go to Hosted Pages.
-
Select a theme or click + New Theme.
If you create a new theme, enter a Name for the theme and click Save.
-
Select Account Pages from the top tabs. This refers to the Advanced Identity Cloud admin UI pages.
-
In the tabs displayed in the right pane, select Layout.
-
The Profile Information section dictates the actions and information end users can see. Select or deselect any of the following:
Profile page component Description Personal Information
Enable to allow the end user to view their attributes and update them. The attributes that display depend on settings at the property level. Learn more in Configure properties end users can view and update.
Sign-in & Security
Enable any of the following:
-
Password — Allow end users to update their password. Uses an existing session. This correlates to the default journey UpdatePassword.
To change the journey used for password updates:
-
From the Advanced Identity Cloud admin UI, select Native Consoles > Access Management.
-
From the left navigation pane, click Services.
-
Select Self Service Trees.
-
In the updatePassword field, enter the name of the journey.
-
Click Save Changes.
-
-
Security Questions — Allows end users to reset their security questions on their profile.
-
2-step verification — If an end user has registered a device for two-factor/MFA, this option displays as enabled.
If enabled, an additional Change button displays to end users. End users can select this button to rename their device(s) or delete their device(s) from Advanced Identity Cloud.
Social Sign-In
Allows end users to view the social providers that have authenticated with, such as Google or FaceBook.
For details on letting end users connect to social providers from their profile page, learn more in Social authentication. After you configure social providers and create the journey, add it as the connectSocial journey for the realm:
-
From the Advanced Identity Cloud admin UI, select Native Consoles > Access Management.
-
From the left navigation pane, click Services.
-
Select Self Service Trees.
-
Add a connectSocial field whose value is the name of the journey.
-
Click Save Changes.
Trusted Devices
Lets end users view the devices that have been used to log in to their account. End users can update the name of the device.
To populate the Trusted Devices tab, add the Device Profile Collector node to your authentication journeys to collect end-user device information. Authorized Applications
Allows end users to view and manage the applications that have access to their personal information.
Preferences
Allows end users to view and set preferences for communication. For example, an end user can select if they would like to receive emails regarding special offers and services.
Consent
Allows end users to view and manage how their data is shared with third parties.
Account Controls
Allows end users to download the data Advanced Identity Cloud has about them in a JSON format and allows end users to delete their account (identity) information.
-
-
Click Save.
Configure properties end users can view and update
When an end user logs into the Advanced Identity Cloud end-user UI and selects Profile > Edit Personal Info, their profile data in Advanced Identity Cloud displays.
When you enable end user’s personal information from the theme, all the Advanced Identity Cloud properties are marked as User Editable. This means that end users can view and update most of their data in Advanced Identity Cloud. However, you may or may not want users to see all of their data.
For example, if you are not using all the properties available to you in Advanced Identity Cloud to store data for your end users, you might want to hide the unused properties for your end users, to decrease confusion and clutter.
To disable user properties from displaying to an end user, follow these steps:
-
From the Advanced Identity Cloud admin UI, select Native Consoles > Identity Management.
-
Select Configure > Managed Objects from the top tabs.
-
The user object to update, such as Alpha_user or Bravo_user.
-
From the Properties tab, select the property to modify.
-
From the properties screen, under the Details tab, select Show advanced options.
-
Disable the User Editable radio button.
-
Click Save. The property is now hidden from the end user.
-
Repeat steps 5-7 for every property you want to hide from the end user.
The following example shows:
-
The Description property being visible to the Advanced Identity Cloud end-user UI.
-
Going to Native Consoles > Identity Management and disabling the User Editable field for the Description property.
-
Going back to the Advanced Identity Cloud end-user UI, refreshing the page, and showing that the Description property no longer displays to the end user.
Use script tags in Advanced Identity Cloud end-user and login UIs
You can include script tags in Advanced Identity Cloud end-user and login UIs to integrate third-party scripts such as customer analytics.
-
In the Advanced Identity Cloud admin UI, go to Hosted Pages, then select a theme.
-
Select either Journey Pages or Account Pages.
-
In the panel on the right-hand side, click Layout.
-
Find the Script Tags section.
-
In the HTML field, enter your script code. The following example adds a script for the OneTrust cookie consent service:
<script type="text/javascript" charset="UTF-8" src="https://cdn.cookielaw.org/scripttemplates/otSDKStub.js" data-domain-script="<account-id>"></script>(1)
<script type="text/javascript">
  function OptanonWrapper() {};
</script>
1 In this example, <account-id>needs replacing with a OneTrust account ID.-
Do not attempt to use scripts with nested nodes. All nodes must be at the same level.
-
The script code can include comments.
-
The script code can include all valid attributes listed here: https://developer.mozilla.org/en-US/docs/Web/HTML/Element/script#attributes..
-
The script code must be wrapped in
<script>tags.
-
-
Click Save.
-
-
Update the tenant’s Content Security Policy:
-
If the tenant has an active report-only policy, update it by adding the domain of the third-party script to the
script-srcpolicy directive. -
If the tenant has an active enforced policy, update it by adding the domain of the third-party script to the
script-srcpolicy directive.
-
Localize login and end-user pages
PingOne Advanced Identity Cloud lets you localize login and end-user pages to support the different languages of your
end users. Use ISO-639-1 language codes (for
example fr and de) to provide locale specific content in as many locales as you need.
Localize at feature level
Localize related features
You can localize the following features related to journey and account pages:
| Feature | Description |
|---|---|
Hosted pages |
Learn more in Localize headers and footers and Localize the favicon and theme logo. |
Security questions |
Learn more in Security questions. |
Terms and conditions |
Learn more in Terms and conditions. |
Email templates |
Learn more in Email templates. |
Localize journey authentication nodes
You can individually localize authentication nodes that display content in journey pages. For example, the Page node lets you add content to the Page Header property to display an initial journey message to end users. You can define as many localized versions of the message as you need:
Localize at UI level
You can localize static content and server messages in the login and end-user UIs using translation configuration. Learn more in Configure tenant localization.
End-user pages
If you choose hosted pages as your UI integration option, PingOne Advanced Identity Cloud provides an end-user UI for your end users.
The Advanced Identity Cloud end-user UI gives users various options, such as updating their profiles and accessing information. The end-user UI pages vary, depending on how you configure the UI, and on which Advanced Identity Cloud capabilities you have purchased.
|
The Advanced Identity Cloud end-user UI exposes personal information. Deactivate the Advanced Identity Cloud end-user UI if:
|
End-user menu items
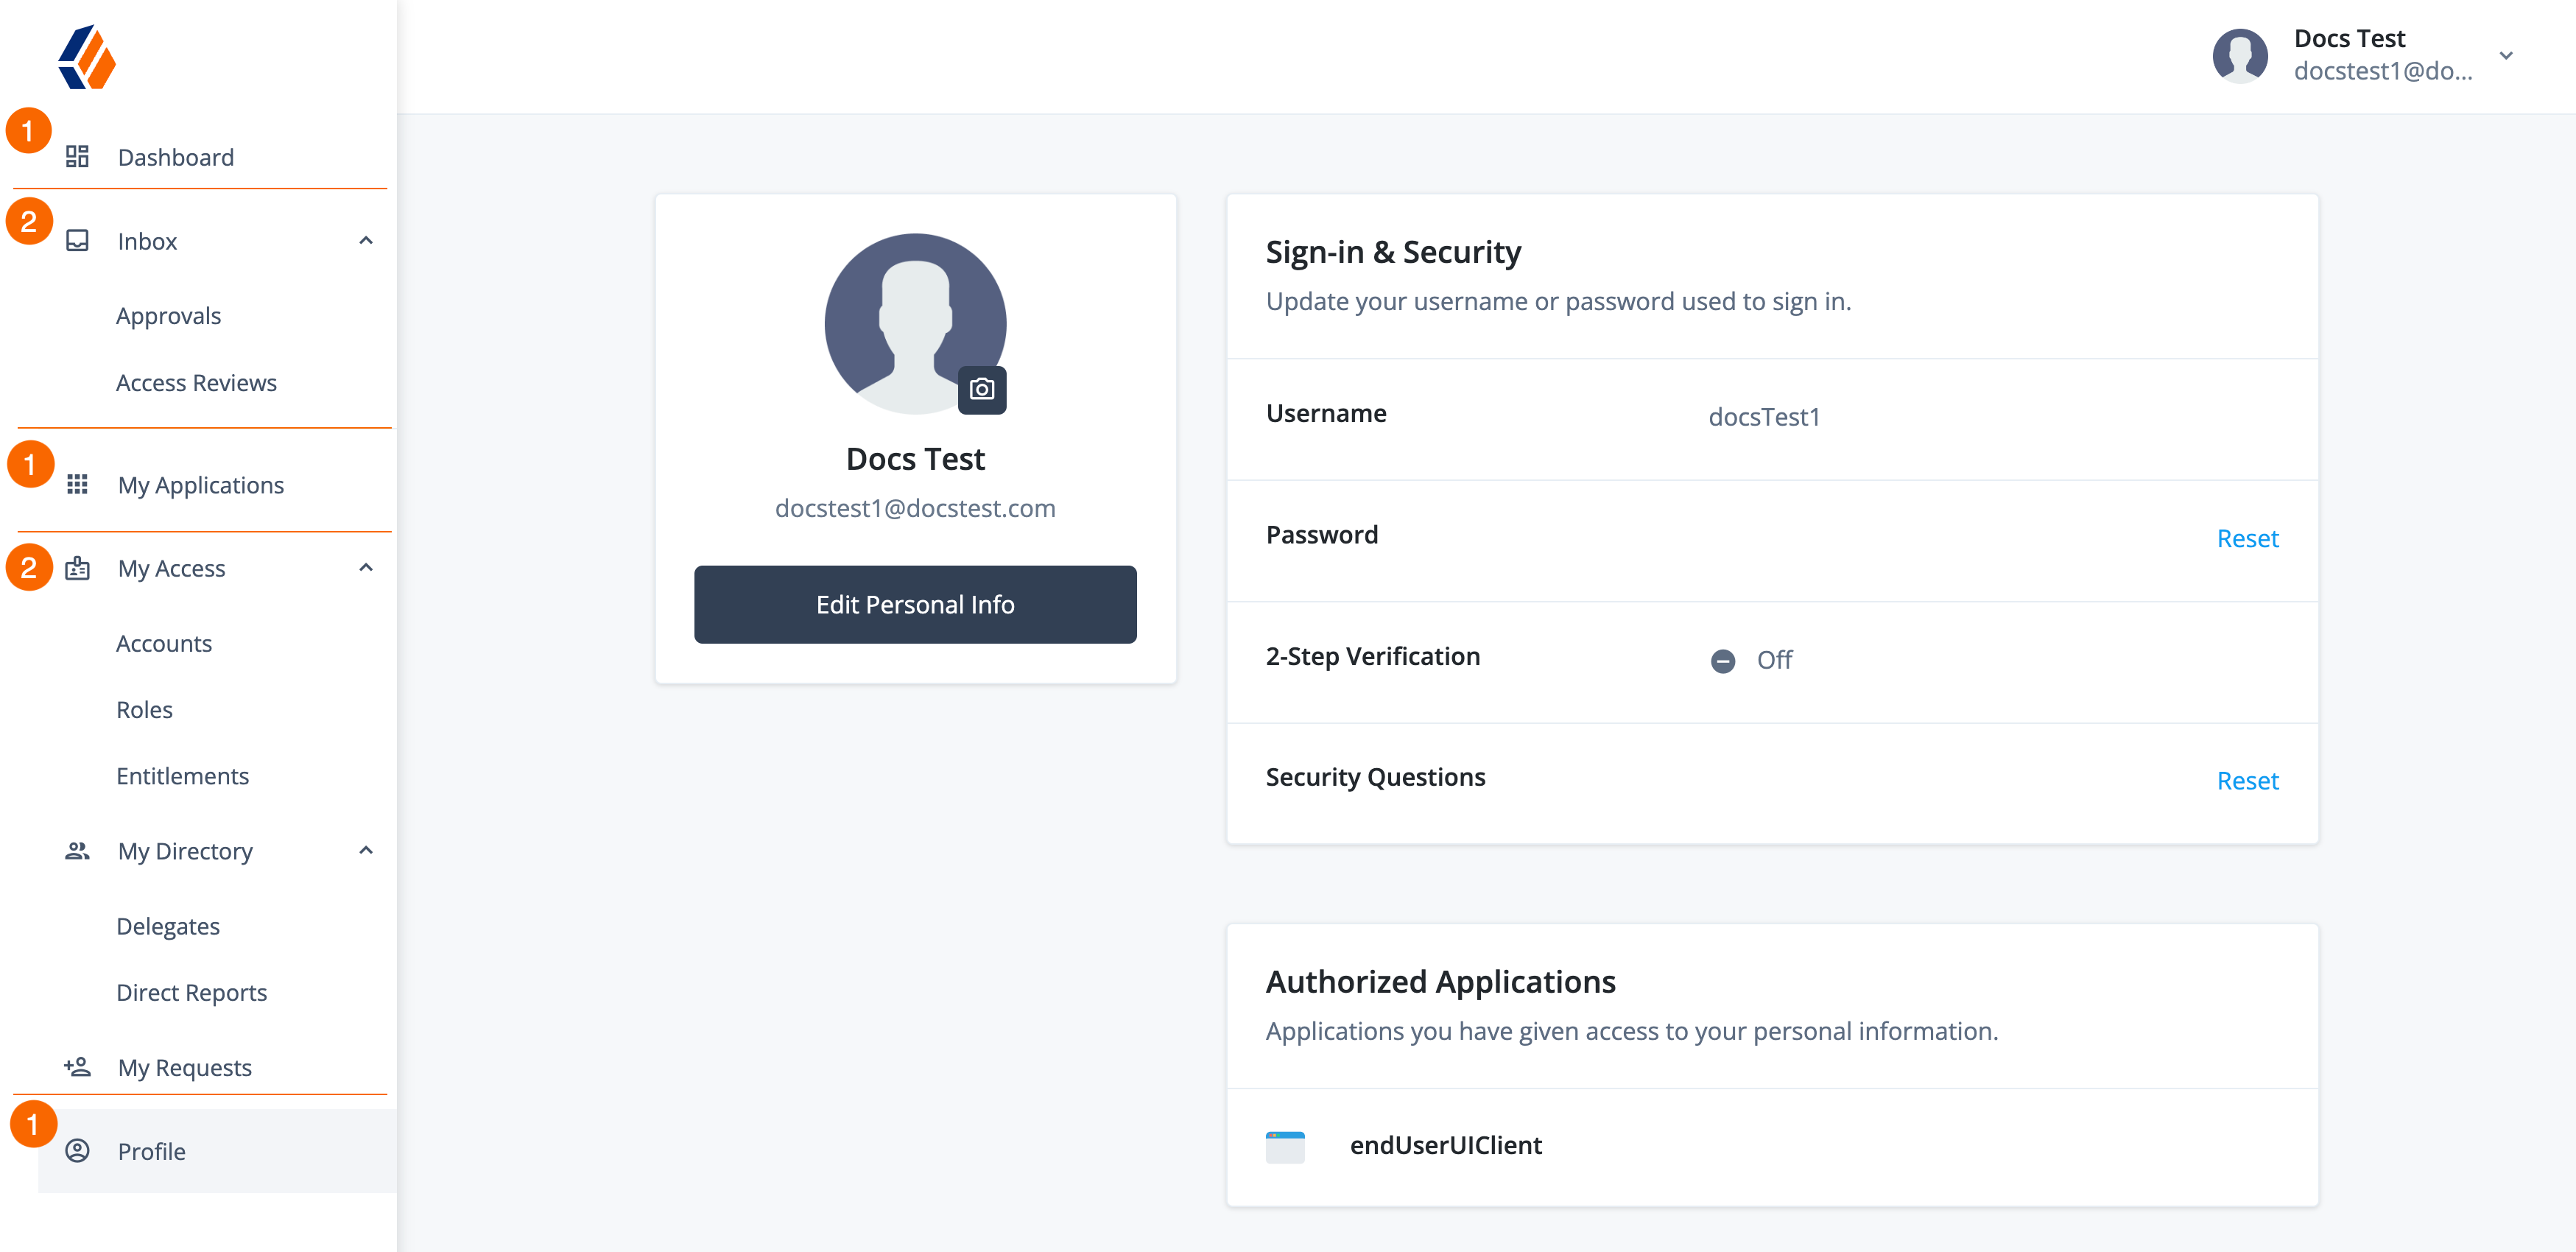
-
1 Default navigation menu items.
-
2 Additional navigation menu items displayed with purchase of Identity Governance.
| This page is a reference. The menu items may or may not be present depending on what has been enabled or purchased. |
| Menu item | Description |
|---|---|
Dashboard that shows tasks and information that requires an end user’s attention. |
|
List of actions for the end user to take. |
|
List of applications the end user has access to. Users can click on applications in the list to navigate to them using SSO. |
|
Access end users have in applications and in Advanced Identity Cloud. This includes:
|
|
Delegates and direct reports (employees) end users have. End users can perform the following actions:
|
|
End users can create requests to access resources, such as target applications, entitlements, or roles. |
|
Profile page where end users can manage their information. When this menu item is selected, additional sections appear that allow end users to take the following actions:
The actions on this page vary depending on the configurations set in Configure actions and information for end users. |
Sign on as an end user
The way your end users sign on can differ based on your Advanced Identity Cloud configuration.
For example, an end user can embed the sign-on URL on a portal page or associate it with a button.
The appearance of the end user pages, including branding and color, changes according to the theme settings you configure.
To sign on to the Advanced Identity Cloud end-user UI for a realm:
-
Access the
Loginjourney using one of the following URL formats:-
If you are using the tenant domain, use one of these URL formats, replacing <realm> with the value
alphaorbravo:-
Full URL format:
https://<tenant-env-fqdn>/am/XUI/?realm=<realm>&authIndexType=service&authIndexValue=Login -
Shortcut URL format:
https://<tenant-env-fqdn>/enduser/?realm=<realm>
-
-
If you are using a custom domain, use one of these URL formats:
-
Full URL format:
https://<custom-domain-fqdn>/am/XUI/?authIndexType=service&authIndexValue=Login -
Shortcut URL format:
https://<custom-domain-fqdn>/enduser/
-
-
-
Enter sign-on credentials.
-
Click Next. The end user is signed on to the Advanced Identity Cloud end-user UI.
Dashboard
The dashboard provides a list of items that require end users' attention. For example, if Identity Governance is enabled, items that require an end user’s review appear here. If nothing requires an end user’s attention, an Edit Your Profile button displays that links to the profile.
To access the dashboard:
-
From the left navigation pane, click Dashboard.
Inbox
The Inbox[9] section lists all items assigned to an end user. For example, if an end user is assigned an access review, items display for the user to act on.
To access the inbox:
-
From the left navigation pane, click Inbox.
Approvals
The Approvals[9] section lists approval items (submitted access requests) for an approver (designated owner) to act on.
If an approver has delegates assigned, then the approval items are also assigned to the delegates.
To view approval tasks:
-
From the left navigation pane, click Inbox > Approvals.
Learn more in Review request items (End user UI).
Access reviews
The Access Reviews[9] section lists the access reviews assigned to a certifier (individual assigned to review the access).
If a certifier has delegates assigned, then the access reviews are also assigned to the delegates.
To view access review tasks:
-
From the left navigation pane, click Inbox > Access Reviews.
Learn more in Certify data using access reviews.
My applications
The My Applications section lists the applications an end user has access to.
The following types of applications display in the My Applications section:
-
SAML-based applications - Configure SAML applications and assign end users or a role to the application. The SAML application then displays to the end user under the My Applications page.
-
Bookmark applications - Bookmark applications do not require authentication and are simply a redirect to a URL. When you assign a bookmark application to an end user or a role, it displays shortcut links on the My Applications page. When an end user clicks one of the links, the browser opens a new tab.
Application templates defined in the application catalog and custom OIDC applications do not display in the My Applications section.
To view and navigate to applications:
-
From the left navigation pane, click My Applications.
-
Click the desired application. The end user is redirected to the application.
Click to display an example
The example shows the following:
-
An end user logging into the Advanced Identity Cloud end-user UI and having no applications assigned.
-
An administrator, signed on to the Advanced Identity Cloud admin UI, assigning a user to a bookmark and SAML application.
-
The end user refreshing the page and the applications displaying under the My Applications menu item.
-
The end user selecting a bookmark application (Google) and the application opening up in a new tab.
-
The end user selecting a SAML application (Sample SAML App) and the user being redirected to the application already signed on.
My access
The My Access[9] section lists the access end users have in Advanced Identity Cloud when they sign on to the Advanced Identity Cloud end-user UI. It also lists the access they have in onboarded target applications.
To view access:
-
From the left navigation pane, click My Access.
-
Select any of the following tabs to view details:
-
Accounts - The accounts (user entities) that end users have in onboarded target applications. These correlate to the end user Advanced Identity Cloud identity.
-
Roles - The provisioning roles assigned to end users in Advanced Identity Cloud.
-
Entitlements - The entitlements end users have in onboarded target applications.
-
My directory
The My Directory[9] section includes the following tabs that allow end users to manage their tooltip:["delegates","Individuals who are auto-assigned an end user’s tasks indefinitely or for a specified time. Useful, for example, if an end user is on vacation and needs someone to cover their items."] and direct reports (employees):
Delegates
In Identity Governance, end users can delegate:
-
Access reviews
-
Line items forwarded to end users
-
Line items reassigned to users
-
Access requests when they’re the approver (designated owner) of a resource
Items still show up in end user’s inbox; however, they’re also sent to the delegate.
| Delegation is useful, for example, if an end user is on vacation and needs someone to cover their items. |
Assign a delegate
-
From the left navigation pane, click My Directory > Delegates.
-
Click + Add Delegates.
-
Search for another end user to delegate items to.
-
(Optional) Set a start and end date for the delegate:
-
Check the Assign role only during a selected time period box.
-
Select a start and end date. Items are assigned during this timeframe only.
If no start and end date is set, the delegate is set indefinitely.
-
-
Click Save.
Direct reports
Direct reports are individuals who end users manage. In Identity Governance, end users can review their direct reports and the access their direct reports have.
For end users to view their direct reports' information:
-
From the left navigation pane, click My Directory > Direct Reports. From this page, end users view their direct reports.
-
Select the desired employee.
-
Click the Accounts, Entitlements, and Roles tabs to view a direct reports access. TIP: As a manager, you can submit a remove access request to remove resources from a user. Learn more in Request to remove access.
My requests
The My Requests[9] section lets end users:
-
Create a request for themselves or others to gain access to an application, entitlement, or role
-
View requests they have submitted
To view and create requests:
-
From the left navigation pane, click My Requests. From this page, end users view their pending requests.
-
To create a request, click + New Request.
The end user creates the request and sends it to the resource approvers for their approval or rejection.
Learn more in Request access.
Profile
The Profile section lets end users access and manage their information.
For end users to access the Profile section and update their personal information, you must:
For an end user to update their profile information follow these steps:
-
From the left navigation pane, click Profile.
-
Select Edit Personal Info.
-
Update one or more pieces of information.
-
Click Save.
ForgeRock SDKs
For an overview of all UI integration options, learn more in End-user UX options for authentication journeys and account management.
The ForgeRock SDKs let you rapidly build applications against the PingOne Advanced Identity Cloud REST APIs.
Leverage Ping Identity’s identity best practices for token exchange, security, and the optimal OAuth 2.0 flow.
ForgeRock SDKs are highly customizable and require a high level of technical skill; therefore, the SDK documentation is hosted separate from Advanced Identity Cloud documentation.
Integrate ForgeRock SDKs with any of the following:
Upload provided files to integrate with Android or iOS apps
Associating a website(s) to your application is crucial when implementing ForgeRock SDKs with Android or iOS applications. This allows you to share credentials or provide redirects within an application. Within the context of ForgeRock SDKs, it is important to associate the SDKs with Android or iOS applications.
Google and Apple both provide ways assist in this process:
-
Android assetlinks.json - Establish trust between the application and a website(s) by automatically opening links for that domain.
-
iOS apple-app-site-association - Associate a website(s) with your application by having the associated domain file on your website and the appropriate entitlement in your application.
Upload an Android assetlinks.json file
To help you integrate your Android apps with PingOne Advanced Identity Cloud, you can upload an assetlinks.json file
to a tenant environment and access it through a custom domain associated with the environment. You
can do this for each custom domain in your set of environments.
As the configuration in your upper environments is immutable, you can only modify the content of
an assetlinks.json file in your development environment configuration. You must then promote any
configuration changes to your upper environments.
Ensure you have set up a
custom domain for
each environment and realm where you need to upload an assetlinks.json file.
|
High-level process
The high-level process to configure and promote an assetlinks.json file is as follows:
-
In your development environment, use the endpoint naming format
/openidm/config/fidc/assetlinks.<custom-domain-fqdn>to setassetlinks.jsoncontent in your configuration with an association to a custom domain. For example, for the custom domainid.mycompany.com, use the endpoint/openidm/config/fidc/assetlinks.id.mycompany.com. -
Promote the configuration to the upper environment that’s configured to use the custom domain; for example, if your production environment is configured to use the custom domain, you will need to promote to your staging environment, and then promote again to your production environment.
-
Access the
assetlinks.jsonfile from your custom domain using the endpoint/.well-known/assetlinks.json; for example, for the custom domainid.mycompany.com, use the URL https://id.mycompany.com/.well-known/assetlinks.json.
View an assetlinks.json file
Use a custom domain to view an assetlinks.json file. You don’t need to use an access token as
the file is publicly accessible.
Show request
$ curl \
--request GET 'https://<custom-domain-fqdn>/.well-known/assetlinks.json'(1)| 1 | Replace <custom-domain-fqdn> with a custom domain, for example id.mycompany.com. |
Show response
{
    "relation": [
        "delegate_permission/common.handle_all_urls",
        "delegate_permission/common.get_login_creds"
    ],
    "target": {
        "namespace": "web",
        "site": "https://id.mycompany.com"
    }
}
Upload or replace an assetlinks.json file
-
Refer to the High-level process for configuring and promoting an
assetlinks.jsonfile. -
In your development environment:
-
Set the
assetlinks.jsonfile contents in your configuration:Show request
$ curl \
--request PUT 'https://<tenant-env-fqdn>/openidm/config/fidc/assetlinks.<custom-domain-fqdn>' \(1) (2)
--header 'Authorization: Bearer <access-token>' \(3)
--header 'Content-Type: application/json' \
--data-raw '{(4)
  "data": [
    {
      "relation": [
        "delegate_permission/common.handle_all_urls",
        "delegate_permission/common.get_login_creds"
      ],
      "target": {
        "namespace": "web",
        "site": "https://id.mycompany.com"
      }
    }
  ]
}'
1 Replace <tenant-env-fqdn> with the domain of your development environment; for example, openam-mycompany.forgeblocks.com.2 Replace <custom-domain-fqdn> with the custom domain, for example id.mycompany.com.3 Replace <access-token> with the access token. 4 Replace the example assetlinks.jsonJSON content with your own JSON content. Note that the JSON content is wrapped in adataobject wrapper.Show response
{ "_id": "fidc/assetlinks.id.mycompany.com", "data": [ { "relation": [ "delegate_permission/common.handle_all_urls", "delegate_permission/common.get_login_creds" ], "target": { "namespace": "web", "site": "https://id.mycompany.com" } } ] } -
(Optional) Repeat the previous step for each additional custom domain that needs the
assetlinks.jsonfile uploading or replacing.
-
Run a series of promotions to add the development environment configuration to your upper environments. Learn more in:
-
Use your custom domain to view the assetlinks.json file. If you uploaded or replaced additional
assetlinks.jsonfiles, repeat this for each custom domain.
Delete an assetlinks.json file
-
Refer to the High-level process for configuring and promoting an
assetlinks.jsonfile. -
In your development environment:
-
Delete the
assetlinks.jsonfile contents from your configuration:Show request
$ curl \
--request DELETE 'https://<tenant-env-fqdn>/openidm/config/fidc/assetlinks.<custom-domain-fqdn>' \(1) (2)
--header 'Authorization: Bearer <access-token>'(3)
1 Replace <tenant-env-fqdn> with the domain of your development environment, for example openam-mycompany.forgeblocks.com.2 Replace <custom-domain-fqdn> with your custom domain, for example id.mycompany.com.3 Replace <access-token> with the access token. Show response
{ "_id": "fidc/assetlinks.id.mycompany.com", "data": [ { "relation": [ "delegate_permission/common.handle_all_urls", "delegate_permission/common.get_login_creds" ], "target": { "namespace": "web", "site": "https://id.mycompany.com" } } ] } -
(Optional) Repeat the previous step for each additional custom domain that needs the
assetlinks.jsonfile deleting.
-
Run a series of promotions to add the development environment configuration to your upper environments. Learn more in:
-
Use your custom domain to view the assetlinks.json file and check that it is empty. If you deleted additional
assetlinks.jsonfiles, repeat this for each custom domain.
Upload an iOS apple-app-site-association file
To help you integrate your iOS apps with PingOne Advanced Identity Cloud, you can upload an apple-app-site-association file
to a tenant environment and access it through a custom domain associated with the environment. You
can do this for each custom domain in your set of environments.
As the configuration in your upper environments is immutable, you can only modify the content of
an apple-app-site-association file in your development environment configuration. You must then promote any
configuration changes to your upper environments.
Ensure you have set up a
custom domain for
each environment and realm where you need to upload an iOS apple-app-site-association file.
|
High-level process
The high-level process to configure and promote an apple-app-site-association file is as follows:
-
In your development environment, use the endpoint naming format
/openidm/config/fidc/apple-app-site-association.<custom-domain-fqdn>to setapple-app-site-associationcontent in your configuration with an association to a custom domain; for example, for the custom domainid.mycompany.com, use the endpoint/openidm/config/fidc/apple-app-site-association.id.mycompany.com. -
Promote the configuration to the upper environment that’s configured to use the custom domain. For example, if your production environment is configured to use the custom domain, you will need to promote to your staging environment, and then promote again to your production environment.
-
Access the
apple-app-site-associationfile from your custom domain using the endpoint/.well-known/apple-app-site-association; for example, for the custom domainid.mycompany.com, use the URL https://id.mycompany.com/.well-known/apple-app-site-association.
View an apple-app-site-association file
Use a custom domain to view an apple-app-site-association file. You don’t need to use an access token as
the file is publicly accessible.
-
View the
apple-app-site-associationfile using aGETrequest:Show request
$ curl \
--request GET 'https://<custom-domain-fqdn>/.well-known/apple-app-site-association'(1)
1 Replace <custom-domain-fqdn> with your custom domain; for example, id.mycompany.com.Show response
{
  "applinks": {
    "details": [
      {
        "appIDs": [
          "XXXXXXXXXX.com.example.AppName"
        ],
        "components": [
          {
            "/": "/reset/*",
            "comment": "Success after reset password journey"
          }
        ]
      }
    ]
  },
  "webcredentials": {
    "apps": [
      "XXXXXXXXXX.com.example.AppName"
    ]
  }
}
Upload or replace an apple-app-site-association file
-
Refer to the High-level process for configuring and promoting an
apple-app-site-associationfile. -
In your development environment:
-
Set the
apple-app-site-associationfile contents in your configuration:Show request
$ curl \
--request PUT 'https://<tenant-env-fqdn>/openidm/config/fidc/apple-app-site-association.<custom-domain-fqdn>' \(1) (2)
--header 'Authorization: Bearer <access-token>' \(3)
--header 'Content-Type: application/json' \
--data-raw '{(4)
  "data": {
    "applinks": {
      "details": [
        {
          "appIDs": [
            "XXXXXXXXXX.com.example.AppName"
          ],
          "components": [
            {
              "/": "/reset/*",
              "comment": "Success after reset password journey"
            }
          ]
        }
      ]
    },
    "webcredentials": {
      "apps": [
        "XXXXXXXXXX.com.example.AppName"
      ]
    }
  }
}'
1 Replace <tenant-env-fqdn> with the domain of your development environment; for example, openam-mycompany.forgeblocks.com.2 Replace <custom-domain-fqdn> with your custom domain; for example, id.mycompany.com.3 Replace <access-token> with your access token. 4 Replace the example apple-app-site-associationJSON content with your own JSON content.Show response
{ "_id": "fidc/apple-app-site-association.id.mycompany.com", "data": { "applinks": { "details": [ { "appIDs": [ "XXXXXXXXXX.com.example.AppName" ], "components": [ { "/": "/reset/*", "comment": "Success after reset password journey" } ] } ] }, "webcredentials": { "apps": [ "XXXXXXXXXX.com.example.AppName" ] } } } -
(Optional) Repeat the previous step for each additional custom domain that needs the
apple-app-site-associationfile uploading or replacing.
-
Run a series of promotions to add the development environment configuration to your upper environments. Learn more in:
-
Use your custom domain to view the apple-app-site-association file. If you uploaded or replaced additional
apple-app-site-associationfiles, repeat this for each custom domain.
Delete an apple-app-site-association file
-
Refer to the High-level process for configuring and promoting an
apple-app-site-associationfile. -
In your development environment:
-
Delete the
apple-app-site-associationfile contents from your configuration:Show request
curl \
--request DELETE 'https://<tenant-env-fqdn>/openidm/config/fidc/apple-app-site-association.<custom-domain-fqdn>' \(1) (2)
--header 'Authorization: Bearer <access-token>'(3)
1 Replace <tenant-env-fqdn> with the domain of your development environment, for example openam-mycompany.forgeblocks.com.2 Replace <custom-domain-fqdn> with your custom domain, for example id.mycompany.com.3 Replace <access-token> with the access token. Show response
{ "_id": "fidc/apple-app-site-association.id.mycompany.com", "data": { "applinks": { "details": [ { "appIDs": [ "XXXXXXXXXX.com.example.AppName" ], "components": [ { "/": "/reset/*", "comment": "Success after reset password journey" } ] } ] }, "webcredentials": { "apps": [ "XXXXXXXXXX.com.example.AppName" ] } } } -
(Optional) Repeat the previous step for each additional custom domain that needs the
apple-app-site-associationfile deleting.
-
Run a series of promotions to add the development environment configuration to your upper environments. Learn more in:
-
Use your custom domain to view the apple-app-site-association file and check that it is empty. If you deleted additional
apple-app-site-associationfiles, repeat this for each custom domain.
Configure user self-service journeys
You must configure user self-service journeys in PingOne Advanced Identity Cloud before your end users can experience them. For example, you can configure journeys for password reset, username retrieval, and more.
Use cases for user self-service
You must configure Advanced Identity Cloud to let end users service their own accounts.
For example, if you want to let end users register themselves with Advanced Identity Cloud in order to create their own identity, you must create a journey that collects required information. Then you must test the journey and push the journey’s configuration to your production tenant.
The features end users' can access depend on the configurations you make.
The following is a table referencing various actions you can take as an end user in Advanced Identity Cloud (if you configure them). Some links refer to information from Ping Identity Knowledge Base and the Ping Identity Community.
You can configure these self-service journeys:
| Use Case | Description |
|---|---|
Simple login journey collecting username and password. |
|
Journey for end users to recover their username. |
|
Allow end users to reset their password using a journey. |
|
Allow end users to update their password, after being logged in with a session. |
|
Allow end users to register their own identity in Advanced Identity Cloud. |
|
Allow end users to use social providers, such as Google or FaceBook to login. |
|
Ask users for more information based on login count. |
|
Validates an end user’s password with a remote system. Use when Advanced Identity Cloud password synchronization doesn’t support the remote system’s hash algorithm. |
|
Create a journey to allow end users to log in with a recovery code if they lose their device. |
For further use cases and questions about configuring the Advanced Identity Cloud end-user UI, learn more in FAQ: Identity Cloud hosted End User UI.
Auth scripting
You can use authentication and authorization (auth) scripting to modify default Advanced Identity Cloud behavior in many situations: client-side authentication, policy conditions, handling OpenID Connect claims, and others.
Use JavaScript for auth scripting in Advanced Identity Cloud. Groovy scripts are deprecated and will eventually be completely replaced with JavaScript scripts.
For JavaScript examples of all auth script types, review the sample scripts. Each sample script includes a list of available variables.
|
Scripts can potentially emit the personally identifiable information (PII) of your end users into Advanced Identity Cloud logs, and then into external services that consume Advanced Identity Cloud logs. Ping Identity recommends that you establish a review and testing process for all scripts to prevent PII leaking out of your Advanced Identity Cloud tenant environments. |
Auth script types
The auth script types available in Advanced Identity Cloud include the following:
Journeys
| Script type | Description | Information |
|---|---|---|
Configuration Provider Node |
Runs in a Configuration Provider node as a step in an authentication journey. |
|
Journey Decision Node |
Runs in a Scripted Decision node as a step in an authentication journey. |
OAuth2 / OIDC
| Script type | Description | Information |
|---|---|---|
OAuth2 Access Token Modification |
Modifies the key-value pairs contained within access tokens before they’re issued to a client. |
|
OAuth2 Evaluate Scope |
Retrieves and modifies scopes for OAuth 2.0 access token introspection. |
|
OAuth2 May Act |
Adds the |
|
OAuth2 Trusted JWT Issuer |
Dynamically retrieves the details of an issuer during the JWT profile for authorization grant. |
|
OAuth2 Validate Scope |
Modifies how Advanced Identity Cloud validates requested OAuth 2.0 scopes. |
|
OIDC Claims |
Modifies or overrides OIDC claims when issuing an ID token
or in the response from the |
SAML
| Script type | Description | Information |
|---|---|---|
SAML2 SP Adapter |
Modifies the processing of the authentication request on the SP. |
|
SAML2 IDP Adapter |
Modifies the processing of the authentication request on the IDP. |
|
SAML2 IDP Attribute Mapper |
Maps user-configured attributes to SAML attributes in the assertion returned by the IDP. |
Other
| Script type | Description | Information |
|---|---|---|
Client-side Authentication |
Runs on the client during authentication. |
|
Library |
Contains reusable functionality that can be imported into journey decision node scripts or other library scripts. |
|
Policy Condition |
Modifies authorization policy decisions. |
|
Social Identity Provider Profile Transformation |
Adapts the fields received from a social identity provider to align with the fields expected by Advanced Identity Cloud. |
Manage auth scripts
To manage your auth scripts, go to Realm > Scripts > Auth Scripts.
On the Scripts page, you can view a list of existing scripts. To edit, duplicate, or delete a script, click its More () menu.
The edit option in the More menu opens the script in a lightweight editor that features syntax highlighting and validation checking. You can maximize the editor to full screen to edit larger scripts:
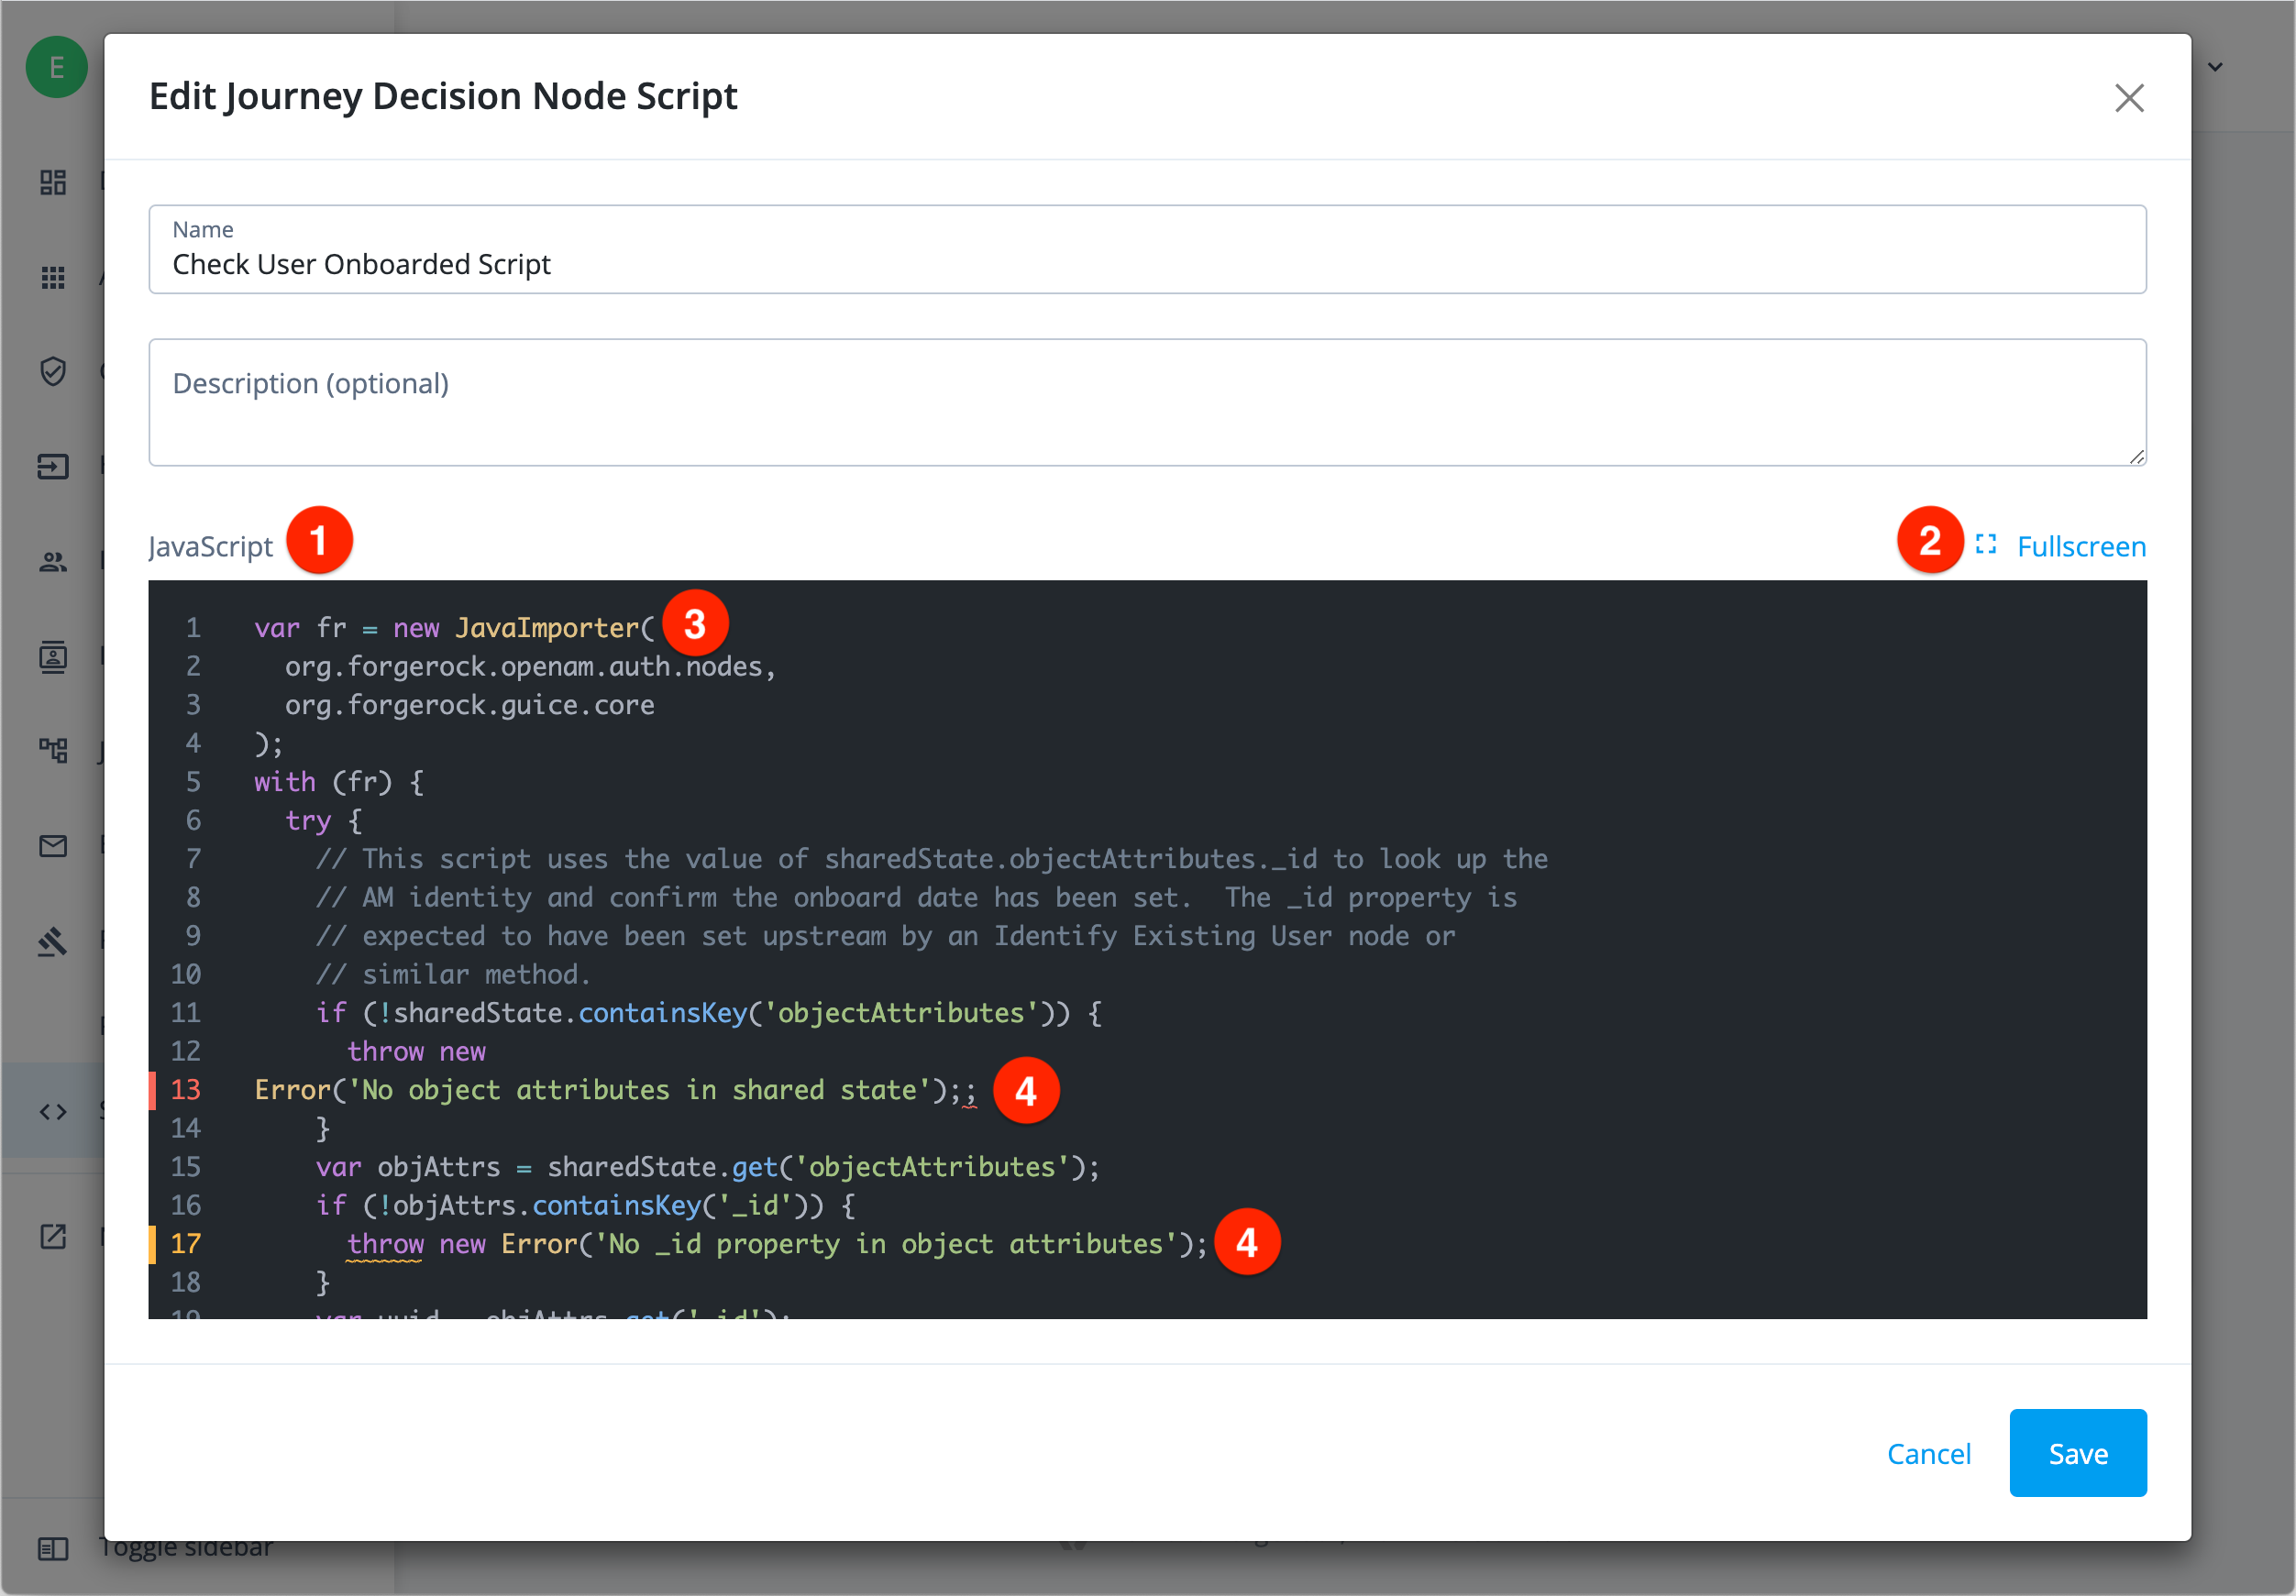
① JavaScript editor
② Fullscreen option
③ Syntax highlighting
④ Syntax error highlighting and validation checking
Create a new auth script
-
Go to Realm > Scripts > Auth Scripts, then click + New Script.
-
Choose an auth script type.
After you select a script type, the editor opens. The editor is prepopulated with a default script for that type, which is intended as a starting point for your custom script.
If you selected the wrong script type, click Previous to select a different script type.
For journey decision node scripts, refer to the specific steps for this script type. -
Enter a unique Name and optional Description for the script, then click Save.
After you save a script, you can’t change its type.
Journey decision node scripts
Learn more about journeys in Journeys.
You can also create, edit, and validate journey decision node scripts directly from within a Scripted Decision node.
-
Go to Realm > Journeys.
-
Open a journey in the journey editor.
-
Find an existing scripted decision node or add a new one.
-
Select the scripted decision node to open the context pane on the right side.
-
The following screenshot shows where you can create a new journey decision node script ④ or edit an existing one ⑤:
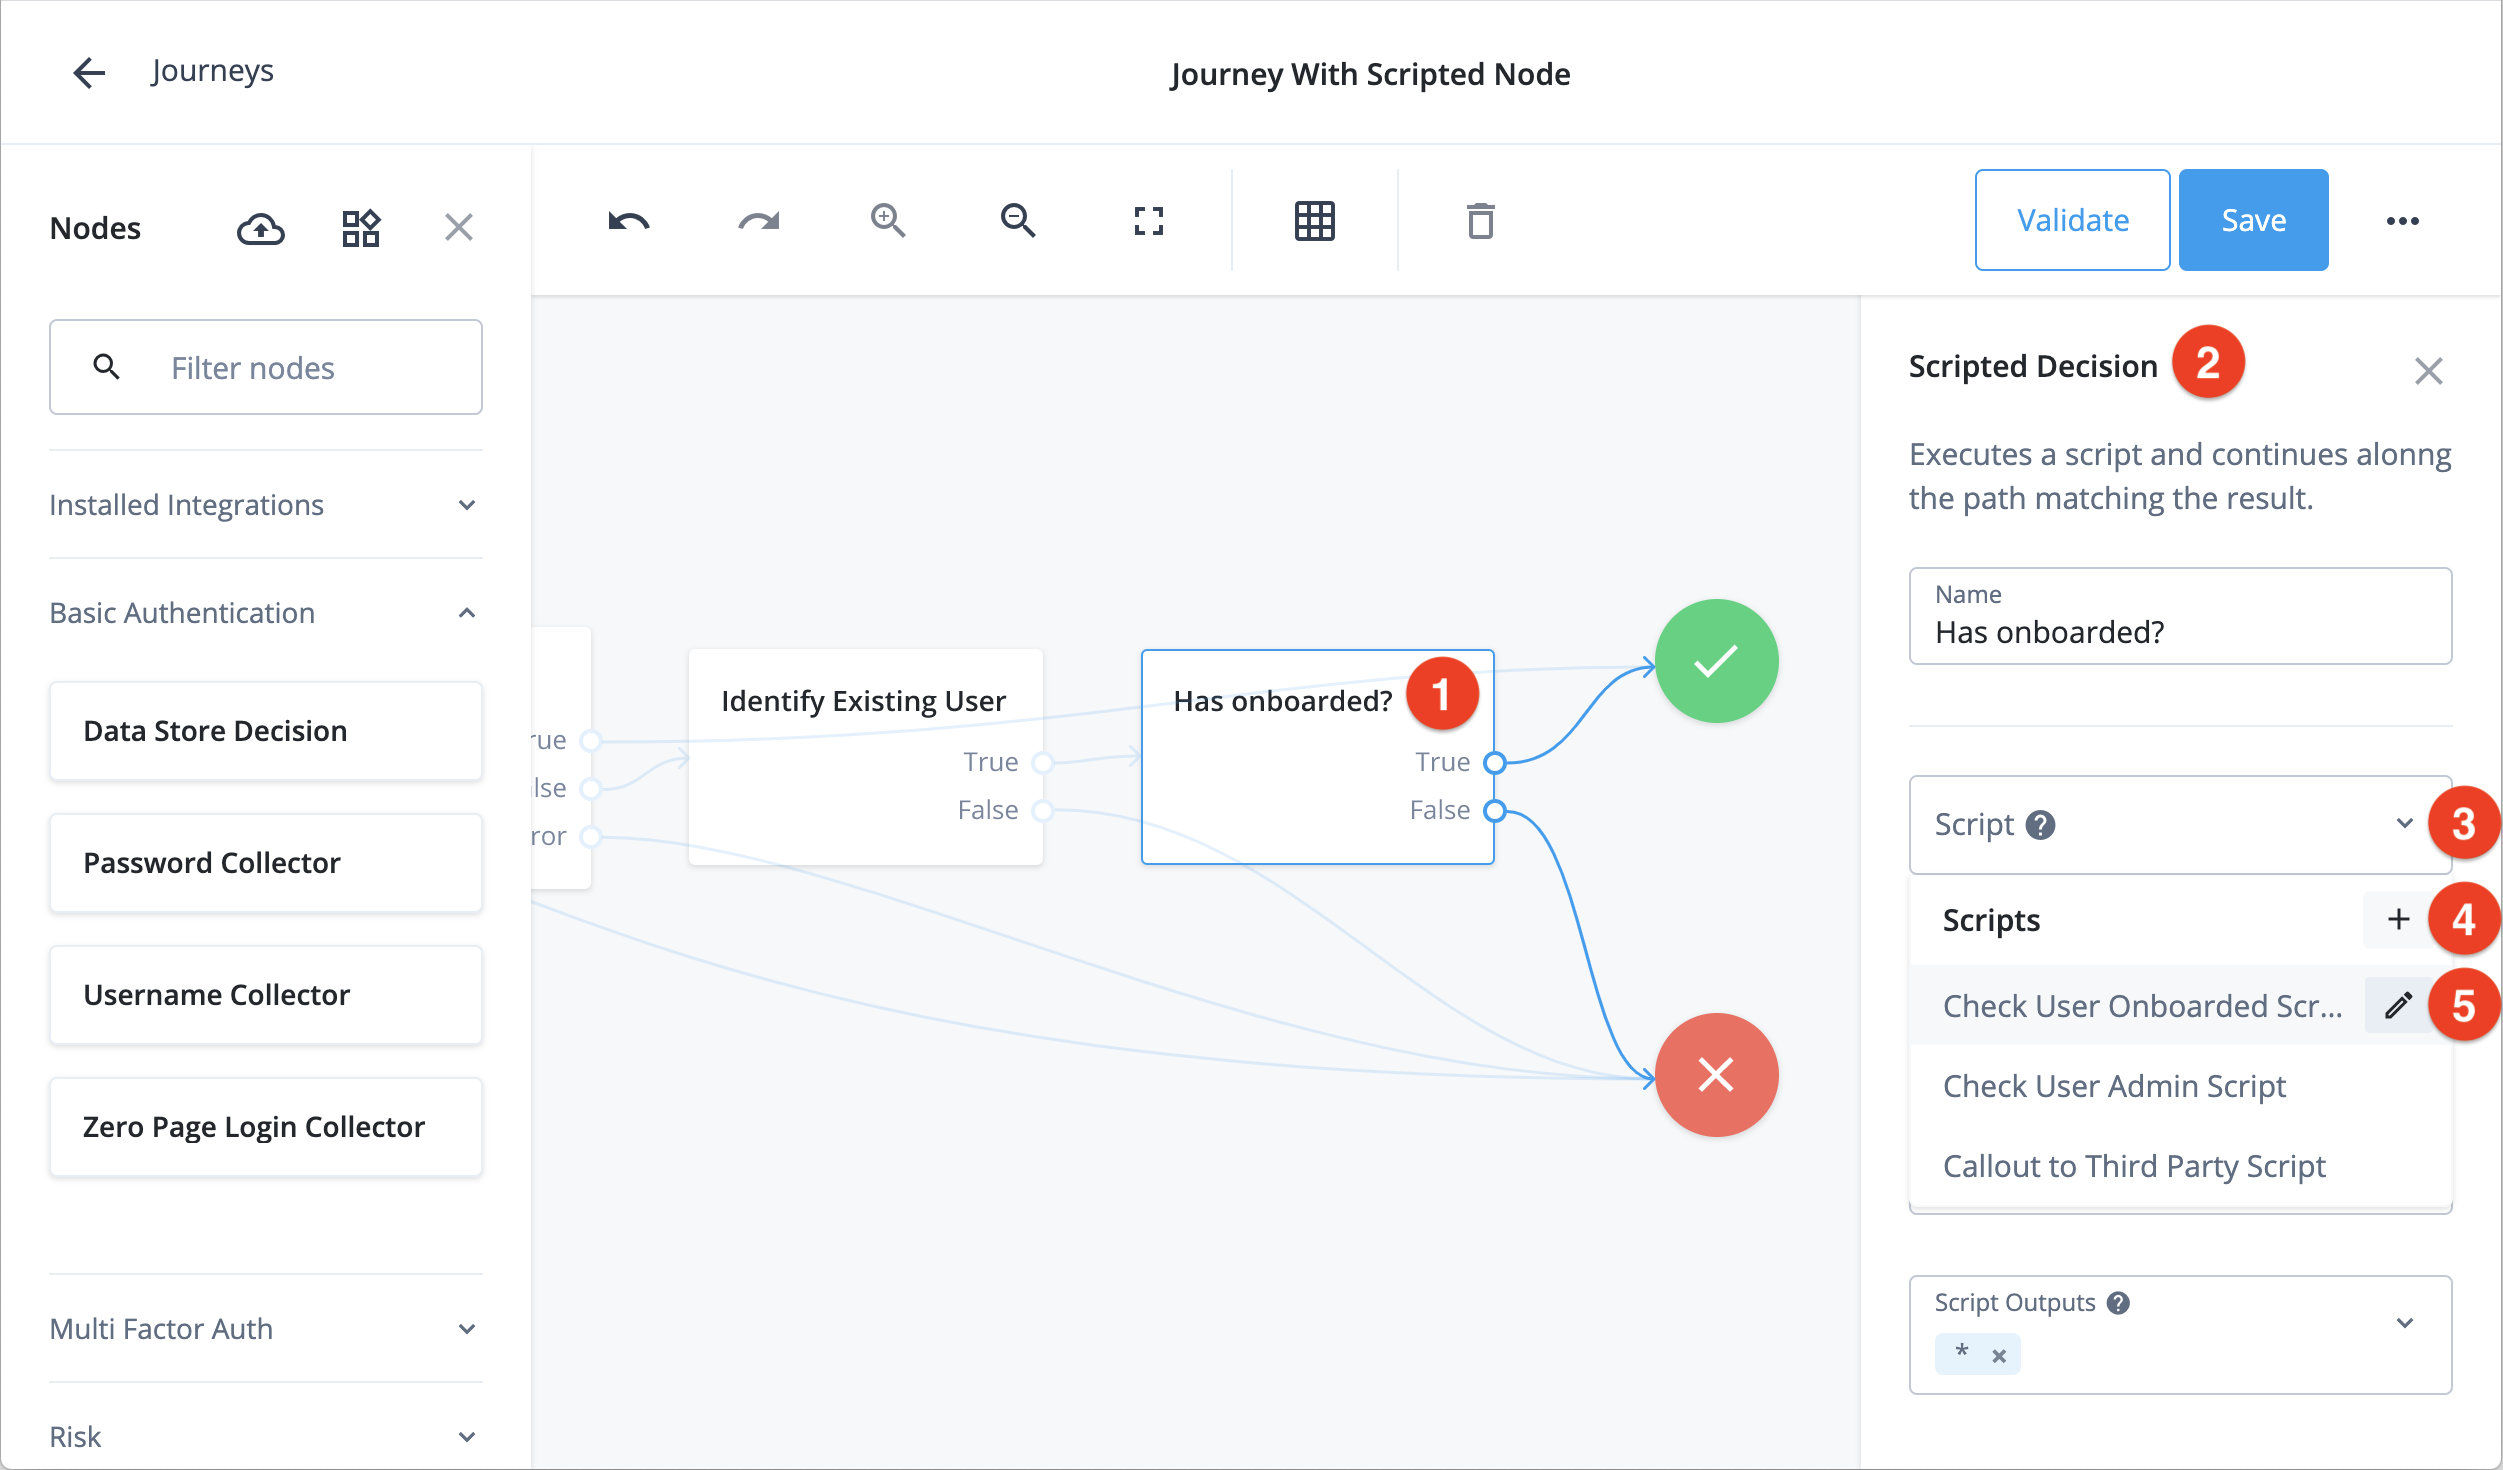
① Scripted decision node
② Context pane
③ Journey decision node script drop-down
④ Add new journey decision node script
⑤ Edit existing journey decision node script
Create a new journey decision node script
Add a new journey decision node script in the journey editor or from Realm > Scripts > Auth Scripts.
-
Select Legacy or Next Generation on the Choose Script Engine page.
Learn more about the enhanced scripting engine in Next-generation scripts.
-
If you create or edit a Next Generation script, click the Libraries icon in the top right to display the following side panel:
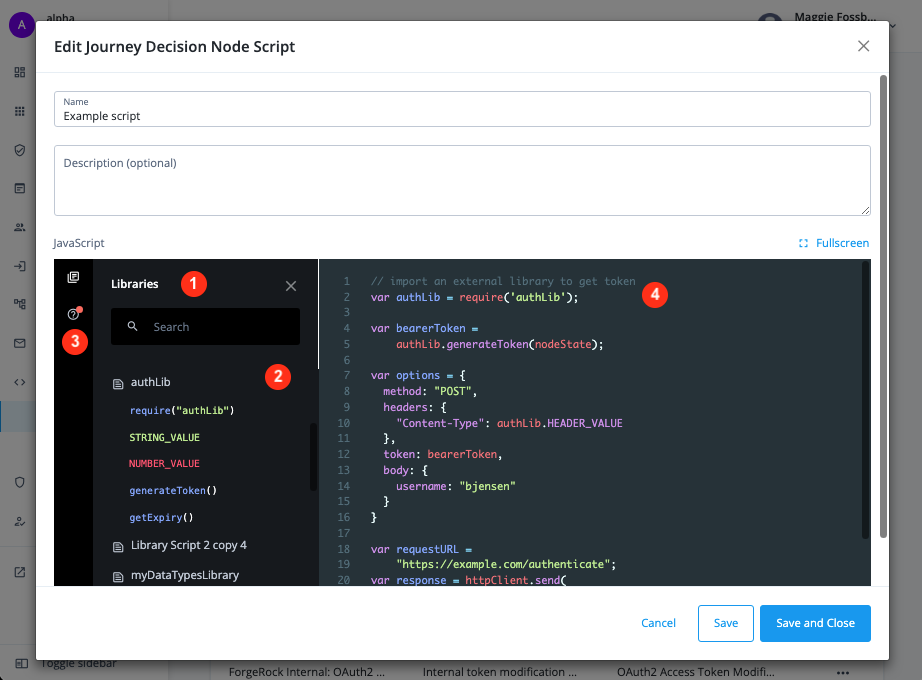
① View and search library scripts to import in your script.
② Click to expand a library script and view its exported methods and constants.
The font colors indicate the exported types:-
Blue for functions
-
Red for numbers
-
Green for strings
-
Orange for boolean types
-
Purple for objects / properties
③ Click the Docs icon to view links to context-related documentation.
A red dot denotes documentation updates.
④ Edit your script and import library scripts as necessary. -
-
Enter a unique Name and optional Description for the script, then click Save.
Custom endpoints
You can use custom endpoints to run arbitrary JavaScript code through the REST API. Custom endpoint scripts are extremely flexible and can extend Advanced Identity Cloud behavior in many ways:
-
Validate user input fields before storing them in a user profile.
-
Create utility functions, such as getting today’s date.
-
Mandate user input fields during registration to support delegated administration decisions.
-
Query identities with a particular relationship, such as being a member of an organization, and page the results.
You can consume custom endpoints within Advanced Identity Cloud or integrate them into your external UIs or system applications.
Custom endpoints scripting introduction
For an introduction to custom endpoints scripting, read the following:
To understand how to create identity object query expressions to use in the request.queryExpression property, learn more in Define and call data queries.
|
|
Scripts can potentially emit the personally identifiable information (PII) of your end users into Advanced Identity Cloud logs, and then into external services that consume Advanced Identity Cloud logs. Ping Identity recommends that you establish a review and testing process for all scripts to prevent PII leaking out of your Advanced Identity Cloud tenant environments. |
Manage custom endpoints
To manage your custom endpoints, go to Realm > Scripts > Custom Endpoints.
On the Custom Endpoints page, you can view a list of existing custom endpoints. To edit, duplicate, or delete a custom endpoint, click its More () menu.
The edit option in the More menu opens the custom endpoint script in a lightweight editor. The editor features syntax highlighting and validation checking. Maximize the editor to full screen to edit larger scripts:

① Endpoint name
② JavaScript editor
③ Fullscreen option
④ Syntax highlighting
⑤ Validation checking
⑥ cURL request tab, learn more in Generate a cURL request for a custom endpoint
⑦ Test tab, learn more in Run a test request for a custom endpoint
Create a custom endpoint
-
Go to Realm > Scripts > Custom Endpoints, then click + New Script.
-
Enter a Name for your new endpoint; for example,
getDate.-
Access the new custom endpoint over HTTP at:
https://<tenant-env-fqdn>/openidm/endpoint/<name> -
Access the new custom endpoint in a script using:
openidm.read('endpoint/<name>')
-
-
(Optional) Enter a Description for your new endpoint; for example,
Get the current date. -
Next, use the editor to create your script. The editor is prepopulated with a default script, which is intended as a starting point for your custom script.
-
To test your script, click Save, then either:
-
When your testing is complete, click Save and Close.
Generate a cURL request for a custom endpoint
In the script editor:
-
Click the angled brackets icon (<>) to open the cURL Request tab.
-
In the Method field, choose an HTTP request method for the cURL request. Learn more about how HTTP request methods relate to the script
request.methodproperty values in this mapping table. -
(Optional) In the Body field, enter a JSON-formatted body for the cURL request (except when using the
GETHTTP request method). For example:{ "param1": "foo", "param2": "bar" }In the script, you can access the body using the request.contentproperty. The example above maps torequest.content.param1andrequest.content.param2. -
Click Generate to output the cURL request, which appears below your script. The cURL request is complete with an access bearer token and ready to run.
-
Click the copy icon () to copy the cURL request from the editor, then paste and run it in a terminal window.
Run a test request for a custom endpoint
In the script editor:
-
Click the triangle icon () to open the Test tab.
-
In the form field, enter a JSON-formatted configuration object for the cURL request. The form field is prepopulated with a default configuration object:
  {
    "request": {
      "method": "create"
    }
  }
This default configuration object creates a request using the
POSTHTTP request method. Learn more about how HTTP request methods relate to the scriptrequest.methodvariable parameter values in this mapping table. -
(Optional) To supply a body with the request, add a
request.contentproperty:{ "request": { "method": "create", "content": { "param1": "foo", "param2": "bar" } } }In the script, you access the body using the request.contentproperty. The example above maps torequest.content.param1andrequest.content.param2. -
Click Run to run the cURL request. The result appears below the editor.
Authenticate to Advanced Identity Cloud REST API
The Identity Cloud REST API has two different authentication methods, depending on what you are trying to achieve:
-
Use an API key and secret for read-only operations.
Examples: Advanced Identity Cloud monitoring and logging. -
Use an access token for access management operations or identity management operations.
Examples: Setting up authentication journeys or policies; configuring user profiles, roles, or assignments.
Summary of authentication methods
The following table summarizes the REST API endpoints and their different authentication methods:
| REST endpoints | Authentication method |
|---|---|
|
Not applicable (publicly accessible endpoint) |
|
API key and secret. |
|
Access token |
Authenticate to Advanced Identity Cloud REST API with API key and secret
You will need an API key and secret to authenticate to the following Identity Cloud REST API endpoints:
-
/monitoring -
/logs
Summary of use:
-
Create an API key and secret in the Advanced Identity Cloud admin UI.
-
Set the API key and secret as
x-api-keyandx-api-secretHTTP headers for each API request:x-api-key: <api-key> x-api-secret: <api-secret>
Get an API key and secret
-
In the Advanced Identity Cloud admin UI, click the user icon, and then click Tenant Settings.
Show me where
-
On the Global Settings tab, click Log API Keys.
-
Click New Log API Key, provide a name for the key, and then click Create Key.
A dialog box appears containing the new keys:

-
Store the
api_key_idandapi_key_secretvalues securely.You cannot view the api_key_secretvalue again once you click Done. -
Click Done.
Use an API key and secret
To use the API credentials, set them as x-api-key and x-api-secret HTTP headers:
Show request
$ curl \
--request GET 'https://<tenant-env-fqdn>/monitoring/logs/sources?_prettyPrint=true' \
--header 'x-api-key: <api-key>' \
--header 'x-api-secret: <api-secret>'
Show response
{
    "result": [
        "am-access",
        "am-activity",
        "am-authentication",
        "am-config",
        "am-core",
        "am-everything",
        "idm-access",
        "idm-activity",
        "idm-authentication",
        "idm-config",
        "idm-core",
        "idm-everything",
        "idm-recon",
        "idm-sync"
    ],
    "resultCount": 14,
    "pagedResultsCookie": null,
    "totalPagedResultsPolicy": "NONE",
    "totalPagedResults": 1,
    "remainingPagedResults": 0
}
Authenticate to Advanced Identity Cloud REST API with access token
You need an access token to authenticate to the following Identity Cloud REST API endpoints:
-
/am/* -
/openidm/* -
/.well-known/* -
/environment/certificates,/environment/csrs(self-managed certificate endpoints) -
/environment/content-security-policy/* -
/environment/cookie-domains(cookie domains endpoint) -
/environment/custom-domains -
/environment/promotion/*(self-service promotion endpoints) -
/environment/release -
/environment/restart,/environment/secrets,/environment/variables(ESV endpoints) -
/environment/sso-cookie
Summary of use:
-
Create a service account in the Advanced Identity Cloud admin UI and download a private key.
-
Create a JSON Web Token (JWT) and sign it using the private key.
-
Create an access token using the JWT profile for OAuth 2.0 authorization grant flow.
-
Set the access token as a bearer token in the
AuthorizationHTTP header for each API request:Authorization: Bearer <access-token>
Get an access token
Prerequisites
You need the jose command-line tool to run some of the commands. You can find installation instructions for your particular package manager in https://command-not-found.com/jose.
Step 1: Create a service account and download its private key
-
Follow the steps in Create a new service account.
-
In step 9, save the private key as a local file called
key.jwk. -
Note the ID for the service account you created. An example of an ID is
449d7e27-7889-47af-a736-83b6bbf97ec5.
-
Step 2: Create and sign a JWT
-
Set the following variables in your terminal, to be used as claims in a JWT payload:
-
Set
SERVICE_ACCOUNT_IDto hold the ID of the service account. For use in theiss(issuer) andsub(subject) claims.$ SERVICE_ACCOUNT_ID="<service-account-id>"(1)1 Replace <service-account-id>with the service account ID; for example,449d7e27-7889-47af-a736-83b6bbf97ec5. -
Set
AUDto hold the URL (including port number) where the JWT will be used to request the access token. For use in theaud(audience) claim.$ AUD='https://<tenant-env-fqdn>:443/am/oauth2/access_token' -
Set
EXPto hold a 15-minute expiration time for the JWT, expressed as a Unix timestamp. For use in theexp(expiration time) claim.$ EXP=$(($(date -u +%s) + 899))Service account access tokens have a non-configurable, fixed expiry of 899 seconds (15 minutes), so the previous example sets a timestamp value that matches the fixed expiry. Despite the expiry being non-configurable, you must supply the expclaim, set with a nominal future timestamp, to create an access token successfully. -
Set
JTIto hold a unique ID for the JWT. For use in thejti(JWT ID) claim.$ JTI=$(openssl rand -base64 16)
-
-
Combine the claims to create a payload for the JWT:
$ echo -n "{ \"iss\":\"${SERVICE_ACCOUNT_ID}\", \"sub\":\"${SERVICE_ACCOUNT_ID}\", \"aud\":\"${AUD}\", \"exp\":${EXP}, \"jti\":\"${JTI}\" }" > payload.json -
Sign the JWT using the private key you downloaded and saved as
key.jwkin step 1a:$ jose jws sig -I payload.json -k key.jwk -s '{"alg":"RS256"}' -c -o jwt.txt
Step 3: Get an access token using the JWT profile authorization grant
-
Request an access token from the
/oauth2/access_tokenendpoint using the JWT:$ curl \ --request POST ${AUD} \ --data "client_id=service-account" \(1) --data "grant_type=urn:ietf:params:oauth:grant-type:jwt-bearer" \(2) --data "assertion=$(< jwt.txt)" \(3) --data "scope=<scope>"(4)1 The client ID service-accounttargets the built-in OAuth 2.0 public client for service accounts. The client only allows the JWT profile for OAuth 2.0 authorization grant flow.
+ NOTE: Access the built-in OAuth 2.0 public client using the tenant FQDN. You cannot access it using an Alpha or Bravo realm alias URL or a custom domain URL.
2 The grant type urn:ietf:params:oauth:grant-type:jwt-bearerrepresents the JWT profile for OAuth 2.0 authorization grant flow.3 The assertionparameter is populated with the output of the signed JWT from step 2c.4 Replace <scope>with a scope or a space delimited set of scopes; for example,fr:idc:esv:*orfr:am:* fr:idm:*. Learn more in Service account scopes. The specified scopes must be the same as (or a subset of) the scopes that you assigned to the service account. -
Examine the response to find the access token, represented as
access_token:{ "access_token": "eyJ0eXAiOiJKV1QiLCJhbGciOiJIUzI1NiJ9... ...8ECmkyDJKow8Qp_Tnp_lGNRJzLWi18iUGQrCTtxyTXw", "scope": "fr:am:* fr:idm:*", "token_type": "Bearer", "expires_in": 899 }
Use an access token
To use the access token with the REST API, set it as a bearer token in the Authorization HTTP header for each API request.
The following example uses the access token to get a list of identities:
Show request
$ curl \
--request GET 'https://<tenant-env-fqdn>/openidm/managed/<realm>_user?_fields=userName,givenName,sn,mail,accountStatus&_prettyPrint=true&_queryFilter=true' \(1)
--header 'Authorization: Bearer <access-token>'(2)| 1 | Replace <realm> with the realm where you created the access token. |
| 2 | Replace <access-token> with the access_token in the authentication response (learn more in Get an access token). |
Show response
{
    "result": [
        {
            "_id": "f413db4c-cebd-4950-81e6-57bdb47921a4",
            "_rev": "0000000016e6754b",
            "userName": "exampleuser",
            "accountStatus": "active",
            "givenName": "Example",
            "sn": "User",
            "mail": "exampleuser@example.com"
        },
        {
            "_id": "15249a65-8f9a-4063-9586-a2465963cee4",
            "_rev": "0000000016e6754b",
            "userName": "exampleuser2",
            "accountStatus": "active",
            "givenName": "Example",
            "sn": "User",
            "mail": "exampleuser2@example.com"
        },
        {
            "_id": "30485bc4-fdbb-4946-8ce4-1a53c6824d92",
            "_rev": "0000000016e6754b",
            "userName": "exampleuser3",
            "accountStatus": "active",
            "givenName": "Example",
            "sn": "User",
            "mail": "exampleuser3@example.com"
        }
    ],
    "resultCount": 3,
    "pagedResultsCookie": null,
    "totalPagedResultsPolicy": "NONE",
    "totalPagedResults": -1,
    "remainingPagedResults": -1
}
Advanced Identity Cloud Postman collection
Advanced Identity Cloud provides REST APIs to help you manage identities, authenticate to the system, monitor Advanced Identity Cloud, and more.
You can also use the AM and IDM APIs with Advanced Identity Cloud.
To help you quickly use and understand these REST APIs, Advanced Identity Cloud provides a Postman collection, containing example requests grouped into features.
Features include:
・Intelligent Access
・User Self-Service
・Session Management
・Identity Profiles
・Managed Identities
・Auditing/Monitoring
・OAuth 2.0 Flows
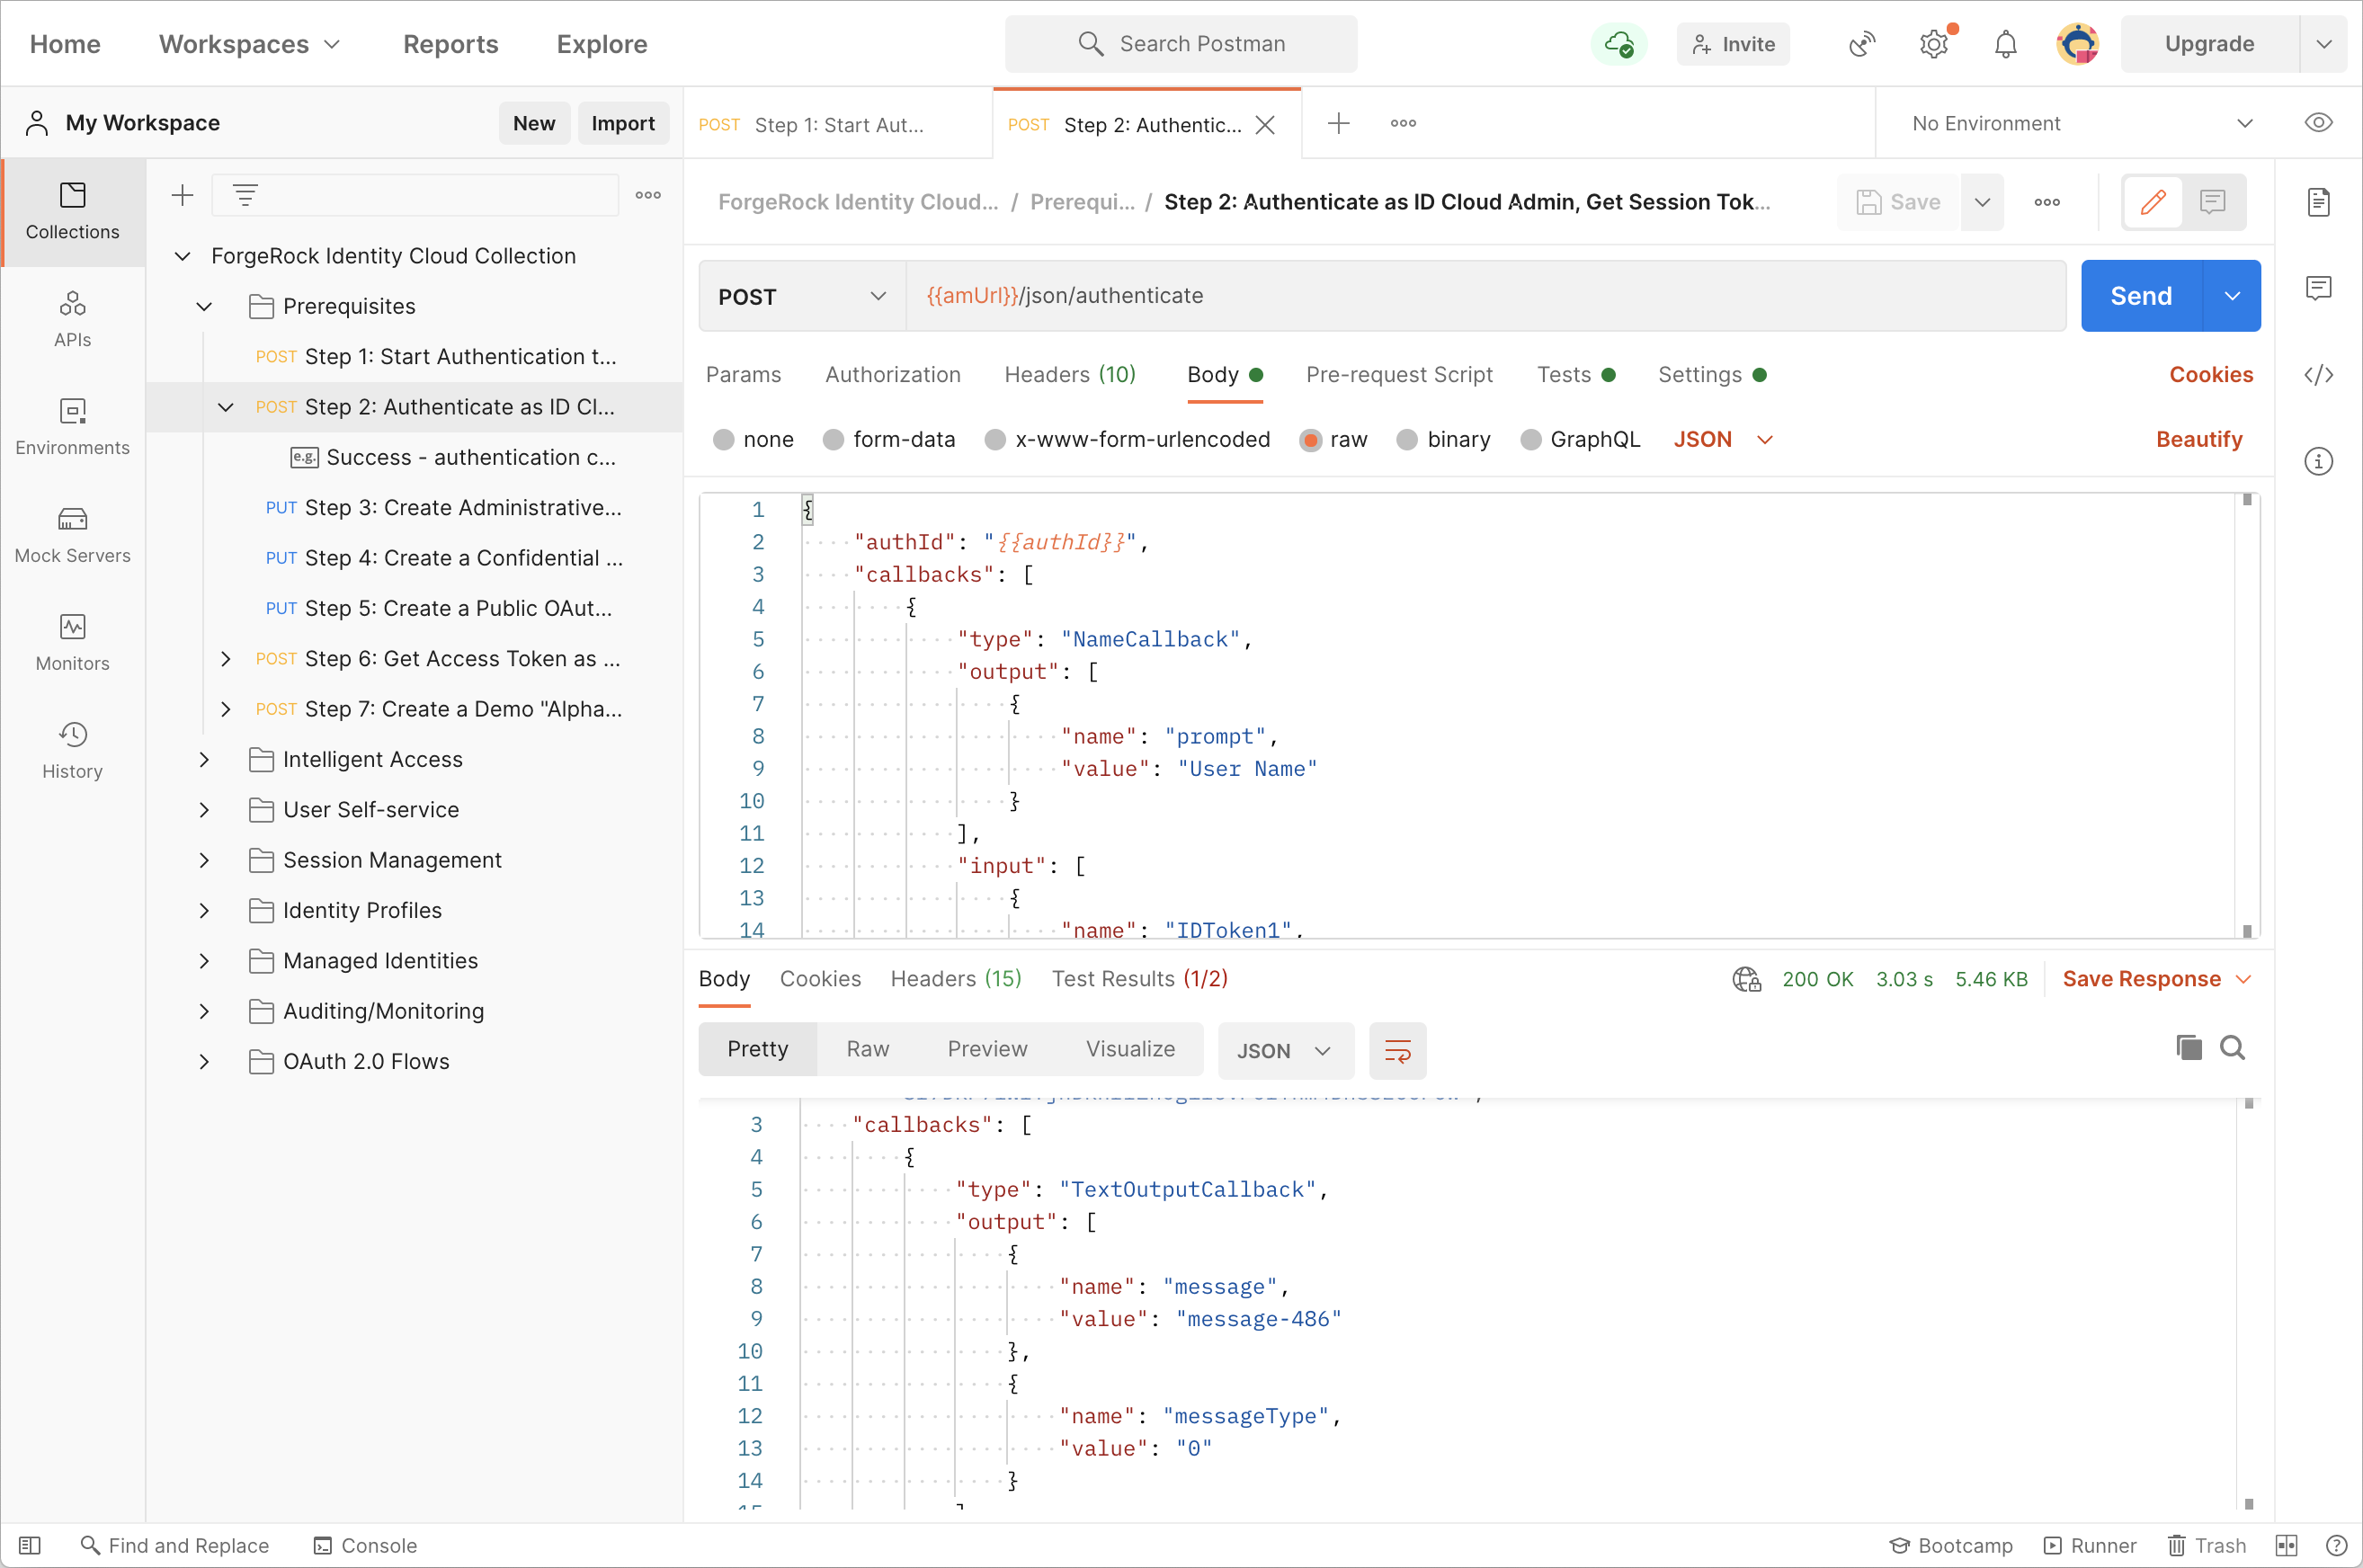
Download Postman and import the Advanced Identity Cloud collection
-
Download and install the Postman application.
-
Download the Advanced Identity Cloud Postman collection.
-
In Postman:
-
Go to File > Import... > Upload Files.
-
Browse to the collection JSON file you downloaded in the previous step, and then click Open.
-
Click Import to bring the collection into your workspace.
-
Create a service account and download its private key
To use the Advanced Identity Cloud Postman collection, you must create a service account that the requests in the collection can use to connect to your Advanced Identity Cloud instance.
Follow the steps in Create a new service account.
-
In step 9, save the private key as a local file called
key.jwk. -
Make a note of the ID for the service account you created.
An example of an ID is
449d7e27-7889-47af-a736-83b6bbf97ec5.
Proceed to the next section to learn how to enter these values into the collection, plus other settings necessary to use Postman with Advanced Identity Cloud.
Configure collection variables
The Advanced Identity Cloud Postman collection uses a number of configurable variables to populate the requests.
These variables are stored at the collection level. To view them, click on the top level of the collection menu labeled PingOne Advanced Identity Cloud Collection, and then select the Variables tab.
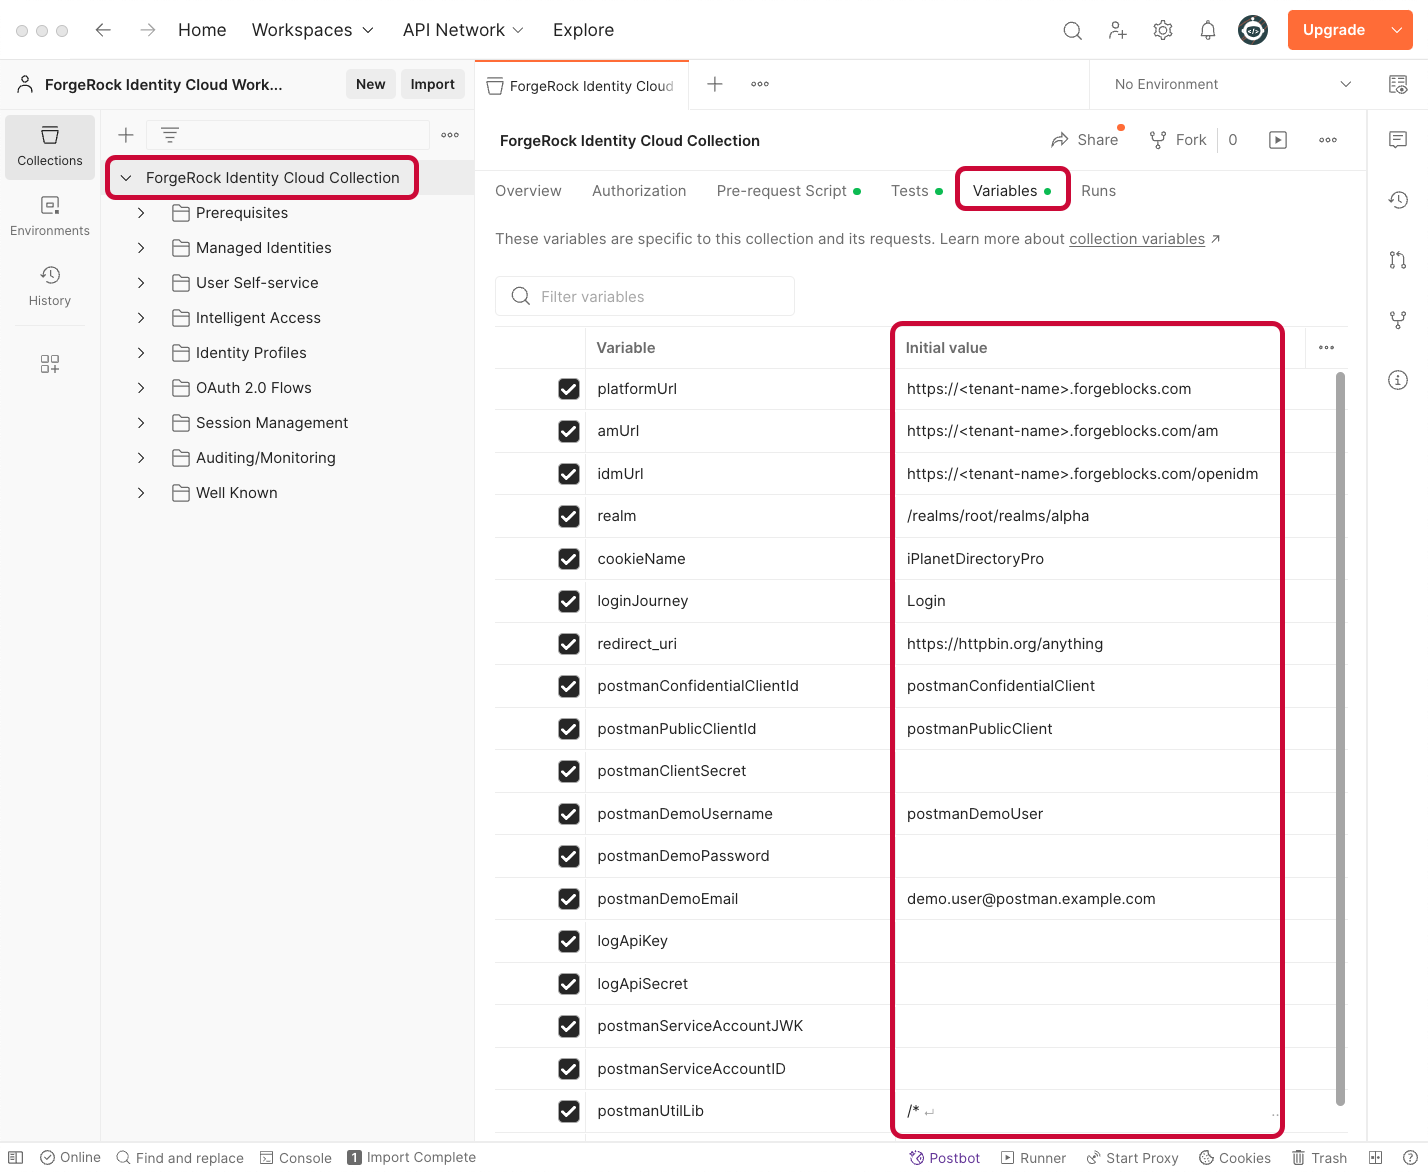
The variables are initially set with placeholder values that you must modify or replace. For example, the collection needs to know the Advanced Identity Cloud URL, as well as your admin access credentials.
To edit the variables, enter new values in the INITIAL VALUE column. Then click Save to make the edits permanent.
To understand which variables you need to edit before you can use the collection, learn more in Required variable values. To understand which variables you can optionally edit to customize the collection to suit your environment, learn more in Optional variable values.
You can then start using the collection.
|
You can also override the default collection-level variables by creating a Postman Environment. Use the same variable names as the Required variable values. This is useful if you have more than one Advanced Identity Cloud tenant, as you can configure the connection and username values as separate environments in Postman. You can also enter potentially sensitive values in an environment to keep them separate from the collection. This means you can share the collection without sharing your credentials. For information on creating a Postman Environment, learn more in Managing environments in the "Postman Learning Center". |
Required variable values
Before using the collection, you must provide the correct values for the following variables. You can provide the value at the collection level or add them at the environment level.
|
Ensure you use strong passwords for access credentials. |
Server URLs
platformUrl-
- Default
-
https://<tenant-env-fqdn> - Description
-
Specifies the root URL of your Advanced Identity Cloud.
amUrl-
- Default
-
https://<tenant-env-fqdn>/am - Description
-
Specifies the URL of the Access Management (AM) component of your Advanced Identity Cloud.
idmUrl-
- Default
-
https://<tenant-env-fqdn>/openidm - Description
-
Specifies the URL of the Identity Management (IDM) component of your Advanced Identity Cloud.
User credentials
postmanServiceAccountID-
- Default
-
Not set
- Description
-
Specifies the ID of the service account you created to allow the Postman collection access to your tenant.
The collection uses this ID when creating a JWT to sign, which it then uses to obtain an access token.
The JWT is generated when you run the Prerequisite requests.
- Example
-
c41515a8e-9c7d-4c37-4b2a-58c0fdea2080
postmanServiceAccountJWK-
- Default
-
Not set
- Description
-
Specifies the private key you downloaded as
key.jwkwhen you created the service account.Open the downloaded
key.jwkin a text editor, and then enter the entire JSON web key into the field in Postman, including the curly braces.The collection uses this key to sign a JWT token, which it then uses to obtain an access token.
The JWK is used to sign the JWT when you run the Prerequisite requests.
- Example
-
{
  "d": "MsVF...dmvw",
  "dp": "0iic...jdrw",
  "dq": "BXja...4epQ",
  "e": "AQAB",
  "kty": "RSA",
  "n": "stO0...qNyU",
  "p": "3VoI-ZPcw",
  "q": "ztGg...EJBw",
  "qi": "NHkA...NV_Gw"
}
postmanClientSecret-
- Default
-
Not set
- Description
-
Specifies the secret used by the OAuth 2.0 clients the collection creates.
You create these clients when you run the Prerequisite requests.
postmanDemoPassword-
- Default
-
Not set
- Description
-
Specifies the password used by the managed realm user the collection creates for demonstration purposes.
You create the realm user when you run the Prerequisite requests.
Logging API
logApiKey-
- Default
-
Not set
- Description
-
Specifies the API key used to access the monitoring endpoints.
Add this key to run the auditing and monitoring requests.
Learn more in Obtaining API Credentials.
- Example
-
0405de08ea73f1d84f
logApiSecret-
- Default
-
Not set
- Description
-
Specifies the API secret used to access the monitoring endpoints.
Add this key to run the auditing and monitoring requests.
Learn more in Obtaining API Credentials.
- Example
-
58932ad661ccf7ea5eda0b...a8d310e1676c9cac7f
Optional variable values
The collection uses the following additional variables that work using their default values; however, you can modify them.
List of optional variable values
postmanDemoUsername-
- Default
-
postmanDemoUser - Description
-
Specifies the username of the managed realm user the collection creates for demonstration purposes.
postmanDemoEmail-
- Default
-
demo.user@postman.example.com - Description
-
Specifies the email of the managed realm user the collection creates for demonstration purposes.
Enter an email address you have access to if you want to test the forgotten username or password flows in the user self-service section of the collection.
realm-
- Default
-
/realms/root/realms/alpha - Description
-
Specifies the realm that the majority of the requests in the collection use.
You must specify the entire hierarchy of the realm, starting at the root realm.
Prefix each realm in the hierarchy with the
realmskeyword. - Example
-
/realms/root/realms/customers/realms/europe.
cookieName-
- Default
-
Not set
- Description
-
Specifies the name of the session cookie the tenant uses to store session tokens.
The collection sets this value automatically when you run the first request in the Prerequisites folder.
loginJourney-
- Default
-
Login - Description
-
Specifies the authorization journey name to use.
For information on the default journeys that Advanced Identity Cloud provides, learn more in Login.
redirect_uri-
- Default
-
https://httpbin.org/anything - Description
-
Specifies the URI to which the OAuth 2.0 client will redirect the user upon a successful authentication request.
postmanConfidentialClientId-
- Default
-
postmanConfidentialClient - Description
-
Specifies the ID of the OAuth 2.0 private client.
postmanPublicClientId-
- Default
-
postmanPublicClient - Description
-
Specifies the ID of the OAuth 2.0 public client.
Hard-coded variable values
The collection uses the following additional variables that must not be modified.
List of hard-coded variable values
postmanUtilLib-
- Description
-
Contains the
postman-util-libutility library that the collection uses to sign requests and generate certain keys.Learn more in postman-util-lib on GitHub.
Use the collection
Before using the Advanced Identity Cloud Postman collection, you should run the Prerequisite requests. The requests configure your Advanced Identity Cloud with the necessary elements, such as OAuth 2.0 clients and managed users
Running the prerequisite requests
| Ensure you have configured the required collection variables as described in Configure collection variables before running the prerequisite requests. |
-
In Postman, with the Advanced Identity Cloud collection loaded, open the Prerequisites section.
-
Select the first request in the list, examine the details, and when you’re satisfied the request is properly formed, click Send.
Many of the requests have associated tests; for example, that the response code was
200. Postman displays the test results alongside the response to the request.Many of the requests set a global variable containing a value returned in the response for use in subsequent requests.
View the details of these in the Tests tab of a request. You can also view the values of these global variables by clicking Environment Quick Look ().
-
Repeat the previous step for each request in the Prerequisites folder.
When completed, Advanced Identity Cloud contains the following:
-
An alpha_user identity, named
postmanDemoUserby default, which demonstrates a number of user-related endpoints, such as identity profiles, and user self-service. -
Two OAuth 2.0 clients:
-
A client named
postmanConfidentialClient, which is used by the OAuth 2.0 requests to demonstrate a number of grant flows. -
A client named
postmanPublicClient, which is used by the OAuth 2.0 requests to demonstrate a number of grant flows.
-
If you need to recreate any of the above, or decide to alter the default values, run each of the steps in the Prerequisite folder again.
Running the requests
The requests in the collection are split into different features. To run the calls for a feature, open the relevant folder, and run each request in sequence.
The value in square brackets in the name shows what type of authentication the request requires:
[User]-
The request acts on a user’s data or profile.
These requests often authenticate as
postmanDemoUserin the collection. [fr:am:*]-
The request requires an access token that has the
fr:am:*scope so that it can perform access management related actions.These requests authenticate as the service account you created earlier.
[fr:idm:*]-
The request requires an access token that has the
fr:am:*scope so that it can perform identity management related actions.These requests authenticate as the service account you created earlier.
Note that intelligent access and identity profiles have additional functionality. Refer to each section for details.
Intelligent access
There are scripts in the Intelligent Access requests that attempt to detect the callbacks that the first step returns, and sets the next request to handle it.
To view the details of this script:
-
Click on the top level of the collection menu (labelled PingOne Advanced Identity Cloud Collection), then select the Pre-request Scripts tab.
-
Within the tab, examine the
detectCallbacksscript.
When manually running through the steps, examine the response returned in the first call, and run the relevant next step. The collection is able to handle the following ready-to-use callbacks:
| Step | Callback |
|---|---|
Step 2a |
Username and password callbacks, together in a page node. |
Step 2b |
Validated create username and password callbacks, together in a page node. |
Step 2c |
Choice callbacks. |
Step 2d |
Text input callbacks. |
Step 2e |
Device profile callbacks. Learn more in Configure Device Profiling. |
Step 2f |
Progressive profile callbacks. |
Identity profiles
Some endpoints require the ID of an identity, rather than the username.
An example of this is when getting the OAuth 2.0 profiles a user has provided consent to.
When running the Identity Profiles requests, ensure you have also executed the request named Step 3: [User] Read session info and store ID in the Authenticate as "Postman Demo User" folder.
The result is stored in the demoUserId global variable.
Advanced Identity Cloud REST
Advanced Identity Cloud REST is a REST API framework defining common APIs to access web resources and collections of resources.
Resources
Endpoints generally return JSON-format resources, though resource formats can depend on the implementation.
Resources in collections can be found by their unique identifiers (IDs).
IDs are exposed in the resource URIs.
For example, if a service has a user collection under /users, you can access a user at /users/user-id.
The ID is also the value of the _id field of the resource.
Resources are versioned using revision numbers.
A revision is specified in the resource’s _rev field.
Revisions make it possible to figure out whether to apply changes
without resource locking and without distributed transactions.
Verbs
The Advanced Identity Cloud REST APIs use the following verbs, sometimes referred to collectively as CRUDPAQ. For details and HTTP-based examples of each, follow the links to the sections for each verb.
| Verb | Description |
|---|---|
Add a new resource with HTTP PUT or HTTP POST. |
|
Retrieve a single resource with HTTP GET. |
|
Replace an existing resource with HTTP PUT. |
|
Remove an existing resource with HTTP DELETE. |
|
Modify part of an existing resource with HTTP PATCH. |
|
Perform a predefined action with HTTP POST. |
|
Search a collection of resources with HTTP GET. |
Query parameters
Advanced Identity Cloud REST reserved query string parameter names start with an underscore (_).
Reserved query string parameters include, but are not limited to, the following names:
_action
_api
_countOnly
_crestapi
_fields
_mimeType
_pageSize
_pagedResultsCookie
_pagedResultsOffset
_prettyPrint
_queryExpression
_queryFilter
_queryId
_sortKeys
_totalPagedResultsPolicy
| Some parameter values are not safe for URLs; URL-encode parameter values as necessary. |
Extension points
The action verb is the main vehicle for extensions.
For example, to create a new user with HTTP POST rather than HTTP PUT, you might use /users?_action=create.
An endpoint can define additional actions.
For example, /tasks/1?_action=cancel.
A service can define stored queries to call by ID.
For example, /groups?_queryId=hasDeletedMembers.
Stored queries can call for additional parameters.
The parameters are also passed in the query string.
Which parameters are valid depends on the stored query.
Create
There are two ways to create a resource: HTTP POST or HTTP PUT.
To create a resource using POST,
perform an HTTP POST with the query string parameter _action=create and the JSON resource as a payload.
The service creates the identifier if not specified:
POST /users?_action=create HTTP/1.1
Host: example.com
Accept: application/json
Content-Length: ...
Content-Type: application/json
{ JSON resource }
To create a resource using PUT, perform an HTTP PUT
with the case-sensitive identifier for the resource in the URL path and the JSON resource as a payload.
Optionally, include the If-None-Match: * header to prevent overwriting an existing object:
PUT /users/some-id HTTP/1.1
Host: example.com
Accept: application/json
Content-Length: ...
Content-Type: application/json
If-None-Match: *
{ JSON resource }
The _id and the content of the resource depend on the endpoint.
The service is not required to use the _id the client provides.
The response to the create request indicates the resource location as the value of the Location header.
-
If you do include the
If-None-Match: *header, the request creates the object if it does not exist or fails if the object does exist. -
If you do not include the
If-None-Match: *header, the request creates the object if it does not exist or updates the object if it does exist. -
If you include the
If-None-Matchheader with any value other than*, the response is an HTTP 400 Bad Request error. For example, creating an object withIf-None-Match: revisionreturns a bad request error.
Parameters
You can use the following query string parameters:
| Parameter | Description |
|---|---|
|
Return only the specified fields in the body of the response. The If the |
|
Format the body of the response. |
Read
To retrieve a single resource, perform an HTTP GET on the resource by its case-sensitive identifier (_id)
and accept a JSON response:
GET /users/some-id HTTP/1.1
Host: example.com
Accept: application/json
Parameters
You can use the following query string parameters:
| Parameter | Description |
|---|---|
|
Return only the specified fields in the body of the response. The If the |
|
Some resources have fields containing multimedia resources, such as a profile photo. If the feature is enabled for the endpoint, read a single multimedia resource field by specifying the field and mime-type. The content type of the field value returned matches the mime-type. The body of the response is the multimedia resource Do not use the |
|
Format the body of the response. |
Update
To update a resource, perform an HTTP PUT
including the case-sensitive identifier (_id) as the final element of the path to the resource
and the JSON resource as the payload.
Use the If-Match: _rev header to verify the version you modify.
Use If-Match: * if the version does not matter.
PUT /users/some-id HTTP/1.1
Host: example.com
Accept: application/json
Content-Length: ...
Content-Type: application/json
If-Match: _rev
{ JSON resource }
When updating a resource, include all the attributes to retain. Omitting an attribute in the resource amounts to deleting it unless it is not under the control of your application. Attributes not under the control of your application include private and read-only attributes. Virtual attributes and relationship references might not be under the control of your application.
| Parameter | Description |
|---|---|
|
Return only the specified fields in the body of the response. The If the |
|
Format the body of the response. |
Delete
To delete a single resource, perform an HTTP DELETE by its case-sensitive identifier (_id) and accept a JSON response:
DELETE /users/some-id HTTP/1.1
Host: example.com
Accept: application/json
Parameters
You can use the following query string parameters:
| Parameter | Description |
|---|---|
|
Return only the specified fields in the body of the response. The If the |
|
Format the body of the response. |
Patch
To patch a resource, send an HTTP PATCH request with an array of operation objects in the payload. Each operation object uses some combination of these fields:
operation-
The type of operation.
field-
The target field.
value-
The value to apply.
from-
The source field.
The service applies the PATCH operations in order.
PATCH /users/some-id HTTP/1.1
Host: example.com
Accept: application/json
Content-Length: ...
Content-Type: application/json
If-Match: _rev
{ JSON array of patch operations }
PATCH operations work differently depending on the field types:
- Single-value
-
An object, string, boolean, or number.
- List semantics array
-
The elements are ordered, and duplicates are allowed.
- Set semantics array
-
The elements are not ordered, and duplicates are not allowed.
Whether an endpoint supports a specific operation depends on the implementation.
Add operation
The add operation ensures the target field contains the value provided, creating parent fields as necessary.
If the target field is single-valued, the value replaces the value of the target.
If the value is an array, the outcome depends on the type:
- List semantics arrays
-
If you
addan array of values, the operation appends the array to the existing list of values.If you
adda single value, specify an ordinal element in the target array, or use the{-}special index to add the value to the end of the list. - Set semantics arrays
-
The operation merges the value(s) in the patch with the existing set of values. Any duplicates in the array are removed.
As an example, start with the following list semantic array resource:
{
  "fruits": ["orange", "apple"]
}
The following add operation appends pineapple at the end of the array:
{
  "operation": "add",
  "field": "/fruits/-",
  "value": "pineapple"
}
The resulting resource is:
{
  "fruits": ["orange", "apple", "pineapple"]
}
Copy operation
The copy operation replaces the value(s) of the target field with the value(s) from the source field.
The following example replaces the value of another_mail with the value of mail:
[{
  "operation": "copy",
  "from": "mail",
  "field": "another_mail"
}]
If the source field value and the target field value are arrays, the result depends on whether the array has list semantics or set semantics. Learn more in Add operation.
Increment operation
The increment operation changes the value or values of the target field by the amount you specify.
The value must be a positive or negative number.
The target must be a single-valued number.
The following example adds 1000 to /user/payment:
[{
  "operation": "increment",
  "field": "/user/payment",
  "value": "1000"
}]
Move operation
The move operation removes existing values from the source and adds them to the target field.
The operation creates the target field if it does not exist.
The following example moves surname values to lastName:
[{
  "operation": "move",
  "from": "surname",
  "field": "lastName"
}]
To apply a move to an array, the source and target must have compatible semantics.
Learn more in Add operation.
Remove operation
The remove operation deletes values in the target field.
When no value is specified, the operation removes the field:
[{
  "operation": "remove",
  "field": "phoneNumber"
}]
For arrays, the result depends on the semantics:
- List semantic arrays
-
Delete the specified element in the array.
The following example removes the first phone number (zero-based array index):
[{ "operation": "remove", "field": "/phoneNumber/0" }] - Set semantic arrays
-
Delete the specified values from the array.
The following example removes the specified phone number:
[{
  "operation": "remove",
  "field": "/phoneNumber",
  "value": "+1 408 555 9999"
}]
Replace operation
The replace operation removes existing values in the target, replacing them with the provided value(s).
The following example replaces existing telephoneNumber values with +1 408 555 9999:
[{
  "operation": "replace",
  "field": "/telephoneNumber",
  "value": "+1 408 555 9999"
}]
For list semantic arrays, you can target items by their indexes. As an example, start with the following resource:
{
  "fruits": ["apple", "orange", "kiwi", "lime"]
}
Apply the following operation:
[{
  "operation": "replace",
  "field": "/fruits/1",
  "value": "pineapple"
}]
The result is:
{
  "fruits": ["apple", "pineapple", "kiwi", "lime"]
}
Transform operation
The transform operation changes the field value based on a script or a data transformation command.
The following example applies the something.js script to the /objects value:
[{
  "operation": "transform",
  "field": "/objects",
  "value": {
    "script": {
      "type": "text/javascript",
      "file": "something.js"
    }
  }
}]
Limitations
Some HTTP client libraries do not support the HTTP PATCH operation.
Make sure the library you use supports HTTP PATCH before using this REST operation.
For example, the Java method HttpURLConnection.setRequestMethod("PATCH") throws ProtocolException.
Parameters
You can use the following query string parameters:
| Parameter | Description |
|---|---|
|
Return only the specified fields in the body of the response. The If the |
|
Format the body of the response. |
Action
Actions are a means of extending Advanced Identity Cloud REST APIs and are defined by the resource provider. The actions you can use depend on the implementation.
The standard action indicated by _action=create is described in Create.
Parameters
You can use the following query string parameters. Other parameters depend on the specific action implementation:
| Parameter | Description |
|---|---|
|
Return only the specified fields in the body of the response. The If the |
|
Format the body of the response. |
Query
To query a resource collection, which you can think of as a resource container,
perform an HTTP GET and accept a JSON response including at least a _queryFilter or _queryId parameter.
These parameters cannot be used together.
GET /users?_queryFilter=true HTTP/1.1
Host: example.com
Accept: application/json
The endpoint returns the result as a JSON object including a results array
and other fields related to the query string parameters.
Parameters
You can use the following query string parameters:
| Parameter | Description |
|---|---|
|
Return only the specified fields in each element of the The If the |
|
The string is an opaque cookie to keep track of the position in the search results.
The service returns the cookie in the JSON response as the value of In the request Use this parameter with the The |
|
When The |
|
Return query results in pages of this size. After the initial request, use |
|
Format the body of the response. |
|
Query filters request entries matching the filter expression. You must URL-escape the filter expression. Learn more in Filter expressions. |
|
Specify a query by its identifier. Specific queries can take their own query string parameter arguments depending on the implementation. |
|
Sort the resources returned based on the specified field(s) in As ascending order is the default, including the The |
|
When a non-zero The
If no count policy is specified in the query, or if |
Filter expressions
Query filters request entries matching the filter expression. You must URL-escape the filter expression.
The string representation is summarized as follows:
Expr           = OrExpr
OrExpr         = AndExpr ( 'or' AndExpr ) *
AndExpr        = NotExpr ( 'and' NotExpr ) *
NotExpr        = '!' PrimaryExpr | PrimaryExpr
PrimaryExpr    = '(' Expr ')' | ComparisonExpr | PresenceExpr | LiteralExpr
ComparisonExpr = Pointer OpName JsonValue
PresenceExpr   = Pointer 'pr'
LiteralExpr    = 'true' | 'false'
Pointer        = JSON pointer
OpName         = 'eq' |  # equal to
                 'co' |  # contains
                 'sw' |  # starts with
                 'lt' |  # less than
                 'le' |  # less than or equal to
                 'gt' |  # greater than
                 'ge' |  # greater than or equal to
                 STRING  # extended operator
JsonValue      = NUMBER | BOOLEAN | '"' UTF8STRING '"'
STRING         = ASCII string not containing white-space
UTF8STRING     = UTF-8 string possibly containing white-space
JsonValue components of filter expressions follow
RFC 7159: The JavaScript Object Notation (JSON) Data Interchange Format.
In particular, as described in section 7 of the RFC, the escape character in strings is the backslash character.
For example, to match the identifier test\, use _id eq 'test\\'.
In the JSON resource, the \ is escaped the same way: "_id":"test\\".
When using a query filter in a URL, notice the filter expression is part of a query string parameter.
URL-encoded the filter expression.
Learn more in
RFC 3986: Uniform Resource Identifier (URI): Generic Syntax.
For example, whitespace, double quotes ("), parentheses, and exclamation characters need URL encoding.
The following rules apply to URL query components:
query       = *( pchar / "/" / "?" )
pchar       = unreserved / pct-encoded / sub-delims / ":" / "@"
unreserved  = ALPHA / DIGIT / "-" / "." / "_" / "~"
pct-encoded = "%" HEXDIG HEXDIG
sub-delims  = "!" / "$" / "&" / "'" / "(" / ")"
/ "*" / "+" / "," / ";" / "="ALPHA, DIGIT, and HEXDIG are core rules of
RFC 5234: Augmented BNF for Syntax Specifications:
ALPHA       =  %x41-5A / %x61-7A   ; A-Z / a-z
DIGIT       =  %x30-39             ; 0-9
HEXDIG      =  DIGIT / "A" / "B" / "C" / "D" / "E" / "F"
As a result, a backslash escape character in a JsonValue component
is percent-encoded in the URL query string parameter as %5C.
To encode the query filter expression _id eq 'test\\', use _id+eq'test%5C%5C'+, for example.
A simple filter expression can represent a comparison, presence, or a literal value.
For comparison expressions use json-pointer comparator json-value, where the comparator is one of the following:
eq (equals)
co (contains)
sw (starts with)
lt (less than)
le (less than or equal to)
gt (greater than)
ge (greater than or equal to)
For presence, use json-pointer pr to match resources where:
-
The JSON pointer is present.
-
The value it points to is not
null.
Literal values include true (match anything) and false (match nothing).
Complex expressions employ and, or, and ! (not), with parentheses, (expression), to group expressions.
HTTP status codes
When working with a Advanced Identity Cloud REST API, client applications should expect at least the following HTTP status codes. Not all services necessarily return all status codes identified here:
- 200 OK
-
The request succeeded and a resource returned, depending on the request.
- 201 Created
-
The request succeeded and the resource was created.
- 204 No Content
-
The action request succeeded, and there was no content to return.
- 304 Not Modified
-
The read request included an
If-None-Matchheader, and the value of the header matched the revision value of the resource. - 400 Bad Request
-
The request was malformed.
- 401 Unauthorized
-
The request requires user authentication.
- 403 Forbidden
-
Access was forbidden during an operation on a resource.
- 404 Not Found
-
The specified resource could not be found, perhaps because it does not exist.
- 405 Method Not Allowed
-
The HTTP method is not allowed for the requested resource.
- 406 Not Acceptable
-
The request contains parameters that are not acceptable, such as a resource or protocol version that is not available.
- 409 Conflict
-
The request would have resulted in a conflict with the current state of the resource.
- 410 Gone
-
The requested resource is no longer available, and will not become available again. This can happen when resources expire.
- 412 Precondition Failed
-
The resource’s current version does not match the version provided.
- 415 Unsupported Media Type
-
The request is in a format not supported by the requested resource for the requested method.
- 428 Precondition Required
-
The resource requires a version, but no version was supplied in the request.
- 500 Internal Server Error
-
The service encountered an unexpected condition that prevented it from fulfilling the request.
- 501 Not Implemented
-
The resource does not support the functionality required to fulfill the request.
- 503 Service Unavailable
-
The requested resource was temporarily unavailable. The service may be disabled, for example.
Advanced Identity Cloud deep dives
Selected pages from across all Ping Identity product documentation to complement PingOne Advanced Identity Cloud docs
 PingAM
Provides infrastructure for managing users, roles, and access to protected resources.
Intelligent Authentication |
Authorization |
Federation |
|
 PingIDM
Reconciles customer identity data to ensure accurate information across disparate resources within an organization.
Identity Synchronization |
User Self-Service |
Identity Lifecycle and Relationships |
Social Identity |
 Edge Security
Integrates web applications, APIs, microservices, Internet of Things devices, and cloud-based services with the Ping Identity Identity Platform.
Beyond Advanced Identity Cloud docs
Useful identity and access management information beyond the scope of PingOne Advanced Identity Cloud docs
Knowledge base articles |
Staff picks • Frodo + Service Accounts = Secure CI/CD in ForgeRock Identity Cloud • ForgeRock Identity Cloud as a SAML 2.0 identity provider • Understanding and troubleshooting ForgeRock platform integration |
Text tutorials |
Blogs |
Community |
About Identity Governance
|
Advanced Identity Cloud add-on capability
Contact your Ping Identity representative if you want to add PingOne® Identity Governance to your Advanced Identity Cloud subscription. |
Identity Governance lets you to administer and manage end user access to applications and data across your company to support corporate and regulatory compliance. Identity Governance uses onboarded target applications when reviewing identity data.
With Identity Governance, you can:
-
Create and manage policies and policy rules, allowing end users to manage segregation of duties (SoD) violations.
-
Allow end users to gain access to the resources they need through access requests.
-
Review (certify) end users access in onboarded target applications through access certifications, event-based certification, and access reviews.
-
Manage access requests by configuring workflows, end-to-end UI-based sequence of tasks that results in the approval or rejection of an access request.
-
Aggregate permissions into Advanced Identity Cloud to view user privileges in onboarded target applications using entitlements.
-
Attach custom attributes to applications, entitlements, and roles that you can use to extend the data you review using governance glossary attributes.
| Identity Governance only supports the use of the Alpha realm. |
To access Identity Governance administration functions in Advanced Identity Cloud, you must be a tenant administrator.
When you purchase Identity Governance, the Governance-related menu items are added to the left navigation pane:
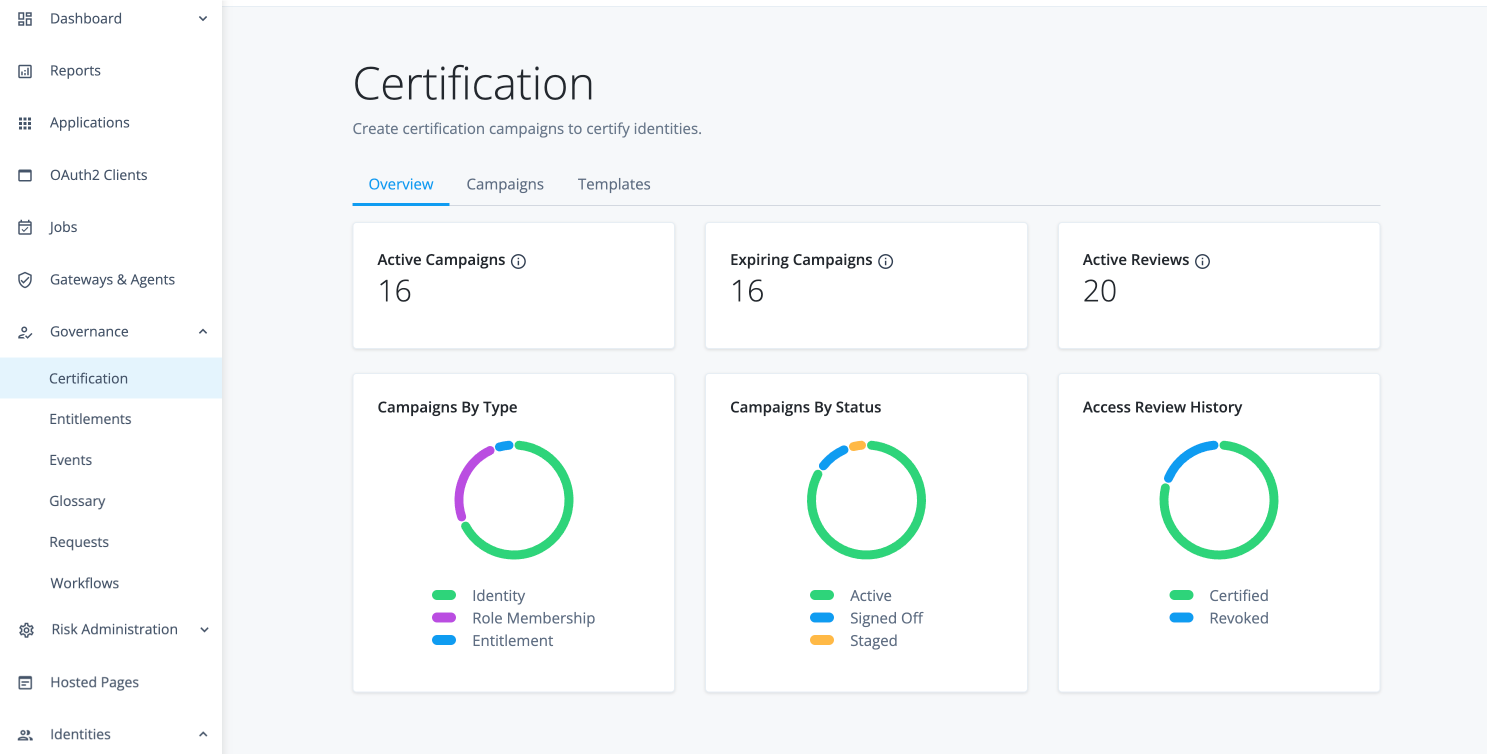
Additional menu items are also added to the End-user pages.
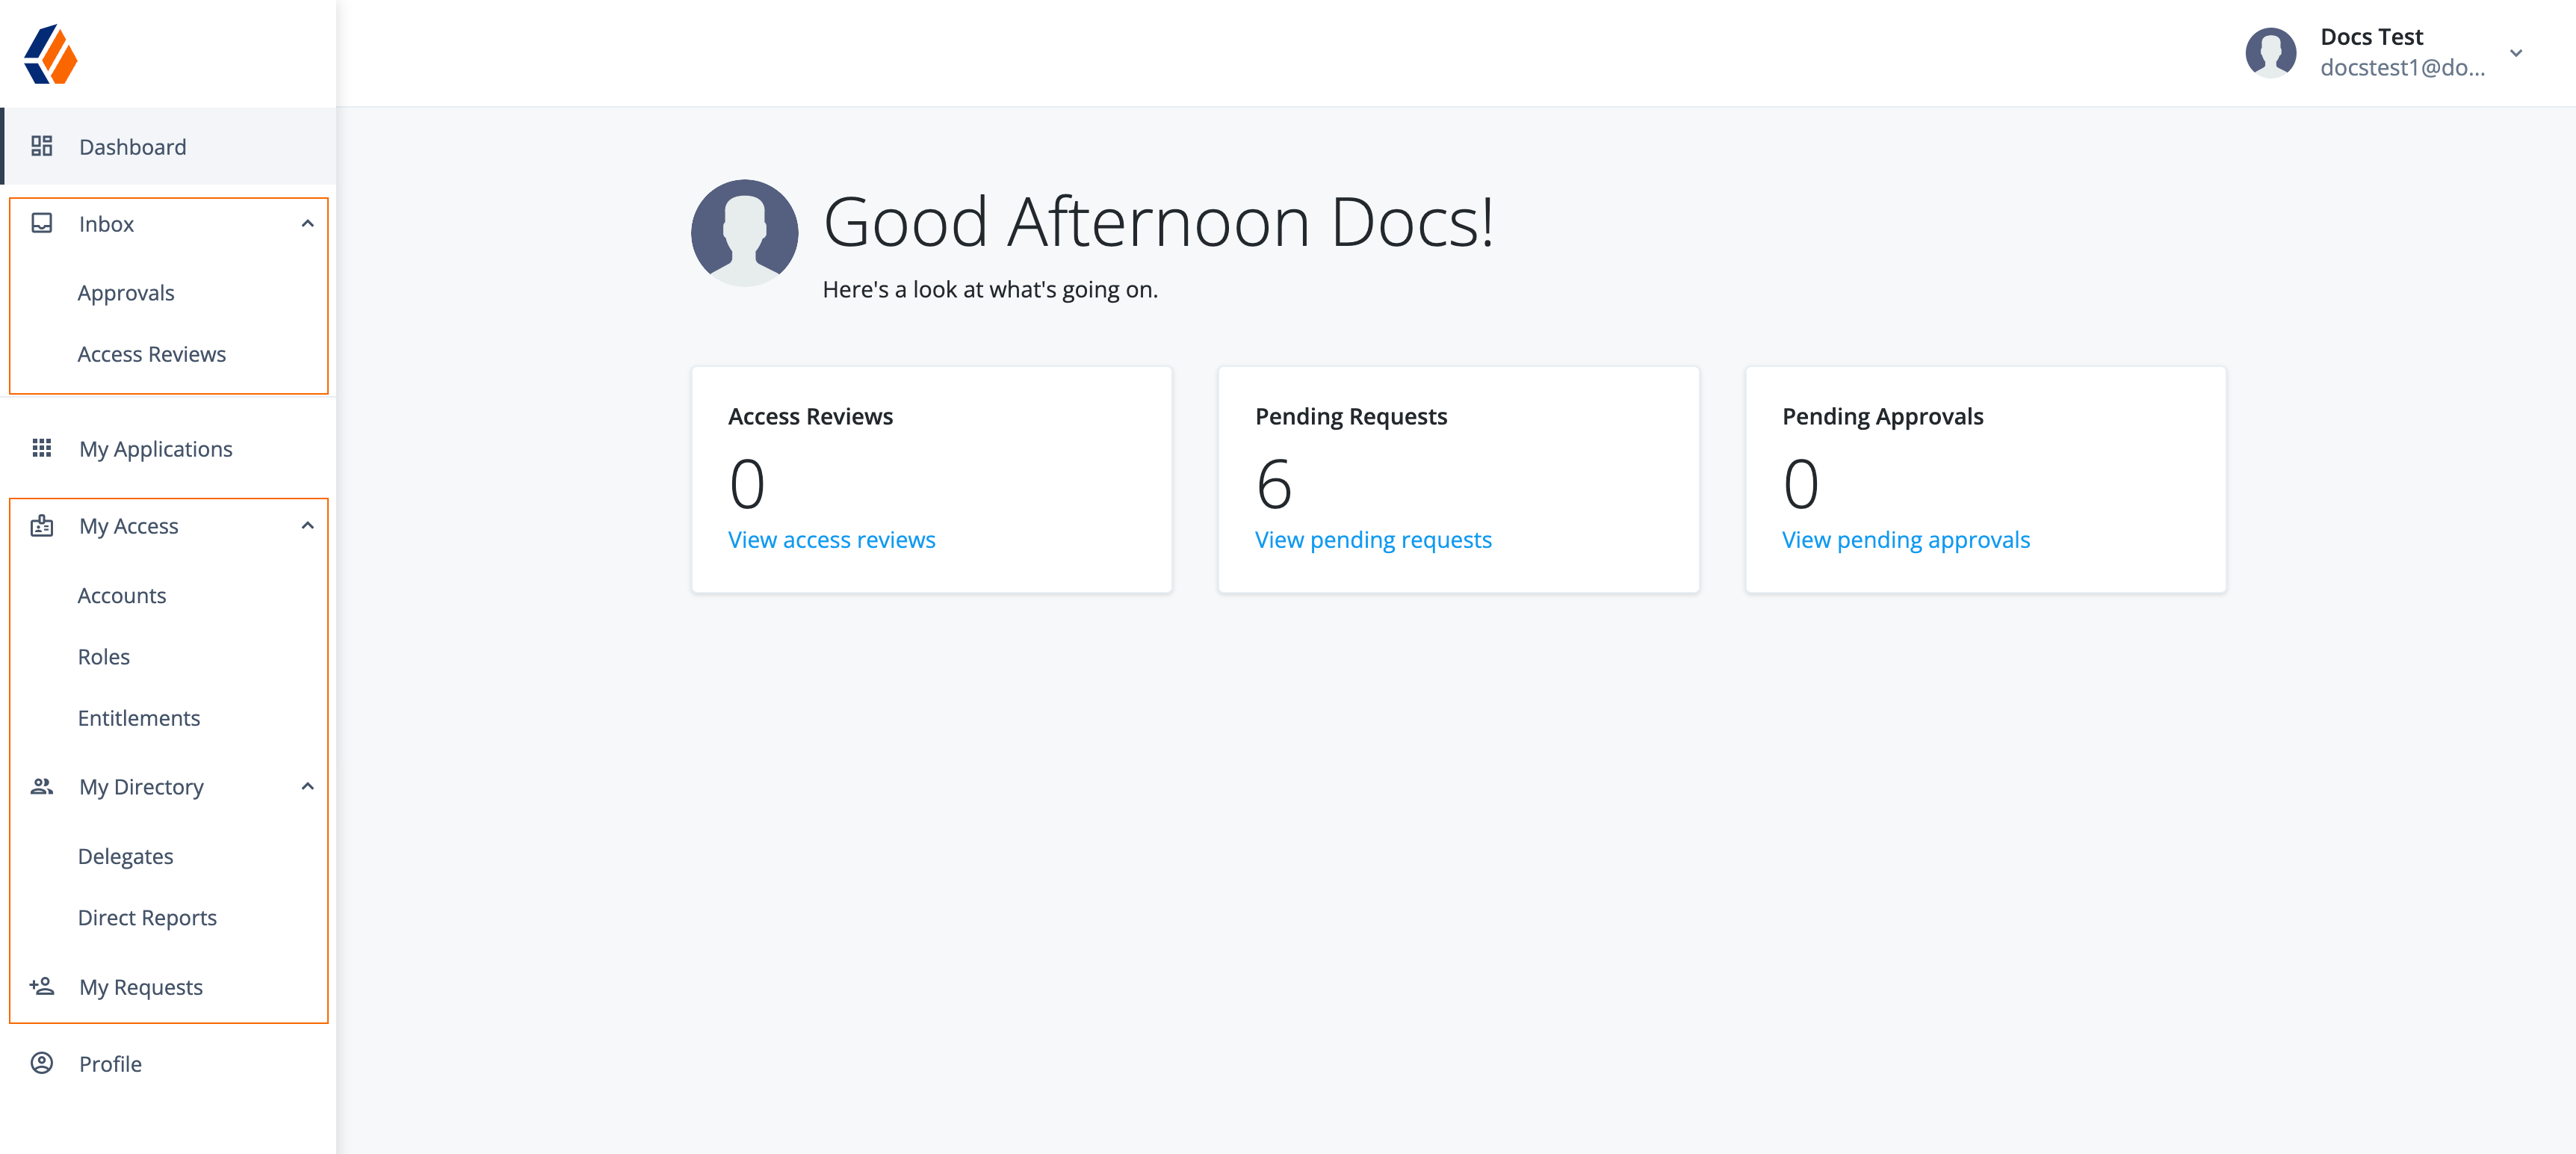
Certify access using templates and campaigns
In Identity Governance, certifying access means reviewing the data and access a user has, such as access to applications, the accounts in those applications, and more.
Steps to certify access
To certify access for users, you must:
-
Create templates — Allows you to configure the data you want to certify.
-
Run campaigns — After you create a template and are ready to kick off the review process, create a campaign.
-
Certify data and access by end users — After you start a campaign, the template-defined end users (certifiers) receive notifications to review the data. The certifiers' review of the data is referred to as an access review.
Certifications tab
Certifications and related features can be found by selecting Certification from the left navigation bar in the Advanced Identity Cloud admin UI.
Three tabs display under Certification:
Overview tab
To access the Overview tab, from the Advanced Identity Cloud admin UI, go to Certification > Overview.
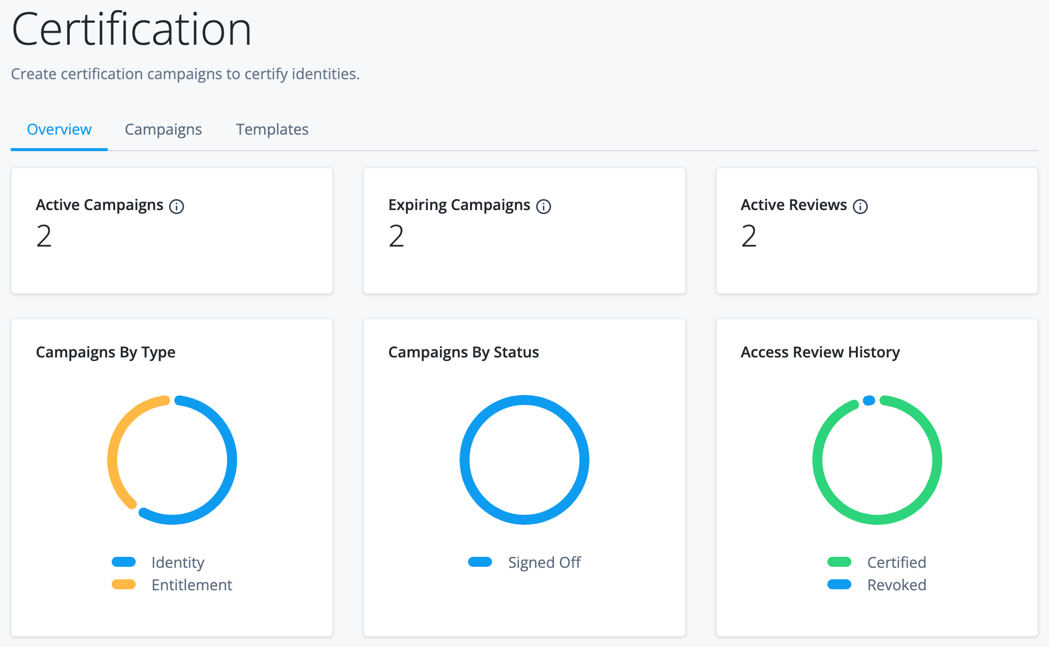
The Overview landing page displays various metrics that allow you to view items such as campaign status, active reviews, and campaigns by type.
You can hover your cursor over the charts to view the data details.
| Data Element | Description |
|---|---|
Active Campaigns |
The number of campaigns currently in progress. |
Expiring Campaigns |
The number of campaigns that expire in the next two weeks. |
Active Reviews |
The total amount of line items in access reviews that are in progress. A line item is a record for a certifier to review. For example, the user Barbara Jensen’s record that details their access to a particular application is a line item. |
Campaigns By Type |
A breakdown of the varying types of certifications. |
Campaigns By Status |
A breakdown of certifications by status. |
access review History |
The number of line items certified versus revoked from campaigns. |
Example of certifying access
As an example of certifying access, let’s say you want to know what applications a specific user, Barbara Jenson, has access to. You may want to do this for a couple of reasons; increasing your company’s security landscape by ensuring users have accurate, appropriate access, or to comply with organizational, industry, or governmental policies. Barbara Jensen has an account and access to an application, called App A.
With Identity Governance, perform the following actions to achieve this:
-
Configure and assign end users (certifiers) in your company to review Barbara’s access to App A using templates.
-
Kick off the data review using campaigns. Campaigns are the active processes, where certifiers review the data. In this case, it is Barbara’s data. Certifiers are assigned to review the data in a campaign.
-
Certifiers review Barbara’s data and either certify (allow) or revoke (remove) the access to App A.
Configure data to review using templates
Templates are the first step in certifying access for users.
Templates are the underlying configurations of certifying access and define the data to review, who is responsible for the review, and when the data needs to be reviewed (on a periodic or ad hoc basis).
Often, organizations need to review the same data multiple times a year to ensure access is accurate. Templates make the certification process easier by saving the configuration settings used in the data review process.
Manage (create, duplicate, edit, or delete) templates on the Templates tab and schedule each campaign to run at a specific interval (if desired).
You can run templates on an ad-hoc or scheduled basis.
View saved templates
To view saved templates, from the Advanced Identity Cloud admin UI, click Certification > Templates tab. The page displays saved templates.
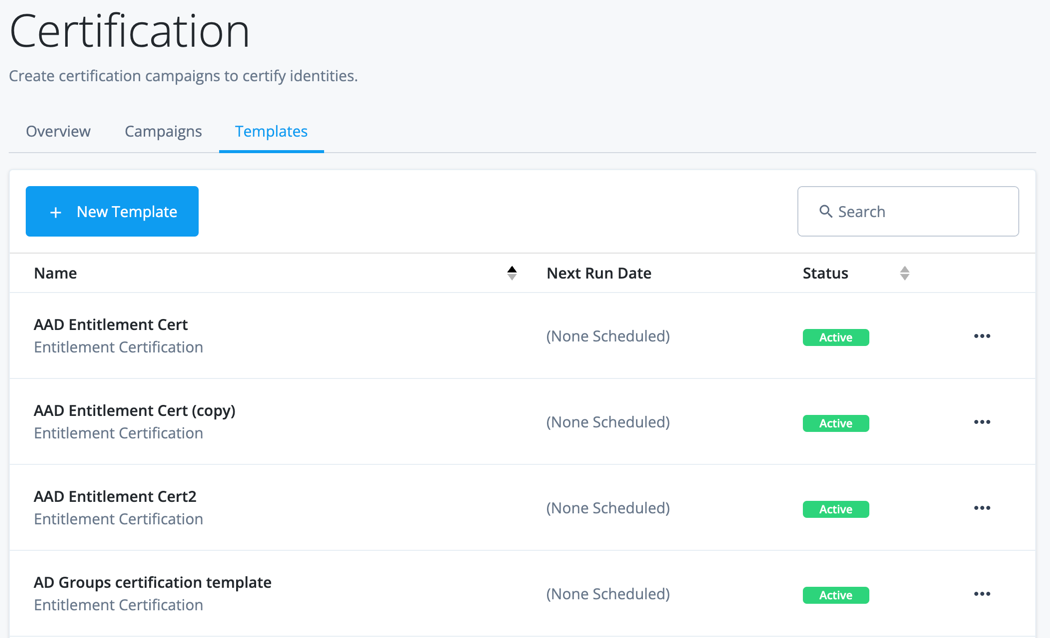
| Field | Description |
|---|---|
Name |
The name of the template. |
Next run date |
A date displays when the template is configured to run according to a schedule. If the template runs ad-hoc, then (None Scheduled) displays. |
Status |
A template can be in one of the following states:
The general sequence of states are Creating → Unused → Active. |
Which certification template to choose?
Identity Governance provides various certification templates to choose from. The underlying business objective you want to achieve determines which template type you choose.
Refer to the following scenarios when determining which template type to choose:
-
You want to review the template to certify or revoke access to applications (accounts). You can specify to review the entitlements or roles a user has. The primary certifier (reviewer) of the certification should be users' managers.
Identity Entitlement assignment Role membership Notes Not every user has entitlements. If you want to review the applications users have access to, and include those users who don’t have entitlements, choose the identity certification.
-
You want to review to certify or revoke specific entitlements assigned to users in target applications. The primary certifier of the certification should be entitlement owners.
Identity Entitlement assignment Role membership Notes The entitlement assignment certification is the best choice in this scenario. It provides entitlement owners the ability to review the access users have to their entitlements.
-
You want to review the template to certify or revoke a user’s role memberships. The primary certifier of the certification should be role owners.
Identity Entitlement assignment Role membership Notes The role membership certification is the best choice in this scenario as it provides the ability to review roles and users who are assigned to roles in Advanced Identity Cloud.
Create templates
Before you create a template, consider creating custom governance glossary attributes to enhance the data for onboarded target applications, entitlements, or roles. This will assist with template filtering and business decisions.
To create a template:
-
Navigate to the Certification > Templates tab.
-
Click + New Template.
-
Select the template type:
-
Identity certification — Review and certify user accounts, entitlements, and access a user has on some or all applications. Primary reviewers are the users' managers, a single user, or users assigned to a role.
-
Entitlement assignment certification — Review and certify entitlements and the users who have access to entitlements in target applications. Primary reviewers are entitlement owners, a single user, or users assigned to a role.
-
Role membership certification — Review and certify role memberships and the users who have access to roles in Advanced Identity Cloud. Primary reviewers are role owners, a single user, or users assigned to a role.
-
-
Click Next.
To continue setting up the template you select, click on the preceding links in step 3.
Modify templates
You can modify various template items:
-
From the Advanced Identity Cloud admin UI, go to Certification > Template tab.
-
Locate the template and click the ellipsis (...) to perform various actions:
To view additional templates, click the caret icons at the bottom of the table. Field Description Duplicate
Duplicate the template details to create a new template, and edit/modify as needed. The characters (copy) are appended to the newly duplicated template.
View Details
This option displays if the template has been run at least once. It provides a read-only view into the configurations on the template. After you run a template, you cannot change the configuration settings.
Edit Template
This option displays if you create the template, but never run it to create a campaign. In this case, you can edit/modify the template configuration.
Activate templates
Activate a template to kick off the review process (a campaign).
You can activate a template by:
-
Creating a schedule when you define the template.
-
Adding a schedule to the template after you define the template.
-
Running the template on an ad-hoc basis.
To activate a template:
-
From the Advanced Identity Cloud admin UI, go to Certification > Template tab.
-
Locate the template and click to perform various actions:
To view additional templates, click the caret icons at the bottom of the table. Action Field Run Now
This activates the template and kicks off the review process (campaign). When selected, the active campaign displays in the Campaigns tab.
When you create a template, if you select Run on a schedule under the When to Certify section. The campaign runs on the set schedule and display on the Campaigns tab at the specified interval. Schedule Campaign
This option displays if you did not configure a schedule when creating the template. This creates a run schedule for the template.
Edit Schedule
This option displays if you did configure a schedule when creating the template, but you would like to modify the existing schedule.
Identity certification
Select an identity certification type to certify user accounts and entitlements for specific applications.
To review information about templates, refer to Create templates.
|
You must populate the Display Name Attribute on the target application User entity object in the Details tab. This allows each account pulled into Advanced Identity Cloud to display with a human-readable name. This is required for the data to properly display when a certifier (reviewer) reviewers their certification. Perform the following:
The following video shows an example: |
The following table lists the areas to configure for each campaign template type:
| Section | Description |
|---|---|
General details of the template, such as the name, description, and a default certifier. |
|
The items to be certified. |
|
The cadence in which the review process is kicks off (campaign). |
|
The end users responsible for certifying the items in the campaign. |
|
Optional. Set up email notifications based on various events that take place during the certification process. |
|
Optional. Various configurations to allow during the campaign, such as bulk actions on line items or self-certification. |
|
Summary of configured sections. |
Details
This section includes basic information about the template, such as the display name, description, owner, and staging process.
To complete this section, do the following:
-
From the Advanced Identity Cloud admin UI, click Certification > Templates > + New Template.
-
Select Identity Certification.
-
Click Next.
-
Complete the following fields:
Field Description Name
The display name for the campaign. This campaign name displays on both the certifications tab and the end-user tasks dashboard.
You can define a date variable in the name of the campaign to know which campaign kicks off. Identity Governance uses moment.js to format the date.
For example, if you have a campaign scheduled to run every two weeks, appending the date to the name lets you know which campaign you are working on. The campaign name can include the date (year, month, day), time (hour, minute), and time of day (AM/PM):
Campaign name — {{YYYY-MM-DD-hh:mma}}When you kick off the template into a campaign, an example of the name is:
Campaign name — 2023-12-12-08:18pmNOTE: Once the campaign kicks off you cannot modify the name. Description
Enter a general description for the campaign. Your company should follow a descriptive convention to describe each of your campaign.
This field is limited to 1000 characters. Campaign Owner
Enter the owner of the campaign. Only campaign owners can fully control their campaigns, including certification decisions, certifier assignment changes, sign off, and more.
Enable Campaign Staging
Enable staging to set up the campaign in the system but not activate it in production. This option allows compliance officers to preview a campaign before it is activated and exposed to end users. Compliance officers can inspect and review the content, decision items, and other details to determine whether to activate or delete it.
-
Click Next.
What to Certify
This sections lets you define the items to certify, including the organizations, users, applications, accounts, and entitlements.
To complete this section, do the following:
-
Complete the following fields:
Field Description Organizations
Filter any generated certification by organization. This feature only appears for identity certification campaigns.
-
All organizations
Include child organization
Click to include any suborganizations in the campaign.
Users
Certify one of the following:
-
All users
-
A single user
-
Users matching a filter — Create a filter to certify select users.
Accounts, Entitlements, Roles
Select at least one of the following:
-
Certify User Accounts.
-
Certify User Entitlements.
-
Certify User Roles.
Applications
Certify one of the following:
-
All applications
-
Specific applications — If you select this, an additional box displays to select which Applications to certify.
-
Applications matching a specific filter — Create a filter to certify specific applications.
If you create a governance glossary attribute and enhance the target application(s) with the attribute, you can filter on attribute(s) you create. For more information, refer to Create an application glossary attribute.
Accounts
Displays if you selected
Certify User Accounts.-
Select All accounts in selected applications if you selected Certify User Accounts.
Entitlements
Displays if you selected
Certify User Accounts.-
Certify one of the following if you selected Certify User Entitlements:
-
All entitlements
-
Entitlements matching a filter — Create a filter to certify specific entitlements.
If you create a governance glossary attribute and populate the attribute you create on the onboarded entitlement(s), you can filter on the attribute(s) you create. For more information, refer to Create an entitlement glossary attribute.
Roles
Displays if you selected
Certify User Roles.Certify one of the following if you selected Certify User Roles:
-
All roles
-
Roles matching a filter — Create a filter to certify specific roles.
If you create a governance glossary attribute and populate the attribute you create on roles, you can filter on the attribute(s) you create. For more information, refer to Create a role glossary attribute.
Exclude access granted only from a role
Enabled by default.
Excludes account and entitlement line items that are granted only through a role.
Identity Governance cannot certify or revoke an application or entitlement from an end user when they’re granted access through a role; therefore, excluding these line items can help reduce unnecessary information in the certification. For more information, refer to Decisions change based on how you grant access.
Exclude dynamically granted role memberships
Displays if you selected
Certify User Roles.Enabled by default if you are creating a role membership certification.
Exclude role line items that are granted to an end user through a condition.
Identity Governance can’t certify or revoke an end user being a member of a role through a condition; therefore, excluding these line items can help reduce unnecessary information in the certification. For more information, refer to Decisions change based on how you grant access.
(Optional) Show advanced filters
To certify accounts based on properties from the last certification decision made on a line item from the drop-down, select Filter by last certification decision.
A line item is a particular record for a certifier to review. For example, the user Barbara Jensen’s record that details their access to a particular application is a line item.
-
-
Click Next.
When to Certify
The When to Certify section lets the administrator specify when to kick off the review process (campaign) and what to do in the event the campaign expires.
To complete this section, do the following:
-
Complete the following fields:
Field Description Schedule
Define whether the template will kick off on a periodic basis. If selected, input various choices to define the schedule.
Check the Run on a schedule box to define a schedule for the template.
Options include:
-
Run Every - Run the certification every specified number of days, weeks, months, or years.
-
Start - Specify a start time when this campaign kicks off for the first time.
-
End - Run the certification on its defined periodic basis until this date is reached.
Campaign Duration
Specify the amount of time each access review (campaign) has before expiration. You can specify the duration in days, weeks, months, or years.
When Campaign Expires
Select a behavior to handle the open access review (campaign) line items when the campaign expires:
-
Close open items - Complete the items using the given information after the campaign expires. The administrator can select what decision to add to the item (certify, revoke, and allow exception to) and when that decision takes effect. The decision can take effect immediately or after a duration (in days).
-
Reassign to - Select a given user or role that the access review (campaign) is reassigned to after the expiration date. The campaign will not be closed.
-
Do Nothing - No action will be taken, and the line items will remain in progress.
-
-
Click Next.
Who will Certify
This section allows you to specify the users that review and make decisions about the items you defined in the What to Certify section.
To complete this section, do the following:
-
Complete the following fields:
Field Description Certifier Type
Specify who can review and certify user access by selecting one of the following:
-
User — Select a single user to review and make a decision on every record. When you select this, a Select user box displays. Select the user who will certify the campaign.
-
Role — Select a role that allows any of its members to review every record. When you select this, a Select a role box displays. Select a role from the list of the created roles in Advanced Identity Cloud.
-
Manager — The user’s manager becomes the certifier of their data (also known as a line item).
-
Organization Admin - Select an administrator for an organization who can certify their data.
Enable default certifiers
Select a certifier to assign in case an access review (campaign) line item is not assigned a certifier. For example, if the manager is the certifier and the user has no manager defined, then the default certifier will be assigned the access review for this user.
-
-
Click Next.
Notifications
This optional section allows you to send email notifications when one or more campaign events are triggered. For example, when a campaign is about to expire or when a certifier is reassigned.
To complete this section, do the following:
-
Define an email template for each selected notification. Each notification requires an associated email template. From the left navigation pane in the Advanced Identity Cloud admin UI, go to Email > Templates. For more information, refer to Email templates.
There are preset email templates created for certification templates. Use these as a base, copy the email template, and customize them to suit your needs. To reference variables in your email templates for Identity Governance, the object is nested an additional level. The following table shows how to access these objects:
Item Usage User attributes
Use the syntax
object.user.userAttribute.Use the attributes available from the email template screen. For more information, refer to Email templates.
Manager attributes
Use the syntax
object.manager.managerAttribute.Use the attributes available from the email template screen. For more information, refer to Email templates.
If the manager is the certifier type in the Who will Certify section, use the same user attributes in the managerAttribute. For example, if you need to reference a user’s manager within the email, then use this object.Campaign attributes
Use the syntax
object.campaign.campaignAttribute.Available attributes are
nameandtype. -
Select any of the notification types:
Field Description Send initial notification
Send a notification any time a certifier is assigned to a line item.
Send reassign notification
Send to a new certifier when a line item in an access review (campaign) is reassigned or forwarded to them.
Send expiration notification
Send a reminder notification to the certifiers before a campaign expires. Select the number of days, before the campaign expires, to send the reminder.
To illustrate the expiration notification mechanism:
If the notification is set for three days prior to expiration, reviewers will receive an email when the campaign is three days away from the expiration date. If the deadline is extended by a week, the expiration date of the notification will be recalculated and sent three days before the new deadline, regardless of any previously sent notifications.
Send reminders
Send a notification to remind certifiers to take action on access review (campaign) line items. Select the number of days, weeks, months, or years to send the reminder.
Enable escalation
Send an escalation notification to specific recipients that certifiers have not completed their actions on a campaign. When selected, an additional Escalation Owner box displays. Select the number of days, weeks, months, or years and the user to send the escalation to.
-
Click Next.
Additional options
This optional section allows you to configure other options for a campaign, such as performing bulk certifications or reassigning tasks to another user or group.
To complete this section, do the following:
-
Complete the following optional fields:
Field Description Allow self-certification
Allows select individuals to certify their own data.
The options to choose from are:
-
All certifiers - Users who are certifying the access review (campaign) can certify their own access.
-
Owners and administrators - Users who are campaign owners or tenant administrators can certify their own access.
Enable line item reassignment and delegation
Allow the certifier to reassign or forward a line item to another user.
When you select this box, you can choose the following options:
-
Forward - Allow certifiers to forward their access review (campaign) to another certifier. When forwarding an access review, other certifiers are removed from the access review in its entirety. For more information, refer to forward line items.
-
Reassign - Select the privileges the current certifier can assign to the new certifier:
-
Add Comment
-
Make Decision
-
Reassign/Forward
-
Sign off
For context on how you use this as a certifier, refer to reassign line items.
-
Require justification on revoke
Require a mandatory comment or reason for the revocation.
Require justification on exception
Require a mandatory comment or reason for any allowed exception.
Allow exceptions
Allow certifiers to continue to certify line items assigned to them after the campaign expires. Select a duration in days, months, weeks, or years.
Allow bulk-decisions
Allow certifiers to make line item decisions in bulk.
This includes:
-
Making a decision (certify, revoke, exception).
-
If Enable line item reassignment and delegation is enabled, then you can bulk Reassign and/or Forward line items.
As an administrator, most access reviews require an in-depth look on each line item. This is to ensure accuracy of each item. Bulk-decisions allow for a certifier to make a decision on many items at once, which could lead to inaccurate data. Use caution when selecting this option. Allow partial sign-off
Allow a certifier to sign-off on an access review before their assigned line items have a decision made on them.
Process remediation
Revokes the end user’s access in the target application when a certifier revokes (denies) the line item. Select a workflow to run either immediately after revocation of access or after a duration.
To ensure end-user access is removed when revoking a line item, you must enable this property. -
-
Click Next.
Summary
The Summary section is the final section in creating a template. It gives a breakdown of each section in the template, allowing for a review.
Summary steps:
-
Review each section.
-
Click Save to complete the certification template.
Under the What to Certify review section, ensure that the Total Decision Items is greater than 0. If you identify that this is 0, this means that the template did not identify items to be certified. Therefore, if you create the campaign off of the template, the system will immediately cancel the campaign. If you identify this to be 0, go back to the What to Certify section and adjust your settings.
Entitlement assignment certification
Select an entitlement assignment certification type to certify the entitlements users have in specific applications.
Certifiers review the accounts and entitlements a user has in every onboarded target applications. When certifying, if the entitlement line item, and the line item has the decision of revoke, then the entitlement the user has in the application will be removed when the certification is signed-off.
To review information about templates, refer to Create templates.
|
You must populate the Display Name Attribute on the target application User entity object in the Details tab. This allows each account pulled into Advanced Identity Cloud to display with a human-readable name. This is required for the data to properly display when a certifier (reviewer) reviewers their certification. Perform the following:
The following video shows an example: |
The following table lists the areas to configure for each campaign template type:
| Section | Description |
|---|---|
General details of the template, such as the name, description, and a default certifier. |
|
The items to be certified. |
|
The cadence in which the review process is kicks off (campaign). |
|
The end users responsible for certifying the items in the campaign. |
|
Optional. Set up email notifications based on various events that take place during the certification process. |
|
Optional. Various configurations to allow during the campaign, such as bulk actions on line items or self-certification. |
|
Summary of configured sections. |
Details
This section includes basic information about the template, such as the display name, description, owner, and staging process.
To complete this section, do the following:
-
From the Advanced Identity Cloud admin UI, click Certification > Templates > + New Template.
-
Select Entitlement Assignment Certification.
-
Click Next.
-
Complete the following fields:
Field Description Certification Name
The display name for the certification. This certification name displays on both the certifications tab and the end-user tasks dashboard.
Define a date variable in the name of the certification to know which campaign kicks off. Identity Governance uses moment.js to format the date.
For example, if you have a certification that is scheduled to run every two weeks, appending the date to the name lets you know which campaign you are working on.
For example, the certification name can include the date (year, month, day), time (hour, minute), and time of day (AM/PM):
Campaign name — {{YYYY-MM-DD-hh:mma}}When you kick off a template into a campaign, an example of the name is:
Campaign name — 2023-12-12-08:18pmOnce the campaign kicks off you cannot modify the name. Description
Enter a general description for the certification. Your company should follow a descriptive convention to describe each of your certifications.
This field is limited to 1000 characters. Certification Owner
Enter the owner of the certification. Only certification owners can fully control their certifications, including certification decisions, certifier assignment changes, sign off, and more.
Enable Campaign Staging
Enable certification staging to set up the certification in the system but not activate it in production. This option allows compliance officers to preview a certification before it is activated and exposed to end users. Compliance officers can inspect and review the content, decision items, and other details to determine whether to activate or delete it.
-
Click Next.
What to Certify
This section lets you define the items to certify, including the users, applications, accounts, and entitlements.
To complete this section, do the following:
-
Complete the following fields:
Field Description Entitlements
Certify one of the following:
-
All entitlements
-
Entitlements matching a filter — Create a filter to certify specific entitlements.
If you create a governance glossary attribute and enhance the onboarded entitlement(s) with the attribute, you can filter on the attribute(s) you create.
For more information, refer to the Manage governance glossary.
Applications
Certify one of the following:
-
All applications
-
Specific applications — If you select this, an additional box is displayed to select which Applications to certify.
-
Applications matching a specific filter — Create a filter to certify specific applications.
If you create a governance glossary attribute and enhance the target application(s) with the attribute, you can filter on the attribute(s) you create. For more information, refer to the Manage governance glossary.
Users
Certify one of the following:
-
All users
-
A single user
-
Users matching a filter — Create a filter to certify select users.
Exclude access granted only from a role
Enabled by default.
Excludes entitlement line items that are granted only through a role.
Identity Governance cannot certify or revoke an entitlement from an end user when they’re granted access through a role; therefore, excluding these line items can help reduce unnecessary information in the certification. For more information, refer to Decisions change based on how you grant access.
(Optional) Show advanced filters
To certify accounts based on properties from the last certification decision made on a line item from the drop-down, select Filter by last certification decision.
A line item is a particular record for a certifier to review. For example, the user Barbara Jensen’s record that details their access to a particular application is a line item.
-
-
Click Next.
When to Certify
The When to Certify section lets the administrator specify when to kick off the review process (campaign) and what to do in the event the campaign expires.
To complete this section, do the following:
-
Complete the following fields:
Field Description Schedule
Define whether the template will kick off on a periodic basis. If selected, input various choices to define the schedule.
Check the Run on a schedule box to define a schedule for the template.
Options include:
-
Run Every - Run the certification every specified number of days, weeks, months, or years.
-
Start - Specify a start time when this campaign kicks off for the first time.
-
End - Run the certification on its defined periodic basis until this date is reached.
Campaign Duration
Specify the amount of time each access review (campaign) has before expiration. You can specify the duration in days, weeks, months, or years.
When Campaign Expires
Select a behavior to handle the open access review (campaign) line items when the campaign expires:
-
Close open items - Complete the items using the given information after the campaign expires. The administrator can select what decision to add to the item (certify, revoke, and allow exception to) and when that decision takes effect. The decision can take effect immediately or after a duration (in days).
-
Reassign to - Select a given user or role that the access review (campaign) is reassigned to after the expiration date. The campaign will not be closed.
-
Do Nothing - No action will be taken, and the line items will remain in progress.
-
-
Click Next.
Who will Certify
This section allows you to specify the users that review and make decisions about the items you defined in the What to Certify section.
To complete this section, do the following:
-
Complete the following fields:
Field Description Certifier Type
Specify who can review and certify user access by selecting one of the following:
-
User — Select a single user to review and make a decision on every record. When you select this, a Select user box displays. Select the user who will certify the campaign.
-
Role — Select a role that allows any of its members to review every record. When you select this, a Select a role box displays. Select a role from the list of the created roles in Advanced Identity Cloud.
-
Entitlement Owner — The individual who manages the entitlement.
Enable default certifiers
Select a certifier to assign in case an access review (campaign) line item is not assigned a certifier. For example, if the manager is the certifier and the user has no manager defined, then the default certifier will be assigned the access review for this user.
-
-
Click Next.
Notifications
This optional section allows you to send email notifications when one or more campaign events are triggered. For example, when a campaign is about to expire or when a certifier is reassigned.
To complete this section, do the following:
-
Define an email template for each selected notification. Each notification requires an associated email template. From the left navigation pane in the Advanced Identity Cloud admin UI, go to Email > Templates. For more information, refer to Email templates.
There are preset email templates created for certification templates. Use these as a base, copy the email template, and customize them to suit your needs. To reference variables in your email templates for Identity Governance, the object is nested an additional level. The following table shows how to access these objects:
Item Usage User attributes
Use the syntax
object.user.userAttribute.Use the attributes available from the email template screen. For more information, refer to Email templates.
Manager attributes
Use the syntax
object.manager.managerAttribute.Use the attributes available from the email template screen. For more information, refer to Email templates.
If the manager is the certifier type in the Who will Certify section, use the same user attributes in the managerAttribute. For example, if you need to reference a user’s manager within the email, then use this object.Campaign attributes
Use the syntax
object.campaign.campaignAttribute.Available attributes are
nameandtype. -
Select any of the notification types:
Field Description Send initial notification
Send a notification any time a certifier is assigned to a line item.
Send reassign notification
Send to a new certifier when a line item in an access review (campaign) is reassigned or forwarded to them.
Send expiration notification
Send a reminder notification to the certifiers before a campaign expires. Select the number of days, before the campaign expires, to send the reminder.
To illustrate the expiration notification mechanism:
If the notification is set for three days prior to expiration, reviewers will receive an email when the campaign is three days away from the expiration date. If the deadline is extended by a week, the expiration date of the notification will be recalculated and sent three days before the new deadline, regardless of any previously sent notifications.
Send reminders
Send a notification to remind certifiers to take action on access review (campaign) line items. Select the number of days, weeks, months, or years to send the reminder.
Enable escalation
Send an escalation notification to specific recipients that certifiers have not completed their actions on a campaign. When selected, an additional Escalation Owner box displays. Select the number of days, weeks, months, or years and the user to send the escalation to.
-
Click Next.
Additional options
This optional section allows you to configure other options for a campaign, such as performing bulk certifications or reassigning tasks to another user or group.
To complete this section, do the following:
-
Complete the following optional fields:
Field Description Allow self-certification
Allows select individuals to certify their own data.
The options to choose from are:
-
All certifiers - Users who are certifying the access review (campaign) can certify their own access.
-
Owners and administrators - Users who are campaign owners or tenant administrators can certify their own access.
Enable line item reassignment and delegation
Allow the certifier to reassign or forward a line item to another user.
When you select this box, you can choose the following options:
-
Forward - Allow certifiers to forward their access review (campaign) to another certifier. When forwarding an access review, other certifiers are removed from the access review in its entirety. For more information, refer to forward line items.
-
Reassign - Select the privileges the current certifier can assign to the new certifier:
-
Add Comment
-
Make Decision
-
Reassign/Forward
-
Sign off
For context on how you use this as a certifier, refer to reassign line items.
-
Require justification on revoke
Require a mandatory comment or reason for the revocation.
Require justification on exception
Require a mandatory comment or reason for any allowed exception.
Allow exceptions
Allow certifiers to continue to certify line items assigned to them after the campaign expires. Select a duration in days, months, weeks, or years.
Allow bulk-decisions
Allow certifiers to make line item decisions in bulk.
This includes:
-
Making a decision (certify, revoke, exception).
-
If Enable line item reassignment and delegation is enabled, then you can bulk Reassign and/or Forward line items.
As an administrator, most access reviews require an in-depth look on each line item. This is to ensure accuracy of each item. Bulk-decisions allow for a certifier to make a decision on many items at once, which could lead to inaccurate data. Use caution when selecting this option. Allow partial sign-off
Allow a certifier to sign-off on an access review before their assigned line items have a decision made on them.
Process remediation
Revokes the end user’s access in the target application when a certifier revokes (denies) the line item. Select a workflow to run either immediately after revocation of access or after a duration.
To ensure end-user access is removed when revoking a line item, you must enable this property. -
-
Click Next.
Summary
The Summary section is the final section in creating a template. It gives a breakdown of each section in the template, allowing for a review.
Summary steps:
-
Review each section.
-
Click Save to complete the certification template.
Under the What to Certify review section, ensure that the Total Decision Items is greater than 0. If you identify that this is 0, this means that the template did not identify items to be certified. Therefore, if you create the campaign off of the template, the system will immediately cancel the campaign. If you identify this to be 0, go back to the What to Certify section and adjust your settings.
Kick off data review process using campaigns
Campaigns are the second step in certifying access for users.
Once you create a template, and you are ready to start the review process, create a campaign.
After you start a campaign, the end users (certifiers), that are defined in the template, are notified to start reviewing the data. The process of certifiers reviewing data is called an access review.
When you kick off a campaign, through the ad-hoc (one time) run under the Templates tab or through the schedule set in the template, the Certification tab displays the certification.
The following video shows an example:
To access campaigns, from the Advanced Identity Cloud admin UI, click Certification > Campaigns tab.
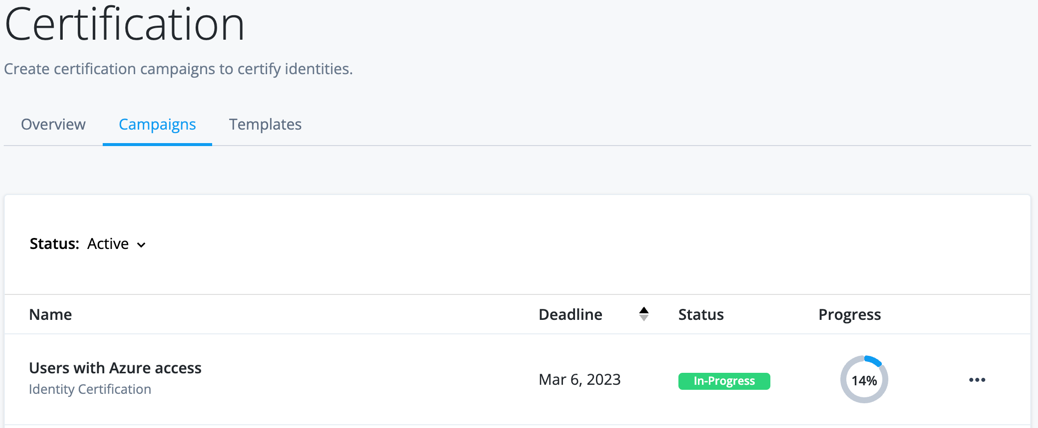
View campaigns
The landing page/modal on the Campaigns tab displays Active campaigns.
To view campaigns that have a specific status, such as Closed or Canceled, click the Status drop-down and filter the status.
| To view additional campaigns, click the caret icons at the bottom of the table. |
Campaign statuses to filter
| Status | Description |
|---|---|
Active |
The campaign is in progress. In the Status column, this includes the In-progress, Expiring and Overdue states.
|
Expired |
The campaign expired. Advanced Identity Cloud triggers this status when you select When to Certify > When certification expires > Close open items > immediately in the template. |
Cancelled |
This campaign was canceled manually and is no longer in progress. In certain situations when there is an error creating the campaign from the template, a campaign might automatically go into this state. |
Completed |
The campaign finished as expected with no issues. |
Staged |
The campaign is staged and is not active. For more information, refer to the details section of creating a template. |
Campaign landing page columns
The campaigns listed on the landing page of the Campaigns tab consists of a table with various columns.
| Field | Description | ||
|---|---|---|---|
Name |
The name of the campaign. This name is generated from the template. |
||
Deadline |
The campaign completion date. |
||
Status |
The state the campaign is in. Refer to Campaign statuses to filter for more information. |
||
Progress |
The percent complete of the campaign.
|
| To filter a column, click the up/down icon (where applicable). |
Update deadline of campaign
The deadline (expiration) of a campaign can be updated once a campaign is ran.
To update the deadline:
-
From the Advanced Identity Cloud admin UI, click Certifications.
-
Select the Campaigns tab.
-
Click next to the campaign to update the deadline.
-
Enter a new date.
-
Click Save.
View details of campaign
From the Campaigns tab on the landing page, click the desired campaign to view more details.
The data the page displays depends on the certification type in the template.
The selected campaign includes two tabs:
Details tab
The Details tab includes graphical information about the campaign. For example, the percentage of completeness or the reviews currently in progress.
The information is broken out into various cards. The following table shows the various information by card.
Campaign details page
| Card/Title | Description |
|---|---|
Status |
Provides information about when the campaign expires. You can select Cancel Campaign to cancel the campaign. If the campaign status is Staged, you can select Activate to kick-off the campaign. |
Campaign Details |
Shows the percentage of the campaign complete, including the number of reviews completed versus the total amount of reviews, as well as general information about the campaign:
|
Users |
Pie chart. The number of new users versus previously certified users in the campaign. |
Decisions Breakdown |
Pie chart. A breakdown of the decisions made in the campaign by certifiers (certified, revoked, exception). |
Access by Application |
Pie chart. The number of accounts by application to be certified in the campaign. |
Users with no email address |
Numerical. The number of users that do not have an email address on their profile. |
Certifiers with no email address |
Numerical. The number of certifiers (reviewers) that do not have an email address on their profile. |
Access reviews tab
The Access Reviews tab contains information on the certifiers in the campaign. The certifiers could be an individual or a role. This includes the progress they have made on their reviews, as well as the ability to view the items each certifier is responsible for.
By default, the page displays the certifiers who are reviewing the access review, which is in the Active state.
To view other statuses, select the Status drop-down:
| Status | Description |
|---|---|
Active |
The certifier has line items on the campaign that do not have a decision made on them. A line item is a record for a certifier to review. For example, the user Barbara Jensen’s record that details their access to a particular application is a line item. |
Expired |
The campaign has passed its deadline and the certifier has line items that do not have a decision made on them. |
Completed |
The certifier has reviewed and made decisions on the line items assigned to them in their access review and signed off. |
You can use the search icon to search for a specific campaign by its name.
There are three columns in the Access Reviews tab:
-
Certifier — The individual or users assigned to a role responsible for a part of the campaign.
-
Status — The status of the campaign.
-
Progress — The progress the certifier has made in their reviews.
To view the percentage and number of items that are complete, hover over the progress icon.
Click the arrow icon on Certifier to filter alphabetically (ascending or descending).
To view additional features, such as forwarding a certifier’s items to another person or end users assigned to a role, click to the right of the table.
| To gain a detailed view of the items left for a certifier, click on their record in the table. The drilled-down view is the same view a certifier utilizes when completing their items for the campaign. For more information on this view, refer to Certify data using access reviews. |
Cancel existing campaign
You can only cancel a campaign that is in the Active state (which includes the states Expiring and Overdue). For more information, refer to Campaign statuses to filter.
There are two ways to cancel a campaign:
-
When viewing campaigns from the Certifications > Campaigns landing page:
-
Click next to the campaign.
-
Click Cancel.
-
Click Cancel Campaign.
-
-
In the drill-down campaign view:
-
Click into a campaign.
-
Click Cancel Campaign.
-
Click Cancel Campaign again in the confirmation screen.
-
Certify data using access reviews
Access reviews are the final step of certifying access for users.
After you kick off the data review process in a campaign, the data defined for review is sent to the end users you define in the template.
The process of end users certifying the data assigned to them is called an access review.
Notes on access reviews:
-
An access review consists of one or more line items or records to review and certify.
-
An end user who has an access review is considered a reviewer of the certification, also called a certifier.
-
Multiple certifiers can be assigned to review the same data.
-
When an end user is designated as a reviewer from a campaign, it displays under Inbox > Access Reviews or in the Dashboard landing page.
-
You define the certifiers when you create a template and kick off a campaign. A reviewer can also be added through forwarding or reassignment by certifiers and administrators.
-
Certifiers can change the decision a previous certifier made for a line item; however, changes cannot be made to a campaign after a decision is set and the campaign is signed off (completed). Additional changes require remediation through another campaign.
For example, if one certifier decides to certify the access for a line item, but another certifier decides to revoke access for it after, then the last certifier’s decision is the decision that prevails.
-
For more information on how access reviews display to certifiers in the end-user UI, refer to End-user pages.
Quick links
As there are various features that become enabled or disabled for end user access reviews depending on the configurations in the template, the following is a table to quick links in this page.
Details
| Item | Description |
|---|---|
A landing screen that shows access reviews that are assigned to an end user. This includes an explanation of the access review landing page columns. |
|
The screen where end users complete the access review of the line items for a campaign. A line item is a record for a certifier to review. For example, the user Barbara Jensen’s record that details their access to a particular application is a line item. This includes:
|
|
Filter campaign items that display data in different ways. |
|
Rearrange or hide the table columns. |
|
Provide a comment on a line item in the access review. Use cases include:
|
|
Make a decision to either certify access, revoke access, or provide an exception to access for a specified duration (you must enable the configurations in the template). |
|
View other reviewers assigned to a line item in the access review. |
|
An end user can reassign an item that is assigned to them and define the permissions of the new assignee. There are two ways to reassign a line item: |
|
Remove prior reviewers and assign the line item to another individual(s). Full permissions on the item are given to the forwarded individual(s). There are two ways to forward a line item: |
|
Perform a bulk line item certification. Not recommended for every campaign as this will bypass much needed manual oversight on each item. |
View access review tasks
To view the access review tasks, from the Advanced Identity Cloud end-user UI, click Inbox > Access Reviews.
The landing screen on Access Reviews is a view of the active campaigns that have a task assigned to an end user.
To view campaigns that have a specific status, such as Closed or Canceled, click the Status drop-down and filter the status.
| To view additional tasks, click the caret icons at the bottom of the table. |
Campaign statuses to filter
| Status | Description |
|---|---|
Active |
The campaign is in progress. In the Status column, this includes the In-progress, Expiring and Overdue states.
|
Expired |
The campaign expired. Advanced Identity Cloud triggers this status when and end user selects When to Certify > When certification expires > Close open items > immediately in the template. |
Completed |
The campaign finished as expected with no issues. |
Access reviews landing page columns
The campaigns listed on the landing page of the Access Reviews tab consists of a table with various columns.
| Field | Description | ||
|---|---|---|---|
Name |
The name of the campaign. This name is generated from the template. |
||
Deadline |
The date in which the campaign must be completed. |
||
Status |
The state the campaign is in. Refer to Campaign statuses to filter for more information. |
||
Progress |
The percent complete of the campaign.
|
| To filter a column, click the up/down icon. |
To view additional features, such as forwarding a certifier’s items to another person or end users assigned to a role, click to the right of the table.
View individual access review line items
For an end user to review the line items they need to certify, click an access review (campaign).
The top section of the screen shows information about the access review including:
-
The Status metric shows the percentage of items to complete, as well as a numeric value of items that are complete versus the total amount of items.
-
The Decisions pie chart is shows the number of records certified versus revoked.
-
The Deadline is the campaign completion date. Click the View campaign details to view additional information such as the description of the campaign and the campaign owner.
Access review task columns
| The following columns can change depending on the certification type and configuration options in the template. |
The columns in the line items table are:
| Field | Description |
|---|---|
User |
The user in Advanced Identity Cloud. |
Application |
The onboarded application the user has access to. |
Account |
The account in the application that correlates to a user in Advanced Identity Cloud. |
Entitlement |
The entitlement in the application the user has granted. |
Flags |
Information about how access was given. One or more of these flags can display on a line item:
|
Comment |
Comments that have been made on a record in a campaign. A number above the comment icon indicates the amount of comments left. |
Decision |
The action taken on a record in a certification. Options are:
|
|
To view information about a line item, click on the item under the column. For example, to review a user’s information in Advanced Identity Cloud for an identity certification type, click the user’s name and a modal window pops up displaying the information for review. The same is true for each single item in a row. The following video shows an example: |
| To view additional line items in the access review, click the caret icon at the bottom of the table. |
High-level reviewer steps
The following are typical steps when an end user certifies line items in an access review (campaign):
-
Click into a record and review information by clicking into each item in the row.
-
Add a comment if necessary (or mandatory if the campaign requires it).
-
Make a decision by selecting Certify access, Revoke access, or Allow an exception. The last reviewer on the item to make a decision is the decision that will prevail for the item.
-
Repeat steps 1-3 for each line item in the table.
-
Once an end user certifies every record, click Sign-off. Once this takes place, no changes can be made to the campaign as it acts as the final decision on a certification.
If Allow partial sign-off is enabled in the Additional Options section of the campaign template, then the line items do not have to be completed before the task can be signed off. A gradual fashion can be used whereas a subset of the items can be signed off and the other items can be completed at a later date. For more information on setting these configurations in the template, refer to additional options. The following video shows an example:
| These steps may vary depending on the configurations made in the template. For example, if bulk actions is enabled, then the certifier has the ability to make a decision for the items in the table at once. Additionally, the task could be reassigned or forwarded. |
Subsequent sections display various functions of the certifier process in detail.
Filter and group items
End users can filter and group items to make them more manageable when certifying.
The following video shows an example:
Filter items
Certifiers can manipulate the data presented on an access review.
To filter the items, click on the filter icon in the top right of the line items table. Once selected, there are two ways to filter:
-
By decision: Filter the table by the decision made on a line item, either Certified, Revoked, Exception Allowed, or No Decision.
-
By item attributes: Filter the table by a particular column item, such as a user. Click the item to filter on, then enter the appropriate value in the additional box that is displayed.
Group items
Grouping items aggregates duplicate information.
For example, if a user has four entitlements, the campaign items table displays this as four separate records. In grouping by fields, the entitlements display as a sub-table under a record, reducing the redundancy of reviewing the same record’s information.
To group the items, click the Group By icon above the Filter icon.
When end users select an object to group by, for example, Account, the view of the table changes splitting the screen in half.
|
If an end user selects multiple items in the What to Certify, such as accounts and entitlements, they can navigate between the various items. |
Customize table columns
An end user can modify the columns presented in the line items table.
For example, they may want to display additional user properties.
To customize columns:
-
Click the view column icon ().
-
Under Available Columns, click each section and select or deselect the columns to display.
-
Under Active Columns, rearrange the order of the columns by clicking the drag icon () and dragging each column to the desired order.
To delete an Active Column, click the delete icon (). -
Click Apply.
Add comment
Certifiers can leave a comment in an access review.
The comment could vary in nature due to a number of reasons:
-
A justification for the decision being made.
-
A comment about why the item is being reassigned.
-
A comment about why the item is being forwarded.
-
A comment from another certifier if there are multiple certifier on the line item(s).
| An auto-generated comment is created when an item is forwarded or reassigned. |
To add a comment:
-
To get to the comment box either:
-
Click the comment icon box.
-
Click next the item to comment on and click the Add Comment.
-
-
Enter the comment.
-
Click Add Comment.
| Once a comment has been made and added to a line item, it cannot be removed. |
Make a decision (certify)
A decision is an action a certifier makes on a line item in an access review.

A certifier can do one of the following:
-
To Certify (keep) access, click the green checkmark icon.
-
To Revoke (deny) access, click the circle-backslash icon. After selecting this, a mandatory comment box displays to the certifier in which they must enter a reason for revoking the line item.
When the campaign is signed off, if the Process remediation configuration option is enabled in the Additional Options section of the template, then the line item will be removed from the onboarded application.
-
The clock icon is disabled unless you explicitly enable exceptions by marking Allow Exceptions (under Additional Options) as allowed.
You can also specify the duration for exceptions under Additional Options. For more information, refer to additional options.
A certifier can only make a decision once per line item, no matter the number of certifiers. The decision made by the last certifier on a line item is the decision that prevails. After an access review (campaign) is signed off, a decision cannot be modified.
Decisions change based on how you grant access
Depending on the certification type and how an end user is given access to a resource, the decisions a certifier can take on a line item changes:
| How you grant access | Cert type | Notes | ||
|---|---|---|---|---|
To an application or entitlement via a role. |
Identity |
Identity Governance cannot certify or revoke the line item if you assign an end user to an application or entitlement using a role. To remove the user from the application or entitlement, remove them from the role.
|
||
In the What to Certify
section of the template, you select to certify |
Identity |
Identity Governance cannot certify or revoke an end user being a member of a role through a condition. To remove the end user from the role, update them to no longer meet the condition. |
||
To an entitlement via a role. |
Entitlement |
Identity Governance cannot certify or revoke the line item if you assign an end user to an entitlement using a role. To remove an end user from an entitlement, when they’re granted access through a role, remove them from the role. |
||
Through a role with a condition. |
Role membership |
Identity Governance cannot certify or revoke an end user being a member of a role through a condition. To remove the end user from the role, update them to no longer meet the condition. |
For each situation, the following UI elements change:
-
The Revoke and Allow an Exception decisions are disabled.
-
The Certify text changes to Acknowledge.
-
The line item cannot be used with bulk certify.
View other certifiers
For each line item in the access review, certifiers have the ability to view the other certifiers. To view the certifiers, click next to the item and click View Reviewers.
From here an end user has the ability to:
Edit certifier privileges
| To edit the privileges a certifier has, you must enable the configuration setting Enable line item reassignment > Reassign in the Additional Options section of the template. |
To edit the permissions of a certifier on a line item:
-
Click next to the line item and click View Reviewers.
-
End users locate the certifier they would like to modify and click > Edit.
-
Select/deselect the privileges on the certifier.
-
Click Save.
Reassign an item
End users reassign a line item by adding another certifier to review the item. When a certifier adds another certifier, they specify the privileges of the certifier.
| To reassign an item, you must enable the configuration setting Enable line item reassignment > Reassign in the Additional Options section of the template. For more information, refer to additional options. |
There are two ways to reassign an item:
Reassign from view reviewers screen
-
On the item, click > View Reviewers.
-
Click + Add a Reviewer.
-
Select to add either Add a user or Add a role to the line item.
-
Search for the individual or role and select it.
-
Select the privileges that the new end user or role will have on the line item. The privileges you can add are:
-
View — Allows another end user to view the line item.
-
Comment — Allows another end user to leave a comment on the line item.
-
Decide — Allows another end user to make a decision on the line item.
-
Assign/Forward — Allows another end user to reassign or forward the line item.
-
Sign off — Allows another end user to sign-off on the line item.
You can only select a privilege if enabled from the template under the Additional Options section. Therefore, the options listed above are subject to change. For more information, refer to additional options.
-
-
Click Reassign.
Reassign from bulk reassign
| The option for bulk certify and reassign must first be enabled in the Additional Options section of the template before bulk reassign can be utilized. For more details, refer to Bulk certify items. |
-
After selecting more than one item, click the Actions drop-down that shows and select Reassign.
-
In the modal, choose to reassign to Another user or to Users with assigned role to the line item.
-
Search for the individual or role and select it.
-
Select the privileges that the user or role will have on the line item. The privileges you can add are:
-
View — Allows a user to view the line item.
-
Comment — Allows a user to leave a comment on the line item.
-
Decide — Allows a user to make a decision on the line item.
-
Forward — Allows a user to reassign or forward the line item.
-
Sign off — Allows a user to sign-off on the line item.
You will only be able to select a privilege if allowed from the template under the additional options section. Therefore, the options listed above are subject to change.
-
-
Click Reassign.
Forward an item
When end users forward a line item in an access review, the end user removes prior certifiers and assigns the line item to another end user or role. The new certifier(s) have full permissions on the line item.
| To forward a line item, you must enable the configuration setting Enable line item reassignment > Forward in the Additional Options section of the template. |
There are two ways to forward an item:
Individual forwarding
-
On the line item, click > Forward.
-
In the modal, choose to forward the line item to Another user or to Users with assigned role.
-
Search for the individual or role.
-
End users leave a comment as to why they are forwarding the line item.
-
Click Forward Item.
Bulk forwarding
| The option for bulk certify and forward must first be enabled in the Additional Options section of the certification campaign template before bulk reassign can be utilized. For more details, refer to Bulk certify items. |
-
Select more than one item via the checkbox next to the items in the left of the certification items table or check the Select All box.
-
Click the Actions drop-down that is displayed.
-
Select Forward.
-
A modal window is displayed.
-
Select if the line items should be forwarded to Another user or Users with assigned role.
-
Search for the individual or role.
-
End users leave a comment as to why they are forwarding the line items.
-
Click Forward Item.
Bulk certify items
The bulk certification of line items allow for many items to undergo the certification process at once instead of one-by-one. This configuration setting is not enabled by default and should be used with caution. Most access reviews require an in-depth look into the accuracy of data and bulk certification circumvents this.
| To bulk certify line items, you must enable the configuration setting Allow Bulk Decisions in the Additional Options section of the template. For more information, refer to additional options. |
Once the bulk certify option is enabled, checkboxes display to the left of the line items table. Additionally, a Select drop-down button displays at the top left of the campaign items table.
When end users select one or more items via the checkboxes, or they select All items (in the drop-down button of Select), an additional Actions drop-down button displays. End users click this button to view actions they can make in a bulk fashion.
| Under the Select drop-down button, end users can choose to select All items that under review, All on this page, or Deselect all items. |
The items that display under the Actions button vary depending on if the configuration settings that you enable in the template, but can include:
-
Certify
-
Revoke
-
Allow an exception
-
Reassign
-
Forward
Manage access requests
In Identity Governance, end users can request access to resources, such as target applications, entitlements, or roles.
You define the resources end users can request by adding them to the access catalog.
An organization works with access requests as follows:
-
An Identity Governance administrator who can configure access requests. This includes defining which resources end users can request in the access catalog.
-
After an administrator defines requestable resources in the access catalog, end users submit requests to gain or remove (managers only) access to resources using the end user UI.
-
Approvers approve or deny access requests — End users configured as the approver (designated owner) to review and approve or reject the request. The items that display to the approver are known as request items.
Manage workflows
When you configure access requests, you can implement workflows, an end-to-end sequence of Identity Governance actions that result in either approving or rejecting an access request. You can configure workflows using the Advanced Identity Cloud’s workflow editor or REST APIs.
Workflows give complete flexibility over all access request types by allowing you to define custom workflow definitions. For example, when an end user requests access to an application, you can specify the actions Identity Governance takes for the access request to be approved or rejected.
These actions could include:
-
Requiring more than one approval for the request. You could require an end user’s manager and the application owner to approve the request before Identity Governance provisions access to the end user.
-
If the access request is rejected, send an email to the end user stating their access request has been denied.
|
The out-of-the-box Identity Governance workflows do not currently support the approval of
custom request types, like event-based requests.
In this case, you can use workflows with custom scripted nodes that can
handle event-based situations, such as |
Access request types
Identity Governance provides six out-of-the-box workflows for each access request type.
The following table displays the different access request types and out-of-the-box workflows:
| Access request type | Workflow name | Description |
|---|---|---|
Grant Application |
|
Request access to an application. |
Remove Application |
|
Request to remove access to an application for an end user. |
Grant Entitlement |
|
Request access to an entitlement (additional privilege inside an application). |
Remove Entitlement |
|
Request to remove access to an entitlement from an end user. |
Grant Role |
|
Request access to an Advanced Identity Cloud provisioning role. |
Remove Role |
|
Request to remove access to a role from an end user. |
Create workflows using the workflow editor
To manage workflows, from the Advanced Identity Cloud admin UI, go to Workflows.
There is a default published workflow for each access request type.
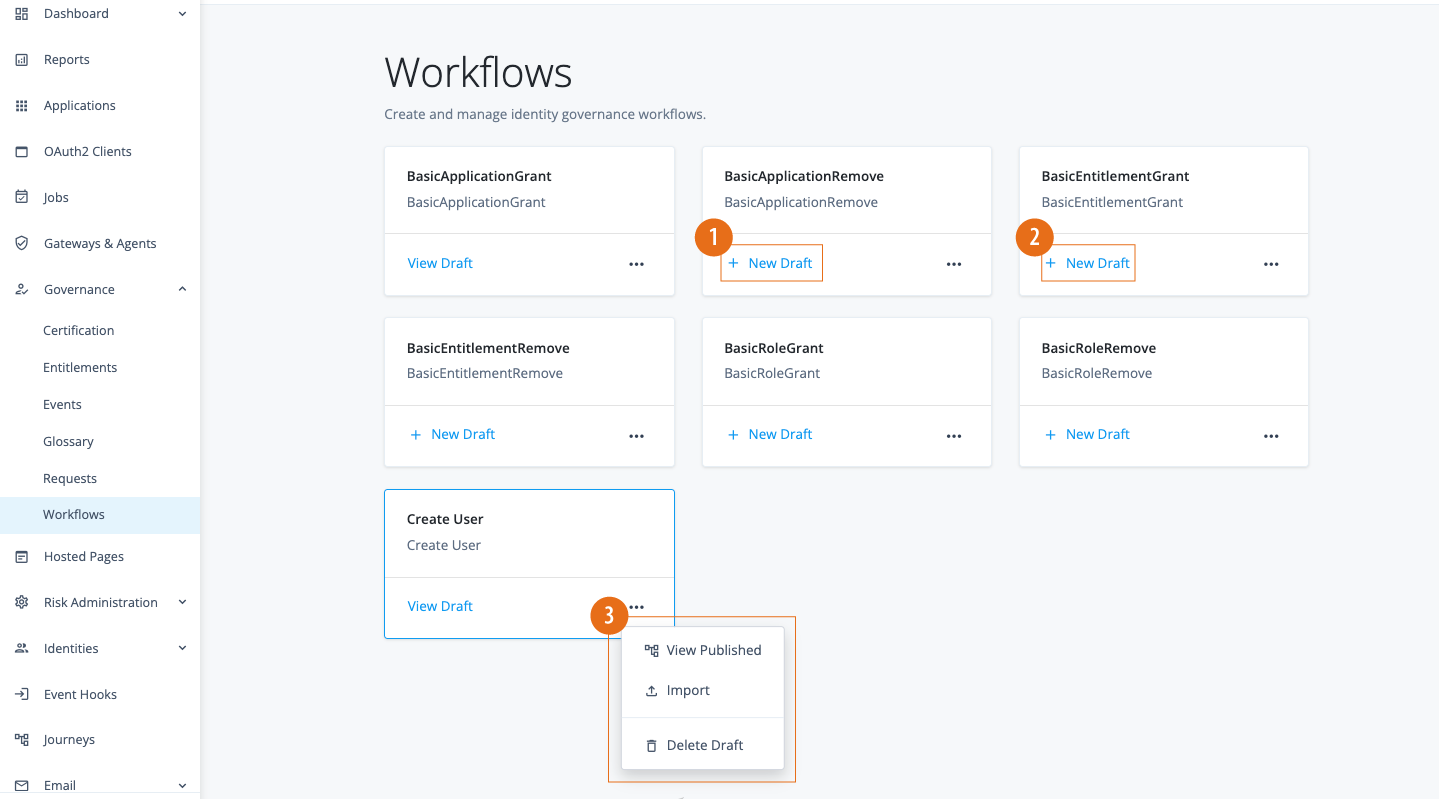
-
1 Click Governance > Workflows on the Advanced Identity Cloud end-user UI.
-
2 Click New Workflow.
-
3 Click Create Duplicate to make a copy of an out-of-the-box workflow. You cannot modify an out-of-the-box workflow but can only make a duplicate.
-
4 Every workflow has two states;
draftandpublished. You can only modify a workflow in thedraftstate. When you click New Draft, Identity Governance creates a copy of the existingpublishedworkflow.-
View the published workflow.
-
Import a JSON file to create or override an existing draft.
-
Duplicate the out-of-the-box workflow.
-
-
5 If a workflow has an existing draft, click View Draft.
-
6 Click ellipsis () to:
-
View the published workflow.
-
Import a JSON file to create or override an existing draft.
-
Duplicate the draft.
-
If there is an existing draft, delete the draft.
-
Workflow editor canvas
When you click a workflow, a blank workflow canvas appears with workflow nodes in the left pane, which you can drag-and-drop onto the canvas.
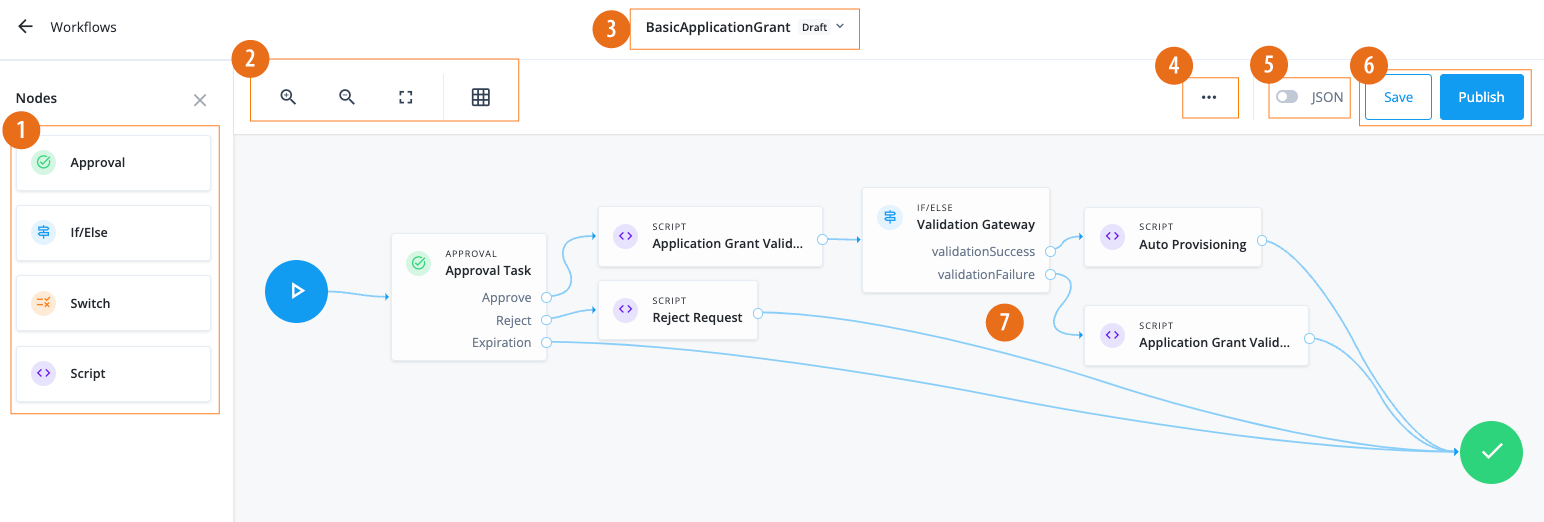
-
1 Available workflow editor nodes.
-
2 Perform orientation functions:
— Zoom in
— Zoom out
— Toggle fullscreen
— Auto layout nodes on the canvas
— When you select on or more nodes, the delete icon displays.
-
3 Toggle between the
draftandpublishedstates of a workflow. -
4 Click (ellipsis icon) to:
-
View Details — View metadata, such as the
stateandworkflow name. -
Import — Upload a JSON file to create or override an existing draft.
-
Export — Download a JSON file of the workflow state.
-
Delete Draft — Only present when viewing the draft state of a workflow.
-
-
5 Switch between viewing the workflow through the canvas UI or through JSON.
-
6 Save or publish the existing workflow.
-
7 The workflow editor canvas. Drag, drop, and connect nodes in the canvas to create your workflow.
| When you click Publish in a workflow, it overrides the existing published version. Identity Governance prompts you to Download backup. Always download a backup in case of an error. |
View workflow in JSON
For technical users, Identity Governance provides the ability to view and download workflows using JSON. From the workflow editor canvas, toggle JSON. If you want to export the workflow JSON, click ellipsis (), and then Export. You can make adjustments and re-import the JSON into Identity Governance.
|
If you are exporting an out-of-box workflow, Identity Governance pulls the UUID of the users or roles from the environment and uses it in the JSON file. Make sure to reset or update the approver values in the Approver node in the JSON. |
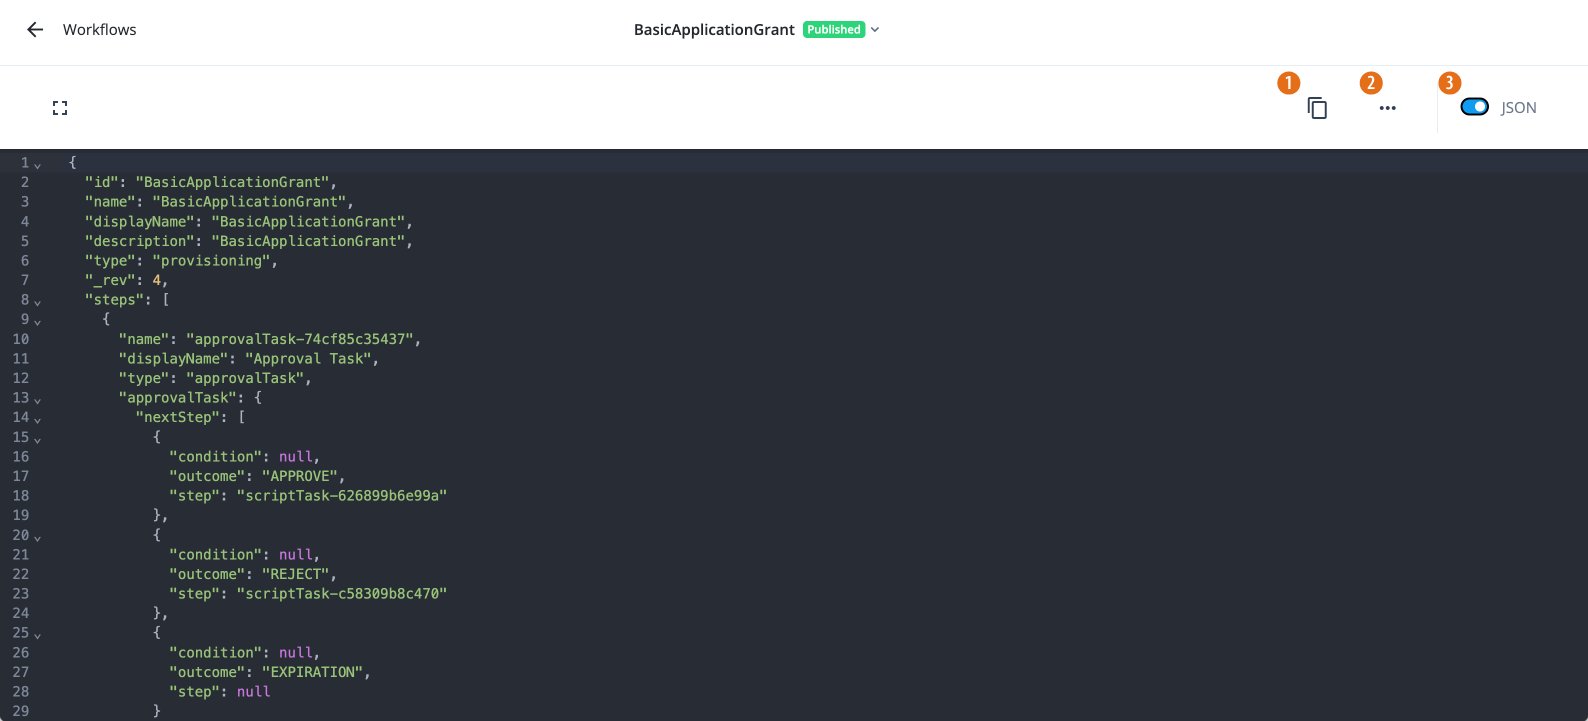
-
1 Copy the JSON workflow file.
-
2 Click to View Details, Import, and Export the JSON file.
-
3 Toggle to enable or disable JSON view.
Workflow nodes
When you define a workflow, you specify each task through a node.
Identity Governance provides several nodes that allow you to customize your workflow.
For information on how to place nodes in a workflow, refer to workflow editor canvas.To use an If/else node or Switch node, you must set outcomes in the script.
| For a comprehensive example of using the following nodes, refer to Workflow use cases. |
Approval node
Requires a user’s input in the workflow. Define:
-
User(s) to approve the access request
-
What to do when the request expires. The end user defines the expiration when they create the access request.
-
Notifications to send.
Outcomes
-
Approved -
Reject
Evaluation continues along the Approved outcome path
if any of the defined approvers approve the request.
Evaluation continues along the Reject outcome path if any of the defined
approvers reject the request.
Properties
| Property | Usage | ||
|---|---|---|---|
Approvers |
Select user(s) that must approve the access request.
|
||
Form |
Select dynamic forms or choose a specific form to present to the reviewer.
|
||
Expiration Settings |
The end user defines the expiration when they create the access request. Select one of the following:
|
||
Notification Settings |
Select which email notifications to send. By default all notifications are enabled. Select any of the following:
|
Fulfillment node
The Fulfillment node assigns a fulfillment task to users, requiring them to
manually complete of a governance task. In this case, an authorized user reviews
the task details and marks it as complete. Workflows using the fulfillment node
should also include flows to suspend the process while waiting for a response.
Administrators can use the Fulfillment node in chain tasks or used in conjunction with the Switch node to implement serial or parallel flows.
The Fulfillment node enables the complete orchestration of end-to-end lifecycles and event-driven flows.
Properties
| Property | Usage | ||
|---|---|---|---|
Reviewers |
Select user(s) that must approve the access request.
|
||
Form |
Allow dynamic form selection or choose a specific form to present to the reviewer.
|
||
Expiration Settings |
The end user defines the expiration when they create the access request. Select one of the following:
|
||
Notification Settings |
Select which email notifications to send. By default all notifications are enabled. Select any of the following:
|
If/else node
| To use this node, there must be a preceding Script node that sets at least one outcome. |
Also referred to as an exclusive gateway, this node has the
outcomes validationSuccess and ValidationFailure.
Once a condition evaluates to true, the node stops evaluating and takes that
outcome.
Outcomes
-
validationSuccess -
validationFailure
Evaluation continues along the validationSuccess outcome path when
the defined condition is met.
Evaluation continues along the validationFailure outcome path when
the defined condition is met.
Properties
| Property | Usage |
|---|---|
Outcomes |
Specify which outcome (defined in a preceding Script node) meets the condition. Set the following properties:
|
Script node
Write custom logic in a workflow with the Script node.
The logic you write depends on the task you are trying to achieve.
For example, you can write a script to set parameters to deny an access request, or you can write a script that sets outcomes you can use in conjunction with an If/else node or Switch node.
Outcomes
Single outcome path; however, you will often set outcomes in the script that you will use with the If/else node or Switch node.
Properties
| Property | Usage |
|---|---|
Script |
Define your custom logic by writing a JavaScript script.
|
Accessing access request-related data in scripts
When an access request is created, the relevant data is stored in a request object. The data accessible through the script node varies depending on the type of access request. For example, an application grant workflow contains information about the application whereas a role grant workflow contains information about the role.
Potential scenarios
|
The following scenarios reference the request object. To view all properties available in the request object, use the REST API endpoint Identity Governance attributes can be referenced using PingIDM functions,
such as reading a resource using |
For an application grant request, grab the application ID and name submitted in the request:
var content = execution.getVariables();                                                     1
var requestId = content.get('id');
var app = null;
var applicationName = null;

var requestObj = openidm.action('iga/governance/requests/' + requestId, 'GET', {}, {});     2
applicationId = requestObj.application.id;
app = openidm.read("managed/alpha_application/" + applicationId);                           3
applicationName = app.name; 4-
1 To leverage the workflow process variables from when the request was created, grab the variables and put them into the
contentvariable. For an access request, the only variable passed is theid. -
2 Obtain information about the access request using a
/governanceendpoint. -
3 Using the
openidm.readfunction, grab all data associated to the application and store it in a local variable,app. -
4 Grab the application name.
For an application grant request, grab the value of the custom created glossary attribute, riskLevel:
var content = execution.getVariables();                                                             1
var requestId = content.get('id');
var appId = null;
var appGlossary = null;
var riskLevel = null;

var requestObj = openidm.action('iga/governance/requests/' + requestId, 'GET', {}, {});             2
appId = requestObj.application.id;
appGlossary = openidm.action('iga/governance/application/' + appId + '/glossary', 'GET', {}, {});   3
riskLevel = appGlossary.riskLevel; 4-
1 To leverage the workflow process variables from when the request was created, grab the variables and put them into the
contentvariable. For an access request, the only variable passed is theid. -
2 Obtain information about the access request using a
/governance/requestsendpoint. -
3 Using the application
idgrabbed from theiga/governance/requestsendpoint, obtain information about the glossasry attributes for the application using theiga/governance/applicationendpoint. -
4 Grab the glossary attribute,
riskLevel, and store it in a local variable,riskLevel. The glossary nameriskLevelcomes from the name that you define when you create a glossary attribute.
For an application grant, access the requester user properties. In this scenario, access the frIndexedString1 property which correlates to a user’s line of business (LOB):
var content = execution.getVariables();                                                     1
var requestId = content.get('id');
var user = null;
var lineOfBusiness = null;

var requestObj = openidm.action('iga/governance/requests/' + requestId, 'GET', {}, {});     2

user = openidm.read("managed/alpha_user/" + requestObj.user.id);                            3

lineOfBusiness = user.frIndexedString1; 4-
1 To leverage the workflow process variables from when the request was created, grab the variables and put them into the
contentvariable. For an access request, the only variable passed is theid. -
2 Obtain information about the access request using a
iga/governance/requestsendpoint. -
3 Using the
openidm.readfunction, put the user;s data into therequestervariable. -
4 Grab line of business the user is in, which is stored in the property
frIndexedString1.
For an entitlement grant request, grab the entitlement ID and name submitted in the request:
var content = execution.getVariables();                                                     1
var requestId = content.get('id');
var requestObj = null;
var entitlementName = null;
var entitlementId = null;

requestObj = openidm.action('iga/governance/requests/' + requestId, 'GET', {}, {});         2
entitlementName = requestObj.descriptor.idx./entitlement.displayName;                       3
entitlementId = requestObj.assignment.id; 4-
1 To leverage the workflow process variables from when the request was created, grab the variables and put them into the
contentvariable. For an access request, the only variable passed is theid. -
2 Obtain information about the access request using a
iga/governance/requestsendpoint. -
3 Grab the entitlement name from
requestObj. Theentitlement.displayNameis derived from the display name attribute on the application’s entitlement object. For more information, refer to populate entitlement object display name. -
4 Grab the entitlement
idfrom therequestObj.The assignment.idis unique whereas theentitlement.idisn’t. The entitlement object is raw data from the application. Applications with the sameentitlement.idcan cause collisions if you referenceentitlement.idin your scripts. Therefore, make sure to reference theassignment.idwhen you want to reference an entitlement.
For a role grant request, grab the role ID and name submitted in the request:
var content = execution.getVariables();                                                 1
var requestId = content.get('id');
var requestObj = null;
var roleId = null;
var role = null;
var roleName = null;

requestObj = openidm.action('iga/governance/requests/' + requestId, 'GET', {}, {});     2
roleId = requestObj.role.id;
role = openidm.read("managed/alpha_role/" + roleId);                                    3
roleName = role.name; 4-
1 To leverage the workflow process variables from when the request was created, grab the variables and put them into the
contentvariable. For an access request, the only variable passed is theid. -
2 Obtain information about the access request using a
iga/governance/requestsendpoint. -
3 Using the
openidm.readfunction, grab all data associated to the role and store it in a local variable,role. -
4 Grab the role name.
Switch node
| To use this node, there must be a preceding Script node that sets multiple outcomes. |
Also referred to as an inclusive gateway, this node allows many outcomes based on different conditions. Any condition or all conditions can be true.
The Switch node and If/else node both evaluate conditions; however, the Switch node continues evaluating conditions after one condition is met.
Properties
| Property | Usage | ||
|---|---|---|---|
Name |
The name of the node. Set the name to update the outcome name in the node.
|
||
Outcomes |
Specify the outcomes (defined in a preceding Script node) based on meeting multiple conditions.
|
Require multiple approvals in parallel
You can use a Switch node to evaluate multiple paths instead of nesting multiple If/else nodes. However, you can also use a Switch node to send multiple approval paths in parallel. For example, you can send an approval to the role owner of a role and to an end user’s manager at the same time. Only when both approvals are approved, the workflow proceeds.
To achieve this:
-
There must be a proceeding Script node before the Swtich node.
-
A switch node must set two or more outcomes with the script set to
true. -
Each outcome of the Switch node routes to an Approval node.
-
The
Approveoutcome of each Approval node must route to an additional Switch node. -
The additional Switch node must only have one outcome with the script set to
true.
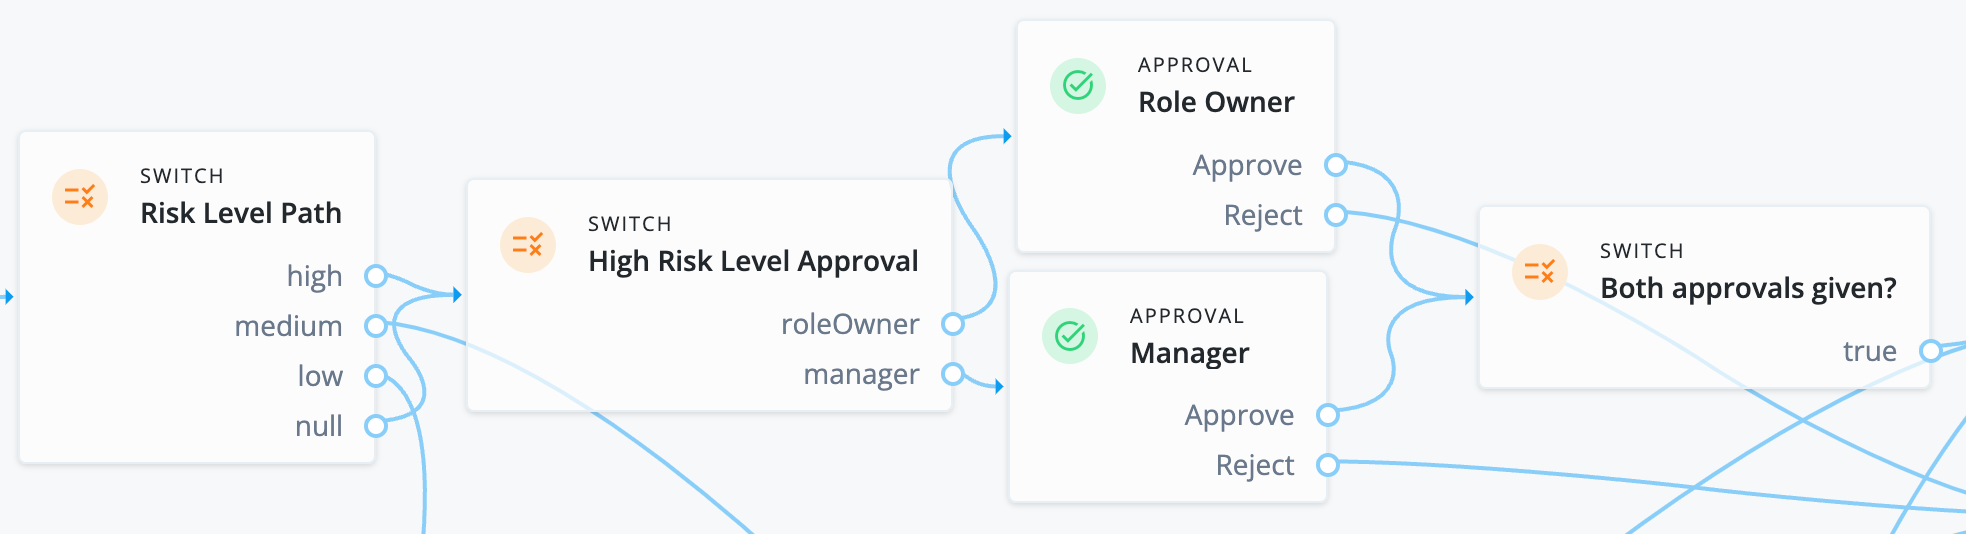
For a detailed example of using a Switch node for parallel paths, refer to Role grant workflow example.
Violation node
Assigns a compliance violation task to users. Workflows using the Violation node can better route violation handling in your company.
You can use the node in chain tasks or used in conjunction with the Switch node to implement serial or parallel flows.
Properties
| Property | Usage |
|---|---|
Name |
Violation Task |
Actors |
Select user(s) who acts on the violation.
|
Expiration Settings |
Define what to do when the violation expires. Options are:
|
Notification Settings |
Select which email notifications to send. By default all notifications are enabled. Select any of the following:
|
Workflow use cases
This section presents workflow use cases featuring workflow nodes. For detailed information on each node, refer to Workflow nodes.
This section covers the following workflows use cases:
Application grant workflow
In this example, an administrator wants to create an application grant workflow that:
-
Requires the manager to approve the request. If an administrator sends a request, the request is auto-approved.
-
If approved, check what line of business (LOB) the application is in.
-
Based on the LOB, the workflow requires a separate approver to approve the request.
Assumptions
-
Each application has an application owner. You populate this value for each target application.
-
You create an application glossary attribute LOB, and populate the LOB for each application. For this scenario, the LOBs are:
-
Sales -
Finance -
Human Resources
-
-
Your end users have a manager assigned to them. An administrator populates this property and it isn’t modifiable by the end user.
Example
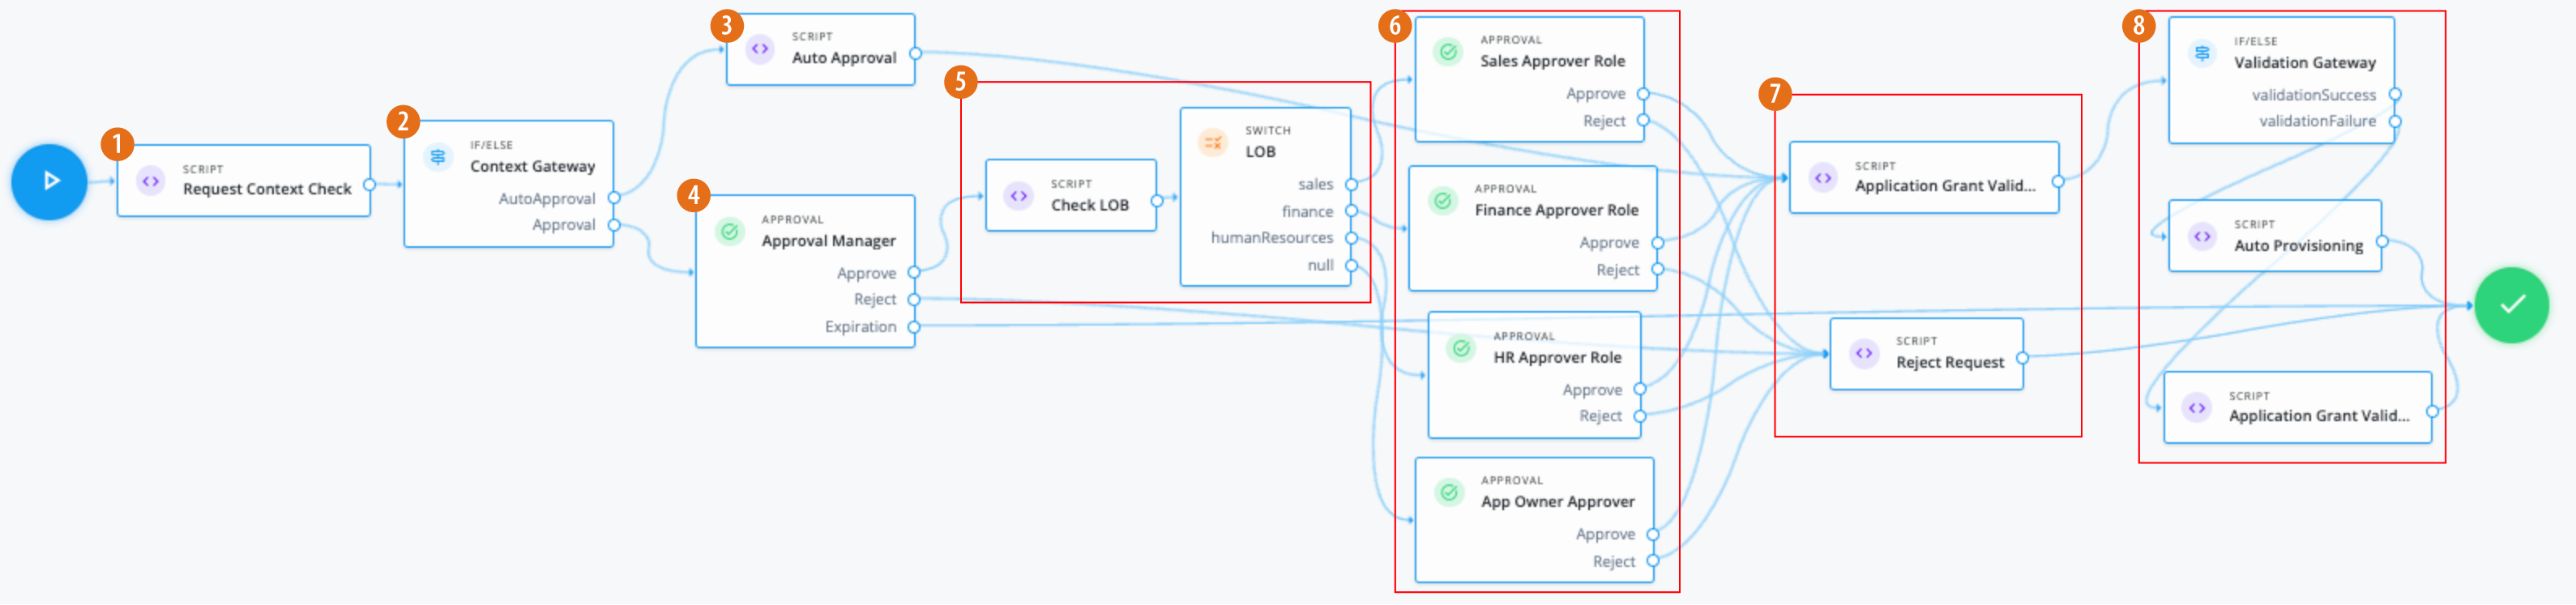
-
1 Use a Script node to do a context check for the request.
Click to display the request context check script
/* Script nodes are used to invoke APIs or execute business logic. You can invoke governance APIs or IDM APIs. You can find details in https://backstage.forgerock.com/docs/idcloud/latest/identity-governance/administration/workflow-configure.html for more details. Script nodes should return a single value and should have the logic enclosed in a try-catch block. Example: try { var requestObj = openidm.action('iga/governance/requests/' + requestId, 'GET', {}, {}); applicationId = requestObj.application.id; } catch (e) { failureReason = 'Validation failed: Error reading request with id ' + requestId; } */ var content = execution.getVariables(); var requestId = content.get('id'); var context = null; var skipApproval = false; var lineItemId = false; try { var requestObj = openidm.action('iga/governance/requests/' + requestId, 'GET', {}, {}); if (requestObj.request.common.context) { context = requestObj.request.common.context.type; lineItemId = requestObj.request.common.context.lineItemId; if (context == 'admin') { skipApproval = true; } } } catch (e) { logger.info("Request Context Check failed "+e.message); } logger.info("Context: " + context); execution.setVariable("context", context); execution.setVariable("lineItemId", lineItemId); execution.setVariable("skipApproval", skipApproval); -
2 Use an IF/ELSE node to set the context gateway for auto approval or standard approval based on a manager review.
-
3 Use the Script node to run any auto approvals:
Click to display the auto approval script
var content = execution.getVariables(); var requestId = content.get('id'); var context = content.get('context'); var lineItemId = content.get('lineItemId'); var queryParams = { "_action": "update" } try { var decision = { "decision": "approved", "comment": "Request auto-approved due to request context: " + context } openidm.action('iga/governance/requests/' + requestId, 'POST', decision, queryParams); } catch (e) { var failureReason = "Failure updating decision on request. Error message: " + e.message; var update = {'comment': failureReason, 'failure': true}; openidm.action('iga/governance/requests/' + requestId, 'POST', update, queryParams); } -
4 Using an Approval node, the manager of the end user must approve the request.
-
5 If approved, a Script node checks the application glossary attribute
lineOfBusiness(LOB) and sets the outcome based on the LOB of the application. Based on the outcome, the Switch node evaluates the LOB.Click to display check LOB script
var content = execution.getVariables(); var requestId = content.get('id'); var requestObj = null; var appId = null; var appGlossary = null; var lob = null; try { requestObj = openidm.action('iga/governance/requests/' + requestId, 'GET', {}, {}); appId = requestObj.application.id; } catch (e) { logger.info("Validation failed: Error reading application grant request with id " + requestId); } try { appGlossary = openidm.action('iga/governance/application/' + appId + '/glossary', 'GET', {}, {}); lob = appGlossary.lineOfBusiness || "default"; execution.setVariable("lob", lob); } catch (e) { logger.info("Could not retrieve glossary with appId " + appId + " from application grant request ID " + requestId); } -
3 If the LOB is:
-
sales— An Approval node requires members of the roleSales App Approverto approve the request. -
finance— An Approval node requires members ot the foleFinance App Approverto approve the request. -
humanResources— An Approval node requires members of the roleHuman Resources App Approverto approve the request. -
null— An Approval node requires the application owner to approve the request.
-
-
7 If the required approvals are met, a Script node runs a validation check.
Click to display app grant validation script
logger.info("Running application grant request validation");

var content = execution.getVariables();
var requestId = content.get('id');
var failureReason = null;
var applicationId = null;
var app = null;

try {
  var requestObj = openidm.action('iga/governance/requests/' + requestId, 'GET', {}, {});
  applicationId = requestObj.application.id;
}
catch (e) {
  failureReason = "Validation failed: Error reading request with id " + requestId;
}

// Validation 1 - Check application exists
if (!failureReason) {
  try {
    app = openidm.read('managed/alpha_application/' + applicationId);
    if (!app) {
      failureReason = "Validation failed: Cannot find application with id " + applicationId;
    }
  }
  catch (e) {
    failureReason = "Validation failed: Error reading application with id " + applicationId + ". Error message: " + e.message;
  }
}

// Validation 2 - Check the user does not already have application granted
// Note: this is done at request submission time as well, the following is an example of how to check user's accounts
if (!failureReason) {
  try {
    var user = openidm.read('managed/alpha_user/' + requestObj.user.id, null, [ 'effectiveApplications' ]);
    user.effectiveApplications.forEach(effectiveApp => {
      if (effectiveApp._id === applicationId) {
        failureReason = "Validation failed: User with id " + requestObj.user.id + " already has effective application " + applicationId;
      }
    })
  }
  catch (e) {
    failureReason = "Validation failed: Unable to check effective applications of user with id " + requestObj.user.id + ". Error message: " + e.message;
  }
}

if (failureReason) {
  logger.info("Validation failed: " + failureReason);
}
execution.setVariable("failureReason", failureReason);
If any Approval node has the
Rejectoutcome, a Script node denies the request.Click to display reject request script
logger.info("Rejecting request"); var content = execution.getVariables(); var requestId = content.get('id'); logger.info("Execution Content: " + content); var requestIndex = openidm.action('iga/governance/requests/' + requestId, 'GET', {}, {}); var decision = {'outcome': 'denied', 'status': 'complete', 'decision': 'rejected'}; var queryParams = { '_action': 'update'}; openidm.action('iga/governance/requests/' + requestId, 'POST', decision, queryParams); -
8 If the If/Else node outcome is:
-
validationSuccess— A Script node provisions the application to the end user.Click to display auto provisioning script
logger.info("Auto-Provisioning"); var content = execution.getVariables(); var requestId = content.get('id'); var failureReason = null; try { var requestObj = openidm.action('iga/governance/requests/' + requestId, 'GET', {}, {}); logger.info("requestObj: " + requestObj); } catch (e) { failureReason = "Provisioning failed: Error reading request with id " + requestId; } if(!failureReason) { try { var request = requestObj.request; var payload = { "applicationId": request.common.applicationId, "startDate": request.common.startDate, "endDate": request.common.endDate, "auditContext": {}, "grantType": "request" }; var queryParams = { "_action": "add" } logger.info("Creating account: " + payload); var result = openidm.action('iga/governance/user/' + request.common.userId + '/applications' , 'POST', payload,queryParams); } catch (e) { failureReason = "Provisioning failed: Error provisioning account to user " + request.common.userId + " for application " + request.common.applicationId + ". Error message: " + e.message; } var decision = {'status': 'complete', 'decision': 'approved'}; if (failureReason) { decision.outcome = 'not provisioned'; decision.comment = failureReason; decision.failure = true; } else { decision.outcome = 'provisioned'; } var queryParams = { '_action': 'update'}; openidm.action('iga/governance/requests/' + requestId, 'POST', decision, queryParams); logger.info("Request " + requestId + " completed."); } -
validationFailure— A Script node doesn’t provision the application to the end user.Click to display validation failure script
var content = execution.getVariables();
var requestId = content.get('id');
var failureReason = content.get('failureReason');

var decision = {'outcome': 'not provisioned', 'status': 'complete', 'comment': failureReason, 'failure': true, 'decision': 'approved'};
var queryParams = { '_action': 'update'};
openidm.action('iga/governance/requests/' + requestId, 'POST', decision, queryParams);
-
|
Download the JSON file for this workflow here. Learn more about how to import or export workflows in workflow editor canvas. |
Entitlement grant workflow
In this example, an administrator wants to create an entitlement grant workflow that:
-
An entitlement owner must approve the request. If an administrator sends a request, the request is auto-approved.
-
If approved, check if the entitlement is marked as
privileged.Companies can define what privilegedmeans in the glossary. However, in most cases, aprivilegedentitlement gives administrative rights to sensitive data, such as view access to quarterly reports before public release. -
If the entitlement is privileged or null, the end user’s manager must approve the request.
Assumptions
-
Each entitlement has an entitlement owner.
-
You create a boolean entitlement glossary attribute ,
isPrivileged. This attribute is populated for each entitlement. -
Your end users have a manager assigned to them. An administrator populates this property and isn’t modifiable by the end user.
Example

-
1 Use a Script node to do a context check for the request.
Click to display the request context check script
/* Script nodes are used to invoke APIs or execute business logic. You can invoke governance APIs or IDM APIs. Learn more in https://backstage.forgerock.com/docs/idcloud/latest/identity-governance/administration/workflow-configure.html. Script nodes should return a single value and should have the logic enclosed in a try-catch block. Example: try { var requestObj = openidm.action('iga/governance/requests/' + requestId, 'GET', {}, {}); applicationId = requestObj.application.id; } catch (e) { failureReason = 'Validation failed: Error reading request with id ' + requestId; } */ var content = execution.getVariables(); var requestId = content.get('id'); var context = null; var skipApproval = false; var lineItemId = false; try { var requestObj = openidm.action('iga/governance/requests/' + requestId, 'GET', {}, {}); if (requestObj.request.common.context) { context = requestObj.request.common.context.type; lineItemId = requestObj.request.common.context.lineItemId; if (context == 'admin') { skipApproval = true; } } } catch (e) { logger.info("Request Context Check failed "+e.message); } logger.info("Context: " + context); execution.setVariable("context", context); execution.setVariable("lineItemId", lineItemId); execution.setVariable("skipApproval", skipApproval); -
2 Use an IF/ELSE node to set the context gateway.
-
3 Use the Script node to run an auto approval:
Click to display the auto approval script
var content = execution.getVariables(); var requestId = content.get('id'); var context = content.get('context'); var lineItemId = content.get('lineItemId'); var queryParams = { "_action": "update" } var lineItemParams = { "_action": "updateRemediationStatus" } try { var decision = { "decision": "approved", "comment": "Request auto-approved due to request context: " + context } openidm.action('iga/governance/requests/' + requestId, 'POST', decision, queryParams); } catch (e) { var failureReason = "Failure updating decision on request. Error message: " + e.message; var update = {'comment': failureReason, 'failure': true}; openidm.action('iga/governance/requests/' + requestId, 'POST', update, queryParams); } -
4 Using an Approval node, the entitlement owner must approve the request.
-
5 Use a Script node to check the value of the entitlement glossary attribute
isPrivilegedand set the outcome.Click to display the entitlement privileged script
var content = execution.getVariables(); var requestId = content.get('id'); var requestObj = null; var entId = null; var entGlossary = null; var entPriv = null; //Check entitlement exists and grab entitlement info try { requestObj = openidm.action('iga/governance/requests/' + requestId, 'GET', {}, {}); entId = requestObj.assignment.id; } catch (e) { logger.info("Validation failed: Error reading entitlement grant request with id " + requestId); } //Check glossary for entitlement exists and grab glossary info try { entGlossary = openidm.action('iga/governance/resource/' + entId + '/glossary', 'GET', {}, {}); // Sets entPriv based on the glossary contents, if present, otherwise defaults to true entPriv = (entGlossary.hasOwnProperty("isPrivileged")) ? entGlossary.isPrivileged : true; //Sets entPriv based on glossary contents, if present, otherwise defaults to false //entPriv = !!entGlossary.isPrivileged; execution.setVariable("entPriv", entPriv); } catch (e) { logger.info("Could not retrieve glossary with entId " + entId + " from entitlement grant request ID " + requestId); } -
6 Use a switch node to route outcomes based on the script. If the outcome is:
-
privileged(entPriv==true) — An additional Approval node requires the end user’s manager to approve the request. -
notPrivileged(entPriv==false`) — An additional approval isn’t required.
-
-
7 If the required approvals are met, the Script node runs a validation check.
Click to display the entitlement grant validation script
logger.info("Running entitlement grant request validation");

var content = execution.getVariables();
var requestId = content.get('id');
var failureReason = null;
var applicationId = null;
var assignmentId = null;
var app = null;
var assignment = null;
var existingAccount = false;

try {
  var requestObj = openidm.action('iga/governance/requests/' + requestId, 'GET', {}, {});
  applicationId = requestObj.application.id;
  assignmentId = requestObj.assignment.id;
}
catch (e) {
  failureReason = "Validation failed: Error reading request with id " + requestId;
}

// Validation 1 - Check application exists
if (!failureReason) {
  try {
    app = openidm.read('managed/alpha_application/' + applicationId);
    if (!app) {
      failureReason = "Validation failed: Cannot find application with id " + applicationId;
    }
  }
  catch (e) {
    failureReason = "Validation failed: Error reading application with id " + applicationId + ". Error message: " + e.message;
  }
}

// Validation 2 - Check entitlement exists
if (!failureReason) {
  try {
    assignment = openidm.read('managed/alpha_assignment/' + assignmentId);
    if (!assignment) {
      failureReason = "Validation failed: Cannot find assignment with id " + assignmentId;
    }
  }
  catch (e) {
    failureReason = "Validation failed: Error reading assignment with id " + assignmentId + ". Error message: " + e.message;
  }
}

// Validation 3 - Check the user has application granted
if (!failureReason) {
  try {
    var user = openidm.read('managed/alpha_user/' + requestObj.user.id, null, [ 'effectiveApplications' ]);
    user.effectiveApplications.forEach(effectiveApp => {
      if (effectiveApp._id === applicationId) {
        existingAccount = true;
      }
    })
  }
  catch (e) {
    failureReason = "Validation failed: Unable to check existing applications of user with id " + requestObj.user.id + ". Error message: " + e.message;
  }
}

// Validation 4 - If account does not exist, provision it
if (!failureReason) {
  if (!existingAccount) {
    try {
      var request = requestObj.request;
      var payload = {
        "applicationId": applicationId,
        "startDate": request.common.startDate,
        "endDate": request.common.endDate,
        "auditContext": {},
        "grantType": "request"
      };
      var queryParams = {
        "_action": "add"
      }

      logger.info("Creating account: " + payload);
      var result = openidm.action('iga/governance/user/' + request.common.userId + '/applications' , 'POST', payload,queryParams);
    }
    catch (e) {
      failureReason = "Validation failed: Error provisioning new account to user " + request.common.userId + " for application " + applicationId + ". Error message: " + e.message;
    }
  }
}

if (failureReason) {
  logger.info("Validation failed: " + failureReason);
}
execution.setVariable("failureReason", failureReason);
If any Approval node has the
Rejectoutcome, a Script node denies the request.Click to display the reject request script
logger.info("Rejecting request"); var content = execution.getVariables(); var requestId = content.get('id'); logger.info("Execution Content: " + content); var requestIndex = openidm.action('iga/governance/requests/' + requestId, 'GET', {}, {}); var decision = {'outcome': 'denied', 'status': 'complete', 'decision': 'rejected'}; var queryParams = { '_action': 'update'}; openidm.action('iga/governance/requests/' + requestId, 'POST', decision, queryParams); -
8 If the
If/elsenode outcome is:-
validationFlowSuccess— A Script node provisions the application to the end user.Click to display the auto provisioning script
logger.info("Auto-Provisioning"); var content = execution.getVariables(); var requestId = content.get('id'); var failureReason = null; try { var requestObj = openidm.action('iga/governance/requests/' + requestId, 'GET', {}, {}); logger.info("requestObj: " + requestObj); } catch (e) { failureReason = "Provisioning failed: Error reading request with id " + requestId; } if(!failureReason) { try { var request = requestObj.request; var payload = { "entitlementId": request.common.entitlementId, "startDate": request.common.startDate, "endDate": request.common.endDate, "auditContext": {}, "grantType": "request" }; var queryParams = { "_action": "add" } var result = openidm.action('iga/governance/user/' + request.common.userId + '/entitlements' , 'POST', payload,queryParams); } catch (e) { failureReason = "Provisioning failed: Error provisioning entitlement to user " + request.common.userId + " for entitlement " + request.common.entitlementId + ". Error message: " + e.message; } var decision = {'status': 'complete', 'decision': 'approved'}; if (failureReason) { decision.outcome = 'not provisioned'; decision.comment = failureReason; decision.failure = true; } else { decision.outcome = 'provisioned'; } var queryParams = { '_action': 'update'}; openidm.action('iga/governance/requests/' + requestId, 'POST', decision, queryParams); logger.info("Request " + requestId + " completed."); } -
validationFlowFailure— A Script node doesn’t provision the application to the end user.Click to display the validation failure script
var content = execution.getVariables();
var requestId = content.get('id');
var failureReason = content.get('failureReason');

var decision = {'outcome': 'not provisioned', 'status': 'complete', 'comment': failureReason, 'failure': true, 'decision': 'approved'};
var queryParams = { '_action': 'update'};
openidm.action('iga/governance/requests/' + requestId, 'POST', decision, queryParams);
-
|
Download the JSON file for this workflow here. For information on how to import or export workflows, refer to workflow editor canvas. |
Role grant workflow
In this example, an administrator wants to create a role grant workflow that:
-
Checks the risk level of the role.
-
Separate approvals are required based on the risk level. Specifically, if the risk level is
high, send two approvals, in parallel, to the end user’s manager and the role owner.
Assumptions
-
Each role has a role owner.
-
You create a role glossary attribute (string with enumerated value),
riskLevel, that has the following values:-
low -
medium -
highFor each role, this attribute is populated.
-
-
Your end users have a manager assigned to them. An administrator populates this property and isn’t modifiable by the end user.
Example
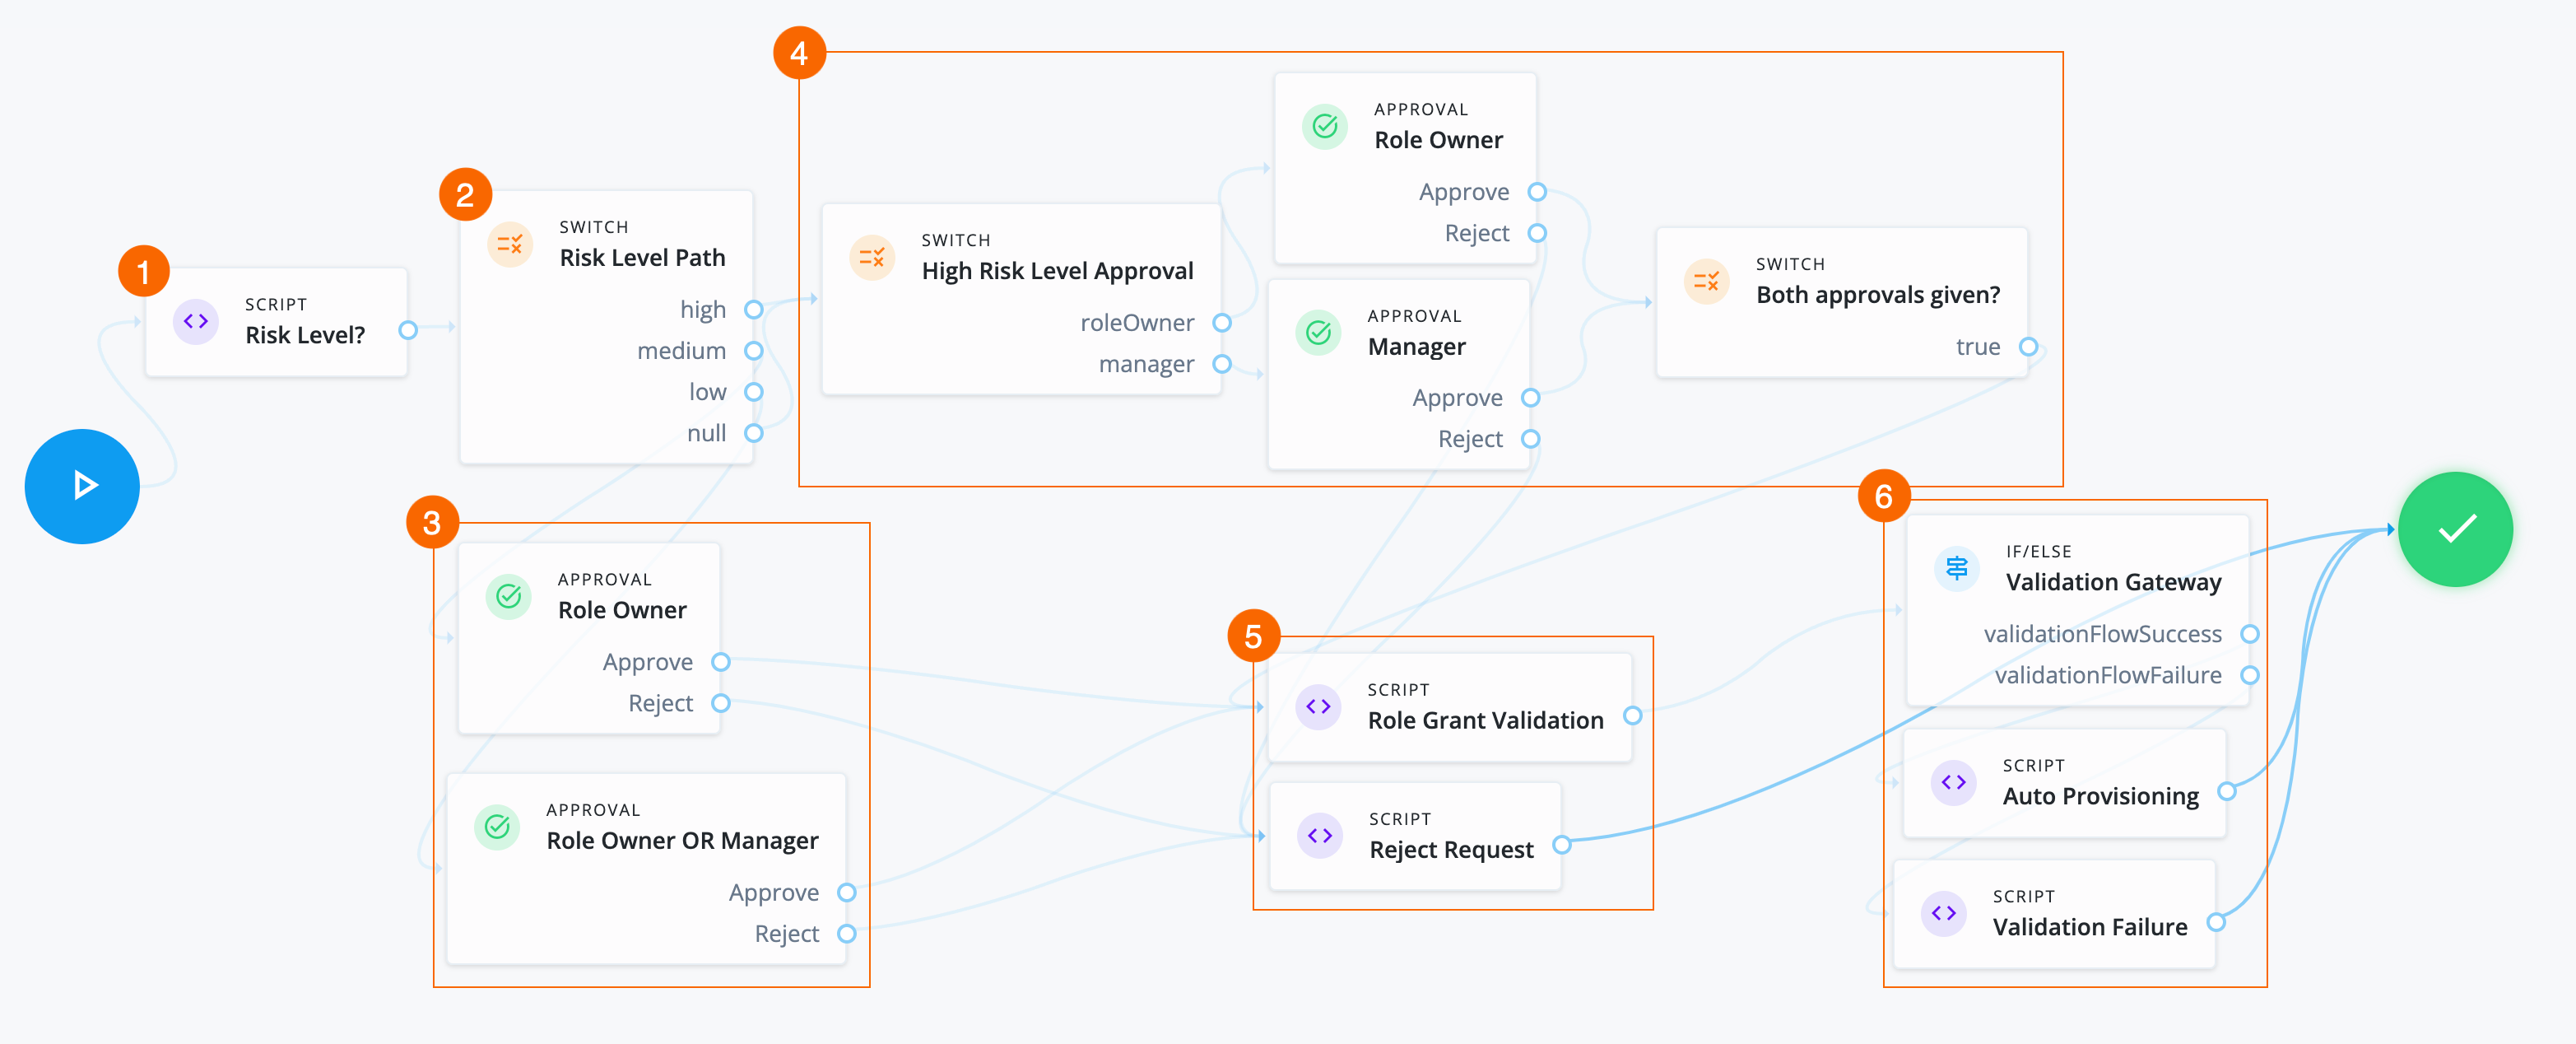
-
1 A Script node checks the value of the role glossary attribute
riskLeveland sets outcomes.Click to display risk level script
var content = execution.getVariables(); var requestId = content.get('id'); var requestObj = null; var roleId = null; var roleGlossary = null; var riskLevel = null; try { requestObj = openidm.action('iga/governance/requests/' + requestId, 'GET', {}, {}); riskId = requestObj.risk.id; } catch (e) { logger.info("Validation failed: Error reading role grant request with id " + requestId); } try { roleGlossary = openidm.action('iga/governance/role/' + roleId + '/glossary', 'GET', {}, {}); riskLevel = roleGlossary.riskLevel; execution.setVariable("riskLevel", riskLevel); } catch (e) { logger.info("Could not retrieve glossary with roleId " + roleId + " from role grant request ID " + requestId); } -
2 A Switch node determines the path to take based on the Script node.
-
3 If the risk level is:
-
low— An Approval node requires either the role owner or the end user’s manager to approve the request. -
medium— An Approval node requires the role owner to approve the request.
-
-
4 If the risk level is
highornullthen:-
A Switch node sends two approval tasks in parallel.
-
An Approval node requires the role owner to approve the request.
-
An Approval node requires the end user’s manager to approve the request.
-
A closing Switch node waits for both approvals before proceeding to provision the role.
-
-
5 If the required approvals are met, a Script node runs a validation check.
Click to display the Role Grant Validation script
logger.info("Running role grant request validation");

var content = execution.getVariables();
var requestId = content.get('id');
var failureReason = null;
var roleId = null;
var role = null;

try {
  var requestObj = openidm.action('iga/governance/requests/' + requestId, 'GET', {}, {});
  roleId = requestObj.role.id;
}
catch (e) {
  failureReason = "Validation failed: Error reading request with id " + requestId;
}

// Validation 1 - Check role exists
if (!failureReason) {
  try {
    role = openidm.read('managed/alpha_role/' + roleId);
    if (!role) {
      failureReason = "Validation failed: Cannot find role with id " + roleId;
    }
  }
  catch (e) {
    failureReason = "Validation failed: Error reading role with id " + roleId + ". Error message: " + e.message;
  }
}

if (failureReason) {
  logger.info("Validation failed: " + failureReason);
}
execution.setVariable("failureReason", failureReason);
If any Approval node has the
Rejectoutcome, a Script node denies the request.Click to display Reject Request script
logger.info("Rejecting request"); var content = execution.getVariables(); var requestId = content.get('id'); logger.info("Execution Content: " + content); var requestIndex = openidm.action('iga/governance/requests/' + requestId, 'GET', {}, {}); var decision = {'outcome': 'denied', 'status': 'complete', 'decision': 'rejected'}; var queryParams = { '_action': 'update'}; openidm.action('iga/governance/requests/' + requestId, 'POST', decision, queryParams); -
6 If the If/else node outcome is:
-
validationFlowSuccess— A Script node provisions the application to the end user.Click to display Auto Provisioning script
logger.info("Auto-Provisioning"); var content = execution.getVariables(); var requestId = content.get('id'); var failureReason = null; try { var requestObj = openidm.action('iga/governance/requests/' + requestId, 'GET', {}, {}); logger.info("requestObj: " + requestObj); } catch (e) { failureReason = "Provisioning failed: Error reading request with id " + requestId; } if(!failureReason) { try { var request = requestObj.request; var payload = { "roleId": request.common.roleId, "startDate": request.common.startDate, "endDate": request.common.endDate, "auditContext": {}, "grantType": "request" }; var queryParams = { "_action": "add" } var result = openidm.action('iga/governance/user/' + request.common.userId + '/roles' , 'POST', payload,queryParams); } catch (e) { failureReason = "Provisioning failed: Error provisioning role to user " + request.common.userId + " for role " + request.common.roleId + ". Error message: " + e.message; } var decision = {'status': 'complete', 'decision': 'approved'}; if (failureReason) { decision.outcome = 'not provisioned'; decision.comment = failureReason; decision.failure = true; } else { decision.outcome = 'provisioned'; } var queryParams = { '_action': 'update'}; openidm.action('iga/governance/requests/' + requestId, 'POST', decision, queryParams); logger.info("Request " + requestId + " completed."); } -
validationFlowFailure— A Script node doesn’t provision the application to the end user.Click to display Validation Failure script
var content = execution.getVariables();
var failureReason = content.get('failureReason');

var decision = {'outcome': 'not provisioned', 'status': 'complete', 'comment': failureReason, 'failure': true, 'decision': 'approved'};
var queryParams = { '_action': 'update'};
openidm.action('iga/governance/requests/' + requestId, 'POST', decision, queryParams);
-
|
Download the JSON file for this workflow here. Learn more about how to import or export workflows in workflow editor canvas. |
Role remove workflow
In this example, an administrator wants to create a workflow that:
-
Handles a normal role removal access request.
-
Includes a context check for administrator-submitted requests.
-
Skips the the approval task process and runs auto-approval and auto-deprovisioning scripts if the context check passes.
Assumptions
-
Each role has a role owner.
-
Notification settings and email templates exist.
-
Make sure to catch any error/failure conditions.
Example
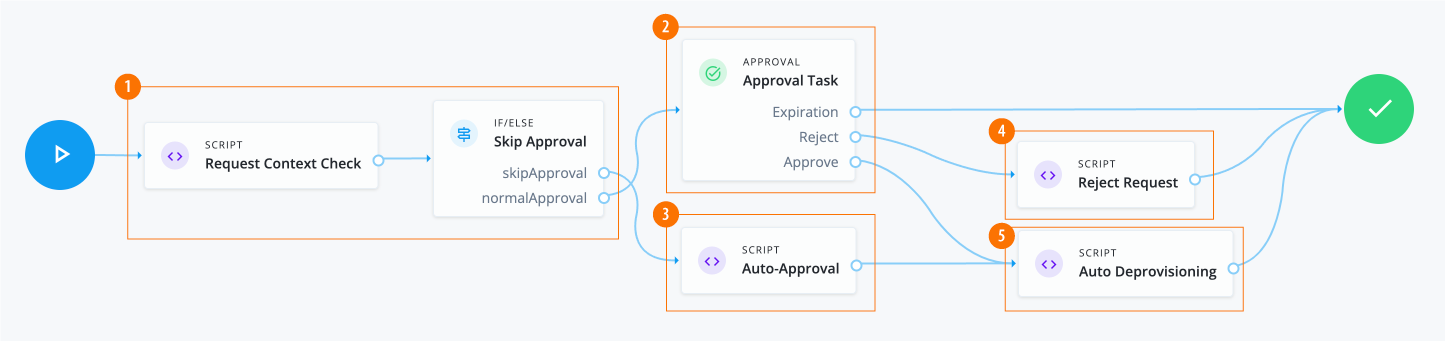
-
1 The Script node invokes the APIs and checks the context. If the context is
adminorcertification, it skips the manual approval process.Click to display request context check script
var content = execution.getVariables(); var requestId = content.get('id'); var context = null; var skipApproval = false; try { var requestObj = openidm.action('iga/governance/requests/' + requestId, 'GET', {}, {}); if (requestObj.request.common.context) { context = requestObj.request.common.context.type; if (context === 'admin' || context === 'certification') { skipApproval = true; } } } catch (e) {} logger.info("Context: " + context); execution.setVariable("context", context); execution.setVariable("skipApproval", skipApproval); -
2 The Approval node assigns an approval task to users and roles. The node chains tasks in conjunction with a Switch node to implement serial or parallel flows.
Click to display the approval task properties
Item Description Name
Approval TaskApprovers
Two options are available:
-
Add users and roles manually, such as
Role Ownerand defineApprovertype-
Approve
-
Reject
-
Reassign
-
Modify
-
Comment
-
-
Define users using a script:
Form
Select a form to present to the reviewer:
-
Dynamic form selection. This selection is typically used for basic out-of-the-box workflows, like
BasicApplicationGrantand others. -
Choose a form. This selection is typically used for custom request type forms.
Expiration Settings
Options are:
-
Reject request
-
Reassign request
-
Do nothing
Notification Settings
Options are:
-
Assignment notification and email templates, such as
requestAssigned. -
Reassignment notification and email templates, such as
requestReassigned. -
Assignee reminders and email templates, such as
requestReminder.-
Sends every number of time periods, such as
3 day(s).
-
-
Escalation notifications and email templates, such as
requestEscalated.-
Send every number of day(s), such as
5 day(s). -
Send to
Send escalation totoUser, and selectUser.
-
-
Expiration notification and email templates, such as
requestExpired.-
Send the notification on the configured number of days before expiration.
-
-
-
3 Invokes the auto-approval script if
scriptApprovalis true.Click to display auto-approval script
var content = execution.getVariables(); var requestId = content.get('id'); var context = content.get('context'); var queryParams = { "_action": "update" } try { var decision = { "decision": "approved", "comment": "Request auto-approved due to request context: " + context } openidm.action('iga/governance/requests/' + requestId, 'POST', decision, queryParams); } catch (e) { var failureReason = "Failure updating decision on request. Error message: " + e.message; var update = {'comment': failureReason, 'failure': true}; openidm.action('iga/governance/requests/' + requestId, 'POST', update, queryParams); } -
4 Runs a
RejectRequestscript whenApproval tasknode returns areject.Click to display
RejectRequestscriptlogger.info("Rejecting request"); var content = execution.getVariables(); var requestId = content.get('id'); logger.info("Execution Content: " + content); var requestIndex = openidm.action('iga/governance/requests/' + requestId, 'GET', {}, {}); var decision = {'outcome': 'denied', 'status': 'complete', 'decision': 'rejected'}; var queryParams = { '_action': 'update'}; openidm.action('iga/governance/requests/' + requestId, 'POST', decision, queryParams); -
5 Run Auto Deprovisioning script.
Click to display the auto deprovisioning script
logger.info("Auto-Deprovisioning"); var content = execution.getVariables(); var requestId = content.get('id'); var failureReason = null; try { var requestObj = openidm.action('iga/governance/requests/' + requestId, 'GET', {}, {}); logger.info("requestObj: " + requestObj); } catch (e) { failureReason = "Deprovisioning failed: Error reading request with id " + requestId; } if(!failureReason) { try { var request = requestObj.request; var payload = { "roleId": request.common.roleId, "startDate": request.common.startDate, "endDate": request.common.endDate, "auditContext": {}, "grantType": "request" }; var queryParams = { "_action": "remove" } var result = openidm.action('iga/governance/user/' + request.common.userId + '/roles' , 'POST', payload,queryParams); } catch (e) { failureReason = "Deprovisioning failed: Error deprovisioning role to user " + request.common.userId + " for role " + request.common.roleId + ". Error message: " + e.message; } var decision = {'status': 'complete', 'decision': 'approved'}; if (failureReason) { decision.outcome = 'not provisioned'; decision.comment = failureReason; decision.failure = true; } else { decision.outcome = 'provisioned'; } var queryParams = { '_action': 'update'}; openidm.action('iga/governance/requests/' + requestId, 'POST', decision, queryParams); logger.info("Request " + requestId + " completed."); }
|
Download the JSON file for this workflow here. Learn more about how to import or export workflows in workflow editor canvas. |
Violation workflow
In this example, an administrator creates a workflow that:
-
Processes a single violation task.
-
If the violation outcome is
Remediate, it remediates the violation, validates the result, and removes the entitlements. -
If the violation outcome is
Allow, it creates an exception. -
If the violation outcome is
expiration, it goes to a manual decision via the Fulfillment node. -
If the end user tasked with the manual fulfillment approves of the various outcomes, the workflow is complete.
-
If the end user tasked with the manual fulfillment denies the resulting outcomes, the workflow calls a reject requests script, and loops back for another manual confirmation.
Example
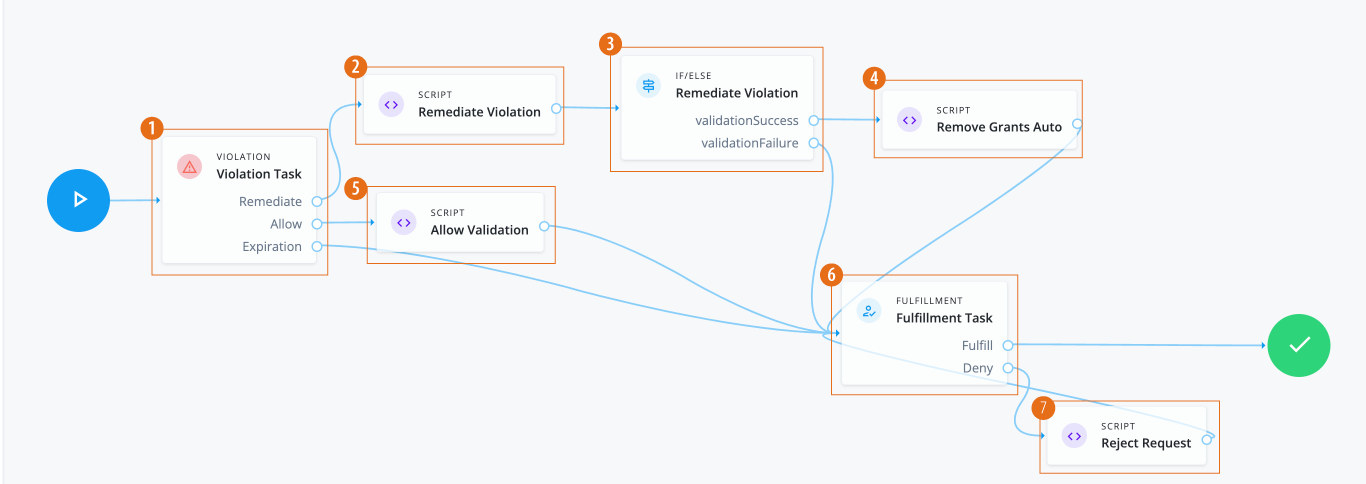
-
1 The Violation node routes the violation to the appropriate outcome. Options are:
Remediate,Allow, andExpiration. -
2 The Remediate Violation Script node gets the context information for the violation and sets the
remediationResponse.Click to display Remediate Violation script
logger.info("Remediating violation"); var content = execution.getVariables(); var violationId = content.get('id'); var remediation = content.get('remediation'); logger.info("Remediating violation - violationId: " + violationId + ', remediation payload: ' + remediation); var remediationContent = null; var remediationResponse = openidm.action('iga/governance/violation/' + violationId + '/remediate', 'POST', remediation); logger.info("Remediating response: " + remediationResponse); remediationContent = remediationResponse.decision.remediation; execution.setVariable("remediation", remediationContent); -
3 The Remediate Violation IF/ELSE node routes successful validations to an auto remove script node and validation failures to a failure handling node.
-
4 The Remove Grants Auto script node removes the entitlement grants that caused the violation.
Click to display Auto Remove Entitlement Grants script
logger.info("Removing grants automatically"); var content = execution.getVariables(); var violationId = content.get('id'); var failureReason = null; var phaseName = content.get('phaseName'); var violationObj; logger.info("Removing entitlement grants for violation " + violationId + " with phase name " + phaseName); try { violationObj = openidm.action('iga/governance/violation/lookup/' + violationId, 'GET', {}, {}); } catch (e) { failureReason = "Removing entitlement grants failed: Error reading violation with id " + violationId + ". Error message: " + e.message; } if (!failureReason) { var remediation = violationObj.decision.remediation; var failedDeprovisioning = false; var deprovisionedIds = []; for(var grant of violationObj.violatingAccess) { if (!remediation.grantIds.includes(grant.compositeId)) { continue; } var userId = violationObj.user.id; logger.info("Removing entitlement grant: " + grant.compositeId + ", user: " + userId + ", violation: " + violationId); try { var payload = { entitlementId: grant.assignment.id }; logger.info('Payload to remove grant: ' + JSON.stringify(payload)); var queryParams = { "_action": "remove" } var result = openidm.action('iga/governance/user/' + userId + '/entitlements', 'POST', payload,queryParams); execution.setVariables(result); logger.info("Deprovisioned " + grant.assignment.id + " successfully, user " + userId + + ", violation: " + violationId); deprovisionedIds.push(grant.compositeId); } catch (e) { failureReason = failureReason + ". Removing grants failed: Error deprovisioning entitlement" + grant.assignment.id + " from user. Error message: " + e.message + "."; failedDeprovisioning = true; } } if (!failedDeprovisioning) { openidm.action('iga/governance/violation/' + violationId + '/remediation/status/complete', 'POST', {}); } else { failureReason = failureReason + ". Grants removed: " + deprovisionedIds; } } if (failureReason) { var update = { 'comment': failureReason }; openidm.action('iga/governance/violation/' + violationId + '/comment', 'POST', update, {}); } -
5 The Allow Violation script node logs the information. If a failure arises, Identity Governance posts the failure with the reason.
Click to display Allow Violation script node
logger.info("Allowing violation"); var content = execution.getVariables(); var violationId = content.get('id'); var phaseName = content.get('phaseName'); logger.info("Violation to be allowed: " + violationId + " with phase name " + phaseName); var failureReason = null; try { var allowResponse = openidm.action('iga/governance/violation/' + violationId + '/allow', 'POST', {}); logger.info("Violation " + violationId + " was allowed successfully.");} catch (e) { failureReason = "Failed allowing violation with id " + violationId + ". Error message: " + e.message; } if (failureReason) { var update = { "comment": failureReason }; try { openidm.action('iga/governance/violation/' + violationId + '/phases/' + phaseName + '/comment', 'POST', update, {}); } catch (e) { openidm.action('iga/governance/violation/' + violationId + '/comment', 'POST', update, {}); } } -
6 The Fulfillment node requests a manual completion of the task by an authorized end user, typically during review time. If successful, the task is fulfilled, and the workflow is complete.
-
7 The Reject Request script node retrieves the
requestID, logs the rejection, and sends a reject request.Click to display Reject Request script
logger.info("Rejecting request"); var content = execution.getVariables(); var requestId = content.get('id'); logger.info("Execution Content: " + content); var requestIndex = openidm.action('iga/governance/requests/' + requestId, 'GET', {}, {}); var decision = {'outcome': 'denied', 'status': 'complete', 'decision': 'rejected'}; var queryParams = { '_action': 'update'}; openidm.action('iga/governance/requests/' + requestId, 'POST', decision, queryParams);
|
Download the JSON file for this workflow here. Learn more about how to import or export workflows in workflow editor canvas. |
User create event workflow - send email
In this example, an administrator creates a workflow that:
-
Sends an email notification to the new user when a user create event occurs.
-
Copies their manager, as well, if present.
Example
-
1 The Script node sends email to the new user and cc’s to the user’s manager.
Click to display send email script
logger.info("Running user create event role workflow - send email"); var content = execution.getVariables(); var requestId = content.get('id'); // Read event user information from request object try { var requestObj = openidm.action('iga/governance/requests/' + requestId, 'GET', {}, {}); var userObj = requestObj.request.common.blob.after; var userDisplayName = userObj.givenName + " " + userObj.sn + " (" + userObj.userName + ")"; var body = { subject: "New user created: " + userDisplayName, to: userObj.mail, body: "New user created: " + userDisplayName + ".", object: {} }; if (userObj && userObj.manager && userObj.manager.mail) { body.cc = userObj.manager.mail }; openidm.action("external/email", "send", body); } catch (e) { logger.info("Unable to send new user creation email"); } // Update event request as final var decision = {'status': 'complete', 'outcome': 'fulfilled', 'decision': 'approved'}; var queryParams = { '_action': 'update'}; openidm.action('iga/governance/requests/' + requestId, 'POST', decision, queryParams); logger.info("Request " + requestId + " completed.");
|
Download the JSON file for this workflow here. Learn more about how to import or export workflows in workflow editor canvas. |
User create event workflow - catalog lookup
In this example, an administrator creates a workflow that:
-
Submits a request to add the
Data AnalystandSecurityroles to a newly created user when a user create event occurs. -
Looks up the two roles in the catalog.
Example
-
1 The Script node looks up two roles in the catalog. If the roles are present in the catalog, the script generates a request for roles.
Click to display
Submit Request for Rolesscriptlogger.info("Running user create event role workflow"); var content = execution.getVariables(); var requestId = content.get('id'); var failureReason = null; var userObj = null; var userId = null; // Read event user information from request object try { var requestObj = openidm.action('iga/governance/requests/' + requestId, 'GET', {}, {}); userObj = requestObj.request.common.blob.after; userId = userObj.userId; } catch (e) { failureReason = "Validation failed: Error reading request with id " + requestId; } // Define roles to request var roleNames = [ "Data Analyst", "Security" ]; // Look up roles in catalog var operand = []; for (var index in roleNames) { operand.push({operator: "EQUALS", operand: { targetName: "role.name", targetValue: roleNames[index] }}) } var body = { targetFilter: {operator: "OR", operand: operand}}; var catalog = openidm.action("iga/governance/catalog/search", "POST", body); var catalogResults = catalog.result; // Define request catalogs key var catalogBody = []; for (var idx in catalogResults) { var catalog = catalogResults[idx]; catalogBody.push({type: "role", id: catalog.id}) } // Define request payload var requestBody = { priority: "low", accessModifier: "add", justification: "Request submitted on user creation.", users: [ userId ], catalogs: catalogBody }; // Create requests try { openidm.action("iga/governance/requests", "POST", requestBody, {_action: "create"}) } catch (e) { failureReason = "Unable to generate requests for roles"; } // Update event request as final var decision = failureReason ? {'status': 'complete', 'outcome': 'cancelled', 'decision': 'rejected', 'comment': failureReason, 'failure': true} : {'status': 'complete', 'outcome': 'fulfilled', 'decision': 'approved'}; var queryParams = { '_action': 'update'}; openidm.action('iga/governance/requests/' + requestId, 'POST', decision, queryParams); logger.info("Request " + requestId + " completed.");
|
Download the JSON file for this workflow here. Learn more about how to import or export workflows in workflow editor canvas. |
User create event workflow - request two roles
In this example, an administrator creates a workflow that submits a separate request to add two roles to the newly created user. The script is triggered when a user create event occurs.
Example

-
1 The Script node gets a user ID from the event request and returns the user object.
Click to display
Get User ID from event requestscriptlogger.info("Get User Id From Event Request: UserCreateEventWithSteps"); var content = execution.getVariables(); var requestId = content.get('id'); // Read event user information from request object try { var requestObj = openidm.action('iga/governance/requests/' + requestId, 'GET', {}, {}); var userObj = requestObj.request.common.blob.after; execution.setVariable("userId", userObj.userId); } catch (e) { execution.setVariable("failureState", "Validation failed: Error reading request with id " + requestId); } -
2 The Script node makes a call to create the request. The payload contains two catalog IDs for the
Data AnalystandSecurityroles.Click to display
Submit request for rolesscriptlogger.info("Submit Role Requests: UserCreateEventWithSteps"); var content = execution.getVariables(); var userId = content.get('userId'); var failureState = content.get('failureState'); // Define request payload if (!failureState) { var requestBody = { priority: "low", accessModifier: "add", justification: "Request submitted on user creation: UserCreateEventWithSteps.", users: [ userId ], catalogs: [ { type: "role", id: "b9224b9ae535c9eab3f493dc206ac689dc9f6733b417d0def37f8969bef3e95dad7c812e4585056f698c7b3eb15c970dfa939eca8217741af187978359af13df"}, { type: "role", id: "e7ec51656c6f5ca297d82772a681e3069d8a7c24c04f15afaa8060856e17ad6e76f88bdeb635d4dc8c3d8faa462f376189322e85df379ae0721fcb2d28d1a222"} ] }; // Create requests try { openidm.action("iga/governance/requests", "POST", requestBody, {_action: "create"}) } catch (e) { execution.setVariable("failureState", "Unable to generate requests for roles"); } } -
3 The Script node completes the request.
Click to display
Finalize requestscriptlogger.info("Finalize Request: UserCreateEventWithSteps"); var content = execution.getVariables(); var requestId = content.get('requestId'); var failureState = content.get('failureState'); if (!failureState) { try { // Update event request as final var decision = {'status': 'complete', 'outcome': 'fulfilled', 'decision': 'approved'} var queryParams = { '_action': 'update'}; openidm.action('iga/governance/requests/' + requestId, 'POST', decision, queryParams); logger.info("Request " + requestId + " completed."); } catch (e) { execution.setVariable("failureState", "Unable to finalize request."); } } -
4 The Script node handles any failures.
Click to display
Failure handlerscriptlogger.info("Failure Handler: UserCreateEventWithSteps"); var content = execution.getVariables(); var requestId = content.get('requestId'); var failureReason = content.get('failureReason'); // Update event request as final if (failureReason) { var decision = {'status': 'complete', 'outcome': 'cancelled', 'decision': 'rejected', 'comment': failureReason, 'failure': true} var queryParams = { '_action': 'update'}; openidm.action('iga/governance/requests/' + requestId, 'POST', decision, queryParams); logger.info("Request " + requestId + " completed."); }The User create event workflow - send email, User create event workflow - catalog lookup, and User create event workflow - request two roles examples present
User createevent workflows. However, you can also adjust the workflows forUser updateevents. For example, in theUser createexamples, the user object returns the current or after state of the user:var userObj = requestObj.request.common.blob.afterUpdate events also have access to the before (or pre-update) state by referencing the object, which you can also use in your scripts.
var userObj = requestObj.request.common.blob.before
|
Download the JSON file for this workflow here. Learn more about how to import or export workflows in workflow editor canvas. |
User offboarding workflow
In this example, an administrator creates a workflow that triggers a series of offboarding tasks when a user update occurs, such as a status, manager, or department change.
The offboarding tasks include:
-
Setting up a replacement user ID for the inactive user. Depending on the case, the replacement user is the manager or former manager.
-
Setting up a replacement user ID as a delegate for the inactive user.
-
Replacing all instances of other users delegating to the inactive user with replacement user ID.
-
Replacing the inactive user with the replacement user ID as an app owner.
-
Replacing the inactive user with the replacement user ID as an entitlements owner.
-
Replacing the inactive user with the replacement user ID as a role owner.
-
Replacing the inactive user with the replacement user ID as an access request approver.
-
Replacing the inactive user with the replacement user ID as a violations approver.
Assumptions
-
Human Resources confirms the user’s change in status, manager, or department and has activated offboarding tasks to stakeholders.
Example
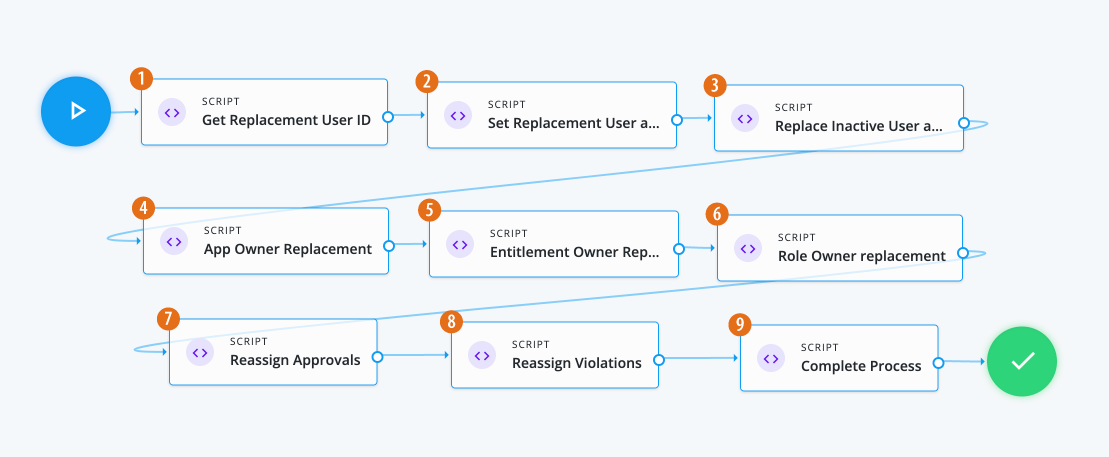
-
1 The Script node reads the event user information, including manager data from the request object.
Click to display the Get Replacement User ID script
// Insert logic to set ID of user who will be replacing inactive user logger.info("Getting ID of user who will be replacing inactive user."); var content = execution.getVariables(); var requestId = content.get('id'); // Read event user information from request object try { var requestObj = openidm.action('iga/governance/requests/' + requestId, 'GET', {}, {}); var previousUserObj = requestObj.request.common.blob.before; var currentUserObj = requestObj.request.common.blob.after; var userId = currentUserObj.id; var replacementId = null; // Check current value of manager, or previous manager if not present, to find a replacement user ID if (currentUserObj && currentUserObj.manager) { replacementId = currentUserObj.manager.id; } else if (previousUserObj && previousUserObj.manager) { replacementId = previousUserObj.manager.id; } execution.setVariable('userId', userId); execution.setVariable('replacementId', replacementId); } catch(e) { logger.info("Unable to get replacement user ID for inactive user " + userId); } -
2 The Script node adds the replacement user as a delegate for the inactive user so that they can act on their tasks.
Click to display Set Replacement User as Inactive User script
// Adding the Replacement User as a delegate for the Inactive User so that they will be able to act on their tasks var content = execution.getVariables(); var userId = content.get('userId'); var replacementId = content.get('replacementId'); // Read event user information from request object try { if (replacementId) { logger.info("Adding " + replacementId + " as inactive user " + userId + "'s delegate"); var payload = { proxyIds: [ "managed/user/" + replacementId ]}; var proxyUpdate = openidm.action('iga/governance/user/' + userId + '/set-proxy', 'POST', payload, {}); logger.info("Added " + replacementId + " as a delegate for inactive user " + userId); } } catch(e) { logger.info("Unable to add delegate for inactive user " + userId); } -
3 The Script node replaces all instances of other users delegating to the inactive user with the replacement user.
Click to display the Replace Inactive User as delegate script
// Replacing all instances of others delegating to the inactive user with replacement user // Before script: User A and User B both delegate to inactive User // After script: User A and User B both delegate to replacement User var content = execution.getVariables(); var userId = content.get('userId'); var replacementId = content.get('replacementId'); try { if (replacementId) { logger.info("Replacing instances of users delegating to inactive user " + userId + " with " + replacementId); // Get the list of users delegating to inactive user var inactiveUser = openidm.query("managed/alpha_user/" + userId + '/taskPrincipals', { _queryFilter: 'true' }, [ '_refResourceId' ]); var usersDelegatingToInactiveUser = inactiveUser.result; // Set the payloads var removePayload = { proxyIds: [ "managed/user/" + userId ]}; var addPayload = { proxyIds: [ "managed/user/" + replacementId ]}; // For each delegate, remove the inactive user and add the replacement user for (var i = 0; i < usersDelegatingToInactiveUser.length; i++) { var delegatingUserId = usersDelegatingToInactiveUser[i]._refResourceId; openidm.action("iga/governance/user/" + delegatingUserId + "/remove-proxy", "POST", removePayload, {}); openidm.action("iga/governance/user/" + delegatingUserId + "/set-proxy", "POST", addPayload, {}); } logger.info("Replaced instances of users delegating to inactive user " + userId + " with " + replacementId); } } catch(e) { logger.info("Unable to replace instances of users delegating to inactive user " + userId + " with " + replacementId); } -
4 The Script node invokes the APIs and executes business logic.
Click to display the App Owner Replacement script
/* Script nodes are used to invoke APIs or execute business logic. You can invoke governance APIs or IDM APIs. Refer to https://backstage.forgerock.com/docs/idcloud/latest/identity-governance/administration/workflow-configure.html for more details. Script nodes should return a single value and should have the logic enclosed in a try-catch block. Example: try { var requestObj = openidm.action('iga/governance/requests/' + requestId, 'GET', {}, {}); applicationId = requestObj.application.id; } catch (e) { failureReason = 'Validation failed: Error reading request with id ' + requestId; } */ var content = execution.getVariables(); var userId = content.get('userId'); var replacementId = content.get('replacementId'); var queryFilter = {"_queryFilter": "true"} var removeBody = []; var addBody = []; var applications = openidm.query('managed/alpha_user/' + userId + '/ownerOfApp', queryFilter, []); for(var app of applications['result']){ removeBody.push({ "operation": "remove", "field": "/ownerOfApp", "value": { "_ref": app._ref, "_refProperties": { "_id": app._id, "_rev": app._rev }, "_refResourceCollection": "managed/alpha_application", "_refResourceId": app._refResourceId } }) addBody.push({ "operation": "add", "field": "ownerOfApp/-", "value": { "_ref": app._ref, "_refProperties": {} } }) } openidm.patch('managed/alpha_user/'+ userId, null, removeBody) openidm.patch('managed/alpha_user/'+ replacementId, null, addBody) -
5 The Script node replaces the entitlement owner.
Click to display the Entitlement Owner Replacement script
/* Script nodes are used to invoke APIs or execute business logic. You can invoke governance APIs or IDM APIs. Refer to https://backstage.forgerock.com/docs/idcloud/latest/identity-governance/administration/workflow-configure.html for more details. Script nodes should return a single value and should have the logic enclosed in a try-catch block. Example: try { var requestObj = openidm.action('iga/governance/requests/' + requestId, 'GET', {}, {}); applicationId = requestObj.application.id; } catch (e) { failureReason = 'Validation failed: Error reading request with id ' + requestId; } */ var content = execution.getVariables(); var userId = content.get('userId'); var replacementId = content.get('replacementId'); var targetFilter = {"targetFilter": { "operator": "EQUALS", "operand": { "targetName": "entitlementOwner.id", "targetValue": userId } }} var entitlements = openidm.action('iga/governance/resource/search', 'POST', targetFilter, {}); for(var entitlement of entitlements['result']){ var body = openidm.action('iga/governance/resource/' + entitlement.id + '/glossary', 'GET', {}, {}) body.entitlementOwner = "managed/user/" + replacementId; openidm.action('iga/governance/resource/' + entitlement.id + '/glossary', 'PUT', body, {}) } -
6 The Script node replaces the role owner.
Click to display the Role Owner Replacement script
/* Script nodes are used to invoke APIs or execute business logic. You can invoke governance APIs or IDM APIs. Refer to https://backstage.forgerock.com/docs/idcloud/latest/identity-governance/administration/workflow-configure.html for more details. Script nodes should return a single value and should have the logic enclosed in a try-catch block. Example: try { var requestObj = openidm.action('iga/governance/requests/' + requestId, 'GET', {}, {}); applicationId = requestObj.application.id; } catch (e) { failureReason = 'Validation failed: Error reading request with id ' + requestId; } */ var content = execution.getVariables(); var userId = content.get('userId'); var replacementId = content.get('replacementId'); var targetFilter = {"targetFilter": { "operator": "EQUALS", "operand": { "targetName": "glossary.idx./role.roleOwner", "targetValue": "managed/user/"+ userId } }} var results = openidm.action('iga/governance/catalog/search', 'POST', targetFilter, {}); for(var result of results['result']){ var body = openidm.action('iga/governance/role/' + result.role.id + '/glossary', 'GET', {}, {}) body.roleOwner = "managed/user/" + replacementId; openidm.action('iga/governance/role/' + result.role.id + '/glossary', 'PUT', body, {}) } -
7 The Script node reassigns approvals.
Click to display the Reassign Approvals script
/* Script nodes are used to invoke APIs or execute business logic. You can invoke governance APIs or IDM APIs. Refer to https://backstage.forgerock.com/docs/idcloud/latest/identity-governance/administration/workflow-configure.html for more details. Script nodes should return a single value and should have the logic enclosed in a try-catch block. Example: try { var requestObj = openidm.action('iga/governance/requests/' + requestId, 'GET', {}, {}); applicationId = requestObj.application.id; } catch (e) { failureReason = 'Validation failed: Error reading request with id ' + requestId; } */ var content = execution.getVariables(); var userId = content.get('userId'); var replacementId = content.get('replacementId'); var targetFilter = { "targetFilter": { "operator": "AND", "operand": [ { "operator": "EQUALS", "operand": { "targetName": "decision.actors.active.id", "targetValue": "managed/user/" + userId } }, { "operator": "EQUALS", "operand": { "targetName": "decision.status", "targetValue": "in-progress" } } ] } } var results = null var params = { "_pageSize": 100, "_pageNumber": 0 } do{ results= openidm.action('iga/governance/requests/search', 'POST', targetFilter, params); for(var result of results['result']){ var phaseName = null; var actors = []; for(var user of result.decision.actors.active){ if(user.id === "managed/user/"+ userId){ phaseName = user.phase; actors.push({"id": "managed/user/" + replacementId, "permissions": user.permissions}) } } for(var user of result.decision.actors.active){ if(user.phase === phaseName && user.id !== "managed/user/"+ userId){ actors.push({"id": user.id, "permissions": user.permissions}) } } var body = { "updatedActors": actors }; if(phaseName){ openidm.action('/iga/governance/requests/' + result.id + '/phases/' + phaseName + '/reassign', 'POST', body, {}) } } } while (results.result.length > 0) -
8 The Script node reassigns violations.
Click to display the Reassign Violations script
/* Script nodes are used to invoke APIs or execute business logic. You can invoke governance APIs or IDM APIs. Refer to https://backstage.forgerock.com/docs/idcloud/latest/identity-governance/administration/workflow-configure.html for more details. Script nodes should return a single value and should have the logic enclosed in a try-catch block. Example: try { var requestObj = openidm.action('iga/governance/requests/' + requestId, 'GET', {}, {}); applicationId = requestObj.application.id; } catch (e) { failureReason = 'Validation failed: Error reading request with id ' + requestId; } */ logger.info('Script Task 3'); logger.info('User Task'); var content = execution.getVariables(); var userId = content.get('userId'); var replacementId = content.get('replacementId'); var targetFilter = { "targetFilter": { "operator": "AND", "operand": [ { "operator": "EQUALS", "operand": { "targetName": "decision.actors.active.id", "targetValue": "managed/user/" + userId } }, { "operator": "EQUALS", "operand": { "targetName": "decision.status", "targetValue": "in-progress" } } ] } } var results = null var params = { "_pageSize": 10, "_pageNumber": 0 } do{ results = openidm.action('iga/governance/violation/search', 'POST', targetFilter, params); if(results['result'].length > 0){ for(var result of results['result']){ var phaseName = null; var actors = []; for(var user of result.decision.actors.active){ if(user.id === "managed/user/"+ userId){ phaseName = user.phase; actors.push({"id": "managed/user/" + replacementId, "permissions": user.permissions}) } } for(var user of result.decision.actors.active){ if(user.phase === phaseName && user.id !== "managed/user/"+ userId){ actors.push({"id": user.id, "permissions": user.permissions}) } } var body = { "updatedActors": actors }; if(phaseName){ openidm.action('/iga/governance/violation/' + result.id + '/phases/' + phaseName + '/reassign', 'POST', body, {}) } } } } while(results.result.length > 0) -
9 The Script node completes the process and sets the ID of the user, replacing the inactive user.
Click to display the Complete Process script
// Insert logic to set ID of user who will be replacing inactive user logger.info("Completing request workflow."); var content = execution.getVariables(); var requestId = content.get('id'); // Read event user information from request object try { var requestObj = openidm.action('iga/governance/requests/' + requestId, 'GET', {}, {}); var decision = {'status': 'complete', 'decision': 'approved', 'outcome': 'fulfilled'}; var queryParams = { '_action': 'update'}; openidm.action('iga/governance/requests/' + requestId, 'POST', decision, queryParams); logger.info("Request " + requestId + " completed."); } catch(e) { logger.info("Error finalizing user inactive workflow") }
|
Download the JSON file for this workflow here. Learn more about how to import or export workflows in workflow editor canvas. |
Workflow using custom request type and form
In this example, an administrator wants to create a custom request type called Create New User to add new employees or contractors
to the system. Administrators or form creators need to carry out the following tasks:
After these tasks, the approver receives the request and can start processing the approval.
Assumptions
-
Each application has an application owner. You populate this value for each target application.
-
You have designated an end user or a test user who can approve the request.
-
You have configured notifications to the end user or test user properly to receive the emails.
Task 1: Create a custom request type
The initial task is to create a custom request type, Create New User that lets an administrator easily add a new user to the system.
The 'Create New User' request type has the following nonmodifiable properties:
-
userName. Username of the new user.
-
givenName. First name of the new user.
-
sn. Last name of the new user.
-
mail. Email address of the new user.
|
Currently, the only way to create a custom request type is through the API. The UI will support this functionality in a future release. |
-
Create a custom request type called
createUserusing the API. Enter the following command using curl to create your custom request type:Details
curl --location 'http://<hostname>/iga/governance/requestTypes' \ --header 'Authorization: Bearer token' \ --header 'Content-Type: application/json' \ --data '{ "id": "createNewUser", "schemas": { "custom": [ { "_meta": { "type": "system", "displayName": "Create User", "properties": { "userName": { "isRequired": true, "isInternal": false, "isMultiValue": false, "display": { "name": "User Name", "isVisible": true, "order": 1, "description": "The userName of the new user" } }, "givenName": { "isRequired": true, "isInternal": false, "isMultiValue": false, "display": { "name": "First Name", "isVisible": true, "order": 2, "description": "The first name of the new user" } }, "sn": { "isRequired": true, "isInternal": false, "isMultiValue": false, "display": { "name": "Last Name", "isVisible": true, "order": 3, "description": "The last name of the new user" } }, "mail": { "isRequired": true, "isInternal": false, "isMultiValue": false, "display": { "name": "Email Address", "isVisible": true, "order": 4, "description": "The email address of the new user" } } } }, "properties": { "userName": { "type": "text" }, "givenName": { "type": "text" }, "sn": { "type": "text" }, "mail": { "type": "text" } } } ] }, "workflow": { "id": "createNewUser", "type": "bpmn" }, "validation": { "source": "var validation = {\"errors\" : [], \"comments\" : []}; if (request.custom.userName == undefined || request.custom.givenName == undefined || request.custom.sn == undefined || request.custom.mail == undefined) { validation.errors.push(\"Must include all of userName, givenName, sn, and mail fields.\");} validation;" }, "custom": true, "displayName": "Create User", "uniqueKeys": [ "custom.userName" ], "notModifiableProperties": [] }'
Task 2: Create a form for the custom request type
Using the UI
-
In the Advanced Identity Cloud admin UI, click Governance > Forms.
-
On the New Form modal, click Custom request form, and then click Next.
-
On the Custom request form modal, enter the following:
Field Description Form
Enter a descriptive name for your form.
Description (optional)
Enter a general description for your form.
Request Type (optional)
Select a custom request type from the list. In this example, select Create User.
You can only assign one form to each request type. Once you create your form, you can go back and make edits to any of the previous form settings by clicking the ellipsis() in the top right, and then click Settings.
-
Use the Forms editor to create a form for your custom request type. For example, drag-and-drop four text fields onto the canvas for the fields and label them:
User Name,E-mail address,First Name, andLast Name.-
On the Forms editor canvas, drag-and-drop the Text node to the canvas, and fill in the properties in the right pane for the
User Namefield:User name text field properties
Field Description Key
Enter the key for the text string. You can retrieve this key from the curl step under the
schemasentry. For example, entercustom.userNameas the key.Label
Enter a general label for this text field. For example, enter
User Name.Description
Enter help text for the text field. The description appears below your text field.
Required
Click if this text field is required. In this example, click Required.
Read Only
Click to make the field non-editable.
Provide Default Value
Click Provide Default Value to assign a default value for this text field. In this example, skip this step.
Columns
Enter the number of columns for this text field. Values are from 1 to 12. For this example, enter
6.Offset
Enter the number of columns to offset from the left for this text field. Values are from 0 to 11. For this example, enter
0.Use validation
Click if you want to validate the text field using a regular expression. In this example, skip this step.
Regex
Enter a regular expression to validate the text field.
Error message
Enter an error message when the regular expression fails.
-
On the Forms editor canvas, drag-and-drop the Text node to the canvas, and fill in the properties in the right pane for the
E-mail addressfield:E-mail address text field properties
Field Description Key
Enter the key for the text string. You can retrieve this key from the curl step under the
schemasentry. For example, entercustom.mailas the key.Label
Enter a general label for this text field. For example, enter
E-mail address.Description
Enter help text for the text field. The description appears below your text field.
Required
Click if this text field is required. In this example, click Required.
Read Only
Click to make the field non-editable.
Provide Default Value
Click Provide Default Value to assign a default value for this text field. In this example, skip this step.
Columns
Enter the number of columns for this text field. Values are from 1 to 12. For this example, enter
6.Offset
Enter the number of columns to offset from the left for this text field. Values are from 0 to 11. For this example, enter
0.Use Validation
Click if you want to validate the text field using a regular expression. In this example, skip this step.
Regex
Enter a regular expression to validate the text field.
Error message
Enter an error message when the regular expression fails.
-
On the Forms editor canvas, drag-and-drop the Text node to the canvas, and fill in the properties in the right pane for the
First Namefield:First name text field properties
Field Description Key
Enter the key for the text string. You can retrieve this key from the curl step under the
schemasentry. For example, entercustom.givenNameas the key.Label
Enter a general label for this text field. For example, enter
First Name.Description
Enter help text for the text field. The description appears below your text field.
Required
Click if this text field is required. In this example, click Required.
Read Only
Click to make the field non-editable.
Provide Default Value
Click Provide Default Value to assign a default value for this text field. In this example, skip this step.
Columns
Enter the number of columns for this text field. Values are from 1 to 12. For this example, enter
6.Offset
Enter the number of columns to offset from the left for this text field. Values are from 0 to 11. For this example, enter
0.Use validation
Click if you want to validate the text field using a regular expression. In this example, skip this step.
Regex
Enter a regular expression to validate the text field.
Error message
Enter an error message when the regular expression fails.
-
On the Forms editor canvas, drag-and-drop the Text node to the canvas, and fill in the properties in the right pane for the
Last Namefield:Last name text field properties
Field Description Key
Enter the key for the text string. You can retrieve this key from the curl step under the
schemasentry. For example, entercustom.snas the key.Label
Enter a general label for this text field. For example, enter
Last Name.Description
Enter help text for the text field. The description appears below your text field.
Required
Click if this text field is required. In this example, click Required.
Read Only
Click to make the field non-editable.
Provide Default Value
Click Provide Default Value to assign a default value for this text field. In this example, skip this step.
Columns
Enter the number of columns for this text field. Values are from 1 to 12. For this example, enter
6.Offset
Enter the number of columns to offset from the left for this text field. Values are from 0 to 11. For this example, enter
0.Use validation
Click if you want to validate the text field using a regular expression. In this example, skip this step.
Regex
Enter a regular expression to validate the text field.
Error message
Enter an error message when the regular expression fails.
-
-
Click Save.

Using the API
-
Enter the following curl command to create your form for the custom request type:
Details
curl --location 'http://<hostname>/iga/governance/requestForms' \ --header 'Authorization: Bearer token' \ --header 'Content-Type: application/json' \ --data '{ "name": "Create New User", "type": "request", "description": "Form for creation of a new user", "categories": { "applicationType": null, "objectType": null, "operation": "create" }, "form": { "fields": [ { "id": "dd155b12-fb27-44e5-b4d6-476587b31a71", "model": "custom.userName", "type": "string", "label": "User Name", "description": "User name of the new user", "validation": { "required": true }, "layout": { "columns": 6, "offset": 0 } }, { "id": "88c73e69-86b1-453f-878b-527ceddeccf4", "model": "custom.mail", "type": "string", "label": "E-mail address", "description": "E-mail address of the new user", "validation": { "required": true }, "layout": { "columns": 6, "offset": 0 } }, { "id": "683892f9-2c13-41c7-a1cc-fcf38d7d0183", "model": "custom.givenName", "type": "string", "label": "First Name", "description": "First name of the new user", "validation": { "required": true }, "layout": { "columns": 6, "offset": 0 } }, { "id": "76fd5526-2ade-42a9-9b03-b6899e65aa31", "model": "custom.sn", "type": "string", "label": "Last Name", "description": "Last name of the new user", "validation": { "required": true }, "layout": { "columns": 6, "offset": 0 } } ] } }' -
Enter the following curl command to assign the form to the custom request type.
Details
curl --location 'http://<hostname>/iga/governance/requestFormAssignments?_action=assign' \ --header 'Authorization: Bearer token' \ --header 'Content-Type: application/json' \ --data '{ "formId": "b309b500-112c-4e6d-b832-a902f91362a3", "objectId": "requestType/createNewUser" }'
Task 3: Create a workflow to use the custom request type and form
Create a new workflow called Create New User to use the custom request type and form.
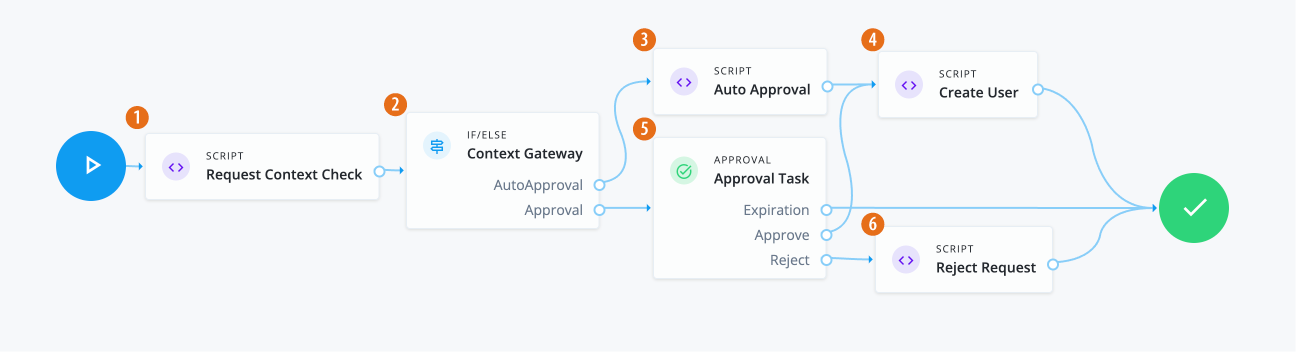
-
1 Use a Script node to do a context check for the request.
Click to display the Request Context Check script
var content = execution.getVariables(); var requestId = content.get('id'); var context = null; var skipApproval = false; try { var requestObj = openidm.action('iga/governance/requests/' + requestId, 'GET', {}, {}); if (requestObj.request.common.context) { context = requestObj.request.common.context.type; if (context == 'admin') { skipApproval = true; } } } catch (e) { logger.info("Request Context Check failed "+e.message); } logger.info("Context: " + context); execution.setVariable("context", context); execution.setVariable("skipApproval", skipApproval); -
2 Use an IF/ELSE node and name it
Context Gateway. IfskipApproval==true, route it to theAuto Approvalnode. IfskipApproval==false, route it to theApproval Tasknode. -
3 Use a Script node for the
Auto Approvaltask.Click to display the Auto Approval script
var content = execution.getVariables(); var requestId = content.get('id'); var context = content.get('context'); var queryParams = { "_action": "update" } try { var decision = { "decision": "approved", "comment": "Request auto-approved due to request context: " + context } openidm.action('iga/governance/requests/' + requestId, 'POST', decision, queryParams); } catch (e) { var failureReason = "Failure updating decision on request. Error message: " + e.message; var update = {'comment': failureReason, 'failure': true}; openidm.action('iga/governance/requests/' + requestId, 'POST', update, queryParams); } -
4 Use a Script node to create a new user using the custom request type.
Click to display the Create User script
logger.info("Creating User"); var content = execution.getVariables(); var requestId = content.get('id'); var failureReason = null; try { var requestObj = openidm.action('iga/governance/requests/' + requestId, 'GET', {}, {}); logger.info("requestObj: " + requestObj); } catch (e) { failureReason = "Provisioning failed: Error reading request with id " + requestId; } if(!failureReason) { try { var request = requestObj.request; var payload = { "userName": request.custom.userName, "givenName": request.custom.givenName, "sn": request.custom.sn, "mail": request.custom.mail, "password": 'DemoP@ssword1' }; /** Create new user **/ var result = openidm.create('managed/alpha_user', null, payload, queryParams); /** Send new user email **/ var body = { subject: "Welcome " + payload.givenName + " " + payload.sn + "!", to: payload.mail, body: "Your new user has been created in the system.\n\nUsername: " + payload.userName + "\nPassword: " + payload.password + "\n\nLogin to your account here: https://openam-gov-dev-4.forgeblocks.com/am/XUI/?realm=/alpha#/", object: {} }; openidm.action("external/email", "send", body); } catch (e) { failureReason = "Creating user failed: Error during creation of user " + request.custom.userName + ". Error message: " + e.message; } var decision = {'status': 'complete', 'decision': 'approved'}; if (failureReason) { decision.outcome = 'not provisioned'; decision.comment = failureReason; decision.failure = true; } else { decision.outcome = 'provisioned'; } var queryParams = { '_action': 'update'}; openidm.action('iga/governance/requests/' + requestId, 'POST', decision, queryParams); logger.info("Request " + requestId + " completed."); } -
5 The Approval node assigns an approval task to users and roles. The node chains tasks in conjunction with a Switch node to implement serial or parallel flows.
Click to display the Approval Task properties
Item Description Name
Approval TaskApprovers
Two options are available:
-
Add users and roles manually, such as
Role Owner, and define theApprovertype. For this example, click . In the Approver Type field, select User, and then select a user. Give the approvers all permissions below. Click Add.-
Approve
-
Reject
-
Reassign
-
Modify
-
Comment
-
-
Define users using a script:
Form
Select a form to present to the reviewer.
-
Dynamic form selection. Skip this step
-
Click Choose a form and select
Create New User.
Expiration Settings
Options are:
-
Reject request. For this example, you can select this option.
-
Reassign request
-
Do nothing
Notification Settings
Options are:
-
Assignment notification and email templates, such as
requestAssigned. -
Reassignment notification and email templates, such as
requestReassigned. -
Assignee reminders and email templates, such as
requestReminder.-
Sends every number of time periods, such as
3 day(s).
-
-
Escalation notifications and email templates, such as
requestEscalated.-
Send every number of day(s), such as
5 day(s). -
Send to
Send escalation totoUserand selectUser.
-
-
Expiration notification and email templates, such as
requestExpired.-
Send a configured number of days before expiration.
-
-
-
6 Use the Script node to process any request rejections.
Click to display the Reject Request script
logger.info("Rejecting request"); var content = execution.getVariables(); var requestId = content.get('id'); logger.info("Execution Content: " + content); var requestIndex = openidm.action('iga/governance/requests/' + requestId, 'GET', {}, {}); var decision = {'outcome': 'denied', 'status': 'complete', 'decision': 'rejected'}; var queryParams = { '_action': 'update'}; openidm.action('iga/governance/requests/' + requestId, 'POST', decision, queryParams);
|
Download the JSON file for this workflow here. Learn more about how to import or export workflows in workflow editor canvas. |
Task 4: Submit the custom request
You can enter a curl command to submit a Create New User request.
curl --location 'https://<hostname>/iga/governance/requests/createNewUser' \
--header 'Authorization: Bearer token' \
--header 'Content-Type: application/json' \
--data-raw '{
"custom": {
"userName": "acabby",
"givenName": "Amy",
"sn": "Cabby",
"mail": "amy.cabby@example.com"
}
}'Example Response
{
"id": "d289d1dd-b376-4860-a3d9-db3dd29702b2",
"requester": {
"givenName": "Joe",
"id": "managed/teammember/ce6ef368-c050-4131-bc07-32aa4f58a785",
"mail": "joe.admin@example.com",
"sn": "Admin",
"userName": "jadmin"
},
"requestType": "createNewUser",
"request": {
"custom": {
"userName": "acabby",
"givenName": "Amy",
"sn": "Cabby",
"mail": "amy.cabby@example.com"
},
"_rev": 1,
"common": {
"isDraft": false,
"context": {
"type": "request"
}
}
},
"decision": {
"status": "in-progress",
"decision": null,
"type": "request",
"outcome": null,
"startDate": "2024-09-09T15:53:49+00:00",
"completionDate": null,
"deadline": null,
"comments": [],
"actors": {
"active": [
{
"givenName": "Frank",
"id": "managed/teammember/ce6ef368-c050-4131-bc07-32aa4f58a785",
"mail": "frank.york@exampe.com",
"sn": "York",
"userName": "fyork",
"permissions": {
"approve": false,
"comment": true,
"modify": false,
"reassign": false,
"reject": false,
"cancel": false,
"fulfill": false,
"deny": false
}
}
],
"inactive": [],
"actorTags": [
"activeId=managed%2Fteammember%2Fce6ef368-c050-4131-bc07-32aa4f58a785&phase=",
"phase=&activeId=managed%2Fteammember%2Fce6ef368-c050-4131-bc07-32aa4f58a785"
]
}
}
}Approver Task: Process the request
-
Once the administrator submits the request, the approver (for example, "Frank York") receives a notification email.
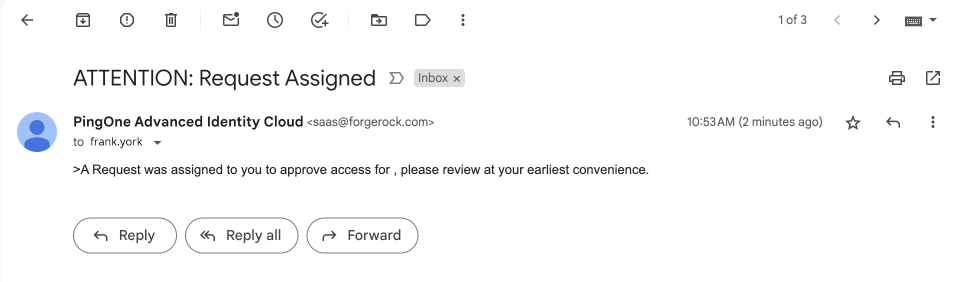
-
The approver logs in to the Advanced Identity Cloud end-user UI and clicks Pending Approvals.
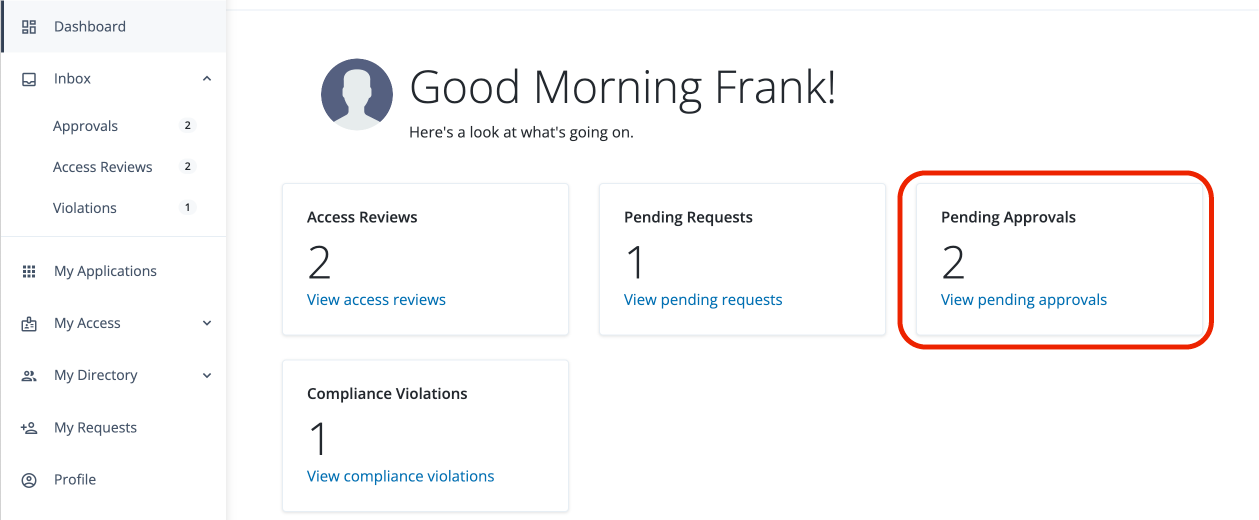
-
The approver can carry out different tasks: click Approve, Reject, or ellipsis () to Forward, Add Comment, or View Details.
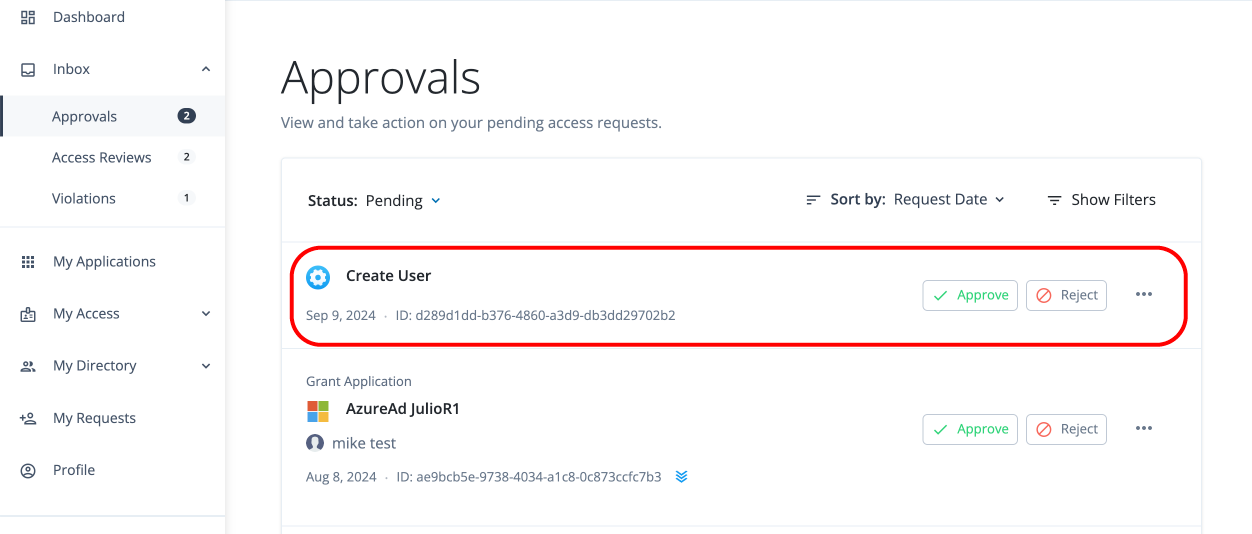
-
The approver clicks View Details.
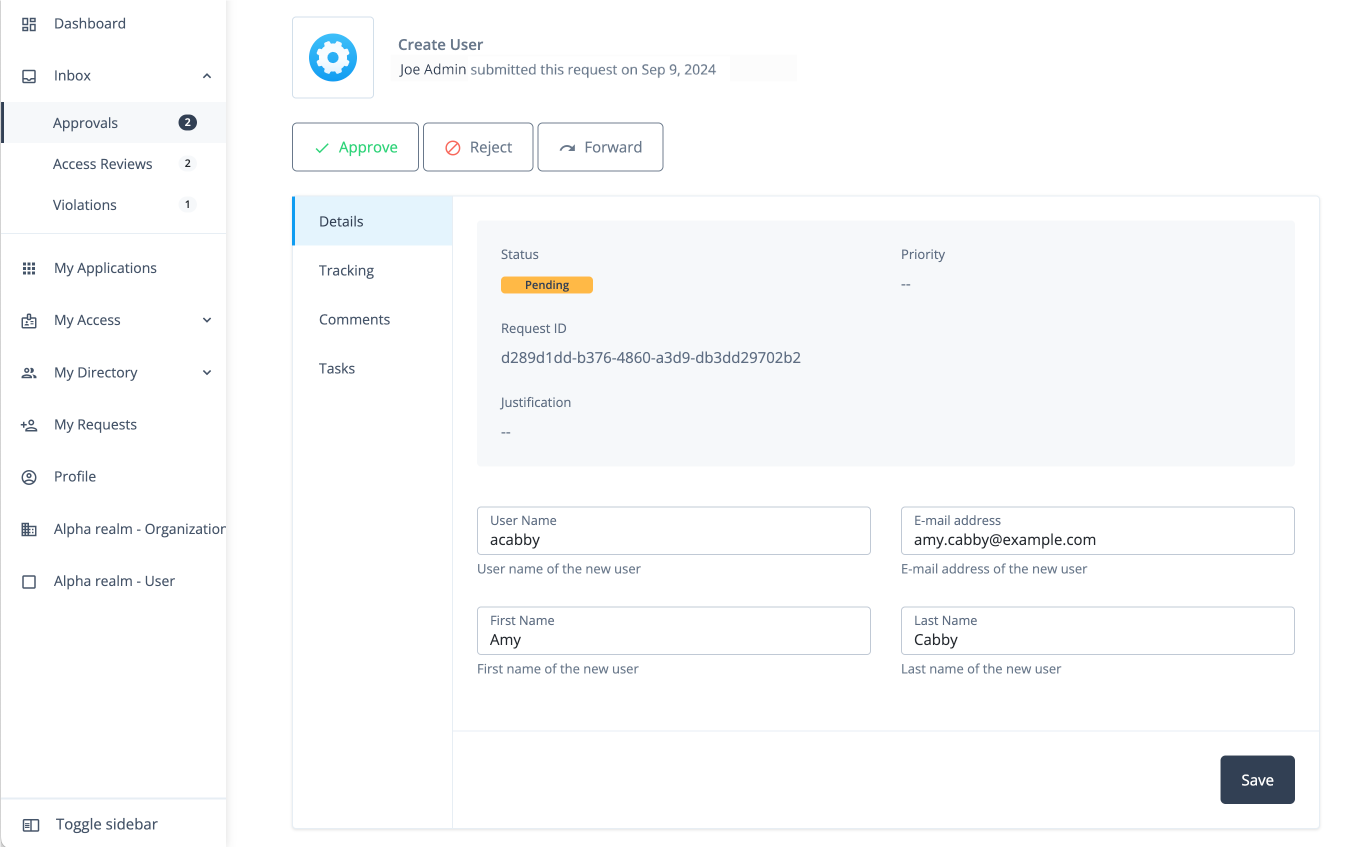
Workflow using organization custom request type and form
In this example, an administrator wants to create a custom request type called Create Organization to add new organizations
to the system. Administrators and form creators need to carry out the following tasks:
After these tasks, the approver receives the request and can start reviewing it.
Assumptions
-
You have designated an end user who can function as an approver and review the request.
-
You have configured notification emails to alert the approver of incoming requests.
Task 1: Create an organization request type
The initial task is to create a custom request type, Create Organization that lets an administrator easily add a new organization to the system.
|
Currently, the only way to create a custom request type is through the API. The UI will support this functionality in a future release. |
-
Create a custom request type called
Create Organizationusing the API. Enter the following command using curl to create your custom request type:Details
curl --location 'http://<hostname>/iga/governance/requestTypes' \ --header 'Authorization: Bearer token' \ --header 'Content-Type: application/json' \ --data '{ "id": "createOrganization", "schemas": { "common": [ { "_meta": { "type": "system", "displayName": "commonRequest", "properties": { "justification": { "isRequired": false, "isInternal": true, "display": { "name": "Justification", "isVisible": true, "order": 3, "description": "The reason for the request" } }, "externalRequestId": { "isRequired": false, "isInternal": true, "isChangable": false, "display": { "name": "External Request ID", "isVisible": true, "order": 4, "description": "The external ID for the request" } }, "requestIdPrefix": { "isRequired": false, "isInternal": true, "display": { "name": "Request ID prefix", "isVisible": true, "order": 5, "description": "Prefix for the request ID" } }, "isDraft": { "isRequired": false, "isInternal": true }, "priority": { "isRequired": false, "display": { "name": "Priority", "isVisible": true, "order": 6, "description": "The priority of the reqeust" }, "text": { "defaultValue": "low" } }, "expiryDate": { "isRequired": false, "isInternal": true, "display": { "name": "Request expiration date", "isVisible": true, "order": 7, "description": "User provided date on which the request will cancel" } }, "context": { "isRequired": false, "isInternal": true, "isMultiValue": false, "display": { "name": "Context", "isVisible": true, "order": 1, "description": "The context of the request" } }, "workflowId": { "isRequired": false, "isInternal": true, "isChangable": false, "display": { "name": "BPMN workflow ID", "isVisible": true, "order": 7, "description": "The ID key of the BPMN workflow" } }, "blob": { "isRequired": false, "isInternal": true } } }, "properties": { "justification": { "type": "text" }, "externalRequestId": { "type": "text" }, "requestIdPrefix": { "type": "text" }, "isDraft": { "type": "boolean" }, "priority": { "type": "text" }, "expiryDate": { "type": "text" }, "context": { "type": "object" }, "workflowId": { "type": "text" }, "blob": { "type": "object" } } } ], "custom": [ { "_meta": { "type": "system", "displayName": "Create Organization", "properties": { "name": { "isRequired": true, "isInternal": false, "isMultiValue": false, "display": { "name": "Name", "isVisible": true, "order": 1, "description": "The name of the organization" } }, "description": { "isRequired": false, "isInternal": false, "isMultiValue": false, "display": { "name": "Description", "isVisible": true, "order": 2, "description": "The description of the organization being created" } }, "parent": { "isRequired": false, "isInternal": false, "isMultiValue": false, "display": { "name": "Parent Organization", "isVisible": true, "order": 3, "description": "The ID of the parent organization for this organization" } }, "admins": { "isRequired": false, "isInternal": false, "isMultiValue": true, "display": { "name": "Organization Administrators", "isVisible": true, "order": 4, "description": "The IDs of the users who will be this organization's admins" } }, "includeSelfAdmin": { "isRequired": false, "isInternal": false, "isMultiValue": false, "display": { "name": "Include Self as Admin", "isVisible": true, "order": 4, "description": "If selected, include requester as an organization admin" } } } }, "properties": { "name": { "type": "text" }, "description": { "type": "text" }, "parent": { "type": "text" }, "admins": { "type": "text" }, "includeSelfAdmin": { "type": "boolean" } } } ] }, "workflow": { "id": "createOrganization", "type": "bpmn" }, "validation": { "source": "var validation = {\"errors\" : [], \"comments\" : []}; if (request.custom.name == undefined) { validation.errors.push(\"Must include all name field.\");} validation;" }, "custom": true, "displayName": "Create Organization", "uniqueKeys": [ "custom.name" ], "notModifiableProperties": [] }'
Task 2: Create a form for the organization request type
-
In the Advanced Identity Cloud admin UI, click Governance > Forms.
-
On the New Form modal, click Custom request form, and then click Next.
-
On the Custom request form modal, enter the following:
Field Description Form
Enter a descriptive name for your form. In this example, enter:
Create Organization.Description (optional)
Enter a general description for your form. In this example, enter:
Form used to create a new organization.Request Type (optional)
Click and select a request type for the form. In this example, enter:
Create Organization.You can only assign one form to each request type. Once you create your form, you can go back and make edits to any of the previous form settings by clicking the ellipsis() in the top right, and then click Settings.
-
Use the Forms editor to create a form for your custom request type. For example, drag-and-drop five form fields onto the canvas for the fields and label them:
-
On the Forms editor canvas, drag-and-drop the Text node to the canvas, and fill in the properties in the right pane for the
Organization Namefield:Organization nametext field propertiesField Description Key
Enter the key for the text string. You can retrieve this key from the example in Task 1 under the
schemasentry. For example, entercustom.nameas the key.Label
Enter a general label for this text field. For example, enter
User Name.Description
Enter help text for the text field. The description appears below your text field. Enter
Name of the organization.Required
Click if this text field is required. In this example, click Required.
Read Only
Click to make the field non-editable. In this example, skip this step.
Provide Default Value
Click Provide Default Value to assign a default value for this text field. In this example, skip this step.
Columns
Enter the number of columns for this text field. Values are from 1 to 12. For this example, use the default (12 columns).
Offset
Enter the number of columns to offset from the left for this text field. Values are from 0 to 11. For this example, use the default (
0).Use validation
Click if you want to validate the text field using a regular expression. In this example, skip this step.
-
On the Forms editor canvas, drag-and-drop the Textarea node to the canvas, and fill in the properties in the right pane for the
Descriptionfield:Descriptiontextarea field propertiesField Description Key
Enter the key for the text string. You can retrieve this key from the example in Task 1 under the
schemasentry. For example, entercustom.descriptionas the key.Label
Enter a general label for this text field. For example, enter
Description.Description
Enter help text for the text field. The description appears below your text field.
Required
Click if this text field is required. In this example, skip this step.
Read Only
Click to make the field non-editable. In this example, skip this step.
Provide Default Value
Click Provide Default Value to assign a default value for this text field. In this example, skip this step.
Columns
Enter the number of columns for this text field. Values are from 1 to 12. For this example, use the default (12 columns).
Offset
Enter the number of columns to offset from the left for this text field. Values are from 0 to 11. For this example, use the default (
0).Use Validation
Click if you want to validate the text field using a regular expression. In this example, skip this step.
-
On the Forms editor canvas, drag-and-drop the Select node to the canvas, and fill in the properties in the right pane for the
Parent Organizationfield:Parent OrganizationSelect field propertiesField Description Key
Enter the key for the text string. You can retrieve this key from the example in Task 1 under the
schemasentry. For example, entercustom.parentas the key.Label
Enter a general label for this text field. For example, enter
Parent Organization (optional).Description
Enter help text for the text field. The description appears below your text field.
Required
Click if this text field is required. In this example, skip this step.
Read Only
Click to make the field non-editable. In this example, skip this step.
Options
Click to manually add enumerated values for your Select menu options:
-
Click .
-
On the Add Option modal, do the following:
-
Value: enter a value for the option field. For example, in the Advanced Identity Cloud end-user UI, click Identities > Manage > <realm> realm - Organizations and search for an organization, such as the
Engineeringorganization, you can view the ID asa27172ad-8adf-425e-a93f-ebd7c7aaa776. Enter this managed organization ID in the Value field. -
Label: enter a label for the option field. In this example, enter:
Engineering. -
Click Selected by default to make the option a default enumerated value for the field.
-
-
Click Add.
-
Repeat the steps 1–3 again to add more Select menu options.
-
Provide Default Value
Click Provide Default Value to assign a default value for this text field. In this example, skip this step.
Columns
Enter the number of columns for this text field. Values are from 1 to 12. In this example, use the default (12).
Offset
Enter the number of columns to offset from the left for this text field. Values are from 0 to 11. For this example, enter
0.Use validation
Click if you want to validate the text field using a regular expression. In this example, skip this step.
Regex
Enter a regular expression to validate the text field.
Error message
Enter an error message when the regular expression fails.
-
-
On the Forms editor canvas, drag-and-drop the Select node to the canvas, and fill in the properties in the right pane for the
Organization Adminsfield:Organization AdminsSelect field propertiesField Description Key
Enter the key for the text string. You can retrieve this key from the example in Task 1 under the
schemasentry. For example, entercustom.adminsas the key.Label
Enter a general label for this text field. For example, enter
Organization Admins (optional).Description
Enter help text for the text field. The description appears below your text field.
Required
Click if this text field is required. In this example, skip this step.
Read Only
Click to make the field non-editable. In this example, skip this step.
Options
Click to manually add enumerated values for your Select menu options:
-
Click .
-
On the Add Option modal, do the following:
-
Value: enter a value for the option field. For example, in the Advanced Identity Cloud end-user UI, click Identities > Manage > <realm> realm - Users and search for a user, such as
Frank York. You can view the ID asc51d9ee1-43b3-49d1-8742-cbb33842a5cc. Enter this managed user ID in the Value field. -
Label: enter a label for the option field. In this example, enter an admin user, such as
Frank York. -
Click Selected by default to make the option a default enumerated value for the field. In this example, skip this step.
-
-
Click Add.
-
Repeat the steps 1–3 again to add more options.
-
Provide Default Value
Click Provide Default Value to assign a default value for this text field. In this example, skip this step.
Columns
Enter the number of columns for this text field. Values are from 1 to 12. In this example, use the default (12).
Offset
Enter the number of columns to offset from the left for this text field. Values are from 0 to 11. In this example, use the default (0).
Use validation
Click if you want to validate the text field using a regular expression. In this example, skip this step.
-
-
On the Forms editor canvas, drag-and-drop the Checkbox node to the canvas, and fill in the properties in the right pane for the
Include yourself as administratorfield:Include yourself as administratorCheckbox field propertiesField Description Key
Enter the key for the text string. You can retrieve this key from the example in Task 1 under the
schemasentry. For example, entercustom.includeSelfAdminas the key.Label
Enter a general label for this text field. For example, enter
Include yourself as administrator.Description
Enter help text for the text field. The description appears below your text field.
Read Only
Click to make the field non-editable. In this example, skip this step.
Provide Default Value
Click Provide Default Value to assign a default value for this text field. In this example, skip this step.
Columns
Enter the number of columns for this text field. Values are from 1 to 12. In this example, use the default (12).
Offset
Enter the number of columns to offset from the left for this text field. Values are from 0 to 11. In this example, use the default (0).
Use validation
Click if you want to validate the text field using a regular expression. In this example, skip this step.
-
-
Click Preview to review your form.
-
Click Save.
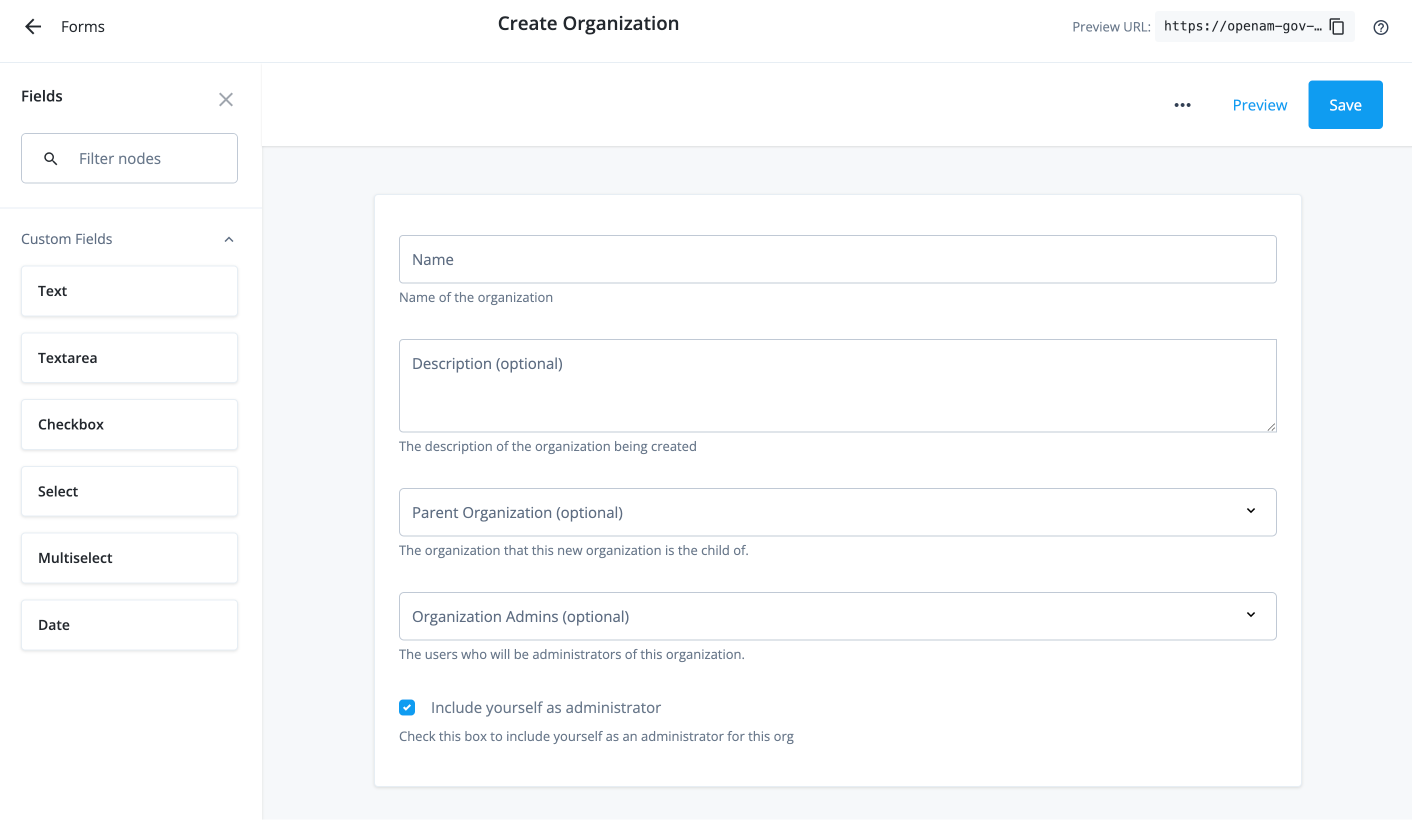
Task 3: Create a workflow to use the organization request type and form
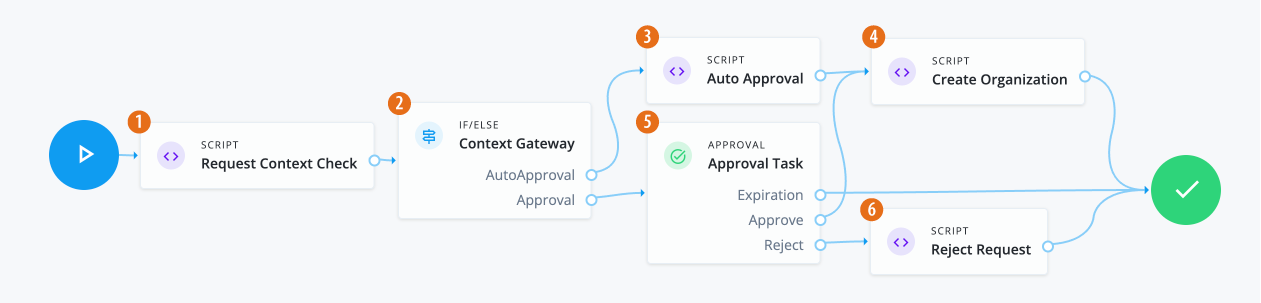
-
1 Use a Script node to do a context check for the request.
Click to display the Request Context Check script
var content = execution.getVariables(); var requestId = content.get('id'); var context = null; var skipApproval = false; try { var requestObj = openidm.action('iga/governance/requests/' + requestId, 'GET', {}, {}); if (requestObj.request.common.context) { context = requestObj.request.common.context.type; if (context == 'admin') { skipApproval = true; } } } catch (e) { logger.info("Request Context Check failed "+e.message); } logger.info("Context: " + context); execution.setVariable("context", context); execution.setVariable("skipApproval", skipApproval); -
2 Use an IF/ELSE node and name it
Context Gateway. IfskipApproval==true, route it to theAuto Approvalnode. IfskipApproval==false, route it to theApproval Tasknode. -
3 Use a Script node for the
Auto Approvaltask.Click to display the Auto Approval script
var content = execution.getVariables(); var requestId = content.get('id'); var context = content.get('context'); var queryParams = { "_action": "update" } try { var decision = { "decision": "approved", "comment": "Request auto-approved due to request context: " + context } openidm.action('iga/governance/requests/' + requestId, 'POST', decision, queryParams); } catch (e) { var failureReason = "Failure updating decision on request. Error message: " + e.message; var update = {'comment': failureReason, 'failure': true}; openidm.action('iga/governance/requests/' + requestId, 'POST', update, queryParams); } -
4 Use a Script node to create a new organization using the custom request type.
Click to display the Create Organization script node
logger.info("Creating Organization"); var content = execution.getVariables(); var requestId = content.get('id'); var failureReason = null; try { var requestObj = openidm.action('iga/governance/requests/' + requestId, 'GET', {}, {}); logger.info("requestObj: " + requestObj); } catch (e) { failureReason = "Provisioning failed: Error reading request with id " + requestId; } if(!failureReason) { try { var request = requestObj.request; var payload = { "name": request.custom.name, "description": request.custom.description, "admins": [] }; if (request.custom.parent) { payload.parent = { "_ref": "managed/alpha_organization/" + request.custom.parent, "_refProperties": {} } } if (request.custom.admins) { request.custom.admins.forEach(function(admin) { payload.admins.push({ "_ref": "managed/alpha_user/" + admin, "_refProperties": {}}); }); } if (request.custom.includeSelfAdmin) { payload.admins.push({ "_ref": "managed/alpha_user/" + requestObj.requester.id.split('/')[2], "_refProperties": {}}); } /** Create new org **/ var result = openidm.create('managed/alpha_organization', null, payload); /** Send new org admins email **/ payload.admins.forEach(function(admin) { var id = admin._ref var adminUser = openidm.read(id); var body = { subject: "Welcome " + adminUser.givenName + " " + adminUser.sn + "!", to: adminUser.mail, body: "You have been added as an administrator for a new organization.\nOrganization: " + payload.name + "", object: {} }; openidm.action("external/email", "send", body); }); } catch (e) { failureReason = "Creating org failed: Error during creation of organization " + request.custom.name + ". Error: " + e.message; } var decision = {'status': 'complete', 'decision': 'approved'}; if (failureReason) { decision.outcome = 'not provisioned'; decision.comment = failureReason; decision.failure = true; } else { decision.outcome = 'provisioned'; } var queryParams = { '_action': 'update'}; openidm.action('iga/governance/requests/' + requestId, 'POST', decision, queryParams); logger.info("Request " + requestId + " completed."); } -
5 The Approval node assigns an approval task to users and roles. The node chains tasks in conjunction with a Switch node to implement serial or parallel flows.
Click to display the Approval Task properties
Item Description Name
Approval TaskApprovers
Two options are available:
-
Add users who can approve the request, such as
fyork, and define theApprovertype. For this example, click . In the Approver Type field, select User, and then select a user. Give the approver all permissions below. Click Add.-
Approve
-
Reject
-
Reassign
-
Modify
-
Comment
-
-
Define users using a script:
Form
Select a form to present to the reviewer.
-
Dynamic form selection. Skip this step
-
Click Choose a form and select
Create Organization.
Expiration Settings
Options are:
-
Reject request. For this example, you can select this option.
-
Reassign request
-
Do nothing
Notification Settings
Options are:
-
Assignment notification and email templates, such as
requestAssigned. -
Reassignment notification and email templates, such as
requestReassigned. -
Assignee reminders and email templates, such as
requestReminder.-
Sends every number of time periods, such as
3 day(s).
-
-
Escalation notifications and email templates, such as
requestEscalated.-
Send every number of day(s), such as
5 day(s). -
Send to
Send escalation totoUserand selectUser. -
Send escalation to: Select User and select a user to handle the escalation.
-
-
Expiration notification and email templates, such as
requestExpired.-
Send a configured number of days before expiration.
-
-
-
6 Use the Script node to process any request rejections.
Click to display the Reject Request script
logger.info("Rejecting request"); var content = execution.getVariables(); var requestId = content.get('id'); logger.info("Execution Content: " + content); var requestIndex = openidm.action('iga/governance/requests/' + requestId, 'GET', {}, {}); var decision = {'outcome': 'denied', 'status': 'complete', 'decision': 'rejected'}; var queryParams = { '_action': 'update'}; openidm.action('iga/governance/requests/' + requestId, 'POST', decision, queryParams);
|
Download the JSON file for this workflow here. Learn more about how to import or export workflows in workflow editor canvas. |
Task 4: Submit the organization request
You can enter a curl command to submit a Create Organization request.
curl --location 'https://<hostname>/iga/governance/requests/createOrganization?_action=publish' \
--header 'Authorization: Bearer token' \
--header 'Content-Type: application/json' \
--data '{
"custom": {
"name": "IGA Organization",
"description": "Organization for all IGA members.",
"parent": "a27172ad-8adf-425e-a93f-ebd7c7aaa776",
"admins": [
"c51d9ee1-43b3-49d1-8742-cbb33842a5cc",
"e140e883-8ec7-4201-889d-f77ea118fcf3",
"adeb08c0-f3b7-44eb-a31a-a31fba305a40"
],
"includeSelfAdmin": false
},
"common": {
}
}'|
Currently, you must include the |
Request access
After you configure access requests, end users can request access to resources on the Advanced Identity Cloud end-user UI. An end user can request access to resources for themselves or for others. They can also request access to multiple resources in the same request.
Access request landing page
The access request landing page displays the access requests an end user submits for themselves and for others.
Learn more about how to sign on to the Advanced Identity Cloud end-user UI in end-user screens.

-
1 Click My Requests from the Advanced Identity Cloud end-user UI to display the access requests landing page.
-
2 Filter access requests by status:
-
Pending — The access request is pending approval by the approver(s).
-
Completed — The approver has either
ApprovedorRejectedthe request. Click a request to view the approver’s decision. -
Canceled — Requests that expire or you cancel.
-
-
3 Click Sort By and sort the request by an attribute in ascending or descending order.
-
4 Click Show Filters to filter by attributes or priority. An end user sets the priority when they create the request.
-
5 To view the details of a submitted request, click the request.
Create request
There are many options an end user can select when creating a request.
The following sections breakout the request process for readability purposes.
Start request
-
From the access request landing page, click + New Request.
-
Select one of the following:
-
Myself — Create a request for yourself.
-
Other Users — Select up to 10 users to submit a request for.
-
-
Click Next.
A page to select resources displays.
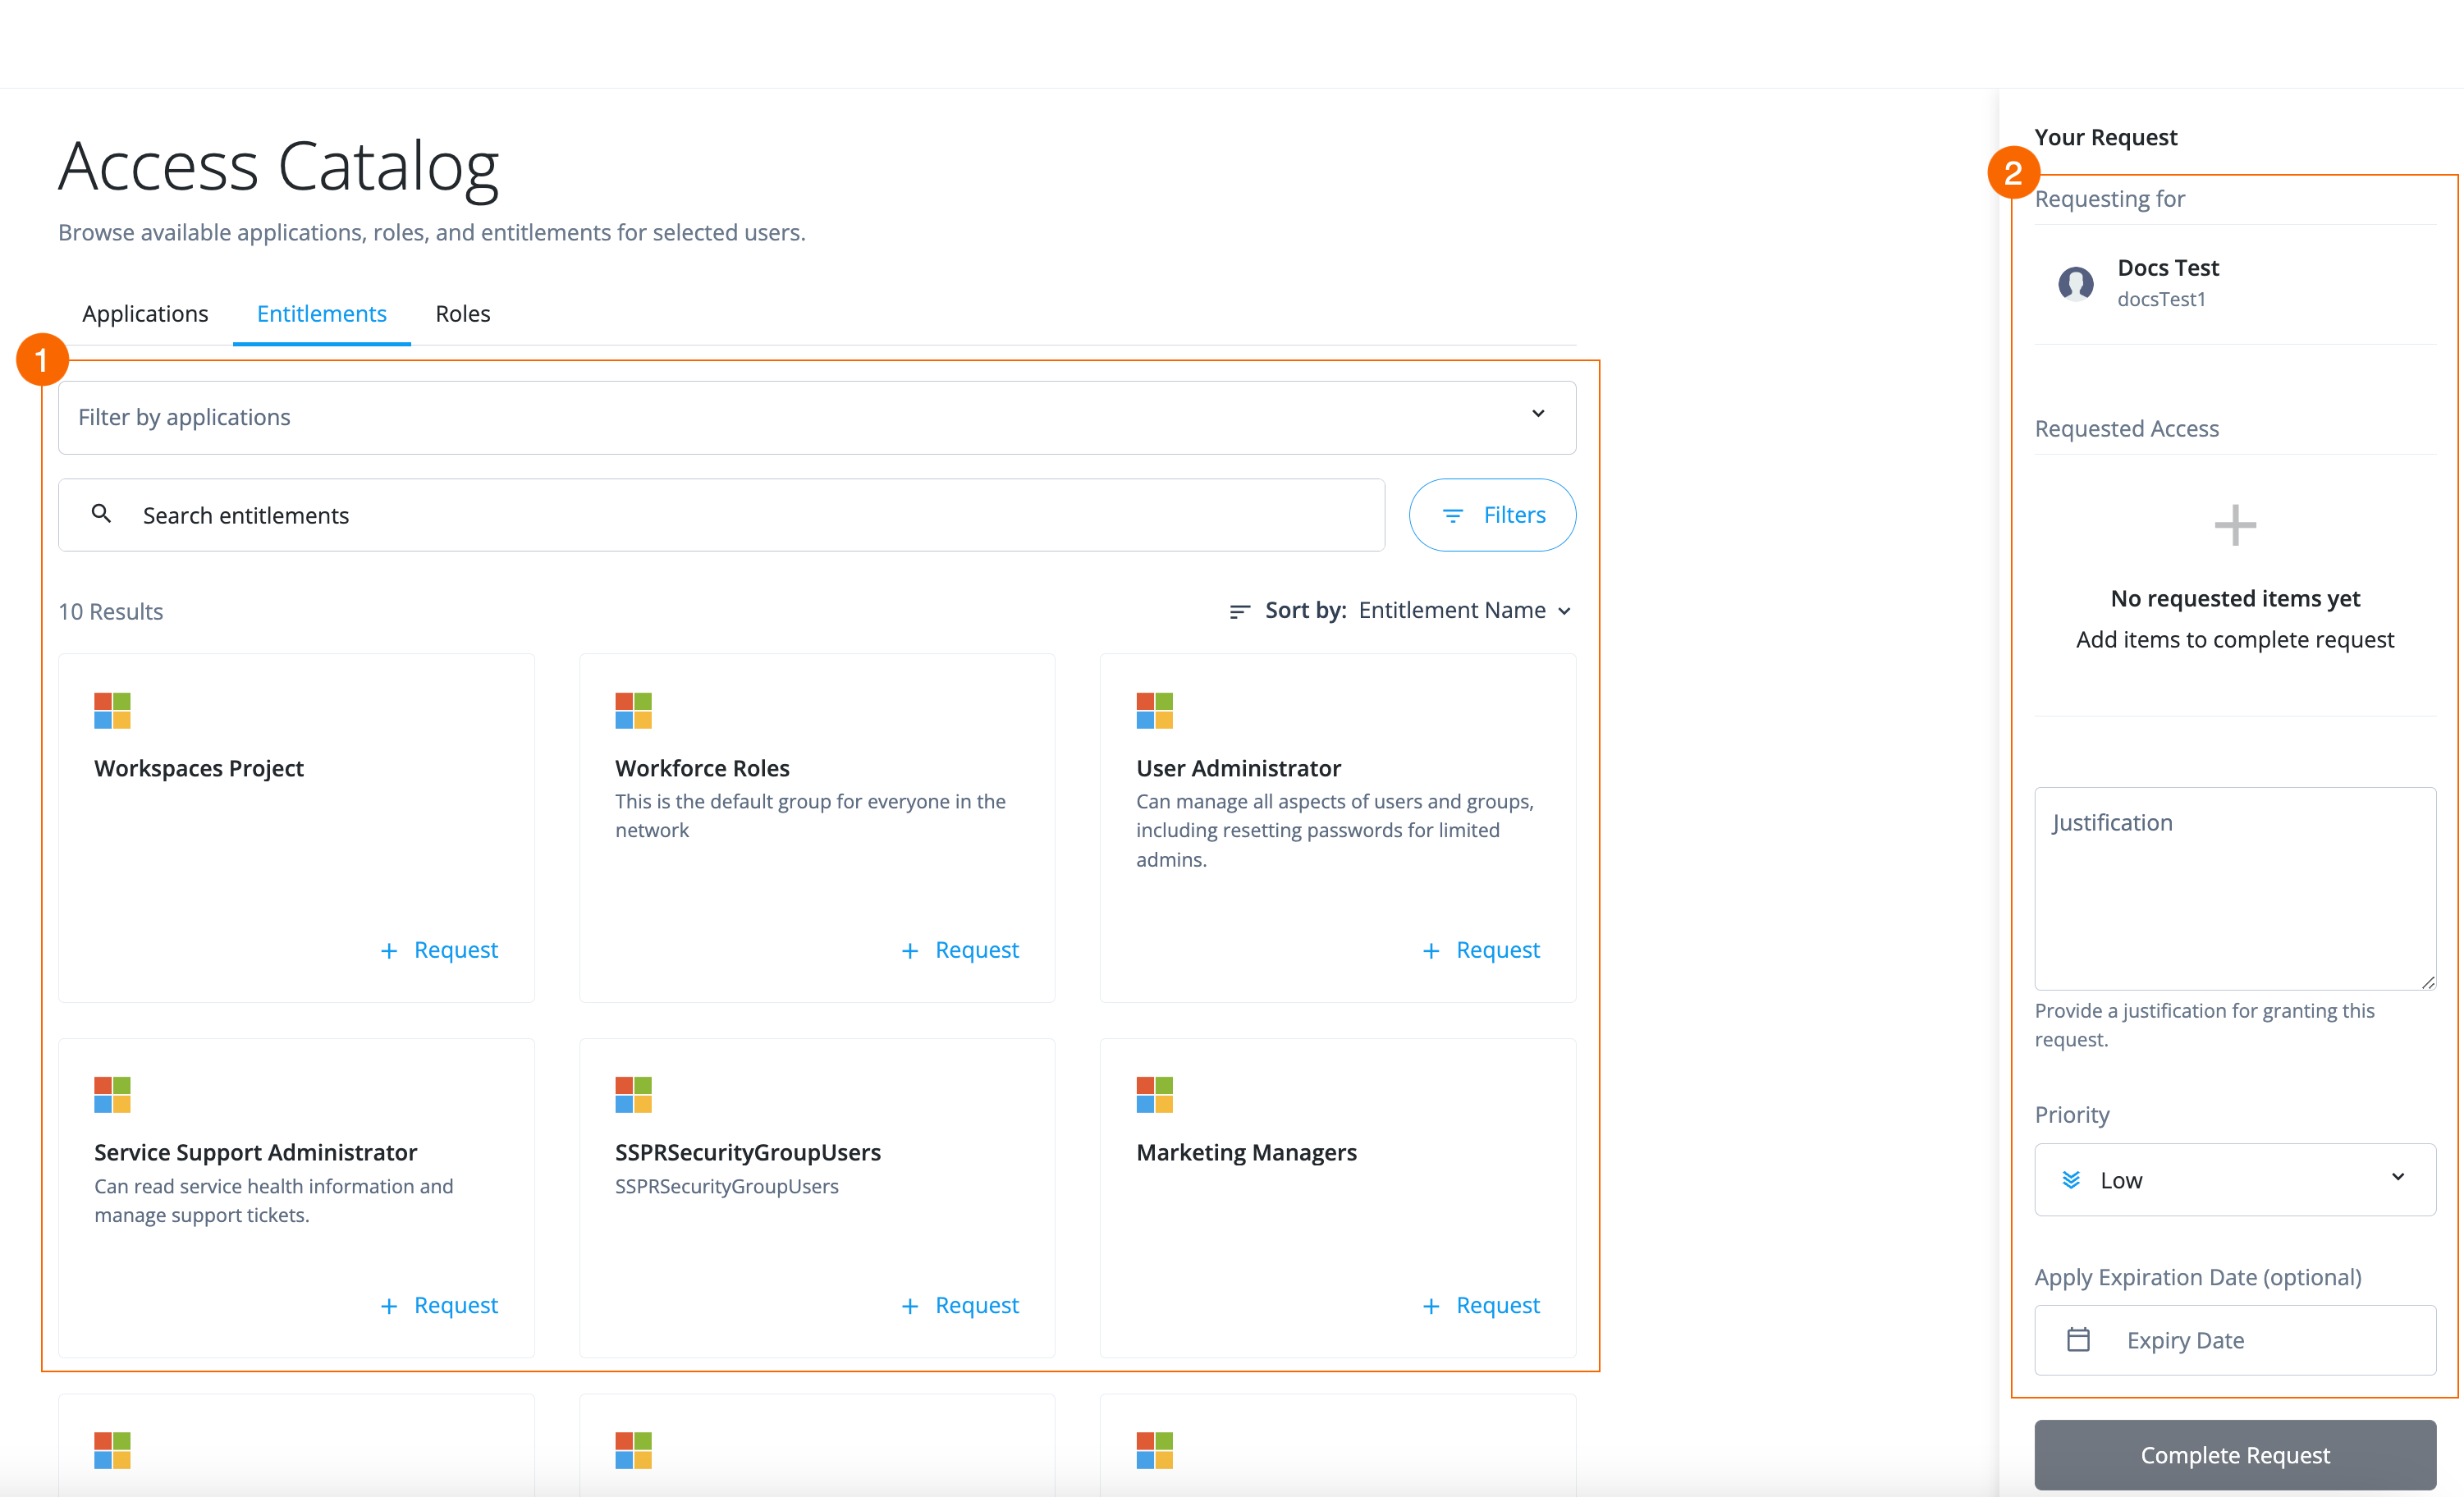
-
1 Search, sort, and select resources to add to the access request.
-
2 End users review current access and the resources they’ve selected, add a justification for the access, set a priority of the request, and optionally add an expiration date.
Select resources
End users can select a combination of up to 10 applications, entitlements, and/or roles in the same request.
There are three types of resources: applications, entitlements, and roles.
On each tab, an end user can:
-
Search for a resource in the search bar.
-
Filter on resources using attributes.
For more information, refer to create and configure glossary attributes.
-
Sort returned results by owner or resource name in ascending or descending order.
The following steps explore going through each resource tab to select which resources an end user wants. However, it isn’t necessary to click through each resource tab.
To select resources:
-
From the Applications tab, click + Request next to each application to search for and select the desired applications.
If an end user selects a resource they already have access to or if the request is in a pending state, an error code is generated:
The following user(s) either already have the requested item assigned or in a pending request. Choose another item to request for the selected user(s).The message also appears if other users are submitting on behalf of the end user.
-
Click the Entitlements tab. Entitlements are specific privileges in applications.
-
Search for and select desired entitlements. To do this, click + Request next to each entitlement.
Select applications in the Filter by application field to display entitlements that pertain to a specific application. -
Click the Roles tab.
-
Search for and select desired roles. To do this, click + Request next to each role.
Enter request details and submit request
The request details pane is where an end user reviews the resources selected in the request and enters information, such as justification.
-
In the right pane, under Requesting for, click the user(s) name to view their current access.
-
Under Requested Access, review the resources selected.
-
Fill out the following fields:
-
Justification — Enter a reason for requesting access to the selected resources.
-
Priority — Select one of the following:
The priority levels bear no meaning in Identity Governance. your company determines the value assigned to the request. -
Low
-
Medium
-
High
-
-
Apply Expiration Date — Optional. Expire (cancel) the access request if it isn’t approved or rejected by the approver(s) by the specified date.
For example, an end user might need access to a resource by the end of the week, and if they don’t get the access by that time, then they don’t need the permission anymore.
-
-
Click Complete Request. The end user is redirected to the access request landing page.
After the end user submits a request, a Request IDdisplays on each resource the end user requests access to. TheRequest IDtracks the request from the end user requesting access to the approver approving or rejecting access.
Request to remove access
Managers can remove access from their direct reports through a remove access request for accounts (applications), roles, and entitlements.
When a manager submits the remove access request, the approver(s) of the resource approve or reject the remove access request.
To submit a remove access request:
-
Sign on to the Advanced Identity Cloud end-user UI and navigate to My Directory > Direct Reports.
For more information on this screen, refer to direct reports.
-
Click any of the following tabs:
-
Accounts (applications)
-
Entitlements
-
Roles — For roles, if the Assignment column has the value of rule-based, you cannot request to revoke the role.
-
-
Click the ellipsis icon () next to the desired resource, and click Revoke.
-
Next, fill out the following fields:
-
Justification — Enter a reason for revoking access to the selected resources.
-
Priority — Select one of the following:
The priority levels don’t affect how Identity Governance processes requests. your company determines the value assigned to the request. -
Low
-
Medium
-
High
-
-
Apply Expiration Date — Optional. Expire (cancel) the remove access request if the approver(s) haven’t approved or rejected it by the specified date.
-
-
Click Submit Request.
Review request items (End user UI)
When an end user submits an access request, designated owners (approvers) must grant approval for the provisioning of resources.
The items on which approvers review and make decisions are referred to as request items.
Approvers review and make decisions on items referred to as request items in the Advanced Identity Cloud end-user UI. For more information, refer to End-user pages.
Sign on to the Advanced Identity Cloud end-user UI and navigate to Inbox > Approvals.
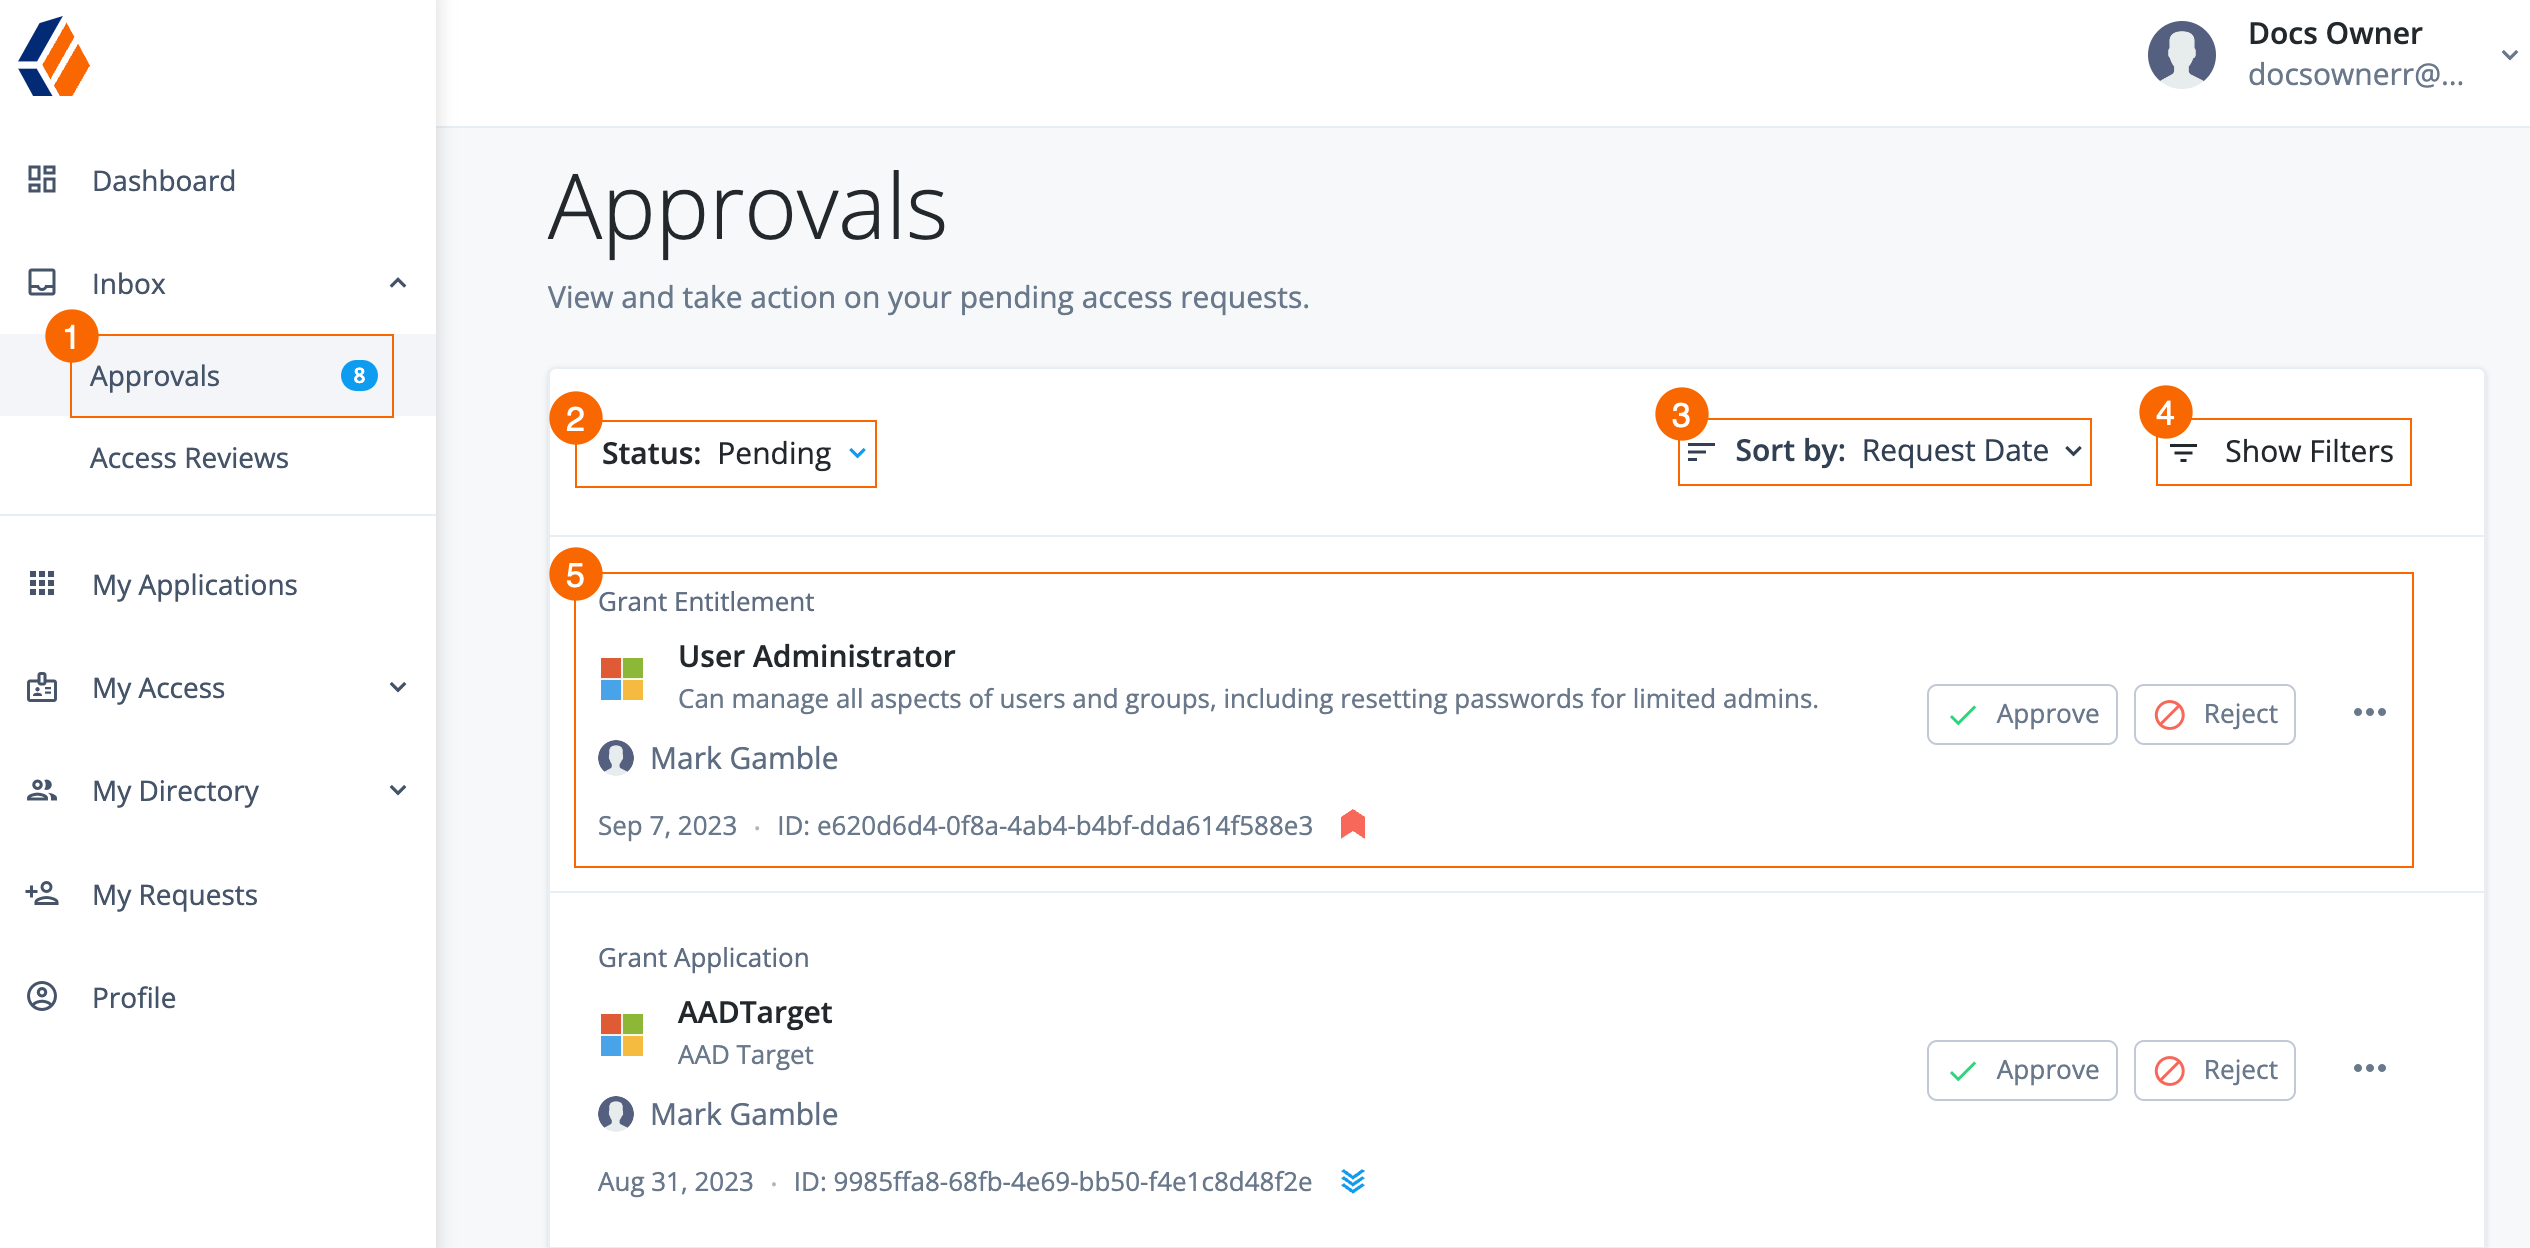
-
1 Click Inbox > Approvals from the Advanced Identity Cloud end-user UI to display the access requests landing page.
-
2 Filter submitted request items by status:
-
Pending — The items are pending review.
-
Completed — The approver reviewed the items and made a decision (approve or reject).
-
-
3 Click Sort By, and sort the items by an attribute in ascending or descending order.
-
4 Click Show Filters to filter by attributes or priority. An end user sets the priority when they create the access request.
-
5 Click on the item to view the details of the request.
Access request types
End users and managers can submit different access request types, such as removing and adding access requests.
The access request type breaks out the request items displayed to approvers.
The following table describes the access request types:
| Access request type | Description |
|---|---|
Grant Application |
End user requests access to an application. |
Remove Application |
End user’s manager requests to remove an application from an end user. |
Grant Role |
End user requests access to an Advanced Identity Cloud provisioning role. |
Remove Role |
End user’s manager requests to remove a role from an end user. |
Grant Entitlement |
End user requests access to an entitlement (an additional privilege inside an application). |
Remove Entitlement |
End user’s manager requests to remove an entitlement from an end user. |
|
The access request type is indicated at the top of each request item. 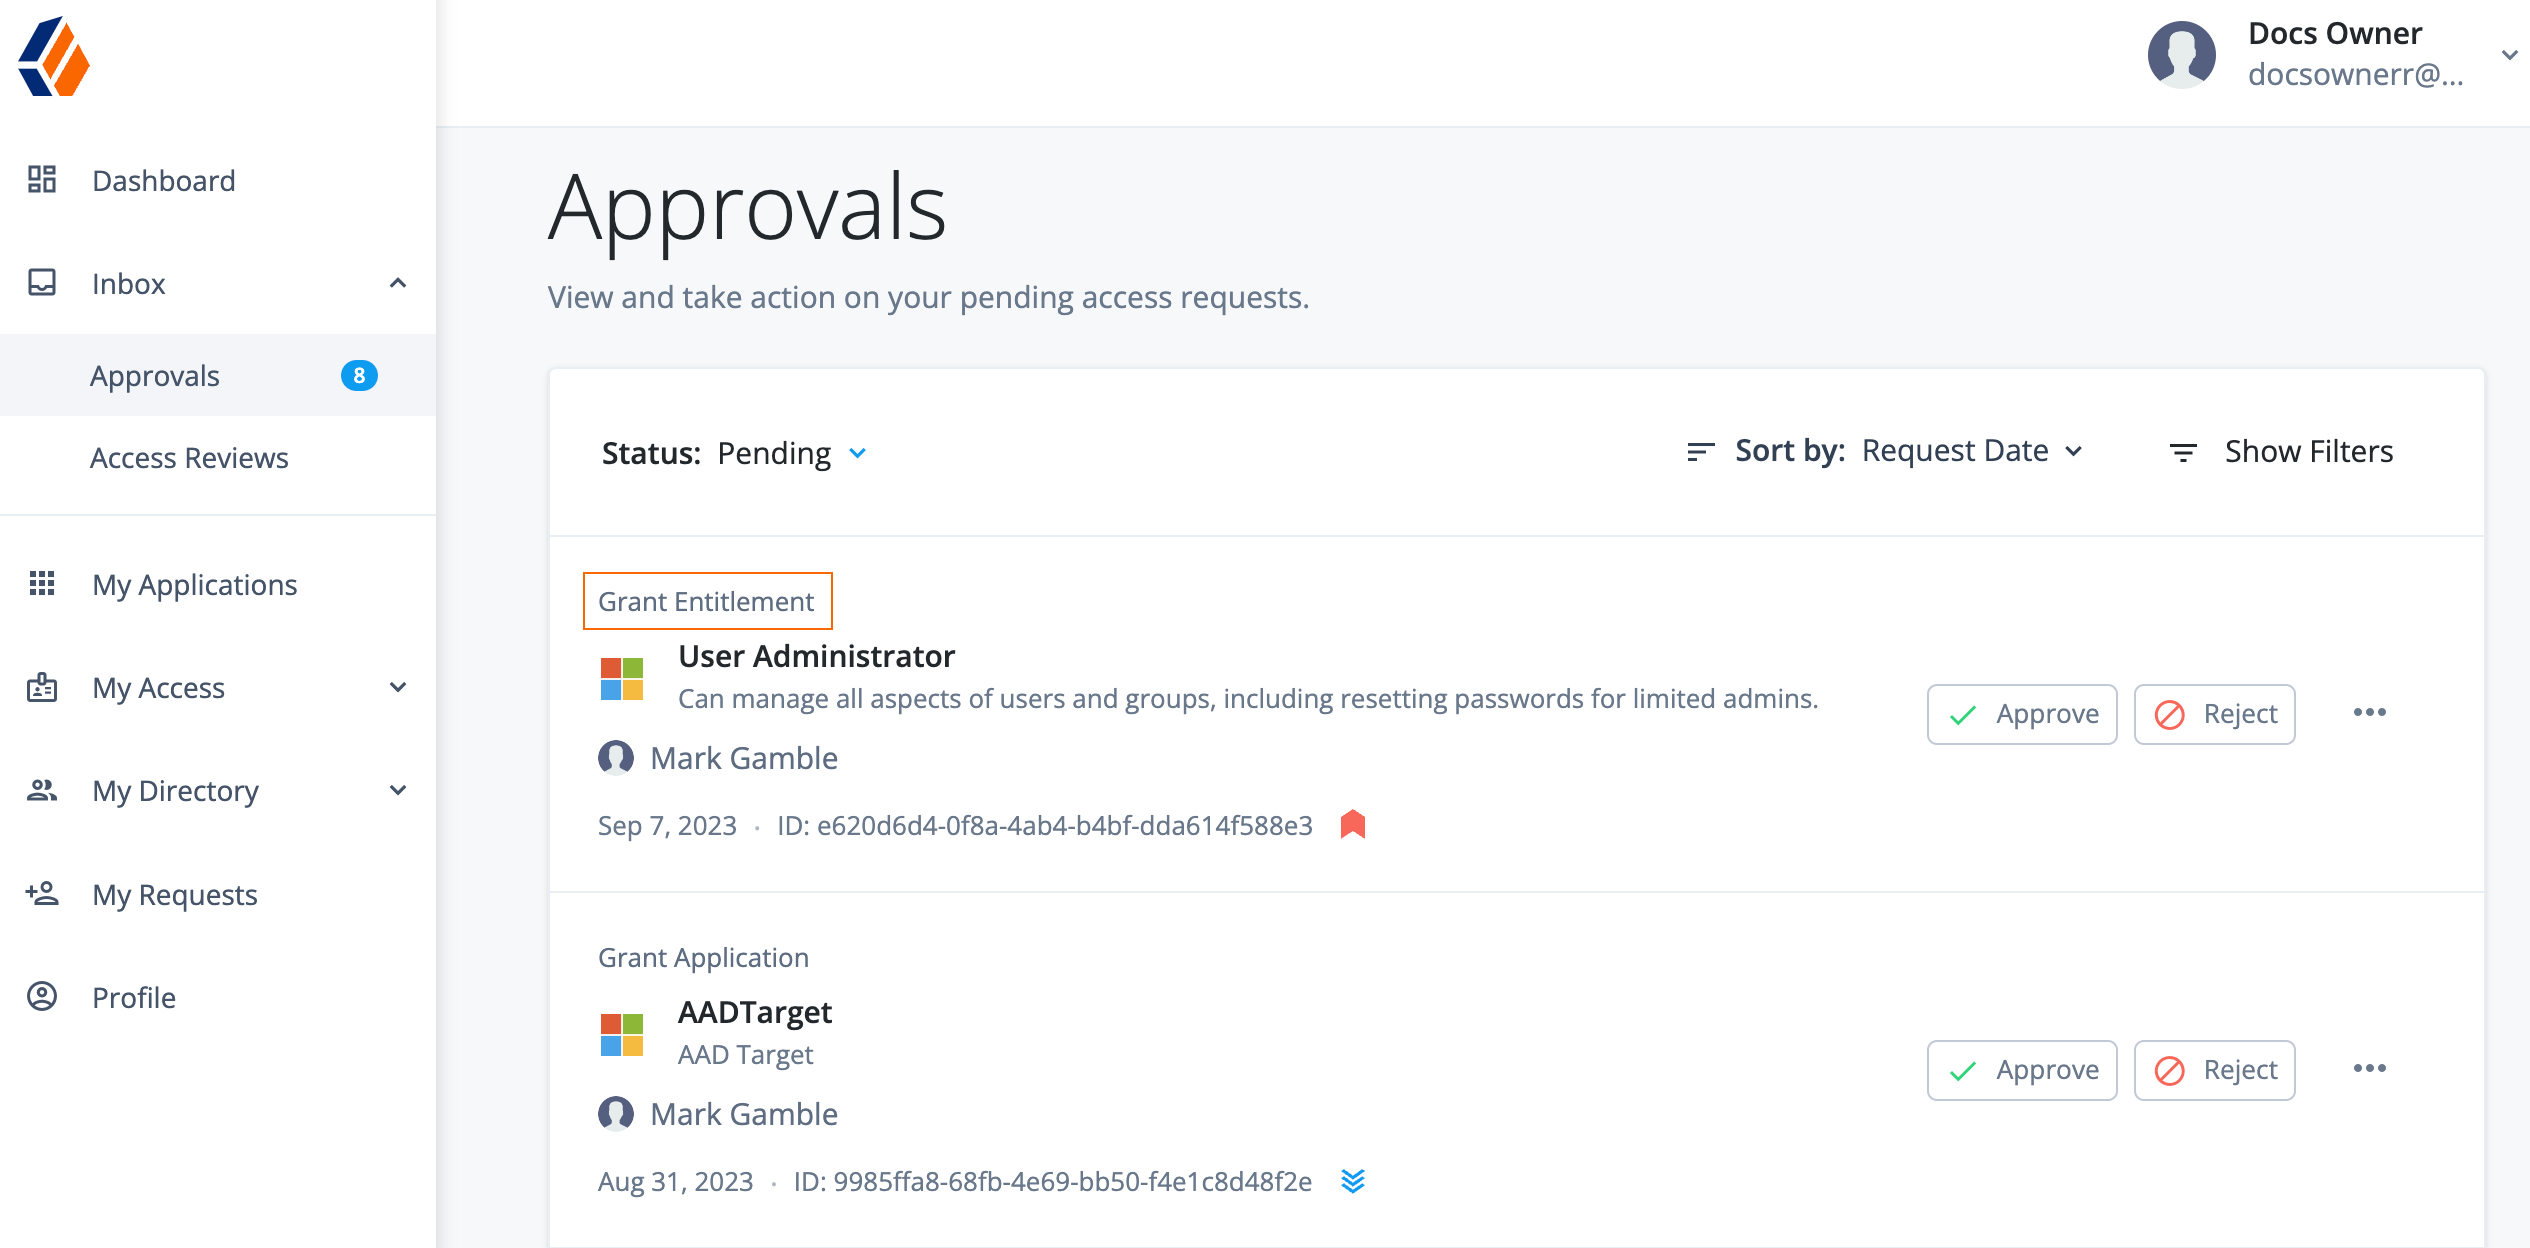
|
|
When end users enter an entitlement request, end users will see a warning message if the request results in a Segregation of Duties (SoD) violation.
End users can click View Details to review the entitlements on the Violations Found modal. The end user has the option to click Submit with Violation or Close the modal. |
Approve, reject, or forward a request item
The access request details of a request item include the requested resource(s), justification, and submission date.
Click a request item to view the details and take action, such as approve or reject.
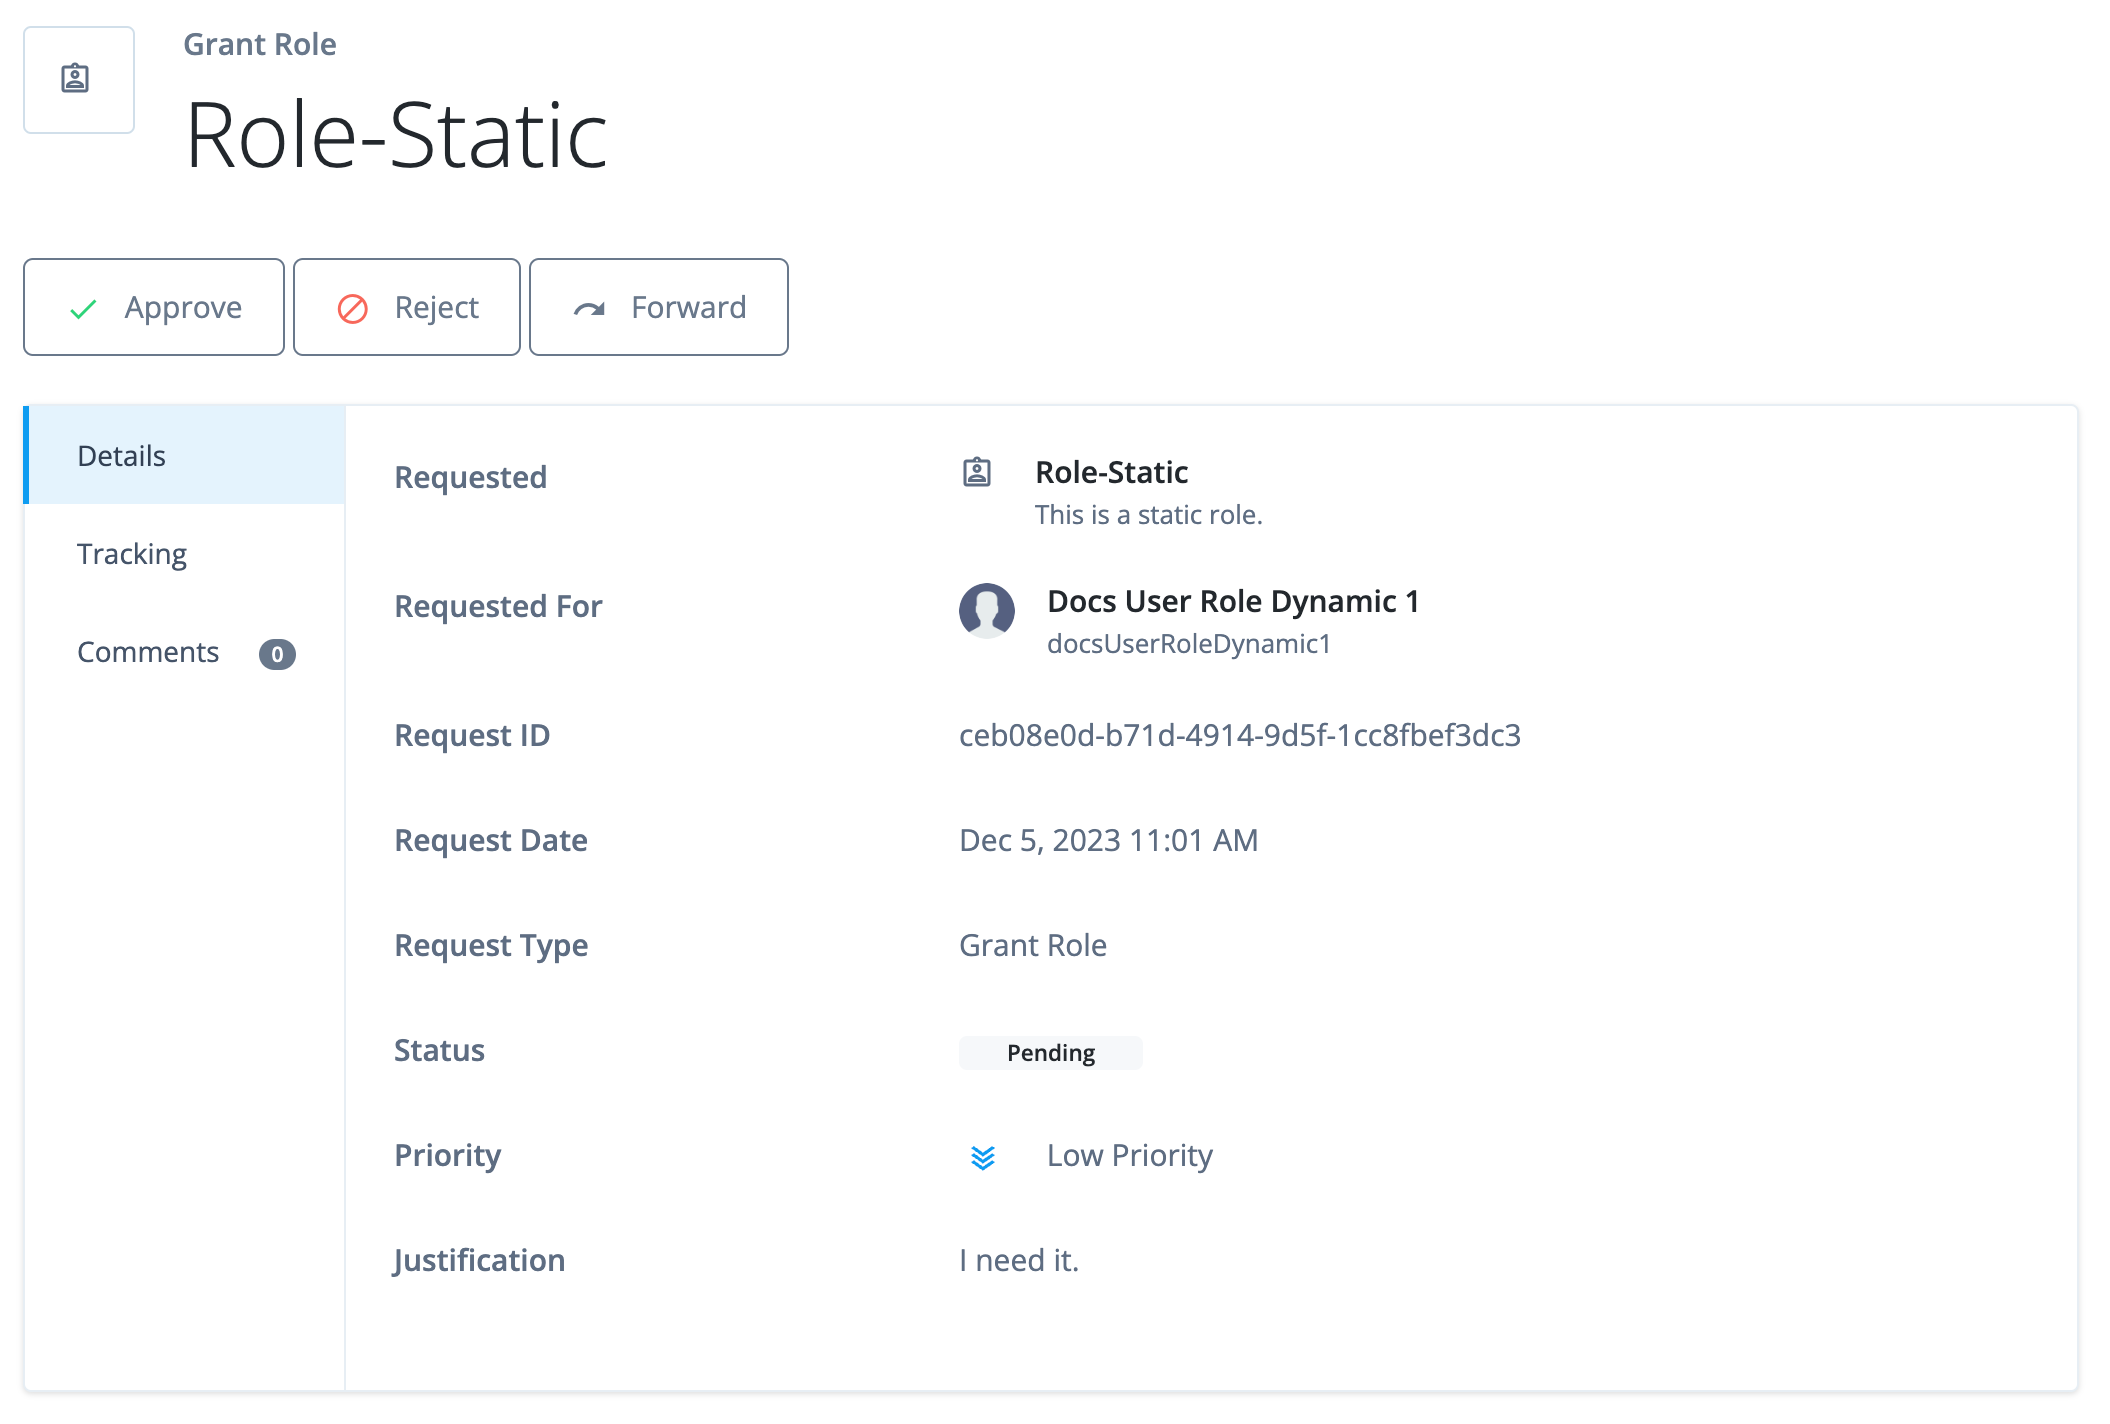
Approve item
-
Click the desired item to view the details.
-
Optional. Add a comment to the request:
-
Click the Comments tab, then click + Add Comment.
-
Enter a comment, and then click Add Comment to save it.
-
-
Click Approve.
-
Click Approve again to confirm the approval of the resource.
Identity Governance provisions the resource to the end user.
Reject item
-
Click the desired item to view the details.
-
Optional. Add a comment to the request:
-
Click the Comments tab, then click [.label]# + Add Comment#.
-
Enter a comment, and then click + Add Comment.
-
-
Click Reject.
-
Enter a justification as to why the request is being rejected.
-
Click Reject.
Forward to another user or role
If the owner is unable to make a decision on their assigned access request due to insufficient information or other reasons, they can approve the request item request to one or more users assigned to a specific role.
To forward a request item to another user or role:
-
Click desired request to view the details.
-
Click Forward.
-
Select one of the following:
-
Another user — Forward the item to a single user.
-
Users with assigned role — Forward the item to users in a role.
Every user within the role can make a decision on the item. However, once a decision is reached, the assigned request item is considered complete.
-
-
Select the user or role to assign the item to.
-
Enter a comment as to why the item is being forwarded.
-
Click Forward.
Extend capabilities
Identity Governance offers capabilities to enrich the process of certifying users. While they are not mandatory when performing the certification process, they allow you to customize your governance processes further.
The additional capabilities in Identity Governance are:
-
Entitlements — Entitlements are permissions given to an account in an target application and each entitlement correlates to a permission.
Identity Governance aggregates entitlements together from onboarded target applications. You can then:
-
Use the entitlements when specifying what to certify templates.
-
Add business logic by creating governance glossary attributes and populating the attribute(s) on the entitlement(s).
-
-
Governance glossary — Attach custom attributes to applications, entitlements, and roles that you can use to extend the data you review using governance glossary attributes.
Manage entitlements
Entitlements are specific permissions given to an account in an target application. Each entitlement correlates to a permission.
Identity Governance aggregates entitlements from onboarded target applications into a centralized repository called the entitlements catalog, providing a unified view of the entitlements.
The entitlement catalog gives you the ability to view the granular access (entitlements) users in Advanced Identity Cloud have for accounts in onboarded target applications.
When you view entitlements, you can do the following:
-
View and populate the entitlement glossary attributes you create for each entitlement.
-
Manage the entitlement owner.
-
View the entitlement properties in the target application and accounts associated with the entitlement.
Load entitlements into Advanced Identity Cloud
Entitlements are pulled into Advanced Identity Cloud when you onboard a target application. Entitlements rely on an object to be configured when you onboard a target application. This object, known as a non-account object (NAO), is the object that represents entitlements (permissions) in the target application.
In many cases, there is no action on your part to set up a NAO as many application connectors have predefined NAOs.
There are scripted applications that require you to manually set the NAO which include:
-
Scripted REST
-
Scripted Groovy
-
Scripted Table
-
PowerShell
|
You must populate the Display Name Attribute on the target application NAO in the Details tab. This allows each entitlement pulled into Advanced Identity Cloud to display with a human-readable name:
The following video shows an example: |
For more information on NAOs when provisioning an target application, refer to synchronize an identity.
View entitlements
When you load entitlements into Advanced Identity Cloud, they appear in the left navigation pane under the Entitlements tab. All onboarded target applications that have entitlements appear on this screen.
There are three tabs that appear on the entitlements screen:
-
Details — Shows the entitlement owner of the entitlement as well as the entitlement glossary attributes.
-
Object Properties — Displays the entitlement data as it is in the target application.
-
Users — Shows the Advanced Identity Cloud user and the corresponding user entity in the target application.
Modify entitlement owner
Entitlement owners are individuals responsible for the entitlements in Advanced Identity Cloud.
You can select the entitlement owners to be the certifiers (reviewers) of the certification when you define Who will Certify in an entitlement assignment certification.
To modify an entitlement owner:
-
Select Entitlements from the left navigation pane.
-
Select the desired entitlement.
-
On the Details tab, click the Entitlement Owner field.
-
Select the user to be the entitlement owner.
-
Click Save.
Grant entitlements to a user
Identity Governance provides capabilities to grant entitlements to a user.
Add an entitlement to a user
Advanced Identity Cloud allows you to add entitlements to a user directly, via a request, or via synchronization with the target application.
To add an entitlement to a user directly:
-
In the Advanced Identity Cloud admin UI, go to Identities > Manage.
-
On the Manage Identities page, click realm-name - Users, and select an existing user.
-
On the selected user’s page, click Entitlements > Add Entitlements.
-
On the Grant Entitlements modal, select which application you would like to grant permissions for this user to access.
-
On the Choose Entitlements modal, select one or more entitlements to grant to the user, and then click Grant Entitlements. You will see an "Entitlements request successfully submitted" message. The new entitlement appears on the user’s entitlements page.
View a user’s entitlements
-
In the Advanced Identity Cloud admin UI, go to Identities > Manage.
-
On the Manage Identities page, click realm-name - Users, and select an existing user.
-
On the selected user’s page, click Entitlements. Each row shows the entitlement name in bold text with the associated application listed below it.
-
Enter an entitlement in the Search box, or click an entitlement from the selected list.
View user entitlement details
-
In the Advanced Identity Cloud admin UI, go to Identities > Manage.
-
On the Manage Identities page, click realm-name - Users, and select an existing user.
-
On the selected user’s page, click Entitlements. Each row shows the entitlement name in bold text with the associated application listed below it.
-
Enter an entitlement in the Search box, or click an entitlement from the selected list.
-
Next, click the ellipsis () for an entitlement, and then click View Details. The modal opens to the Entitlement Details.
Field Description Application
Displays the application name and logo.
Owner
Displays the owner of the application.
<glossary attributes>
Displays various glossary attributes and their values. For example:
-
Requestable. Displays the values of the
requestableflag:trueorfalse. -
Description. Displays the description of the attribute.
-
New Entitlement Glossary Attribute. Displays the value of the entitlement glossary attribute.
<Technical details>
Displays technical details, such as object type properties and their values. The details differ with each application.
-
Revoke a user’s entitlement
Advanced Identity Cloud admin UI allows users to revoke non-role-based entitlements from the user’s entitlements list page. If the entitlement is role-based, users cannot revoke the entitlement.
-
In the Advanced Identity Cloud admin UI, go to Identities > Manage.
-
On the Manage Identities page, click realm-name - Users, and select an existing user.
-
On the selected user’s page, click Entitlements. Each row shows the entitlement name in bold text with the associated application listed below it.
-
Enter an entitlement in the Search box, or click an entitlement from the selected list.
-
Next, click the ellipsis () for an entitlement, and then click Revoke. The Revoke Request modal appears.
-
On the Revoke Request modal, enter the following information:
-
Justification. Enter a justification for the entitlement revoke request.
-
Priority. Select a priority for the revocation.
-
Expiry Date. Enter an expiry date for the revoke request.
-
-
Click Submit Request. The
Request successfully submittedmessage appears.
Manage entitlements in a role
Identity Governance provides capabilities to manage entitlements in a role.
View entitlements in a role
-
In the Advanced Identity Cloud admin UI, go to Identities > Manage.
-
On the Manage Identities page, click realm-name - Roles.
-
Enter a role in the Search box, or click a role from the selected list.
-
On the selected role page, click Entitlements. Each row shows the entitlement name in bold text with the associated application listed below it.
View entitlement details in a role
-
In the Advanced Identity Cloud admin UI, go to Identities > Manage.
-
On the Manage Identities page, click realm-name - Roles.
-
Enter a role in the Search box, or click a role from the selected list.
-
On the selected role page, click Entitlements. Each row shows the entitlement name in bold text with the associated application listed below it.
-
Next, click the ellipsis () for an entitlement, and then click View Details. The modal opens to the Entitlement Details.
Field Description Application
Displays the application name and logo.
Owner
Displays the owner of the application.
<glossary attributes>
Displays various glossary attributes and their values. For example:
-
Requestable. Displays the values of the
requestableflag:trueorfalse. -
Description. Displays the description of the entitlement attribute.
-
New Entitlement Glossary Attribute. Displays the value of the entitlement glossary attribute.
<Technical details>
Displays technical details, such as object type properties and their values. The details differ with each application.
-
Revoke an entitlement in a role
-
In the Advanced Identity Cloud admin UI, go to Identities > Manage.
-
On the Manage Identities page, click realm-name - Roles.
-
Enter a role in the Search box, or click a role from the selected list.
-
On the selected role page, click Entitlements. Each row shows the entitlement name in bold text with the associated application listed below it.
-
Next, click the ellipsis () for an entitlement, and then click Revoke. The Revoke Entitlement? modal appears.
-
Click Revoke. The
Entitlement was revokedmessage appears.
Enhance entitlements with glossary attributes
When you create entitlement glossary attributes, they appear as metadata you can populate for each entitlement.
To enhance entitlements:
-
From the Advanced Identity Cloud admin UI, go to Governance > Entitlements.
-
Select the desired entitlement.
-
On the Details tab, populate the glossary attributes you created.
-
Click Save.
Example of when to use the governance glossary
There are many scenarios in which using identity glossary attributes can provide useful business logic to make decisions.
Oftentimes, organizations have specific attributes to track users' entitlements from applications.
An example could be that you want to attach a risk score to each entitlement pulled into Advanced Identity Cloud. This could be to determine the sensitivity of the entitlement (privilege) in the target application.
Steps:
-
From the Advanced Identity Cloud admin UI, click Glossary.
-
Click Entitlement > + Entitlement Glossary Item.
-
Enter the following values:
-
Name -
riskScore -
Display Name -
Risk score -
Type -
NumberFor more information, refer to create entitlement attribute.
-
-
Once you create the entitlement glossary attribute, it displays as metadata for each entitlement. To view this metadata in an entitlement, go to Entitlements > Select entitlement to view the attribute under the Details tab.
-
Assign a risk score of
80using the newly createdRisk scoreattribute. The higher the risk score for an entitlement, the more sensitive operations that entitlement allows.
Now that you have created an entitlement glossary attribute and enriched existing entitlements with
the Risk score attribute, you can leverage this new business-relevant data.
For example, you can create an entitlement assignment certification template that filters
the template to show entitlements to review that have a Risk score of 75 or higher. This allows you to
certify highly-sensitive entitlements.
This is just one scenario in which the identity glossary can be used. Create identity glossary attributes for applications, entitlements, or roles to suit your business cases.
Manage governance glossary
In Identity Governance, you can use the governance glossary to attach custom attributes (metadata) to applications, entitlements, or roles to enhance certifications or access requests.
When using the governance glossary, you can create the following custom attributes:
Typical steps to make use of a governance glossary attribute
-
Create governance glossary attribute (application, entitlement, or role).
-
Populate the governance glossary attribute you create. For example, if you create an application glossary attribute, the attribute will appear on every target application in the Details tab.
-
Use the attribute you create to:
-
Filter on what you would like to certify when you create a template.
-
Allow the end user to filter on the attribute in applications, entitlements, or roles when they request access.
-
Example of when to use the governance glossary
| If you are already familiar with the use case(s) of governance glossary, start with Create a governance glossary attribute. |
There are many scenarios in which using identity glossary attributes can provide useful business logic to make decisions.
Oftentimes, organizations have specific attributes to track users' entitlements from applications.
An example could be that you want to attach a risk score to each entitlement pulled into Advanced Identity Cloud. This could be to determine the sensitivity of the entitlement (privilege) in the target application.
Steps:
-
From the Advanced Identity Cloud admin UI, click Glossary.
-
Click Entitlement > + Entitlement Glossary Item.
-
Enter the following values:
-
Name -
riskScore -
Display Name -
Risk score -
Type -
NumberFor more information, refer to create entitlement attribute.
-
-
Once you create the entitlement glossary attribute, it displays as metadata for each entitlement. To view this metadata in an entitlement, go to Entitlements > Select entitlement to view the attribute under the Details tab.
-
Assign a risk score of
80using the newly createdRisk scoreattribute. The higher the risk score for an entitlement, the more sensitive operations that entitlement allows.
Now that you have created an entitlement glossary attribute and enriched existing entitlements with
the Risk score attribute, you can leverage this new business-relevant data.
For example, you can create an entitlement assignment certification template that filters
the template to show entitlements to review that have a Risk score of 75 or higher. This allows you to
certify highly-sensitive entitlements.
This is just one scenario in which the identity glossary can be used. Create identity glossary attributes for applications, entitlements, or roles to suit your business cases.
Create a governance glossary attribute
To access the governance glossary, navigate to Glossary from the left navigation pane in the Advanced Identity Cloud admin UI.
Create governance glossary attributes for:
Create an application glossary attribute
To create an application glossary attribute:
-
Select Application from the left pane in the table.
-
Select + Application Glossary Item.
-
Enter details for the item:
Field Description Name
The backend name of the attribute.
Display Name
The name that displays on the Details tab of the target application.
Description
The rationale for the attribute.
Type
The data type of the attribute. The data type you select changes the way it displays in the application’s Details tab and the actions you can take.
Select one of the following:
-
String
-
Number
-
Boolean — A checkbox. Checking the box corresponds to
true. -
Date — A date field (
mm/dd/yyyy). -
User — Select from existing users.
-
Role — Select from existing roles.
-
Organization — Select from existing organizations.
-
-
Depending on the data type chosen, optional settings appear:
-
Multi-Valued — Lets you have more than one value when you populate the attribute, an array. For example, if you select the
Usertype in step 3, you can select multiple users instead of one. -
Enumerated Values — When you are populating the attribute on the application, create fixed values to choose from:
-
Select the + icon.
-
Fill out the text and value for the item.
The text displays as the human-readable option to select. The value is the actual value saved to the backend.
-
If desired, add more values.
-
-
-
Click Show advanced settings and optionally select Searchable. This allows an end user to search using this attribute when requesting access to the application.
-
Click Save.
The application glossary attribute displays in the Details tab of every target application.
The following video shows an example:
Create an entitlement glossary attribute
To create an entitlement glossary attribute:
-
Select Entitlement from the left pane in the table.
-
Select + Entitlement Glossary Item.
-
Enter details for the item:
Field Description Name
The backend name of the attribute.
Display Name
The name that displays on the Details tab of each entitlement.
Description
The rationale for the attribute.
Type
The data type of the attribute. The data type you select changes the way it displays each entitlement and the actions you can take.
Select one of the following:
-
String
-
Number
-
Boolean — A checkbox. Checking the box corresponds to
true. -
Date — A date field (
mm/dd/yyyy). -
User — Select from existing users.
-
Role — Select from existing roles.
-
Organization — Select from existing organizations.
-
-
Depending on the data type chosen, optional settings appear:
-
Multi-Valued — Lets you have more than one value when you populate the attribute, an array. For example, if you select the
Usertype in step 3, you can select multiple users instead of one. -
Enumerated Values — When you are populating the attribute on the entitlement, create fixed values to choose from:
-
Select the + icon.
-
Fill out the text and value for the item.
The text displays as the human-readable option to select. The value is the actual value saved to the backend.
-
If desired, add more values.
-
-
-
Click Show advanced settings and optionally select Searchable. This allows an end user to search using this attribute when requesting access to the entitlement.
-
Click Save.
The entitlement glossary attribute displays in every onboarded entitlement. From the Advanced Identity Cloud admin UI, go to Entitlements > Select entitlement > Details tab to view the newly created entitlement attribute.
The following video shows an example:
Create role glossary attribute
To create a role glossary attribute:
-
Select Role from the left pane in the table.
-
Select + Role Glossary Item.
-
Enter details for the item:
Field Description Name
The backend name of the attribute.
Display Name
The name that displays on the Details tab of each role.
Description
The rationale for the attribute.
Type
The data type of the attribute. The data type you select changes the way it displays each role and the actions you can take.
Select one of the following:
-
String
-
Number
-
Boolean — A checkbox. Checking the box corresponds to
true. -
Date — A date field (
mm/dd/yyyy). -
User — Select from existing users.
-
Role — Select from existing roles.
-
Organization — Select from existing organizations.
-
-
Depending on the data type chosen, optional settings appear:
-
Multi-Valued — Lets you have more than one value when you populate the attribute, an array. For example, if you select the
Usertype in step 3, you can select multiple users instead of one. -
Enumerated Values — When you are populating the attribute on the role, create fixed values to choose from:
-
Select the + icon.
-
Fill out the text and value for the item.
The text displays as the human-readable option to select. The value is the actual value saved to the backend.
-
If desired, add more values.
-
-
-
Click Show advanced settings and select any of the following:
-
Click Show advanced settings and optionally select Searchable. This allows an end user to search using this attribute when requesting access to the entitlement.
-
Click Save.
The role glossary attribute displays in every role. From the Advanced Identity Cloud admin UI, go to Manage > Identities > Select role > Details tab to view the newly created role attribute.
The following video shows an example:
Delete a governance glossary attribute
To delete a governance glossary attribute:
-
From the Advanced Identity Cloud admin UI, click Glossary.
-
Select one of the following tabs:
-
Application
-
Entitlement
-
Role
-
-
Click ellipsis () next to the governance glossary attribute you want to delete.
-
Click Delete.
-
Click Delete again to confirm the deletion.
This action cannot be undone.
Identity Governance REST API reference
This section describes the endpoints and specific characteristics of Identity Governance REST APIs. For an overview of the Ping Identity REST API framework, refer to Advanced Identity Cloud REST.
| Access Identity Governance REST APIs using access tokens. For information on obtaining a token, refer to Authenticate to Advanced Identity Cloud REST API with access token. |
-
Identity Governance-related APIs — Identity Governance has many features, including access requests, the governance glossary (catalog), and entitlements. This page comprehensively explores the Identity Governance REST API endpoints.
-
Identity orchestration (access request workflows) — While related to the Identity Governance-related APIs, these REST API endpoints specifically focus on modifying the default workflow for access request types.
Identity Governance-related APIs
Identity Governance has many features, including access requests, the governance glossary (catalog), and entitlements. The following sections comprehensively explore the Identity Governance REST API endpoints.
YAML file
The REST APIs contain many parameters and, in some instances, large request bodies. For your convenience, you can view the entire API using a YAML file based on the OpenAPI specification.
To download the YAML file, click here.
| Adjust the configurations of the file to match your specific details, such as your Advanced Identity Cloud tenant FQDN. |
Endpoints
Request types
| URI | HTTP method | Description |
|---|---|---|
|
GET |
Get a list of supported request types. |
|
POST |
Create a new custom request type. |
|
GET |
Get the request type by ID. |
|
PUT |
Replace an existing request type. |
|
PATCH |
Update a request type. |
|
DELETE |
Delete a request type. |
Access request
In Identity Governance, end users can request access to resources. Resources are target applications, entitlements, or roles. You define which resources are requestable.
For more information, refer to access requests.
The following table shows the endpoints used by access requests:
| You can define workflows for access requests, such as what email gets sent to who for an access request type. These endpoints are used, in tandem, with the access request endpoints. For more information, refer to Workflows. |
| URI | HTTP method | Description |
|---|---|---|
|
POST |
Create or validate a new access request for a list of users. When submitting a new request for access, the system validates the request’s contents. If no issues are found, IGA creates a request for each pairing of user and catalog items included in the request. You can choose to only validate the request by using the |
|
POST |
Create request of the given request type. |
|
GET |
Retrieve the details of a single access request using an unique identifier, |
|
PUT |
Replace the content of a request. The only properties that can be changed are
properties that are defined in the request schema and not in the |
|
PATCH |
Update the contents of a request. The only properties that can be updated are properties
that are defined in the request schema and not in the |
|
POST |
Perform various actions on a specific request, such as |
|
GET |
Get requests for which the authenticated user has permissions to view. For additional search capabilities,
use the |
|
POST |
Get requests for which the authenticated user has permissions to view. The |
|
POST |
Get requests for which the authenticated user is assigned, either directly, through a role, or
through a delegate. The |
Request forms
Identity Governance enables administrators to create custom forms presented to users during request workflows.
| URI | HTTP method | Description |
|---|---|---|
|
GET |
Search request forms. |
|
POST |
Create a request form. |
|
GET |
Get a request form by ID. |
|
PUT |
Replace an existing request form by ID. |
|
PATCH |
Update an existing request form by ID. |
|
GET |
Search the request form assignments. |
|
POST |
Assign and unassign a request form. |
Governance glossary (catalog)
In Identity Governance, you can use the governance glossary to attach custom attributes (metadata) to applications, entitlements, or roles to enhance certifications or access requests.
For more information, refer to the Manage governance glossary.
The following table shows the endpoints used by access requests:
| URI | HTTP method | Description |
|---|---|---|
|
GET |
Get a list of items from the Identity Governance access catalog. Each entry represents a single
type of requestable access that can be added to a request. The current supported types
of access that are requestable are |
|
POST |
Get a list of items from the Identity Governance access catalog using additional filter criteria.
Each entry represents a single type of requestable access that can be added to a request.
The current supported types of access that are requestable are |
|
GET |
Retrieve all currently configured properties eligible to be used for search or sort when searching against the catalog API. Each property includes some additional metadata about the property, such as whether it is multivalued or not and its datatype. |
|
GET |
Retrieve all currently configured properties eligible to be used for search or sort for a single object when searching against the catalog API. For example, you can use the endpoint to search for all specific entitlement properties. Each property includes some additional metadata about the property, such as whether it is multivalued or not and its datatype. |
Provisioning
In the Advanced Identity Cloud admin UI, you can add or remove, or provision, resources from end users, however; you can do the same through REST APIs.
The following table shows the endpoints to add or remove users from resources:
| URI | HTTP method | Description |
|---|---|---|
|
POST |
Provision or de-provision applications for an end user. |
|
POST |
Provision or de-provision roles for an end user. |
|
POST |
Provision or de-provision entitlements for an end user. |
Identity Governance configurations
Identity Governance has overarching configurations, such as requiring a justification when rejecting an access request.
The following table shows the endpoints relating to Identity Governance configurations:
| URI | HTTP method | Description | ||
|---|---|---|---|---|
|
GET |
Reads and returns all Identity Governance configuration properties across all categories. Only access request-related properties are available. These properties are used to determine the behavior behind functionality. For example, access request features contain configuration on whether justification is required to reject a request or whether a user can approve their own access. |
||
|
PUT |
Update all Identity Governance configuration properties across all categories. Only access request-related properties are available.
|
||
|
GET |
Get Identity Governance configuration settings for a given category (for example, |
||
|
PUT |
Update Identity Governance configuration settings for a given category (for example, |
Account
Accounts are user profiles in applications. For example, when you provision an end user to an application, an account is created for them.
The following table shows the endpoints for accounts:
| URI | HTTP method | Description |
|---|---|---|
|
GET |
Retrieve all account objects across all applications that have been onboarded as part of any application. |
|
POST |
Retrieve all account objects across all applications that have been onboarded as part of any application. Additional filter criteria can be provided to allow searching by application, user, or glossary data. |
|
GET |
Retrieve by details of a single account object using its unique identifier. |
|
GET |
Retrieve the glossary specific details of a single account object using its unique identifier. |
|
POST |
Create glossary entry for a single account object using its unique identifier. |
|
PUT |
Create or update a glossary entry for a single account object using its unique identifier. |
Events
Events are rules defined to detect a change in the IGA system. Each rule has two core parts: a condition for the event and the action taken when that event occurs
The following table shows the endpoints for events:
| URI | HTTP method | Description |
|---|---|---|
|
GET |
Get and search for a list of event rules defined in IGA. Each entry represents a single event rule defined to detect a change in the system. IGA rules consist of two core pieces: condition for the event, and action taken when the event occurs. For example, a rule might define that whenever someone creates a user in IGA, they should also generate a certification for that user. |
|
POST |
Create a single IGA event rule. A single event rule is defined to detect a change in the system. IGA rules consist of two core pieces: condition for the event, and action taken when that event occurs. For example, a rule might define that whenever someone creates a user in IGA, they should also generate a certification for that user. |
|
GET |
Get a single IGA event by ID. The response is a single event rule defined to detect a change in the system. |
|
PUT |
Update a single IGA event by ID. This call requires that the entire object be provided and that it replaces the entire existing event definition. |
|
PATCH |
Update a single IGA event by ID. This call allows the caller to update specific properties of the event only without providing the entire object. |
|
DELETE |
Delete a single IGA event by ID. |
|
GET |
Get the list of available event entities from which you can define a condition. |
|
GET |
Get the available schema for defining a condition on a given object.
For example, |
Scope
Scope determines which specific users are able to view or interact with particular target objects. Scoping rules comprise of two core parts: a condition for the source object (who or what the scope applies to) and a condition for the target object that can be viewed or acted upon.
| URI | HTTP method | Description |
|---|---|---|
|
GET |
Get and search for a list of scoping rules defined in IGA. Each entry represents a single scoping rule defined to assign a set of conditions that allows a subset of users visibility on a subset of target objects. IGA scoping rules consist of two core parts: a condition for the source object (who/what the scope applies to) and a condition for the target object that can be viewed or acted upon. |
|
POST |
Create a single scoping rule in IGA. Each scoping rule is defined to assign a set of conditions that allows a subset of users visibility on a subset of target objects. IGA scoping rules consist of two core parts: a condition for the source object (who/what the scope applies to) and a condition for the target object that can be viewed or acted upon. |
|
GET |
Get a single scoping rule in IGA by ID. Each scoping rule is defined to assign a set of conditions that allows a subset of users visibility on a subset of target objects. IGA scoping rules consist of two core parts: a condition for the source object (who/what the scope applies to) and a condition for the target object that can be viewed or acted upon. |
|
PUT |
Update a single IGA scope by ID. This call expects the entire object to be provided and replaces the entire existing scope definition. |
|
PATCH |
Update a single IGA scope by ID. This call allows the caller to update specific properties of the scope only without providing the entire object. |
|
DELETE |
Delete a single IGA scope by ID. |
|
GET |
Get a list of available entities on which a condition can be defined. |
|
GET |
Get the available schema for defining a condition on a given object. For example, 'user' returns the attributes available for defining a scope for users in IGA. |
Task
| URI | HTTP method | Description |
|---|---|---|
|
GET |
Get the tasks for which the authenticated user has permissions to view. |
|
POST |
Get the tasks for which the authenticated user has permissions to view. The
|
Evolving APIs
| The APIs referenced in this section are evolving, which means they can change or become deprecated at any time. |
The current evolving APIs focus on entitlements. For more information, refer to Manage entitlements.
| URI | HTTP method | Description |
|---|---|---|
|
GET |
Get an entitlement by an ID. |
|
POST |
Search for a list of all entitlements that match the target filter. |
|
GET |
Gets the users assigned to a specific entitlement. |
Access grant
Access grants are one-to-one relationships between an end user and a resource.
For example, when you assign an end user to an entitlement, Identity Governance correlates the user to that entitlement. This one-to-one correlation is an entitlement grant. If an entitlement has 12 users associated, there are 12 entitlement grants.
For each entitlement grant, a confidence score can be assigned using Autonomous ID (Autonomous Identity).
With Autonomous Identity data exported, import the confidence scores into Identity Governance.
The confidence scores display on line-items in a certification.
This assists certifiers regarding which actions to take during a certification.
For example, if the confidence score for an end user to have an entitlement is 90,
then the certifier can have a high degree of certainty
that the end user can have the entitlement.
The following table shows the endpoints relating to an entitlement grant’s glossary metadata:
|
Only create confidence scores for access grants from data generated from Autonomous Identity. When importing the confidence scores from Autonomous Identity, use a script to iterate over the resource ID and account ID. |
| URI | HTTP method | Description |
|---|---|---|
|
GET |
Retrieve a single entitlement grant’s glossary entry by account and entitlement ID. |
|
POST |
Create a single entitlement grant’s glossary entry by account and entitlement ID. |
|
PUT |
Create or update a single entitlement grant’s glossary entry by account and entitlement ID. |
Workflows
In Identity Governance, end users can request access to resources, and managers can request to revoke access to resources. Resources are target applications, entitlements, or roles.
There are various access request types that you can create using REST:
| Access request type | Name in REST APIs | Description |
|---|---|---|
Grant Application |
|
Request access to an application. |
Remove Application |
|
Request to remove access to an application for an end user. |
Grant Entitlement |
|
Request access to an entitlement (additional privilege inside an application). |
Remove Entitlement |
|
Request to remove access to an entitlement from an end user. |
Grant Role |
|
Request access to an Advanced Identity Cloud provisioning role. |
Remove Role |
|
Request to remove access to a role from an end user. |
These access request types correspond to a default workflow definition
that you can change to meet the needs of your company.
This referred to as identity orchestration.
For example, you can create custom scripts for what actions to take
when a BasicApplicationGrant access request type is approved.
For more information on using the endpoints in sequential steps, refer to Manage workflows.
YAML file
The REST APIs contain many parameters and, in some instances, large request bodies. For your convenience, you can view the entire API using a YAML file based on the OpenAPI specification.
To download the YAML file, click here.
| Adjust the configurations of the file to match your specific details, such as your Advanced Identity Cloud tenant FQDN. |
Endpoints
The following table displays the actions available with workflow definitions for access request types:
| URI | HTTP method | Description | ||
|---|---|---|---|---|
|
POST |
Validate a workflow script. |
||
|
GET |
Get the default JavaScript used in the script node. |
||
|
GET |
Get a list of workflow definitions saved to the backend. Workflow definitions have two statuses:
The |
||
|
POST |
Create, publish, or validate a workflow definition.
|
||
|
PUT |
Update an existing workflow definition for an access request type in a |
||
|
GET |
Get definitions by |
||
|
DELETE |
Delete an existing workflow definition in a |
Advanced Identity Cloud how-tos
Supported browsers
The following browsers are supported in PingOne Advanced Identity Cloud:
| Browser | Version |
|---|---|
Google Chrome |
Latest stable version of full-desktop browser |
Firefox |
Latest stable version of full-desktop browser |
Safari |
Latest stable version of full-desktop browser |
Microsoft Edge |
Latest stable version of full-desktop browser |
|
Ping Identity does not provide support for these browsers:
Ping Identity optimizes its platform for modern browsers to ensure the best user experience, security, and performance. If you encounter issues while using the Ping Identity platform, ensure you use a supported, up-to-date browser for the optimal experience. |
|
While Advanced Identity Cloud works with all supported browsers, administrative activity works best using Google Chrome. |
Legal notices
Click here for legal information about product documentation published by Ping Identity.
About Ping Identity Identity Platform software
Ping Identity Identity Platform serves as the basis for our simple and comprehensive identity and access management solution. We help our customers deepen their relationships with their customers, and improve the productivity and connectivity of their employees and partners. Learn more about Ping Identity and about the platform at https://www.pingidentity.com.
The platform includes the following components:
-
AM
-
IDM
-
DS
-
IGA
Third-party copyrights
FontAwesome
Copyright © 2017 by Dave Gandy, https://fontawesome.com/. This Font Software is licensed under the SIL Open Font License, Version 1.1. Refer to https://opensource.org/license/openfont-html/.
Security and compliance
PingOne Advanced Identity Cloud provides full tenant isolation in a multi-tenant cloud service by using individual trust zones. Every customer’s environment is a dedicated trust zone that shares no code, data, or identities with other customers’ environments. This prevents any accidental or malicious commingling. All data is encrypted—at rest and in transmission—to prevent unauthorized access and data breaches.
Certifications & compliance
-
Find our ISO 27001 certificate in the Schellman Certificate Directory.
-
To view the certificate, go to the Shellman certificate directory, and then search for ForgeRock.
-
To download the ForgeRock certificate, click this link: https://zpr.io/RUTE2.
The direct link to the certificate is obsolete when a newer version becomes available. If the direct link doesn’t work, then use the main certificate directory search.
-
-
Learn more about our CSA CIAQ certification.
-
Learn how Ping Identity supports HIPAA compliance.
-
Learn how Ping Identity can help with GDPR.
Security white paper
Learn more about our security practices in our security white paper.
Identity Cloud product lifecycle and releases
PingOne Advanced Identity Cloud releases new features, updates functionality and fixes bugs on a continual cadence. ForgeRock aims to deliver features and functionality that will be the most useful, complete and intuitive for customers. In order to deliver on this goal we have several stages to our release lifecycle.
Early access
Participating in Early Access programs allow customers to provide feedback and collaborate with ForgeRock in designing future capabilities in the product.
Select customers are invited to provide feedback on new features. Customers are encouraged to give feedback and have an active say in product direction; product management and customer success will work with you to gather feedback. Features may be unstable, changed in backward-incompatible ways, and are not guaranteed to be released. We will use all reasonable efforts to communicate breaking changes to customers participating in the program.
Beta
Beta features give customers advanced insights into up-and-coming product capabilities with extra time to prepare to adopt the feature and provide design feedback to the product team. Generally speaking, functionality is stable and meets security and quality expectations but please note that a beta feature is not officially supported for production use.
Upcoming features
Customers receive notifications of new and upcoming features at least a week in advance of a release. The notifications provide customers with high-level information on changes or new functionality.
Limited availability
Features are available for production use and are fully functional and supported; however, they are available only to a select set of customers.
Migration dependent features
Features are not backward compatible and require a tenant migration before they can be used. Learn more in Migration dependent features.
General availability
Features are available for production use and are fully functional and supported. They are available to all customers.
Bug fixes and low impact changes
On an ongoing basis, ForgeRock makes bug fixes and low impact changes as necessary to Advanced Identity Cloud. These types of fixes are deployed as necessary. You can monitor these in the Regular channel changelog and Rapid channel changelog. You can also subscribe to the RSS feeds mentioned at the start of the two changelog pages.
Deprecation and end of life
In order to maintain both security and quality in ForgeRock Identity Cloud, we periodically have to modify or remove functionality.
Learn more in Deprecation Notices.
Deprecated features
A feature or behavior (or API endpoint) flagged for deprecation means it is no longer actively enhanced, and is minimally maintained. Tenants using the feature at the time of deprecation will continue to have access to the feature until it reaches end of life, at which point customers will no longer have access to the feature. We know deprecation disruptions are inconvenient, and as such we attempt to limit the frequency of deprecations and to pair them with alternative options and/or migration recommendations where available.
Deprecation notification
Deprecation information is posted to the ForgeRock Identity Cloud documentation. Deprecation notices typically include a date that the feature or behavior will reach end of life. Our policy is to flag a feature for deprecation with at least twelve (12) months advance notice prior to end of life whenever possible, in order to allow a twelve (12) month migration window.
Periodically, and in case of emergency (critical vulnerabilities or changes required by applicable law or third-party certification standards), we may accelerate this time frame. In such cases, we will provide as much prior notice as is reasonable under the circumstances.
Tenant administrator mandatory 2-step verification FAQ
How is 2-step verification changing?
Ping Identity is making 2-step verification mandatory for all PingOne Advanced Identity Cloud tenant administrators.
The option to skip registration for 2-step verification is deprecated and will be removed a year after the deprecation notification date (Friday, February 3, 2023), following the Advanced Identity Cloud deprecation and end of life policy.
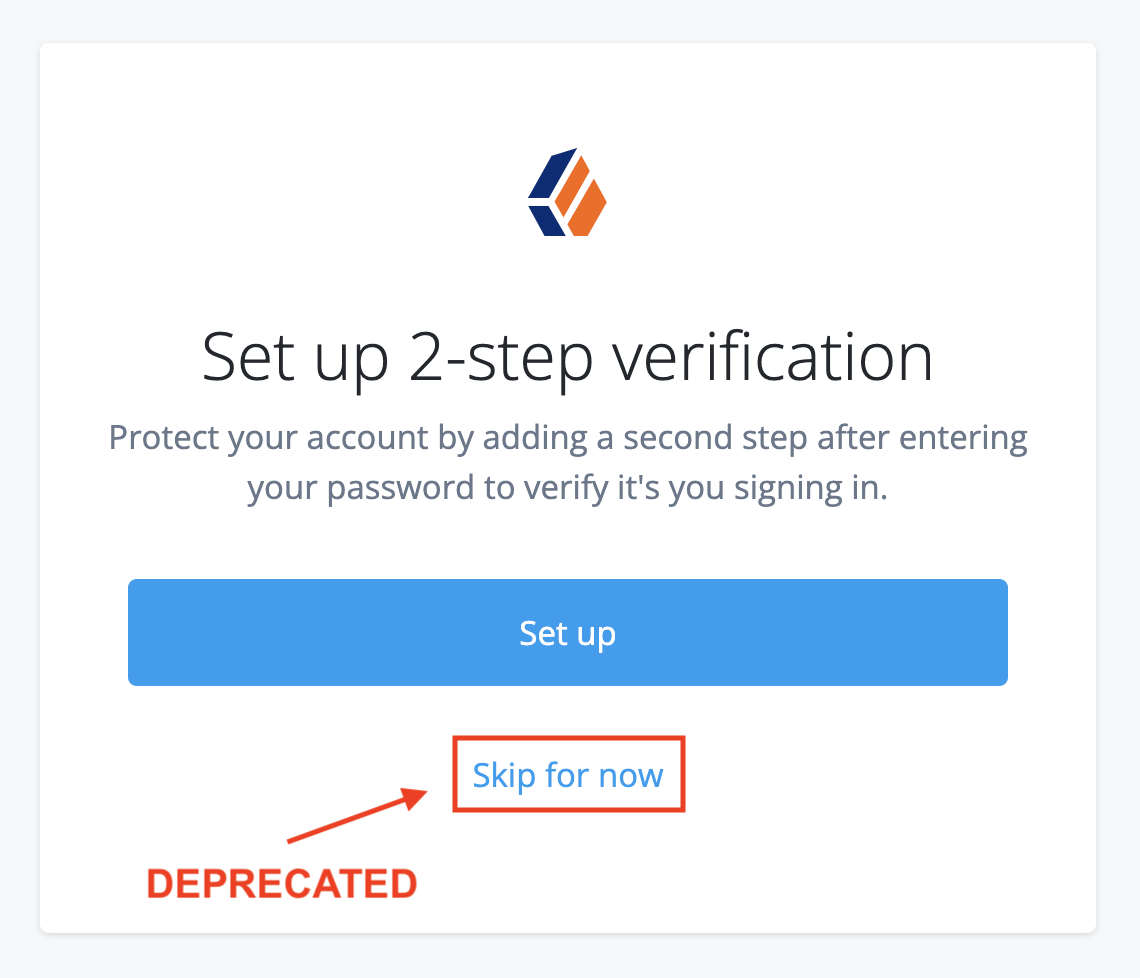
After the option to skip registration is removed, any tenant administrator that has not already set up MFA will be forced to do so the next time they sign in; Advanced Identity Cloud will guide the tenant administrator through the device registration process, with no assistance needed from Backstage Support.
Will the change to mandatory 2-step verification affect me?
Yes, this change affects all customers. You have until the deprecation end-of-life date (Tuesday, April 2, 2024) to update your tenants to make 2-step verification mandatory for all tenant administrators.
How do I prepare my tenants to support 2-step verification?
If you have any automation that relies on the skip option to authenticate to Advanced Identity Cloud APIs, it must be updated to use a service account to get an access token.
| After 2-step verification is enforced, any automation that depends on the skip option will fail authentication. |
How do I enable mandatory 2-step verification for my tenants?
-
Make sure you have updated any automation that authenticates to Advanced Identity Cloud APIs to use a service account. Learn more in How do I prepare my tenants to support 2-step verification?.
-
Open an Advanced Identity Cloud: Config request with Backstage Support.
-
On the Advanced Identity Cloud: Config Request page, provide values for the following fields:
Field Value Hostname(s)
Enter a comma-separated list of FQDNs for your sandbox[2], development, UAT[3], staging, and production tenant environments.
What would you like to do?
Select Enforce 2-step verification for tenant administrators.
Do you give permission for ForgeRock to access and make changes to your environment?
Select Yes to allow ForgeRock to access your environments
-
Click Submit.
-
Backstage Support turns on the enforcement of 2-step verification for your tenant administrators and then asks you to verify that everything is working as expected.
Application management migration FAQ
Application management allows you to manage the security and access of common and custom relying-party applications and SAML 2.0 applications directly from PingOne Advanced Identity Cloud. This functionality is most commonly used to manage data and system access for employees within an organization, commonly referred to as workforce identity and access management.
How is application management changing?
Ping Identity has improved application management by introducing a single UI interface to the Advanced Identity Cloud admin UI that manages all aspects of an application relevant to Advanced Identity Cloud. This replaces the previous arrangement, which required a combination of actions across the Advanced Identity Cloud admin UI, AM admin UI, and IDM admin UI. In addition, Ping Identity has introduced an application catalog to speed up application configuration for common use cases.
How is the improved application management UI being introduced?
The improved application management UI is only available in tenants created on or after January 12, 2023.
What documentation should I use?
-
For tenants created on or after January 12, 2023, learn more in Application management (current).
-
For tenants created before January 12, 2023, learn more in Application management (legacy).
Group identity migration FAQ
What has changed?
Ping Identity has introduced a group identity to PingOne Advanced Identity Cloud to simplify the management of permissions and authorizations for collections of users.
How is the group identity being introduced?
Tenants created on or after November 29, 2022 have the group identity enabled by default. Tenants created before that date can follow an upgrade path to enable it; learn more in Enable groups.
Does this affect any other features?
Yes. If you have not upgraded your tenant, event hooks are not available for group identities.
What documentation should I use?
Learn more in Group management.
Deprecation notices
For information about the PingOne Advanced Identity Cloud product lifecycle and deprecation, learn more in Deprecation and end of life.
Duo authentication node is deprecated
- Notification date
-
March 5, 2024
ForgeRock has deprecated the Duo authentication node because Duo has deprecated Traditional Duo Prompt that is used by the Duo node.
ForgeRock created Duo Universal Prompt node in anticipation of this depreciation. You should use Duo Universal Prompt node instead of Duo node (Deprecated).
- End-of-life date
-
September 30, 2024
Introspect endpoint GET requests and URL query string parameters
- Notification date
-
July 19, 2023
ForgeRock has deprecated the following behaviors of the OAuth 2.0
introspectendpoint in Advanced Identity Cloud:-
Accept GET requests
-
Accept data in POST requests from URL query string parameters
You can continue to use these behaviors, but they will be removed on July 19, 2024. Instead, when using the OAuth 2.0
introspectendpoint, you should use POST requests and pass data in the POST request body. -
- End-of-life date
-
July 19, 2024
Health check endpoints
- Notification date
-
June 13, 2023
ForgeRock has deprecated the following Advanced Identity Cloud health check endpoints:
-
/am/isAlive.jsp -
/am/json/health/live -
/am/json/health/ready -
/openidm/info/ping
You can continue to use the endpoints, but they will be removed on June 13, 2024. You should update any external monitoring to use the Advanced Identity Cloud
/monitoring/healthendpoint instead. Learn more in Monitor using health check endpoint. -
- End-of-life date
-
June 13, 2024
Skip option for 2-step verification registration for Advanced Identity Cloud tenant administrators
- Notification date
-
February 3, 2023
ForgeRock has deprecated the option to let Advanced Identity Cloud tenant administrators skip 2-step verification. You can continue to use the skip option in your tenants, but this functionality will be removed from Advanced Identity Cloud on April 2, 2024. Learn more in Tenant administrator mandatory 2-step verification FAQ.
- End-of-life date
-
April 2, 2024
ForgeRock Identity Cloud Email Server Service
- Notification date
-
April 12, 2021
Built-in Email Server Service
ForgeRock no longer supports the default email provider settings for use in production. The default email provider settings will only be available for testing purposes. Current customers can continue to use the default email provider settings for production purposes, but this functionality will reach end of life on April 12, 2022. Customers should move to using their own email provider.
- End-of-life date
-
April 12, 2022
Groovy OIDC Custom Claims Script
- Notification date
-
April 20, 2021
ForgeRock will continue to support the Groovy version of the OIDC custom claims script until it is end of lifed on April 20th 2022. Current customers can continue to use the Groovy version of the OIDC custom claims script for production purposes, but this functionality will reach end of life on April 20, 2022.
- End-of-life date
-
April 20, 2022
Marketplace
The Marketplace lets you quickly and easily extend the capabilities of the PingOne Advanced Identity Cloud by integrating third party services into your applications or user journeys. Advanced Identity Cloud provides a subset of Marketplace integrations out of the box in your environment.
Your Advanced Identity Cloud tenant provides the following Marketplace nodes. You can find them under the Marketplace header in the Advanced Identity Cloud admin UI’s drag-and-drop user journey editor.
| Integration | Use case |
|---|---|
Integrate with BioCatch scoring for identity proofing, continuous authentication, and fraud protection. The BioCatch platform develops behavioral biometric profiles of online users to recognize a wide range of human and non-human cybersecurity threats including malware, remote access trojans (RATs), and robotic activity (bots). |
|
Use Duo’s solution for adaptive authentication, bring your own device (BYOD) security, cloud security, endpoint security, mobile security, and two-factor authentication. |
|
Integrate with fingerprint.com to reduce fraud and improve customer experience. |
|
Enable a secure communication channel for Advanced Identity Cloud authentication journeys to communicate directly with the PingGateway. |
|
The HTTP Client node lets you make HTTP(S) requests to APIs and services external to Advanced Identity Cloud from within a journey. |
|
Integrate with the Daon IdentityX platform for MFA with mobile authentication or out-of-band authentication using a separate, secure channel. |
|
The iProov Authentication node integrates Advanced Identity Cloud authentication journeys with the Genuine Presence Assurance and Liveness Assurance] products from iProov. |
|
Integrate with Jumio identity verification to let you capture and submit your government-issued ID documents easily and securely. |
|
Interate with LexisNexis One Time Password (OTP) to use an out-of-band identity proofing method that provides stronger authentication for high-risk, high-value transactions. |
|
Integrates with Microsoft Intune to let you control features and settings on Android, Android Enterprise, iOS/iPadOS, macOS, and Windows 10/11 devices in your organization. |
|
Integrate with OneSpan Intelligent Adaptive Authentication (IAA) to help reduce fraud, improve customer experience, and meet compliance requirements. |
|
Integrate an Onfido check for identity verification, matching a user with their official identification documents. |
|
The PingOne node establishes trust between PingOne and Advanced Identity Cloud by leveraging a federated connection. The PingOne DaVinci API node executes an API call to PingOne DaVinci to launch a specific DaVinci flow. |
|
The PingOne Credentials nodes use the PingOne Credentials service to implement digital wallet pairing, credential management, and credential verification. |
|
PingOne Protect is a centralized identity threat protection service, securing your digital assets against online fraud attempts, such as account takeover and fraudulent new account registration. |
|
The PingOne Verify service lets you configure and use PingOne Verify nodes to provide four types of secure user verification: |
|
The RSA SecurID node lets you use the RSA Cloud Authentication Service (RSA ID Plus) or RSA Authentication Manager from within an authentication journey on your Advanced Identity Cloud environment. |
|
Integrate with Secret Double Octopus (SDO) to provide high-assurance, passwordless authentication system. |
|
Integrate Lexis-Nexis ThreatMetrix decision tools and enable device intelligence and risk assessment in Advanced Identity Cloud. |
|
Leverage Twilio for second factor authentication during new account or sign on scenarios. |
| Check this list periodically as we continue to expand our integrations. |
For details on developing and troubleshooting journeys, learn more in:
Release notes
Ping Identity continuously provides GA releases to PingOne Advanced Identity Cloud to introduce new features, fix known issues, and address security issues.
These GA releases are delivered through release channels:
| Sandbox and UAT environments are add-on capabilities. |
Scheduled release freezes
Rapid release channel freezes (all dates inclusive):
-
Tuesday, November 26, 2024 - Friday, November 29, 2024
-
Monday, December 23, 2024 - Thursday, January 2, 2025
Regular release channel freezes (all dates inclusive):
-
Friday, November 22, 2024 - Tuesday, December 3, 2024
-
Monday, December 16, 2024 - Monday, January 6, 2025
During a release freeze, Ping Identity only makes critical updates.
Release channels
Rapid channel
If you have a sandbox[2] environment, a continuous stream of the newest features and fixes are deployed there, as soon as they are ready for GA release. This lets you test and evaluate GA releases to make sure they are compatible with your Advanced Identity Cloud implementation. It also lets Ping Identity qualify and establish GA releases through cumulative usage and soak testing, typically over a two-week period. When a GA release has been established, it is allocated to the regular channel and deployed into your development, UAT[3], staging, and production environments.
For early access to documentation about features in the rapid channel, learn more in Rapid channel features.
Hotfixes
In general, Ping Identity applies critical hotfixes to both the rapid and regular channels.
On occasion, Ping Identity may apply hotfixes, as necessary, to the rapid channel only. These hotfixes will be released to the regular channel at a later time.
Further information
-
Learn more about release lifecycles.
-
Subscribe to release notifications:
-
Scroll down to Documentation Digests.
-
Check the Advanced Identity Cloud Rapid Channel Changelog checkbox.
-
Check the Advanced Identity Cloud Regular Channel Changelog checkbox.
-
Submit a Backstage Support ticket.
Regular channel changelog
Subscribe to get automatic updates: Regular channel changelog RSS feed
For release notes published before August 2023, refer to the Regular channel changelog archive.
October 2024
15 Oct 2024
Versions 15158.7
Key features
- Scripted SAML v2.0 NameID values(AME-25921)
-
The NameID mapper script lets you customize SAML v2.0 NameID values per application.
- Set State node (AME-26443)
-
The Set State node lets you add attributes to the journey state.
- Http Client service (AME-27936)
-
The new Http Client service lets you create named instances that you can reference from a next-generation script to make mTLS connections to external services.
Learn more in Access HTTP services.
- Support for LINE as a social identity provider (AME-28672)
-
You can now configure a social provider authentication with LINE Login when signing in from a browser. There is a separate configuration for authenticating from a mobile app.
Learn more in Social authentication.
- Advanced Reporting[12] (ANALYTICS-763)
-
Advanced Identity Cloud now offers Advanced Reporting to let you create custom reports on activity in your tenant environments. You can query a number of metrics to create useful reports for your company.
Learn more in Advanced Reporting.
- Identity Governance request and approval forms[9] (IAM-6358)
-
Identity Governance now lets you create request and approval forms to make it easier for end users to request access to applications.
Learn more in Identity Governance forms.
- Additional cloud connectors
-
The following connectors are now bundled with Advanced Identity Cloud:
-
AWS IAM Identity Center Connector v1.5.20.23 (OPENIDM-20038)
-
Box Connector v1.5.20.23 (OPENIDM-20367)
Learn more in the ICF documentation.
-
- Enable Device Management node (SDKS-2919)
-
The new Enable Device Management node lets end users manage devices from their account.
Enhancements
-
FRAAS-21728: Updated the cookie domain API to add default values for GET requests where cookie domain values haven’t been overridden by a PUT request. The default values are derived from the existing tenant cookie domain configuration, so are backward compatible.
-
AME-26594: Added secrets API binding to all next-generation script contexts.
-
AME-27129: Added option to exclude client certificate from SAML hosted SP metadata.
-
AME-27792: Added
AM-TREE-LOGIN-COMPLETEDaudit log event that outputs aresultofFAILED. -
AME-27839: Added the ability to specify connection and response timeouts for Http Client service instances.
-
AME-28008: You can now disable certificate revocation checks, or all certificate checks entirely, on your Http Client service instances.
-
IAM-4753: Added a toggle to the application catalog to hide deprecated templates.
-
OPENIDM-19698: Added ability to use wildcards in the
watchedFieldsproperty. -
OPENAM-22666: The well-known endpoint is no longer required when configuring a social identity provider service. If it is not provided, AM uses the client secret for signature verification.
-
SDKS-1752[13]: Enhance WebAuthn Authentication node, OATH Token Verifier node, and Push Result Verifier node to store creation date and last sign-on date.
Fixes
-
FRAAS-16228: Promotions are now halted if the AM CORS service is disabled; the service is essential to the correct functioning of promotions.
-
FRAAS-21715: Environments can now be unlocked if configuration rollback fails because there are no promotions to roll back.
-
OPENAM-15410: Fixed an issue that prevented customization of claims if
profileandopenidscopes are requested. -
OPENAM-20609: Fixed inconsistent error message when generating access token using refresh token after changing username.
-
OPENAM-21974: Adds an OAuth 2.0 client configuration for the new version of the LinkedIn provider.
-
OPENAM-22298: Log unretrieved SP and IdP descriptors in SAML2 Authentication node.
-
OPENIDM-19336: Fixed an issue where delegated administrators couldn’t add new users to their organization.
-
OPENIDM-20238: Fixed an issue where clustered reconciliation can fail with "Expecting a Map or List" under specific circumstances.
September 2024
18 Sep 2024
Version 14800.7
Key features
- DocuSign application template (IAM-6194)
-
The DocuSign application lets you manage DocuSign service accounts and synchronize DocuSign accounts and Advanced Identity Cloud identities.
Enhancements
-
IAM-6493: The PingOne application template now supports specifying an LDAP gateway.
-
IAM-6868: Added screen reader label to end-user access approval button.
-
IAM-6870: Added screen reader label to end-user access request button.
-
IAM-6880: Added a toggle in the hosted pages journey settings to disable the error heading fallback that displays if there is no heading in the page content. (FORGEROCK-1582)
03 Sep 2024
Version 14620.4
Key features
- BeyondTrust application template (IAM-6492)
-
The BeyondTrust application lets you manage and synchronize data from Advanced Identity Cloud to BeyondTrust.
August 2024
20 Aug 2024
Version 14442.2
06 Aug 2024
Version 14260.4
Key features
- Adobe Admin Console application template (IAM-6195)
-
The Advanced Identity Cloud Adobe Admin Console application lets you manage users, groups, and user group memberships between Adobe Admin Console and Advanced Identity Cloud.
- Paris added to data residency regions (FRAAS-20850)
-
The Paris region (europe-west9) is now available. For more information, refer to:
Enhancements
-
AME-26135[13]: The Advanced Identity Cloud admin UI now lets you configure a secret from a secret store for these features:
-
Identity Gateway agents
-
Web and Java agents
-
OAuth 2.0 agents
You can now optionally set a secret label identifier for these features instead of a manually entered client secret.
-
-
IAM-4279: Display available ESV placeholders in Decision Node script editor.
-
IAM-4654: Enable creation of all script types in Advanced Identity Cloud admin UI.
Fixes
-
FRAAS-20397: The promotion process now retries tagging the lower environment after a network interruption, preventing blocking promotion failures.
-
IAM-5356: Session logout warning not displaying when maximum idle time set to a higher value than maximum session time.
-
IAM-6628: New draft option shouldn’t exist for out-of-the-box workflows.
-
IAM-6779: Pagination for list of apps not working when there are over 4000 apps.
July 2024
23 Jul 2024
Version 14077.0
Fixes
-
FRAAS-20970: The
/monitoring/logsendpoint now returns anX-Ratelimit-Limitheader with a fixed value of 60. Previously, the value was misleading due to the way it was calculated when scaling an environment’s resources. TheX-Ratelimit-Remainingheader continues to report the number of requests that may be sent before receiving a rate limited response. -
FRAAS-20983: Promotion reports now list changes to the default OAuth 2.0 provider.
11 Jul 2024
Version 13945.9
Key features
- Additional cloud connectors
-
The following connectors are now bundled with Advanced Identity Cloud:
-
Adobe Admin Console connector (OPENIDM-19843)
-
DocuSign connector (OPENIDM-20190)
For more information, refer to the ICF documentation.
-
Fixes
-
OPENIDM-20142: Resolved a communication failure between Advanced Identity Cloud and RCS instances that could result in a prolonged failure to activate remote connectors.
Changed functionality
-
OPENIDM-20178: You can’t use scope private fields in query filters. For more information, refer to Security Advisory #202402.
10 Jul 2024
Version 13945.8
Key features
- Product name change for Identity Cloud (FRAAS-20178)
-
To align ForgeRock products with Ping family names, ForgeRock Identity Cloud has been renamed to PingOne Advanced Identity Cloud. Name and logo changes have been updated throughout the user interfaces, and documentation updates will occur when the UI changes are released to the regular channel.
For more information, refer to the New names for ForgeRock products FAQ.
- Organization-based certification[9] (IAM-5237)
-
Advanced Identity Cloud introduces organization-based certification—a new Identity Governance feature that lets you configure B2B customers and partners as organizations and allow designated organization administrators to certify access for the users in their organization.
For more information, refer to Certify access by organization.
- Segregation of duties (SoD) (IAM-5624)
-
Advanced Identity Cloud introduces a new Identity Governance compliance feature designed to help you create and manage segregation of duties (SoD) policies and rules. SoD is a crucial practice that ensures no single individual has privileges that could lead to a conflict of interest.
For more information, refer to Configure compliance policies.
- Scoping rules[9] (IAM-5629)
-
Advanced Identity Cloud introduces a new Identity Governance feature that lets you create scoping rules to determine what actions an end user can perform and on what resource.
For more information, refer to Configure scoping rules to resources.
Enhancements
-
IAM-4785: Synchronize only the modified properties on a target source during reconciliation of applications.
-
IAM-5487: Correlation rules moved to the top of the reconciliation settings page.
-
IAM-6231: Scripted Decision Node now updates the list of scripts when a script is added or edited.
-
IAM-6544: Add reviewer column to administrator list view of compliance violations.
Fixes
-
FRAAS-20604: Removed superfluous AM metrics related to token store internals:
-
am_cts_connection_count -
am_cts_connection_seconds -
am_cts_connection_seconds_total -
am_cts_connection_state -
am_cts_reaper_cache_size -
am_cts_reaper_deletion -
am_cts_reaper_deletion_count -
am_cts_reaper_deletion_total
-
-
IAM-6135: ESV values containing accents get corrupted by encoding process.
-
IAM-6562: Label duplicated for OAuth 2.0 access token and ID token endpoints.
-
IAM-6669[9]: Badge count of violations in end-user navigation doesn’t update when an action is performed.
01 Jul 2024
Version 13848.13
Fixes
-
OPENIDM-18495[14]: Disable sorting in the connector data tab in the IDM admin UI (native console). (FORGEROCK-1582)
June 2024
26 Jun 2024
Version 13848.8
Key features
- Certificate API[15] (FRAAS-7319)
-
You can now use the certificate API to upload SSL certificates to your tenant environments. You can create the certificates in two ways:
-
Use a tenant-generated private key that is only accessible by the tenant itself. The tenant generates the CSR, and you install the resulting certificate on the same tenant. Refer to Create a certificate using a tenant-generated private key.
-
Use a locally generated private key that you retain access to. You generate the CSR locally and install the resulting certificate on as many tenants as you need. Refer to Create a certificate using a locally generated private key.
-
- Promotion rollback API (FRAAS-20048)
-
You can now roll back configuration promotions using the API. You can roll back an environment successively to revert as many previous promotion changes as needed.
For more information, refer to Run a rollback.
- New utility binding available for scripting (AME-25519)
-
You can now use a new utility binding in your scripts to access several common utility classes. For example, the utility binding includes classes for generating random UUIDs and for base64 encoding and decoding.
- PingOne Protect nodes (TNTP-180)
-
The following PingOne Protect nodes are now available in the regular channel:
-
These nodes replace the deprecated PingOne Protect Marketplace nodes.
Before using the PingOne Protect nodes, you must:
Enhancements
-
AME-26199: Added the ability to set additional claims, including non-registered claims, during JWT assertion and generation, as per the specification.
-
AME-26820: Provided library scripts with access to all common script bindings.
-
AME-26993: Enhanced secret mapping for agents. Updating a secret label identifier value now causes any corresponding secret mapping for the previous identifier to also be updated, provided no other agent shares that secret mapping. If another agent shares the secret mapping, PingOne Advanced Identity Cloud creates a new secret mapping for the updated identifier and copies its aliases from the previously shared secret mapping.
-
AME-27346: Renamed Secret ID Identifier to Secret Label Identifier in the SAML remote entity provider configuration.
-
AME-27478: Renamed Client ID Token Public Encryption Key property to ID Token Encryption Public Key in the OAuth 2.0 client configuration.
-
AME-27775: Added scripting thread pool metrics per script context.
-
OPENAM-16564: Enabled next-generation scripts to access the cookies in incoming requests.
-
OPENAM-21800: Added page node functionality to next-generation scripts.
-
OPENAM-21933: Enabled auto-encoding of the
httpClientform body in next-generation scripts.
Fixes
-
FRAAS-20786: Fixed the case where a promotion attempts to delete the same application more than once.
-
FRAAS-19461: Fixed an issue where large audit logs could be missing from IGA events and processing.
-
FRAAS-20154: ESVs with special characters are now correctly encoded. The workaround of double-encoding ESVs is no longer required.
-
OPENAM-21748: Restored the missing
getwrapper function forHiddenValueCallbackin next-generation scripting. -
OPENAM-21830[13]: Unable to get entitlement info hashmap values in SAML
IdPAdapterscript -
OPENAM-21864: Fixed an issue that prevented setting the tracking cookie to resume a journey after returning from a redirect flow.
-
OPENAM-21897: Corrected inconsistent results from the policy
evaluateTreeendpoint. -
OPENAM-21951: Enabled setting of the
selectedIndexproperty in aChoiceCallbackin next-generation scripts. -
OPENAM-22181: Corrected an issue with UMA
approveandapproveAllrequests failing. -
TNTP-166:
-
Add configuration options to P1 Verify Authentication nodes.
-
Verify code not visible when using QR option.
-
Set claim mapping only in shared state in P1 Proofing node.
-
11 Jun 2024
Version 13664.8
Key features
- Localize the Advanced Identity Cloud admin UI[13] (IAM-6267)
-
You can now localize static content and server messages in the Advanced Identity Cloud admin UI to support your company’s tenant administrators in different language locales. The localization is implemented in the same way as the existing localization functionality used by the login and end-user UIs. Refer to Configure tenant localization.
- Oracle E-Business Suite app template (IAM-6342)
-
The Advanced Identity Cloud Oracle E-Business Suite (EBS) application lets you manage and synchronize accounts between EBS and Advanced Identity Cloud.
Enhancements
-
FRAAS-15404: When updating ESV secrets, the API saves a new secret version only when it differs from the previous value.
-
FRAAS-19982: Configuration promotion now fails if Advanced Identity Cloud services do not restart successfully with the new configuration.
-
IAM-6376: In the applications rules tab, you can now configure custom logic to perform specific actions, such as sending an email, when an account is successfully created or updated.
-
IAM-6380: In the applications rules tab, you can now use the provisioning failure rule to configure custom logic to perform specific actions when provisioning fails.
Fixes
-
FRAAS-11180: Authentication session whitelisting is now enabled by default for new tenants
-
IAM-5593: Adding roles to certain objects no longer breaks readable titles
-
IAM-6537: Journey import now alerts users if they try to import a file containing missing references
-
IAM-6548[13]: Advanced Identity Cloud admin UI now loads Identity Gateway profile properties
07 Jun 2024
| The following issues were released on May 30, 2024 but inadvertently excluded from the changelog. |
Version 13465.7
Key features
- Improved promotion of applications (FRAAS-19241)
-
It is now possible to promote applications via the API and not just the UI.
Additionally, the provisional report has been improved to only show applications that have changed, rather than show all applications in the report.
- Epic EMP application template (IAM-2407)
-
The Advanced Identity Cloud Epic EMP application lets you manage and synchronize data between Epic EMP and Advanced Identity Cloud.
Enhancements
-
IAM-2653: Configure object properties with user-friendly display names.
-
IAM-3857: Application list view displays enabled/disabled status of enterprise apps.
-
IAM-5913[9]: Create custom access request workflows.
May 2024
20 May 2024
| The following issues were released on February 6, 2024 but inadvertently excluded from the changelog. |
Key features
- Social Provider Handler node (OPENAM-20924)
-
The new Social Provider Handler node adds an outcome to better handle interruptions in a social authentication journey after requesting profile information.
14 May 2024
Version 13313.2
Key features
- Event-based certification[9] (IAM-5148)
-
Identity Governance now allows tenant administrators to configure certifications that are triggered by specific governance events, a process referred to as event-based certification. This method offers faster certification resolution compared to scheduled—and often lengthy—campaigns spanning weeks or months and involving numerous applications, intricate rules, and hundreds of reviewers.
The event-based certifications feature kicks off an identity certification for the following events:
-
User create. Advanced Identity Cloud detects when a user account has been created.
-
User modify. Advanced Identity Cloud detects when an existing user account has been modified or updated.
-
Attribute change. Advanced Identity Cloud detects changes in the attributes of an existing user account.
-
User delete/deactivate. Advanced Identity Cloud detects if a user account has been deleted or deactivated.
For more information, refer to Certify access by event.
-
- Grant entitlements to users and roles[9] (IAM-5146)
-
Identity Governance now allows tenant administrators to carry out more fine-grained entitlement grants for their user accounts. Tenant administrators can now:
-
Create a role and grant entitlements to the role.
-
Revoke entitlements in a role.
-
Grant entitlements to a user account.
-
Revoke entitlements from a user account.
For more information, refer to Manage entitlements.
-
- Authenticate gateway and agent profiles with a shared secret (IAM-5833)
-
The Advanced Identity Cloud admin UI for gateways and agents now lets you authenticate with a shared secret instead of a password. Use this to set the label for the shared secret.
- Authenticate OAuth 2.0 applications with a shared secret (IAM-6028)
-
The Advanced Identity Cloud admin UI for OAuth 2.0 applications now lets you authenticate with a shared secret instead of a password. Use this to set the label for the shared secret.
Enhancements
-
IAM-3199: HTML styling in the Message node journey editor allows you to left justify text.
Fixes
-
FRAAS-19334: Failure to look up service account names following changes applied through the ESV API.
-
IAM-5079[9]: End-user roles page sometimes shows role grants as conditional even when the grants are direct.
-
IAM-5363[9]: Show the total number of approvals and access reviews in the inbox.
-
IAM-5858[9]: Missing support for access request global configuration options.
-
IAM-6138[9]: The governance events filter builder incorrectly validates
beforeandafterproperties in the user created state. -
IAM-6176[9]: The end-user access request rejection is missing a justification message.
-
IAM-6203[9]: The governance events filter doesn’t use
aftertemporal values for user created flows. -
IAM-6209: The Advanced Identity Cloud admin UI navigation panel text appears when the panel is collapsed.
-
OPENIDM-19879: Identity management reconciliation service processes additional source query pages whenever a query returns a
pagedResultsCookie. -
OPENIDM-19924: Unnecessary quotes not being removed from email addresses.
-
TNTP-166:
-
Add configuration options to P1 Verify Authentication nodes.
-
Verify code not visible when using QR option.
-
Set claim mapping only in shared state in P1 Proofing node.
-
01 May 2024
Version 13162.0
Key features
- Identity Assertion node (AME-26821)
-
The new Identity Assertion node provides a secure communication channel for authentication journeys to communicate directly with ${ig.abbr}.
- PingOne Verify service (TNTP-118)
-
The PingOne Verify service lets you configure and use PingOne Verify nodes (PingOne Verify Authentication node and PingOne Verify Proofing node) in your authentication journeys.
For more information, refer to PingOne Verify service.
- PingOne nodes (TNTP-119)
-
- PingOne node
-
The PingOne node node establishes trust between PingOne and Advanced Identity Cloud by leveraging a federated connection. For more information, refer to PingOne node.
- PingOne DaVinci API node
-
The PingOne DaVinci API node node lets an Advanced Identity Cloud journey trigger a PingOne DaVinci flow through the API integration method. For more information, refer to PingOne DaVinci API node.
Enhancements
-
AME-26085: SAML v2.0
NameIDmapping can be configured per SP -
AME-27126: A SAML SP can now authenticate to IDPs using mutual TLS (mTLS) when making an artifact resolution request.
-
AME-27133: "Secret ID" has been renamed to "Secret Label" for secret mappings
-
The following services now support configuration using the Secrets API:
-
AME-16536: The OAuth 2.0 provider hash salt secret
-
AME-25885: The persistent cookie core authentication attribute
-
AME-26110: The client-side session signing key
-
AME-26134: The social provider service
-
AME-26441: The new CAPTCHA node (replaces the legacy CAPTCHA node)
-
AME-26442: The OIDC Token Validator node now lets you store the client secret in any type of secret store
-
AME-26633: The OAuth 2.0 client
clientJwtPublicKey -
AME-26637: The OAuth 2.0 client
idTokenPublicEncryptionKey -
AME-26639: OAuth 2.0 client mTLS self-signed certificates
-
AME-26668: The post authentication process (PAP) replay password
-
AME-26670: The web agents replay password key
-
AME-26998: The OAuth 2.0 client secret
-
-
The following services now support rotation of secrets using secret versions:
-
AME-25988: The persistent cookie encryption secret
-
AME-26999: OAuth 2.0 client secrets
-
AME-27000: OAuth 2.0 client
clientJwtPublicKey -
AME-27001: OAuth 2.0 client mTLS self-signed certificates
-
-
OPENAM-21031: The performance of Google KMS has been improved by the introduction of caching.
Fixes
-
FRAAS-19596: Promotion report should include changes to realm authentication settings.
-
OPENAM-21473: If you set the collection method of a Certificate Collector node to
REQUEST,HEADER, orEITHER, and the certificate is not provided in the request or in the header, the node now returns a status ofNot collected.
April 2024
22 Apr 2024
Version 13019.10
Key features
- Additional cloud connectors
-
The following connectors are now bundled with Advanced Identity Cloud:
-
Dropbox connector (OPENIDM-19838)
-
PingOne connector (OPENIDM-19736)
-
Webex connector (OPENIDM-19920)
For more information, refer to the ICF documentation.
-
Enhancements
-
OPENIDM-19921: The following connectors included with Advanced Identity Cloud were upgraded to 1.5.20.21:
-
Google Apps connector
-
Microsoft Graph API connector
-
AWS connector
For details, refer to 1.5.20.21 Connector changes.
-
16 Apr 2024
Version 13019.8
Enhancements
-
FRAAS-19414: You can now configure custom domains directly in all environments without needing to create ESVs or promote configurations. Existing custom domains will be migrated automatically.
-
FRAAS-19566: Add
_sortKeysquery parameter to ESV API -
IAM-4585[9]: Request and approvals page now shows the current and past approvers, their decisions, and the dates
-
IAM-4968: Expose additional top-level parameters in the advanced section of mapping pages
-
IAM-5674: Target application can use ONBOARD action for FOUND situation
-
IAM-5769: Add grouping logic to journey node items
Fixes
-
IAM-3927[9]: Identity Governance now enforces mandatory comments (if configured) for revoke and allow exceptions
-
IAM-4309[9]: Access reviews no longer display the internal
lastSyncuser attribute -
IAM-4762: Authoritative apps are now requestable
-
IAM-4986: Platform UI can now determine whether to use a pagedResultsCookie or offset for paging results
-
IAM-5076[9]: "Abstain from action" option no longer displays when a campaign has expired
-
IAM-5362: Marking a property as an authoritative app entitlement no longer causes target app config to be generated
-
IAM-5413: Account deprovisioning now works in AD/LDAP after deleting a user identity
-
IAM-5794: Border color of sign-in input fields in hosted pages can now be overridden in themes
-
IAM-5810: Add option for email configuration to specify UTF-8 address support
-
IAM-5814: Allow fixed application usernames to be chosen for custom SAML apps
-
IAM-5875: Journey editor no longer orphans deleted nodes
04 Apr 2024
Version 12820.5
Key features
- HTTP Client node (TNTP-136)
-
The HTTP Client node lets you make HTTP(S) requests to APIs and services external to Advanced Identity Cloud from within a journey.
Use the HTTP Client node to simplify the integration with a broad range of external services by making direct HTTP(S) requests.
For more information, refer to HTTP Client node.
- PingOne Service (TNTP-148)
-
The PingOne Service lets you set up the PingOne service in your Advanced Identity Cloud tenant so you can add Ping Identity nodes to your authentication journeys.
For more information, refer to PingOne Service.
03 Apr 2024
Version 12820.5
Enhancements
-
FRAAS-19341: ESV support for AES keys through the
base64aesencoding typeFor more information, refer to Encoding format.
-
IAM-5602: Add functionality for viewing and deleting user’s trusted devices in Advanced Identity Cloud admin UI
For more information, refer to Manage trusted devices (tenant administrators) and Configure visible information and end user actions (end users).
March 2024
26 Mar 2024
Version 12589.7
Key features
- Implemented "remember me" functionality
-
You can now display a checkbox on the end user sign-in card that makes it remember and pre-populate the username.
Refer to Customize login and end-user pages
Enhancements
-
FRAAS-15371: Added ability to prevent search engines from indexing end user login pages
-
IAM-4257: Updated Azure AD app template to accommodate the latest changes
-
IAM-4342: Updated MSGraphAPI Connector with a new configuration property
-
IAM-4892: Updated Salesforce app template to accommodate the latest changes
-
IAM-4900: Added build number and next release cycle date range to user interface
-
IAM-5334: Exposed guarded string as an object type property in scripted template
-
IAM-5459: KBA answer field should contain question context
-
IAM-5461: Custom login error not read with priority
-
IAM-5503: Rename "Orchestrations" to "Workflows"
-
IAM-5563: Updated Google Apps app template to accommodate the latest changes
-
IAM-5603: Added ability to view device details for managed user identities
-
IAM-5606: Added "POWERED BY" metadata to journey nodes
-
IAM-5748: Made 'PingOne' a special case on the federation providers page
Fixes
-
IAM-4918: Check that user has correct permissions when requesting access for other users
-
IAM-5287: Make username, password, and KBA fields H3 elements
-
IAM-5598: Prevent styled terms and conditions included in a journey from making authenticate call fail
-
IAM-5611: Correct ability to revoke custom apps from roles, or edit them from the role view
-
IAM-5641: Custom Endpoints search returned endpoints created by other areas of the UI
-
IAM-5692: Remove console errors when opening the "Add Bravo user" modal
-
IAM-5767: SAML SSO was not remembered when app is saved from another tab after SSO setup
-
IAM-5873: Fix
.getTranslationcall in Vue -
OPENIDM-19405: Special non-ascii characters in emails sent from Advanced Identity Cloud would fail
25 Mar 2024
Notices
ForgeRock deprecated the option to let Advanced Identity Cloud tenant administrators skip 2-step verification on Friday, February 3, 2023.
This is a reminder that the end-of-life date for this deprecation is Tuesday, April 2, 2024, when the skip option functionality will be removed from Advanced Identity Cloud.
You have until this date to update your tenants to make 2-step verification mandatory for all tenant administrators. For more information, refer to Tenant administrator mandatory 2-step verification FAQ.
13 Mar 2024
Enhancements
-
FRAAS-19288: Autonomous Access and Identity Governance are now available in the Jakarta (asia-southeast2) region
05 Mar 2024
Deprecations
- Duo authentication node (FRAAS-19062)
-
ForgeRock has deprecated the Duo authentication node because Duo has deprecated Traditional Duo Prompt that is used by the Duo node.
ForgeRock created Duo Universal Prompt node in anticipation of this depreciation. You should use Duo Universal Prompt node instead of Duo node (Deprecated).
Refer to Duo Universal Prompt node.
February 2024
28 Feb 2024
Notices
ForgeRock deprecated the option to let Advanced Identity Cloud tenant administrators skip 2-step verification on Friday, February 3, 2023.
The end-of-life date for this deprecation has been moved to Tuesday, April 2, 2024, when the skip option functionality will be removed from Advanced Identity Cloud.
You have until this date to update your tenants to make 2-step verification mandatory for all tenant administrators. For more information, refer to Tenant administrator mandatory 2-step verification FAQ.
16 Feb 2024
Notices
ForgeRock deprecated the option to let Advanced Identity Cloud tenant administrators skip 2-step verification on Friday, February 3, 2023.
The end-of-life date for this deprecation is Friday, March 1, 2024, when the skip option functionality will be removed from Advanced Identity Cloud. You have until this date to update your tenants to make 2-step verification mandatory for all tenant administrators. For more information, refer to Tenant administrator mandatory 2-step verification FAQ.
08 Feb 2024
Key features
- Advanced Identity Cloud security guide update
-
ForgeRock has updated the Advanced Identity Cloud security guide to advise caution with using the
X-Forwarded-ForHTTP header to identify the originating IP address of a client due to security and privacy concerns.Instead, you should consider using the
X-Real-IPorX-Trusted-Forwarded-ForHTTP headers as trusted replacements. Refer to Identify originating client IP addresses.
06 Feb 2024
Key features
- Create and manage custom relationship properties (OPENIDM-19106, OPENIDM-19109)
-
You can now create and manage custom relationship properties using the Advanced Identity Cloud admin UI.
- Schema API improvements (OPENIDM-19107)
-
You can now directly modify managed object schemas over REST using the schema API. This capability includes configuring custom relationship properties.
- Password timestamps (OPENIDM-19262)
-
Enabling this new feature lets you view or query when a user password was last changed and when it is set to expire.
- Fingerprint Profiler and Fingerprint Response nodes (TNTP-130)
-
The Fingerprint nodes nodes let you integrate your Advanced Identity Cloud environment with the Fingerprint platform to help reduce fraud and improve customer experience.
- iProov Authentication node (TNTP-131)
-
The iProov authentication node integrates Advanced Identity Cloud authentication journeys with the Genuine Presence Assurance and Liveness Assurance products from iProov.
- RSA SecurID node (FRAAS-18037)
-
The RSA SecurID node lets you use the RSA Cloud Authentication Service (RSA ID Plus) or RSA Authentication Manager from within an authentication journey on your Advanced Identity Cloud environment.
Enhancements
-
OPENIDM-17878: Allow access to operational attributes in the Advanced Identity Cloud data store
-
OPENIDM-19674: The relationship-defined virtual property (RDVP) schema editor allows you to edit the
flattenPropertiesproperty. The anaged object schema editor allows you to edit thenotifyRelationshipsproperty.
Fixes
-
FRAAS-18398: Allow the HTTP OPTIONS method on calls to /openidm/config/* endpoints for CORS preflight checks
-
FRAAS-18526: Script library functionality can’t be used in the UI in certain environments
-
IAM-5656: Fix alignment of text, buttons, and links in Message nodes
-
IAM-5660: Hosted pages not displaying list of themes
-
OPENIDM-18743: Attempts to use connectors fail with null pointer exceptions when
operationOptionsis defined in the provisioner configuration -
OPENIDM-18957: The scheduler now attempts to release any triggers it attempted to acquire during a timeout due to an unresponsive repository
-
OPENIDM-19141: Workflow engine queries now properly honor
tablePrefixandtablePrefixIsSchemaconfiguration options -
OPENIDM-19279: Resource collection is required to create a relationship
January 2024
22 Jan 2024
Key features
- Advanced Identity Cloud use case catalog
-
Introducing the release of the Advanced Identity Cloud use case catalog, a collection of guides that focus on tenant administrator use cases and third-party integrations.
19 Jan 2024
Key features
- New Identity Governance capabilities[9][16] (IAM-4617, IGA-1664)
-
The Workflow UI lets you define custom workflow definitions for all access request types.
Role membership certification, a new certification type for access reviews, lets you review and certify roles and the users who have access to roles. Primary reviewers are role owners, a single user, or users assigned to a role.
09 Jan 2024
Key features
- Schedule jobs directly in the Advanced Identity Cloud admin UI (IAM-3489)
-
You can now schedule the following jobs directly in the Advanced Identity Cloud admin UI without using the IDM admin UI (native console):
-
Scripts: Execute a script at a regular interval.
-
Task scanner: Execute a scan of identities using a complex query filter at a regular interval. The scan can then execute a script on the identities returned by the query filter.
-
Enhancements
-
FRAAS-7382: Add ability to include JavaScript snippets in login and end-user UIs
-
IAM-4514[9]: Allow reviewers to add user, entitlement, and role columns to an access review
-
IAM-4739: Add read schema option to SCIM application template to discover custom schemas/attributes
-
IAM-5138[13]: Add ability to view reports to end-user UI
-
IAM-5201: Focus on first input field or button automatically upon page load
-
IAM-5268: Add source-missing situation rule to authoritative applications
Fixes
-
IAM-4810: Custom endpoint UI missing context option
-
IAM-5072: Inbound mapping tab shows in target applications
-
IAM-5171: Azure Active Directory application template doesn’t return a user’s role membership
-
IAM-5187: LDAP v2.1 application template doesn’t clear
dc=example,dc=combase DN -
IAM-5238: LDAP application template is missing the group object classes property
-
IAM-5422[9]: Entitlement owner doesn’t show in the entitlement list
-
OPENAM-21856: Introspecting stateless token with IG/Web agents will cause
OAuth2ChfException
December 2023
12 Dec 2023
Key features
- Duo Universal Prompt node (FRAAS-15675)
-
The Duo Universal Prompt node lets you provide two-factor authentication using Duo’s Universal Prompt authentication interface. You can integrate Universal Prompt with your web applications using the Duo Web v4 SDK.
For details, refer to Duo Universal Prompt node.
Enhancements
-
AME-22326: The
httpClientavailable in scripts now automatically adds the currenttransactionIdas an HTTP header. This lets you correlate caller and receiver logs to make requests to other ForgeRock products and services. -
AME-25392: Add
org.forgerock.openam.scripting.api.PrefixedScriptPropertyResolver, used for accessing ESVs from scripts, to the allowlist forSAML2_SP_ADAPTERandSAML2_IDP_ADAPTERscript types -
AME-25433: Add
com.sun.crypto.provider.PBKDF2KeyImpl,javax.crypto.SecretKeyFactory, andjavax.crypto.spec.PBEKeySpecto the allowlists for Scripted Decision nodes and Configuration Provider nodes -
AME-25608: Add auditing for opening and closing connections for the LDAP decision node, ID Repo service, and Policy Configuration service
-
AME-25630: Add
java.security.spec.InvalidKeySpecExceptionto the allowlist for the Scripted Decision and Configuration Provider nodes -
FRAAS-17939: Some connectors included with Advanced Identity Cloud were upgraded to the following versions:
1.5.20.19For details, refer to 1.5.20.19 Connector changes.
-
Microsoft Graph API connector
-
SCIM connector
1.5.20.18For details, refer to 1.5.20.18 Connector changes.
-
Google Apps connector
-
Microsoft Graph API connector
-
Salesforce connector
-
SCIM connector
-
Workday connector
-
-
IAM-4511: Hide fields in the Users & Roles tab when editing and creating unreadable properties
-
IAM-4615: Add a "Skip to main content" link to page headers
-
OPENAM-16897: The OAuth 2.0 Device grant flow can now return either JSON or HTML
-
OPENIDM-19037: Update property value substitution to reflect boolean value in the UI
Fixes
-
COMMONS-1397: Audit event log entries not logged due to thread contention
-
FRAAS-17686: Add
org.forgerock.json.jose.jwe.JweHeaderto the allowlists for theAUTHENTICATION_TREE_DECISION_NODEandCONFIG_PROVIDER_NODEscript types -
IAM-4401: Disabling
Clear-Site-Dataheader breaks realm login -
IAM-4991: When a
suspendedIdis in use, redirect tofailureUrlfails -
IAM-5075: Login messages are read twice by screen readers
-
IAM-5186: User identity related values aren’t saved after removal
-
OPENAM-17331: Disabled SNS endpoints can now be re-enabled
-
OPENAM-17816: OAuth 2.0 requests without a
Content-Typeheader fail with a 500 error -
OPENAM-19282: Recovery Code Display node only works immediately after a registration node
-
OPENAM-19889: Policy evaluation fails when subject is agent access token JWT
-
OPENAM-20026: Social IDP with trailing whitespace in the name can’t be deleted using the UI
-
OPENAM-20329: Issuer missing from OAuth 2.0 JARM response
-
OPENAM-21053: Missing
userIdfrom access audit log whenorg.forgerock.security.oauth2.enforce.sub.claim.uniqueness=falsein JWT client authentication flow -
OPENAM-21421: Scripting logger name isn’t based on logging hierarchy convention
-
OPENAM-21476: Persistent cookie is not created when using Configuration Provider node
-
OPENAM-21484: Introspection of a stateful refresh token for claims field for known OAuth2 fields is now a string and not nested in a list
-
OPENIDM-19328: Fix queued sync to recover following node restart
November 2023
30 Nov 2023
Fixes
-
IAM-5275: Advanced Identity Cloud admin UI doesn’t add query parameters to the logout URL
-
IAM-5289: Fix warning message when
maxidletimeis greater than 24.8 days
Notices
ForgeRock deprecated the option to let Advanced Identity Cloud tenant administrators skip 2-step verification on Friday, February 3, 2023.
The end-of-life date for this deprecation is Friday, March 1, 2024, when the skip option functionality will be removed from Advanced Identity Cloud. You have until this date to update your tenants to make 2-step verification mandatory for all tenant administrators. For more information, refer to Tenant administrator mandatory 2-step verification FAQ.
14 Nov 2023
Key features
- Next generation scripting enhancements (AME-25928)
-
The next generation scripting engine for journey decision node scripts lets you:
-
Reduce the need to allowlist Java classes with a stable set of enhanced bindings.
-
Simplify scripts with fewer imports and more intuitive return types that require less code.
-
Debug efficiently with clear log messages and a simple logging interface based on SLF4J.
-
Make requests to other APIs from within scripts with a more intuitive HTTP client.
-
Modularize your scripts by reusing common code snippets, including external libraries such as CommonJS, with library scripts.
-
Access identity management information seamlessly through the
openidmbinding.
The next generation engine can’t use legacy scripts.
If your Scripted Decision node uses legacy scripts, you must convert them to use updated bindings to take advantage of the benefits of the next generation scripting engine.
Where possible, you should migrate legacy scripts to take advantage of next generation stability.
For more information, refer to Next-generation scripts.
-
- Gateway Communication node (FRAAS-17380)
-
Lets Advanced Identity Cloud authentication journeys communicate directly with the PingGateway (${ig.abbr}).
This secure communication channel extends the Advanced Identity Cloud capabilities with ${ig.abbr} features, such as validating a Kerberos ticket and performing other certificate handshakes.
For details, refer to Gateway Communication overview.
Enhancements
-
FRAAS-3841: Activate and deactivate journeys in the Advanced Identity Cloud admin UI. Refer to Deactivate journeys.
-
IAM-4191: Allow tenant session cookie name to be configured. Refer to Session cookie name.
-
IAM-4735: Add support for schema discovery in application templates
-
IAM-4806: Show outbound tenant IP addresses in Advanced Identity Cloud admin UI. Refer to Access global settings.
-
IAM-4853: Add AS400 application template. Refer to the AS400 section in Provision an application.
Fixes
-
FRAAS-16785: Incorrect positioning of reCAPTCHA v2 elements
-
FRAAS-17883: Tenant administrators cannot save edits to their personal information
-
IAM-2936: Journeys hang indefinitely when using a State Metadata node within a Page node
-
IAM-4521: Screen readers announce field labels twice
-
IAM-4956: Advanced Identity Cloud admin UI doesn’t use the current realm when logging out
-
IAM-5113: Unable to remove an NAO assignment from a user in Advanced Identity Cloud admin UI
-
IAM-5226: Tenant administrator security questions should not be shown when editing personal information
-
IAM-5240: No error message displays when a tenant administrator fails to save edits to their personal information
October 2023
31 Oct 2023
Key features
- New Autonomous Access capabilities[17] (DATASCI-1269)
-
User access behavior and tenant access behavior UI pages let administrators understand the typical authentication behavior for a selected user or for all users in the tenant for the past six months by displaying key metrics. Administrators can filter the UI to show certain login metrics, like time of day, city, country, day of week, device used for login, operating system, and browser type. Administrators can also compare a selected user’s authentication behavior to that of the authentication attempts for all other users in the tenant.
Enhancements
-
FRAAS-17373[18]: The following connectors included with Advanced Identity Cloud were upgraded from 1.5.20.15 to 1.5.20.17:
-
Adobe Marketing Cloud connector
-
Google Apps connector
-
Microsoft Graph API connector
-
Salesforce connector
-
SCIM connector
Some highlights include:
-
OPENICF-900: SCIM connector: Add support for dynamically generated SCIM schemas
-
OPENICF-2453: SCIM connector: Persist optional refresh token upon successful access token renewal
For a complete list of enhancements and fixes, refer to Connector changes.
-
-
IAM-4211: Display disaster recovery region in the Advanced Identity Cloud admin UI
-
IAM-4369: Remove AM applications from application list view
-
IAM-5045: Display pop-up warning when an end user is about to be logged out of an Advanced Identity Cloud hosted page
Fixes
-
ANALYTICS-311: The
USER-LAST-LOGINreport doesn’t show results if the last journey failed -
FRAAS-17413: Improve IDM service reliability during upgrades and routine maintenance
-
IAM-4698: Fix accessibility issues with messages in page nodes
-
IAM-4812: Correctly save array ESVs containing newline characters
-
IAM-4863: Display ESV buttons properly when the user gives them focus
-
IAM-4877: Display ESV selection button properly while user is modifying a script associated with a Scripted Decision node
17 Oct 2023
Key features
- OneSpan Identity Verification node (FRAAS-13738)
-
Sends request to OneSpan to analyze the image and determine whether the document is genuine or fraudulent.
For details, refer to OneSpan Identity Verification node.
- OneSpan Get User Authenticator (FRAAS-13160)
-
Retrieves the authenticators assigned to a user and helps enable user’s authentication and security levels.
For details, refer to OneSpan Get User Authenticator node.
- New Identity Governance capabilities[9] (IGA-1691)
-
Access requests let end users request access to resources and let managers request that access be removed from their delegates. The list of resources an end user can request access to is referred to as the access catalog.
Manage access request workflows is a new feature that lets you optionally define flows to include business logic, decisions, and approvals. For example, decide what happens when an approver rejects an access request for an application. Workflows currently only supports access request-related features.
New options in the Advanced Identity Cloud end-user UI let end users submit access requests, submit requests to remove access, and review assigned request items:
-
The My Requests option lets you view and create access requests to resources (applications, roles, entitlements) for yourself or on behalf of others.
-
The My Directory > Direct Reports option lets managers submit access removal requests.
-
The Inbox > Approvals option lists request items (requests an end user submits) for an approver (designated owner) to act on.
-
Enhancements
-
IAM-3648: ESV placeholders can now be entered from a drop-down list
-
IAM-3651: ESV placeholders can now be entered from key-value input fields
-
IAM-4236: Improve layout of the applications reconciliation tab
-
IAM-4367: Separate the connection status of OAuth 2.0 client applications into a dedicated list
-
IAM-4662: ESV placeholders can now be entered from tag input fields
-
IAM-4717: Added date, datetime, and time fields to the login UI
-
IAM-4789: Grant roles now show temporal constraints
-
OPENAM-20847: Sanitized HTML can now be added into messages for the Email Suspend node
Fixes
-
FRAAS-17235: Validate ESV values correctly when they are wrapped in white space
-
FRAAS-17283: Tenant status pages not automatically updated during downtime
-
IAM-4235: Passthrough authentication using AD connector fails if set up in UI and user DN includes a space
-
IAM-4418: Fix accessibility issues with multi-select input fields
-
IAM-4489: Align checkbox color with other form elements
-
IAM-4491: Correctly label sidebar buttons when expanded or collapsed
-
IAM-4492: Make navigation bars in end-user UI accessible for screen readers
-
IAM-4528: Outbound reconciliation mapping preview shows generated password value
-
IAM-4798: The
aria-labelis now correctly displayed for all component types on sidebar buttons -
OPENIDM-19192: Personal information is still editable by end users when User Editable is set to
false
03 Oct 2023
Key features
- Query Parameter node (AME-24069)
-
Allows you to insert query parameter values from a journey URL into configurable node state properties. This lets you customize journeys based on the query parameter values.
For details, refer to Query Parameter node.
Enhancements
-
IAM-3650: Add a drop-down menu to checkbox inputs for selecting ESV placeholders
-
IAM-3826: Add the ability to specify a source and transformation script when mapping application properties.
-
IAM-4515: Include autocomplete attribute with login form fields
-
IAM-4525: Update profile picture modal with accessibility improvements for screen readers
-
IAM-4567: Add a warning when running reconciliations and selecting the
persistAssociationsoption. For details, refer to View a report about the last reconciliation. -
IAM-4576: Increase time on screen for loading spinner so that screen readers can announce it
-
IAM-4616: Include contextual information with the show/hide buttons for improved accessibility
-
OPENAM-21073: Request headers are now accessible in OAuth 2.0/OIDC scripts for
OIDC_CLAIMS,OAUTH2_ACCESS_TOKEN_MODIFICATION, andOAUTH2_MAY_ACTscript contexts using therequestPropertiesbinding -
OPENAM-21346: Add classes
java.util.concurrent.TimeUnit,java.util.concurrent.ExecutionException, andjava.util.concurrent.TimeoutExceptionto the scripting allowlist -
OPENAM-21355: Jakarta AWS region (ap-southeast-3) enabled for the PingAM push notification service
-
OPENAM-21416: Canada Central AWS region (ca-central-1) enabled for the PingAM push notification service
Fixes
-
IAM-4366: Provide browser-specific logic to handle alternative CSS for accessibility
-
IAM-4409: Require at least three characters before running identity searches when there are more than 1000 identities of that type
-
IAM-4460: Screen readers read show/hide buttons for security questions as show/hide password
-
IAM-4478: Only allow certain combinations of properties in a mapping transformation script
-
IAM-4493: Fix the heading hierarchy in the UI
-
IAM-4523: Screen readers read avatar alt text when tabbing to action menu
-
IAM-4524: Two buttons with different labels open the same dialog
-
IAM-4568: Do not enable the option to change a user association in the UI
-
IAM-4584: Drop-down boxes fail ADA compliance
-
IAM-4639: String/password field button is highlighted in the UI
-
IAM-4703: Fix display of password fields in some themes
-
IAM-4710: Fix rounded border of password fields in hosted pages
-
IAM-4829: Eye icon displays over the password field highlight box in the UI
-
OPENAM-18599: Allow customization of the error message that displays to end users when their account is locked or inactive using
.withErrorMessage()in a Scripted Decision node -
OPENAM-18685: Use the OAuth2 Provider service in the AM admin UI to specify if tokens issued should contain the
subnameclaim -
OPENAM-19261: Errors are incorrectly logged when triggered by introspection of tokens using OAuth 2.0 client credentials grant
-
OPENAM-20451: The WebAuthn Registration node now displays an end user’s
userNamewhen registering a device when the identity’s name isn’t human-readable -
OPENAM-21158: Add support for trusted platform module (TPM) attestation using elliptic curve cryptography (ECC) unique parameter validation starting with Windows 11 version 22H2
-
OPENAM-21304: The
request_urisfield does not populate when OAuth 2.0 clients register using dynamic client registration
September 2023
26 Sep 2023
Fixes
-
FRAAS-17278: Health status reports for AM, IDM, and Admin services incorrectly reported as available in some situations
-
IAM-4843: The user column in the certification task list now shows a user’s full name instead of only the first name
-
IAM-4903[19]: Fix IGA calls that are not working in a custom domain
-
IAM-4915[19]: Fix Access Review UI that shows the JSON object of the manager relationship in the User Details modal
05 Sep 2023
Key features
- Salesforce Community User application template (IAM-4340)
-
Provision, reconcile, and synchronize Salesforce, Salesforce Portal, and Salesforce Community accounts.
For details, refer to Salesforce application template or Salesforce Community User application template.
- OneSpan Auth VDP User Register node (FRAAS-15426)
-
Registers end users to authenticate using the virtual one-time password (VOTP).
For details, refer to OneSpan Auth VDP User Register node.
- OneSpan Auth Assign Authenticator node (FRAAS-15426)
-
Assigns a VIR10 authenticator to an end user if the end user isn’t already assigned to one. Requires a VIR10 authenticator to be available in the tenant.
For details, refer to OneSpan Auth Assign Authenticator node.
- OneSpan Auth Generate VOTP node (FRAAS-15426)
-
Generates a virtual one-time password (VOTP) and delivers it to an end user through the node’s configured delivery method. Requires the end user to be assigned to a VIR10 authenticator.
For details, refer to OneSpan Auth Generate VOTP node.
August 2023
28 Aug 2023
Key features
- Add preference-based provisioning to Privacy and Consent settings (IAM-4243)
-
End users in target applications can share their data with other applications. After the end user configures a preference to share data with other applications, data from the target application is synchronized with Advanced Identity Cloud.
For details, refer to End-user data sharing.
Enhancements
-
AME-25061: Provide additional context information in Marketplace authentication nodes to enable UI improvements
-
IAM-3502: Add the ability to set and reset a sync token for identity management account object type. For details, refer to Reset the last reconciliation job.
-
IAM-3678: Update error messages and labels in login and signup pages
-
IAM-3962: Improve design of push number challenge page for Push Wait node
-
IAM-4248: Add three additional non-account objects to ServiceNow page
-
IAM-4326: Improve onLink script to handle mapped properties of type array and object
-
IAM-4334: Update SuccessFactors application templates to support Advanced Identity Cloud built-in SuccessFactors connector
Fixes
-
IAM-3877: UI loader spins indefinitely when realm is deactivated
-
IAM-4093: Replace Google Fonts in the login UI to meet GDPR compliancy requirements
-
IAM-4176: Advanced setting query filter does not show all available properties
-
IAM-4240: Accessibility issues in Page node when NVDA readers are used
-
IAM-4261: Accessing end-user UI with query parameter "code" displays empty page
-
IAM-4371: Unable to create applications due to
userpasswordproperty set -
IAM-4384: Platform UI does not resume journeys with custom redirect logic
-
IAM-4427: Platform UI does not show assignments for tenants running deprecated application management
-
IAM-4475: Platform UI does not load after tenant administrator signs into an upper tenant during promotion
-
IAM-4533: Journeys do not resume correctly when returning from a social identity provider without a realm identifier
-
IAM-4534: Redirect callbacks for journeys not working correctly
-
OPENAM-18004: Audit logging does not specify transaction IDs correctly for internal requests to certain APIs
-
OPENAM-18709: Calls to the
nodeState.get()method in Scripted Decision nodes do not return values in shared state when a variable is stored in both shared state and secure state -
OPENAM-20230: Calls to classes in the allowlist fail occasionally with access prohibited messages
-
OPENAM-20682: Unable to encrypt
id_tokenerror when there are multiple JWKs with the same key ID but different encryption algorithms -
OPENAM-20691: Session quota reached when oldest session is not destroyed due to race condition
-
OPENAM-20783: Logging is incorrect when the authorization code grant flow is used successfully
-
OPENAM-20920: Null pointer exceptions when a SAML v2.0 binding is null and the SSO endpoint list contains non-SAML v2.0 entries
-
OPENAM-20953: Policy evaluation with a subject type
JwtClaimreturns HTTP response code 500 -
OPENAM-21001: Custom scripted SAML v2.0 IDP account mappers are determined incorrectly
-
OPENAM-21004: Invalid session ID error when session management is disabled in an OIDC provider
-
OPENAM-21046: The Create Object and Patch Object nodes do not log exception stack traces when they can’t retrieve the object schema
-
OPENAM-21164: XML string formatted incorrectly when using a custom adapter to get the assertion from a SAML v2.0 response
Rapid channel changelog
Subscribe to get automatic updates: Rapid channel changelog RSS feed
For release notes published before August 2023, refer to the Rapid channel changelog archive.
October 2024
17 Oct 2024
Versions 15335.0, 15337.0
No customer-facing features, enhancements, or fixes released.[11]
15 Oct 2024
Versions 15310.0, 15312.0
No customer-facing features, enhancements, or fixes released.[11]
14 Oct 2024
Version 15300.0
September 2024
20 Sept 2024
Versions 15044.0, 15052.0
Key features
- Support for LINE as a social identity provider (AME-28672)
-
You can now configure a social provider authentication with LINE Login when signing in from a browser. There is a separate configuration for authenticating from a mobile app.
Learn more in Social authentication.
- Identity Governance request and approval forms[9] (IAM-6358)
-
Identity Governance now lets you create request and approval forms to make it easier for end users to request access to applications.
Learn more in Identity Governance forms.
16 Sept 2024
Version 14975.0
Key features
- Additional cloud connectors
-
The following connectors are now bundled with Advanced Identity Cloud:
-
AWS IAM Identity Center Connector v1.5.20.23 (OPENIDM-20038)
-
Box Connector v1.5.20.23 (OPENIDM-20367)
Learn more in the ICF documentation.
-
13 Sept 2024
Version 14962.0
Key features
- Advanced Reporting[12] (ANALYTICS-763)
-
Advanced Identity Cloud now offers Advanced Reporting to let you create custom reports on activity in your tenant environments. You can query a number of metrics to create useful reports for your company.
Learn more in Advanced Reporting.
09 Sept 2024
Versions 14868.0, 14888.0
Key features
- Scripted SAML v2.0 NameID values(AME-25921)
-
The NameID mapper script lets you customize SAML v2.0 NameID values per application.
- Set State node (AME-26443)
-
The Set State node lets you add attributes to the journey state.
- Http Client service (AME-27936)
-
The new Http Client service lets you create named instances that you can reference from a next-generation script to make mTLS connections to external services.
Learn more in Access HTTP services.
- Enable Device Management node (SDKS-2919)
-
The new Enable Device Management node lets end users manage devices from their account.
Enhancements
-
FRAAS-21728: Updated the cookie domain API to add default values for GET requests where cookie domain values haven’t been overridden by a PUT request. The default values are derived from the existing tenant cookie domain configuration, so are backward compatible.
-
AME-26594: Added secrets API binding to all next-generation script contexts.
-
AME-27129: Added option to exclude client certificate from SAML hosted SP metadata.
-
AME-27792: Added
AM-TREE-LOGIN-COMPLETEDaudit log event that outputs aresultofFAILED. when a journey ends with an error. -
AME-27839: Added the ability to specify connection and response timeouts for Http Client service instances.
-
AME-28008: You can now disable certificate revocation checks, or all certificate checks entirely, on your Http Client service instances.
Fixes
-
OPENAM-15410: Fixed an issue that prevented customization of claims if
profileandopenidscopes are requested. -
OPENAM-20609: Fixed inconsistent error message when generating access token using refresh token after changing username.
-
OPENAM-21974: Adds an OAuth 2.0 client configuration for the new version of the LinkedIn provider.
-
OPENAM-22298: Log unretrieved SP and IdP descriptors in SAML2 Authentication node.
August 2024
29 Aug 2024
Version 14741.0
Key features
- DocuSign application template (IAM-6194)
-
The DocuSign application lets you manage DocuSign service accounts and synchronize DocuSign accounts and Advanced Identity Cloud identities.
Enhancements
-
IAM-6493: The PingOne application template now supports specifying an LDAP gateway.
-
IAM-6868: Added screen reader label to end-user access approval button.
-
IAM-6870: Added screen reader label to end-user access request button.
-
IAM-6880: Added a toggle in the hosted pages journey settings to disable the error heading fallback that displays if there is no heading in the page content. (FORGEROCK-1582)
21 Aug 2024
Version 14626.0
Key features
- BeyondTrust application template (IAM-6492)
-
The BeyondTrust application lets you manage and synchronize data from Advanced Identity Cloud to BeyondTrust.
July 2024
19 Jul 2024
Version 14225.0
Key features
- Adobe Admin Console application template (IAM-6195)
-
The Advanced Identity Cloud Adobe Admin Console application lets you manage users, groups, and user group memberships between Adobe Admin Console and Advanced Identity Cloud.
02 Jul 2024
Version 14013.0
Fixes
-
FRAAS-20970: The
/monitoring/logsendpoint now returns anX-Ratelimit-Limitheader with a fixed value of 60. Previously, the value was misleading due to the way it was calculated when scaling an environment’s resources. TheX-Ratelimit-Remainingheader continues to report the number of requests that may be sent before receiving a rate limited response.
June 2024
27 Jun 2024
Versions 13964.0, 13966.0
Key features
- Additional cloud connectors
-
The following connectors are now bundled with Advanced Identity Cloud:
-
Adobe Admin Console connector (OPENIDM-19843)
-
DocuSign connector (OPENIDM-20190)
For more information, refer to the ICF documentation.
-
Fixes
-
OPENIDM-20142: Resolved a communication failure between Advanced Identity Cloud and RCS instances that could result in a prolonged failure to activate remote connectors.
Changed functionality
-
OPENIDM-20178: You can’t use scope private fields in query filters. For more information, refer to Security Advisory #202402.
24 Jun 2024
Versions 13937.0
Key features
- Product name change for Identity Cloud (FRAAS-20178)
-
To align ForgeRock products with Ping family names, ForgeRock Identity Cloud has been renamed to PingOne Advanced Identity Cloud. Name and logo changes have been updated throughout the user interfaces, and documentation updates will occur when the UI changes are released to the regular channel.
For more information, refer to the New names for ForgeRock products FAQ.
Enhancements
-
IAM-4785: Synchronize only the modified properties on a target source during reconciliation of applications.
-
IAM-5237[9]: Add ability for B2B business partners to certify access for their users using organizational-based certification.
-
IAM-5487: Correlation rules moved to the top of the reconciliation settings page.
-
IAM-5629[9]: Add ability to create scoping rules in Identity Governance.
-
IAM-6231: Scripted Decision Node now updates the list of scripts when a script is added or edited.
-
IAM-6544[9]: Add reviewer column to administrator list view of compliance violations.
Fixes
-
IAM-6135: ESV values containing accents get corrupted by encoding process.
-
IAM-6562: Label duplicated for OAuth 2.0 access token and ID token endpoints.
-
IAM-6669[9]: Badge count of violations in end-user navigation doesn’t update when an action is performed.
18 Jun 2024
Versions 13896.0, 13900.0
Key features
- PingOne Protect nodes[20] (TNTP-180)
-
The new PingOne Protect nodes replace the deprecated PingOne Protect Marketplace nodes.
Fixes
-
FRAAS-20604: Removed superfluous AM metrics related to token store internals:
-
am_cts_connection_count -
am_cts_connection_seconds -
am_cts_connection_seconds_total -
am_cts_connection_state -
am_cts_reaper_cache_size -
am_cts_reaper_deletion -
am_cts_reaper_deletion_count -
am_cts_reaper_deletion_total
-
-
FRAAS-20786: Fix promotion issue where an attempt was made to delete an already deleted application.
12 Jun 2024
Version 13848.0
Key features
- New utility binding available for scripting (AME-25519)
-
You can now use a new utility binding in your scripts to access several common utility classes. For example, the utility binding includes classes for generating random UUIDs and for base64 encoding and decoding.
Enhancements
-
AME-26199: Added the ability to set additional claims, including non-registered claims, during JWT assertion and generation, as per the specification.
-
AME-26820: Provided library scripts with access to all common script bindings.
-
AME-26993: Enhanced secret mapping for agents. Updating a secret label identifier value now causes any corresponding secret mapping for the previous identifier to also be updated, provided no other agent shares that secret mapping. If another agent shares the secret mapping, PingOne Advanced Identity Cloud creates a new secret mapping for the updated identifier and copies its aliases from the previously shared secret mapping.
-
AME-27346: Renamed Secret ID Identifier to Secret Label Identifier in the SAML remote entity provider configuration.
-
AME-27478: Renamed Client ID Token Public Encryption Key property to ID Token Encryption Public Key in the OAuth 2.0 client configuration.
-
AME-27775: Added scripting thread pool metrics per script context.
-
OPENAM-16564: Enabled next-generation scripts to access the cookies in incoming requests.
-
OPENAM-21800: Added page node functionality to next-generation scripts.
-
OPENAM-21933: Enabled auto-encoding of the
httpClientform body in next-generation scripts.
Fixes
-
FRAAS-19461: Fixed an issue where large audit logs could be missing from IGA events and processing.
-
OPENAM-21748: Restored the missing
getwrapper function forHiddenValueCallbackin next-generation scripting. -
OPENAM-21864: Fixed an issue that prevented setting the tracking cookie to resume a journey after returning from a redirect flow.
-
OPENAM-21897: Corrected inconsistent results from the policy
evaluateTreeendpoint. -
OPENAM-21951: Enabled setting of the
selectedIndexproperty in aChoiceCallbackin next-generation scripts. -
OPENAM-22181: Corrected an issue with UMA
approveandapproveAllrequests failing.
05 Jun 2024
Version 13760.0
Enhancements
-
FRAAS-20048: Configuration promotions can now be rolled back using the API. An environment can be rolled back successively to revert as many previous promotion changes as needed.
This feature can’t be used in sandbox environments; a promotion or a rollback can only be run between development, UAT[3], staging, and production environments.
May 2024
22 May 2024
Versions 13570.0
Key features
- Oracle E-Business Suite app template (IAM-6342)
-
The Advanced Identity Cloud Oracle E-Business Suite (EBS) application lets you manage and synchronize accounts between EBS and Advanced Identity Cloud.
Enhancements
-
IAM-6376: In the applications rules tab, you can now configure custom logic to perform specific actions, such as sending an email, when an account is successfully created or updated.
-
IAM-6380: In the applications rules tab, you can now use the provisioning failure rule to configure custom logic to perform specific actions when provisioning fails.
20 May 2024
Version 13528.0
03 May 2024
Key features
- Webex application template (IAM-5234[22])
-
The Advanced Identity Cloud Webex application lets you manage and synchronize data between Webex Control Hub and Advanced Identity Cloud.
- Epic EMP application template (IAM-2407)
-
The Advanced Identity Cloud Epic EMP application lets you manage and synchronize data between Epic EMP and Advanced Identity Cloud.
Enhancements
-
IAM-2653: Configure object properties with user-friendly display names.
-
IAM-3857: Application list view displays enabled/disabled status of enterprise apps.
-
IAM-5913[9]: Create custom access request workflows.
April 2024
17 Apr 2024
Version 13218.0
Key features
- Event-based certification[9] (IAM-5148)
-
Identity Governance now allows tenant administrators to configure certifications that are triggered by specific governance events, a process referred to as event-based certification. This method offers faster certification resolution compared to scheduled—and often lengthy—campaigns spanning weeks or months and involving numerous applications, intricate rules, and hundreds of reviewers.
The event-based certifications feature kicks off an identity certification for the following events:
-
User create. Advanced Identity Cloud detects when a user account has been created.
-
User modify. Advanced Identity Cloud detects when an existing user account has been modified or updated.
-
Attribute change. Advanced Identity Cloud detects changes in the attributes of an existing user account.
-
User delete/deactivate. Advanced Identity Cloud detects if a user account has been deleted or deactivated.
For more information, refer to Certify access by event.
-
- Grant entitlements to users and roles[9] (IAM-5146)
-
Identity Governance now allows tenant administrators to carry out more fine-grained entitlement grants for their user accounts. Tenant administrators can now:
-
Create a role and grant entitlements to the role.
-
Revoke entitlements in a role.
-
Grant entitlements to a user account.
-
Revoke entitlements from a user account.
For more information, refer to Manage entitlements.
-
- Identity Assertion node (AME-26821)
-
The new Identity Assertion node provides a secure communication channel for authentication journeys to communicate directly with ${ig.abbr}.
- PingOne application template (IAM-5232)
-
The PingOne application lets you manage and synchronize data between PingOne and Advanced Identity Cloud.
- Authenticate gateway and agent profiles with a shared secret (IAM-5833)
-
The Advanced Identity Cloud admin UI for gateways and agents now lets you authenticate with a shared secret instead of a password. Use this to set the label for the shared secret.
- Authenticate OAuth 2.0 applications with a shared secret (IAM-6028)
-
The Advanced Identity Cloud admin UI for OAuth 2.0 applications now lets you authenticate with a shared secret instead of a password. Use this to set the label for the shared secret.
Enhancements
-
OPENAM-21031: The performance of Google KMS has been improved by the introduction of caching.
-
AME-27126: A SAML SP can now authenticate to IDPs using mutual TLS (mTLS) when making an artifact resolution request.
-
IAM-3199: HTML styling in the Message node journey editor allows you to left justify text.
Fixes
-
FRAAS-19334: Failure to look up service account names following changes applied through the ESV API.
-
IAM-5079[9]: End-user roles page sometimes shows role grants as conditional even when the grants are direct.
-
IAM-5363[9]: Show the total number of approvals and access reviews in the inbox.
-
IAM-5858[9]: Missing support for access request global configuration options.
-
IAM-6138[9]: The governance events filter builder incorrectly validates
beforeandafterproperties in the user created state. -
IAM-6176[9]: The end-user access request rejection is missing a justification message.
-
IAM-6203[9]: The governance events filter doesn’t use
aftertemporal values for user created flows. -
IAM-6209: The Advanced Identity Cloud admin UI navigation panel text appears when the panel is collapsed.
-
OPENAM-21473: If you set the collection method of a Certificate Collector node to
REQUEST,HEADER, orEITHER, and the certificate is not provided in the request or in the header, the node now returns a status ofNot collected.This node is currently not supported in PingOne Advanced Identity Cloud. -
SDKS-2935: The Device Binding node now gracefully handles the case of a user being set to
inactive.
11 Apr 2024
Version 13149.0
Enhancements
-
AME-26085: SAML v2.0
NameIDmapping can be configured per SP -
AME-27133: "Secret ID" has been renamed to "Secret Label" for secret mappings
-
The following services now support configuration using the Secrets API:
-
AME-16536: The OAuth 2.0 provider hash salt secret
-
AME-25885: The persistent cookie core authentication attribute
-
AME-26110: The client-side session signing key
-
AME-26134: The social provider service
-
AME-26441: The new CAPTCHA node (replaces the legacy CAPTCHA node)
-
AME-26442: The OIDC Token Validator node now lets you store the client secret in any type of secret store
-
AME-26633: The OAuth 2.0 client
clientJwtPublicKey -
AME-26637: The OAuth 2.0 client
idTokenPublicEncryptionKey -
AME-26639: OAuth 2.0 client mTLS self-signed certificates
-
AME-26668: The post authentication process (PAP) replay password
-
AME-26670: The web agents replay password key
-
AME-26998: The OAuth 2.0 client secret
-
-
The following services now support rotation of secrets using secret versions:
-
AME-25988: The persistent cookie encryption secret
-
AME-26999: OAuth 2.0 client secrets
-
AME-27000: OAuth 2.0 client
clientJwtPublicKey -
AME-27001: OAuth 2.0 client mTLS self-signed certificates
-
09 Apr 2024
Version 13122.0
Key features
- PingOne Verify service (TNTP-118)
-
The PingOne Verify service lets you configure and use PingOne Verify nodes (PingOne Verify Authentication node and PingOne Verify Proofing node) in your authentication journeys.
For more information, refer to PingOne Verify service.
March 2024
26 Mar 2024
Versions 12899.0
Key features
- Social Provider Handler node[23] (OPENAM-20924)
-
The new Social Provider Handler node adds an outcome to better handle interruptions in a social authentication journey after requesting profile information.
- Event-based certification[9] (IGA-2357)
-
Identity Governance now allows tenant administrators to configure certifications that are triggered by specific governance events, a process referred to as event-based certification. This method offers faster certification resolution compared to scheduled—and often lengthy—campaigns spanning weeks or months and involving numerous applications, intricate rules, and hundreds of reviewers.
The event-based certifications feature kicks off an identity certification for the following events:
-
User create. Advanced Identity Cloud detects when a user account has been created.
-
User modify. Advanced Identity Cloud detects when an existing user account has been modified or updated.
-
Attribute change. Advanced Identity Cloud detects changes in the attributes of an existing user account.
-
User delete/deactivate. Advanced Identity Cloud detects if a user account has been deleted or deactivated.
For more information, refer to Certify access by event.
-
- Grant entitlements to users and roles[9] (IAM-5146)
-
Identity Governance now allows tenant administrators to carry out more fine-grained entitlement grants for their user accounts. Tenant administrators can now:
-
Create a role and grant entitlements to the role.
-
Revoke entitlements in a role.
-
Grant entitlements to a user account.
-
Revoke entitlements from a user account.
For more information, refer to Manage entitlements.
-
Enhancements
-
AME-26130[23]: Updated the PUSH Notification service to store access keys as a secret
-
AME-25906[23]: Updated Identity Gateway agents to store credentials as a secret
-
IAM-4585: Request and approvals page now shows the current and past approvers, their decisions, and the dates
-
IAM-4968: Expose additional top-level parameters in the advanced section of mapping pages
-
IAM-5769: Add grouping logic to journey node items
-
IAM-5674: Target application can use ONBOARD action for FOUND situation
-
IAM-5814: Allow fixed application usernames to be chosen for custom SAML apps
-
OPENAM-21575[23]: Added
org.forgerock.json.jose.jwe.JweHeaderto the allowlist for Scripted Decision nodes
Fixes
-
AME-25915[23]: Assertion consumer processing fails if NameID format not present in the assertion response
-
IAM-3927[9]: Identity Governance now enforces mandatory comments (if configured) for revoke and allow exceptions
-
IAM-4309: Access reviews no longer display the internal
lastSyncuser attribute -
IAM-4762: Authoritative apps are now requestable
-
IAM-4986: Platform UI can now determine whether to use a pagedResultsCookie or offset for paging results
-
IAM-5076: "Abstain from action" option no longer displays when a campaign has expired
-
IAM-5362: Marking a property as an authoritative app entitlement no longer causes target app config to be generated
-
IAM-5413: Account deprovisioning now works in AD/LDAP after deleting a user identity
-
IAM-5794: Border color of sign-in input fields in hosted pages can now be overridden in themes
-
IAM-5875: Journey editor no longer orphans deleted nodes
21 Mar 2024
Versions 12899.0, 12863.0, 12855.0
Key features
- Additional cloud connectors
-
The following connectors are now bundled with Advanced Identity Cloud:
-
Dropbox connector (OPENIDM-19838)
-
PingOne connector (OPENIDM-19736)
-
Webex connector (OPENIDM-19920)
For more information, refer to the ICF documentation.
-
Enhancements
-
OPENIDM-19921: The following connectors included with Advanced Identity Cloud were upgraded to 1.5.20.21:
-
Google Apps connector
-
Microsoft Graph API connector
-
AWS connector
For details, refer to 1.5.20.21 Connector changes.
-
18 Mar 2024
Versions 12873.0, 12784.0
Enhancements
-
FRAAS-19341: ESV support for AES keys through the
base64aesencoding typeFor more information, refer to Encoding format.
15 Mar 2024
Versions 12754.0
Key features
- PingOne Service (TNTP-148)
-
The PingOne Service lets you set up the PingOne service in your Advanced Identity Cloud tenant so you can add Ping Identity nodes to your authentication journeys.
For more information, refer to PingOne Service.
- PingOne nodes (TNTP-119)
-
- PingOne node
-
The PingOne node node establishes trust between PingOne and Advanced Identity Cloud by leveraging a federated connection. For more information, refer to PingOne node.
- PingOne DaVinci API node
-
The PingOne DaVinci API node node lets an Advanced Identity Cloud journey trigger a PingOne DaVinci flow through the API integration method. For more information, refer to PingOne DaVinci API node.
- PingOne Protect nodes (TNTP-127)
-
Ping Identity’s PingOne Protect is a centralized identity threat protection service, for securing your digital assets against online fraud attempts.
For more information, refer to PingOne Protect > How it Works.
13 Mar 2024
Version 12714.0
Key features
- HTTP Client node (TNTP-136)
-
The HTTP Client node lets you make HTTP(S) requests to APIs and services external to Advanced Identity Cloud from within a journey.
Use the HTTP Client node to simplify the integration with a broad range of external services by making direct HTTP(S) requests.
For more information, refer to HTTP Client node.
02 Mar 2024
Version 12580.0
Enhancements
-
The following services now support setting secrets using the secrets API rather than setting secrets in the service configuration:
-
AME-25709: AuthId signing key
-
AME-25907: Java agents
-
AME-25908: Web agents
-
AME-26014: Rotatable secrets for agents
-
AME-26301: SAML remote entities
-
AME-26241: OATH, Push, Web AuthN devices and the device binding, device ID, and Device profile services
-
-
The following nodes now support setting their secrets using the secrets API rather than setting secrets in the node configuration:
-
AME-26117: OTP SMS Sender and OTP SMTP Sender nodes
-
AME-16535: Set Persistent Cookie node
-
-
AME-26041: Enhanced handling of agents secret mappings – if you update or delete a secret label identifier, any corresponding secret mapping for the previous identifier is updated or deleted, provided no other agent shares that secret mapping
-
AME-25434: New Request Header node lets you inject values into shared state based on request header values
-
AME-26039: Added LDAP Affinity Level configuration option to the LDAP Decision node, to enable affinity-based load balancing for BIND requests
-
OPENAM-21768: Added
org.forgerock.opendj.ldap.Rdnandorg.forgerock.opendj.ldap.Dnclasses to the allowlist for all script contexts
Fixes
-
AME-24760: Inner nodes of a PageNode don’t independently audit node-login-complete events
-
AME-26158: Exception thrown when generating a Signed JWT with no encryption within a next-gen script called by a Scripted Journey node
-
OPENAM-17315: Scripts used to call 'response.getEntity()' in the past should now use 'response.getEntity().getString()' instead
-
OPENAM-21856: Introspecting stateless token with IG/Web agents causes
OAuth2ChfException
February 2024
29 Feb 2024
Version 12560.0
Enhancements
-
IAM-4257: Azure AD app template updates
-
IAM-4342: MSGraphAPI connector includes a new optional
licenseCacheExpiryTimeconfiguration property -
IAM-4892: Salesforce app template updates
-
IAM-4900: UI has been updated to show the Advanced Identity Cloud build number
-
IAM-5033: Added new "Remember my username" checkbox to authentication trees
-
IAM-5287: Updated username, password, and KBA heading size on the profile page to improve accessibility
-
IAM-5334: Expose "Guarded String" as an object type property for Scripted Groovy, ScriptedREST, ScriptedSQL, CSV, Database table, and SCIM connectors
-
IAM-5459: KBA answer field now contains question context
-
IAM-5461: Custom errors sent as
TextOutputCallback.ERRORare now rendered as primary login errors, improving screen reader accessibility feature -
IAM-5503: Rename Orchestrations to Workflows
-
IAM-5563: Google Apps app template updates
-
IAM-5603: Create device details modal for managed user identities
-
IAM-5606: Add "POWERED BY" metadata to marketplace nodes
-
IAM-5748: Make "PingOne" a special case on the federation providers page
Fixes
-
IAM-5598: Styled terms and conditions included in a journey causes authenticate calls to fail
-
IAM-5611: Can’t revoke custom apps from roles or edit them from the role view
-
IAM-5641: Custom endpoints search returns endpoints created by other areas of the UI
-
IAM-5692: Console errors when opening the Add user modal for Bravo realm
-
IAM-5767: SAML SSO is not used when an application is saved from another tab after SSO setup
-
IAM-5873: Hosted page may fail to match user locale
28 Feb 2024
Version 12547.0
Enhancements
-
OPENIDM-19405: Allow email addresses to contain non-ASCII characters for supported SMTP providers
January 2024
24 Jan 2024
Fixes
-
OPENIDM-18743[24]: Attempts to use connectors fail with null pointer exceptions when
operationOptionsis defined in the provisioner configuration
23 Jan 2024
Key features
- iProov Authentication node (TNTP-131)
-
The iProov authentication node integrates Advanced Identity Cloud authentication journeys with the Genuine Presence Assurance and Liveness Assurance products from iProov.
22 Jan 2024 (supplementary)
Key features
- Fingerprint Profiler and Fingerprint Response nodes (TNTP-130)
-
The Fingerprint nodes nodes let you integrate your Advanced Identity Cloud environment with the Fingerprint platform to help reduce fraud and improve customer experience.
Enhancements
-
AME-25906: Add the ability to configure the password for authenticating to an Identity Gateway agent as an ESV secret
-
AME-26130: Add the ability to configure the SNS access key secret for the push notification service to use an ESV secret
-
OPENAM-21575: Add
org.forgerock.json.jose.jwe.JweHeaderto the class allowlist for Scripted Decision node
Fixes
-
AME-25915: SAML flow fails if a
NameIDFormatelement is not present in an assertion response -
FRAAS-18464: Sandbox debug logging level set to
WARNinstead ofDEBUG -
IAM-5656: Fix alignment of text, buttons, and links in Message nodes
-
IAM-5660: Hosted pages not displaying list of themes
-
OPENAM-20924: Social Provider Handler node does not let end user switch to a different IdP
22 Jan 2024
Enhancements
-
AME-26117: Updated nodes relating to one-time passwords to use secret labels for passwords. Refer to OTP Email Sender node and OTP SMS Sender node.
19 Jan 2024
Key features
- RSA SecurID node (FRAAS-18037)
-
The RSA SecurID lets you use the RSA Cloud Authentication Service (RSA ID Plus) or RSA Authentication Manager from within an authentication journey on your Advanced Identity Cloud environment.
- Advanced Identity Cloud use case catalog
-
Introducing the release of the Advanced Identity Cloud use case catalog, a collection of guides that focus on tenant administrator use cases and third-party integrations.
18 Jan 2024
Key features
- Create and manage custom relationship properties (OPENIDM-19106, OPENIDM-19109)
-
You can now create and manage custom relationship properties using the Advanced Identity Cloud admin UI.
- Schema API improvements (OPENIDM-19107)
-
You can now directly modify managed object schemas over REST using the schema API. This capability includes configuring custom relationship properties.
- Password timestamps (OPENIDM-19262)
-
Enabling this new feature lets you view or query when a user password was last changed and when it is set to expire.
Enhancements
-
OPENIDM-19674: The relationship-defined virtual property (RDVP) schema editor allows you to edit the
flattenPropertiesproperty. The managed object schema editor allows you to edit thenotifyRelationshipsproperty.
Fixes
-
OPENIDM-18957: The scheduler now attempts to release any triggers it attempted to acquire during a timeout due to an unresponsive repository
-
OPENIDM-19141: Workflow engine queries now properly honor
tablePrefixandtablePrefixIsSchemaconfiguration options -
OPENIDM-19279: Resource collection is required to create a relationship
-
OPENIDM-19565: The default
apiVersionconfiguration has been updated with additional resource paths
December 2023
19 Dec 2023
Key features
- Schedule jobs directly in the Advanced Identity Cloud admin UI (IAM-3489)
-
You can now schedule the following jobs directly in the Advanced Identity Cloud admin UI without using the IDM admin UI (native console):
-
Scripts: Execute a script at a regular interval.
-
Task scanner: Execute a scan of identities using a complex query filter at a regular interval. The scan can then execute a script on the identities returned by the query filter.
-
- New Identity Governance capabilities[9] (IAM-4617, IGA-1664)
-
The Workflow UI lets you define custom workflow definitions for all access request types.
Role membership certification, a new certification type for access reviews, lets you review and certify roles and the users who have access to roles. Primary reviewers are role owners, a single user, or users assigned to a role.
Enhancements
-
FRAAS-7382: Add ability to include JavaScript snippets in login and end-user UIs
-
IAM-4514[9]: Allow reviewers to add user, entitlement, and role columns to an access review
-
IAM-4739: Add read schema option to SCIM application template to discover custom schemas/attributes
-
IAM-5201: Focus on first input field or button automatically upon page load
-
IAM-5268: Add source-missing situation rule to authoritative applications
Fixes
-
FRAAS-16659: ESV mapping updates aren’t captured in promotions report
-
IAM-4810: Custom endpoint UI missing context option
-
IAM-5072: Inbound mapping tab shows in target applications
-
IAM-5171: Azure Active Directory application template doesn’t return a user’s role membership
-
IAM-5187: LDAP v2.1 application template doesn’t clear
dc=example,dc=combase DN -
IAM-5238: LDAP application template is missing the group object classes property
-
IAM-5422[9]: Entitlement owner doesn’t show in the entitlement list
12 Dec 2023
Enhancements
-
AME-22326[25]: The
httpClientavailable in scripts now automatically adds the currenttransactionIdas an HTTP header. This lets you correlate caller and receiver logs to make requests to other ForgeRock products and services. -
AME-25392[25]: Add
org.forgerock.openam.scripting.api.PrefixedScriptPropertyResolver, used for accessing ESVs from scripts, to the allowlist forSAML2_SP_ADAPTERandSAML2_IDP_ADAPTERscript types -
AME-25433[25]: Add
com.sun.crypto.provider.PBKDF2KeyImpl,javax.crypto.SecretKeyFactory, andjavax.crypto.spec.PBEKeySpecto the allowlists for Scripted Decision nodes and Configuration Provider nodes -
AME-25608[25]: Add auditing for opening and closing connections for the LDAP decision node, ID Repo service, and Policy Configuration service
-
AME-25630[25]: Add
java.security.spec.InvalidKeySpecExceptionto the allowlist for the Scripted Decision and Configuration Provider nodes -
OPENAM-16897[25]: The OAuth 2.0 Device grant flow can now return either JSON or HTML
Fixes
-
COMMONS-1397[25]: Audit event log entries not logged due to thread contention
-
FRAAS-17686[26]: Add
org.forgerock.json.jose.jwe.JweHeaderto the allowlists for theAUTHENTICATION_TREE_DECISION_NODEandCONFIG_PROVIDER_NODEscript types -
IAM-4401[25]: Disabling
Clear-Site-Dataheader breaks realm login -
OPENAM-17331[25]: Disabled SNS endpoints can now be re-enabled
-
OPENAM-17816[25]: OAuth 2.0 requests without a
Content-Typeheader fail with a 500 error -
OPENAM-19282[25]: Recovery Code Display node only works immediately after a registration node
-
OPENAM-19889[25]: Policy evaluation fails when subject is agent access token JWT
-
OPENAM-20026[25]: Social IDP with trailing whitespace in the name can’t be deleted using the UI
-
OPENAM-20329[25]: Issuer missing from OAuth 2.0 JARM response
-
OPENAM-21053[25]: Missing
userIdfrom access audit log whenorg.forgerock.security.oauth2.enforce.sub.claim.uniqueness=falsein JWT client authentication flow -
OPENAM-21421[25]: Scripting logger name isn’t based on logging hierarchy convention
-
OPENAM-21476[25]: Persistent cookie is not created when using Configuration Provider node
-
OPENAM-21484[25]: Introspection of a stateful refresh token for claims field for known OAuth2 fields is now a string and not nested in a list
November 2023
30 Nov 2023
Fixes
-
IAM-5275[25]: Advanced Identity Cloud admin UI doesn’t add query parameters to the logout URL
Notices
ForgeRock deprecated the option to let Advanced Identity Cloud tenant administrators skip 2-step verification on Friday, February 3, 2023.
The end-of-life date for this deprecation is Friday, March 1, 2024, when the skip option functionality will be removed from Advanced Identity Cloud. You have until this date to update your tenants to make 2-step verification mandatory for all tenant administrators. For more information, refer to Tenant administrator mandatory 2-step verification FAQ.
28 Nov 2023
Key features
- Duo Universal Prompt node (FRAAS-15675)
-
The Duo Universal Prompt node lets you provide two-factor authentication using Duo’s Universal Prompt authentication interface. You can integrate Universal Prompt with your web applications using the Duo Web v4 SDK.
For details, refer to Duo Universal Prompt node.
27 Nov 2023
Enhancements
-
FRAAS-17939[27]: Some connectors included with Advanced Identity Cloud were upgraded to the following versions:
1.5.20.19For details, refer to 1.5.20.19 Connector changes.
-
Microsoft Graph API connector
-
SCIM connector
1.5.20.18For details, refer to 1.5.20.18 Connector changes.
-
Google Apps connector
-
Microsoft Graph API connector
-
Salesforce connector
-
SCIM connector
-
Workday connector
-
-
OPENIDM-19037: Update property value substitution to reflect boolean value in the UI
17 Nov 2023
13 Nov 2023
Fixes
-
FRAAS-17883: Tenant administrators cannot save edits to their personal information
-
IAM-5226: Tenant administrator security questions should not be shown when editing personal information
-
IAM-5240: No error message displays when a tenant administrator fails to save edits to their personal information
October 2023
31 Oct 2023
Key features
- next-generation scripting enhancements (AME-25928)
-
The next-generation scripting engine for journey decision node scripts lets you:
-
Reduce the need to allowlist Java classes with a stable set of enhanced bindings.
-
Simplify scripts with fewer imports and more intuitive return types that require less code.
-
Debug efficiently with clear log messages and a simple logging interface based on SLF4J.
-
Make requests to other APIs from within scripts with a more intuitive HTTP client.
-
Modularize your scripts by reusing common code snippets, including external libraries such as CommonJS, with library scripts.
-
Access identity management information seamlessly through the
openidmbinding.
The next-generation engine can’t use legacy scripts.
If your Scripted Decision node uses legacy scripts, you must convert them to use updated bindings to take advantage of the benefits of the next-generation scripting engine.
Where possible, you should migrate legacy scripts to take advantage of next-generation stability.
For more information, refer to Next-generation scripts.
-
Enhancements
-
FRAAS-3841: Activate and deactivate journeys in the Advanced Identity Cloud admin UI. Refer to Deactivate journeys.
-
IAM-4191: Allow tenant session cookie name to be configured. Refer to Session cookie name.
-
IAM-4735: Add support for schema discovery in application templates
-
IAM-4806: Show outbound tenant IP addresses in Advanced Identity Cloud admin UI. Refer to Access global settings.
-
IAM-4853: Add AS400 application template. Refer to the AS400 section in Provision an application.
Fixes
-
FRAAS-16785: Incorrect positioning of reCAPTCHA v2 elements
-
IAM-2936: Journeys hang indefinitely when using a State Metadata node within a Page node
-
IAM-4521: Screen readers announce field labels twice
-
IAM-4956: Advanced Identity Cloud admin UI doesn’t use the current realm when logging out
-
IAM-5113: Unable to remove an NAO assignment from a user in Advanced Identity Cloud admin UI
19 Oct 2023
Key features
- Gateway Communication node (FRAAS-17380)
-
Lets Advanced Identity Cloud authentication journeys communicate directly with the PingGateway (${ig.abbr}).
This secure communication channel extends the Advanced Identity Cloud capabilities with ${ig.abbr} features, such as validating a Kerberos ticket and performing other certificate handshakes.
For details, refer to Gateway Communication overview.
16 Oct 2023
Key features
- New Autonomous Access capabilities[17] (DATASCI-1269)
-
User access behavior and tenant access behavior let end users understand their "normal" login behavior for the past six months by graphically displaying key access metrics on a UI. Users can filter the UI to show certain login metrics, like time of day, city, country, day of week, device used for login, operating system, and browser type. Users can also compare an individual user’s login behavior to that of the access attempts for all other users.
Enhancements
-
IAM-4211: Display disaster recovery region in the Advanced Identity Cloud admin UI
-
IAM-4369: Remove AM applications from application list view
-
IAM-5045: Display pop-up warning when an end user is about to be logged out of an Advanced Identity Cloud hosted page
Fixes
-
IAM-4812: Correctly save array ESVs containing newline characters
-
IAM-4863: Display ESV buttons properly when the user gives them focus
-
IAM-4877: Display ESV selection button properly while user is modifying a script associated with a Scripted Decision node
-
IAM-4698: Fix accessibility issues with messages in page nodes
13 Oct 2023
Enhancements
-
FRAAS-17373[18]: The following connectors included with Advanced Identity Cloud were upgraded from 1.5.20.15 to 1.5.20.17:
-
Adobe Marketing Cloud connector
-
Google Apps connector
-
Microsoft Graph API connector
-
Salesforce connector
-
SCIM connector
Some highlights include:
-
OPENICF-900: SCIM connector: Add support for dynamically generated SCIM schemas
-
OPENICF-2453: SCIM connector: Persist optional refresh token upon successful access token renewal
For a complete list of enhancements and fixes, refer to Connector changes.
-
Fixes
-
ANALYTICS-311: The
USER-LAST-LOGINreport doesn’t show results if the last journey failed -
FRAAS-17413: Improve IDM service reliability during upgrades and routine maintenance
-
OPENICF-1723: Salesforce connector: Clarify usage of
proxyUriconfiguration property -
OPENICF-2297: SCIM connector: Roles attribute should be a list of
Strings, not a list ofObjects -
OPENICF-2482: SCIM connector: Dynamic schema doesn’t default to static schema on all exceptions
-
OPENICF-2483: SCIM connector: Creating a user with special attributes fails with dynamically generated schema
-
OPENICF-2484: SCIM connector: PUT with
schemasattribute fails for providers that support PATCH -
OPENICF-2448: SCIM connector: HTTP client fails to handle OAuth 2.0 errors
12 Oct 2023
Key features
- OneSpan Get User Authenticator node (FRAAS-17378)
-
Retrieves the authenticators assigned to a user and helps enable user’s authentication and security levels.
For details, refer to OneSpan Get User Authenticator node.
- OneSpan Identity Verification node (FRAAS-17378)
-
Sends request to OneSpan to analyze the image and determine whether the document is genuine or fraudulent.
For details, refer to OneSpan Identity Verification node.
03 Oct 2023
Fixes
-
FRAAS-17283: Tenant status pages not automatically updated during downtime
-
IAM-4235: Passthrough authentication using AD connector fails if set up in UI and user DN includes a space
-
IAM-4903: API calls to IGA endpoints not working with custom domain
-
IAM-4915: User details modal for IGA access review shows manager details as JSON object
-
OPENIDM-19192: Personal information is still editable by end users when User Editable is set to
false
September 2023
25 Sep 2023
Enhancements
-
IAM-4515[28]: Include autocomplete attribute with login form fields
-
IAM-4525[28]: Update profile picture modal with accessibility improvements for screen readers
-
IAM-4576[28]: Increase time on screen for loading spinner so that screen readers can announce it
-
IAM-4616[28]: Include contextual information with the show/hide buttons for improved accessibility
Fixes
-
FRAAS-17278: Health status reports for
AM,IDM, andplatform-adminservices incorrectly reported as available in some situations -
IAM-4460[28]: Screen readers read show/hide buttons for security questions as show/hide password
-
IAM-4523[28]: Screen readers read avatar alt text when tabbing to action menu
-
IAM-4524[28]: Two buttons with different labels open the same dialog
20 Sep 2023
Key features
- New Identity Governance capabilities[9] (IGA-1691)
-
Access requests let end users request access to resources and let managers request that access be removed from their delegates. The list of resources an end user can request access to is referred to as the access catalog.
Manage access request workflows is a new feature that lets you optionally define flows to include business logic, decisions, and approvals. For example, decide what happens when an approver rejects an access request for an application. Workflows currently only supports access request-related features.
New options in the Advanced Identity Cloud end-user UI let end users submit access requests, submit requests to remove access, and review assigned request items:
-
The My Requests option lets you view and create access requests to resources (applications, roles, entitlements) for yourself or on behalf of others.
-
The My Directory > Direct Reports option lets managers submit access removal requests.
-
The Inbox > Approvals option lists request items (requests an end user submits) for an approver (designated owner) to act on.
-
Enhancements
-
IAM-3648: ESV placeholders can now be entered from a drop-down list
-
IAM-3651: ESV placeholders can now be entered from key-value input fields
-
IAM-4236: Improve layout of the applications reconciliation tab
-
IAM-4367: Separate the connection status of OAuth 2.0 client applications into a dedicated list
-
IAM-4662: ESV placeholders can now be entered from tag input fields
-
IAM-4717: Added date, datetime, and time fields to the login UI
-
IAM-4789: Grant roles now show temporal constraints
-
OPENAM-20847: Sanitized HTML can now be added into messages for the Email Suspend node
Fixes
-
IAM-4418: Fix accessibility issues with multi-select input fields
-
IAM-4489: Align checkbox color with other form elements
-
IAM-4491: Correctly label sidebar buttons when expanded or collapsed
-
IAM-4492: Make navigation bars in end-user UI accessible for screen readers
-
IAM-4798: The
aria-labelis now correctly displayed for all component types on sidebar buttons -
IAM-4843: The user column in the certification task list now shows a user’s full name instead of only the first name
-
IAM-4528: Outbound reconciliation mapping preview shows generated password value
15 Sep 2023
Key features
- Query Parameter node (AME-24069)
-
Allows you to insert query parameter values from a journey URL into configurable node state properties. This lets you customize journeys based on the query parameter values.
For details, refer to Query Parameter node.
Enhancements
-
OPENAM-21073: Request headers are now accessible in OAuth 2.0/OIDC scripts for
OIDC_CLAIMS,OAUTH2_ACCESS_TOKEN_MODIFICATION, andOAUTH2_MAY_ACTscript contexts using therequestPropertiesbinding -
OPENAM-21355: Jakarta AWS region (ap-southeast-3) enabled for the PingAM push notification service
Fixes
-
IAM-4639: String/password field button is highlighted in the UI
-
IAM-4829: Eye icon displays over the password field highlight box in the UI
-
OPENAM-18599: Allow customization of the error message that displays to end users when their account is locked or inactive using
.withErrorMessage()in a Scripted Decision node -
OPENAM-18685: Use the OAuth2 Provider service in the AM admin UI to specify if tokens issued should contain the
subnameclaim -
OPENAM-19261: Errors are incorrectly logged when triggered by introspection of tokens using OAuth 2.0 client credentials grant
-
OPENAM-20451: The WebAuthn Registration node now displays an end user’s
userNamewhen registering a device when the identity’s name isn’t human-readable -
OPENAM-21158: Add support for trusted platform module (TPM) attestation using elliptic curve cryptography (ECC) unique parameter validation starting with Windows 11 version 22H2
-
OPENAM-21304: The
request_urisfield does not populate when OAuth 2.0 clients register using dynamic client registration -
OPENAM-21390: Fix caching error to correctly provide data to
nodeStatewhen a journey switches server instances
11 Sep 2023
Enhancements
-
IAM-3650: Add a drop-down menu to checkbox inputs for selecting ESV placeholders
-
IAM-3826: Add the ability to specify a source and transformation script when mapping application properties. For details, refer to app-management:provision-an-application.adoc#apply-a-transformation-script-to-a-mapping.
-
IAM-4567: Add a warning when running reconciliations and selecting the
persistAssociationsoption. For details, refer to View a report about the last reconciliation.
Fixes
-
IAM-4366: Provide browser-specific logic to handle alternative CSS for accessibility
-
IAM-4409: Require at least three characters before running identity searches when there are more than 1000 identities of that type
-
IAM-4478: Only allow certain combinations of properties in a mapping transformation script
-
IAM-4493: Fix the heading hierarchy in the UI
-
IAM-4568: Do not enable the option to change a user association in the UI
-
IAM-4703: Fix display of password fields in some themes
-
IAM-4710: Fix rounded border of password fields in hosted pages
August 2023
22 Aug 2023
Key features
- Salesforce Community User application template (IAM-4340)
-
Provision, reconcile, and synchronize Salesforce, Salesforce Portal, and Salesforce Community accounts.
For details, refer to Salesforce application template or Salesforce Community User application template
- Add preference-based provisioning to Privacy and Consent settings (IAM-4243)
-
End users in target applications can share their data with other applications. After the end user configures a preference to share data with other applications, data from the target application is synchronized with Advanced Identity Cloud.
For details, refer to End-user data sharing
18 Aug 2023
Key features
- OneSpan Auth VDP User Register node (FRAAS-15426)
-
Registers users to authenticate using the virtual one-time password (VOTP). For details, refer to OneSpan Auth VDP User Register node.
- OneSpan Auth Assign Authenticator node (FRAAS-15426)
-
Assigns VIR10 authenticator to the user when there’s a VIR10 authenticator available in the tenant and the user isn’t assigned a VIR10 authenticator. For details, refer to OneSpan Auth Assign Authenticator node.
- OneSpan Auth Generate VOTP node (FRAAS-15426)
-
Generates and delivers a virtual one-time password (VOTP) through the delivery method configured in the node if there’s a VIR10 authenticator assigned to the user. For details, refer to OneSpan Auth Generate VOTP node.
09 Aug 2023
Fixes
-
OPENAM-18004[29]: Audit logging does not specify transaction IDs correctly for internal requests to certain APIs
-
OPENAM-18709[29]: Calls to the
nodeState.get()method in Scripted Decision nodes do not return values in shared state when a variable is stored in both shared state and secure state -
OPENAM-20230[29]: Calls to classes in the allowlist fail occasionally with access prohibited messages
-
OPENAM-20682[29]: Unable to encrypt
id_tokenerror when there are multiple JWKs with the same key ID but different encryption algorithms -
OPENAM-20691[29]: Session quota reached when oldest session is not destroyed due to race condition
-
OPENAM-20783[29]: Logging is incorrect when the authorization code grant flow is used successfully
-
OPENAM-20920[29]: Null pointer exceptions when a SAML v2.0 binding is null and the SSO endpoint list contains non-SAML v2.0 entries
-
OPENAM-20953[29]: Policy evaluation with a subject type
JwtClaimreturns HTTP response code 500 -
OPENAM-20980[29]: The OIDC social provider is unable to use an issuer’s comparison check regex
-
OPENAM-21001[29]: Custom scripted SAML v2.0 IDP account mappers are determined incorrectly
-
OPENAM-21004[29]: Invalid session ID error when session management is disabled in an OIDC provider
-
OPENAM-21046[29]: The Create Object and Patch Object nodes do not log exception stack traces when they can’t retrieve the object schema
-
OPENAM-21164[29]: XML string formatted incorrectly when using a custom adapter to get the assertion from a SAML v2.0 response
Rapid channel features
This page links to early access documentation for features available in the rapid channel and not in the regular channel. As these features become available in the regular channel, we update the links to refer to the main body of the PingOne Advanced Identity Cloud documentation.
| These topics are draft documentation and subject to change. |
Regular channel changelog archive
2023
19 Jul 2023
Deprecations
- Introspect endpoint GET requests and URL query string parameters (FRAAS-10638)
-
ForgeRock has deprecated the following behaviors of the OAuth 2.0
introspectendpoint in Advanced Identity Cloud:-
Accept GET requests
-
Accept data in POST requests from URL query string parameters
You can continue to use these behaviors, but they will be removed on July 19, 2024. Instead, when using the OAuth 2.0
introspectendpoint, you should use POST requests and pass data in the POST request body.Refer to /oauth2/introspect.
-
17 Jul 2023
Fixes
-
OPENIDM-19245[13]: Fix IDM version qualifier to prevent ForgeRock REST proxy error
07 Jul 2023
Fixes
-
FRAAS-16041: Support Basic Authentication for Identity Cloud logging endpoints
-
OPENIDM-19240[13]: Fix the "internal server error" message when configuring reconciliation mappings
27 Jun 2023
Key features
- New Identity Governance capabilities[9] (IGA-1592)
-
Entitlements are specific permissions given to an account in an onboarded target application. Each entitlement correlates to a permission. Pull in entitlements from all onboarded target applications into Advanced Identity Cloud for use in certifications.
Entitlement assignment certification, a new certification type for access reviews, lets you review and certify entitlements and the users who have access to entitlements on some or all applications. Primary reviewers are entitlement owners, a single user, or users assigned to a role.
The governance glossary lets you attach business-friendly attributes to applications, entitlements, and roles to add more specificity to the data you review in access certifications.
New options in the Advanced Identity Cloud end-user UI let you view your access, your direct reports, and the access your direct reports have:
-
The My Access option lets you view your access in Advanced Identity Cloud and onboarded target applications. This includes accounts from onboarded target applications, roles you are assigned in Advanced Identity Cloud, and entitlements or privileges you have in onboarded target applications.
-
The Direct Reports option lets you get access information for individuals you manage. This includes their profile information, accounts from onboarded target applications, roles they are assigned in Advanced Identity Cloud, and entitlements or privileges they have in onboarded target applications.
-
- Lexis-Nexis ThreatMetrix Authentication nodes (FRAAS-15325)
-
Integrate Lexis-Nexis ThreatMetrix decision tools and enable device intelligence and risk assessment in Advanced Identity Cloud.
For details, refer to ThreatMetrix Authentication nodes.
- Filter log results (FRAAS-15378)
-
Use the
_queryFilterparameter to filter log results on any field or combination of fields in a payload. For details, refer to Filter log results. - Microsoft Graph API email client (OPENIDM-17899)
-
Configure the email client to use the MS Graph API Client for sending email.
For more information, refer to Microsoft Graph API email client.
- Included connectors and framework upgraded to OpenICF 1.5.20.15
-
The connectors included with Advanced Identity Cloud have been upgraded from version 1.5.20.12 to 1.5.20.15. Some highlights include:
-
MS Graph API Connector: Add the ability to read
applicationandservicePrincipalobject (OPENICF-2208) -
MS Graph API Connector: Implement application role assignments (OPENICF-2269)
-
SCIM Connector: Support for throttling (OPENICF-1916)
For a complete list of enhancements and fixes, refer to Connector changes.
-
Enhancements
-
IAM-2826: Filter the "Assignments" tab for identities so that it does not show overrides, entitlements, or resources
-
IAM-3408: Let provisioners use a range of connector versions
-
IAM-3677: Remove increment/decrement arrows from numeric input fields
-
IAM-3678[13]: Improved ADA accessibility for error messages associated with input fields
-
IAM-3982: Let users filter risk activity using distributed attack as a risk reason
-
IAM-3983: Show distributed attack as a risk reason in the risk dashboard
-
IAM-4051: Improved ADA accessibility for drop-down boxes
-
IAM-4053: Improved ADA accessibility when NVDA readers are used on pages that use the Page node
-
IAM-4074: Add a loading animation to the pie chart component
-
IAM-4136: Use the tab key to move focus and remove tags in multi-select components
Fixes
-
FRAAS-5756[13]: Journeys don’t resume after authentication in downstream identity provider
-
FRAAS-9230: Sanitize
aria-hiddenfields -
FRAAS-14214: Changing an existing ESV type is now denied by the API and new ESVs always require an explicit type
-
FRAAS-14262: Include changes to group privileges in the configuration promotions report
-
FRAAS-14706: Improve the detection of changes to complex configuration files and IDM script hooks in promotion reports
-
FRAAS-14897: Improve the rate limiting behavior of the
/monitoring/logsendpoint -
IAM-2026: Support versioning of the application and connector templates
-
IAM-2713: Prohibit editing of managed application objects
-
IAM-2972: Route users to the correct realm after granting Salesforce permissions
-
IAM-3089: Unable to exit a social provider and select a different social provider in a journey
-
IAM-3594: Correctly redirect control to the End User UI after authenticating with itsme
-
IAM-3719: Modals not showing display access review comments and activity
-
IAM-3939: Let end users switch to a different authentication journey
-
IAM-4013: When using a custom domain,
originalLoginRealmis set incorrectly -
IAM-4116: Don’t let access review users add reviewers with greater privileges than they themselves have
-
IAM-4134: User pop-up is visible in "Entitlement" tab
-
IAM-4200: Last certified date, decision, and actor displaying incorrectly in Governance account details
-
IAM-4242: Add "Conflicting changes" category to reconciliation summary
-
IAM-4289: Unable to assign non-account object properties to roles
-
IAM-4293: Access reviews and line items not shown for staged campaigns
-
IAM-4295: Reviewer not redirected back to pending reviews after access review sign off
-
OPENIDM-17481: Managed object schema can now describe a field as a nullable array and specify a default value for this field if not provided in a create request
-
OPENIDM-17771: Processing of a large number of scheduled jobs no longer causes all scheduled tasks to continuously misfire
-
OPENIDM-18192: Updating a relationship-defined virtual property (RDVP) on a managed object by signal receipt no longer causes other RDVP state within that object to be lost
-
OPENIDM-18292[13]: Add support for the
_fieldsrequest parameter to the syncgetTargetPreviewendpoint. -
OPENIDM-18360: Use the full object state when validating requests made by a delegated administrator to modify a relationship
-
OPENIDM-18613: Provide the ability to remove the
userPasswordattribute -
OPENIDM-18644: Correctly determine whether it’s possible to configure clustered reconciliation
-
OPENIDM-18807[13]: Update user provisioning workflow sample to check for empty manager strings
-
OPENIDM-18895: Fixes support for multi-version concurrency control on managed object patches and updates
-
OPENIDM-18898[13]: Add support for the
_countOnlyparameter in identity management scripts -
OPENIDM-18980[13]: Add a new metric to measure the duration of a LiveSync event
-
OPENIDM-19098[13]: Enable ES6 support for identity management scripts
13 Jun 2023
Key features
- Administrator federation enhancements (FRAAS-12097)
-
- Groups support
-
The new groups feature allows you to add and remove administrators depending on group membership in your identity provider. Using administration groups lets you automate the granting and removing of access for administrators that are being on-boarded, switching roles, or leaving your organization.
- OIDC Federation
-
OIDC is now supported as a federation identity provider, along with Microsoft ADFS and Microsoft Azure.
For more information, refer to Configure federated access for tenant administrators.
- OIDC ID Token Validator node (OPENAM-13293)
-
The new OIDC ID Token Validator node lets Advanced Identity Cloud rely on an OIDC provider’s ID token to authenticate an end user. The node evaluates whether the ID token is valid according to the OIDC specification.
For details, refer to OIDC ID Token Validator node.
- Scripted SAML 2.0 SP adapter (AME-21638)
-
Customize the SAML 2.0 SP adapter using a script.
For details, refer to SP adapter.
Enhancements
-
AME-24073: Expose the
prompt_values_supportedparameter of the provider configuration at the OIDC.well-knownendpoint -
AME-24175: Provide additional classes in the allowlist that scripts used in the Scripted Decision node
-
FRAAS-13293: Provide more accurate and granular information in promotion reports
-
FRAAS-14063: Remove orphaned unused scripts during promotion
-
FRAAS-15022: Improve promotion reports
-
IAM-2561: Allow adding applications to a user or role from the Identities > Manage page
-
IAM-3666: Add alternative text to QR code image
-
IAM-3676: Add keyboard controls to UI to select multiple values in multivalued lists
-
IAM-4030: Improve handling of identity provider and groups claims
-
IAM-4031: Generic OIDC configuration returns HTTP 400 Bad Request
-
OPENAM-18692: Set the minimum value for the Default Max Age property to
0 -
OPENAM-19745: Add support for EdDSA signing algorithm to WebAuthn Registration node
-
OPENAM-20541: Add additional inner classes to scripting allowlist to support RSA keypair generation
Fixes
-
AME-24026: Allow specifying inputs required by the provider scripts in the Configuration Provider node
-
IAM-3550: When attempting to validate Office 365 applications, a blank screen appears
-
IAM-3580: Improve service accounts UI including error handling
-
IAM-4032: Federation enforcement is missing from the UI
-
FRAAS-10816: Include thread ID and remove control characters from some Identity Cloud log files for easier log correlation
-
FRAAS-14956: Promotion preview and report not showing all configuration changes
-
FRAAS-15188: Ensure environments can be recreated after deletion
-
OPENAM-12030: Authentication node instances are deleted when journeys containing them are deleted
-
OPENAM-13329: Display journeys with spaces in their name in the Authentication Configuration drop-down menu
-
OPENAM-13766: Route user session based on whether policy evaluation is requested or not
-
OPENAM-17179: Correctly delete a script if its referring journey is deleted
-
OPENAM-17566: Display account name instead of UUID in the ForgeRock Authenticator when using MFA
-
OPENAM-18488: Support certificate-based attestation in certificate chains terminating at an intermediate CA
-
OPENAM-20082: Show correct error message to locked out users
-
OPENAM-20104: Fix the fragment response mode for the OAuth 2.0 authorize endpoint
-
OPENAM-20187: Fix the "waiting for response" page so that it fails authentication as configured in the authentication journey
-
OPENAM-20230: Prevent class allowlist from failing for classes already on the allowlist
-
OPENAM-20318: Allow a restricted set of HTML tags to be rendered in page node headers and descriptions
-
OPENAM-20360: Fix default URL encoding to ensure ampersand characters are not double encoded in a SAML assertion
-
OPENAM-20386: Fix authentication node state reconciliation in some complex journeys
-
OPENAM-20451: Fix WebAuthn registration node to return a human-readable username
-
OPENAM-20457: Device Location Match node routes to "Unknown Device" outcome instead of failing the authentication journey when the previously stored location of the device is not provided
-
OPENAM-20479: Enhance OIDC authentication to handle unsecured JWS requests
Deprecations
- Deprecate health check endpoints (FRAAS-15623)
-
ForgeRock has deprecated the following Advanced Identity Cloud health check endpoints:
-
/am/isAlive.jsp -
/am/json/health/live -
/am/json/health/ready -
/openidm/info/ping
You can continue to use the endpoints, but they will be removed on June 13, 2024.
You should update any external monitoring to use the Advanced Identity Cloud
/monitoring/healthendpoint instead.Refer to Monitor using health check endpoint.
-
07 Jun 2023
Key features
- UAT environment (FRAAS-13196)
-
You can now add one additional environment to your standard promotion group of development, staging, and production tenant environments. A UAT environment has the same capabilities as your staging environment, which allows your organization an additional production-like environment in which to test your development changes.
A UAT environment is an add-on capability.
For details, refer to UAT environments.
- Secure Connect (FRAAS-15187)
-
You can now use ForgeRock Secure Connect to create dedicated, direct, and secure communication between your Advanced Identity Cloud network and your private network, such as an on-premises data center or IaaS provider. Secure Connect bypasses the public internet, improving latency, throughput, and security.
Secure Connect is a limited availability feature.
For details, refer to Secure Connect.
16 May 2023
Key features
- PowerShell connector
-
Use the PowerShell Connector Toolkit to register a connector that can provision any Microsoft system.
For details, refer to PowerShell.
- SAP SuccessFactors Account or SAP SuccessFactors HR connector
-
Use the SAP SuccessFactors connectors to synchronize SAP SuccessFactors users with Advanced Identity Cloud users.
For details, refer to SAP SuccessFactors Account or SAP SuccessFactors HR.
- Bookmark application
-
You can now register a bookmark application - for example, OneNote, Evernote, Google Bookmarks, or raindrop.io - to direct users to specific URLs. A bookmark application displays shortcut links on dashboards. When you click one of the links, the browser opens a new tab.
For details, refer to Bookmark.
- Microsoft Intune node
-
Integrates Microsoft Intune to control features and settings on Android, Android Enterprise, iOS/iPadOS, macOS, and Windows 10/11 devices in your organization.
For details, refer to Microsoft Intune node.
- Secret Double Octopus (SDO) nodes
-
PingOne Advanced Identity Cloud integrates with Secret Double Octopus (SDO) to provide high-assurance, passwordless authentication systems that address the diverse authentication needs of a real-world, working enterprise.
For details, refer to Secret Double Octopus (SDO) nodes.
Fixes
| Issue ID | Summary |
|---|---|
IAM-2911 |
Add support for bookmark apps in application management |
IAM-3472 |
Update promotions UI to set tenant color dynamically based on the tenant name |
IAM-3518 |
Make Auto Access dashboard data realm specific |
IAM-3560 |
Add new default SCIM object types and mappings |
IAM-3563 |
Access review progress tooltip not working in end-user UI |
IAM-3630 |
Add SuccessFactors template and connector configuration |
IAM-3656 |
Display sign-off button in access review page in admin UI |
IAM-3666 |
Add alt text to QR code |
IAM-3667 |
Add visual indication of keyboard focus on input fields |
IAM-3681 |
Improve accessibility of the |
IAM-3682 |
Line items not showing for completed access reviews |
IAM-3688 |
Validate campaign deadline dates in admin UI |
IAM-3703 |
Campaign owner is duplicated in user dropdown after reconciliation run |
IAM-3734 |
Ensure relationship resource collection grids filter based on managed object settings |
IAM-3778 |
Allow login UI to work when browser session storage is unavailable |
IAM-3792 |
Prevent login UI rendering extra whitespace character in front of text on suspended nodes |
IAM-3806 |
Remove beta indicator from the trends chart in admin UI dashboard |
IAM-3840 |
Change color of radio button changed in Choice Collector node |
IAM-3879 |
Ensure global variable |
IAM-3887 |
Enhance |
IAM-3910 |
New PowerShell configuration properties |
IAM-3922 |
Risk score definition on autonomous decision node is not working |
IAM-3937 |
Risky events are not shown in the risk dashboard |
IAM-3964 |
Risk reasons do not display in the risk dashboard |
OPENAM-18895 |
Fix API request timeout errors for slow connections |
OPENAM-20815 |
Add missing footer to Page node when session expired |
OPENIDM-18917 |
Display last name instead of user ID on user profile when no first name is provided |
TNTP-42 |
Microsoft Intune marketplace node |
TNTP-45 |
Secret Double Octopus marketplace node |
02 May 2023
Key features
- Support for all Google Fonts for hosted pages
-
Meet your organization’s brand guidelines by using any Google Font in your hosted pages.
Fixes
| Issue ID | Summary |
|---|---|
FRAAS-13247 |
Set the log API key creation date correctly |
IAM-1686 |
Allow any Google Font to be used on hosted pages |
IAM-3164 |
Prevent table columns from stacking vertically on smaller viewports |
IAM-3313[9] |
Additional Options section missing from Identity Certification campaign template |
IAM-3950 |
End-user UI fails to load when accessing Advanced Identity Cloud in a new tab |
OPENIDM-18988 |
Prevent repository reads when anonymous users make requests to info and ping endpoints |
21 Apr 2023
Resolved issues
| Issue ID | Summary |
|---|---|
OPENIDM-18967[31] |
RelationshipArray grid queries use unnecessary |
18 Apr 2023
Key features
- IP allowlisting
-
Enterprises often need to ensure that requests entering their network come from trusted sources. PingOne Advanced Identity Cloud now offers outbound static IP addresses for all environments.
Outbound static IP addresses let you implement network security policies by setting up allowlists of IPs originating from Advanced Identity Cloud. This adds an extra layer of security to outbound calls to your APIs or SMTP servers.
For more information, refer to Outbound static IP addresses.
Resolved issues
| Issue ID | Summary |
|---|---|
FRAAS-5995 |
Outbound request static IP allows IP allowlisting for new customers |
FRAAS-9376 |
Provide the ability to display a login journey in an iframe for specific custom domains. To implement this feature, you need to open a support ticket. |
FRAAS-13522 |
Promotion report does not include changes to custom email provider |
FRAAS-14097 |
Promotion report should identify journeys by their name |
FRAAS-14187 |
Updated user registration cloud logging to capture events from identity providers |
FRAAS-14260 |
UI displays "Resource 'managed/alpha_application' not found" message |
FRAAS-14265 |
Cannot access ESVs in sandbox tenants |
FRAAS-14353 |
Configuration placeholder replacement assumes a string value |
FRAAS-14475 |
Certain searches cause |
OPENIDM-18957 |
Update the scheduler to attempt to release any triggers it previously attempted to acquire from a timeout due to an unresponsive repository |
11 Apr 2023
Key features
- PingOne® Identity Governance (add-on capability)
-
PingOne Identity Governance is a new add-on capability that allows you to centrally administer and manage user access to applications and data across your organization to support regulatory compliance.
With Identity Governance you can:
-
Work with onboarded target applications when reviewing user data. This allows you to review user data for onboarded applications.
-
Define and launch reviews of data using certification campaigns.
-
Review and manage user access to applications. This includes managers reviewing the access their direct reports have.
For more information, refer to About Identity Governance.
To purchase an Identity Governance subscription, contact your ForgeRock representative.
-
- Administrator federation
-
Administrator federation allows administrators to use single sign-on (SSO) to log in to an Advanced Identity Cloud tenant.
By using federation to authenticate your administrators to Advanced Identity Cloud, you can quickly and easily deprovision an administrator by removing their access from your centralized identity provider.
For details, refer to Configure federated access for tenant administrators.
Resolved issues
| Issue ID | Summary |
|---|---|
IGA-1433 |
Initial release of Identity Governance with identity certifications |
FRAAS-5416 |
Administrators can access Advanced Identity Cloud using single sign-on from another identity provider |
OPENDJ-9295[13] |
Search with |
29 Mar 2023
Key features
- OneSpan authentication journey nodes
-
The new OneSpan authentication journey nodes integrate OneSpan Intelligent Adaptive Authentication (IAA) scoring for identity proofing, continuous authentication, and fraud protection.
For details about OneSpan authentication integration set up, refer to OneSpan.
- Jumio identity verification
-
The new Jumio identity verification integrates with Jumio’s NetVerify service to easily and securely verify identity by using facial recognition to authenticate against government issued IDs.
For details about Jumio identity verification, refer to Jumio identity verification.
- Logout for all server-side sessions for a user or set of users
-
Administrators can now invalidate (log out) all server-side sessions for a user by sending a POST request to the
json/sessionsendpoint with thelogoutByUseraction, specifying the username in the request payload.
- Composite advice with an AuthLevelCondition in journeys
-
Composite advice gives AM hints about which authentication services to use when logging in a user. Journeys now take into account the AuthLevelCondition composite advice.
For example, you can now use AuthLevelCondition composite advice so that AM uses a journey that provides an authentication level of 10 or higher.
- Promotions API documentation
-
The promotions API documentation is now publicly available at https://apidocs.id.forgerock.io/#tag/Promotion.
- SCIM built-in connector
-
You can now use the SCIM built-in connector to manage user and group accounts on any SCIM-compliant resource provider.
- Support for REST connector applications
-
Application management now lets you create, provision, and manage REST connector applications.
For details, refer to Scripted REST connector.
Resolved issues
| Issue ID | Summary |
|---|---|
AME-21638 |
Scripted plugin for SAML 2.0 SP Adapter |
AME-22942 |
Log out all server-side sessions for a user or set of users so that they have to reauthenticate |
FRAAS-5416 |
Let administrators access Identity Cloud using single sign-on from another identity provider |
FRAAS-8225 |
The promotions API documentation is now publicly available at https://apidocs.id.forgerock.io/#tag/Promotion |
FRAAS-8709 |
Include the log sources in the logged events |
FRAAS-12402 |
Add /platform/oauthReturn route to support authentication for Salesforce and Google Apps |
FRAAS-12413 |
OIDC login from a custom domain results in blank page |
FRAAS-13454 |
Integrate Jumio identity verification journey nodes |
FRAAS-13555 |
Integrate OneSpan authentication nodes |
FRAAS-13478 |
Promotions report shows changes that it shouldn’t |
FRAAS-13597 |
Remove unexpected changes from promotion reports |
FRAAS-13866 |
Let Identity Cloud administrators access policy configuration |
FRAAS-13933 |
Make managed groups visible in the AM admin UI |
FRAAS-13974 |
Add class |
FRAAS-13983 |
Remove OneSpan nodes from the Basic Authentication journey node list |
FRAAS-14030 |
Add inner classes from |
FRAAS-14069 |
Add |
FRAAS-14260 |
UI displays "Resource 'managed/alpha_application' not found" message |
FRAAS-14265 |
Cannot access ESVs in sandbox tenants |
IAM-662 |
Fixed agent logout in platform UI |
IAM-2879 |
Allow properties in forms to be reordered |
IAM-2921 |
In the Dashboard, the total number of applications that display in the Applications box now includes those applications registered using the new app catalog in tenants created on or after January 12, 2023. |
IAM-3089 |
Unable to exit a social provider and select a different social provider in a journey |
IAM-3094 |
Add support for enumerated values in array attributes |
IAM-3156 |
Update the descriptive text in the "Add Property" modal to be more accurate |
IAM-3160 |
Added ability to configure the scripted Groovy connector |
IAM-3180 |
Hide the SSO tab when an application is authoritative |
IAM-3193 |
Updated SCIM app template to only show the refresh token property for OAuth authentication |
IAM-3261 |
Adjust Autonomous Access risk filter to better handle scoring edge cases |
IAM-3262 |
Adjust menu width on the Autonomous Access Risk Administration page |
IAM-3303 |
Enable clicking a row to edit entries on the service accounts page |
IAM-3304 |
Added breadcrumbs to the service accounts page |
IAM-3305 |
Added a search field to the service accounts page |
IAM-3461 |
Fix display of OAuth 2.0 applications with a UUID for a name |
IAM-3462 |
Corrected AD template property from |
IAM-3478 |
Addressed accessibility concerns when displaying password policy validation |
IAM-3492 |
Fix objects ending in |
IAM-3642 |
Fixed an issue with unselected applications being imported when promoting, and improved the user experience for selecting and deselecting applications in the promotions UI |
IAM-3694 |
Added ability to customize the success color in hosted pages |
IAM-3760 |
Apple social authentication works with other authentication methods |
OPENAM-16374 |
Add support in journeys for composite advices that use an AuthLevelCondition |
OPENAM-18270 |
Don’t raise errors when calls to the access_token endpoint specify the scope parameter in OAuth2 authorization_code exchange |
OPENAM-18488 |
Handle the CA certificate correctly for Windows Hello attestations |
OPENICF-400 |
The LDAP connector now correctly reads the AD Account tokenGroups attribute |
OPENICF-1762 |
IBM RACF API connector |
OPENICF-1858 |
Add group owners management support to the Microsoft Graph API connector |
OPENICF-2033 |
PeopleSoft connector v2.0 |
OPENICF-2039 |
Add archived, languages, isEnrolledIn2Sv, and isEnforcedIn2Sv fields to the Google Apps connector |
OPENICF-2067 |
Adjust license assignments as part of the user creation and update operations in the Google Apps connector |
OPENICF-2068 |
The Microsoft Graph API connector now lets you assign and revoke directory roles to an Azure AD user account and query the target instance for roles |
OPENICF-2088 |
The Microsoft Graph API connector now lets you assign and revoke custom roles to an Azure AD user account and query the target instance for roles |
OPENICF-2102 |
Assign and revoke PermissionSets and Groups to Salesforce user accounts in the Salesforce connector |
OPENICF-2110 |
Expose groups and roles through user object in the ServiceNow connector |
OPENICF-2111 |
View, update, and remove a group’s roles through the role object in the ServiceNow connector |
OPENICF-2129 |
The LDAP connector now includes a parameter to use isMemberOf by ldapGroups |
OPENICF-2192 |
In the Google Apps connector, don’t throw an NPE when updating a user with a change to license assignments if _NAME_ is not specified |
OPENICF-2194 |
In the GoogleApps connector, the PATCH remove operation doesn’t update the object when both the field and value are provided |
OPENIDM-17876 |
Query filter editor no longer removes double quotes from all properties that aren’t of type string |
OPENIDM-17936 |
Saving changes to the authzRoles field on users no longer overrides the field type |
OPENIDM-18001 |
Country codes in locales are no longer ignored when sending emails |
OPENIDM-18077 |
Added new default policy, cannot-contain-others-case-insensitive |
OPENIDM-18153 |
Custom script exception messages are no longer incorrectly truncated in REST responses |
OPENIDM-18216 |
IDM admin UI should query recon association data instead of audit data |
OPENIDM-18238 |
Improved resiliency of clustered reconciliations |
OPENIDM-18243 |
Validate that connector names are alphanumeric |
OPENIDM-18260 |
New sync mapping fields, defaultSourceFields and defaultTargetFields, let you specify which fields to use for read and query requests |
OPENIDM-18261 |
Endpoints within /system now support specifying additional fields when using wildcards |
OPENIDM-18275 |
The groups' name field is now searchable |
OPENIDM-18319 |
An up-to-date target object state is now provided in sync script bindings and sync audit mechanisms |
OPENIDM-18336 |
The default assignment object schema now contains a "condition" field |
OPENIDM-18476 |
The IDM admin UI now defaults identity object number fields to |
OPENIDM-18498 |
Queued sync not triggered if target is a CREST proxy endpoint |
OPENIDM-18501 |
Tenant administrator password policy no longer restricts passwords to a maximum length |
OPENIDM-18629 |
Reconciliation job identifiers now use a more precise timestamp |
OPENIDM-18650 |
Add new SCIM connector; applications now support creating connections to SCIM services |
OPENIDM-18865 |
Script changes cannot be saved unless you click outside the Inline Script box |
OPENIDM-18868 |
Inability to save a schedule when you add or remove a passed variable |
OPENIDM-18870 |
Inability to delete an inline reconciliation or schedule script |
15 Mar 2023
Key features
- Improved access to reconciliation logs in Advanced Identity Cloud
-
You can now view IDM reconciliation logs in your tenant by updating your audit configurations and specifying the log source
idm-reconin a call to the logging API endpoint.For more information, refer to Update audit configuration.
14 Feb 2023
Key features
- Application promotions
-
You can now use the UI to promote applications between tenant environments. Promoted applications are recreated in the upper environment with any associated static configuration (connectors, mappings, or SAML configuration) and any associated dynamic configuration (OAuth 2.0 clients).
For more information, refer to Manage self-service promotion of applications using the UI.
Resolved issues
| Issue ID | Summary |
|---|---|
FRAAS-7542 |
Control access to hosted account and journey pages |
FRAAS-11599 |
Don’t allow changes to scripts in staging and production environments |
FRAAS-13464 |
Adjust sandbox environment migration to not use development environment migration steps |
FRAAS-13809 |
Autonomous log filters fail in connected environments |
IAM-2725 |
Adjust input field placeholders to clear properly when a user starts typing |
IAM-3084 |
Only allow unique values when adding application owners |
IAM-3141 |
Add the ability to promote dynamic configuration attached to application |
IAM-3151 |
Remove redirect to global settings during administrator login |
IAM-3183 |
Let users filter the trends dashboard by date without resetting the journeys dashboard |
IAM-3339 |
After refreshing the realm settings page, set the current tab using the identifier specified in the URL fragment |
IAM-3512 |
Access Management native console incorrect redirect URL |
OPENIDM-16640 |
Changes to identity objects by onUpdate scripts not triggering relationship property onRetrieve hooks |
03 Feb 2023
Key features
- Deprecate skip option for tenant administrator MFA
-
ForgeRock has deprecated the option to let Advanced Identity Cloud tenant administrators skip 2-step verification. Customers can continue to use the skip option in their tenants, but this functionality will be removed from Advanced Identity Cloud on February 3, 2024.
31 Jan 2023
Key features
- Service accounts
-
You can now use service accounts to request access tokens for most Advanced Identity Cloud REST API endpoints without relying on a particular identity in your system:
-
Call Identity Cloud APIs programmatically without needing a human identity.
-
Access AM or IDM APIs in the same way using a signed JWT.
-
Set scopes on each service account to assign only necessary permissions to access tokens.
-
Use for automation and CI/CD tooling.
For details, refer to Service accounts.
-
Resolved issues
| Issue ID | Summary |
|---|---|
FRAAS-13478 |
Remove unrelated AM root realm changes from promotion reports |
FRAAS-13519 |
Remove unexpected file changes from self-service promotion reports |
FRAAS-13620 |
Improve performance of promotion report generation by removing unrelated data |
FRAAS-8477 |
Service accounts |
IAM-1939 |
Fix hCaptcha support in Platform UI |
IAM-2025[13] |
Add Uncategorized to the journey category filter |
IAM-2224 |
Replace bullets with checkmarks when validating password policy |
IAM-2305[13] |
Add support for localized logos in end-user UI |
IAM-2847 |
Increase the size of the terms and conditions modal window |
IAM-2912 |
Enable promotions UI to ignore encrypted secrets |
IAM-3011 |
Update risk configuration UI to show only user-modifiable configuration |
IAM-3012 |
Add new |
IAM-3015 |
Update risk configuration evaluation UI so that updates use the new APIs |
IAM-3016 |
Fix the |
IAM-3041 |
Prevent proceeding from the Active Directory modal window without entering base DNs |
IAM-3076 |
Fix Salesforce provisioning connection |
IAM-3079 |
Fix single sign-on (SSO) setup when app name has a space |
IAM-3088 |
Enable suppression of the login failure message from the failure node |
IAM-3091[13] |
Fix localized headers rendering as [object Object] |
IAM-3107[13] |
Remove bitwise filter on Active Directory page |
IAM-3108[13] |
Update Maintain LDAP Group Membership option to not be selected by default |
IAM-3109[13] |
Update cn property to be optional in Active Directory target mode |
IAM-3110[13] |
Update ldapGroups property to be available by default in Active Directory target mode |
IAM-3111[13] |
Fix password hash algorithm |
IAM-3122 |
Fix font weight of the title text on provisioning tab |
IAM-3139[13] |
Fix Revoke button in Users & Roles to revoke users, and not be clickable when there are no users to revoke |
IAM-3142[13] |
Fix Active Directory user filter anomaly when deleting a row |
IAM-3145 |
Fix Active Directory assignment on array attributes to be a merge and not replace |
IAM-3146[13] |
Update user-specific attributes to be editable by administrators |
IAM-3177 |
Add paging back to application list view if workforce feature is not enabled |
IAM-3257[13] |
Fix escaping of ESV placeholders in the advanced email editor |
IAM-3335 |
Fixed display of localized favicon |
19 Jan 2023
Key features
- BioCatch authentication nodes
-
The new BioCatch authentication nodes integrate BioCatch scoring for identity proofing, continuous authentication, and fraud protection.
For details, refer to Marketplace.
Resolved issues
| Issue ID | Summary |
|---|---|
AME-22948[13] |
Create endpoint to log out sessions based on user identifier |
FRAAS-11964 |
Avoid potential performance degradation when removing expired token state |
FRAAS-12140 |
Integrate BioCatch authentication journey nodes |
FRAAS-13242 |
Improve invalid page size error message |
OPENAM-13766[13] |
No configuration found for log in with session condition advice deny |
OPENIDM-17392 |
Prevent script typos that cause services to fail from being introduced into the system |
OPENIDM-17664 |
LDAP connector has invalid configuration when whitespace added to Base DN |
OPENIDM-17953 |
Support email addresses that contain non-ASCII UTF-8 characters |
12 Jan 2023
Key features
- Workforce application and connector management
-
In new tenants created on or after January 12, 2023, you can use the improved applications page to integrate Advanced Identity Cloud with external data stores or identity providers. The applications page acts as a one-stop location where you can:
-
Register and provision popular federation-capable applications quickly and easily by choosing from a library of templates, such as Salesforce and Workday.
-
Register and provision your organization’s custom applications.
-
Manage data, properties, rules, SSO, provisioning, users, and groups for an application.
-
View the connection status of each application.
-
Activate and deactivate an application.
For details, refer to Application management.
-
- Event hooks
-
Event hooks let you trigger scripts during various stages of the lifecycle of users, roles, assignments, and organizations.
You can trigger scripts when one of these identity objects is created, updated, retrieved, deleted, validated, or stored in the repository. You can also trigger a script when a change to an identity object triggers an implicit synchronization operation.
Post-action scripts let you manipulate identity objects after they are created, updated, or deleted.
For details, refer to Event hooks.
- Daon IdentityX authentication nodes
-
The new Daon authentication nodes let you integrate with the Daon IdentityX platform for MFA with mobile authentication or out-of-band authentication using a separate, secure channel.
For details, refer to Marketplace.
- Onfido authentication nodes
-
The new Onfido authentication nodes let you use Onfido’s solution for collecting and sending document identification and, optionally, biometrics to the Onfido backend for verification.
For details, refer to Marketplace.
Resolved issues
| Issue ID | Summary |
|---|---|
DATASCI-1548 |
Update the filter text on the Autonomous Access dashboard from "All Risk Scores" to "Risk Score" |
DATASCI-1550 |
Update text on the Autonomous Access dashboard’s Copy on User Detail page |
FRAAS-11158[13] |
AM cache outdated during restart of Identity Cloud services |
FRAAS-11574 |
Integrate Daon authentication journey nodes |
FRAAS-11575 |
Integrate Onfido authentication journey nodes |
FRAAS-11964 |
Avoid potential performance degradation when removing expired token state |
FRAAS-12477 |
Add list of encrypted secrets to promotion reports |
FRAAS-12492[13] |
Add classes to the scripting allow list |
FRAAS-12494 |
Unlock the environment and stop checking progress after successfully promoting an environment |
FRAAS-12545 |
Remove the option to keep orphaned configuration nodes from the promotions API |
FRAAS-12552 |
Add redirect for custom domain login screen |
FRAAS-12713 |
Promotions API failed to generate a report |
FRAAS-12917[13] |
Email invites to sandbox tenant administrators sometimes do not work |
FRAAS-12939 |
Add proxy state to output of lock state endpoint for promotions API |
FRAAS-12988 |
Prevent placeholder support being enabled unless a specific migration flag value is set |
FRAAS-13057 |
Add only standard placeholders (not user-defined placeholders) prior to enabling placeholder management |
FRAAS-13082[13] |
Provisional report endpoint can return 500 if requested repeatedly before cache is built |
FRAAS-13121 |
Provisional reports can cause promotion service to run out of memory and restart |
FRAAS-13244 |
Unable to log into tenant to perform self-service promotion |
IAM-2658 |
Application management improvements |
OPENAM-19485 |
Access multi-tenant social providers without requiring multiple secondary configurations |
OPENIDM-17556 |
Ensure RDVPs are not erased for all types of managed objects for all types of PUT operations |
OPENIDM-17616[13] |
Add support for direct assignments |
OPENIDM-18024[13] |
Implement weighted assignments |
OPENIDM-18037[13] |
Create endpoint for aggregating effective assignments and user identity object type outbound mapping values |
OPENIDM-18063[13] |
Include Google Apps connector in bundled connectors |
OPENIDM-18388[13] |
Do not schedule clustered-recon-resilience jobs for reconById invocations |
2022
14 Dec 2022
Resolved issues
| Issue ID[32] | Summary |
|---|---|
FRAAS-8589 |
Promotion hangs when waiting for Identity Cloud services |
FRAAS-9155 |
Promotion reports not showing changes for all connectors |
FRAAS-11830 |
Promotion reports rendering new line characters inside JSON strings |
FRAAS-11158 |
Restart of AM can lead to outdated cache |
FRAAS-12049 |
Promotion reports not showing changes to custom endpoint scripts |
IAM-2465 |
Password policy to force password expiry not working |
IAM-2706 |
Embedding images in the theme editor only displays alternative text |
IAM-2739 |
Email suspend message displayed without line breaks |
IAM-2939 |
Add translation configuration key for "Passwords do not match" message |
IAM-2973 |
Self-service promotions migration UI flow should enable promotions UI features |
OPENIDM-16830 |
Speed up search for organizations |
OPENIDM-18388 |
Do not flag reconById invocations as clustered |
OPENIDM-18483 |
Add name field to resourceCollection query fields for group identity objects |
29 Nov 2022
Key features
- Group management
-
You can now create and manage groups that are shared across AM and IDM within your Advanced Identity Cloud instance. New tenants have group management enabled by default, and existing tenants can follow an upgrade path to enable it.
For more information, refer to Group management.
- ID Cloud Analytics Dashboard enhancements
-
You can now take advantage of the following enhancements to the analytics dashboard:
-
The journey chart now lets users drill down at specific points on a trend line to view individual journey outcomes for that date/hour. Journeys are sorted by a ranking of percentage failures, but can also be sorted based on number ranking.
-
Two new widgets — Top Five Journeys by Outcome and Top Five Journeys by Usage — that rank trending journeys based on outcomes and usages are now available.
For more information, refer to Advanced Identity Cloud analytics dashboard.
-
09 Nov 2022
Key features
- Self-service promotions
-
Self-service promotions let you promote configuration between environments without raising a support ticket. You can perform self-service promotions from development to staging tenant environments, and from staging to production tenant environments. You cannot promote sandbox environments.
For more information, refer to Introduction to self-service promotions.
- Configuration placeholders visible in all APIs
-
Configuration placeholders let you set ESVs in your configuration.
For more information, refer to Configure placeholders to use with ESVs.
- Duo authentication node
-
The new Duo authentication node lets you use Duo’s solution for adaptive authentication, bring your own device security, cloud security, endpoint security, mobile security, and two-factor authentication.
- Twilio authentication node
-
The new Twilio authentication node allows you to use Twilio for two-factor authentication during account setup, sign-on, and other scenarios. The node lets you integrate Twilio’s APIs to build solutions for SMS and WhatsApp messaging, voice, video, and email. The node uses Twilio’s latest Lookup API, which uses real-time risk signals to detect fraud and trigger step-up authentication when needed.
For details, refer to Marketplace.
Resolved issues
| Issue ID | Summary |
|---|---|
ANALYTICS-52 |
Correct the value in the All Journeys field |
DATASCI-1437 |
Correct prefilled username fields in Filters window |
DATASCI-1474 |
Don’t show explainability if not specified in response after applying Unusual Day of Week filter |
DATASCI-1497 |
Let users see previously selected risk reasons after closing the Filter window |
DATASCI-1504 |
Prevent the truncation of text on the right side of pages |
FRAAS-10979 |
Configuration placeholders visible in all APIs in new customer environments |
FRAAS-11570 |
Add Duo authentication node |
FRAAS-11571 |
Add Twilio authentication node |
FRAAS-11825 |
Add translation configuration key for no search results message |
FRAAS-12219 |
Self-service promotions available in new customer environments |
FRAAS-12301 |
Add Marketplace nodes to journey editor menu |
FRAAS-12413 |
Remove blank page shown when user returns to login page following successful login to custom domain |
FRAAS-12625 |
Handle ESVs as string type if no type is set |
IAM-1935 |
Expose ESV variable type in the UI |
IAM-2038 |
Prevent theme styles rendering in the hosted pages editor |
IAM-2066 |
Show the entire answer to a long security question after clicking the visibility icon |
IAM-2259 |
Do not let users save email templates that contain JavaScript |
IAM-2312 |
Render SVG images correctly |
IAM-2411 |
ForgeRock favicon displays briefly before the customer’s favicon |
IAM-2502 |
Remove flashing red text from security questions window |
IAM-2633 |
Support localization for radio display fields in Choice Collector node |
IAM-2696 |
Remove legend from Risk Score window |
IAM-2869 |
Update UI regex validation for ESV list type |
05 Oct 2022
Resolved issues
| Issue ID | Summary |
|---|---|
AME-22684 |
Include grace period configuration in the OAuth2 provider settings |
DATASCI-1165 |
Remove Automated User Agent from the list of risk reasons filters |
DATASCI-1358 |
Let users filter dashboards by date, risk scores and features |
DATASCI-1365 |
Update the Risk Activity page when applying a filter without requiring users to refresh the page |
DATASCI-1394 |
Show the times that events occurred correctly without requiring users to refresh the display |
DATASCI-1395 |
Let users see their last five risky authentication attempts |
DATASCI-1397 |
Remove risk administration options from end users' navigation menus |
DATASCI-1406 |
When filtering activities using a date range, include the activities that occur on the end date |
IAM-1678 |
Allow login journey attributes that are not required to have empty values |
IAM-1682 |
When editing email templates, cut text correctly |
IAM-1932 |
When placeholders are used, display read-only strings in the Platform UI |
IAM-1933 |
Alter AM XUI to display readonly strings wherever placeholders are in use |
IAM-2028 |
Remove excess space from journey editor fields that do not require floating labels |
IAM-2064 |
Replace fields for specifying numeric thresholds with a risk score definition slider in Autonomous Access Decision nodes |
IAM-2080 |
Let users create customized footers on Page nodes |
IAM-2141 |
Add option to customize Page node background color |
IAM-2142 |
Add option to customize Page node button width |
IAM-2143 |
Add option to customize label text for Page node fields |
IAM-2227 |
Remove spurious "No configuration exists for id external.email" pop-up warning |
IAM-2249 |
Add option to display Message node as a link |
IAM-2250 |
After importing journeys, let user delete all imported journeys with a single delete action |
IAM-2251 |
Provide a value when the object.password variable is specified in an email template |
IAM-2258 |
Remove tenant information from the Realm menu |
IAM-2285 |
Make H2, H3, and H4 HTML headings bigger when there’s no higher-level predecessor heading |
IAM-2290 |
Show the correct number of events per country on the Activity Risk dashboard |
IAM-2294 |
Show previous authentication attempts when doing anomaly lookups |
IAM-2320 |
Change the default navigation background color of Account pages without changing the dashboard color |
IAM-2329 |
Change the color of the Autonomous Access event log indicator to red |
IAM-2351 |
Correct pagination on the Autonomous Access Risk page |
IAM-2373 |
Make dashboard analytics pipeline logs in Autonomous Access work as expected |
IAM-2468 |
Wrap long security questions |
IAM-2521 |
Don’t reuse authId during password validation |
OPENAM-18112 |
Provide better error message when an LDAP authentication node encounters a TLS connection issue |
OPENAM-18933 |
Do not override the Success URL node’s value |
OPENAM-19196 |
Do not wait for cache timeout before OAuth2 clients reflect changes to Javascript origins |
OPENAM-19868 |
Correctly handle multi-line text in Email Suspend nodes |
OPENIDM-16420 |
Update the default email validation policy to conform with RFC 5322 |
OPENIDM-17533 |
Allow configuration changes to the repo.ds.json file to take effect without restarting IDM |
OPENIDM-17720 |
Fix null pointer exception when the repo.ds.json file is misconfigured |
OPENIDM-17836 |
Fix for startup error message caused by ObjectMapping constructor exception |
OPENIDM-17911 |
Fix email validation errors in the IDM admin UI (native console) |
OPENIDM-18272 |
Save managed object properties correctly in Identity Management native console |
SDKS-1720 |
Point developers to the ForgeRock SDKs when they create an OAuth2.0 client in the Platform UI |
SDKS-1721 |
Point developers to the ForgeRock SDKs when they configure CORS in the Platform UI |
24 Aug 2022
Resolved issues
| Issue ID | Summary |
|---|---|
OPENAM-19427 |
Display security questions in the correct default language |
OPENIDM-17644 |
Release scheduled tasks after all failures so they are rerun |
OPENIDM-17858 |
Process job completion instructions when a trigger is not found |
OPENIDM-18123 |
Correctly load scripts that use ISO 8859-1 encoding |
18 Aug 2022
Resolved issues
| Issue ID | Summary |
|---|---|
IAM-2282 |
Do not ignore the noSession=true parameter in journeys that do not have Email Suspend nodes |
IAM-2412 |
Left-align long security questions |
IAM-2473 |
Control redirection precedence with AlignGoToPrecedence environment variable |
OPENAM-19631 |
Prevent end users from defining their own security questions in the KBA Definition node (UI fix) |
28 Jul 2022
UI release (hotfix)
Resolved issues
| Issue ID | Summary |
|---|---|
IAM-2051 |
Turn off autocomplete for select and multi-select field components |
IAM-2091 |
Fix unstyled content flashing |
IAM-2232 |
Fix Platform Password node validation when allowlisting is enabled for trees |
IAM-2348 |
Localize label text used for confirming passwords |
IAM-2452 |
Fix issue with login callback components mounting twice |
21 Jun 2022
Platform release: 2022.6
Key features
- Workday built-in connector
-
You can now use the Workday built-in connector to synchronize Advanced Identity Cloud easily with a datastore in the Workday cloud service.
Resolved issues
| Issue ID | Summary |
|---|---|
AME-22011 |
Allow OAuth 2.0 clients to override plugin configuration |
OPENAM-13557 |
Add support for JWT Secured Authorization Response Mode for OAuth 2.0 (JARM) |
OPENAM-18223 |
Return 400 Bad Request error code if the id_token_hint is invalid |
OPENAM-18252 |
Allow nodes to update the universal ID for use cases like impersonation and peer authentication |
OPENAM-19028 |
Support social identity providers that provide IDs that are not returned as strings |
OPENAM-19119 |
Provide localization for the URL links on the GetAuthenticatorApp node |
OPENIDM-17659 |
Add the Workday connector as a built-in Identity Cloud connector |
15 Jun 2022
Key features
- Remove log sources for internal services
-
The following log sources are no longer available in the
/monitoring/logsREST API endpoint:-
ctsstore
-
ctsstore-access
-
userstore
-
userstore-access
These sources are for internal services that are managed by ForgeRock, so have been removed to simplify the API.
-
09 Jun 2022
Key features
- Import and export journeys
-
You can now import and export journeys from the Advanced Identity Cloud admin UI, making it easier to back up and restore journeys in your environment. You can also import and export associated assets, such as themes and scripts, along with journeys.
- Email template editor enhancements
-
The email template editor now takes better advantage of available space on the the screen. A new preview panel shows you what your template looks like without the need to scroll. A new option in the editor lets you use HTML with CSS, giving you more control over the look and feel of your email templates.
- Journey configuration enhancements
-
You can now take advantage of the following enhancements when you configure journeys:
-
Configure a Choice Collector node to let end users select from a set of radio buttons or a drop-down field.
-
Add a password confirmation field to a Platform Password node by simply selecting a checkbox.
-
Configure a Message node to have a single button instead of two buttons, so that end users can simply acknowledge messages.
-
Customize text in the Next button text on a Page node.
-
Resolved issues
| Issue ID | Summary |
|---|---|
ANALYTICS-8 |
Clarify the tool tip shown with the user engagement graph |
IAM-1649 |
Enhance email template editor |
IAM-1167 |
Add UI for importing and exporting journeys, nodes, and scripts |
IAM-1981 |
Increase use of landmarks across all journeys to improve accessibility |
IAM-1997 |
Make full recovery question visible on password reset page |
IAM-2144 |
Allow confirmation callbacks to have a single outcome and message nodes to show a single button |
IAM-2145 |
Let choice collector nodes show choices as radio buttons |
IAM-2146 |
Add option to require password confirmation |
IAM-2147 |
Make text displayed in the Next button configurable |
IAM-2151 |
Remove text that inadvertently appears in the theme editor |
20 May 2022
Resolved issues
| Issue ID | Summary |
|---|---|
IAM-2059 |
Add UI support for Autonomous Access |
IAM-1343 |
Add duplicate option to email templates list |
IAM-1899 |
Convert page node from string to object to support additional feature specifications |
IAM-1962 |
Double password reveal icon in Edge browser in non-login pages |
IAM-1972 |
Changing tenant administrator status resets list sort |
IAM-1980 |
Add font weight slider to themes |
IAM-2004 |
Realms not deleting |
IAM-2010 |
Platform Admin UI rendering with horizontal scroll |
IAM-2050 |
Ensure date inputs include Zulu timezone |
IAM-2065 |
Wrong months order in calendar history of analytics UI date picker |
IAM-2075 |
Make spinner component color inherit from theme primary color |
IAM-2085 |
Allow users to be created without a password in Platform Admin UI |
11 May 2022
Key features
- ForgeRock® Autonomous Access (add-on capability)
-
Autonomous Access is a new add-on capability that provides your Advanced Identity Cloud tenant with significant threat protection capabilities. Autonomous Access helps to prevent account takeover and fraud at the identity perimeter. It leverages artificial intelligence and machine learning techniques to analyze threat signals and anomalous behavior patterns. It speeds and simplifies access decisions, enabling your organization to block threats and deliver personalized journeys that enhance the digital experience of legitimate users.
ForgeRock Autonomous Access includes:
-
ForgeRock Autonomous Access journey nodes:
-
The Autonomous Access Prediction node produces a risk score based on anomalous user behavior, credential stuffing, suspicious IP’s, automated user agents (bots), impossible travelers, and brute force attacks.
-
The Autonomous Access Decision node lets you control users' journeys based on their risk scores.
-
The Autonomous Access Results node, when added to your journeys, provides data that lets Autonomous Access populate the activity dashboard, learn, and make its AI models more accurate.
-
-
The activity dashboard, which shows you risky access activity. It lets you drill down to investigate risky activity across time, risk reason, and risk score.
For more information, see About Autonomous Access.
Interested in adding Autonomous Access to your Advanced Identity Cloud subscription? Contact your ForgeRock account executive.
-
10 May 2022
Resolved issues
| Issue ID | Summary |
|---|---|
AME-21573 |
Add set custom cookie node |
AME-22248 |
Provide option to mandate that clients must use pushed authorization requests |
OPENAM-17698 |
Let users request specific claims from a social identity provider as part of an OIDC request |
OPENAM-18533 |
Distinguish between standard OIDC and JAR OIDC request parameters |
OPENAM-19089 |
Return to user’s UI after completion of a login journey with SAML federation |
OPENDJ-8503 |
Populate the total paged results counter for query responses with an estimate when possible |
02 May 2022
Key features
- New identity store decision node
-
The new Identity Store Decision node lets you make authentication decisions based on user information in Advanced Identity Cloud. You can configure identity store decision nodes to control authentication flow based on any of the following conditions:
-
A username and password exists in Advanced Identity Cloud.
-
The profile associated with a user is locked.
-
A user’s password has expired.
-
A user needed to change their password on first login, but canceled the password change form.
-
19 Apr 2022
Resolved issues
Hotfix release:
| Issue ID | Summary |
|---|---|
DATASCI-1020 |
Correct the times at the bottom of the analytics dashboard charts after clicking Today |
DATASCI-1040 |
Filter journeys correctly in the analytics dashboard |
DATASCI-1041 |
Display months before January 2022 correctly in the analytics dashboard filter |
FRAAS-10342 |
Remove inadvertent popups after administrator signouts |
IAM-2031 |
Fix Platform UI errors during navigation within the UI and resizing the UI window |
11 Apr 2022
Key features
- Dynamic configuration in journey nodes
-
Many nodes have static configuration, which forces you to have a new node for each use case. With dynamic configuration, you can now pass dynamic information to any static node during a journey’s execution.
- Better control over device codes used in the OAuth 2.0 device flow
-
You can now specify the length of generated user codes, and the set of characters that’s used to generate the user codes.
Resolved issues
| Issue ID | Summary |
|---|---|
AME-22015 |
Dynamically resolve configuration in node tree execution |
AME-22247 |
Make request URI single time use for pushed authorization requests |
OPENAM-17756 |
Provide better control over the list of characters used in device codes |
OPENIDM-16774 |
Provide full details of schedules in the IDM admin UI |
OPENIDM-17029 |
Allow IDM string properties to have formats, such as date and time |
OPENIDM-17065 |
Return idm_sync_queue_failed error in Prometheus when an implicit sync fails |
OPENIDM-17116 |
Don’t force persistAssociations=true in a URL that starts a reconciliation operation |
OPENIDM-17204 |
Improve IDM REST API query performance |
OPENIDM-17410 |
Allow time and datetime policies to specify +-00:00 locale |
OPENIDM-17420 |
Allow any number of digits of precision for fractions of seconds when specifying time policy |
SDKS-1329 |
Make push notification compatible with iOS 15 focus mode |
31 Mar 2022
Key features
- Advanced Identity Cloud analytics dashboard
-
The Advanced Identity Cloud analytics dashboard will be the new landing page for tenant administrators. The dashboard gives tenant administrators a snapshot of Ping Identity service usage, including views of the latest metrics and trends for:
-
User engagements
-
New users
-
Total users
-
Applications
-
Organizations
-
Successful and failed journey outcomes
-
25 Mar 2022
Hotfix release:
| Issue ID | Summary |
|---|---|
IAM-1902 |
Extend the Login UI to set transaction IDs for authentication sessions |
IAM-2005 |
Display debug pop-up windows correctly after trees with debug mode enabled fail and are auto-restarted |
24 Mar 2022
Resolved issues
| Issue ID | Summary |
|---|---|
FRAAS-9031 |
Allow valid characters in "From Name" during Platform UI validation |
IAM-1482 |
Display Internal Role permission dialog correctly |
IAM-1594 |
Eliminate doubled password reveal icon in Microsoft Edge |
IAM-1834 |
Support new Config Provider script type, Config Provider Node, in journey editor |
IAM-1942 |
Don’t throw console error reading filter |
IAM-1945 |
Support undo in email template markdown and style editor |
IAM-1955 |
Enable saving changes to existing email templates |
IAM-1958 |
Improve page load time when there are multiple journeys in one category |
IAM-1964 |
Correct Highlander theme enduser footer |
IAM-1973 |
Clear journey tags when user closes modal window |
IAM-1977 |
Don’t overlay User Name and Password fields in the Login UI when highlighting saved login details |
15 Mar 2022
Key features
- Extend the user identity schema
-
You can now extend the user identity schema by adding your own custom attributes. This lets you store more useful information about each user such as the user’s department, cost centers, application preferences, device lists, and so on.
11 Mar 2022
Key features
- Set categories for end-user journeys
-
You can now set up categories for your end-user journeys in the UI. This helps you manage your trees by grouping them in the list view. For example, you may want to group all your registration journeys together so that you can find them in the list more easily.
- Ability to debug end-user journeys
-
You now have the ability to debug end-user journeys in your development environment, as you create them. By setting a journey to debug mode, you can view information stored in shared, transient, and secure state, as you navigate the journey. This lets you confirm that information is being passed correctly from node to node in the journey.
Resolved issues
| Issue ID | Summary |
|---|---|
FRAAS-8289 |
Add ability to set categories for a journey |
FRAAS-9382 |
Trailing space after the T&C link on the self registration journey |
IAM-1711 |
Invited tenant administrators have doubled usernames |
IAM-1536 |
Add debug controls to journey editor |
IAM-1896 |
Creating consecutive applications with a different type shows the wrong logo and headline |
IAM-1903 |
Unable to localize the display of 2FA and push authentication device names |
OPENIDM-17479 |
Recognize IDM static role naming convention when assigning UI roles |
02 Mar 2022
Key features
- Scripted Plugin for SAML 2.0 IdP adapter
-
The new scripted SAML 2.0 IdP adapter lets you introduce your own business logic during a SAML 2.0 authentication flow. You can use it to look up session, policy, or identity related information, and make routing decisions before sending the SAML 2 assertion to the service provider. Refer to Customize SAML 2.0.
- Support for OAuth 2.0 Pushed Authorization Requests (PAR)
-
The OAuth 2.0 Pushed Authorization Request (PAR) is an RFC specification that allows a secure way of initiating an OAuth or OIDC authorization flow. PAR enables you to move the authorization request data from the URL query string to the request object. This protects the authorization request from any potential tampering. Confidential clients are also authenticated when registering the PAR and this enables the platform to refuse any unauthorized or malformed requests early in the process, reducing the load from any malicious attacks. Refer to Authorization code grant with PAR.
Resolved issues
| Issue ID | Summary |
|---|---|
AME-21830 |
Remove feature flag for PAR endpoint |
AME-21943 |
Add OAuth2 Provider config options for plugin types |
AME-21947 |
OAuth2 scripted plugin selection improvements |
AME-22060 |
OAuth2 authorize endpoint throws NPE for a query parameter without a value |
AME-22066 |
Scripted plugin for SAML 2.0 IDP adapter |
OPENAM-17590 |
OIDC login hint cookie using deprecated Set-Cookie2 header |
OPENAM-18185 |
Add support for PKCE to OAuth2 device code grant |
OPENAM-18264 |
Update Apple profile normalization script template for sign-in with Apple |
OPENAM-18459 |
IdTokenInfo endpoint fails when using client ID in POST |
OPENAM-18527 |
Add ability to track suspended authentication session |
OPENAM-18918 |
Unable to add scopes in the modification script when using OAuth2 with Grant Set storage scheme |
OPENIDM-16833 |
Implement conditionally assigned relationships dependent on RDVPs |
OPENIDM-17002 |
Can’t tune hash settings from openidm.hash script invocations |
OPENIDM-17007 |
Security questions with multiple answers can only be created in Latin charset |
OPENIDM-17051 |
Implement a mechanism to derive grantor RDVP dependencies |
23 Feb 2022
Key features
- Custom endpoints UI
-
A single UI now lets you create custom endpoints, edit their scripts within a syntax highlighting editor, and then run and test them directly. You can consume custom endpoints within Advanced Identity Cloud, or integrate them into your external UIs or system applications.
10 Feb 2022
Resolved issues
Hotfix release:
| Issue ID | Summary |
|---|---|
IAM-1818 |
End User UI for delegated admin cannot be fully translated |
IAM-1873 |
Add support to Login UI for WebView browser |
Hotfix release:
| Issue ID | Summary |
|---|---|
OPENAM-18952 |
Security questions are not always falling back to the default locale |
OPENIDM-17367 |
Target phase is running for reconciliation to a specific ID when using clustered reconciliation |
08 Feb 2022
-
Added dashboard counts to let you quickly view the number of users, applications, and organizations in each realm.
-
Added UI improvements to date and time input fields.
-
Added language localization for headers and footers in hosted pages.
| Issue ID | Summary |
|---|---|
IAM-1513 |
Allow customers to localize header and footer in Hosted Pages |
IAM-1596 |
Implement simple dashboard counts |
IAM-1597 |
Add tenant region information to tenant settings page |
IAM-1716 |
Tenant administrator account details not loaded correctly after refresh |
IAM-1725 |
Add date-time chooser to date-time fields |
IAM-1726 |
Add time chooser to time fields |
IAM-1808 |
Preview URL should be scrollable inside preview input |
IAM-1844 |
PollingWaitCallback not always returning a callback |
IAM-1848 |
Journeys with large themes cause a refresh loop |
07 Feb 2022
Hotfix release:
| Issue ID | Summary |
|---|---|
OPENAM-18341 |
Importing entity IDs from an external SP can cause invalid request URIs |
OPENAM-18661 |
Two or more OAuth2 clients with duplicate origins causes CORS filter to be aborted |
OPENAM-18764 |
API incompatibility in systemEnv.getProperty |
OPENAM-18887 |
Security questions password reset causes login failure |
OPENAM-18915 |
Unable to add scopes in the modification script when using OAuth2 with Grant Set storage scheme |
04 Feb 2022
Hotfix release:
| Issue ID | Summary |
|---|---|
FRAAS-9295 |
Prevent initial loading of identities in UI when a minimum search string length is configured |
03 Feb 2022
Hotfix release:
| Issue ID | Summary |
|---|---|
FRAAS-9045 |
Add account lockout for tenant administrators |
25 Jan 2022
-
Updated the staging environment information on the tenant status page. Individual service statuses are now combined into a single status.
21 Jan 2022
| Issue ID | Summary |
|---|---|
IAM-1687 |
Use the first populated locale when duplicating Terms and Conditions |
IAM-1723 |
Add datepicker to date fields |
IAM-1724 |
Add duration chooser to duration fields |
IAM-1747 |
Optional node attributes default to empty strings in request JSON when saving journey |
IAM-1757 |
Adding security question translation causes KbaCreateNode to loop |
IAM-1762 |
Show all available page numbers in pagination for application and script list views |
IAM-1764 |
Default starter theme UI in security question picker is too dark |
IAM-1769 |
Policy list has console scrollIntoView error |
IAM-1774 |
Add translated values to alt text entries and aria-label entries |
IAM-1788 |
Incorrect URL is copied for journeys after search filtering |
IAM-1792 |
Goto param in start over link is not URL encoded |
IAM-1813 |
Journey list page flashes empty state instead of loading state |
IAM-1825 |
Show user avatar and name for user identities |
19 Jan 2022
-
Added new built-in connector for Microsoft Graph.
| Issue ID | Summary |
|---|---|
AME-22153 |
Default client-side authentication script is incorrect |
OPENAM-18241 |
Permit OAuth2 Modification Script to return scopes as space-delimited string |
2021
22 Dec 2021
| Issue ID | Summary |
|---|---|
IAM-1757 |
Adding security question translation causes KbaCreateNode to loop |
IAM-1792 |
Goto param in start over link is not URL encoded |
17 Dec 2021
-
Added ability to manage security questions to UI.
| Issue ID | Summary |
|---|---|
FRAAS-4765 |
Tenant administrators should not have the option in the UI to delete or disable themselves |
FRAAS-8290 |
Tenant administrator list needs to show if MFA is activated |
FRAAS-8437 |
Admin UI encoding IDM system property specifiers in email templates |
FRAAS-8584 |
Cannot apply dark theme on security question picker |
FRAAS-8754 |
Display preview URL in the journey editor |
IAM-1592 |
User is redirected to error page after trying to invite already invited admin |
IAM-1621 |
Add security questions configuration to Admin UI |
IAM-1685 |
WCAG 2.2 UI Compliance |
IAM-1690 |
Remove ghost in Not Found page |
IAM-1697 |
Theme transition flickering between journeys |
IAM-1699 |
End user profile picture is not shown in top navigation bar |
IAM-1716 |
Tenant administrator account details not loaded correctly after refresh |
IAM-1739 |
Allow subsequent login attempts to enable next button |
IAM-1740 |
Default provider setup should keep 'Use my own provider' toggled off |
IAM-1753 |
Allow login theme to be set properly for URLs with both query parameters and route parameters |
IAM-1765 |
Paging error on tenant administrator list |
OPENAM-18511 |
Missing navigation options when an expired link from "Email Suspend" node is used |
15 Dec 2021
| Issue ID | Summary |
|---|---|
AME-21617 |
Create Scripted implementation for SAML 2.0 IDP Attribute Mapper |
AME-21303 |
Create Scripted implementation of ScopeValidator#additionalDataToReturnFromEndpoint methods |
AME-21265 |
Scope Implementation Class per Client not just per Provider |
AME-21262 |
OAuth2 Scripts per Client not just per Provider |
OPENAM-18167 |
OIDC requests with request parameter fail with 500 error when there is no session using POST |
OPENAM-18154 |
Wrong AMR returned with prompt=login and force authn setting enabled |
OPENAM-18121 |
Slow loading in Authentication Tree |
OPENAM-18120 |
Audit logging service does not correctly reflect the "prompt" URL parameter |
OPENAM-18119 |
Audit log no longer shows the userID of session being invalidated by amadmin |
OPENAM-18043 |
Device Match module not setting correct AuthLevel |
OPENAM-17979 |
Backchannel authentication - auth_req_id can be used to obtain multiple access tokens |
OPENAM-17968 |
Scripting engine breaks when you create script with empty name |
OPENAM-17923 |
Retry Limit Decision Should Not Have User Involvement when Save Retry Limit to User is Disabled |
OPENAM-17783 |
Language tag limited to 5 characters instead of 8 |
OPENAM-17826 |
Introspect endpoint returns a static value for "expires_in" when using client based tokens |
OPENAM-17610 |
OTP Email Sender node does not allow to specify connect timeout and IO/read timeout for underlying transport. |
OPENAM-17458 |
Enable access to hasResumedFromSuspend within a script |
OPENAM-16560 |
OAuth2 scope validation using policy engine should be configurable per OAuth2 client |
OPENAM-16149 |
Allow JWT bearer client authn unreasonable lifetime limit to be configurable |
OPENAM-15877 |
Support for Google reCAPTCHA v3 |
OPENAM-15340 |
OAuth2 RT - Ability to obtain original custom claim when regenerate the token |
OPENIDM-16677 |
Cannot retrieve entries from /recon endpoint when using DS as a repo if reconprogressstate size exceeds index limits |
10 Dec 2021
-
Added ability to manage environment secrets and variables (ESVs) to API and UI.
22 Nov 2021
| Issue ID | Summary |
|---|---|
FRAAS-4276 |
Social Provider Handler node should default to "Normalized Profile to Managed User" transformation script |
FRAAS-6275 |
During registration the "Next" button should be greyed out until all mandatory fields are completed |
FRAAS-7827 |
Hyperlinks cannot link to header elements in T&Cs |
FRAAS-8288 |
Add ability to search for a journey by name |
FRAAS-8317 |
Hard browser cache reset required when switching default theme in realm |
FRAAS-8367 |
Platform UI doesn’t allow "from name" to be configured in email templates |
FRAAS-8613 |
Social IDP CSS is overridden by themes |
FRAAS-8683 |
Stage field not showing on page nodes when value set to "themeId=name" prior to the new theme selector UI enhancement |
IAM-1548 |
Enduser UI not hiding side menu and nav bar |
IAM-1644 |
Create multiple locales at same time when adding a new T&C |
IAM-1650 |
Update Gateway and Agents page when in no data state |
IAM-1652 |
Use journey name to set page title in Login UI |
IAM-1689 |
Text from push authentication node cannot be overriden via config translation override |
IAM-1695 |
Clicking column header with no sorting enabled throws error |
IAM-1713 |
Hosted Pages tenant settings view has incorrect description |
OPENAM-18511 |
Missing navigation options when an expired link from "Email Suspend" node is used |
11 Nov 2021
| Issue ID | Summary |
|---|---|
AME-21261 |
Allow configuring "Issue Refresh Token" at OAuth client level |
AME-21263 |
Overridable Id_Token claims per client not just per provider |
IAM-1074 |
Provide Javascript defaults for AM scripts in Identity Cloud |
OPENAM-12995 |
Allow configuration of 'Custom Login URL Template' at client level |
OPENAM-14159 |
OAuth2 token storage to be configured per client |
OPENAM-15381 |
Allow configuring "Issue Refresh Tokens on Refreshing Access Tokens" per client |
OPENAM-16418 |
Client auth using private_key_jwt fails with 500 if claim format is wrong |
OPENAM-17185 |
Need ability to configure Remote Consent Service at the client level |
OPENAM-17262 |
Subname claim inconsistences |
OPENAM-17548 |
Can’t go back to login page after invoking Social Authentication Nodes |
OPENAM-17663 |
Improve the error response code for "Failed to revoke access token" |
OPENAM-17669 |
Ability to encrypt or sign access tokens based on client IDs |
OPENAM-17773 |
The acr_values parameter is mandatory on CIBA bc-authorize endpoint |
OPENAM-17782 |
Policy evaluation fails with 400 error when user does not exist |
OPENAM-17784 |
Session timeouts (maximum session time, maximum idle timeout) set incorrectly if username is dynamically created in a tree. |
OPENAM-17801 |
OIDC userinfo subname claim returns incorrect value |
OPENAM-17813 |
Allow /userinfo endpoint to include 'aud' claim in response |
OPENAM-17814 |
Auth Tree step-up fails if username case does not match |
OPENAM-17863 |
Authorization code is not issued when nonce is not supplied when using OpenID Hybrid profile |
OPENAM-17912 |
Account lockout count is not reset correctly |
04 Nov 2021
| Issue ID | Summary |
|---|---|
FRAAS-8502 |
Unable to set default theme to a theme not on the first page of themes in Hosted Pages |
IAM-673 |
Identity tabs in Platform UI not correctly positioned on small screens |
IAM-1495 |
Platform admin theme editor has confusing modal behaviour |
IAM-1499 |
Add theming to Platform UI to control color of login card: background, input, text... |
IAM-1501 |
Add ability to configure theme on a page node in journey editor |
IAM-1517 |
Terms and Conditions published version should just display rendered text |
IAM-1529 |
Links from non authorized page do not redirect user |
21 Oct 2021
| Issue ID | Summary |
|---|---|
FRAAS-7669 |
Page unresponsive message shown in End User UI when an organisation admin selects the password reset button for an organisation user |
FRAAS-7960 |
Terms and Conditions UI does not list the locales already created |
FRAAS-8048 |
Applications created without status don’t show default active status |
FRAAS-8050 |
Allow Platform Admin UI to display all application types |
FRAAS-8089 |
Theme layout overlays login box in theme designer |
FRAAS-8138 |
Discovery URI missing from OAuth client |
IAM-1117 |
Display data from linked systems when editing a user in Platform Admin UI |
IAM-1204 |
Journey editor lines too light |
IAM-1495 |
Platform admin theme editor has confusing modal behaviour |
IAM-1498 |
Add font family dropdown to theme editor |
IAM-1525 |
Application URL text is curtailed |
12 Oct 2021
-
Added ability to manage Java and Web Agents to UI.
| Issue ID | Summary |
|---|---|
IAM-1435 |
Add ability to create Java/Web Agents in Platform Admin UI |
IAM-1613 |
Allow configuration and display of password policy where at least 1–4 of 4 character sets are required |
06 Oct 2021
-
Added ability to validate passwords with a remote service using pass-through authentication.
| Issue ID | Summary |
|---|---|
AME-21058 |
Roll the config option for signing Request Object and Private Key JWT into one |
AME-21411 |
Create an IDM passthrough authentication node |
OPENAM-17405 |
Token introspection response not spec compliant |
OPENAM-17515 |
Sub attribute in access token can be in wrong casing |
OPENAM-17591 |
Session quota destroy next expiring action can fail when two new sessions attempt to read and update the same expiring session |
OPENAM-17595 |
Calling endSession endpoint should fail gracefully instead of Unknown JWT error |
OPENAM-17666 |
Update Scripted Decision Node bindings to deprecate "sharedState" and "transientState" and add new "state" |
OPENAM-17683 |
Selfservice user registration auto login fails for a sub-realm |
OPENAM-17828 |
Apostrophe in username breaks Push/OATH device registration |
OPENAM-18233 |
Social Provider Configuration for Google (Native iOS) does not work without a client secret |
OPENDJ-8178 |
Change of data format in date fields: trailing zeros on milliseconds are now truncated |
OPENIDM-15951 |
Support additional mime types for CSV bulk import |
OPENIDM-16081 |
Prevent users saving managed objects with invalid names |
OPENIDM-16089 |
Enhance error message for failed config property substitution in email templates |
OPENIDM-16473 |
Task scanner job fails on null top level objects |
29 Sep 2021
| Issue ID | Summary |
|---|---|
FRAAS-8110 |
Spinning wheel displayed when using an expired link from email suspend node |
FRAAS-8133 |
Login UI flashes with ForgeRock logo before loading the End User UI |
IAM-1398 |
Accessing platform UI with old token redirects user |
22 Sep 2021
| Issue ID | Summary |
|---|---|
FRAAS-5860 |
Table markup issue in email templates |
IAM-1409 |
Password Policy on Self-Service Registration page does not reset when blanking entered text |
IAM-1544 |
Platform UI allows creating scripts without any name |
IAM-1558 |
Assignment console errors caused by deleted managed object mapping |
IAM-1576 |
Cannot delete email template from preview page |
IAM-1577 |
Styles not being shown on edit email template page |
15 Sep 2021
| Issue ID | Summary |
|---|---|
IAM-1150 |
Remove data table component in favor of adding cell specific components |
IAM-1547 |
End-User Password Update changes session cookie and breaks logout |
IAM-1559 |
Admin and Enduser UIs not loading in IE11 |
IAM-1562 |
Sanitize postLogoutUrlClaim on redirection after Logout |
IAM-1563 |
403 when attempting to read password policy for delgated admin reset password |
10 Sep 2021
| Issue ID | Summary |
|---|---|
FRAAS-7890 |
Validation of custom domains allows upper case domain names |
FRAAS-8064 |
OATH Device not shown in End-User Profile Dashboard |
IAM-1475 |
Issue with enduser platform-ui when compiled from source |
IAM-1542 |
End users are unable to update their KBA info |
IAM-1545 |
KBA Create node does not send custom question as part of payload |
08 Sep 2021
-
Added Apple as a social identity provider for native applications.
| Issue ID | Summary |
|---|---|
AME-20499 |
Using Social Identity Provider Selector node and having disabled social IDPs causes massive amounts of exceptions and errors in the logs |
AME-20895 |
Request Object Encryption |
AME-21056 |
Make request object 'aud' configurable |
AME-21133 |
Apple Sign In Form POST Endpoint Compatibility with Custom Login Apps |
OPENAM-16314 |
Create OAuth2/OIDC Node to allow same authentication methods used and supported by our own OpenID Connect provider and clients |
OPENAM-17286 |
Add additional configuration options required for private key jwt feature |
OPENAM-17494 |
Other ways to allow OTP SMS Sender and OTP Email Sender nodes to send custom message |
OPENAM-17527 |
Support KMS/AM-encryption of PEM-format secrets |
OPENAM-17581 |
Scripted decision node on /authentication/authenticationtrees/trees PUT breaks tree save |
OPENAM-17625 |
No trees shown in inner tree selection box when another tree is misconfigured |
OPENAM-17672 |
Page Node does not expose inner nodes inputs or outputs |
OPENAM-17673 |
Nodes within a Page node do not have access to secure state |
OPENIDM-16113 |
rsFilter is case sensitive, which triggers authentication errors |
OPENIDM-16191 |
New live sync schedule created from UI is missing invokeContext.source |
OPENIDM-16275 |
UI does not display Progressive Profile Query Filter Condition properly |
OPENIDM-16322 |
Unable to create new LDAP connector through admin UI |
OPENIDM-16335 |
NPE on org model children endpoint when making a request that contains an error |
OPENIDM-16343 |
Unable to save powershell connector config through admin UI |
OPENIDM-16388 |
LDAP Connector created through Admin UI not setting credentials and baseContexts |
02 Sep 2021
| Issue ID | Summary |
|---|---|
FRAAS-7996 |
Cannot remove org members when logged in as org admin |
IAM-1421 |
Application Token lifetime input textbox not visible in some ID Cloud environments |
IAM-1424 |
Platform UI application list page shows errors when viewed from a sub-sub-realm |
IAM-1441 |
Custom Domain previous button is misplaced |
IAM-1442 |
Too much space between realm avatar on realm title |
IAM-1496 |
Platform admin theme editor missing default values for logo url/alt text |
IAM-1514 |
In a list view, clicking directly on checkbox does not select row |
IAM-1533 |
UI labels missing from ID Cloud registration UI |
IAM-1537 |
Platform UI: Not able to update user when email is an optional attribute |
IAM-1538 |
After changing password on a user in the admin ui any subsequent changes to the object results in an error on save |
23 Aug 2021
| Issue ID | Summary |
|---|---|
IAM-1473 |
Unable to access links to native consoles if platform dashboard page not large enough |
IAM-1492 |
Using 'reset to defaults' on theme admin wipes out theme name |
IAM-1508 |
Edit managed user page has bad formatting when ListField inputs contain long entries |
IAM-1509 |
Social login failure does not return to initial journey step |
IAM-1515 |
Ensure login theme background covers entire height |
17 Aug 2021
| Issue ID | Summary |
|---|---|
FRAAS-7936 |
Email templates missing from console |
IAM-1476 |
Change Consent menu item and related text to Terms & Conditions |
16 Aug 2021
-
Updated End User UI to support WCAG accessibility best practices.
-
Updated End User UI and Login UI to support localization.
-
Updated End User UI theming and customization for user journeys:
-
Added ability to apply a different theme and logo to each user journey.
-
Added ability to provide a different user journey to each brand.
-
Added ability to add custom footers to end-user login and account management pages.
-
Added ability to configure the layout of the end-user account management page by adding and removing sections.
-
-
Updated End User UI terms and conditions management:
-
Added versioning and localization.
-
Added ability to track end-user version history.
-
| Issue ID | Summary |
|---|---|
IAM-1259 |
EndUser-UI WCAG updates |
IAM-1264 |
End user stored state returns different user to previous users page |
IAM-1289 |
Platform-ui not rendering in IE11 because Postcss v8+ only serves ES6+ sources |
IAM-1291 |
End user delegated admin should not display raw JSON option |
30 Jul 2021
| Issue ID | Summary |
|---|---|
FRAAS-7721 |
Unable to save a new LDAP connector configuration in the Platform UI |
15 Jul 2021
| Issue ID | Summary |
|---|---|
AME-20475 |
OpenID Connect Back-Channel Logout |
AME-20499 |
Using Social Identity Provider Selector node and having disabled social IDPs causes massive amounts of exceptions and errors in the logs |
AME-20600 |
Grant Types UI field the OAuth2 Provider shows as supportedGrantTypes |
AME-20994 |
Rename StoreOps tokens to OIDC Session Management |
IAM-1096 |
Scripted decision node description has a typo |
OPENAM-14402 |
Access/ID tokens only include short username for "sub" claim |
OPENAM-15214 |
Auth Tree - Clicking save with no changes causes render problem with node attributes inside page node |
OPENAM-16314 |
Create OAuth2/OIDC Node to allow same authentication methods used and supported by our own OpenID Connect provider and clients |
OPENAM-16653 |
Identity using fr-idm-uuid has wrong account ID in FR Authenticator |
OPENAM-16959 |
Failed to authenticate with Twitter as Social Login Provider |
OPENAM-17297 |
HOTP Generator Node adds cleartext OTP to sharedState |
OPENAM-17436 |
JS version of the OIDC Claims script does not work due to a casting error. |
OPENAM-17489 |
Add new form_post endpoint |
OPENAM-17494 |
Other ways to allow OTP SMS Sender and OTP Email Sender nodes to send custom message |
OPENAM-17517 |
JS versions of Social Identity Provider Profile Transformation scripts do not work due to a casting error. |
OPENAM-17595 |
endSession should fail gracefully instead of Unknown JWT error |
OPENAM-17625 |
No trees shown in inner tree selection box when another tree is misconfigured |
OPENAM-17659 |
Select Identity Provider Node does not load social IDPs that do not define a client secret |
OPENAM-17672 |
Page Node does not expose inner nodes inputs or outputs |
OPENAM-17828 |
Apostrophe in username breaks Push/OATH device registration |
OPENIDM-14525 |
Customer would like to define a default value for a property on a managed object. |
OPENIDM-15220 |
Temporal constraints on internal role grants with privileges are not reflected in the end-user UI |
OPENIDM-16192 |
Under certain conditions it is possible to generate two users with the same userName |
OPENIDM-16206 |
TaskScanner tries to read object after deletion |
OPENIDM-16266 |
ICF service retry during livesync network failures |
OPENIDM-16326 |
SchemaService does not allow filtering on _id |
OPENIDM-16334 |
Managed object schema editor fails on properties with "pattern : null" |
23 Jun 2021
| Issue ID | Summary |
|---|---|
FRAAS-4877 |
Attempting to Import a CSV file that contains a number in an frUnindexedInteger field fails |
15 Jun 2021
| Issue ID | Summary |
|---|---|
FRAAS-7322 |
Common passwords policy errors now show in bulleted list below password field |
IAM-1264 |
Logging out and logging back in now returns user to dashboard instead of last route visited |
IAM-1319 |
Allow disabling of sorting and searching on relationship array grids |
IAM-1321 |
Allow UI to use |
10 Jun 2021
| Issue ID | Summary |
|---|---|
FRAAS-6504 |
Terms and Conditions do not render correctly when using HTML formatting directives |
IAM-1081 |
Using the back button in some UI contexts causes an session termination |
OPENAM-17297 |
HOTP Generator Node adds cleartext OTP to sharedState |
OPENAM-17343 |
Access token call returns 500 error if password needs to be changed or has expired |
OPENAM-17349 |
OIDC Refresh token - Ops token is deleted from the CTS during refresh EDISON |
OPENAM-17352 |
OAuth Introspection Endpoint can be accessed by public clients providing an empty client secret |
OPENAM-17359 |
Unfriendly error message displayed when an expired link from "email suspend" node is used |
OPENAM-17396 |
Terms of Service URI Link does not Display in Consent Page |
OPENAM-17426 |
No validation for attribute collector node |
OPENAM-17436 |
JS version of the OIDC Claims script does not work due to a casting error. |
OPENAM-17494 |
Other ways to allow OTP SMS Sender and OTP Email Sender nodes to send custom message |
OPENAM-17517 |
JS versions of Social Identity Provider Profile Transformation scripts do not work due to a casting error |
OPENAM-17595 |
endSession should fail gracefully instead of Unknown JWT error |
OPENAM-17625 |
No trees shown in inner tree selection box when another tree is misconfigured |
OPENAM-17672 |
Page Node does not expose inner nodes inputs or outputs |
OPENAM-17673 |
Nodes within a Page node do not have access to secure state |
OPENAM-17828 |
Apostrophe in username breaks Push/OATH device registration |
OPENIDM-15953 |
Connector Config Disappears from UI in IDCloud for RCS Connectors |
OPENIDM-15903 |
Grant Type not shown in the Grant Column for Assigned Roles |
OPENIDM-16134 |
/system?_action=createFullConfig unexpectedly replaces variables |
OPENIDM-16150 |
Identity Connect UI - Manage Admin Groups modal does not have cancel button after adding new Group Base Contexts |
OPENIDM-16180 |
Removed Properties cannot be Re-Added Until Page Refresh in User Registration |
04 Jun 2021
| Issue ID | Summary |
|---|---|
IAM-1219 |
JS error when assigning multiple relationships |
IAM-1261 |
Adding relationship via UI fails when large user populations |
IAM-1263 |
Need some default data in managed object lists when search filter on UI |
IAM-1290 |
Managed identities configuration cosmetic improvements |
20 May 2021
-
Added ability to add multiple domains per realm.
-
Added Access Management scripting user interface.
-
Added Cross-Origin Resource Sharing (CORS) setup UI.
-
Added optimized search option.
-
Advanced Identity Cloud admin UI now displays Alpha and Bravo entities separately.
| Issue ID | Summary |
|---|---|
FRAAS-6854 |
When the commonly-used passwords option is selected for password policy...option unusable |
FRAAS-6012 |
Remove Restriction in UI of Only Allowing One Domain |
FRAAS-5525 |
Add CORs Settings to New Platform UI |
FRAAS-4017 |
On all journey drag-and-drop UIs, links to SDK/API Docs are broken |
IAM-1242 |
SDK config for CORS settings doesn’t properly set allowCredentials |
IAM-1240 |
Fix styling of Multiselect Dropdown and tags |
IAM-1228 |
Platform ui scripting issues seen in ID cloud testing |
IAM-1227 |
remove dependency that requires 'parent required' for UI to handle orgs properly |
IAM-1213 |
Input Label and Placeholder doubling up on all input fields |
IAM-1212 |
Unable to use Webauth TouchID or FaceID on Safari MacOS/iOS |
IAM-1205 |
Update copyright bot copyright message GoodFirstIssue |
IAM-1195 |
Adding a temporal constraint to a role member relationship does not work |
IAM-1181 |
IDM policies not displayed in policy panel for password |
IAM-1177 |
Update grids to handle large datasets based on managed object schema flag |
IAM-1160 |
Server list doesn’t update on new server cluster modal |
IAM-1155 |
Improve code coverage display in PR testing |
IAM-1151 |
Multiselect Does Not Remove Entry If Removed When Entering New Value GoodFirstIssue |
IAM-1148 |
Remove JEST snapshot testing |
IAM-1105 |
Disable save button on new connector server modal after first click GoodFirstIssue |
IAM-1076 |
When in cloud env hide bravo_user, bravo_role, and bravo_assignment when realm is alpha and vice versa |
IAM-1065 |
E2E Tests - Admin - Import Identities |
IAM-1039 |
Platform Scripting Usability (UI Only) |
IAM-1024 |
Adjust app detail header top margin |
IAM-375 |
Refreshing Page on Alias Doesn’t Highlight Side Menu Item |
28 Apr 2021
-
Added ability to activate or deactivate hosted pages.
| Issue ID | Summary |
|---|---|
FRAAS-6503 |
Turn Off The End User Hosted hosted profile page |
IAM-1001 |
Remove extra padding on login error |
IAM-1144 |
Email Templates - Create Email Provider View |
IAM-996 |
Remove extra spacing on Agent profile status button |
12 Apr 2021
-
Added multi-factor authentication (MFA) option to tenant administrator profiles.
-
Added ability to configure your own email service provider.
| Issue ID | Summary |
|---|---|
FRAAS-6573 |
SAML 2.0 login flow ends with error: “No mapping organization found for organization identifier” |
FRAAS-6465 |
Social login seems to break expected goto URL behavior when protecting apps with IG |
IAM-1165 |
Sidebar-shim Does not Dynamically Change on Resolution Change |
IAM-1120 |
End user account controls throwing invalid argument error on profile page load |
IAM-1080 |
Convert switches to checkboxes in journey editor |
OPENAM-17625 |
No trees shown in inner tree selection box when another tree is misconfigured |
OPENAM-17517 |
JS versions of Social Identity Provider Profile Transformation scripts do not work due to a casting error |
OPENAM-17494 |
Other ways to allow OTP SMS Sender and OTP Email Sender nodes to send custom message |
OPENAM-17436 |
JS version of the OIDC Claims script does not work due to a casting error |
01 Apr 2021
| Issue ID | Summary |
|---|---|
FRAAS-6504 |
Updated terms callback to sanitize html from backend |
FRAAS-6431 |
End User UI calls ../authenticate endpoint switch at login |
FRAAS-6399 |
ID Cloud UI Multiselect spinner |
FRAAS-6255 |
Tenant Admin List does not always Show Entire List of Admins |
FRAAS-5968 |
End User Profile Page Displays "ForgeRock" Specific Information |
FRAAS-5585 |
Custom Domain - UI Re-Verify Flow |
IAM-1179 |
Fix issue with managed identities table not displaying properly |
IAM-1171 |
Drag selection in the journey editor can cause console errors cause saving to hang |
IAM-1165 |
Sidebar-shim Does not Dynamically Change on Resolution Change |
IAM-1142 |
Duplicate Journey modal breaks if initially dismissed |
IAM-1141 |
Update password policy messages to a more user friendly format in the Platform-UI. |
IAM-1128 |
Resource view cutting off dropdown menu |
IAM-1126 |
Login-UI doesn’t change locale language to browser default |
IAM-1109 |
Realm theme logo preview doesn’t update |
IAM-1104 |
Not possible to change or remove the default locale of email templates. |
IAM-1083 |
Email template "From" input field limited to email addresses while label suggests otherwise |
IAM-1080 |
Swap toggle w/ checkbox in journey editor |
IAM-1040 |
Journey list page displays javascript errors when expanding a journey |
OPENIDM-15019 |
End-user UI displays user name without accents (umlaut etc) |
11 Mar 2021
-
Added Salted SHA-256 support.
| Issue ID | Summary |
|---|---|
FRAAS-6209 |
Theme Editor popover() does not display using Firefox on MacOS |
FRAAS-6199 |
Ugly Error Messaging in UI when Password Policy Fails |
FRAAS-6099 |
AM Authorization with Advices broken |
FRAAS-6013 |
When you enter a domain in the Domain Modal, and it Fails Validation, you cannot add a Domain that is Valid |
FRAAS-5968 |
End User Profile Page Displays “ForgeRock” Specific Information |
FRAAS-5938 |
Platform UI generates forbidden Journey title and cannot be deleted |
FRAAS-5843 |
Current password policy limits passwords to a maximum of 64 characters |
FRAAS-5756 |
Authentication Trees Don’t Respect reentry Cookie |
FRAAS-5340 |
Hashed passwords synchronization fails |
IAM-794 |
Platform login UI has hard-coded “/am” path assumed for default path behavior |
IAM-1124 |
Can’t save Agent type RCS on edit page |
IAM-1103 |
Password policy shows ‘must be less than 0 characters long’ when max length is 0 |
IAM-1097 |
Incorrect instruction link for RCS in IDCloud docs |
IAM-1088 |
Add show columns, sort, and search capability to relationship array grid |
IAM-1087 |
Admin create resource modal should handle required relationship array properties |
IAM-1081 |
Using the back button in some UI contexts causes an session termination |
IAM-1021 |
Ability to copy and paste values from multiselect component |
IAM-1017 |
Force Use SSL option for Connector Servers in Cloud |
OPENAM-16949 |
Cannot create a policy for subject type group |
17 Feb 2021
-
New UI lets you configure a custom domain name.
-
New Admin profile UI lets admins edit their own tenant administrator profiles.
-
Added ability to end a user session for testing and troubleshooting purposes.
| Issue ID | Summary |
|---|---|
IAM-1066 |
Links for delegated admin objects not showing in end-user UI when a user has correct privileges |
IAM-1064 |
Incomplete provisioner file makes it impossible to create clusters |
IAM-887 |
Admin UI does not display in the Firefox web browser when Private Browsing is enabled. (Will not fix) |
04 Feb 2021
-
New, shorter URL for Identity Cloud Docs: https://backstage.forgerock.com/docs/idcloud/latest/overview.html.
| Issue ID | Summary |
|---|---|
OPENAM-17289 |
Generated |
OPENIDM-15892 |
Persisted schedules not being displayed in IDM Native UI |
29 Jan 2021
-
Added email notification templates.
13 Jan 2021
| Issue ID | Summary |
|---|---|
AME-20719 |
RelayState Not Being Used on Identity Cloud with SAML tree node |
AME-13690 |
Create an OATH authentication node |
FRAAS-5257 |
Cannot disconnect social identity provider |
IAM-1003 |
IE11 does not search for user on End User page |
IAM-989 |
Update connection status for servers on server cluster pages |
IAM-988 |
Platform UI error for end users when resizing in IE 11 |
IAM-978 |
ConnectorServers generates browser console errors when connector servers are present |
IAM-958 |
Backend scripts updating hiddenValueCallback values don’t propagate to step requests |
IAM-952 |
ID cloud new server cluster modal allows going back to select adding servers when it should not |
IAM-947 |
Platform UI: support 'default' values in Managed Object create/edit screens |
IAM-907 |
Adding IG Agent with non-unique name breaks UI |
OPENAM-16965 |
Alignment of shared state with self-service object nodes |
OPENAM-16961 |
OIDC Claims Script - /userinfo to access clientProperties |
OPENAM-16919 |
SAML JSP Flows not working |
OPENIDM-15686 |
Cannot delete a mapping in an Identity Cloud tenant |
OPENIDM-15576 |
Unable to save the 'Reconciliation Query Filters' under Mappings in the Admin UI. |
OPENIDM-15511 |
IDM Admin console - Paging controls in managed objects are disabled |
OPENIDM-15507 |
Paging controls in connector data tab are disabled and should not be |
OPENIDM-15368 |
Value of ldapGroups isn’t visible in the admin UI as an assignement attribute |
OPENIDM-15150 |
IE11 script error in End-User UI |
OPENIDM-14750 |
Managed Object schema editor scripts tab not saving scripts on relationship type properties |
OPENIDM-14411 |
Unable to create a user with a previously used password |
2020
08 Nov 2020
-
Added ability to use organization name as part of the tenant name.
-
Added ability to set a default end-user journey.
| Issue ID | Summary |
|---|---|
AME-20500 |
Users cannot authenticate using local authentication and the Social IDP Selector node |
FRAAS-4856 |
Cannot create API keys using Safari 14.0 |
FRAAS-4767 |
Identity Cloud UI does not display user properties according to managed object settings |
FRAAS-4699 |
Connector server (RCS) connection status inaccurate |
FRAAS-4481 |
Enduser UI - Password required in Edit Personal Info |
FRAAS-4070 |
Update tenant naming convention |
IAM-906 |
Cannot create an assignment when the mapping target is a system object |
IAM-885 |
ID cloud journeys list has visual errors for journeys created in AM native console |
IAM-882 |
Breadcrumb needs to update upon navigating away from page |
IAM-881 |
End-user profile doesn’t render multi-value fields |
IAM-862 |
Footer has wrong logo |
IAM-861 |
Change managed object toggle to show object value instead of entire schema |
IAM-795 |
Bulk Import: improve error messages in Advanced Identity Cloud admin UI |
IAM-784 |
Add dynamic theme for end user |
IAM-759 |
Incorrect URL for legacy AM admin console |
IAM-697 |
Platform-admin Unit tests: Applications |
IAM-606 |
Allow Password entry in 'New Identity' Modal |
IAM-589 |
Accessibility: CardRadioInput is not navigable and doesn’t report as a radio input correctly |
13 Oct 2020
-
Added ability to customize an end-user UI theme.
-
Added administrator list page.
02 Oct 2020
-
Improved IDM debug logging.
-
Custom attributes can be used in scripts.
-
Added Gateways & Agents list and profile page.
-
Journey edit page indicates required fields.
-
Updated dark theme.
-
Added the ability to theme the login UI from config.
| Issue ID | Summary |
|---|---|
FRAAS-4610 |
Filename with a space gets converted to an null pointer |
FRAAS-4558 |
Admin invite doesn’t work |
FRAAS-4550 |
User profile attributes are inaccessible to token modification scripts |
FRAAS-4549 |
Base URL Source service should be part of quickstart config |
FRAAS-4522 |
Cannot save "Generic Indexed String" attributes in user profile |
FRAAS-4520 |
Cannot save "Address 1" field in user profile properties |
FRAAS-4477 |
Password-related failures at onboarding |
FRAAS-4459 |
Make createResource behave more consistently with repeat use. |
FRAAS-4440 |
Broken create assignment functionality |
FRAAS-4379 |
UI issues with OAuth 2.0 related interfaces (Consent page, OAuth 2.0 client error pages, and the device code grant page |
FRAAS-4319 |
Alpha/Bravo Realm Users cannot edit personal info in the Enduser UI |
FRAAS-4277 |
Hide incompatible tree nodes |
FRAAS-3928 |
Remove on-prem connectors from PaaS IDM instance |
IAM-789 |
Password policy rules should display in platform-admin password reset UI |
IAM-603 |
403/404 errors in platform-admin when user has insufficient privileges |
passwordExpirationTime is an unindexed virtual property that can’t be queried. To achieve the same outcome, query on passwordLastChangedTime while taking the expiration period into account.