Build a protected iOS app with Flutter
This tutorial covers the basics of developing a ForgeRock-protected, mobile app with Flutter. It focuses on developing the iOS bridge code along with a minimal Flutter UI to authenticate a user.
First, what is a protected mobile app?
A protected app (client or server) is simply an app that uses some type of access artifact to verify a user’s identity (authentication) and permissions (authorization) prior to giving access to a resource. This "access artifact" can be a session cookie, an access token, or an assertion, and is shared between the entities of a system.
Additionally, a protected mobile app (client) is responsible for providing a user with methods for acquiring, using, and removing this access artifact upon request. The focus of this guide is implementing these capabilities using the ForgeRock iOS SDK within a Flutter app.
What you will learn
"Bridge code" development is a concept common to mobile apps built using hybrid technologies. "Hybrid" is a term used when a portion of the mobile app is written in a language that is not native to the platform (Android and Java or iOS and Swift). Flutter is an open source framework by Google for building beautiful, natively compiled, multi-platform applications from a single codebase. Flutter requires this bridging code to provide the Hybrid (Dart) layer access to native (Swift in this case) APIs or dependencies.
We also touch on some concepts and patterns popularized by the Flutter library. Since ForgeRock does not (as of this writing) provide a Flutter version of our SDK. Instead, we present this how-to as a guide to basic development of "bridge code" for connecting our iOS SDK to the Flutter layer.
This guide covers how to implement the following application features using version 3 of the ForgeRock iOS and JavaScript SDK:
-
Authentication through a simple journey/tree.
-
Requesting OAuth/OIDC tokens.
-
Requesting user information.
-
Logging a user out.
This is not a guide on how to build a Flutter app
How to architect or construct Flutter apps is beyond the scope of this guide. It’s also worth noting that there are many Flutter libraries and frameworks for building mobile applications. What is "best" is highly contextual to the product and user requirements for any given project.
To simply demonstrate our SDK integration, we use some basic Flutter patterns and the Material design UI library.
Using this guide
This is a "hands-on" guide. We are providing the mobile app and resource server for you. You can find the repo on GitHub to follow along. All you’ll need is your own ForgeRock® Identity Cloud or Access Management (AM) instance. If you don’t have access to either, and you are interested in the ForgeRock® Identity Platform, reach out to a representative today, and we’ll be happy to get you started.
Two ways of using this guide
-
Follow along by building portions of the app yourself ensuring you can meet the requirements below.
-
Just curious about the bridge code and Flutter implementation details? Skip to Implement the iOS bridge code for authentication.
Requirements
-
Xcode 12 or higher with the developer tools installed, the iOS Simulator, and related tools.
-
Swift SPM (Swift Package Manager).
-
Dart and the Flutter ecosystem of modules.
-
The command-line interface (for example Terminal, Shell or Bash).
-
Core
gitcommands (for example,clone,checkout). -
Admin access to an Identity Cloud tenant or AM service.
-
Latest Flutter release.
-
A tool or service to generate a security certificate and key. (Self-signed is fine).
-
Latest Android Studio with the Flutter plug-in installed.
-
Set the Dart SDK path in Android Studio. (Find it in the folder where you downloaded the Flutter SDK, such as
~/flutter/bin/cache/dart-sdk.)
ForgeRock setup
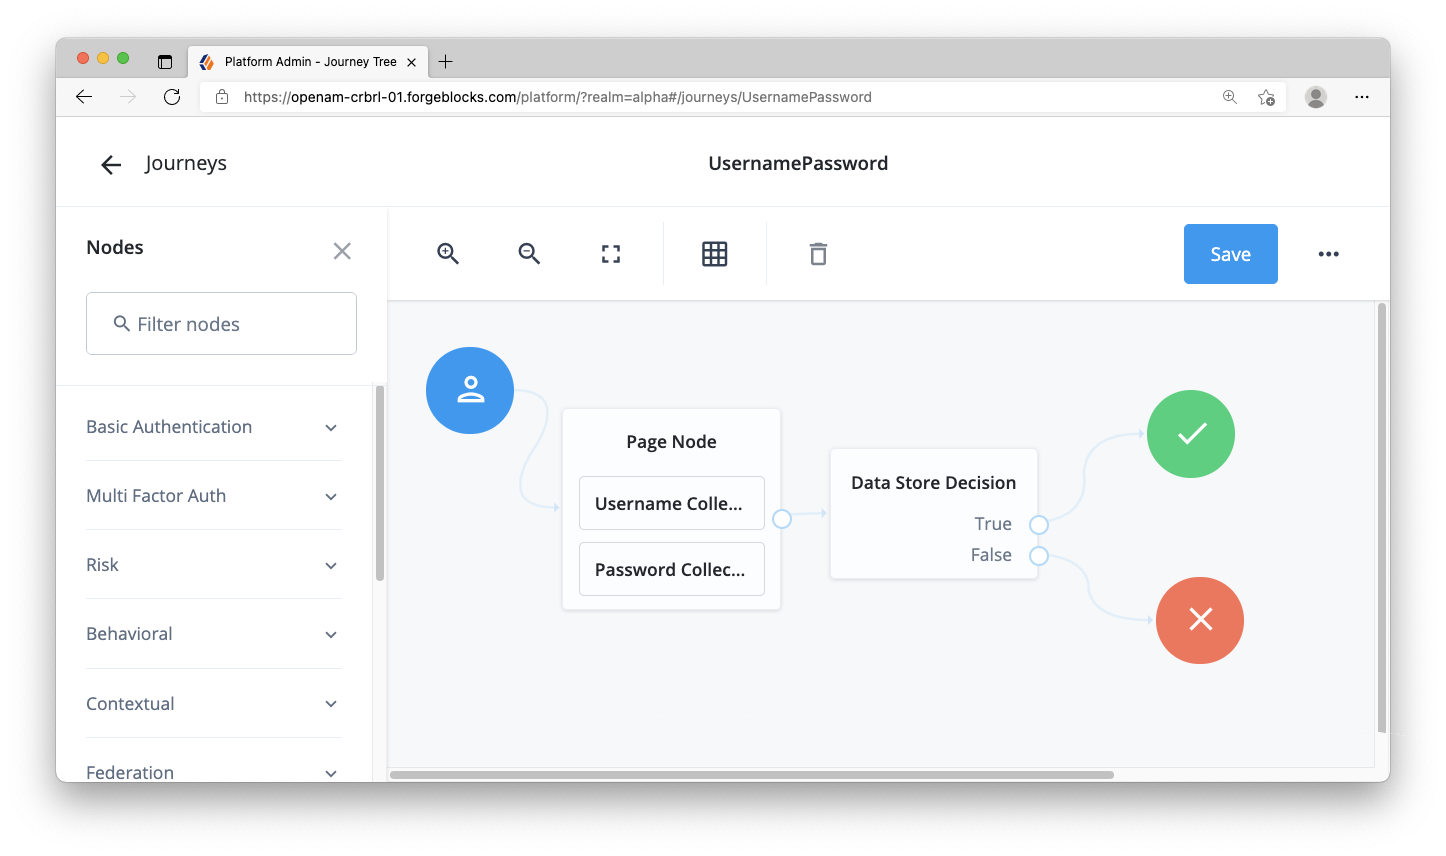
Step 1. Create a simple login journey/tree
You need a simple username and password authentication journey/tree for this guide.
-
Create a Page Node and connect it to the start of the journey.
-
Add Username Collector and Password Collector nodes within the Page Node.
-
Add a Data Store Decision node and connect it to the Page Node.
-
Connect the
Trueoutcome of the decision node to the Success node. -
Connect the
Falseoutcome of the decision node to the Failure node.
|
For more information about building journeys/trees, read the ForgeRock documentation for tree configuration on AM, or for journey configuration in Identity Cloud. |
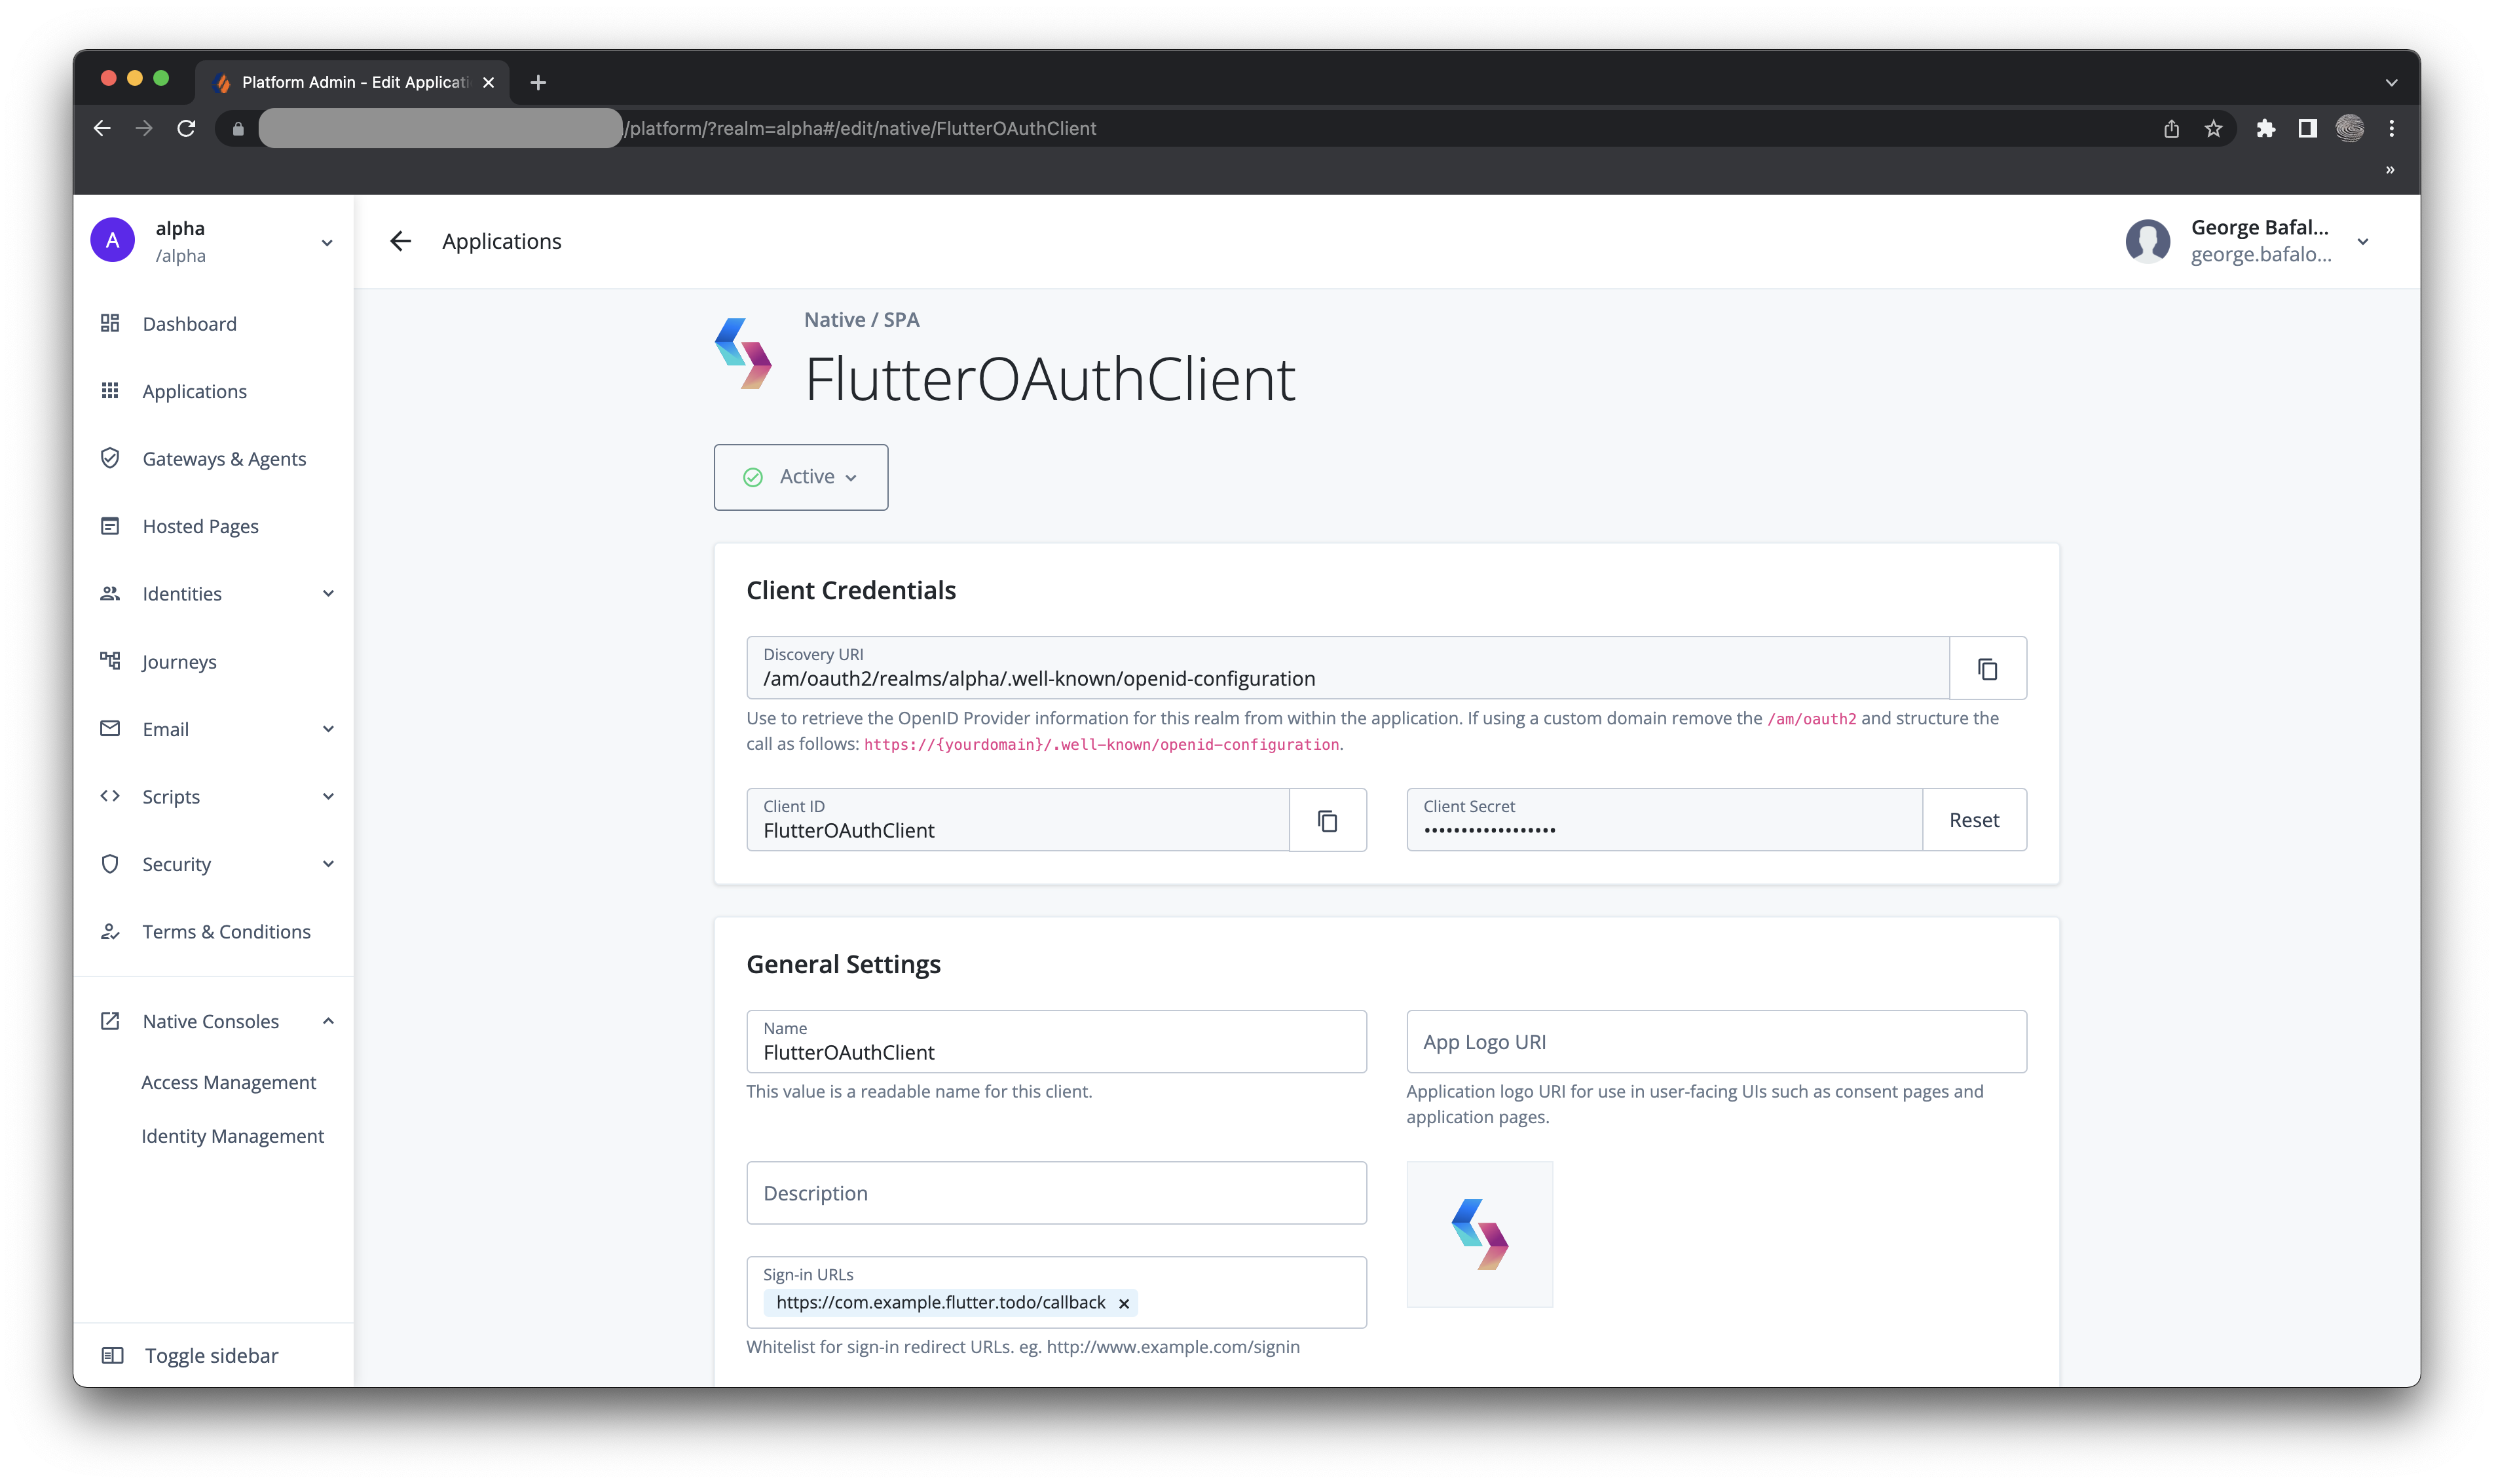
Step 2. Create an OAuth client
Within the ForgeRock server, create a public, "Native", OAuth client for the mobile client app with the following values:
-
Client name/ID:
FlutterOAuthClient -
Client type:
Public -
Secret:
<leave empty> -
Scopes:
openid profile email address -
Grant types:
Authorization CodeRefresh Token -
Implicit consent: enabled
-
Redirection URLs/Sign-in URLs:
https://com.example.flutter.todo/callback -
Token authentication endpoint method:
none
Each of the above is required, so double check you set each of the items correctly. If you don’t, you’ll likely get an "invalid OAuth client" error in Xcode logs.
|
For more information about configuring OAuth clients, read the ForgeRock documentation for OAuth 2.0 client configuration on AM, or for OAuth client/application configuration on Identity Cloud. |
Step 3. Create a test user
Create a test user (identity) in your ForgeRock server within the realm you will use.
If using an Identity Cloud tenant, follow our ForgeRock documentation for creating a user in Identity Cloud.
Or, if you are using AM, click Identities in the left navigation. Use the following instructions to create a user:
-
Click Add Identity to view the create user form.
-
In a separate browser tab, visit this UUID v4 generator and copy the UUID.
-
Switch back to AM and paste the UUID into the User ID input.
-
Provide a password and email address.
|
You will use this UUID as the username for logging into the app. |
Local project setup
Step 1. Clone the project
First, create a new directory mkdir, clone the
Flutter Sample project to your local computer, and checkout the branch for this guide:
mkdir forgerock-flutter-sample
cd forgerock-flutter-sample
git clone https://github.com/ForgeRock/forgerock-flutter-sample.git
git checkout part-one-start
In addition, there’s a branch that represents the completion of this guide.
If you get stuck, you can
visit part-one-complete branch in GitHub, and use it as a reference.
|
This guide uses a branch that is a simplified version of the sample app
you see in the |
Step 2. Install the project dependencies
This Flutter app requires the installation of the native ForgeRock iOS SDK. You can install this by using SPM (Swift Package Manager) on the generated iOS project.
-
Navigate to the iOS project,
forgerock-flutter-sample/Flutter_To_Do_app/flutter_todo_app/ios. -
Use Xcode to open
Runner.xcworkspace. -
In Xcode, select the Runner project and navigate to Package Dependencies.
-
Click the sign, and add the ForgeRock iOS SDK repository,
https://github.com/ForgeRock/forgerock-ios-sdk.git. -
Add the
FRCoreandFRAuthlibraries to the project.
Next, we need to open Android Studio and build the project. If you haven’t configured Android Studio for Flutter, please follow the guide in the Flutter documentation.
Don’t forget to set the Dart SDK path in Android Studio.
You can find that in the folder where you downloaded the Flutter SDK.
(For example, ~/flutter/bin/cache/dart-sdk.)
In Android Studio, click File > Open,
and navigate to forgerock-flutter-sample/Flutter_To_Do_app/.
When Android Studio loads the project and is ready, install any gradle dependencies,
and select the iOS simulator to build and run the project.
Additionally, you are required to install the node dependencies for the ToDo node Server.
-
Open up a Terminal window and navigate to the root folder of your project.
-
Run the
npm installcommand.
Step 3. Edit the .env.js file
Using the ForgeRock server settings from above, edit the .env.js file within the project.
This can be found the root folder of your project.
Add your relevant values to configure all the important server settings to your project.
Not all variables will need values at this time.
You can list the file in the Terminal by doing ls -a, and edit it using a text editor like nano or vi.
A hypothetical example (required variables commented):
/**
 * Avoid trailing slashes in the URL string values below.
 */
const AM_URL = 'https://auth.forgerock.com/am'; // Required; enter _your_ ForgeRock AM URL
const DEBUGGER_OFF = true;
const DEVELOPMENT = true;
const API_URL = 'https://api.example.com:9443'; // (your resource API server's URL)
const JOURNEY_LOGIN = 'Login'; // (name of journey/tree for Login)
const JOURNEY_REGISTER = 'Registration'; // (name of journey/tree for Register)
const SEC_KEY_FILE = './updatedCerts/api.example.com.key';
const SEC_CERT_FILE = './updatedCerts/api.example.com.crt';
const REALM_PATH = ''; //Required (ex: alpha)
const REST_OAUTH_CLIENT = ''; // (name of private OAuth 2.0 client/application)
const REST_OAUTH_SECRET = ''; // (the secret for the private OAuth 2.0 client/application)
const WEB_OAUTH_CLIENT = ''; // (the name of the public OAuth 2.0 client/application)
const PORT = '9443';
Descriptions of relevant values:
AM_URL-
The URL that references AM itself (for Identity Cloud, the URL is likely
https://<tenant-name>.forgeblocks.com/am). API_PORTandAPI_BASE_URL-
These just need to be "truthy" (not 0 or an empty string) right now to avoid errors, and we will use them in a future part of this series.
DEBUGGER_OFF-
When
true, this disables thedebuggerstatements in the JavaScript layer. These debugger statements are for learning the integration points at runtime in your browser. When the browser’s developer tools are open, the app pauses at each integration point. Code comments above each integration point explain its use. REALM_PATH-
The realm of your ForgeRock server (likely
root,alpha, orbravo). REST_OAUTH_CLIENTandREST_OAUTH_SECRET-
We will use these values in a future part of this series, so any string value will do.
Build and run the project
Now that everything is set up, build and run the to-do app project.
-
Go back to the iOS project (
forgerock-flutter-sample/Flutter_To_Do_app/flutter_todo_app/ios). -
If the project is not already open in Xcode double-click
Runner.xcworkspace. -
Once Xcode is ready, select iPhone 11 or higher as the target for the device simulator on which to run the app.
-
Now, click the build/play button to build and run this application in the target simulator.
With everything up and running, you will need to rebuild the project with Xcode when you modify the bridge code (Swift files). But, when modifying the Flutter code, it will use "hot module reloading" to automatically reflect the changes in the app without having to manually rebuild the project.
Using Xcode and iOS Simulator
We recommend the use of iPhone 11 or higher as the target for the iOS simulator. When you first run the build command in Xcode (clicking the Play button), it takes a while for the app to build, the OS to load, and app to launch within the simulator. Once the app is launched, rebuilding it is much faster if the changes are not automatically "hot reloaded" when made in the Flutter layer.
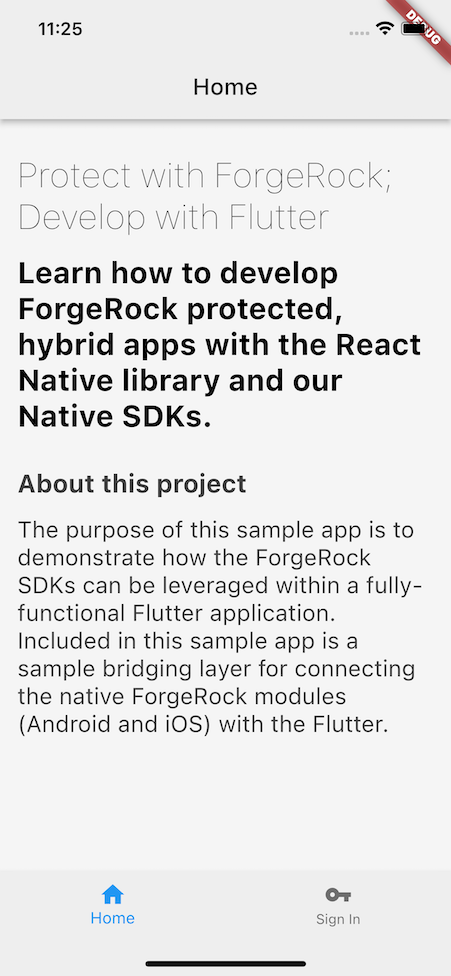
|
Only the home screen will render successfully at this moment. If you click the Sign In button, it won’t be fully functional. This is intended as you will develop this functionality throughout this tutorial. |
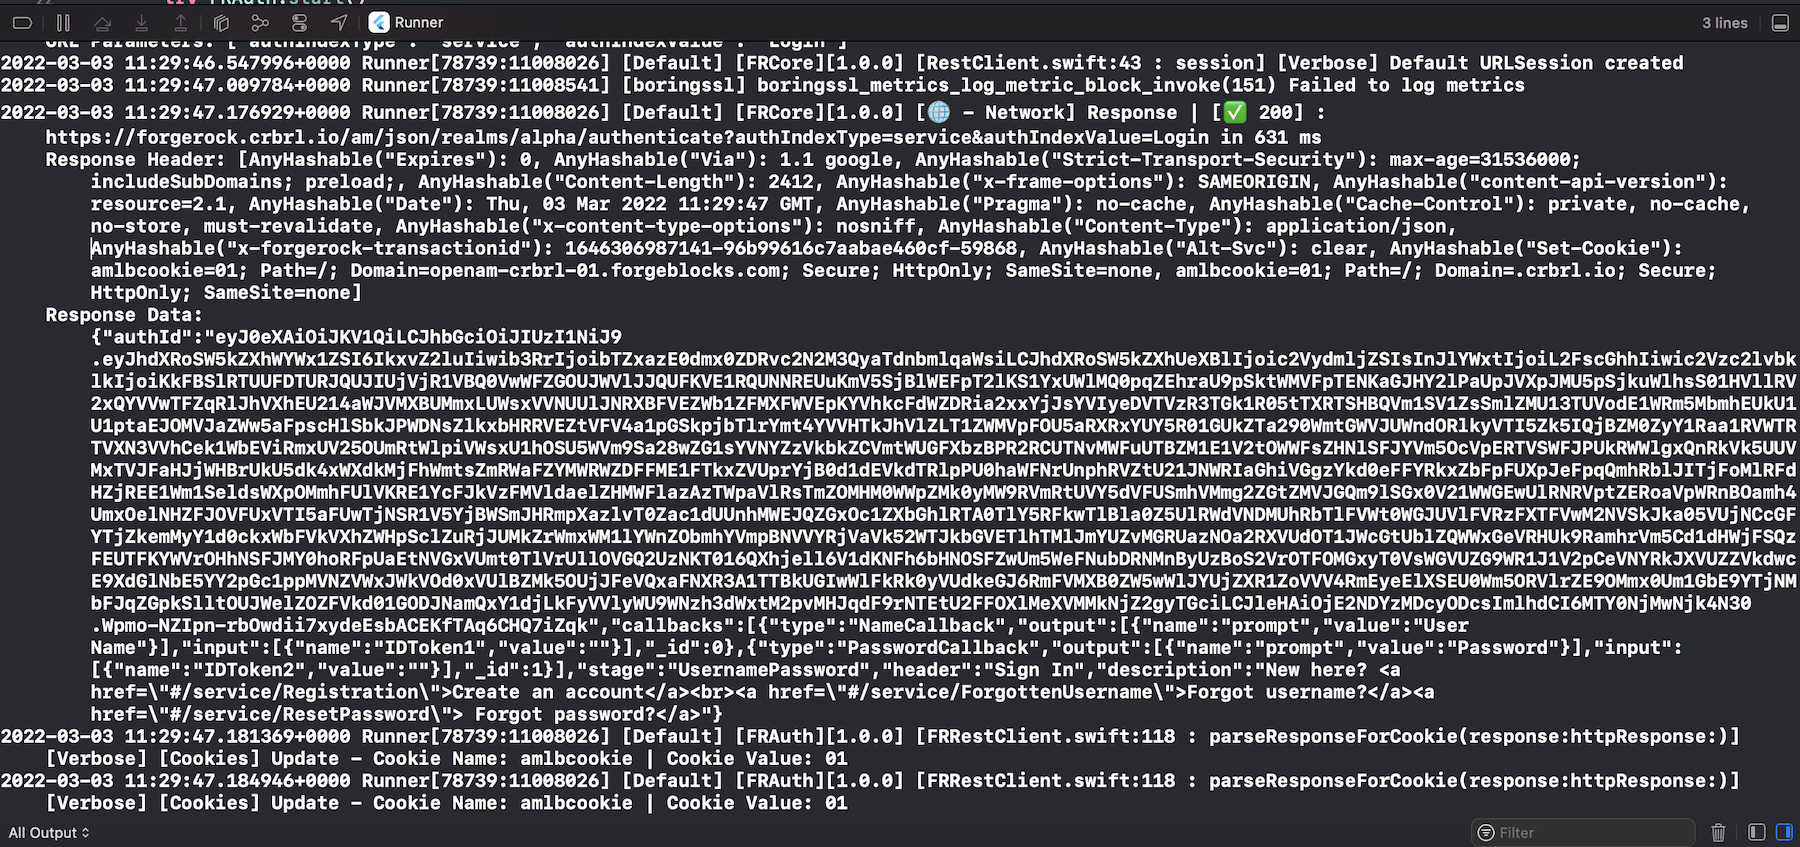
Once the app is built and running, you will have access to all the logs in the Xcode output console.
Implement the iOS bridge code for authentication
Step 1. Review the iOS related files
We first need to review the files that allow for the "bridging" between our Flutter project and our native SDKs. In Xcode, navigate to the Runner/Runner directory, and you will see a few important files:
FRAuthSampleBridge.swift-
The main Swift bridging code that provides the callable methods for the Flutter layer.
FRAuthSampleStructs.swift-
Provides the structs for the Swift bridging code.
FRAuthSampleHelpers.swift-
Provides the extensions to often used objects within the bridge code.
FRAuthConfig-
A
.plistfile that configures the iOS SDK to the appropriate ForgeRock server.
|
The remainder of the files within the workspace are automatically generated when you create a Flutter project with the CLI command, so you can ignore them. |
Step 2. Configure your .plist file
In the Xcode directory/file list section, also known as the Project Navigator, complete the following:
-
Find
FRAuthConfig.plistfile within theios/Runnerdirectory. -
Add the name of your ForgeRock cookie.
-
Add the OAuth client you created from above.
-
Add your ForgeRock URLs.
-
Add the login tree you created above.
A hypothetical example (your values may vary):
  <dict>
    <key>forgerock_cookie_name</key>
-   <string></string>
+   <string>e1babb394ea5130</string>
    <key>forgerock_enable_cookie</key>
    <true/>
    <key>forgerock_oauth_client_id</key>
    <string>flutterOAuthClient</string>
    <key>forgerock_oauth_redirect_uri</key>
    <string>https://com.example.flutter.todo/callback</string>;
    <key>forgerock_oauth_scope</key>
    <string>openid profile email address</string>
    <key>forgerock_oauth_url</key>
-   <string></string>
+   <string>https://auth.forgerock.com/am</string>;
    <key>forgerock_oauth_threshold</key>
    <string>60</string>
    <key>forgerock_url</key>
-   <string></string>
+   <string>https://auth.forgerock.com/am</string>;
    <key>forgerock_realm</key>
-   <string></string>
+   <string>alpha</string>
    <key>forgerock_timeout</key>
    <string>60</string>
    <key>forgerock_keychain_access_group</key>
    <string>com.forgerock.flutterTodoApp</string>
    <key>forgerock_auth_service_name</key>
-   <string></string>
+   <string>UsernamePassword</string>
    <key>forgerock_registration_service_name</key>
-   <string></string>
+  <string>Registration</string>
</dict>
Descriptions of relevant values:
forgerock_cookie_name-
If you have an Identity Cloud tenant, you can find this random string value under the Tenant Settings in the top-right dropdown in the admin UI. If you have your own installation of AM, this is often
iPlanetDirectoryPro. forgerock_urlandforgerock_oauth_url-
The URL of AM within your ForgeRock server installation.
forgerock_realm-
The realm of your ForgeRock server (likely
root,alpha, orbeta). forgerock_auth_service_name-
This is the journey/tree that you use for login.
forgerock_registration_service_name-
This is the journey/tree that you use for registration, but it will not be used until a future part of this tutorial series.
Step 3. Write the start() method
Staying within the Runner directory, find the FRAuthSampleBridge file and open it.
We have parts of the file already stubbed out and the dependencies are already installed.
All you need to do is write the functionality.
For the SDK to initialize with the FRAuth.plist configuration from Step 2, write the start function as follows:
  import Foundation
  import FRAuth
  import FRCore
  import Flutter

  public class FRAuthSampleBridge {
      var currentNode: Node?
      private let session = URLSession(configuration: .default)

   @objc func frAuthStart(result: @escaping FlutterResult) {

+     /**
+      * Set log level to all
+      */
+     FRLog.setLogLevel([.all])
+
+     do {
+       try FRAuth.start()
+       let initMessage = "SDK is initialized"
+       FRLog.i(initMessage)
+       result(initMessage)
+     } catch {
+       FRLog.e(error.localizedDescription)
+       result(FlutterError(code: "SDK Init Failed",
+                              message: error.localizedDescription,
+                              details: nil))
+     }
   }
The start() function above calls the iOS SDK’s start() method on the FRAuth class.
There’s a bit more that may be required within this function for a production app.
We’ll get more into this in a separate part of this series, but for now, let’s keep this simple.
Step 4. Write the login() method
Once the start() method is called, and it has initialized, the SDK is ready to handle user requests.
Let’s start with login().
Just underneath the start() method we wrote above, add the login() method.
@@ collapsed @@

@objc func frAuthStart(result: @escaping FlutterResult) {
    // Set log level according to your needs
    FRLog.setLogLevel([.all])

    do {
      try FRAuth.start()
        result("SDK Initialised")
        FRUser.currentUser?.logout()
    }
    catch {
      FRLog.e(error.localizedDescription)
        result(FlutterError(code: "SDK Init Failed",
                            message: error.localizedDescription,
                            details: nil))
    }
  }

 @objc func login(result: @escaping FlutterResult) {
+   FRUser.login { (user, node, error) in
+     self.handleNode(user, node, error, completion: result)
+   }
 }

@@ collapsed @@
This login() function initializes the journey/tree specified for authentication.
You call this method without arguments as it does not log the user in.
This initial call to the ForgeRock server will return the first set of callbacks
that represents the first node in your journey/tree to collect user data.
Also, notice that we have a special "handler" function within the callback of FRUser.login().
This handleNode() method serializes the node object that the iOS SDK returns in a JSON string.
Data passed between the "native" layer and the Flutter layer is limited to serialized objects.
This method can be written in many ways and should be written in whatever way is best for your application.
Step 5. Write the next() method
To finalize the functionality needed to complete user authentication,
we need a way to iteratively call next() until the tree completes successfully or fails.
In the bridge file, add a private method called handleNode().
First, we will write the decoding of the JSON string and prepare the node for submission.
@@ collapsed @@

@objc func login(result: @escaping FlutterResult) {
      FRUser.login { (user, node, error) in
          self.handleNode(user, node, error, completion: result)
      }
  }

 @objc func next(_ response: String, completion: @escaping FlutterResult) {
+   let decoder = JSONDecoder()
+   let jsonData = Data(response.utf8)
+   if let node = self.currentNode {
+     var responseObject: Response?
+     do {
+       responseObject = try decoder.decode(Response.self, from: jsonData)
+     } catch  {
+       FRLog.e(String(describing: error))
+       completion(FlutterError(code: "Error",
+                                      message: error.localizedDescription,
+                                  details: nil))
+     }
+
+     let callbacksArray = responseObject!.callbacks ?? []
+
+     for (outerIndex, nodeCallback) in node.callbacks.enumerated() {
+       if let thisCallback = nodeCallback as? SingleValueCallback {
+         for (innerIndex, rawCallback) in callbacksArray.enumerated() {
+           if let inputsArray = rawCallback.input, outerIndex == innerIndex,
+             let value = inputsArray.first?.value {
+
+             thisCallback.setValue(value.value as! String)
+           }
+         }
+       }
+     }
+
+     //node.next logic goes here
+
+
+   } else {
+     completion(FlutterError(code: "Error",
+                                message: "UnkownError",
+                                details: nil))
+   }
 }

@@ collapsed @@
Now that you’ve prepared the data for submission, introduce the node.next() call from the iOS SDK.
Then, handle the subsequent node returned from the next() call,
or process the success or failure representing the completion of the journey/tree.
@@ collapsed @@

      for (outerIndex, nodeCallback) in node.callbacks.enumerated() {
        if let thisCallback = nodeCallback as? SingleValueCallback {
          for (innerIndex, rawCallback) in callbacksArray.enumerated() {
            if let inputsArray = rawCallback.input, outerIndex == innerIndex,
              let value = inputsArray.first?.value {

              thisCallback.setValue(value)
            }
          }
        }
      }

     //node.next logic goes here
+     node.next(completion: { (user: FRUser?, node, error) in
+       if let node = node {
+         self.handleNode(user, node, error, completion: completion)
+       } else {
+         if let error = error {
+           completion(FlutterError(code: "LoginFailure",
+                                          message: error.localizedDescription,
+                                      details: nil))
+           return
+         }
+
+         let encoder = JSONEncoder()
+         encoder.outputFormatting = .prettyPrinted
+         do {
+             if let user = user, let token = user.token, let data = try? encoder.encode(token), let jsonAccessToken = String(data: data, encoding: .utf8) {
+                 completion(try ["type": "LoginSuccess", "sessionToken": jsonAccessToken].toJson())
+             } else {
+                 completion(try ["type": "LoginSuccess", "sessionToken": ""].toJson())
+             }
+           }
+           catch {
+             completion(FlutterError(code: "Serializing Response failed",
+                                     message: error.localizedDescription,
+                                     details: nil))
+           }
+       }
+     })
    } else {
      completion(FlutterError(code: "Error",
                                message: "UnkownError",
                                details: nil))
    }
  }

@@ collapsed @@
The above code handles a limited number of callback types.
Handling full authentication and registration journeys/trees requires additional callback handling.
To keep this tutorial simple, we’ll focus just on SingleValueCallback type.
Step 6. Write the logout() bridge method
Finally, add the following lines of code to enable logout for the user:
@@ collapsed @@

    } else {
      completion(FlutterError(code: "Error",
                                message: "UnkownError",
                                details: nil))
    }

  @objc func frLogout(result: @escaping FlutterResult) {
+        FRUser.currentUser?.logout()
+        result("User logged out")
  }

@@ collapsed @@
Building a Flutter form for simple login
Step 1. Initializing the SDK
First, let’s review how the application renders the home view. Open Android Studio and navigate to the Flutter project, flutter_todo_app > java/main.dart.
Open up the second file in the above sequence, the java/main.dart file, and notice the following:
-
The use of
import 'package:flutter/material.dart';from the Flutter library. -
The
TodoAppclass extendingStatefulWidget. -
The
_TodoAppStateclass extendingState<TodoApp>. -
Building the UI for the navigation bar.
import 'package:flutter/material.dart';
import 'package:flutter_todo_app/home.dart';
import 'package:flutter_todo_app/login.dart';
import 'package:flutter_todo_app/todolist.dart';

void main() => runApp(
  new TodoApp(),
);

class TodoApp extends StatefulWidget {
  @override
  _TodoAppState createState() => new _TodoAppState();
}

class _TodoAppState extends State<TodoApp> {
  int _selectedIndex = 0;

  final _pageOptions = [
    HomePage(),
    LoginPage(),
    TodoList(),
  ];

  void _onItemTapped(int index) {
    setState(() {
      _selectedIndex = index;
    });
  }

  @override
  Widget build(BuildContext context) {
    return new MaterialApp(
      home: Scaffold(
        body: _pageOptions[_selectedIndex],
        bottomNavigationBar: BottomNavigationBar(
          items: const <BottomNavigationBarItem>[
            BottomNavigationBarItem(
              icon: Icon(Icons.home),
              label: 'Home',
            ),
            BottomNavigationBarItem(
              icon: Icon(Icons.vpn_key),
              label: 'Sign In',
            ),
          ],
          currentIndex: _selectedIndex,
          selectedItemColor: Colors.blueAccent[800],
          onTap: _onItemTapped,
          backgroundColor: Colors.grey[200],
        )
      ),
    );
  }
}
Flutter uses something called MethodChannel to communicate between Flutter and the Native layer.
In this application we will define a MethodChannel with the following identifier: 'forgerock.com/SampleBridge'.
The same identifier will be used in the iOS FRSampleBridge so that the two layers communicate and pass information.
To initialize the ForgeRock SDK when the log in view first loads, we call the frStart() method on the bridge code.
|
It’s important to initialize the SDK as early as possible. Call this initialization step, so it resolves before any other native SDK methods can be used. |
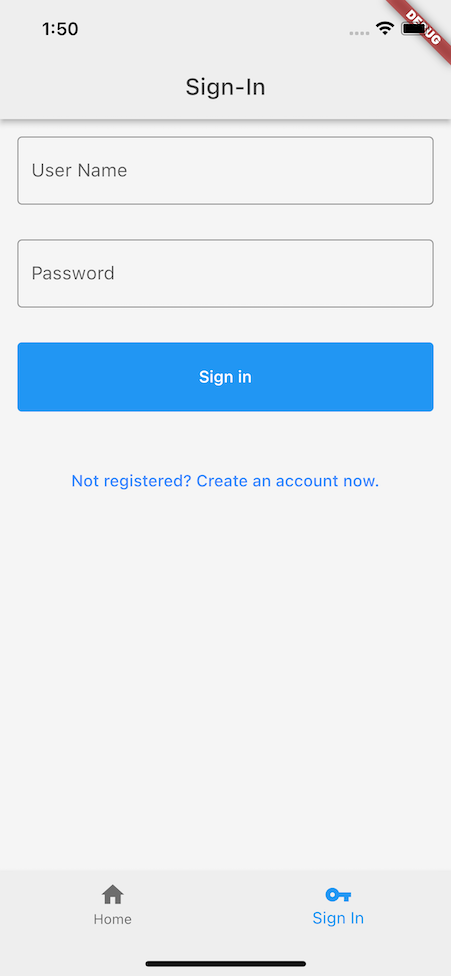
Step 2. Building the login view
Navigate to the app’s login view within the Simulator. You should see an empty screen with a button, since the app doesn’t have the data needed to render the form. To render the correct form, retrieve the initial data from the ForgeRock server. This is our first task.
Since most of the action is taking place in
flutter_todo_app/Java/login.dart, open it and add the following:
-
Import
FRNode.dartfrom the Dart helper classes provided for improved ergonomics for handling callbacks:import 'package:flutter_todo_app/FRNode.dart';
-
If not already there, import
async,convert,scheduler,servicesfrom theflutterpackage. Add the following:import 'dart:async'; import 'dart:convert'; import 'package:flutter/scheduler.dart'; import 'package:flutter/services.dart';
-
Create a static reference for the method channel
MethodChannel('forgerock.com/SampleBridge') -
Override the
initStateFlutter lifecycle method and initialize the SDK.class _LoginPageState extends State<LoginPage> { + static const platform = MethodChannel('forgerock.com/SampleBridge'); //Method channel as defined in the native Bridge code @@ collapsed @@ //Lifecycle Methods + @override + void initState() { + super.initState(); + SchedulerBinding.instance?.addPostFrameCallback((_) => { + //After creating the first controller that uses the SDK, call the 'frAuthStart' method to initialize the native SDKs. + _startSDK() + }); + } // SDK Calls - Note the promise type responses. Handle errors on the UI layer as required Future<void> _startSDK() async { + String response; + try { + + //Start the SDK. Call the frAuthStart channel method to initialise the native SDKs + final String result = await platform.invokeMethod('frAuthStart'); + response = 'SDK Started'; + _login(); + } on PlatformException catch (e) { + response = "SDK Start Failed: '${e.message}'."; + } } @@ collapsed @@
To develop the login functionality, we first need to use the login() method from the bridge code
to get the first set of callbacks, and then render the form appropriately.
This login() method is an asynchronous method.
Let’s get started!
Compose the data gathering process using the following:
-
After the SDK initialization is complete, call the
_login()method. -
Use the
platformreference to call the Bridge login methodplatform.invokeMethod('login'). -
Parse the response and call
_handleNode()method. -
Handle any errors that might be returned from the
Bridge.@@ collapsed @@ Future<void> _login() async { + try { + //Call the default login tree. + final String result = await platform.invokeMethod('login'); + Map<String, dynamic> frNodeMap = jsonDecode(result); + var frNode = FRNode.fromJson(frNodeMap); + currentNode = frNode; + + //Upon completion, a node with callbacks will be returned, handle that node and present the callbacks to UI as needed. + _handleNode(frNode); + } on PlatformException catch (e) { + debugPrint('SDK Error: $e'); + Navigator.pop(context); + } }
The above code is expected to return either a Node with a set of Callback objects, or a success/error message.
We need to handle any exceptions thrown from the bridge on the catch block.
Typically, when we begin the authentication journey/tree, this returns a Node.
Using the FRNode helper object, we parse the result in a native Flutter FRNode object.
In the next step we are going to "handle" this node, and produce our UI.
@@ collapsed @@
  // Handling methods
  void _handleNode(FRNode frNode) {
+    // Go through the node callbacks and present the UI fields as needed. To determine the required UI element, check the callback type.
+    frNode.callbacks.forEach((frCallback) {
+      final controller = TextEditingController();
+      final field = TextField(
+        controller: controller,
+        obscureText: frCallback.type == "PasswordCallback", // If the callback type is 'PasswordCallback', make this a 'secure' textField.
+        enableSuggestions: false,
+        autocorrect: false,
+        decoration: InputDecoration(
+          border: OutlineInputBorder(),
+          labelText: frCallback.output[0].value,
+        ),
+      );
+      setState(() {
+        _controllers.add(controller);
+        _fields.add(field);
+      });
+    });
  }
The _handleNode() method focuses on the callbacks property.
This property contains instructions about what to render to collect user input.
The previous code processes the Node callbacks and generates two TextField objects:
-
A
TextFieldfor the username. -
A
TextFieldfor the password.
Use the frCallback.type to differentiate between the two TextField objects and obscure the text of each TextField.
Next, add the TextField objects to the List and create the accompanying TextEditingControllers.
Run the app again, and you should see a dynamic form that reacts to the callbacks returned from our initial call to ForgeRock.
Step 3. Handling the login form submission
Since a form that can’t submit anything isn’t very useful,
we’ll now handle the submission of the user input values to ForgeRock.
Continuing in login.dart, edit the current _okButton element,
adding an onPressed handler calling the _next() function.
This function should do the following:
-
Go through the
_controllersarray to capture the values of the form elements. -
Update the
Node callbackswith those values. -
Submit the results to ForgeRock.
-
Check the response for a
LoginSuccessmessage, or if a new node is returned, handle this in a similar way and resubmit the user inputs as needed. -
Handle errors with a generic failure message.
@@ collapsed @@

Widget _okButton() {
  return Container(
    color: Colors.transparent,
    width: MediaQuery.of(context).size.width,
    margin: EdgeInsets.all(15.0),
    height: 60,
    child: TextButton(
      style: ButtonStyle(backgroundColor: MaterialStateProperty.all(Colors.blue)),
      onPressed: () async {
        showAlertDialog(context);
+       _next();
      },
      child:
      Text(
        "Sign in",
        style: TextStyle(color: Colors.white),
      ),
    ),
  );
}

@@ collapsed @@

 Future<void> _next() async {
   // Capture the User Inputs from the UI, populate the currentNode callbacks and submit back to AM
+  currentNode.callbacks.asMap().forEach((index, frCallback) {
+    _controllers.asMap().forEach((controllerIndex, controller) {
+      if (controllerIndex == index) {
+        frCallback.input[0].value = controller.text;
+      }
+    });
+  });
+  String jsonResponse = jsonEncode(currentNode);
+  try {
+    // Call the SDK next method, to submit the User Inputs to AM. This will return the next Node or a Success/Failure
+    String result = await platform.invokeMethod('next', jsonResponse);
+    Navigator.pop(context);
+    Map<String, dynamic> response = jsonDecode(result);
+    if (response["type"] == "LoginSuccess") {
+      _navigateToNextScreen(context);
+    } else  {
+      //If a new node is returned, handle this in a similar way and resubmit the user inputs as needed.
+      Map<String, dynamic> frNodeMap = jsonDecode(result);
+      var frNode = FRNode.fromJson(frNodeMap);
+      currentNode = frNode;
+      _handleNode(frNode);
+    }
+  } catch (e) {
+    Navigator.pop(context);
+    debugPrint('SDK Error: $e');
+  }
 }

@@ collapsed @@
After the app refreshes, use the test user to login. If successful, you should see a success message. Congratulations, you are now able to authenticate users!
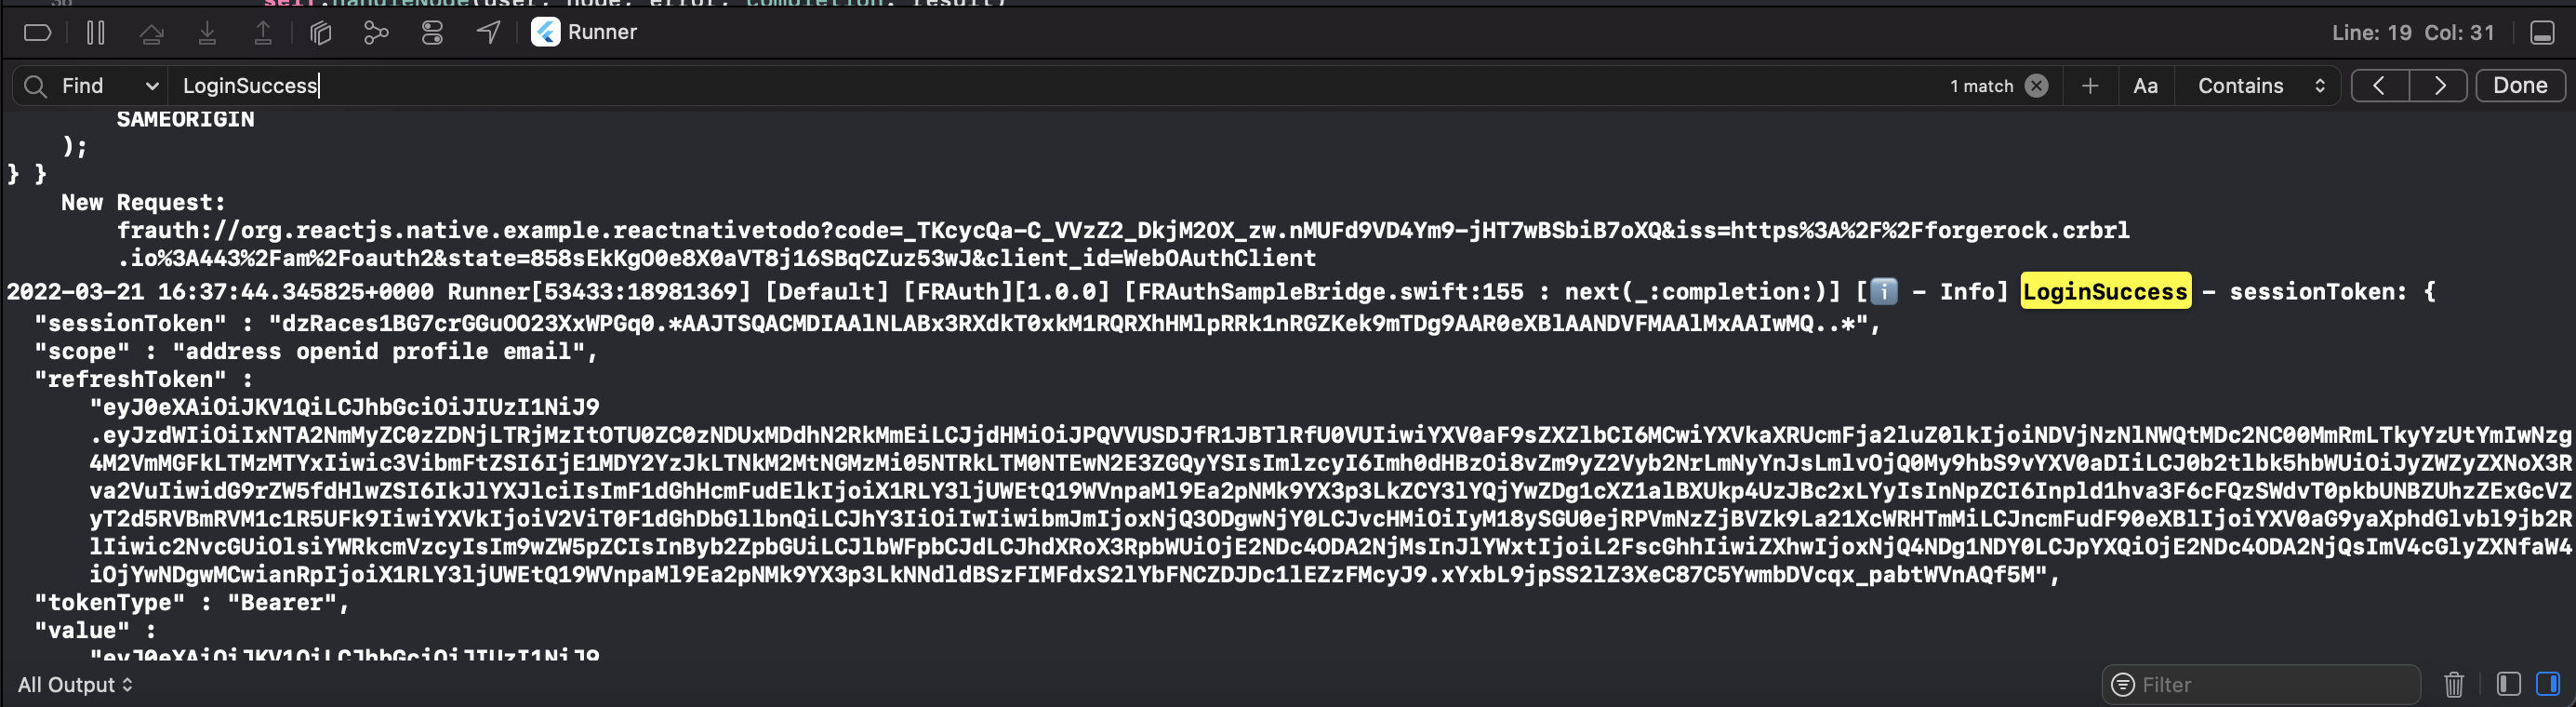
What’s more, you can verify the authentication details by going to the Xcode or Android Studio log,
and observing the result of the last call to the ForgeRock server.
It should have a type of LoginSuccess with token information.
Handling the user provided values
You may ask, "How did the user’s input values get added to the Node object?"
Let’s take a look at the component for handling the user input submission.
Notice how we loop through the Node Callbacks and the _controllers array.
Each input is set on the frCallback.input[0].value, and then we call FRSampleBridge.next() method.
@@ collapsed @@

// Capture the User Inputs from the UI, populate the currentNode callbacks and submit back to AM
  currentNode.callbacks.asMap().forEach((index, frCallback) {
    _controllers.asMap().forEach((controllerIndex, controller) {
      if (controllerIndex == index) {
        frCallback.input[0].value = controller.text;
      }
    });
  });

  String jsonResponse = jsonEncode(currentNode);

@@ collapsed @@

  try {
    // Call the SDK next method, to submit the User Inputs to AM. This will return the next Node or a Success/Failure
    String result = await platform.invokeMethod('next', jsonResponse);

@@ collapsed @@

  } catch (e) {
    Navigator.pop(context);
    debugPrint('SDK Error: $e');
  }
There are two important items to focus on regarding the FRCallback object.
callback.type-
Retrieves the call back
typeso that can identify how to present the callback in the UI. callback.input-
The input array that contains the inputs that you need to set the values for.
Since the NameCallback and PasswordCallback only have one input,
you can set the value of them by calling frCallback.input[0].value = controller.text;.
Some other callbacks might contain multiple inputs, so some extra code will be required to set the values of those.
Each callback type has its own collection of inputs and outputs.
Those are exposed as arrays that the developer can loop through and act upon.
Many callbacks have common base objects in iOS and Android, like the SingleValueCallback,
but appear as different types NameCallback or PasswordCallback to allow for easier differentiation in the UI layer.
You can find a full list of the supported callbacks of the SDKs here.
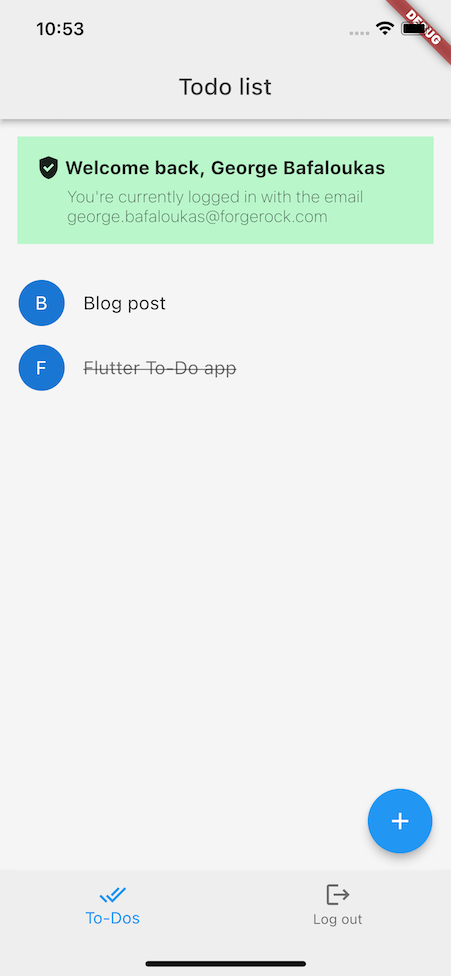
Step 4. Redirecting to the TodoList screen and requesting user info
Now that the user can log in, let’s go one step further and redirect to the TodoList screen.
After we get the LoginSccess message we can call the _navigateToNextScreen() method.
This will navigate to the TodoList class.
When the TodoList initializes, we want to request information about the authenticated user
to display their name and other information.
We will now utilize the existing FRAuthSampleBridge.getUserInfo() method already included in the bridge code.
Let’s do a little setup before we make the request to the ForgeRock server:
-
Override the
initState()method in the_TodoListStateclass intodolist.dart. -
Create a
SchedulerBinding.instance?.addPostFrameCallbackto execute some code when the state is loaded. -
Call
_getUserInfo().@@ collapsed @@ //Lifecycle methods + @override + void initState() { + super.initState(); + SchedulerBinding.instance?.addPostFrameCallback((_) => { + //Calling the userinfo endpoint is going to give use some user profile information to enrich our UI. Additionally, verifies that we have a valid access token. + _getUserInfo() + }); + } @@ collapsed @@
With the setup complete, implement the request to ForgeRock for the user’s information.
Within this empty _getUserInfo(), add an async function
to make that call FRAuthSampleBridge.getUserInfo() and parse the response.
@@ collapsed @@

Future<void> _getUserInfo() async {
  showAlertDialog(context);
  String response;
+  try {
+    final String result = await platform.invokeMethod('getUserInfo');
+    Map<String, dynamic> userInfoMap = jsonDecode(result);
+    response = result;
+    header = userInfoMap["name"];
+    subtitle = userInfoMap["email"];
+    Navigator.pop(context);
+    setState(() {
+      _getTodos();
+    });
+  } on PlatformException catch (e) {
+    response = "SDK Start Failed: '${e.message}'.";
+    Navigator.pop(context);
+  }
+  debugPrint('SDK: $response');
}

@@ collapsed @@
In the code above, we collected the user information and set the name and email of the user in some variables.
In addition to updating the user info, we will call the _getTodos() method in order to retrieve ToDos from the server.
Notice that we use the setState() function.
This ensures that our UI is updated based on the newly received information.
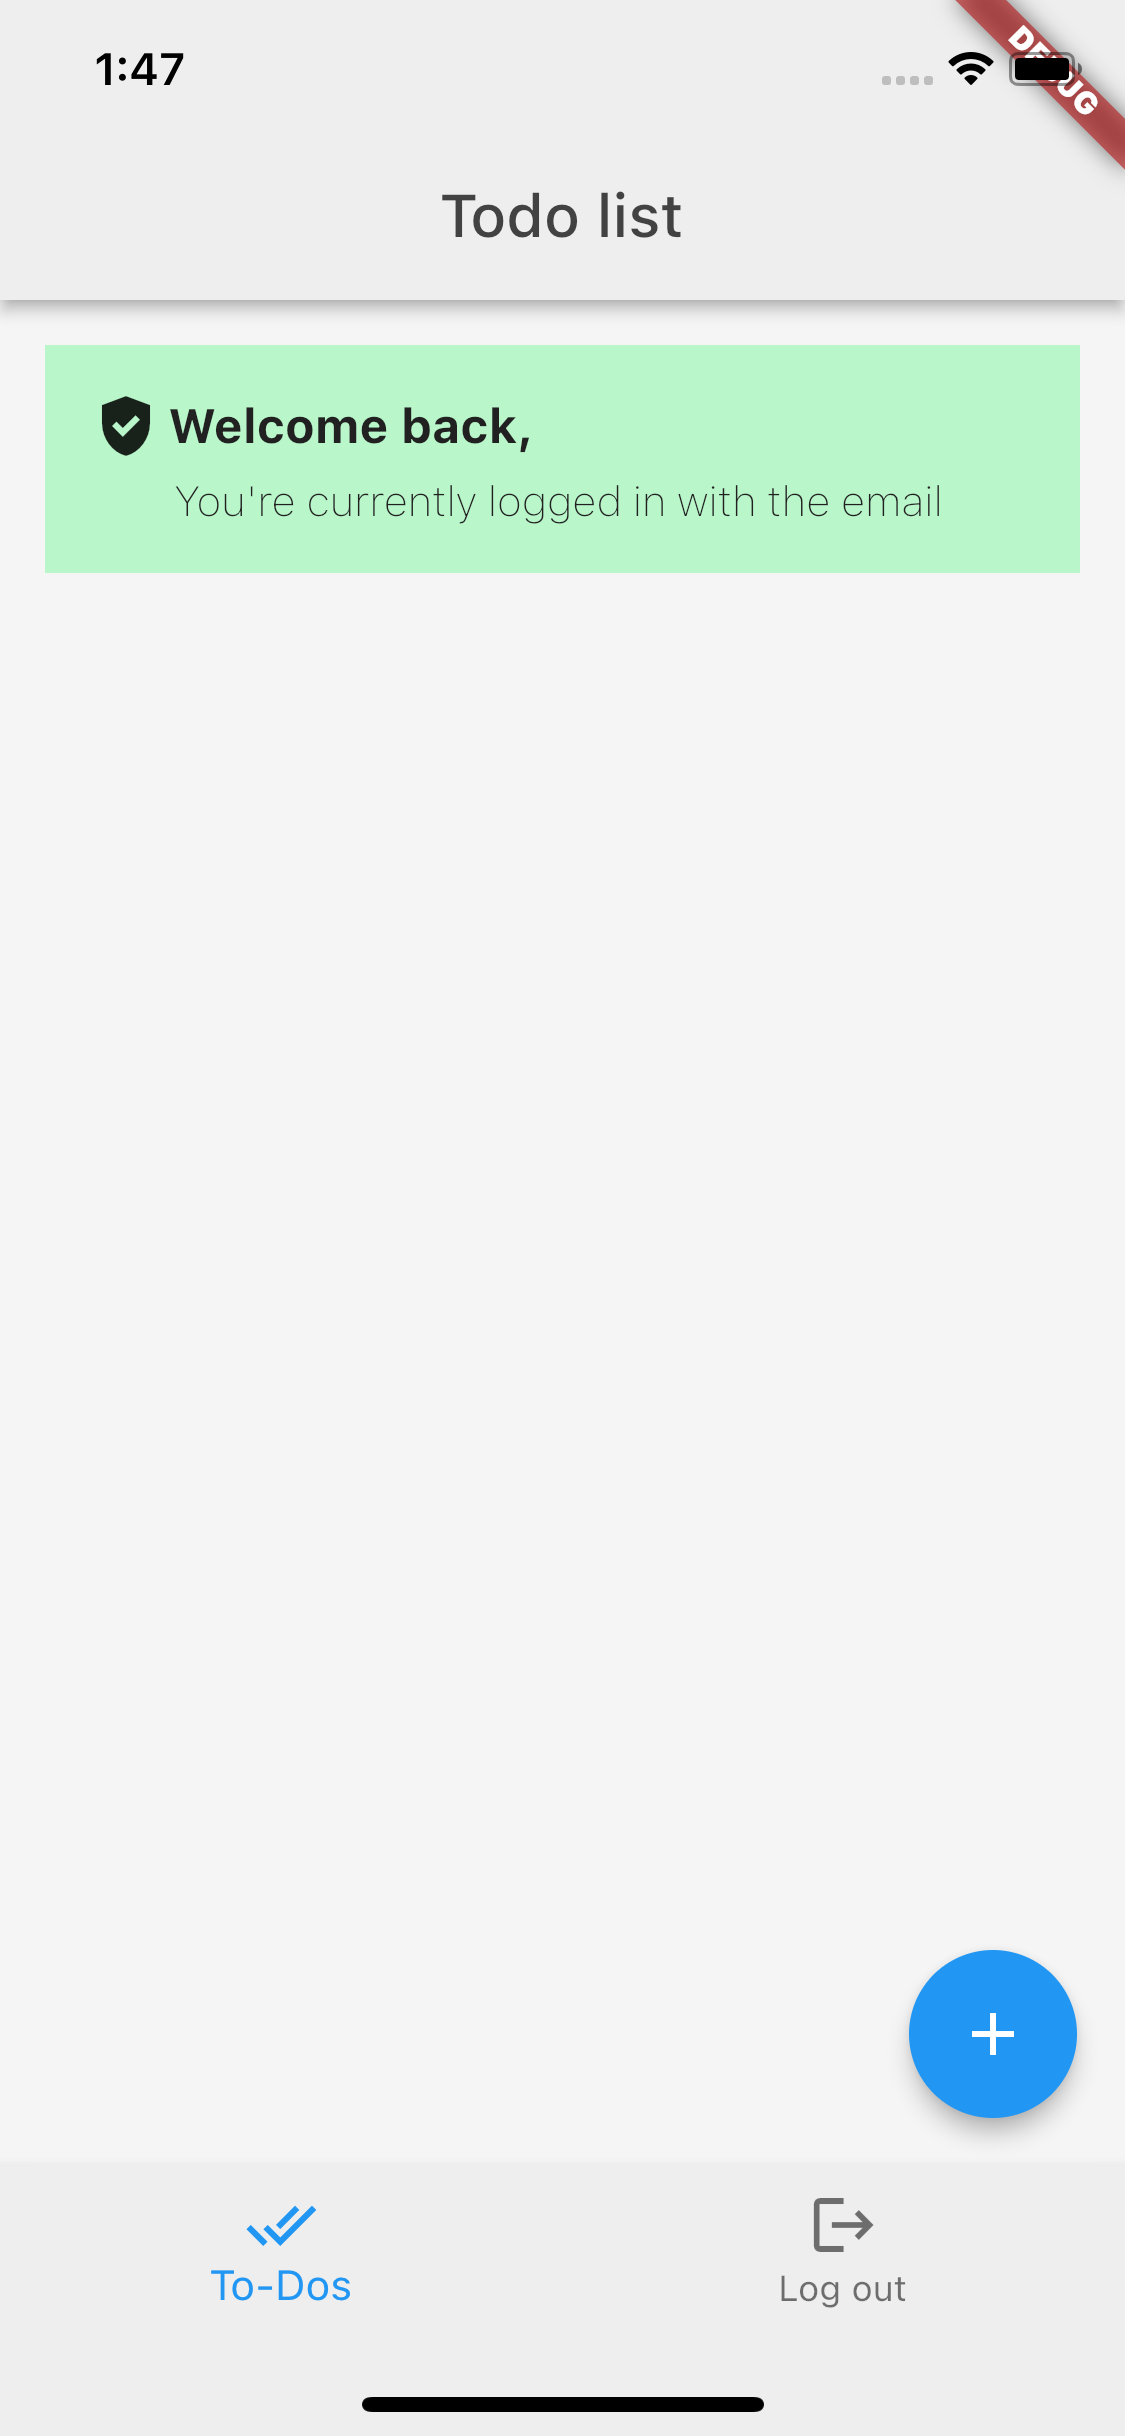
When you test this in the Simulator, completing a successful authentication results in the home screen being rendered with a success message. The user’s name and email are included for visual validation. You can also view the console in Xcode and see more complete logs.
Adding logout functionality to our bridge and Flutter code
Clicking the Sign Out button results in creating and rendering an alert view asking you if you are sure you want to log out with two options (yes/no). Clicking yes does nothing at the moment. We will now implement that missing logic.
Handle logout request in Flutter
Now, add the logic into the view to call this new Swift method.
Open the todolist.dart file, and add the following:
@@ collapsed @@

  TextButton(
    child: const Text('Yes'),
+        onPressed: () {
+            Navigator.of(context).pop();
+            _logout();
+        },
  ),

@@ collapsed @@

  Future<void> _logout() async {
+    final String result = await platform.invokeMethod('logout');
+    _navigateToNextScreen(context);
  }
Revisit the app within the Simulator, and tap the Sign Out button. This time around when clicking yes, will dispose of the alert and log you out, returning you back to the log in screen. If you tap no, you will return to the ToDo list screen.
You should now be able to successfully authenticate a user, display the user’s information, and log a user out.
Congratulations, you just built a ForgeRock protected iOS app with Flutter!