Bind and verify user devices
The ForgeRock SDKs for Android and iOS can cryptographically bind a mobile device to a user account.
Registered devices generate a key pair and a key ID. The SDK sends the public key and key ID to AM for storage in the user’s profile.
The SDK stores the private key on the device in either the Android KeyStore, or the iOS Secure Enclave. Access to the private keys is protected by either biometric security or a PIN.
A user can bind multiple devices to their account, and each device can bind to multiple users.
After binding a device your authentication journeys in AM can verify ownership of the bound device by requesting that it signs a challenge using the private key.
There are many similarities between WebAuthn and Device Binding and JWS verification. ForgeRock provides authentication nodes to implement both technologies in your journeys.
Both can be used for usernameless and passwordless authentication, they both use public key cryptography, and both can be used as part of a multi-factor authentication journey.
One major difference is that with device binding, the private key never leaves the device.
With WebAuthn, there is a possibility that the private key is synchronized across client devices because of Passkey support, which may be undesirable for your organization.
For more details of the differences, refer to the following table:
| Feature | WebAuthn / FIDO | Device Binding / JWS Verifier | Details |
|---|---|---|---|
Industry-standards based |
✅ |
❌ |
You can refer to the WebAuthn W3C specification. Device binding and JWS verification are proprietary implementations. |
Public key cryptography |
✅ |
✅ |
Both methods use Public key cryptography. |
Usernameless support |
✅ |
✅ |
After registration, the username can be stored in the device and obtained during authentication without the user having to enter their credentials. |
Keys are bound to the device |
❌ |
✅ |
With WebAuthn, if Passkeys are used, they can be shared across devices. With device binding, the private keys do not leave the device. |
Sign custom data |
❌ |
✅ |
With device binding, you can:
|
Format of signed data |
|||
Integration |
❌ |
✅ |
With device binding, after verification, the signed JWT is available in:
This enables the data within to be used for integration into your processes and business logic. |
Platform support |
✅ Android ✅ iOS ✅ Web browsers |
✅ Android ✅ iOS ❌ Web browsers |
As it is challenging to store secure data in a browser as a client app, device binding is not supported in web browsers. |
Authenticator support |
Determined by the platform. Configuration limited to:
|
Determined by the authentication node. Full configuration options:
|
With device binding, you can specify what authentication action the user must perform to get access to the private keys. This provides greater flexibility in your security implementation and can reduce authentication friction for your users. |
Key storage |
Web browsers and iOS synchronize to the cloud. Android has the option to synchronize to the cloud. |
|
Both technologies store the private keys securely on the client. WebAuthn supports synchronizing the private keys to the cloud for use on other devices. This can reduce authentication friction for your users but may also increase the risk of a breach. |
Managing device keys |
Managed by the device OS. Apps cannot delete local client keys programmatically and do not have a reference to the remote server key for deletion. |
Managed by the ForgeRock SDKs. Provides an interface to delete local client and remote server keys. |
The ability to programmatically delete both client and server keys can greatly simplify the process of registering a new device if an old device is lost or stolen. |
Passkey Support |
✅ |
❌ |
WebAuthn supports synchronizing the private keys to the cloud for use on other devices. Device binding keeps the private key locked in the device. |
App integrity verification |
|
Not provided by the device binding or verification nodes. It can be added as part of the journey by using app integrity nodes. |
App integrity verification helps ensure your users are only using a supported app rather than a third-party or potentially malicious version. |
Key attestation |
|
|
Key attestation verifies that the private key is valid and correct, is not forged, and was not created in an insecure manner. |
Complexity |
Medium |
Low |
WebAuthn requires a bit more configuration, for example, creating and uploading the Device binding only requires the journey and the SDK built into your app. |
Relevant authentication nodes and callbacks
The following table covers the authentication nodes and callbacks that AM provides for creating device binding journeys.
| Node | Callback | Description |
|---|---|---|
Registers a device to the user and optionally stores the public key and key ID in the user’s profile |
||
Non-interactive |
Stores the public key and key ID in the user’s profile if they were stored in node state |
|
Verifies ownership of a device by requesting it signs a challenge and verifying the result |
The SDKs support the default Authentication Type options provided by the authentication nodes. These options define how the user must authenticate on their device to gain access to the private keys stored on it:
Biometric only-
Request that the client secures access to private keys with biometric security, such as a fingerprint.
Biometric with PIN fallback-
Request that the client secures access to the private keys with biometric security, such as a fingerprint, but allow use of the device PIN if biometric is unavailable.
Application PIN-
Request that the client secures access to the private keys with an application-specific PIN.
On Android devices, the private keys used for binding and verification are stored in a keystore file protected by the application PIN specified by the user - it does not use hardware-backed encryption. However, this keystore file is encrypted using keys from the hardware-backed
AndroidKeyStore.The application-specific PIN applies only to your app, and is not linked to the device PIN used to unlock the device.
The application-specific PIN is stored only on the client device and is not sent to AM.
If the user forgets their application-specific PIN, they must bind the device again.
None-
The user does not need to authenticate to gain access to the private keys on their device.
The SDKs provide the UI to handle these application types by default. You can also override the default UI and provide your own implementations. Refer to Custom authentication UI.
Add device binding dependencies
To bind a device and perform signing verification, you must add the ForgeRock device binding module to your project.
Add Android dependencies
To add the device binding dependencies to your Android project:
-
In the Project tree view of your Android Studio project, open the
Gradle Scripts/build.gradlefile for the module. -
In the
dependenciessection, add the required dependencies:Exampledependenciessection after editing:dependencies { implementation 'org.forgerock:forgerock-auth:4.4.0' // Device binding core dependencies implementation 'com.nimbusds:nimbus-jose-jwt:9.23' implementation 'androidx.security:security-crypto:1.0.0' // BIOMETRIC_ONLY, BIOMETRIC_WITH_FALLBACK implementation 'androidx.biometric:biometric-ktx:1.2.0-alpha04' // APPLICATION_PIN implementation 'com.madgag.spongycastle:bcpkix-jdk15on:1.58.0.0' }
Add iOS dependencies
You can use CocoaPods or the Swift Package Manager to add the device binding dependencies to your iOS project.
- Add dependencies using CocoaPods
-
-
If you do not already have CocoaPods, install the latest version.
-
If you do not already have a Podfile, in a terminal window run the following command to create a new Podfile:
pod init
-
Add the following lines to your Podfile:
pod 'FRDeviceBinding' // Add-on for Device Binding feature
-
Run the following command to install pods:
pod install
-
- Add dependencies using Swift Package Manager
-
-
With your project open in Xcode, select File > Add Package Dependencies.
-
In the search bar, enter the ForgeRock SDK for iOS repository URL:
https://github.com/ForgeRock/forgerock-ios-sdk. -
Select the
forgerock-ios-sdkpackage, and then click Add Package. -
In the Choose Package Products dialog, ensure that the
FRDeviceBindinglibrary is added to your target project. -
Click Add Package.
-
In your project, import the library:
// Import the library
import FRDeviceBinding
-
Handle device binding callbacks
To bind a device on receipt of a DeviceBindingCallback, use the DeviceBindingCallback.bind() function.
This binds the device to the account using the default implementation.
Examples
DeviceBindingCallback callback = node.getCallback(DeviceBindingCallback.class);
callback.setDeviceName("My Android Device");
callback.bind(this.getActivity(), new FRListener<Void>() {
    @Override
    public void onSuccess(Void result) {
        // Proceed to the next node
        node.next();
    }

    @Override
    public void onException(Exception e) {
        // Proceed to the next node
        node.next();
    }
});
try {
// Provide a friendly name for the device
callback.setDeviceName("My Android Device")
// Bind the device
callback.bind(context)
// Proceed to the next node
} catch (e: CancellationException) {
// Ignore, due to configuration change
} catch (e: DeviceBindingException) {
// Proceed to the next node
}// Provide a friendly name for the device
callback.setDeviceName("My iOS Device")
// Bind the device
callback.bind() { result in
switch result {
case .success:
// Proceed to the next node
case .failure(let error):
// Handle the error and proceed to the next node
}
}| The examples above use the default user interface for authenticating users in order to create and securely store private keys. For information on providing your own UI for authenticating access to the private keys, refer to Implement custom UI. |
Handle device signing verifier callbacks
To sign the challenge on receipt of a DeviceSigningVerifierCallback, use the DeviceBindingCallback.sign() function.
Examples
callback.sign(requireContext(), new FRListener<Void>() {
    @Override
    public void onSuccess(Void result) {
        // Proceed to the next node
    }

    @Override
    public void onException(Exception e) {
        // Proceed to the next node
    }
});
try {
callback.sign(context)
// Proceed to the next node
} catch (e: CancellationException) {
// Ignore, due to configuration change
} catch (e: DeviceBindingException) {
// Map custom client errors:
when (e.status) {
is UnRegister -> {
callback.setClientError("UnReg")
}
is UnAuthorize -> {
callback.setClientError("UnAuth")
}
}
// Proceed to the next node
}callback.sign() { result in
switch result {
case .success:
// Proceed to the next node
case .failure(let error):
// Handle the error and proceed to the next node
}
}| The examples above use the default user interface for authenticating users in order to access the private keys. For information on providing your own UI for authenticating access to the private keys, refer to Implement custom UI. |
Add custom claims when signing
When signing a challenge on receipt of a DeviceSigningVerifierCallback, you can also add custom claims to the payload to provide additional context to the server.
A script in your authentication journey can access these claims and use them to implement additional functionality or logic.
The Device Signing Verifier node places the contents of the signed JWT in shared state in a variable named DeviceSigningVerifierNode.JWT.
Examples
Map<String, String> customClaims  = new HashMap<>() {{
    put("os", "value1");
}};

callback.sign(context, customClaims, new FRListener<Void>() {
    @Override
    public void onSuccess(Void result) {
        // Proceed to the next node
    }

    @Override
    public void onException(Exception e) {
        // Check for DeviceBindingErrorStatus.InvalidCustomClaims status
        // and fix invalid custom claims if needed
        // Proceed to the next node
    }
});
try {
callback.sign(context, mapOf("os" to "android"))
// Proceed to the next node
} catch (e: CancellationException) {
// Ignore, due to configuration change
} catch (e: DeviceBindingException) {
// Map custom client errors:
when (e.status) {
is UnRegister -> {
callback.setClientError("UnReg")
}
is UnAuthorize -> {
callback.setClientError("UnAuth")
}
is DeviceBindingErrorStatus.InvalidCustomClaims -> {
// Fix the invalid custom claims
}
}
// Proceed to the next node
}callback.sign(
customClaims: [
"platform": "iOS",
"isCompanyPhone": true,
"lastUpdated": Int(Date().timeIntervalSince1970)
]
) { result in
switch result
{
case .success:
// Proceed to the next node
case .failure(let error):
// Handle the error and proceed to the next node
if error == .invalidCustomClaims {
// Fix the invalid custom claims
print(error.errorMessage)
return
}
}
}Unbind devices by deleting keys
Registered devices store a public key and key ID on the AM server, and the private key in either the Android KeyStore or the iOS Secure Enclave.
To completely unbind a device from a user, you must delete the keys from both the client device and the server.
The following table outlines scenarios where the client deletes the local keys:
| Scenario | Android Device | iOS Device |
|---|---|---|
User deletes the client application |
Local key is deleted |
Local key is NOT deleted. Reinstall an app with the same AppID and signature to gain access to the original keys. The device is still bound to the user. |
User factory resets the client device |
Local key is deleted |
Local key is deleted |
User restores a backup from the original device to a new device |
Local keys are not exported to the cloud during backup and cannot be restored to another device. New device will require new keys. Keys remain on the original device. |
Local keys are stored in Secure Enclave and are not exported to the cloud during backup and cannot be restored to another device. New device will require new keys. Keys remain on the original device. |
|
Removing keys from the client device manually does not remove the keys from the server. Use the SDK to remove both sets of keys from within your application, or an Administrator can remove server keys by using the REST API. |
To completely unbind a device from a user, use the SDK delete method to contact the AM server to delete the keys.
When the keys are successfully removed from the server, the SDK removes the private keys from the device.
Step 1. Retrieve a list of keys
Call the FRUserKeys().loadAll() method to obtain a list of keys that are stored on the device:
Step 2. Delete the key from both the server and the device
Call the FRUserKeys().delete(userKey, forceDelete) method to delete a key from the server.
The parameters are as follows:
userKey-
Which key to delete.
forceDelete-
Whether to delete the local key if deleting the key from the server fails.
When set to
true, the local key is deleted even if removal from the server was not successful.Defaults to
false, meaning the local key is not deleted if removal from the server fails.
Example:
val frUserKeys = FRUserKeys(context)
frUserKeys.delete(userKey, false)
do {
try FRUserKeys().delete(
userKey: userKey,
forceDelete: false
)
}
catch {
print("Failed to delete public key from server")
}After deleting keys, the user needs to rebind the device for use in authentication journeys.
Implement custom UI
To ease implementation, the OS and ForgeRock SDKs provide default user interfaces for authenticating to access private keys, and also for selecting the private key to use if there is more than one.
The user interface for authenticating to access the private keys uses the text strings returned by the callback. You can configure these strings in the configuration of the relevant nodes on the server, or you can override these values using the SDK for providing the prompts.
You can also implement your own user interface for requesting an application PIN, and key selection when there are multiple available.
Customize authentication prompts
Customize or localize the text prompts that appear when accessing the private keys.
Customize authentication UI
Learn how to implement your own user interface for accessing the private keys when requesting an application PIN.
Customize key selection UI
Discover how to implement a user interface for choosing between multiple available keys.
Custom authentication prompts
The default text strings used when prompting the user to authenticate to gain access to the private keys come from the callbacks.
You can override or localize these strings by using the Prompt object. You can then pass the customized object into the deviceBindingCallback.bind and deviceSigningVerifierCallback.sign calls.
Binding:
val deviceBindingCallback = node.getCallback(DeviceBindingCallback::class.java)

deviceBindingCallback.bind(
    activity,
    prompt = Prompt("Custom Title", "Custom Subtitle", "Custom Description"),
    listener =
        object : FRListener<Void?> {
            override fun onSuccess(result: Void?) {
                node.next(activity, activity)
            }

            override fun onException(e: java.lang.Exception) {
                node.next(activity, activity)
            }
        }
)
Signing:
val deviceSigningVerifierCallback = node.getCallback(DeviceSigningVerifierCallback::class.java)

deviceSigningVerifierCallback.sign(
    activity,
    prompt = Prompt("Custom Title", "Custom Subtitle", "Custom Description"),
    listener =
        object : FRListener<Void?> {
            override fun onSuccess(result: Void?) {
                node.next(activity, activity)
            }

            override fun onException(e: java.lang.Exception) {
                node.next(activity, activity)
            }
        }
)
Binding:
if callback.type == "DeviceBindingCallback",
let deviceBindingCallback = callback as? DeviceBindingCallback {
    let customPrompt = Prompt (
        title: "Custom Title",
        subtitle: "Custom Subtitle",
        description: "Custom Description"
    )
    deviceBindingCallback.bind (prompt: customPrompt)
    { result in
        /// process the result
    }
    return
}
Signing:
if callback.type == "DeviceSigningVerifierCallback",
let deviceSigningVerifierCallback = callback as? DeviceSigningVerifierCallback {
    let customPrompt = Prompt (
        title: "Custom Title",
        subtitle: "Custom Subtitle",
        description: "Custom Description"
    )
    deviceSigningVerifierCallback.sign (prompt: customPrompt)
    { result in
        /// process the result
    }
    return
}
Apple iOS restrictions on custom prompts
On iOS devices, some of the prompts displayed to the user are system controlled and cannot be customized.
The following table outlines the situations where iOS uses your customized prompt:
| Biometric Only | Biometric with allow fallback | Application PIN |
|---|---|---|
FaceID-registered devices display no system-provided or custom text: 
TouchID-registered devices show a system-provided title and the custom description text: 
|
When allow fallback is enabled, the biometric prompts match the biometric-only display. If authentication falls back to using the device PIN, then the device shows a system-provided title and the custom description text: 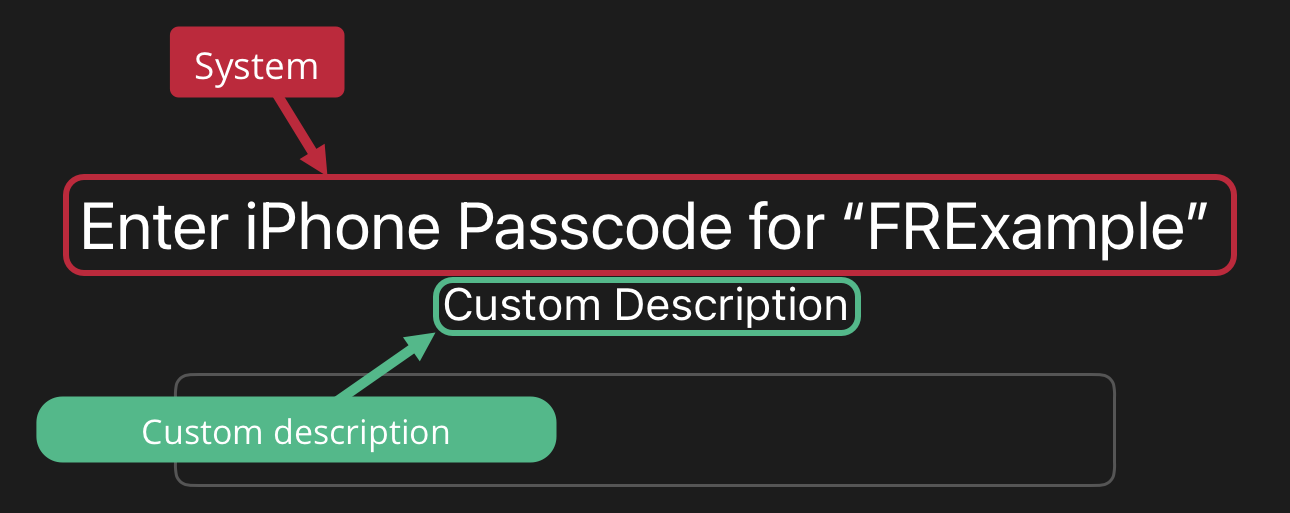
|
When using an application PIN, the device shows both the custom title and custom description text: 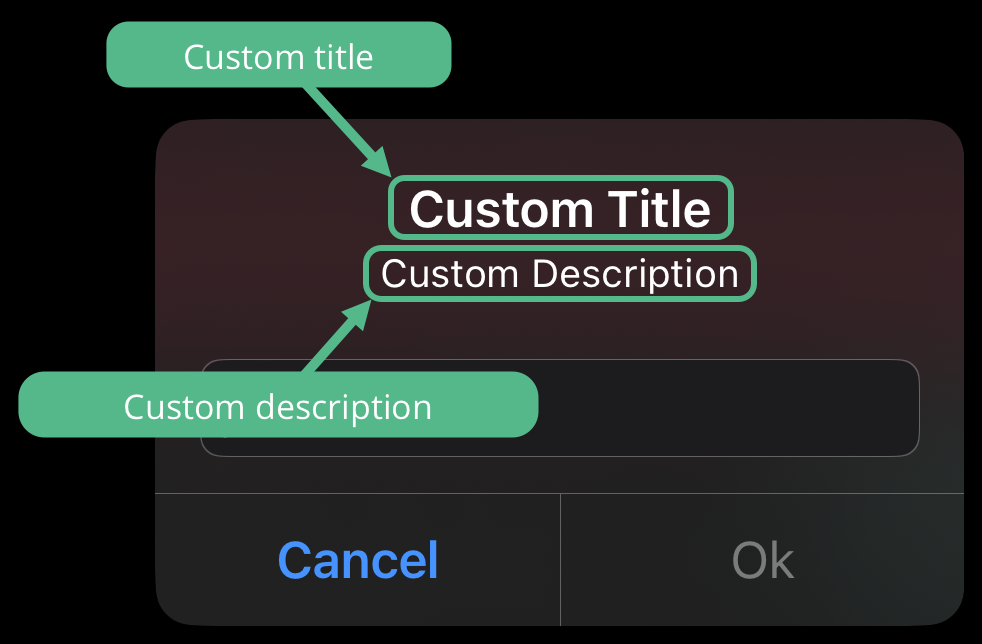
|
Custom authentication UI
When binding a device or verifying ownership of a device with signing, the user is asked to authorize access to their private keys.
For biometric-backed authentication such as touch or face ID, the UI is provided by the OS. When using APPLICATION_PIN as the authentication method you can customize the UI as required.
For example, the ForgeRock SDK for Android uses the following UI when requesting an application PIN:
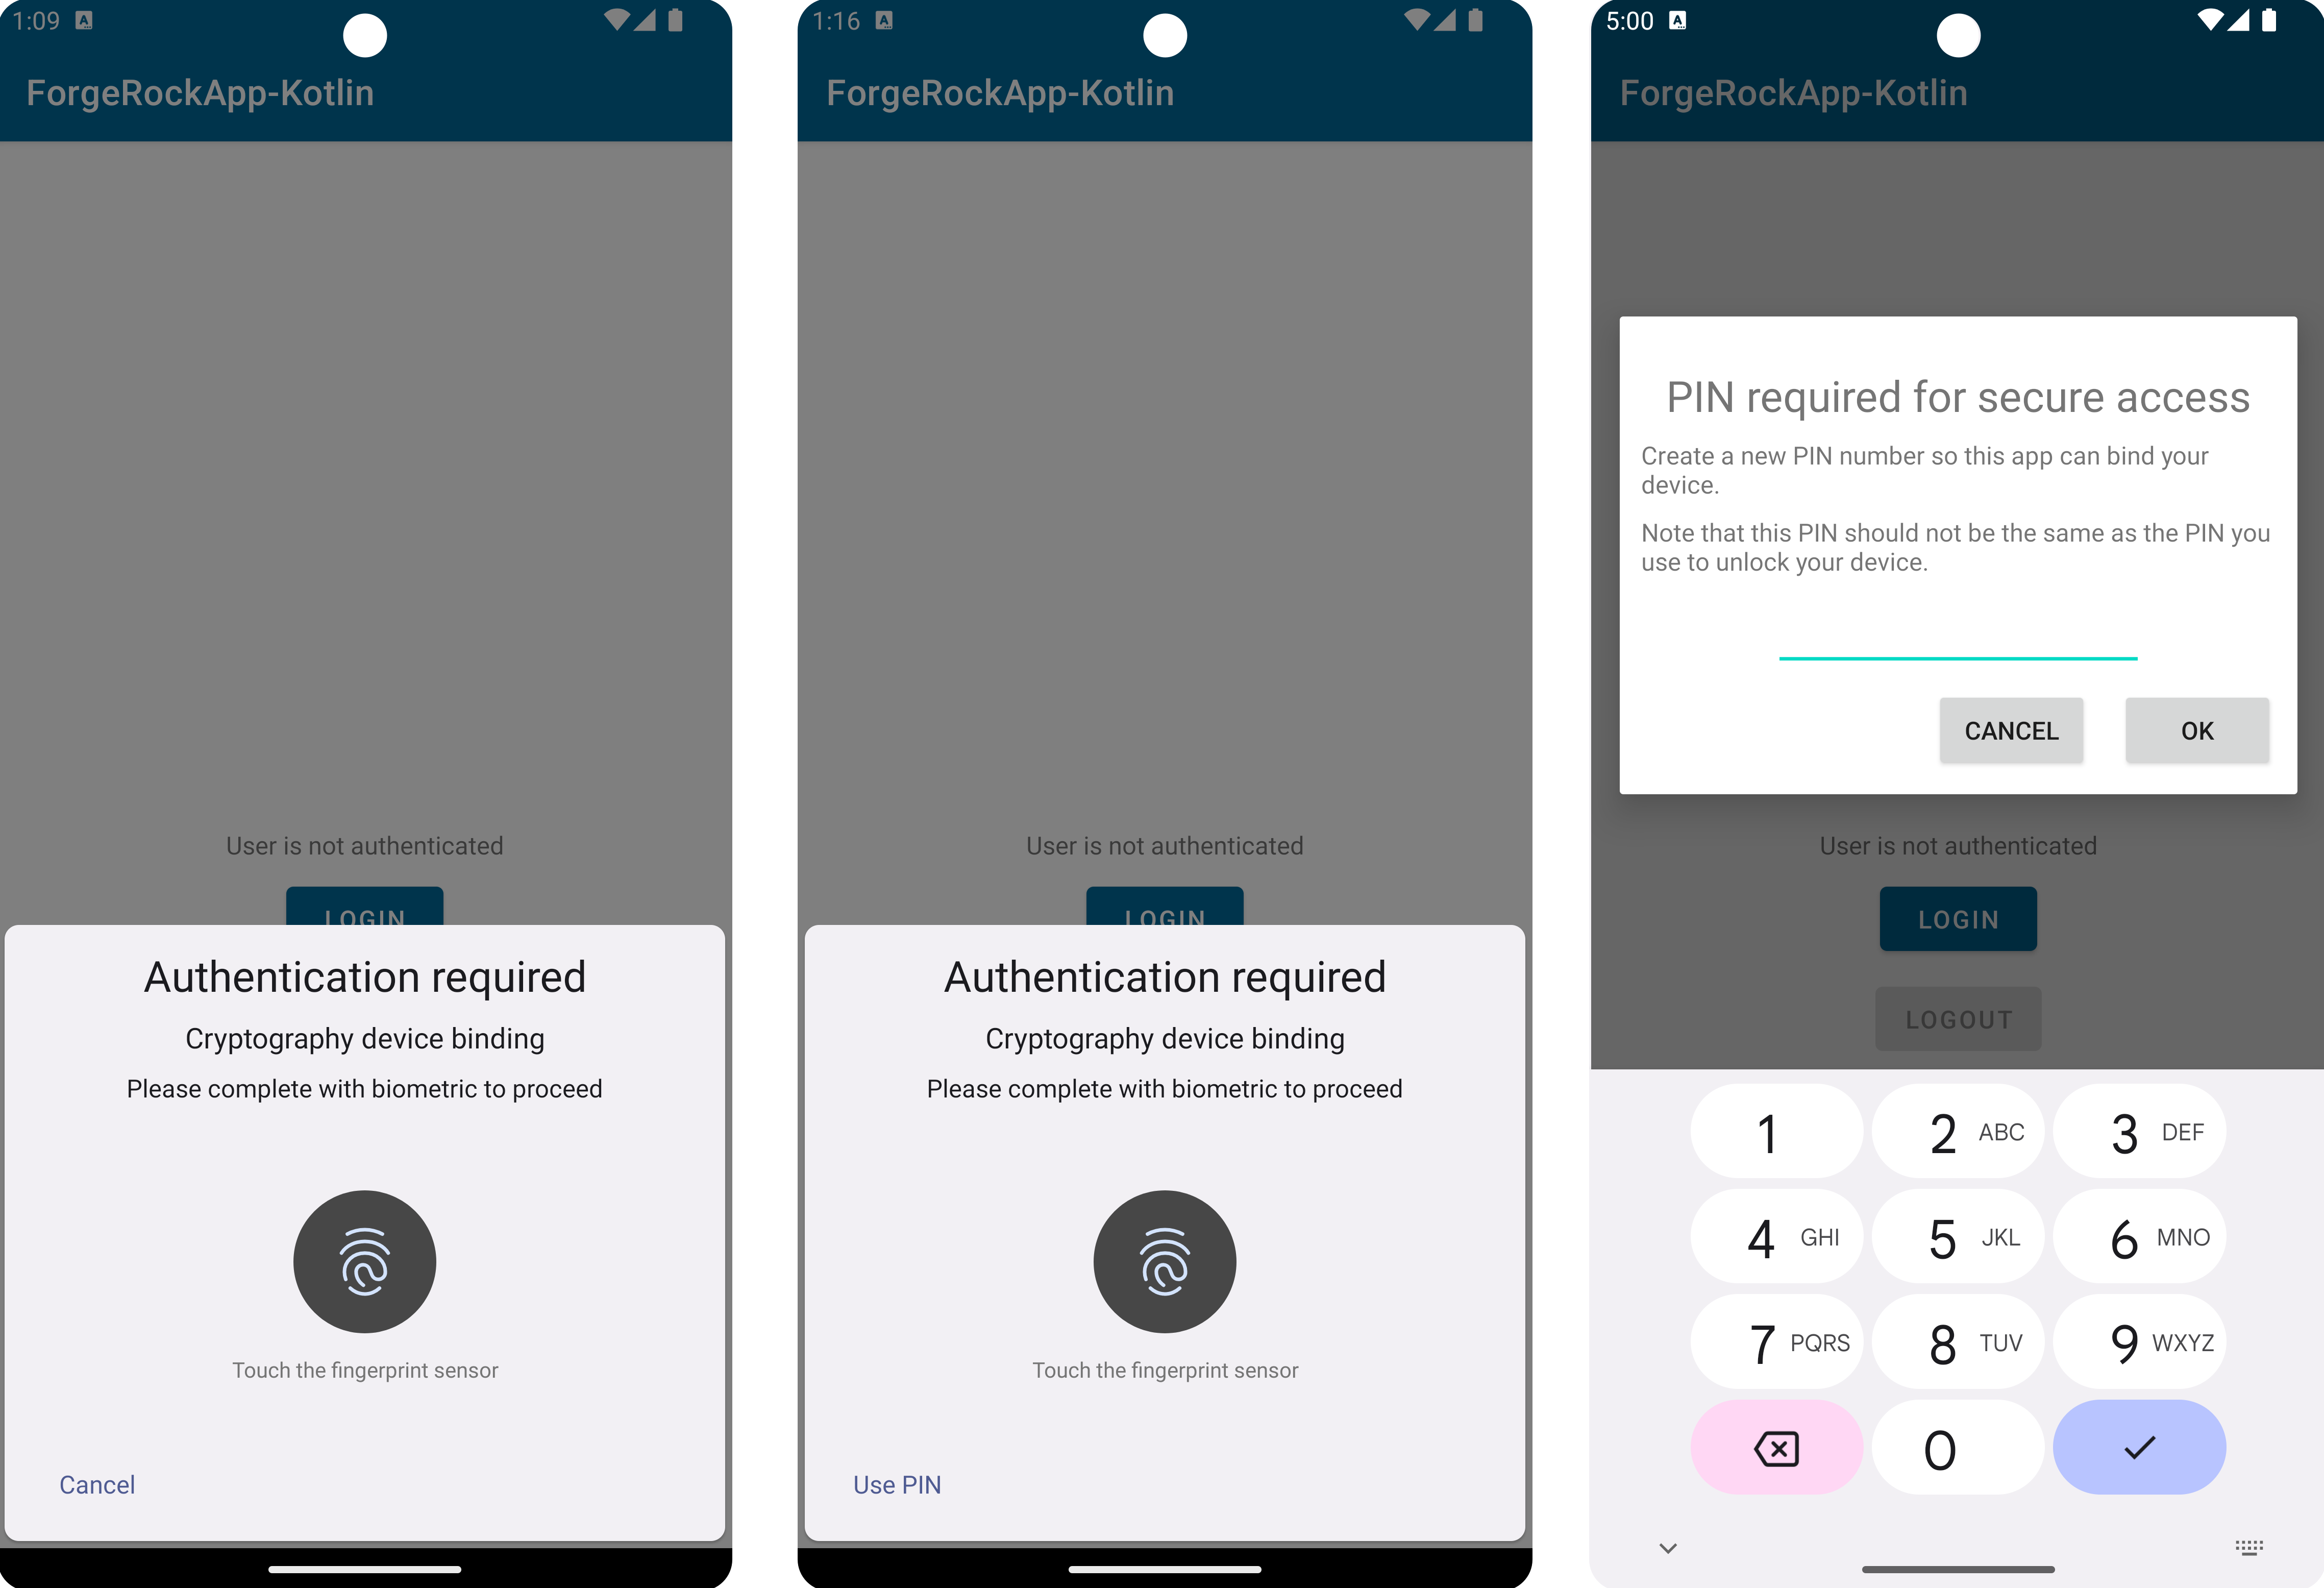
BIOMETRIC_ONLY, BIOMETRIC_ALLOW_FALLBACK, and a custom APPLICATION_PINWhen providing your own application PIN UI, you can use the same mechanism for both binding and signing.
The following code shows how to implement a custom application PIN UI:
callback.bind(requireContext(), deviceBindingAuthenticationType -> {
    switch (deviceBindingAuthenticationType) {
        case APPLICATION_PIN: {
            return new CustomAppPinDeviceAuthenticator();
        }
        default:
            return callback.getDeviceAuthenticator(deviceBindingAuthenticationType);
    }
}, new FRListener<Void>() {
    @Override
    public void onSuccess(Void result) {
      // Proceed to the next node
    }

    @Override
    public void onException(Exception e) {
      // Proceed to the next node
    }
});
public class CustomAppPinDeviceAuthenticator extends ApplicationPinDeviceAuthenticator {
public CustomAppPinDeviceAuthenticator() {
super((prompt, fragmentActivity, $completion) -> {
$completion.resumeWith("1234".toCharArray());
return IntrinsicsKt.getCOROUTINE_SUSPENDED();
});
}
}class CustomPinCollector: PinCollector {
override suspend fun collectPin(prompt: Prompt, fragmentActivity: FragmentActivity): CharArray {}
}
class CustomAppPinDeviceAuthenticator: ApplicationPinDeviceAuthenticator(CustomPinCollector())
callback.bind(context) {
when (it) {
// Implement your custom app PIN UI...
APPLICATION_PIN -> CustomAppPinDeviceAuthenticator()
else -> {
callback.getDeviceAuthenticator(it)
}
}
}callback.bind(deviceAuthenticator: { type in
switch type {
case .applicationPin:
return ApplicationPinDeviceAuthenticator(pinCollector: CustomPinCollector())
default:
return callback.getDeviceAuthenticator(type: type)
}
}, completion: { result in
switch result {
case .success:
// Proceed to the next node
case .failure(let error):
// Handle the error and proceed to the next node
}
})class CustomPinCollector: PinCollector {
func collectPin(prompt: Prompt, completion: @escaping (String?) -> Void) {
// Implement your custom app PIN UI...
completion("1234")
}
}Custom key selection UI
When verifying ownership of a device using signing, the user could be asked to select which private key to use if they have more than one on their device.
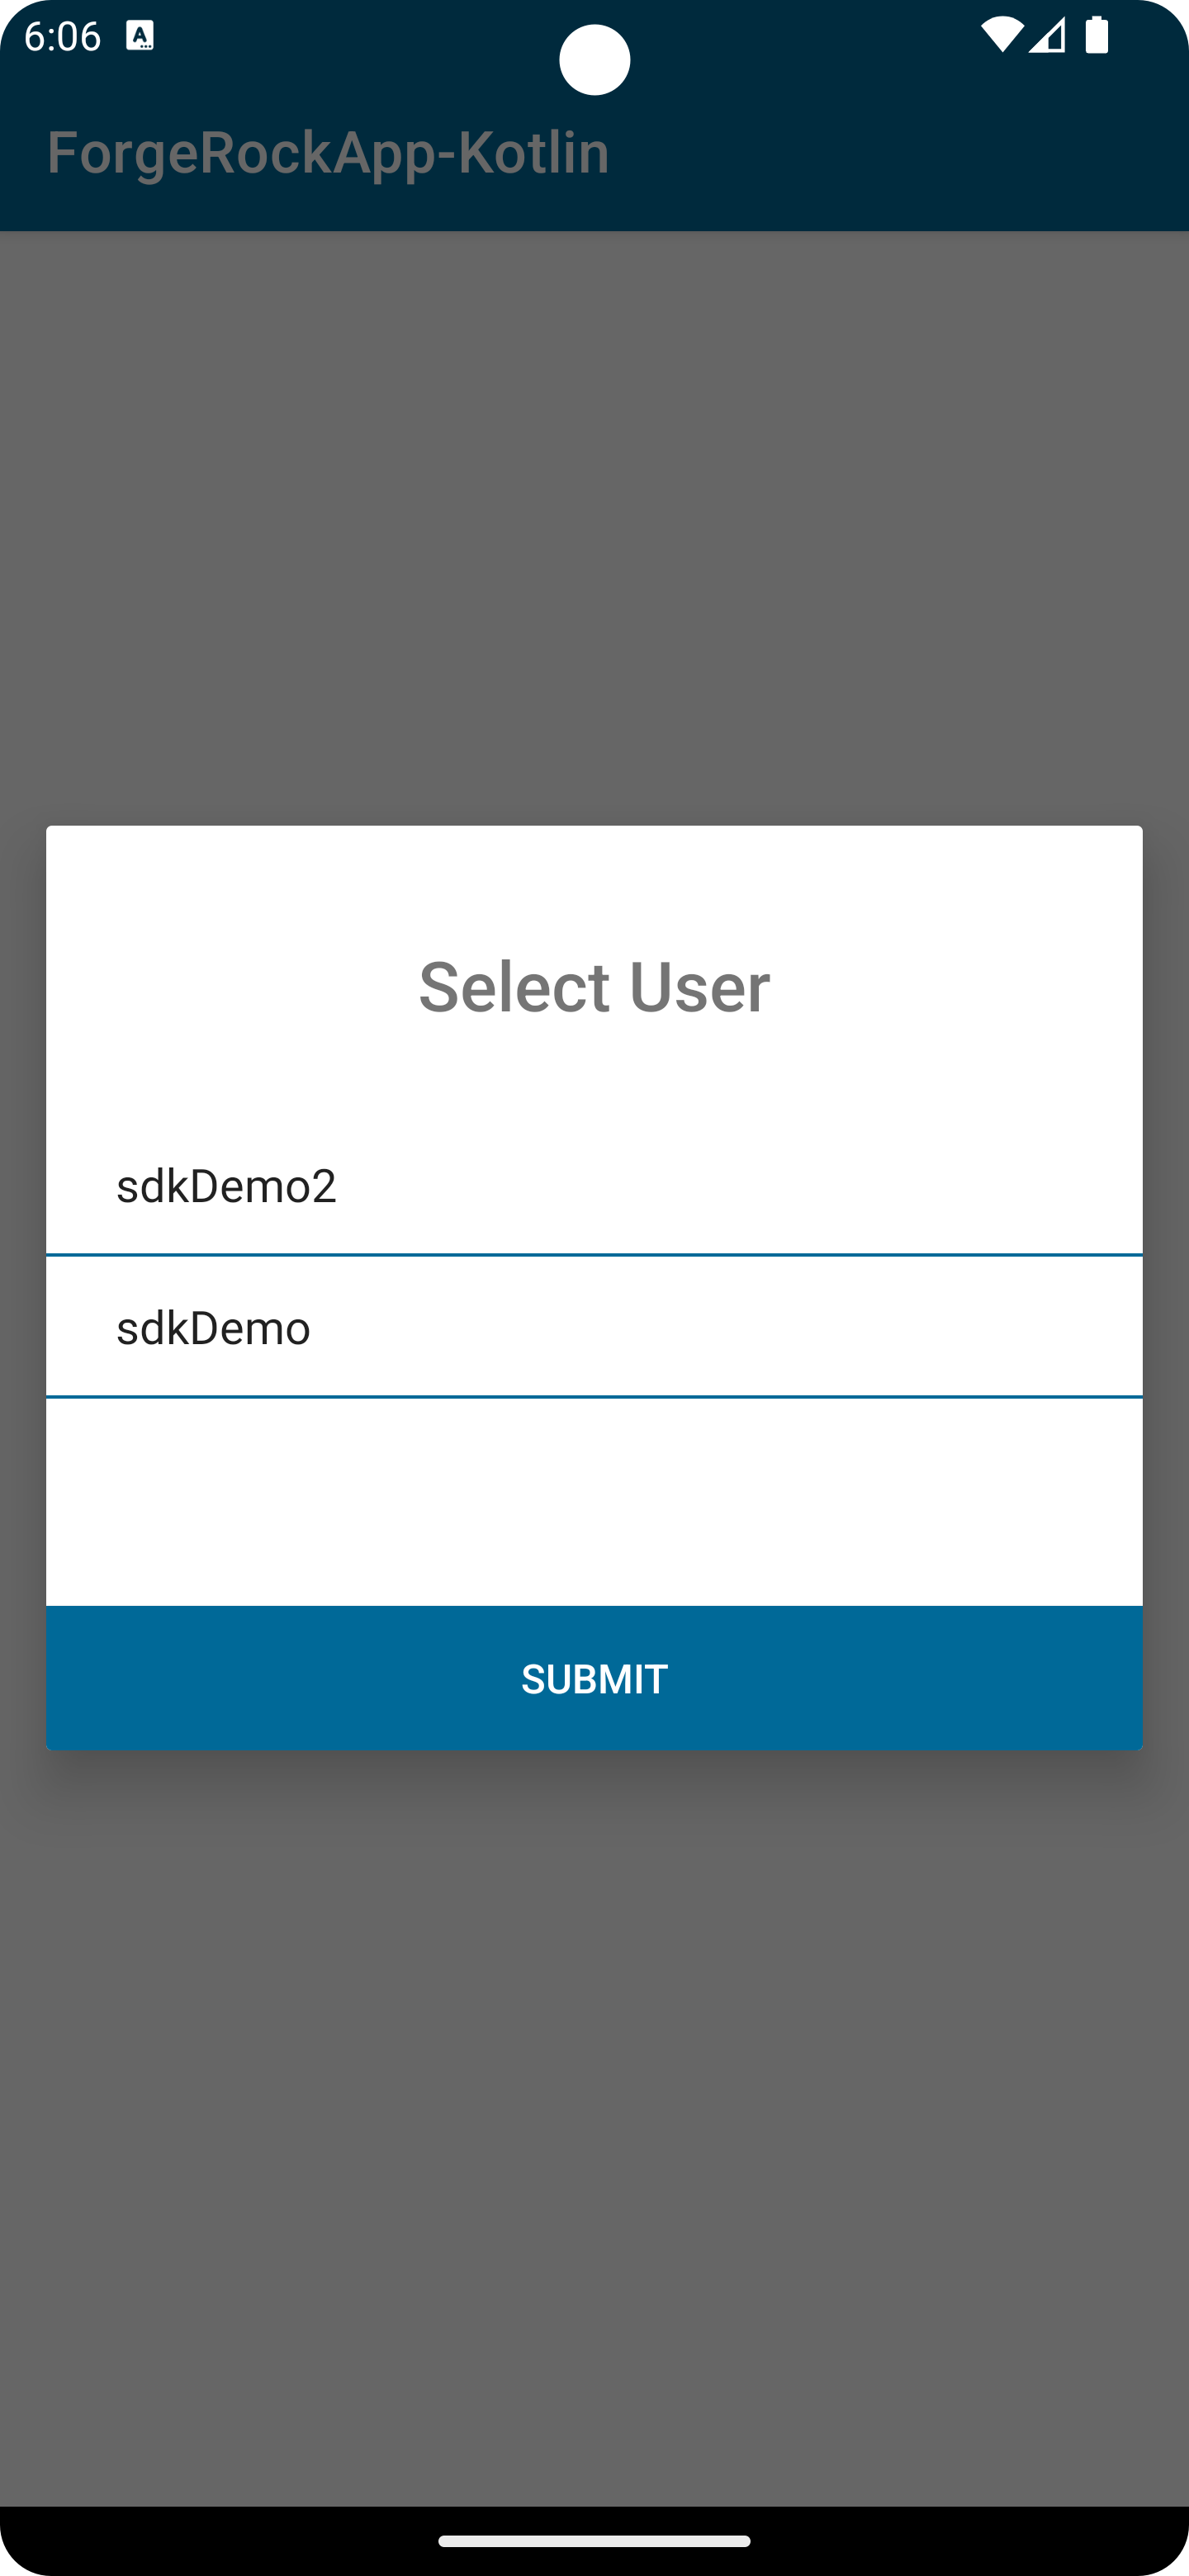
You can override the default key selection UI to implement your own.
callback.sign(requireContext(), new CustomUserKeySelector(),  new FRListener<Void>() {
   @Override
   public void onSuccess(Void result) {

   }

   @Override
   public void onException(Exception e) {

   }
});
// Custom user selector that always returns the most recently created key
public class CustomUserKeySelector implements UserKeySelector {
@Nullable
@Override
public Object selectUserKey(@NonNull UserKeys userKeys, @NonNull FragmentActivity fragmentActivity, @NonNull Continuation<? super UserKey> $completion) {
$completion.resumeWith(userKeys.getItems().get(0));
return IntrinsicsKt.getCOROUTINE_SUSPENDED();
}
}callback.sign(context, CustomUserKeySelector())// Custom user selector that always returns the most recently created key
class CustomUserKeySelector : UserKeySelector {
override suspend fun selectUserKey(userKeys: UserKeys,
fragmentActivity: FragmentActivity): UserKey {
return userKeys.items[0]
}
}callback.sign(userKeySelector: CustomUserKeySelector()) { result in
switch result {
case .success:
// Proceed to the next node
case .failure(let error):
// Handle the error and proceed to the next node
}
}// Custom user selector that always returns the most recently created key
class CustomUserKeySelector: UserKeySelector {
func selectUserKey(userKeys: [UserKey], selectionCallback: @escaping UserKeySelectorCallback) {
selectionCallback(userKeys.first)
}
}Error handling
If an error occurs when binding a device or signing a secret for verification, the SDK raises an exception. Check the status property of the exception for information about the problem.
The following table lists the possible values, and the outcomes these map to in the authentication nodes:
| Description | Exception status | Mapped node outcome |
|---|---|---|
The client device does not support device binding. For example, it does not provide biometric sensors, or the SDK cannot generate the required key pair. |
|
Unsupported |
Binding or signing did not complete before the timeout expired. |
|
Timeout |
The user cancelled binding or signing before completion. |
|
Abort |
The SDK could not locate an existing private key. Either the device has not yet been bound, or the private key was removed. |
|
Unsupported |
The user failed the authentication required to access the private key. For example, they used an unrecognized fingerprint, or the wrong application PIN. |
|
Unsupported |
An unknown, unexpected error occurred. |
|
Abort |
You can map exceptions to custom client error outcomes in the nodes. For example, the following code maps the UnRegister status to an outcome named CustomUnReg in the node:
deviceBindingCallback.bind(activity, object : FRListener<Void> {
    override fun onSuccess(result: Void?) {
        node.next(activity, activity)
    }

    override fun onException(e: java.lang.Exception?) {
        // Custom Error
        if (e is DeviceBindingException) {
            if (e.status is UnRegister) {
                deviceBindingCallback.setClientError("CustomUnReg")
            }
        }
        node.next(activity, activity)
    }
})
// Bind the device
callback.bind() { result in
switch result {
case .success:
// Proceed to the next node
case .failure(let error):
// Custom Error
if error == DeviceBindingStatus.unRegister {
callback.setClientError("CustomUnReg")
}
}
}|
You must add the name of the custom client error, for example 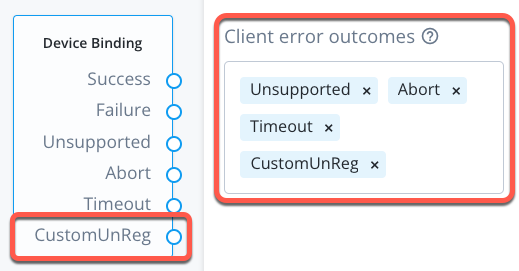
Figure 3. Custom client error outcome in the device binding node.
|