Set up passwordless authentication with passkeys
What is passwordless?
Passwordless authentication is the term used to describe a group of identity verification methods that don’t rely on users entering passwords. There are many ways to go passwordless, such as supporting biometrics, hardware security keys, or the use of specialized mobile applications like authenticators that can all provide a secure alternative to inputting a password and sending it over the network.
ForgeRock offers extensive support for passwordless, including OTPs either via email or SMS, an authenticator application, push notifications with number challenges and biometric unlock, magic links, WebAuthn, and more.
All these methods can be used in passwordless scenarios or as additional factors of authentication (2FA/MFA) to secure your systems further. Some of these require an authenticator application, such as the ForgeRock Authenticator, while others just on existing channels like email or SMS. Using the ForgeRock SDKs, developers can include the functionality of the ForgeRock Authenticator within their own applications.
In this blog post, we focus more on using biometrics for going passwordless. ForgeRock and the ForgeRock SDKs support the WebAuthn protocol, offering out-of-the-box nodes in both AM and Identity Cloud. Furthermore, using the SDKs, developers can utilize the power of passkeys on every supported platform.
Biometrics and WebAuthn
What are these technologies, and how can we use them? Let’s dive a bit deeper into that.
WebAuthn is an abbreviation of Web Authentication. It is a specification issued by W3C. It specifies a set of interfaces for browsers and apps to implement.
To use the WebAuthn protocol, the user requires access to a strong authenticator. Newer laptops and most Android and iOS mobile devices include biometric sensors that can be used for this. Those biometric scanners, more commonly known by their marketing names such as FaceID or TouchID, are used to register the user’s biometric data with the mobile operating system. They can be used to unlock the device itself, unlock information stored in the secure storage, and more.
WebAuthn requires two distinct ceremonies:
- Registration
-
During registration, the device (called "authenticator") generates a cryptographic keypair. The public key is sent to the server, and the private key is safely stored locally.
- Authentication
-
During authentication, the server asks the client to sign a message with a nonce (called "challenge") with its private key.
This signed message with the nonce can then be verified by the server using the public key obtained through registration.
This has really strong security properties because the private key is hardware bound and never leaves the device. The signing of the message is done directly by the authenticator, the device, and protected by some form of local user verification (PIN or Biometrics).
Differences between WebAuthn keys and Passkeys
So, what is the difference between WebAuthn keys, as described above, and passkeys? Until now, the private key created during the registration process was stored on the device. This has one shortcoming; if the user changes the device or loses it, they cannot authenticate again. Moreover, the server needs to allow for registration of more than one key if users have multiple devices for authenticating to a website or service.
Apple, Google, and Microsoft chose passkeys, an implementation of WebAuthn with the additional feature of storing the user’s private keys in their respective cloud services. That means that those "passkeys" are available to use on all the devices logged in to the same cloud account.
This means Apple, Google, and Microsoft are responsible for keeping the user’s private keys safe. Also, it is up to the user to ensure their account on these providers is secure by using strong passwords, MFA, and so on.
Although this makes the attack vector broader, this way of handling keys makes the whole passwordless experience more accessible and, therefore, more likely to be used by the everyday user. Additionally, it makes account recovery due to a single lost device a thing of the past.
Differences between WebAuthn and Device Binding
There are many similarities between WebAuthn and Device Binding and JWS verification. ForgeRock provides authentication nodes to implement both technologies in your journeys.
Both can be used for usernameless and passwordless authentication, they both use public key cryptography, and both can be used as part of a multi-factor authentication journey.
One major difference is that with device binding, the private key never leaves the device.
With WebAuthn, there is a possibility that the private key is synchronized across client devices because of Passkey support, which may be undesirable for your organization.
For more details of the differences, refer to the following table:
| Feature | WebAuthn / FIDO | Device Binding / JWS Verifier | Details |
|---|---|---|---|
Industry-standards based |
✅ |
❌ |
You can refer to the WebAuthn W3C specification. Device binding and JWS verification are proprietary implementations. |
Public key cryptography |
✅ |
✅ |
Both methods use Public key cryptography. |
Usernameless support |
✅ |
✅ |
After registration, the username can be stored in the device and obtained during authentication without the user having to enter their credentials. |
Keys are bound to the device |
❌ |
✅ |
With WebAuthn, if Passkeys are used, they can be shared across devices. With device binding, the private keys do not leave the device. |
Sign custom data |
❌ |
✅ |
With device binding, you can:
|
Format of signed data |
|||
Integration |
❌ |
✅ |
With device binding, after verification, the signed JWT is available in:
This enables the data within to be used for integration into your processes and business logic. |
Platform support |
✅ Android ✅ iOS ✅ Web browsers |
✅ Android ✅ iOS ❌ Web browsers |
As it is challenging to store secure data in a browser as a client app, device binding is not supported in web browsers. |
Authenticator support |
Determined by the platform. Configuration limited to:
|
Determined by the authentication node. Full configuration options:
|
With device binding, you can specify what authentication action the user must perform to get access to the private keys. This provides greater flexibility in your security implementation and can reduce authentication friction for your users. |
Key storage |
Web browsers and iOS synchronize to the cloud. Android has the option to synchronize to the cloud. |
|
Both technologies store the private keys securely on the client. WebAuthn supports synchronizing the private keys to the cloud for use on other devices. This can reduce authentication friction for your users but may also increase the risk of a breach. |
Managing device keys |
Managed by the device OS. Apps cannot delete local client keys programmatically and do not have a reference to the remote server key for deletion. |
Managed by the ForgeRock SDKs. Provides an interface to delete local client and remote server keys. |
The ability to programmatically delete both client and server keys can greatly simplify the process of registering a new device if an old device is lost or stolen. |
Passkey Support |
✅ |
❌ |
WebAuthn supports synchronizing the private keys to the cloud for use on other devices. Device binding keeps the private key locked in the device. |
App integrity verification |
|
Not provided by the device binding or verification nodes. It can be added as part of the journey by using app integrity nodes. |
App integrity verification helps ensure your users are only using a supported app rather than a third-party or potentially malicious version. |
Key attestation |
|
|
Key attestation verifies that the private key is valid and correct, is not forged, and was not created in an insecure manner. |
Complexity |
Medium |
Low |
WebAuthn requires a bit more configuration, for example, creating and uploading the Device binding only requires the journey and the SDK built into your app. |
How to implement Passkeys using ForgeRock SDKs
The first step is having access to a ForgeRock Access Management instance or a ForgeRock Identity Cloud tenant, as well as an existing application that uses these for authentication. In this example, we use ForgeRock Identity Cloud.
Download the sample app
We provide a sample app we’ve built that implements authentication using the ForgeRock SDK for iOS. You can download the full iOS project from GitHub. The passkeys example is in the Passkeys branch.
Create WebAuthn registration and authentication journeys
In Identity Cloud, we will create new journeys for both WebAuthn device registration and authentication.
|
To speed up the process of creating the required journeys, we provide a pre-configured JSON file that you can import into your ID Cloud tenant. This automatically creates both of the required journeys, as well as the scripts you require in the scripted nodes. To import the JSON file, in the Identity Cloud admin UI, go to Journeys, and then click Import. After successfully importing the journeys into your tenant, skip ahead and Configure the WebAuthn nodes in the journeys. For more information on importing journeys, refer to Import journeys. |
Create the registration journey manually
If you decided not to import the journey file into your tenant, you need to create the journey manually.
Using the Journey editor, create a new journey in the alpha realm and name it BlogWebAuthnRegistration. Then, drag the following nodes from the list and connect them as displayed on the screenshot below:
-
Four scripted Decision nodes
-
WebAuthn Registration Node
-
Get Session Data Node
-
Username Collector Node
-
Password Collector Node
-
Data Store Decision Node
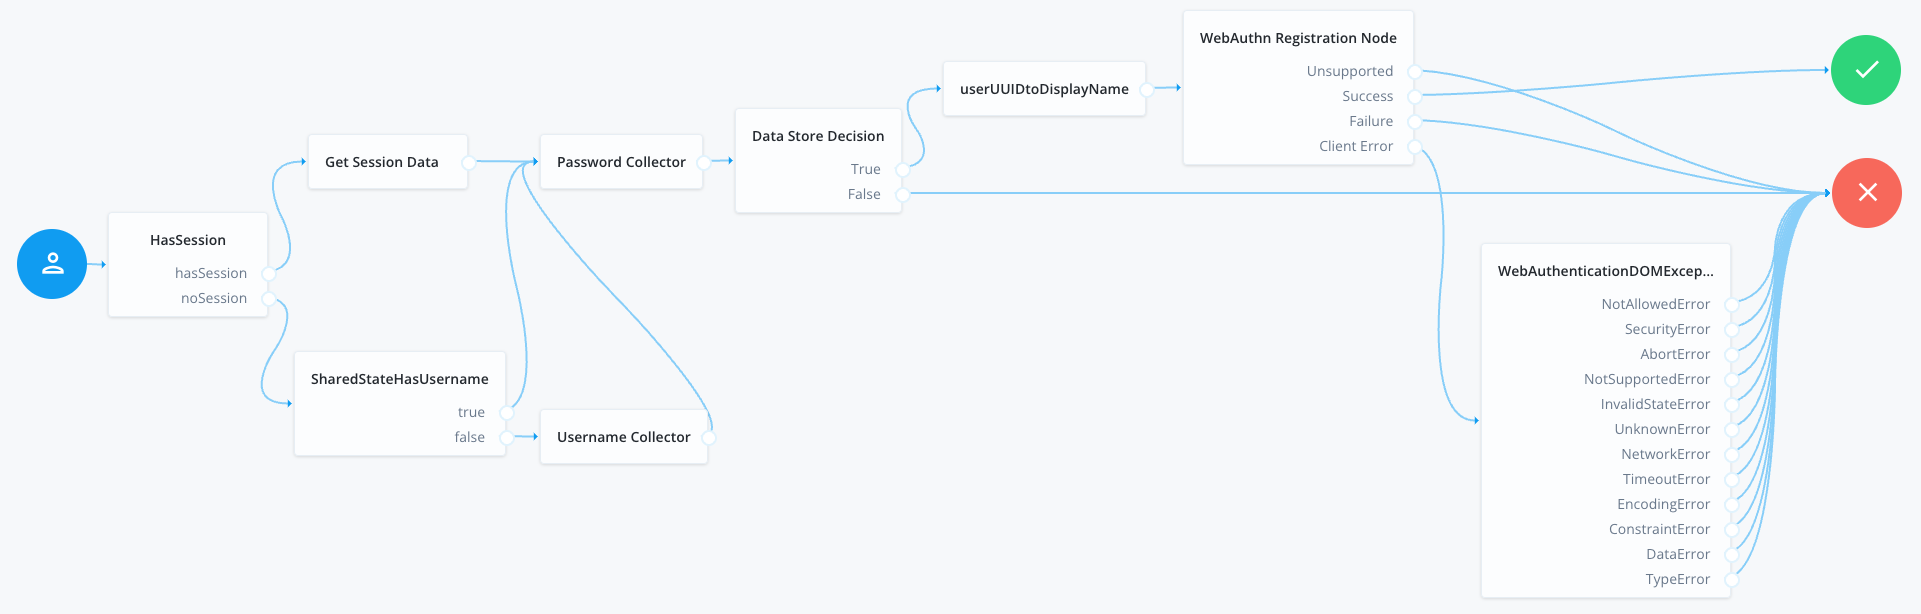
BlogWebAuthnRegistration journeyWe need to assign the scripts for the scripted decision nodes. First, setUUIDtoDisplayName, and second, WebAuthnErrorHandler. The first one ensures the creation of a user-friendly name for our passkey, and the second allows developers to handle the WebAuthn client error cases in more detail.
userUUIDtoDisplayName scriptvar user = nodeState.get('username').asString();
nodeState.putShared('displayName', user.toString());
outcome = 'true';WebAuthnErrorHandler script// Error format example:
// ERROR::InvalidStateError:No Credential is registered
var error = sharedState.get("WebAuthenticationDOMException");
logger.message(error);
// Match word or phrase between "::" and ":"
var result = error.match(/::([\w\s]{1,}):{0,}/);
outcome = result ? result[1] : 'UnknownError';
logger.message("Outcome: " + outcome + "| ERROR: " + error);Next, we set up the "HasSession" and "SharedStateHasUsername" scripts.
HasSession scriptif (typeof existingSession !== 'undefined') {
outcome = "hasSession";
} else {
outcome = "noSession";
}SharedStateHasUsername scriptvar user = nodeState.get('username');
if (user != null) {
outcome = 'true';
} else {
outcome = 'false';
}Create the authentication journey manually
If you decided not to import the journey file into your tenant, you need to create the journey manually.
Using the journey editor, create a new journey named BlogWebAuthnAuthentication. For this journey, use the following nodes:
-
Scripted Decision node
-
WebAuthn Authentication node
-
Inner Tree Evaluator node (this calls the
BlogWebAuthnRegistrationyou created previously)
Connect them as follows:
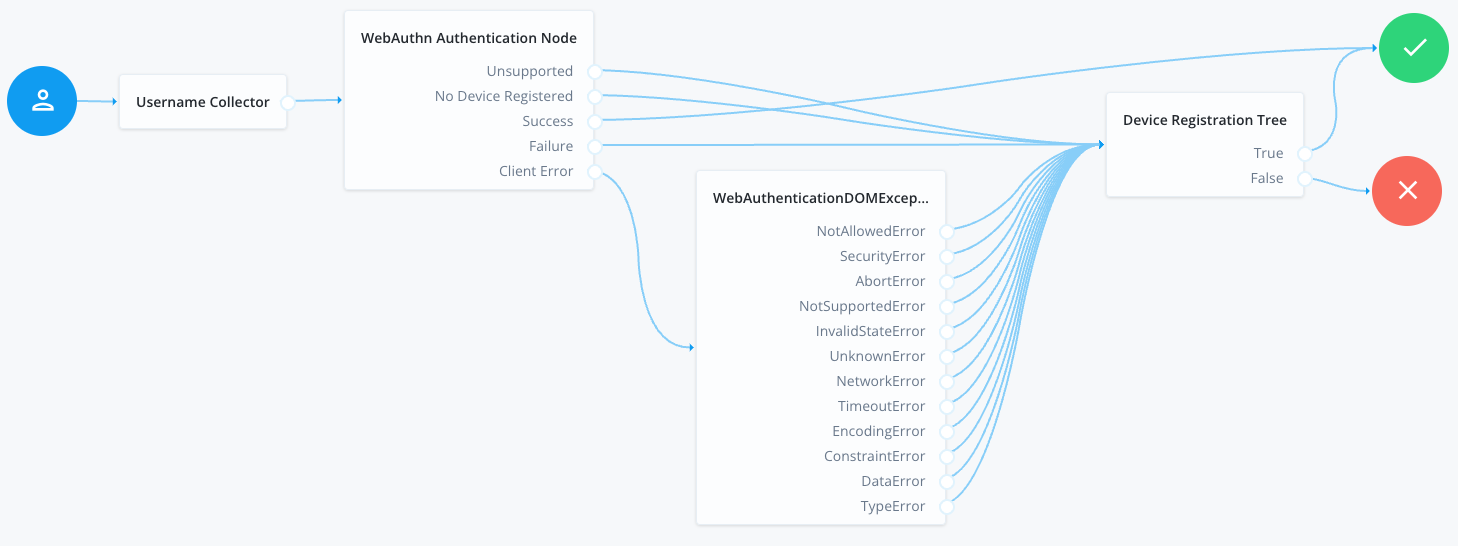
BlogWebAuthnAuthentication journeyConfigure the WebAuthn nodes in the journeys
You must configure the WebAuthn Registration node and the WebAuthn Authentication node in the new journeys with values matching your environment.
Open each newly created tree and configure the WebAuthn nodes within to use identical configuration.
The important configuration options in this case are the following fields:
- Relying party identifier
-
This needs to be set to the domain that will be the "Relying Party" for the registration. Set this to the domain name of your tenant. If you are using custom domains, set this to match the custom domain configured for the realm.
- Origin domains
-
This needs to be set to the origin of the application that registers passkeys.
For iOS and Android, this involves special configuration depending on the platform and whether you use plain WebAuthn keys or passkeys.
For more information, refer to the following:
When implementing passkeys, set this to the origin that serves the
apple-app-site-associationfile. - Return challenge as JavaScript
-
Ensure this is NOT enabled.
- Shared state attribute for display name
-
Set to
displayNameas indicated by the script above.
Lastly, in order to allow the application to register and authenticate against the server using passkeys, we need to configure and upload the apple-app-site-association file.
For more details on how to do this in Identity Cloud, refer to Prepare an apple-app-site-association file.
With both journeys configured, the ForgeRock server is able to register a device for passkeys and authentication.
In the BlogWebAuthnAuthentication journey, you will notice that if the authentication step fails, the user proceeds to the registration step automatically. This is acceptable based on the requirements for the scope we have in this blogpost, but in other scenarios allowing the user to authenticate with other means such as a password or OTP is advisable.
The BlogWebAuthnRegistration journey is built in a way that allows applications to call it directly when a user session exists or call it internally from another journey.
Test the journeys in a browser
Using the out-of-the-box platform user interface you can test the functionality in a browser. Start by copying the Preview URL from the journey editor for the BlogWebAuthnAuthentication journey.
Running for the first time, the flow should look something like this:
In subsequent authentication attempts, you are able to authenticate using your newly created passkey:
Using Passkeys with the ForgeRock SDK for iOS
At this point it is advisable to download the complete project from GitHub. Open the project in Xcode and have a look at the LoginViewController and SettingsViewController class. The logic described below can be found in those two controllers.
If you have an existing project using the iOS SDK, the code should look familiar. This tutorial focuses on the logic regarding passkey (WebAuthn) authentication and registration.
Add support for the callbacks
In order to use passkeys with the ForgeRock SDK for Android or iOS, developers need to handle the WebAuthnAuthentication and WebAuthnRegistration callbacks.
The first node the app needs to handle on the authentication journey is the NameCallback from the username node. We assume your iOS application already handles basic authentication with username and password, so we expect this to be implemented.
The first new callback to be handled is the WebAuthnAuthentication callback. In the handleNode method add some code to do so:
WebAuthnAuthentication callbackelse if let authenticationCallback = callback as? WebAuthnAuthenticationCallback {
authenticationCallback.delegate = self
...
...
}In order to start the WebAuthn authentication flow, we need to call the authenticationCallback.authenticate() method:
authenticationCallback.authenticate(node: node, preferImmediatelyAvailableCredentials: false, usePasskeysIfAvailable: self.usePasskeysIfAvailable) { (assertion) in
     // Authentication is successful
     // Submit the Node using Node.next()
     node.next { (user: FRUser?, node, error) in
           self.handleNode(user: user, node: node, error: error)
     }
  } onError: { (error) in
     // An error occurred during the authentication process
     // Submit the Node using Node.next()
     node.next { (user: FRUser?, node, error) in
           self.handleNode(user: user, node: node, error: error)
     }
  }
The full code should look something like this:
if let authenticationCallback = callback as? WebAuthnAuthenticationCallback {
  authenticationCallback.delegate = self

  // Note that the `Node` parameter in `.authenticate()` is an optional parameter.
  // If the node is provided, the SDK automatically sets the assertion to the designated HiddenValueCallback
  authenticationCallback.authenticate(
    node: node,
    usePasskeysIfAvailable: PebbleBankUtilities.usePasskeysIfAvailable
  ) { (assertion) in
    // Authentication is successful
    // Submit the Node using Node.next()
    node.next { (token: Token?, node, error) in
      self.handleNode(token: token, node: node, error: error)
    }
  } onError: { (error) in
    // An error occurred during the authentication process
    // Submit the Node using Node.next()
    let alert = UIAlertController(
      title: "WebAuthnError",
      message: "Something went wrong authenticating the device",
      preferredStyle: .alert
    )
    let okAction = UIAlertAction(
      title: "OK",
      style: .default,
      handler: { (action) in
        node.next { (token: Token?, node, error) in
          self.handleNode(token: token, node: node, error: error)
        }
      }
    )
    alert.addAction(okAction)
    DispatchQueue.main.async {
      self.present(alert, animated: true, completion: nil)
    }
  }
}
In a similar way, we need to add support for the WebAuthnRegistration callbacks.
if let registrationCallback = callback as? WebAuthnRegistrationCallback {
  registrationCallback.delegate = self

  // Note that the `Node` parameter in `.register()` is an optional parameter.
  // If the node is provided, the SDK automatically sets the error outcome or attestation to the designated HiddenValueCallback
  registrationCallback.register(
    node: node,
    deviceName: UIDevice.current.name,
    usePasskeysIfAvailable: PebbleBankUtilities.usePasskeysIfAvailable
  ) { (attestation) in
    // Registration is successful
    // Submit the Node using Node.next()
    node.next { (token: Token?, node, error) in
      self.handleNode(token: token, node: node, error: error)
    }
  } onError: { (error) in
    // An error occurred during the registration process
    // Submit the Node using Node.next()
    let alert = UIAlertController(
      title: "WebAuthnError",
      message: "Something went wrong registering the device",
      preferredStyle: .alert
    )
    let okAction = UIAlertAction(
      title: "OK",
      style: .default,
      handler: { (action) in
        node.next { (token: Token?, node, error) in
          self.handleNode(token: token, node: node, error: error)
        }
      }
    )
    alert.addAction(okAction)
    DispatchQueue.main.async {
      self.present(alert, animated: true, completion: nil)
    }
  }
}
The application can now handle the callbacks returned by each of the nodes that appear on the journey. The full list of expected callbacks is as follows:
-
NameCallback -
PasswordCallback -
WebAuthnAuthenticationCallback -
WebAuthnRegistrationCallback
Furthermore, we allow the iOS application to call different journeys based on the situation. For example, when the users haven’t registered for biometrics, the app calls the default Login journey. When the user has followed the BlogWebAuthnRegistration journey and has registered for biometrics, the app uses the BlogWebAuthnAuthentication journey for authentication.
|
The sample app has been implemented to call the This allows the user to register the device for biometrics after successfully authenticating. |
Call the journeys
When using the SDKs, we can call a journey directly by using the FRSession.authenticate method. In order to call the passkey registration journey, we can use the following code:
FRSession.authenticate(authIndexValue: "BlogWebAuthnRegistration") { result, node, error in
    self.handleNode(token: result, node: node, error: error)
}
In order to call the passkey authentication journey:
FRSession.authenticate(authIndexValue: "BlogWebAuthnAuthentication") { result, node, error in
       self.handleNode(token: result, node: node, error: error)
}
In the iOS app, upon successful completion of the BlogWebAuthnRegistration journey, the SDK saves a flag on the iOS device (in UserDefaults) noting that this device is now registered with a passkey.
This client side logic allows us to swap to a passkey authentication journey as the main way of authenticating from this device.
Configure the project
With the sample project open, select the PebbleBankUtilities file. This file contains the SDK configuration options. Configure these to point to your ForgeRock environment.
Additionally, this file contains the ForceAuthInterceptorBiometricRegistration request interceptor. When using the SDK, developers have the option to create request interceptors that enrich the REST calls the SDK makes. In this case we have added the following:
-
A URL query parameter to force the use of the journey despite the presence of an existing valid session:
ForceAuth=true -
A header to inject the session cookie:
[Cookie Name]: <SessionToken>
This request interceptor is only used when the app calls BlogWebRegistrationJourney, and injects the existing user session and the ForceAuth parameter.
Lastly, the Xcode project needs to be configured to allow WebCredentials based on your server configuration. We also need to create an apple-app-association file and upload it to Identity Cloud.
You can find more details on how to configure Xcode in the Apple developer docs. You can also find more details on how to configure and upload the apple-app-association file in the SDK documentation.
Test the app
With the Xcode project fully configured, we can now run and test the flow. A reminder that a complete version of this project can be found on GitHub. Complete documentation on mobile biometrics for iOS and Android can be found in the SDK documentation.
Below is a complete demonstration of the functionality using the demo app:
Summary
Building passwordless flows for users is not trivial, as they will need to register a device that will act as an authenticator, replacing the password.
Furthermore, users need to be driven down a passwordless journey by choice, or automatically if they have enabled this option in the app.
Using ForgeRock Identity Cloud and the ForgeRock SDKs for Android and iOS, developers have a set of tools to make these flows as frictionless as possible and by writing minimal code.
When registering a device with passkeys to replace the traditional username and password, the following considerations should come to mind:
-
Is the user or the device registering a valid and authenticated user, or is it a bad actor attempting an account take over?
-
What happens if the user attempts to authenticate on a device that does not have the passkey? Will there be an offering for traditional username and password paths?
-
Is the flow clear and easy to understand for all users?
-
Could the use case support usernameless authentication? A step further to make this flow even smoother for end users
Passkeys are here to stay and seem to be a great stepping stone for replacing passwords. Improvements on the user experience from the operating systems and browsers are sure to come in the future.
As this post shows, using the tools that ForgeRock provides your applications are ready to go passwordless today!