Associate your app with your ForgeRock server
To associate your ForgeRock server with your Android app you need to make public, verifiable statements by using a Digital Asset Links JSON file (assetlinks.json).
assetlinks.json file[
{
"relation": [
"delegate_permission/common.handle_all_urls",
"delegate_permission/common.get_login_creds"
],
"target": {
"namespace": "android_app",
"package_name": "com.example.app",
"sha256_cert_fingerprints": [
"E6:5A:5D:37:22:FC...22:99:20:03:E6:47"
]
}
}
]Get SHA-256 fingerprint of your signing certificates
The assetlinks.json file includes SHA-256 fingerprints of the certificates you use to sign your Android applications.
The steps for obtaining the fingerprint depend on the method you use to distribute your application.
If you are using Android App Bundles to distribute your apps, then the hashes of the certificate used to sign your application are available in the Android Developer console.
Follow these steps to obtain the SHA-256 hash of your signing certificate:
-
Configure your Android App Bundle for signing. Google has a number of methods for managing the signing certificates, including uploading your own or having Google manage them for you.
For information on how to set up signing, refer to Sign your app in the Google Developer Documentation.
-
In the Google Play Console:
-
Select the app that will be supporting mobile biometrics.
-
Navigate to Setup > App integrity > App signing.
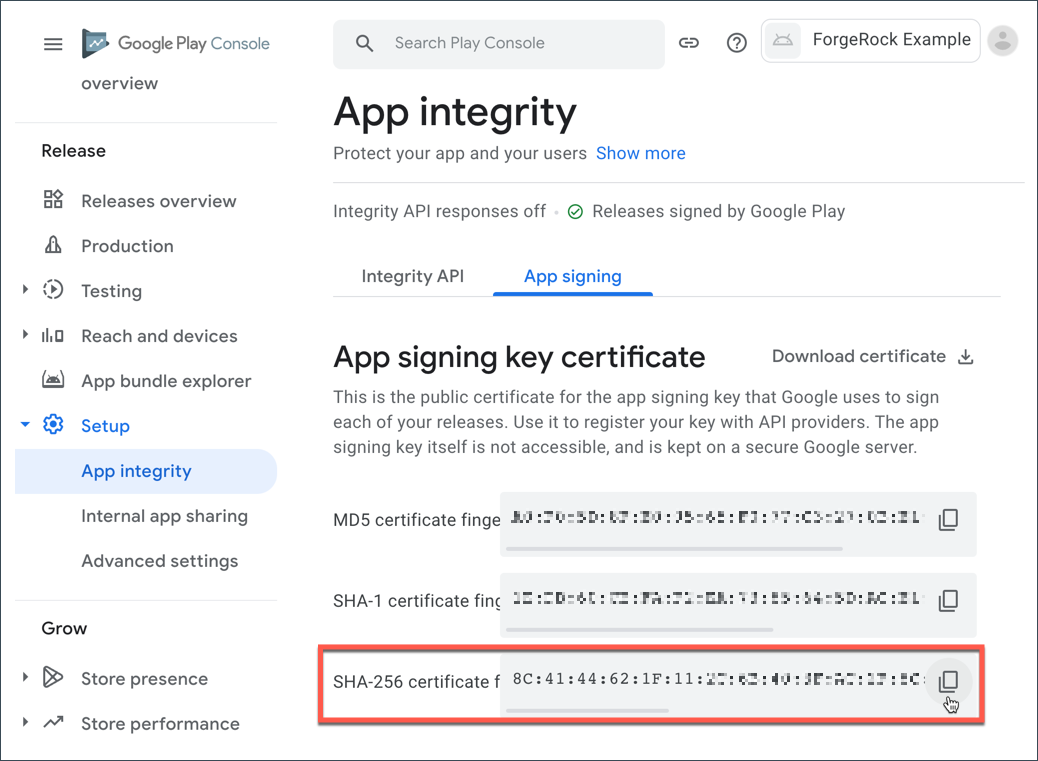 Figure 1. App signing keys in the Google Play Console
 -
In the App signing key certificate section, copy the SHA-256 certificate fingerprint value.
In the Digital Asset Links JSON section is a file that you can copy with the SHA-256 fingerprint already in place.
-
-
Create or update an
assetlinks.jsonwith the values copied from the Google Play Console for your app.
For more information on creating an assetlinks.json file, refer to Google Digital Asset Links.
You must manually generate a SHA-256 fingerprint of your signing key in the following scenarios:
-
You are signing your APK with the default debug.jks that Android Studio created for the project
-
You are signing your APK with your own keys that you have generated that have not been uploaded to the Google Play Console
Follow these steps to obtain the SHA-256 hash of your signing certificate:
-
In the
build.gradlefile for your application, check the settings defined in thesigningConfigsproperty:Example signingConfigs when using the default debug.jkssigningConfigs { debug { storeFile file('../debug.jks') storePassword 'android' keyAlias 'androiddebugkey' keyPassword 'android' } } -
In a terminal window, navigate to the location of the JKS file, and then run the following command:
keytool -list -v -alias <keyAlias> -keystore <storeFile> | grep SHA256Swap the <keyAlias> and <storeFile> placeholders with the values you obtained from your project. For example:
keytool -list -v -alias "androiddebugkey" -keystore "./debug.jks" | grep SHA256 -
When requested, enter the keystore password, as specified in the
keyPasswordproperty in thebuild.gradlefile.The command prints the SHA-256 fingerprint of the signing key:
Enter keystore password: android SHA256: E6:5A:5D:37:22:FC...22:99:20:03:E6:47 Signature algorithm name: SHA256withRSA -
Create or update an
assetlinks.jsonwith the SHA-256 fingerprint, and the details of your app.
For more information on creating an assetlinks.json file, refer to Google Digital Asset Links.
Host the digital asset links JSON file
-
For ForgeRock Identity Cloud deployments, refer to Upload an Android assetlinks.json file.
-
For self-managed deployments, host the file at
https://<your domain>/.well-known/assetlinks.json.
Summary
You have now created and uploaded a digital asset links JSON file.
You can now proceed to Configure biometric authentication journeys.